Docker is a platform for creating and deploying applications in self-sufficient containers. The installation of Docker is pretty easy in Linux, but this is usually not the case with Windows. In this post, I will show you how to install Docker in Windows 10 or Windows 11 in multiple ways. You’ll learn there is indeed a way that makes the Docker Desktop installation in Windows as simple as in Linux.
Contents
- Prerequisites
- Docker with WSL2 backend
- Docker with Hyper-V backend
- Install Docker using the GUI
- Install Docker using winget
- Install Docker using PowerShell
- Author
- Recent Posts

Surender Kumar has more than twelve years of experience in server and network administration. His fields of interest are Windows Servers, Active Directory, PowerShell, web servers, networking, Linux, virtualization, and penetration testing. He loves writing for his blog.
Latest posts by Surender Kumar (see all)
- Extending LVM space in Ubuntu — Thu, Feb 2 2023
- Backup in Proxmox VE — Thu, Jan 26 2023
- Snapshots in Proxmox VE — Wed, Jan 25 2023
Prerequisites
You might already be aware that Docker relies on virtualization technology. On Windows, Docker can use either the Windows Subsystem for Linux (WSL) 2 or Hyper-V as a backend.
Docker with WSL2 backend
The current version of Docker Desktop only works on the 64-bit edition of Windows, whether you’re running Windows 10 or Windows 11. To run Docker with the WSL2 backend, your system must meet the following prerequisites:
- Windows 10: Home/Pro 21H1 (build 19043) or higher, or Enterprise/Education 20H2 (build 19042) or higher
- Windows 11: Home/Pro version 21H2 or higher, or Enterprise/Education version 21H2 or higher
- WSL2 feature enabled
- Linux kernel update package for WSL2
- For WSL2, the following are the hardware requirements:
- 64-bit CPU with second-level address translation (SLAT)
- Hardware virtualization support, which must be enabled in BIOS/UEFI
- 4 GB RAM
Docker with Hyper-V backend
To be able to run Docker with a Hyper-V backend and Windows containers, your system must meet the following prerequisites:
- Windows 10: Pro 21H1 (build 19043) or higher, or Enterprise/Education 20H2 (build 19042) or higher
- Windows 11: Pro/Enterprise/Education version 21H2 or higher
- Optional Windows features for Hyper-V and Containers must be enabled

Enable Hyper V and Containers windows features for Docker

For Hyper-V, following are the hardware requirements:
- 64-bit CPU with second-level address translation (SLAT)
- Hardware virtualization support, which must be enabled in BIOS/UEFI
- 4 GB RAM
In addition to the aforementioned requirements, if you want to run Docker in a Hyper-V guest VM, you need to enable nested virtualization by running this PowerShell command on the Hyper-V host:
Set-VMProcessor -VMName <VMName> -ExposeVirtualizationExtensions $True

Enable nested virtualization for a VM on Hyper V host using PowerShell
Make sure your VM is powered off before running this command. Without nested virtualization support, Docker will not work in a VM, and you will receive the error message shown below.

Docker desktop cannot start An unexpected error occurred
Install Docker using the GUI
To install Docker Desktop in Windows using the GUI, follow these steps:
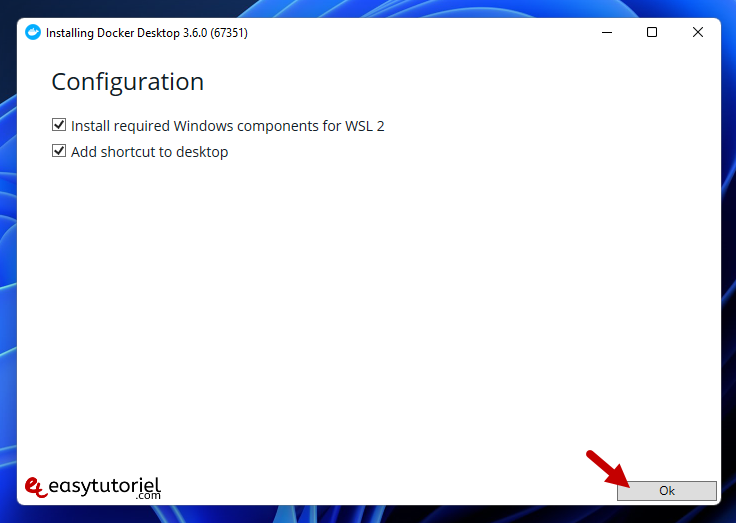
Download Docker Desktop. You will see a configuration screen, as shown in the screenshot:

Docker desktop configuration Use WSL 2 instead of Hyper V recommended
To use Docker with the WSL 2 backend, check the box that says Use WSL 2 instead of Hyper-V (recommended). If you want to use Hyper-V instead, uncheck this option and click OK.
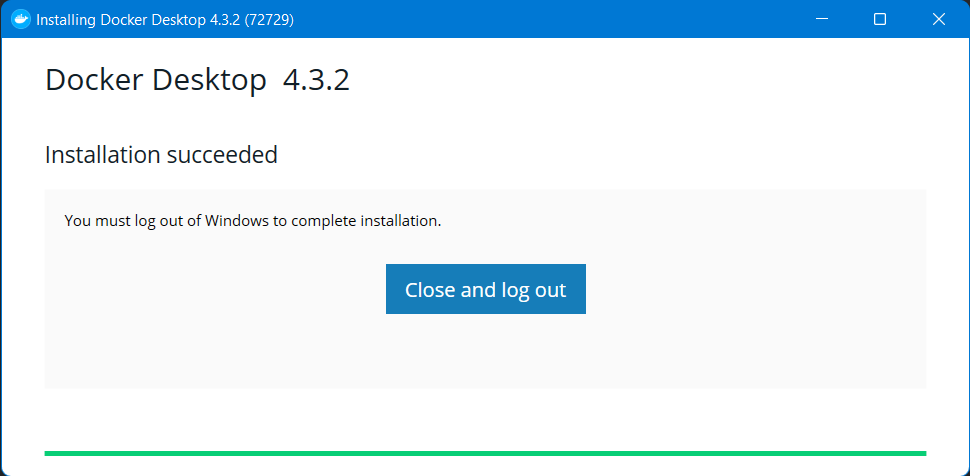
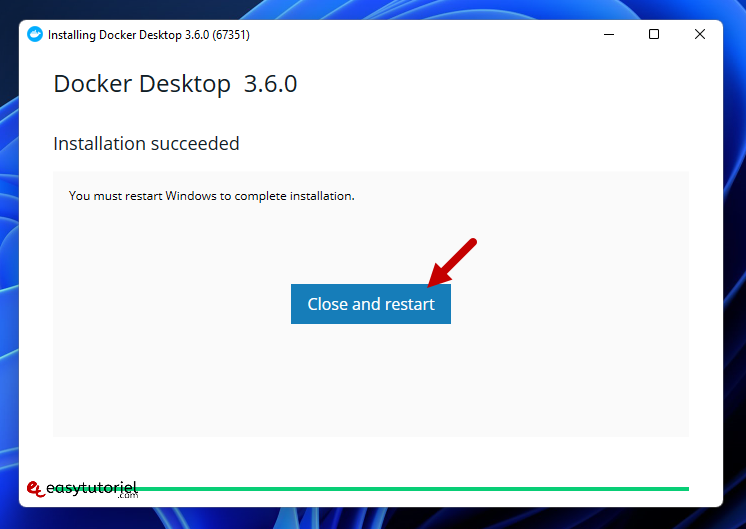
When the installation is complete, click the Close and Restart button to restart your computer.

Close Docker installer and restart the computer to complete installation
After restarting, you will be able to run Docker Desktop using either a shortcut or a command prompt. If you did not install WSL 2 before installing Docker, you will receive the WSL 2 installation is incomplete error when you try to start Docker.

Docker desktop error WSL 2 installation is incomplete
To fix this error, run the wsl —update command in an elevated PowerShell console, and restart your computer.

Installing WSL2 kernel updates to fix the WSL 2 installation is incomplete error
Install Docker using winget
Winget is a command-line package manager for modern versions of Windows, which works just like apt or DNF in Linux. If you have a little experience with package installation in Linux, you probably know that you usually just have to type a command and the package is ready for use. Well, winget does the exact same thing in Windows. All you need is Windows 10 1809 (build 17763) or Windows 11. To install Docker in Windows using winget, follow these steps:
Launch an elevated command prompt or PowerShell console, and type the following command:
winget install --exact --id Docker.DockerDesktop --accept-source-agreements --accept-package-agreements

Installing docker desktop in windows using winget
The —exact (or -e in short) parameter tells winget to find the package using an exact match. The installation can take a while, but it is pretty much automatic, so there is nothing you need to do but wait.
When the command is finished, open a new command prompt (or PowerShell console) and run the docker —version command.
If you try to run docker —version in the same command prompt, you will likely see The term ‘docker’ is not recognized as the name of a cmdlet, function, script file, or operable program error, as shown in the screenshot.

The term docker is not recognized as the name of a cmdlet function script file or operable program
This error occurs because your current command session (cmd or PowerShell) is still using the old environment variables. To be able to recognize the newly added Docker variable, you must reload the environment variables. Launching a new command session is the easiest way to load new variables.
Install Docker using PowerShell
To install Docker Desktop using PowerShell, follow these steps:
Download Docker Desktop.
Once the installer package is downloaded, open an elevated PowerShell console or Windows Terminal, and type the following command to start Docker installation:
Start-Process "D:Docker Desktop Installer.exe" -Wait -NoNewWindow "install --quiet --accept-license"

Installing Docker silently using PowerShell
Make sure you adjust the installer path. The -Wait parameter causes the Start-Process cmdlet to wait for the new process to finish, and the -NoNewWindow parameter prevents the new process from opening in a new window. The —quiet switch is offered by Docker’s install command and suppresses the installation information. To see the information, skip this switch. Since we are using PowerShell, notice how —quiet and other flags are enclosed in quotes along with the install command—this is very important to avoid errors. By default, Docker will use the WSL 2 backend, but you could include the —backend=hyper-v flag to use the Hyper-V backend instead.
Once the above command is finished, you will see a shortcut for Docker Desktop on your desktop. Double-click the shortcut to launch Docker.
All of these installation methods are self-sufficient, so there is nothing additional you need to do. But you may still get an error message that says Docker Desktop – Access denied. You are not allowed to use Docker. You must be in the «docker-users» group.
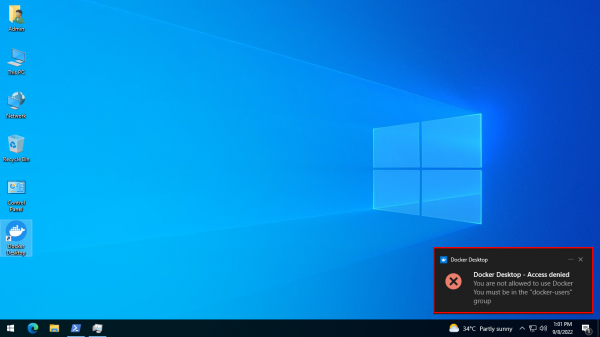
Docker Desktop – Access denied. You are not allowed to use Docker. You must be in the docker users group
If you get this error, run the following command in an elevated PowerShell console:
Add-LocalGroupMember -Group "docker-users" -Member $env:UserName -Verbose

Adding the current user to the docker users group using PowerShell
Don’t forget to log off and log on again after running this command. If you want to delegate another user to run Docker Desktop, you can specify that username with the -Member parameter instead of $env:UserName.
Subscribe to 4sysops newsletter!
That was all for this guide. You just learned how to install Docker in Windows using the GUI, winget, and PowerShell. I am curious to know which method you prefer, and why.
| description | keywords | title | redirect_from | ||||||||||
|---|---|---|---|---|---|---|---|---|---|---|---|---|---|
|
How to install Docker Desktop for Windows |
windows, install, download, run, docker, local, Docker Desktop |
Install on Windows |
|
Docker Desktop terms
Commercial use of Docker Desktop in larger enterprises (more than 250
employees OR more than $10 million USD in annual revenue) requires a paid
subscription.
Welcome to Docker Desktop for Windows. This page contains information about Docker Desktop for Windows system requirements, download URL, instructions to install and update Docker Desktop for Windows.
Download Docker Desktop for Windows
Docker Desktop for Windows{: .button .primary-btn }
For checksums, see Release notes
System requirements
Your Windows machine must meet the following requirements to successfully install Docker Desktop.
- WSL 2 backend
- Hyper-V backend and Windows containers
WSL 2 backend
-
Windows 11 64-bit: Home or Pro version 21H2 or higher, or Enterprise or Education version 21H2 or higher.
-
Windows 10 64-bit: Home or Pro 21H1 (build 19043) or higher, or Enterprise or Education 20H2 (build 19042) or higher.
-
Enable the WSL 2 feature on Windows. For detailed instructions, refer to the
Microsoft documentation{: target=»blank» rel=»noopener» class=»«}. -
The following hardware prerequisites are required to successfully run
WSL 2 on Windows 10 or Windows 11:- 64-bit processor with Second Level Address Translation (SLAT){: target=»blank» rel=»noopener» class=»«}
- 4GB system RAM
- BIOS-level hardware virtualization support must be enabled in the
BIOS settings. For more information, see
Virtualization.
-
Download and install the Linux kernel update package{: target=»blank» rel=»noopener» class=»«}.
Hyper-V backend and Windows containers
-
Windows 11 64-bit: Pro version 21H2 or higher, or Enterprise or Education version 21H2 or higher.
-
Windows 10 64-bit: Pro 21H1 (build 19043) or higher, or Enterprise or Education 20H2 (build 19042) or higher.
For Windows 10 and Windows 11 Home, see the system requirements in the WSL 2 backend{: data-toggle=»tab» data-target=»#win-wsl2″ } tab.
-
Hyper-V and Containers Windows features must be enabled.
-
The following hardware prerequisites are required to successfully run Client
Hyper-V on Windows 10:- 64 bit processor with Second Level Address Translation (SLAT){: target=»blank» rel=»noopener» class=»«}
- 4GB system RAM
- BIOS-level hardware virtualization support must be enabled in the
BIOS settings. For more information, see
Virtualization.
Note
Docker only supports Docker Desktop on Windows for those versions of Windows 10 that are still within Microsoft’s servicing timeline{:target=»blank» rel=»noopener» class=»«}.
Containers and images created with Docker Desktop are shared between all
user accounts on machines where it is installed. This is because all Windows
accounts use the same VM to build and run containers. Note that it is not possible to share containers and images between user accounts when using the Docker Desktop WSL 2 backend.
Running Docker Desktop inside a VMware ESXi or Azure VM is supported for Docker Business customers.
It requires enabling nested virtualization on the hypervisor first.
For more information, see Running Docker Desktop in a VM or VDI environment.
About Windows containers
Looking for information on using Windows containers?
- Switch between Windows and Linux containers
describes how you can toggle between Linux and Windows containers in Docker Desktop and points you to the tutorial mentioned above.
- Getting Started with Windows Containers (Lab)
provides a tutorial on how to set up and run Windows containers on Windows 10, Windows Server 2016 and Windows Server 2019. It shows you how to use a MusicStore application
with Windows containers. - Docker Container Platform for Windows articles and blog
posts{:target=»blank» rel=»noopener» class=»«} on the Docker website.
Note
To run Windows containers, you need Windows 10 or Windows 11 Professional or Enterprise edition.
Windows Home or Education editions will only allow you to run Linux containers.
Install Docker Desktop on Windows
Install interactively
-
Double-click Docker Desktop Installer.exe to run the installer.
If you haven’t already downloaded the installer (
Docker Desktop Installer.exe), you can get it from
Docker Hub{:target=»blank» rel=»noopener» class=»«}.
It typically downloads to yourDownloadsfolder, or you can run it from
the recent downloads bar at the bottom of your web browser. -
When prompted, ensure the Use WSL 2 instead of Hyper-V option on the Configuration page is selected or not depending on your choice of backend.
If your system only supports one of the two options, you will not be able to select which backend to use.
-
Follow the instructions on the installation wizard to authorize the installer and proceed with the install.
-
When the installation is successful, click Close to complete the installation process.
-
If your admin account is different to your user account, you must add the user to the docker-users group. Run Computer Management as an administrator and navigate to Local Users and Groups > Groups > docker-users. Right-click to add the user to the group.
Log out and log back in for the changes to take effect.
Install from the command line
After downloading Docker Desktop Installer.exe, run the following command in a terminal to install Docker Desktop:
$ "Docker Desktop Installer.exe" install
If you’re using PowerShell you should run it as:
Start-Process 'Docker Desktop Installer.exe' -Wait install
If using the Windows Command Prompt:
start /w "" "Docker Desktop Installer.exe" install
The install command accepts the following flags:
--quiet: suppresses information output when running the installer--accept-license: accepts the Docker Subscription Service Agreement{: target=»blank» rel=»noopener» class=»«} now, rather than requiring it to be accepted when the application is first run--no-windows-containers: disables Windows containers integration--allowed-org=<org name>: requires the user to sign in and be part of the specified Docker Hub organization when running the application--backend=<backend name>: selects the default backend to use for Docker Desktop,hyper-v,windowsorwsl-2(default)--installation-dir=<path>: changes the default installation location (C:Program FilesDockerDocker)--admin-settings: Automatically creates anadmin-settings.jsonfile which is used by admins to control certain Docker Desktop settings on client machines within their organization. For more information, see Settings Management.- It must be used together with the
--allowed-org=<org name>flag. - For example:
--allowed-org=<org name> --admin-settings='{"configurationFileVersion": 2, "enhancedContainerIsolation": {"value": true, "locked": false}}'
- It must be used together with the
If your admin account is different to your user account, you must add the user to the docker-users group:
$ net localgroup docker-users <user> /add
Start Docker Desktop
Docker Desktop does not start automatically after installation. To start Docker Desktop:
-
Search for Docker, and select Docker Desktop in the search results.
 {:width=»300px»}
 -
The Docker menu (
{: .inline}) displays the Docker Subscription Service Agreement window.{% include desktop-license-update.md %}
-
Select Accept to continue. Docker Desktop starts after you accept the terms.
Important
If you do not agree to the terms, the Docker Desktop application will close and you can no longer run Docker Desktop on your machine. You can choose to accept the terms at a later date by opening Docker Desktop.
{: .important}For more information, see Docker Desktop Subscription Service Agreement{:target=»blank» rel=»noopener» class=»«}. We recommend that you also read the FAQs{: target=»_blank» rel=»noopener» class=»*» id=»dkr_docs_desktop_install_btl»}.
 {:width=»300px»}
 {: .inline}) displays the Docker Subscription Service Agreement window.
Where to go next
- Get started with Docker is a tutorial that teaches you how to deploy a multi-service stack.
- Troubleshooting describes common problems, workarounds, and
how to get support. - FAQs provide answers to frequently asked questions.
- Release notes lists component updates, new features, and improvements associated with Docker Desktop releases.
- Back up and restore data provides instructions on backing up and restoring data related to Docker.
Table of Contents
Краткая выдержка команд для установки Docker.
Необходимые условия
У вас должен быть установлен wsl, командой
проверьте существование WSL. На скриншоте с wsl все ок.

Если у вас нет WSL,
следуйте инструкции по ссылке
и возвращайтесь.
Скачивание и установка Docker
Все действия выполнялись на Windows 11 (сборка 22000.376) и Docker 4.3.2
- Скачайте Windows установку с официального сайта.
- Запустите установку и просто прожимайте Далее. По окончанию, перезагрузитесь или выполните Выход (Log out).
- Сразу при входе или первом запуске Docker, вам предложат принять соглашение.
- Далее будет запуск необходимых служб. Открывайте Docker Dashboard, ярлык на рабочем столе или в трее иконка.
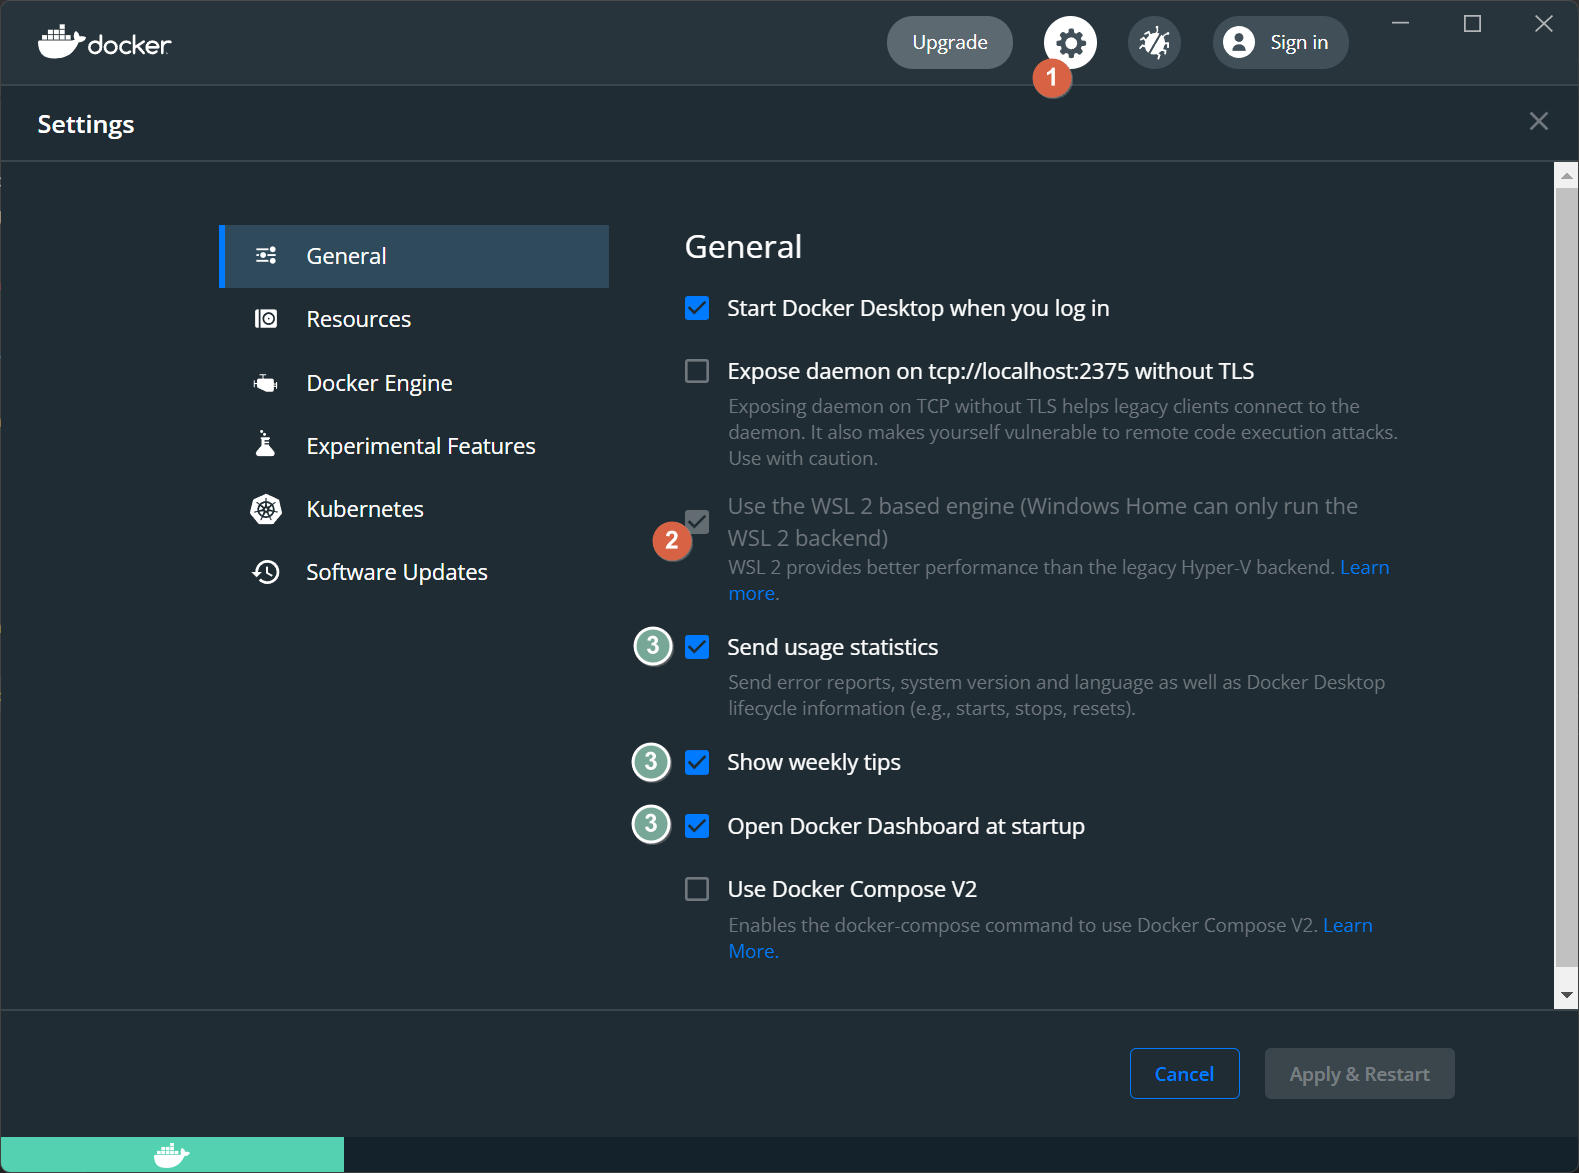
- Зайдите в настройки (1) и убедитесь (2) — что выбран WSL2.
- Если хотите чтобы Docker вас лишнего не тревожил отключите пункты (3).
Установка завершена!
Запуск первого контейнера
Попробуйте запустить контейнер через консоль wsl.
Например, поднимем текстовый рассказ фильма Star Wars в контейнере.
- Запустите WSL консоль.
- Введите команду:
docker run -it --rm mikesplain/telnet towel.blinkenlights.nl
Кратко по параметрам:
runзапуск нового контейнера.-itконтейнер будет запущен в интерактивном (i) режиме, и в используется tty взаимодействие, позволяет использовать консоль внутри контейнера (t).--rmконтейнер будет удален после завершения своей работы.mikesplain/telnetназвание образа, он будет загружен из dockerhub.towel.blinkenlights.nlпараметр, который будет использовать контейнер. В данном случае программа telnet.
В итоге увидите титры и начало истории, а значит все работает отлично
и можно полноценно пользоваться Docker.
🚀 Не залипните на звездные войны 
🎁 Полезные ссылки
- The Docker Handbook – 2021 Edition
Изучаем Docker на Habr
- Часть 1: основы
- Часть 2: термины и концепции
- Часть 3: файлы Dockerfile
- Docker команды
хотеть установить докер и разверните свое первое приложение в контейнер ?
Docker — это платформа для виртуализация de Type-1 запущен в 2013 и используется для выполнения нескольких контейнеры изолированный между ними при использовании только одного ядро система.
La контейнеризация позволяет запускать несколько (десятки) машины при этом без потери производительности и это дешевле!
Вы можете использовать Docker чтобы создать законченную среду для вашего приложения и экспортировать ее в облако (Докер-хаб) как с Github но вся среда экспортируется и может быть развернута на любом компьютере с помощью Docker.
Я изучил Docker во время изучения Master но любой может узнать это инструмент очень полезно, особенно в работе облако и оркестровка данные (Кубернетес).
В этом уроке вы узнаете, как установить Docker на Windows 11, для этого необходимо наличие виртуализация активировать, не забывая Hyper-V, что очень важно, и поэтому вы не можете использовать программное обеспечение для виртуализации, такое как VirtualBox ou VMware Player.
Давайте!
Установить Docker на Windows 11 и 10 бесплатно
0. Активировать Hyper-V
следовать этот учебник налить активный ле Hyper-V, вам, так Windows, это исконно.
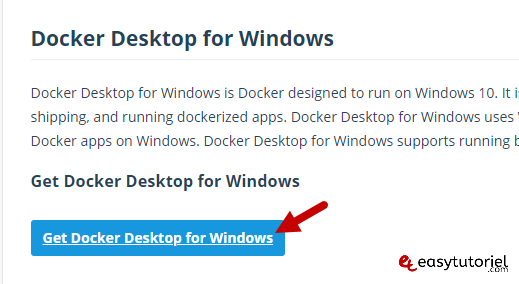
1. Загрузите Docker для Windows
Вы можете скачать установочный файл Docker для рабочего стола поблизости.
Нажмите на «Получите Docker Desktop для Windows«
2. Установите Docker для Windows
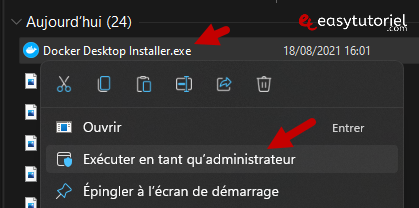
Запустите установку Docker от имени администратора.
Нажмите на «OK«
Подождите несколько минут …
Перезагрузите компьютер, нажав «Закройте и перезапустите«
3. Используйте Docker, чтобы создать свой первый тестовый контейнер.
Запустить Docker с ярлыка на рабочем столе.
Учебник поможет вам создать свой первый контейнер из Github и запустить его на своем компьютере. Windows.
Вам просто нужно нажать на код, чтобы запустить его, а в конце — на «Далее«


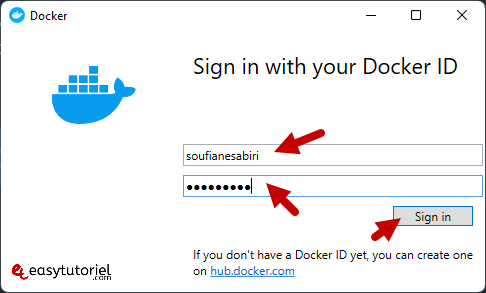
В конце создать учетную запись в Docker Hub затем нажмите «Войдите здесь«

Введите данные для входа …

Чтобы открыть приложение в браузере, нажмите «ОТКРЫТЬ В БРАУЗЕРЕ«

И вот так! Приложение 100% работает на Docker-контейнере!

Поздравляю! Вы установили Docker на Windows 11 успешно!
У вас есть вопросы? Не стесняйтесь оставлять комментарий ![]()
A+
Soufiane Sabiri — Easytutoriel.com
Install Docker on Windows 11 with WSL Ubuntu 22.04
This is to install Docker within Ubuntu WSL without using the Windows Docker application.
Follow the below steps.
1. Enable Windows Subsystem for Linux and Virtual Machine platform
Go to Control Panel -> Programs -> Programs and Features -> Turn Windows features on or off

2. Switch to WSL 2
Open Powershell and type in the below command.
wsl —set-default-version 2
3. Install Ubuntu
Open Microsoft Store and search for Ubuntu. Select the version you intend to install. I’d use the latest LTS version Ubuntu 22.04. Click on the Get button.

It will take a couple of minutes to download and install.
4. Open up the installed Ubuntu version that was installed.

If you get an error like the below image, make sure to install the WSL2 Kernel update.

If it’s an older Ubuntu version the error message would be something like the image below.

Error: WSL 2 requires an update to its kernel component.
Installing the WSL2 kernel update should fix this issue. Then close the Ubuntu window and open it up again.
It will ask for the Language, username, and password like below.


In the mount settings, you can leave the defaults.

It will take a minute or two to apply the changes.

Hit enter to reboot Ubuntu WSL.

Now, we have installed the WSL 2.
Install Docker within Ubuntu WSL
5. Run the apt update command to get the updated and install some required packages.
sudo apt-get update
sudo apt-get install
ca-certificates
curl
gnupg
lsb-release
6. Add CPG keys for the official docker repository.
curl -fsSL https://download.docker.com/linux/ubuntu/gpg | sudo gpg —dearmor -o /usr/share/keyrings/docker-archive-keyring.gpg
7. Add Docker repository to APT.
echo
«deb [arch=$(dpkg —print-architecture) signed-by=/usr/share/keyrings/docker-archive-keyring.gpg] https://download.docker.com/linux/ubuntu
$(lsb_release -cs) stable» | sudo tee /etc/apt/sources.list.d/docker.list > /dev/null
8. Install Docker
sudo apt-get update
sudo apt-get install docker-ce docker-ce-cli containerd.io docker-compose-plugin
9. Start the docker service
sudo service docker start
10. Check the docker service status
sudo service docker status
If it is Ubuntu 22.04, then it might have an issue with the iptables version. When you are checking the status, it might still show up not running. If that is the case, make sure to switch the iptables to legacy.
Run the below command to change the default iptables version.
sudo update-alternatives —config iptables

Select the iptables-legacy by entering option 1. Then hit enter.
Then start the docker service again by repeating step 9 above.
11. Add the user to the docker user group.
sudo usermod -aG docker ${USER}
su — ${USER}
12. Now, that everything is complete, feel free to use docker!
docker ps
Issues and troubleshooting
If you still can’t run the docker service, check the WSL version in Powershell.
wsl -l -v

If you have version 1, WSL 1 did not support running Docker within the Ubuntu subsystem on its own. The WSL 1 required to use Windows Desktop Docker app to be installed and use windows binaries to run Docker within WSL. This is great if you need to keep the 2 docker services in sync.
If you want to run Docker within WSL without having the windows Docker client, you have to update it to WSL2.
I would uninstall the current Ubuntu installation from Settings -> Apps -> Ubuntu.
Then switch the WSL version as per step 2 above, then install the Ubuntu again.