I downloaded the tar file emacs-24.3.tar.gz and I extracted it. I look at the installation instructions here:
You can run Emacs without any extra steps, but if you want icons in
your Start Menu, or for Emacs to detect the image libraries that are
already installed on your system as part of GTK, then you should run
the program emacs-24.3binaddpm.exe.
How do I run Emacs?
And where is emacs-24binaddpm.exe. In the folder emacs-24 there is no bin folder. So how do I run emacs after installation?
asked Oct 1, 2013 at 2:11
![]()
1
Download windows binaries here:
http://ftp.gnu.org/gnu/emacs/windows/
.tar.gzs are usually linux sources, so you’ll have to compile it if you download that.
answered Oct 1, 2013 at 2:16
![]()
simonzacksimonzack
19k13 gold badges68 silver badges113 bronze badges
4
GNU Emacs is a popular text editor designed for programmers of all sorts. Because it was developed on Unix and is widely used on Linux (and shipped with macOS), people sometimes don’t realize that it’s also available for Microsoft Windows. You don’t need to be an experienced or full-time programmer to make use of Emacs, either. You can download and install Emacs with just a few clicks, and this article shows you how.
You can install Windows manually or with a package manager, like Chocolatey.
7-zip
If you haven’t already installed 7-zip for Windows, you should do that first. 7-zip is an open source archive utility with the ability to create and extract ZIP, 7z, TAR, XZ, BZIP2, and GZIP (and more) files. It’s an invaluable tool for Windows users.
After installing 7-zip, you have new 7-zip archive options in your right-click menu when browsing files in Windows Explorer.
Powershell and Chocolatey
To install GNU Emacs on Windows using Chocolatey:
PS> choco install emacs-fullOnce it has installed, launch Emacs from Powershell:
PS> emacs
Download GNU Emacs for Windows
To manually install GNU Emacs on Windows, you must download Emacs.

This takes you to a server near you, which shows you a list of all available Emacs releases. Find the directory with the highest release number and click into it. There are many different builds of Emacs for Windows, but the most general-purpose version is just named emacs-VERSION-ARCHITECTURE.zip. The VERSION depends upon which release you’re downloading, while the ARCHITECTURE depends on whether you have a 32-bit or 64-bit machine. Most modern computers are 64-bit, but if you’re in doubt you can download the 32-bit version, which runs on both.
If you’re downloading version 26 of Emacs for a 64-bit machine, you would click the link titled emacs-26.2-x86_64.zip. There are smaller downloads available (such as the no-deps variety) but you must be familiar with how Emacs is built from source code, knowing which libraries it needs and which of those your computer has on it already. Generally, it’s easiest to get the large version of Emacs, because it contains everything it needs to run on your computer.
Next, unarchive the ZIP file you downloaded. To extract it, right-click on the Emacs ZIP file and select Extract to Emacs-VERSION from the 7-zip sub-menu. It’s a big archive, so it may take a while to uncompress, but when it does, you have a new directory containing all the files distributed with Emacs. For example, in this example, the file emacs-26.2-x86_64.zip was downloaded, so the unarchived directory is emacs-26.2-x86_64.
Launch Emacs
Within the Emacs directory, find the bin directory. This folder stores all the binary executable files (EXE files) distributed with Emacs. Double-click the emacs.exe file to launch the application.

You can create a shortcut to emacs.exe on your desktop for easier access.
Learn Emacs
Emacs isn’t as obtuse as its reputation may indicate. It’s got its own traditions and conventions, but when you’re typing text into it, you can treat it exactly as you treat Notepad or any given text field on any given website.
The important differences occur when you edit the text you’ve typed.
The only way to learn is to start using it, though, so make Emacs your go-to text editor for simple tasks. When you’d normally open Notepad or Word or Evernote or whatever it is you use for quick notes or as a temporary scratchpad, launch Emacs instead.
Emacs has the reputation of being a terminal-based application, but obviously it has a GUI, so use the GUI often, just as you would with any application. Copy, cut, and paste (or «yank» in Emacs terminology) from the menu instead of with the keyboard, and open and save files from the menu or toolbar. Start from the beginning and learn the application based on what it is and not how you think it should act based on your experience with other editors.
Download our cheatsheet!
Thanks to Matthias Pfuetzner and Stephen Smoogen.
 This work is licensed under a Creative Commons Attribution-Share Alike 4.0 International License.
Calling the default and official Windows’ C++ compiler MSVC (Microsoft
Visual C++) from command line is not easy as calling gcc, mingw or
clang as MSVC needs environment variables INCLUDE, LIB, LIBPATH and
PATH to be properly set with correct paths. Those settings depends on
the version of the compiler and the building target x86 (32 bits) or
x64 (64 bits), so the path settings of MSVC 2015 are different from
MSVC 2017. This section provides useful commands that solve this
problem by allowing the user call the compiler directly which may be
useful for studying c++ on Windows, learning about Windows API, testing
the compiler, building simple C++ programs or creating
proof-of-concepts.
Note: It was tested with MSVC 2017 and Windows10.
To use it just copy the functions to the file ~/.init.el or emacs
intialization file.
- Porgram:
Saves the original PATH variable
(defvar msbuild-old-path-var (getenv "PATH"))
This command sets environments variables for MSVC — 2017 Building tools and x68
building target. If the user runs M-x msbuild-2017-x86-setup, it will
allows to call the msvc compiler cl.exe with M-x compile cl.exe file.cpp.
Then, the code will be compiled for x86 target. It is also possible to
call with M-x compile the commands msbuild.exe, link.exe (MSVC’s linker)
and dumpbin.exe (similar to GNU objdump).
(defun msbuild-2017-x86-setup ()
  "Set enviorment variables to load Microsoft Visual C++ Compiler (MSVC 32 bits)"
  (interactive)
  (message "Setting 32 bits MSVC building tools.")
  (setenv "PATH" msbuild-old-path-var)
  (setenv "INCLUDE"
        (concat
             "C:/Program Files (x86)/Microsoft Visual Studio/2017/Community/VC/Tools/MSVC/14.12.25827/ATLMFC/include"
         ";" "C:/Program Files (x86)/Microsoft Visual Studio/2017/Community/VC/Tools/MSVC/14.12.25827/include"
         ";" "C:/Program Files (x86)/Windows Kits/NETFXSDK/4.6.1/include/um"
         ";" "C:/Program Files (x86)/Windows Kits/10/include/10.0.16299.0/ucrt"
         ";" "C:/Program Files (x86)/Windows Kits/10/include/10.0.16299.0/shared"
         ";" "C:/Program Files (x86)/Windows Kits/10/include/10.0.16299.0/um"
         ";" "C:/Program Files (x86)/Windows Kits/10/include/10.0.16299.0/winrt"
         ))

  (setenv "LIB"
        (concat
             "C:/Program Files (x86)/Microsoft Visual Studio/2017/Community/VC/Tools/MSVC/14.12.25827/ATLMFC/lib/x86"
         ";" "C:/Program Files (x86)/Microsoft Visual Studio/2017/Community/VC/Tools/MSVC/14.12.25827/lib/x86"
         ";" "C:/Program Files (x86)/Windows Kits/NETFXSDK/4.6.1/lib/um/x86"
         ";" "C:/Program Files (x86)/Windows Kits/10/lib/10.0.16299.0/ucrt/x86"
         ";" "C:/Program Files (x86)/Windows Kits/10/lib/10.0.16299.0/um/x86"
         ))

  (setenv  "LIBPATH"
         (concat
              "C:/Program Files (x86)/Microsoft Visual Studio/2017/Community/VC/Tools/MSVC/14.12.25827/ATLMFC/lib/x86"
          ";" "C:/Program Files (x86)/Microsoft Visual Studio/2017/Community/VC/Tools/MSVC/14.12.25827/lib/x86"
          ";" "C:/Program Files (x86)/Microsoft Visual Studio/2017/Community/VC/Tools/MSVC/14.12.25827/lib/x86/store/references"
          ";" "C:/Program Files (x86)/Windows Kits/10/UnionMetadata/10.0.16299.0"
          ";" "C:/Program Files (x86)/Windows Kits/10/References/10.0.16299.0"
          ";" "C:/Windows/Microsoft.NET/Framework/v4.0.30319"
          ))

  (setenv "PATH"
        (concat
         (getenv "PATH")
         ";" "C:/Program Files (x86)/Microsoft Visual Studio/2017/Community/VC/Tools/MSVC/14.12.25827/bin/HostX86/x86"
         ";" "C:/Program Files (x86)/Microsoft Visual Studio/2017/Community/Common7/IDE/VC/VCPackages"
         ";" "C:/Program Files (x86)/Microsoft Visual Studio/2017/Community/Common7/IDE/CommonExtensions/Microsoft/TestWindow"
         ";" "C:/Program Files (x86)/Microsoft Visual Studio/2017/Community/Common7/IDE/CommonExtensions/Microsoft/TeamFoundation/Team Explorer"
         ";" "C:/Program Files (x86)/Microsoft Visual Studio/2017/Community/MSBuild/15.0/bin/Roslyn"
         ";" "C:/Program Files (x86)/Microsoft Visual Studio/2017/Community/Team Tools/Performance Tools"
         ";" "C:/Program Files (x86)/Microsoft Visual Studio/Shared/Common/VSPerfCollectionTools/"
         ";" "C:/Program Files (x86)/Microsoft SDKs/Windows/v10.0A/bin/NETFX 4.6.1 Tools/"
         ";" "C:/Program Files (x86)/Microsoft SDKs/F#/4.1/Framework/v4.0/"
         ";" "C:/Program Files (x86)/Windows Kits/10/bin/x86"
         ";" "C:/Program Files (x86)/Windows Kits/10/bin/10.0.16299.0/x86"
         ";" "C:/Program Files (x86)/Microsoft Visual Studio/2017/Community//MSBuild/15.0/bin"
         ";" "C:/Windows/Microsoft.NET/Framework/v4.0.30319"
         ";" "C:/Program Files (x86)/Microsoft Visual Studio/2017/Community/Common7/IDE/"
         ";" "C:/Program Files (x86)/Microsoft Visual Studio/2017/Community/Common7/Tools/"
         )))
The command below sets enviroment variable for MSVC — 2017 and x64
building target and its similar to msbuild-2017-x86-setup.
(defun msbuild-2017-x64-setup ()
  "Set enviorment variables to load Microsoft Visual C++ Compiler (MSVC) 64 bits"
  (interactive)
  (message "Setting 64 bits building tools.")
  (setenv "PATH" msbuild-old-path-var)
  (setenv "INCLUDE"
        (concat
             "C:/Program Files (x86)/Microsoft Visual Studio/2017/Community/VC/Tools/MSVC/14.12.25827/ATLMFC/include"
         ";" "C:/Program Files (x86)/Microsoft Visual Studio/2017/Community/VC/Tools/MSVC/14.12.25827/include"
         ";" "C:/Program Files (x86)/Windows Kits/NETFXSDK/4.6.1/include/um"
         ";" "C:/Program Files (x86)/Windows Kits/10/include/10.0.16299.0/ucrt"
         ";" "C:/Program Files (x86)/Windows Kits/10/include/10.0.16299.0/shared"
         ";" "C:/Program Files (x86)/Windows Kits/10/include/10.0.16299.0/um"
         ";" "C:/Program Files (x86)/Windows Kits/10/include/10.0.16299.0/winrt"
         ))

  (setenv "LIB"
        (concat
             "C:/Program Files (x86)/Microsoft Visual Studio/2017/Community/VC/Tools/MSVC/14.12.25827/ATLMFC/lib/x64"
         ";" "C:/Program Files (x86)/Microsoft Visual Studio/2017/Community/VC/Tools/MSVC/14.12.25827/lib/x64"
         ";" "C:/Program Files (x86)/Windows Kits/NETFXSDK/4.6.1/lib/um/x64"
         ";" "C:/Program Files (x86)/Windows Kits/10/lib/10.0.16299.0/ucrt/x64"
         ";" "C:/Program Files (x86)/Windows Kits/10/lib/10.0.16299.0/um/x64"
         ))

  (setenv  "LIBPATH"
         (concat
              "C:/Program Files (x86)/Microsoft Visual Studio/2017/Community/VC/Tools/MSVC/14.12.25827/ATLMFC/lib/x64"
          ";" "C:/Program Files (x86)/Microsoft Visual Studio/2017/Community/VC/Tools/MSVC/14.12.25827/lib/x64"
          ";" "C:/Program Files (x86)/Microsoft Visual Studio/2017/Community/VC/Tools/MSVC/14.12.25827/lib/x64/store/references"
          ";" "C:/Program Files (x86)/Windows Kits/10/UnionMetadata/10.0.16299.0"
          ";" "C:/Program Files (x86)/Windows Kits/10/References/10.0.16299.0"
          ";" "C:/Windows/Microsoft.NET/Framework/v4.0.30319"
          ))

  (setenv "PATH"
        (concat
         (getenv "PATH")
         ";" "C:/Program Files (x86)/Microsoft Visual Studio/2017/Community/VC/Tools/MSVC/14.12.25827/bin/HostX86/x64"
         ";" "C:/Program Files (x86)/Microsoft Visual Studio/2017/Community/Common7/IDE/VC/VCPackages"
         ";" "C:/Program Files (x86)/Microsoft Visual Studio/2017/Community/Common7/IDE/CommonExtensions/Microsoft/TestWindow"
         ";" "C:/Program Files (x86)/Microsoft Visual Studio/2017/Community/Common7/IDE/CommonExtensions/Microsoft/TeamFoundation/Team Explorer"
         ";" "C:/Program Files (x86)/Microsoft Visual Studio/2017/Community/MSBuild/15.0/bin/Roslyn"
         ";" "C:/Program Files (x86)/Microsoft Visual Studio/2017/Community/Team Tools/Performance Tools"
         ";" "C:/Program Files (x86)/Microsoft Visual Studio/Shared/Common/VSPerfCollectionTools/"
         ";" "C:/Program Files (x86)/Microsoft SDKs/Windows/v10.0A/bin/NETFX 4.6.1 Tools/"
         ";" "C:/Program Files (x86)/Microsoft SDKs/F#/4.1/Framework/v4.0/"
         ";" "C:/Program Files (x86)/Windows Kits/10/bin/x64"
         ";" "C:/Program Files (x86)/Windows Kits/10/bin/10.0.16299.0/x64"
         ";" "C:/Program Files (x86)/Microsoft Visual Studio/2017/Community//MSBuild/15.0/bin"
         ";" "C:/Windows/Microsoft.NET/Framework/v4.0.30319"
         ";" "C:/Program Files (x86)/Microsoft Visual Studio/2017/Community/Common7/IDE/"
         ";" "C:/Program Files (x86)/Microsoft Visual Studio/2017/Community/Common7/Tools/"
         )))
This command allows to compile the current buffer. For instance, if
the current buffer is associated to a file test1.cpp and user types
M-x compile-msvc-x86, it will show a prompt with cl.exe test1.cpp
asking the user to confirm or complement the compilation command.
(defun compile-msvc-x86()
  (interactive)
  (msbuild-2017-x86-setup)
  (let ((compile-command (format "cl.exe "%s""
                                 (file-name-nondirectory (buffer-file-name))))
        (compilation-ask-about-save nil))
    (call-interactively #'compile )))

(defun compile-msvc-x64 ()
  (interactive)
  (msbuild-2017-x64-setup)
  (let ((compile-command (format "cl.exe "%s""
                                 (file-name-nondirectory (buffer-file-name))))
        (compilation-ask-about-save nil))
    (call-interactively #'compile )))
The screenshot below shows an example about how those commands can be
used:
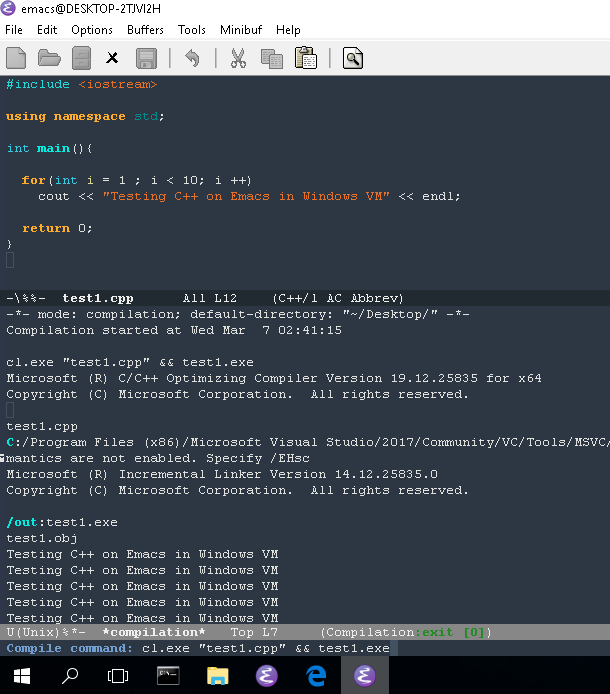
Test file: codes/test.cpp
#include <iostream>

using namespace std;

int main(){

  for(int i = 1 ; i < 10; i ++)
    cout << "Testing C++ on Emacs in Windows VM" << endl;

  return 0;
}
I can’t find a clear tutorial for how to install GNU Emacs on Windows 10. Normally there are a few tricks required to get it running properly, so I thought I would ask here before trying one of the Windows 8 tutorials.
The specific “flavour” of Emacs is not particularly important.
![]()
asked Mar 1, 2017 at 18:09
![]()
6
Some third-party Windows package managers offer a straightforward installation of GNU Emacs on Windows 7+. Notes:
- Chocolatey requires an administrative shell access, whereas Scoop does not and makes installation portable.
- Both Chocolatey and Scoop install 64-bit Emacs on 64-bit host system.
- Both Chocolatey and Scoop automatically create corresponding shims so that Emacs can be called from the console via
emacs(GUI version) oremacs -nw(terminal session).
Chocolatey
Installation
Open elevated PowerShell and install the choco package manager, then install emacs package:
choco install emacs
Launching
By default an icon is added to the start menu and the launcher can be found at C:ProgramDatachocolateybinrunemacs.exe.
Updating
choco update emacs
Removing
choco uninstall emacs
Scoop
Installation
Open PowerShell and install the scoop package manager, then add extras repo (you will need to install git and 7zip as well):
scoop bucket add extras
Install emacs package:
scoop install emacs
Launching
By default an icon is added to the start menu into the Scoop Apps folder and the launcher can be found at ~scoopappsemacscurrentbinrunemacs.exe.
Updating
scoop update emacs
Removing
scoop uninstall emacs
answered Oct 1, 2017 at 10:31
![]()
andseliskandselisk
2083 silver badges9 bronze badges
2
After reading many tutorials and readmes I was unable to install Emacs and spacemacs on my machine until now. It is super easy.
- create a folder in a directory you wish to install (eg I’d like to install on drive
c:/ - add a new user variable named
HOMEand valuedto the created folder(egc:/emacs/ - download the latest version of Emacs
- extract the content of the downloaded file into the folder you have created a couple of steps ago. (eg
c:/emacs/) - open
runemacs.exelocated inc:/emacs/bin/directory; this would generate a folder named.emacs.dinc:/emacs/
installing spacemacs
- quit Emacs
- download spacemacs
- extract the content in the
c:/emacs/.emacs.ddirectory - finally re-execute
runemacs.exe.
I’ve learned about the instruction in this video
![]()
Stefan
25.8k3 gold badges45 silver badges80 bronze badges
answered Oct 30, 2019 at 8:21
![]()
1
Introduction
At home I am on LINUX pretty much full-time. I only run Windows inside a VM in some special circumstances. But at work I have to use Windows due to corporate policy, so I regularly face the challenge of finding cross-platform software which I can use both at home and at work.
One of the things I had to change when I switched from Windows at home was my text editor, because the previous editor I used was a Windows only application.
I decided that I would take the opportunity to go the whole-hog and learn a “proper” comprehensive text editor. But this would involve a significant and ongoing investment of my time, so I wanted an editor that I could learn once and then use it everywhere.
I chose emacs.
Since then I have discovered org-mode (a major-mode for emacs which supports task management) and I have developed a detailed configuration which enables me to plan my work, clock time spent on tasks, develop projects, take notes, produce reports, etc.
Of course, I needed a setup which would allow me to work cross-platform, so that my text editing and org-mode task management would be seamless no matter if I worked at the office on Windows or at home on LINUX. The need for a cross-platform installation and configuration was born.
In this blog I will explain my method for installing emacs on Windows. Some of the decisions I make are related to my desire for cross-platform use, and these will be discussed. But this blog works fine standalone, so even if all you’re interested in is using emacs on Windows, and you have no interest in sharing a configuration with LINUX, these instructions will still produce a working emacs installation on Windows for you.
I also discuss installation of org-mode and associated cross-platform use.
Pre-Requisites
EMACS ON LINUX
If you’re following this blog with the aim of cross-platform use, then you must already have a working installation on LINUX since I will not discuss the details of that here. Your config file on LINUX must be available at ~/.emacs because that is the setup I am going to replicate on Windows.
GIT
I will discuss an org-mode installation that makes use of git. If you don’t care to use org-mode and are only interested in emacs then this pre-requisite is not required and you can ignore it. Otherwise, if you want to replicate my cross-platform setup with org-mode, you’ll need git.
I don’t explain how to install git on Windows, so if you’re unsure about that you will need to find some tutorials elsewhere and come back here once you’ve got git installed. But here’s a hint: you need to visit the git web page, and install git for Windows. If you prefer a GUI client I recommend tortoise git, you will need to install this separately.
INSTALLING EMACS
Cygwin
The first task is to install Cygwin. Cygwin is a repository of GNU tools for Microsoft Windows. This will allow you to install emacs on Windows and maintain an environment and file structure that is similar to that on LINUX. This is essential to satisfy the cross-platform objective of the configuration.
Visit http://www.cygwin.com and download the Windows installer. Launch it.

Advance the installer, and when asked to choose a download source, select “Install from internet”.
Next you will be asked to choose an install directory. This will form the root of your Cygwin installation. Inside it a file structure will be created, and this will include your “Home” folder.
The Home folder is the crucial ingredient; this will allow us to maintain an emacs installation that is the same across Windows and LINUX.
You don’t need to do anything to set all this up. Just advance the installer script. You can choose a different install location if you want, but I tend to accept the default.

Now it is time to choose the GNU packages you want to install. I’ll stick to what is required for emacs here. You can always go back and browse for further packages that interest you afterwards. I’ll be showing you how to install more packages later on.
In the search box type “emacs”. This will show all the emacs related packages. Now expand the “Editors” tree.
You must select the emacs package. This is the base emacs installation. You will see the package install message change from “Skip” to the version number that is going to be installed.
Now you have a choice. You can either select the emacs-X11 package, in which case you will get a console only version of emacs, or you can select the emacs-w32 package. In this case you will get the full emacs experience with GUI. Even though emacs usage is heavily weighted towards the keyboard, I still prefer this option.
The screen grab below shows the correct selections to make:

Advance the installer.
The next page asks you if it’s OK to install dependencies. You need to leave this box checked and advance to the next page.
Now cygwin will start installing everything, including emacs. Sit back and wait!

When the installer finishes you will have an option to create a desktop icon. This shortcut is not for emacs! It’s a shortcut for the cygwin terminal. The terminal is quite useful, so I recommend you allow the installer to create the shortcuts, but it’s up to you.
Setting up emacs.

Emacs is installed and will run as it is. First, let’s check it works. Launch the Cygwin terminal using the shortcut icon.
Now you will see a terminal appear. If this is the first time you have launched a cygwin terminal you will see some initial setup take place; cygwin will create some startup files in your cygwin home directory. Then you will get a terminal prompt.
In the terminal prompt, type:
emacs &
If everything has worked, you should find that a bare-bones default emacs setup will launch.

Now it is time to set things up. If you’re a seasoned emacs user you will surely have your own config file that you want to use. If you’re new to emacs then you should still create the file we’re going to talk about (because you will undoubtedly want to edit it in the future).
Now, a disclaimer: I can’t possibly know what you’ve got inside your own .emacs file. If you’ve created a rats-nest in there, and some things don’t work, it’s up to you to fix them. I’m happy to answer questions if I can though! Ask them in the comments. Note that I consider myself very much an amateur emacs user. I am still learning the ropes myself! I don’t know everything.
I have quite an extensive .emacs file which I have developed while using emacs on LINUX. I control it with git, so I checked out the file and copied it to my cygwin home directory. Assuming you accepted the default cygwin installation path then the home directory will be located at:
C:cygwinhomeuser
Where ‘user’ is your Windows user name.
This is what we refer to as your “home” directory. On LINUX the home directory for a user is typically abbreviated as ~/. This abbreviation works in Cygwin as well, and that’s why we can develop a common configuration that works across LINUX and Windows. We only need to make sure that critical files (e.g. files which are referred to explicitly in .emacs, or used in org-mode) are kept in the home directory with a file structure that is replicated across the two systems. The location of the home directory itself is not important, nor is the user name, since we will use the ~/ abbreviation when we refer to the home directory in code.
Creating an emacs shortcut icon

You might find it tedious to have to launch a cygwin terminal and type ’emacs’ every time you want to launch the application.
To fix that you can find the emacs executable in the cygwin bin directory and send a shortcut for it to your desktop. Or you can pin it to your start menu, whatever you want. See the screen grab below:

That’s it for emacs! We’re done!
You just need some way to keep the .emacs file current on both your Windows and LINUX systems. I use git for that, so whenever I make changes I commit them to a git repository and then simply pull the changes on each local system. This means I have one configuration which works at home on LINUX and at work on Windows. The user experience and functionality is identical between these systems.
If you want to set up org-mode, read on:
org-mode setup
There are a few ways to set up org-mode. I don’t debate the pros and cons here, I only offer a method that works for me.
I run org-mode by pulling the latest code from a repository and then running uncompiled source files on my systems. This works on both LINUX and Windows. Here’s how to do it:
First, you need git installed. Otherwise you’ll have to find a manual method by which you can obtain the org-mode source.
Clone the org-mode repository:

make
Now you need to install the make utility. You can get it from the Cygwin repository. It could have been selected and installed at the same time as emacs, but if you’re not familiar with Cygwin this is a good opportunity to find out how to install extra packages.
You need to launch the Cygwin installer again. Advance the installer in the same way as you did before until you get to the package selections. Change the ‘View’ combobox to “Full”. Then search for “make”.

You need to install the GNU version. Select it so that the status changes from skip to the version number that will be installed. Then advance the installer in the same way as before.
Make will be installed.
make uncompiled org-mode
Now open a Cygwin terminal. Change directory to the location of the org-mode repo (in my case it’s ~/git/org-mode). Enter “make uncompiled”. See screen grab below:

Synchronising org files
Now you need a way to synchronise your org files in a way that will be common on both LINUX and Windows with the file paths being identical.
Some people use git to sync their org files, and that’s something I’d like to explore. But right now I am using ownCloud, which is a cloud storage tool. I use ownCloud because I run my own server and prefer to be in control of my own files, but you can use any cloud storage tool: Dropbox, Google Drive, One Drive, they all should work the same. If you’re looking to run cross-platform, like me, then your choice will be limited by the clients that are available on both platforms.
The important bit is setting a target path for the cloud storage client that can be repeated on both platforms. That means setting it up in your home folder.
I have my org files set up in the following path on both systems:
~/ownCloud/Documents/emacs/org
This way I am safe to refer to this path in my .emacs file. For example, I have some lines in my .emacs that tells org-mode to include all org files inside certain folders into the agenda view:

This works on both platforms because ~/ refers to my home folder on LINUX and to the Cygwin home on Windows. As long as the rest of the path is common on both systems, it’ll work.
When I am at work my org files are changed as I clock into and out of tasks, complete tasks, set new tasks, take notes, and so on. These changes are synchronised with my server using ownCloud, and then the ownCloud client on my LINUX side at home pulls down the changed files.
The Final Result
Here is a screen grab of my emacs installation. The theme and all configuration is common across LINUX and Windows using a single .emacs file.


These notes summarize some of my discoveries (re-)learning GNU Emacs. Since these are my personal notes, it may help to briefly describe my background. I used Emacs on Unix from somewhere around 1990 until 1995. Then in 1995 I began using Windows as my primary operating system and stopped using Emacs. In 2010 I decided to give Emacs on Windows another try. I may not mention some basic things just because I remember them from my initial experience.
These notes are not a thorough introduction to Emacs. For a more systematic reference, the Emacs Wiki is a good place to start. I wanted to write these things down for future reference, and I put this file up on my website in case someone else finds it useful. If you have comments or corrections, please let me know.
Table of contents
- Installation and configuration
- Installing Emacs and setting up .emacs
- Backup files
- Recycle bin
- Integration with the Windows File Explorer
- Getting rid of the start-up screen and toolbar
- Changing fonts
- Enabling commands to change case
- Spell check
- Installing color-theme
- Installing nXhtml
- Installing powershell-mode
- Remapping my keyboard
- Line wrapping
- Column position
- Emacs vocabulary
- Editing LaTeX
- Editing source code
- Selecting and deleting text
- Searching and replacing
- Searching for strings
- Regular expressions
- Replacing
- Saving text and positions
- Saving text
- Saving positions
- The Emacs help system
- Navigating files, buffers, and windows
- Files
- Buffers
- Windows
- Miscellaneous commands
- Emacs resources
Installation and configuration
Installing Emacs and setting up .emacs
I install all my Unix-like software under C:bin and have that directory in my Windows PATH environment variable. I installed Emacs 23.1 in C:binemacs-23.1 and created an environment variable HOME set to C:bin. The significance of HOME is that Emacs can find your configuration file if you put it there. This file is called “dot emacs” because the traditional name for the file on Unix systems is .emacs. On Windows, it is more convenient to name the file _emacs. (You can also name the file _emacs.el. Giving the file the .el extension causes Emacs to open the file in Lisp mode. And if someday the file becomes huge, you can compile it to make startup faster.)
Backup files
Emacs automatically saves backup versions of file and by default leaves these backup files beside the files being edited. This can be annoying. Some people call these extra files “Emacs droppings.” Adding the following lines to .emacs instructs Emacs to put all backup files in a temporary folder.
(setq backup-directory-alist
`((".*" . ,temporary-file-directory)))
(setq auto-save-file-name-transforms
`((".*" ,temporary-file-directory t)))
Recycle Bin
The following line configures Emacs so that files deleted via Emacs are moved to the Recycle.
(setq delete-by-moving-to-trash t)
More details here.
Integration with the Windows File Explorer
The following registry script creates an “Open with Emacs” option in the Windows file explorer context menu.
Windows Registry Editor Version 5.00

[HKEY_CLASSES_ROOT*ShellOpen In EmacsCommand]
@=""C:\bin\Emacs-23.1\bin\emacsclientw.exe" -a "C:\bin\Emacs-23.1\bin\runemacs.exe" "%1""
See also this blog post for how to open a file in a running instance of Emacs rather than starting a new instance for each file.Putting these two lines in .emacs creates a menu item File -> Open recent.
(require 'recentf)
(recentf-mode 1)
If you have a desktop shortcut to runemacs, you can open a file in Emacs by dropping it on the shortcut icon.
Getting rid of the start-up screen and toolbar
I turned off initial start-up screen by adding (setq inhibit-startup-screen t) to .emacs. This had the pleasant side effect of making the “Open with Emacs” context menu work as expected. (Before, Emacs would open with a split window. Now it opens with just the “sent” file.)
Got rid of the toolbar by using the configuration editor under Options / Customize Emacs.
Changing fonts
I used the Options menu to change the default font to Consolas.
Enabling commands to change case
The commands for converting the text in a region to upper or lower case are disabled by default. (The GNU Emacs manual says beginners find these commands confusing and so you have turn them on. That seems very strange. Many other Emacs commands are more confusing.) The following turns the commands on.
(put 'upcase-region 'disabled nil)
(put 'downcase-region 'disabled nil)
Once this is enabled, you can make the text in a region lowercase with C-x C-l or uppercase with C-x C-u.
Spell check
GNU Emacs does not provide a spell checker. Instead, it provides hooks to install your own spell checker, usually Aspell. I downloaded Aspell version 0.50.3 (win32) from here. I then installed the English dictionary from the same page. The dictionary installer warned me that Aspell was already installed and suggested that I uninstall it. I did, thinking that it might install a newer version. That didn’ work. I re-installed Aspell, then installed the dictionary, ignoring the warning. Everything worked fine.
After installing Aspell, I let Emacs know where to find it by adding these lines to my .emacs file.
(setq-default ispell-program-name "C:/bin/Aspell/bin/aspell.exe")
(setq text-mode-hook '(lambda() (flyspell-mode t) ))
The command M-x ispell will run the spell checker on your file. If flyspell-mode is turned on, as it is in the lines above, misspelled words are underlined in red as you type.
Installing color-theme
It was difficult to find a more direct way to configure the color schemes that Emacs uses, so I installed color-theme version 6.60. I then used color theme creator to create a basic theme then tweaked the colors.
Installing nXhtml
The default support for editing HTML files was less than I expected. I heard good things about nXhtml and decided to go with it. Notice that it inserts extra menus when you open a file in nXhtml mode. You can use the commands from the menu until you learn their keyboard shortcuts.
nXhtml mode requires HTML to be valid XHTML. If your HTML is not valid, you can use HTML Tidy to bring it into standard compliance. HTML Tidy appears as a menu option under nXhtml, but it must be installed separately. Installing HTML Tidy is very simple: download two files, the executable and a DLL, and copy them to somewhere in your path. Once HTML Tidy is installed, it will continually check the validity of the XHTML. It will display its status in the mode line and will turn angle brackets red that are not in the correct place.
Incidentally, the table of contents for this page was automatically generated using nXhtml. Just give every <h> tag an id. Then you can use commands from the nXhtml menu to insert the table of contents and its style sheet.
NB: Apparently the nXhtml code does not allow a space on either side of the equal sign when specifying the id value.
Installing powershell-mode
I installed a mode for editing PowerShell code by copying powershell-mode.el, downloaded from here, by copying the file to C:binemacs-23.1site-lisp, which is in my Emacs load-path. I tried installing some code that would allow me to run PowerShell as a shell inside Emacs. That did not work on the first try and I did not pursue it further.
Remapping my keyboard
Many Emacs users recommend remapping your keyboard so that the caps lock key becomes a control key. I don’t like the idea of changing my keyboard just to accommodate one program, even a program I may use very often. However, I recently bought a laptop that came with a Fn key right where my muscle memory expects the left control key. I hardly ever use the caps lock key, so I made it a control key for the sake of Emacs and for making it easier to use my laptop. I mapped the scroll lock key, a key I have not used in a decade or two, to caps lock in case I ever need a caps lock key. My initial intention was to keep the original left control key as an addition control key, but then I disabled it to force myself to get into the habit of using my new control key. I mapped the keyboard of every computer I use to be the same. This has been hard to get used to.
I don’t know what I want to do for my “Meta” key. For now I’m using the Esc key. Some recommend using the original Control key after remapping the Caps Lock key. I have two problems with that: it will not work on my laptop, and I first have to break my habit of using the original Control key as a Control key. (Why not just remap the Fn key on my laptop? Unfortunately this key cannot be remapped like an ordinary key.) I may try to get in the habit of using the right Alt key as my Meta key.
Line wrapping
I set global-visual-line-mode as the default way to handle line wrap. I did this through the menu sequence Options / Customize Emacs / Specific Option. This causes text to flow as it does in most Windows programs.
Column position
By default, Emacs displays the current line number in the mode line but not the current column number. To display the column number, add the following to your .emacs file.
(setq column-number-mode t)
Emacs vocabulary
Emacs uses a set of terminology that is not commonly used elsewhere. The following correspondences are not exact, but they are a good first approximation.
| Emacs terminology | Common terminology |
|---|---|
| fill | word wrap |
| yank | paste |
| kill | cut |
| kill ring | clipboard |
| mode line | status bar |
| point | cursor |
| font lock | syntax coloring |
The “echo area” is the very bottom of an Emacs window. It echoes commands, displays the minibuffer, and provides a place to type extra arguments for commands.
Editing LaTeX
One of the most useful key sequences for editing LaTeX files are C-c C-o to insert a begin and end pair. Emacs will prompt you for the keyword to put inside the begin{} statement. Another useful key sequence is C-c C-f to run latex on a file. (Emacs can detect whether a file is plain TeX or LaTeX. I use LaTeX exclusively.)
There is Emacs package AUCTex for editing (La)TeX files, but I have not tried it.
I would like to have C-c C-f run pdflatex rather than latex, but I have not found out how to configure that.
Editing source code
Here are a few useful commands for editing source code files.
| Command | Explanation |
|---|---|
| C-M-a | Go to beginning of a function definition |
| C-M-e | Go to end of a function definition |
| C-M-h | Put a region around a function definition |
| C-j | Insert a newline and properly indent the next line |
I put these lines in my .emacs file to make the C++ mode behave more like what I am accustomed to.
(add-hook 'c++-mode-hook
  '(lambda ()
     (c-set-style "stroustrup")
     (setq indent-tabs-mode nil)))
Selecting and deleting text
C-x h selects the entire current buffer.
You select a region by using C-SPACE at one end of the region and a selection command and moving the point (cursor) to the other end of the region. Then you can use C-w to cut or M-y to copy. The paste command is C-y. Emacs maintains a “kill ring”, something analogous to the Windows clipboard but containing more than just the latest cut or copy. For example, C-y M-y. lets you paste the next-to-last thing that was cut. Use M-y again to paste the cut before that, etc.
You can kill all but one whitespace character with M-SPACE. You can kill all but one blank line with C-x C-o.
Emacs has commands for working with rectangular regions, analogous to vertical selection in some Windows programs. Specify a rectangular region by setting the mark at one corner and the point at the opposite corner. All commands for working with rectangular regions start with C-x r. Here are a few rectangular region commands.
| Command | Explanation |
|---|---|
C-x r k |
Kill the rectangle |
C-x r d |
Delete the rectangle |
C-x r c |
Clear the rectangle, i.e. fill the region with whitespace |
C-x r y |
Yank (paste) the rectangular region |
Searching and replacing
Searching for strings
Use C-s for forward incremental search, C-r for backward incremental search. Type another C-s or C-r to repeat the search. Type RET to exit search mode.
Regular expressions
C-M-s and C-M-r are the regular expression counterparts of C-s and C-r.
Emacs regular expressions must escape the vertical bar | and parentheses. For example, the Perl regular expression (a|b) becomes (a|b) in Emacs.
Emacs regular expressions do not support lookaround.
The whitespace patterns s and S in Perl are written as s- and S- in Emacs. There is no equivalent of Perl’s d except to use the range [0-9].
Replacing
Use M-x replace-string and M-x replace-regex for replacing text. There are also interactive counterparts M-x query-replace and M-x query-replace-regex.
Saving text and positions
Saving text
You can save a region of text to a named register for later pasting. Register names can be any single character. The command to save to a register a is C-x r s a. The command to insert the contents of register a is C-x r i a .
Saving positions
Bookmarks are named positions in a buffer. The command to create a bookmark is C-x r m bookmark_name. The command to go to a bookmark is C-x r b bookmark_name.
The Emacs help system
All help commands start with C-h. If you don’t know a more specific location to go to, you can start by typing C-h C-h to get to the top of a navigation system for help.
C-h m is very useful. It displays all active modes and describes key bindings.
C-h k tells what command is bound to a key and gives documentation on how it is used. C-h w is a sort of opposite: given a command, it sells what keys are bound to that command.
Navigating files, buffers, and windows
Files
The command to open a file is C-x C-f. The command for ‘save as” is C-x C-w.
Emacs has a sort of File Explorer named Dired. You can open Dired with the command C-x d. You can move up and down in the Dired buffer by using p and n just as you can use C-p and C-n in any other buffer. You can still use the control key, but you do not have to.
Here are a few of the most important Dired commands.
| Dired command | Action |
|---|---|
| RET | Visit selected file (or directory) |
| C | Copy |
| D | Delete immediately |
| d | Mark for deletion. Use x to carry out deletions. |
| R | Rename a file |
| ! | Specify a shell command to carry out on a file |
Adding the following two lines to your .emacs file will create an Open Recent submenu under the File menu.
(require 'recentf)
(recentf-mode 1)
Buffers
The command C-x b takes you to your previous buffer.
The command C-x C-b creates a new window with a list of open buffers. You can navigate this list much as you would the Dired buffer.
You can type the letter o to open the file on the current line in another window. You can type the number 1 to open the file as the only window.
The command M-x kill-some-buffers lets you go through your open buffers and select which ones to kill.
Windows
The command C-x 1 closes all windows except the current one.
C-x 2 splits the current window horizontally, one buffer on top of the other.
C-x 3 splits the current window vertically, one beside the other.
C-x o cycles through windows.
Miscellaneous commands
| Command | Explanation |
|---|---|
M-g g |
Go to line number |
M-= |
Report line and character count of region |
M-/ |
Autocomplete based on text in current buffer |
C-x C-e |
Evaluate the Lisp expression to the left of the cursor |
M-x eval-region |
Evaluate the selected region as Lisp code |
M-x shell |
Run a shell inside Emacs |
M-! |
Run a single shell command |
M-x sort-lines |
Sort the lines in a region |
M-x desktop-save |
Save an Emacs session |
C-t |
Transpose characters |
M-t |
Transpose words, works across punctuation and tags |
Emacs resources
One program to rule them all
Emacs cursor movement
Emacs and Unicode
Emacs kill (cut) commands
Real Programmers (xkcd cartoon)
10 Specific Ways to Improve Your Productivity With Emacs from Steve Yegge
Emacs-WSL
This guide shows you how to run Emacs with the Windows Subsystem for Linux WSL
(Version 1 and 2) on Windows 10 using Ubuntu 20.04 LTS as Linux distribution and
VcXsrv as X server to run Emacs in a graphical display.

Contents
- Preparation
- Enable WSL 1 or WSL 2
- Install Ubuntu 20.04
- Install Emacs 28.1
- Run Emacs in Terminal
- Run Emacs in a Graphical Display
- Optional Additions
- FAQ
- Troubleshooting
Preparation
Clone this repository with Git or download it to any place on your machine to be
able use the batch scripts (recommended) later on.
Enable WSL 1 or WSL 2
Open PowerShell as Administrator and run:
dism.exe /online /enable-feature /featurename:Microsoft-Windows-Subsystem-Linux /all /norestart
For WSL 2 (see requirements) you have to enable another feature:
dism.exe /online /enable-feature /featurename:VirtualMachinePlatform /all /norestart
Restart the computer.
Download and install the Linux kernel update package.
If you want to use WSL 2 you should set it as default before intstalling
Ubuntu:
wsl --set-default-version 2
If you are not able to install WSL with this instructions go have a look at the
official Microsoft docs (site) on how to install WSL.
Install Ubuntu 20.04
To install Ubuntu 20.04 open PowerShell and run:
Use PowerShell Version 5 which is the preinstalled Version else the Appx module
might not be available and you will get an error when running this command.
curl.exe -L -o ubuntu-2004.appx https://aka.ms/wslubuntu2004
Add-AppxPackage .ubuntu-2004.appx
After installation open Start (WIN) and launch the
Ubuntu 20.04 LTS terminal. After a short while you will be prompted to enter a
username and a password. This user will be your default user for the
distribution and is considered the Linux administrator with the ability to run
sudo commands.
Make sure everything is up to date:
sudo apt update && sudo apt upgrade -y
If you already have been using another Linux distribution you might want to
set Ubuntu 20.04 as default. Open PowerShell and run:
wsl --set-default Ubuntu-20.04
Install Emacs 28.1
To install Emacs 28.1 in Ubuntu 20.04 follow those steps:
- Install all dependencies (taken from the snap):
sudo apt update
sudo apt install -y autoconf automake bsd-mailx dbus-x11 debhelper dpkg-dev
    gcc-10 libacl1-dev libasound2-dev libdbus-1-dev libgccjit-10-dev libgif-dev
    libgnutls28-dev libgpm-dev libgtk-3-dev libjansson-dev libjpeg-dev
    liblcms2-dev liblockfile-dev libm17n-dev libncurses5-dev liboss4-salsa2
    libotf-dev libpng-dev librsvg2-dev libselinux1-dev libsystemd-dev libtiff-dev
    libxi-dev libxml2-dev libxpm-dev libxt-dev procps quilt sharutils texinfo
    zlib1g-dev gvfs language-pack-en-base libasound2 libaspell15 libasyncns0
    libatk-bridge2.0-0 libatk1.0-0 libatspi2.0-0 libbrotli1 libc6 libc6-dev
    libcairo-gobject2 libcairo2 libcanberra-gtk3-0 libcanberra-gtk3-module
    libcanberra0 libcroco3 libdatrie1 libdb5.3 libdrm2 libegl1 libenchant1c2a
    libepoxy0 libflac8 libfontconfig1 libfreetype6 libgbm1 libgccjit0 libgcc-s1
    libgdk-pixbuf2.0-0 libgif7 libgl1 libglvnd0 libglx0 libgpm2 libgraphite2-3
    libgstreamer-gl1.0-0 libgstreamer-plugins-base1.0-0 libgstreamer1.0-0
    libgtk-3-0 libgudev-1.0-0 libharfbuzz-icu0 libharfbuzz0b libhyphen0 libice6
    libicu66 libisl22 libjansson4 libjbig0 libjpeg-turbo8 liblcms2-2 liblockfile1
    libltdl7 libm17n-0 libmpc3 libmpfr6 libnotify4 libnss-mdns libnss-myhostname
    libnss-systemd libogg0 liborc-0.4-0 libotf0 libpango-1.0-0 libpangocairo-1.0-0
    libpangoft2-1.0-0 libpixman-1-0 libpng16-16 libpulse0 librsvg2-2 libsasl2-2
    libsecret-1-0 libsm6 libsndfile1 libsoup2.4-1 libssl1.1 libstdc++6 libtdb1
    libthai0 libtiff5 libvorbis0a libvorbisenc2 libvorbisfile3 libwayland-client0
    libwayland-cursor0 libwayland-egl1 libwayland-server0 libwebp6 libwebpdemux2
    libwoff1 libx11-6 libx11-xcb1 libxau6 libxcb-render0 libxcb-shm0 libxcb1
    libxcomposite1 libxcursor1 libxdamage1 libxdmcp6 libxext6 libxfixes3 libxi6
    libxinerama1 libxkbcommon0 libxml2 libxpm4 libxrandr2 libxrender1 libxslt1.1
    libyajl2 libwebp-dev
There might be a dialog about the mail server configuration, just select
noto leave it as it is and confirm with OK (use TAB and RET to
configuration
get through this). - Download and extract Emacs:
cd ~
wget https://ftp.gnu.org/pub/gnu/emacs/emacs-28.1.tar.gz
tar -xzvf emacs-28.1.tar.gz
- Configure and install Emacs:
This Step will take a while and you might be prompted to enter your password
once. If you don’t want to usenative compilationjust remove the
compilation flag in the following instructions:cd ~/emacs-28.1 export CC="gcc-10" CXX="gcc-10" ./configure --with-json --with-native-compilation --with-xwidgets make sudo make install rm ~/emacs-28.1.tar.gz
Keep the directory where Emacs was cloned to be able to reinstall (if a step
fails), to reconfigure or to uninstall it.
To try out if Emacs is working just run it directly in the terminal with emacs.
-nw
Update to a new Emacs version
To update to a new Emacs version uninstall the current one by going to the
folder you used for the installation (for instance ~/emacs-28.1) and run sudo.
make uninstall
Then install the new version.
Use latest Snapshot
To use the latest snapshot you can clone the git repository. Just replace step 2
from above with:
cd ~
git clone git://git.sv.gnu.org/emacs.git
Then in step 3 make sure to cd ~/emacs instead. You can also add the
--with-pgtk (pure GTK) compilation flag.
Run Emacs in Terminal
Run Emacs with emacs -nw in Ubuntu terminal.
Run Emacs in a Graphical Display
If you have Windows 11 you want to use WSLg to run Emacs in a graphical display
instead of installing an X-Server and VcXsrv. This makes the rest of this
section obsolete.
If you are on Windows 10 you need to install an X-Server and then run Emacs
using it.
Install Windows X-Server VcXsrv
An X-server lets you access a Linux application or desktop environment’s graphic
user interface (GUI). This guide is using VcXsrv (free, open source, GPLv3).
Installation
Download VcXsrv from https://sourceforge.net/projects/vcxsrv/ and install it.
Check out the next section about the firewall configuration before launching
it (app is called XLaunch) for a first time to add the firewall rules.
Windows Defender Firewall Configuration
The first time you launch VcXsrv you are notified that Windows Defender Firewall
has blocked some features.

You have to allow VcXsrv to communicate on:
WSL 1Private networksWSL 2Private and public networks.
After allowing access the following inbound rules are added:
WSl 1

WSL 2

If you missed this step or are not sure what you’ve chosen or if you are
switching from WSL 1 to WSL 2 you can retrigger this dialog by deleting the
inbound rules (admin rights needed) and restart VcXsrv. The inbound rules shown
above can be found at WIN Windows Defender Firewall
> Advanced Settings (or WIN-r wf.msc RET).
WSL 2 Additional Firewall Configuration
To make VcXsrv work with WSL 2 you have to disable access control. Disabling the
user access control with the -ac flag has some security issues:
-ac disables host-based access control mechanisms. Enables access by any host,
and permits any host to modify the access control list. Use with extreme
caution. This option exists primarily for running test suites remotely.
Therefore we want to restrict the access as much as possible. Unfortunately you
can’t modify the firewall rules if you have no admin rights. In that case you
have to live with the security issue (not sure how severe it is).
If you have admin rights you can add an inbound firewall rule to restrict
access as much as possible. As the IP used by WSL 2 is dynamic a powershell
script is provided later on to create/update the rule.
If you want to use the additional firewall rule make sure that you disable
the existing inbound rules:
- Go to the inbound rule settings with WIN Windows
Defender Firewall > Advanced Settings (or WIN-r wf.msc
RET). - Search for VcXsrv entries (there should be two) and disable all found.
Run Emacs in Graphical Display Using VcXsrv
To run Emacs in a graphical display you have to:
WSL 2 only, optionalCreated/update the inbound firewall rule (admin rights needed)- Run VcXsrv
- Run Emacs
For convenience there are batch scripts (double-clickable) to (you can copy
the run-emacs folder for WSL 1 or WSL 2 to wherever you want):
WSL 1- Run VcXsrv and Emacs ./run-emacs-wsl-1/wsl-1_0-run-all.bat
- Run VcXsrv ./run-emacs-wsl-1/wsl-1_1-vcxsrv.bat
- Run Emacs ./run-emacs-wsl-1/wsl-1_2-emacs.bat
WSL 2- Run all (Firewall rule, VcXsrv and Emacs) ./run-emacs-wsl-2/wsl-2_0-run-all.bat
- Run Firewall rule and VcXsrv ./run-emacs-wsl-2/wsl-2_1-firewall-rule-vcxsrv.bat
- Run Firewall rule (admin rights needed). ./run-emacs-wsl-2/wsl-2_2-firewall-rule.bat
- Run VcXsrv ./run-emacs-wsl-2/wsl-2_3-vcxsrv.bat
- Run Emacs ./run-emacs-wsl-2/wsl-2_4-emacs.bat
WSL 2 only Create/update the Inbound Firewall Rule
As described in WSL 2 Additional Firewall Configuration we want to restrict the
access by adding a firewall rule. Make sure you have disabled the existing
VcXsrv firewall rules.
To create or update the inbound firewall rule you can use the batch script
./run-emacs-wsl-2/wsl-2_2-firewall-rule.bat. If VcXsrv was running before the firewall
rule was updated it has to be restarted.
Run VcXsrv
To run VcXsrv use the batch script provided or run the following commands in cmd
(if you haven’t used the default installation path you have to adapt the
script/command):
WSL 1./run-emacs-wsl-1/wsl-1_1-vcxsrv.batstart "" "C:Program FilesVcXsrvvcxsrv.exe" :0 -multiwindow -clipboard -wgl
WSL 2./run-emacs-wsl-2/wsl-2_3-vcxsrv.batstart "" "C:Program FilesVcXsrvvcxsrv.exe" :0 -multiwindow -clipboard -wgl -ac
If you are using the additional firewall rule make sure to create/update the
rule before launching VcXsrv.
If VcXsrv is already running it will show an error message. In that case stop
VcXsrv if needed and run the script again.
Run Emacs
To run Emacs you can launch Ubuntu terminal and run the following commands or
use the batch script:
WSL 1./run-emacs-wsl-1/wsl-1_2-emacs.batexport DISPLAY=:0.0 export LIBGL_ALWAYS_INDIRECT=1 setsid emacs
WSL 2./run-emacs-wsl-2/wsl-2_4-emacs.batexport DISPLAY=$(ip route | awk '/^default/{print $3; exit}'):0.0 export LIBGL_ALWAYS_INDIRECT=1 setsid emacs
You can add the lines without setsid emacs to ~/.bashrc and then just use
setsid emacs to launch Emacs in the background. If you do so VcXsrv has to
be running before launching the terminal else this will give an error when
starting the terminal and in that case slow the startup down.
To not have to type this over and over add an alias in ~/.bashrc and then
run Emacs with ema (needs a restart):
WSL 1alias ema=" export DISPLAY=:0.0 export LIBGL_ALWAYS_INDIRECT=1 setsid emacs "
WSL 2alias ema=" export DISPLAY=$(ip route | awk '/^default/{print $3; exit}'):0.0 export LIBGL_ALWAYS_INDIRECT=1 setsid emacs "
Optional Additions
Preserve X11 Connections to Hyper-V
The network connection between Windows and WSL2 breaks when your machine goes
into standby or hibernate. Graphical Emacs & other GUI apps will terminate.
Should you want to preserve your GUI Emacs sessions between sleep, there are
three options:
- Use X2Go — virtual X11 server with Windows client
This is the most preferred option
a) Fix SSH host keys
sudo apt-get remove --purge openssh-server
sudo apt-get install openssh-server
sudo service ssh --full-restart
b) Install X2Go on your Linux distribution
c) Download and install the client for Windows.
d) Configure the
Host: localhost
Login: <your user>
Session type: Published Applicationse) After each WSL/Windows restart
Launch ssh in Linux (if not started yet): sudo service ssh start
Launch “X2Go Client” on Windows ad connect to the server with user/password
Now you can launch X11 apps via the tray icon (see X2Go Published Applications)Source: Development Environment in WSL2
- Forward X11 unix socket from WSL2 via WSL1 to X410/Vcxsrv/etc. running on Windows
Using Emacs on Windows with WSL2 | Emacs Redux
microsoft/WSL#4619 {WSL 2} WSL 2 cannot access windows service via localhost:… - WSL Daemon — Stable X11 connection for WSL2
GitHub — nbdd0121/wsld: WSL Daemon — Stable X11 connection and time synchroni…
Use Windows Terminal
Install Windows Terminal from Microsoft from the Microsoft Store.
The Windows Terminal is a modern, fast, efficient, powerful, and productive
terminal application for users of command-line tools and shells like Command
Prompt, PowerShell, and WSL.
To make it open WSL by default:
- Open the Windows Terminal.
- Open the settings by clicking on the dropdown button in the tab bar and then
select settings (bound to Ctrl-,). - Copy the GUID for WSL (example: {12345678-1234-1234-1234-1234567890AB}).
- Set the default profile to the one copied from WSL:
{
    ...
    "defaultProfile": "{12345678-1234-1234-1234-1234567890AB}",
    ...
To change the default path to ~:
- Go to the settings (Ctrl-,).
- Add a line in the WSL part at the end (make sure to also add the ~,~ on the
previous line):{ ... "source": "Windows.Terminal.Wsl", "startingDirectory": "//wsl$/Ubuntu-20.04/home/<username>/" },
Change keyboard layout
If you want to change the keyboard layout used make sure x11-xkb-utils is
installed (sudo apt install x11-xkb-utils) and add for instance
to ~/.bashrc or to the alias to use the US keyboard layout. Or add it to
the scripts used to run Emacs (... && setxkbmap -layout us && setsid).
emacs
Generate SSH Key
Generate a new ED25519 SSH key pair:
ssh-keygen -t ed25519 -C "email@example.com"
A dialog will ask you to:
- input a file path: use the suggested path by pressing
Enter - enter a password: enter your password
To copy the generated ssh key into the clipboard use:
clip.exe < ~/.ssh/id_ed25519.pub
Use en_US Language
Bash on Ubuntu on Windows starts on the language defined in your Country or
Region settings (maybe this got changed, not 100 % sure). If you want to change
the default language to en_US you may need to run the following commands:
sudo apt install -y language-pack-en language-pack-en-base manpages
sudo locale-gen en_US.UTF-8
sudo update-locale LANG=en_US.UTF8
Mount Network Drives Automatically
To do so the fstab file needs to be configured.
For instance to mount H: add this to “/etc/fstab” (the directory has to exist to
make this work, so in this case sudo mkdir /mnt/h is needed beforehand):
H: /mnt/h drvfs defaults 0 0
From now on that network drive is automatically mounted.
Zsh and oh-my-zsh
If you want to use zsh and oh-my-zsh:
sudo apt install zsh
chsh -s $(which zsh)
sh -c "$(curl -fsSL https://raw.githubusercontent.com/robbyrussell/oh-my-zsh/master/tools/install.sh)"
Restart WSL.
In some scripts you need to change bash to zsh to be able to use it when
emulating a terminal in Emacs.
FAQ
Where is the root folder located?
The root is accessible as \wsl$ in file explorer followed by the
distribution. You can show the current distribution name by running wsl -l -q
in cmd.
How to access Linux files from Windows?
Run explorer.exe . in WSL to open the Windows File Explorer at the current
location. The path will start with \wsl$ unless it is a mounted drive. In the
File Explorer the files and folders can be copied, moved and edited as usual
(see this blog post).
How start WSL from File Explorer in the current folder?
To start WSL from Windows File Explorer just type wsl into the location input
box or hold down Shift while right-clicking and select Open Linux shell here
from the context menu. If it’s a network drive it has to be mounted else this
will not work.

What ways are there to run WSL?
See https://docs.microsoft.com/en-us/windows/wsl/wsl-config#ways-to-run-wsl.
Troubleshooting
Check out the Microsoft docs:
- WSL troubleshooting installation
- WSL troubleshooting page
The GUI is not loading/showing at all
Check your firewall settings (see WSL 2 Additional Firewall Configuration).