Brief: This detailed tutorial shows you how to dual boot Fedora Linux with Windows 10, step-by-step, accompanied by proper screenshots.
Dual booting Linux and Windows is one of the popular ways to enjoy the full potential of the two operating systems. You have both Linux and Windows installed on the same system and you can choose which one to use after starting your system.
If you have a system with Windows installed already, you’ll learn how to install Fedora alongside Windows in this tutorial.
Installing Fedora alongside Windows

The tutorial has been performed on a system with Windows already installed, GPT partitioning and UEFI boot. It should be applicable to other systems with MBR partitioning and legacy BIOS system as well, but I cannot confirm that.
Note: If your Windows system uses BitLocker encryption, it will be a good idea to disable it first before you go on installing Fedora.
Requirements
Here’s what you’ll need to follow this tutorial:
- A system preinstalled with Windows
- Good speed internet connection
- A USB key (pen drive) with at least 4 GB in size
- Optional: External USB disk for making back up of your existing data on Windows.
- Optional: Windows recovery or bootable disk (if you encounter any major boot issues, you can fix with it).
Let’s see the steps.
Step 1: Make a backup of data on your Windows system [optional]
Backup is always a good idea. You will be dealing with the disk partitions. In the rare unfortunate case, if you make a mistake and delete the wrong partition, you’ll lose your data.
The simplest way would to be to copy the data in Documents, Videos, Music, Pictures and other folders to an external USB disk. You can use an external HDD (slower but cheaper) or SSD (faster but expensive) and copy the important files and folders on it.
[lasso box=”B08GTXVG9P” link_id=”20925″ ref=”sandisk-500gb-extreme-portable-ssd-up-to-1050mb-s-usb-c-usb-3-2-gen-2-external-solid-state-drive-sdssde61-500g-g25″ id=”101803″]
[lasso box=”B08JKFY8FH” link_id=”20926″ ref=”toshiba-canvio-advance-1tb-portable-external-hard-drive-usb-3-0-black-hdtca10xk3aa” id=”101806″]
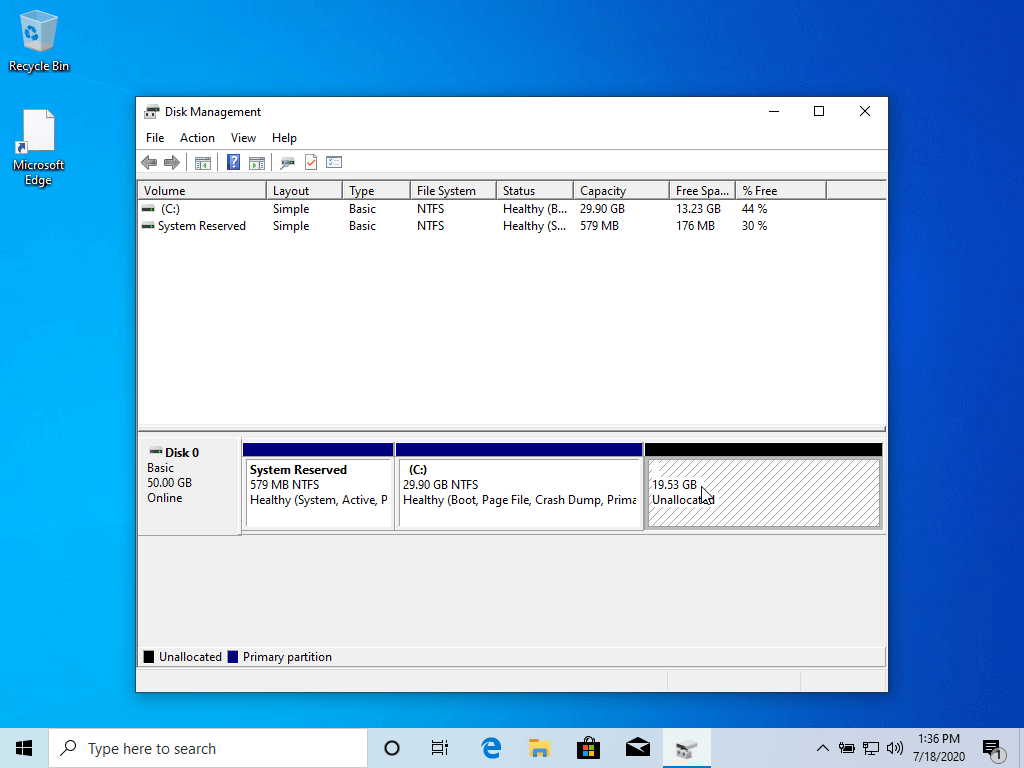
Step 2: Make some free space for Fedora installation
You need to create a partition where you’ll be installing Fedora. If you just have C drive, shrink it. If you have D, E or F drive, see if you can move their data to some other partition and delete or shrink one of them. Anything above 40 GB should be comfortable enough space for Fedora.
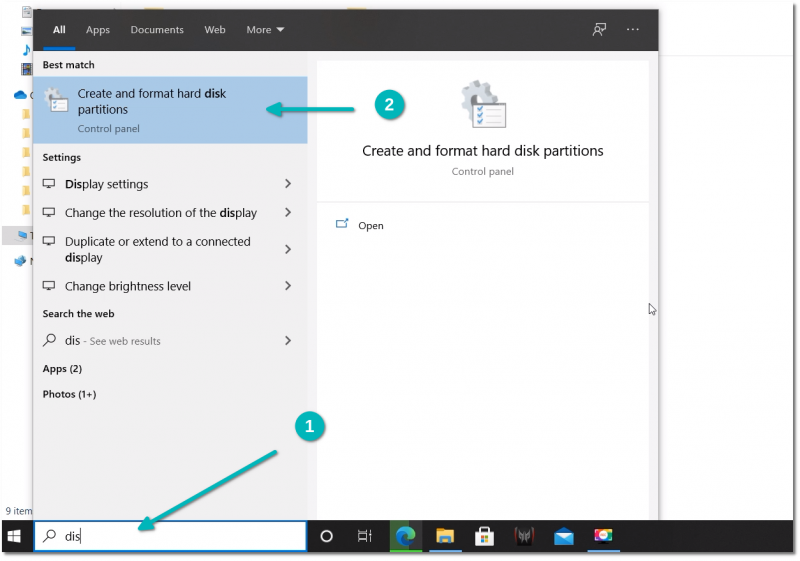
In the Windows menu, search for ‘disk partitions’ and go to ‘Create and format hard disk partitions’.
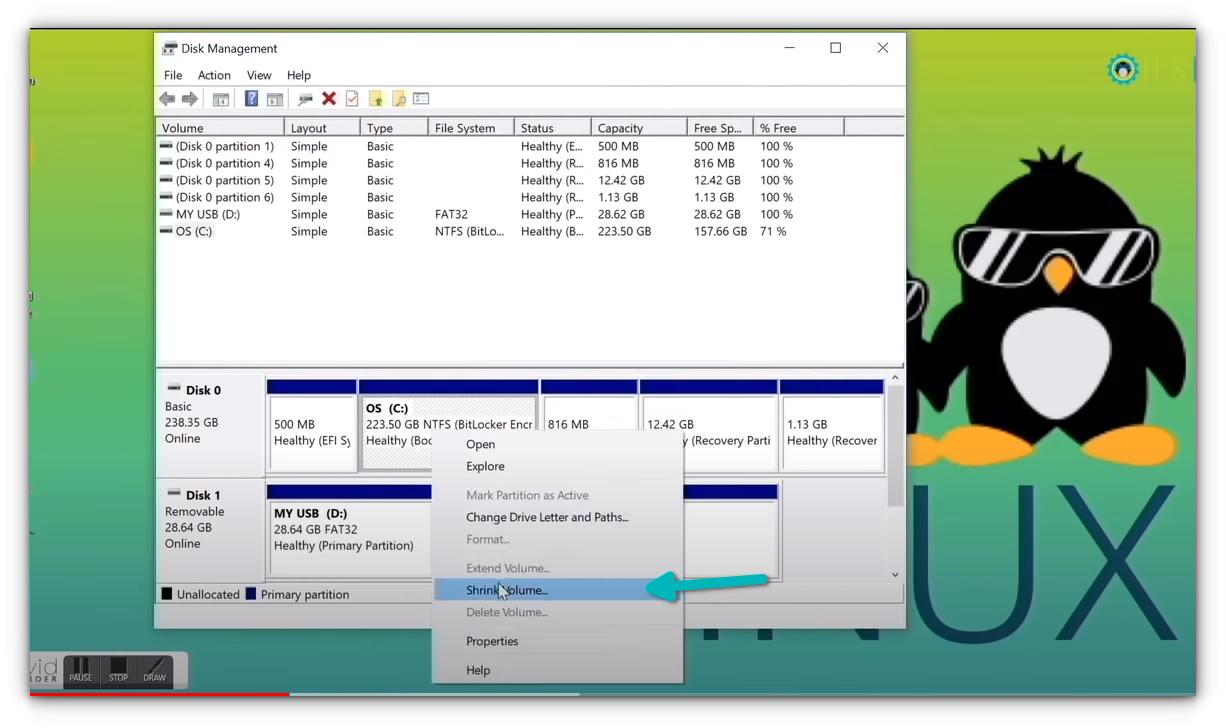
In the Disk Management tool, right-click on the drive which you want to partition and select shrink volume.
If you have just one partition like this, you need to make some free space out of it for Linux. If you have several partitions of considerable size, use any of them except C drive because it may erase the data.
Step 3: Making a live USB of Fedora in Windows
Now, this can be done in different ways. You can download the ISO and use Etcher or Rufus or some other tool to write the ISO image to the USB disk.
However, Fedora provides a dedicated tool for downloading and making live USB. I am going to use that in this tutorial. The Fedora team put some effort in creating this tool, so why not use it.
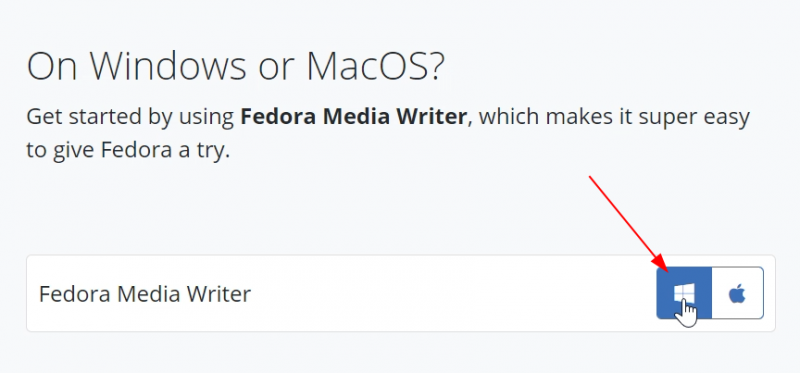
But first, plug in the USB key. Now, go to the download page of Fedora:
You’ll see the option to download the Fedora Media Writer tool for Windows.
It will download an exe file. Once downloaded, go to your downloads folder and double-click the FedoraMediaWriter exe file to install the Fedora Media Writer tool. Just keep on hitting next.
Once installed, run the Fedora Media Writer tool. But before that, make sure that you have plugged in the USB.
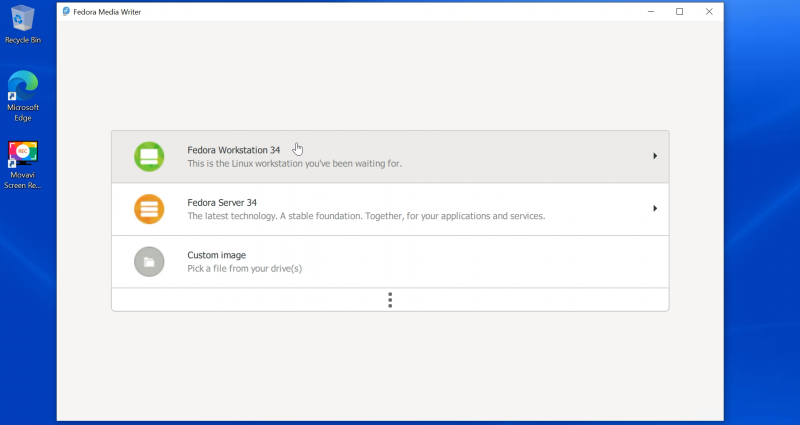
It will give you the option to install various editions of Fedora. For desktops, go with Workstation.
On the next screen, you’ll get the option to create live USB. When you hit that button, it starts downloading the ISO. It will also recognize your inserted USB key.
You need to have a good speed internet connection to download the 2 GB of ISO in a comfortable time span.
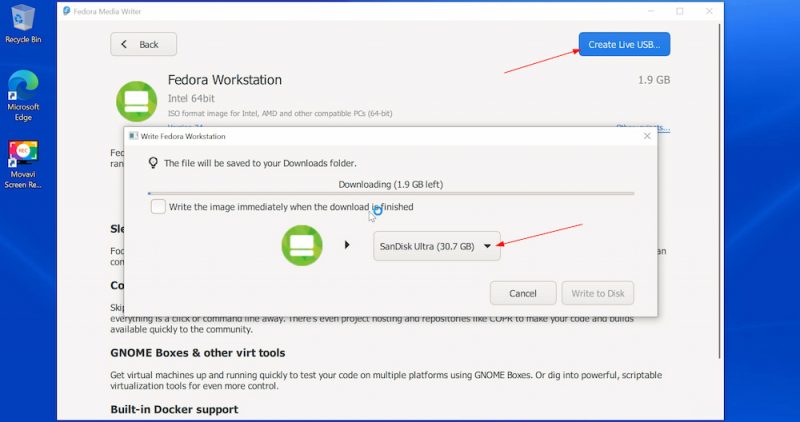
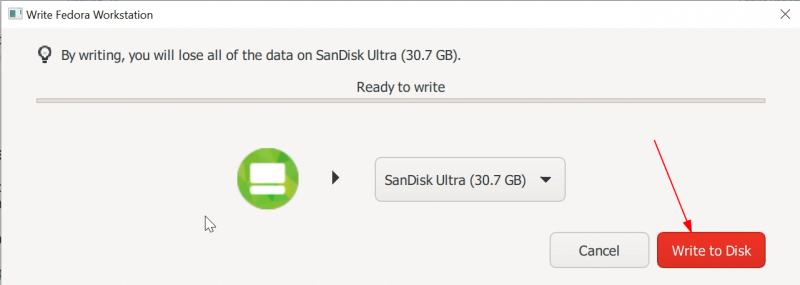
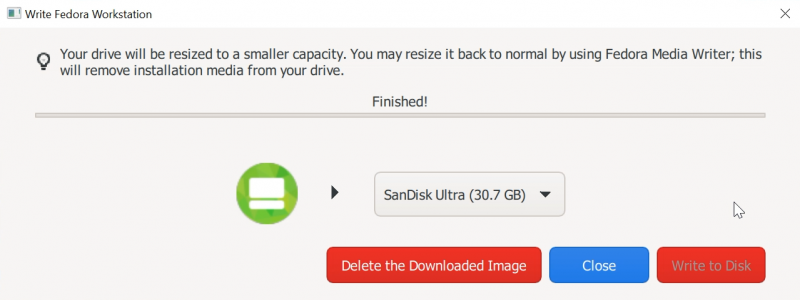
After downloading the ISO, it checks the download automatically and then gives you the option to write the ISO image to the USB disk, i.e. create the live USB. Hit the “Write to Disk” button.
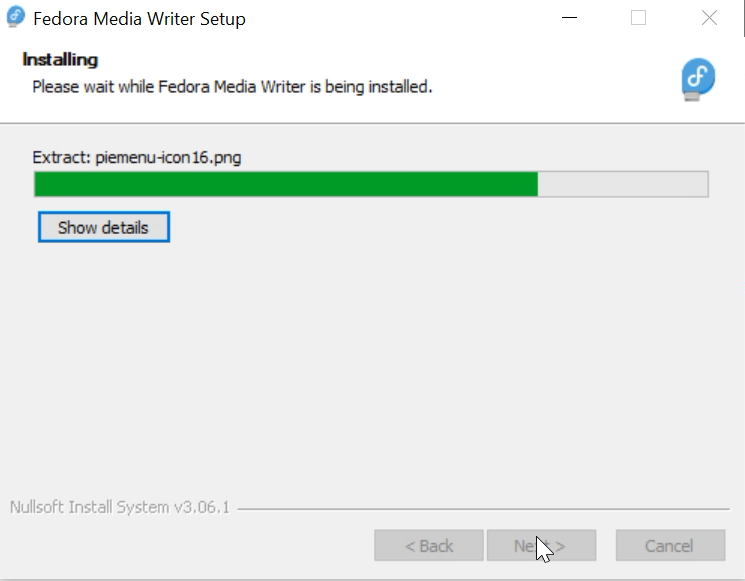
It will take a couple of minutes to complete the process. It displays “Finished” message and you can close the Fedora Media Writer tool now.
Good! So now you have the Fedora live USB ready with you. Time to use it for installing Fedora with Windows.
Step 4: Boot from live USB and install Fedora
Some systems do not allow you to boot from live USB with secure boot. If that’s the case with you, please disable secure boot.
At the screen that shows the logo of your system manufacturer, press the F2 or F10 or F12 key. You may try pressing all of them one by one if you are not sure of the key. But be quick when you do that otherwise it will boot into the operating system.
This key is different for different brand of computers. Some may even use Esc or Del keys for this purpose.
In some rare cases, you may have to access the UEFI boot settings from within Windows.
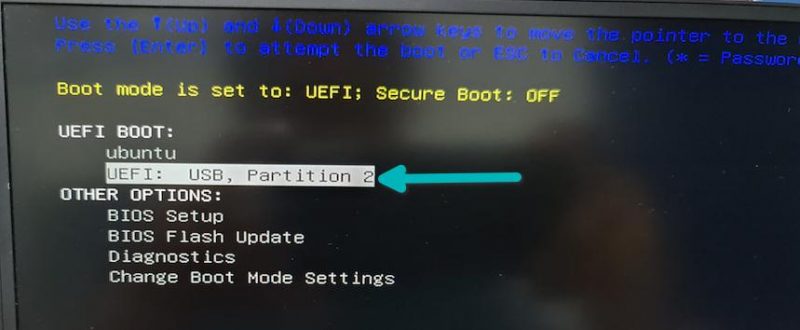
In the BIOS settings, normally, you should see a screen like this. Here, you use the arrow keys to move down to USB option and press enter to boot from the USB. Please note that the screen may look different in different systems.
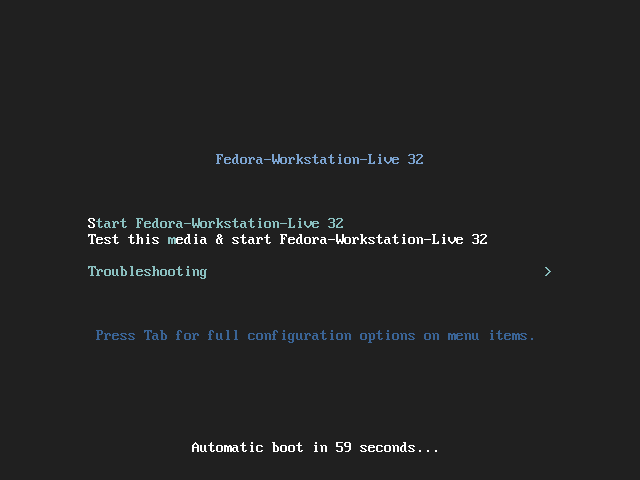
If things go right, you should see a screen like below. Go with the first option “Start Fedora Workstation”:

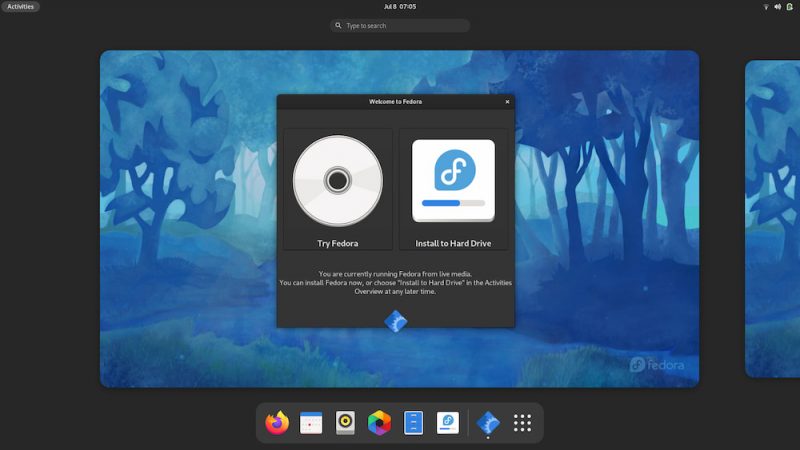
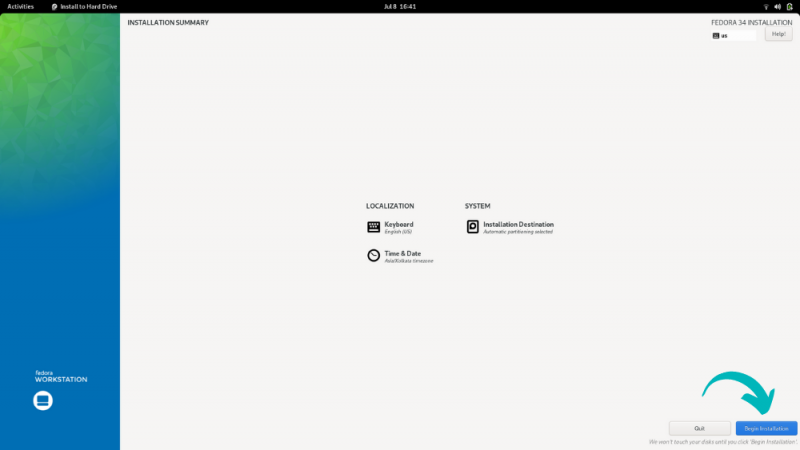
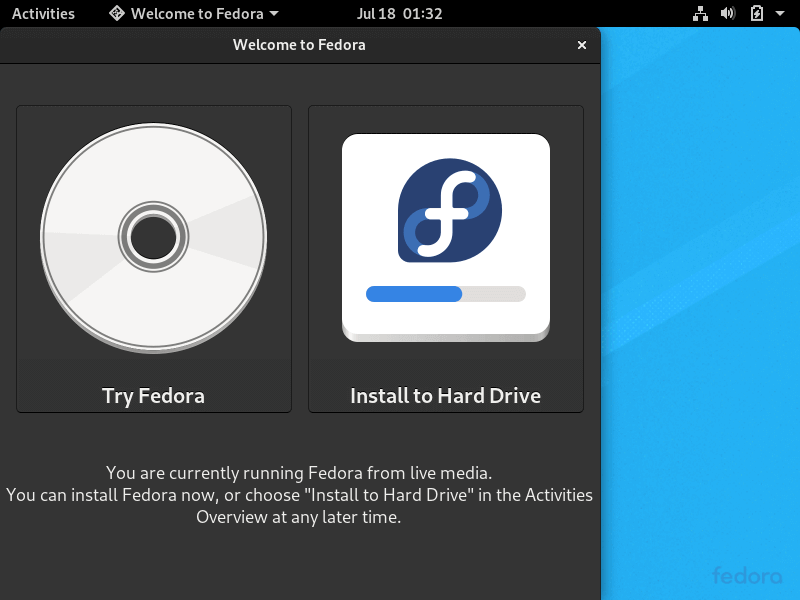
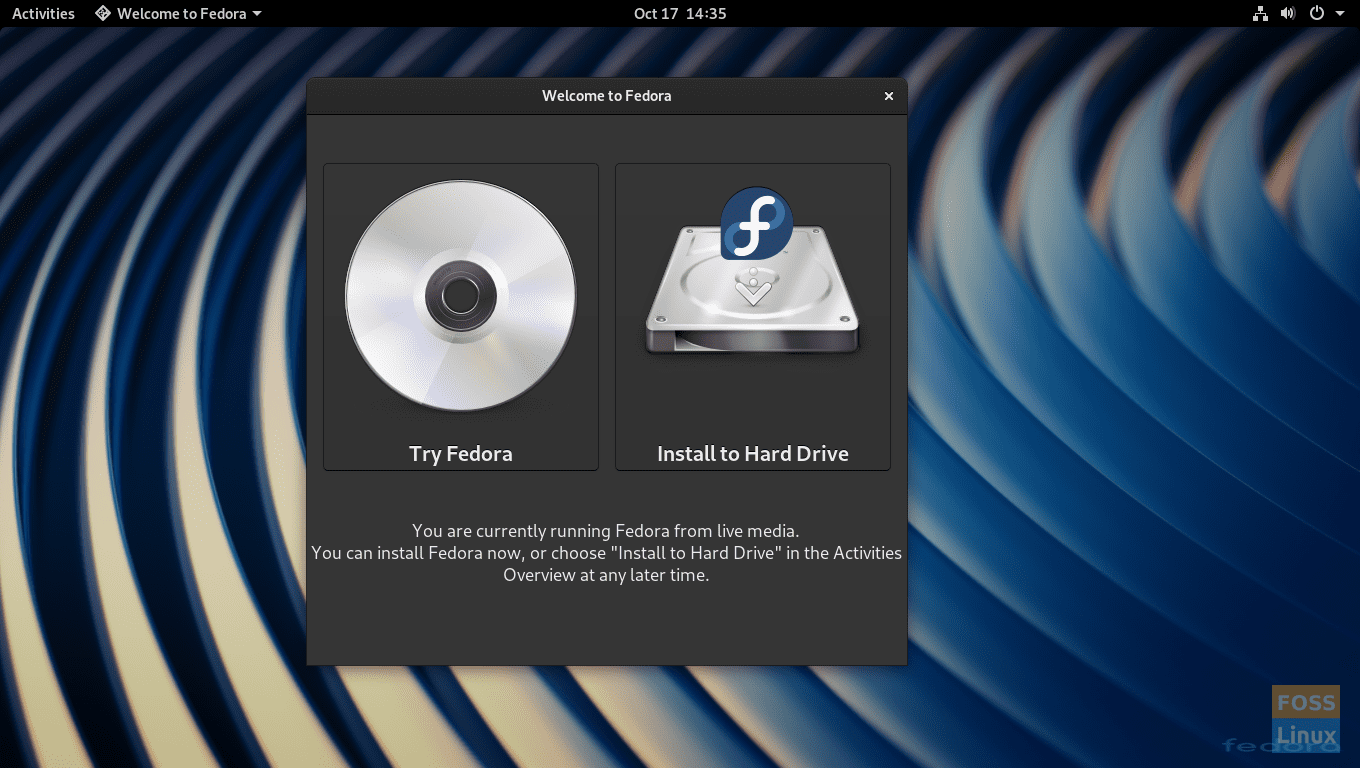
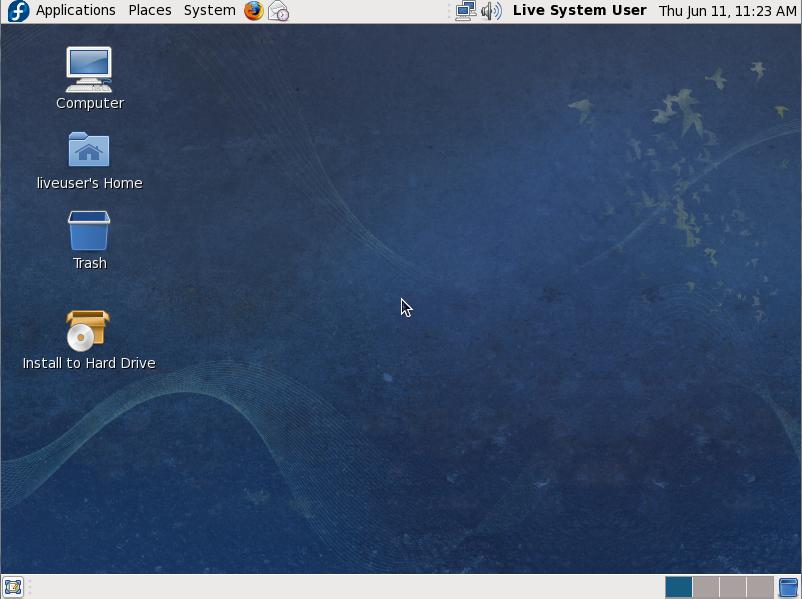
After some seconds, you should boot into the live Fedora session and see the option to try or install it. Go with “Install to Hard Drive”.
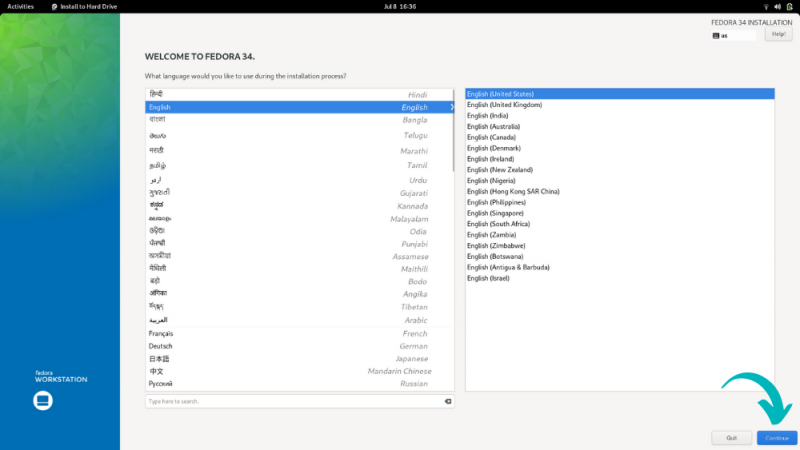
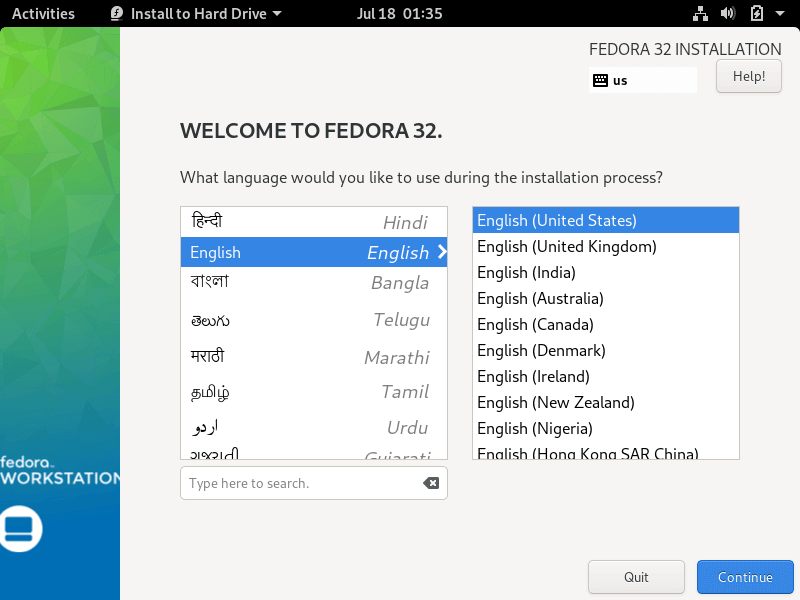
It will ask to choose the language of choice for the installation process.
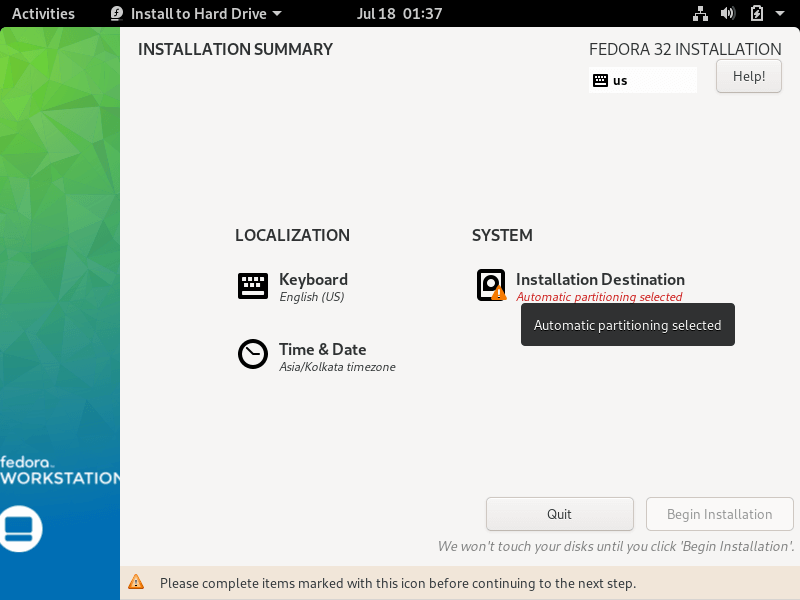
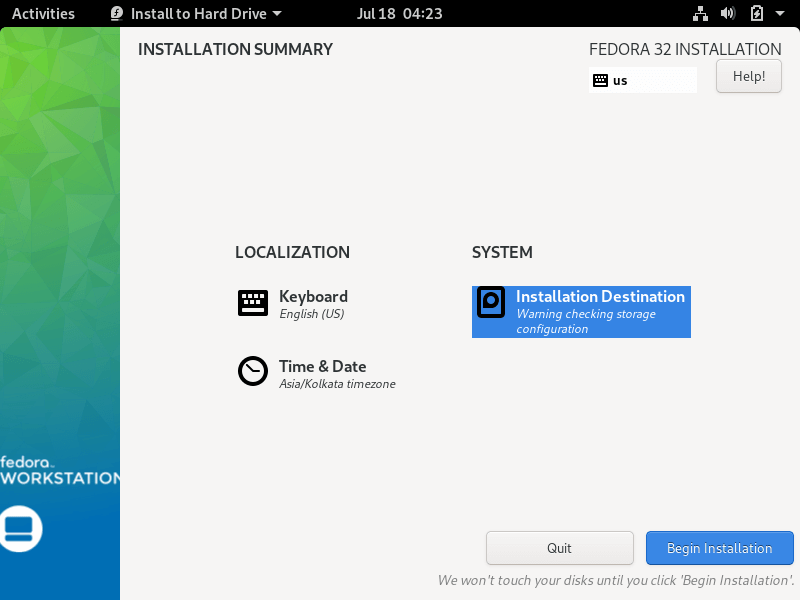
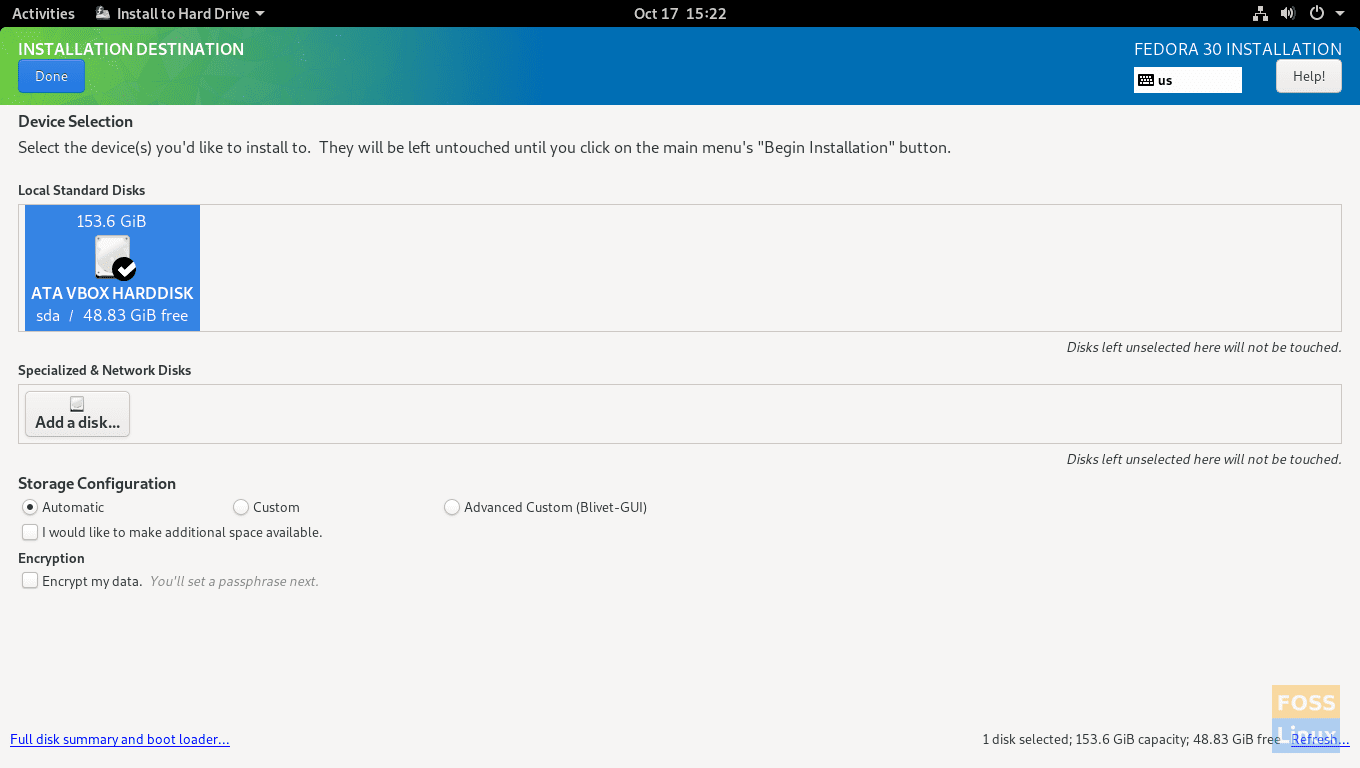
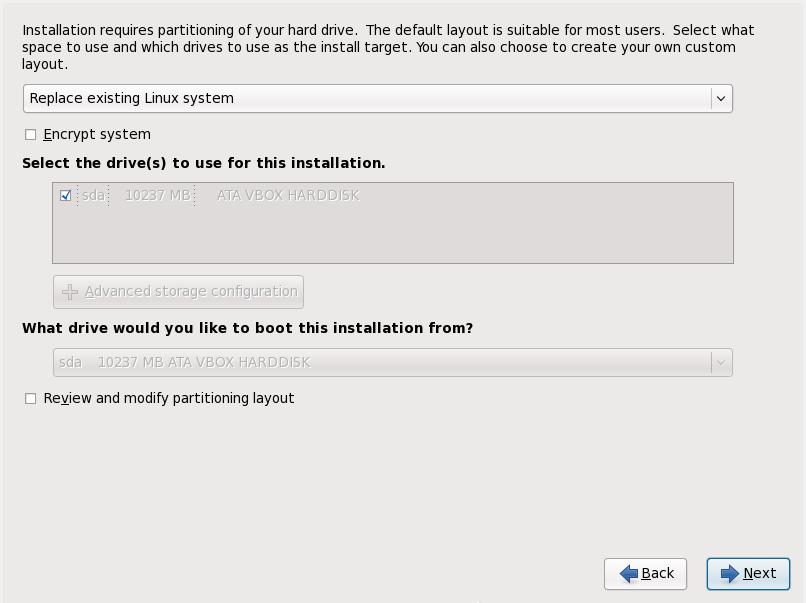
The next screen is important. If you had created the free space in the step 2, you should be able to hit on the “Begin Installation”. If you see an exclamation mark on the disk icon under System, click on it and see what kind of disk configuration you can use here.
If you have more than one disk, you can choose which disk to use for Fedora.
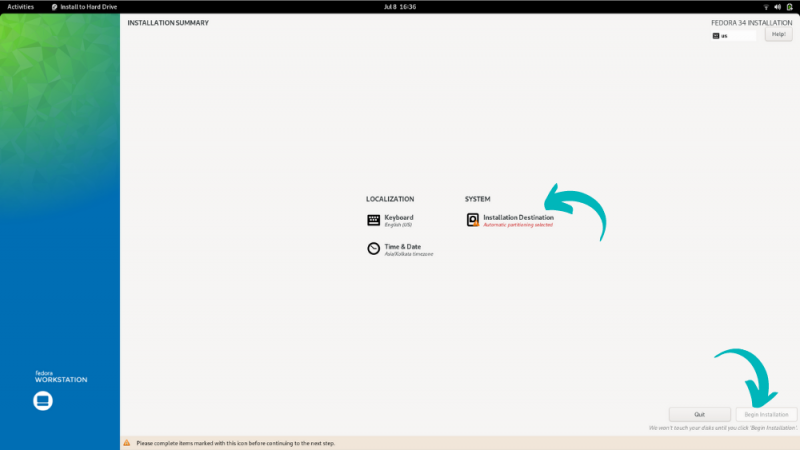
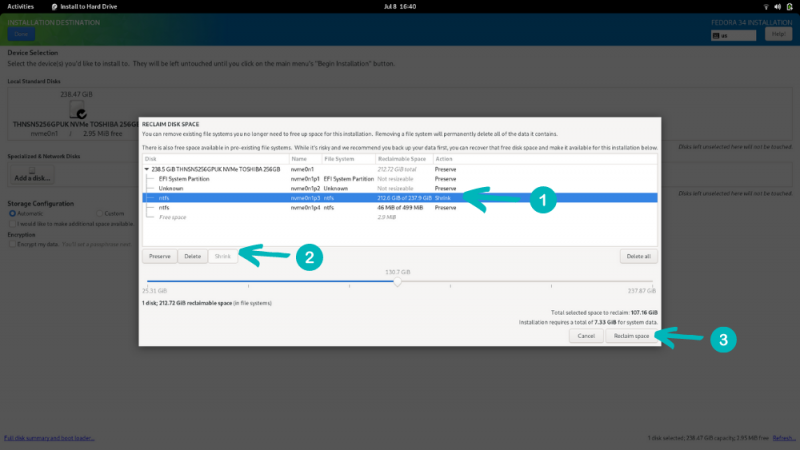
Select the disk and click on Done. You may see a warning message now. In my case, I did not create free space in the step 2 and hence it complained that there is not enough free space to install Fedora.
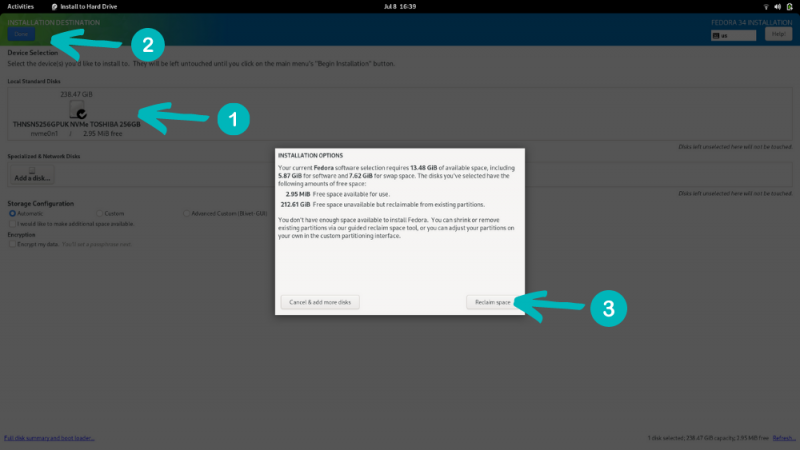
I clicked on reclaim space and shrank the Windows partition here.
After this, the “Begin Installation” option appeared to start the installation.
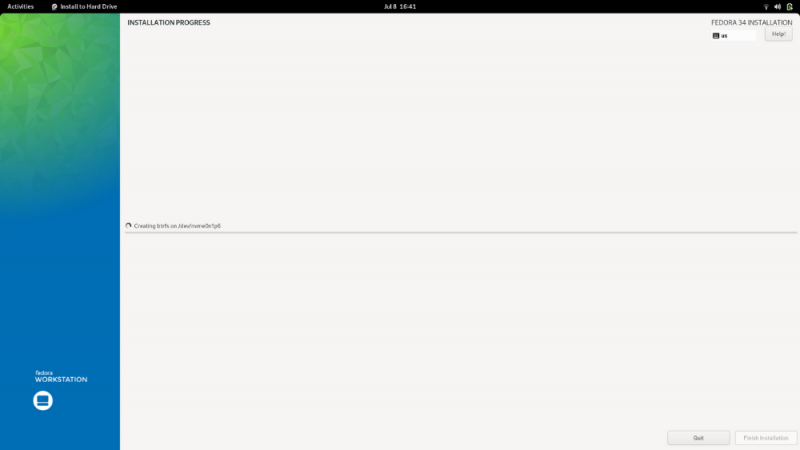
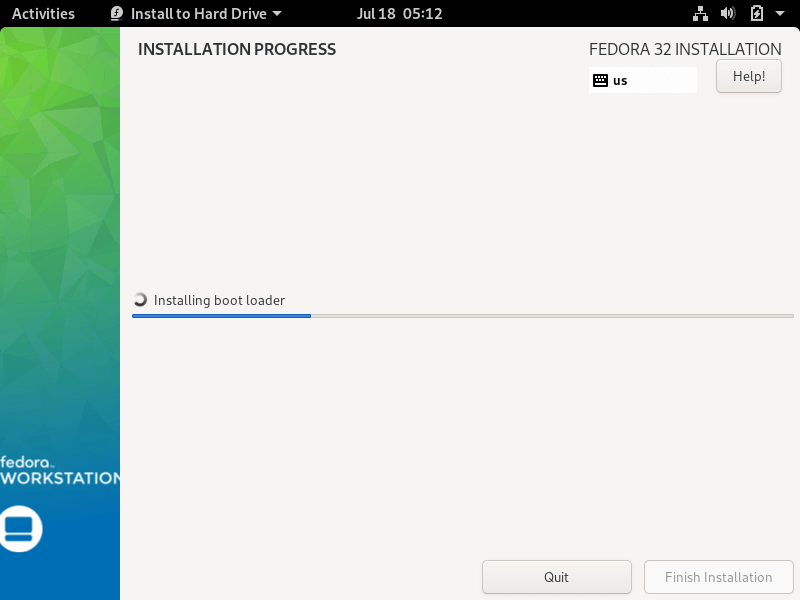
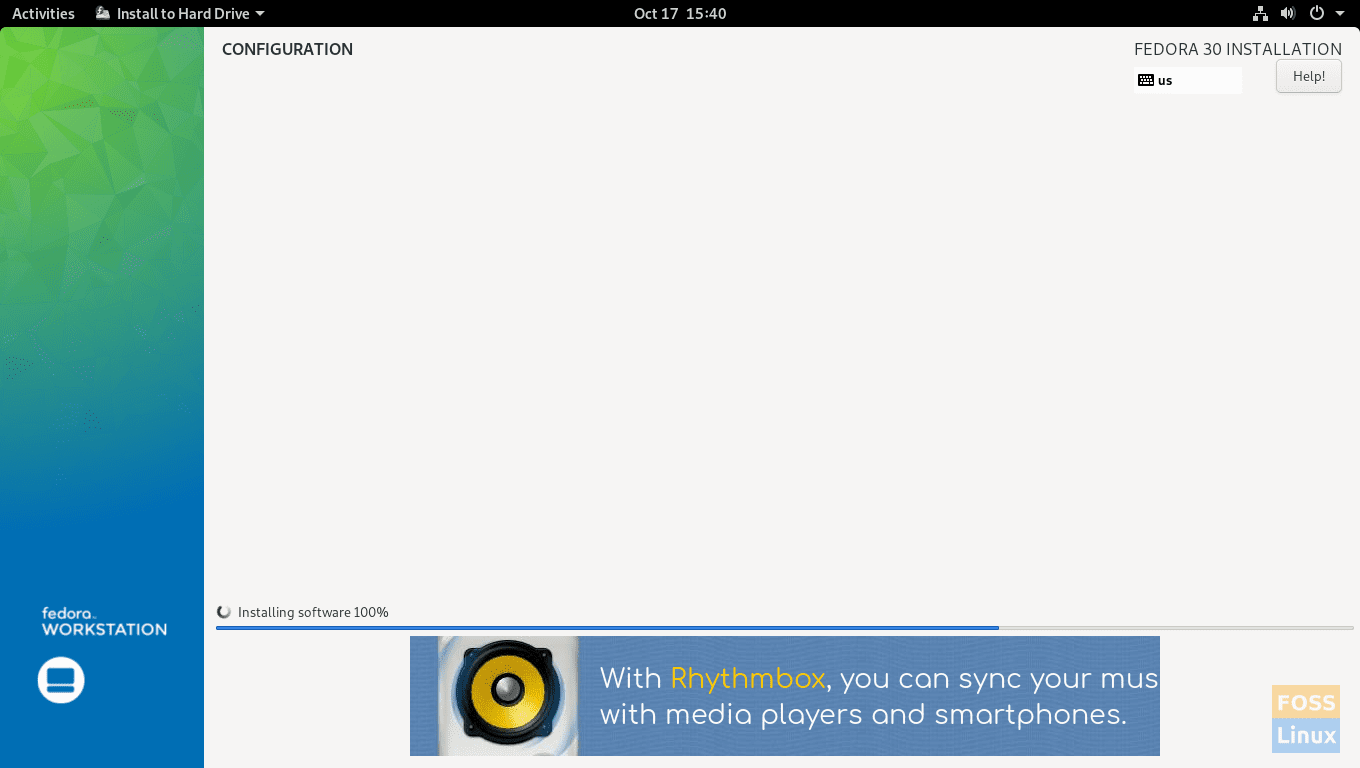
Now it’s just a waiting game. It will take a few minutes to extract files and install them.
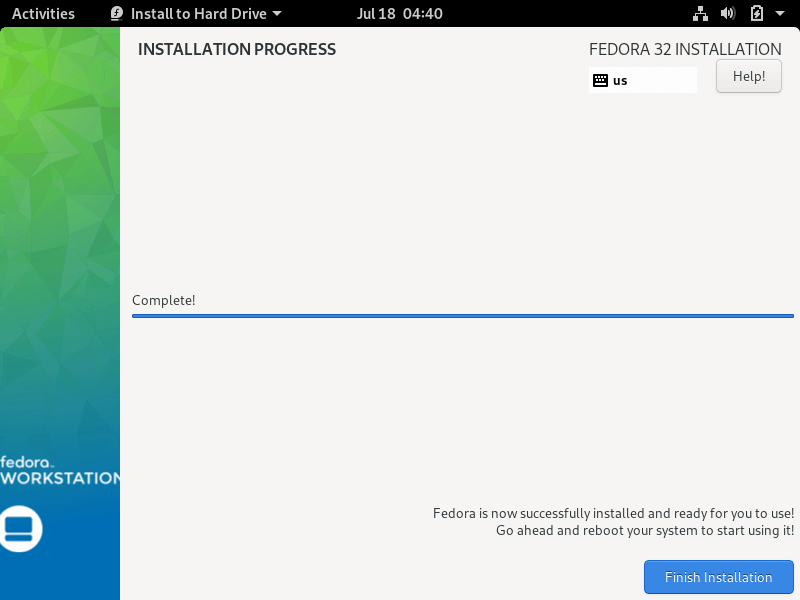
When the process completes, you’ll see the “Finish Installation” button. Hit it.
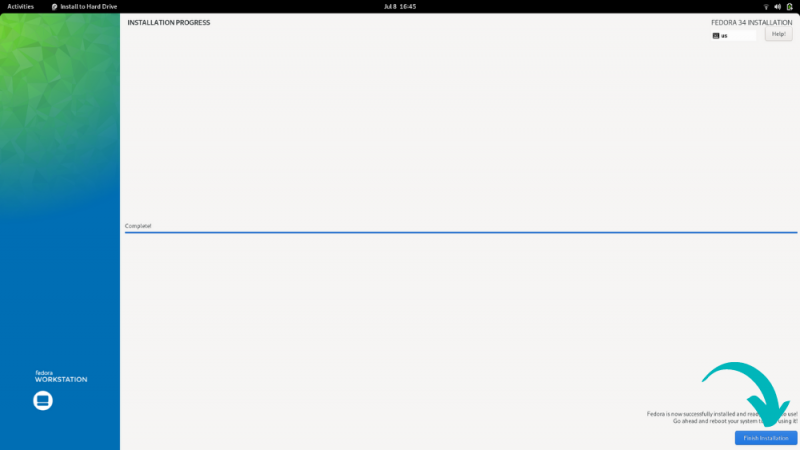
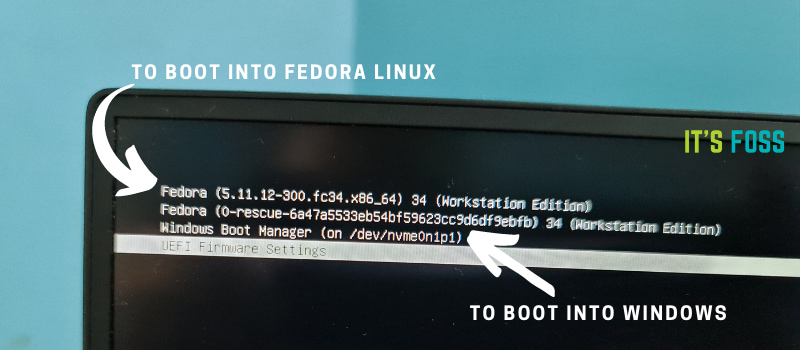
You’ll be back to Fedora live session. Click the top right corner to bring down the menu and select Restart.

When the system starts now, you should see the Grub bootloader screen with option to boot into Fedora and Windows.
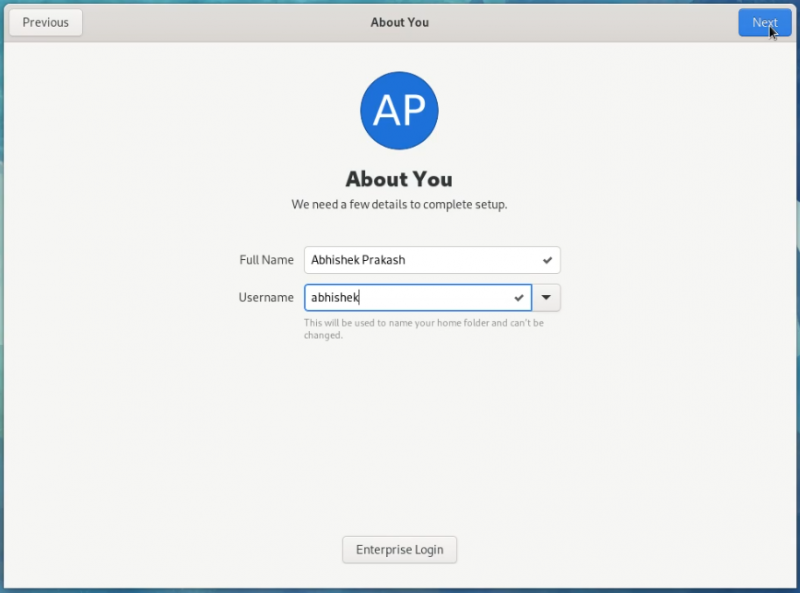
Step 5: Complete Fedora setup
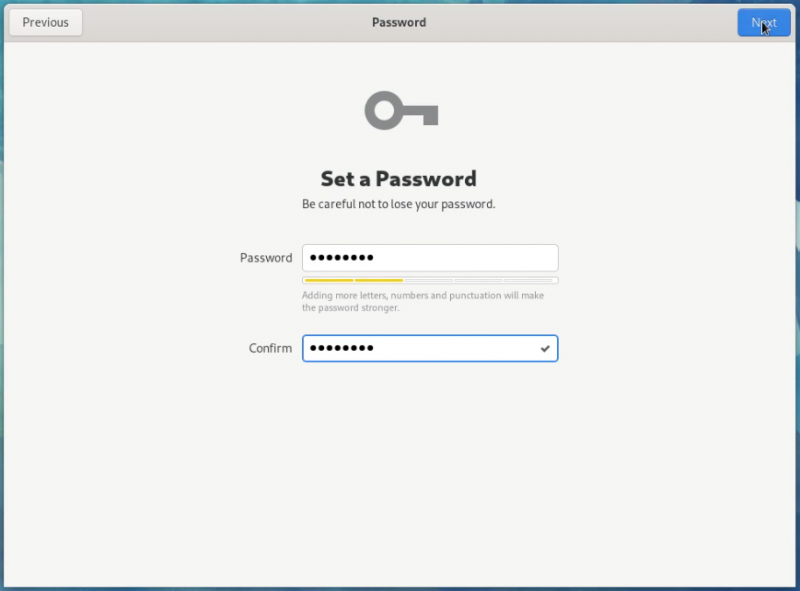
You are almost there. Did you notice that Fedora didn’t ask you to enter username and password? Many distributions like Ubuntu ask you to create an admin user during the installation itself. On the other hand, Fedora gives you this option when you log in to the installed system for the first time.
When you first log in, it runs a setup and creation of user and password is part of this initial setup.
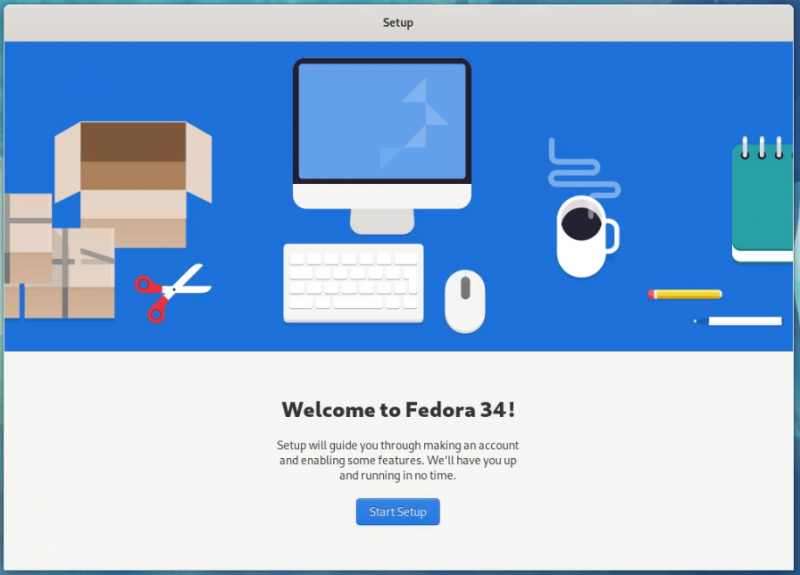
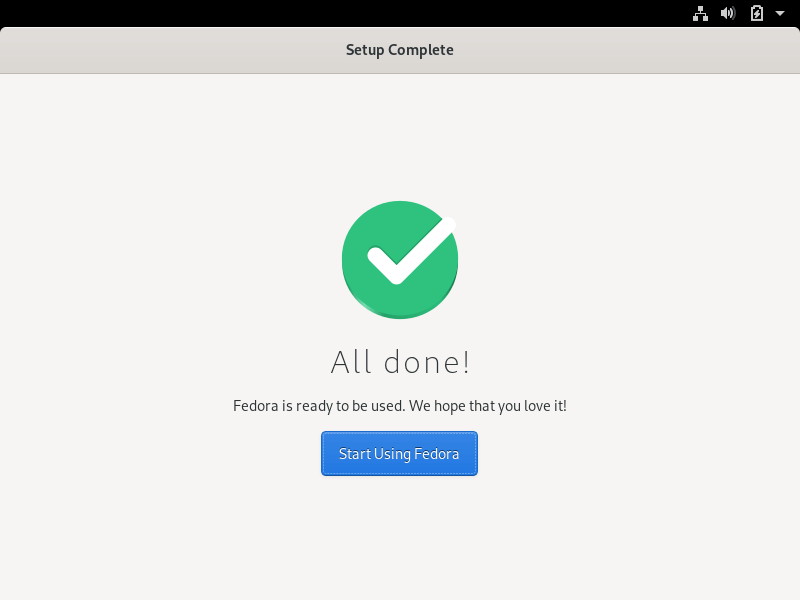
Once you do that, you are ready to enjoy Fedora Linux.
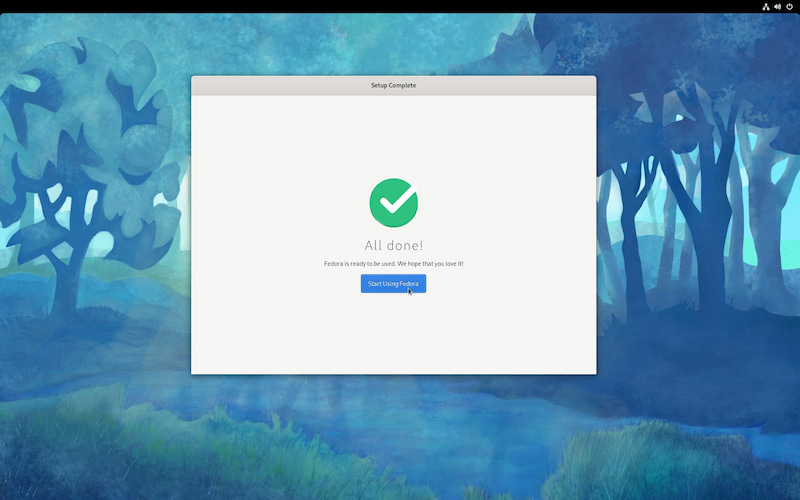
That’s it. You can enjoy Fedora Linux and Windows in dual boot mode on the same system.
If you have any questions or if you are facing any issues while following this tutorial, please let me know in the comment system.
This tutorial will guide you on how to install Fedora 32 Workstation in dual boot with Microsoft Windows 10 Operating System pre-installed on a BIOS firmware machine.
If your computer has no pre-installed operating system and you plan to install Fedora Linux in dual-boot with a Microsoft operating system, you should first install Windows on your machine before installing Fedora Linux.
However, try to disable Fast Boot and Secure Boot options in UEFI firmware based machines if you plan to install Fedora in dual boot with Windows.
Also, if Windows installation was performed in UEFI mode (not in Legacy Mode or CSM – Compatibility Support Module), Fedora installation should also be performed in UEFI mode.
The installation procedure of Fedora Linux alongside a Microsoft Windows 10 OS requires no special configurations to be made in BIOS-based motherboards, except maybe changing the BIOS boot order.
The only requirement is, you must allocate a free space on the disk with at least 20 GB in size in order to use it later as a partition for Fedora installation.
Requirements
- Download Fedora 32 Workstation ISO Image
Preparing Windows Machine for Dual-Boot for Fedora
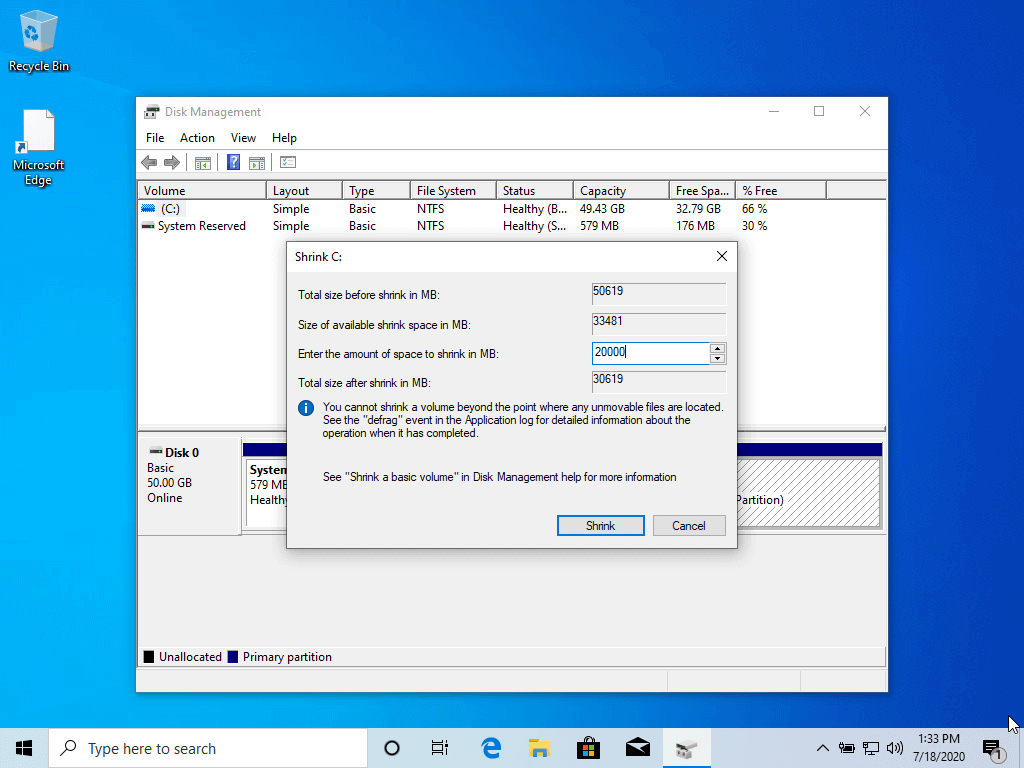
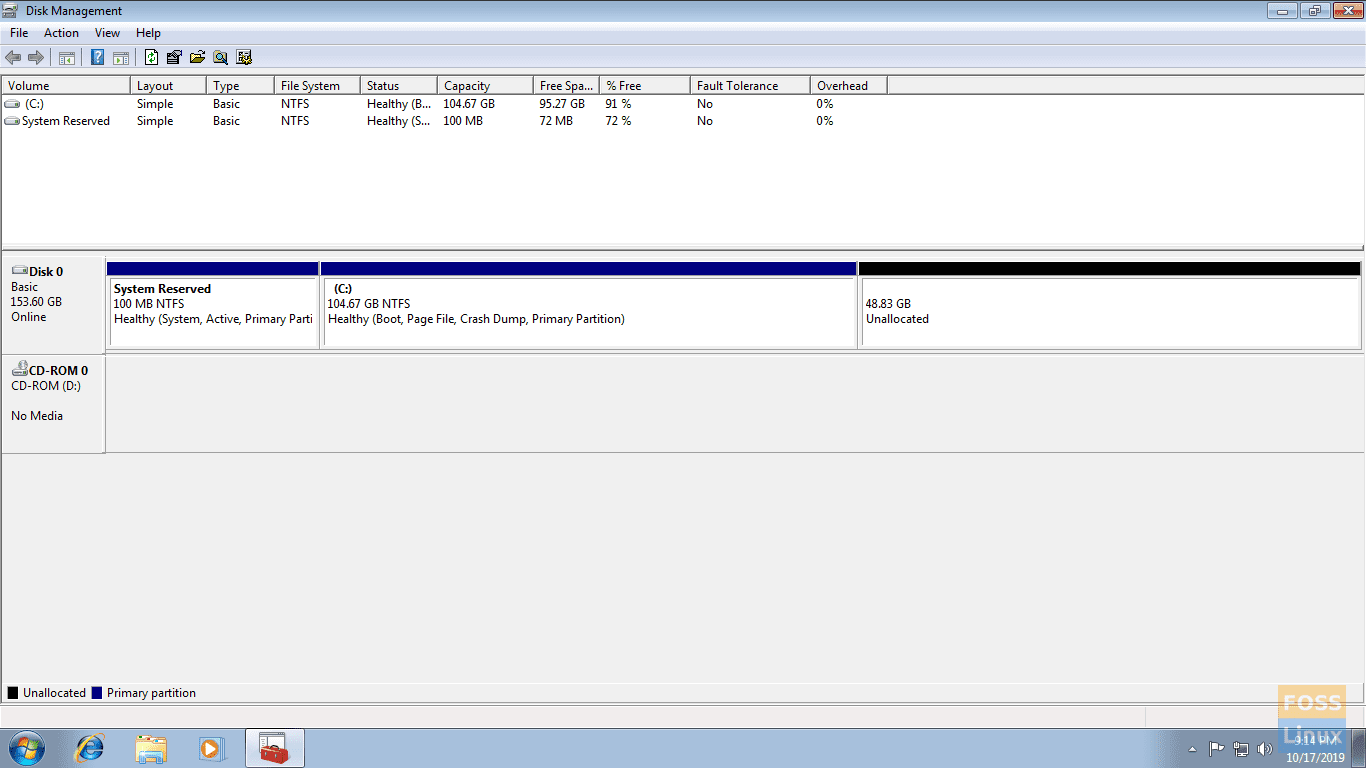
Open your windows Disk Management utility and right-click on C: partition and select Shrink Volume in order to resize the partition for Fedora installation.
Give at least 20000 MB (20GB) depending on the size of C: partition and hit Shrink to start partition resize as shown below.
After resizing partition, you will see a new unallocated space on the hard drive. Leave it as default and reboot the system in order to proceed with the Fedora installation.
Install Fedora 32 with Windows Dual-Boot
1. On the first step, download the Fedora DVD ISO image and burn it to a DVD disk or create a bootable USB flash drive using the Fedora Media Writer tool or other utility.
To create a bootable Fedora USB drive compatible with installation performed in UEFI mode, use Rufus utility or Etcher. Place Fedora bootable media into your machine appropriate drive, restart the machine and instruct the BIOS or UEFI firmware to boot from DVD/USB bootable media.
2. On the first installation screen, select Install Fedora Workstation Live 32 and press [enter] key to continue.
3. After the installer loads the Fedora Live system, click on Install to Hard Drive option in order to start the installation process.
4. On the next screen, select the language that will be used during the installation process and hit on the Continue button.
5. The next screen will present you Fedora Installation Summary menu. First, click on the Keyboard menu, choose your system keyboard layout, and hit on the top Done button to complete this step and go back to the main menu, as illustrated in the below images.
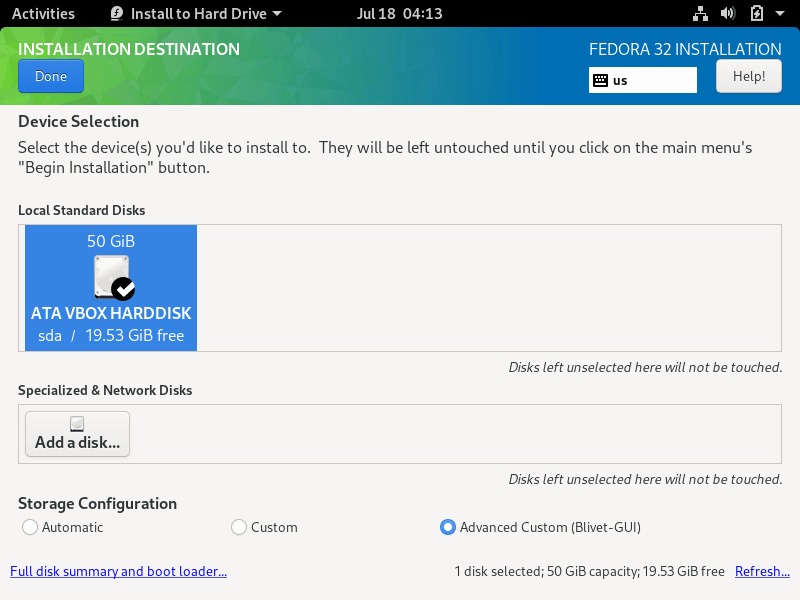
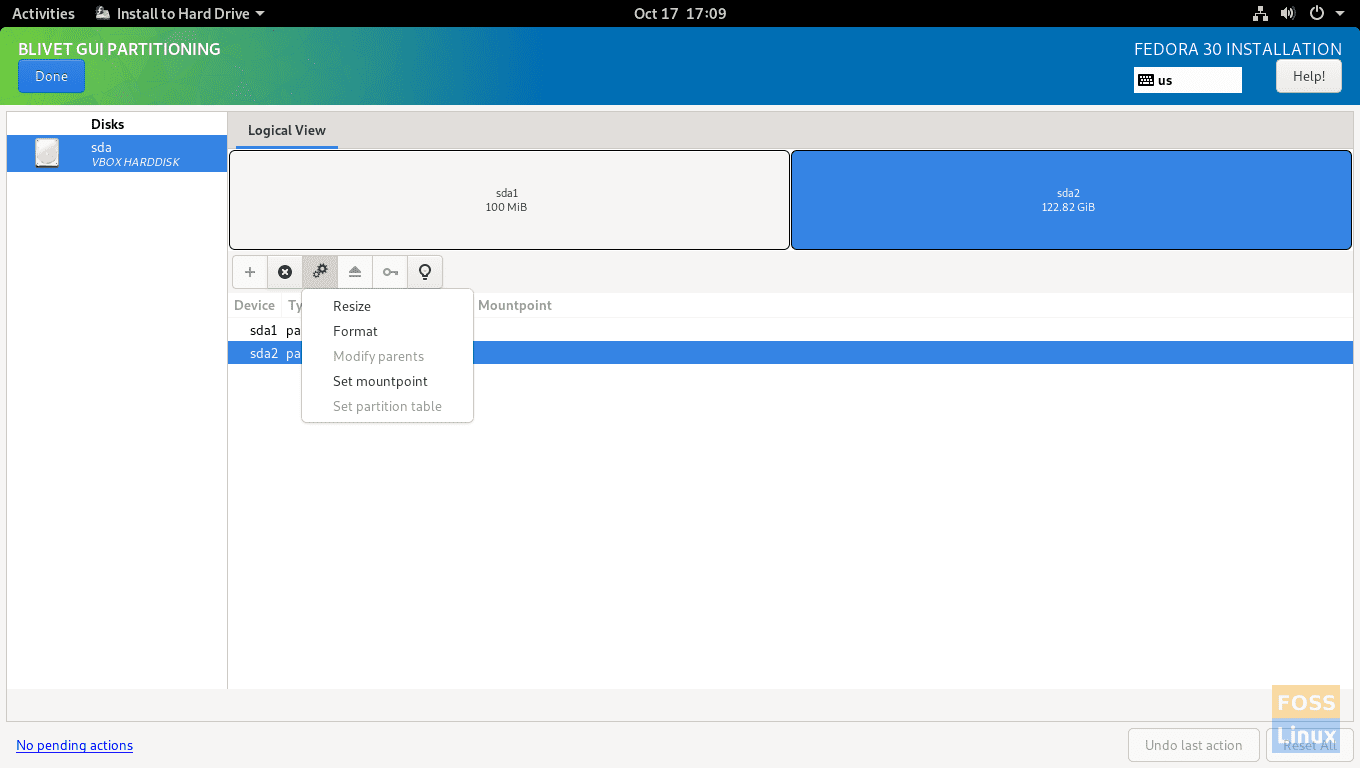
6. Next, click on the Installation Destination menu, check your machine hard disk and select the Advanced Custom (Blivet-GUI) option to configure the storage. Again, hit on the Done button to enter the Blivet GUI Partitioning program.
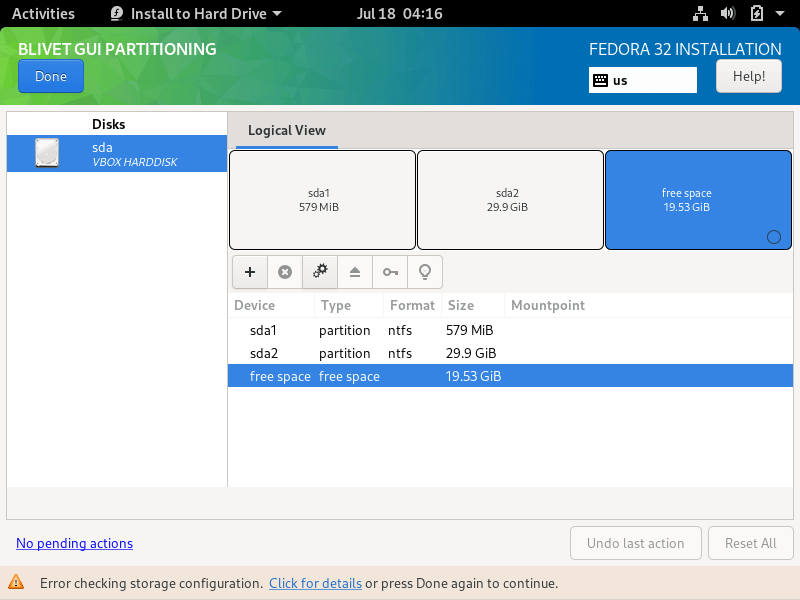
7. In this step, select the free space that resulted after shrinking the Windows partition will be used for installing Fedora Workstation. Select the free space and hit on the + button to create a new partition
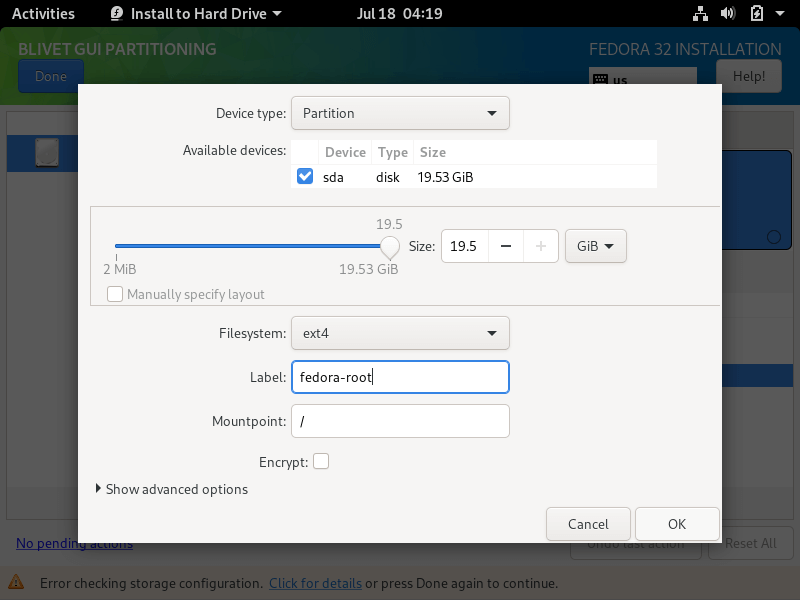
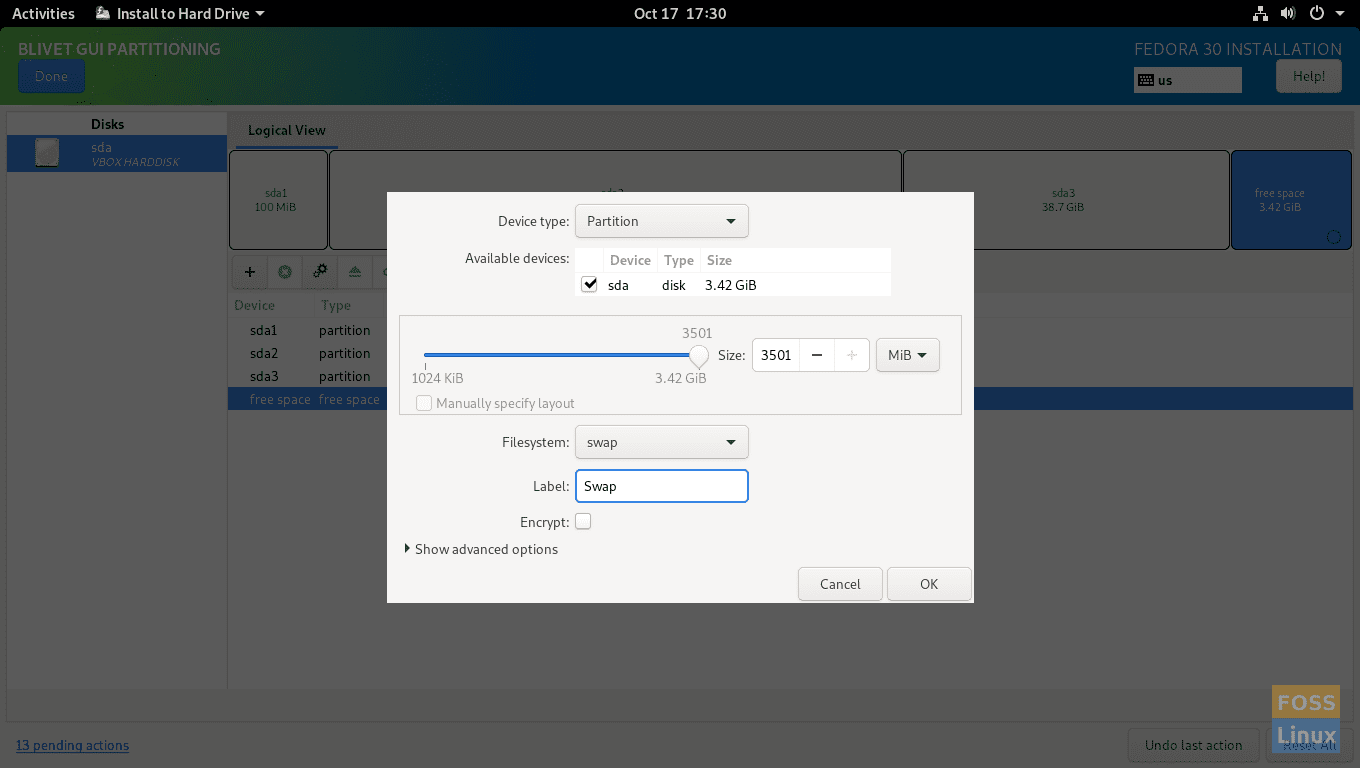
8. On partition settings window, enter the size of the partition, select a file system type, such as the robust ext4 file system to format the partition, add a label for this partition and use /(root) as the mount point of this partition.
When you finish hit the OK button to apply the new configuration. Use the same procedure to create the swap partition or other partitions for your system. In this tutorial, we’ll create and install Fedora on a single partition mounted in /(root) tree and we’ll configure no swap space.
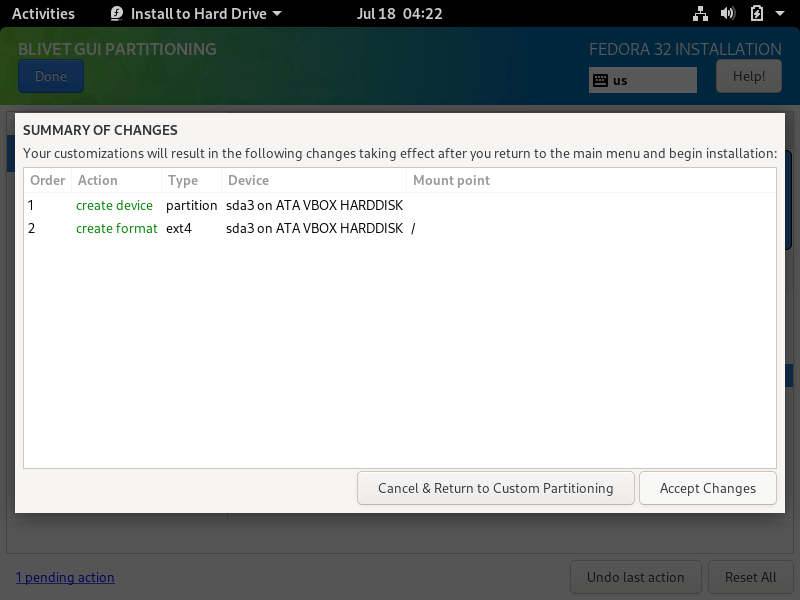
9. After you’ve created the partitions, review the partition table and press the top Done button twice to confirm configuration and hit on Accept Changes button from the pop-up Summary of Changes window to apply storage partition configurations and return to the main menu.

10. To start the installation process, just hit on the Begin Installation button, as illustrated in the following image.
11. After the installation completes, eject Fedora installation media and reboot the machine.
Fedora 32 Post Installation
12. After the system boots up, follow the Fedora post-installation instructions as shown.
12. Allow applications to determine your location.
13. Connect online accounts to access your email accounts, contacts, documents, photos and more.
14. Next, add the name of a new user and set up a strong password for the new account.
15. Finally, your Fedora system is ready to use.
16. After reboot, you will be directed to the GRUB menu, where for 5 seconds you can choose what operating system you want the machine to boot from Fedora or Windows.
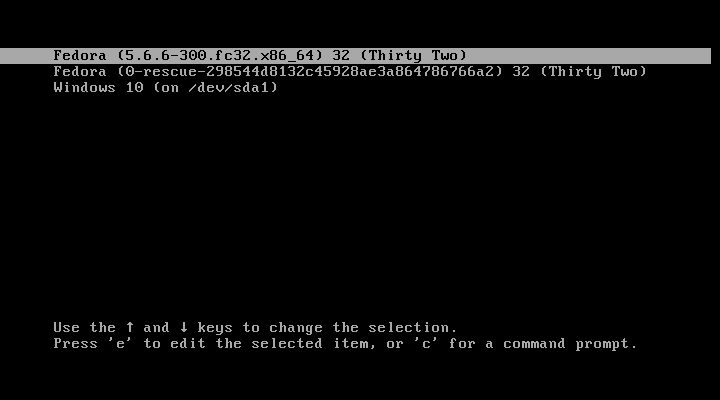
Sometimes, in cases of dual-booting Linux-Windows in UEFI firmware machines, the GRUB menu is not always displayed after reboot. If that’s your case, boot the machine in to Windows 10, open a Command prompt with elevated privileges and execute the following command in order to restore the GRUB menu.
bcdedit /set {bootmgr} path EFIfedorashim.efi
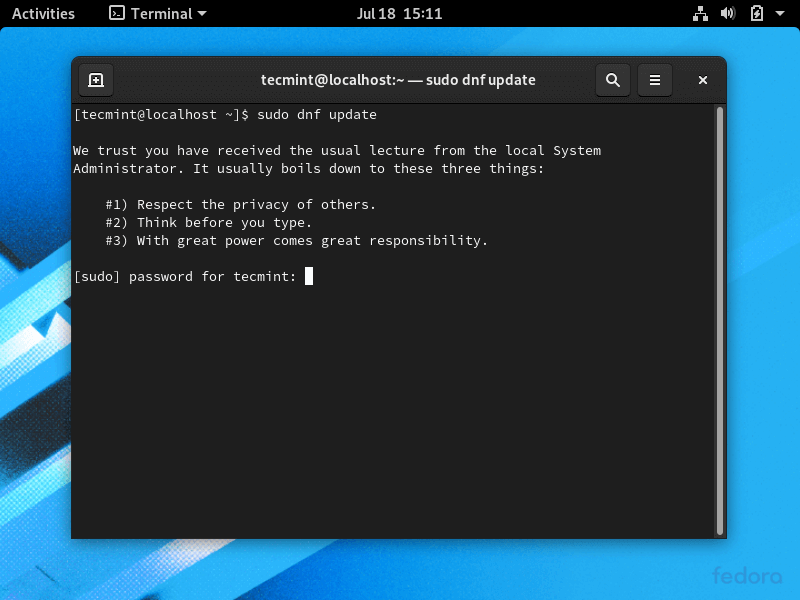
17. Log in to Fedora Desktop with the account and open a Terminal console and update the fedora system by issuing the below command.
$ sudo dnf update
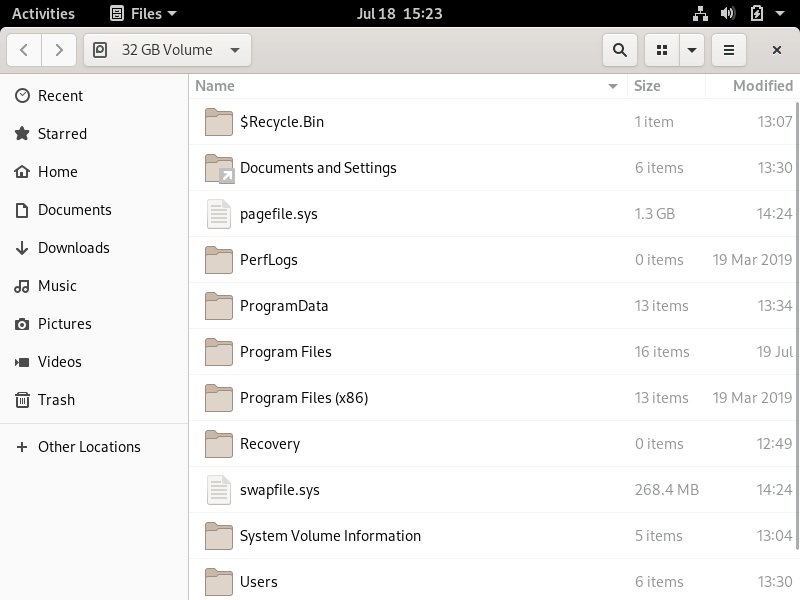
18. In case you want to access a Windows partition under Linux, open Disks utility, select the Windows NTFS partition, and hit on mount button (the button with a triangle sign).
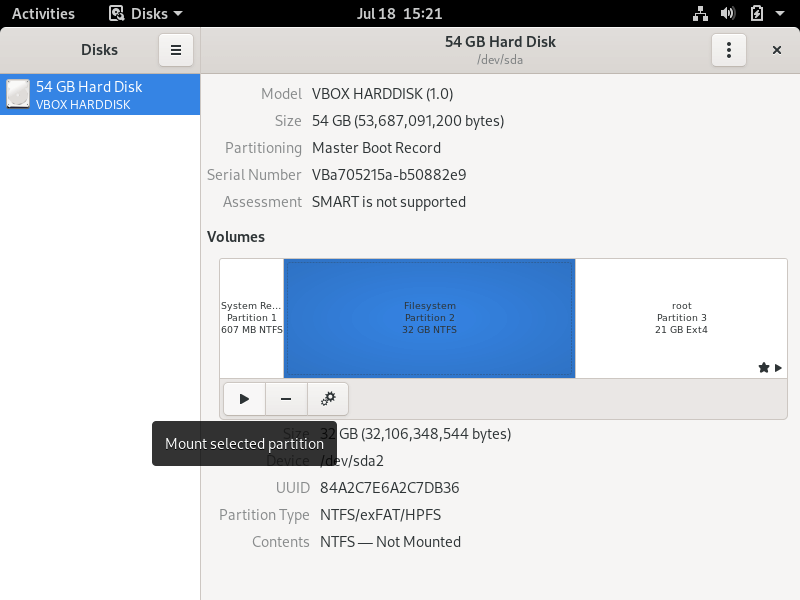
19. To browse the mounted Microsoft Windows partition, open Files -> Other Locations and double-click on NTFS partition Volume to open the NTFS partition.
Congratulations! You’ve successfully installed the latest version of Fedora 32 Workstation in dual-boot with Windows 10. Reboot the machine and select Windows from the GRUB menu in order to switch the operating system back to Windows 10.
If You Appreciate What We Do Here On TecMint, You Should Consider:
TecMint is the fastest growing and most trusted community site for any kind of Linux Articles, Guides and Books on the web. Millions of people visit TecMint! to search or browse the thousands of published articles available FREELY to all.
If you like what you are reading, please consider buying us a coffee ( or 2 ) as a token of appreciation.

We are thankful for your never ending support.
This guide assists you on how to install Fedora 30 in a dual-boot with Windows. Installing Fedora 30 in a dual boot mode with Microsoft Windows does not require any special configurations.
You Might Be Interested In
But before starting the installation, you need to make sure to set your BIOS or UEFI boot order to ensure that the Fedora Bootable USB or CD should boot first.
Prerequisites
- Fedora Bootable USB Drive or CD
- PC with pre-installed Windows. We perform this tutorial in a PC with Windows 7 pre-installed on it
Installing Fedora 30 dual-boot setup with Windows
Let’s start by creating a partition on which we are going to install Fedora. In case you have one partition that has Windows installed on it, then you need to resize this partition and create a new one.
Create New Partition using built-in Windows Tool
Partitioning can be done before or during the Fedora installation. We recommend doing it before using the Windows Disk Management tool to be on a safer side of not losing the Windows partition by mistake. If you followed our recommendation, you should skip Step 7 of this article.
Step 1. On your Windows machine, launch the Start menu and search for Disk Management application then open it.

Open Disk Management
Step 2. Select the needed partition.

Select Disk To Shrink
Step 3. Right-click on the selected partition then choose to Shrink volume.

Shrink Volume
Step 4. Enter your new partition size and press the Shrink button to continue.

Choose Your Shrink Size
Step 5. After shrinking the partition successfully, you should find the new partition as allocated space.
New UN-allocated Volume
Your system is now ready to install Fedora on the free unallocated space. At the time of writing the article, Fedora 30 is available. Therefore, you should see the screenshots of it.
Installing Fedora 30
Step 1. Insert the Fedora 30 bootable USB or CD into your machine then restart it.
Step 2. The Fedora 30 booting menu should appear after the system starts up. Now choose the Start Fedora Workstation Live 30 option then hit the Enter button.

Fedora Boot-able ISO
Step 3. Fedora 30 live session should start, as you can see in the screenshot. Press the Install to Hard Drive option then hit the Enter button.
Install Fedora To Hard Drive
Step 4. Choose your language. Press the Continue button to complete the Fedora 30 installation.

Choose Your Language
Step 5. From the installation summary window, you can set your keyboard layout, your Fedora 30 system time and date, and the destination of the Fedora 30. Press the Installation destination to choose where to install Fedora 30.

Installation Destination
Step 6. Select your disk to install Fedora 30 on it, then press the Done button from the top left of your screen.
Choose Your Disk
Step 7. Skip this step if you have already partitioned your hard disk from Windows, as mentioned earlier in this guide.
If you have not partitioned your hard disk, then select your disk and choose the Advanced option from the storage configuration. Press the Done button to continue.

Advanced Custom Storage Configuration
Select the partition you need to resize.

Choose Your Disk To Partition
Right-click on the selected partition and choose the Resize option.
Edit Selected Partition And Resize It
Choose your new partition size and press the Resize button to continue.

Choose Your New Disk Size
As you can see in the below screenshot, the new free space is created successfully.

Disk Resized And Disk With Free Space
Step 8. Now select your free space and press the (+) button to start creating partitions for Fedora installation.
We shall create a “/” partition only for this installation.

Create a New Partition
If you need, you can create a swap partition too.
Swap Partition
After creating your partitions, press the Done button from the top left of your screen. A summary of the changes window should appear to you, press the Accept changes button to confirm the changes.

Summary Of All Changes
Step 9. Now press the Begin Installation button to continue the Fedora 30 installation.

Begin Your Installation
Step 10. Applying your configurations and Fedora installation should start immediately.

Installation Progress
Fedora 30 installation progress almost done.
Installation Progress 2
Step 11. Fedora 30 should be installed successfully. Press the Quit button to continue. Then Restart your system. Do not forget to remove your bootable USB or CD when the system restarts.
Step 12. As you can see the Fedora 30 has been installed successfully alongside with Windows 7. Choose the Fedora option to complete the installation.

Fedora And Windows Dual Boot Menu
Step 13. Press the Next button to complete the post-installation tasks.

Welcome To Your Fedora
Step 14. Create a new Fedora 30 user, press the Next button to continue.

Complete Your Fedora Setup
Step 15. Now you are ready to use Fedora 30.

Start Using Fedora
Congratulations, Fedora 30 has been installed successfully in a dual boot mode with Windows operating system.
You Might Be Interested In

![]()
Are you curious to work with the Linux Operating System inside your PC/Laptop? Then you’re at the right place. This guide helps you in the hassle-free installation of Fedora Linux on your System.
Now, we are going to install Fedora Workstation v35 on our system.
What is Fedora?
Fedora Linux is a Linux distribution developed by the community-supported Fedora Project which is sponsored primarily by Red Hat, a subsidiary of IBM, with additional support from other companies.
If you want to know more about Linux and its distributions, check it out here.
Prerequisites
- 35GB+ free space in HDD/SSD
- 8/16GB Pen drive
- Windows 11/10
Note: This guide is only for the system which has UEFI BIOS and the type of SSD/HDD is GPT and System Type is x64-based.
How to check the BIOS Mode of your system?
- Click Start Button
- Search msinfo32 (or) System Information in the search bar
- Check BIOS Mode Property
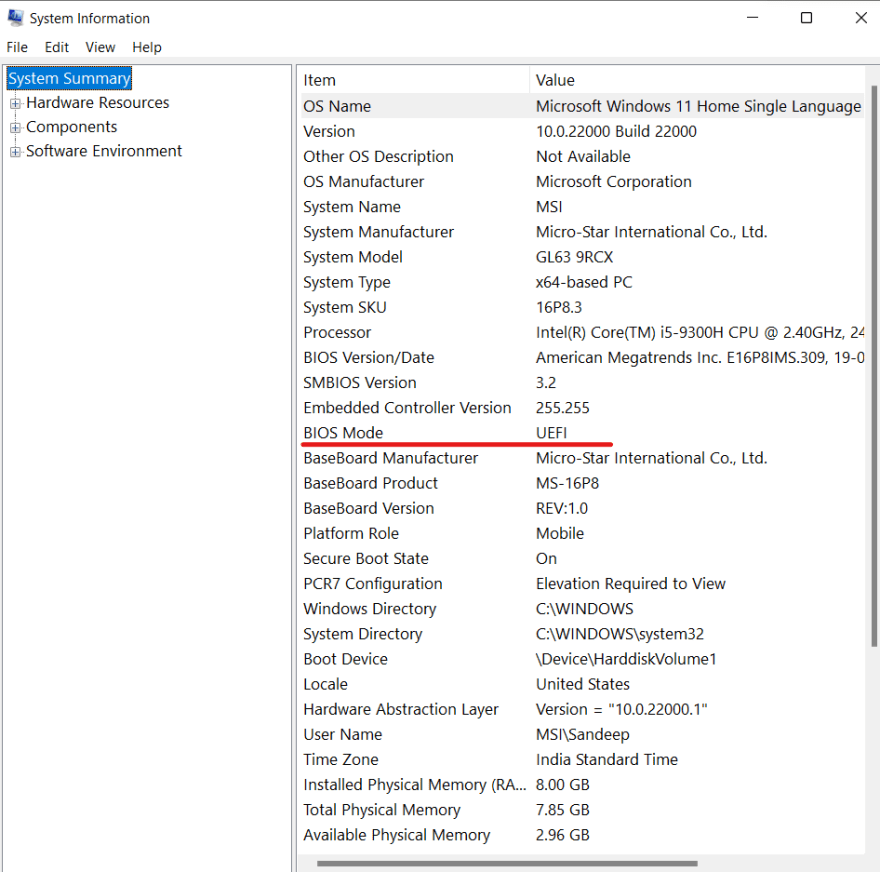
If it’s UEFI, you’re good to go.
How to check the SSD/HDD Mode of your system?
- Click Start Button
- Search for
cmd - Run
cmdas administartor - Type
diskpartand press enter. - Next, type
list diskand press enter.
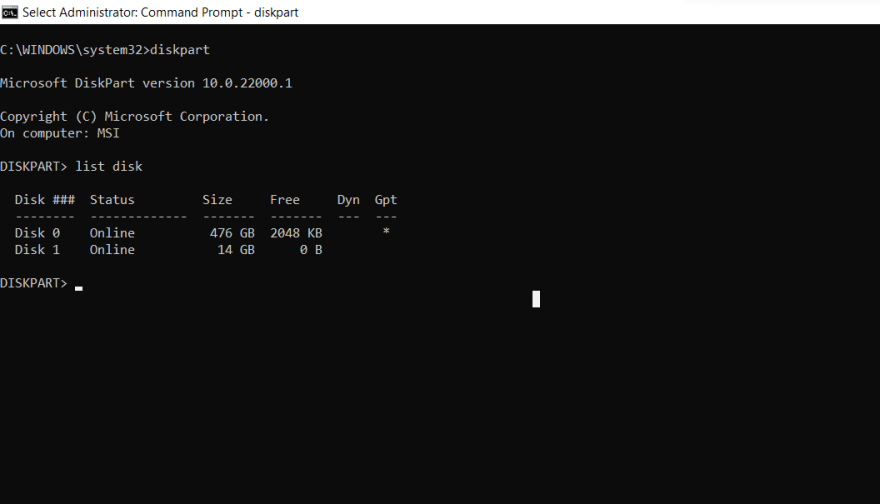
If you see * under GPT of Disk 0, you’re ready for installation of Fedora Linux in your System.
Softwares Required
- Fedora Workstation ISO

- Rufus for making USB bootable. Click here to know more.
Now, it’s time to create a bootable USB. So, format your USB beforehand.
Create a Bootable USB using Rufus
- Open Rufus and plug your clean USB stick into your computer.
- Rufus will automatically detect your USB. Click on Device and choose the USB you want to use from the drop-down menu.
- Make sure the Boot Selection option is set to Disk or ISO image then click Select. Rufus will open a file explorer browser window, locate the ISO image which you downloaded named
Fedora-Workstation-Live-x86_64-XX-X.X.isoto burn onto the USB, and select it.
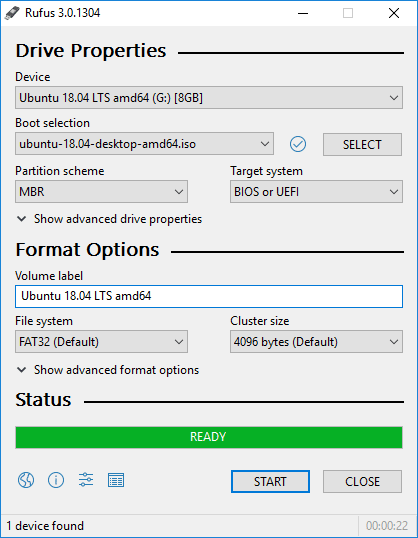
- Leave other options as default and click Start.
- You’ll get a warning saying that any data on the USB will be destroyed (this is normal). Click OK and Rufus will start creating the ISO image on the USB.
- Let it run in the background, jump to the next section.
- Once Rufus has finished creating the ISO image on the USB, you can close it and your bootable USB is ready to go!
Make a new Unallocated Partition.
-
Press the
Windows key + Ron your keyboard to open the Run utility, or search for it in the Start menu. -
Type
diskmgmt.mscand press OK. -
A menu will appear with a list of all your hard drives. Right-click on the drive you want to partition and select Shrink Volume.
-
You’ll be asked how much you want the drive to shrink. The amount you enter will be the amount of space left for your new partition. The
total size after shrinkwill be the space left in the original partition. -
Enter a value and Click Shrink. (Note: If you want 50GB partition, the value is 50 x 1024 = 51200).
-
Now, you’ll find a new Unallocated Partition under Disk 0.


Reboot your system into BIOS Mode.
- To boot into BIOS, Press the below keys before OEM Logo (Brand Logo) appears. the key may be
ESC,Del,F1,F2,F10,F12. If still, it’s not booting into BIOS, Check the below step. - Google your system model with BIOS mode at the end. You’ll find the solution.
- After booting into BIOS, disable
Secure Bootand Change the Boot Drive priority toUSB. - Save the Changes and Reboot.
Boot into Fedora
- If all steps have been performed correctly, you will see the below image.
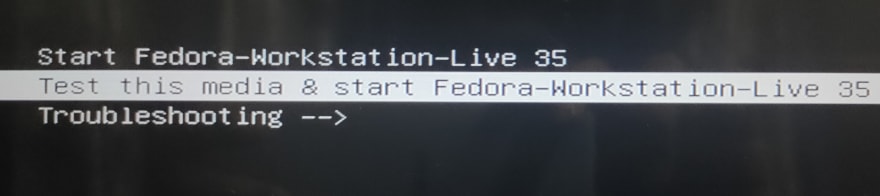
- Select
Test this media & start Fedora Workstation-Live XX - Wait for some time, you’ll see a window with two options.
- Click Install to Hard Drive. Again, wait for < 1 min.
- You will land on the below Window.
-
Click on the
Keyboardoption, Select your Keyboard Language and Click Continue. -
Similarly, Click on the
Date & Timeoption, Select your Time Zone and Click Done.
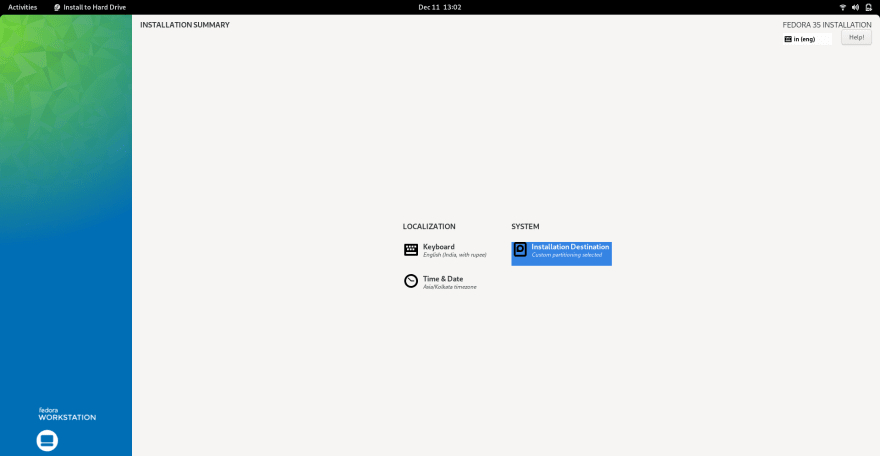
Installation
- Now, Click
Installation Destination.
- Select your disk, Choose Custom under Storage Configuration and Click on Done.
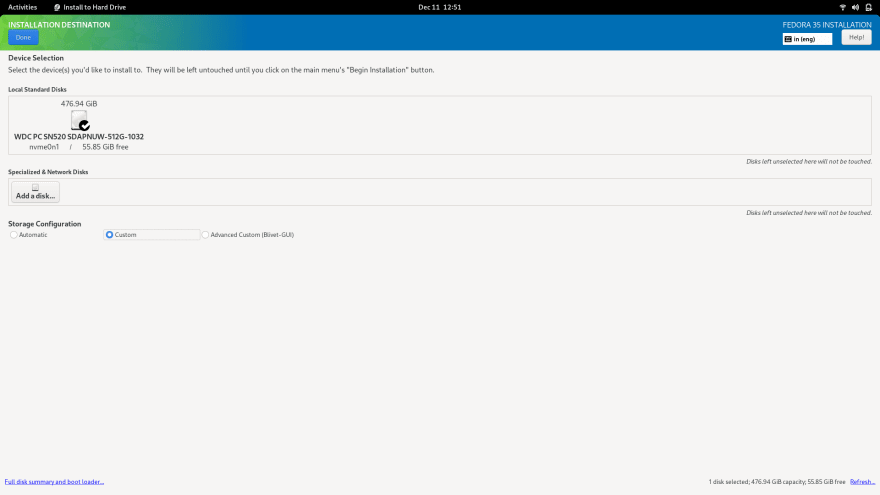
- Now, you’ll be in the below window and also verify that the Available Space is your Unallocated Partition Space.

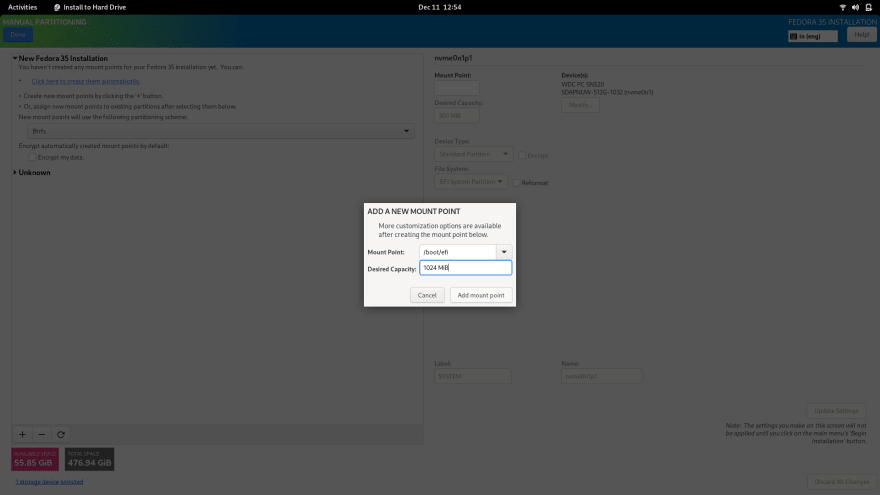
- Click on the + icon, a popup appears, Choose
/boot/efiUnder Mounting Point which is System’s EFI partition. Enter1024MiBin Desired capacity. Click on Add mount Point.
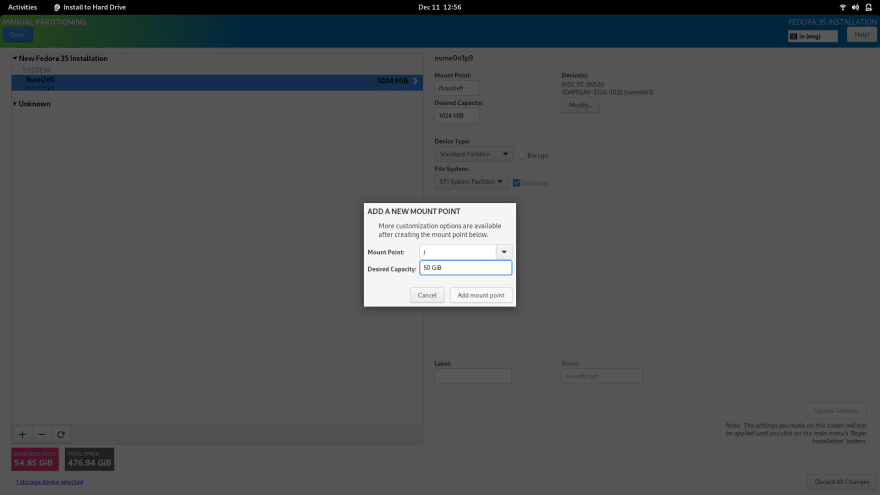
- Similarly, Click on the + icon again, In popup, Choose
/Under Mounting Point which is called Root Partition. Subtract 5GiB from Available Space and Enter remaining space in Desired capacity (Ex: 50 GiB). Click on Add mount Point. And Verify it’sDevice Typewhich is Btrfs.
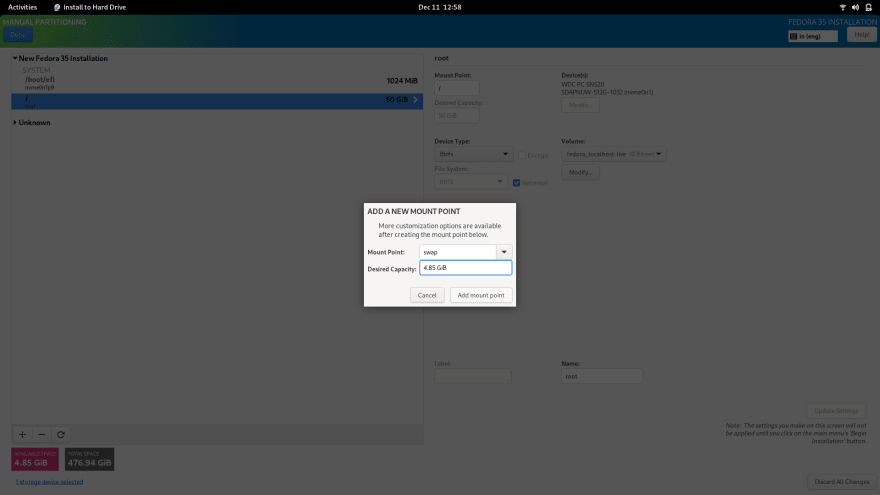
- Similarly, Click on the + icon again, In Pop up, Choose
swapUnder Mounting Point, which is swap memory. Enter the remaining space in Desired capacity (Ex: 5 GiB). Click on Add mount Point.
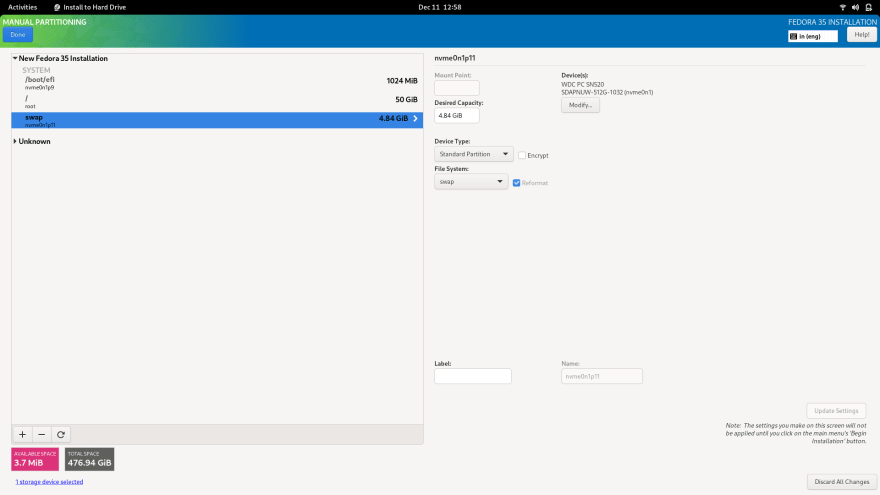
- Finally, you’ll see all the partitions created.
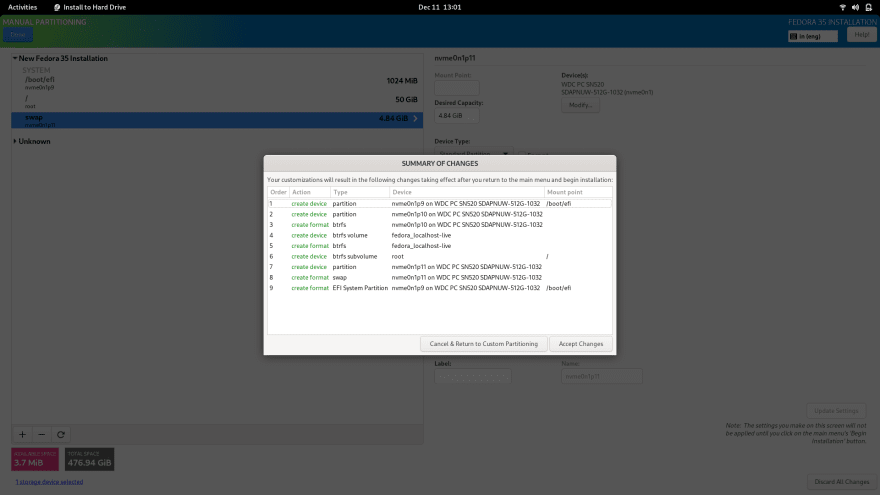
- Now, click on Done. Verify the Summary of Changes. And click on Accept Changes.
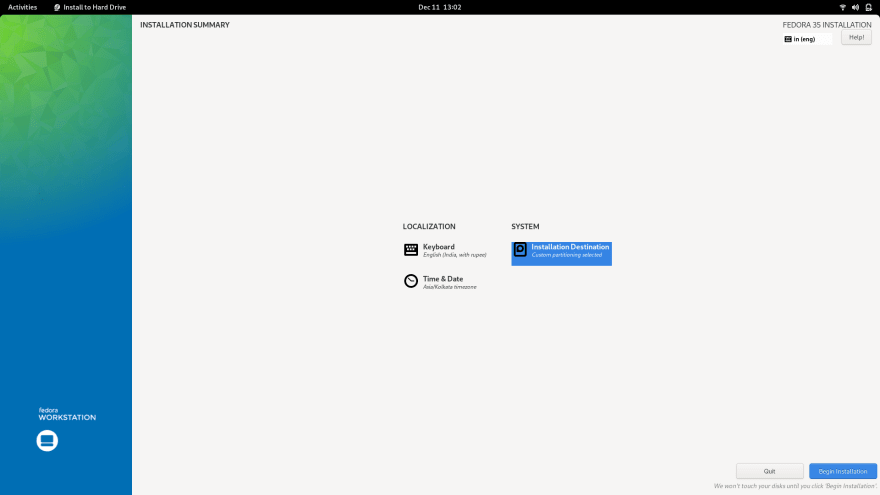
- You’ll see the below window. Now, click on Begin Installation.
Relax for 10-15 mins.
- Click on Finish Installation.
The system will restart automatically and you’ll see the GRUB Bootloader, Select Fedora, and Press Enter.
Enter your details and you’ll be finally booted into Fedora Linux.

Thanks for following the guide. Hope this helps you in some way 
This tutorial will guide you on how to install Fedora 32 Workstation in dual boot with Microsoft Windows 10 Operating System pre-installed on a BIOS firmware machine.
If your computer has no pre-installed operating system and you plan to install Fedora Linux in dual-boot with a Microsoft operating system, you should first install Windows on your machine before installing Fedora Linux.
However, try to disable Fast Boot and Secure Boot options in UEFI firmware based machines if you plan to install Fedora in dual boot with Windows.
Also, if Windows installation was performed in UEFI mode (not in Legacy Mode or CSM – Compatibility Support Module), Fedora installation should also be performed in UEFI mode.
The installation procedure of Fedora Linux alongside a Microsoft Windows 10 OS requires no special configurations to be made in BIOS-based motherboards, except maybe changing the BIOS boot order.
The only requirement is, you must allocate a free space on the disk with at least 20 GB in size in order to use it later as a partition for Fedora installation.
Requirements
- Download Fedora 32 Workstation ISO Image
Preparing Windows Machine for Dual-Boot for Fedora
Open your windows Disk Management utility and right-click on C: partition and select Shrink Volume in order to resize the partition for Fedora installation.
Give at least 20000 MB (20GB) depending on the size of C: partition and hit Shrink to start partition resize as shown below.

After resizing partition, you will see a new unallocated space on the hard drive. Leave it as default and reboot the system in order to proceed with the Fedora installation.

Install Fedora 32 with Windows Dual-Boot
1. On the first step, download the Fedora DVD ISO image and burn it to a DVD disk or create a bootable USB flash drive using the Fedora Media Writer tool or other utility.
To create a bootable Fedora USB drive compatible with installation performed in UEFI mode, use Rufus utility or Etcher. Place Fedora bootable media into your machine appropriate drive, restart the machine and instruct the BIOS or UEFI firmware to boot from DVD/USB bootable media.
2. On the first installation screen, select Install Fedora Workstation Live 32 and press [enter] key to continue.

3. After the installer loads the Fedora Live system, click on Install to Hard Drive option in order to start the installation process.

4. On the next screen, select the language that will be used during the installation process and hit on the Continue button.

5. The next screen will present you Fedora Installation Summary menu. First, click on the Keyboard menu, choose your system keyboard layout, and hit on the top Done button to complete this step and go back to the main menu, as illustrated in the below images.

6. Next, click on the Installation Destination menu, check your machine hard disk and select the Advanced Custom (Blivet-GUI) option to configure the storage. Again, hit on the Done button to enter the Blivet GUI Partitioning program.

7. In this step, select the free space that resulted after shrinking the Windows partition will be used for installing Fedora Workstation. Select the free space and hit on the + button to create a new partition

8. On partition settings window, enter the size of the partition, select a file system type, such as the robust ext4 file system to format the partition, add a label for this partition and use /(root) as the mount point of this partition.
When you finish hit the OK button to apply the new configuration. Use the same procedure to create the swap partition or other partitions for your system. In this tutorial, we’ll create and install Fedora on a single partition mounted in /(root) tree and we’ll configure no swap space.

9. After you’ve created the partitions, review the partition table and press the top Done button twice to confirm configuration and hit on Accept Changes button from the pop-up Summary of Changes window to apply storage partition configurations and return to the main menu.


10. To start the installation process, just hit on the Begin Installation button, as illustrated in the following image.


11. After the installation completes, eject Fedora installation media and reboot the machine.

Fedora 32 Post Installation
12. After the system boots up, follow the Fedora post-installation instructions as shown.

12. Allow applications to determine your location.

13. Connect online accounts to access your email accounts, contacts, documents, photos and more.

14. Next, add the name of a new user and set up a strong password for the new account.

15. Finally, your Fedora system is ready to use.

16. After reboot, you will be directed to the GRUB menu, where for 5 seconds you can choose what operating system you want the machine to boot from Fedora or Windows.

Sometimes, in cases of dual-booting Linux-Windows in UEFI firmware machines, the GRUB menu is not always displayed after reboot. If that’s your case, boot the machine in to Windows 10, open a Command prompt with elevated privileges and execute the following command in order to restore the GRUB menu.
bcdedit /set {bootmgr} path EFIfedorashim.efi
17. Log in to Fedora Desktop with the account and open a Terminal console and update the fedora system by issuing the below command.
$ sudo dnf update

18. In case you want to access a Windows partition under Linux, open Disks utility, select the Windows NTFS partition, and hit on mount button (the button with a triangle sign).

19. To browse the mounted Microsoft Windows partition, open Files -> Other Locations and double-click on NTFS partition Volume to open the NTFS partition.

Congratulations! You’ve successfully installed the latest version of Fedora 32 Workstation in dual-boot with Windows 10. Reboot the machine and select Windows from the GRUB menu in order to switch the operating system back to Windows 10.
Вы должны быть подключены к Интернету. Выберите вниз — стрелка в верхнем правом углу рабочего стола , чтобы просмотреть подключения.
Выберите Установить на жесткий диск .
Выберите ваш язык и выберите Продолжить .
Выберите « Время и дата» на экране «Сводка установки».
Выберите часовой пояс на карте, затем нажмите « Готово», чтобы вернуться к экрану «Сводка установки».
Выберите пункт назначения установки .
Выберите жесткий диск в разделе « Стандартный локальный диск» и выберите « Автоматически» в разделе « Конфигурация хранилища» , затем нажмите « Готово», чтобы вернуться к экрану «Сводка установки».
Выберите Начать установку .
Fedora должна автоматически определить раскладку клавиатуры, но вы можете выбрать « Клавиатура» на экране «Сводка установки», чтобы добавить новые раскладки.
После завершения процесса выберите « Завершить установку» .
Если компьютер не перезапускается автоматически, выберите вниз — стрелка в верхнем правом углу рабочего стола и выберите питания кнопки.
Выберите Перезапустить .
|
Take your Fedora Linux Skills to the Next Level
|


Fedora Linux, just like most Linux distributions, will happily co-exist on a hard disk drive with just about any version of Windows. This is a concept known as dual-booting. Essentially, when you power up your PC you will be presented with a menu providing the option to boot either Fedora Linux or Windows. Obviously you can only run one operating system at a time, but it is worth noting that the files on the Windows partition of your disk drive will be available to you from Fedora Linux regardless of whether your Windows partition was formatted using NTFS, FAT16 or FAT32.
This installation method involves shrinking the size of the existing Windows partition to accommodate the installation of Fedora. Recent Fedora releases have provided the option to automatically shrink existing disk partitions during the installation process. It is also possible to pre-shrink an existing partition before starting the installation process. In this chapter both approaches will be covered in detail.
Contents
Contents
|
||
Downloading the Fedora Live CD
The first step in the installation process is to obtain the Fedora installation media in a format suitable for installing on a hard disk which already contains a Windows installation. The easiest way to achieve this is to boot the Fedora Live CD and perform the configuration and installation from the live session. Live CD support was introduced in Fedora Linux beginning with the release of Fedora 7. The latest Fedora Live CD images can be downloaded from the Fedora project web site:
http://fedoraproject.org/get-fedora-all http://fedoraproject.org/get-fedora http://fedoraproject.org/get-fedora-all
The download image is approximately 650Mb in size so a broadband internet connection is recommended and sufficient disk space on the target system required.
The Live CD images are listed in the Fedora Desktop Live Media category and images are available for both 32 and 64-bit processor architectures. If you are unsure of the architecture of your computer hardware, check with the manufacturer for clarification. If you are still unsure, or wish to get started quickly it is worth knowing that the 32-bit version of Fedora will also run on 64-bit systems, though the same cannot be said of running the 64-bit version on a 32-bit computer.
There are two predominant desktop environments on Linux, namely KDE and GNOME. Given that the default desktop environment on Fedora is the GNOME desktop this will be the desktop covered in the remainder of this book. Once you have downloaded the appropriate image for your hardware and choice of desktop, burn the image onto a CDROM. Check the documentation for your preferred CD writing software for steps on how to write an ISO image file to a CD if you do not already know how to do this.

Beginning the Dual Boot Installation Process
Place the Fedora Live CD into the CD drive of your Windows system and reboot. If the system loads Windows again you will need to change the boot order in your system BIOS. To do this reboot again. Early in the boot process the BIOS will display a message indicating which key should be pressed to enter Setup. Press the key indicated so that the BIOS Setup menu appears. Navigate the menu system until you find the setting which indicates the boot order used by the BIOS. Change the order so that the drive containing the Fedora Linux Live CDROM is listed before the hard disk drive, then exit and save the settings. Reboot once more and you should find that Fedora loads from the CDROM.
Once Fedora has loaded you will be presented with the Fedora login screen with the option to perform an automatic login pre-selected. If you take no action, Fedora will log you in after 60 seconds. If you prefer not to wait, click on the Login button to initiate the login sequence. Either way, Fedora will present you with the desktop screen similar to the one illustrated in the following figure:
To initiate the installation process, double click on the Install to Hard Drive icon located on the Fedora desktop. Once the installer has launched, make appropriate selections for keyboard layout, machine name, time zone and root password (the password that will be used when performing privileged administrative tasks on the system after installation). Once these settings have been configured, the drive partitioning screen will appear. At this point, the partition used by the incumbent Windows installation is ready to be resized to accommodate Fedora.
Resizing the Windows Partition
The installer screen responsible for configuring the basic partition layout of the target hard disk drive appears as illustrated in the following figure:
A number of options are provided for allocating space for the installation of Fedora:
- Use entire drive — The entire disk drive will be assigned to the Fedora operating system installation. Any pre-existing partitions, together with any existing operating systems and associated data files contained therein will be deleted to make room for Fedora. This option should only be used if you are absolutely sure you no longer need anything that is currently stored on that disk, or have already backed up all user files.
- Replace existing Linux System — If the drive was previously configured to support a Windows/Linux dual boot environment, this option may be selected to instruct the installer to delete the pre-existing Linux partition and replace it with Fedora. Once again, it is important to backup any user data that may still be needed.
- Shrink current system — Allows an existing partition to be reduced in size to make room on the drive for the Fedora installation. More details on this option are provided later in this chapter.
- Use free space — If the current partitions on the drive do not take up the entire disk space available, any unallocated space may be assigned to the Fedora installation using this option.
- Create custom layout — When selected, this option displays the disk partitioning tool allowing each partition on the disk to be manually configured. Unless you have experience with low level disk partitioning this option is not recommended.
Shrinking the Existing Windows Partition
To create a dual boot environment, the existing Windows partition will need to be reduced in size to make room for Fedora to be installed on the hard disk drive. To achieve this, begin by selecting the Shrink current system option followed by the Next button. The installer will subsequently display the Volume to Shrink dialog as illustrated in the following figure:
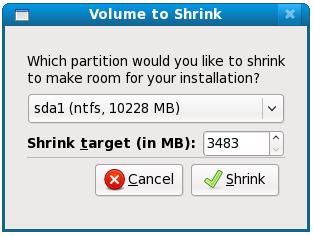
Within this dialog, select the partition to shrink from the drop down menu, followed by the amount of space by which the partition is to be reduced in MB. Note that to allow sufficient room for the Fedora installation, a minimum of 5GB is recommended (equivalent to 5120MB). Once the partition and reduction amount have been entered, click on the Shrink button to initiate the partition modification. The installer will display a dialog seeking confirmation that you wish to proceed. Clicking the Write changes to disk button will commit the change. Once the resize process has completed, select the Use free space option and click Next to continue with the installation process.
The installer will format the unallocated space ready for the installation of Fedora and begin copying files to the partition.
Once the installation completes, shutdown the Live CD Fedora session using the System->Shutdown menu option and eject the Fedora Live CD from the drive. Restart the system and note that a countdown message appears. Press any key at this point to enter the boot menu which will appear as follows:
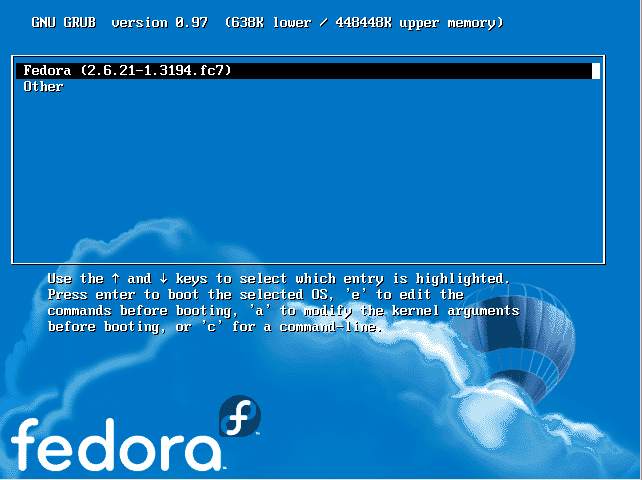
This menu provides the option of booting either «Fedora» or «Other». In this instance, selecting «Other» will boot your original Windows installation. In the next section we will cover the steps to modify this menu to change the boot default and rename the «Other» menu option to something more descriptive.
The boot menu configuration settings are stored in the /boot/grub/grub.conf file. This file may be edited in a terminal window (Applications->System Tools->Terminal) as follows:
su -
gedit /boot/grub/grub.conf
The contents of a typical grub.conf file is listed below:
# grub.conf generated by anaconda
#
# Note that you do not have to rerun grub after making changes to this file
# NOTICE:  You have a /boot partition.  This means that
#          all kernel and initrd paths are relative to /boot/, eg.
#          root (hd0,1)
#          kernel /vmlinuz-version ro root=/dev/VolGroup00/LogVol00
#          initrd /initrd-version.img
#boot=/dev/sda
default=0
timeout=5
splashimage=(hd0,1)/grub/splash.xpm.gz
hiddenmenu
title Fedora (2.6.21-1.3194.fc7)
        root (hd0,1)
        kernel /vmlinuz-2.6.21-1.3194.fc7 ro root=LABEL=/ rhgb quiet
        initrd /initrd-2.6.21-1.3194.fc7.img
title Other
        rootnoverify (hd0,0)
        chainloader +1
The above grub.conf file contains options to boot from two operating systems. The Fedora section of the configuration is as follows:
title Fedora (2.6.21-1.3194.fc7)
        root (hd0,1)
        kernel /vmlinuz-2.6.21-1.3194.fc7 ro root=LABEL=/ rhgb quiet
        initrd /initrd-2.6.21-1.3194.fc7.img
The Windows section of the configuration is:
title Other
        rootnoverify (hd0,0)
        chainloader +1
The default=0 line indicates that the first entry in the file is to be default operating systems (in other words, the operating system that will boot by default if the user does not intervene during the boot phase). The timeout=5 specifies the number of seconds the boot screen is displayed before the default operating system is automatically booted.
To configure the system to boot Windows by default simply change this line so that it reads as follows:
default=1
To increase the timeout before the default operating system boots, change the timeout value (in this case to 20 seconds):
timeout=20
The final task in our dual boot configuration process is to name the Windows boot option to something more descriptive than «Other». To achieve this, simply change the «Other» line as follows:
title Windows
Note that the title value can be anything you choose. Below is the entire grub.conf file with the above modifications made:
# grub.conf generated by anaconda
#
# Note that you do not have to rerun grub after making changes to this file
# NOTICE:  You have a /boot partition.  This means that
#          all kernel and initrd paths are relative to /boot/, eg.
#          root (hd0,1)
#          kernel /vmlinuz-version ro root=/dev/VolGroup00/LogVol00
#          initrd /initrd-version.img
#boot=/dev/sda
default=1
timeout=20
splashimage=(hd0,1)/grub/splash.xpm.gz
hiddenmenu
title Fedora (2.6.21-1.3194.fc7)
        root (hd0,1)
        kernel /vmlinuz-2.6.21-1.3194.fc7 ro root=LABEL=/ rhgb quiet
        initrd /initrd-2.6.21-1.3194.fc7.img
title Windows
        rootnoverify (hd0,0)
The next time the system is rebooted, the boot screen will wait 20 seconds before auto-booting. If no keys are pressed the system will now boot Windows by default, instead of Fedora Linux. If the user does intervene and display the boot menu, the Windows option is now titled «Windows» and not «Other».
Accessing the Windows Partition from Fedora Linux
When running Fedora Linux in a dual boot configuration it is possible to access files located on the Windows partition. This can be achieved using the file browser, or by manually mounting the partition from the command-line.
To access the Windows partition from the browser, select the Places->Computer desktop menu item. This will display a window similar to the one in the following figure containing a list of devices attached to the system:
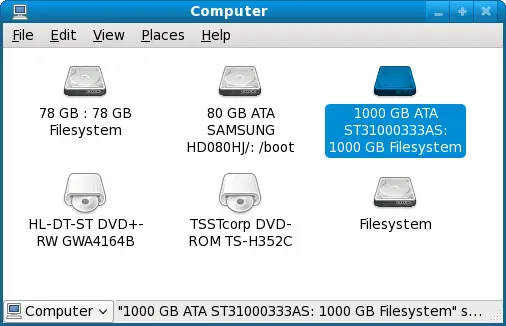
Amongst the listed devices will be an icon for the hard disk drive containing the Windows partition. To mount this partition, double click on the disk drive and enter the root password if prompted to do so. A new window will subsequently appear listing contents of the top level directory of the Windows partition. It should now possible to navigate throughout the partition and access any files contained therein. In addition, a new shortcut will appear on the desktop containing a disk drive icon. Double clicking on this icon will provide access to the contents of the Windows partition.
Another option is to manually mount the Windows partition. The first step is to create a directory to use as the mount point. In this example we will create a directory called /windows from the terminal window (Applications->System Tools->Terminal):
su -
mkdir /windows
Next, we need to run the mount command (still as super user and assuming the Windows partition is /dev/sda1 and NTFS format — this may be different on your system):
mount /dev/sda1 /windows
Under some circumstances you may get a message that the Windows partition needs to be checked. If so, either reboot into Windows again, or force the mount:
mount /dev/sda1 /windows -o force
To automate the mount each time the system is booted, simply add the mount line to the /etc/fstab file:
/dev/sda1 /windows ntfs defaults 0 0
To unmount the Windows filesystem at any time:
umount /windows
Manually Partitioning the Disk for Windows/Fedora
Before moving on to the next chapter we will quickly look at the steps involved in manually resizing a Windows partition to make room for Fedora in advance of running the installer. The reason for including this information is that it can be helpful to understand what happens behind the scenes of the installer and also to provide an alternative mechanism should the installer fail to perform the resize operation.
Linux includes a powerful disk partitioning tool called GParted which will need to be installed before it can be used in the live system. To perform the installation, select the System->Administration->Add Remove Software menu option and wait for the application to start and populate the package list. Enter GParted into the text field, click Find and wait for the package to appear in the list. Click the check box next to the package name and initiate the installation.
Once installed, to launch GParted click on the Applications desktop menu and from the System Tools sub-menu, select GParted. Once running, the GParted main screen will appear displaying a graphical representation of the disk partition layout:
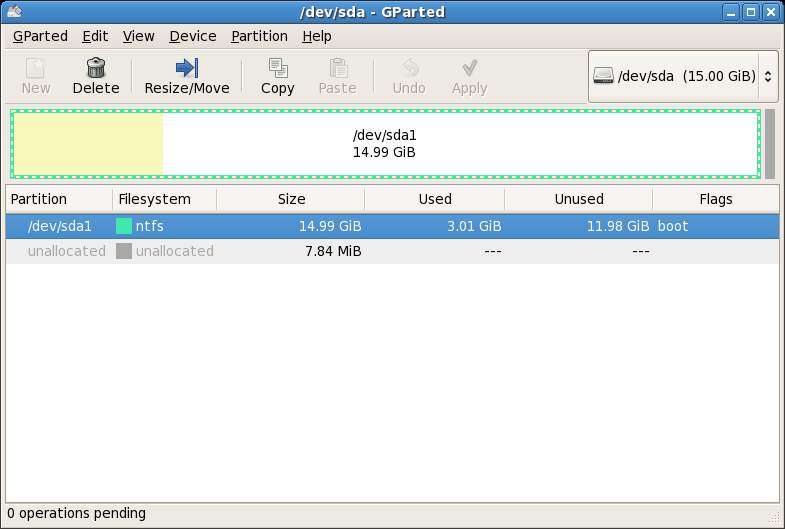
The above GParted session shows a Windows NTFS formatted partition which is taking up most of the available disk space. In order to make space for a Fedora Linux installation the next step is to resize the Windows NTFS partition. The objective is to reduce the size of the Windows partition from the current size of approximately 15GB to 8GB. This will create 7GB of unused space for the Fedora installation. Select the NTFS partition in the GParted window and click on the Resize/Move toolbar button to invoke the Resize/Move dialog:
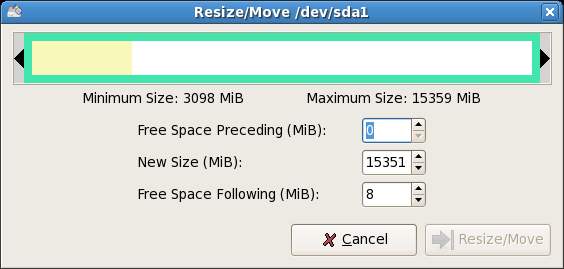
Change the New Size field to 8000 MiB and click on the Resize/Move button at the bottom of the dialog. The Resize action will then appear in the Pending panel at the bottom of the main GParted screen and the new space will be displayed in the graphical representation of the disk as Unallocated space:
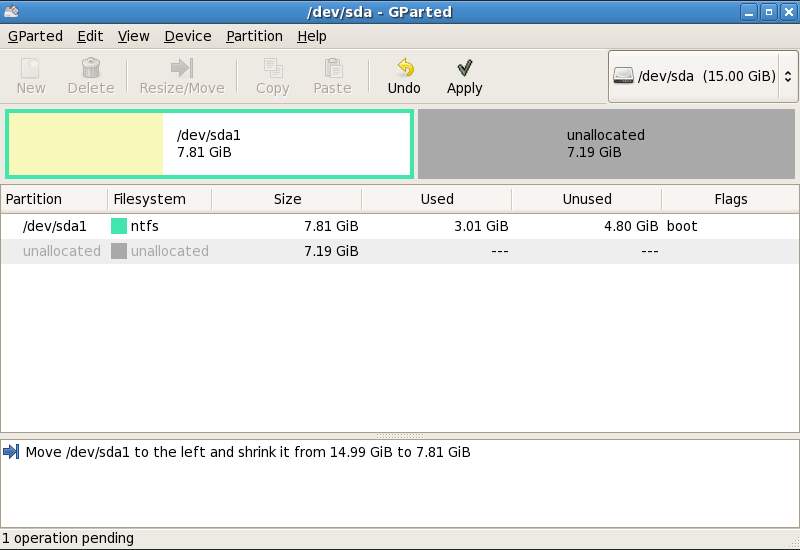
To commit the resize click on the Apply button in the toolbar and confirm the resize in the subsequent warning dialog. The Apply pending operation dialog will appear and display the progress of the resize. Once the resize is completed successfully, close the dialog and exit GParted.
The disk is now partitioned with the existing Windows installation and unallocated space suitable for the installation of Fedora Linux. Launch the installer as previously outlined and select the Use free space option when prompted for partitioning information.
In the next chapter we will look at the steps necessary to remove a Windows partition from a dual boot configuration and assign that partition to Fedora Linux.
|
Take your Fedora Linux Skills to the Next Level
|
Fedora 25 is the latest update released for the Fedora distro. Fedora Workstation is an easy to use operating system for laptop and desktop computers, with a set of tools that are idle for everyone. Fedora is a global community that works together to lead the advancement of free and open-source software. It is based on Red Hat which has scored well this time Fedora 25 is beauty in itself. To know all the new and exciting features provided by it you can visit Here Is What Is New In Fedora 25.
If you are a fan of Linux or want to give a spin to a Linux distro, you have hit the right place. If you are wondering how to install Fedora 25 on a pc that has already Windows 10 installed, then this guide is for you.
In this tutorial, I assume that you have prior experience of running any kind of Linux distro although if you’re a newbie there shouldn’t be any problem while following the guide. However, it is always advised to backup your data although if you are a professional or not.
- Decide what architecture of Fedora you want to install on your system i.e 32 bit or 64 bit.
- On the other hand you should also have a spare USB stick of at least 2gb.
Basically there are two ways of installing Fedora 25 on your system:
- Through Fedora Media Writer .
With the release of Fedora 25, Fedora community also released the Fedora Media Writer. This tool makes it easier than ever to download and install Fedora Workstation.
2. By downloading the Live Image .
This is the legacy way of installing any Linux distro by downloading its live image(ISO) to create a bootable USB stick.
>Don’t worry we are going to explain both the ways.
Prerequisites
Creating the partition
Before starting the process of installation of your Fedora 25, you have to create the partition on your hard disk so that the new operating system can be installed on it.
Creating a partition is easy to process but should be implemented with care.
- Open File Explorer.
- Right Click on ‘This PC’ and select ‘Manage’ for which you’ll administrative rights.
- Go to Storage > Disk Management.
- In the bottom half pane, you’ll find the list of all partitions. You’ will have to shrink a partition to make space for another.
- Right-click on the partition, select ‘Shrink Partition’.
- Enter the amount of space you would like your new partition to be. It cannot be more than free space for that drive. You can shrink multiple partitions to add more space. I recommend freeing up at least 20gb space.
Click Shrink and an un-allocated new volume will be generated.

Turn Off Windows Fast Startup
Go to Control Panel > Power Options.
- Click on ‘Chose what the closing lid does’.
- Click to Enable settings that is unavailable yet (Needs administrator access).
- Deselect ‘Turn On Fast Startup’ and Save Changes.
- Turning off Fast Start-up is optional but recommended. Also, if you want to get access to all files (documents, pictures, videos, music and everything else) in Ubuntu or Fedora it’s required to disable Fast Startup.

Setting Bios for UEFI support:
Do these at your own risk as some of the steps may cause temporary/permanent damage to your system. Turning Off UEFI/Secure Boot may cause security issues.
- Restart your system and press ‘Esc’ to pause start-up. This key may differ in your system.
- A Start-Up menu is displayed. Press the key defined to BIOS System/UEFI System. In my case it’s F10.
- Go to System Configuration.
- Turn Off Secure Boot
- Turn On Legacy Boot
- Save and Exit.
Now we are all done and ready to install Fedora on our system. It is important to follow above mentioned instructions in order to install Fedora smoothly on your system. By following above mentioned instruction the guest operating system will be able to access all the files easily and the permissions to do administrative work and to modify system files will be granted.
Installation via Fedora Media Writer
Fedora Media writer is a small .exe installer which in turn I found was nothing but a Fedora’s personal Live USB creator. On exploring it more it felt like UNetbootin, but a lot, lot easier. You can download the latest version from here.
After firing it up you have to put on a spare USB and start the creation tool.
- The media writer tool is a beauty in itself, unlike the hassle users have to bear previously. This tool offers a load of options within a clean interface. User has to choose the image type and the USB destination, then user gets the right to download. Do keep in mind to choose 32bit or 64bit accordingly. Within no time the USB with the power of Fedora will ready.

- Now as the USB is ready you have to simply reboot the computer and open the Fedora installation setup. In order to do that make sure you have chosen the USB as first boot device in your BIOS settings.
- On booting through pen drive it will ask whether you want to try Fedora first or simply install it on Hard Drive on your system. You simply have to choose “Install it on Hard Drive”.

- After you choose desirable language and locale storage the installer starts installing packages. While the process is going on in background you can set the root password and/or add users.

- You are done.
How To Install Fedora 25 Via Live Image
- In order to create a bootable Fedora USB stick first insert USB stick. Beware that all the data on the USB will be erased, so backup any data present on it.
- You’ll have to download the Live image from the website.You can download the latest images 32-bit from here and 64bit from here.
- For creating the live USB, I am using RUFUS. You can use any other Linux compatible software to create the Live USB.
You can download RUFUS here.
- Start the rufus application. On starting it a window will appear.
- Rufus will auto-detect the USB stick.
- On the window there will be an icon of CD Drive, click it.
- Browse to the downloaded ISO image and select it.
Press start.

- Now as the USB is ready you have to simply reboot the computer and open the Fedora installation setup. In order to do that make sure you have chosen the USB as the first boot device in your BIOS settings.
- On booting through pen drive it will ask whether you want to try Fedora first or simply install it on Hard Drive on your system. You simply have to choose “Install it on Hard Drive”.

- After you choose desirable language and locale storage the installer starts installing packages. While the process is going on in background you can set the root password and/or add users.

You are done.
Conclusion
Fedora 25 is very awaited version and was released by Fedora Community after many major changes. Installing Fedora on your system is an easy process only if implemented carefully. Also there is an old saying in our community that to always make a backup while doing such type of work.Enjoy your new Fedora Workstation.
For any assistance or problem ask me in the comment box.
Содержание
- Dualboot Fedora 29 и Windows 10
- 1. Выделение места для новой ОС#
- 2. Создание загрузочного образа#
- 3. Загрузка в USB-накопитель#
- 4. Установка#
- Почему же так важно выбрать существующий системный раздел EFI нашей системы?#
- How to Install Fedora 32 Alongside With Windows 10 in Dual-Boot
- Requirements
- Preparing Windows Machine for Dual-Boot for Fedora
- Install Fedora 32 with Windows Dual-Boot
- Fedora 32 Post Installation
- If You Appreciate What We Do Here On TecMint, You Should Consider:
- Как установить и двойную загрузку Windows и Fedora
- Подготовка компьютера к Fedora
- Как установить Fedora вместе с Windows
- Настройка Fedora
- Нужна помощь с установкой Fedora 29 рядом с Windows
- Дубликаты не найдены
- Linux-сообщество
- Вышла шестая версия российской операционной Linux-системы: доступна и обычным ПК
- Вышла Fedora 27
Dualboot Fedora 29 и Windows 10

Если вы хотите ознакомиться с дистрибутивами Linux, практически используемыми на всевозможных предприятиях, то идеальным вариантом послужит Fedora. Поскольку она поддерживается Red Hat, работать с ней много приятнее нежели с Ubuntu. А если дополнительно установить GNOME v3.20.2+, то система будет выглядеть просто великолепно.
Мы покажем, как грамотно сделать dualboot Windows 10 и Fedora.
P.S. Способ, приведённый в статье, подойдёт и для Fedora 28.
1. Выделение места для новой ОС#
Не сжимайте диск C, если там нет свободного места. Рекомендуется иметь минимум 30 Гб.


Вы увидите нераспределённое пространство.
2. Создание загрузочного образа#
Откройте Rufus и выберите ISO.
Если ваш жесткий диск имеет схему разделов GPT, выберите GPT partition scheme for UEFI, в противном случае оставьте всё как есть. Нажмите start, после чего ваш USB-накопитель будет отформатирован и назначен как загрузочный.

Если ОС Windows уже была установлена на ваш ноутбук, то он будет иметь GPT.
3. Загрузка в USB-накопитель#
Выберите Use a device, после чего USB drive. Или же, вы можете перезагрузить компьютер, нажимая F12 (Dell) или ESC (hp), и выбрать USB-накопитель в параметрах загрузки.
4. Установка#
Следуйте инструкциям, показанным на изображениях:


Для настройки разделов выберите Manual partitioning. Если у вас уже есть UEFI boot, тогда просто выберите существующий раздел EFI и смонтируйте его в /boot/efi.
Почему же так важно выбрать существующий системный раздел EFI нашей системы?#
ОС Windows от Microsoft испытывает проблемы, когда она видит более одного раздела EFI во время установки. На данный момент, создание другого системного раздела EFI будет работать, однако, с повторной установкой Windows могут возникнуть проблемы.
После этого мы добавим один раздел для / и один для swap (подкачки), нажав +
Лучше указать размер swap-раздела от 5 ГБ до удвоенного размера оперативной памяти.


После этого вам нужно установить пароль root и создать нового пользователя. Когда установка закончится вы сможете загрузиться в ОС. Просто перезапустите и завершите процесс установки.


Теперь у вас есть Fedora-29 вместе с Windows 10. Вы можете включить в настройках мыши распознавание касания по тачпаду в качестве щелчка мыши и добавить сочетание клавиш Ctrl+Alt+T для запуска терминала.
Спасибо за внимание! Надеемся, что данная статья помогла вам.
Источник
How to Install Fedora 32 Alongside With Windows 10 in Dual-Boot
This tutorial will guide you on how to install Fedora 32 Workstation in dual boot with Microsoft Windows 10 Operating System pre-installed on a BIOS firmware machine.
If your computer has no pre-installed operating system and you plan to install Fedora Linux in dual-boot with a Microsoft operating system, you should first install Windows on your machine before installing Fedora Linux.
However, try to disable Fast Boot and Secure Boot options in UEFI firmware based machines if you plan to install Fedora in dual boot with Windows.
Also, if Windows installation was performed in UEFI mode (not in Legacy Mode or CSM – Compatibility Support Module), Fedora installation should also be performed in UEFI mode.
The installation procedure of Fedora Linux alongside a Microsoft Windows 10 OS requires no special configurations to be made in BIOS-based motherboards, except maybe changing the BIOS boot order.
The only requirement is, you must allocate a free space on the disk with at least 20 GB in size in order to use it later as a partition for Fedora installation.
Requirements
Preparing Windows Machine for Dual-Boot for Fedora
Open your windows Disk Management utility and right-click on C: partition and select Shrink Volume in order to resize the partition for Fedora installation.
Give at least 20000 MB (20GB) depending on the size of C: partition and hit Shrink to start partition resize as shown below.
![]() Shrink Windows Partition
Shrink Windows Partition
After resizing partition, you will see a new unallocated space on the hard drive. Leave it as default and reboot the system in order to proceed with the Fedora installation.
![]() Unallocated Partition for Fedora Install
Unallocated Partition for Fedora Install
Install Fedora 32 with Windows Dual-Boot
1. On the first step, download the Fedora DVD ISO image and burn it to a DVD disk or create a bootable USB flash drive using the Fedora Media Writer tool or other utility.
To create a bootable Fedora USB drive compatible with installation performed in UEFI mode, use Rufus utility or Etcher. Place Fedora bootable media into your machine appropriate drive, restart the machine and instruct the BIOS or UEFI firmware to boot from DVD/USB bootable media.
2. On the first installation screen, select Install Fedora Workstation Live 32 and press [enter] key to continue.
![]() Fedora 32 Grub Menu
Fedora 32 Grub Menu
3. After the installer loads the Fedora Live system, click on Install to Hard Drive option in order to start the installation process.
![]() Choose Install Fedora to Hard Drive
Choose Install Fedora to Hard Drive
4. On the next screen, select the language that will be used during the installation process and hit on the Continue button.
![]() Select Fedora Installation Language
Select Fedora Installation Language
5. The next screen will present you Fedora Installation Summary menu. First, click on the Keyboard menu, choose your system keyboard layout, and hit on the top Done button to complete this step and go back to the main menu, as illustrated in the below images.
![]() Fedora Installation Summary
Fedora Installation Summary
6. Next, click on the Installation Destination menu, check your machine hard disk and select the Advanced Custom (Blivet-GUI) option to configure the storage. Again, hit on the Done button to enter the Blivet GUI Partitioning program.
![]() Select Fedora Installation Destination
Select Fedora Installation Destination
7. In this step, select the free space that resulted after shrinking the Windows partition will be used for installing Fedora Workstation. Select the free space and hit on the + button to create a new partition
![]() Choose Free Space Partition
Choose Free Space Partition
8. On partition settings window, enter the size of the partition, select a file system type, such as the robust ext4 file system to format the partition, add a label for this partition and use /(root) as the mount point of this partition.
When you finish hit the OK button to apply the new configuration. Use the same procedure to create the swap partition or other partitions for your system. In this tutorial, we’ll create and install Fedora on a single partition mounted in /(root) tree and we’ll configure no swap space.
![]() Create a New Root Partition
Create a New Root Partition
9. After you’ve created the partitions, review the partition table and press the top Done button twice to confirm configuration and hit on Accept Changes button from the pop-up Summary of Changes window to apply storage partition configurations and return to the main menu.
![]() Partition Table Summary
Partition Table Summary ![]() Confirm Partition Changes
Confirm Partition Changes
10. To start the installation process, just hit on the Begin Installation button, as illustrated in the following image.
![]() Begin Fedora 32 Installation
Begin Fedora 32 Installation ![]() Fedora 32 Installation Progress
Fedora 32 Installation Progress
11. After the installation completes, eject Fedora installation media and reboot the machine.
![]() Fedora 32 Installation Complete
Fedora 32 Installation Complete
Fedora 32 Post Installation
12. After the system boots up, follow the Fedora post-installation instructions as shown.
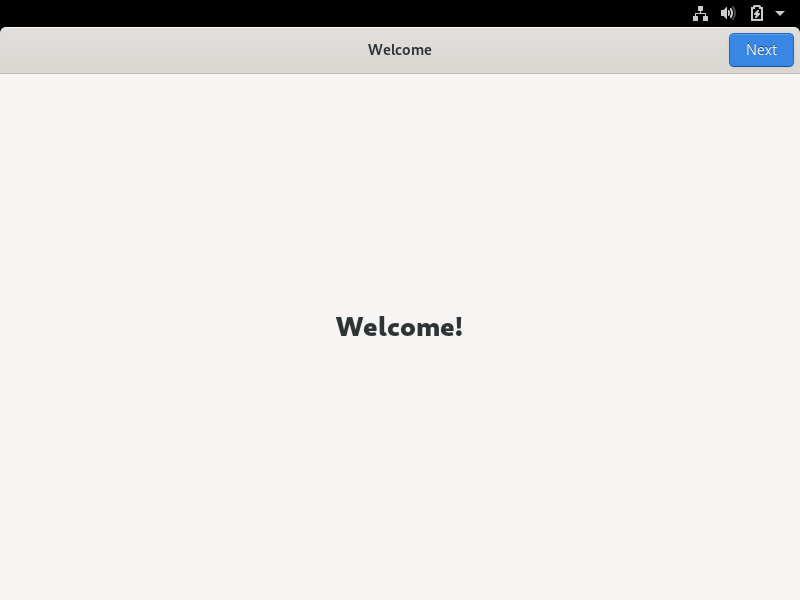
![]() Fedora Welcome Screen
Fedora Welcome Screen
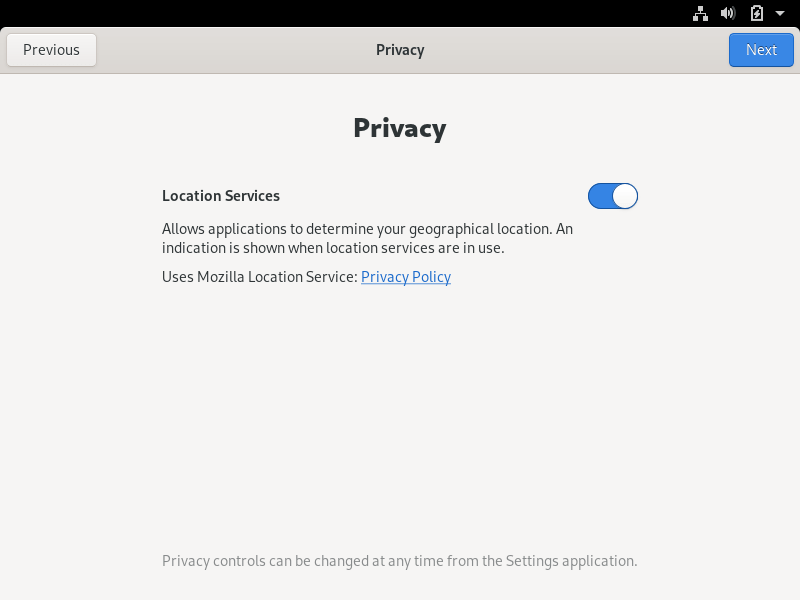
12. Allow applications to determine your location.
![]() Enable Location Services
Enable Location Services
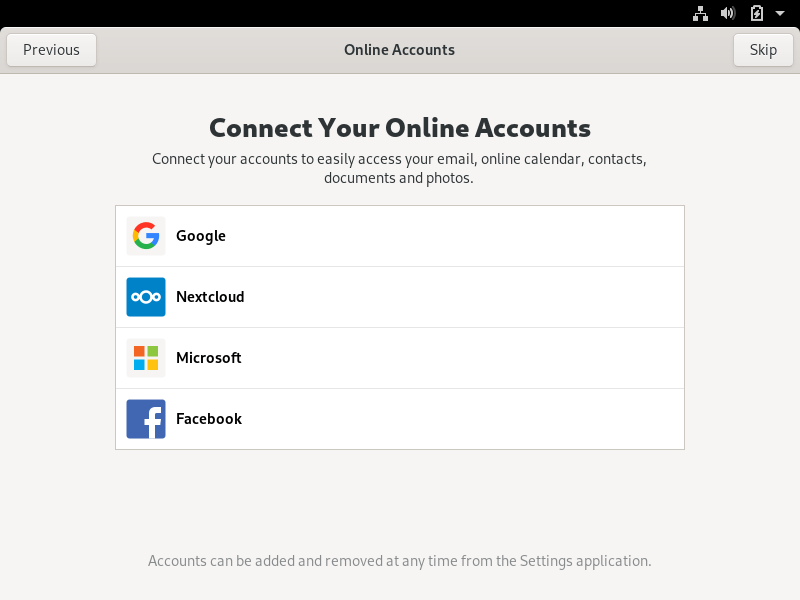
13. Connect online accounts to access your email accounts, contacts, documents, photos and more.
![]() Connect Online Accounts
Connect Online Accounts
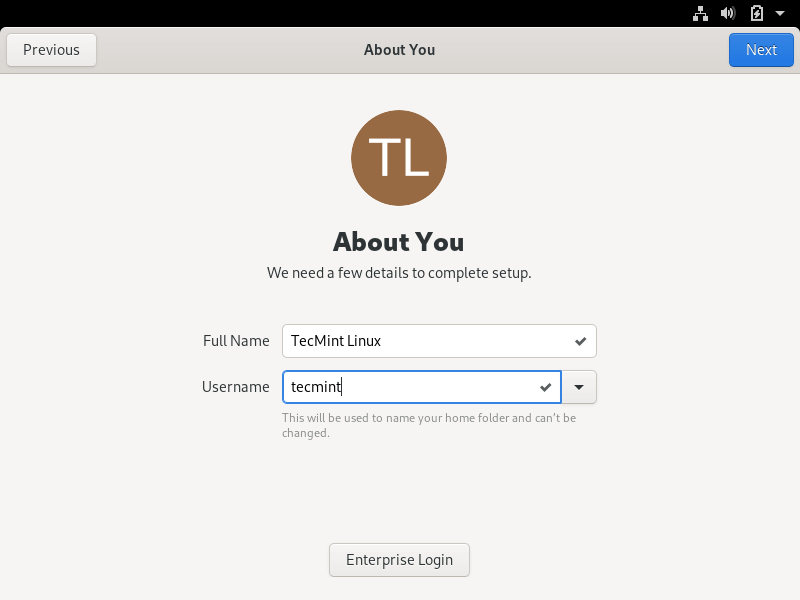
14. Next, add the name of a new user and set up a strong password for the new account.
![]() Create a User Account
Create a User Account
15. Finally, your Fedora system is ready to use.
![]() Fedora System is Ready
Fedora System is Ready
16. After reboot, you will be directed to the GRUB menu, where for 5 seconds you can choose what operating system you want the machine to boot from Fedora or Windows.
![]() Fedora and Windows Dual Boot Grub Menu
Fedora and Windows Dual Boot Grub Menu
Sometimes, in cases of dual-booting Linux-Windows in UEFI firmware machines, the GRUB menu is not always displayed after reboot. If that’s your case, boot the machine in to Windows 10, open a Command prompt with elevated privileges and execute the following command in order to restore the GRUB menu.
17. Log in to Fedora Desktop with the account and open a Terminal console and update the fedora system by issuing the below command.
![]() Update Fedora System
Update Fedora System
18. In case you want to access a Windows partition under Linux, open Disks utility, select the Windows NTFS partition, and hit on mount button (the button with a triangle sign).
![]() Mount Windows Partition in Fedora
Mount Windows Partition in Fedora
![]() Access Windows Files in Fedora
Access Windows Files in Fedora
Congratulations! You’ve successfully installed the latest version of Fedora 32 Workstation in dual-boot with Windows 10. Reboot the machine and select Windows from the GRUB menu in order to switch the operating system back to Windows 10.
If You Appreciate What We Do Here On TecMint, You Should Consider:
TecMint is the fastest growing and most trusted community site for any kind of Linux Articles, Guides and Books on the web. Millions of people visit TecMint! to search or browse the thousands of published articles available FREELY to all.
If you like what you are reading, please consider buying us a coffee ( or 2 ) as a token of appreciation.
We are thankful for your never ending support.
Источник
Как установить и двойную загрузку Windows и Fedora

Эти инструкции предназначены для установки Fedora Linux 31 на ПК под управлением Windows 10, Windows 8.1 или Windows 8.
Подготовка компьютера к Fedora
После создания USB-накопителя Fedora Linux перезагрузите компьютер и загрузитесь с USB-устройства, чтобы запустить живую версию Fedora. Вы можете сразу начать использовать Fedora, но вы должны установить ОС, чтобы сохранить любые изменения на жестком диске.
Как установить Fedora вместе с Windows
Когда Fedora загрузится, у вас будет возможность установить ее на жесткий диск или попробовать без установки. Чтобы установить Fedora вместе с Windows:


Выберите « Время и дата» на экране «Сводка установки».

Выберите часовой пояс на карте, затем нажмите « Готово», чтобы вернуться к экрану «Сводка установки».


Fedora должна автоматически определить раскладку клавиатуры, но вы можете выбрать « Клавиатура» на экране «Сводка установки», чтобы добавить новые раскладки.


Если компьютер не перезапускается автоматически, выберите вниз — стрелка в верхнем правом углу рабочего стола и выберите питания кнопки.


Настройка Fedora
При первой загрузке Fedora вам придется завершить процесс установки, создав имя пользователя и пароль. У вас также будет возможность включить службы определения местоположения и подключаться к различным учетным записям в Интернете. Например, вы можете синхронизировать Fedora с вашей учетной записью Microsoft или Google, чтобы импортировать все ваши контакты и пароли.
Источник
Нужна помощь с установкой Fedora 29 рядом с Windows
Дубликаты не найдены
Ох не нужна тебе Fedora
Удали нафиг раздел, который наметил под федору, оставь эту область неразмеченной
выделенное место в ext4 форматни через акронис + место для файла подкачки (swap)
По принципу: сначала попробую, потом НЕ пойду в профильный форум!
сначала Fedora ставить надо, а после Винду
Чтобы виндовый загрузчик к херам собачьим затёр grub?
это каким таким образом? Виндовый загрузчик даже не распознает ext
Нельзя отказаться от установки загрузчика при установке виндов. А он затирает MBR, где обитает GRUB. Последний нужно снова устанавливать.
Зачем это делать, если можно не делать?


Linux-сообщество


Вышла шестая версия российской операционной Linux-системы: доступна и обычным ПК
Российская компания МЦСТ, разрабатывающая архитектуру «Эльбрус» и одноимённые микропроцессоры, объявила о выходе новой версии дистрибутива «Эльбрус Линукс» — она получила цифровой индекс 6.0 и создана для процессорных архитектур «Эльбрус», SPARC и х86
«Эльбрус Линукс» 6.0 основана на ядре Linux 5.4, то есть на самой новой версии с расширенным сроком поддержки (LTS). Благодаря новой версии ядра, обновлённый дистрибутив получил поддержку современных аппаратных компонентов, в числе которых и производительные видеокарты, — это существенно расширяет сферы применения компьютеров с этим дистрибутивом


Мой первый пост, если не считать пары фоток, так что прошу не закидывать тапками.
Давно работаю с Linux и на работе и дома, вот и решил, что нужно сваять боевую флеху, чтоб можно было и компы подлатать и друзьям систему поставить.
Система собрана на базе Fedora 28 x64 (никакого ребрендинга или фатальных изменений, просто Fedora для себя )

Добавлены репозитории RpmFusion и Russian Fedora

Для серверов на CentOS я часто ставлю удобную систему управления Cockpit, с её помощью удобно настраивать сети, диски да и вообще классная штука, решил и тут прикрутить. Она включена по умолчанию, подключиться можно по web через порт :9090


Внешний вид после установки и первом входе нового пользователя отличается от запуска с флешки, это сделано специально, чтоб при работе с флешки можно было изменить диски или подключиться к удаленным серверам. Пользователям же изначально предложен выбор с учетом моих вкусов, но их конечно можно в избранном заменить.
Погода по умолчанию настроена на мой родной город Белгород.
Обои меняются автоматически, не пугайтесь могут переключиться и просто на какой нить однотонный цвет. Добавлено меню приложений и доступа к разным папкам. Включить или отключить расширения можно в дополнительных настройках.

На диске есть проги для восстановления данных, подключения к удаленным машинам, системы создания бекапов, работа с документами, Clamav, программы для резки и обработки видео и аудио, векторной и растровой графики, несколько проигрывателей, браузеры и чатики(телеграм и пиджин), tor-browser, системы мониторинга сети и портов, работа с дисками и еще много всего список и настройки можно посмотреть в kickstart файле https://yadi.sk/d/U0QzQpKahJrx3A
для создания образа из файла в командной строке из под Федоры надо запустить:
с флешки может не получиться, так как не хватит памяти для загрузки всех временных файлов потому можно написать
для записи на флешку
так же можно добавить дополнительные параметры для форматирования, добавления папок для хранения изменений и создание мультизагрузочной флешки
для создания на старые компы используем
Так же хочу отметить, что делал подобные флешки на CentOS для тонких клиентов. Создавал файл настройки подключения по rdp и при входе в систему автоматически открывалось подключение к удаленному серверу, запрашивая логин и пароль. Запускался Openbox и в нем remmina, оперативы кушало 130-250 Мб.
за ошибки прошу простить, признаю сразу крайне невнимателен и вообще писать это не моё 🙂

Вышла Fedora 27

Наиболее заметные изменения в Fedora 27:
* Обновление рабочего стола GNOME до версии 3.26, в которой улучшена работа сеанса на базе Wayland, улучшены средства поиска, добавлена анимация раскрытия и сворачивания окон, появилась поддержка цветных Emoji, отключен системный лоток, проведён редизайн конфигуратора, представлена новая панель настройки экрана, обеспечена поддержка синхронизации с Firefox в Epiphany;
* Обновлены версии программ, в том числе GCC 7, Perl 5.26, Qt 5.9.1, Boost 1.64, Node.js 8, Go 1.9, Java 9, RPM 4.14, Ruby on Rails 5.1, Glibc 2.26, LibreOffice 5.4;
* В Fedora Atomic упрощена настройка хранилища контейнеров, предоставлены адаптированные для запуска в контейнерах варианты Kubernetes, flannel и etcd;
* В Fedora Media Writer, интерфейсе для создания загрузочных носителей, появилась возможность создания загрузочных образов для записи на SD-карты ARM-устройств, таких как Raspberry Pi;
* Обеспечена поддержка загрузки на 64-разрядных системах с 32-разрядными прошивками UEFI;
* Добавлены пакеты с реализацией контроллера домена Active Directory на базе Samba 4.7. Ранее пакеты с Samba AD не поставлялись, так как была привязка Samba к Heimdal Kerberos. В версии Samba 4.7 появилась поддержка сборки с MIT Kerberos, что дало возможность собрать пакеты для Fedora;
* В качестве альтернативного графического интерфейса управления пакетами вместо Yumex-DNF задействован интерфейс dnfdragora, написанный на Python 3 с использованием универсальной библиотеки виджетов libYui, поддерживающей формирование интерфейса на базе Qt 5, GTK+ 3 и ncurses;
* В состав включён мультимедийный сервер PipeWire, развивающийся как замена PulseAudio с поддержкой видео. В текущем выпуске PipeWire задействован для организации совместного доступа к экрану и захвата содержимого экрана в GNOME Shell, но в дальнейшем на него планируется перевести обработку всех видео и аудио потоков.
Получить систему можно тут
Инструкция по обновлению
От себя добавлю, что это обновление прошло гладко на всех устройствах. Кажется впервые без проблем с драйвером nvidia.
Лично пока заметил только некоторые визуальные изменения, как например более плавная анимация переключения окон, прозрачность верхней панели и более приятный стандартный шрифт в терминале.
Источник
November 12, 2021 | By the+gnu+linux+evangelist | Filed in: Tutorial.
Installing
-
2. Shrinking Windows 10 Volume
How to Shrink the Windows 10 Installation Partition
Shrinking Ntfs Windows 10 Partition
-
3. Booting Fedora 35 Live
First, you may need Disabling Secure Boot and Setting up Boot from CD/DVD on Windows 10.
How to Start Up Windows 10 with Fedora CD/DVD/USB Live Media
So then Boot Your PC with Fedora 35 Live Media:

-
4. Installing Fedora 35 Workstation
Then follow with the Fedora 35 Installation
On displayed Wizard choose “Install to Hard Driver“:Now Choose the Language:
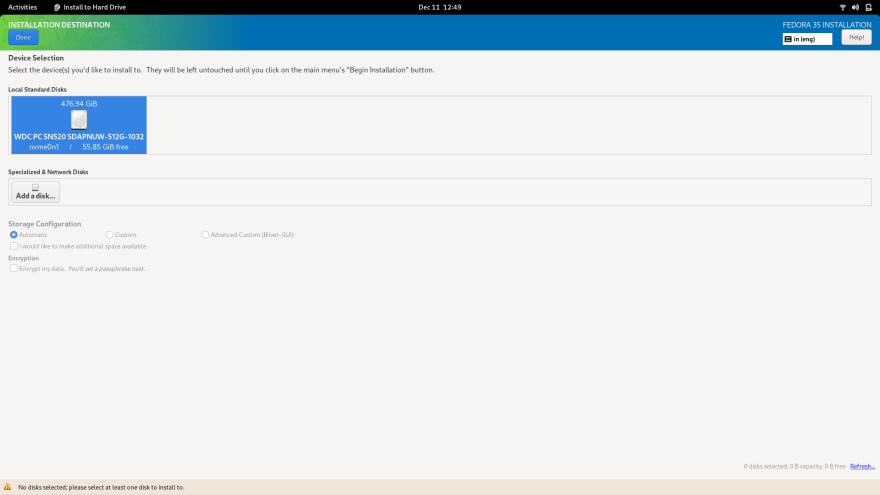
Next choose the Installation Destination:
You have to Choose 2 Times the Target to Select it.
And provide to the Automatic Partitioning using the created Free Space:In case, for an Expert Setup you may see: Fedora 35 Custom Partitioning Guide
Finally, confirm to Begin Installation:Last, simply Wait until the Installation is Successfully Achieved!


Tags: Fedora 35 Alongside Windows 10, Fedora 35 Dual Boot Windows 10, Fedora 35 Windows 10 PC, Install Fedora 35 Alongside Windows 10, install Fedora 35 on top Windows 10, Install Fedora 35 Windows 10 PC, install Fedora alongside Windows 10, install Fedora on top Windows 10, install Fedora pc