![]()
Download Article
![]()
Download Article
FFmpeg is an open-source media tool you can use to convert any video format into the one you need. The tool is command-line only, which means it doesn’t have a graphical, clickable interface. If you’re used to installing regular graphical Windows programs, installing FFmpeg may seem complicated at first—but don’t worry, it’s actually pretty easy! This wikiHow teaches you the simplest way to install FFmpeg on your Windows PC.
Steps
-

1
Go to https://ffmpeg.org/download.html. This brings you to a page containing the latest FFmpeg install packages and binary files.
- If you don’t have an app that can decompress files ending with the .7z file extension, such as WinRAR or 7Zip, you must install one before you can continue.
-
2
Click the Windows logo. It’s the blue square with a white window inside.
Advertisement
-
3
Click Windows builds from gyan.dev. This takes you to a page that contains FFmpeg builds specifically for Windows that contains all of the hardware libraries you could possibly need.
- If you prefer, you could click Windows builds by BtbN instead, which is another Windows build of FFmpeg. There are a variety of builds available from different websites—the official FFmpeg website may add more as they become available.
-
4
Scroll down to the «git» section. It’s about halfway down the page between the set of green boxes and the «release» sections.
-
5
-
6
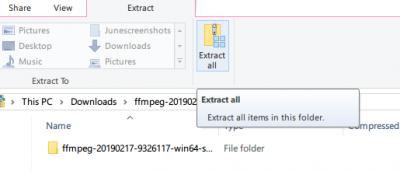
Extract the downloaded file. Here’s how:
- Right-click the Windows/Start button and select File Explorer.
- Click the Downloads folder in the left panel (you may have to click This PC first to find it).
- Right-click ffmpeg-*-git-*full_build.7z (the file name will vary depending on the current release).
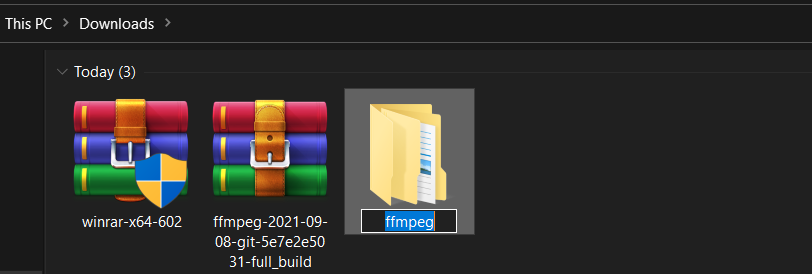
- Select Extract Here and wait for the files to extract. This creates a new folder with the same name as the .7z file.
-
7
Rename the extracted folder to FFmpeg. To do this, just right-click the folder, type FFmpeg, and press the Enter key.
-
8
Click the FFmpeg folder once and press Control+X. This «cuts» the folder from the Downloads folder so you can paste it into the root of your hard drive.
-
9
Click This PC in File Explorer. It’s the computer icon in the left panel.
-
10
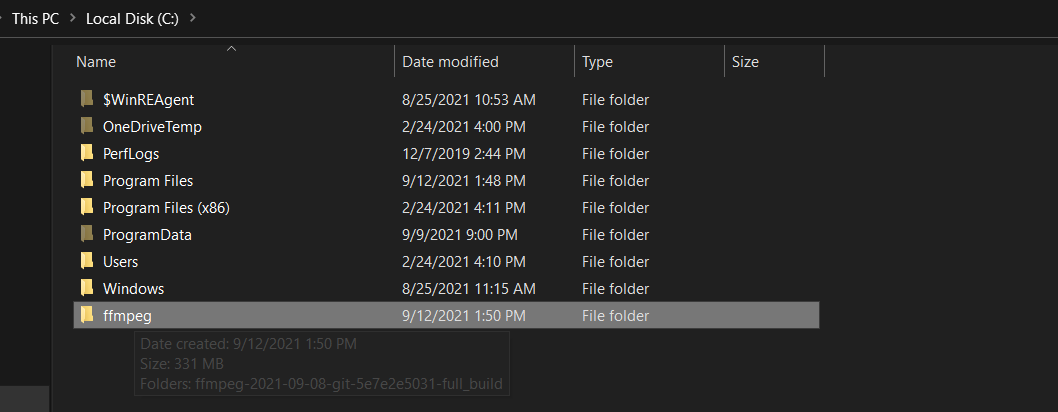
Double-click your hard drive. It’s usually called «Windows (C:)» or «Local Disk (C:)» but the name and drive letter may vary.
-
11
Right-click a blank area of the right panel and select Paste. This moves the folder to the root of your hard drive.
-
12
Open the system environment variables control panel. Here’s how:
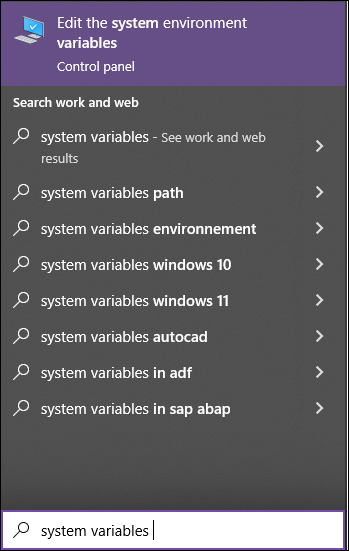
- Press Windows key + S to open the search bar.
- Type system variables into the search bar.
- Click Edit the system environment variables in the search results.
- Click the Environment variables button in the bottom-right area of the window.
-
13
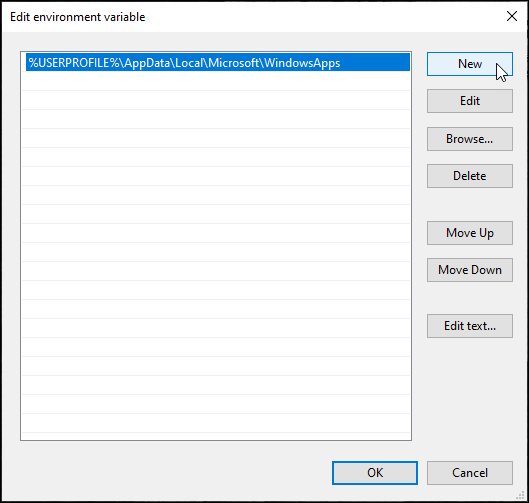
Select the Path variable under «User variables for (your name)» and click Edit. A list of paths will appear.
-
14
Add the FFmpeg binary directory to the path. This will allow you to easily run FFmpeg commands at the command prompt without having to type out the full path to FFmpeg. Here’s how:
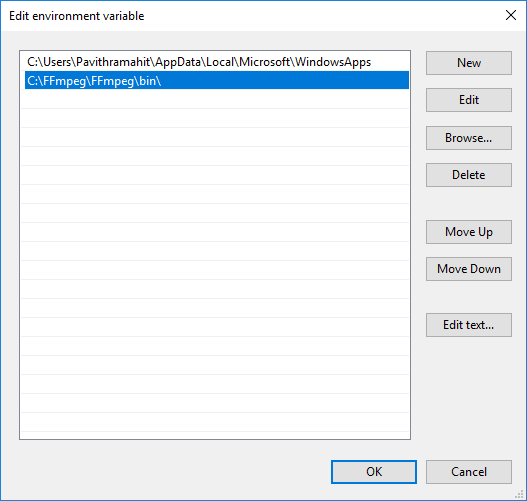
- Click the New button to open a new blank line below the bottom-most path.
- Type C:ffmpegbin. Or, if you placed the FFmpeg folder on a different drive or in a different folder, replace this path with that location instead (remember to leave bin at the end).
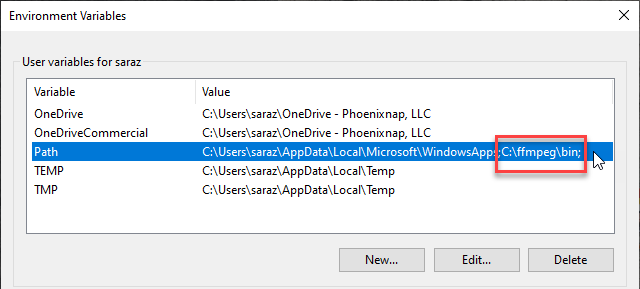
- Click OK. Now you’ll see the FFmpeg path and the end of the «Path» variable in the upper portion of the window.
-
15
Click OK to save your changes. You’ve now installed FFmpeg and set the proper environment variables. To confirm that FFmpeg is working, open the command prompt and run this command to see the version number: ffmpeg -version


Advertisement
Add New Question
-
Question
How can I watch HEVC videos?

The newest version of VLC can play HEVC. FFplay, which comes with FFmpeg, can also play them.
-
Question
What versions of Windows does FFmpeg work with?
Windows 7 or above, MacOS 10.x.x.x or above.
-
Question
Why is ‘ffmpeg-version’ not recognized as an internal or external command, operable program or batch file?
Insert a space between «ffmpeg» and «-version»; -version is a switch on the ffmpeg command/program.
See more answers
Ask a Question
200 characters left
Include your email address to get a message when this question is answered.
Submit
Advertisement
Thanks for submitting a tip for review!
-
FFmpeg is a command line-only program, which means that you can only use it in Command Prompt. This may prove difficult for users who aren’t familiar with Command Prompt.
-
You must be on an administrator account in order to install FFmpeg.
Advertisement
About This Article
Article SummaryX
1. Download FFmpeg from https://www.gyan.dev/ffmpeg/builds/ffmpeg-git-full.7z.
2. Extract the file.
3. Rename the extracted folder to «FFmpeg.»
4. Move the «FFmpeg» folder to the root of your hard drive.
5. Right-click the Start menu and select Command prompt (Admin).
6. Run this command: setx /m PATH «C:FFmpegbin;%PATH%»
Did this summary help you?
Thanks to all authors for creating a page that has been read 1,440,596 times.
Is this article up to date?
Improve Article
Save Article
Improve Article
Save Article
The ffmpeg is a cross-platform & open-source software utility to record, convert and stream video/audio files. It can be used to:
- Change the format of a video/audio file
- Extract audio from video file
- Merge audio and video streams
- Change the bitrate of a video/audio file
- Create GIF from a video file
- Extract still images from a video file
- To embed subtitles into a video file
- To compress or resize a video/audio file
- Record a live stream
In this article, we will show you how to install ffmpeg in Windows.
Installing FFmpeg on windows:
Follow the below steps to install FFmpeg on windows:
Step 1: Click here to download the zip file of the latest version. (As of September 2021, version 4.4 is the latest)

Step 2: Unzip this file by using any file archiver such as Winrar or 7z.
Step 3: Rename the extracted folder to ffmpeg and move it into the root of C: drive.
Step 4: Now, run cmd as an administrator and set the environment path variable for ffmpeg by running the following command:
setx /m PATH "C:ffmpegbin;%PATH%"
Step 5: Restart your computer and verify the installation by running:
ffmpeg -version
Introduction
FFmpeg is a command-line audio and video converter available for Linux, macOS, and Windows. This open-source tool helps users manipulate multimedia content and offers free access to several audio and video libraries.
Even though FFmpeg doesn’t have a clickable GUI, the installation process is straightforward.
In this guide, you will learn how to install FFmpeg on Windows in four simple steps.
Prerequisites
- A system running Windows (This tutorial uses Windows 10).
- A file archiver (This guide uses 7-Zip).
- Command Prompt or Windows PowerShell access.
- Administrator privileges.
How To Install FFmpeg on Windows
Installing FFmpeg on Windows requires adding the utility to the Windows PATH. Additionally, users can manually navigate to the folder containing the executable and run the program. However, the process is time-consuming and impractical.
A straightforward way to work with FFmpeg is to add it to PATH by editing Windows environment variables. Therefore, Windows knows where to look for the executable. Users can run FFmpeg directly from the command line without typing in the full path to the app’s folder.
Step 1: Download FFmpeg for Windows
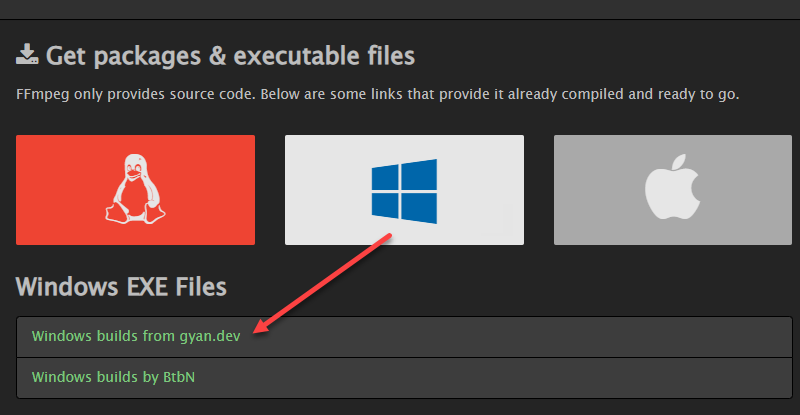
Visit the FFmpeg download page. The More downloading options section has FFmpeg packages and executable files for Linux, Windows, and Mac. To get the Windows version:
1. Hover over the Windows logo and click the Windows builds from gyan.dev link. A new page opens.
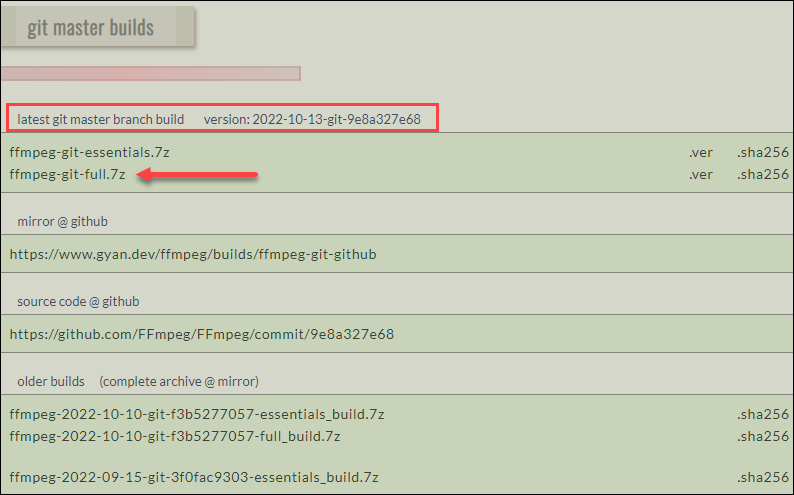
2. In the git master builds section, look for the latest version of the FFmpeg build. Click the ffmpeg-git-full-7z link to download the full build since that version has the most up-to-date libraries.
3. Choose the download location and save the file if the download does not start automatically.
Note: This guide uses the Windows build from gyan.dev. Other builds are available for download, like the one by BtbN. No official documentation confirms any significant differences between different builds.
Step 2: Extract the Downloaded Files
Once downloaded, extract the contents:
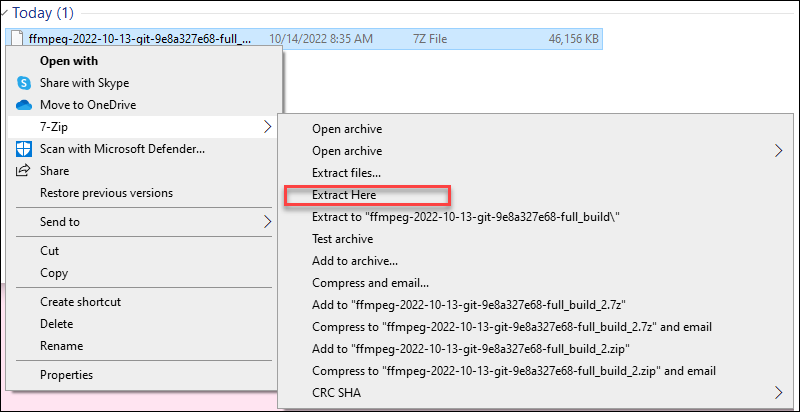
1. Locate the downloaded file. The default location is the Downloads folder.
2. Right-click the file and hover over 7-Zip (or another file archiver of choice).
3. From the archiver submenu, choose Extract here. Wait for a few seconds for the extracting process to complete.
5. Rename the extracted folder to ffmpeg.

6. Move the folder to the root of the C drive or the folder of your choice.

Step 3: Add FFmpeg to PATH
Set Windows environment variables to add FFmpeg to the PATH. Follow these steps:
1. Type system variables into the search bar and click the Edit the system environment variables option.
2. Under the User variables section, select Path and click the Edit button.

3. Choose New from the side menu.
4. Add C:ffmpegbin to the empty field and confirm changes with OK.
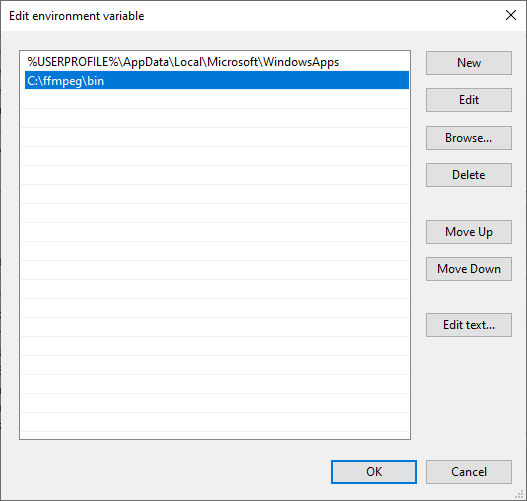
The change in the Path variable line confirms the FFmpeg is added to PATH.
Note: If you stored FFmpeg in a folder other than the C drive, use that path accordingly.
Step 4: Verify FFmpeg PATH
To verify the FFmpeg is correctly added to the Windows PATH, open the Command Prompt or PowerShell and run:
ffmpegThe output confirms the installation:

Conclusion
This article provided an easy step-by-step guide on installing FFmpeg on Windows.
For more tutorials refer to our article and learn how to install FFmpeg on MacOS.
Next, learn how to change or reset the administrator password on the Windows server.
FFmpeg is a popular software for processing, converting, or manipulating video and audio files. The program is used for endless things like rotating videos, scaling videos, extracting information about videos, and many others. It is an open-source program that is simply awesome for video scaling, format transcoding, decoding, encoding, demuxing, streaming, filtering, converting audio files, recording live audio/video, handling video and other multimedia files. This multimedia framework is designed for command-line-based processing of multimedia files, and you can make basic edits with single-line commands.
While the program is simple to use, accessing FFmpeg to execute commands is a little confusing. Installing and using FFmpeg can take a lot of time as you need to manually open the FFmpeg folder within the command prompt or Power Shell terminal to access the FFmpeg executive file to execute relevant commands for basic editing. If you are stuck with installing and using FFmpeg on your machine, you are in the right place.
To make things simple, all you have to do is install FFmpeg and add the FFmpeg program to the Windows path using Environment variables. This way you can directly access FFmpeg from a Command prompt or Power Shell in any directory. In this article, we explain how to install FFmpeg on Windows in order to access FFmpeg directly from Command Prompt or PowerShell
Get the latest FFmpeg build from the official website here. You can either download the 32-bit version or the 64-bit version that suits your system. Click the Download Build button to start downloading.
The program doesn’t work directly on Windows 10. You need to add a program to the system path using Environment Variables.
So navigate to the downloaded folder where the FFmpeg zip file is a store. Right-click on the Zip folder and click extract from the drop-down menu.
Select the folder or drive where you want to extract.
Next, rename the extracted folder. To rename the folder, right-click on a folder and click Rename from the drop-down menu with title FFmpeg-20180424-d9706f7-win64-static to FFmpeg.
Copy the FFmpeg folder and navigate to C drive. Paste the folder to the root of C drive.
Once done, the next step is to enable FFmpeg using Command Prompt.
Add FFmpeg to Windows path using Environment variables
To use FFmpeg in Command Prompt, you need first to add the bin folder containing the FFmpeg executable file to your Windows path
In the Windows search menu, type Edit the system environment variables and click Enter. This will open the system properties window.
Navigate to Advanced button and click Environment Variables at the bottom of the window.
In the Environment Variables window, Select the variable Path and click Edit to change the Path variable.
Click New and type the path of FFmpeg folder “C:ffmpegbin” and click OK.
Type the path directory according to the drive or folder where you have placed FFmpeg folder.
Once done, the path gets added to the Environment variables. Click OK to apply changes.
Verify FFmpeg path in Command Prompt
Launch Command Prompt and type the command FFmpeg in the command prompt terminal and hit Enter.
If the FFmpeg is added properly to Windows Path, the command prompt will display the details about FFmpeg like its version number, configuration, etc.

If you weren’t successful, it only means that your command prompt did not recognize the commands. Cross-check to see if you have added the FFmpeg folder to the system path properly.
Read: Fix Audacity FFmpeg error on Windows PC.
That’s all!
FFmpeg is a free and open-source command-line tool for transcoding multimedia files. It supports a wide variety of codecs and file formats, including AVI, MP4, FLV, MKV, WMV, and more.
With it you can convert video and audio files, edit them in various ways such as cutting or cropping videos, as well as encode and decode them. You can also use it to record your screen or webcam, or to create time-lapse videos, and much more.
It’s used by a lot of popular applications, such as VLC media player, HandBrake, and Adobe Premiere Pro, and many others.
Table of Contents
- Installing FFmpeg on Windows
- Download FFmpeg
- Extract & Move FFmpeg
- Add FFmpeg to PATH
- Check if FFmpeg is Installed on Windows
- Conclusion
Installing FFmpeg on Windows
To install FFmpeg on Windows is very easy, it’s just different than the usual install process.
All we have to do is download the FFmpeg software which is bundled in an archive, place it somewhere we’d keep software/utilities, such as in the C: drive, and add its location to the PATH environment variable.
The PATH environment variable is a list of directories that Windows will look in for executable files (EXE, DLL, BAT). This allows you to run programs from any directory without having to type the full path to the program. We want this so we can easily use ffmpeg from the command-line.
Download FFmpeg
To download FFmpeg:
- Go to https://ffmpeg.org/download.html
- Hover over the Windows logo in the bottom left of the screen.
- Underneath it you’ll see two links appear. Click on Windows builds from gyan.dev
- On that page click on ffmpeg-git-full.7z. It’s a link that will download the archive in 7zip format. If you can’t extract it make sure to download and install 7zip on your system.
Now extract the archive and rename it to something simple, like ffmpeg.
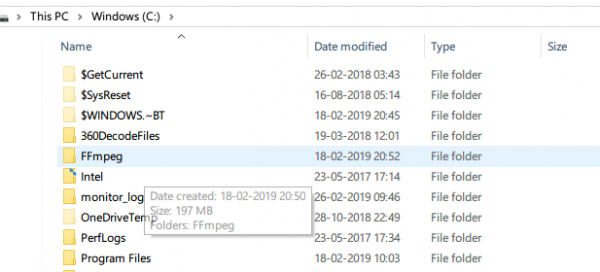
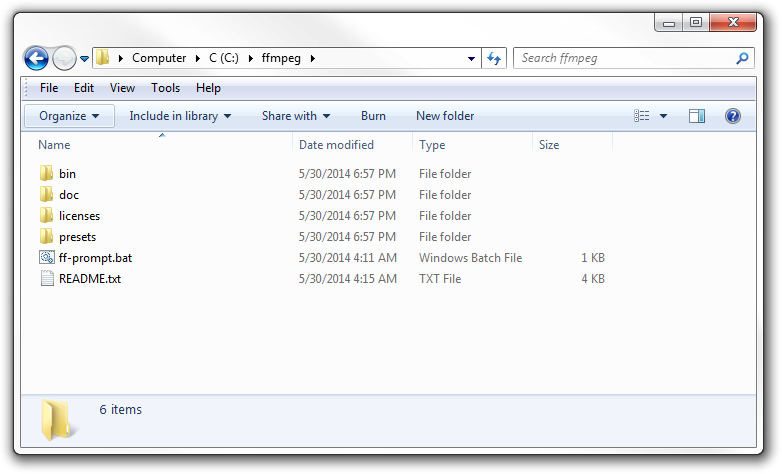
Next we’ll move the archive somewhere in the C: drive. I’ll move it right in C:. So the path will be C:ffmpeg in my case.
This is my C: drive with ffmpeg in it:

Next we want to add the path to the directory containing ffmpeg.exe (and a few other executables) to our PATH environment variable. That directory is ffmpegbin.
You can see for yourself if you go inside ffmpegbin:

Add FFmpeg to PATH
Like we said before the PATH is the system variable that your operating system uses to locate needed executables from the command-line.
You can do this in multiple ways, such as by using the command-line or using the Windows graphical interface.
The command-line method is faster and we’ll do it this way.
Add FFmpeg to PATH Using the Command-Line
To do this just open a command promp (cmd) as an Administrator and run:
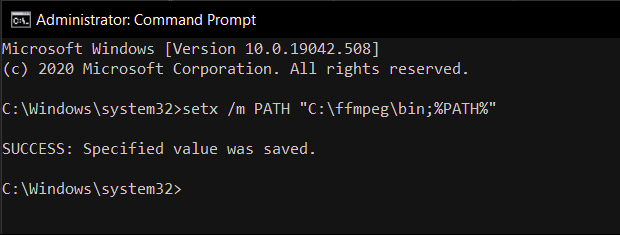
setx /m PATH "C:ffmpegbin;%PATH%"
You can change C:ffmpegbin with something else, if you have placed ffmpeg elsewhere.
Here’s how it looks like when you run the command in the Command Prompt:

That’s it. If everything went well, we should be able to use ffmpeg from the command-line.
Check if FFmpeg is Installed on Windows
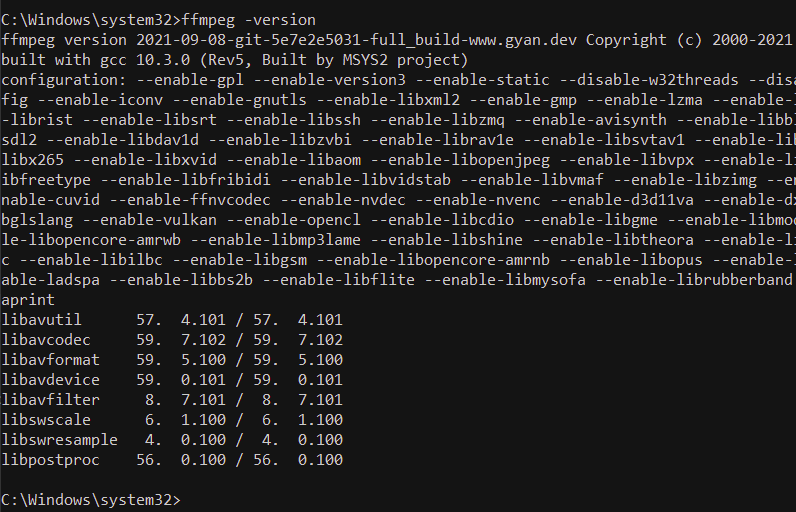
To check if ffmpeg is installed on Windows just run ffmpeg in the command line and it should output some information about our version of ffmpeg, such as available codecs, ffmpeg version, and some other things.

Well done. FFmpeg should now be installed on your Windows system and you can start using it to convert or encode your video and audio files.
Conclusion
In this tutorial we covered how to install FFmpeg on Windows. Hopefully it worked for you. If it didn’t feel free to leave us a comment and we’ll get back to you as soon as we can.
Did you receive a video with those annoying black bars on the side? Do you wonder how you could change the orientation and remove those black bars? Or maybe you want to create a montage of your favorite pictures and make a music video. You can do all that for free when you install FFmpeg.
Not a reader? Watch this related video tutorial!
Not seeing the video? Make sure your ad blocker is disabled.
In this guide, you will learn to install FFmpeg and how to use it by following many examples. By the end, you’ll have acquired the foundation to start converting and altering media files!
Prerequisites
This tutorial will be a hands-on demonstration. If you’d like to follow along, be sure you have the following.
- You’ll need a computer running on a compatible operating system, such as Windows, Linux (RHEL-based, Debian-based, or Ubuntu-based), and macOS. This tutorial will be using Ubuntu 20.04, Windows 10, and macOS Big Sur for the installation.
While the installation method varies, FFmpeg usage should be the same across different operating systems.
- Your computer must have at least 4GB of RAM and a two-core CPU. Multimedia processing is generally a resource-intensive task. As such, your computer must have decent hardware capacity.
Installing FFmpeg on Ubuntu
FFmpeg is available in the default repositories of most Linux distributions. Conveniently, you can install FFmpeg through your distro’s package manager, such as apt in Ubuntu.
To install FFmpeg on Ubuntu, follow these steps:
1. SSH into your Ubuntu server and update the apt package index.
2. Next, install FFmpeg and all the necessary libraries.
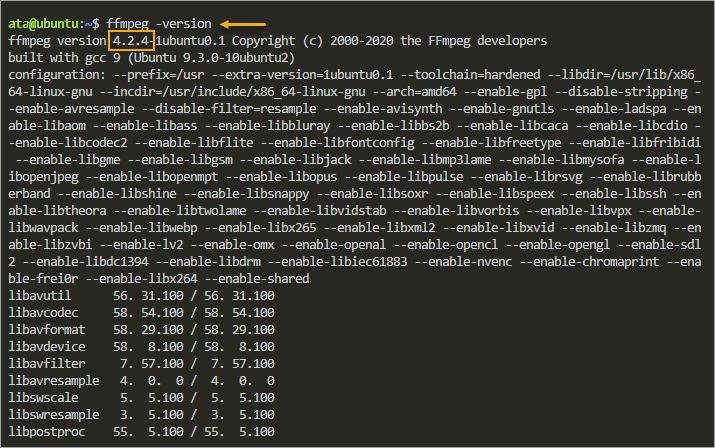
3. Finally, check the FFmpeg version you installed.
You will see an output similar to the following screenshot. Your version may be different.
Installing FFmpeg on Windows 10
So far, you have learned how to install FFmpeg on Ubuntu. Now, know two ways to install FFmpeg on Windows 10 in this section.
Method 1: Install FFmpeg via PowerShell
This method gives you more control over where to download and install FFmpeg on your computer. Best of all, you’ll perform everything within PowerShell.
To install FFmpeg on Windows 10, follow these steps.
1. Open a PowerShell as administrator on your computer.
2. Create the folder where you’ll download and install FFmpeg. This command creates the folder C:ffmpeg.
New-Item -Type Directory -Path C:ffmpeg ; Set-Location C:ffmpeg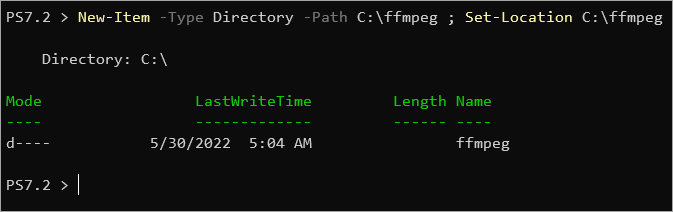
3. Run the below command to download the latest FFmpeg release for Windows. This command saves the file as ffmpeg.zip.
curl.exe -L 'https://www.gyan.dev/ffmpeg/builds/ffmpeg-release-essentials.zip' -o 'ffmpeg.zip'
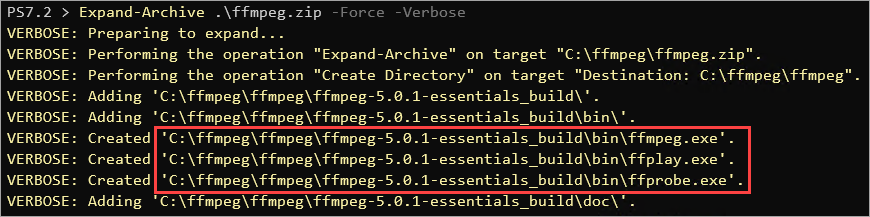
4. After downloading, extract the ffmpeg.zip file to the current directory. To do so, run the Expand-Archive command below.
# Expand the Zip
Expand-Archive .ffmpeg.zip -Force -Verbose
As you can see, the command extracted all files from the zip file. The only files you’ll need are the executable files.
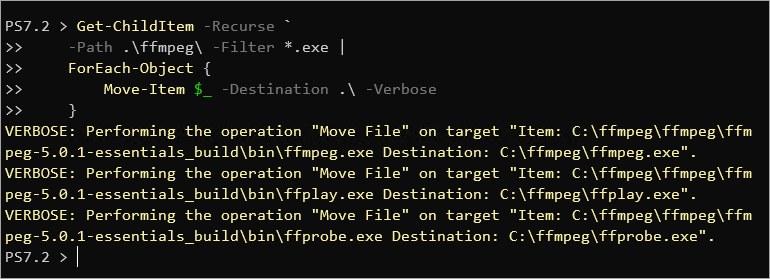
5. Move the executable files to the top folder for simplicity and quick access.
# Move the executable (*.exe) files to the top folder
Get-ChildItem -Recurse `
    -Path .ffmpeg -Filter *.exe |
    ForEach-Object {
        Move-Item $_ -Destination . -Verbose
    }
6. Now, clean up the FFmpeg directory by deleting the unnecessary files and folder.
# Clean up
Remove-Item .ffmpeg -Recurse
Remove-Item .ffmpeg.zip
# List the directory contents
Get-ChildItem
At this point, only the executable files remain

7. Now, prepend the C:ffmpeg folder to the system path environment variable. This step ensures that you can run the ffmpeg.exe command from any directory without specifying the full path.
# Prepend the FFmpeg folder path to the system path variable
[System.Environment]::SetEnvironmentVariable(
    "PATH",
    "C:ffmpeg;$([System.Environment]::GetEnvironmentVariable('PATH','MACHINE'))",
    "Machine"
)
8. For the new system variables to take effect, perform either one of the two options below.
Note: You only need to do either option once. Every subsequent PowerShell or CMD session will pick up the environment variables automatically.
Option 1: Close your current PowerShell session and open a new one.
Option 2: Run the below command in the current PowerShell session to import the machine’s PATH variable into the current session.
$env:Path = [System.Environment]::GetEnvironmentVariable("Path","Machine")9. Finally, check the FFmpeg version by running the below command.
As you can see, you don’t need to specify the full path of the ffmpeg.exe executable file due to what you did in steps 5 and 6.

Method 2: Install FFmpeg via Chocolatey
Since Windows 10 does not have a default package manager like Ubuntu’s apt, an excellent alternative is to use Chocolatey.
Follow the steps below to install FFmpeg via Chocolatey.
1. If you don’t have Chocolatey yet, open an elevated PowerShell terminal and run the following code to install.
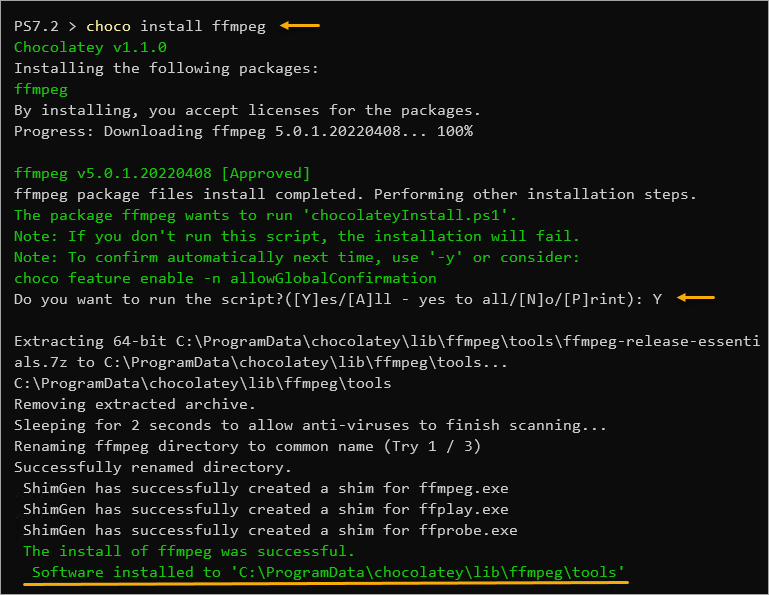
Set-ExecutionPolicy Bypass -Scope Process -Force; [System.Net.ServicePointManager]::SecurityProtocol = [System.Net.ServicePointManager]::SecurityProtocol -bor 3072; iex ((New-Object System.Net.WebClient).DownloadString('https://community.chocolatey.org/install.ps1'))2. After installing Chocolatey, close your current PowerShell window and reopen a new one. On your new PowerShell window, run the following command to install FFmpeg.
Type Y and press Enter at the confirmation prompt.
3. Finally, check the FFmpeg version you installed.

Installing FFmpeg on macOS
If you’re using a macOS computer, the most convenient way to install FFmpeg is through Homebrew. Homebrew is a package manager for macOS but does not come out of the box.
1. Open a terminal window on your macOS computer.
2. If you don’t have Homebrew yet, run the below command to install it on your computer.
/bin/bash -c "$(curl -fsSL https://raw.githubusercontent.com/Homebrew/install/HEAD/install.sh)"3. Once you’ve installed Homebrew, run the below command in the terminal to install FFmpeg.
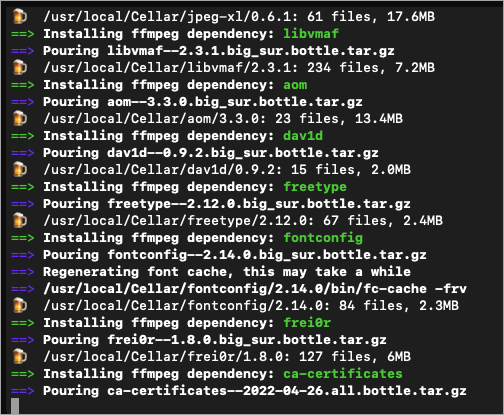
As you can see below, Homebrew automatically detects and installs every FFmpeg dependency.
Installing FFmpeg on macOS could take several minutes, especially when many dependencies are missing. Be patient.
4. Finally, check your version of FFmpeg by running the below command.

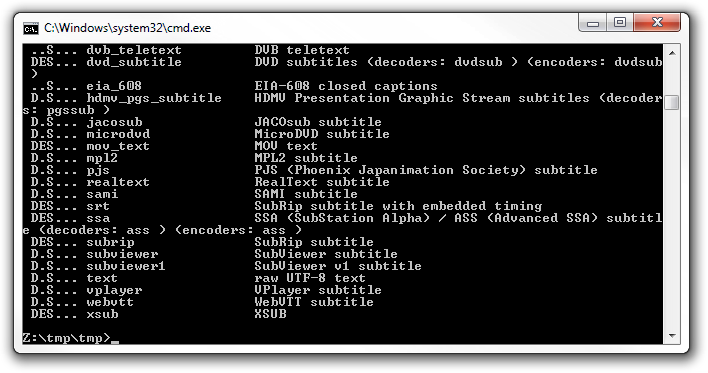
Listing Available Encoders and Decoders
FFmpeg is known for its media processing capabilities, especially in converting media formats. Converting media files between different formats involves encoding and decoding. What enables FFmpeg to convert media files are the encoders and decoders.
These encoders and decoders determine which media file formats FFmpeg can process. How do you know which encoders and decoders come with FFmpeg?
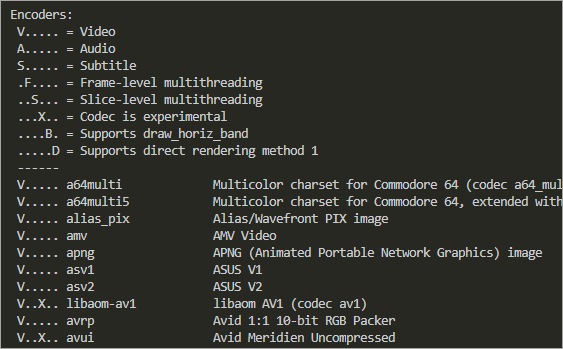
To display the list of encoders or decoders, run the commands below.
# Show encoders
ffmpeg -encoders
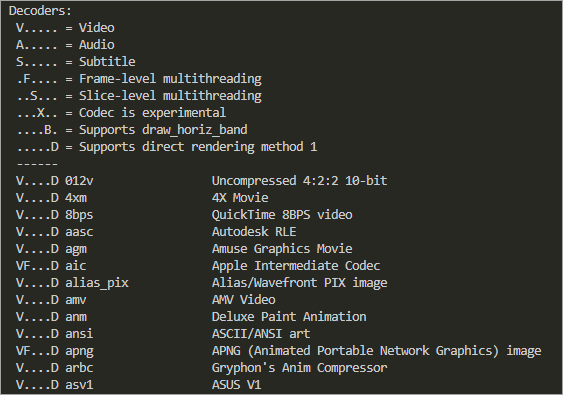
# Show decoders
ffmpeg -decoders
The below screenshots show only a portion of the available encoders and decoders. The legend at the beginning indicates whether the encoder supports video, audio, subtitles, etc.
Extracting Media File Information
After installing FFmpeg, the first thing you will want to do is to get the essential information about a media file. This information includes the duration of a video or which codecs were used during an audio file encoding.
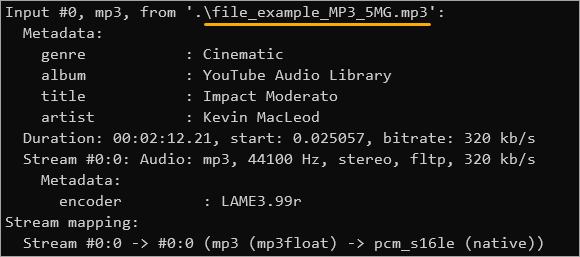
To get a file’s media information, run the below command. Ensure to provide the correct filename after the -i option. The -f null – flag prevents FFmpeg from encoding the output to a file, where null means no file format and – means no filename.
This example uses a sample MP3 file named file_example_MP3_5MG.mp3 downloaded from this link.
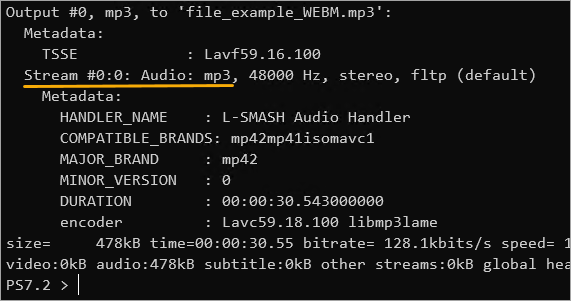
ffmpeg -i .\file_example_MP3_5MG.mp3 -f null -
As you can see, the input file information shows the metadata, bitrate, duration, and container format, among others.
Converting Media Files with FFmpeg (Examples)
Suppose you have a WEBM video file that you want to watch on your smart TV. But your TV does not support the WEBM format. You can use FFmpeg to convert the WEBM file to a format that your TV supports, such as MP4.
This example uses a sample video file called file_example_WEBM_1920_3_7MB.webm downloaded from this link.
Example 1: Basic Conversion with Automatic Codec Selection
The command is as follows to perform a basic conversion of a video format. This command takes file_example_WEBM_1920_3_7MB.webm as the input, converts it, and saves the output file file_example_MP4_1920_3_7MB.mp4.
ffmpeg -i file_example_WEBM_1920_3_7MB.webm file_example_MP4_1920_3_7MB.mp4
Notice that you didn’t have to specify the output format? Because FFmpeg recognized the format since MP4 is well-known and uses the correct codecs and encoders.
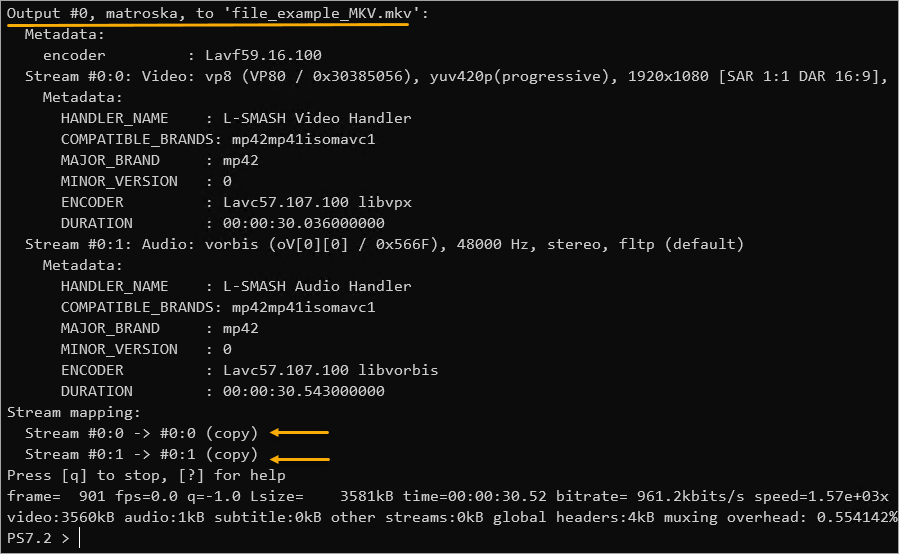
Example 2: Changing the Container without Encoding
In some cases, you may want to change a file container into another without re-encoding the video or audio streams. One reason could be that you’ve already encoded the streams correctly but chose the wrong container in the first place.
To change contains without transcoding, run the below command. This command uses the -c:a copy and -c:v copy options to copy the audio and video streams from a WEBM into an MKV container.
ffmpeg -i file_example_WEBM_1920_3_7MB.webm -c:v copy -c:a copy file_example_MKV.mkv
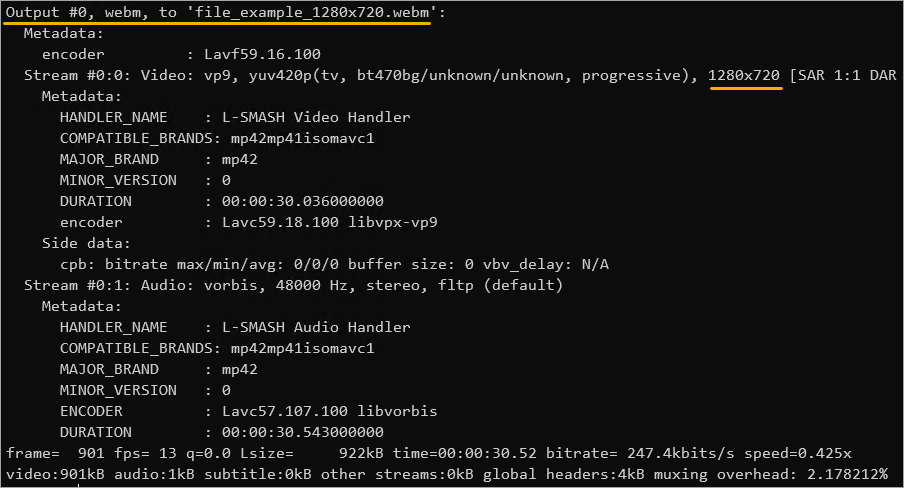
Example 3: Changing the Video Resolution
What you are mainly playing videos on a small screen, perhaps on a mobile phone. Smaller screens may have fewer benefits with higher video resolutions, such as 1920×1080, and bigger file sizes.
In such cases, FFmpeg can resize a video to a smaller resolution, like 1280×720. To do so, run the following command. This command uses the -c:a copy option to copy the audio stream (without conversion), and the -s 1280×720 option specifies the output video resolution.
ffmpeg -i file_example_WEBM_1920_3_7MB.webm -c:a copy -s 1280x720 file_example_1280x720.webm
Example 4: Extracting Audio from a Video File
You can also use FFmpeg to extract the audio from a video file. This FFmpeg usage is widespread for converting music videos or instructional videos to audio files like MP3 and OGG.
To extract the audio from a video file, run the below command. This command uses the -vn option to disable the video stream and save the output to an MP3 file.
ffmpeg -i file_example_WEBM_1920_3_7MB.webm -vn file_example_WEBM.mp3
As you can see below, the input file had two streams; Stream#0:0 for video and Stream#0:1 for audio.
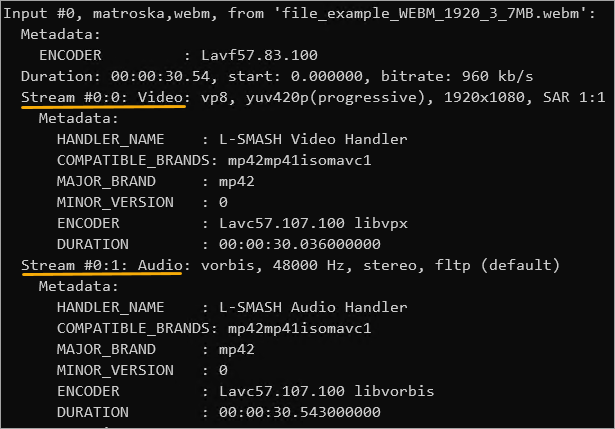
But the output only contains one stream, which is the audio-only since you’ve disabled the video stream.
Conclusion
FFmpeg is a powerful multimedia tool for converting media files between different formats and extracting audio from video files. This guide taught you how to install FFmpeg and used its command with several real-life examples.
With FFmpeg, you can make your media files work on any device or platform. So don’t be afraid to give it a try. Don’t stop here! There’s a lot more you can do with FFmpeg, like how to compress a large video file to save space or extract all the images from a movie to create a photo gallery.
For more ideas, check out the FFmpeg documentation. Thanks for reading, and happy learning!
Understandably, most people are a little lost when it comes to using command-line programs like FFmpeg. But don’t worry, I was there not too long ago, and now I’ll try explain as thoroughly as I can how to install it and start using it.
But first, a little info from their site:
FFmpeg is the leading multimedia framework, able to decode, encode, transcode, mux, demux, stream, filter and play pretty much anything that humans and machines have created. It supports the most obscure ancient formats up to the cutting edge.
So really, you’re doing yourself a huge favour by installing it, you just need a little help to get started.
(click to expand each section)
1: Download
Head on over to http://ffmpeg.zeranoe.com/builds/ and download either the 32 or 64-bit Static version (depending on your system). Most modern computers are 64-bit, but just in case you’re not sure, it’s pretty easy to check.
At the time of writing this, the latest build is from 2014-05-30:

2: Unzip
To make the download size nice and small, it’s compressed into a .7z file, which is just like a .zip file but smaller. Chances are you know exactly what this is and how to extract it, but if not, you’ll just need to download a program called 7zip which will allow you to unzip it. I know it sounds like I’m sending you further down the rabbit hole, but 7zip is another program you’ll not regret you installed.
Unzip it to a folder that’s easy to find, like directly to your C: drive. It should create a folder like ffmpeg-20140530-git-98a6806-win64-static, but just rename it to ffmpeg for simplicities sake. You’ll thank me later.
It should look something like this:
3: Add to Path
Finally, we need to add the bin folder, which contains the ffmpeg.exe file, to our system path to allow us to run the commands easily.
Technically, you could always do something like C:ffmpegbinffmpeg.exe -codecs,
but it’s much easier to type ffmpeg -codecs.
If you try that right now, you’ll get an error saying that the ffmpeg is not recognized as an internal or external command.
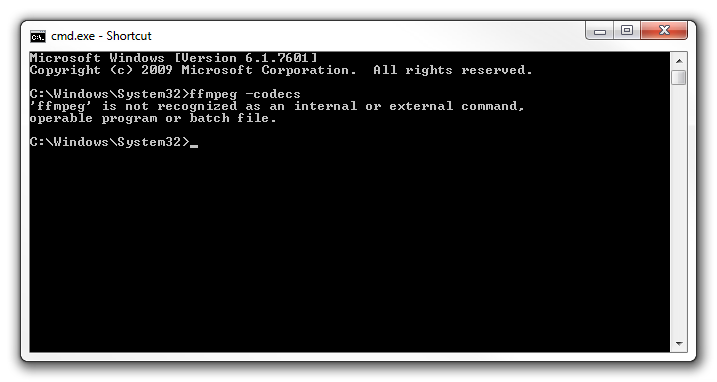
That basically means windows has not idea what you’re talking about.
All we need to do is add C:ffmpegbin to our system path, and it’ll understand us.
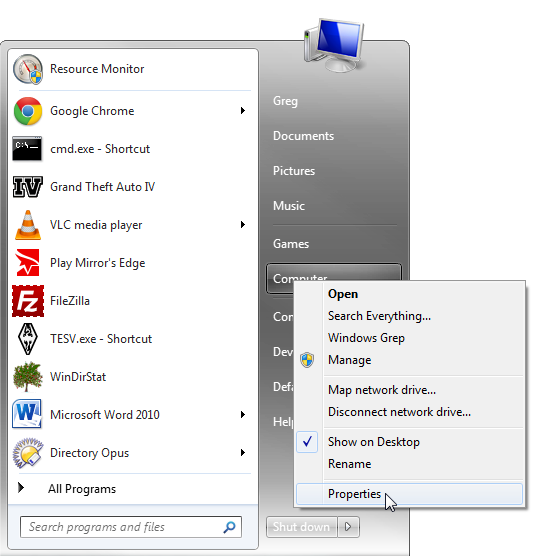
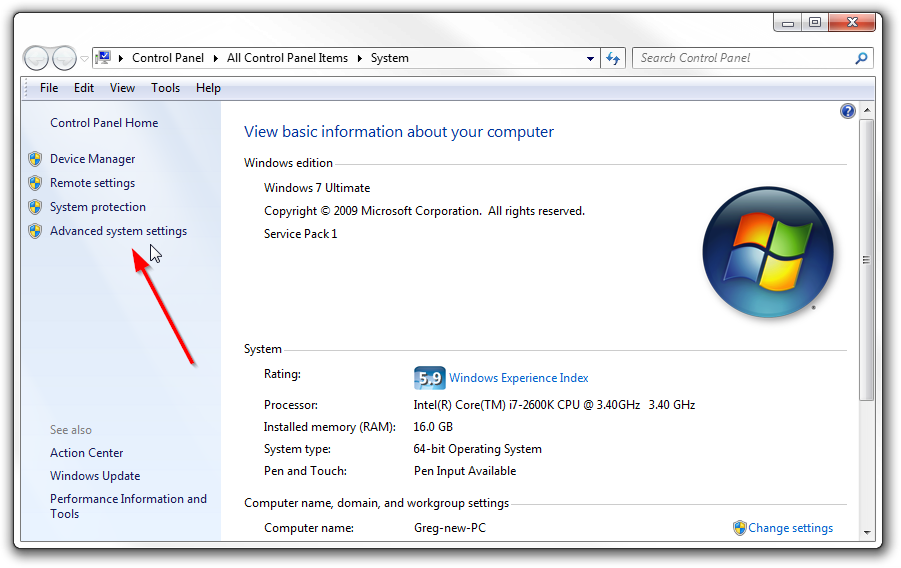
So, in the Start Menu, right click on Computer and choose Properties.
Then select Advanced system settings:
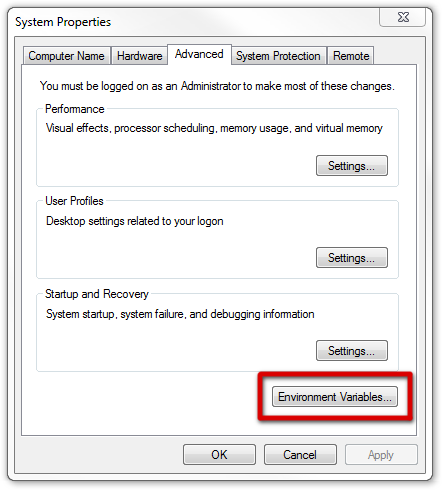
Open up the Environment Variables:
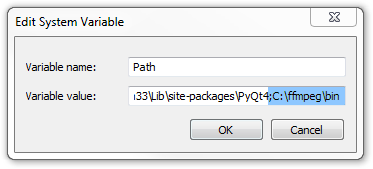
And then edit the Path variable:

The Path is just a list of folders that contain commands you’re allowed to use without typing in the full path of the exe files.
So, go ahead and add C:ffmpegbin to the end of the line, making sure that there’s a semi-colon (;) after the previous folder:
4: Use it!
Since FFmpeg is a command-line program, we’re going to need to open a command line!
There are several ways to do this:
- Search in the start menu for command prompt or just cmd
- Hit Win+R to open the Run utility and type cmd there
- Shift+Right Click in a folder (without any files selected) and choose Open command window here. That’s what I usually do.
Once you’ve got a console open, check that FFmpeg is installed properly by typing ffmpeg -codecs, which will show you all the codecs you have access to, including audio and video.
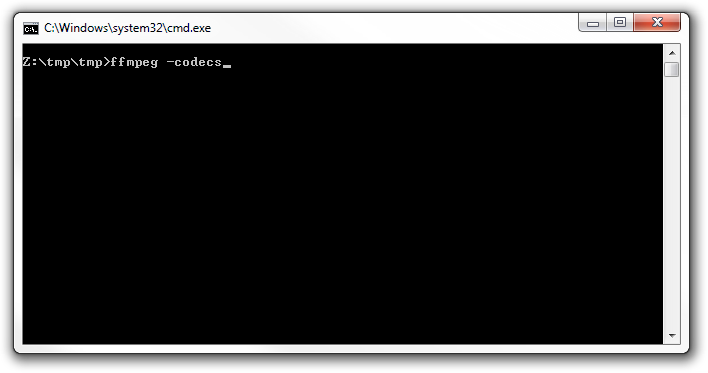
If it still tells you that it doesn’t recognize the command, double check that you successfully added the ffmpeg bin folder to the system path.
If all is well – congratulations, it’s installed!
Now you can play around with all sorts of things, like converting an image sequence into a video, a video into an image sequence, rotate and scale videos, discover information about a video, stabilize that shaky video you took at you Great Aunt’s 4th wedding, stream the webcam you planted in your girlfriend’s ex-boyfriend’s bedroom, or convert your 250 frame cube render to a super-crispy lossless h264 of unparalleled awesomeness.
There’s really an endless number of things you can do, so have a look at the documentation some time. But if that sounds like too much hard work, here’s my own personal reference I keep to remind me of common tasks:
Make video from image sequence:
ffmpeg -i frame_%04d.png -c:v h264 test.mp4 – ‘%04d’ is the padding, like ‘frame_0001.png’
lossless h264:
ffmpeg -i frame%04d.png -c:v libx264 -preset veryslow -qp 0 vid.mkv
ffmpeg -i frame%04d.png -c:v libx264 -preset ultrafast -qp 0 vid.mkv – larger file size, but quicker to encode
quicktime (camtasia can use these):
ffmpeg -i frame%04d.png -c:v prores vid_prores.mov
ffmpeg -i frame%04d.png -c:v qtrle qtrle.mov – possibly lossless compression
HTML5 supported video:
ffmpeg -i frame%04d.png -c:v libx264 -b:v 1M -c:a aac -r 10 output.mp4 – ‘-r 10’ specifies a framerate of 10 fps
ffmpeg -i frame%04d.png -c:v libvpx -b:v 2M -c:a libvorbis -r 10 output.webm
ffmpeg -i frame%04d.png -vf scale=680:-1 -c:v libvpx -b:v 2M output.webm – 680p (auto height), no audio
Make image sequence from video:
ffmpeg -i video.avi image%04d.png
ffmpeg -i video.avi .imgsimage%04d.png – outputs the images to a folder (the folder must already exist!)
Get info on video:
ffmpeg -i video.avi
Deshake video (stabalize):
ffmpeg -i input.mov -vf deshake output.mov
Side-by-side:
ffmpeg -i left_video.mov -vf "[in] scale=iw/2:ih/2, pad=2*iw:ih [left];movie=right_video.mov, scale=iw/2:ih/2 [right];[left][right] overlay=main_w/2:0 [out]" sidebyside.mov
That’s it!
If you weren’t successful, just post a comment below and I’ll help you out 
If you are looking for a library to help you out with video compression and processing, FFmpeg is certainly the best open-source library you’d find out there. It can be used for blurring, color conversion, rotation, extraction of frames. As well as offer an interface to various video codecs like H.264/AVC, HEVC, AV1.
Here in this tutorial, I’ll discuss briefly what FFmprg really is and how you can install it on windows. On top of it, there are a few basic commands for FFmpeg to get you started.
What is FFMPEG?
FFmpeg is a free and open-source software project consisting of different libraries and programs for handling video, audio, and other multimedia files and streams. FFMPEG is a command-line tool used for processing video and audio files. It is widely used for format transcoding, basic editing (trimming and concatenation), video scaling, and video post-production effects.
Installing FFMPEG on windows is quite easy, Once the installation process is done we will elaborate on how to set up environment variables in windows for FFMPEG. To install it on your windows machine you need to follow a step-by-step guide as described below.
Before downloading FFMPEG build you must have an app that can decompress files ending with the .7z file extension, such as WinRAR, you must install it before you can continue.
Step 1 – Go to https://ffmpeg.org/download.html and Select the windows icon.
Step 2 – On Clicking the windows icon you will see 2 different options one is Windows build from gyan.dev and other is Windows build by BtbN to download from you can choose anyone. In this article we will follow the first option. Click on Windows build from gyan.dev, It will take you to a page that contains FFMPEG build for windows.
On this page you can see 4 different builds, each build has a specific purpose.
- git full is built from the latest master branch with a large set of libraries.
- git essentials is built from the latest master branch with commonly used libraries.
- release full is built from the latest release branch with a large set of libraries.
- release essentials is built from the latest release branch with a large set of libraries.
Step 3 – To download the latest stable version scroll down to release and click on https://www.gyan.dev/ffmpeg/builds/ffmpeg-release-full.7z , It will start downloading the latest stable release full version in compressed format.
Step 4 – Once the download is finished you can extract the build in the downloads folder and rename the folder to ffmpeg.
Step 5 – Now cut the folder from downloads and paste it into the C drive on your PC.
Now you have FFMPEG installed in your machine. To make it work you need to set its path to environment variables. To set up the path follow below steps:
Step 6 – Search for system variables in windows search, Click on edit system environment variables. It will open a pop up window, in the bottom right corner you will see an option of environment variables, click on it.
Step 7 – Select the Path Variable under “User variables for (your name)” and click edit. It will open up a pop up with a list of paths.
Step 8 – Click on the New button from the right navigation bar in the pop up and add it will show you a new line at the bottom of the path list. Type C:ffmpegbin and click ok.
Now you can see the FFmpeg path in the path list at the end. Click Ok to save your changes. You have now installed FFMPEG and set proper environment variables. To confirm the installation open the command prompt and enter ffmpeg -version.
Some Basic Commands of FFMPEG :
· Convert video from one format to another
ffmpeg -i youtube.flv -c:v libx264 filename.mp4
· Convert a video into an animated GIF
ffmpeg -i video.mp4 -vf scale=500:-1 -t 10 -r 10 image.gif
· Extract image frames from a video
ffmpeg -ss 00:00:15 -i video.mp4 -vf scale=800:-1 -vframes 1 image.jpg
· Convert Video into Images
ffmpeg -i movie.mp4 -r 0.25 frames_%04d.png
· Rotate a video
ffmpeg -i input.mp4 -filter:v ‘transpose=2,transpose=2’ rotated-video.mp4
Conclusion
FFmpeg is a great tool for anyone genuinely interested in video compression and processing. Being an open-source tool it gives you endless capabilities as you can make changes to the source to your requirements.
Supercharge Your Business with Videos
At VdoCipher we maintain the strongest content protection for videos. We also work extremely hard to deliver the best viewer experience. We’d love to hear from you, and help boost your video streaming business.
Free 30-day trial →

- ffmpeg
Let’s learn how to install FFmpeg on Ubuntu, MacOS, and Windows – the easy and painless way. Often times, people spend too much time installing FFmpeg and not using it. Let’s solve that problem today!
For those who do not know, FFmpeg is one of the most important and popular video processing and compression libraries there is! It powers some of the most efficient encoders that are commercially available along with commonly used software like Handbrake and VLC player.
In this article, let’s start with the basics and see how to install FFmpeg on Windows, MacOS, and Ubuntu. Let’s go!
On a Windows machine, it is a complex process to compile and install FFmpeg if you are not a programmer and don’t have access to coding tools.
However, for almost all purposes, you can head over to Zeranoe and download compiled .exe FFmpeg files and use that (or the shared libraries).
Update: Zeranoe is shutting down on Sept. 18, 2020 and I’ll provide weekly Win64 builds (static and shared) over here.
How to Install FFmpeg on MacOS?
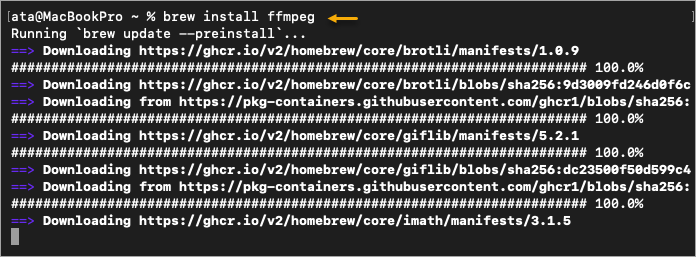
On a Mac, you can install FFmpeg using brew which is a superb package manager for the MacOS ecosystem. Here is the one-liner to install FFmpeg on a Mac machine (testing and working on Cataline v 10.15.5)
brew install ffmpegIf you want additional tools like Netflix’s VMAF on MacOS with FFmpeg, all you need to do is to include if when you install ffmpeg. For example,
brew install ffmpeg --with-libvmafThe brew page is an excellent resource for all the possible options. Check there first before hunting on Google or Stackoverflow.
How to Install FFmpeg on Ubuntu?
On Ubuntu, you can install FFmpeg in a couple of ways – using the apt package manager or compiling from source.
Using apt
To simply install it using apt, use the following commandline,
sudo apt install ffmpegThat’s it.
Compiling FFmpeg from Source
However, if you are installing FFmpeg on an Ubuntu machine, there is a high likelihood that you are going to tinker with FFmpeg and that means you might want to compile from the FFmpeg source.
To do so, you can use the procedure mentioned in the FFmpeg Official Installation Guide.
I’ve done it a few times, and there are a couple of dependencies missing in the official guide. Here is my procedure for compiling and installing FFmpeg from source on Ubuntu 18.04.
Step 1: Install the Dependencies (including nasm). And, remember to create the following folders
mkdir -p ~/ffmpeg_sources ~/binStep 2: Install the Video and Audio Codecs that you are going to need. I installed libx264, libx265-dev, libnuma-dev, libvpx-dev, libfdk-aac-dev, libmp3lame-dev, and libopus-dev.
Step 3: Install libunistring-dev to prevent the following error : ERROR: gnutls not found using pkg-config
sudo apt-get install libunistring-devStep 4: Download and compile FFmpeg from sources. Notice that we are now using --enable libvmaf to enable VMAF with FFmpeg.
cd ~/ffmpeg_sources &&
wget -O ffmpeg-snapshot.tar.bz2 https://ffmpeg.org/releases/ffmpeg-snapshot.tar.bz2 &&
tar xjvf ffmpeg-snapshot.tar.bz2 &&
cd ffmpeg &&
PATH="$HOME/bin:$PATH" PKG_CONFIG_PATH="$HOME/ffmpeg_build/lib/pkgconfig" ./configure
  --prefix="$HOME/ffmpeg_build"
  --pkg-config-flags="--static"
  --extra-cflags="-I$HOME/ffmpeg_build/include"
  --extra-ldflags="-L$HOME/ffmpeg_build/lib"
  --extra-libs="-lpthread -lm"
  --bindir="$HOME/bin"
  --enable-gpl
  --enable-gnutls
  --enable-libass
  --enable-libfdk-aac
  --enable-libfreetype
  --enable-libmp3lame
  --enable-libopus
  --enable-libvorbis
  --enable-libvpx
  --enable-libx264
  --enable-libx265
  --enable-nonfree &&
PATH="$HOME/bin:$PATH" make &&
make install &&
hash -r
That’s it – you should be up and running with FFmpeg now!

Krishna Rao Vijayanagar
I’m Dr. Krishna Rao Vijayanagar, founder of OTTVerse. I have a Ph.D. in Video Compression from the Illinois Institute of Technology, and I have worked on Video Compression (AVC, HEVC, MultiView Plus Depth), ABR streaming, and Video Analytics (QoE, Content & Audience, and Ad) for several years.
I hope to use my experience and love for video streaming to bring you information and insights into the OTT universe.