One way you can change the style of a document is by adding a new text font. To add a font to Word, download and install the font in Windows, where it will become available to all Microsoft 365 applications.
Fonts come as files, and there are many sites on the Internet where you can download free fonts, such as DaFont. You can also import font files from a CD, a DVD, or your organization’s network. TrueType (file extension .ttf) and OpenType (.otf) fonts both work fine.
Note: Before you download a font, make sure that you trust the source.
Add a font
-
Download the font files. These often come compressed in .zip folders. In one .zip folder, you might find several variations on the same font, such as “light” and “heavy.” A .zip folder usually looks like this:

-
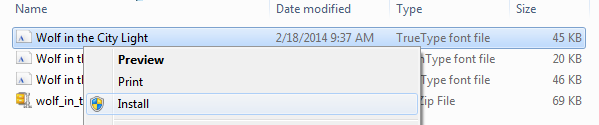
If the font files are zipped, unzip them by right-clicking the .zip folder and then clicking Extract. Now you’ll see the available TrueType and OpenType font files:
-
Right-click the fonts you want, and click Install.
-
If you’re prompted to allow the program to make changes to your computer, and if you trust the source of the font, click Yes.
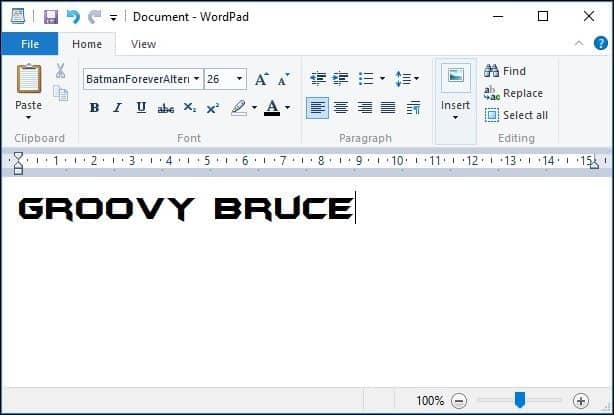
Your new fonts will appear in the fonts list in Word.


Here are two other ways to install and manage fonts:
-
All fonts are stored in the C:WindowsFonts folder. You can also add fonts by simply dragging font files from the extracted files folder into this folder. Windows will automatically install them. If you want to see what a font looks like, open the Fonts folder, right-click the font file, and then click Preview.
-
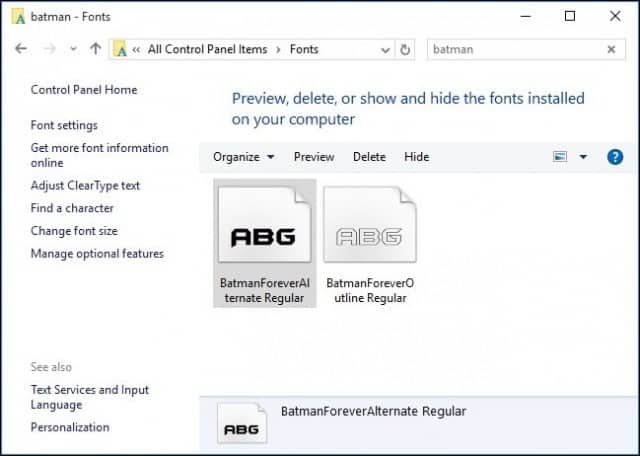
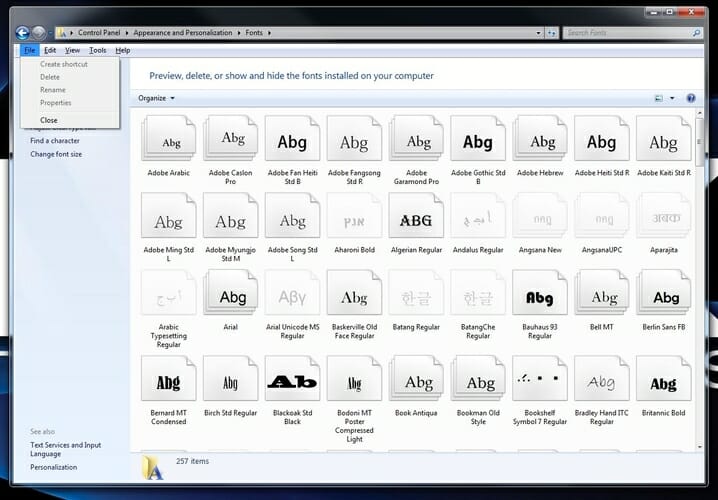
Another way to see your installed fonts is through Control Panel. In Windows 7 and Windows 10, go to Control Panel > Fonts. In Windows 8.1, go to Control Panel > Appearance and Personalization > Fonts.
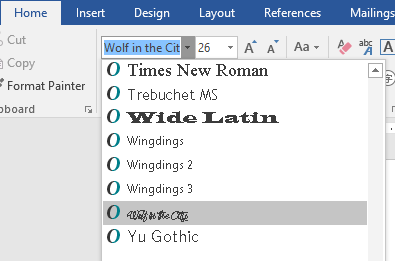
The next time you start Word, you’ll see the fonts you added in the Font list.
Need more help?

Windows 10 has several fundamental and advanced fonts by default, but you can also install any font you desire. Here’s a look at how to install them.
Windows comes preloaded with many stylish fonts, but they might not be what you are looking for. Thankfully Windows 10 makes it easy to install any font you desire. Here’s a look at how to install them.
Once you have your font downloaded (often .ttf files) and available, right-click it and click Install. That’s it! I know, uneventful.

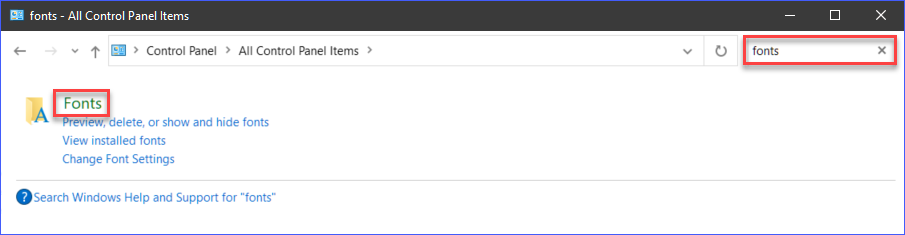
To check if the font is installed, press Windows key+Q then type: fonts then hit Enter on your keyboard.
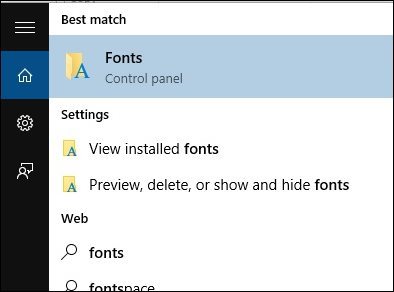
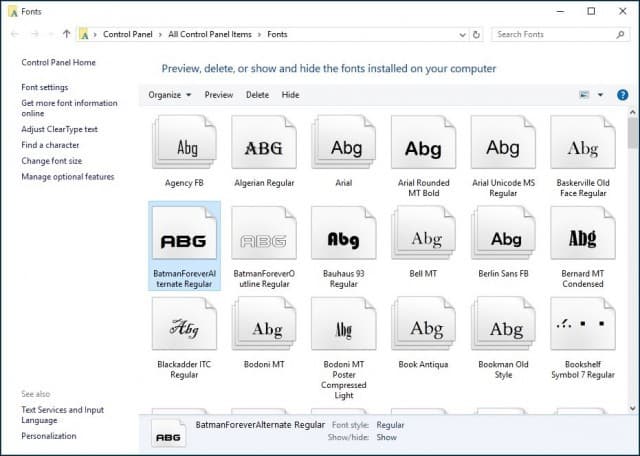
You should see your fonts listed in the Font Control Panel.
If you don’t see it and have a ton of them installed, type in its name in the search box to find it.
That’s all there is to it. Now you can create stylish and unique documents with some of your favorite fonts not included in Windows 10 by default.
If you’re not on Windows 10 yet, check out our article on how to install fonts on Windows 8.1.
If you’re a graphics design enthusiast, before downloading a font, be sure to check out our article about the best and worst fonts for homemade designs.
![]()
How to remove fonts, as well
Updated on December 1, 2021
What to Know
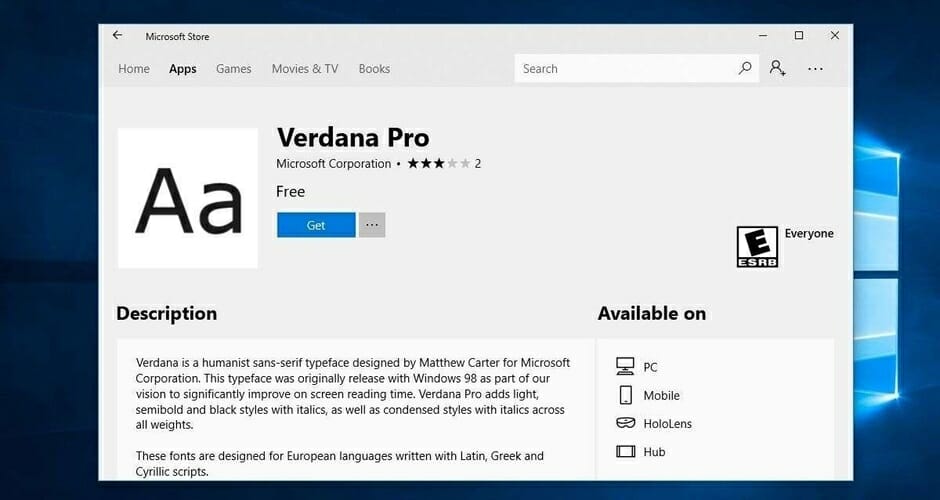
- Microsoft Store: Go to Start > Settings > Personalization > Fonts > Get more fonts in Microsoft Store. Choose a font and select Get.
- The font downloads and installs. When complete, close Windows Store. The new font appears at the top of the Available fonts list.
- Web: Download a font file to the desktop. Go to Start > Settings > Personalization > Fonts. Drag the file to Drag and drop to install.
Windows 10 comes with an assortment of fonts installed with the operating system. If you can’t find a built-in font that suits your project, download a font from the web or the Microsoft Store and install the new font in Windows 10. Here’s how to install fonts in Windows 10 and delete fonts you no longer need.
How to Install Fonts in Windows 11
How to Install a New Font to Windows 10 From the Microsoft Store
When you can’t find the perfect font for your documents, search the Microsoft Store. The Microsoft Store offers several free fonts along with others that cost a nominal price.
Here’s how to search the Microsoft Store and add a font to Windows 10:
-
Go to the Start menu and select Settings.
Your computer must be connected to the internet before you begin.
-
In the Settings window, select Personalization.
-
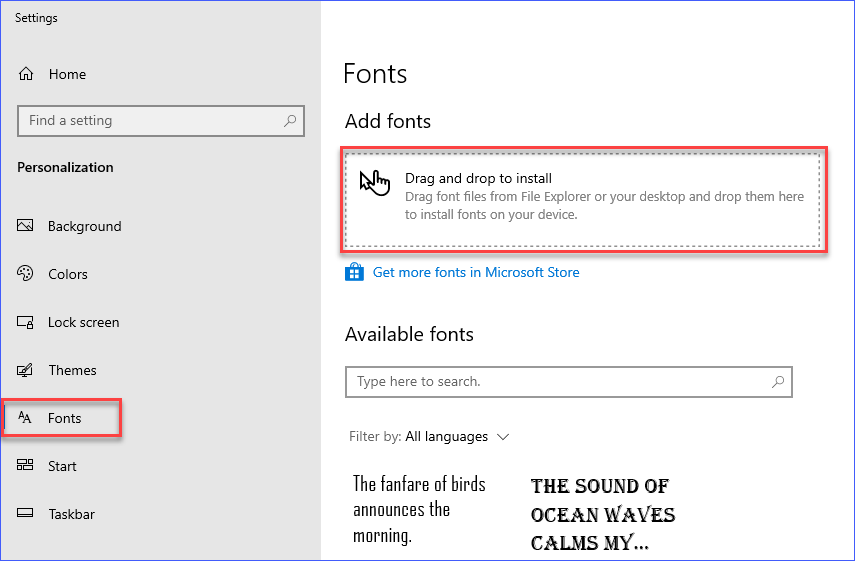
Go to Fonts.
-
Select Get more fonts in Microsoft Store.
-
Select a font.
The Microsoft Store contains several free fonts and other fonts for a fee.
-
Select Get.
-
In the Use across your devices window, select either No thanks or Sign in to choose whether to use this font on all your devices.
-
Wait while the font downloads and installs on your computer.
-
When the download and installation are complete, a notification appears in the Windows Store.
-
Close Windows Store.
-
The new font appears at the top of the Available fonts list.
How to Install a New Font from the Web
If you can’t find a font you like in the Microsoft Store, download fonts from the web and install those font files in Windows 10. Windows can use several types of font files, including the TrueType Font (TTF) and OpenType Font (OTF) file formats.
Before downloading a free font file, check for any use restrictions. Some free fonts are only for personal use.
-
Find the font file you want to use.
-
Download the font file to the Windows desktop.
If the font file is contained in a ZIP file, you must extract the files before installing the font in Windows.
-
Select Start > Settings > Personalization > Fonts.
-
Resize the Settings window to show the Settings window and the downloaded font file on the desktop.
-
Drag the font file from the desktop to the Drag and drop to install section of the Fonts Settings screen.
-
The new font appears in the Available fonts list.
How to Uninstall Fonts in Windows 10
When your computer has too many windows fonts, you may need to delete fonts to free up space on the hard drive. Here’s how to delete fonts you no longer need.
-
Go to Start > Settings > Personalization > Fonts.
-
Select the font you want to remove.
If you know the name of the font and don’t want to scroll through the Available fonts list, enter the font name in the search box.
-
Select Uninstall.
-
In the Uninstall this font family permanently dialog box, select Uninstall.
-
Select the back arrow to return to the Fonts Settings window.
-
The uninstalled font no longer appears in the Available fonts list.
Thanks for letting us know!
Get the Latest Tech News Delivered Every Day
Subscribe
It’s hard to overstate just how important fonts are. To spice up your Word documents, Photoshop files, and InDesign creations, you need to know how to install fonts in Windows 11 and Windows 10, and in this guide, we’re going to walk you through it.
Contents
- How to install fonts in Windows 11 and Windows 10
- How to install fonts through the Microsoft Store
- How to delete fonts in Windows
- Where to find Windows fonts
There are two main ways to install fonts on Windows, but most people should use our first method. In addition to installing fonts, we also have some steps on uninstalling fonts you don’t want, as well as our favorite places online to download new fonts.
We’re covering Windows 11 and Windows 10 here, which will apply fonts across all of your applications. If you’re looking for a different method, make sure to read our guides on how to install fonts to Photoshop and how to install fonts on a Mac.
How to install fonts in Windows 11 and Windows 10
The best way to install fonts on Windows 10 and Windows 11 is also the easiest. All you need to do is download a font, select the font file, and drag it over to the Windows font screen. Within a few seconds, you’ll have a new font without worrying about restarting your computer or downloading any programs.
We took screenshots on Windows 11, but the process is the same for Windows 10, as well. If you’re having trouble finding the right spot, use Windows Key + S to search for Font Settings.
Step 1: Download the font you want to install. Fonts usually come in zipped (compressed) folders. Extract the folder to your desktop or a location you can easily access on your PC. You can do this by selecting Extract All from the top of the File Explorer window.

Step 2: Open the Windows Settings menu and select Personalization from the left menu. In the list of options, select Fonts.

Step 3: Find your extracted font folder. Select the TrueType font (ttf) files in the folder and drag them to the dotted rectangle in the Windows Settings screen.
How to install fonts through the Microsoft Store
You can install fonts through the Microsoft Store as well. The process is easier, but the Microsoft Store doesn’t have that many options. Most of the fonts are free, but certain packs will cost you. We found a few packs around $5 at the time of writing, as well as some fonts for around $2.
This isn’t the best option for installing fonts, not only due to the limited selection, but also because some of the fonts cost money. We recommend using the drag-and-drop method above instead. Still, we’ll show you how to install fonts through the Microsoft Store.
Step 1: Open the Windows Settings menu and select Personalization from the left menu. Then, select Fonts from the list.
Step 2: Click Get More Fonts in Microsoft Store to open the font store. Select the font you want to install, and click Get.

How to delete fonts in Windows
If you want to clean up your font menu, you can delete any font in Windows 10 or Windows 11 — including the ones provided by Microsoft. Once again, we used Windows 11 for our screenshots, but this process is the same across Windows 10 and Windows 11.
Step 1: Open the Windows Settings menu, select Personalization from the left menu, then select Fonts.
Step 2: Left-click on the font you want to uninstall. Under Metadata, select Uninstall.

Where to find Windows fonts
The Microsoft Store has fonts, but you’ll need to look online if you want to find more options. There are dozens of free font websites online, though some are better than others. Here are some of the few Windows font archives we frequent.
If you want free fonts, the best place to start is Google Fonts. Google has thousands of free fonts available, and you don’t need to worry about downloading something you didn’t sign up for. Google also makes the licenses clear, which isn’t always the case elsewhere.
For paid fonts, check out Creative Market. There are several community-generated packs that you can usually pick up for a few dollars. Behance is a solid alternative, too, though it’s tailored for Adobe applications.
Before installing your new font, make sure to check out its license. Although many fonts are free to download, not all of them are free to use. Fonts may be free for personal use but not commercial use, for example, so it’s best to double-check.
![]()
Today’s tech news, curated and condensed for your inbox
Check your inbox!
Please provide a valid email address to continue.
This email address is currently on file. If you are not receiving newsletters, please check your spam folder.
Sorry, an error occurred during subscription. Please try again later.
Editors’ Recommendations
-
ChatGPT: how to use the viral AI text generator that’s taken the world by storm
-
How to download YouTube videos
-
Ranking all 12 versions of Windows, from worst to best
-
How to schedule an email in Outlook
-
The 6 biggest problems with ChatGPT right now
Managing fonts in Windows is a relatively straightforward process once you know where to find what you’re looking for. And what we’re looking for, in this case, is a built-in font management system hiding in the Windows Control panel.
Microsoft is touting a more feature-rich font manager to come in its Fall Creators Update, but for now, here’s how you find, add, and remove fonts in Windows.
1. Open the Windows Control Panel.
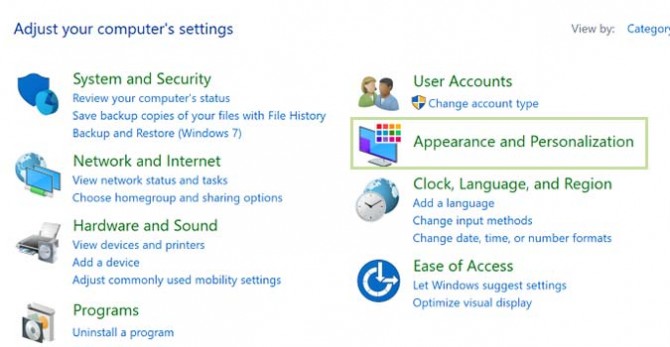
2. Select Appearance and Personalization.
3. At the bottom, select Fonts.
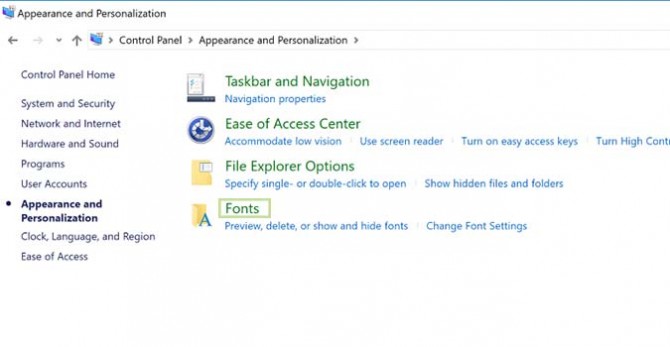
From here, you can view any font installed on your system, as well as add new ones or remove those you don’t need anymore. When removing fonts, I’d recommend extreme caution, as many are considered System Fonts, meaning Windows uses them within certain programs.
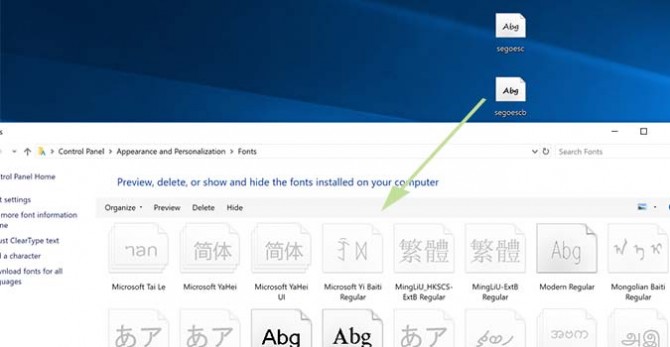
4. To add a font, simply drag the font file into the font window.
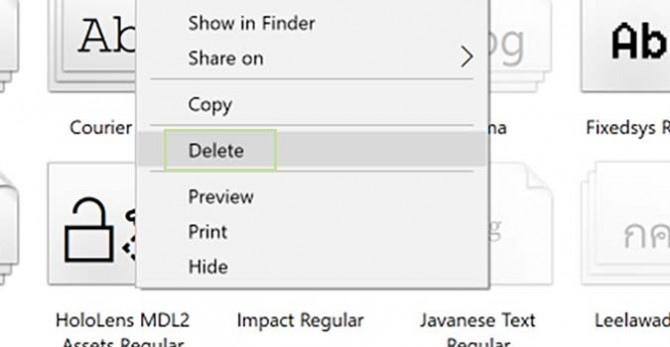
5. To remove fonts, just right click the chosen font and select Delete.
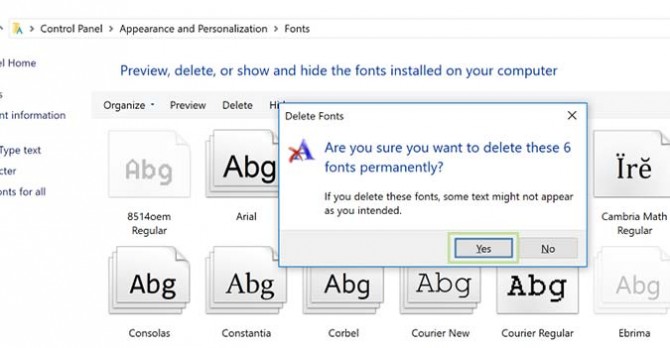
6. Click Yes when prompted.
- Ports Guide
- Screen Guide
- USB Type-C FAQ
Get instant access to breaking news, the hottest reviews, great deals and helpful tips.
Are you tired of using the same old fonts on your Windows 10 computer? Why get stuck when there are several ways you can install fonts on Windows 10? Having new fonts to use can be exciting as they can bring new life to your work.
In this article, learn how to install and manage fonts on Windows 10, and you’ll never again have to settle using the default system fonts. Let get started!
Prerequisites
If you’d like to follow the steps in this tutorial, make sure that you meet these requirements.
- A Windows 10 PC. This tutorial will be using Windows 10 version 20H2.
- If you want to install fonts for all users on the computer, your user account must have administrative rights on the Windows 10 PC.
Installing Fonts in Windows 10
When you need to install fonts in Windows 10, there are several ways you can do so. Each method is different, but the result is the same. You’ll have new fonts that you can use with various applications, such as word processors and text editors, to name a few.
Let’s explore the different ways you can install fonts in Windows 10.
Note: That the succeeding font installation methods install new fonts in the %LOCALAPPDATA%MicrosoftWindowsFonts directory of the current user only by default. If you want to install fonts for all users on the computer, skip to the Using the Font Viewer (All Users) section.
From the Microsoft Store
Microsoft gives its Windows 10 users the ability to install apps directly from the Microsoft Store. But did you know that aside from apps, the Microsoft Store also lets you install fonts on Windows 10?
Best of all, you’ll be browsing available fonts like an online shopping catalog. And installing them is convenient with only a few clicks. To install fonts on Windows 10 using the Microsoft Store, follow the steps below.
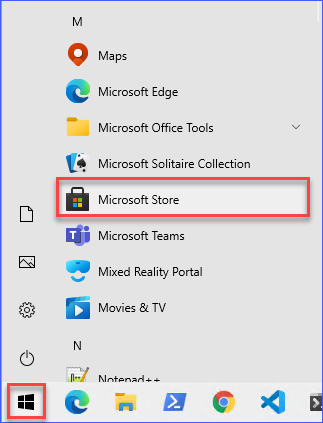
- Before you can install fonts, you first need to open the Microsoft Store. To do so, click Start → Microsoft Store.
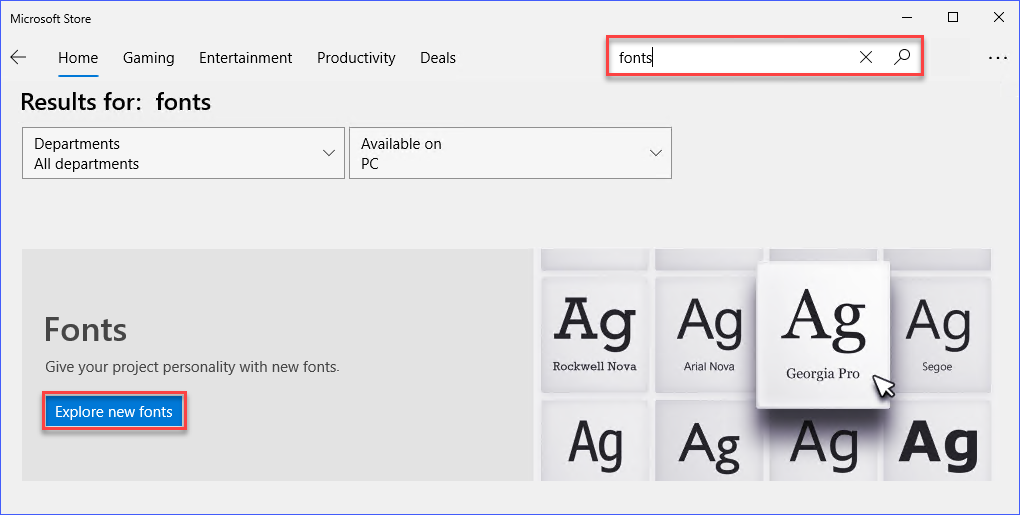
2. Once the Microsoft Store window is up, type fonts in the Search box and press Enter to search.
After the search, on the results, click the Explore new fonts button. Clicking the Explore new fonts button will bring you to the fonts gallery.
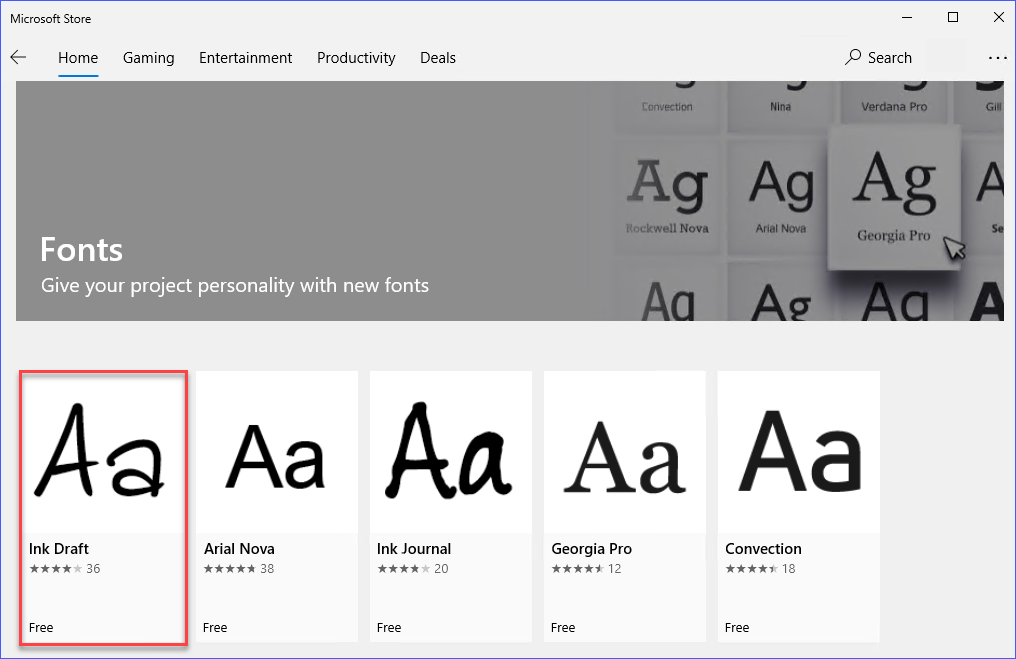
3. Next, you’ll see the list of available fonts that you can install on your Windows 10 computer. Look for the font you want to install and click it. This example will select the Ink Draft font, which is free.
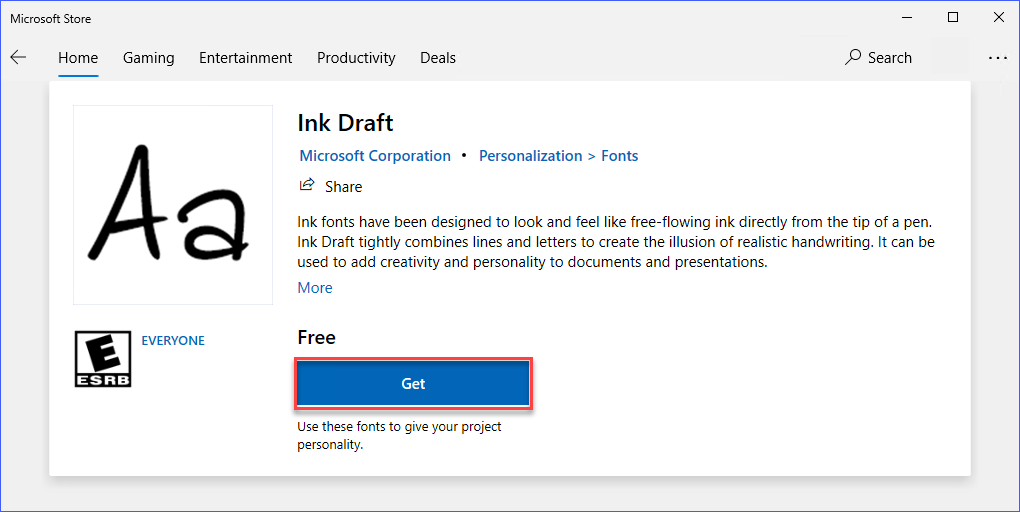
4. After selecting the font, you’ll arrive at the font’s dedicated information page. On this page, you’ll find the details about the font. To continue installing the font, click the Get button.
The installation process may take several seconds to complete. In this example, the installation took only 30 seconds.
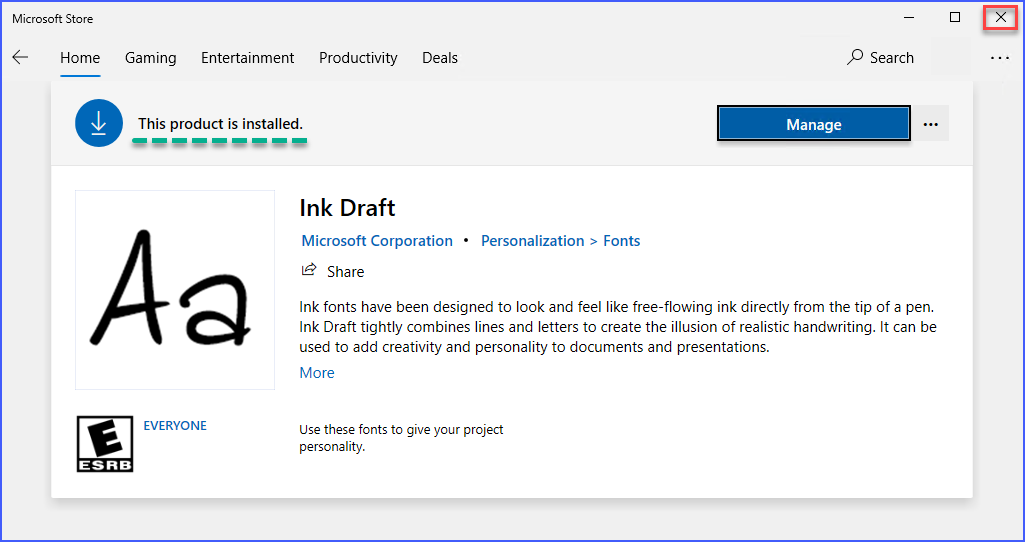
5. After Microsoft Store completed the installation, you will see a message saying This product is installed. To exit Microsoft Store, click the X button in the upper-right corner. Or, if you want to install more fonts, you can repeat the same steps.
Using the Windows Settings App
The internet offers seemingly unlimited resources that you can download, including fonts. If you’ve found a font that you like and downloaded it onto your computer, what next?
Another way to install fonts on Windows 10 is by dragging and dropping a font file into the Font setting app. How convenient is that? Follow the steps below to install a font in Windows 10.
If you don’t have a sample font for testing, you may download the Pattaya font first, which this example will use.
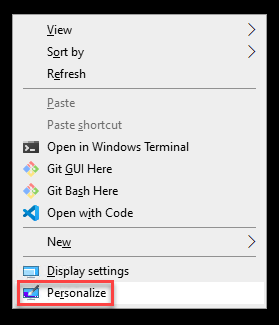
1. First, open the Fonts settings on your computer. To do so, right-click on any blank space on your Desktop and click Personalize.
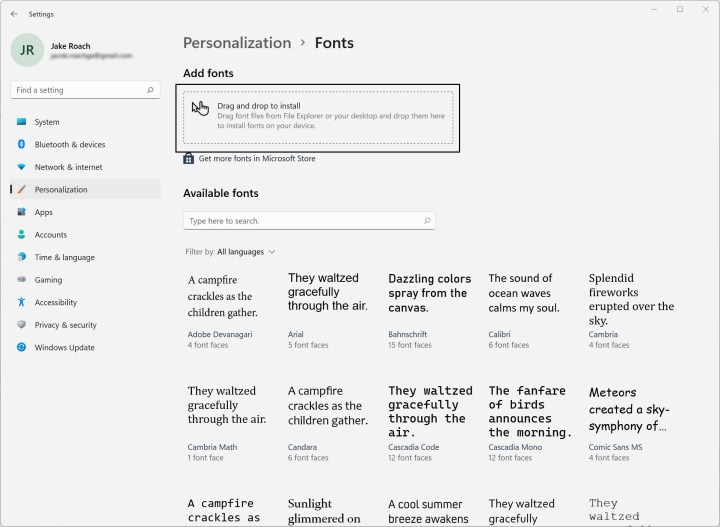
2. On the Settings window, click the Fonts tab under the Personalization section.
Under the Add fonts section, you should see a rectangular area that says Drag and drop to install. This area is you can drop one or more font files from your computer to install.
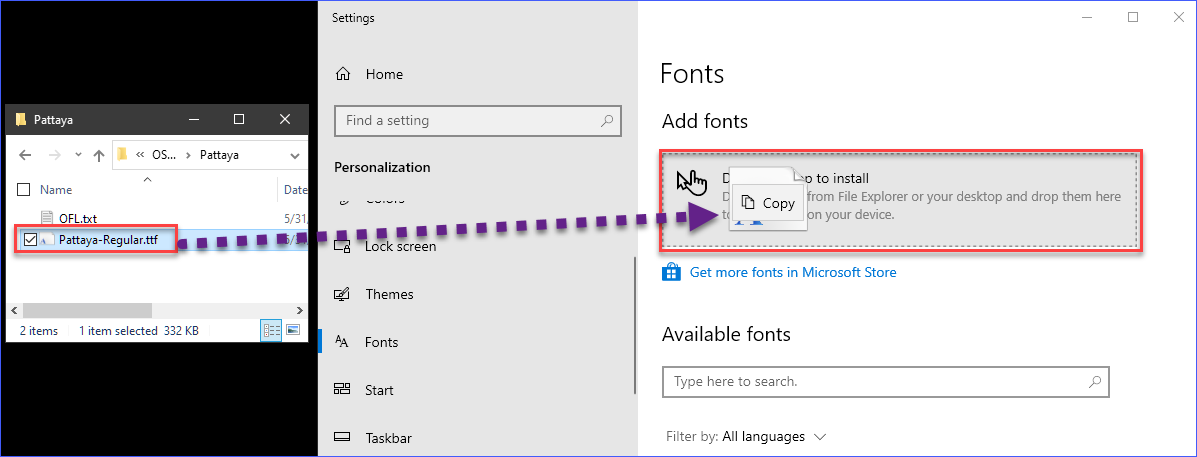
3. Now, open the File Explorer and navigate to the directory where you have downloaded the font. Once you’ve located the font file, click to hold the file, drag it to the Fonts settings window, and drop it to the Drag and drop to install area. Doing so will install the font on the Windows 10 computer.
You can also drag and drop multiple font files at the same time.
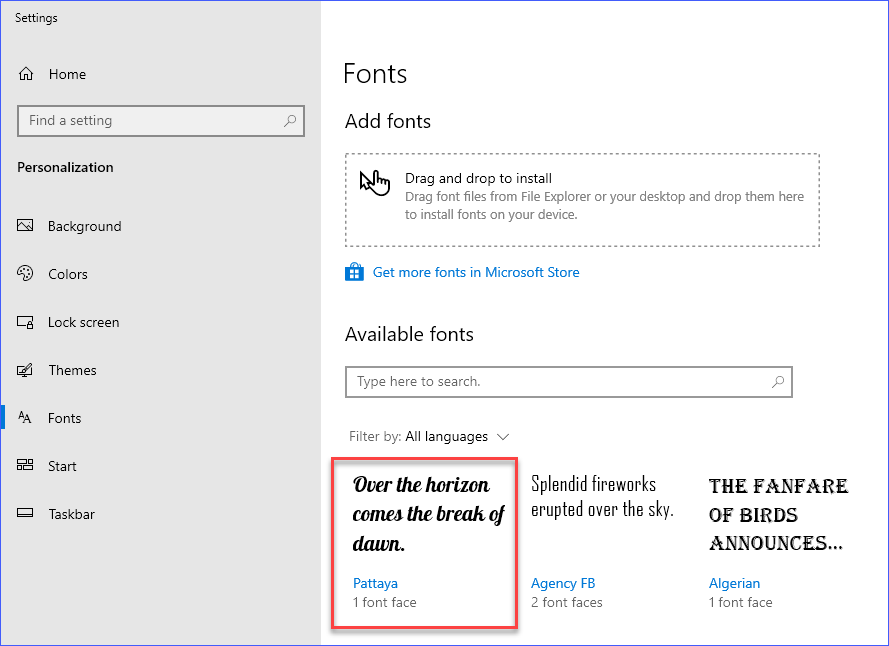
After installing the font, you can find the new font immediately under the Available fonts list.
Using the Control Panel
The more traditional method to install fonts in Windows 10 is through the Control Panel. Like the Windows Settings app, you’ll need to drag and drop one or more files from a location on the computer to the Control Panel to install fonts.
Follow the steps below to install fonts in Windows 10 using the Control Panel.
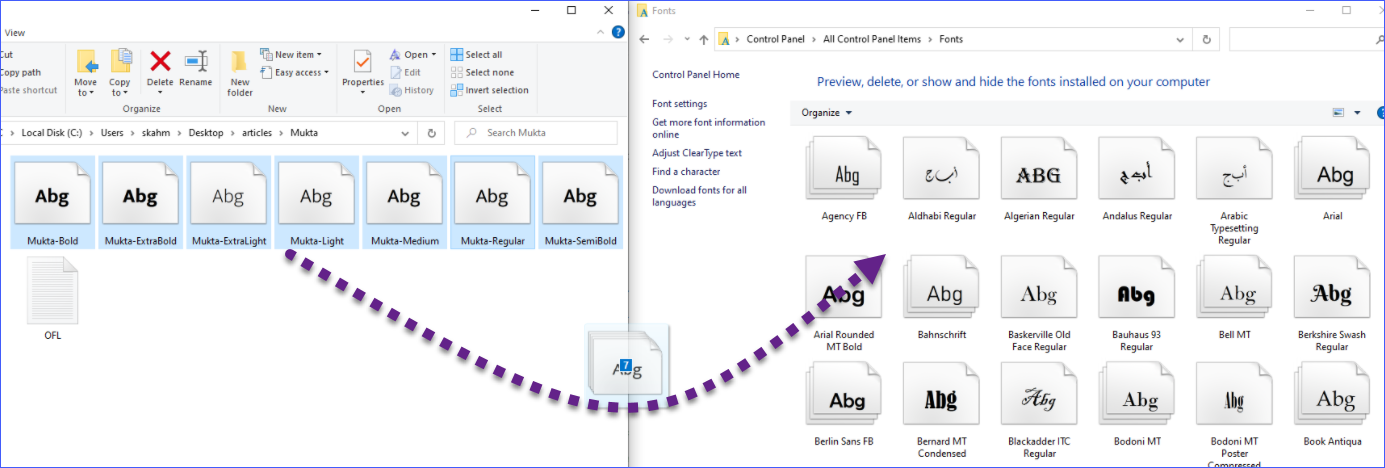
1. Open File Explorer and locate the directory where you have downloaded the font files. Keep the File Explorer window open.
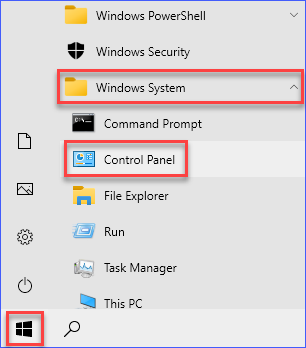
2. Next, open the Control Panel window. To do so, click the Start → Windows System → Control Panel.
3. On the Control Panel window, click the search box on the top right and type in fonts to search for the Fonts Control Panel item. On the search results, click the Fonts Control Panel item to open the Fonts window.
4. Now you have both File Explorer and the Fonts Control Panel opened. On the File Explorer window, click or select the font files you want to install.
After selecting the font files, click to hold the files, drag them to the Fonts Control Panel window, and release the mouse button to drop the files. Dropping the files will automatically install the fonts on your computer.
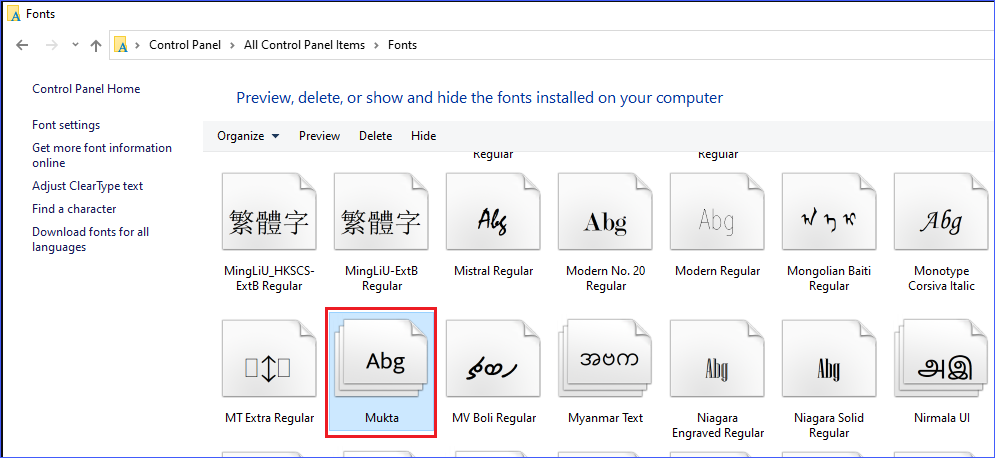
After installing the fonts, you can now see them in the Fonts Control Panel window.
Using the Windows Font Viewer
In Windows, font files open with Windows Font Viewer by default. The Windows Font Viewer is a built-in Windows program for viewing and installing fonts (%WINDIR%System32fontview.exe).
To view and install fonts in Windows 10 using the Windows Font Viewer, follow the steps below.
- Open the File Explorer and browse to the font file’s location.
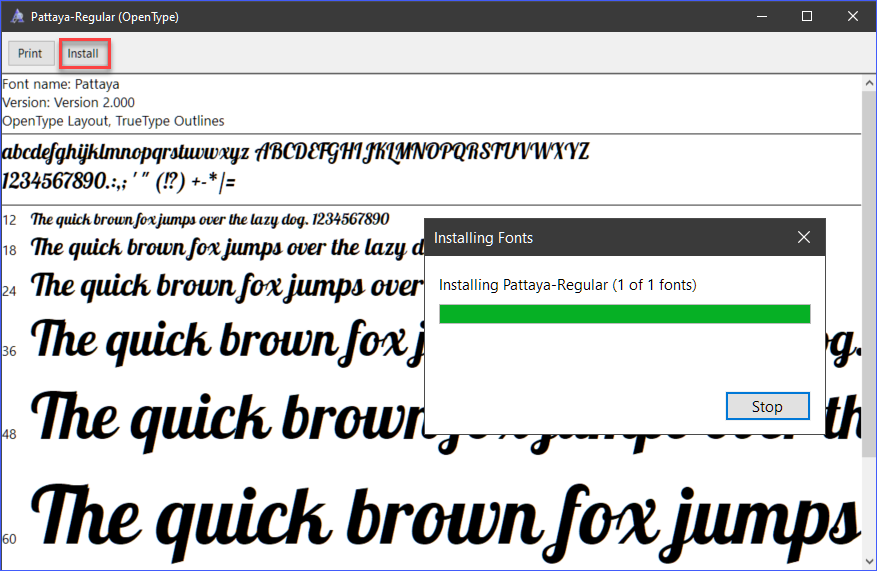
- Once you’ve located the font file, double click the font file to open it in the Windows Font Viewer window.
- On the Windows Font Viewer, you’ll see the font details and its preview. To install the font, click the Install button at the top of the window. The font installation should complete quickly, and there will be no confirmation messages.
Using the Windows Font Viewer (All Users)
Up to this point, you’ve only been installing new fonts in the user context, which puts new fonts in the %LOCALAPPDATA%MicrosoftWindowsFonts folder by default. Meaning, in shared computers, each user must install the font in their user profiles.
Using the Windows Font Viewer, you can install fonts for all users on a computer. But your user account must have administrator rights on the computer.
Installing fonts for all users will install the font file to the %WINDIR%Fonts folder.
To install fonts for all users, open the File Explorer and browse the font file’s location. Next, right-click on the font file and click Install for all users.
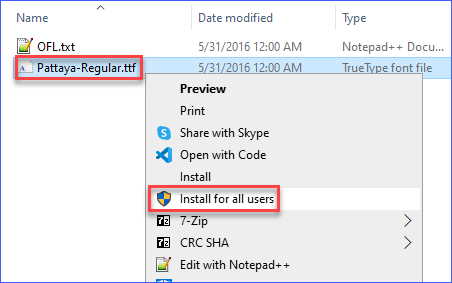
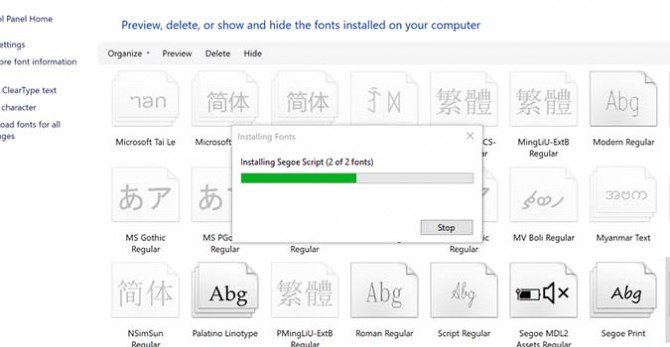
During the font installation, you’ll only briefly see the progress indicator similar to the image below.

Uninstalling Fonts in Windows 10
There may be times when you need to uninstall fonts from your computer. Such as when you no longer need the font or if you plan to install an updated version of the font. Whatever the reason, know the there are ways to uninstall fonts in Windows 10 you can perform.
Note: When uninstalling a system-wide font (all users), your user account must have administrator rights on the local computer.
Using the Windows Settings App
One way to uninstall fonts in Windows 10 is from the Windows Settings App. To do so, proceed as follows.
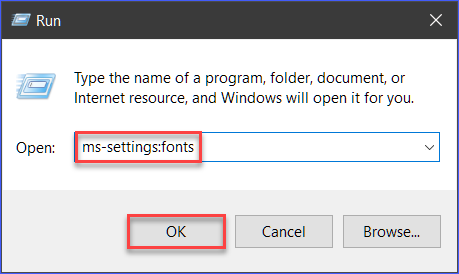
1. First, open the Fonts Windows Settings. To do so, right-click the Start button and click on Run to open the run dialog box. On the Run dialog, type the command ms-settings:fonts in the Open box and press Enter or click OK.
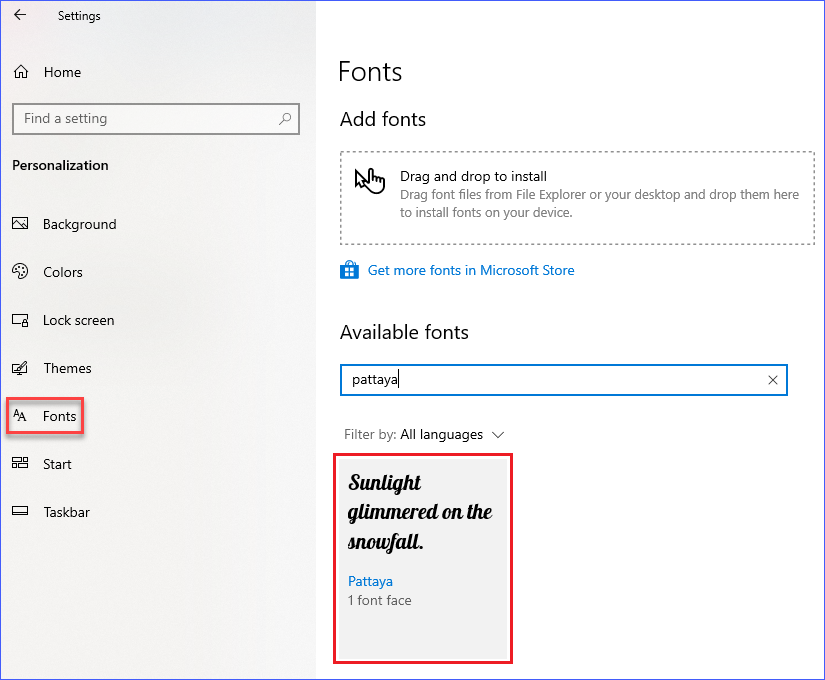
2. Next, under the Available fonts list, type the font’s name you want to uninstall in the search box. On the search results, click the font name to open its properties.
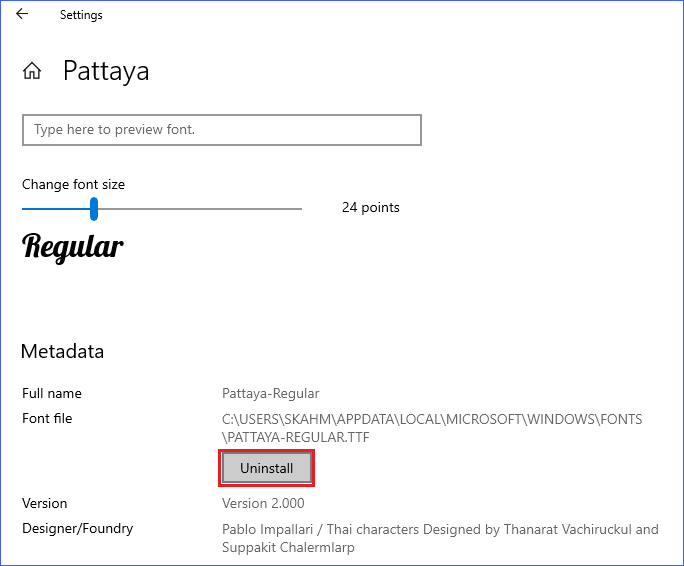
3. Once you’re in the font’s properties window, click on the Uninstall button. Clicking on this button will uninstall the font from the computer.
Using the Control Panel
Another method to uninstall a font in Windows 10 is through the Control Panel.
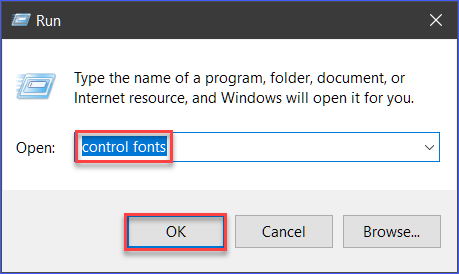
1. To open Fonts Control Panel, right-click the Start button and click Run. In the Open box, type in control fonts and press Enter or click OK.
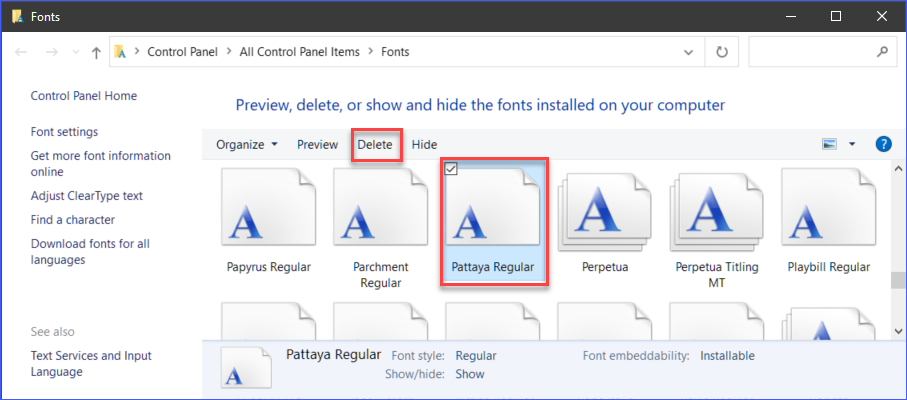
2. You should now be in the Fonts list in Control Panel. To uninstall a font, click to select the font and click the Delete button. You can also select multiple fonts by holding down the CTRL key while clicking on each font.
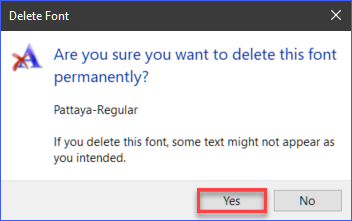
3. At the confirmation window that pops up, click Yes to confirm to delete the font.
Conclusion
This article showed you how not to get stuck with the same set of system fonts, which can be boring over time. You learned the different ways to install fonts in Windows 10 and how to uninstall them, too. Which method did you like best?
Do you know other ways of installing fonts in Windows 10 that weren’t in this tutorial? Let us know!
Found a great new font, but not sure how to install it? In this tutorial, we’ll walk through how to do just that—install a font onto your PC running Windows 10. In addition, we’ll look at how to uninstall a font, just in case you’d like to remove one from your list of installed fonts.
Follow along with us over on our Envato Tuts+ YouTube channel:

What You’ll Need
The following assets are used in this tutorial:
- Modern Serif — Elegant Serif Font
This is the font I’ll install in this example. You’re welcome to use this font with me. Otherwise, you’ll need a font of your choice—the only requirement is that it has not been installed on your computer just yet!


Now, let’s get down to business and install a new font.
1. How to Install a Font on Windows 10
Step 1
First, download your font.
In most cases, font files tend to be delivered in a compressed document, containing more than one file. A common file type for this is a ZIP file. Make sure to open this file up and extract the font files to your computer.
Below is an example. When, for example, I open a ZIP document, it’s like looking inside a folder.


All I need to do is select the contents and drag it to a location on my computer.


I chose to save and store my font files in a folder called «My Fonts» on my Desktop. Here’s what it looks like when my font files are extracted from the zip document and into a folder on my desktop.


Step 2
When it comes to fonts themselves, there are many different file types. I won’t dig deep into the details of that in this article, but here are two of the most common file types that you’ll likely see:
- TTF: this is a TrueType Font.
- OTF: this is an OpenType Font.
What’s the difference? If you’re looking for basic font usage, TTF or OTF would likely serve you just fine. If you’re a designer looking for extras, OTF might be a stronger choice as it can store additional options like ligatures, glyphs, and alternates that a TTF wouldn’t include.
Again, there are other font file types out there, but these are most likely the ones you’ll encounter.


Step 3
So, where do the fonts «go» on our computer, when we want to install them? Just having them in any old folder on your computer won’t install them.
On Windows 10, you’ll want to navigate to your C drive. Double-click to «go inside» and view its contents. Note, if your operating system (Windows) is installed on a different drive, go there instead. However, in most cases, this is assigned to the drive named «C».
Then, go to the Windows folder. Again, double-click to go inside this folder.
Inside the Windows folder, select the Fonts folder. We’re going to go inside this folder too.
Here’s what the Fonts folder looks like, once I’ve double-clicked to go inside it.
Tip: Not sure where you «are» on your computer? Check out the highlighted square, below. You’ll see that I’m currently viewing «Fonts» inside of Windows, on my C drive.


Step 4
Next, we’re going to take our font files and drag them into the Fonts folder.
Just select a font file, click and hold, and then drag it to the folder. When you do so, you’ll get visual confirmation that Windows is installing the font.
If there’s any concern or conflict, your computer will let you know. For example, if the font is already installed, it will ask you what you would like to do.


Step 5
And now, your font is installed! However, before we wrap up, let’s look at one additional way that we can install fonts. This way is even faster and even easier.
Go to your font file and double-click it to open it. You’ll get a visual preview, and in the upper left-hand corner, you’ll see a button that says Install. Super easy, right?
When I’m installing a lot of fonts at once, I tend to prefer the first method—dragging multiple font files into my Fonts folder. However, for just one, single font, either method is just fine. Choose the one that’s most convenient for you!


2. How to Uninstall a Font on Windows 10
Step 1
Now, let’s uninstall a font that we don’t want on our computer anymore.
Before we do so, I’d like to recommend backing up your fonts.
I like to keep a copy of my font files, just in case. Keep in mind that licensing might limit your installations, but keeping a backup for your records is typically acceptable.
Remember the «My Fonts» folder I made earlier, on my Desktop? This isn’t my live fonts folder—having font files here doesn’t mean they’re installed. They’re just files on my desktop. However, I can store them here as a backup if I’d like to.
I can also select fonts from my Fonts folder (where they are installed)—and copy and paste them to another folder, to back them up. For example, here’s my backup folder with an extra font I copied from my Fonts folder (the font is Mattea!)


Step 2
Let’s go to the Fonts folder in our Windows folder. Again, to get there:
- Go to your C drive. Double-click to go «inside» it and look at its contents. Note, you’ll want to go to where your operating system is installed. This is typically assigned to «C», but may vary if your system was set up differently.
- Go to the Windows folder. Double-click to go inside and view its contents.
- Go to the Fonts folder. Again, double-click to go inside this folder.
Remember this folder? We can browse through all the fonts installed here.


Step 3
Now, browse through the list of fonts and find the one that you want to uninstall. Again, I would suggest saving a backup of the font you uninstall, so you have it for your reference—in case you’d like to reinstall it sometime.
Right-click on the font you’d like to uninstall and select Delete.


Step 4
Next, we’re given a warning prompt. It asks us to confirm if we’d like to delete this font from our computer. Click yes if you’d like to, or click no if you’ve changed your mind.


And That’s How It’s Done!
Installing and uninstalling a font on Windows 10 only takes a couple of clicks. Hopefully, this tutorial has helped you figure out how to install fonts and uninstall fonts to your heart’s content.
Love fonts? Check out these tutorials for more how-tos and typographic inspiration.
Windows 11 ships with plenty of fonts, but it offers several ways for people who aren’t content with the likes of Arial, Georgia, and Times New Roman to install their own. This can be particularly useful for developers who spend a lot of time staring at text, graphic designers who think a piece needs more pizazz than Verdana can offer, and writers who have successfully convinced themselves that constantly experimenting with new fonts is productive. (Ahem.)
Fonts can be installed on Windows 11 or 10 via the Microsoft Store, Settings and File Explorer. Each method has its own benefits and drawbacks. The Microsoft Store can install a given font with just a few clicks, for example, but it doesn’t offer the same breadth of choices as the open web. Settings and File explorer require a bit more effort on the installation front but can be used to install any font available for download in the TrueType, OpenType or PostScript file formats. Note that, though these screenshots were taken from Windows 11, the same steps also work in Windows 10.
How to install fonts via the Microsoft Store in Windows 11 or 10
The Microsoft Store is the most approachable way for most Windows users to install new fonts because it’s a straightforward process that’s unlikely to be used to install anything malicious on your system, which isn’t guaranteed when you’re installing a font from an obscure website, for example. Here’s how to install new fonts on Windows 11 via the Microsoft Store.
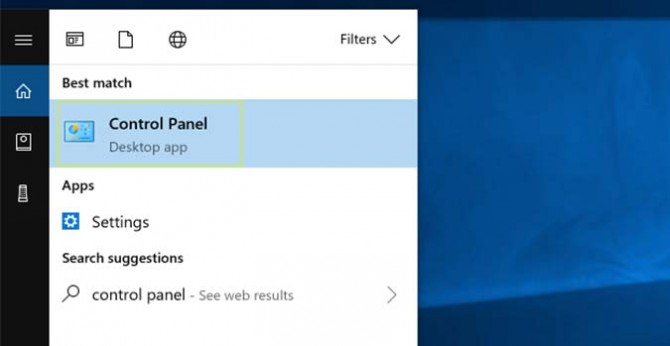
1. Launch the Microsoft Store. Microsoft pins it to Windows 11’s Taskbar and Start menu by default, but if you’ve removed it from both of those places, the quickest way to access the marketplace is by searching for “Microsoft Store” via the Start menu.
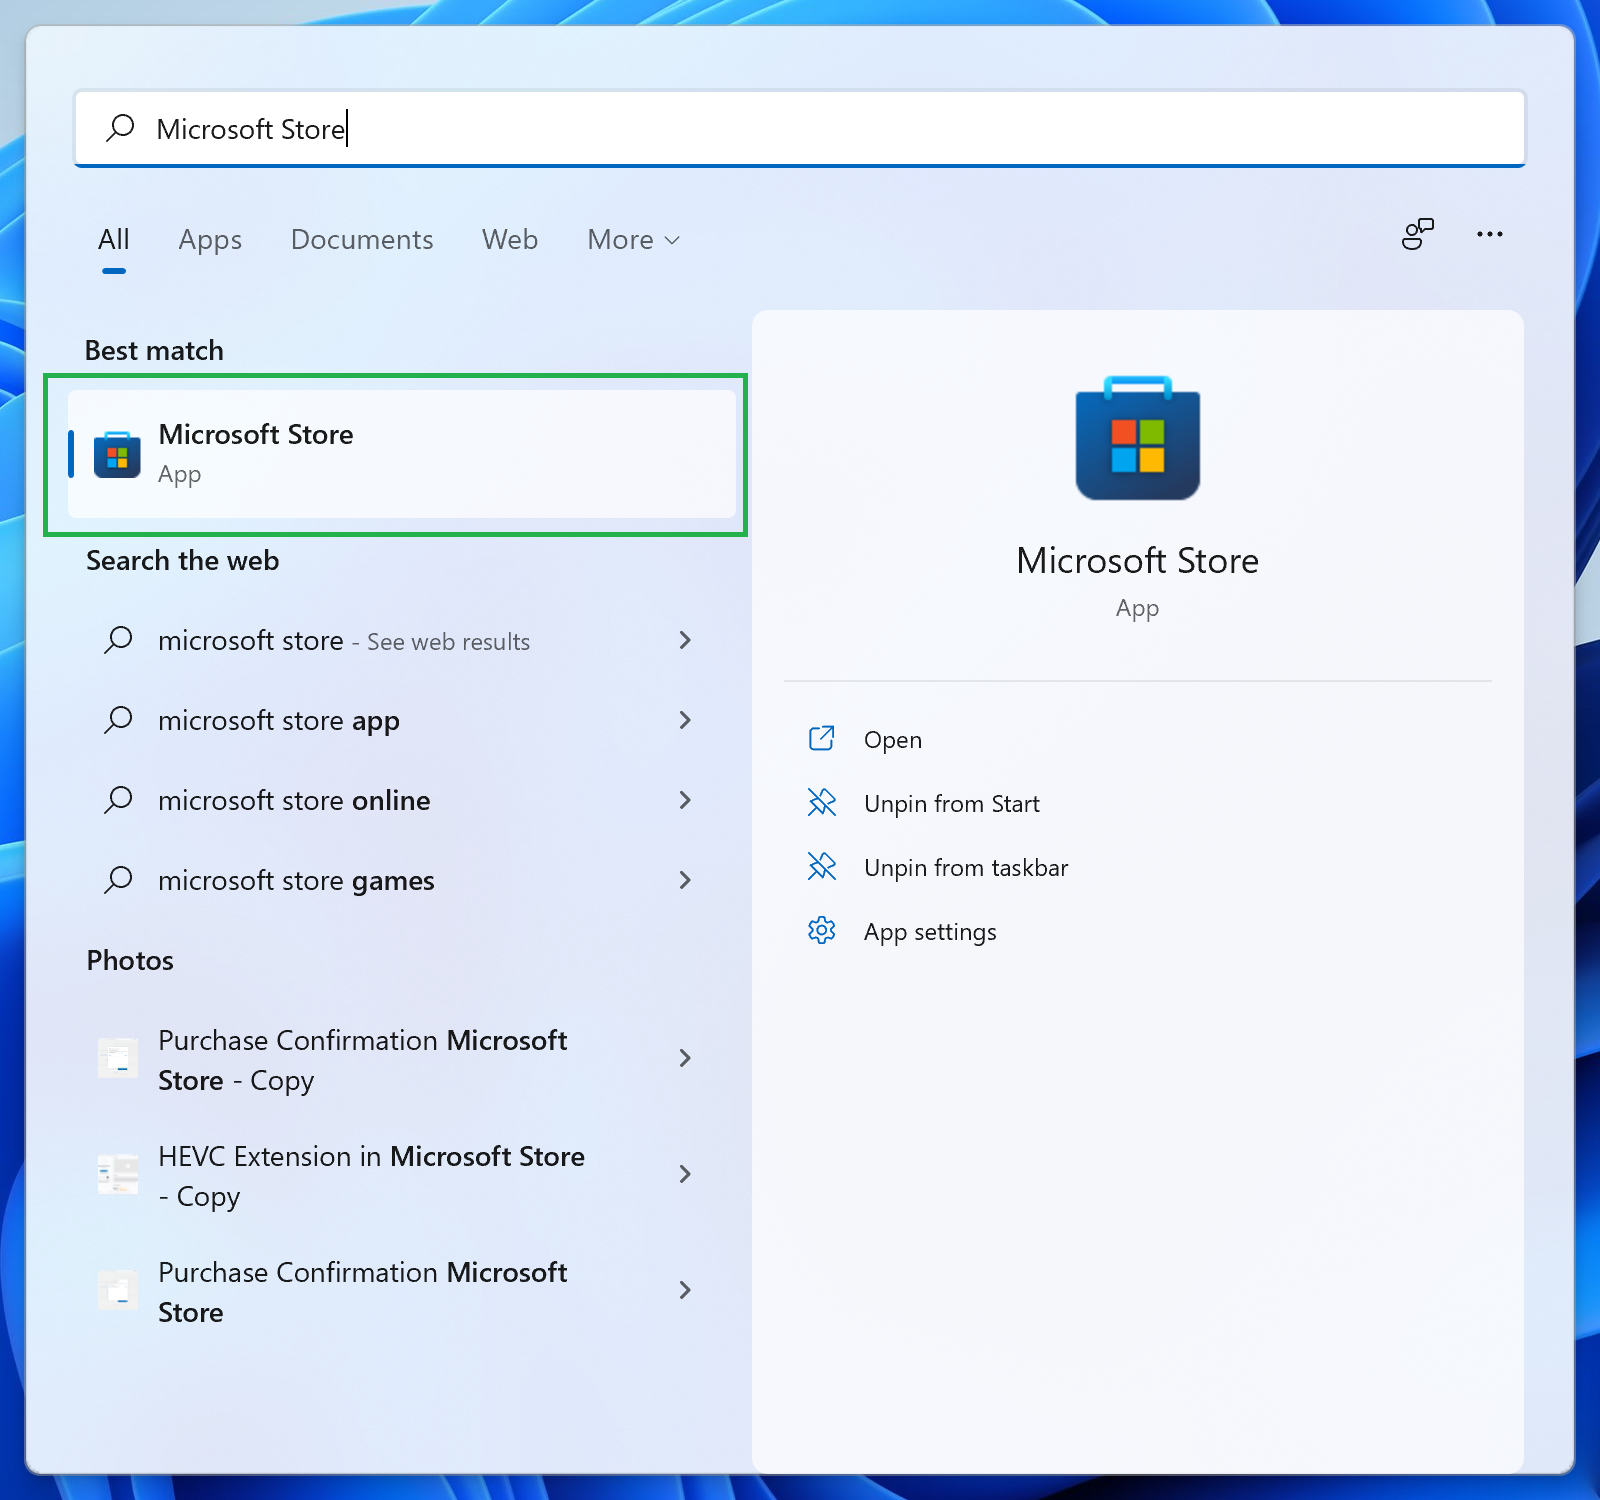
2. Search for ‘Fonts’ in the top search bar. A results menu will appear, and “Fonts” should be the top result. It’s easy to spot if it isn’t, though, because it has a nondescript icon and is captioned with “Explore new fonts.” Click it.
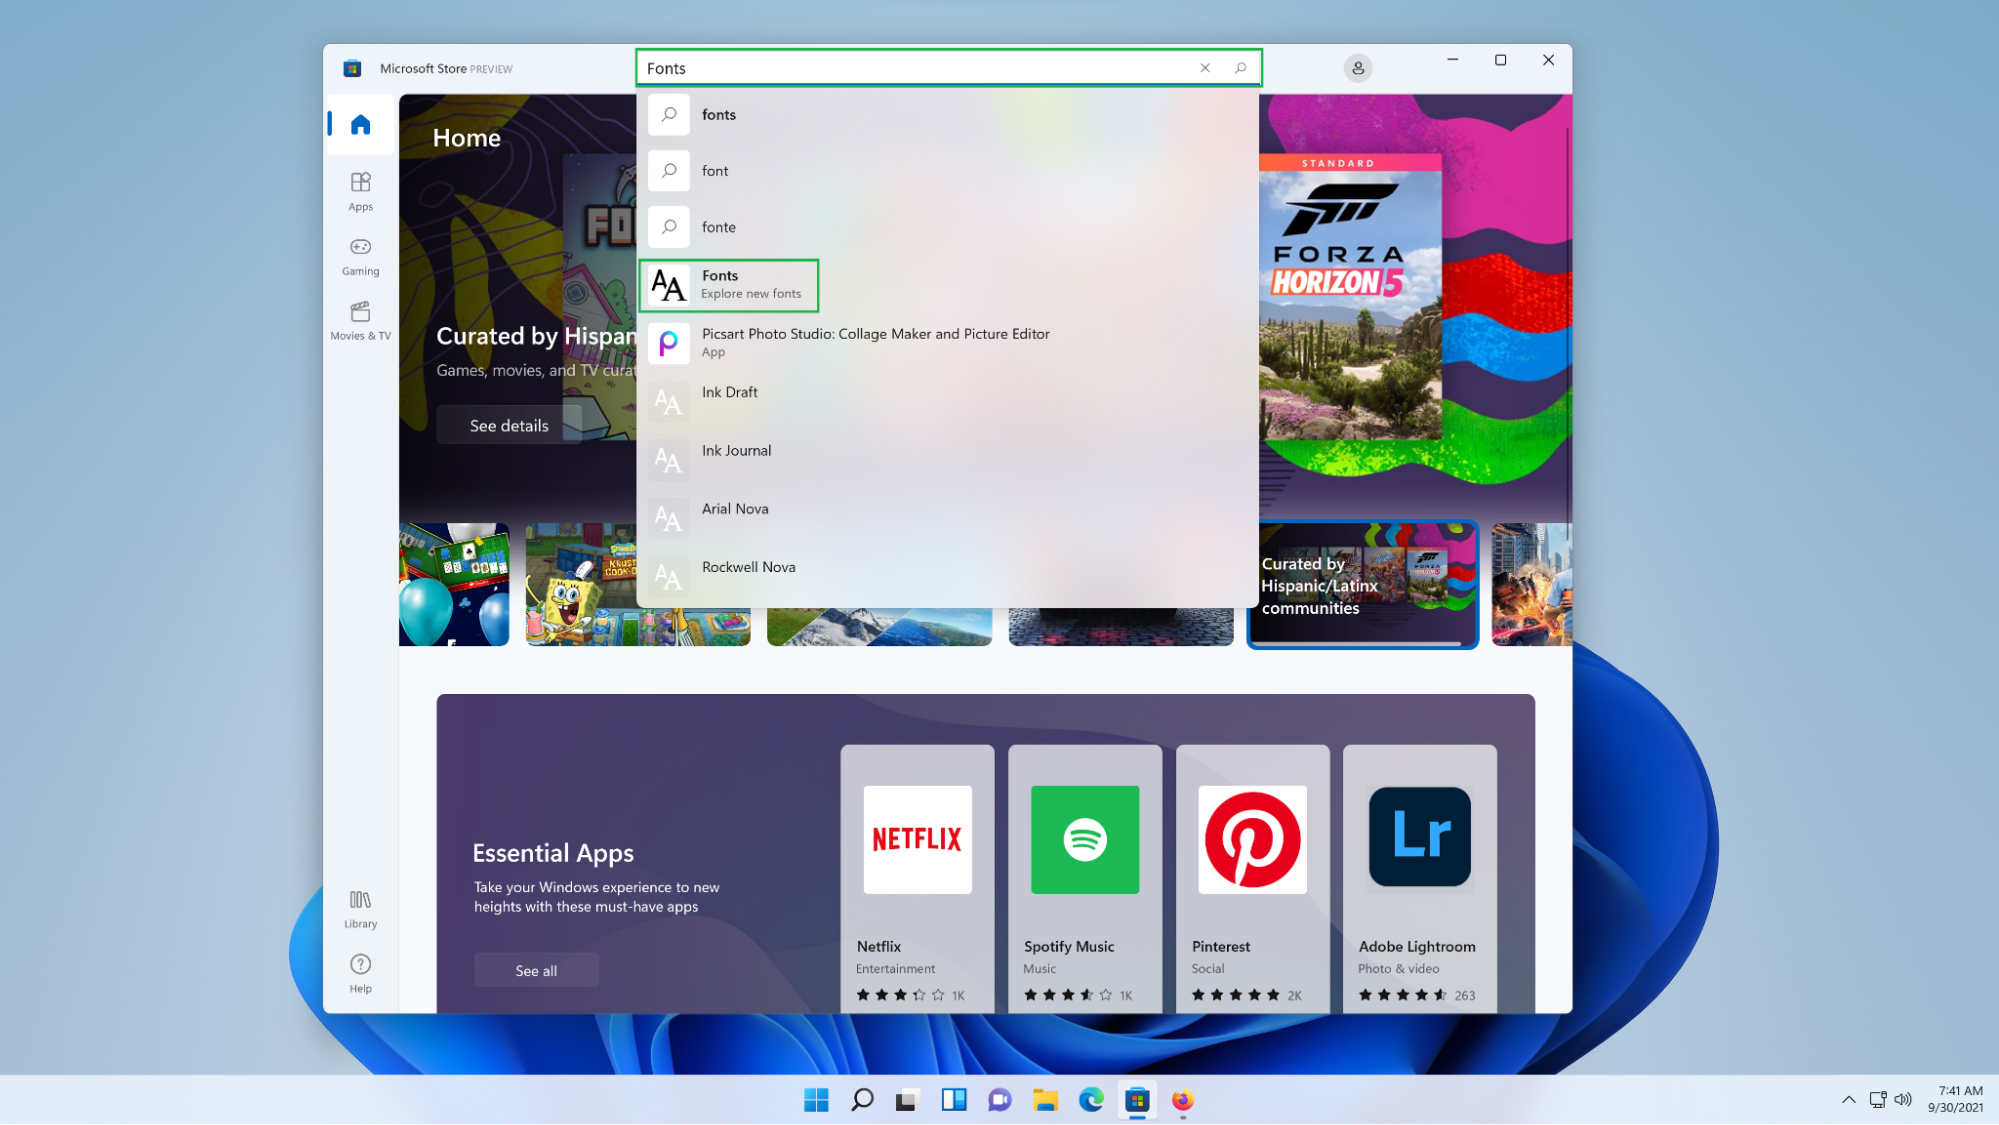
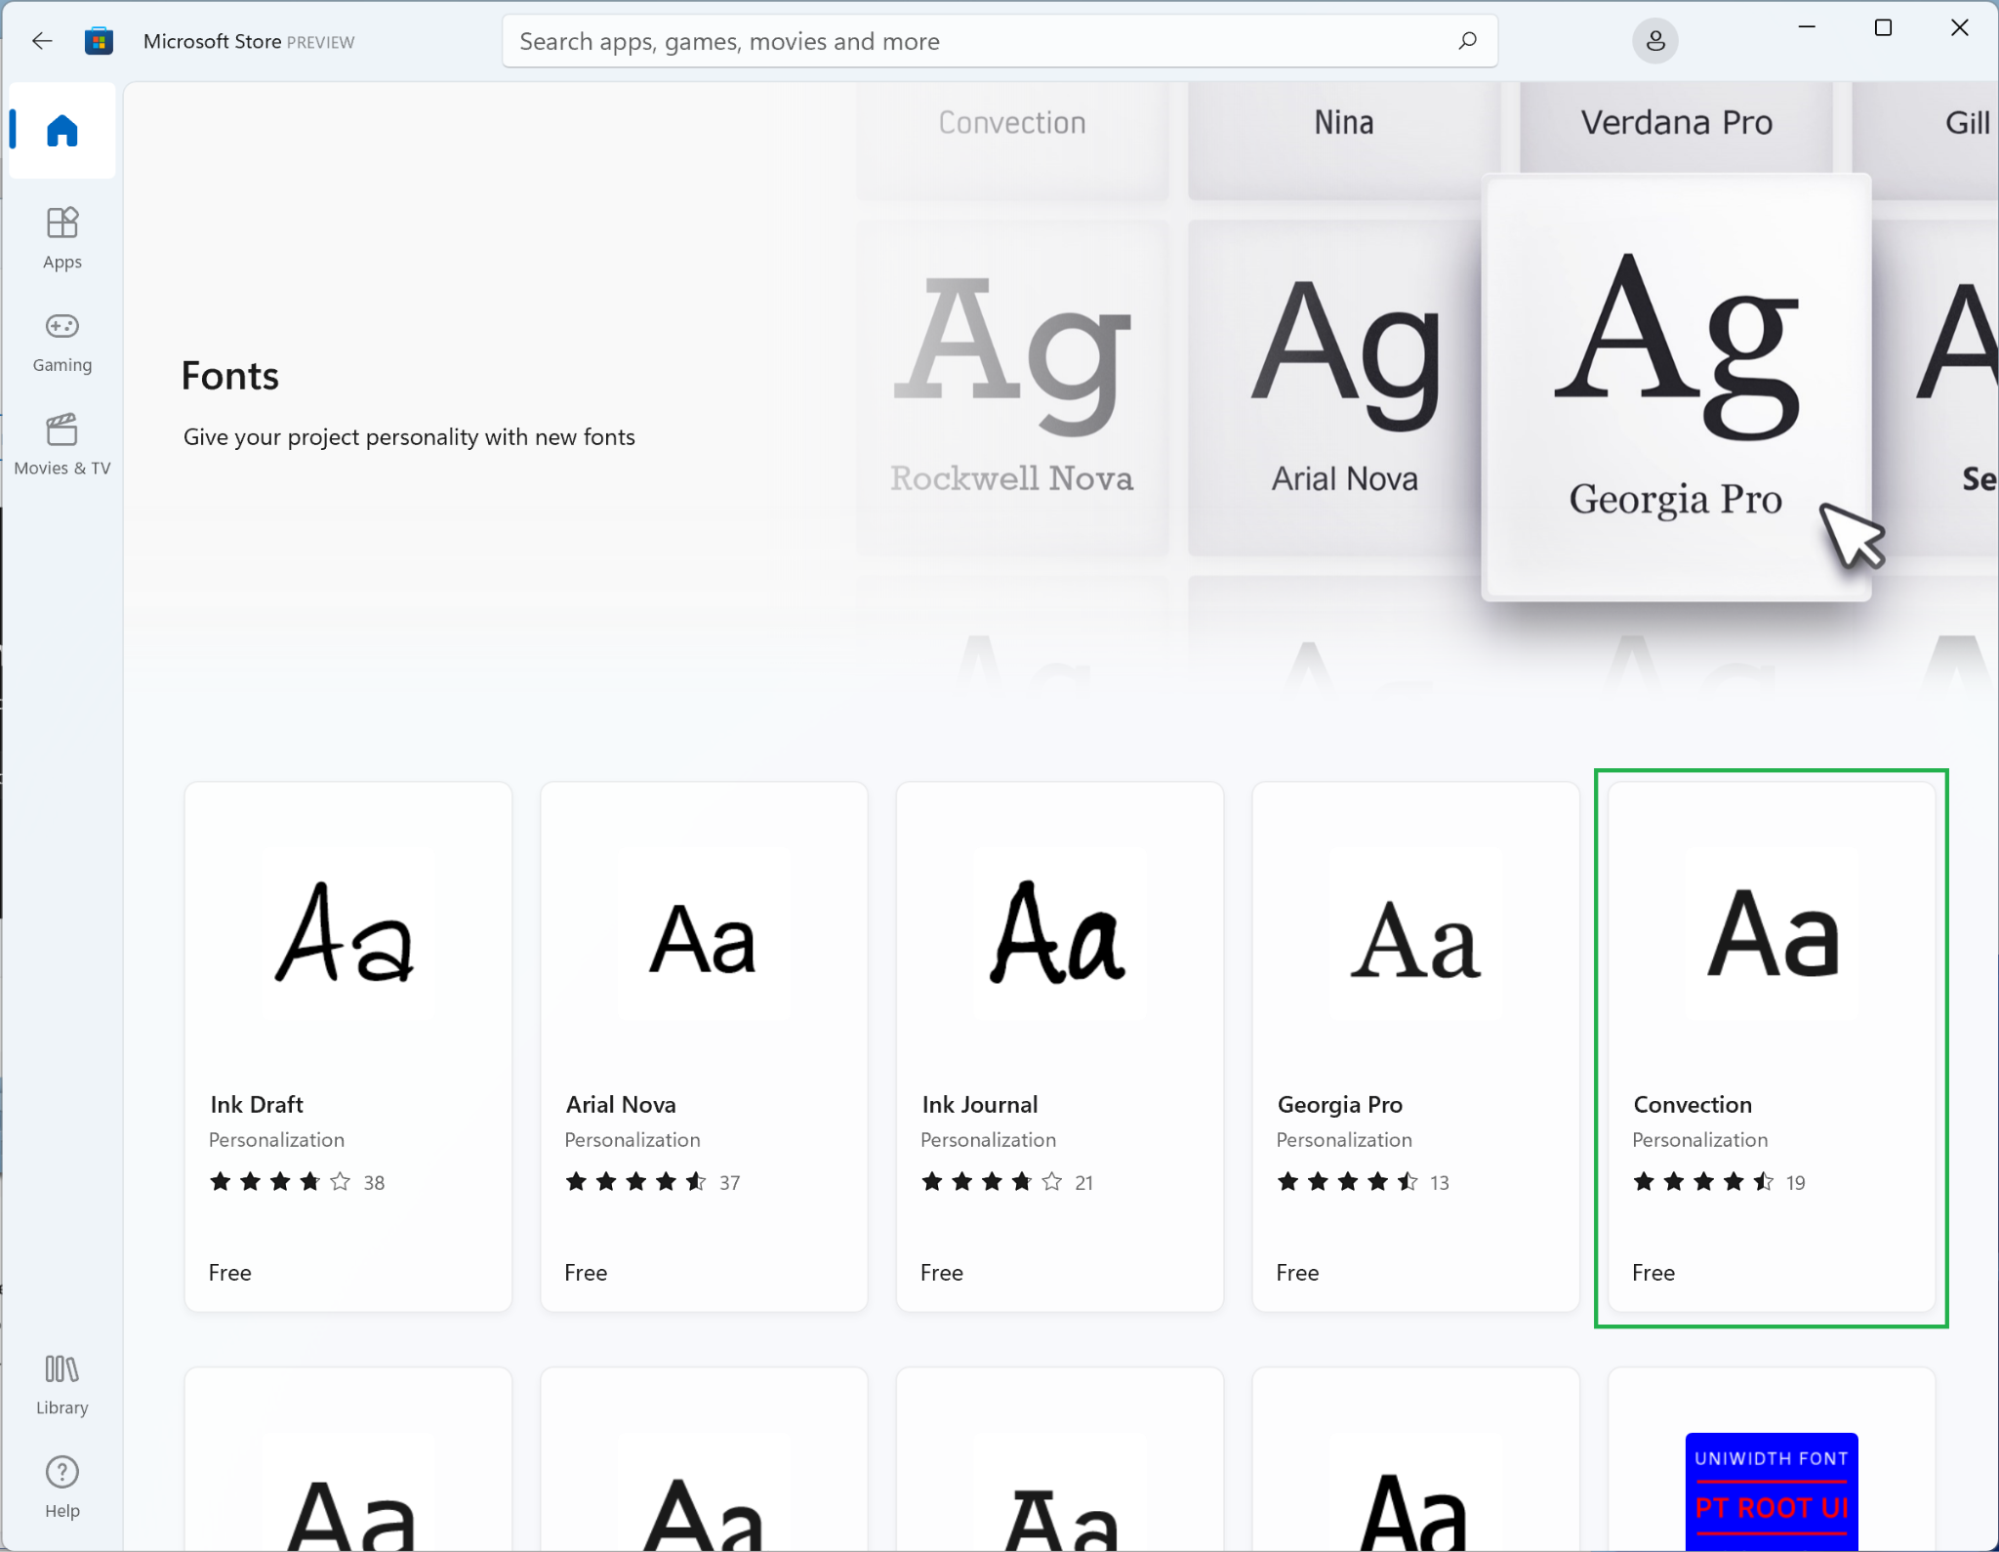
3. Click the ‘Explore new fonts’ button. Microsoft devotes a significant amount of this page to a curated selection of fonts, many of which it designed, so we’ll start there.

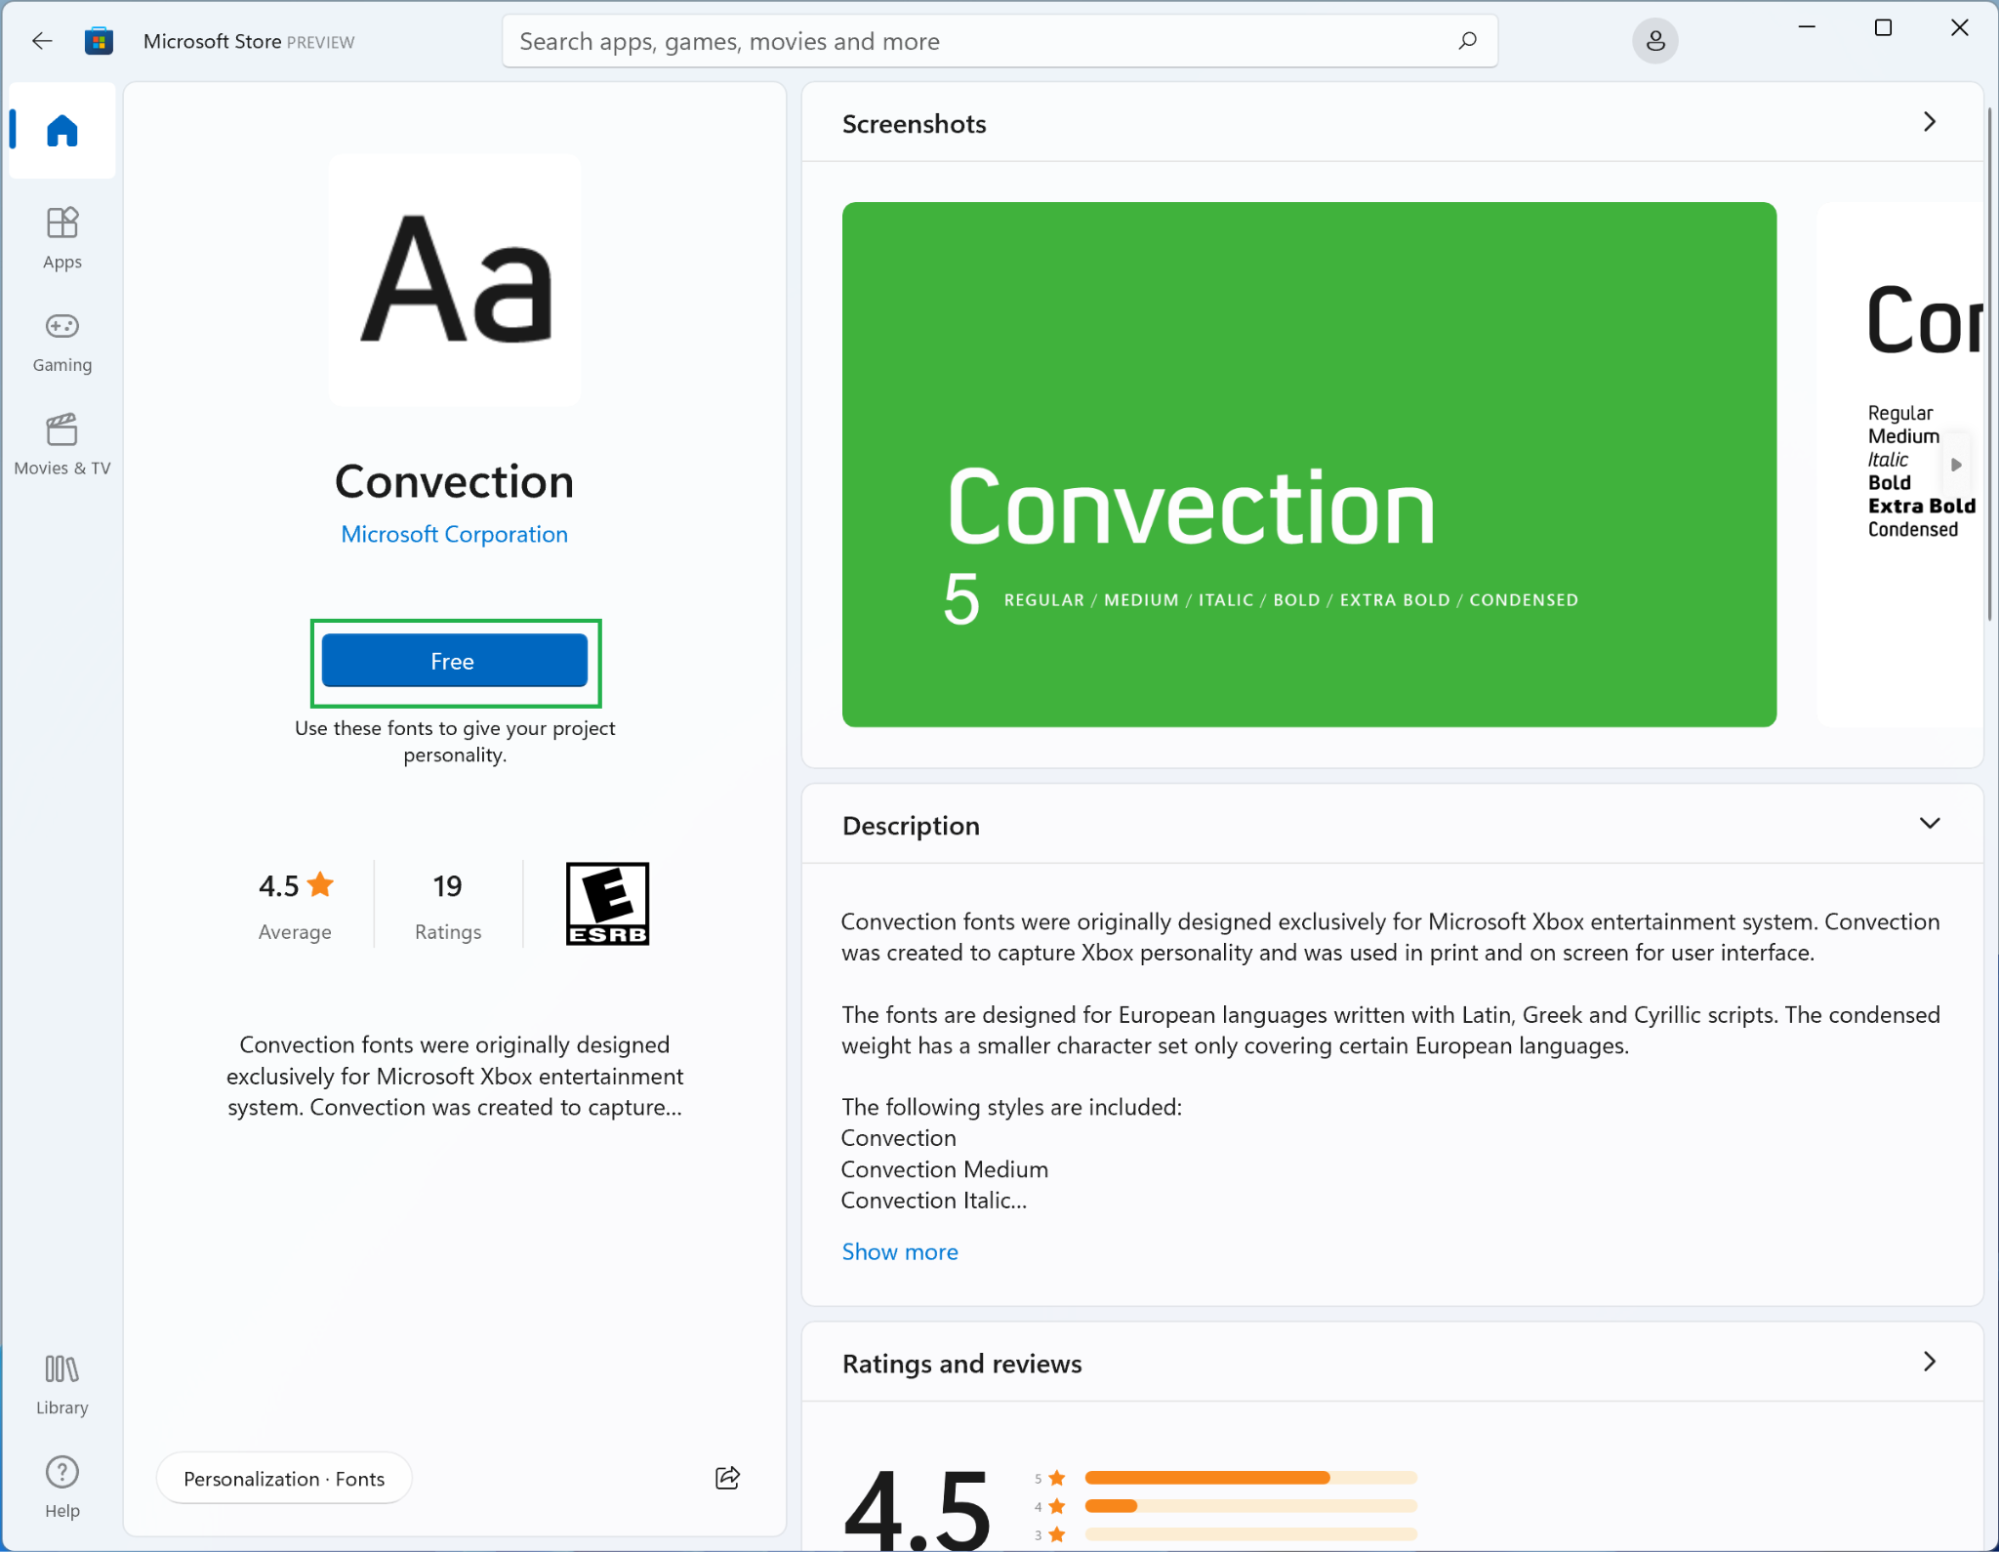
4. Choose a font that interests you. In our case we’re going to select “Convection” because it looks like a fun sans serif we might want in our collection, but the steps will be the same for any of the fonts you choose, so pick whichever option catches your eye.
5. Click the ‘Free’ button. You don’t even have to sign in to the Microsoft Store to install free fonts; you simply have to click the “Free” button. Paid fonts do require you to sign in to a Microsoft account, however, and you’ll have to choose your payment method before you can confirm your purchase and install the font you want to use.
Once the “Free” button changes to “Open” you should be able to use the font you chose. Note that clicking the “Open” button won’t actually preview the font. It simply leads to the Personalization section of the Settings app, which is exactly where we were going to go next.
How to install fonts via Settings in Windows 11 or 10
Installing fonts via Settings requires you to download a TrueType, OpenType or PostScript file. Many sites offer a variety of free, often user-created fonts, and professionally designed fonts can be found on a variety of marketplaces. Google Fonts is one of the best. Just be wary about where you choose to download something from so you can minimize your potential exposure to malicious files. With all that said, here’s how to install fonts via the Settings app that’s built in to Windows 11 and Windows 10.
1. Locate your downloaded font. Most browsers automatically save downloaded files to the Downloads folder, but if you set a custom destination, navigate to it using your file manager of choice. You can then leave that program window open or move the file to your Desktop, which is what we’ve done in the picture below with Google’s Roboto font. Note that if your download is compressed (in a ZIP file perhaps) you’ll have to extract it.
Installing fonts via Settings requires you to download a TrueType, OpenType or PostScript file. Many sites offer a variety of free, often user-created fonts, and professionally designed fonts can be found on a variety of marketplaces. Google Fonts is one of the best. Just be wary about where you choose to download something from so you can minimize your potential exposure to malicious files. With all that said, here’s how to install fonts via the Settings app that’s built in to Windows 11 and Windows 10.
2. Locate your downloaded font. Most browsers automatically save downloaded files to the Downloads folder, but if you set a custom destination, navigate to it using your file manager of choice. You can then leave that program window open or move the file to your Desktop, which is what we’ve done in the picture below with Google’s Roboto font. Note that if your download is compressed (in a ZIP file perhaps) you’ll have to extract it.

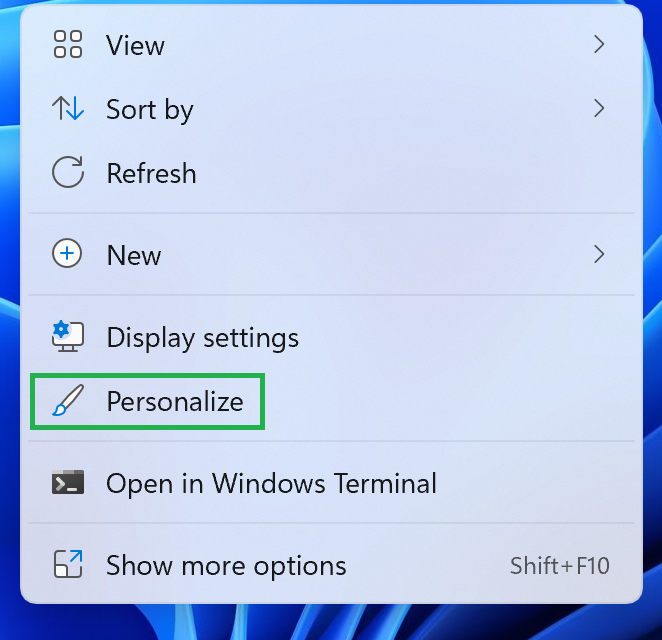
3. Navigate to the ‘Personalization’ page in Settings. The quickest way to do this is to right-click on the Desktop and choose “Personalize” from the menu that appears. You can also navigate to it in the Settings app by clicking “Personalization” in the sidebar.
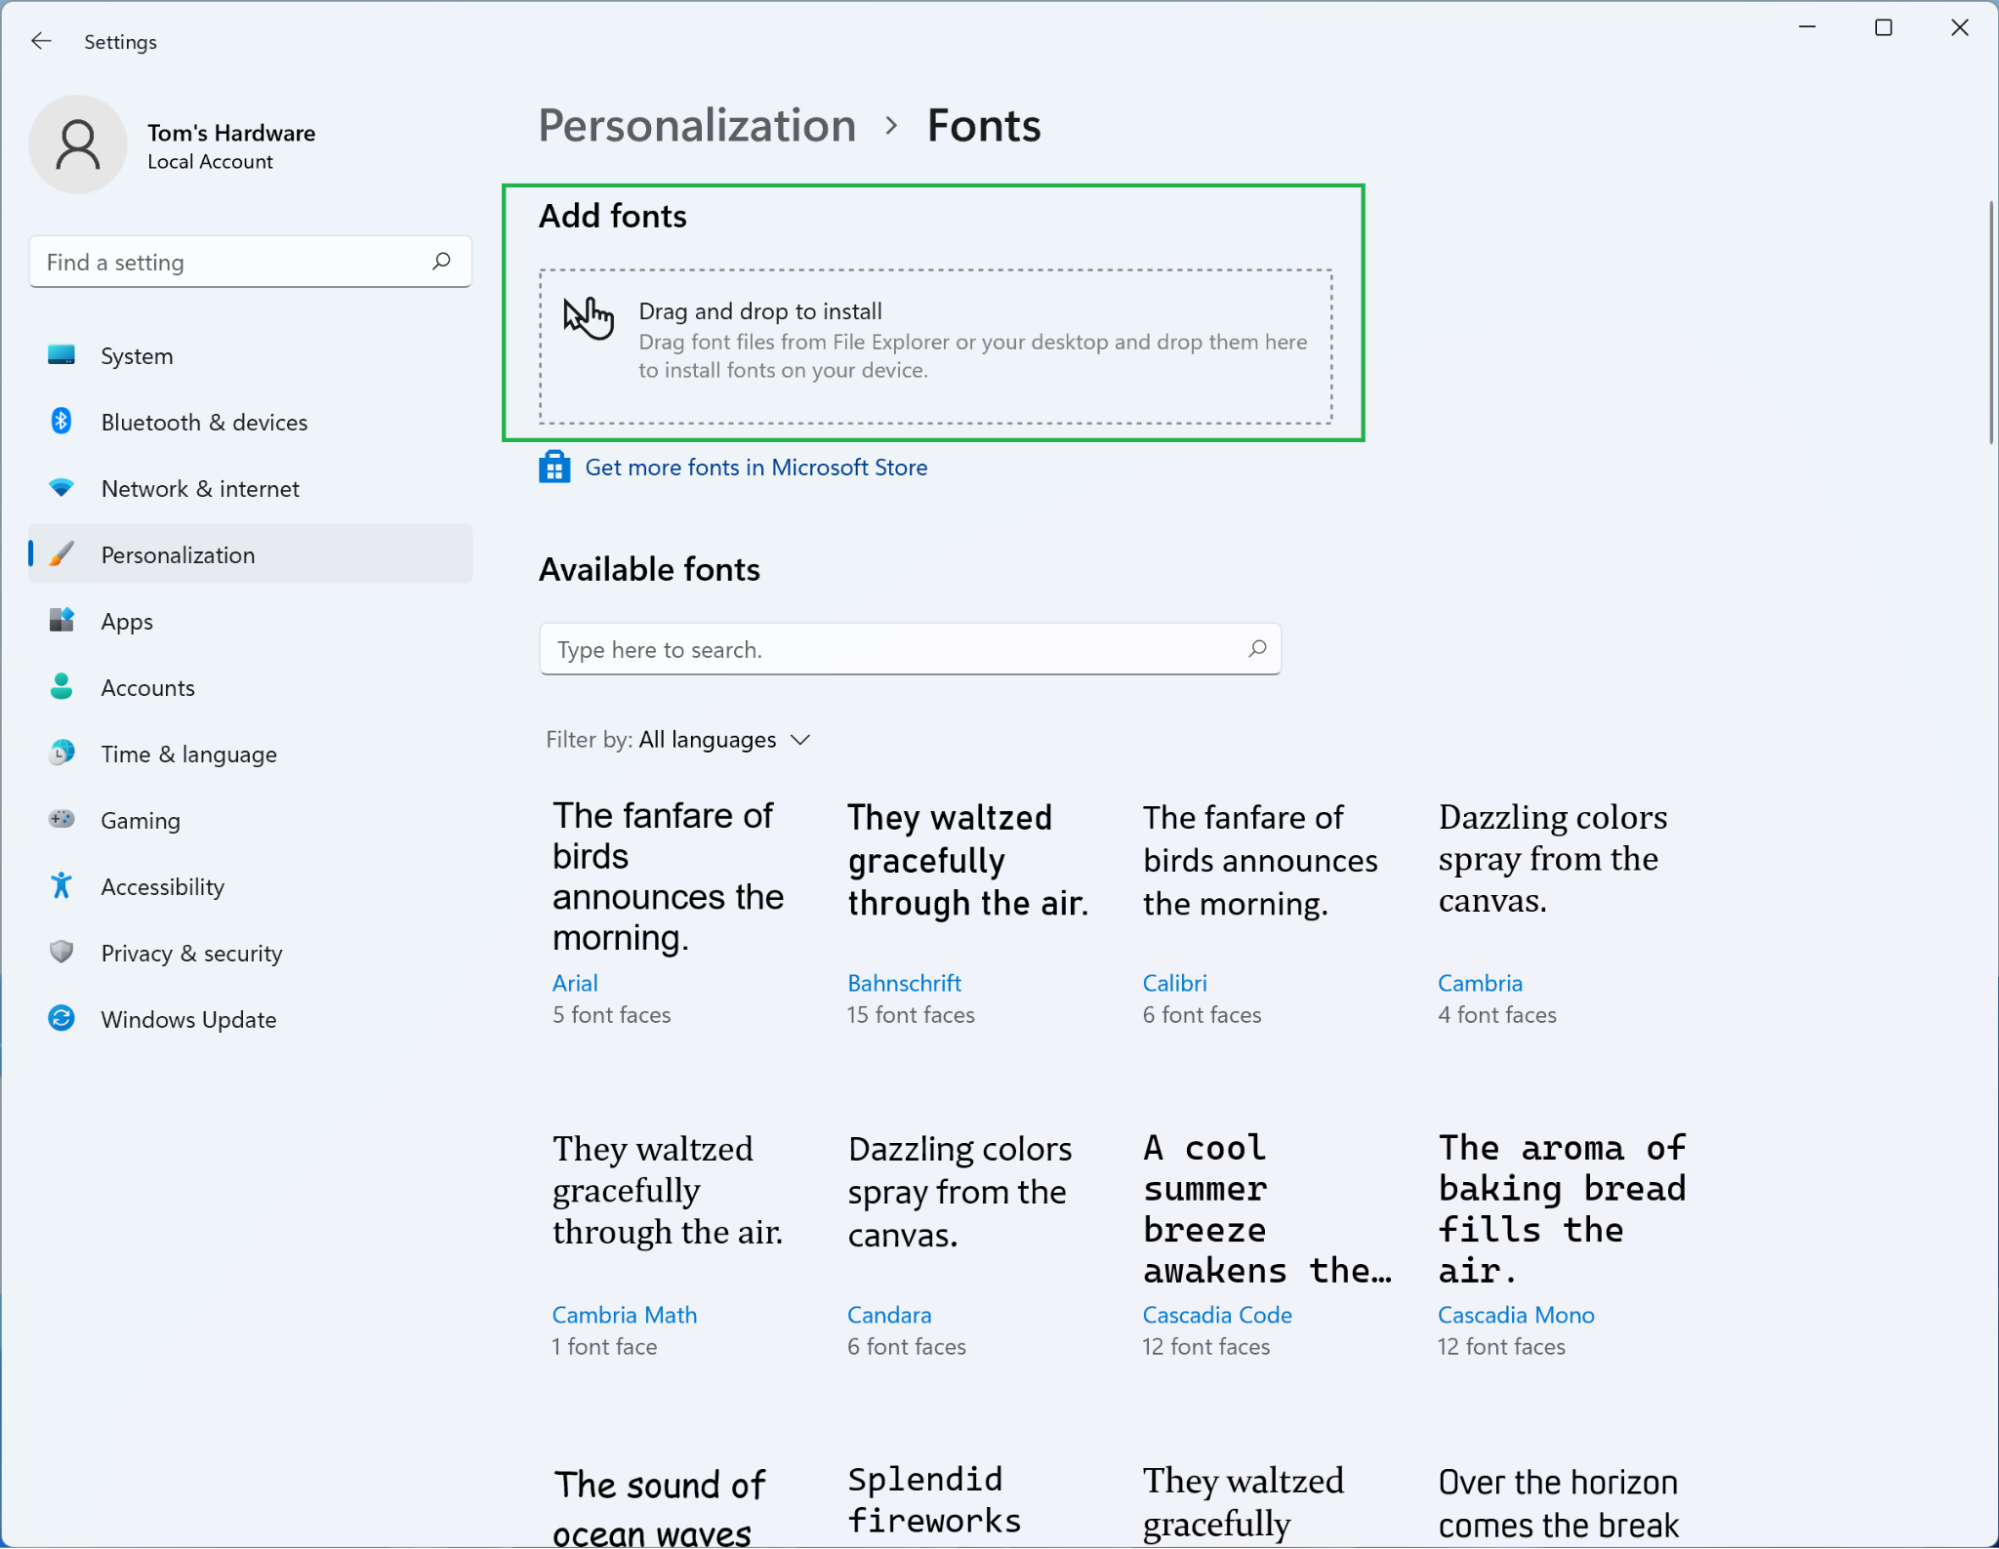
4. Select the ‘Fonts’ option. You might have to scroll, but there will be an option called “Fonts” captioned “Install, manage.” Clicking it will bring up a page showing your installed fonts and, more important for our purposes, a way to add new ones.

5. Drag your downloaded font to the appropriate box in Settings. You can’t drag-and-drop the folder itself for some reason, but you can select multiple files within the folder and drop them in the indicated area to install your new font.
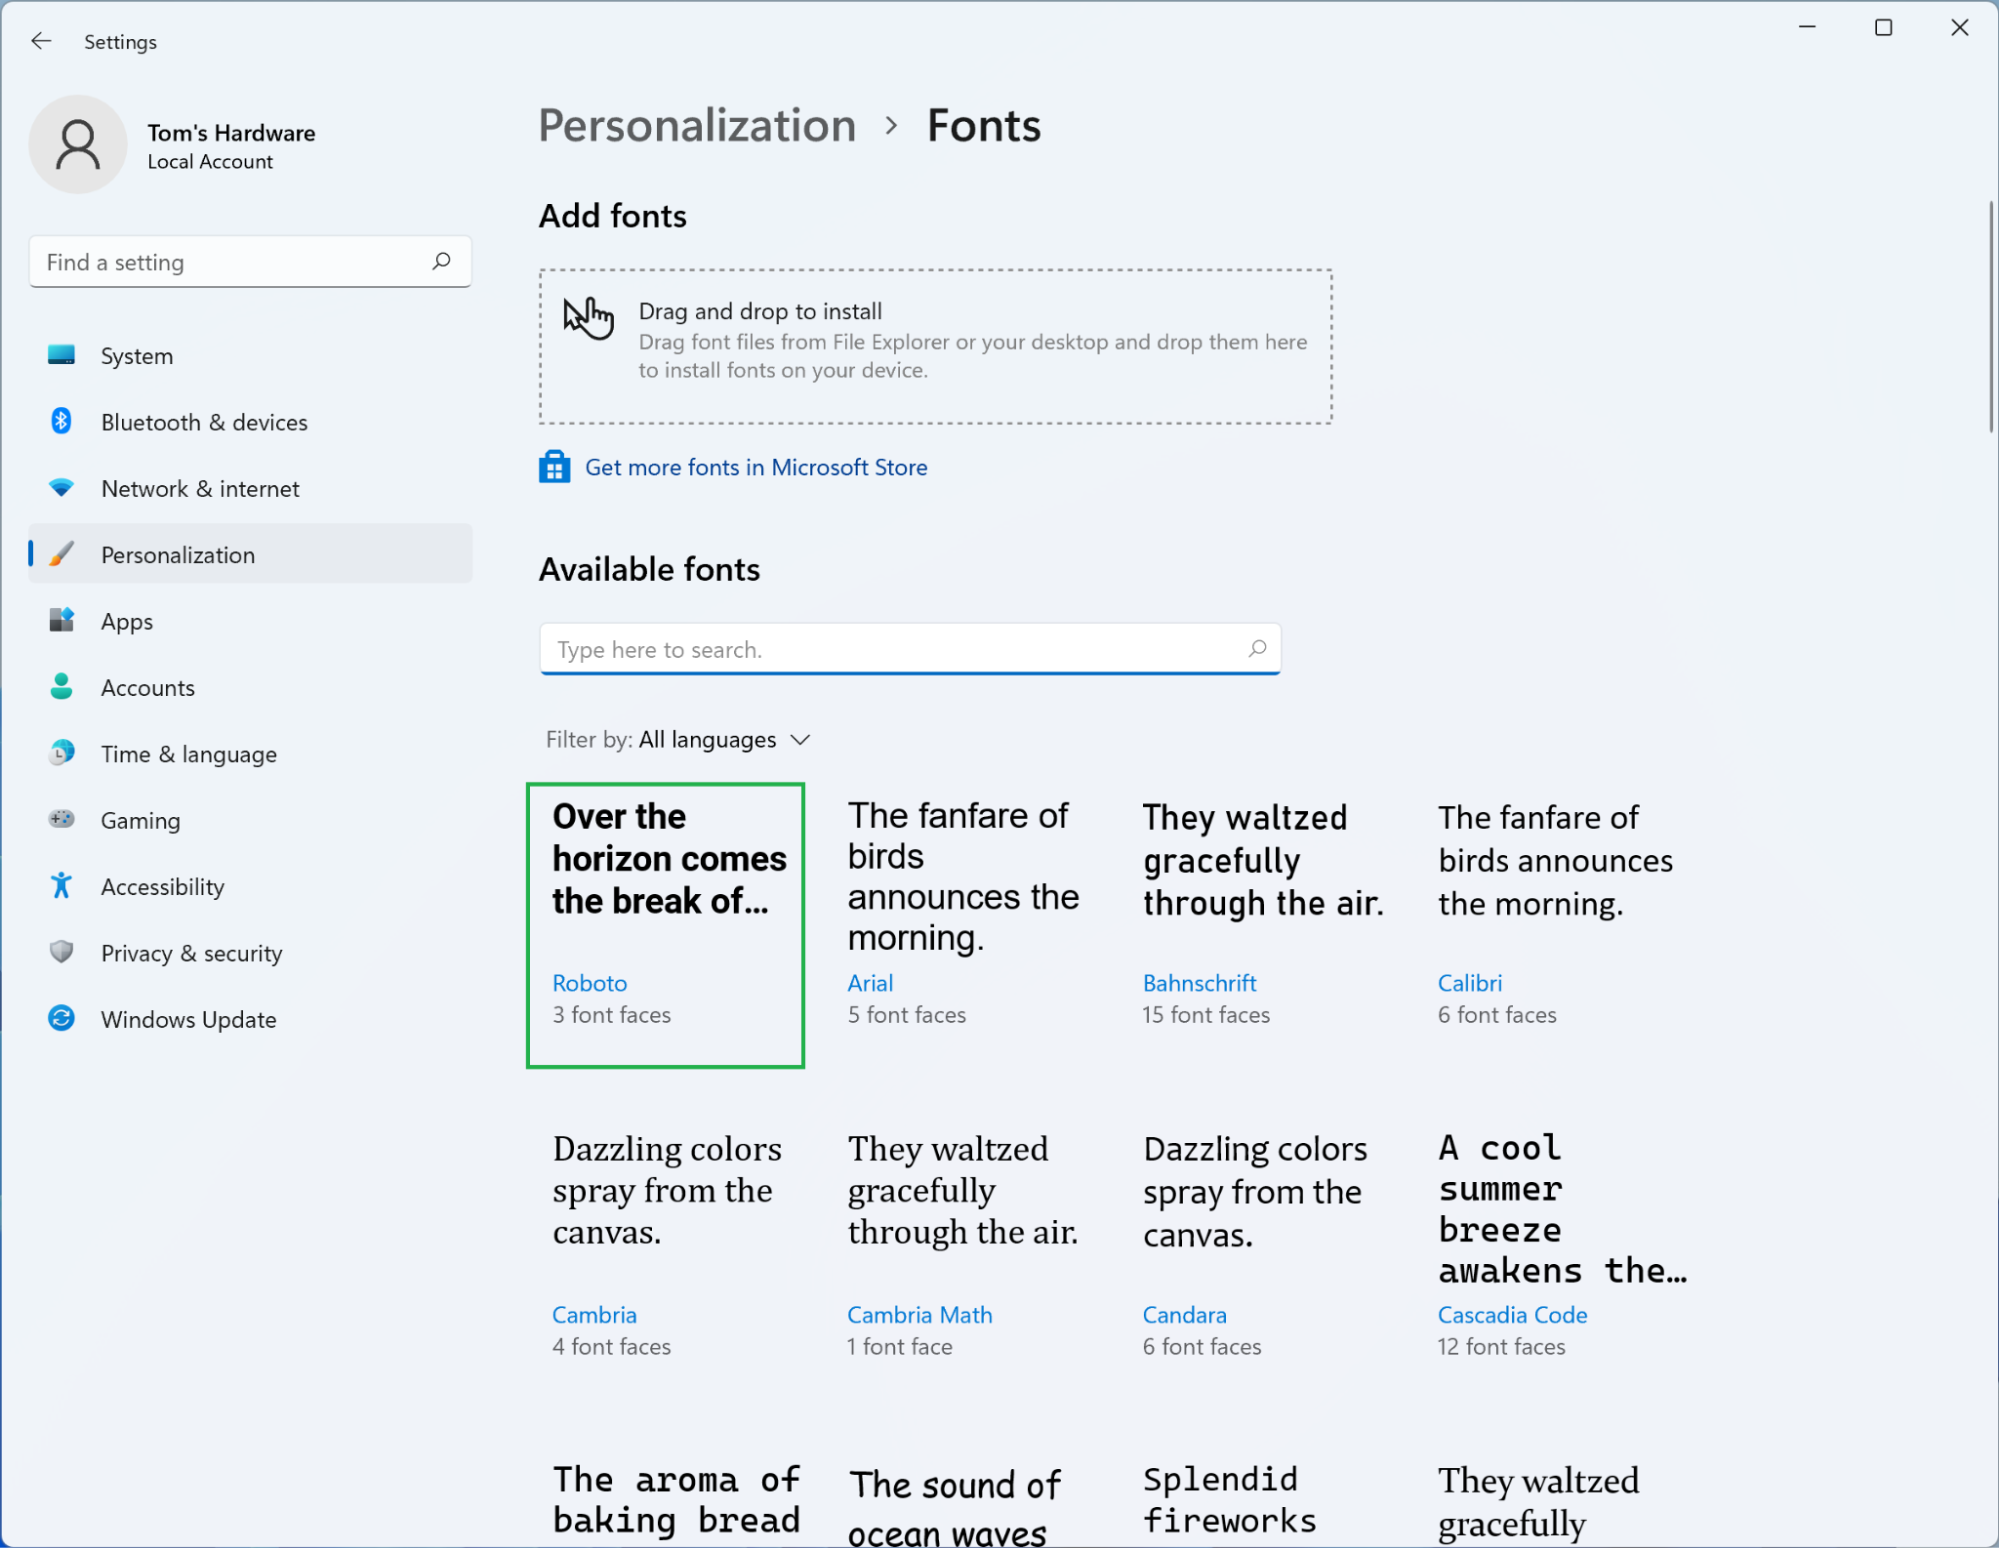
6. Confirm the font was installed. Settings will automatically show the new font as the first item in the list of installed fonts below the drag-and-drop interface to confirm it was successfully installed. (The fonts will be alphabetically sorted again if you return to the page.) The app will also group multiple font faces, such as Roboto Bold or Roboto Italic, under a single font to prevent duplicates from cluttering up the list.
That’s it! The font you downloaded has now been successfully installed and should be selectable in most programs. You can safely remove the downloaded file from your system; Windows stores installed fonts in a separate folder to make sure they remain available.
How to install fonts via File Explorer in Windows 11
Installing fonts via File Explorer is very similar to installing them via Settings—it simply requires more right-clicking instead of dragging and dropping files across multiple windows. Let’s begin.
1. Locate the downloaded font. As before, you’ll most likely want to check your Downloads folder, but if you saved the font somewhere else you can either navigate to the appropriate folder in File Explorer or use Windows 11 or 10’s search tool to find it.

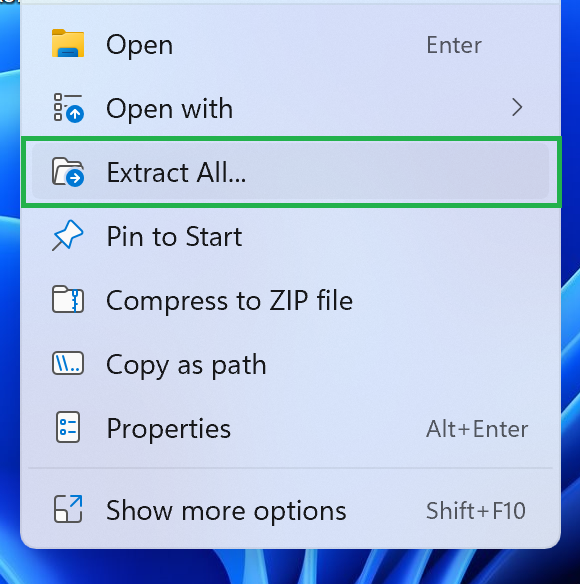
2. (Optional) Decompress the archive. If you downloaded the font as a ZIP file you can right-click it, choose “Extract All…” from the menu, and then click “Extract” in the window that appears. Other archive formats such as .rar files will require additional software.
3. Select the files you need. Many fonts ship with numerous font faces (bold, italic, etc.) and weights (light, heavy, and so on) you can use. If you want to install all of them for posterity’s sake, you can select all of them. If you only want to install a few of them, just pick the ones you need, and ignore the rest.
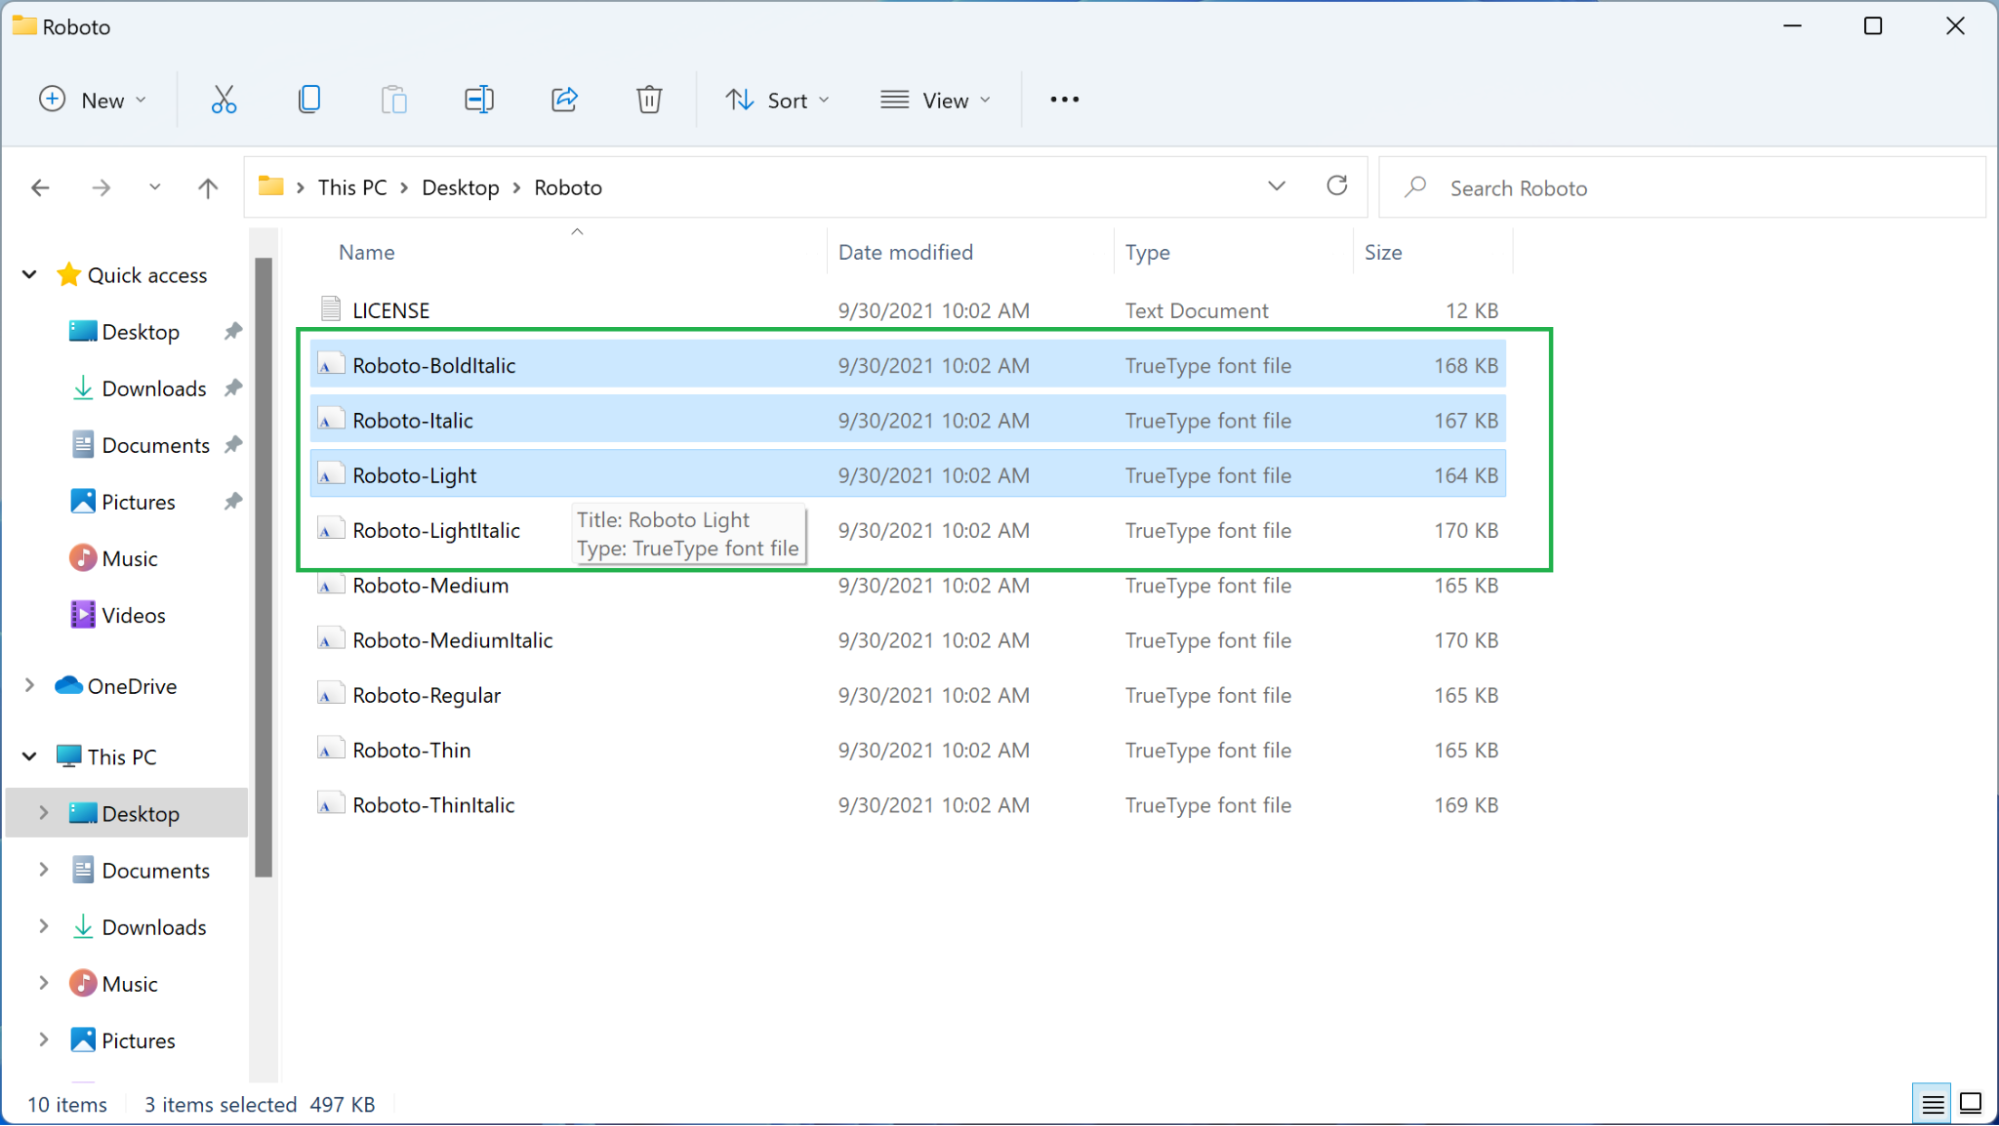
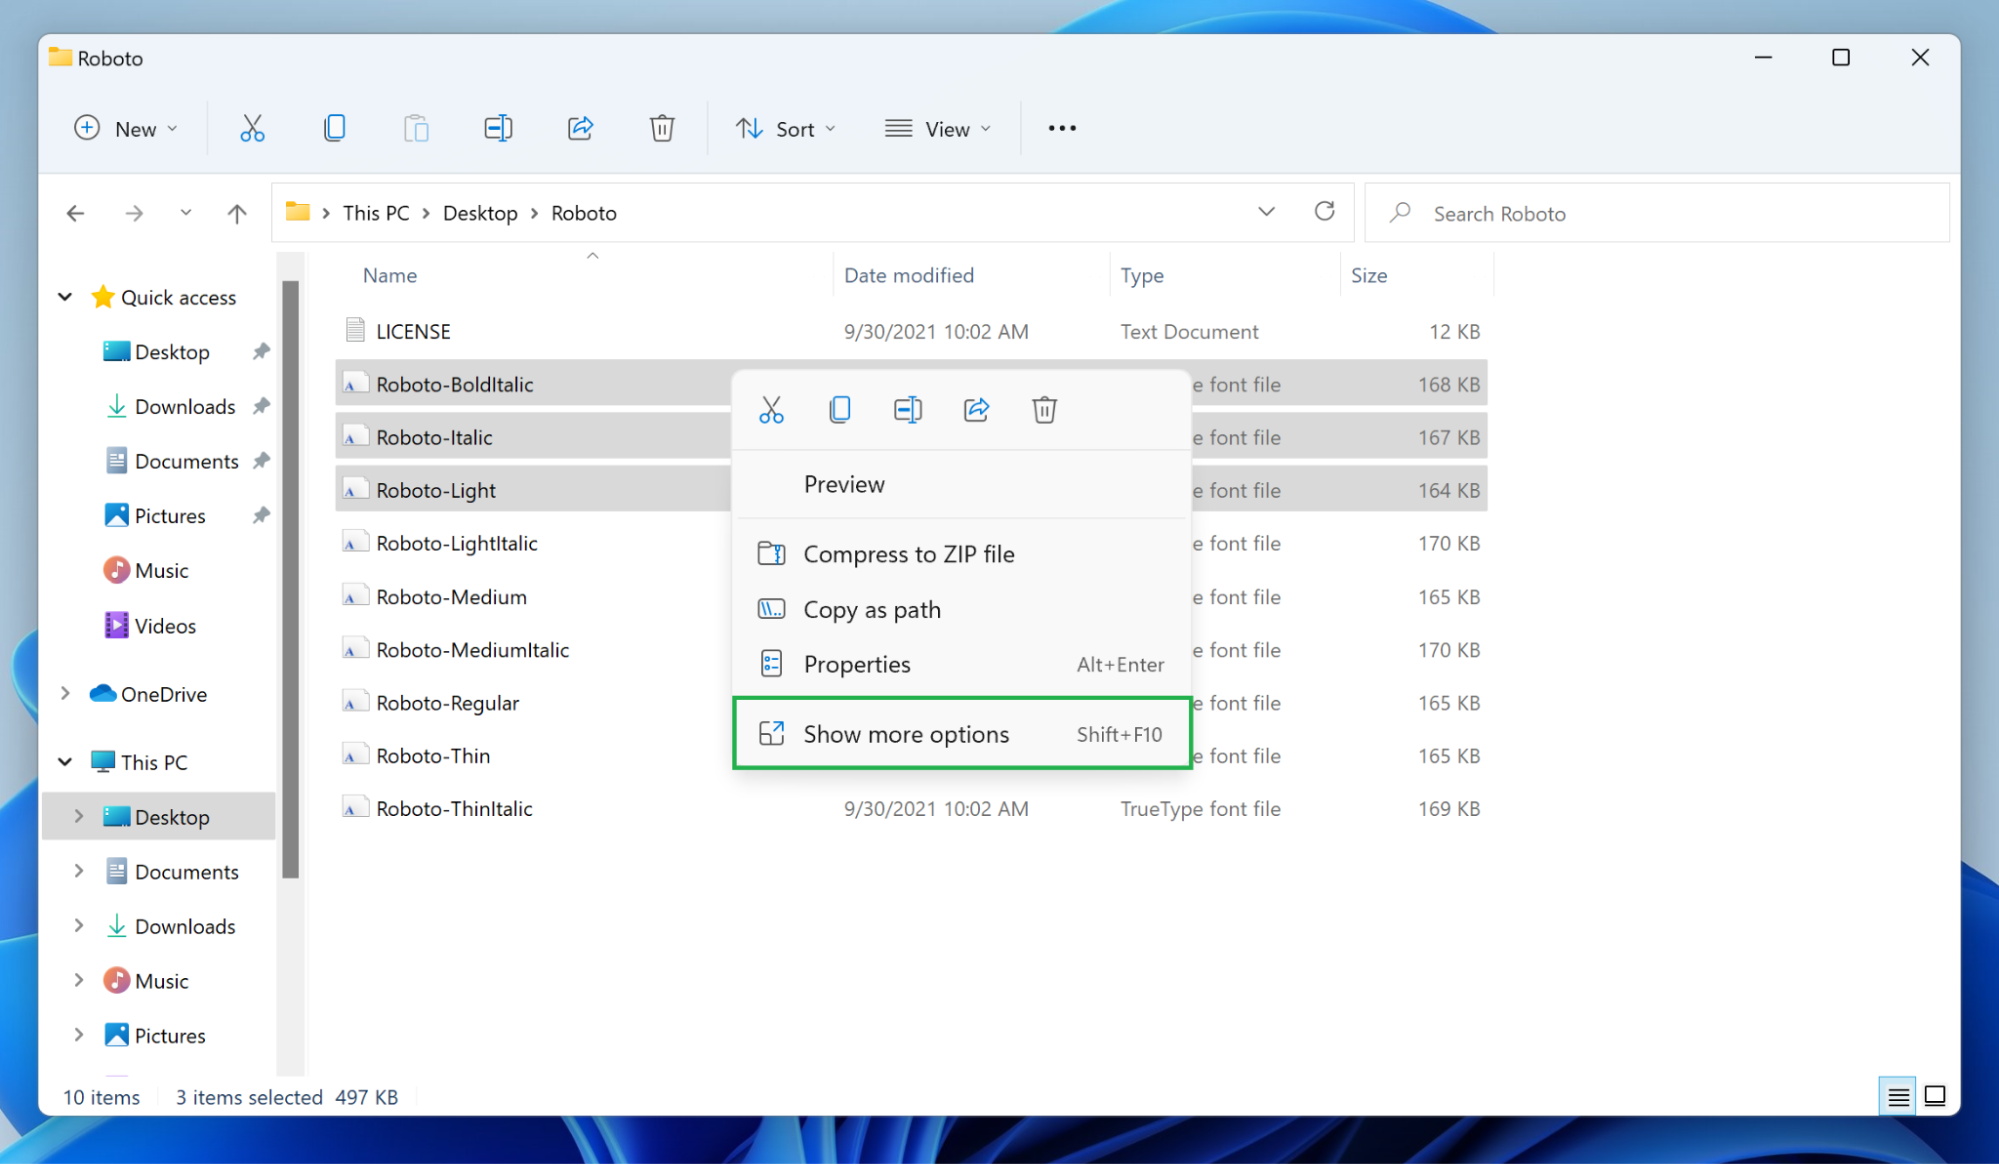
4. Right-click and, if the option to install doesn’t appear, select ‘Show more options’ in the menu. Windows 11 has moved the ability to install fonts by right-clicking the appropriate file and then choosing the appropriate option, so you’ll have to click “Show more options” or press Shift+F10 to access it. Windows 10 users can skip this step.
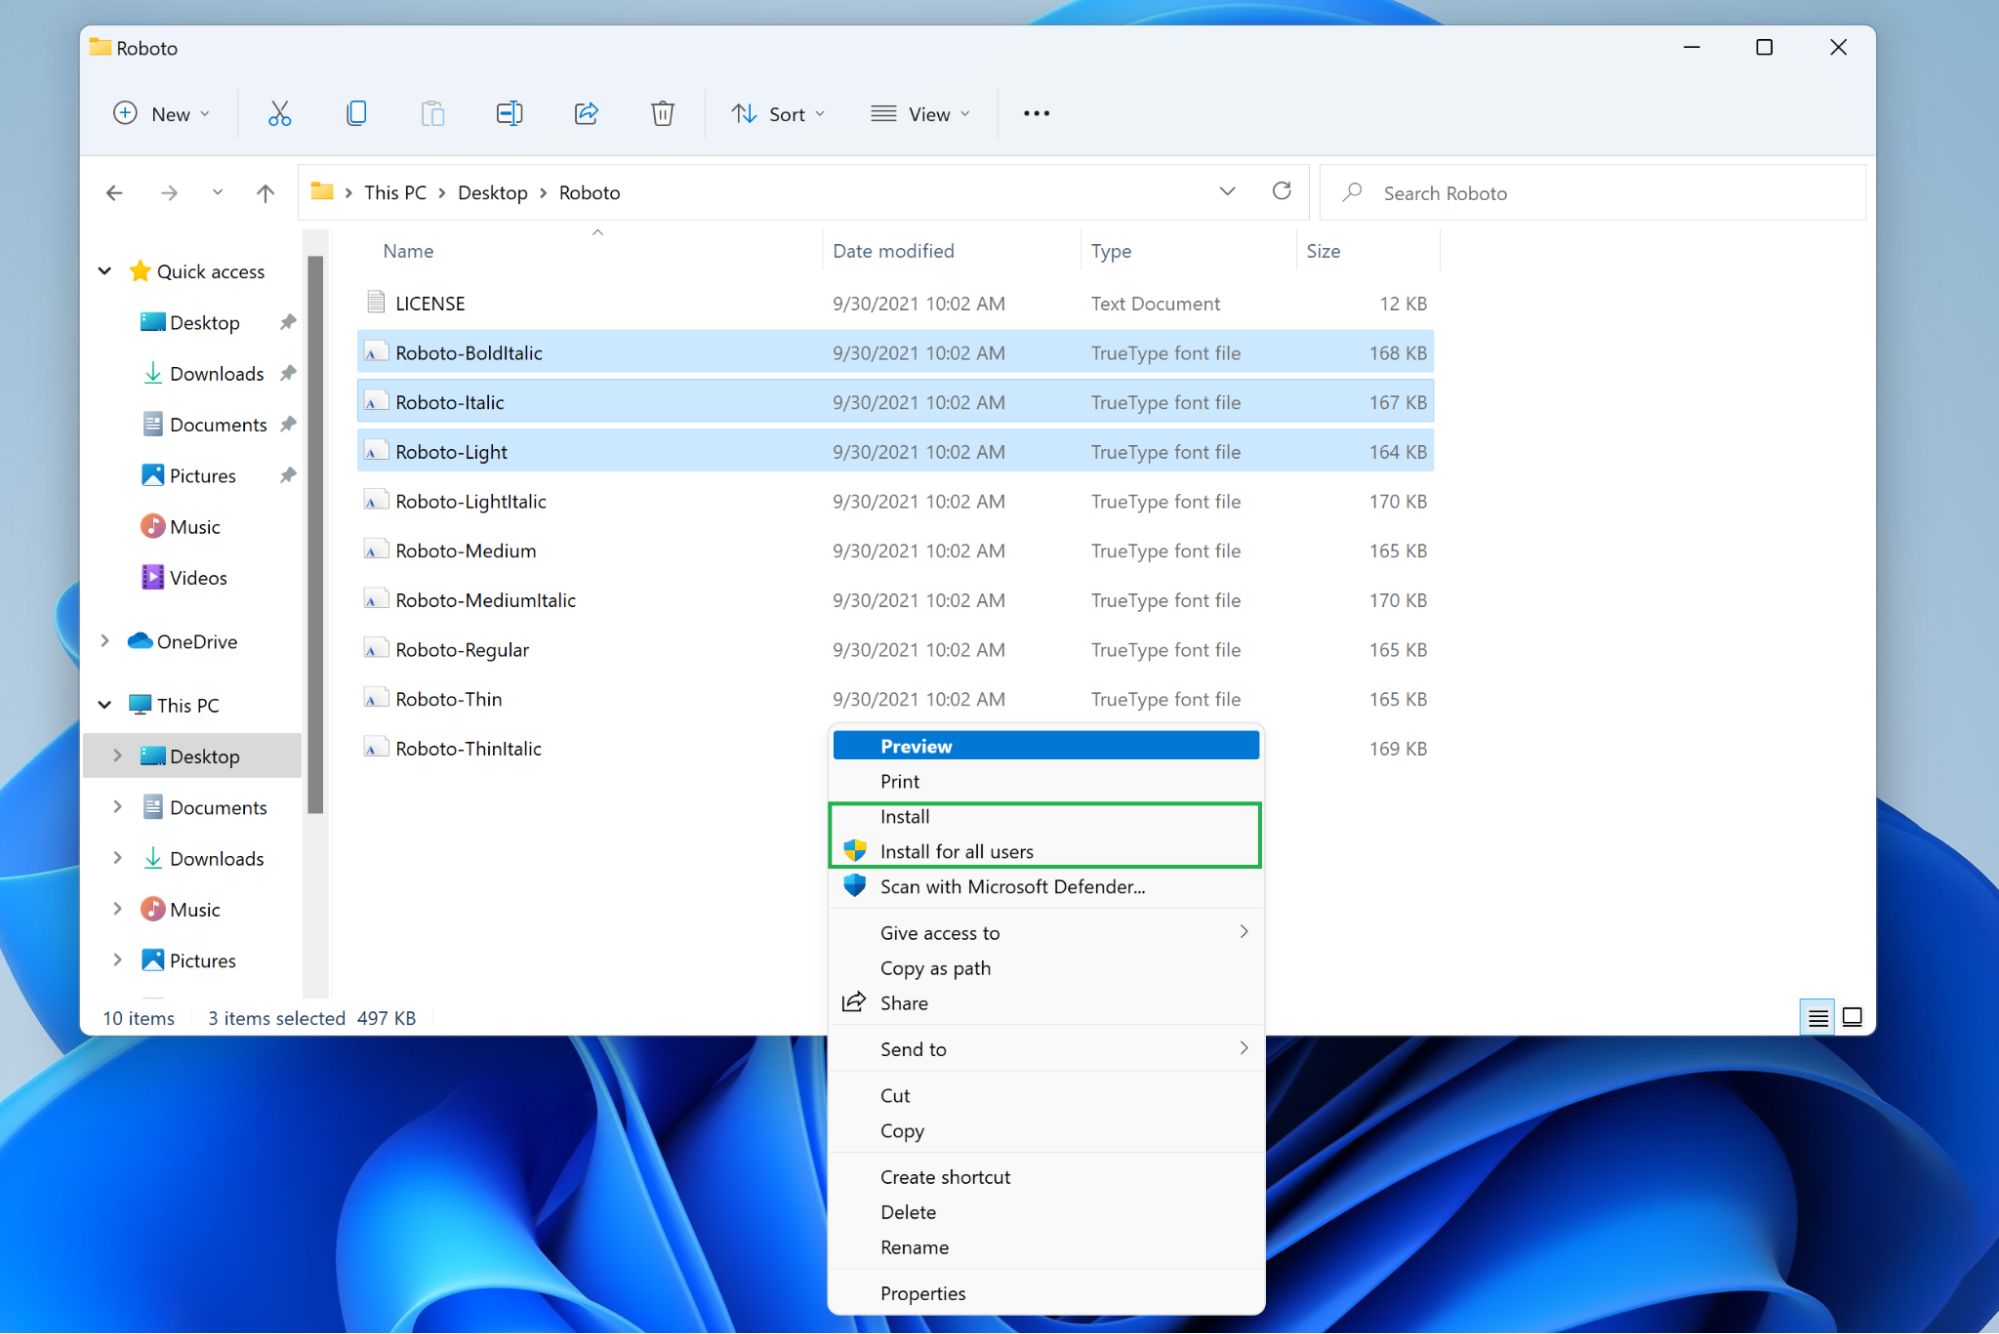
5. Choose ‘Install’ or ‘Install for all users’ from the menu. Normal users can install fonts for their own use, but installing it for every account on the system requires administrator privileges. Either way, once you’ve clicked whichever option you chose, a progress window should appear that automatically closes when the font is successfully installed.
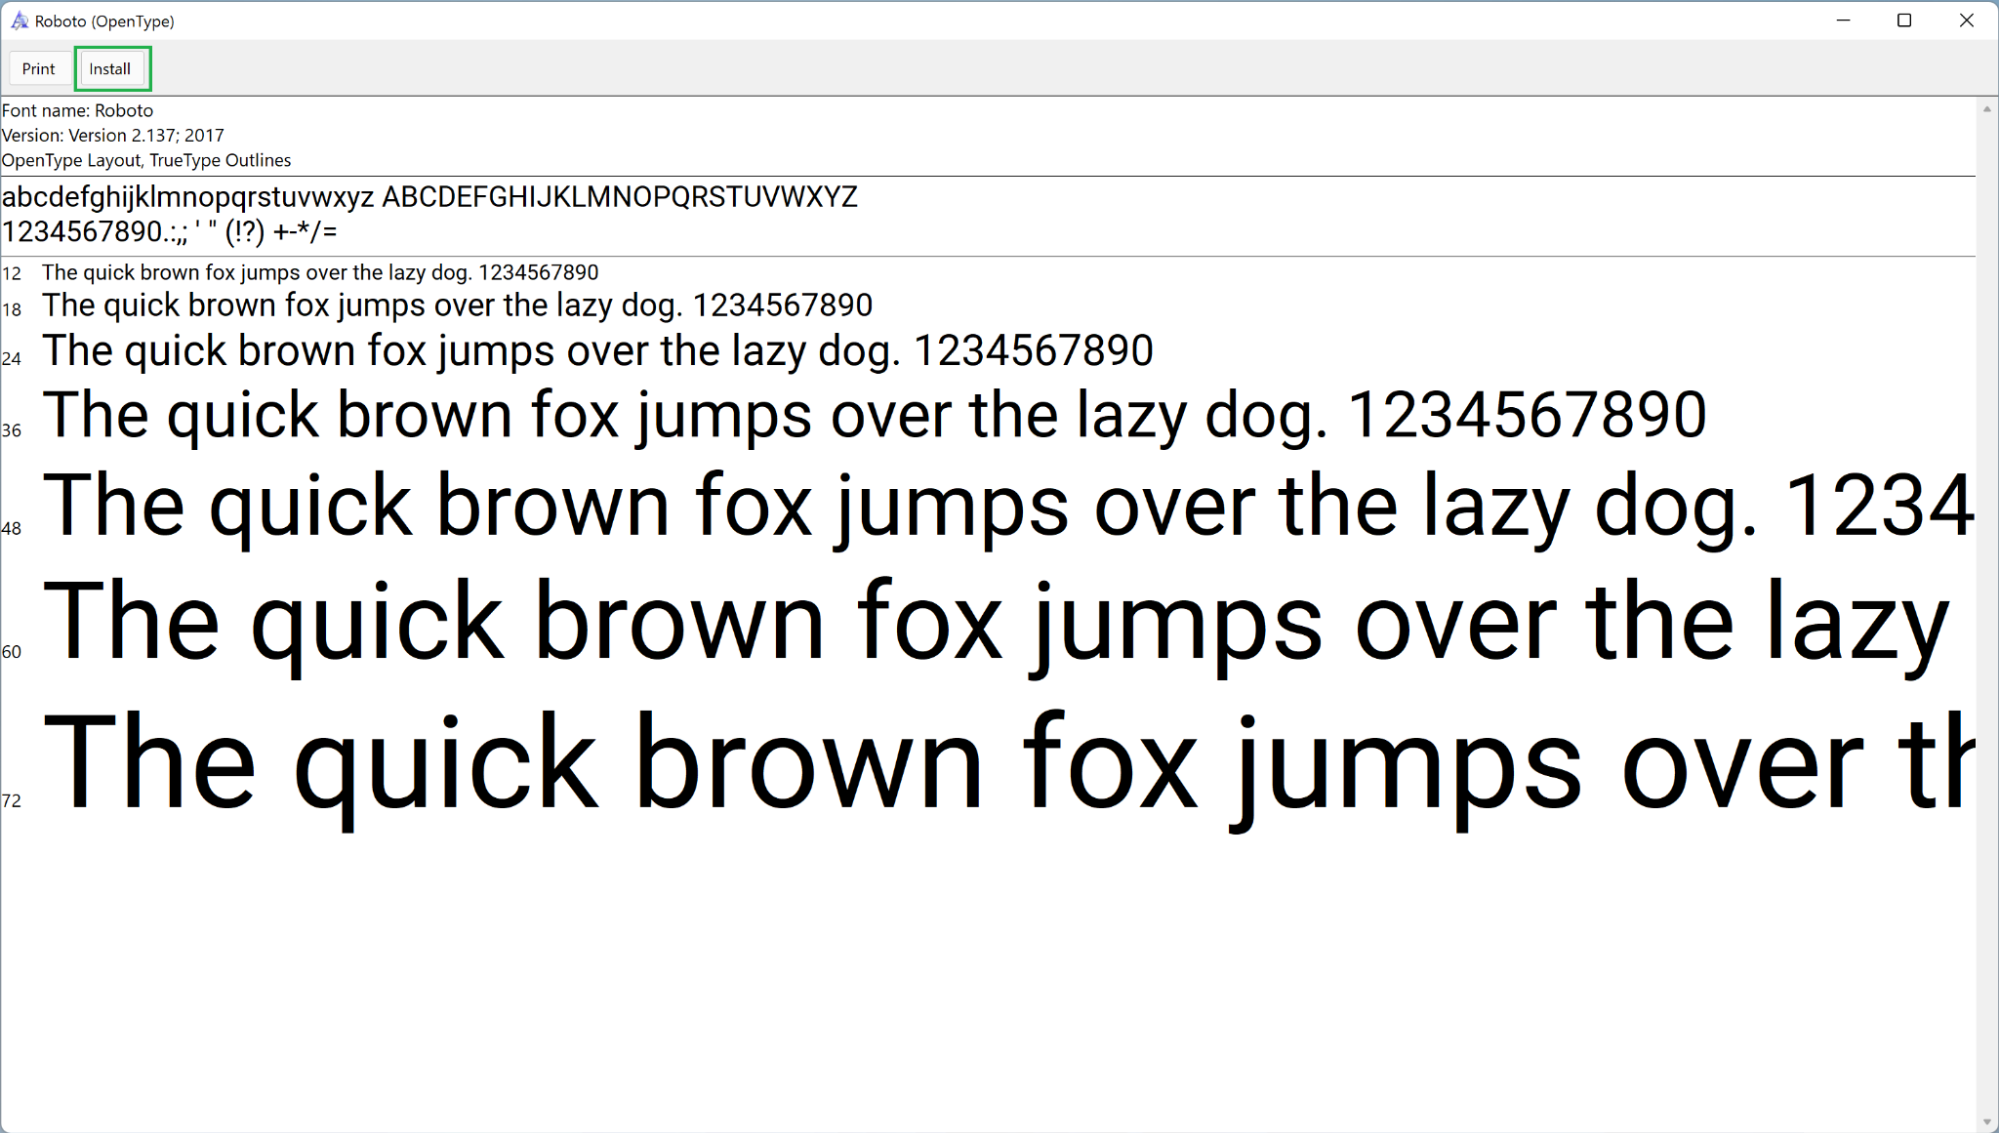
Alternative: Preview and then install. You can also skip all this right-clicking by opening the font face (or faces) you wish to install directly. This will show you a standard preview of the font face you’re about to add, and if you still want it, you can click the “Install” button.
Any of these methods will expand Windows 11 or Windows 10’s collection of fonts so you can use something that’s a little easier on the eyes, perhaps, or maybe even more eye-catching than the default options. Just remember that Comic Sans is never the appropriate font for the job.
More Windows 11 Tutorials:
- How to Get a Windows 11 ISO File and Do a Clean Install
- How to Enable God Mode in Windows 11 or 10
- How to Uninstall Windows 11 and Return to 10
- How to Clean Install Windows 11, No Product Key Required
- How to Install Windows 11 in a Virtual Machine
Get instant access to breaking news, in-depth reviews and helpful tips.
Nathaniel Mott is a freelance news and features writer for Tom’s Hardware US, covering breaking news, security, and the silliest aspects of the tech industry.
by Ivan Jenic
Passionate about all elements related to Windows and combined with his innate curiosity, Ivan has delved deep into understanding this operating system, with a specialization in drivers and… read more
Updated on July 30, 2021
- If you’re looking to install the best fonts for Windows 10, in our article we’ll give you some unexpected and fun options.
- Going for something more sophisticated? then Adobe will surprise you with a multitude of features.
- Once you add your favorite fonts to Windows 10, learn to manage them efficiently in our excellent guide.
- You won’t have to worry about potential errors regarding fonts, we have some great solutions for that too.

Get the right software to support your ideas!Creative Cloud is all you need to bring your imagination to life. Use all the Adobe apps and combine them for amazing results. Using Creative Cloud you can make, edit, and render in different formats:
- Photos
- Videos
- Songs
- 3D models & infographics
- Many other artworks
Get all apps at a special price!
If you want to add some additional cool fonts to your Windows 10 OS, you don’t have to put much effort in it, because it’s very easy.
And in this article we’ll show you not only how to install fonts in your Windows 10 but we’ll also provide you with interesting data on how to manage them.
How can I install and manage new fonts in Windows 10?
1. Use the Fonts folder in Control Panel
- Go to Search.
- Type fonts and open Fonts.
- Drag your font file to Fonts folder and wait until the installation is complete.
Your fonts are packed in .otf files and these files have an installing option, so just right-click on the font you want to install, and choose Install.
There are two ways to add fonts to Windows 10: you can add them simply by installing them or putting them in the Fonts folder in Control Panel.
2. Download fonts from the Microsoft Store
You can also download and install Windows 10 fonts from the Microsoft Store. There are many resources that you can use to add new fonts on your computer.
For example, the Fonts app lets you customize your posts and replies on social media using a wide variety of fonts.
You can write in different styles and your text will definitely stand out in the crowd. You can also rotate your text if you want to puzzle your friends.
3. Use Adobe Fonts

However, if you want to see what it is truly like to have all of the top-quality fonts at your disposal, then your best bet is with Adobe Fonts.
By using Adobe Fonts, you will get the fonts directly on the websites that you are using. More so, they become synced via Adobe Creative Cloud to applications installed on the subscriber’s PC.
Get ready to be amazed by the multitude of style fonts that can help you enhance the impact you make whether you’re an entrepreneur or a media content creator.
You have over 1.000 different options to choose from and they’re all one click away, all you have to do is switch the toggle button and you’re free to make the best of those amazing fonts.
The fonts you download with this smart tool can also be used with other editing programs, for example you can add the Adobe font to Photoshop in your Windows 10.
A great advantage of this high-quality tool is the fact it’s reliable so you won’t have to deal with bugs or other annoying errors.

Adobe Fonts
Get your hands of this amazing tool that provides you with the largest variety of professional fonts!
4. Manage your fonts

Some PC issues are hard to tackle, especially when it comes to corrupted repositories or missing Windows files. If you are having troubles fixing an error, your system may be partially broken.
We recommend installing Restoro, a tool that will scan your machine and identify what the fault is.
Click here to download and start repairing.
Once installed, you can manage your fonts. You can preview them to make sure that you really like them, hide them if you’re not planning on using them any time soon or you can simply delete them.
All you need to do is go to Start, type fonts and double click on the first result. The fonts window will now open and you just have to select the font that you want to manage and click on the option of your choice.
There you go, with just a few simple steps, you have new fonts installed on your computer, ready to decorate your project or other kinds of work.
As we already showed you, managing your fonts is as easy as installing them. Just go to the above-mentioned Fonts folder in Control Panel, where you can preview, add, delete or even print your fonts.
5. Manage possible font issues

Upgrading to Windows 10 can also create some font-related problems. These are not some out-of-normal issues but can seriously obstruct you from using your PC.
Hopefully, we have managed to find the necessary fixes for the most faced font issues in Windows 10.
First of all, we have a great fix article if you encounter problems with installing fonts in Windows 10 that it’s definitely worth your attention.
Fortunately we managed to offer solution for one of he most common issues that users confront with and you can check it in our article on how to fix the font being too small in Windows 10.
If you’re having issues with changing the default font in Windows 10 Registry Editor, take a look at this guide that will help you handle the problem. Checking the fixing guides above will help you get rid of various font issues in Windows 10.
As you can there are plenty of sources if you want to install fonts in Windows 10 and we recommend you to try all of them.
Don’t forget that if you encounter any issues you can always check out the useful guides we mentioned about how you can fix potential errors.
If you have some additional comments or questions, please write them down in the comments section below, we would love to hear them.
![]()