
![]()
GCC, abbreviation for ‘GNU Compiler Collection’ (thanks @saphirakai
) (and not Gulf Cooperation Council, like I’d assumed) is a necessity if you (or your pesky college) is into C Programming.
Almost all Linux distros come pre-installed with it so they are out of the trouble. But for those of you who were constant users of Windows and Command Prompt, and never felt the necessity for a C compiler, GCC seems to come out of the blue and a tough nut to install. 1000 rage-quits later, I present you this article.
This article is written so that the installation process is made easier than most of the trashy articles I had to go through.
Installation
-
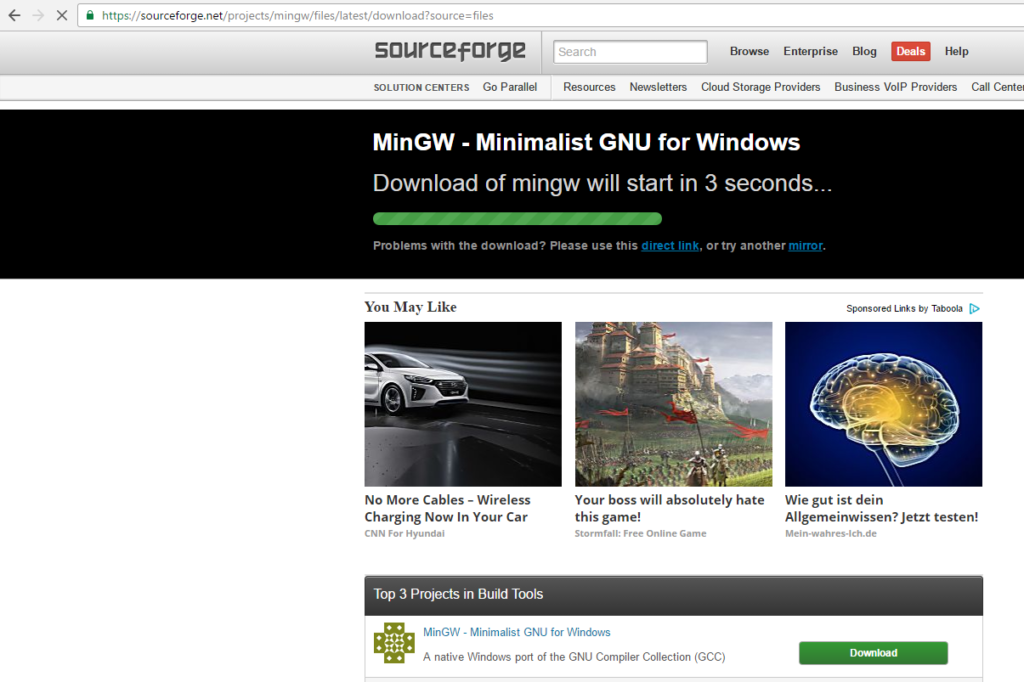
Go to MinGW official website and click on ‘Downloads’ on the left panel. You’ll be redirected to the site which hosts the files.
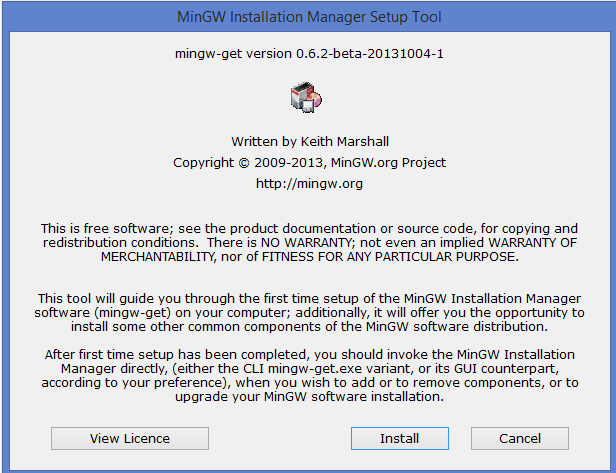
Important Edit: MinGW official website is now down (as of 24th March 2021). Hence, instead of their official website, download from MinGW SourceForge page - Look for mingw-get-setup.exe for downloading. Download it and launch the installer. Accept the terms and move on.
- You’ll now see that the installer is connecting to the Internet and downloading a lot of tiny and small files. Wait till it ends.
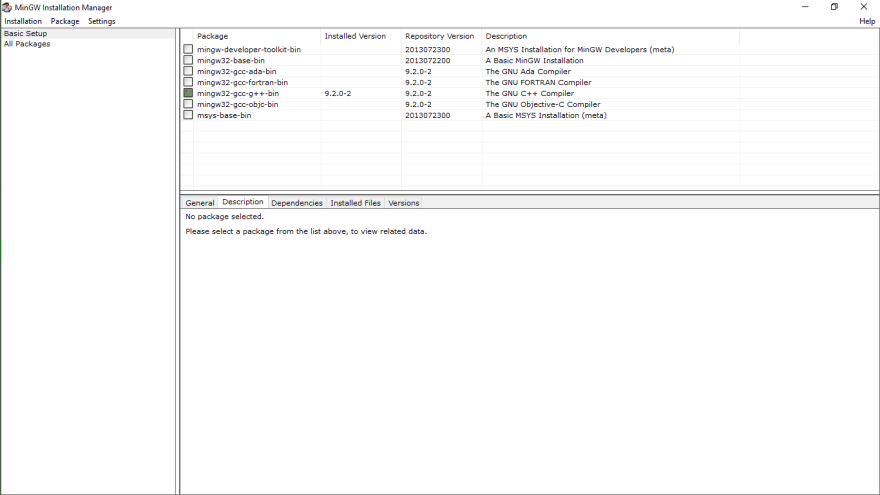
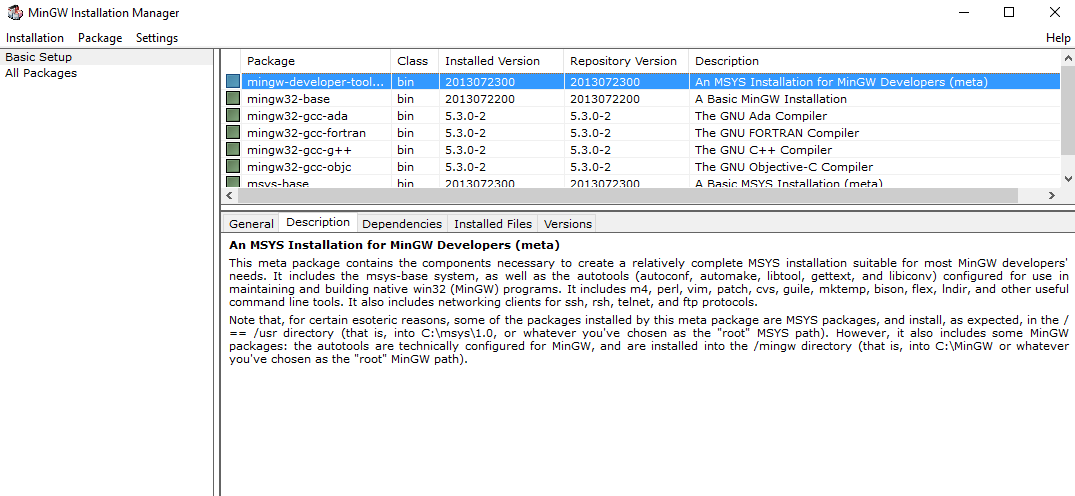
- Right when it ends (which won’t take long), you’ll be presented a window with title MinGW Installation Manager. You should be in the ‘Basic Setup’ tab by default when it launches. If not, click on Basic Setup.
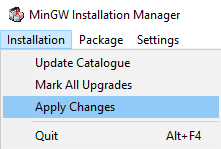
- Out of the numerous check boxes presented to you on the right side, tick «mingw32-gcc-g++-bin«. If you are prompted with a menu, click on Mark for Install.
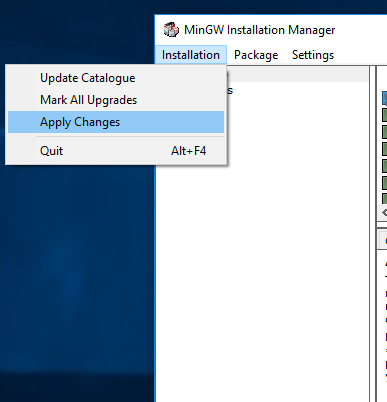
- Then on the top left corner click on Installation > Apply Changes. And wait while it downloads a billion files and installs them.
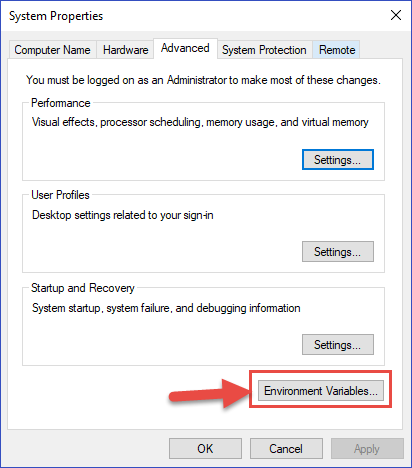
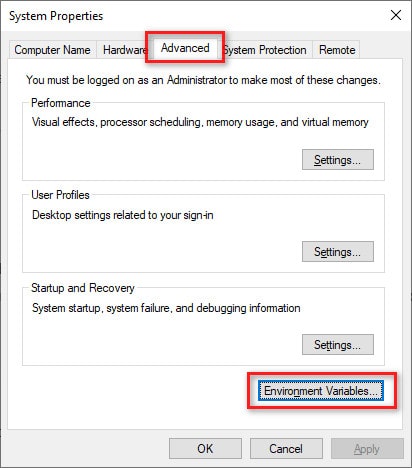
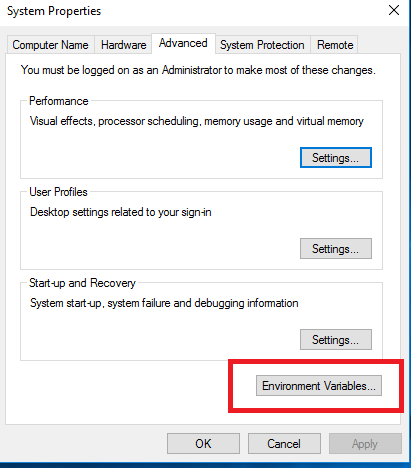
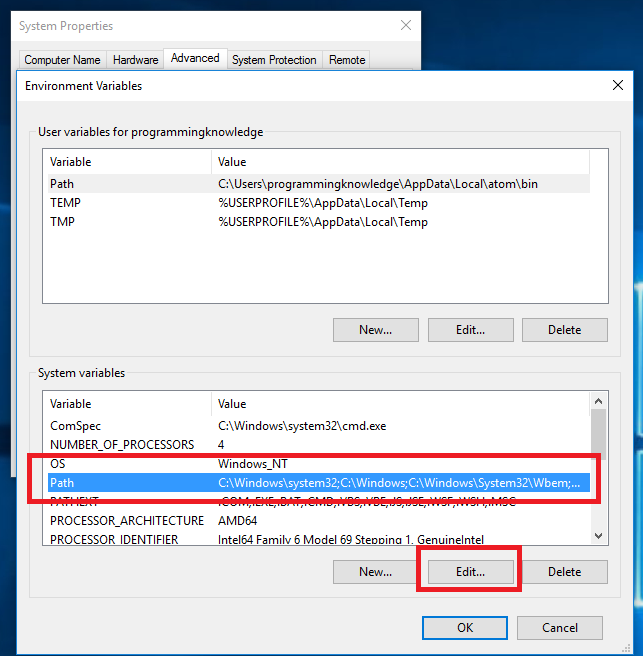
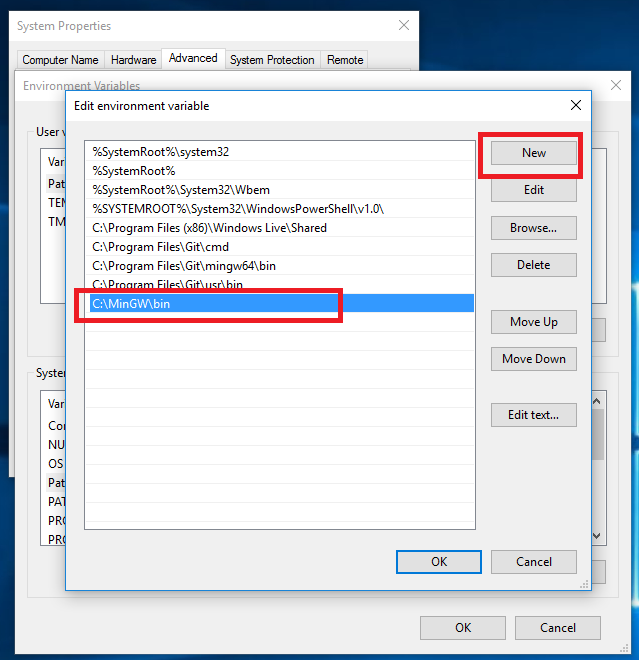
- Now you gotta edit your «Environment Variables» as well, so that gcc works in cmd no matter the file location.
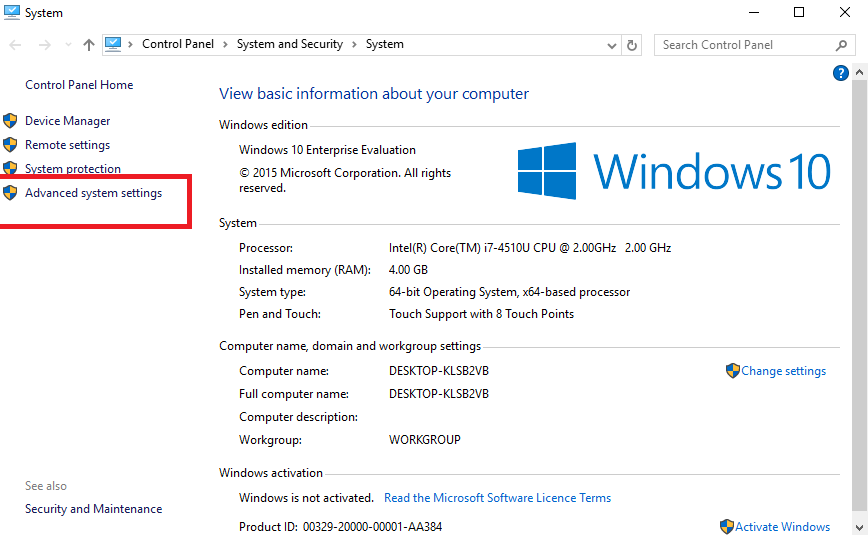
- For that go to Windows Explorer > Right click on This PC > Properties > Advanced system settings > Environment Variables or you could just search for «Environment Variables» in Windows Search…
-
At the bottom «System Variables» panel, look for a Variable named «Path» and double click on it. Some systems show a good UI for adding a New Path easily (by clicking New), else you just need to add ; at the end and add the following path
C:MinGWbin(This is assuming you didn’t manually change any installation paths and went with just clicking ‘Next’ during installation)
-
Click on OK, and OK and close the other windows. Open a Command Prompt Terminal and try typing
gcc --versionand press Enter.If you get something like
gcc (MinGW.org GCC Build-2) 9.2.0
Copyright (C) 2019 Free Software Foundation, Inc.
This is free software; see the source for copying conditions.
There is NO warranty; not even for MERCHANTABILITY or FITNESS
FOR A PARTICULAR PURPOSE.
gcc has been successfully installed in your PC. Enjoy!
Cheers and happy coding!
In this tutorial, we will learn how to install GCC in Windows 10, Mac, and Linux.
We will use an open-source Integrated Development environment named Code::Blocks which bundles a compiler (named gcc offered by Free Software Foundation GNU), editor and debugger in a neat package.
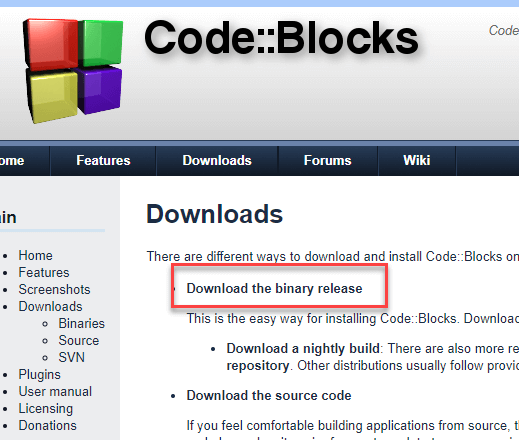
Step 1) Download Binary release
Go to http://www.codeblocks.org/downloads and click Binary Release.
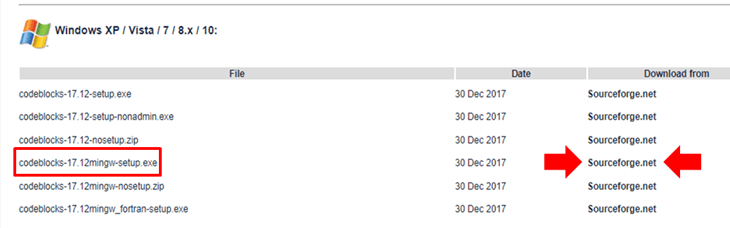
Step 2) Select the installer with GCC for Windows compiler
Choose the installer with GCC Compiler, e.g., codeblocks-17.12mingw-setup.exe which includes MinGW’s GNU GCC compiler download and GNU GDB debugger with Code::Blocks source files.
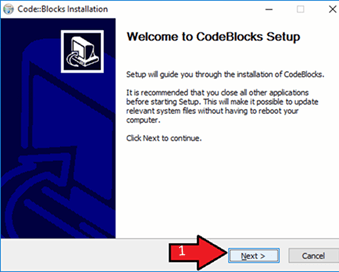
Step 3) Start installation
Run the downloaded installer and accept the default options to install GCC Windows file.
Step 4) Accept the terms and conditions
Accept the Agreement

Step 5) Keep default component selection
Keep the component selection default and click Next.

Step 6) Locate the installation path
You may change the installation folder and click Next.

Step 7) Find and double-click on the CodeBlocks icon
To launch Code::Blocks double click on the icon.
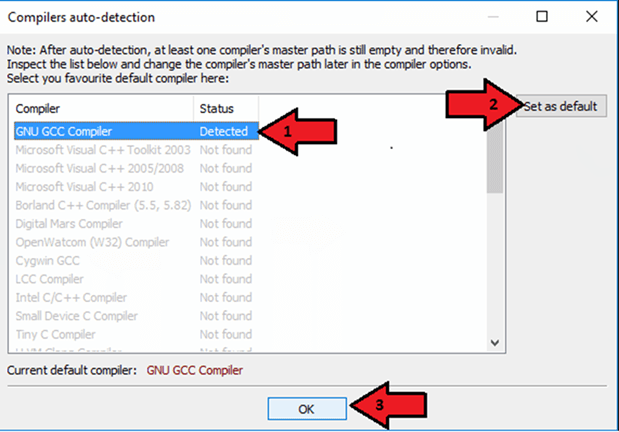
Step  Let it detect the compiler itself
It will detect the GCC compiler for Windows automatically, set it as default.
Associate C/C++ files with code::blocks
Step 9) Open the IDE and start using
You will see the IDE Home screen.

Install GCC Linux
Linux operating systems mostly comes with GCC preinstalled. To verify if the compiler is installed on the machine, run the following command in the terminal:
gcc --version
After executing this command if the gcc is installed on the machine then it will return the information about the compiler otherwise it will ask you to install the compiler.
To set up the ‘C’ environment on Linux distributions follow the given steps:
1. Open terminal.
2. For red-hat, Fedora users, type and execute this command
# yum groupinstall 'Development Tools'
3. For Debian and Ubuntu users, type and execute following command
$ sudo apt-get update
$ sudo apt-get install build-essential manpages-dev
4. To verify that the GCC has been successfully installed on the machine as we discussed earlier, execute the following command
gcc --version
Install GCC on Mac
To set up a ‘C’ programming environment on MAC operating system, follow the given steps:
1. Visit the given link https://developer.apple.com/downloads/index.action and download. You will need an Apple developer ID
“Command Line Tools for X-Code,” pick any version (latest version is always recommended) and download the .dmg file.
2. After the file is being downloaded on the machine, double click and follow the wizard and install the file. Always keep the default settings as suggested by the installation wizard.
3. After the installation process, open a terminal and run gcc -v command to check if everything is successfully installed.
Conclusion:
‘C‘ program can be written and executed on any machine that has a suitable environment to run the program. Its recommended using an IDE or C compiler for Windows to run C programs. An IDE includes a compiler, editor and debugger. Clanfg, MinGW compiler (Minimalist GNU compiler collection for Windows), Portable ‘C’ compiler, Turbo C are popular compilers available.
In this tutorial ,
We will learn How to install 64 bit (GCC) GNU Compiler Collection (Mingw-w64 port) on a Windows 10 system using MSYS2 installer for C/C++ software development.
|

GNU Compiler Collection (GCC) is an compiler produced by the GNU Project supporting various programming languages like for Objective-C, Objective-C++, Fortran, Ada, D and Go. Here we will be concentrating only C/C++ development on Windows 10.
GCC along with other utilities like GNU Binutils for Windows (assembler, linker, archive manager), set of freely distributable Windows specific header files and static import libraries have been ported to Windows platform and is available in the following flavors.
- MinGW — («Minimalist GNU for Windows») which can be used for creating 32 bit native executable on Windows platform
- Mingw-w64 — 64bit
Please note that we will not be covering WSL or Windows Subsystem for Linux.
What is Mingw-w64

Mingw-w64 is a fork off MinGW which provides a more complete Win32 API implementation including Win64 support,C99 support, DDK, DirectX.Mingw-w64 can generate 32 bit and 64-bit executables for x86 under the target names i686-w64-mingw32 and x86_64-w64-mingw32.
Here we will be using Mingw-w64 for C/C++ native application development using Windows API as most modern PC are now 64 bit.
Mingw-w64 Project does not provide any binaries for download from its website instead it maintains a list of Pre-built toolchains and packages provided by other vendors.
These prebuilt toolchains contains GCC, Debugger ,Package Manager ,Terminals and a set of other Unix tools like curl, openssl, sed, awk etc which can be used for development on Windows Platform.

Here we will be using a Mingw-w64 package called MSYS2 Software Distribution
MSYS2

MSYS2 is a collection of tools and libraries providing the developer with an easy-to-use environment for building, installing and running native Windows software.
MSYS2 Software Distribution consists of
- command line terminal called mintty,
- Bash,
- tools like tar and awk
- build systems like autotools,
all based on a modified version of Cygwin. Despite some of these central parts being based on Cygwin, the main focus of MSYS2 is to provide a build environment for native Windows software and the Cygwin-using parts are kept at a minimum.
To install and remove various software packages internally MSYS2 uses Pacman as their package manager.
MSYS2 is sponsored by Microsoft Open Source Programs Office through their FOSS Fund.
- Download MSYS2 Software Distribution (Mingw-w64) for Windows
- Download extra MSYS2 Packages from Repo here
Installing MSYS2 on Windows
Installing MSYS2 on Windows 10 is quite easy. Download the executable using the above link and run it
After the binary is installed on your system ,
MSYS2 comes with different environments/subsystems and the first thing you have to decide is which one to use.
The differences among the environments are mainly environment variables, default compilers/linkers, architecture, system libraries used etc.
If you are unsure, go with UCRT64.

UCRT (Universal C Runtime) is a newer version which is also used by Microsoft Visual Studio by default.
It should work and behave as if the code was compiled with MSVC.

You can start a terminal .The default terminal is Mintty (above)
Install GCC on Windows using Pacman on Windows 10
MSYS2 on Windows 10 uses pacman as its package manager.
After installing MSYS2 ,you can check the installed packages by typing
$pacman -Q
on the Mintty terminal.

This will list all the available packages on your system.
GCC will not be installed by default, So you can go to the package repo and search for gcc.

You can now use pacman to install gcc
$pacman -S gcc

After which you can check GCC by issuing the whereis command.
$whereis gcc

Compiling C/C++ file on Windows10 using GCC (MingW-w64/MSYS2)
First we will compile a simple c file using gcc.
Code below ,Save as main_c.c
#include<stdio.h>
int main()
{
  printf("Hello World");
  return 0;
}
Compile and run the code using the below commands
$ gcc -o main_c main_c.c
$ ./main_c

Compiling a C++ code using GCC (MingW-w64/MSYS2)
Code below, Save as main_cpp.cpp
#include <iostream>
using namespace std;
int main()
{
    cout << "Hello from MSYS2n!";
    cout << "Compiled C++ Filen!";
}
Compile and run the code using the below commands
$ g++ -o main_cpp main_cpp.cpp
$ ./main_cpp

Compiling a Win32/64 API GUI C code using GCC (MingW-w64/MSYS2)
Now we will compile a Win32/64 GUI application using GCC (MingW-w64/MSYS2) on Windows 10 .
We will create a Window and a Message Box using Win32 native api and configure the gcc to compile and link to the native system API.
Copy the below code and save it as win.c
#include<Windows.h>

int WINAPI WinMain(HINSTANCE hInstance,     //the instance of the program
                      HINSTANCE hPrevInstance, //the previous instance
                   LPSTR lpCmdLine,         //ptr to command line args
                   int nCmdShow)            //display properties
{
    HWND h;
    h = CreateWindow("BUTTON",
                        "Hit me",
                        WS_OVERLAPPEDWINDOW,
                        350,300,250,100,0,0,
                         hInstance,0); //Create a window with BUTTON class

    ShowWindow(h,nCmdShow);   //show the window
     MessageBox(0,"Press Me","Waiting",MB_OK); //used to display window
}
You can compile the Win32 API code on GCC using the following command
$ gcc -o win  win.c -Wl,--subsystem,windows  -lgdi32

$ ./win
Here
-
The -Wl,—subsystem,windows linker switch ensures that the application is built as a Windows GUI application, and not a console application. Failing to do so would result in a console window being displayed whilst your application runs
-
You should link with the gdi32 library using «—lgdi32 » otherwise the code will complain about «undefined reference to GetStockObject«.

The latest version of this document is always available at
https://gcc.gnu.org/install/.
It refers to the current development sources, instructions for
specific released versions are included with the sources.
This document describes the generic installation procedure for GCC as well
as detailing some target specific installation instructions.
GCC includes several components that previously were separate distributions
with their own installation instructions. This document supersedes all
package-specific installation instructions.
Before starting the build/install procedure please check the
host/target specific installation notes.
We recommend you browse the entire generic installation instructions before
you proceed.
Lists of successful builds for released versions of GCC are
available at https://gcc.gnu.org/buildstat.html.
These lists are updated as new information becomes available.
The installation procedure itself is broken into five steps.
- Prerequisites
- Downloading the source
- Configuration
- Building
- Testing (optional)
- Final install
Please note that GCC does not support ‘make uninstall’ and probably
won’t do so in the near future as this would open a can of worms. Instead,
we suggest that you install GCC into a directory of its own and simply
remove that directory when you do not need that specific version of GCC
any longer, and, if shared libraries are installed there as well, no
more binaries exist that use them.
Return to the GCC Installation page
Copyright © 1988-2023 Free Software Foundation, Inc.
Permission is granted to copy, distribute and/or modify this document
under the terms of the GNU Free Documentation License, Version 1.3 or
any later version published by the Free Software Foundation; with no
Invariant Sections, the Front-Cover texts being (a) (see below), and
with the Back-Cover Texts being (b) (see below). A copy of the
license is included in the section entitled “GNU
Free Documentation License”.
(a) The FSF’s Front-Cover Text is:
A GNU Manual
(b) The FSF’s Back-Cover Text is:
You have freedom to copy and modify this GNU Manual, like GNU
software. Copies published by the Free Software Foundation raise
funds for GNU development.
On Linux, gcc is install by default and you can start to compile and execute C language code almost right away!
That’s not the case on Windows…
I have been struggling with how to do the same thing on Windows 10 for some time, but I finally succeeded
Here’s a video in which I explain the procedure:
Note: The procedure I describe here will not only allow you to install gcc, but also g++, gfortran, and many other useful tools that you usually only get in linux OS (like ls or grep)
1- What I want to teach you here
If you want a simple way to create programs based on C, C++, Fortran, etc… you will have to install a software with can compile the code you write into code that the machine understands
Such program is called a “compiler”
The most well know compiler for C language is the GNU compiler called GCC.
There are actually several compilers which go together like a suite:
- for C++, you have the compiler g++
- for Fortran, the compiler is called gfortran
Why using the gcc compiler?
If you are on Windows, you probably heard about software such as visual studio from Microsoft which also you to write and compile C and C++ code as well.
That’s true, and it’s totally fine if you want to use it…
I am personally not such a big fan of Visual Studio because of the following reasons:
- It is huge to download and install (between 10 and 20 GB if I remember)
- It’s a big pain to set up the first time
- Building even a very simple project takes much more time than it should
Because of that, I find that I kind of takes out the fun of programming and seeing immediately the result of what you did…
Now, for large pieces of software, visual studio is probably the way to go
Once installed on your machine, gcc is just a piece of cake to use to compile a simple c language code
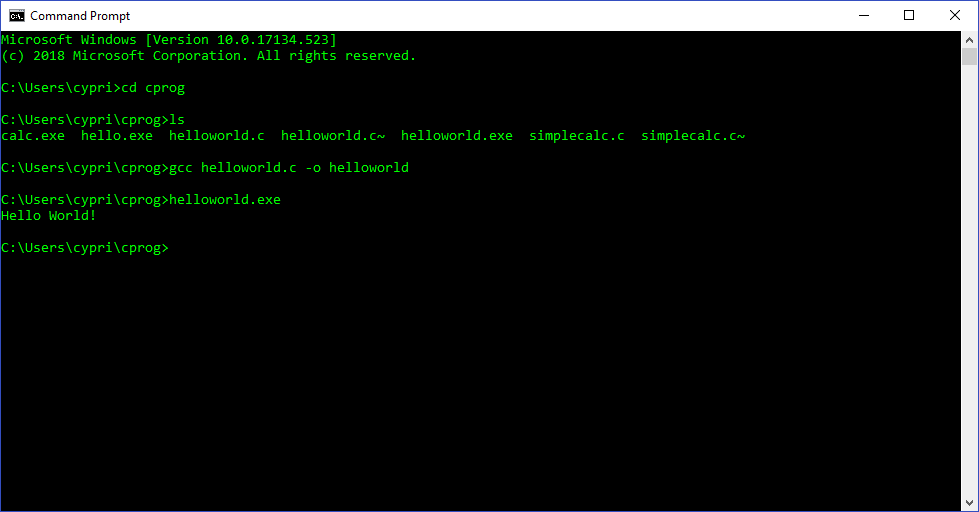
Step 1: Write your c code
For example, let’s take this Hello World example
#include
#include

int main()
{

  printf("Hello World!/n");
  return 0;

}
Step 2: Compile using gcc
Write the following line of code into your terminal:
gcc helloworld.c -o helloworld
This will generate an executable binary file called helloworld.exe which can be used to run your code
![]()
Step 3: Execute your code
Just go into the directory where your executable is and run it by writing “helloworld.exe”

2- The principle
Now that you understand how it can be easy to start with writing C code, let’s talk about the difficult part…
How to actually install gcc on Windows…
The reason it is easy to install compilers and other kind of open source software on linux is because you have a very powerful command line terminal called bash which handles the installation, uninstallation and upgrade of software using a software called “apt” on debian-based linux systems.
On Windows, if you want to have gcc (and the other compilers too), you have to download the source code and find a way to compile it…
For that, you will need to install first other software called pre-requisites which will also need to be compiled, etc…
You can spend several days trying to do that if you are really motivated
I will present you another way much simplier!
For that I will have to install a software called MSYS2, which is an “easy” way to give some linux feel to your Windows PC and able it to install programs almost as easily as in linux…
You will be able to install gcc just with one command line like this:
![]()
Excited?
Let’s go
3- Installing MSYS2 on your PC
What is MSYS2?
According to their website, MSYS2 is a software distribution and building platform for Windows
The Website: https://www.msys2.org/
Installing it is actually a peace of cake
Just download the correct installer and launch it with admin rights and you are good to go

Expected something more complex?
Sorry about that
Once you installed it, you will see 3 programs appear in your list of programs:
- MSYS2 MinGW 32-bit
- MSYS2 MinGW 64-bit
- MSYS2 MSYS
Run the 3rd one MSYS2 MSYS to open a special command window in which you can input commands and start to install programs
The package management system which is equivalent to apt-get on linux is called pacman
When you install MSYS2 for the first time, you have to update pacman using the following command:
pacman -Syu
4- Installing GCC and other development tools with the pacman package management system
Then you can start to install gcc and other developer tools using pacman like this:
# Install make, autoconf, etc to C:msys64usrbin
pacman -S base-devel gcc vim cmake
This command will install first a set of development software included in a package called base-devel and then it will install gcc, vim and cmake
vim is optional, but always good to have 
(You can also install emacs very easily in the same way)
In the package base-devel, you have 53 useful developement tools that can be installed:
# pacman -S base-devel
   1) asciidoc  2) autoconf  3) autoconf2.13  4) autogen  5) automake-wrapper
   6) automake1.10  7) automake1.11  8) automake1.12  9) automake1.13
   10) automake1.14  11) automake1.15  12) automake1.16  13) automake1.6
   14) automake1.7  15) automake1.8  16) automake1.9  17) bison  18) diffstat
   19) diffutils  20) dos2unix  21) file  22) flex  23) gawk  24) gdb
   25) gettext  26) gettext-devel  27) gperf  28) grep  29) groff  30) help2man
   31) intltool  32) lemon  33) libtool  34) libunrar  35) libunrar-devel
   36) m4  37) make  38) man-db  39) pacman  40) pactoys-git  41) patch
   42) patchutils  43) perl  44) pkg-config  45) pkgfile  46) quilt  47) rcs
   48) scons  49) sed  50) swig  51) texinfo  52) texinfo-tex  53) ttyrec

# pacman -S gcc
   binutils-2.30-1  isl-0.19-1  mpc-1.1.0-1
   msys2-runtime-devel-2.11.1-2
   msys2-w32api-headers-6.0.0.5223.7f9d8753-1
   msys2-w32api-runtime-6.0.0.5223.7f9d8753-1
   windows-default-manifest-6.4-1  gcc-7.3.0-3
5- Last Important Step: Add Executables to your Windows PATH
Now you are able to install all those packages easily, but how to access them through the normal windows command line?
For that, you have to add the two following directories to your PATH:
C:msys64mingw64bin
C:msys64usrbin
To add anything to your PATH in Windows 10:
1- Search “Advanced System Settings” in the search bar
2- Open the “environment variables” window, click on the PATH variable and click on “Edit”

3- Click on the “New” button and add the 2 following directories to your PATH
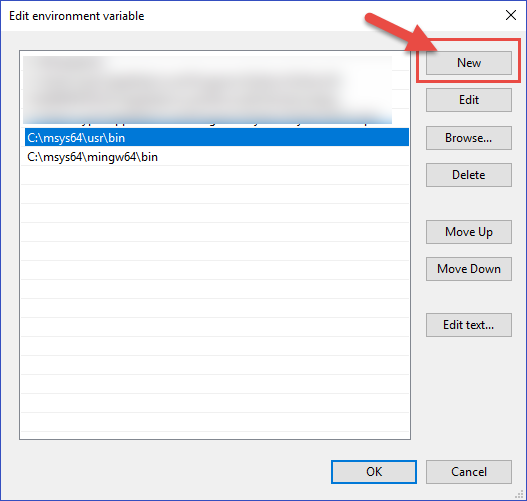
Important Note: This adds a lot of executables to your path which might conflict with other applications. The usrbin directory contains the whole slew of executables listed above. There is a lot of unnecessary stuff in that directory.
4- Click on OK on all the windows and open a new Command Window and you will be able to use gcc into your windows command prompt!
That’s all for today, hope you understand better now how to install and use GCC and other linux tools on windows!
I will write new articles soon about how to develop simple programs in C.
Let me know through the comments if there is something special that you want to understand!
–Cyprien

PS: If you like what I write, subscribe to the newsletter and help me to spread the knowledge by sharing this article! We all win by learning from each other and making the engineering knowledge more accessible  THANK YOU!
If you are a developer and trying to compile your C/C++ program in command prompt, then this article will help you to install gcc compiler and g++ compiler on your Windows 10 computer in order to compile your code. If these compilers are not installed, you will get error “gcc is not recognized as an internal or external command“.
Before we proceed with the installation steps, you must know about these tools.
- Minimalist GNU for Windows (MinGW): It is a development environment for Windows applications.
- gcc compiler: Use this compiler to compile C programs.
- g++ compiler: Use this compiler to compile C++ programs.
gcc and g++ compiler along with other compilers comes together as a package when you install MinGW tool. So, you are required to download and install MinGW tool on your development environment.
Here is a step by step guide.
Step 1: Download MinGW tool
You can download the installable from MinGW official website or from any other trusted source.
On the official website, click on Downloads tab on the top right corner. Under the Download List section, look for the Windows download button as shown below and download the setup file.
![]()
The mingw-get-setup.exe file gets downloaded to your computer in the downloads folder.
Step 2: Steps to install MinGW
- Right-click on the mingw-get-setup.exe file and run as administrator.
- In the MinGW Installation Manager Setup Tool window, click on Install.
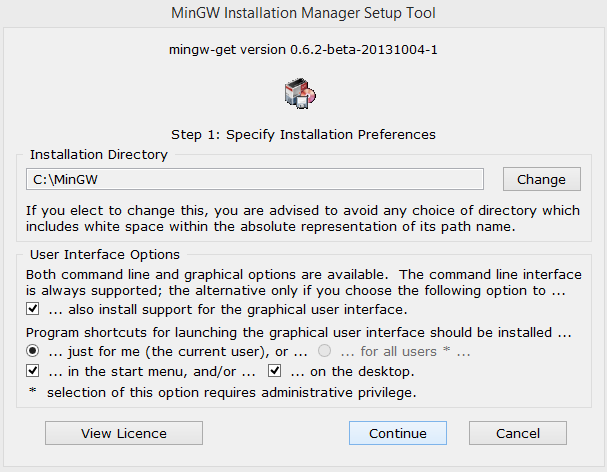
- By default the installation directory is set as C:MinGW. You can change the installation directory by clicking on the Change button and selecting a different folder.
- Click on Continue button to start the installation.
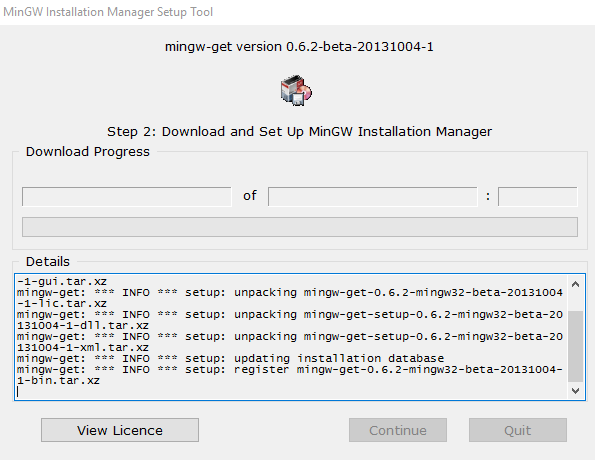
- Once the installation is complete, click the Continue button to close MinGW Installation Manager Setup Tool.
Step 3: Install packages in MinGW / Install gcc compiler
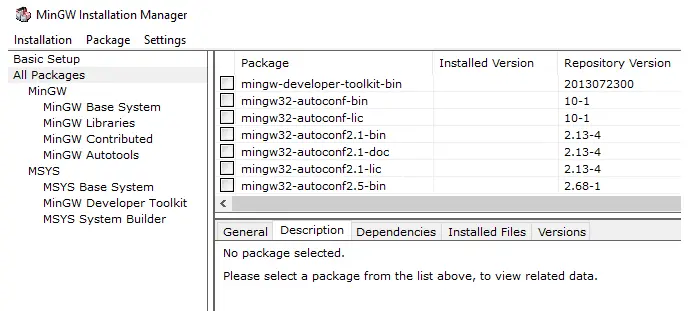
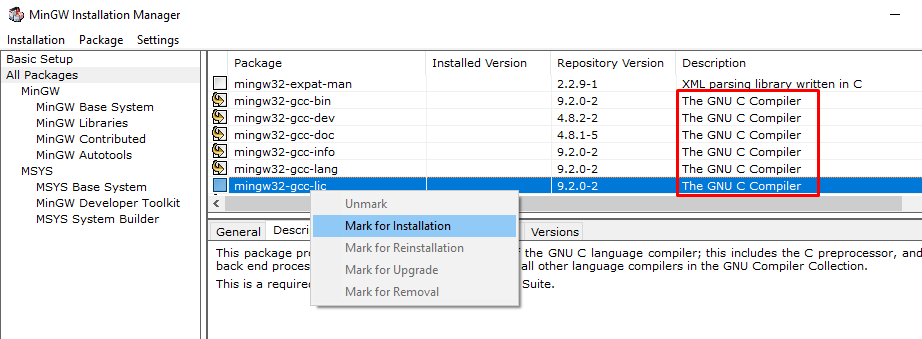
Once you install MinGW, open MinGW Installation Manager from Windows start menu that contains the list of packages you can install.
Select the packages you want to install and right-click and choose Mark for Installation. Make sure to mark all GNU C Compiler as shown below.
Note: After installation, if you want to remove, upgrade or reinstall certain packages, then you can use MinGW Installation Manager and choose respective option by right-clicking on the package.
Once you mark all packages for installation click on Installation menu and select Apply Changes.
In the Schedule of Pending Actions window, click on Apply button. It starts installing marked packages on your local environment.
Step 4: Set up environment variable for MinGW
Once the MinGW setup is complete and the gcc and g++ compiler packages are installed, you must set the PATH variable for your computer.
- Go to Control Panel → System and Security → System or right-click on This PC → Properties.
- Click on Advanced system settings. It opens System Properties dialog box.
- In System Properties window, under Advanced tab, click on “Environment Variables…” button to open environment variables window.
- Under System variables section, edit the path variable and append gcc compiler path up to bin folder.
Note: The bin folder contains executable files of the compiler.

Step 5: Test installation of gcc and g++ compiler
To test if the gcc compiler or the g++ compiler is installed correctly, open a command prompt and type the following command.
For gcc compiler: gcc –v
For g++ compiler: g++ -v

If these commands return the version of the compiler, then it means you have installed gcc and g++ compilers correctly.
If you are getting an error message “gcc is not recognized as an internal or external command” then click on below link to resolve the error.
Fix: gcc is not recognized as an internal or external command, operable program or batch file.
Final words:
These are all the steps you need to follow in order to install gcc compiler and g++ compiler on your computer and execute your C/C++ program in command prompt. If you have any questions or issues, do let us know in the comments section.
Cheers !!!
Introduction: Learn to Install GCC (Mingw-w64) Compiler Tools on Windows 10 Using MSYS2
We will learn
How to install 64 bit (GCC) GNU Compiler Collection on a Windows 10 system using MSYS2 installer for C/C++ software development.
After installing GCC, we will compile a Win32/64 GUI application using GCC (MingW-w64/MSYS2) on Windows 10 .
Step 1: Contents
Step 2: What Is GCC
GNU Compiler Collection (GCC) is an compiler produced by the GNU Project supporting various programming languages like for Objective-C, Objective-C++, Fortran, Ada, D and Go.
Here we will be concentrating only C/C++ development on Windows 10.
GCC along with other utilities like a set of freely distributable Windows specific header files and static import libraries have been ported to Windows platform in the following flavors.
- MinGW — («Minimalist GNU for Windows») which can be used for creating 32 bit native executable on Windows platform
- Mingw-w64 — 64bit version of GCC
Step 3: What Is Mingw-w64
Mingw-w64 is a fork off MinGW which provides a more complete Win32 API implementation including Win64 support,C99 support, DDK, DirectX.
Mingw-w64 can generate 32 bit and 64-bit executables for x86 under the target names i686-w64-mingw32 and x86_64-w64-mingw32.
Here we will be using Mingw-w64 for C/C++ native application development using Windows API as most modern PC are now 64 bit.
Mingw-w64 Projectdoes not provide any binaries for download from its website instead it maintains a list of Pre-built toolchains and packages provided by other vendors.
Here we will be using a Mingw-w64 package called MSYS2 Software Distribution
Step 4: MSYS2 Software Distribution
MSYS2
MSYS2 is a collection of tools and libraries providing the developer with an easy-to-use environment for building, installing and running native Windows software.
MSYS2 Software Distribution consists of
- command line terminal called mintty,
- Bash,
- tools like tar and awk
- build systems like autotools,
all based on a modified version of Cygwin.
o install and remove various software packages internally MSYS2 uses Pacman as their package manager.
MSYS2 is sponsored by Microsoft Open Source Programs Office through their FOSS Fund.
- Download MSYS2 Software Distribution (Mingw-w64) for Windows
- Download extra MSYS2 Packages from Repo here
Step 5: Installing MSYS2 on Windows
Installing MSYS2 on Windows 10 is quite easy. Download the executable using the above link and run it
After the binary is installed on your system ,
MSYS2 comes with different environments/subsystems and the first thing you have to decide is which one to use.
The differences among the environments are mainly environment variables, default compilers/linkers, architecture, system libraries used etc.
If you are unsure, go with UCRT64.
Step 6: Install GCC on Windows Using Pacman on Windows 10
MSYS2 on Windows 10 uses pacman as its package manager.
After installing MSYS2 ,you can check the installed packages by typing
$pacman -Q
on the Mintty terminal.
This will list all the available packages on your system.
GCC will not be installed by default, So you can go to the package repo and search for gcc.
You can now use pacman to install gcc
$pacman -S gcc
After which you can check GCC by issuing the whereis command.
$whereis gcc
Step 7: Compiling C/C++ File on Windows10 Using GCC (MingW-w64/MSYS2)
First we will compile a simple c file using gcc.
Code below ,Save as main_c.c
#include<stdio.h>
int main()
{
  printf("Hello World");
  return 0;
}
Compile and run the code using the below commands
$ gcc -o main_c main_c.c
$ ./main_c
Step 8: Compiling a C++ Code Using GCC (MingW-w64/MSYS2)
Code below, Save as main_cpp.cpp
#include <iostream>
using namespace std;
int main()
{
    cout << "Hello from MSYS2n!";
    cout << "Compiled C++ Filen!";
}
Compile and run the code using the below commands
$ g++ -o main_cpp main_cpp.cpp
$ ./main_cpp
Step 9: Compiling a Win32/64 API GUI C Code Using GCC (MingW-w64/MSYS2)
Now we will compile a Win32/64 GUI application using GCC (MingW-w64/MSYS2) on Windows 10 .
We will create a Window and a Message Box using Win32 native api and configure the gcc to compile and link to the native system API.
Copy the below code and save it as win.c
#include<Windows.h>int WINAPI WinMain(HINSTANCE hInstance, //the instance of the program
HINSTANCE hPrevInstance, //the previous instance
LPSTR lpCmdLine, //ptr to command line args
int nCmdShow) //display properties
{
HWND h;
h = CreateWindow("BUTTON",
"Hit me",
WS_OVERLAPPEDWINDOW,
350,300,250,100,0,0,
hInstance,0); //Create a window with BUTTON classShowWindow(h,nCmdShow); //show the window
MessageBox(0,"Press Me","Waiting",MB_OK); //used to display window
}
You can compile the Win32 API code on GCC using the following command
$ gcc -o win win.c -Wl,--subsystem,windows -lgdi32$ ./win
More details about compiling Win32 API can be found here
Be the First to Share
Recommendations
Для того, чтобы писать программы на C/C++ обычно достаточно установить какую-нибудь интерактивную среду разработки (IDE), например, Visual Studio или Eclipse, однако иногда (обычно в целях обучения студентов) требуется создавать программы в обыкновенном текстовом редакторе и компилировать приложение, используя консоль и компилятор gcc. В Unix системах он обычно установлен прямо «из коробки», а вот на Windows системах такой роскоши не наблюдается. Более того, у многих пользователей возникает множество проблем при установке компилятора. Поэтому нами было принято решение написать данную статью, чтобы помочь всем тем, кому пришлось или приходится мучаться с установкой этого компилятора на Windows.
Кстати, если вдруг на вашей Unix системе не установлен GCC, то поставить его можно командой sudo apt install gcc, введя свой пароль и согласившись на установку.
0. Прежде чем поставить компилятор GCC
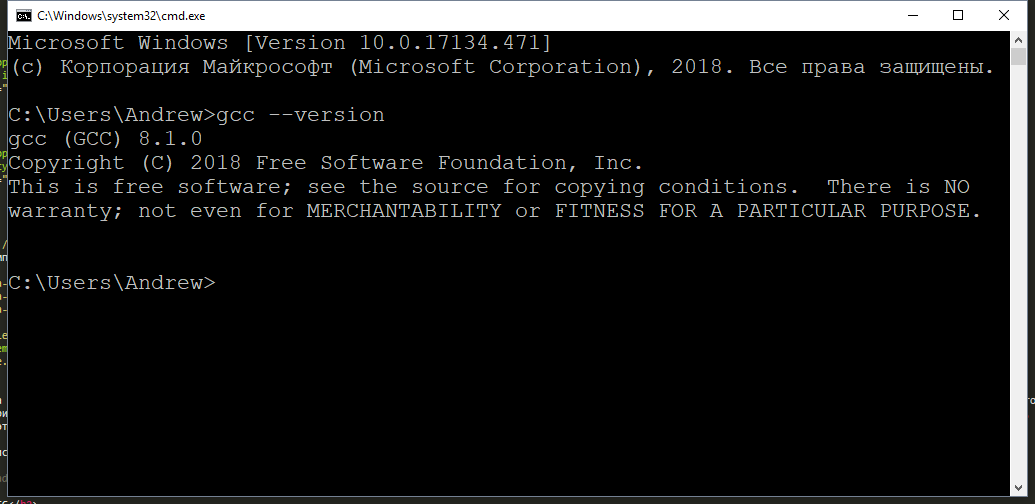
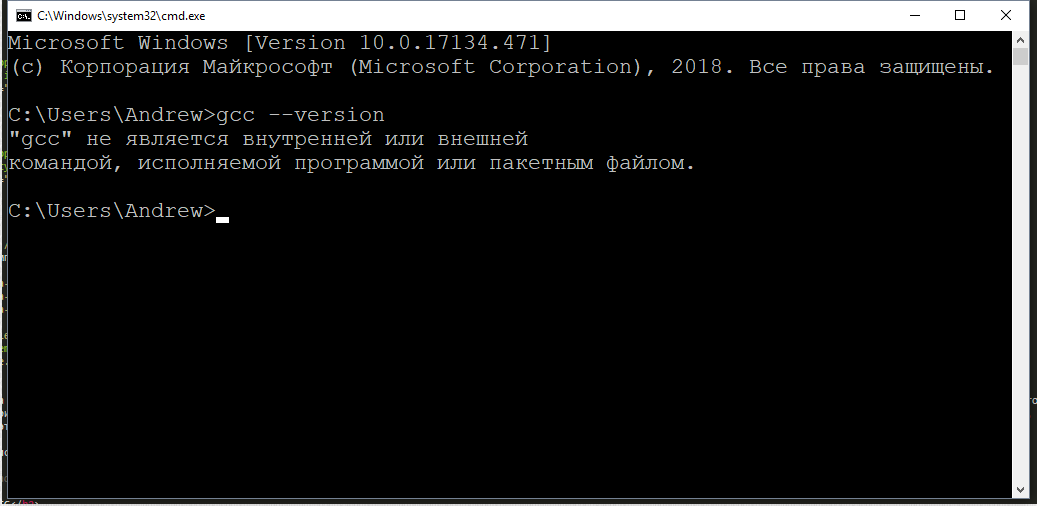
Перед тем как приступить к установке этого компилятора на ваш компьютер, убедитесь в том, что GCC ещё не установлен на нём. Для этого откройте консоль (нажмите Win + R, введите в появившемся окне cmd и нажмите клавишу Enter) и введите следующую команду: gcc --version и нажмите Enter. Если компилятор уже установлен, то выполненная команда выдаст примерно следующую информацию:
gcc (GCC) 8.1.0
Copyright (C) 2018 Free Software Foundation, Inc.
This is free software; see the source for copying conditions.  There is NO
warranty; not even for MERCHANTABILITY or FITNESS FOR A PARTICULAR PURPOSE.
Если в окне консоли появилось сообщение с версией компилятора и другая информация о GCC (второй скриншот), значит компилятор уже установлен и больше дополнительно ничего делать не нужно. А вот если вывод командной строки такой:
"gcc" не является внутренней или внешней
командой, исполняемой программой или пакетным файлом
— значит GCC ещё не установлен в системе, поэтому двигаемся дальше.

Появившееся окно консоли
GCC уже установлен
GCC не установлен
1. Скачиваем установщик компилятора
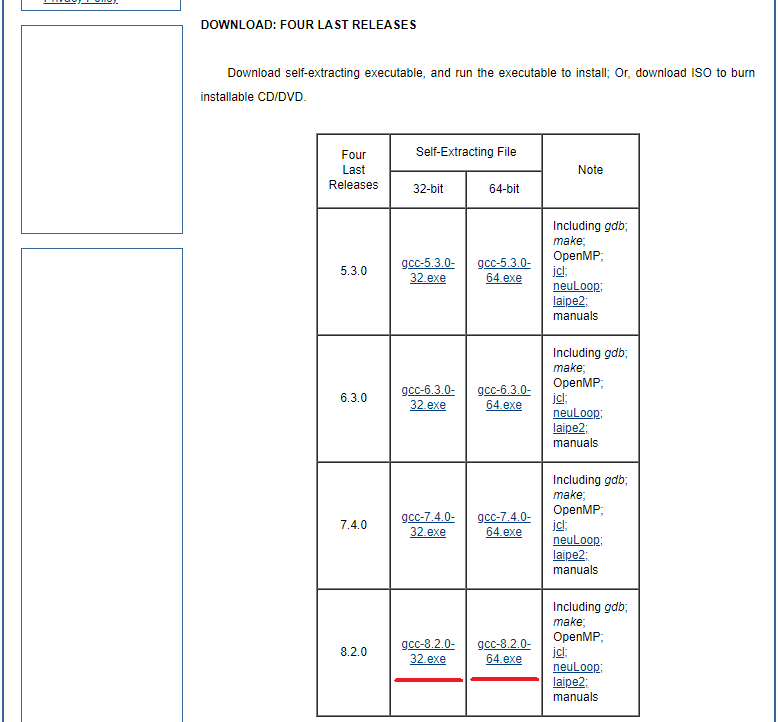
Чтобы поставить GCC на операционную систему Windows, необходимо скачать установочный файл для него. Сделать это можно здесь: equation.com/servlet/equation.cmd?fa=fortran. Найдите в таблице версию компилятора, которая вам больше нравится (мы рекомендуем скачивать самую последнюю, на текущий момент — это версия 8.2.0) и скачайте установщик для вашей системы (32 или 64 бит).
Выбор установочного файла
2. Установка GCC
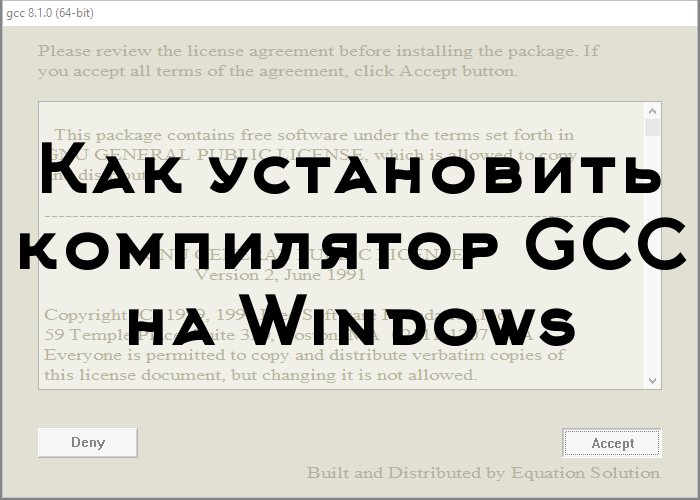
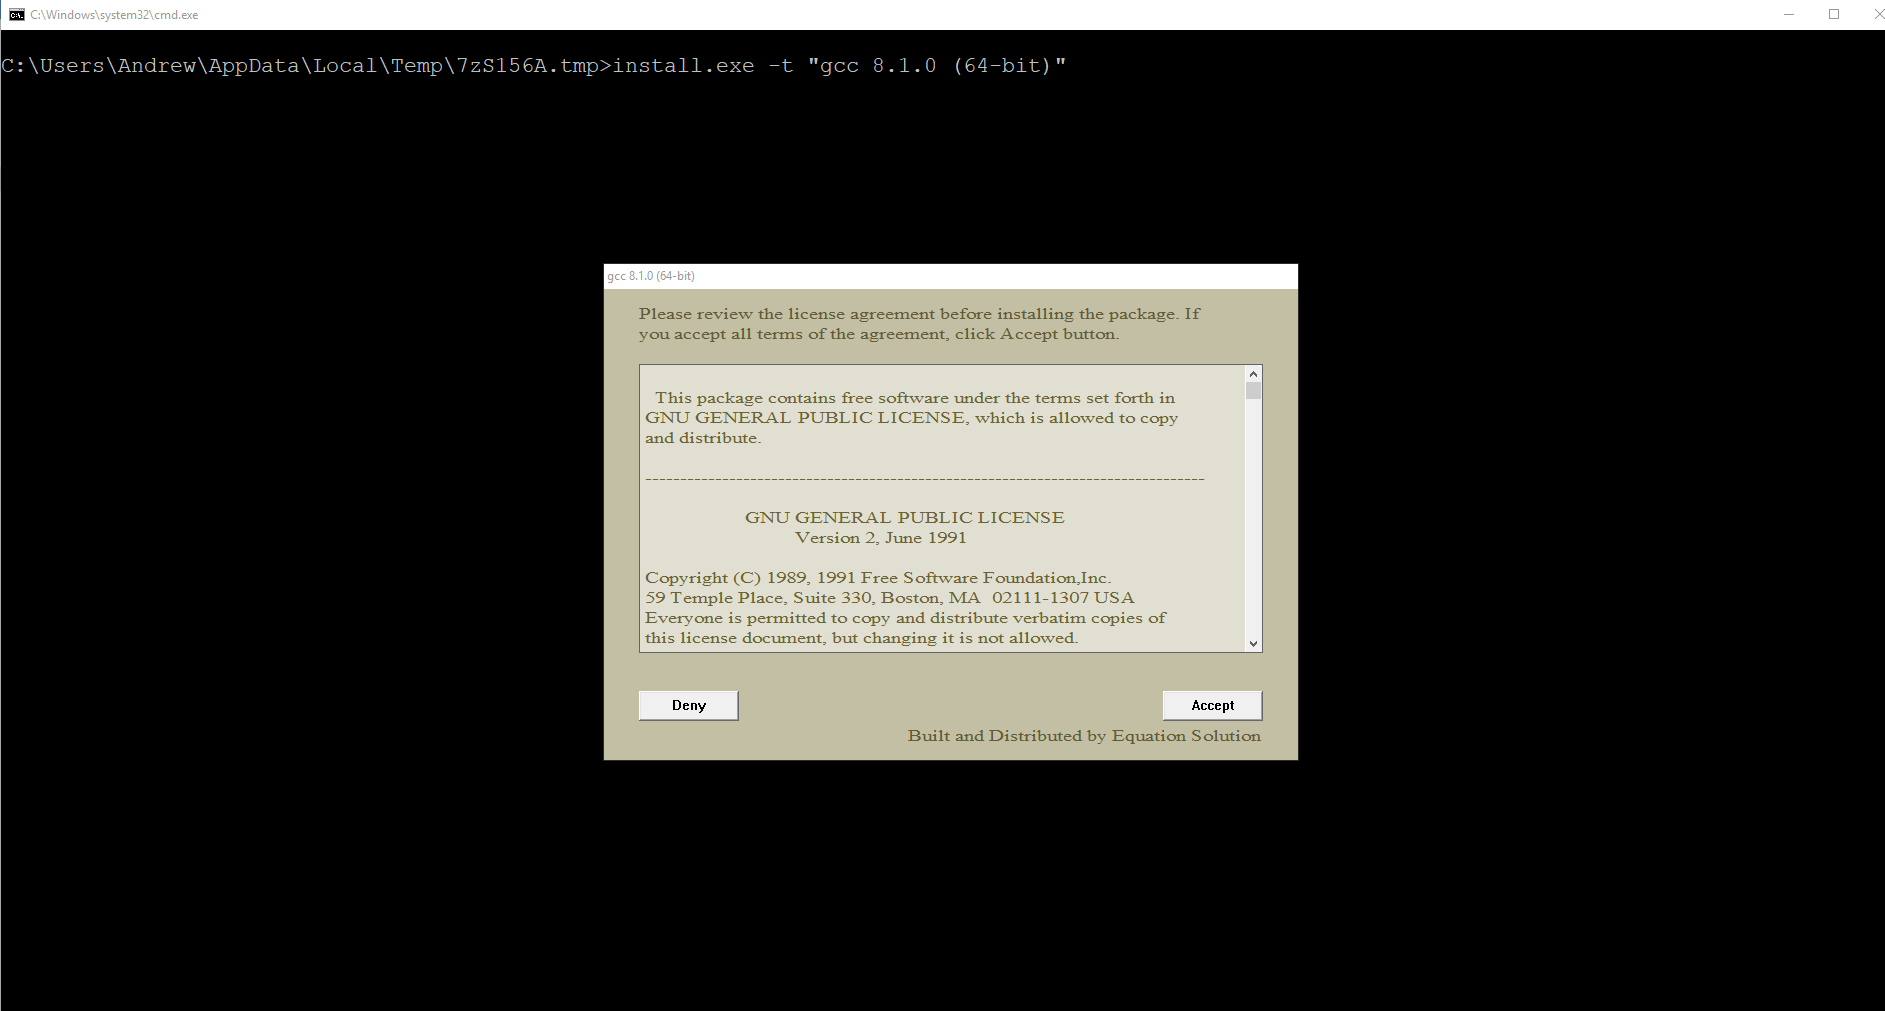
После того, как файл был скачан, откройте в проводнике папку, в которую был скачан установщик и запустите его, кликнув по файлу дважды левой кнопкой мыши. Появится окно, требующее подтверждения действия. В нём нужно выбрать да (иначе ничего ставиться не будет).
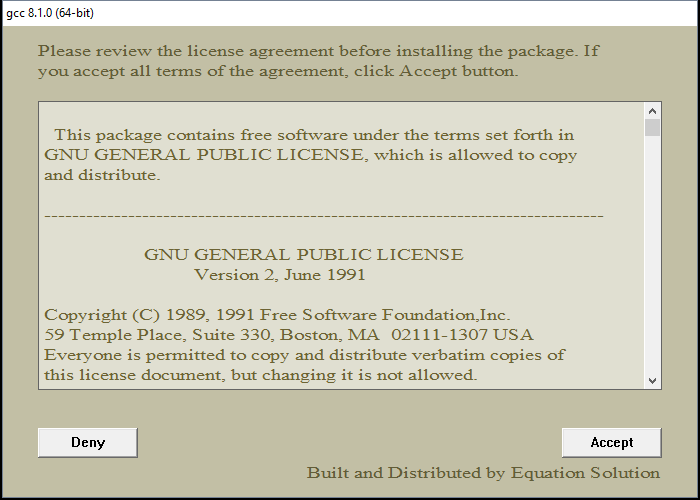
Установщик начнёт работу и отобразит окно с консолью, а также окно с бежевым фоном, в котором попросит прочесть и принять (или отклонить) лицензионное соглашение. Нажимаем Accept.
Открывшееся окно с установщиком
Принимаем лицензионное соглашение
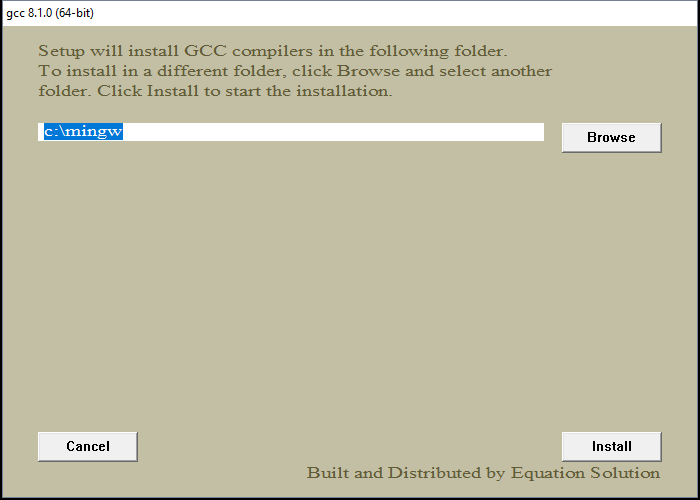
После этого установщик попросит выбрать путь для установки, предложив по умолчанию путь C:mingw. Если вам категорически не нравится этот путь — измените его на более подходящий на ваш взгляд, в противном же случае просто нажмите Install.
Выбор папки для установки
Теперь остаётся только дождаться окончания распаковки архивов и установки их на компьютер. Как только все файлы будут установлены, инсталятор сообщит об этом, после чего нужно будет нажать на кнопку Finish.
Распаковка файлов и установка
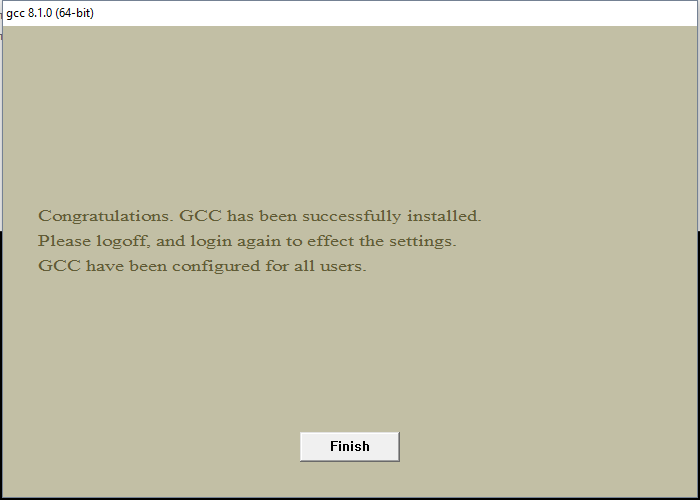
Окончание установки
3. Проверка установки
По завершении работы установщика перезагрузите компьютер и вновь откройте окно командной строки, введите команду gcc --version и нажмите Enter. На этот раз ответ от этой команды должен будет совпадать со вторым скриншотом из пункта 0. Если это не так, то скорее всего работа установщика была некорректно или преждевременно завершена, так что просто начните установку заново.
GCC установлен
Поздравляем! Теперь на вашем компьютере установлен компилятор GCC и вы можете писать программы на языках C и C++, а компилировать их через командную строку!
4. Бонус. Компиляция программ с помощью GCC
Теперь, когда у вас установлен компилятор GCC, вы можете создавать программы на C/C++, используя только текстовый редактор и консоль. Для этого создайте новый файл и назовите его как угодно (например, hello_world). Задайте ему расширение .c вместо .txt. Напишите (или скопируйте) текст программы на С в этот файл. Откройте командную строку (Win + R, cmd) и введите следующую команду gcc hello_world.c и нажмите Enter. Если код не содержит ошибок, то результатом команды будет пустота. В противном же случае вы увидите все ошибки, который нашёл компилятор в программе с указанием места этой ошибки. При этом в проводнике появится файл a.out.exe, который будет являться исполняемым файлом для написанной программы. Чтобы запустить его введите в консоли a.out (для Unix-систем нужно писать ./a.out) и нажмите Enter.
Что ещё за a.out? Непонятно!
По умолчанию при компиляции программ GCC в качестве результата создаём исполняемый файл с именем a.out (если такой уже есть, то b.out и т.д.). Это может быть не очень удобно, если у вас в папке лежит сразу много программ, которые нужно скомпилировать и затем запустить. Неудобно хотя бы тем, что разобраться, что такое a.out, а что такое b.out и c.out может быть непросто. Именно поэтому мы рекомендуем компилировать программы с явным указанием имени выходного файла. делается это так: gcc имя_файла.c -o имя_программы.
В результате выполнения такой программы вместо a.out будет создаваться файл с именем, заданным в имя_программы. Например, если для файла hello_world.c мы хотим получить программу hello, то компилировать нужно такой командой: gcc hello_world.c -o hello.
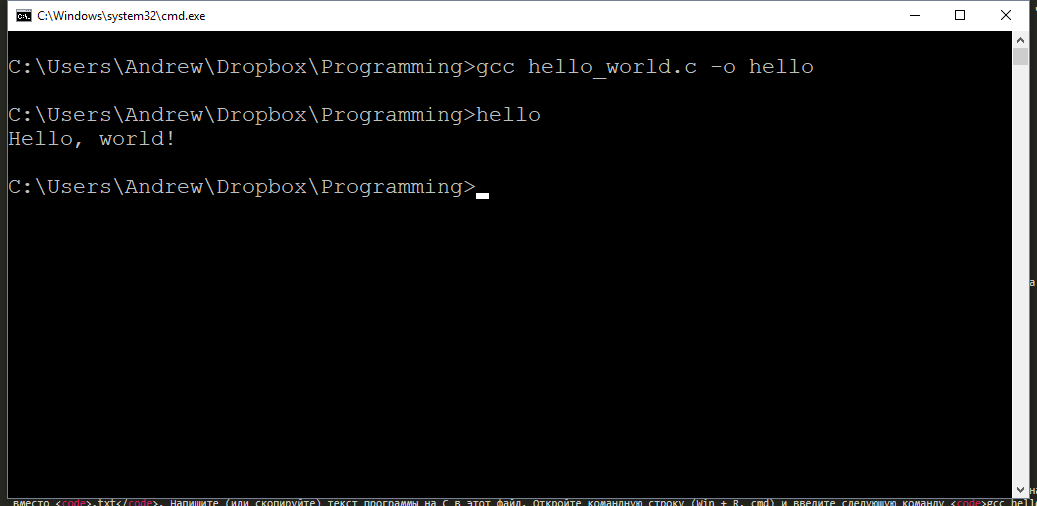
Результат компиляции и запуска программы
Используя понятные имена выходных программ (исполняемых файлов), вы гарантируете себе простоту работы и сокращение времени на разбирательство спустя долгое время.
Возможно, также будет интересно: как установить Sublime Text для работы с C/C++.

Программист, сооснователь programforyou.ru, в постоянном поиске новых задач и алгоритмов
Языки программирования: Python, C, C++, Pascal, C#, Javascript
Выпускник МГУ им. М.В. Ломоносова

MinGW, a contraction of “Minimalist GNU for Windows”, is a minimalist development environment for native Microsoft Windows applications.
Downloading MinGW
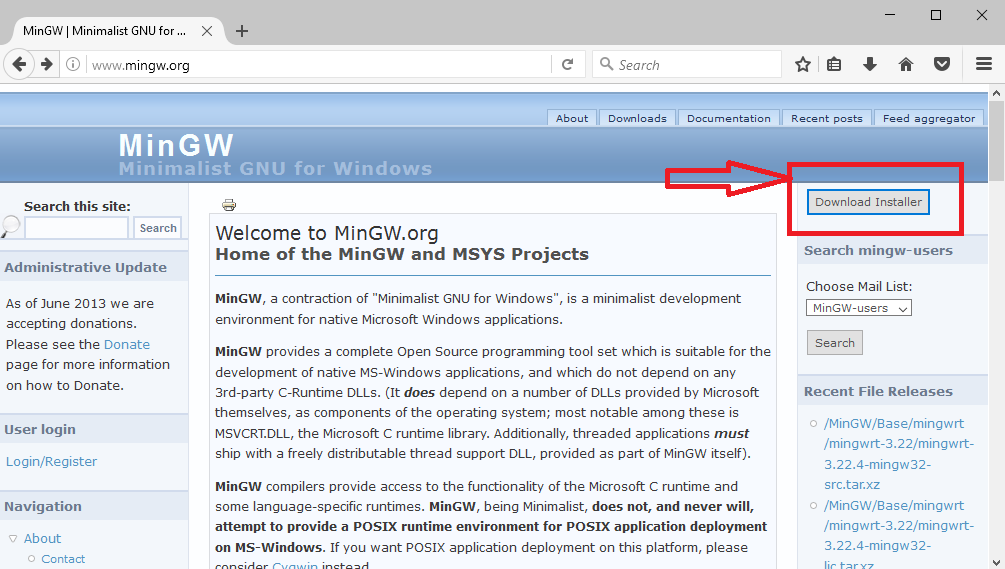
- open http://www.mingw.org/
- Click Download Button as shown in the picture below.
3. As soon as you click download button on mingw website The following page will open in your browser (from the SourceForge.net web site).
4. The following exe file will be downloaded with the name mingw-get-setup.exe
![]()
5. Click mingw-get-setup.exe
6. Click install
7. Click continue
8. Click continue

9. The following pop-up window will appear. Pleas make sure that you selected all the check-boxes. e.g. mingw32-base, mingw32-gcc=g++, msys-base and so on.
10. Click on Installation > Apply Changes as shown in the picture below.
11. wait for the process to complete. once you see successful installation message close the window. Click Close.
12. Now we will set environment variable to use gcc and g++ command from terminal.
Windows 10 and Windows 8
- In Search, search for and then select: System (Control Panel)
- Click the Advanced system settings link.
- Click Environment Variables. In the section System Variables, find the
PATHenvironment variable and select it. Click Edit. If thePATHenvironment variable does not exist, clickNew.
- In the Edit System Variable (or New System Variable) window, specify the value of the
PATHenvironment variable. - Copy C:MinGWbin .
- Click OK.
- Close all remaining windows by clicking OK.
- Reopen Command prompt window, and type
gcc. if you see the following output as shown in the picture below the mingw is installed successfully.
Video : How To install MinGW on Windows 10 (GCC & G++)
- MinGW