In the last article, we saw the various parts of GitLab, its architecture and how GitLab works. If you haven’t already, I suggest reading the previous article first before reading this one. Here is the link
GitLab, A Complete Beginner’s Guide!
In this article lets look at how to set it up locally on your Windows PC, so that you can have your very own GitLab setup running right at your home or organization!
If you are using Mac or Linux, you can follow the links below.
Complete Guide To Setting Up GitLab Locally On Mac.
Complete Guide To Setting Up GitLab Locally On Linux PC..!!
So let’s begin!
Things you will need
All you need are a computer running Windows OS with enough resources (CPU, memory, and disk space) for running the GitLab Server and GitLab Runner. How much resources is enough depends on how much performance you need, the more you have the better it is!
You can also set it up on the cloud over at Gitlab.com, but
- the free plans have some limitations in terms of processing power and hard disk space.
- Also doing it locally gives you more control over the setup and
- it will also be an opportunity to learn you more about GitLab
Hence I suggest taking this route of a local installation.
If you are part of a larger organization, and you wish to install it on the cloud, then you can always take a look at the paid plans of GitLab here link
Approach to install GitLab on Windows
Okay, let’s get back to the task in hand.
As we saw in the previous article GitLab consists of 2 parts.
- GitLab Server and
- GitLab Runner
Also, we have learned in the previous article that it is preferable to set the GitLab server and runners on separate computers. But I am going for a home set up, so I will be setting them both upon the same Windows computer.
The GitLab Server relies heavily on Linux technologies and hence it cannot be installed in our Windows PC natively. If you do some research, there are ways you can do it through the Linux subsystem in windows, but we are not going to take that approach.
The
problem with these workarounds are
- The installation process is a bit complicated and is not recommended for beginners.
- They are only guaranteed to work on a version to version basis. What I mean by that is you need to have a particular version of Windows and a particular version of GitLab for everything to run smoothly. If you update your Windows or if you wish to upgrade your GitLab then you might break your GtiLab set up. Since both Windows and GitLab updates come frequently, it is not such a good idea to waste time trying to fix things every few months.
- It is unofficial and hence support for future versions cannot be guaranteed.
- These unofficial methods will bring their own limitations as opposed to running natively on Linux
Due to these above reasons, we are going to go for a more stable approach of installing the GitLab server in a virtual environment. We will also see in this article the ways to make it run as smoothly and efficiently as possible while making sure it consumes as few resources as possible.
So this
is what we are going to do
- Install the GitLab Server on a Virtual Box running Ubuntu server
- Install GitLab runner natively on Windows.
This approach takes away the cons of using unofficial hacks, as it will work on all versions of you Windows and GitLab and you don’t need to worry too much while updating your software either!
By following the step by step guide shown below you should be able to set everything up and running in an hour or 2 (depending upon how good your internet connection is, it can take longer!)
GitLab Installation Process
STEP#1: Download and install VirtualBox
You can download and install VirtualBox from this link
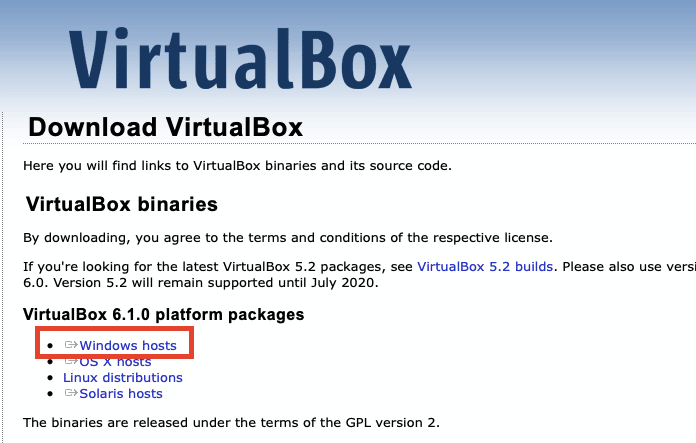
Just click on the Windows hosts and the download should start automatically. The installation process is pretty straightforward, you can just accept the default options and click through to complete the process.
Once the installation is completed you can open VirtualBox from the Start menu in Windows.
STEP#2: Install Ubuntu Server as a Virtual Machine in your Windows PC.
The next step is to get a Linux distro to install our GitLab server. For this purpose, I recommend Ubuntu Server. I chose this particular distro for 2 reasons.
- Ubuntu is known for its stability.
- GitLab Server software has support for Ubuntu
- The server edition is chosen so that it will consume fewer resources on your computer.
For this first, you need the Ubuntu Server image. You can download it from this link.
Ubuntu usually offers 2 sets of packages for us to choose from.
- Long term support version: Has a support period of 5 years
- Latest Version: has all the latest features.
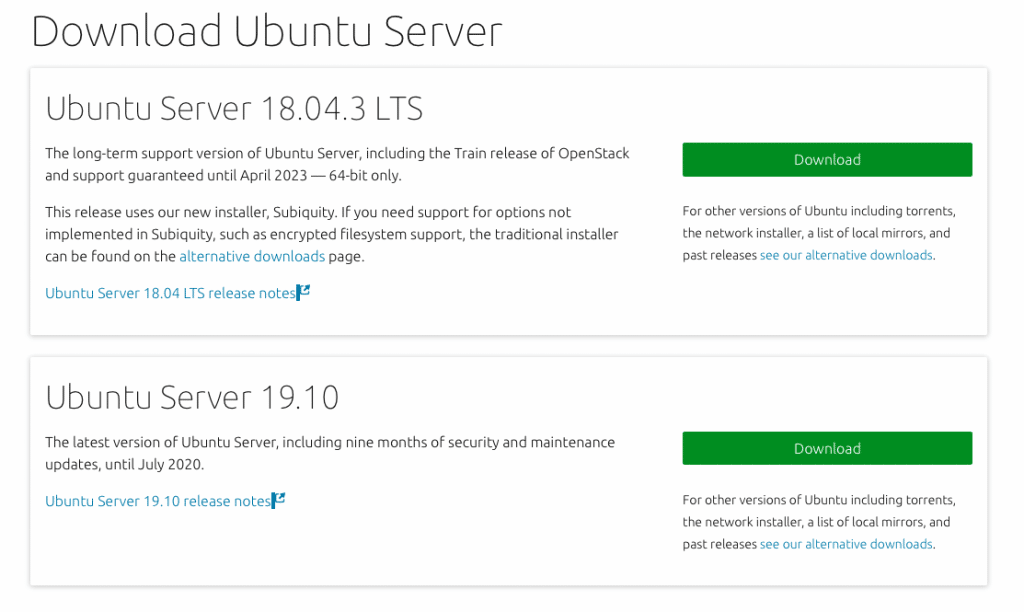
I suggest you go for the LTS one, but then the latest version should also work just fine. So click on a “Download” button and your download should start automatically. It will take some time to complete as the iso is around 900MB.
Once the download is complete you can proceed to the installation process on VirtualBox.
STEP#3: Install Ubuntu Server on VirtualBox
Open VirtualBox Application and click on the “New” button
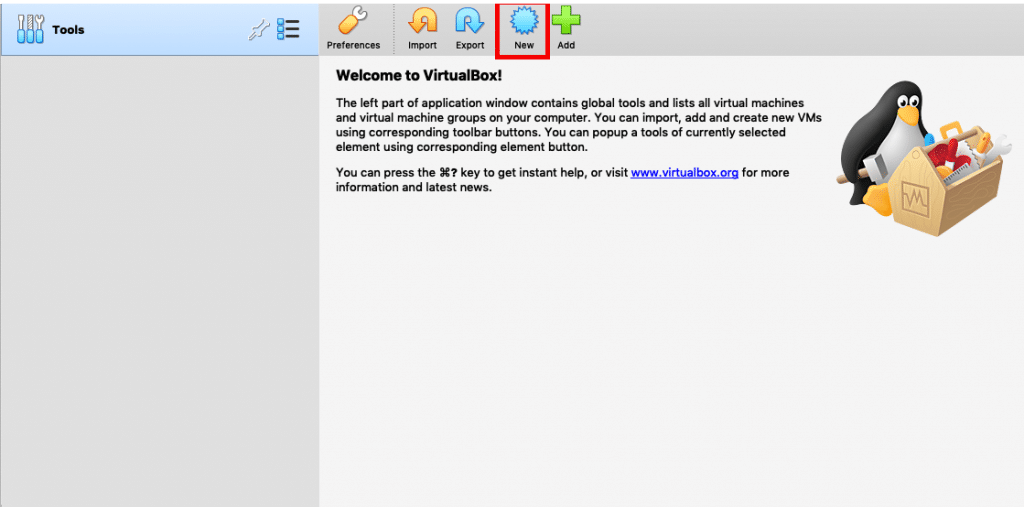
A window like this should pop up
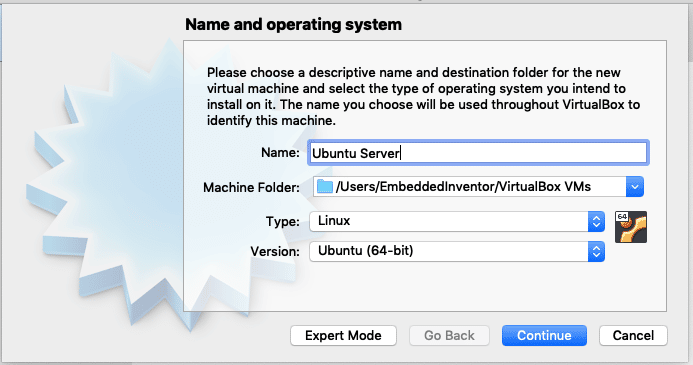
Give your virtual machine a name and choose Linux for type and ubuntu 64 bit for version and click “Continue”.
The next screen usually asks for RAM. GitLab recommends 8GB for a GitLab system with 100 users, I suggest a minimum of 2GB RAM for a home set up, you can give more if you can, just make sure you don’t allot more than 50% of your total available RAM.
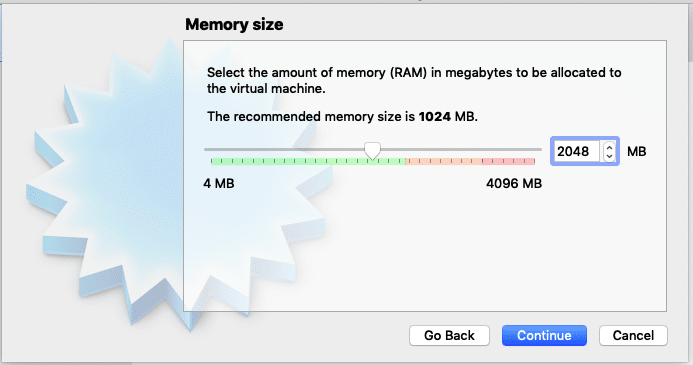
Once you have allocated RAM space, Click “Continue” to the next page.
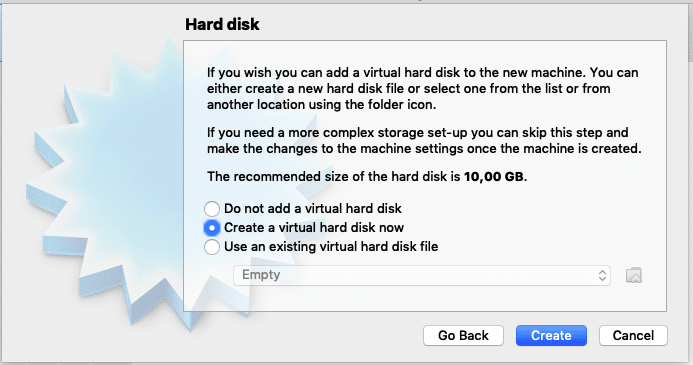
Next, you will be prompted for hard disk. Make sure “Create a virtual hard disk now” is selected and click “Create”
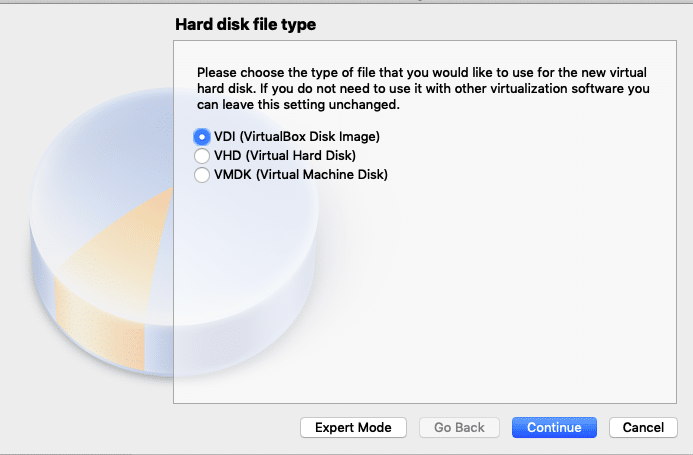
Accept
the default “VDI (VirtualBox Disk Image)” and click
“Continue”

Accept “Dynamically Allocated” and Press continue. This option allocates hard disk space to the virtual machine on the run, so that as you use the more space, more will be allocated.
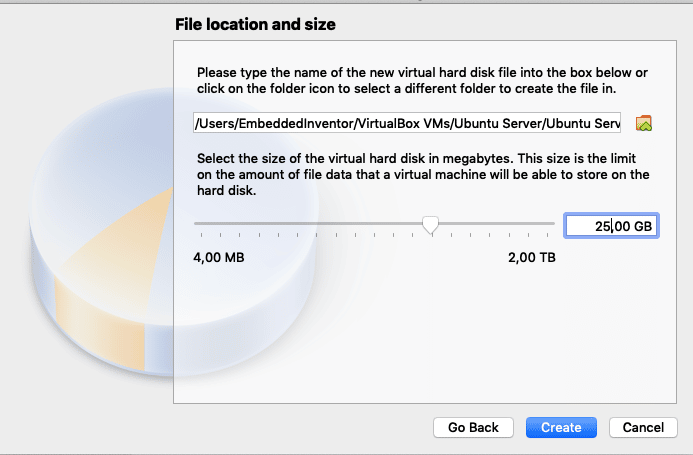
I suggest you allocate at least 25GB of space to the virtual machine, you can allot more if you can. Once you have chosen the disk space click create
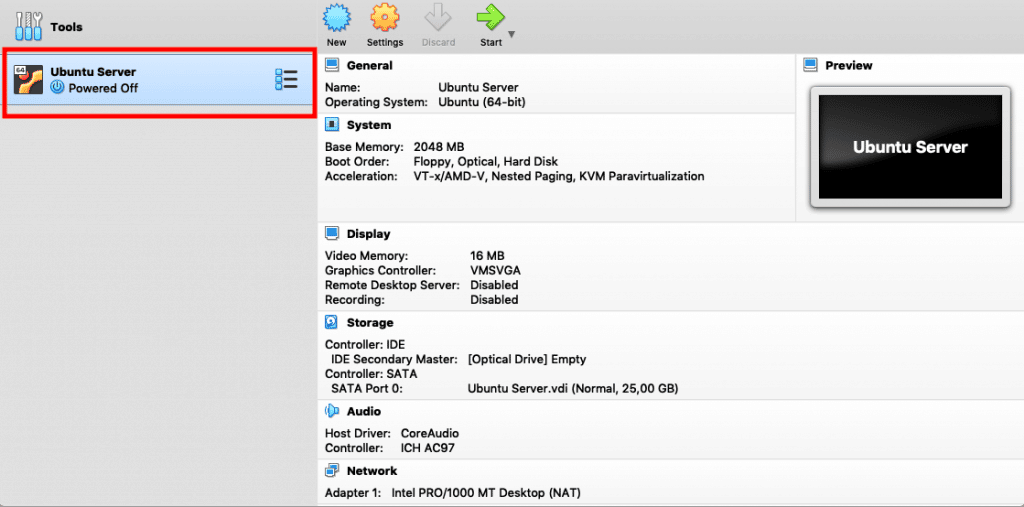
Once you have done this, you should be taken back to the main window of VirtualBox and you should see the virtual machine you just created on the left pane of the window as shown in the screenshot below.
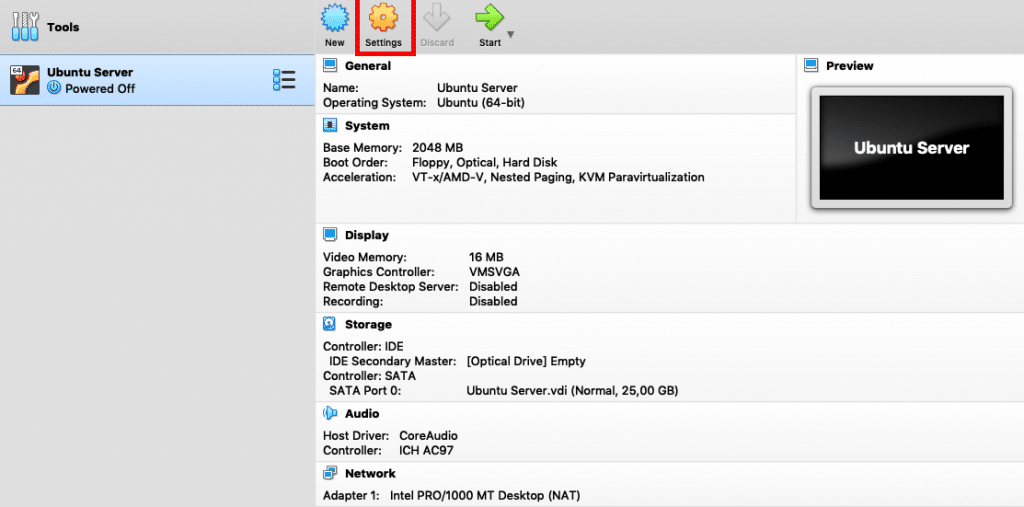
Next click on the “Settings”
And click on storage -> empty -> disk icon -> “Choose a disk file”
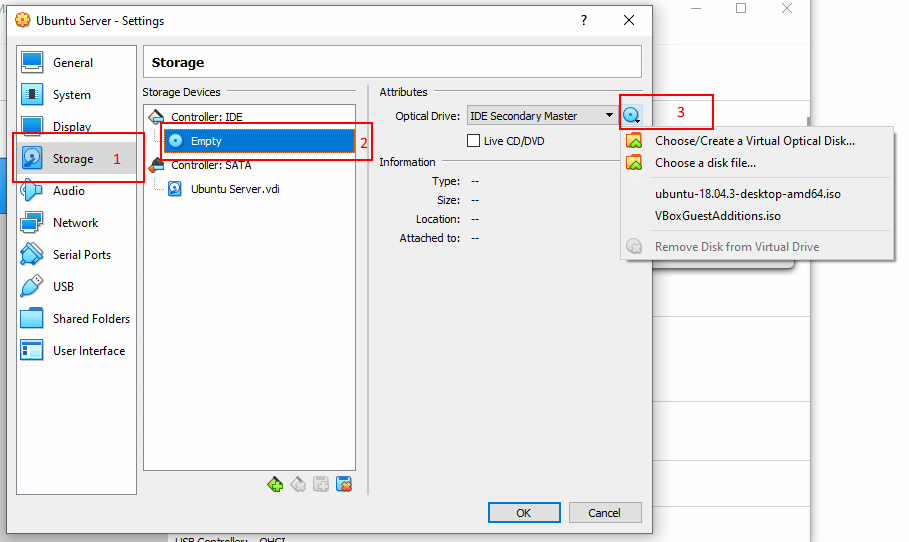
Select the ubuntu server iso image you have just downloaded and press ok. This is equivalent to inserting the Ubuntu disk in a real machine.

Next, go to settings->Network and choose “Bridged Adapter” in the “Attached to:” drop-down menu and press “OK”
I have explained the reason behind using these network settings in detail in this article, you can go ahead and read that if you are into computer networks.
The short explanation is, we will not be able to access the GitLab server from our other machines on the network unless we choose this option.
That’s it, the configuration is done!
You can now go ahead and click the start button!
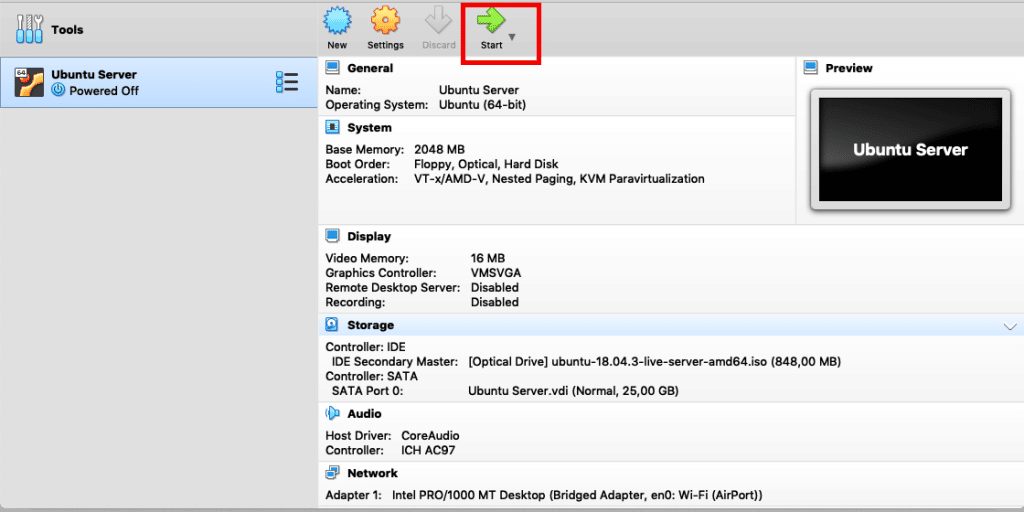
Now the installation process will start. Since we have chosen to go with “Ubuntu server” in order to minimize the resource consumption (so that GitLab can take up as many resources as it needs) we don’t get a fancy Graphical UI, like in the desktop version of Ubuntu. You need to navigate the menus during installation only using Keyboard (tab, enter and arrow keys) since the Ubuntu server doesn’t come with mouse support. So go through the process and get it done.
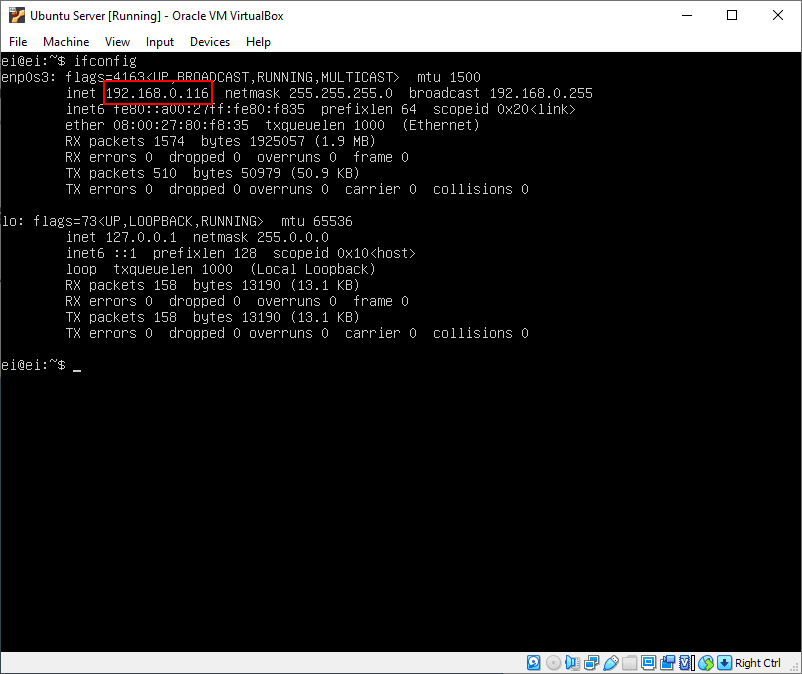
STEP#4: Get the IP address of your ubuntu server
Okay now
once you got the Ubuntu server up and running, you need to find its IP address
and make a note of it.
To do that, use the “ifconfig” command on your Ubuntu server’s terminal
STEP#5: Download and install GitLab server
To download GitLab server, go to the official link on the Gitlab’s Website
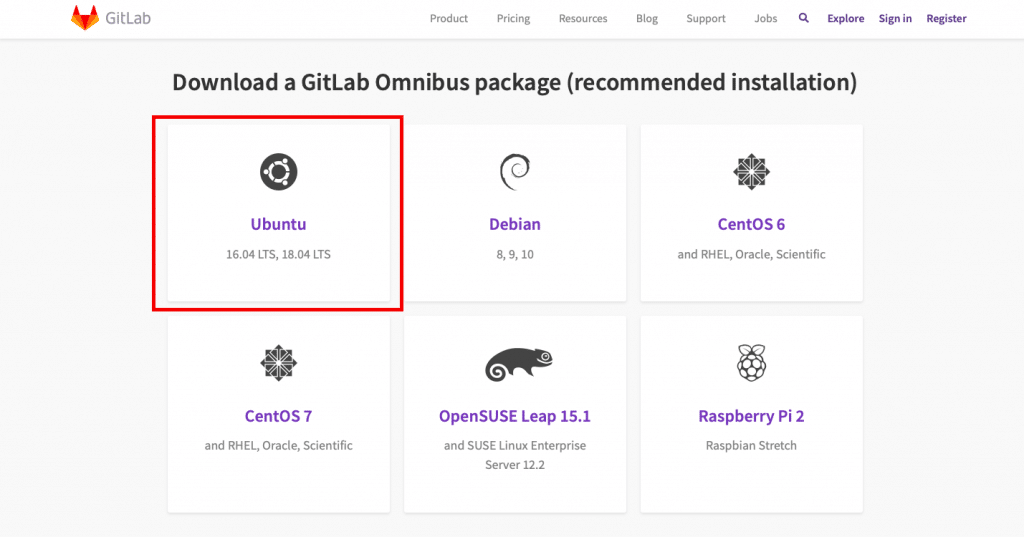
As you can see GitLab official supports several Linux distros, even a Raspberry Pi 2’s Raspbian! We are interested in Ubuntu, so click on the Omnibus Ubuntu Link on as shown in the screenshot above.
Once you click on Ubuntu, the commands you need to enter to install GitLab server will be shown to you.
I am not showing each instruction here since GitLab updates the information presented on their website all the time and that can make this section of the article outdated. Just follow the step by step instructions given in the link to install the GitLab Server on your VM.
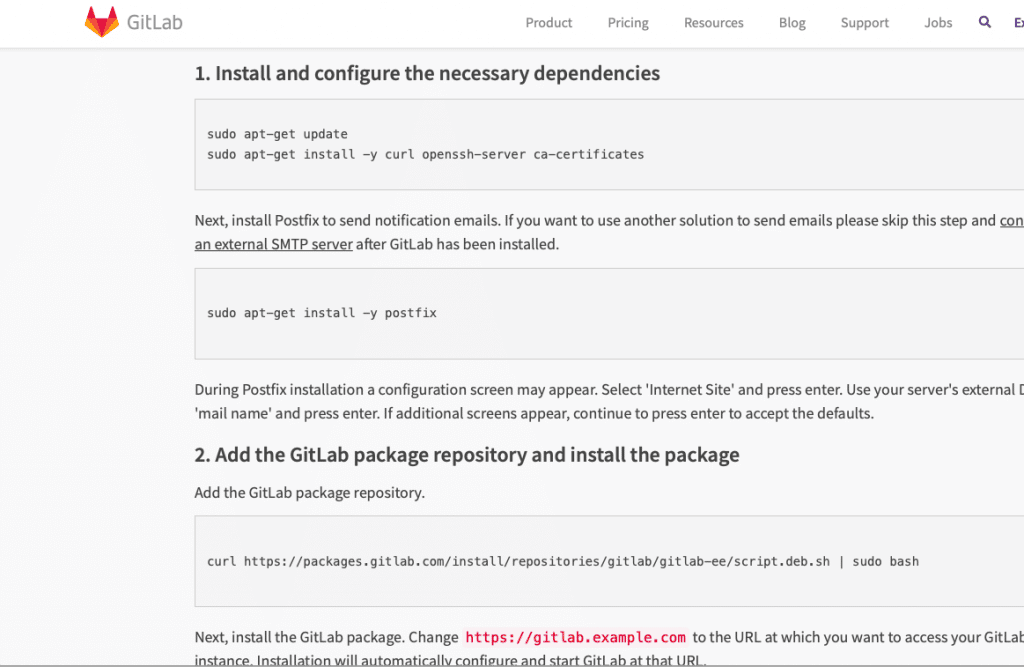
Just type in the commands shown there on you Ubuntu server’s terminal one by one to get GitLab Server installed.
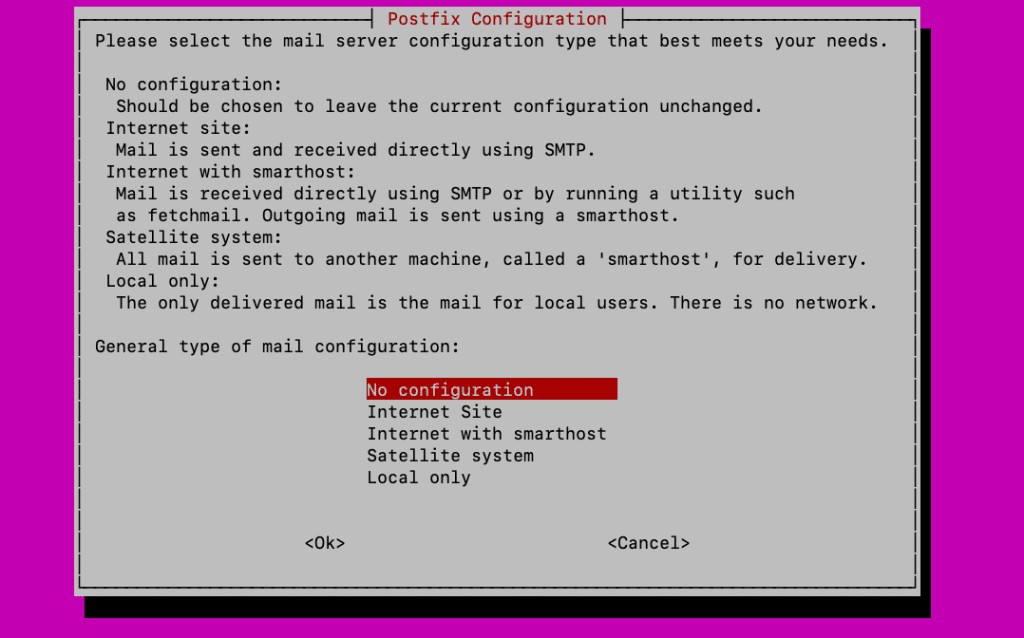
A couple of tips on the GitLab installation instructions
Tip#1
In the postfix installation step (step 1 last command on the GitLab website)
sudo apt-get install -y postfix
you can skip the mail option by choosing the “no configuration” option as shown in the screenshot below.
Tip#2
In the last command of step 2 at GitLab website
sudo EXTERNAL_URL="https://gitlab.example.com" apt-get install gitlab-ee
Make sure you replace the URL with the IP address of the VM that we have made a note of in Step 5 above like this
sudo EXTERNAL_URL="192.168.0.116" apt-get install gitlab-ee
Or to be more precise just place the VM’s IP address that we obtained in Step#4 in its appropriate place
sudo EXTERNAL_URL=”<Your VM’s IP address>” apt-get install gitlab-ee
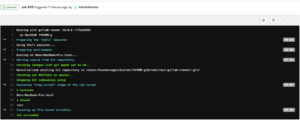
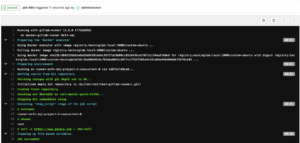
This step will take a while, so be patient. In my machine it took 4 minutes 48 seconds as shown in the screenshot below, yours can vary depending on the processing power it has.
Once done it will show u something like in the screenshot below.
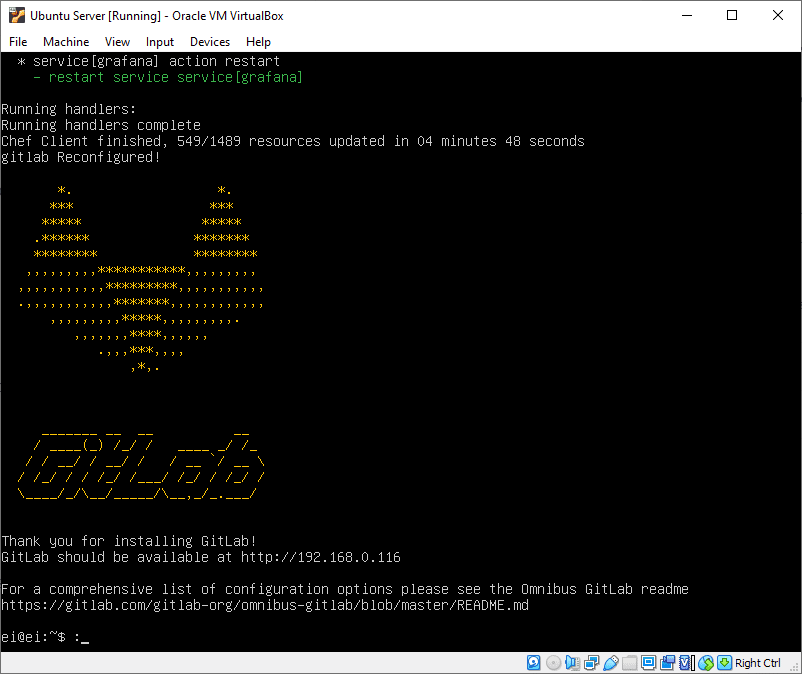
Once it’s done, you can go ahead to your favorite browser and type in the IP address of your VM and check if the installation has succeeded.
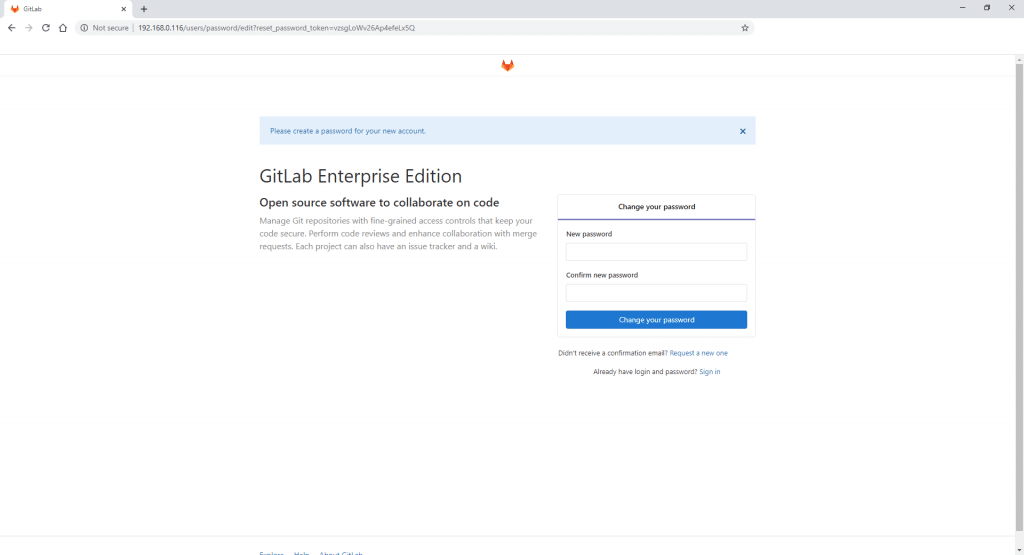
And voila! GitLab server installation has succeeded!
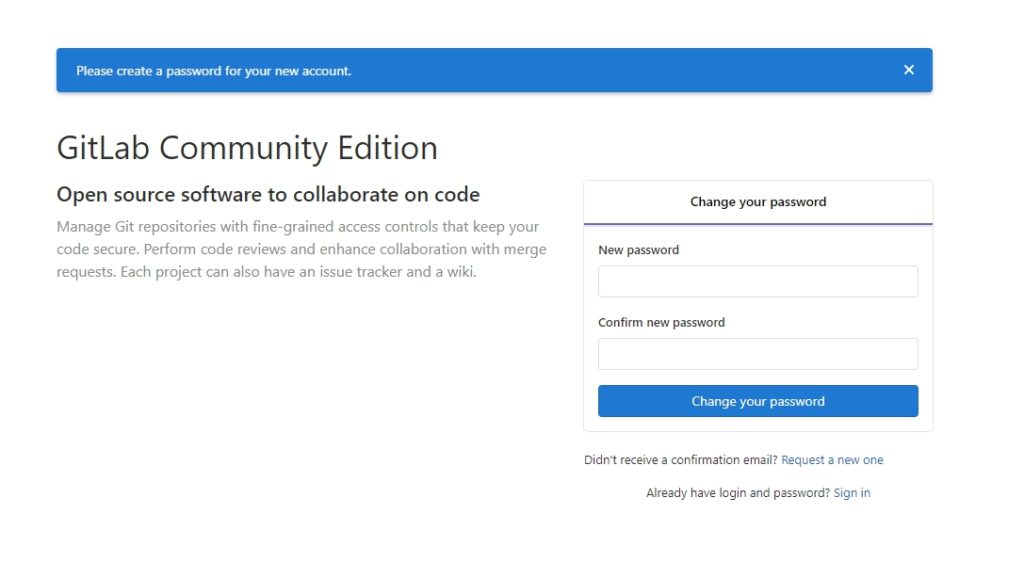
Go ahead and follow the onscreen instructions to set up your password, accounts and everything else!
STEP#6: Download GitLab runners
Before installing GitLab runners you need to install Git on your Windows PC. You can download the latest version of Git in this link.
Now that we have set up the Gitlab server and Git, the next step is to set up the GitLab runner!
At the time of writing this article, the installation process goes like this:
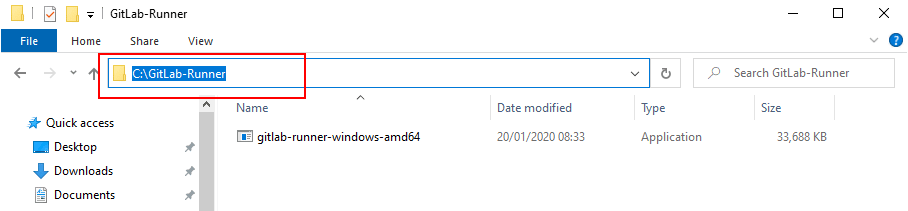
Make a folder on your computer and go to either this link for 32bit version or this link for 64bit version to download the binaries and put them in the folder you created
For getting the most up to date instruction, I am gonna ask you to follow the process given in the GitLab website
STEP#7: Connect the GitLab server to the GitLab runner
GitLab
calls this process of connecting the Server to Runner as “Registering the
GitLab Runner to the Server”
You can follow the instructions for Windows in this link to do the same.
Scroll down to the windows section and you will see something similar to this

Step# 7.1: Start the registration process
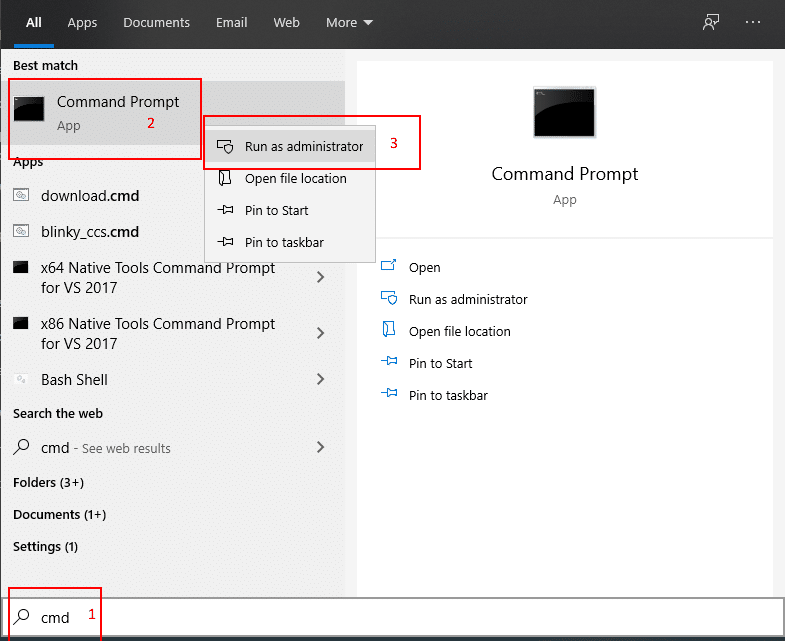
To enter these commands you need to open a command prompt with administrator privileges. For this just type cmd on the search menu, right-click on Command prompt and choose run as administrator
After that, just go to the folder to which you have downloaded the Gitlab Runner to and copy the path to that folder
Next, go back to the command line and give the following command
cd <path you copied>
Run the following command to start the registration process
gitlab-runner-windows-amd64.exe register

As shown in the screenshots above, enter your Virtual Machine’s IP address when prompted. Make sure you add “http://” before the IP address.
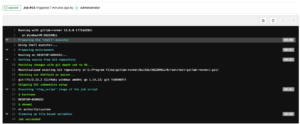
Once the IP address is entered, the next prompt appears asking you to enter a token, so let’s first go get a token from our GitLab server.
Step#7.2: Obtain token from GitLab Server
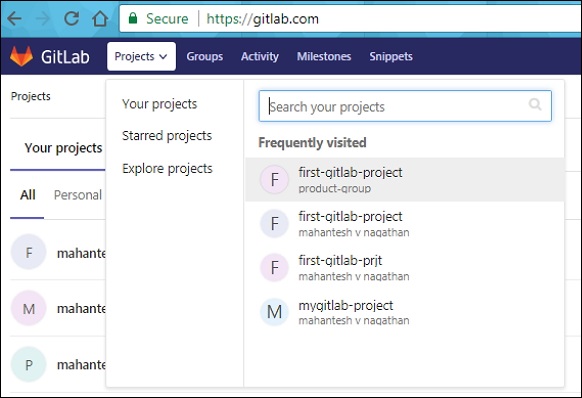
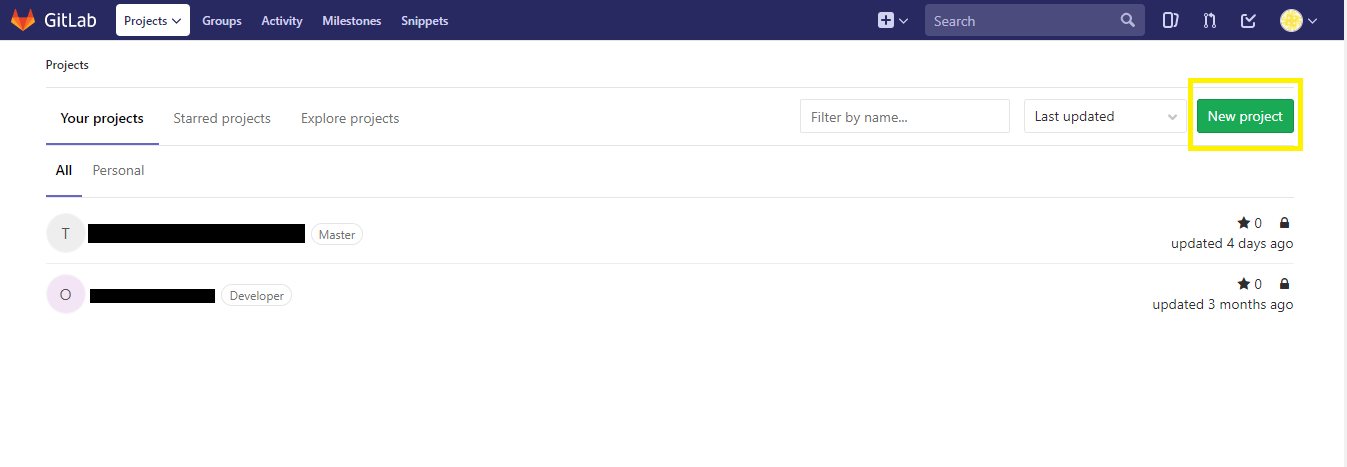
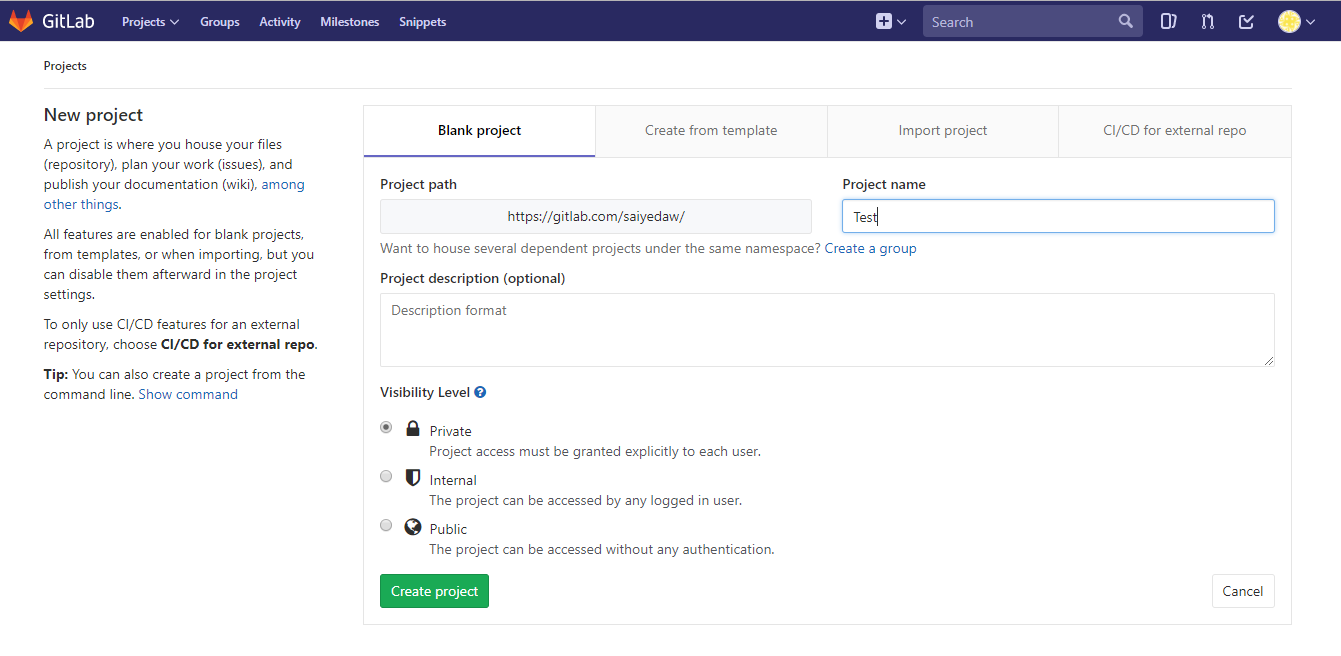
Go to your browser and enter the GitLab Server’s IP address. Once you have logged in you can create your first project by clicking on the respective pane as shown in the screenshot below.
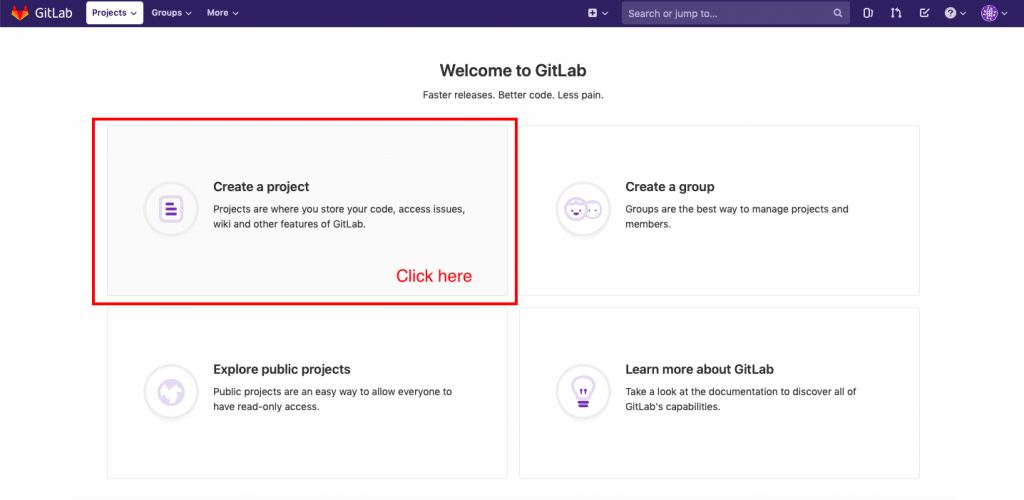
Just give the project a name and click on the create project button. The other field should get populated automatically.
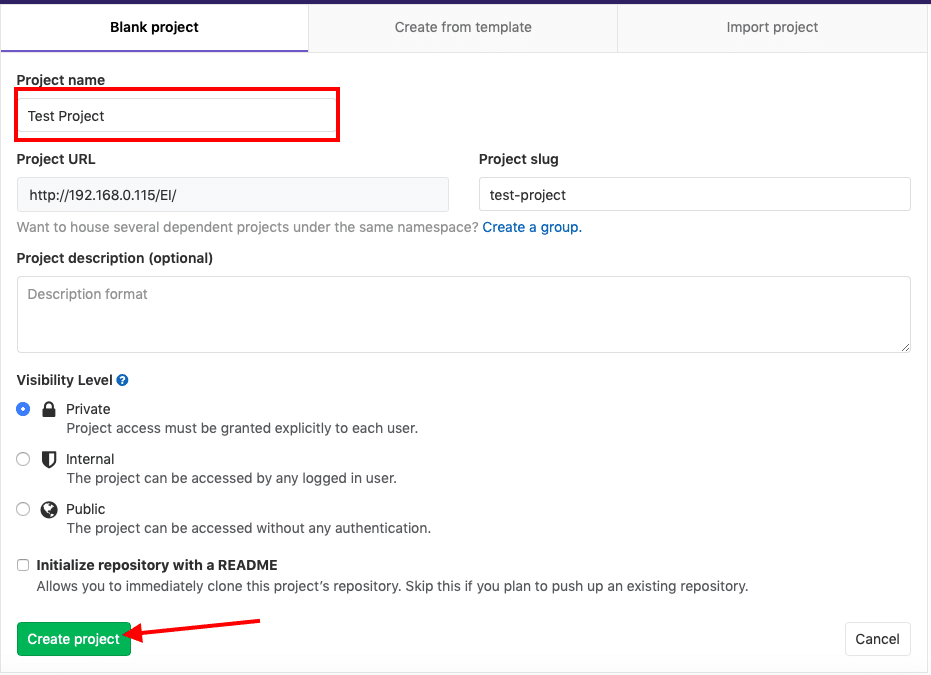
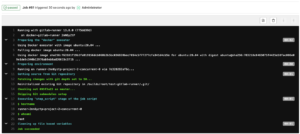
Once you click the button as shown in the screenshot above, you will be taken to your project page.
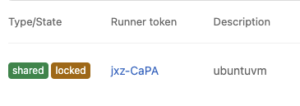
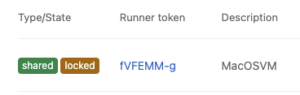
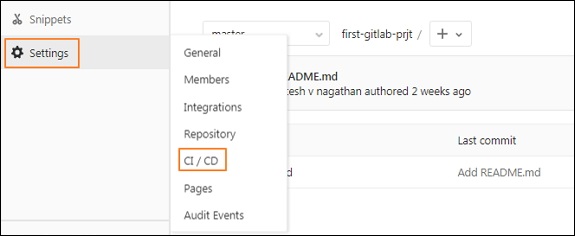
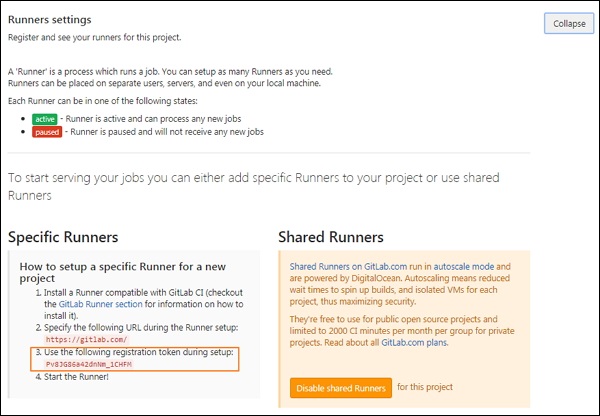
From there just click on Settings->CI/CD and scroll down a bit and click the “Expand” button next to “Runners” and you will find the token you need as shown in the screenshot below.
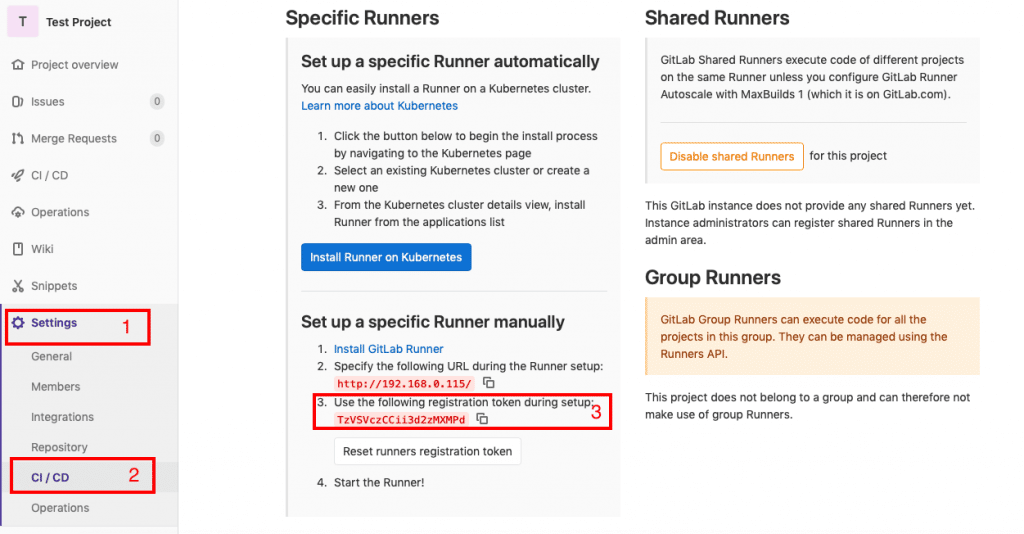
This token basically connects your project on the GitLab Server to the GitLab runner.
Step#7.3: Enter the token
Now that we have the token let’s enter it on the Command prompt
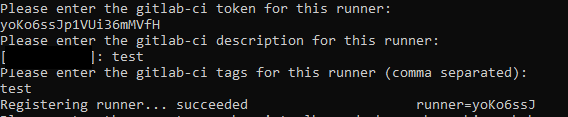
Once
entering the token, you will be prompted to give the runner a description, go
ahead and do that.
After that, you will be asked to enter some tags.
What are tags? Why are they needed for GitLab runners?
The
better term for tags can be capabilities.
Consider
this scenario.
Assume you are working in a large team of 1000 developers, who are doing say 50 different projects and your GitLab system has 100 different runners set up with several capabilities to do specific tasks. Some projects may need C compilers, while others may need python interpreters.
Now in order to connect a given project with a free-runner, we need some sort of parameter to tell the GitLab server that this particular free runner is capable of running the scripts needed for that particular job.
This is where tags come into the picture. By giving tags like “C” or “Python” a single runner can be connected to multiple projects and a single project can execute its jobs on several runners to ensure the best possible performance.
Using
these tags the Gitlab server can find a runner with the specific capability to
use for a given job. So give some suitable tags that will imply the
capabilities of your runner.
Once that is done, you will be prompted to enter “executor”.
Executors are programs that run our CI/CD scripts. Type shell and press enter

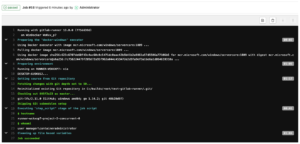
This will end the registration process the Runner to the server
Once registered you can start the GitLab runner as a Service (background task) by issuing the commands
gitlab-runner-windows-amd64.exe install
gitlab-runner-windows-amd64.exe start

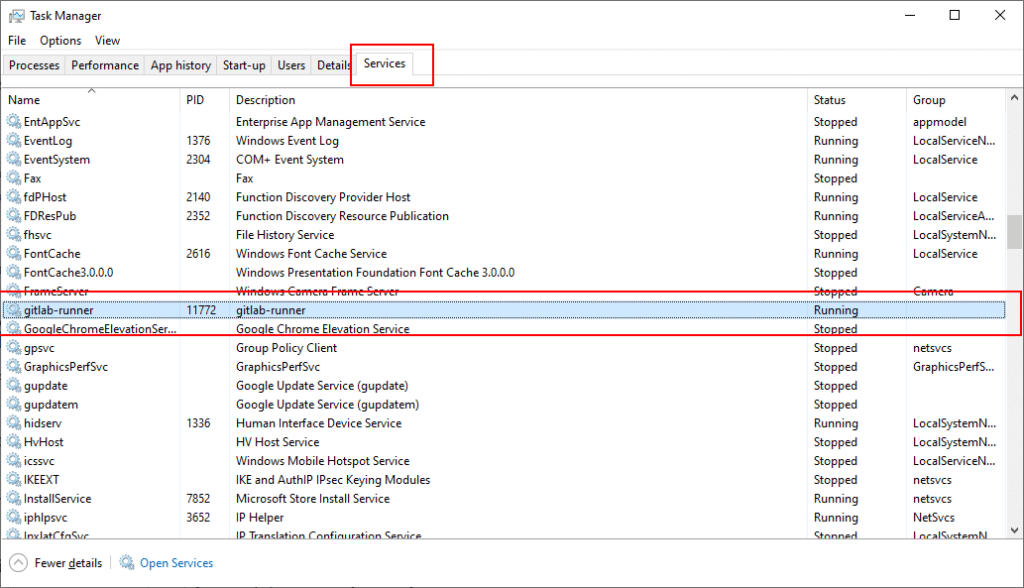
As you can see in the screenshot below, in the task manager app we can see that our gitlab-runner service is running!
Test to see if everything works
By following the 7 steps above, you should have a set up with GitLab Server and Runner running on your system. Its time to test and see if everything works the way it is supposed to work!
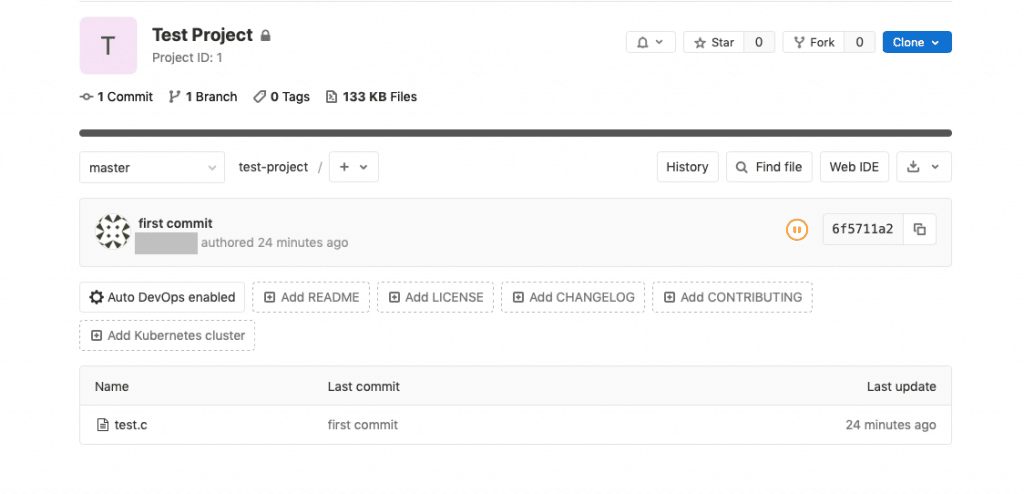
First, let’s test the GitLab server by creating a repo and pushing it to the server.
Testing GitLab Server
STEP#1: Make a test git repo
Let’s make a simple git repo on a new folder on our Desktop and push it to the GitLab server.
So open your Git-Bash app, which got installed as you were installing git.

Once opened type in the following commands
cd
cd Desktop
mkdir test_project
cd test_project
touch test.c
The above lines of command are just the fancy way of creating a folder named test_project on your Desktop and a file named test.c inside it. You can also do it through the Graphical User Interface if you want to.
So next, please open the C file using your favorite text editor and type in a simple program for testing, something like the following.
#include <stdio.h>

int main()
{
	printf("Hello Embedded Inventors!");
	return 0;
}
Next, let’s initialize a git repository on our test_project folder. So go back to the terminal cd into the test_project folder and type in the following command
You should receive a reply saying “Initialized empty Git repository”
STEP#2: Push it to the server
Now that we have our git repo ready, let’s push it to our git server. To do that login to your GitLab and go to the project we created earlier. There GitLab shows us the commands needed to push our repo to the server.
First, let’s configure our name and email on the git repository to the ones set on the GitLab server
So enter
the following command.
git config --global user.name "<enter your name here>"
git config --global user.email "<enter your email here>"
Next, we need to connect our server and our repository. To do that just enter the following commands
git remote add origin <your project URL>.git
In my case it is
git remote add origin http://192.168.0.115/EI/test-project.git
To find your project URL, just copy the address bar of your browser while you are on your project’s page in GitLab
![]()
Then add our test.c file and commit the changes using the following commands
git add .
git commit -m"first commit"
Then push
your git repo onto the GitLab using the command
git push -u origin master
You will be prompted to enter the user name and password of your GitLab account, once done go to your browser and just refresh the page and you should be able to see your test project page in GitLab!
Testing GitLab Runner
STEP#3: Make a simple bash script to build the test.c
file
Create a bash script on your project folder
cd
cd Desktop/test_project
touch build.ps1
Edit it so that it looks something like this
gcc test.c -o test
echo "Build completed"
STEP#4: Create and edit .gitlab_ci.yml to run the
above script
What is .gitlab-ci.yml and why it is needed? This is the file that contains the instructions for the GitLab runners to execute the CI/CD tasks. It should be present in the project’s root folder. It can be used to test if a commit builds correctly, passes some unit tests and if it needs packaging and deployment.
You can
learn more about how to configure it from the official quick start tutorial
here
For the
purpose of testing our installation let’s create a file named .gitlab-ci.yml in
the test_project folder and put the following lines in there.
Make sure you are in the right directory
cd
cd Desktop/test_project
Create the file using the command
Open it with your favorite text editor and type the following lines into it.
build:
  script:
    - powershell -File build.ps1
  tags:
    - test
The last line tells the GitLab server to use the GitLab runner with the tag named “test”. If you gave your GitLab runner installation a different tag, make sure you make the appropriate change to the above lines.
Also,
make sure you use spaces instead of tabs at the beginning of the above lines.
Now add it to the git repository and push it to the Gitlab server
git add .
git commit -m"gitlab yml added"
git push
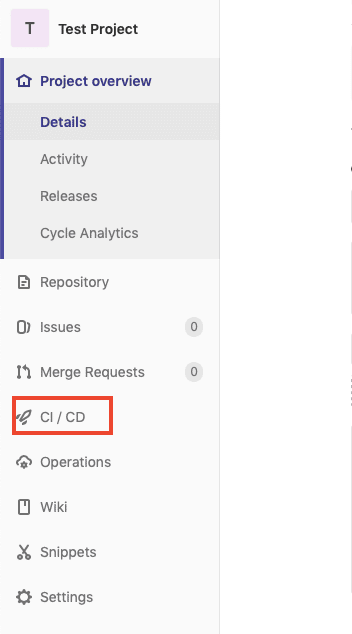
Now let’s get back to our GitLab server’s URL and see if it worked. Go to the project page and click on CI/CD
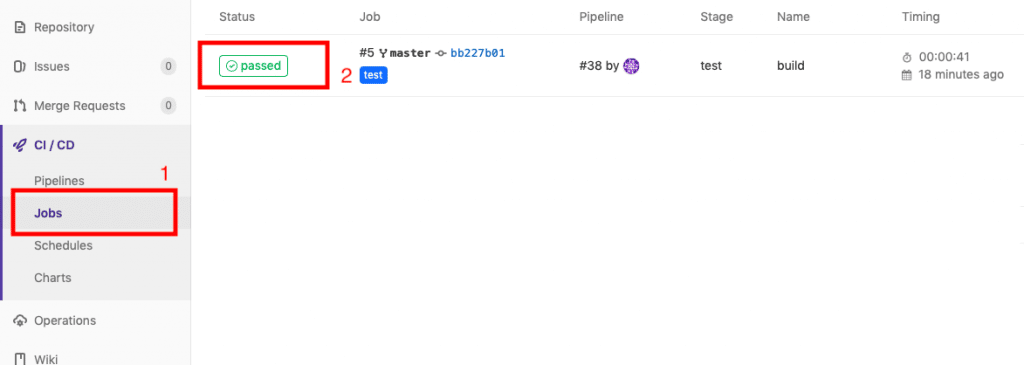
You will
be taken to the pipeline page which shows the result of your latest commit.

It will
take a minute or so before it completes the pipeline and as you can see in the
screenshot above, mine took 41 seconds to complete and the status is
“passed”
If you
click on “jobs” under the CI/CD menu, you will be taken to another
page which shows you more information about the execution of our yml file
Next click on “passed” as shown in the screenshot above, this will take you to another page which will look something like this.

As you can see, our build.ps1 gets executed by the GitLab runner and it succeeds to compile our project.
And with that, I will conclude this tutorial!
I leave the rest to you to play, explore, experiment and learn GitLab!
I hope you guys enjoyed this article and learned something useful.
You can email us or contact us through this link if you have any questions or suggestions.
If you liked the post, feel free to share this post with your friends and colleagues!
Как установить Gitlab в Windows? Первая же ссылка в поисковике дала ответ: Самый легкий способ установить Gitlab в Windows-е — это установить виртуальную машину Linux и уже там установить Gitlab. Пост был опубликован на официальном форуме Гитлаба. Автор кажется не шутить? Хм… А есть ли все таки способ?
Обратимся к официальной документации. Раздел требования https://docs.gitlab.com/ee/install/requirements.html , где есть список поддерживаемых ОС.
- Ubuntu
- Debian
- CentOS
- openSUSE
- Red Hat Enterprise Linux (please use the CentOS packages and instructions)
- Scientific Linux (please use the CentOS packages and instructions)
- Oracle Linux (please use the CentOS packages and instructions)
Что там написано про Windows?
Microsoft Windows
GitLab is developed for Linux-based operating systems. It does not run on Microsoft Windows, and we have no plans to support it in the near future. For the latest development status view this issue. Please consider using a virtual machine to run GitLab.
То есть,
Gitlab разрабатывался для Linux-based ОС. Оно не запуститься на Windows и у нас нет планов на поддержку этой ОС в ближайшее время. Следить за ходом разработки можете по ссылке. Если хотите запустить на Windows используйте виртуальную машину.
Вот те на… Но постойте, есть же Докер, философия которой заключается как раз в кросс платформенной доставке продукта. Даже есть целый раздел посвязенной установке через Docker https://docs.gitlab.com/omnibus/docker/README.html
Вот только если попытаться запустить на Windows вот этот конфиг:
|
1 2 3 4 5 6 7 8 9 10 11 12 13 14 15 16 17 |
web: image: ‘gitlab/gitlab-ce:latest’ restart: always hostname: ‘gitlab.example.com’ environment: GITLAB_OMNIBUS_CONFIG: | external_url ‘http://gitlab.example.com:8929’ gitlab_rails[‘gitlab_shell_ssh_port’] = 2224 ports: — ‘8929:8929’ — ‘2224:22’ volumes: — ‘/srv/gitlab/config:/etc/gitlab’ — ‘/srv/gitlab/logs:/var/log/gitlab’ — ‘/srv/gitlab/data:/var/opt/gitlab’ |
получите ошибку
|
Error executing action `run` on resource ‘ruby_block[directory resource: /var/opt/gitlab/git-data]’ |
Эта ошибка не нова, обсуждение ее началось два года назад, а может и более. Есть большая дискуссия на эту тему по этой ссылке
https://gitlab.com/gitlab-org/omnibus-gitlab/issues/2280
Сотни людей столкнулись с одним и тем же.
В чем же проблема?
Суть проблемы в самом докере для Windows. Во время установки Gitlab-a Chef скрипт пытается удостовериться что каталог принадлежит пользователю git:git, вместо этого получает none. Потому что, после монтирования, каталогу присваивается UID 0 : GID 0 755 unix file permissions, который невозможно изменить внутри контейнера
Обсуждение данной проблемы можно прочитать по ссылке
https://github.com/docker/for-win/issues/2042
Корень проблемы заключается в архитектурных различиях ФС Windows и вряд ли решится в ближайшее время. Протокол SMB/CIFS не поддерживает расширенные права для файлов.
Значит пора ставить виртуальную машину?
Скорее всего, автор этого топика https://forum.gitlab.com/t/how-to-install-gitlab-on-windows/32 прав и самый легкий способ установки — это поставить виртуальную машину. Ведь недаром Windows официально даже не поддерживается.
Но! Если нужно, то можно взять вот такой конфиг и…
|
1 2 3 4 5 6 7 8 9 10 11 12 13 14 15 16 17 18 19 20 21 22 23 24 |
version: «3.2» services: web: image: ‘gitlab/gitlab-ce:latest’ hostname: ‘gitlab.example.com’ restart: always environment: GITLAB_OMNIBUS_CONFIG: | external_url ‘https://gitlab.example.com’ # Add any other gitlab.rb configuration here, each on its own line ports: — 80:80 — 443:443 — 22:22 volumes: — ./gitlab/config:/etc/gitlab — gitlab—logs:/var/log/gitlab — gitlab—opt:/var/opt/gitlab volumes: gitlab—opt: gitlab—logs: |
Предварительно создав volumes вручную, и …
|
docker volume create gitlab—opt docker volume create gitlab—logs |
И вуаля после всех операции видим приветственное сообщение от Gitlab
ошибка letsencrypt_certificate[gitlab.example.com] (letsencrypt::http_authorization) had an error. что делать?
Нужно отключить Lets Encrypt. Финальный конфиг будет выглядит так
|
1 2 3 4 5 6 7 8 9 10 11 12 13 14 15 16 17 18 19 20 21 22 23 24 25 |
version: «3.2» services: web: image: ‘gitlab/gitlab-ce:latest’ hostname: ‘gitlab.example.com’ restart: always environment: GITLAB_OMNIBUS_CONFIG: | external_url ‘http://gitlab.example.com’ # Add any other gitlab.rb configuration here, each on its own line letsencrypt[‘enabled’] = false ports: — 80:80 — 443:443 — 22:22 volumes: — ./gitlab/config:/etc/gitlab — gitlab—logs:/var/log/gitlab — gitlab—opt:/var/opt/gitlab volumes: gitlab—opt: gitlab—logs: |
Найдите два отличия 😉 Естественно не забудьте добавить домен gitlab.example.com в etc/hosts
Заключения
Как мы поняли установка Gitlab on Windows подходит только для экспериментальных целей или для тестирования новых фичей. Сами основатели предупреждают об отсутствии поддержки на Windows, поэтому использование в боевых целях не рекомендуется. Намного проще и дешевле будет поднять машину на Линуксе, хоть локально, хоть в облаке.
Кстатит, все работы проводились на версии Docker for Windows 18.06.1
You can install the GitLab runner on different operating systems, by installing Git versioning system and creating user account in the GitLab site.
Git is a version control system used for −
- Handling the source code history of projects
- Tracking changes made to files
- Handling small and large projects with speed and efficiency
- To collaborate with other developers on different projects
GitLab is a Git-based platform provides remote access to Git repositories and helpful for software development cycle by creating private and public repositories for managing the code.
GitLab supports different types of operating systems such as Windows, Ubuntu, Debian, CentOS, open SUSE and Raspberry Pi 2. In this chapter, we will discuss about how to install GitLab on Windows and Ubuntu operating systems −
Installation of GitLab on Windows:
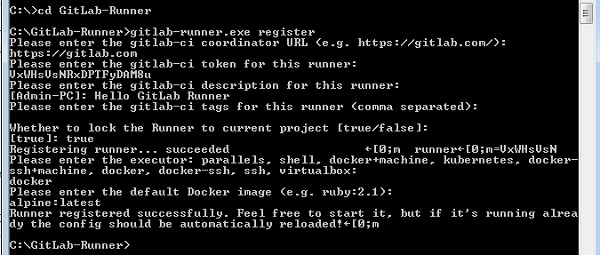
Step 1 − First create a folder called ‘GitLab-Runner’ in your system. For instance, you can create in C drive as C:GitLab-Runner.
Step 2 − Now download the binary for x86 or amd64 and copy it in the folder created by you. Rename the downloaded binary to gitlab-runner.exe.
Step 3 − Open the command prompt and navigate to your created folder. Now type the below command and press enter.
C:GitLab-Runner>gitlab-runner.exe register
Step 4 − After running the above command, it will ask to enter the gitlab-ci coordinator URL.
Please enter the gitlab-ci coordinator URL (e.g. https://gitlab.com/):
https://gitlab.com
Step 5 − Enter the gitlab-ci token for the runner.
Please enter the gitlab-ci token for this runner:
xxxxx
-
To get the token, login to your GitLab account −

-
Now go to your project −
-
Click on the CI/CD option under Settings tab and expand the Runners Settings option.

-
Under Runners Settings section, you will get the token as shown in the image below −

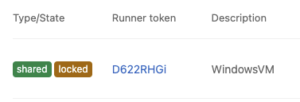
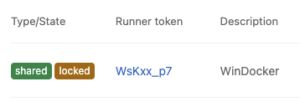
Step 6 − Enter the gitlab-ci description for the runner.
Please enter the gitlab-ci description for this runner:
[Admin-PC]: Hello GitLab Runner
Step 7 − It will ask to enter the gitlab-ci tags for the runner.
Please enter the gitlab-ci tags for this runner (comma separated):
tag1, tag2
You can change these tags in the GitLab’s user interface later.
Step 8 − You can lock the Runner to current project by setting it to true value.
Whether to lock the Runner to current project [true/false]:
[true]: true
After completing above steps, you will get the successful message as ‘Registering runner… succeeded’.
Step 9 − Now enter the Runner executor for building the project.
Please enter the executor: parallels, shell, docker+machine, kubernetes, docker-
ssh+machine, docker, docker-ssh, ssh, virtualbox:
docker
We have used the selector as ‘docker’ which creates build environment and manages the dependencies easily for developing the project.
Step 10 − Next it will ask for default image to be set for docker selector.
Please enter the default Docker image (e.g. ruby:2.1):
alpine:latest
Step 11 − After completing the above steps, it will display the message as ‘Runner registered successfully’. The below image will describe the working flow of above commands −

Step 12 − Now go to your project, click on the CI/CD option under Settings section and you will see the activated Runners for the project.
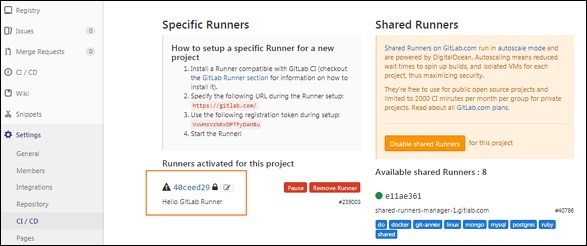
You can see the GitLab Runner configuration in the config.toml file under the GitLab-Runner folder as shown below −
concurrent = 1
check_interval = 0
[[runners]]
  name = "Hello GitLab Runner"
  url = "https://gitlab.com"
  token = "40ceed29eec231fa9e306629cae4d7"
  executor = "docker"
  [runners.docker]
      tls_verify = false
      image = "alpine:latest"
      privileged = false
      disable_cache = false
      volumes = ["/cache"]
      shm_size = 0
  [runners.cache]
Installation of GitLab on Ubuntu
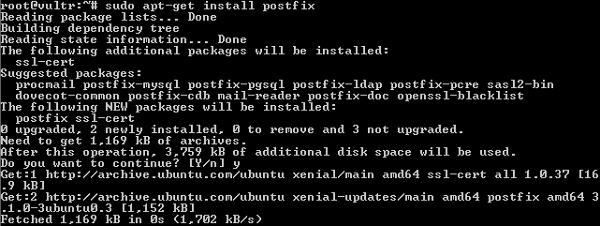
The GitLab can be installed on Ubuntu system by using Omnibus package which provides different services to run GitLab. The Omnibus package provides necessary components of GitLab, establishes the configurations and project metadata which can be used in user’s system.
The following steps describe installation of GitLab on Ubuntu −
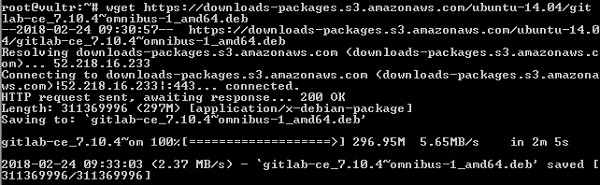
Step 1 − First, login to your GitLab server using SSH (Secure Shell).
Step 2 − Next, download the Omnibus package −
wget https://downloads-packages.s3.amazonaws.com/ubuntu-14.04/gitlab-ce_7.10.4~omnibus-1_amd64.deb
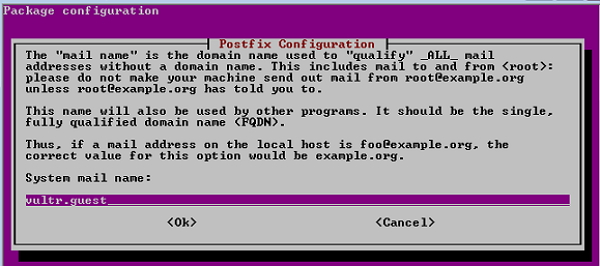
Step 3 − Install the postfix −
sudo apt-get install postfix
Postfix is a open source mail transfer agent used to deliver the email notifications.

Step 4 − While installing Postfix, it will ask type of installation; then select the Internet Site option. Next, it will show Postfix configuration along with the system mail name as shown in the image −

Step 5 − Install the dpkg (package manager for debian system) for managing the installed packages −
sudo dpkg -i gitlab-ce_7.10.4~omnibus-1_amd64.deb

Step 6 − To have the changes take effect, you need to reconfigure the GitLab by using the below command −
sudo gitlab-ctl reconfigure
Step 7 − Check the status of the GitLab services by using below command −
sudo gitlab-ctl status
If you want to install GitLab from the source, then install some dependencies on the server and need to setup the database by using the PostgreSQL. It is described in the Environment setup chapter. You can install the coordinator to build a web interface and control build instances. For more information, you can check the Installation of Coordinator chapter.
GitLab is a place where we can manage our git repositories. It can be considered as an alternate of GitHub and Bitbucket. Currently, Gitlab is offering four versions namely Core, Starter, Premium, and Ultimate.
- Core: For small and personal projects. Free of cost.
- Starter: For small and personal projects who need professional support. It is paid.
- Premium: For teams who need high availability, high performance, and/or 24/7 support.
- Ultimate: For large enterprises who want to align strategy and execution with security and compliance.
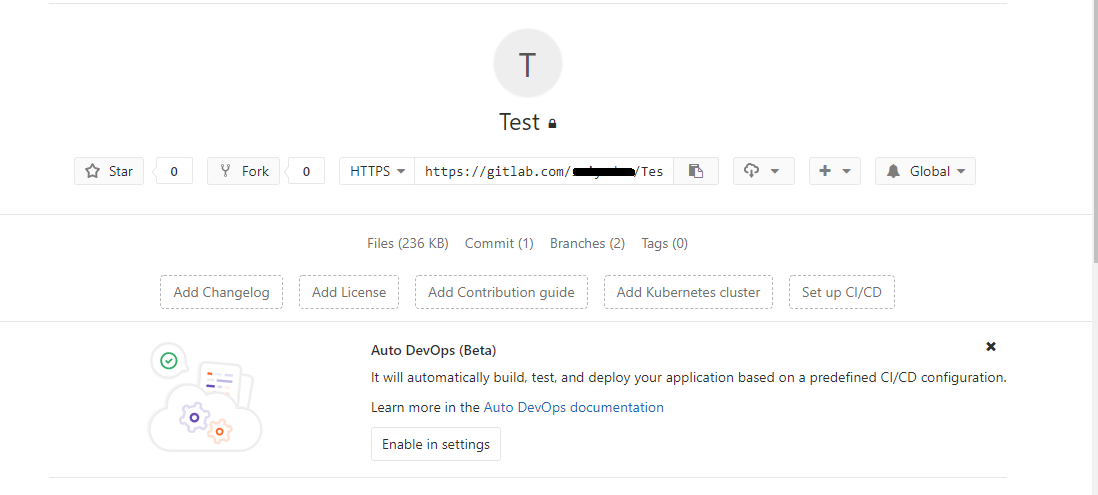
In this article, we will use Core version and learn how to setup GitLab Repository on Windows System in order to manage your codes and projects. So let’s start:
1. Create Account on GitLab.
Username or Email:  abc@gmail.com
Password:  **********
2. Create New Project, named as “Test”.
3. Download Git for Windows and install it.
4. Open Cmd and run following command to check the successful installation of Git.
git --version

5. Set username and email
git config --global user.name ABC
git config --global user.email “abc@gmail.com”
Note: Username and email should be same as your Gitlab Account.
6. Check for Success:
git config --global --list

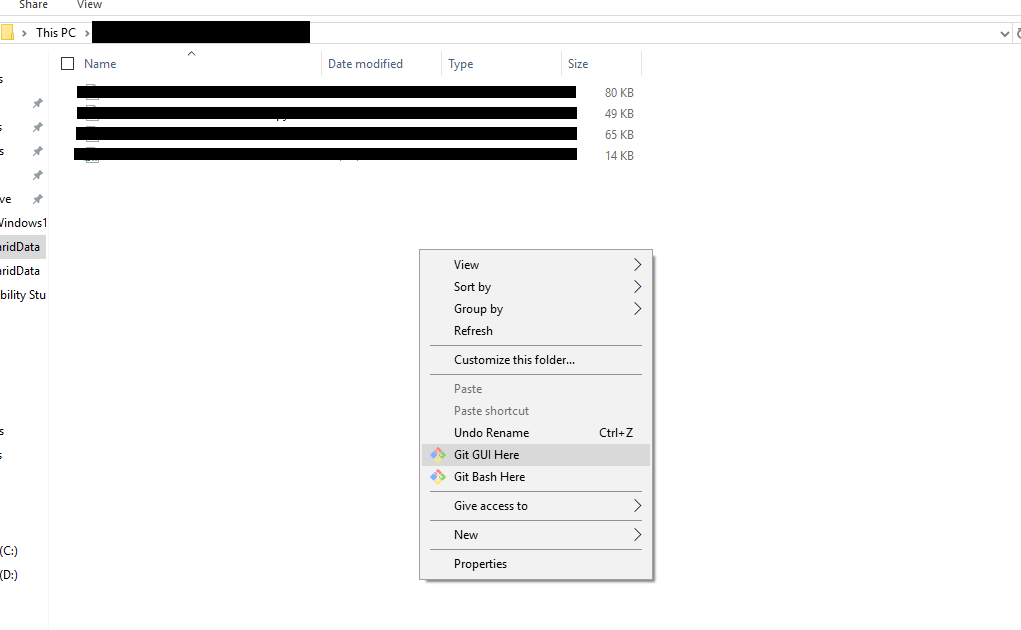
7. Go to Directory from where you want to upload project. Right Click there and open “Git Bash Here”.
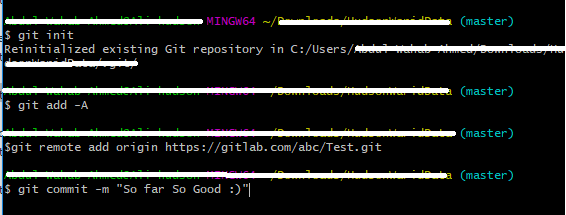
8. Initialize Git here.
git init

9. Add changes from all tracked and untracked files.
git add -A

10. To add a new remote, use Project URL from GitLab:
git remote add origin https://gitlab.com/abc/Test.git
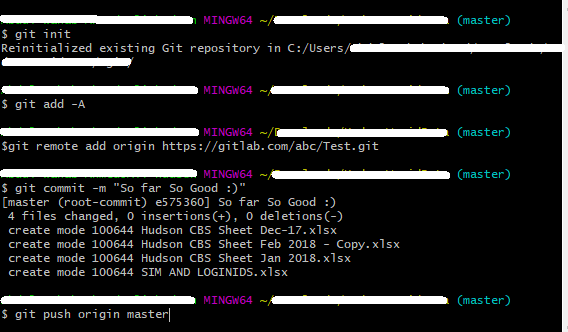
11. Commit changes with message:
git commit -m "Your_Message"
12. Now push project on GitLab
git push origin master
Pull GitLab Repository
13. Go to the master branch to pull the latest changes from there
git checkout master
14. Download the latest changes in the project
git pull REMOTE NAME-OF-BRANCH -u
(REMOTE: origin) (NAME-OF-BRANCH: could be “master” or an existing branch)
Create New Branch
15. Create a branch. Spaces won’t be recognized, so you will need to use a hyphen or underscore.
git checkout -b NAME-OF-BRANCH
16. Work on a branch that has already been created
git checkout NAME-OF-BRANCH
17. View the changes you’ve made
git status
18. Add changes to commit. You’ll see your changes in red when you type “git status”.
git add CHANGES IN RED
git commit -m "DESCRIBE THE INTENTION OF THE COMMIT"
19. Send changes to gitlab.com
git push REMOTE NAME-OF-BRANCH

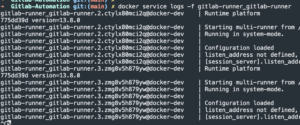
Are you tired of manually pushing code to production? Are you always searching through your BASH history to find the commands you used to test your code? Do you wish the process to merge code into production had a defined process? Well I have the solution for you! Introducing Gitlab CI/CD pipelines! With Gitlab you can setup Gitlab runners to create a CI/CD pipeline. A CI/CD pipeline will revolutionize your workflow to push code to production.
The purpose of this blog post is to provide instructions on how to setup the necessary components (Gitlab and Gitlab runners) to create a CI/CD pipeline. One of the deliverables from this blog post is Docker composes for Swarm and non-swarm deployments of Gitlab. Additionally, there are manual instructions on how to setup Gitlab runners on Ubuntu 20.04, Ubuntu 20.04 with Docker, Windows 10, Windows 10 with Docker, and macOS Big Sur. In addition, a Docker Registry is setup and integrated into the CI/CD pipeline for custom Docker images. The instructions and the infra-as-code provided in this post will create the foundation for future blogs that will contain a CI/CD component.
Goals
- Setup Gitlab stack with Docker Swarm
- Setup Gitlab runner on Windows
- Setup Gitlab runner on Linux
- Setup Gitlab runner on macOS
- Setup Gitlab runner on Docker Windows
- Setup Gitlab runner on Docker Linux
- Setup a Docker Registry with a self-signed HTTPS certificate
Update log
- September 24th 2021 – Updated Docker from Gitlab v13.8.1 to v14.3.0
Assumptions
- The means to generate DNS A records for each service.
- These services require DNS records and will NOT work without it!!!
- Docker Swarm or machine running Docker to run Gitlab
- The ability to run VMs but not required
- Access to a macOS machine or VM but not required
Background
What is Gitlab?
GitLab is a web-based DevOps lifecycle tool that provides a Git-repository manager providing wiki, issue-tracking and continuous integration and deployment pipeline features, using an open-source license, developed by GitLab Inc.
What is a Gitlab runner?
GitLab Runner is an application that works with GitLab CI/CD to run jobs in a pipeline. You can choose to install the GitLab Runner application on infrastructure that you own or manage. You can install GitLab Runner on several different supported operating systems or GitLab Runner can also run inside a Docker container. A more simplified explanation is a Gitlab runner is essentially a tool that executes the instructions defined in .gitlab-ci.yml and sends the results back to Gitlab.
What is CI/CD?

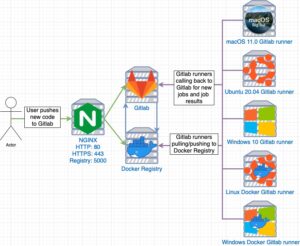
Credit for the creation of this diagram goes to Valentin Despa: Udemy course: GitLab CI: Pipelines, CI/CD and DevOps for Beginners.
A CI/CD pipeline automates the process of delivering code from a developers machine to production. Obviously that statement is an over simplification of the process because the digram above illustrates numerous steps. This section is going to provide a high overview of the process to help you understand the general process needed for this blog post. CI/CD stands for continuous integration and continuous deployment, which as the acronym and the digram above illustrates is two distinct phases. Continuous integration is the process of integrating new code changes, validating the new code changes can still build/compile the application, and ensuring the new code passes a set of tests.
For example, let’s say you have a web application written in GoLang. As a developer you make some changes to the existing application on your local development machine and push the changes to Gitlab. Next, Gitlab will attempt to compile the existing code base with your changes. Assuming the compilation is successful, Gitlab will perform several tests on the newly compiled application to ensure the application is functioning as intended. If the tests are successful, the developer can merge the changes into the MAIN branch.
Now you might be asking what happens if this phase is unsuccessful? Using the example above, let’s say you initialize a variable that is not used. If you’re a GoLang developer you already know this will fail to compile but for this example let’s say the code is pushed to Gitlab. Gitlab will once again attempt to compile the code that contains your changes. However, the compilation will fail and typically the pipeline will stop running on the first occurrence of an error. Gitlab will provide the developer the ability to review the error produced. Until this issue is resolved Gitlab will not allow the new code to merged.
Continuous deployment is the process of again evaluating/testing the newly committed code, pushing the application to QA for further evaluation, and finally upon manual human interaction the code is pushed to production. Pushing to prod (production) means pushing your code to the environment so that your new code can be utilized by users. Again, as the digram above illustrates there is more to this process but hopefully this provided a high overview of the process. For a more in-depth explanation, I highly recommend checking out the following Udemy course: GitLab CI: Pipelines, CI/CD and DevOps for Beginners.
.gitlab-ci.yml stages
There really aren’t any official stages but the ones listed below outline a typical flow you might see:
- Pre-build – A set of actions to perform before building your application with the newly committed code. During this stage you might install the necessary tools, libraries, or dependencies to build your application.
- Build – A set of actions to build/compile your application with the newly committed code
- Test – A set of actions to run against your newly compiled/built application to ensure everything is functioning as intended
- Deploy – A set of actions that will only run when the build and test stages have successful completed their tasks without any errors. Upon completion, this stage will push the newly committed code to appropriate environment.
Network diagram
Generate OpenSSL private key and public cert
git clone https://github.com/CptOfEvilMinions/Gitlab-Automationcd Gitlab-Automationmv conf/tls/tls.conf.example conf/tls/tls.confvim conf/tls/openssl.confand set:- Replace
{{ base_domain }}with your domain- My base_domain is
hackinglab.local
- My base_domain is
- Set the location information under
[ my_req_distinguished_name ]C– Set CoutryST– Set stateL– Set CityO– Enter organization name
- Replace
openssl req -x509 -new -nodes -keyout conf/tls/tls.key -out conf/tls/tls.crt -config conf/tls/tls.conf-
- Generate TLS private key and public certificate
-

Install Gitlab with Docker-compose v2.x
WARNING
The Docker-compose v2.x setup is for development use ONLY. The setup contains hard-coded credentials in configs and environment variables. For a more secure Docker deployment please skip to the next section to use Docker Swarm which implements Docker secrets.
WARNING
-
vim
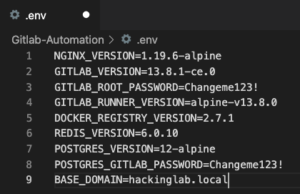
.envand setGITLAB_VERSION– OPTIONAL – Set the version of Gitlab to use – Community edition or Enterprise editionGITLAB_ROOT_PASSWORD– Set the Gitlab root user passwordPOSTGRES_GITLAB_PASSWORD– Set Postgres Gitlab user passwordBASE_DOMAIN– Set this to your domain
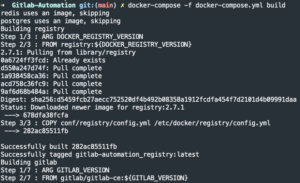
docker-compose -f docker-compose.yml build
docker-compose -f docker-compose.yml up -d
Install Gitlab with Docker-compose v3.x (Swarm)
Create secrets
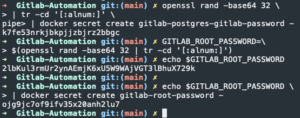
openssl rand -base64 32 | tr -cd '[:alnum:]' | docker secret create gitlab-postgres-gitlab-password -- Create password for Gitlab Postgres password
GITLAB_ROOT_PASSWORD=$(openssl rand -base64 32 | tr -cd '[:alnum:]')- Generate Gitlab root password
echo $GITLAB_ROOT_PASSWORD- Print Gitlab root password – record for later
echo -n $GITLAB_ROOT_PASSWORD | docker secret create gitlab-root-password -- Create Gitlab root password

- Create Gitlab root password
Docker start stack
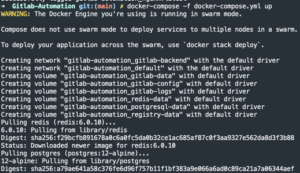
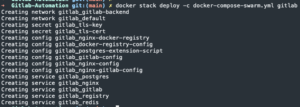
docker stack deploy -c docker-compose-swarm.yml gitlab
docker service logs -f gitlab_nginx- Monitor logs until NGINX prints
/docker-entrypoint.sh: Configuration complete; ready for start up
- Monitor logs until NGINX prints

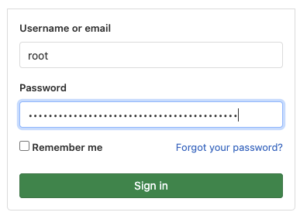
Login into Gitlab WebGUI
- Open web browser to
https://<Docker IP addr>:8443- Enter
rootas username - Enter
<Gitlab root password>for password
- Select “Sign in”
- Enter
Use Docker Registry
Push image to Registry
cd Gitlab-Automation- Add self-signed certificate for the Docker Registry to your certificate store
- MacOS
- Windows
- Linux
- Instructions for macOS
security add-trusted-cert -d -r trustRoot -k ~/Library/Keychains/login.keychain conf/tls/tls.crt- Add Registry certificate to the user’s local keychain
- Enter password
- Restart Docker Desktop on macOS
docker build -f docker/Dockerfile-ubuntu-custom -t ubuntu-custom .docker image ls | grep ubuntu-custom- Grab image ID
docker tag <custom Ubuntu image ID> registry.hackinglab.local:5000/custom-ubuntudocker push registry.hackinglab.local:5000/custom-ubuntu
Pull image from Registry
Since the certificate for the Registry is self-signed Docker will NOT pull the image. The instructions below are how to add the self-signed certificate for the Docker Registry to the OS root cert store.
- SSH into Docker Swarm node
sudo suopenssl s_client -connect registry.<base_domain>:5000 2>/dev/null </dev/null | sed -ne '/-BEGIN CERTIFICATE-/,/-END CERTIFICATE-/p' > /usr/local/share/ca-certificates/ca.crt- Obtain the public certificate from the remote server
update-ca-certificates --fresh- Instruct Ubuntu to add the new cert to the cert root store
systemctl restart dockerdocker pull registry.<base_domain>:5000/custom-ubuntu
Install/Setup Gitlab runner

This section will cover how to setup a Gitlab runner on Windows 10, Windows 10 with Docker, Ubuntu 20.04, Ubuntu 20.04 with Docker, and macOS Big Sur. It should be noted that setting up a Gitlab runner on Docker is the optimal setup. Running a Gitlab runner on a VM will not provide a clean state between CI/CD runs. Meaning that if you have an Ubuntu 20.04 VM and the first CI/CD run installs Java 8 but the second run requires Java 7 you will have to uninstall Java 8 first to avoid dependency conflicts.
However, the other side of this coin is you can have a Gitlab runner with a pre-defined environment. Therefore the runs can assume that the correct Java version is installed and you just need to build and run the code. Docker containers provide the advantage that each container is a blank canvas ready to be crafted to the need of the run.
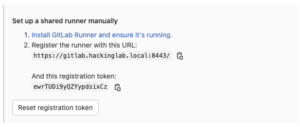
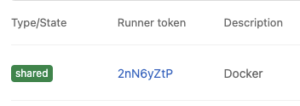
Obtain Gitlab runner register token
- Login in as a Gitlab admin
- Admin area > Overview > Runners
- Copy runners token
- Copy Gitlab runner URL

Install/Setup Gitlab runner on Docker
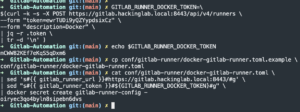
GITLAB_RUNNER_DOCKER_TOKEN=$(curl -k -s -X POST https://gitlab.<base_domain>:8443/api/v4/runners --form "token=<Gitlab runner registration token>" --form "description=Docker" | jq -r .token | tr -d 'n' )- Generate Gitlab runner token
echo $GITLAB_RUNNER_DOCKER_TOKENcp conf/gitlab-runner/docker-gitlab-runner.toml.example conf/gitlab-runner/docker-gitlab-runner.tomlcat conf/gitlab-runner/docker-gitlab-runner.toml | sed 's#{{ gitlab_runner_url }}#https://gitlab.<base_domain>:8443/#g' | sed "s#{{ gitlab_runner_token }}#${GITLAB_RUNNER_DOCKER_TOKEN}#g" | docker secret create gitlab-runner-config -- Create Gitlab runner config containing Gitlab runner token

- Create Gitlab runner config containing Gitlab runner token
docker stack deploy -c docker-compose-swarm-gitlab-runners.yml gitlab-runner

docker service logs -f gitlab-runner_gitlab-runner

- Admin area > Overview > Runners
- Select “Edit” for the runner
- Enter
linux,dockerinto the tags field - Select “Save changes”
- Enter

Install/Setup Gitlab runner on Windows 10
Install GIT
- Log into Windows
- Open Powershell as Administrator
Set-ExecutionPolicy Bypass -Scope Process -Force; [System.Net.ServicePointManager]::SecurityProtocol = [System.Net.ServicePointManager]::SecurityProtocol -bor 3072; iex ((New-Object System.Net.WebClient).DownloadString('https://chocolatey.org/install.ps1'))- Install Chocolately
choco install git- Install GIT
Install/Setup Gitlab runner
- Log into Windows
- Open Powershell as Administrator
mkdir 'C:Program Filesgitlab-runner'- Make a directory for Gitlab
cd 'C:Program Filesgitlab-runner'$ProgressPreference = 'SilentlyContinue'- Download executable without status bar – faster download
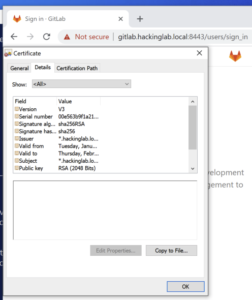
Invoke-WebRequest -Uri https://gitlab-runner-downloads.s3.amazonaws.com/latest/binaries/gitlab-runner-windows-amd64.exe -OutFile gitlab-runner.exe- Download Gitlab runner
- Open Chrome
- Browse to Gitlab homepage
- Select the “Not secure” button next to the address bar then “Certificate”
- Select. “Details” tab
- Select “Copy to file”

- Follow the instructions to export the certificate to the Desktop
- Select “Base-64 encoded X.509 (.CER)” for format
- Move the public certificate to
C:Program Filesgitlab-runner - Return to Powershell terminal
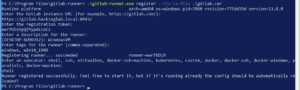
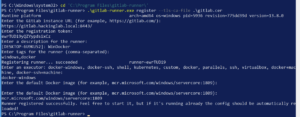
.gitlab-runner.exe register --tls-ca-file .gitlab.cer- Register Gitlab runner
- Enter
https://gitlab.<base_domain>:8443 - Enter
<registration token> - Enter
WindowsVMfor description - Enter
windows, win10_1909for tags - Enter
shellfor executor
.gitlab-runner.exe install- Install Gitlab runner as a service
.gitlab-runner.exe start- Start Gitlab runner service

- Start Gitlab runner service
Install/Setup Gitlab runner on Windows 10 with Docker
Install Hyper-V
- Log into Windows
- Open Powershell as Administrator
Enable-WindowsOptionalFeature -Online -FeatureName Microsoft-Hyper-V -All- Install Hyper-V
- Reboot
Install WSL v2 with Linux kernel
- Log into Windows
- Open Powershell as Administrator
dism.exe /online /enable-feature /featurename:Microsoft-Windows-Subsystem-Linux /all /norestart- Enable the Windows Subsystem for Linux
Enable-WindowsOptionalFeature -Online -FeatureName VirtualMachinePlatform -NoRestart- Enable Virtual Machine feature
cd $ENV:TMP$ProgressPreference = 'SilentlyContinue'Invoke-WebRequest -Uri https://wslstorestorage.blob.core.windows.net/wslblob/wsl_update_x64.msi -OutFile wsl_update_x64.msi- Download the Linux kernel update package
msiexec.exe /i "wsl_update_x64.msi" /quiet /qn /norestart- Install updated Linux kernel
wsl --set-default-version 2- Set WSL 2 as default
Install Docker
- Log into Windows
- Open Powershell as Administrator
cd $ENV:TEMP- Enter user’s temporary directory
$ProgressPreference = 'SilentlyContinue'- Download executable without status bar – faster download
Invoke-WebRequest -Uri https://desktop.docker.com/win/stable/Docker%20Desktop%20Installer.exe -OutFile DockerDesktopInstaller.exe- Download Docker
.DockerDesktopInstaller.exe install --quiet- Install Docker

- Install Docker
- Logout and Sign back in
- Start Docker if has no started on it’s own
& 'C:Program FilesDockerDockerDocker Desktop.exe'

Install and register Gitlab-runner
mkdir 'C:Program Filesgitlab-runner'- Make a directory for Gitlab
cd 'C:Program Filesgitlab-runner'Invoke-WebRequest -Uri https://gitlab-runner-downloads.s3.amazonaws.com/latest/binaries/gitlab-runner-windows-amd64.exe -OutFile gitlab-runner.exe- Download Gitlab runner
- Open Chrome
- Browse to Gitlab homepage
- Select the “Not secure” button next to the address bar then “Certificate”
- Select. “Details” tab
- Select “Copy to file”
- Follow the instructions to export the certificate to the Desktop
- Select “Base-64 encoded X.509 (.CER)” for format
- Move the public certificate to
C:Program Filesgitlab-runner - Return to Powershell terminal
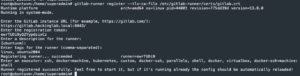
.gitlab-runner.exe register --tls-ca-file .gitlab.cer- Register Gitlab runner
- Enter
https://gitlab.<base_domain>:8443 - Enter
<registration token> - Accept the VM’s hostname as the Gitlab runner’s name
- Enter
windows, dockerfor tags - Enter
docker-windowsfor executor - Accept default Windows image

docker pull mcr.microsoft.com/windows/servercore:1809docker pull gitlab/gitlab-runner-helper: x86_64-775dd39d-servercore1909- Download Windows image
- In the Windows system tray right-click Docker and select “Switch to Windows Containers”
- Select “Switch” on the pop-up
.gitlab-runner.exe install- Install Gitlab runner as a service
.gitlab-runner.exe start- Start Gitlab runner service

- Start Gitlab runner service
Install/Setup Gitlab runner on Ubuntu 20.04
- SSH into Ubuntu
sudo suapt update -y && apt install curl openssl -ycd /tmp && curl -LJO "https://gitlab-runner-downloads.s3.amazonaws.com/latest/deb/gitlab-runner_amd64.deb"- Download Gitlab runner
dpkg -i gitlab-runner_amd64.deb- Install Gitlab runner
mkdir /etc/gitlab-runner/certs- Create a directory to store the Gitlab cert
openssl s_client -connect gitlab.<base_domain>:8443 2>/dev/null </dev/null | sed -ne '/-BEGIN CERTIFICATE-/,/-END CERTIFICATE-/p' > /etc/gitlab-runner/certs/gitlab.crt- Grab a copy of the public cert for Gitlab
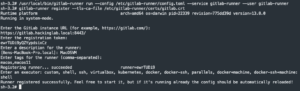
gitlab-runner register --tls-ca-file /etc/gitlab-runner/certs/gitlab.crt- Register Gitlab runner
- Enter
https://gitlab.<base_domain>:8443 - Enter
<registration token> - Enter
ubuntuvm - Enter
linux, ubuntu2004for tags - Enter
shellfor executor
rm -rd /home/gitlab-runner/*- Delete all the dotfiles which are executed on every job run
systemctl restart gitlab-runnersystemctl enable gitlab-runner
Install/Setup Gitlab runner on macOS Big Sur
- Log into macOS
- Open terminal
sudo sucd /tmp && curl https://gitlab-runner-downloads.s3.amazonaws.com/latest/binaries/gitlab-runner-darwin-amd64 --output gitlab-runner-darwin-amd64.bin- Download Gitlab runner
mv gitlab-runner-darwin-amd64.bin /usr/local/bin/gitlab-runnerchmod +x /usr/local/bin/gitlab-runner- Install Gitlab runner
mkdir -p /etc/gitlab-runner/certscd /etc/gitlab-runner/certsopenssl s_client -connect gitlab.<base_domain>:8443 2>/dev/null </dev/null | sed -ne '/-BEGIN CERTIFICATE-/,/-END CERTIFICATE-/p' > /etc/gitlab-runner/certs/gitlab.crt- Grab a copy of the public cert for Gitlab
gitlab-runner register --tls-ca-file /etc/gitlab-runner/certs/gitlab.crt- Register Gitlab runner
- Enter
https://gitlab.<base_domain>:8443 - Enter
<registration token> - Enter
macosvmfor description - Enter
macos, macos11for tags - Enter
shellfor executor
gitlab-runner installgitlab-runner start

Ensure all agents have checked in
- Login in as a Gitlab admin
- Admin area > Overview > Runners

Create Gitlab pipeline
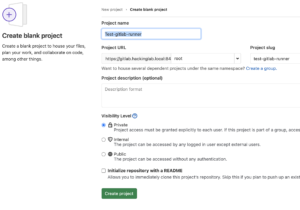
Step 1: Create example repo
- From the Gitlab user homepage
- Select “New Project”
- Select “Create blank project”
- Enter
Test-gitlab-runneras Project name
- Select “Create project”
- Enter
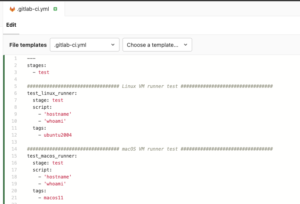
Step 2: Create .gitlab-ci.yml
- Select “Project overview” in the top left
- Select “New file” and select it again
- Enter
.gitlab-ci.ymlas the file name - Open a web browser to https://github.com/CptOfEvilMinions/Gitlab-Automation/blob/main/gitlab-ci-example.yml
- Copy the contents
- Paste the contents into
.gitlab-ci.yml
- Select “Commit” in bottom left
- Select “Commit” again in the bottom left
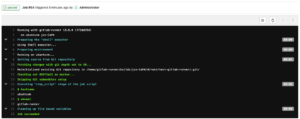
Step 3: Review pipeline jobs
Pipeline jobs
- Go to the Test-gitlab-runner repo
- CI/CD > Pipelines
- Select the latest pipeline run

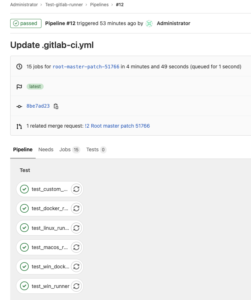
test_linux_runner
test_macos_runner
test_win_runner
test_docker_runner
test_win_docker_runner
test_custom_docker_image_runner
Shoutout
A personal shout out to Valentin Despa’s Gitlab course on Udemy: GitLab CI: Pipelines, CI/CD and DevOps for Beginners. I would highly recommend taking this class to learn more about Gitlab, Gitlab runners, and creating Gitlab CI/CD pipelines in-depth.
Lessons learned
New skills/knowledge
- Learned how to use environment variables in NGINX configs per this StackOverFlow post
- Learned about how to the utility
svto interact with services - How to use Windows Docker containers
- Learned how to setup Gitlab runners
- Learned how to create a Gitlab CI/CD pipeline
- Learned how to push and pull images to the Docker Registry
What You’d Do Differently
- Build our Ansible playbooks for each Gitlab runner
- In an enterprise environment I would implement PKI to ensure all certificates are trusted
References
- Substitute environment variables in NGINX config from docker-compose
- Install GitLab Runner manually on GNU/Linux
- Install Hyper-V on Windows 10
- Powershell – Why is Using Invoke-WebRequest Much Slower Than a Browser Download?
- Silent installation of a MSI package
- How to Install WSL 2 on Windows 10 (Updated)
- Get started: Prep Windows for containers
- Docker Registry HTTP API V2
- Using openssl to get the certificate from a server
- Self-signed certificates or custom Certification Authorities
Вы можете установить GitLab Runner в разных операционных системах, установив систему контроля версий Git и создав учетную запись пользователя на сайте GitLab.
Git – система контроля версий, используемая для –
- Обработка исходного кода истории проектов
- Отслеживание изменений, внесенных в файлы
- Быстрая и эффективная работа с небольшими и большими проектами.
- Сотрудничать с другими разработчиками в разных проектах
GitLab – это основанная на Git платформа, предоставляющая удаленный доступ к репозиториям Git и полезная для цикла разработки программного обеспечения, создавая частные и публичные репозитории для управления кодом.
GitLab поддерживает различные типы операционных систем, таких как Windows, Ubuntu, Debian, CentOS, open SUSE и Raspberry Pi 2. В этой главе мы обсудим, как установить GitLab в операционных системах Windows и Ubuntu.
Установка GitLab на Windows:
Шаг 1 – Сначала создайте папку с именем «GitLab-Runner» в вашей системе. Например, вы можете создать на диске C как C: GitLab-Runner.
Шаг 2 – Теперь скачайте бинарный файл для x86 или amd64 и скопируйте его в созданную вами папку. Переименуйте загруженный бинарный файл в gitlab-runner.exe .
Шаг 3 – Откройте командную строку и перейдите в созданную папку. Теперь введите приведенную ниже команду и нажмите ввод.
C:GitLab-Runner>gitlab-runner.exe register
Шаг 4 – После выполнения вышеупомянутой команды она попросит ввести URL-адрес координатора gitlab-ci.
Please enter the gitlab-ci coordinator URL (e.g. https://gitlab.com/):
https://gitlab.com
Шаг 5 – Введите токен gitlab-ci для бегуна.
Please enter the gitlab-ci token for this runner:
xxxxx
-
Чтобы получить токен, войдите в свою учетную запись GitLab –
Чтобы получить токен, войдите в свою учетную запись GitLab –
-
Теперь перейдите к вашему проекту –
Теперь перейдите к вашему проекту –

-
Нажмите на опцию CI / CD на вкладке Настройки и разверните опцию Настройки бегунов .
Нажмите на опцию CI / CD на вкладке Настройки и разверните опцию Настройки бегунов .
-
В разделе « Настройки бегунов » вы получите токен, как показано на рисунке ниже –
В разделе « Настройки бегунов » вы получите токен, как показано на рисунке ниже –
Шаг 6 – Введите описание gitlab-ci для бегуна.
Please enter the gitlab-ci description for this runner:
[Admin-PC]: Hello GitLab Runner
Шаг 7 – Он попросит ввести теги gitlab-ci для бегуна.
Please enter the gitlab-ci tags for this runner (comma separated):
tag1, tag2
Вы можете изменить эти теги в пользовательском интерфейсе GitLab позже.
Шаг 8 – Вы можете привязать Runner к текущему проекту, установив для него значение true.
Whether to lock the Runner to current project [true/false]:
[true]: true
После выполнения описанных выше шагов вы получите сообщение об успешной регистрации: «Регистрация участника … выполнена успешно».
Шаг 9 – Теперь введите Runner executor для построения проекта.
Please enter the executor: parallels, shell, docker+machine, kubernetes, docker-
ssh+machine, docker, docker-ssh, ssh, virtualbox:
docker
Мы использовали селектор как «докер», который создает среду сборки и легко управляет зависимостями для разработки проекта.
Шаг 10 – Затем он попросит установить изображение по умолчанию для селектора докеров.
Please enter the default Docker image (e.g. ruby:2.1):
alpine:latest
Шаг 11 – После выполнения вышеуказанных шагов на экране появится сообщение «Бегун успешно зарегистрирован». На изображении ниже будет описан рабочий процесс вышеуказанных команд –
Шаг 12 – Теперь перейдите к своему проекту, нажмите на опцию CI / CD в разделе « Настройки », и вы увидите активированных бегунов для проекта.

Вы можете увидеть конфигурацию GitLab Runner в файле config.toml в папке GitLab-Runner, как показано ниже –
concurrent = 1
check_interval = 0
[[runners]]
  name = "Hello GitLab Runner"
  url = "https://gitlab.com"
  token = "40ceed29eec231fa9e306629cae4d7"
  executor = "docker"
  [runners.docker]
      tls_verify = false
      image = "alpine:latest"
      privileged = false
      disable_cache = false
      volumes = ["/cache"]
      shm_size = 0
  [runners.cache]
Установка GitLab на Ubuntu
GitLab может быть установлен в системе Ubuntu с помощью пакета Omnibus , который предоставляет различные сервисы для запуска GitLab. Пакет Omnibus предоставляет необходимые компоненты GitLab, устанавливает конфигурации и метаданные проекта, которые можно использовать в системе пользователя.
Следующие шаги описывают установку GitLab в Ubuntu –
Шаг 1 – Сначала войдите на ваш сервер GitLab с помощью SSH (Secure Shell).
Шаг 2 – Затем загрузите пакет Omnibus –
wget https://downloads-packages.s3.amazonaws.com/ubuntu-14.04/gitlab-ce_7.10.4~omnibus-1_amd64.deb

Шаг 3 – Установите постфикс –
sudo apt-get install postfix
Postfix – это агент передачи почты с открытым исходным кодом, используемый для доставки уведомлений по электронной почте.
Шаг 4 – При установке Postfix, он спросит тип установки; затем выберите вариант Интернет-сайта . Далее он покажет конфигурацию Postfix вместе с системным почтовым именем, как показано на рисунке –
Шаг 5 – Установите dpkg (менеджер пакетов для системы Debian) для управления установленными пакетами –
sudo dpkg -i gitlab-ce_7.10.4~omnibus-1_amd64.deb

Шаг 6 – Чтобы изменения вступили в силу, вам нужно перенастроить GitLab с помощью следующей команды:
sudo gitlab-ctl reconfigure
Шаг 7 – Проверьте состояние сервисов GitLab с помощью команды ниже –
sudo gitlab-ctl status
Если вы хотите установить GitLab из исходного кода, установите некоторые зависимости на сервере и вам необходимо настроить базу данных с помощью PostgreSQL. Это описано в главе Настройка среды . Вы можете установить координатор для создания веб-интерфейса и управления экземплярами сборки. Для получения дополнительной информации вы можете проверить главу Установка координатора .
По натуре своей многие разработчики слишком ленивые не любят делать одно и то же действие много раз. Нам проще научить компьютер, чтобы он делал монотонные действия за нас.
Как только кто-либо из нашей команды вносит изменения в код (читай «мерджит feature-ветку в develop»), наш билд-сервер:
- Собирает исходный код и установщик приложения
- проставляет номер сборки, каждый раз увеличивая последнюю цифру. Например, текущая версия нашего ПО 3.3.0.202 – часть 3.3.0 когда-то ввёл разработчик (привет, SemVer), а «202» проставляется в процессе сборки.
- В процессе анализирует качество кода (с использованием SonarQube) – и отправляет отчёт во внутренний SonarQube,
- Сразу после сборки запускает автотесты (xUnit) и анализирует покрытие тестами (OpenCover),
Также, в зависимости от ветки, в которую были внесены изменения, могут быть выполнены:
- отправка сборки (вместе с changelog-ом) в один или несколько телеграм-каналов (иногда удобнее брать сборки оттуда).
- публикация файлов в систему автообновления ПО.
Под катом о том, как мы научили Gitlab CI делать за нас бОльшую часть этой муторной работы.
Оглавление
- Устанавливаем и регистрируем Gitlab Runner.
- Что нужно знать про .gitlab-ci.yml и переменные сборки.
- Активируем режим Developer PowerShell for VS.
- Используем CI для проставления версии во все сборки решения.
- Добавляем отправку данных в SonarQube.
- «Причёсываем» автотесты xUnit + добавляем вычисление покрытия тестами через OpenCover.
- Послесловие.
Перед началом
Чтобы быть уверенными, что написанное ниже работает, мы взяли на github небольшой проект, написанный на WPF и имеющий unit-тесты, и воспроизвели на нём описанные в статье шаги. Самые нетерпеливые могут сразу зайти в созданный на сайте gitlab.com репозиторий и посмотреть, как это выглядит.
Устанавливаем и регистрируем Gitlab Runner
Для того чтобы Gitlab CI мог что-либо собрать, сначала установите и настройте Gitlab Runner на машине, на которой будет осуществляться сборка. В случае проекта на .Net Framework это будет машина с ОС Windows.
Чтобы настроить Gitlab Runner, выполните следующие шаги:
- Установите Git для Windows с сайта git.
- Установите Visual Studio с сайта Microsoft. Мы поставили себе Build Tools для Visual Studio 2019. Чтобы скачать именно его, разверните список Инструменты для Visual Studio 2019.
- Создайте папку C:GitLab-Runner и сохраните в неё программу gitlab runner. Скачать её можно со страницы [документации Gitlab] (https://docs.gitlab.com/runner/install/windows.html) — ссылки скрыты прямо в тексте: «Download the binary for x86 or amd64».
- Запустите cmd или powershell в режиме администратора, перейдите в папку C:GitLab-Runner и запустите скачанный файл с параметром install (Gitlab runner установится как системная служба).
.gitlab-runner.exe install - Посмотрите токен для регистрации Runner-а. В зависимости от того, где будет доступен ваш Runner:
- только в одном проекте — смотрите токен в меню проекта Settings > CI/CD в разделе Runners,
- в группе проектов — смотрите токен в меню группы Settings > CI/CD в разделе Runners,
- для всех проектов Gitlab-а — смотрите токен в секции администрирования, меню Overview > Runners.
- Выполните регистрацию Runner-а, с помощью команды
.gitlab-runner.exe register
Далее надо ввести ответы на вопросы мастера регистрации Runner-а:
- coordinator URL — http или https адрес вашего сервера gitlab;
- gitlab-ci token — введите токен, полученный на предыдущем шаге;
- gitlab-ci description — описание Runner-а, которое будет показываться в интерфейсе Gitlab-а;
- gitlab-ci tags — через запятую введите тэги для Runner-а. Если вы не знакомы с этим механизмом, оставьте поле пустым — отредактировать его можно позднее через интерфейс самого gitlab-а. Тэги можно использовать для того, чтобы определённые задачи выполнялись на определённых Runner-ах (например, чтобы настроить сборку ПО на Runner-е, развёрнутом на копьютере ОС Windows, а подготовку документации на Runner-е с ОС Linux);
- enter the executor — ответьте
shell. На этом шаге указывается оболочка, в которой будут выполняться команды; при указании значения shell под windows выбирается оболочка powershell, а последующие скрипты написаны именно для неё.
Что нужно знать про .gitlab-ci.yml и переменные сборки
В процессе своей работы Gitlab CI берёт инструкции о том, что делать в процессе сборки того или иного репозитория из файла .gitlab-ci.yml, который следует создать в корне репозитория.
Вбив в поиске содержимое .gitlab-ci.yml для сборки приложения .NET Framework можно найти несколько шаблонов: 1, 2. Выглядят они примерно так:
variables:
  # Максимальное количество параллельно собираемых проектов при сборке решения; зависит от количества ядер ПК, выбранного для сборки
  MSBUILD_CONCURRENCY: 4
  # Тут куча путей до утилит, которые просто обязаны лежать там, где ожидается
  NUGET_PATH: 'C:ToolsNugetnuget.exe'
  MSBUILD_PATH: 'C:Program Files (x86)Microsoft Visual Studio2017BuildToolsMSBuild15.0Binmsbuild.exe'
  XUNIT_PATH: 'C:Toolsxunit.runner.console.2.3.1xunit.console.exe'
  TESTS_OUTPUT_FOLDER_PATH: '.testsCiCdExample.TestsbinRelease'

# Тут указываются стадии сборки. Указывайте любые названия которые вам нравятся, но по умолчанию используют три стадии: build, test и deploy.
# Стадии выполняются именно в такой последовательности.
stages:
  - build
  - test

# Далее описываются задачи (job-ы)

build_job:
  stage: build # указание, что задача принадлежит этапу build
  # tags: windows # если тут указать тэг, задача будет выполняться только на Runner-е с указанным тэгом
  only: # для каких сущностей требуется выполнять задачу
    - branches
  script: # код шага
    - '& "$env:NUGET_PATH" restore'
    - '& "$env:MSBUILD_PATH" /p:Configuration=Release /m:$env:MSBUILD_CONCURRENCY /nr:false /clp:ErrorsOnly' # сборка; ключ clp:ErrorsOnlyоставляет только вывод ошибок; ключ nr:false завершает инстансы msbuild
  artifacts: # где по завершении задачи будут результаты, которые надо сохранить в gitlab (т.н. артефакты) и которые можно будет передать другим задачам по цепочке
    expire_in: 2 days # сколько хранить артефакты
    paths: # список путей, по которым находятся файлы для сохранения
      - '$env:TESTS_OUTPUT_FOLDER_PATH'

test_job:
  stage: test
  only:
    - branches
  script:
    - '& "$env:XUNIT_PATH" "$env:TESTS_OUTPUT_FOLDER_PATHCiCdExample.Tests.dll"'
  dependencies: # указание, что для запуска этой задачи требуется успешно завершенная задача build_job
    - build_job
И последнее: если нам требуется передавать в скрипт значение параметра, который мы не хотим хранить в самом скрипте (например, пароль для подключения куда-либо), мы можем использовать для этого объявление параметров в gitlab. Для этого зайдите в проекте (или в группе проекта) в Settings > CI/CD и найдите раздел Variables. Прописав в нём параметр с именем (key) SAMPLE_PARAMETER, вы сможете получить его значение в в скрипте .gitlab-ci.yml через обращение $env:SAMPLE_PARAMETER.
Также в этом разделе можно настроить передачу введенных параметров только при сборке защищённых веток (галочка Protected) и/или скрытие значения параметра из логов (галочка Masked).
Подробнее о параметрах окружения сборки смотрите в документации к Gitlab CI.
Активируем режим Developer PowerShell for VS
Скрипт, приведённый выше, уже можно использовать для сборки и вызова тестов. Правда, присутствует НО: крайне неудобно прописывать абсолютные пути к разным установкам Visual Studio. К примеру, если на одной билд-машине стоит Visual Studio 2017 BuildTools, а на другой Visual Studio Professional 2019, то такой скрипт будет работать только для одной из двух машин.
К счастью, с версии Visual Studio 2017 появился способ поиска всех инсталляций Visual Studio на компьютере. Для этого существует утилита vswhere, путь к которой не привязан ни к версии Visual Studio, ни к её редакции. А в Visual Studio 2019 (в версии 16.1 или более новой) есть библиотека, которая умеет «трансформировать» консоль Powershell в режим Developer Powershell, в котором уже прописаны пути к утилитам из поставки VS.
Как применить
Дописываем переменную к секции Variables:
variables:
  VSWHERE_PATH: '%ProgramFiles(x86)%Microsoft Visual StudioInstallervswhere.exe'
Затем создаём новую секцию before_msbuild якорем enter_vsdevshell и следующим текстом:
.before_msbuild: &enter_vsdevshell
  before_script:
    - '$vsWherePath = [System.Environment]::ExpandEnvironmentVariables($env:VSWHERE_PATH)'
    - '& $vsWherePath -latest -format value -property installationPath -products Microsoft.VisualStudio.Product.BuildTools | Tee-Object -Variable visualStudioPath'
    - 'Join-Path "$visualStudioPath" "Common7ToolsMicrosoft.VisualStudio.DevShell.dll" | Import-Module'
    - 'Enter-VsDevShell -VsInstallPath:"$visualStudioPath" -SkipAutomaticLocation'
И всюду, где нам надо использовать утилиты Visual Studio, добавляем этот якорь. После этого задача сборки начинает выглядеть намного более опрятно:
build_job:
  <<: *enter_vsdevshell
  stage: build
  only:
    - branches
  script:
    - 'msbuild /t:restore /m:$env:MSBUILD_CONCURRENCY /nr:false /clp:ErrorsOnly'
    - 'msbuild /p:Configuration=Release /m:$env:MSBUILD_CONCURRENCY /nr:false /clp:ErrorsOnly'
  artifacts:
    expire_in: 2 days
    paths:
      - '$env:TESTS_OUTPUT_FOLDER_PATH'
Подробно о том, что написано в .before_msbuild
- Утилита vswhere.exe умеет находить и выдавать список найденных инсталляций Visual Studio. Расположен она всегда по одному и тому же пути (этот путь записан в переменной VSWHERE_PATH). Поскольку в переменной фигурирует подстановка
%programfiles%, её требуется раскрыть до пути к этой папке. Такое раскрытие проще всего сделать через статический метод .NET System.Environment.ExpandEnvironmentVariables.
Результат: мы имеем путь к vswhere.
- Вызовом vswhere получим путь к папке с установленной Visual Studio.
Все параметры утилиты можно посмотреть, если запуститьvswhere.exeс параметром-help, в статье же только перечислю использованные:- -latest (искать самые свежие установки),
- -property installationPath (вывести параметр пути установки),
- -format value (при печати параметра вывести только значение параметра, без его имени),
- -products <список искомых инсталляций Visual Studio, пробел считается разделителем элементов списка> (указание искомых редакций Visual Studio). Например, при запуске с параметром
-products Microsoft.VisualStudio.Product.Community Microsoft.VisualStudio.Product.BuildToolsутилита попробует найти Visual Studio редакций Community или BuildTools. Подробнее об идентификаторах продуктов смотрите по ссылке https://aka.ms/vs/workloads.
Результат: в переменную $visualStudioPath записан путь к Visual Studio или пустая строка, если инсталляций Visual Studio не найдено (обработку этой ситуации мы ещё не добавили).
- Команда Import-Module загружает библиотеку Microsoft.VisualStudio.DevShell.dll, в которой прописаны командлеты трансформации консоли Powershell в Developer-консоль. А командлет Join-Path формирует путь к этой библиотеке относительно пути установки Visual Studio.
На этом шаге нам прилетит ошибка, если библиотека Microsoft.VisualStudio.DevShell.dll отсутствует или путь к установке Visual Studio нужной редакции не был найден — Import-Module сообщит, что не может загрузить библиотеку.
Результат: загружен модуль Powershell с командлетом трансформации.
- Запускаем «переделку» консоли в Developer Powershell. Чтобы корректно прописать пути к утилитам, командлету требуется путь к установленной Visual Studio (параметр
-VsInstallPath). А указаниеSkipAutomaticLocationтребует от командлета не менять текущее расположение (без этого параметра путь меняется на<домашнаяя папка пользователя>sourcerepos).
Результат: мы получили полноценную консоль Developer Powershell с прописанными путями к msbuild и многим другим утилитам, которые можно использовать при сборке.
Используем CI для проставления версии во все сборки решения
Раньше мы использовали t4 шаблоны для проставления версий: номер версии собиралась из содержимого файла в формате <major>.<minor>.<revision>, далее к ней добавлялся номер сборки из Gitlab CI и он передавался в tt-шаблон, добавляющий в решение везде, где требуется, номер версии. Однако некоторое время назад был найден более оптимальный способ — использование команд git tag и git describe.
Команда git tag устанавливает коммиту метку (тэг). Отметить таким образом можно любой коммит в любой момент времени. В отличие от веток, метка не меняется. То есть если после помеченного коммита вы добавите ещё один, метка останется на помеченном коммите. Если попробуете переписать отмеченный коммит командами git rebase или git commit —amend, метка также продолжит указывать на исходный коммит, а не на изменённый. Подробнее о метках смотрите в git book.
Команда git describe, к сожалению, в русскоязычном gitbook не описана. Но работает она примерно так: ищет ближайшего помеченного родителя текущего коммита. Если такого коммита нет — команда возвращает ошибку fatal: No tags can describe '<тут хэш коммита>'. А вот если помеченный коммит нашёлся — тогда команда возвращает строку, в которой участвует найденная метка, а также количество коммитов между помеченным и текущим.
На заметку: чтобы данная команда работала корректно во всех случаях, автор gitflow даже чуть-чуть поменял скрипты finish hotfix и finish release. Если кому интересно посмотреть обсуждение с автором gitflow, а также увидеть что изменилось (картинка с актуальной схемой в последнем сообщении в треде).
Кстати, по этой же причине если вы используете gitflow, после вливания feature-ветки в develop требуется удалить влитую локальную ветку, после чего пересоздать её от свежего develop:

(обратите внимание на историю git в левой части картинки: из-за отсутствия пути из текущего коммита до коммита с меткой 1.0.5, команда git describe выдаст неверный ответ)
Но вернёмся к автопроставлению версии. В нашем репозитории царит gitflow (точнее его rebase-версия), метки расставляются в ветке master и мы не забываем пересоздавать feature-ветки от develop, а также merge-ить master в develop после каждого релиза или хотфикса.
Тогда получить версию для любого коммита и сразу передать её в msbuild можно добавив всего пару строк к задаче сборки:
build_job:
  <<: *enter_vsdevshell
  stage: build
  only:
    - branches
  script:
    - 'msbuild /t:restore /m:$env:MSBUILD_CONCURRENCY /nr:false /clp:ErrorsOnly'
    - '$versionGroup = git describe --long | Select-String -Pattern "(?<major>[0-9]+).(?<minor>[0-9]*).(?<patch>[0-9]*)-(?<commit>[0-9]+)-g[0-9a-f]+" | Select-Object -First 1'
    - '[int]$major, [int]$minor, [int]$patch, [int]$commit = $versionGroup.Matches[0].Groups["major", "minor", "patch", "commit"].Value'
    - '[string]$version = "$major.$minor.$patch.$commit"'
    - 'msbuild /p:Configuration=Release /p:AssemblyVersionNumber=$version /m:$env:MSBUILD_CONCURRENCY /nr:false /clp:ErrorsOnly'
  artifacts:
    expire_in: 2 days
    paths:
      - '$env:TESTS_OUTPUT_FOLDER_PATH'
Как это работает:
- Мы проставляем метки в формате
<major>.<minor>.<revision>. - Тогда
git describe --longвозвращает нам строку, описывающую версию в формате<major>.<minor>.<revision>-<количество новых коммитов>-g<хэш текущего коммита>. - Парсим полученную строку через регулярные выражения, выделяя нужные нам части — и записывем части в
$versionGroup. - Преобразовываем четыре найденные подстроки в 4 числа и пишем их в переменные
$major,$minor,$patch,$commit, после чего собираем из них строку уже в нужном нам формате. - Передаём указанную строку в msbuild чтобы он сам проставил версию файлов при сборке.
Обратите внимание: если вы, согласно gitflow, будете отмечать (тэгировать) ветку master после вливания в неё release или hofix, будьте внимательны: до простановки метки автосборка будет вестись относительно последней существующей ветки. Например, сейчас опубликована версия 3.4, а вы создаёте release-ветку для выпуска версии 3.5. Так вот: всё время существования этой ветки, а также после её вливания в master, но до простановки тэга, автосборка будет проставлять версию 3.4.
Добавляем отправку данных в SonarQube
SonarQube — это мощный инструмент контроля качества кода.
SonarQube имеет бесплатную Community-версию, которая способна проводить полный анализ. Правда, только одной ветки. Чтобы настроить её на контроль качества ветки разработки (develop), требуется выполнить следующие шаги (разумеется, помимо установки и развёртывания сервера SonarQube):
- Создайте в SonarQube новый проект, после чего запомните его ключ.
- Скачайте SonarScanner for MSBuild (с сайта sonarqube.org)[https://docs.sonarqube.org/latest/analysis/scan/sonarscanner-for-msbuild/] — мы используем версию .NET Framework 4.6+.
- Распакуйте содержимое архива в папку. Например, в
C:ToolsSonarScanner.
На заметку: эту утилиту также можно скачать на сборочную машину через NuGet, но тогда надо будет чуть по-иному указывать её путь. - Зайдите в параметры CI/CD в свойствах проекта Gitlab и добавьте следующие параметры:
- SONARQUBE_PROJECT_KEY — ключ проекта,
- SONARQUBE_AUTH_TOKEN — токен авторизации.
Прописывать параметр ключа проекта необходимо для каждого проекта отдельно (ведь у каждого проекта свой уникальный ключ). А параметр токена авторизации желательно скрыть (отметить как Masked) чтобы он не был доступен всем, кто имете доступ к репозиторию или логам сборки.
- Допишите переменные к секции Variables:
variables: SONARSCANNER_MSBUILD_PATH: 'C:ToolsSonarScannerSonarScanner.MSBuild.exe' SONARQUBE_HOST_URL: 'url вашего сервера SonarQube' - Допишите в задачу тестирования ветки разработки (test_job) команды для запуска анализа кода и уберите зависимость от задачи build_job:
    test_job:
      stage: test
      only:
        - /^develop$/
      <<: *enter_vsdevshell
      script:
        - '$versionGroup = git describe --long | Select-String -Pattern "(?<major>[0-9]+).(?<minor>[0-9]*).(?<patch>[0-9]*)-(?<commit>[0-9]+)-g[0-9a-f]+" | Select-Object -First 1'
        - '[int]$major, [int]$minor, [int]$patch, [int]$commit = $versionGroup.Matches[0].Groups["major", "minor", "patch", "commit"].Value'
        - '[string]$version = "$major.$minor.$patch.$commit"'
        - '& "$env:SONARSCANNER_MSBUILD_PATH" begin /key:$env:SONARQUBE_PROJECT_KEY /d:sonar.host.url=$env:SONARQUBE_HOST_URL /d:sonar.login=$env:SONARQUBE_AUTH_TOKEN /d:sonar.gitlab.project_id=$CI_PROJECT_PATH /d:sonar.gitlab.ref_name=develop /v:$version /d:sonar.dotnet.excludeGeneratedCode=true'
        - 'msbuild /t:rebuild /m:$env:MSBUILD_CONCURRENCY /nr:false /clp:ErrorsOnly'
        - '& "$env:SONARSCANNER_MSBUILD_PATH" end /d:sonar.login=$env:SONARQUBE_AUTH_TOKEN'
        - '& "$env:XUNIT_PATH" "$env:TESTS_OUTPUT_FOLDER_PATHCiCdExample.Tests.dll"'
Теперь при каждой сборке ветки develop в SonarQube будет отправляться подробный анализ нашего кода.
На заметку: вообще команда msbuild /t:rebuild полностью пересобирает решение. Вероятно, в большинстве проектов анализ можно было бы встроить прямо в стадию сборки. Но сейчас у нас анализ в отдельной задаче.
Пара слов об использованных параметрах:
- key — ключ проекта на сервере SonarQube,
- v — собираемая версия. Отлично комбинируется с предыдущим шагом автопроставления версии,
- sonar.gitlab.project_id — ID проекта на сервере Gitlab,
- sonar.gitlab.ref_name — название ветки, которое получает сервер SonarQube при передаче результатов анализа,
- sonar.dotnet.excludeGeneratedCode — не включать в анализ объекты, отмеченные атрибутом System.CodeDom.Compiler.GeneratedCode (чтобы не оценивать качество автосгенерированного кода).
«Причёсываем» автотесты xUnit + добавляем вычисление покрытия тестами через OpenCover
Со сборкой более-менее разобрались — теперь приступаем к тестам. Доработаем код прогона тестов, чтобы он:
- сам находил библиотеки с тестами,
- прогонял их пачкой через xUnit,
- вычислял тестовое покрытие через OpenConver,
- отправлял результаты покрытия тестами в SonarQube.
На заметку: обычно в паре с OpenCover используют ReportGenerator, но при наличии SonarQube мы с тем же успехом можем смотреть результаты через его интерфейс.
Для настройки выполним следующие шаги:
- Скачайте OpenCover в виде zip-файла с сайта github.
- Распакуйте содержимое архива в папку. Например, в
C:ToolsOpenCover.
На заметку: эту утилиту также можно скачать на сборочную машину через NuGet, но тогда надо будет чуть по-иному указывать её путь. - Допишите переменные к секции Variables:
variables: OBJECTS_TO_TEST_REGEX: '^Rt[^n]*.(dll|exe)$' OPENCOVER_PATH: 'C:Toolsopencover-4.7.922xunit.console.exe' OPENCOVER_FILTER: '+[Rt.*]* -[*UnitTests]* -[*AssemblyInfo]*' OPENCOVER_REPORT_FILE_PATH: '.cover.xml' - Модифицируйте задачу тестирования ветки разработки (test_job), чтобы она включала и команды вызова OpenCover:
    test_job:
      stage: test
      only:
        - /^develop$/
      <<: *enter_vsdevshell
      script:
        - '$versionGroup = git describe --long | Select-String -Pattern "(?<major>[0-9]+).(?<minor>[0-9]*).(?<patch>[0-9]*)-(?<commit>[0-9]+)-g[0-9a-f]+" | Select-Object -First 1'
        - '[int]$major, [int]$minor, [int]$patch, [int]$commit = $versionGroup.Matches[0].Groups["major", "minor", "patch", "commit"].Value'
        - '[string]$version = "$major.$minor.$patch.$commit"'
        - '& "$env:SONARSCANNER_MSBUILD_PATH" begin /key:$env:SONARQUBE_PROJECT_KEY /d:sonar.host.url=$env:SONARQUBE_HOST_URL /d:sonar.login=$env:SONARQUBE_AUTH_TOKEN /d:sonar.gitlab.project_id=$CI_PROJECT_PATH /d:sonar.gitlab.ref_name=develop /v:$version /d:sonar.cs.opencover.reportsPaths="$env:OPENCOVER_REPORT_FILE_PATH" /d:sonar.dotnet.excludeGeneratedCode=true'
        - 'msbuild /t:rebuild /m:$env:MSBUILD_CONCURRENCY /nr:false /clp:ErrorsOnly'
        - '$dllsToRunUnitTesting = @(Get-ChildItem "$env:TESTS_OUTPUT_FOLDER_PATH" -Recurse) | Where-Object {$_.Name -match $env:OBJECTS_TO_TEST_REGEX} | ForEach-Object { """""$_""""" } | Join-String -Separator " "'
        - '& "$env:OPENCOVER_PATH" -register -target:"$env:XUNIT_PATH" -targetargs:"$dllsToRunUnitTesting -noshadow" -filter:"$env:OPENCOVER_FILTER" -output:"$env:OPENCOVER_REPORT_FILE_PATH" | Write-Host'
        - 'if ($?) {'
        - '[xml]$coverXml = Get-Content "$env:OPENCOVER_REPORT_FILE_PATH"'
        - '$sequenceCoverage = $coverXml.CoverageSession.Summary.sequenceCoverage'
        - '$branchCoverage = $coverXml.CoverageSession.Summary.branchCoverage'
        - 'Write-Host "Total Sequence Coverage <!<$sequenceCoverage>!>"'
        - 'Write-Host "Total Branch Coverage [![$branchCoverage]!]"'
        - '} else {'
        - 'Write-Host "One or more tests failed!"'
        - 'Throw'
        - '}'
        - '& "$env:SONARSCANNER_MSBUILD_PATH" end /d:sonar.login=$env:SONARQUBE_AUTH_TOKEN'
Обратите внимание: в begin-команде запуска sonar scanner-а появился дополнительный параметр —
/d:sonar.cs.opencover.reportsPaths.(необязательный пункт) Ненадолго возвращаемся в Gitlab, заходим в меню проекта Settings > CI/CD и находим на странице настроек параметр
Test coverage parsing. Указываем в нём регулярное выражение, которое позволит Gitlab-у также получать информацию о покрытии тестами приложения:- если хочется видеть значение покрытия тестов по строкам кода (его ешё называют Sequence Coverage или Statement Coverage), указываем выражение
<!<([^>]+)>!>, - если хочется видеть значение покрытия тестов по веткам условных операторов (его называют Decision Coverage или Branch Coverage), указываем выражение
[![([^>]+)]!].
- если хочется видеть значение покрытия тестов по строкам кода (его ешё называют Sequence Coverage или Statement Coverage), указываем выражение
Только зарегистрированные пользователи могут участвовать в опросе. Войдите, пожалуйста.
Какие примеры использования автосборки/автопубликации вам интересны?
10%
Публикация артефактов сборки: на сайт, в телеграм-канал
1
30%
Создание и сборка инсталлера
3
20%
Оповещение об этапах сборки и ошибках: в телеграм, в слак, по почте
2
90%
Автосборка и тестирование в .NET 5/.NET Core
9
10%
Другое, напишу в комментариях
1
Проголосовали 10 пользователей.
Воздержались 2 пользователя.