Although IIS is included in every installation of Windows 10, it’s not turned on by default. Here’s a way to install IIS on Windows 10.
-
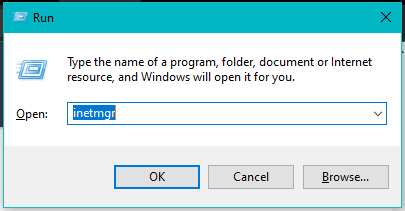
Right-click on the Windows button on the bottom-left corner and select Run

-
In the Run dialog box, type appwiz.cpl and press ENTER.

-
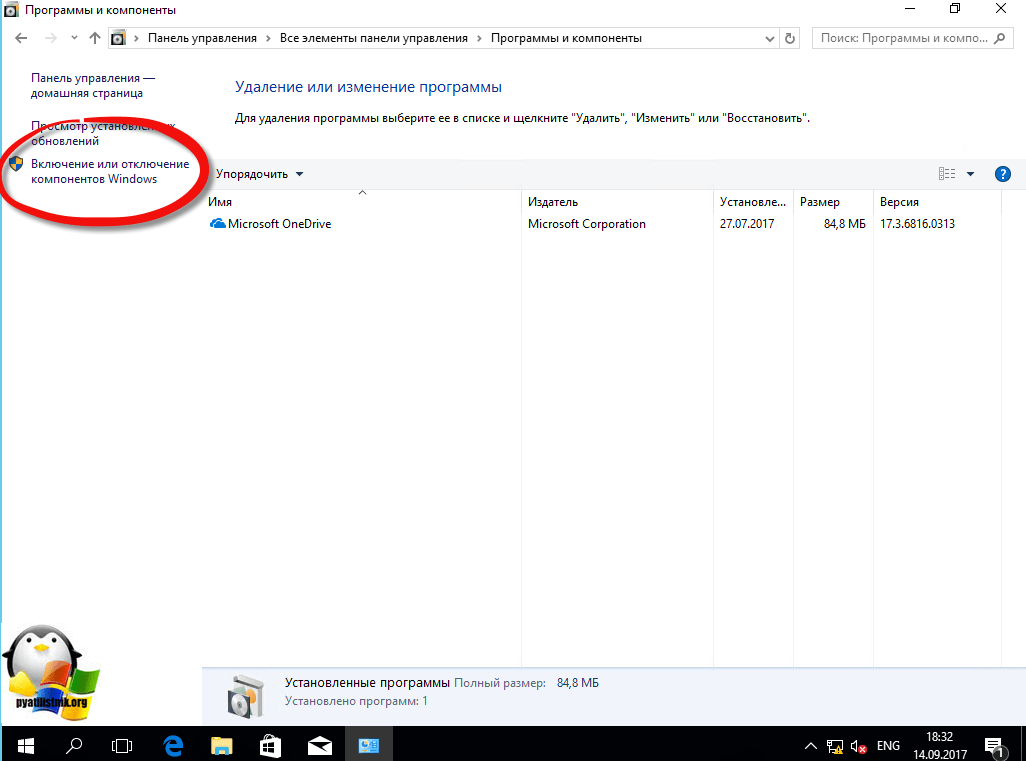
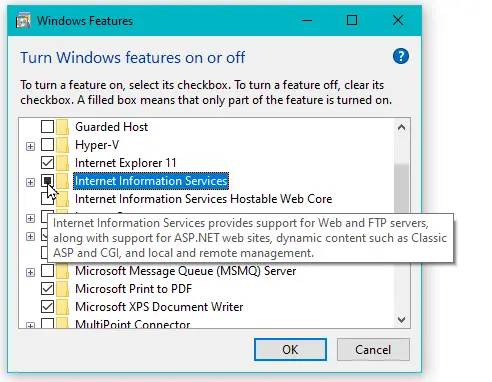
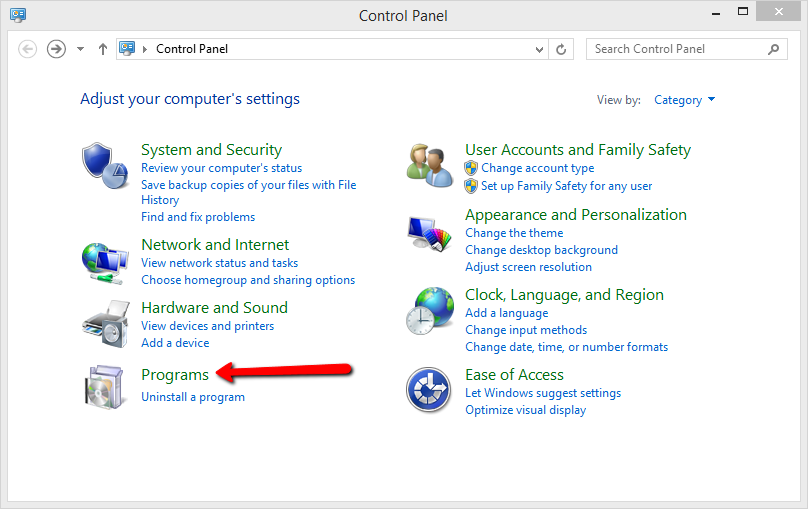
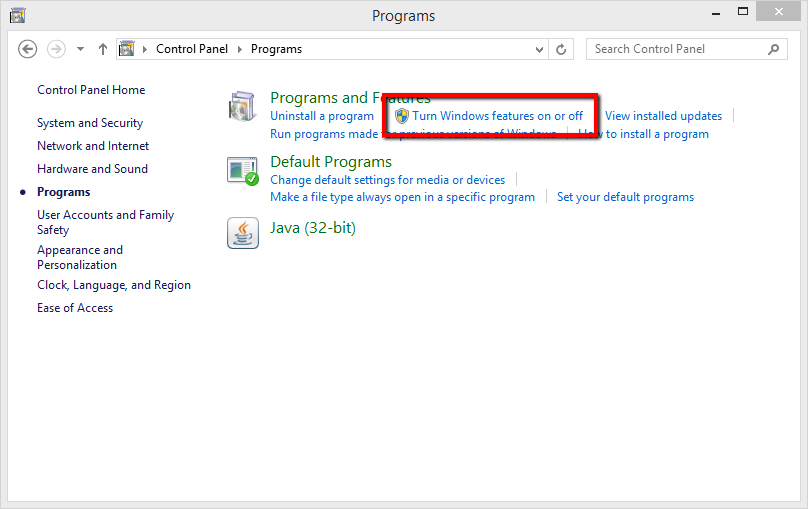
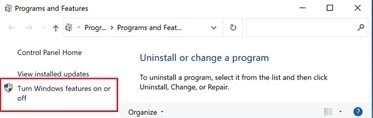
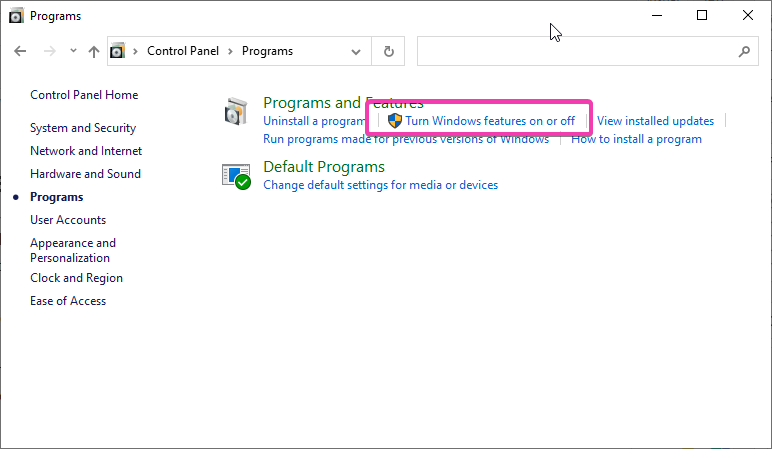
As soon as a new window called Programs and Features is opened, click on the link Turn Windows features on or off.

-
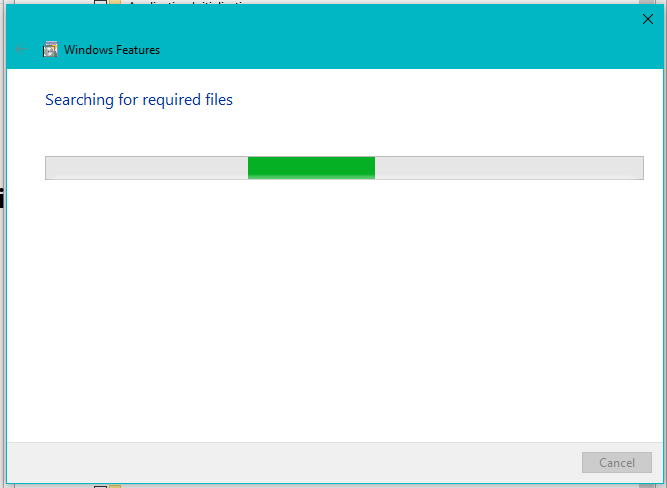
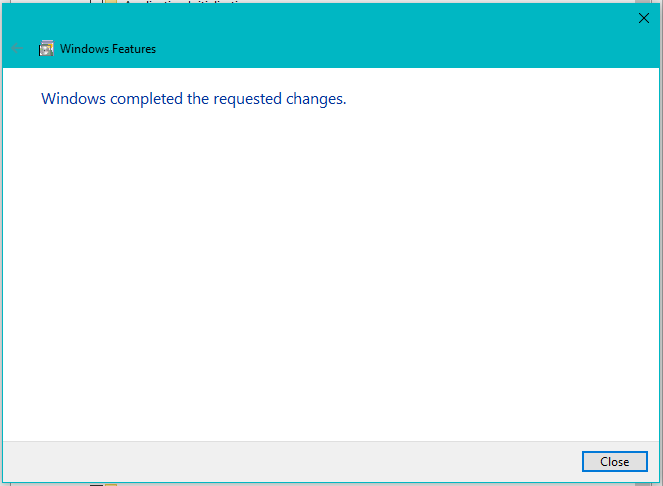
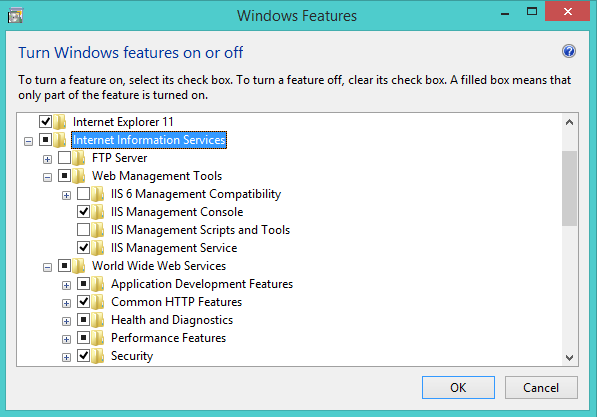
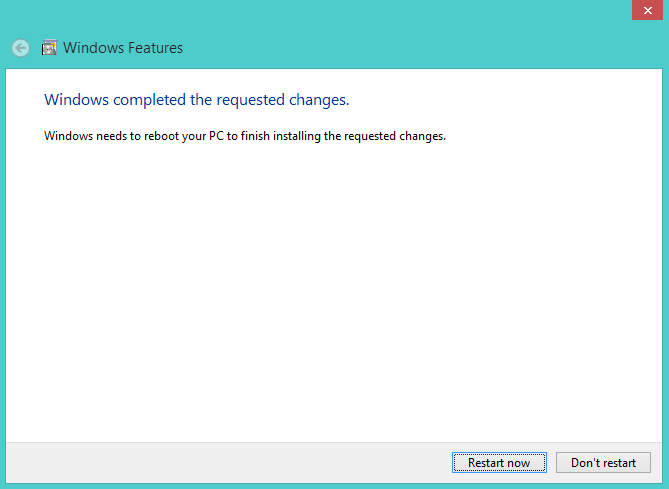
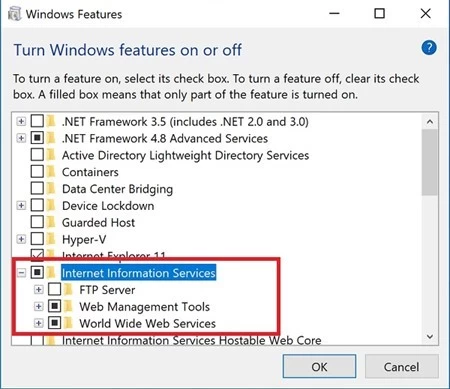
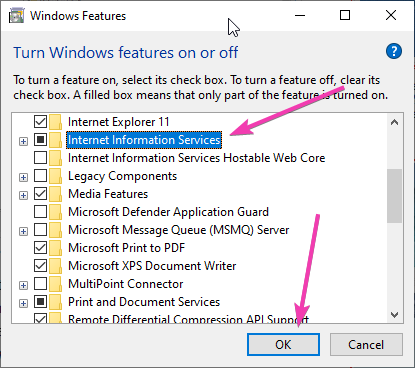
Click on the Internet Information Services checkbox. By default it will install all you need to host a website. However you might want to check some other components that you might need as well. Once done, click OK and Close when it says “Windows completed the requested changes.”

-
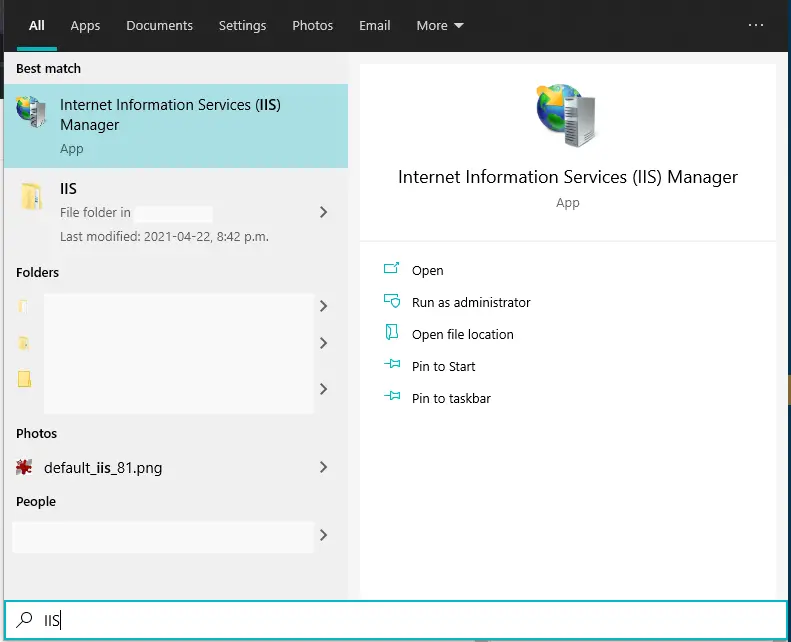
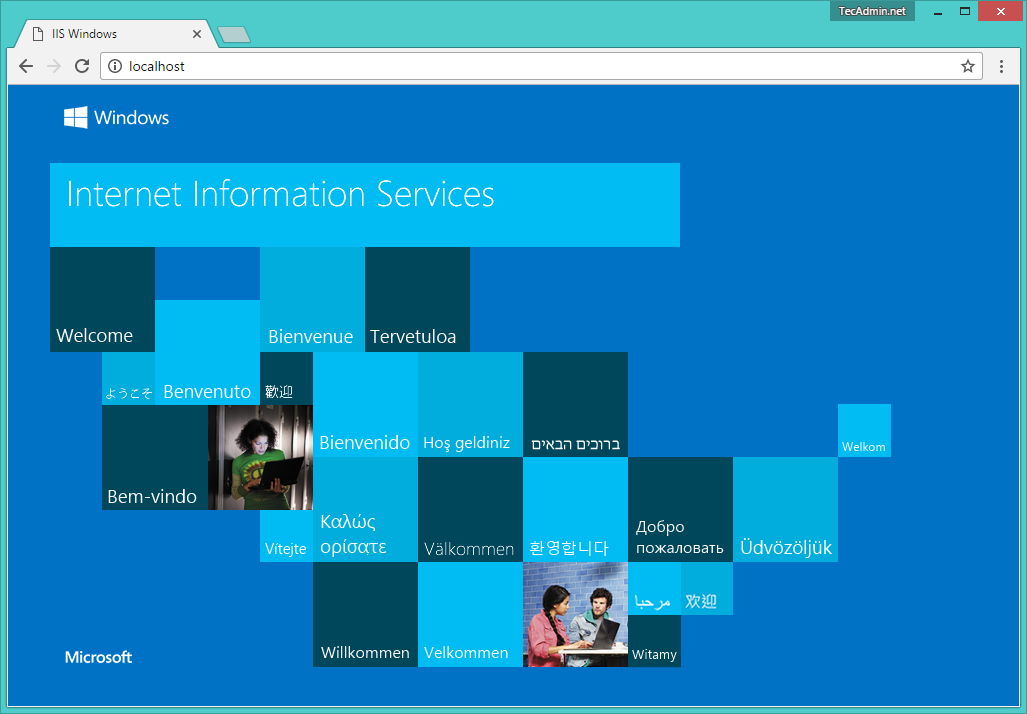
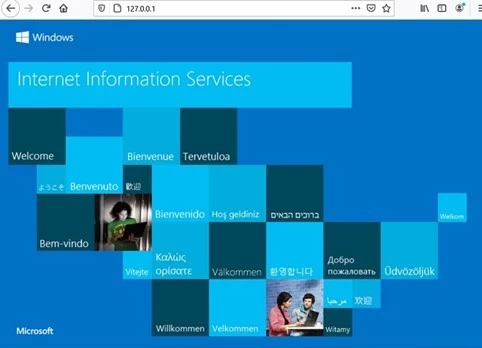
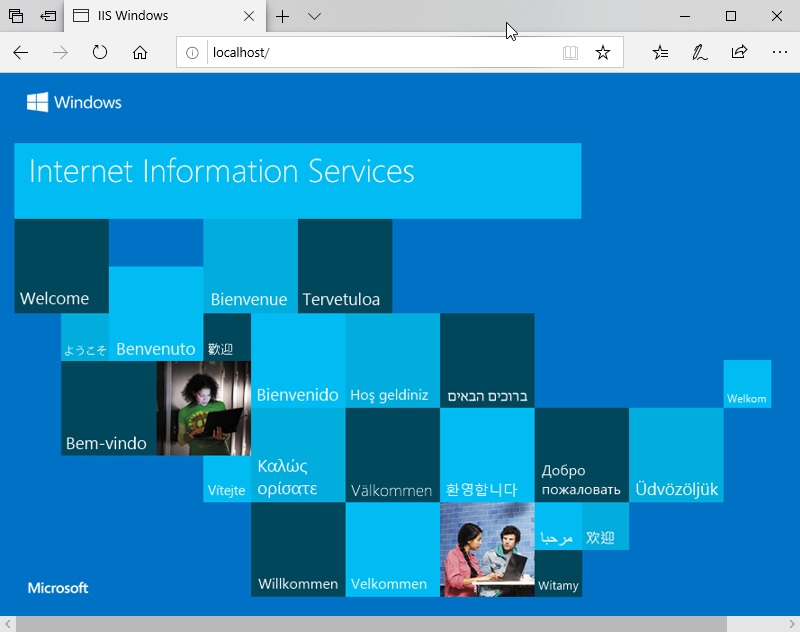
Now open your browser and type in localhost and press ENTER. You should see a default web page is rendered in your browser.


That’s all there is to it and the default website directory will be in C:Inetpubwwwroot folder.
Further Reading
How to Manage IIS Remotely
How to Manage IIS Servers Remotely with WMSVC
How to Backup IIS Manager Connections List on Windows
How to Install IIS Management Console on Windows
How to Migrate IIS Websites to a Different Server
New Features Introduced in IIS 10.0
How to Setup HTTP Strict Transport Security (HSTS) on IIS
How to Activate Built-in Web Server
Обновлено 01.10.2017
Добрый день, в прошлый раз я вам рассказал, как отключить Internet Information Services и мы в этом разобрались, теперь же я хотел вернуться к клиентской версии операционной системы, а именно к Windows 10 Creators Update и другие редакции, многие из пользователей не предполагают, что еще со времен Windows 7, ее можно превратить в настоящий веб-сервер, на той же службе IIS и создавать на ней свои сайты, такой аля хостинг, как в Европе. Сегодня я вам покажу, как установить iis на windows 10 за минуту, вы поймете, что это реально просто и дешевле, чем покупать серверную версию.
Диспетчер служб iis в windows 10
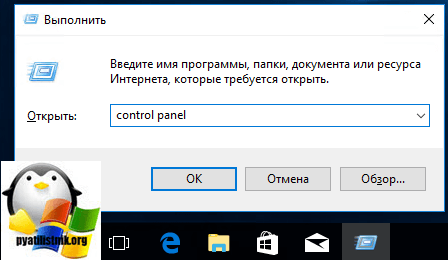
Итак, службы iis в windows 10 по умолчанию, находятся в выключенном состоянии, а точнее, данный компонент не установлен из коробки, сделано это специально, чтобы не тратились ресурсы компьютера и лишние сокеты не крутились на нем. Чтобы нам добавить нужный компонент, сделайте вот что. Нажмите сочетание клавиш Win+R и введите в окне выполнить:
В результате чего у вас откроется панель управления Windows. Сделаем в ней представление значков в формате «Крупные значки»
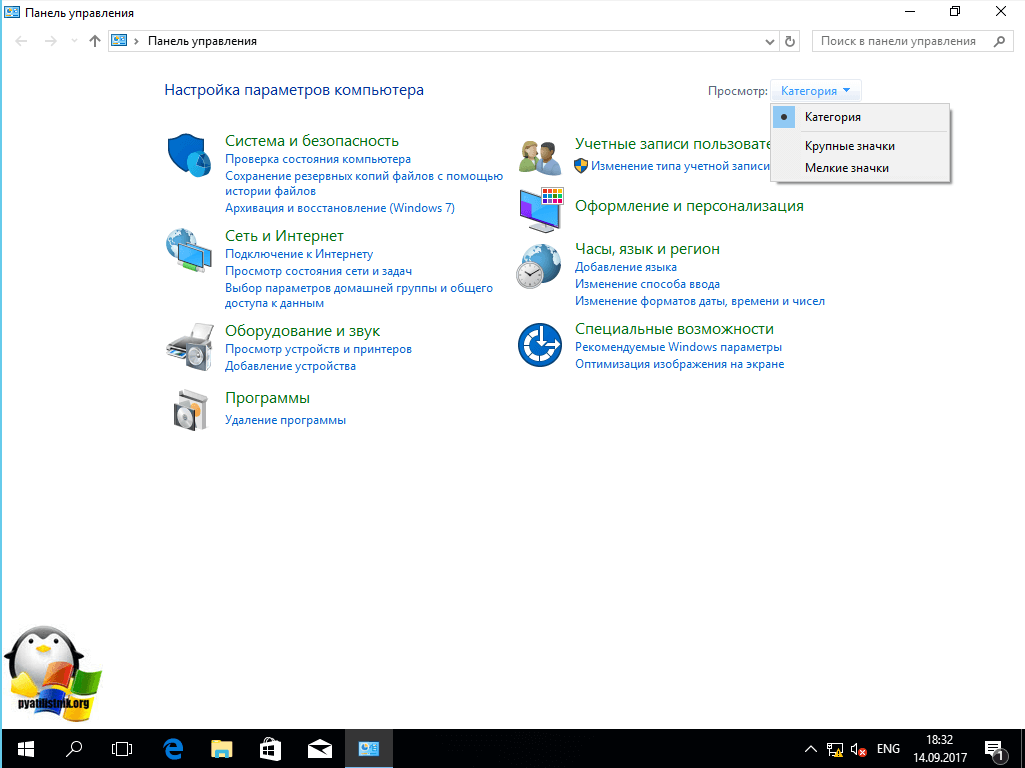
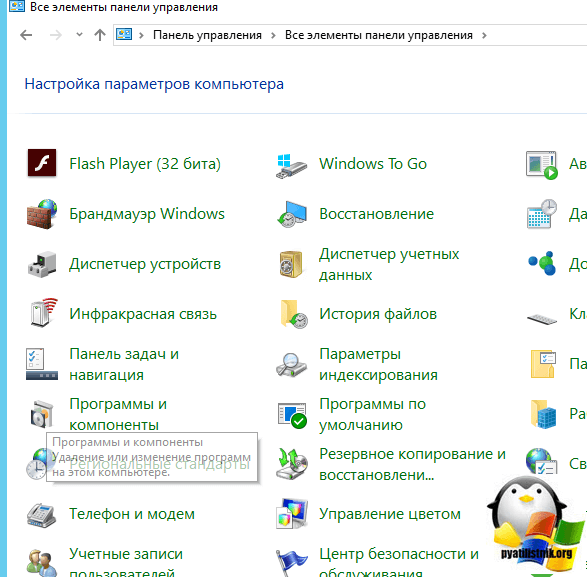
Далее находим пункт «Программы и компоненты»
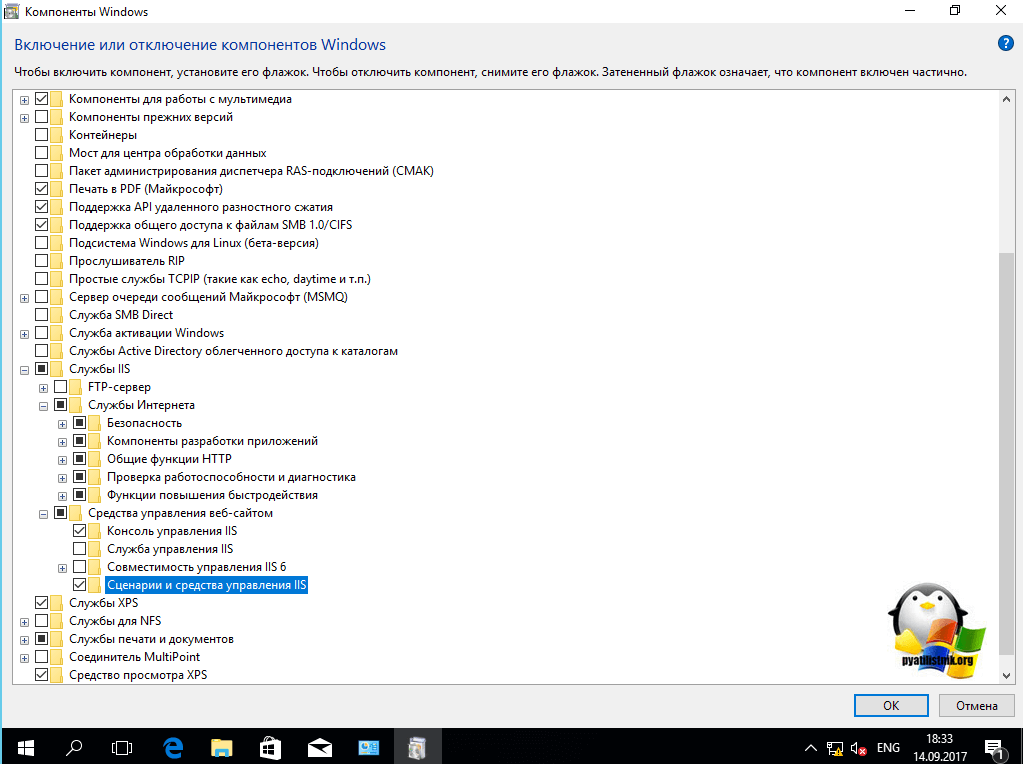
Переходим в пункт «Включение или отключение компонентов Windows», мы с вами это уже делали, устанавливая telnet клиент
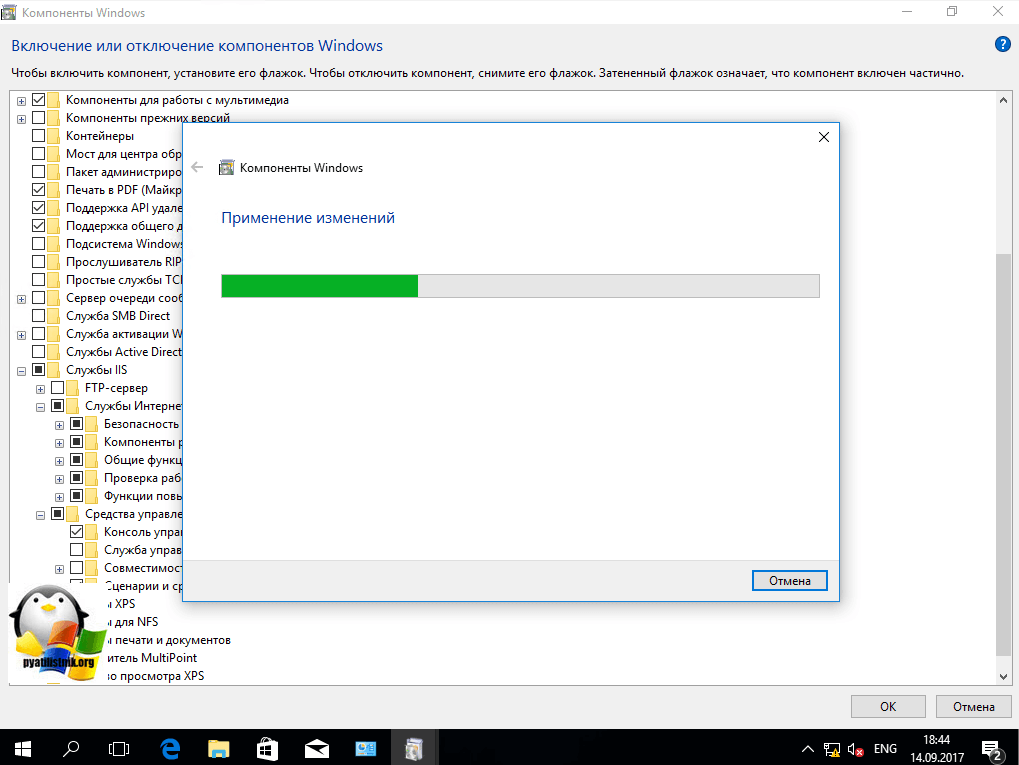
Находим среди множества пунктов «Службы Интернета», ставим на против них галку и нажимаем ок. У вас начинается установка IIS windows 10.
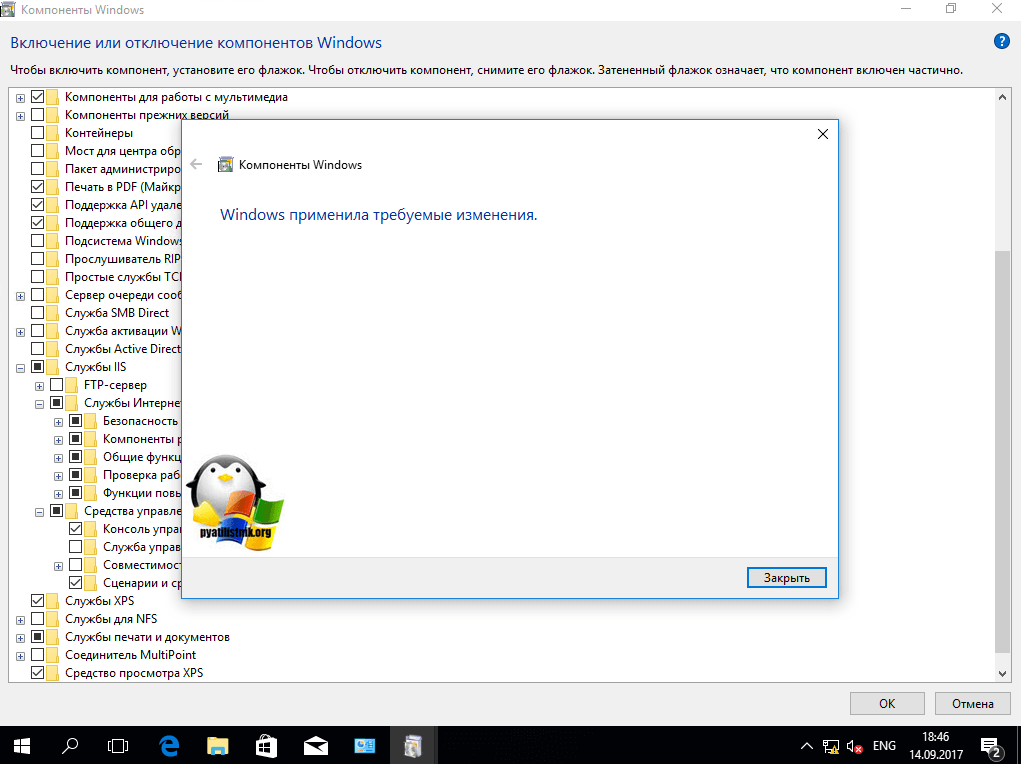
Компонент веб сервер IIS, будет добавлен в считанные секунды, после чего я вам советую перезагрузить вашу операционную систему Windows 10.
Как и писал выше, перезапустим систему.
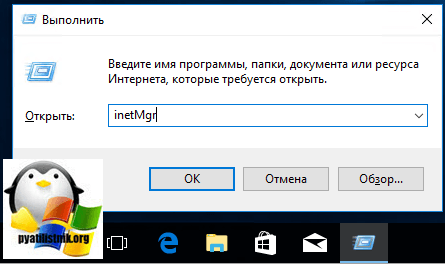
Кстати, как только вы все установили, перед запуском не поленитесь поискать свежие обновления в центре обновления Windows, так как могут быть свежие заплатки. Теперь смотрите, как вы можете теперь открыть диспетчер IIS. Есть несколько способов, первый, нажмите WIN+R и введите inetMgr. У вас откроется нужная оснастка.
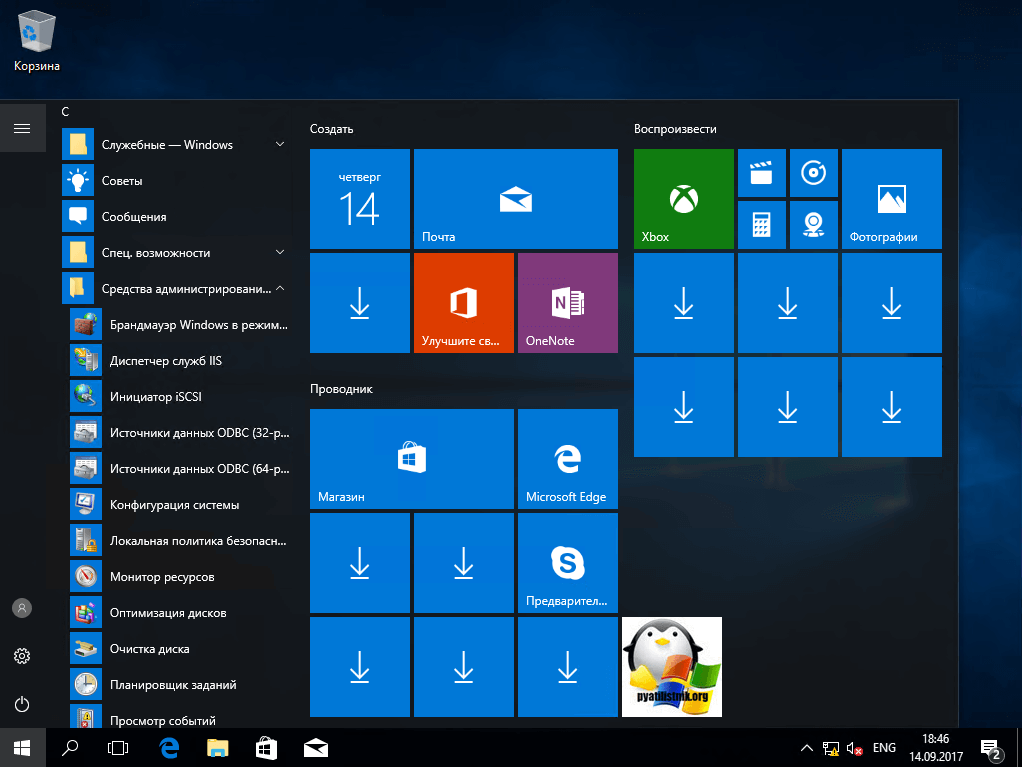
Второй метод, это открыть кнопку пуск и в папке «Средства администрирования» найдите «Диспетчер служб IIS»
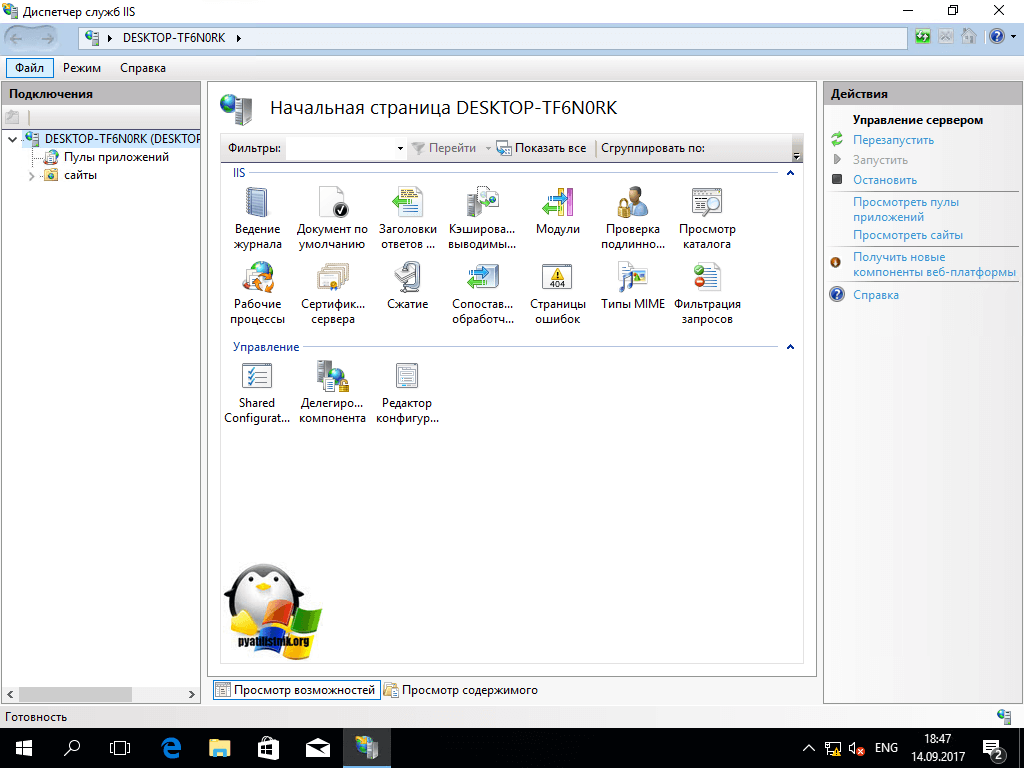
Вот так вот выглядит оснастка. Далее я вам советую почитать, про создание сайтов.
Установить IIS 8.5 через powershell
Можно командой:
Install-WindowsFeature -name Web-Server -IncludeManagementTools

This post was most recently updated on April 29th, 2022.
2 min read.
It’s the roaring twenties again, cloud is the hot stuff, and nobody needs a server anymore. Right?
Nope! I’ve been involved in more on-prem or hybrid projects in the last 12 months than in the last 3-4 years combined. There are plenty of industries and valid uses for still setting up on-prem servers. And quite often, that includes setting up IIS (Internet Information Services) on said machines.
And of course, there’s the classic use case – local development. Depending on what you’re trying to achieve, you might be fine with “just” IIS Express, but often you’ll still want to set up a full-blown IIS installation.
For this case, you might be setting up IIS on Windows 10 as well. And this short and sweet tutorial will guide you through just that!
Prerequisites
The process has remained essentially the same, at least since the days of IIS 7.0 over 10 years ago – obviously, the screenshots below would be slightly different for different versions of the Operating System each IIS version ships with.
Talking about that – here’s a list of different IIS versions that are available with different Windows versions:
| IIS version | Operating System version |
|---|---|
| IIS 10 | Windows Server 2019 Windows Server 2016 Windows 10 (Enterprise, Education, Pro) |
| IIS 8.5 | Windows Server 2012 R2 Windows 8.1 |
| IIS 8 | Windows Server 2012 |
| IIS 7.5 | Windows 7 Windows Server 2008 R2 |
| IIS 7.0 | Windows Server 2008 |
| IIS 6.0 | Windows Server 2003 |
In short, you’ll need one of those Windows versions, an internet connection, and an administrator account. That’s it.
Solution
Okay – let’s get to it, then!
Time needed: 10 minutes.
To enable IIS on a Windows 10 computer, follow these steps!
- Open the Start menu
That’s where it starts. Probably not a surprise.
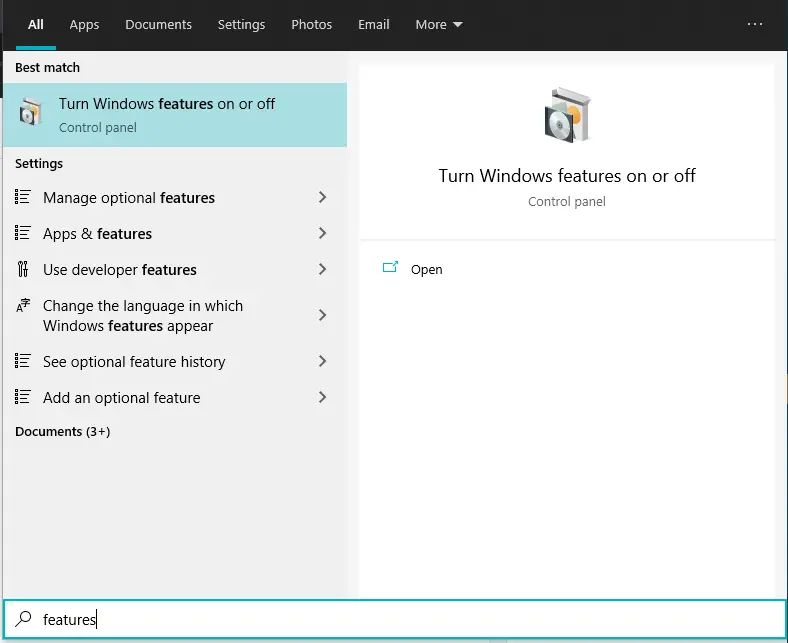
- Type features and select Turn Windows features on or off
It’ll look something like this:

- Choose your IIS configuration of choice
I’m not gonna lie, 99% of the time it’s safe to get started by just installing IIS with default options – i.e., just select the checkbox for “Internet Information Services”. You’ll see the checkbox “filled”, which means you don’t have everything selected. Instead, you’ll get a basic selection of default modules.

Hit OK to proceed with the installation!
If you want to see what my machine – Windows 10 Enterprise – gets by default, check out appendix 1!
- Practice your patience
It’ll take a while. This is what you’ll see:

And after a while…

Yay!
- That’s it!
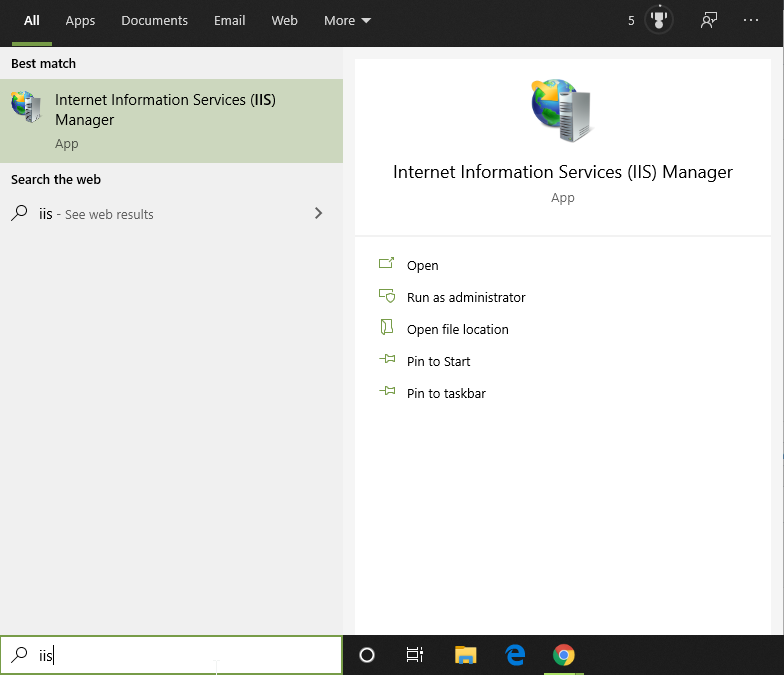
You can now get started with your IIS server by searching for “IIS” – you should get results somewhat like in the screenshot below:

You can also start IIS Manager by hitting the windows key + R and entering “inetmgr” and hitting Enter – the end result is the same as searching for it from the Start Menu.
References & Appendices
- How to install IIS 8.5 on Windows Server 2012 R2 – to be fair, the process is very similar between most Windows and IIS versions

- https://docs.microsoft.com/en-us/iis/install/installing-iis-85/installing-iis-85-on-windows-server-2012-r2

Appendix 1

- Author
- Recent Posts

Antti Koskela is a proud digital native nomadic millennial full stack developer (is that enough funny buzzwords? That’s definitely enough funny buzzwords!), who works as Solutions Architect for Precio Fishbone, building delightful Digital Workplaces.
He’s been a developer from 2004 (starting with PHP and Java), and he’s been working on .NET projects, Azure, Office 365, SharePoint and a lot of other stuff. He’s also Microsoft MVP for Office Development.
This is his personal professional (e.g. professional, but definitely personal) blog.
The IIS service, or Microsoft Web Server, is one of the top web servers with many features. This service includes FTP setup, PHP support, and ASP.net support. In this article, we are going to look at how to install IIS in Windows 10.
In this tutorial, users who want to use this web server in Windows 10 will be familiar with the installation process.
As we said in the IIS installation tutorial on Windows Server 2012, IIS is a roll called Web Server on Windows Server. But in Windows client, like Windows 10, it is known as a Features.
In Windows 10, IIS does not have the power to respond to IIS on the server due to software and hardware limitations of Windows client. It can be said that it is generally used as a local web server or ultimately for serving less than 50 people at a time. However, if you are going to service a specific website on IIS, it is better to use this service on Windows Server.
Choose your perfect Windows VPS Server Packages
Installing IIS in Windows 10
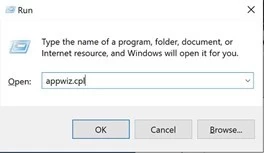
1- First, open the Run window by pressing the Winkey + R key. Type appwiz.cpl to open the Program and Features window.
Note: You can open the Program and Features window in the Windows Control Panel.
2- Click Turn Windows Features on or off.
3- In the page that opens, find the Internet Inforamtion Serives option and check.
Note: If you plan to use the FTP service as well, check the FTP Server sub-category below this option.
4- Click Ok to begin the installation process. The system will first search for the IIS file and will start installing the file if it is safe.
If the file is not found in Windows or incomplete, the operating system itself will download it from the Internet.
5- After installation, a window like the one below will be displayed for you. Click Restart Now to allow the system to reboot to finish installing IIS on Windows 10.
6- After booting the system through the Start menu, type and search for IIS.
7- After finding the IIS, click on it to open it.
Dear user, we hope you would enjoy this tutorial, you can ask questions about this training in the comments section, or to solve other problems in the field of Eldernode training, refer to the Ask page section and raise your problem in it as soon as possible. Make time for other users and experts to answer your questions.
How to install IIS in Windows 10
Goodluck.
IIS is formerly known as Internet Information Server. It is created by Microsoft for Windows operating systems. IIS supports HTTP, HTTPS, FTP, FTPS, SMTP and NNTP protocols. Microsoft also provides a graphical user interface for IIS called IIS Manager. It is useful for managing websites and other applications on Internet Information Server.
Useful tutorials:
- How to Setup Let’s Encrypt SSL in IIS
- How to Redirect HTTP to HTTPS in IIS
- How to Setup Reverse Proxy in IIS
Use the following step-by-step tutorial to install IIS on Windows 8 & Windows 10 operating systems.
Step 1- First of all open control panel on your system. To open the control panel either use the start menu or you’re can also type “control” on the run window.
Step 2- Turn windows features on or off under the Programs and Features section.
Step 3- You will get a list of Windows features. Expand the “Internet Information Service” option. Select all required features to add to your IIS server. Now click OK.
The installation process begins now. It will take few minutes to complete. After completing the installation process reboot your system by clicking on Restart now button.
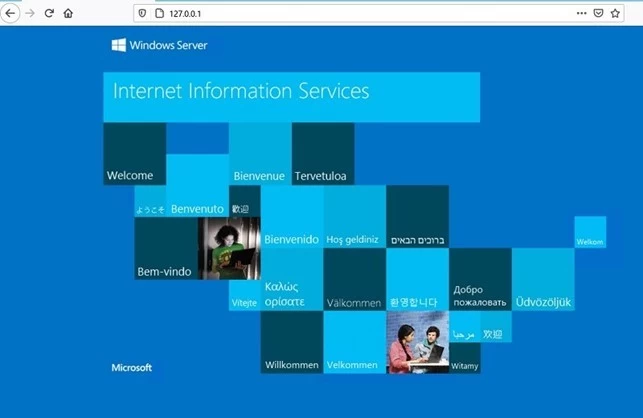
Step 4-As a result, you have successfully completed the installation process. Visit localhost on a web browser. You will see the default IIS page on your screen as below, maybe the screen looks to change in your case as per the version of IIS. You can change the default page under directory C:inetpubwwwroot.
Now access to Internet Information Services(IIS) Manager by typing “inetmgr” in the run window or search in the start menu to open IIS manager on your system and start added new sites.
List of content you will read in this article:
- 1. What is IIS?
- 2. How to install IIS in Windows
- 3. Install IIS on Windows Server 2012
- 4. Installing IIS in Windows 10
- 5. Conclusion
IIS was developed by Microsoft and is the most used web server for Windows. By installing IIS on your Windows server you can use it as a webserver to host your websites or web-based applications. While it is possible to install IIS on different platforms like Linux and macOS, it will most likely be unstable. We created a simple tutorial so that you can set up an IIS server on Windows without any hiccups. In this article, we will explain how you can install IIS web server on Windows 2019, Windows 2016, Windows 2012, and Windows 10. Let’s get to it!
What is IIS?
Internet Information Services (IIS) is a flexible, general-purpose webserver from Microsoft that runs on Windows systems to serve requested HTML pages or files. An IIS web server runs on the Microsoft .NET platform on the Windows OS.
An IIS web server accepts requests from remote computers and in return responds with the appropriate response. This allows the web servers to share and deliver information across local networks and through the internet.
The information that is delivered to users is shown in several forms as static webpages, through file exchanges as downloads and uploads; and text documents, image files, and more. So how does IIS work?
IIS works with the help of standard protocols and programming languages. To create elements such as text, buttons, image placements, direct interactions/behaviors, and hyperlinks, IIS uses HTML. HTTP or the hypertext transfer protocol is used to exchange information between the web server and the user.
HTTPS — HTTP over Secure Sockets Layer (SSL) uses Transport Layer Security or SSL to encrypt the communication for added data security. The File Transfer Protocol (FTP), or its secure variant, FTPS, can transfer files. Additional supported protocols include the Simple Mail Transfer Protocol (SMTP), to send and receive email. The aforementioned protocols plus other languages and protocols together make the perfect IIS package.
How to install IIS in Windows
Now that we know what exactly IIS is, let us give you a short step-by-step tutorial on how to install it on different versions of Windows OS.
Install IIS on Windows Server 2012
Note that this tutorial was based on Windows Server 2012. However, the process is similar to other Windows Server OS.
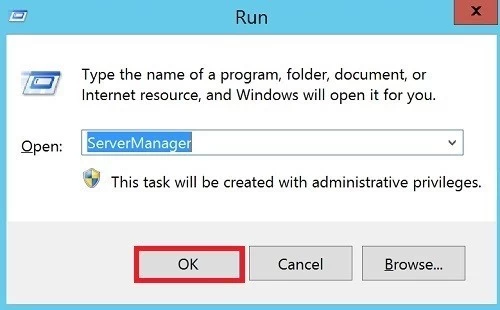
Step 1: To install IIS in Windows Server, first press the Windows + R keys to open Run.
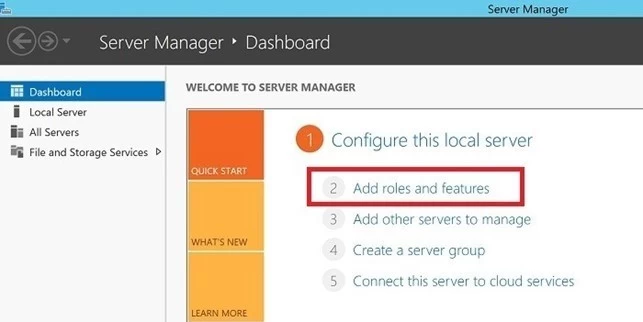
Step 2: Type ServerManager in the run box and click on OK. This will open the Programs and features panel in Windows Server 2012.
Step 3: Now click on “Add roles and features” in the newly appeared window.
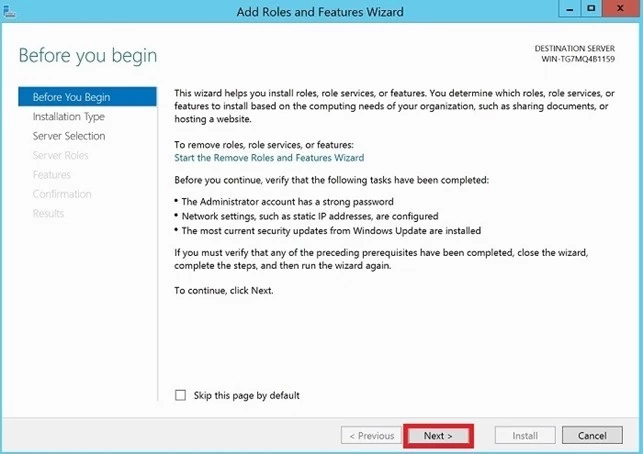
Step 4: Now, an installation Wizard will appear: Click on Next.
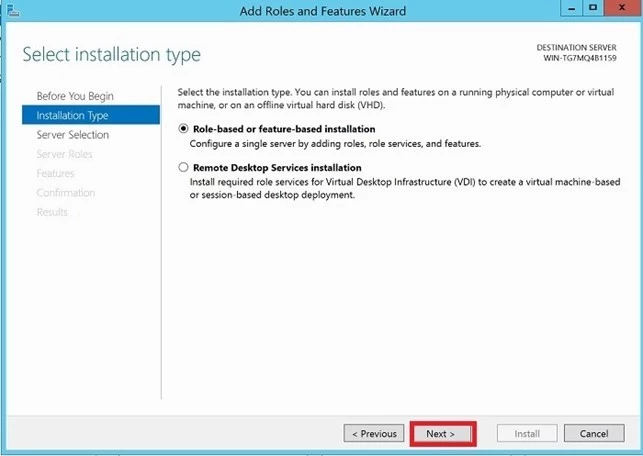
Step 5: Check the Role-based or feature-based installation and click on Next.
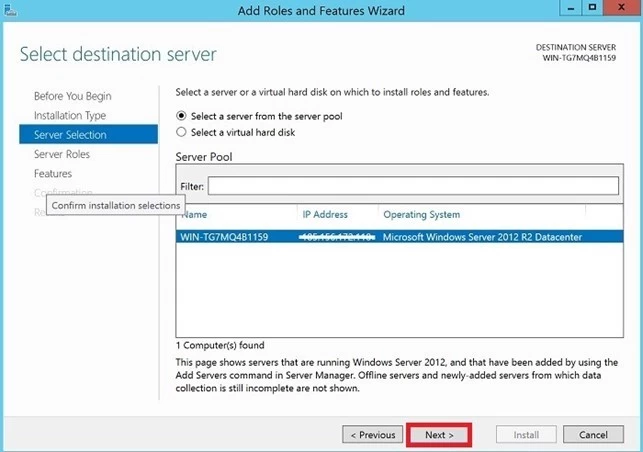
Step 6: Now, select the “Select a server from the server pool”. From the window select the Server and click on Next.
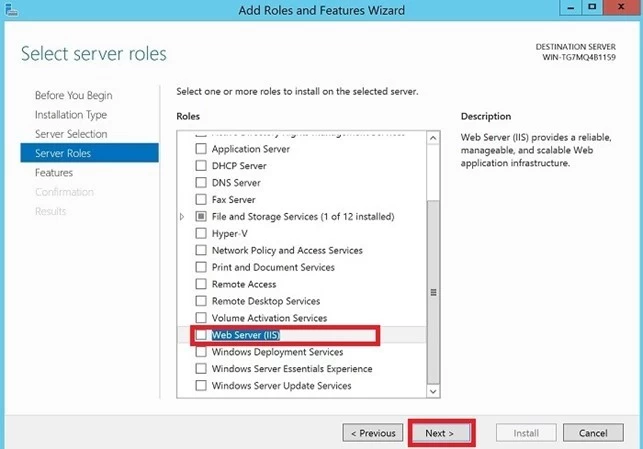
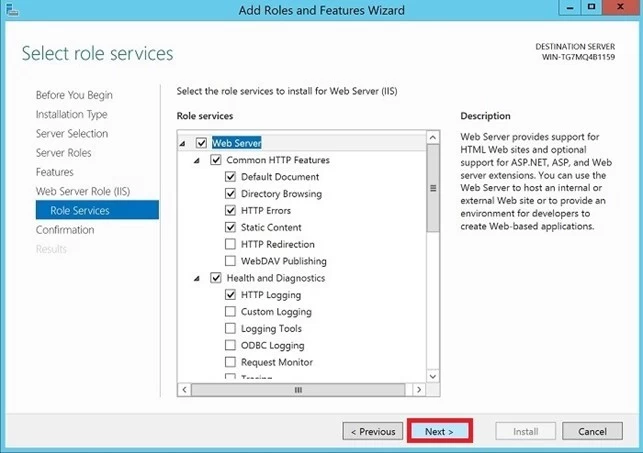
Step 7: When you come to the Server Roles section, scroll down on the list, and check the Web Server (IIS) check box and click Next.
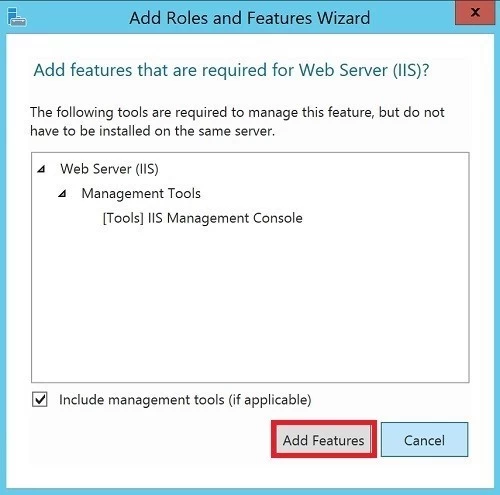
Step 8: Click on Add Features, don’t forget to have the checkbox clicked for “Include management tool (if applicable)”
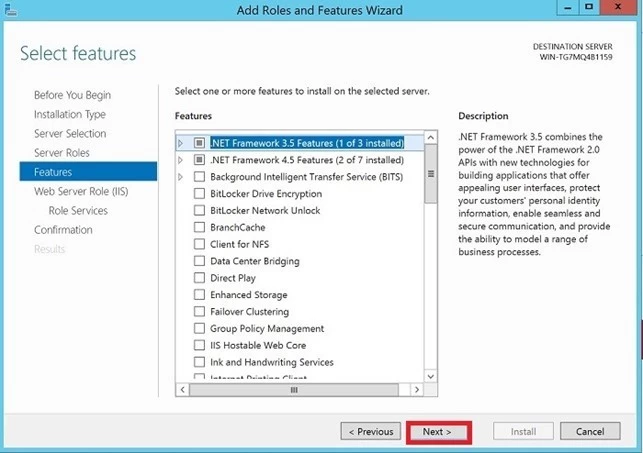
Step 9: Keep the default features as it is and click on Next.
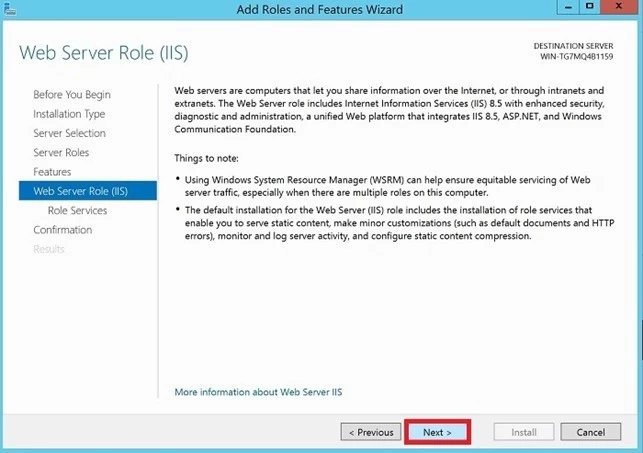
Step 10: Click Next after reading the Web Server Roles (IIS) text.
Step 11: Click Next after selecting the Web Server Roles as seen in the following picture.
Step 12: Click on Install.
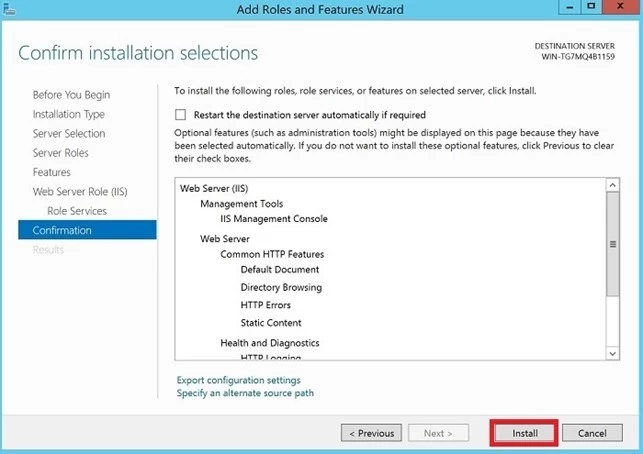
After the installation is complete, you can close the installation wizard. You will see the main interface of Internet Information Services (IIS) similar to the one shown below.
Please Note: Your IIS directory in your device is this C:inetpubwwwroot. You can copy and access your website files or any other files through the IIS web server using your browser.
Installing IIS in Windows 10
If you are using virtual machines like Windows VPS, you should connect to Windows with Remote Desktop.
Step 1: Press Windows + R key to open the run box
Step 2: Then type appwiz.cpl in the text box and press Enter. This will open Programs and Features in Windows 10.
Step 3: In the programs and features page, click on Turn Windows features on or off.
Step 4: In the features list, search for Internet information service (IIS) and check the IIS services as per your needs and click on OK.
Step 5: After completing the installation, restart your computer to finish the installation.

Now you can access IIS on your browser by using the address 127.0.01 on your local network. You can also access your IIS web server remotely by entering your server’s IP address through your browser. It looks something like this: 185.156.x.x
Please Note: Your IIS directory in your device is this: C:inetpubwwwroot. You can copy and access your website files or any other files through the IIS web server using your browser.
Conclusion
We hope that with the help of this article you were able to expand your knowledge about Microsoft’s IIS and to successfully install it on your Windows machine. If you run into any problems during the installation procedure or have any questions & suggestions, please leave them in the comment section below.
In this article, I will explain how to install an IIS web server on a computer with Windows 10.
IIS is a Web server developed by Microsoft that is also available on servers.
The version installed on the client is called IIS Express, it is perfect for testing locally.
Installation IIS on Windows 10
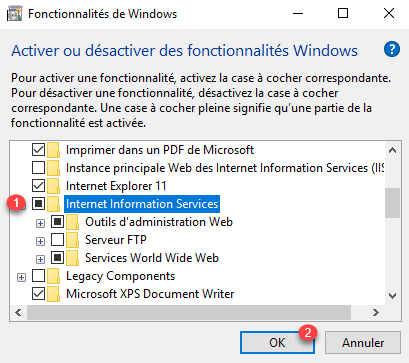
1. Open the Control Panel and go to Programs and Features and then click Enable or Disable Windows Features 1 .
2. Search Internet Information Services and check the box 1 and click OK 2 .
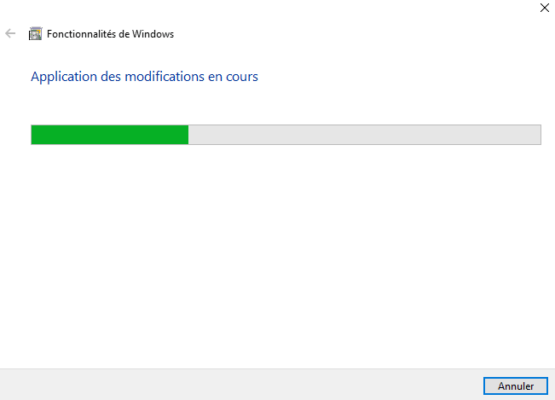
3. Wait during the installation …
4. When the installation is complete, close the window.
Manage IIS
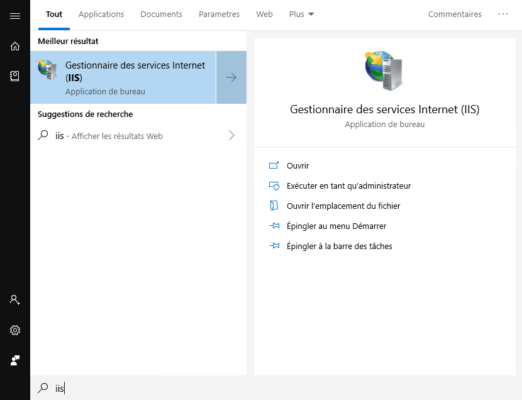
1. To access the Administration Console, look for IIS in the Start menu and click Internet Services Management.
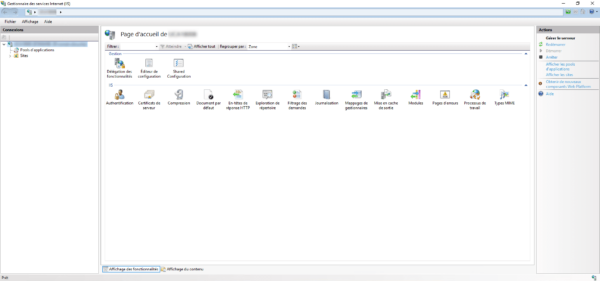
2. The console is the same as for the Windows Server version.
For administration, release articles can be applied to IIS with Windows 10.
Use IIS
Copy your pages in the folder C: inetpub wwwroot
Launch a browser and enter the address http://127.0.0.1 to display your site.
IIS (internet information services manager) on Windows 10/7 Desktop or server is basically a flexible and secure Web server provided by Microsoft on its desktop and server operating systems. Just like Apache and Nginx in Linux Distros on WIndows we have IIS.
Install and configure the webserver (IIS) in Windows 10
Microsoft didn’t integrate only the desktop version of Windows with IIS- Internet Information Services instead with this even Windows 10 Home can be turned in to a web server with the help of this feature.
However, as compared free and open-source server such as Apache, the configuration and the dealing with IIS web server could be a little complex, yet if you are a Windows Desktop or server user, the usage of IIS would be best because of better integration into the system.
The IIS, which also contain an FTP server, is not intended on the client to provide company websites or heavily used web applications. The Windows 10 desktop IIS is mainly for developing or for the demonstration of web applications.
So, if you want to set up and run some application on Windows 10 PC using IIS, for example, WordPress, then here is the step by step guide to install and configure this web server.
Step 1: Enable Internet Information Services -IIS on Windows 10
So, to install the Windows 10 web server feature, we don’t have to download some special packages, it is already in our system and just we need to activate.
Go to Control panel-> Select Program-> Turn Windows features on and off.
Now, scroll down and select “Internet Information Services” and press OK button to get it installed. Later restart the PC to make changes into effect.
The installation of it is very easy, by default when we select the IIS management console the Web Management Tools and Word Wide services along with HTTP features, performance features, security, system status and diagnostics are automatically going to be install. If you want FTP server as well then click on the + icon given in front of Internet information services and select FTP server option too.
Step 2: Start Internet information service (IIS) Manager
Go to Windows 10 Search box and simply type IIS and you will get installed webserver Manager application, click on it to start.
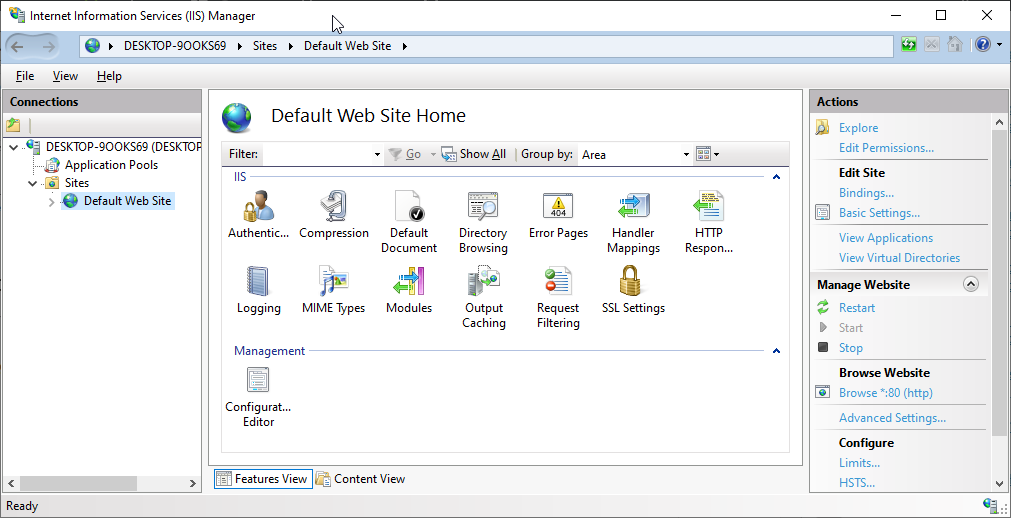
Finally, you will see the IIS manager with so many options to operate and handle different Web server application tasks.
Step 3: Test IIS Webserver
After the installation of IIS, Windows will automatically start the webserver services on default port number 80. Thus, to check whether it is functioning properly or not, open your system browser and type http://localhost to see.
By default, the IIS shows the local HTML page to show everything is working fine. In case not then check whether the HTTP server (localhost) is listening on port 80. Run the following command in command prompt.
netstat -a -p tcp -n
However, for newly installed IIS webserver such problem would not appear.
In case, your port 80 is already bound to some other application then you can change the default website or Http listening port on IIS.
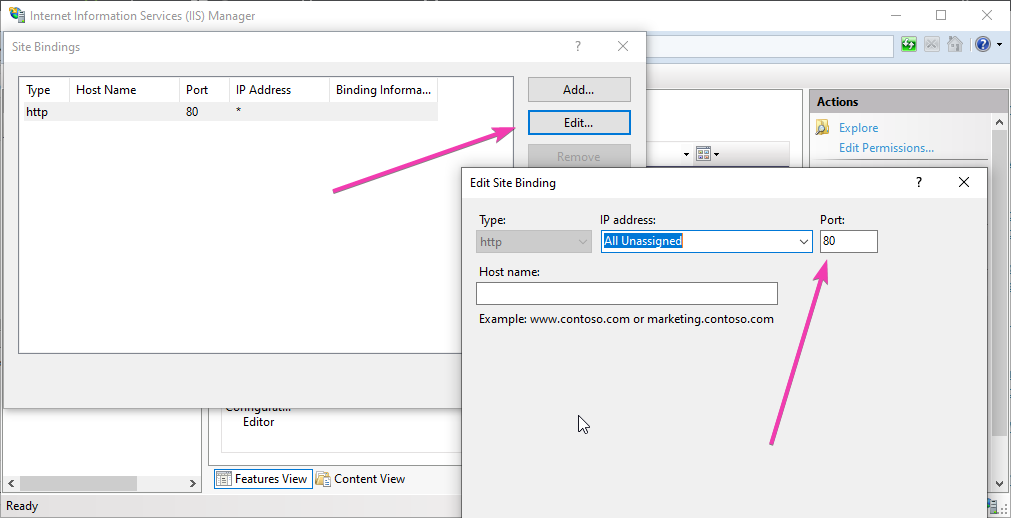
Right-click on Default web site option given under the Sites and select Edit Bindings.
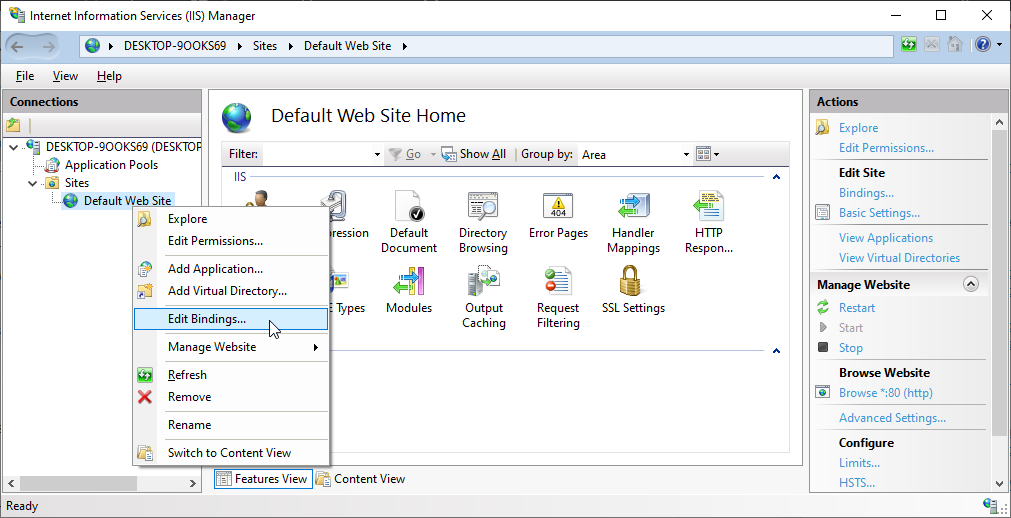
Now Click on Edit button and change the port number to one which you want to use. You can also specify any particular IP-address you want to use that port number.
Step 4: Configure and install WordPress with IIS Manager
So, to give you an idea of how to host an HTML website or web application like WordPress on IIS, we are going to configure it.
However, hosting a website on IIS, the steps will be the same for both WordPress or just a simple HTML one. Yet being a web application WordPress needs PHP support too.
Right-click on the default website and select Explore.
The root directory at %SystemDrive% inetpubwwwroot will open. Now simply extract all your WordPress file there. If it asks for permission give it.
Now, Select your newly created website and click on the restart option given in the right-side panel.

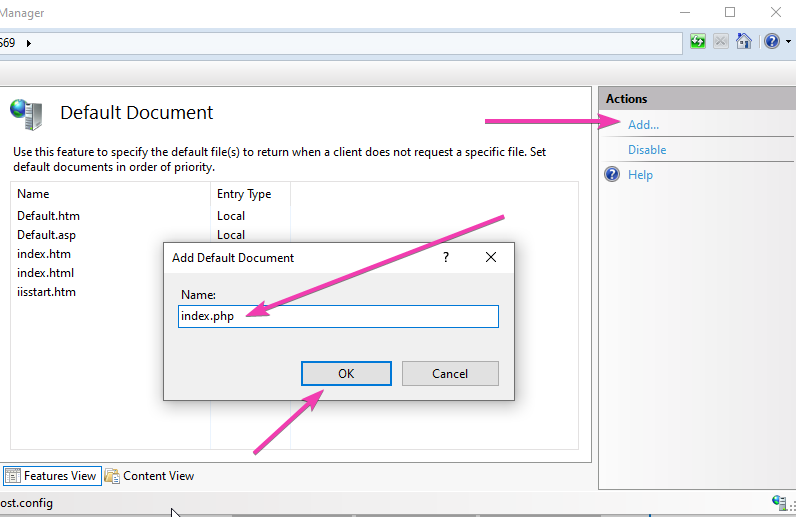
Add index.php to the Default Document.
Select Default website and double click on Default Document icon then Add link given on the right-side panel. Type index.php and save it.
Open the browser and point it to http://localhost, this time it will show the hosted website. However, in case of WordPress, it gives an error because we haven’t yet configured its Wp-config file.
Again right-click on the Default website ->Explore and then rename wp-config-sample.php to wp-config.php.
Now edit the wp-config.php file and change the following things given in red colour… In short, add the database details.
// ** MySQL settings - You can get this info from your web host ** //
/** The name of the database for WordPress */
define( 'DB_NAME', 'database_name_here' );

/** MySQL database username */
define( 'DB_USER', 'username_here' );

/** MySQL database password */
define( 'DB_PASSWORD', 'password_here' );

/** MySQL hostname */
define( 'DB_HOST', 'localhost' );
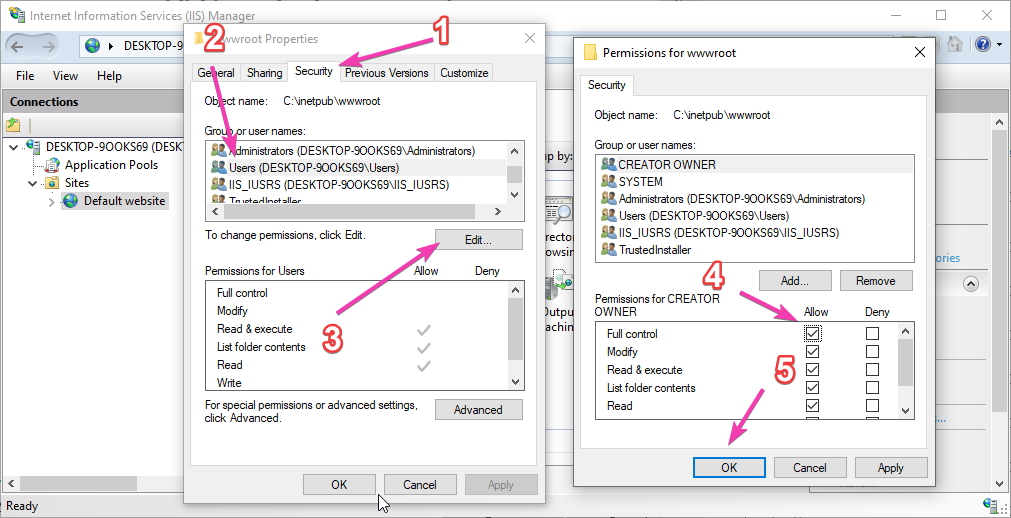
In case, it will say you don’t have permission to write a wp-config file, then simply right click on the Default website in IIS manager and select Edit Permissions.
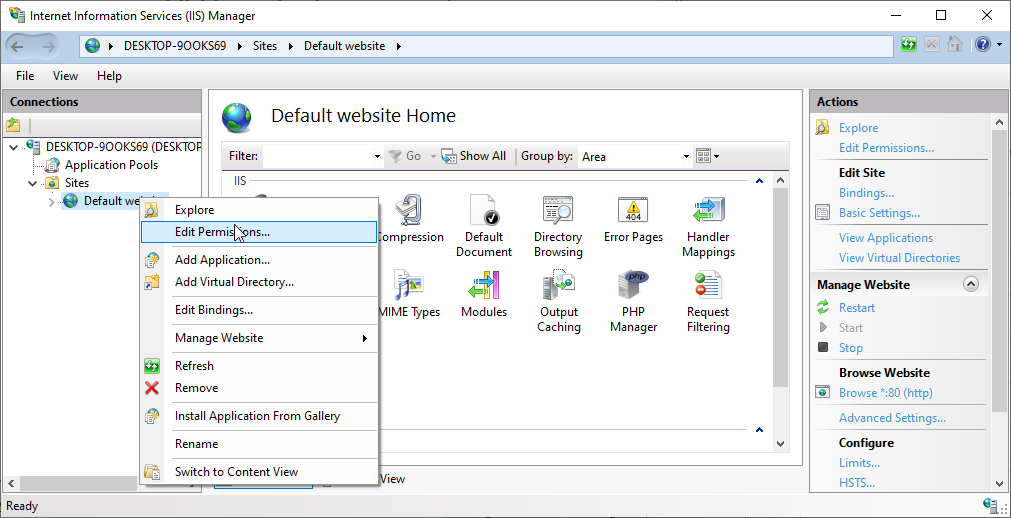
Go to Security Tab and select your Windows system user. Then Edit button-> Give all permissions to it and then press OK button.
Now, type http://localhost/index.php and you would be able to access your WordPress installation.
In the same way, if you have hosted some HTML based website file for development in the root directory of Default website you will get to see that.
How to Disable IIS web server on Windows 10
In case you don’t require IIS Manager and want to disable it. Again open “Turn Windows feature On or OFF” and unselect the option “Internet Information Services“. This will remove the IIS web server from your Windows 10 or Windows 7 PC, laptop or server.
Other Articles:
- How to install Kali Linux with GUI on WSL Windows 10
- How to install Apache web server on CentOS 8 or Stream
- Install Apache Cassandra on Windows 10/8/7 without datastax
- How to install Apache, MySQL, PHP & PhpmyAdmin on Windows 10 WSL