Introduction
The Java Development Kit (JDK) is software used for Java programming, along with the Java Virtual Machine (JVM) and the Java Runtime Environment (JRE). The JDK includes the compiler and class libraries, allowing developers to create Java programs executable by the JVM and JRE.
In this tutorial, you will learn to install the Java Development Kit on Windows.
Prerequisites
- A system running Windows 10.
- A network connection.
- Administrator privileges.
Note: Develop your core app services on PNAP’s Bare Metal Cloud servers to ensure superior performance. It’s cloud native and the perfect environment for the entire SDLC.
Check if Java Is Installed
Before installing the Java Development Kit, check if a Java version is already installed on Windows. Follow the steps below:
- Open a command prompt by typing cmd in the search bar and press Enter.
- Run the following command:
java -version
The command outputs the Java version on your system. If Java isn’t installed, the output is a message stating that Java isn’t recognized as an internal or external command.
Download Java for Windows 10
Download the latest Java Development Kit installation file for Windows 10 to have the latest features and bug fixes.
- Using your preferred web browser, navigate to the Oracle Java Downloads page.
- On the Downloads page, click the x64 Installer download link under the Windows category. At the time of writing this article, Java version 17 is the latest long-term support Java version.
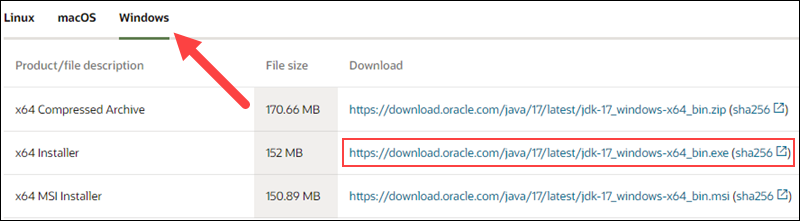
Wait for the download to complete.
After downloading the installation file, proceed with installing Java on your Windows system.
Follow the steps below:
Step 1: Run the Downloaded File
Double-click the downloaded file to start the installation.
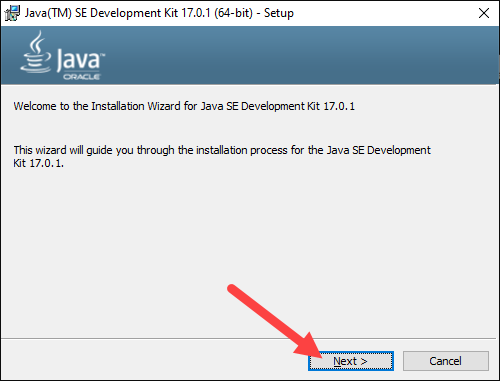
Step 2: Configure the Installation Wizard
After running the installation file, the installation wizard welcome screen appears.
1. Click Next to proceed to the next step.
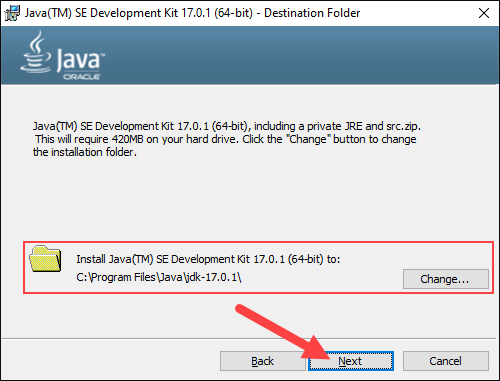
2. Choose the destination folder for the Java installation files or stick to the default path. Click Next to proceed.
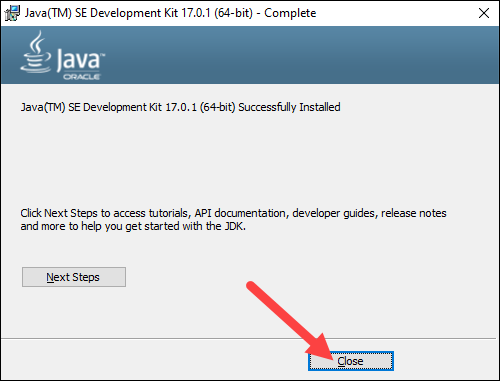
3. Wait for the wizard to finish the installation process until the Successfully Installed message appears. Click Close to exit the wizard.
Set Environmental Variables in Java
Set Java environment variables to enable program compiling from any directory. To do so, follow the steps below:
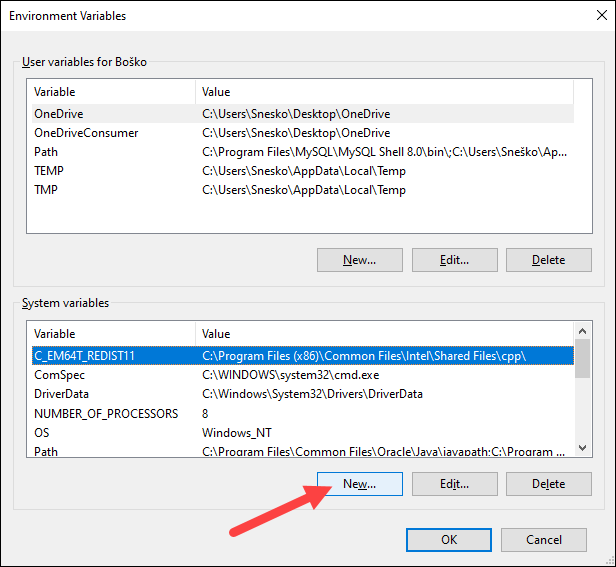
Step 1: Add Java to System Variables
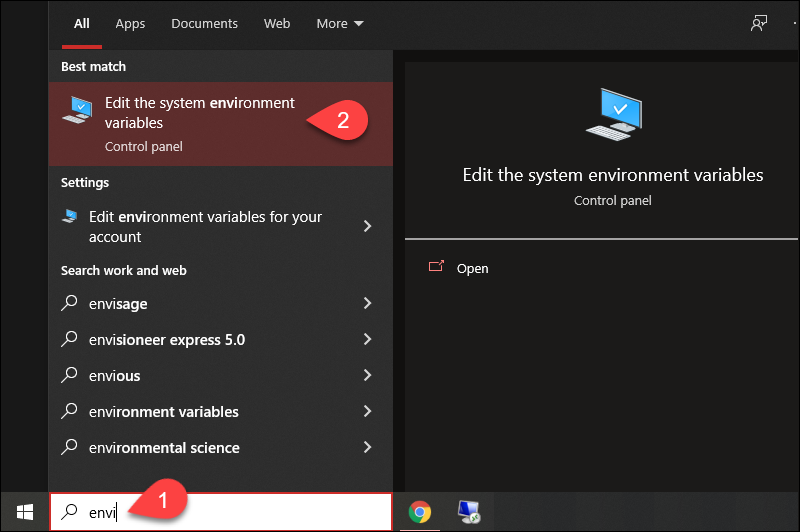
1. Open the Start menu and search for environment variables.
2. Select the Edit the system environment variables result.
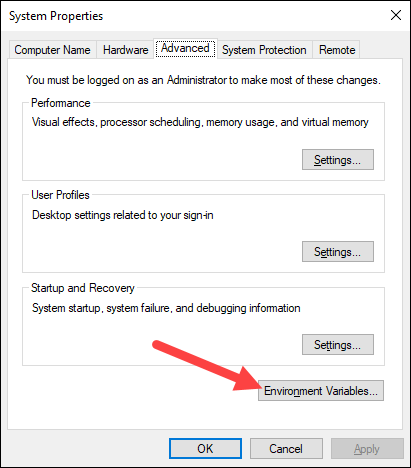
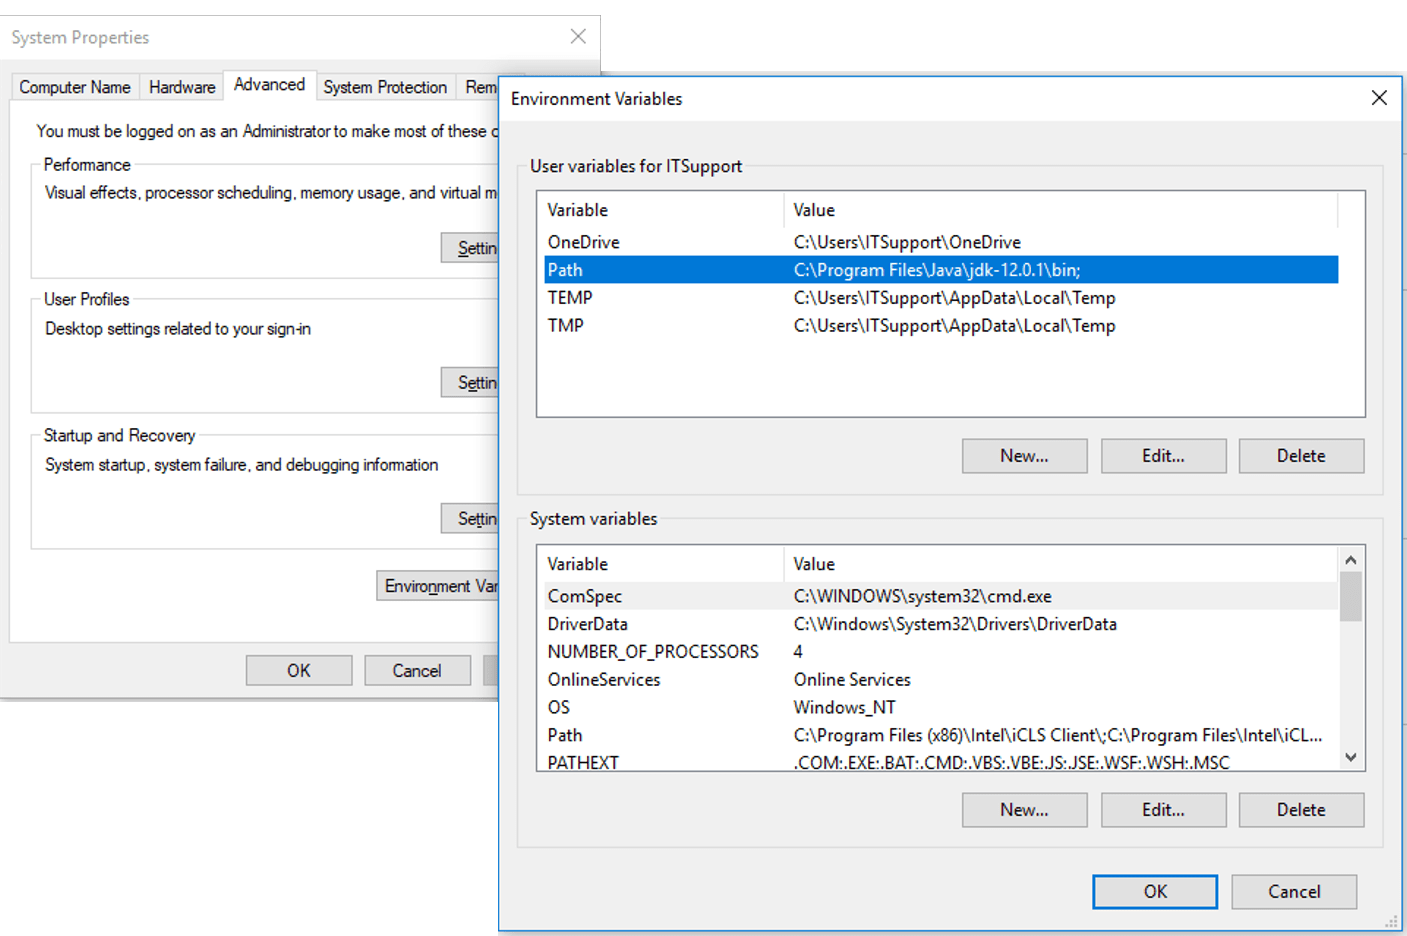
3. In the System Properties window, under the Advanced tab, click Environment Variables…
4. Under the System variables category, select the Path variable and click Edit:

5. Click the New button and enter the path to the Java bin directory:
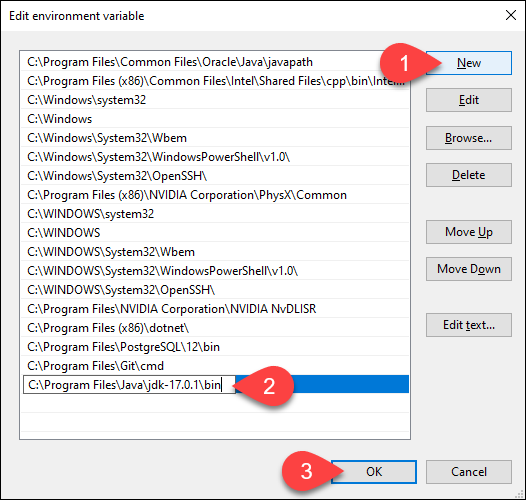
Note: The default path is usually C:Program FilesJavajdk-17.0.1bin.
6. Click OK to save the changes and exit the variable editing window.
Step 2: Add JAVA_HOME Variable
Some applications require the JAVA_HOME variable. Follow the steps below to create the variable:
1. In the Environment Variables window, under the System variables category, click the New… button to create a new variable.
2. Name the variable as JAVA_HOME.
3. In the variable value field, paste the path to your Java jdk directory and click OK.
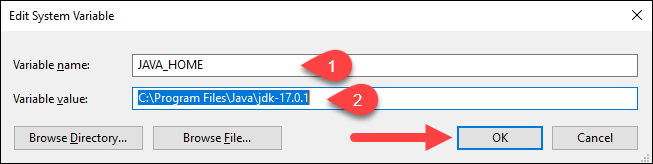
4. Confirm the changes by clicking OK in the Environment Variables and System properties windows.
Test the Java Installation
Run the java -version command in the command prompt to make sure Java installed correctly:

If installed correctly, the command outputs the Java version. Make sure everything works by writing a simple program and compiling it. Follow the steps below:
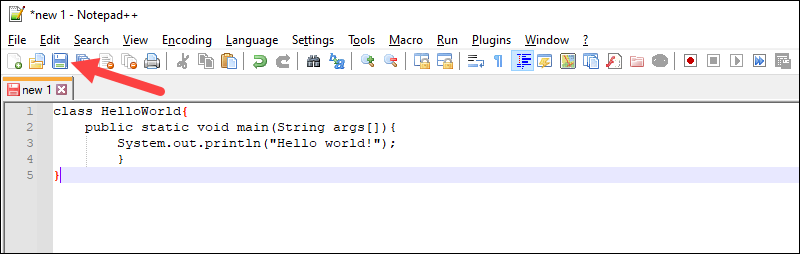
Step 1: Write a Test Java Script
1. Open a text editor such as Notepad++ and create a new file.
2. Enter the following lines of code and click Save:
class HelloWorld{
	public static void main(String args[]){
		System.out.println("Hello world!");
		}
}
3. Name the file and save it as a Java source file (*.java).
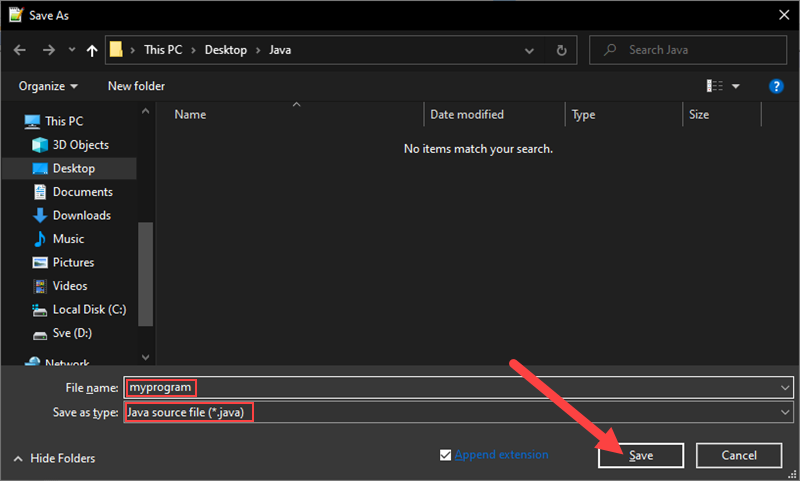
Note: When using Notepad, select All files for the Save as type option and add the .java extension to the file name.
Step 2: Compile the Test Java Script
1. In the command prompt, change the directory to the file’s location and use the following syntax to compile the program:
javac [filename]For example:

After a successful compilation, the program generates a .class file in the file directory.
2. Run the program with the following syntax:
java [filename]
The output shows that the program runs correctly, displaying the Hello world! message.
Conclusion
This tutorial showed how to install the Java Development Kit on a Windows system. If you are interested in learning more about Java, read our list of 13 best Java IDEs for writing, debugging, and testing Java code.
In this tutorial, we will discuss how to install Java 8 on Windows 10. The steps should be the same for other versions of Java and older versions of Windows.
Notes: You may also install the popular IDEs to develop Java applications by following — How To Install Eclipse For Java On Windows, How To Install IntelliJ IDEA for Java on Windows, How To Install NetBeans On Windows, and How To Install VSCode For Java On Windows. You may also follow the How To Install OpenJDK 16 On Windows, How To Install OpenJDK 16 On Ubuntu 20.04 LTS to install the latest OpenJDK and How To Install Java 16 On Windows, How To Install Java 16 On Ubuntu 20.04 LTS to install Oracle JDK.
System Checks
In this step, we will test whether Java is already installed or not. To do so, open the command prompt and type java -version as shown in Fig 1. It shows that Java is not installed.

Fig 1
Download Java 8
Open the download link to select the available versions as shown in Fig 2.

Fig 2
Click the Download Option as highlighted in Fig 3. It will ask to accept the License Agreement before starting the download as shown in Fig 3 and Fig 4. It might also ask to login to Oracle before starting the download.

Fig 3

Fig 4
Install Java 8
Double click the downloaded file to start the installation. In windows 10, the installer asks for system permission before starting the installation. Click the Yes Button to allow the installer to execute. The installer shows the Welcome Screen as displayed in Fig 5.

Fig 5
Make sure that you have gone through the updated License Agreement of Java. Now click the Next Button to continue with the installation. The next screen shows options to select optional features to be installed together. Leave the default options without making any change. We can also change the installation location on this screen if required as displayed in Fig 6.

Fig 6
Now click the Next Button to start the installation. It will show the progress as displayed in Fig 7.

Fig 7
The installer will also ask to choose the location of JRE as displayed in Fig 8.

Fig 8
Click the Next Button to start the JRE installation. It will show the progress as shown in Fig 9.

Fig 9
At last, it shows the Success Screen after completing the installation as shown in Fig 10.

Fig 10
Now open the Command Prompt and type the command java -version to confirm whether it’s installed successfully as shown in Fig 11.

Fig 11
It will either show the message — java is not recognized as an internal or external command or show the previously installed version. In order to start using the JDK installed by us from the command prompt, we need to set the environment variable. You can follow the below-mentioned steps to do so.
Right Click -> My Computer(This PC) -> Properties -> Advanced System Settings
The above steps will open the Windows settings panel as shown in Fig 12.

Fig 12
Now click on Environment Variables, select Path under System Variables section and click on Edit. We need to add the path of installed JDK to system Path.
Remove the path of previously installed JDK. Also, update JAVA_HOME in case it’s already set. Now click on New Button and add the path to JDK bin which is C:Program FilesJavajdk1.8.0_241bin in my case as shown in Fig 13. Press OK Button 3 times to close all the windows. This sets the JDK 8 on system environment variables to access the same from the console. You may also set the JAVA_HOME environment variable which is referred by some of the software including Android SDK Tools to determine the Java version.

Fig 13
Now again open the console and test the Java version as shown in Fig 14.

Fig 14
Getting started with Java — Hello World
In this step, we will write, compile, and execute our first program in Java using the standard Hello World example.
Now write the first Java program as shown below, save the program as HelloWorld.java and exit the editor. Make sure that the class name and file name are the same.
class HelloWorld {	public static void main( String[] args ) {		System.out.println( "Hello World !!" );
	}
}
Now open the command prompt and navigate to the path where you have saved your Java program. Use the below-mentioned commands to compile and execute the program.
# Compile - Specify file name and extension
javac HelloWorld.java# Execute - Spicy file name
java HelloWorld# Output
Hello World !!
These are the easy to install steps required to install Oracle Java on Windows and write, compile and execute the Java program.
Summary
This tutorial provided all the steps required to install Java 8 on Windows 10 and also provided the steps to configure the system path to access Java from the console. At last, it explained the steps required to compile and run the Java programs using a simple Hello World program.
Overview
Java is one of the most widely used programming languages. To execute code in any programming language, we need to set up required environments like editors, software, and IDEs. JDK (Java Development Kit) is the complete environment required to run java codes on any operating system. IDE(Integrated Development Environment) like Eclipse and IntelliJ, makes coding and developing complex projects easier with their user interfaces, automation tools, and debugger.
Scope of article
- This article consists of detailed installation steps of different software packages required to run the java program in the Windows10 operating system.
- Installation steps of a famous IDE Eclipse are covered.
Introduction
Java is a high-level, robust programming language and a platform. It was developed by James Gosling at Sun Microsystems that was released in 1995. Any hardware or software environment in which a program runs is known as a platform. Since Java has a runtime environment (JRE) and API, it is called a platform.
To run any code and develop applications in java language, we need to install JDK(Java Development Kit). JDK contains tools required for development, and JRE(Java Runtime Environment), which contains all libraries, and JVM(Java Virtual Machine) is required to execute the programs.
JDK can be installed on different operating systems including Linux, Windows, and macOS. Here, we will see detailed steps of installations of JDK SE 16 on the Windows 10 operating system.
Which One Do We Need: JVM or a JRE or a JDK?
While installing Java, we come across different terms like JVM, JRE, JDK. These are different software bundles available for running java programs with different functionalities. To understand what we need to install JVM, JRE or JDK let’s understand these terms.
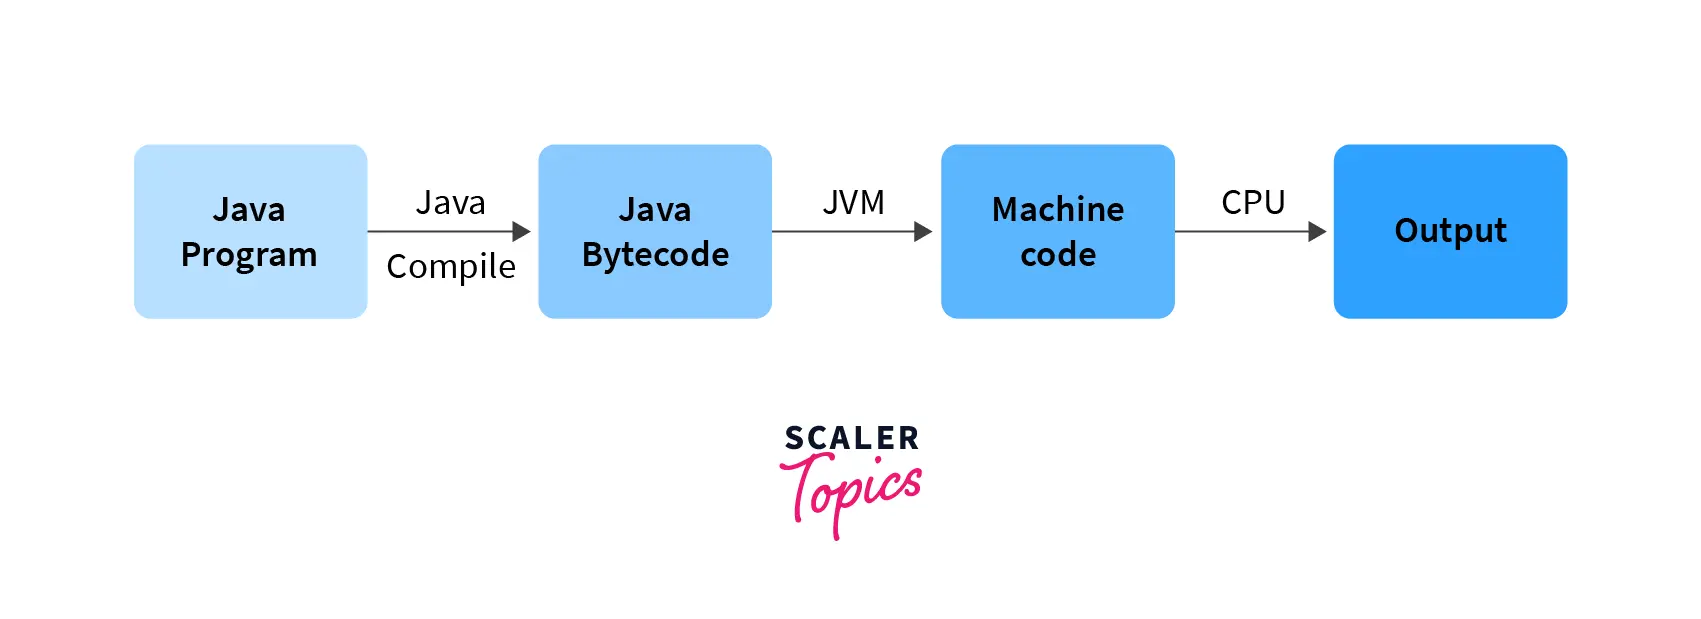
1. Java Virtual Machine (JVM)
- JVM(Java Virtual Machine) is an abstract machine. It is a specification that provides a runtime environment in which java bytecode can be executed.
- When we run any Java program, the Java compiler first compiles your Java code into bytecode. After compilation JVM translates bytecode into machine code, i.e. machine-level instructions.
- Java is known as a platform-independent language because programs written in Java are executed by JVM and not by the physical machine.
- To execute any Java program user has to first compile the code to convert Java code into byte code and then run it. The compiler creates a .class file after successful compilation.
- After compilation, the byte code given in the .class file by the compiler is converted into machine-level instructions by JVM, and output is given to the user.
Syntax to compile Java program:
Syntax to run Java program:
Here java command activates JVM.
- Flow of program execution is done as follows:

2.Java Runtime Environment(JRE)
- Java Runtime Environment (JRE) is an open-source software distribution with a Java class library, specific tools, and a JVM.
- It is the most common environment for devices running Java applications. JRE can be used when a user has to use Java applications but does not do development.
- Java source code is compiled and translated into Java bytecode. If you want to get output from this bytecode, you need JRE.
- It loads classes, checks memory access, and finds the system resources needed to run applications.
- JRE acts as a software layer over the operating system. It is one of the related components of Java Development Kit(JDK) and superset of JVM.
3.Java Development Kit(JDK)
- JDK is a software development kit required to develop applications in Java.
- JDK consists of development tools like a compiler and debugger in addition to JRE.
- It contains JVM, JRE, and additional development tools like compiler, interpreter, debugger, and many more things required for application development.
- JDK makes it easy for developers to develop applications.

Points to Remember while Downloading:
-
If you’re a user looking to run a Java application, you only need the JRE(which includes a JVM.)
-
If you’re a developer looking to program in Java and use any IDE for the same, you need the JDK(which includes JRE libraries, which in turn includes a JVM.)
From the above explanations, we know that JDK contains all the required components(JVM, JRE, compiler, and debugger) to execute the java program. So, we will download and install JDK 16.
NOTE: JDK 17 is the latest version available, but we will go with JDK 16 so that we don’t face any challenges during installation.
Installing JDK on Windows
Step 1:
To download Java, you should have an account on oracle.com. You can sign in if you have one, or else you can sign up and create an account.
Step 2:
Go to the site of Java Oracle using this link and download the latest version of JDK 16 from oracle.com for windows.

NOTE: Before downloading check whether your system is 32-bit or 64-bit and download accordingly. In my case, it’s 64-bit.
Step 3:
Clicking on the installation link will take you to a popup window as shown below. Click on I reviewed and accept the Oracle Technology Network License Agreement for Oracle Java SE development kit and click on the download button. It will take you to the login page of oracle.com, log in and start downloading the software.

Step 4:
Once the JDK 16 download is complete, run the .exe file on windows to start installations.
First allow windows to make necessary changes during installation.

Begin the installation by clicking on next.

Step 5:
Select the PATH where you want to install Java in Windows. Leave it default and click on Next.

Step 6:
After installations are done, click on Close.

Step 7:
After installation, we need to set environment variables PATH and CLASSPATH to run a program. Path and Classpath both are operating system level environment variables. Path is used to define where the system can find the executables(.exe) files and classpath is used to `specify the location of .class files.
PATH Variable:
- The PATH variable gives the location of executables like javac and java that are stored in the bin folder of Java.
- When you try to execute a program from the command line, the operating system searches for the specified program in the current direction and executes if it’s available.
- In case the programs are not available in the current directory, the operating system verifies in the set of directories specified in the ‘PATH ’ environment variable.
CLASSPATH Variable:
- The CLASSPATH variable gives the location of library files that are stored in the lib folder of Java.
- This environment variable is used to specify the location of the classes and packages.
- When we try to import classes and packages that are not available in Java Standard Library.
- JVM verifies the current direction for them, if not available it verifies the set of directories specified in the CLASSPATH environment variable.
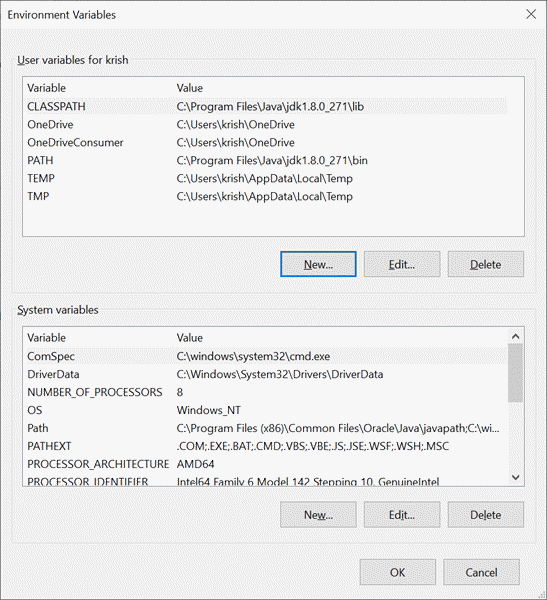
To set these environment variables right-click on this PC and go to properties.

Step 8:
Click on Advanced System Settings

Step 9:
Go to environment variables and click on New.


Step 10:
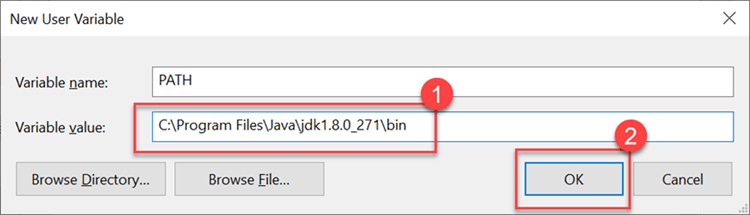
Create a new PATH variable and set its path to the bin folder, which is in the installed JDK folder.

Copy the address of the bin folder in JDK.

Paste it in path variable value.

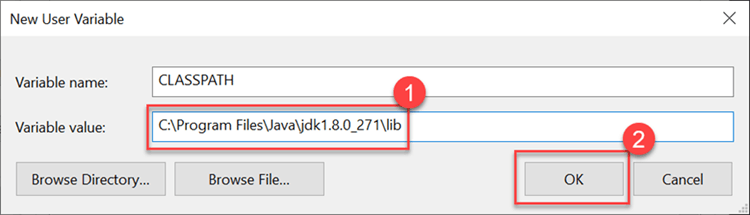
Step 11:
Follow the same steps to create the CLASSPATH variable. Its variable value will be set to the lib folder in JDK.

Step 12:
The PATH and CLASSPATH variables are set. Click on OK.

Here the installation of JDK 16 is complete and environment variables are set.
Verifying the Setup
After installation, verify if it is working properly by checking the java version on cmd.
Syntax: java -version

If it shows the java version we have installed, then the installations are successful.
Installing the IDE
- Integrated development environment(IDE) is a software suite that comprises basic tools like editor, compiler, debugger to develop applications.
- Java has various IDE but mostly used is Eclipse IDE.
- Eclipse IDE is famous for Java Integrated Development Environment, but it has other IDEs like C/C++ IDE, JavaScript IDE, PHP IDE. It can also be used for web development technologies.
- It has all the necessary tools required for application development and testing.
- One of the best perks of using Eclipse IDE is its user-friendly user interface(UI).
Here are the Steps to Install One of the Famous IDE Eclipse :
Step 1:
Download Eclipse Installer from the link and run .exe file.

Step 2:
Click on install.

Step 3:
Accept the license by clicking on Accept Now.

It will start the installation.

Step 4:
Click on the Eclipse IDE shortcut to open the IDE.

Step 5:
Select the workspace to run the project. You can create a new workspace(folder) and give its location.

Now, the Eclipse IDE is ready to create your first Java Program.
Write Your First Java Program on Windows
Let’s write our first Java Program that prints «Hello World!»`
Step 1:
Write a simple program using Java that prints «Hello World!» in any editor. (Here, we have used notepad.)

Note: Java is an Object-Oriented Programming language which works using classes and objects. And a basic requirement to run any java program is that it must have at least one class.
Step 2:
Save the file with any name using the .java extension.

Note: While saving files, remember that the class name in the program and file name should be the same.
Step 3:
Open the command prompt from the folder where your program file is saved.

Step 4:
Run command
to compile the java program.

After successful compilation of the program command prompt will be ready for another command.
Step 5:
To execute the program and get output on the command prompt screen run the command

Step 6:
And after execution, you will see your output on the screen.

Conclusion
- Java needs JDK which is a superset of JRE and JVM to execute programs.
- javac command is used to compile java code and java command is used to execute it.
- java command activates JVM, which is responsible for executing java programs.
- After successful installation, we need to set environment variables to execute java commands.
- IDE consists of the smart editor and other applications which are helpful in developing and debugging Java applications easily.
How To Install Java 12 On Windows 10
Published on Jul 03,2019 3K Views
![]()
Research Analyst, Tech Enthusiast, Currently working on Azure IoT & Data Science… Research Analyst, Tech Enthusiast, Currently working on Azure IoT & Data Science with previous experience in Data Analytics & Business Intelligence.
Oracle JDK is a highly versatile kit which can be used for testing applications, and program development alike, using the Java programming language. This article is going to be a brief guide on How to download and install Java 12 on Windows 10, for beginners.
Java is one of the most extensively used computer languages. It is an object-oriented programming language and is very easy to learn. To write and run Java code we need Oracle Java Development Kit (JDK) installed on our computer. JDK provides a development environment for programs, applications and tools based on Java.
Java SE 12.0.1 is currently, the latest release for the Java SE Platform.
So, if you follow these few simple steps, you should be able to download and install JDK 12 on your Operating Systems, completely hassle-free.
- Download Java/JDK from the Oracle Website
- Install Java/JDK on your system
- Set up Java Environment Variables on Windows 10
Download Java/JDK from the Oracle Website
To install JDK on Windows, open any browser, search for download Java/JDK 12 and open the Oracle Official Website.
Step 1: Visit the Oracle Website Downloads Page
-
Head to the Menu button on the top-left corner of the screen (which looks like 3 short lines stacked on top of each other) and proceed to Products >> Java >> Download Java (JDK) for Developers
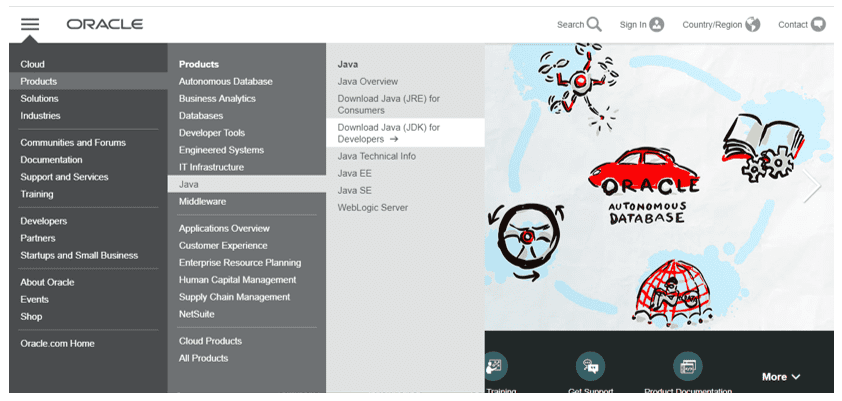 Or,
Or,
you could straightaway log on to the downloads page on the Oracle Official Website.
-
Click on the download button. It looks like a square with the Java logo on it.
Step 2: Java SE Development Kit
-
Scroll down. You will come across a box which looks like the following image. You’ll see a plethora of options to download the Java SE 12 installation file for Linux, MacOS and Windows.

-
At the top of the box, you’ll see an option named Accept License Agreement. Select the bubble next to it.
-
You, then, have to select your operating system. For Windows 10, click on jdk-12_windows-x64_bin.exe

Note: You need a 64-bit operating system to install any version of Java after JDK 9. If you’re still using a 32-bit OS, you can’t install Java JDK 12.
Install Java JDK 12 on your system
After the download has been completed, you can follow a few simple steps to install Java JDK 12 on Windows 10.
-
Open the downloaded file and it will lead you to an installation wizard simply click on Next.

-
You can go ahead and change your installation location but I reckon you keep to the default location and click on Next.


You now have installed Java JDK 12 on your Windows 10 System!
Set up Java Environment Variables on Windows 10
Hope you’ve found it pretty simple till now. But here’s the catch!
By just downloading and installing JDK 12, Java is not going to work. You need to set the environment variable which will help in compiling the Java Code. Now, to set up a Java environment, you’ll need to do the following.
Step 1: Set up Java Environment Variables
-
Navigate to C:Program Files and look for Java folder. Open it and you will find jdk 12 folder.
-
Go to the bin folder and copy the path of the bin folder.
-
Next, navigate through this path, Control Panel > System and Security > System > Advanced System Setting > Environment Variables
-
Under the System Variables, you will find a variable named PATH just go to edit and add the bin folder location.

Java does not necessarily need any environment variables to be set. However, setting environment variables does make certain things easier. The environment variables point to the folder location where your preferred version of Java is installed. These environment variables are mainly required by external programs and tools to figure out where exactly is Java installed on your machine.
Step 2: Check if the Variables have been set correctly
Now to check whether you have successfully set up Java, open the Windows Command Prompt and type the following commands
-
java -version
-
javac
You should see something like the following image.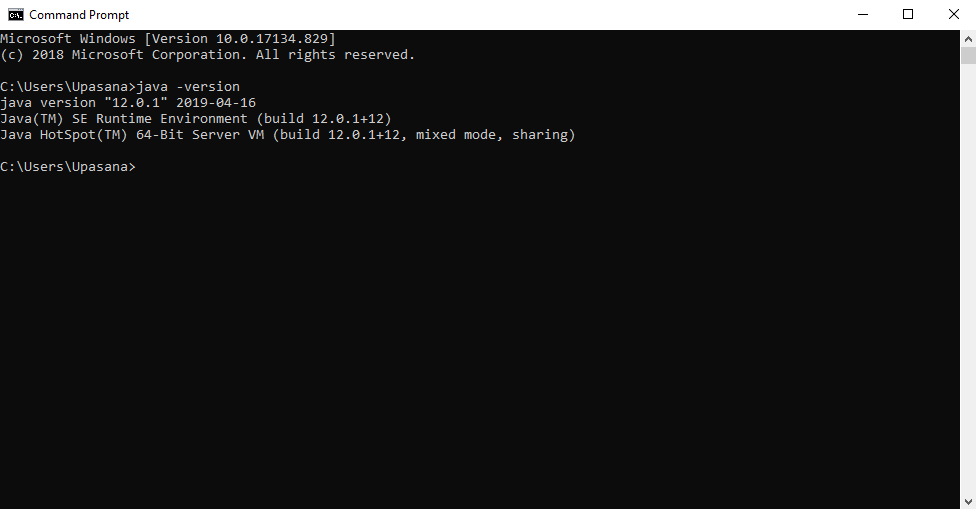
Congratulations! You’ve just successfully learnt to install Java 12 on Windows 10. Now you’ll be running complex codes in Java in no time at all!
Want more of Java? Go ahead and check out the Java Training Programme by Edureka, a trusted online learning company with a network of more than 250,000 satisfied learners spread across the globe. Edureka takes you through every step on your journey of learning Java. We have a curriculum, designed for students and professionals, alike, who want to be a Java Developer.
Got a question for us? Please mention it in the comments section below and we will get back to you as soon as possible.
This Java Development Kit(JDK) allows you to code and run Java programs. It’s possible that you install multiple JDK versions on the same PC. But Its recommended installing Java on Windows 10 with latest version.
Following are the steps on how to install Java in Windows 10 for JDK 8 free download for 32 bit or JDK8 download for Windows 64 bit and installation
Step 1) Go to link. Click on JDK Download for Java download JDK 8.

Step 2) Next,
- Accept License Agreement
- Download Java 8 JDK for your version 32 bit or JDK download 64 bit.

Step 3) When you click on the Installation link the popup will be open. Click on I reviewed and accept the Oracle Technology Network License Agreement for Oracle Java SE development kit and you will be redirected to the login page. If you don’t have an oracle account you can easily sign up by adding basics details of yours.

NOTE: You will be required to create an Oracle Account to start Java 8 download of the file.
Step 4) Once the Java JDK 8 download is complete, run the exe for install JDK. Click Next

Step 5) Select the PATH to install Java in Windows… You can leave it Default. Click next.

NOTE: Follow the onscreen instructions in succeeding steps to install Java 8 on Windows 10.
Step 6) Once you install Java in windows, click Close

How to set Environment Variables in Java: Path and Classpath
The PATH variable gives the location of executables like javac, java etc. It is possible to run a program without specifying the PATH but you will need to give full path of executable like C:Program FilesJavajdk1.8.0_271binjavac A.java instead of simple javac A.java
The CLASSPATH variable gives location of the Library Files.
Let’s look into the steps to set the PATH and CLASSPATH
Step 1) Right Click on the My Computer and Select the properties
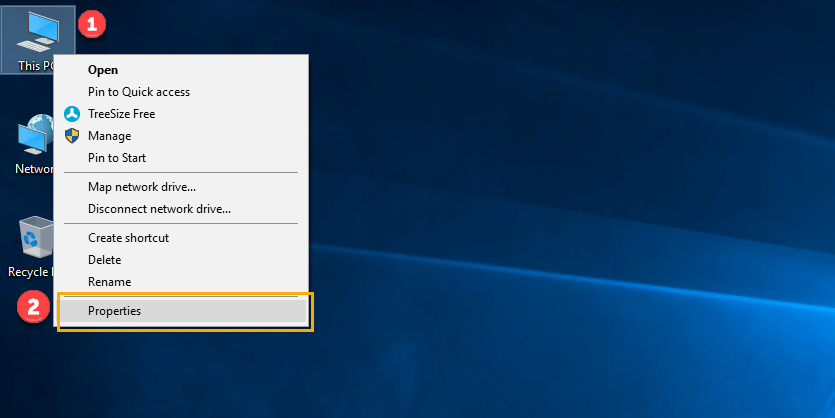
Step 2) Click on advanced system settings

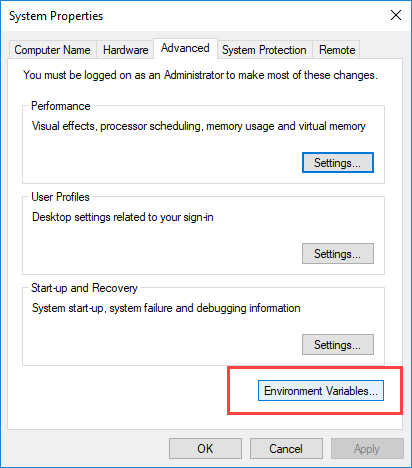
Step 3) Click on Environment Variables to set Java runtime environment
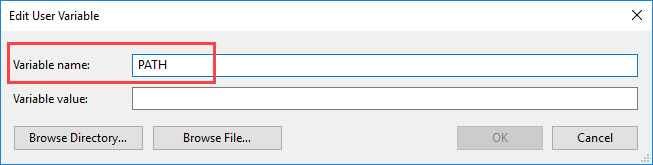
Step 4) Click on new Button of User variables
Step 5) Type PATH in the Variable name.
Step 6) Copy the path of bin folder which is installed in JDK folder.
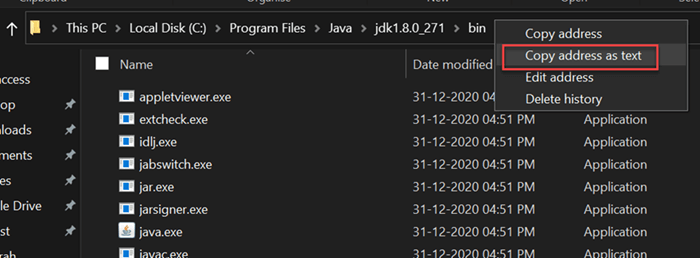
Step 7) Paste Path of bin folder in Variable value. Click on OK Button.
Note: In case you already have a PATH variable created in your PC, edit the PATH variable to
PATH = <JDK installation directory>bin;%PATH%;
Here, %PATH% appends the existing path variable to our new value
Step  You can follow a similar process to set CLASSPATH.
Note: In case you java installation does not work after installation, change classpath to
CLASSPATH = <JDK installation directory>libtools.jar;
Step 9) Click on OK button
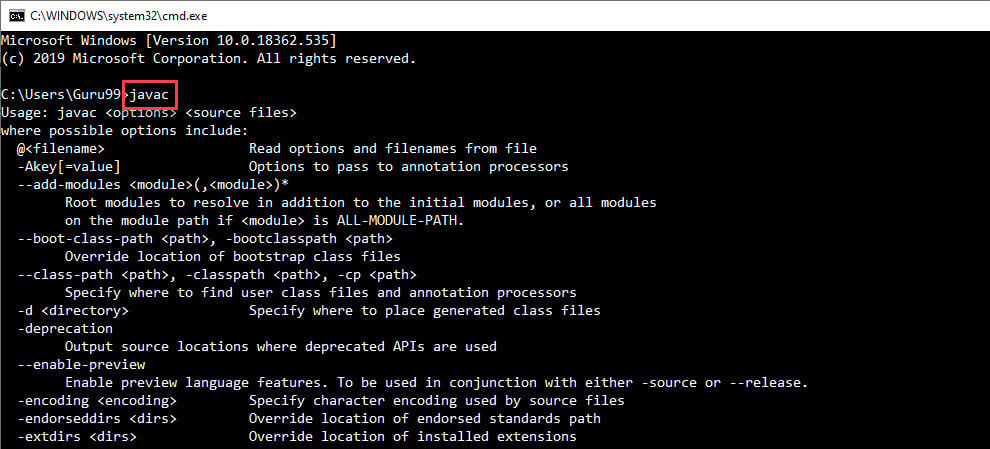
Step 10) Go to command prompt and type javac commands.
If you see a screen like below, Java is installed.
Having trouble installing Java? Check our Online Java Compiler