Эта инструкция устарела, используйте вместо неё более новую
Во многих моих тренингах так или иначе используется Java, либо как язык программирования для разработки автотестов, либо как виртуальная машина для запуска приложений, написанных на Java — инструментов тестирования, сред разработки, и даже клиент системы видеоконференций GotoWebinar требует наличия Java.
Поэтому я решил описать процедуру установки Java для операционной системы Windows и последующей настройки системы, потому что, к сожалению, недостаточно просто “запустить инсталлятор и всегда нажимать кнопку Next”.
1. Где взять Java?
На официальном сайте Oracle Java.
2. Какую версию выбрать?
Разумеется, последнюю доступную (на момент написания инструкции это Java 8).
Выбирая из 32-битной и 64-битной версий, берите 64-битную, если ваша операционная система это позволяет, потому что у неё менее строгие ограничения по памяти, доступной исполняемым Java-приложениям.
3. Что устанавливать, JRE или JDK?
Java Runtime Environment, или JRE — это виртуальная машина, позволяющая запускать приложения, написанные на языке программирования Java.
Java Development Kit, или JDK — это набор инструментов, для разработки программ на языке программирования Java (компилятор, архиватор, генератор документации и прочие). JRE разумеется тоже входит в дистрибутив JDK.
Правило очень простое: если вы собираетесь что-нибудь писать на языке программирования Java, значит вам потребуется JDK. А если только запускать готовые программы — тогда достаточно JRE.
4. Установка Java
Вот тут, действительно, всё просто — нужно запустить инсталлятор и следовать указаниям визарда. Можно просто всё время нажимать кнопку Next.
5. Настройка переменных окружения
К сожалению, инсталлятор Java не выполняет настройку переменных окружения, поэтому придётся сделать это вручную после установки.
Во-первых, необходимо установить переменную JAVA_HOME, которая должна указывать на директорию, в которую установлена Java. Многие программы используют эту переменную, чтобы определить, где находится Java.
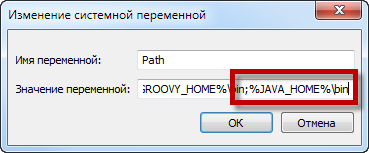
Во-вторых, надо в переменную PATH добавить путь к директории %JAVA_HOME%bin. Эта переменная указывает операционной системе список директорий, в которых нужно искать исполняемые файлы, и чтобы можно было запускать Java из консоли, переменная PATH должна быть правильно настроена.
Для установки переменных окружения сначала нужно открыть свойства компьютера, либо использовав сочетание клавиш Win-Pause, либо через меню “Пуск”:
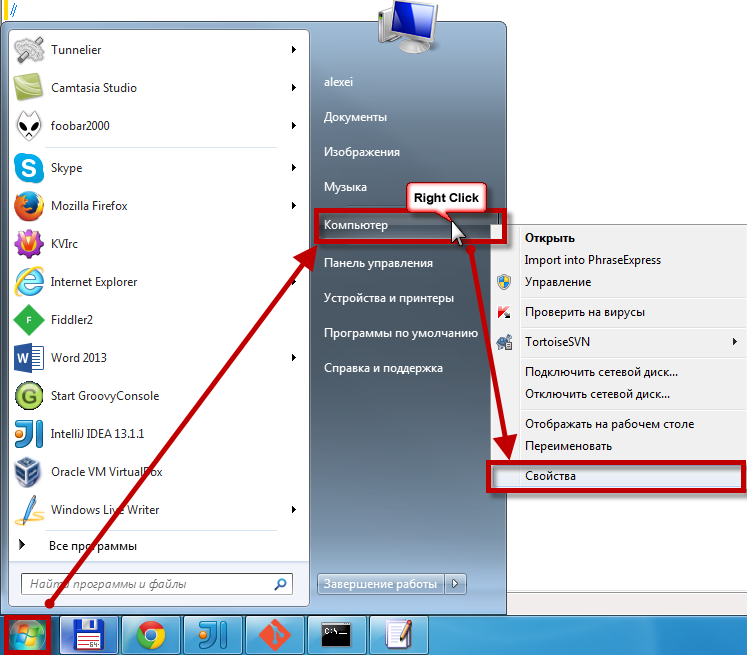
Затем нужно выбрать “Дополнительные параметры системы”, в открывшемся диалоге перейти на вкладку “Дополнительно” и нажать кнопку “Переменные среды”, после чего появится диалог настройки переменных окружения.
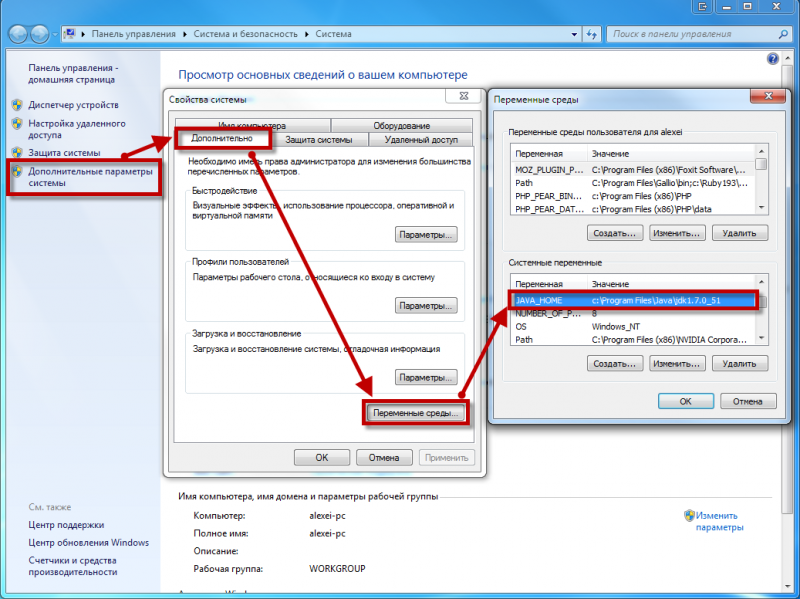
Если у вас уже есть переменная окружения JAVA_HOME — надо её отредактировать, если нет — создать новую. В качестве значения нужно указать путь к директории, куда установлена Java, то есть, например c:Program FilesJavajdk1.8.0_25, если вы установили JDK, либо c:Program FilesJavajre1.8.0_25, если вы установили только JRE.
После того, как вы установили значение переменной JAVA_HOME, необходимо отредактировать значение переменной PATH, добавив туда путь к директории, где находятся исполняемые файлы Java, то есть %JAVA_HOME%bin
И сохранить всё это, закрыв все открытые диалоги в обратном порядке кнопками OK.
Обратите внимание, что если вы устанавливаете JDK, то в названии директории указывается номер версии, поэтому впоследствии, когда вы решите установить более новую версию, не забудьте поменять значение переменной окружения JAVA_HOME.
После того, как вы изменили переменные окружения, новые значения будут действительны только для новых запускаемых программ, уже запущенные программы не узнают о том, что переменные окружения поменялись. Поэтому если вы, например, пытались запустить Java из консоли и у вас не получилось из-за неправильных настроек переменной PATH, вам придётся перезапустить консоль после того, как вы поменяли значение переменной.
6. Удаление лишних файлов
Запустите консоль (cmd) и выполните в ней команду where java.
В результате вы должны увидеть путь к исполняемому файлу java.exe, который операционная система должна успешно обнаружить в том месте, куда вы установили Java. Если файл не нашёлся — значит неправильно настроена переменная PATH и нужно вернуться к предыдущему пункту.
Однако иногда бывает и наоборот, находятся «лишние» исполняемые файлы:
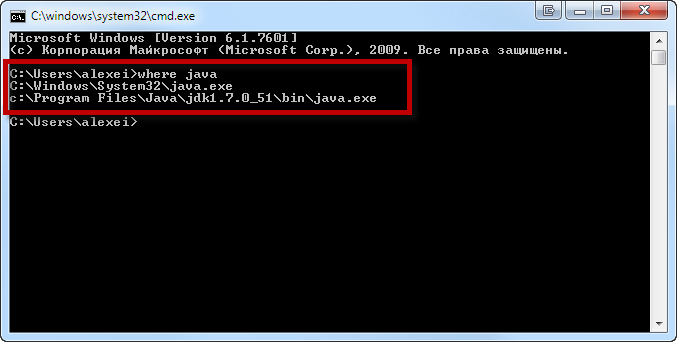
Происходит это из-за того, что инсталлятор Java вместо того, чтобы правильно настроить переменные окружения, пытается положить исполняемые файлы в директорию C:Windowssystem32
Это не очень хорошо — засоряется системная директория, может возникнуть рассогласование версий Java (в разных директориях разные версии). Поэтому надо удалить из каталога C:Windowssystem32 исполняемые файлы java.exe, javaw.exe и javaws.exe, если они там обнаружатся.
Вот и всё, теперь можно пользоваться Java. Только не забывайте о том, что после установки новой версии надо будет обновить переменную окружения JAVA_HOME!
When you install Java JDK on Windows 11, you will only find the Java JDK folder. On the latest version of the Java SE Development Kit, you will not find the Java JRE(Java Runtime Environment).
If you need Java JRE, you can install the Java SE Runtime Environment. You will find it on Java 8. It is a set of software tools for the development of Java applications. Here is the guide on How to Install Java JRE on Windows 11.
If you don’t know to download and install Java JRE on windows 11, then follow this article to find out. Before installing Java JRE on windows, first of all, you have to install Java JDK.
After successfully installing Java JDK. Follow these steps to download and install Java JRE on Windows 11.
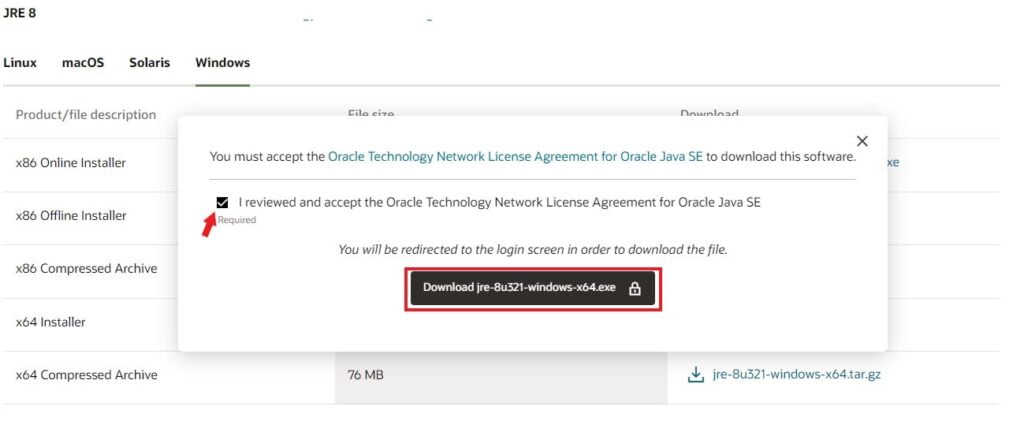
Step 1: Open any browser and search for Java JRE or simply visit this link https://www.oracle.com/in/java/technologies/javase/javase8u211-later-archive-downloads.html

Step 2: Now look for JRE 8 on the download page and select your operating system. Now to download, click on the download link and accept the license agreement.
If your operating system is 32-bit then you have to download the x86 version of the software and if 64-bit then you have to download the x64 version of the software (*** download the .exe file). Here you can check your System Type on Windows Computer.
Note:- It will be redirected to the login screen in order to download the file. Here you can check why you need an Oracle account and how you can create a free Oracle account.
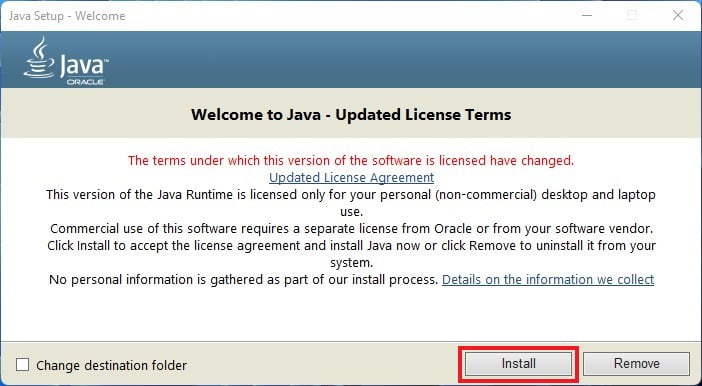
Step 3: After completing the download, open the downloaded file to install Java JRE on windows, here on the setup page click on “Install“.
How to Setup Java JRE on Windows 11
By just downloading and installing Java JRE, Java JRE will not work. we need to set the environment path variable for the Java JRE bin folder.
To set up the Java JRE environment variable follow these steps:
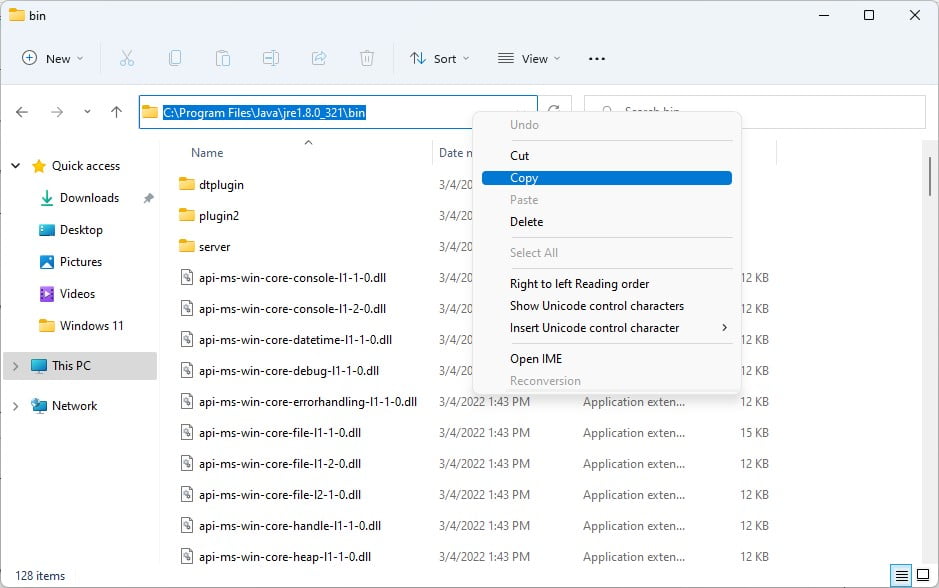
Step 1: Open C Drive > Program Files folder and look for the Java folder and open it.
Step 2: Inside the Java folder you will find a jre1.8.0_291 folder, open it and open the bin folder, and copy the path of the bin folder.
Note:- Now you have to set the environment variable.
Step 3: For that Go to Control Panel > System and Security > System > Advanced System Setting > Environment Variables

Step 4: Under the System variable, you will find “PATH” just select it and click on edit. Now click on New and add the bin folder location, after that click on “OK“.

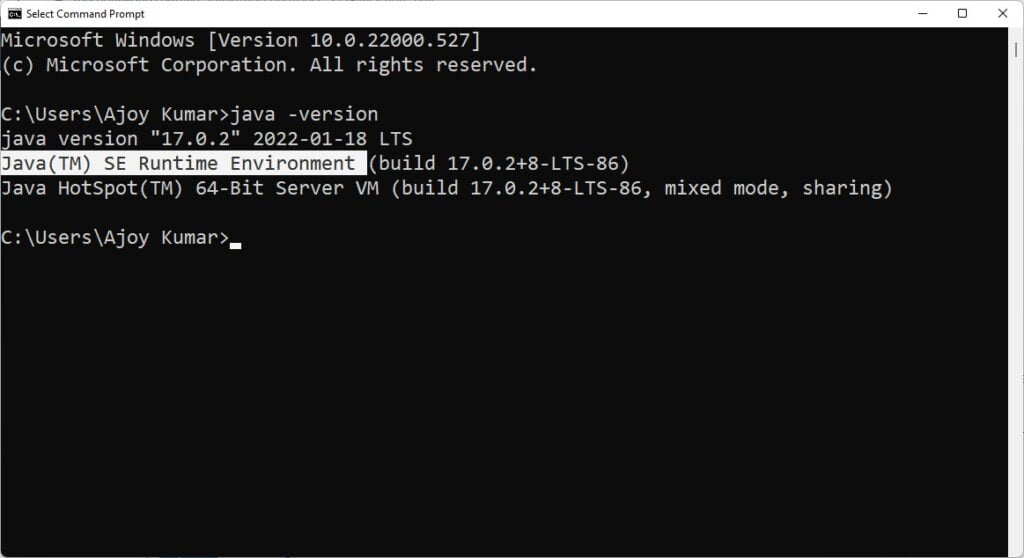
Now to check whether Java JRE is successfully set up or not, open Command Prompt and type this command “java -version”
By using the ‘java -version‘ command, you can check the Java JDK version and Java SE Runtime Environment build number. Now you are ready to use Java JRE on Windows 11.
Conclusion
That’s it; this is how you can download and install Java JRE on Windows 11. If you are having an error related to JAVA_HOME, then you can check our detailed guide on; how to set the JAVA_HOME variable on Windows 11. For that, follow the linked guide.
I hope this article was helpful to you. If you liked the article, share it with your friends. If you have some suggestions or doubts, do not hesitate to leave them in the comments section.
This page describes how to install and uninstall JRE 8 for Windows.
The page has these topics:
-
System Requirements
-
Proxy Settings and Authentication
-
Installation Instructions Notation
-
Installation Instructions
-
Uninstalling the JRE
-
Java Start Menu
-
Java Plug-in
-
Java Web Start
-
Java Update Feature
-
Option to Disable the «JRE out of date» Warning
-
Installation of JRE on 64-Bit Windows Computers
See «JDK 8 and JRE 8 Installation Start Here» for general information about installing JDK 8 and JRE 8.
Proxy Settings and Authentication
To use the Windows Online Installer, you must be connected to the Internet. If you are running behind a proxy server, you must have your proxy settings correctly configured. If they are not configured, or are incorrectly configured, the installer will terminate with the following message:
  The installer cannot proceed with the current Internet Connection proxy
  settings. Please check the Installation Notes for more information.
If you see this message, check your proxy settings: From the Start menu select Settings, click Control Panel, double-click Internet Options, select the Connections tab, and click the LAN Settings button.
If you do not know what the correct settings should be, check with your Internet provider or system administrator.
Installation Instructions Notation
For any text in this document that contains the following notation, you must substitute the appropriate update version number:
version
For example, if you were downloading the JRE installer for 32-bit systems for update 1.8.0_01, the file name: jre-8version-windows-i586.exe would become jre-8u1-windows-i586.exe.
Similarly, if you were downloading the JRE installer for 64-bit systems for update 1.8.0_01, the file name jre-8version-windows-x64.exe would become jre-8u1-windows-x64.exe.
Installation Instructions
Installing the JRE consists of two main steps:
-
«Downloading the Installer»
-
«Running the Installer»
Running the Installer
Note:
You must have administrative permissions in order to install the JRE.
If you saved the JRE installer to your computer, run the installer by double-clicking it. Follow the instructions the installer provides. The installer notifies you if Java content is disabled in web browsers, and provides instructions for enabling it. If you previously chose to hide some of the security prompts for applets and Java Web Start applications, the installer provides an option for restoring the prompts. When you are finished with the installation, you can delete the downloaded file to recover disk space.
Note the following:
-
The public JRE installed with the JDK is not registered. (This also applies to the 64-bit version of the JDK.) You must set the
PATHenvironment variable to point toJAVA_HOMEbin(whereJAVA_HOMEis the location where you installed the public JRE) to register the JRE. See «Private Versus Public JRE» for more information about the public JRE. -
By default, Java Access Bridge is disabled. To enable it, see
http://docs.oracle.com/javase/8/docs/technotes/guides/access/enable_and_test.html#enabling_jab. -
After installation, use the Java item in the Windows Start menu to get access to essential Java information and functions, including help, the Java Control Panel, and checking for updates.
Java Plug-in
Java Plug-in technology, included as part of the JRE, establishes a connection between popular browsers and the Java platform. This connection enables applets on web sites to be run within a browser on the desktop. Java Plug-in is automatically enabled for supported web browsers during installation of the JRE. No user intervention is necessary. See http://docs.oracle.com/javase/8/docs/technotes/guides/deploy/applet_dev_guide.html for more information about Java Plug-in technology.
Note:
In Java SE 8, the version of Java Plug-in that is available in versions of the JRE prior to Java SE 6 Update 10 has been deprecated. However, this earlier version of Java Plug-in is still shipped with Java SE 8 for compatibility purposes but is no longer fully supported. It will be removed in a future release. For backward compatibility purposes, you can specify which Java Plug-in is used to run applets in the Java Control Panel. To specify this, run Java Control Panel, go to the Advanced tab, Java Plug-in node, and toggle the check box labeled Enable the next-generation Java Plug-in. See Java Control Panel http://docs.oracle.com/javase/8/docs/technotes/guides/deploy/jcp.html#JSDPG759 for more information. In addition, you can use the Java Control Panel to manage multiple JRE versions used for applet execution.
Java Web Start
Java Web Start is an application-deployment technology that gives you the power to run full-featured applications with a single click from your Web browser. You can now download and run applications, such as a complete spreadsheet program or an Internet chat client, without going through complicated installation procedures. With Java Web Start, you run applications simply by clicking a web page link. If the application is not present on your computer, Java Web Start automatically downloads all necessary files. It then caches the files on your computer so the application is always ready to be run anytime you want — either from an icon on your desktop or from the browser link. No matter which method you use to run the application, the most current, available version of the application is always presented to you. See Java Web Start for more information.
This topic covers the following topics:
-
«Upgrading from Previous Versions»
-
«Uninstallation»
Upgrading from Previous Versions
If you have a previous version of Java Web Start, do not uninstall it. Uninstalling it will cause the download cache to be cleared, and all previously installed Java Web Start application data will have to be downloaded again. This new version will write over previous installations and automatically update browsers to use this new version. The configuration files and the program files folder used by Java Web Start have changed, but all your settings will remain intact after the upgrade because Java Web Start will translate your settings to the new form.
Uninstallation
The only way to uninstall Java Web Start is to uninstall the JDK/JRE. Uninstalling the JDK/JRE will not, however, remove the cache for previous versions of Java Web Start. Previous releases have separate uninstall instructions for Java Web Start.
You may see a misleading message if you do the following:
-
Download and cache a Java Web Start application with the JDK or JRE.
-
Remove the JDK or JRE using «Add or Remove Programs» from the Windows Control Panel.
-
Remove the Java Web Start application using «Add or Remove Programs.»
When you remove the application, you see an «Uninstaller Error» dialog box saying «An error occurred while trying to remove Java-Application: name App. It may have already been uninstalled. Would you like to remove Java-Application: name App from the Add or Remove program list?» If you say yes to this, then you will see another «Uninstaller Error» dialog box saying «You do not have sufficient access to remove Java-Application: name App from the Add or Remove Program list. Please contact your system administrator.» This is the misleading message. It implies that the problem is due to privileges. It is not. The problem is that you have already removed the Java Web Start application when you removed JDK or JRE, but this is not reflected in the «Add or Remove Programs» dialog box until it is refreshed by pressing F5 or it is closed and reopened.
To avoid seeing this misleading message, either press F5 or close and reopen the dialog box. Any Java Web Start application that was downloaded and cached with the JDK or JRE will no longer appear in the list of currently installed programs.
Installation of JRE on 64-Bit Windows Computers
64-bit Windows operating systems (which may be Vista, Windows 7, or Windows  come with a 32-bit Internet Explorer (IE) browser as the standard (default) for viewing web pages. These operating systems also include a 64-bit Internet Explorer browser. However, using it is optional, and it must be explicitly selected to view web pages. Note that because some web content may not work properly in a 64-bit browser, it is recommended that you use the default 32-bit browser and install the 32-bit JRE.
The following topics can help you determine which JRE to install:
-
«Verifying Your Version of Windows»
-
«Verifying Your Browser»
-
«Choosing Which JRE Installer to Download»
Verifying Your Browser
Follow these steps to determine whether you are using a 32-bit or 64-bit version of Internet Explorer:
-
Start Internet Explorer.
-
In the menu bar, click Help.
-
Select About Internet Explorer, which will open an information window.
Follow one of the following methods to determine whether you are using a 64-bit version of Firefox:
-
Check the About Firefox panel.
-
Type
about:supportin the browser address.
If you running 64-bit version of Firefox, it may be indicated as 64-bit (for example, Win64); otherwise, it is a 32-bit version of Firefox.
Note:
The 64-bit JRE is presented as a download option automatically for 64-bit Internet Explorer and 64-bit Firefox for Windows users.
Choosing Which JRE Installer to Download
Download a JRE installer, depending on which browser you have installed:
-
32-bit browser: download the 32-bit JRE installer (use either the Windows x86 Offline or Online installer).
-
64-bit browser: download the 64-bit JRE installer.
-
Both 32-bit and 64-bit browsers: download both the 32-bit and 64-bit JRE installers, respectively.
Java is a programming language that is very popular amongst developers. In order to run Java applications Java Runtime Environment a.k.a. JRE should be installed. As new features come or security bugs fixed JRE is updated regularly. Java or JRE can be updated in different ways where we will look at these ways in this tutorial.
We will start with the installation of Java or JRE. First, we will browse the following URL which provides the Java installation executables for the all Windows operating system like Windows 7, Windows 8, Windows 10, Windows 2008, Windows 2012, Windows 2016 etc.
https://java.com/en/download/windows_manual.jsp

We can see that the following installation files are provided
- Windows Online will download a little executable which will 1.87 MB and download all required files and libraries for Java from the internet.
- Windows Offline will download all files and libraries which is 63.53 MB.
- Windows Offline (64-bit) which contains all files and libraries for Java installation. It is 71.44 MB and can be used for a 64-bit browser.

During the installation we will see the following screen which will provide basic information about the currently running installation process.

When the installation is complete successfully we will see the following screen which provides “You have successfully installed Java” message.

Check Java or JRE Version
Java or JRE provides regular updates. New updates are numbered according to track updates. Each update or Java version has a version number. We can print this version number in different ways like command-line, GUI, or Browser. We can use java command with the --version option in order to check the version of the installed Java or JRE.
> java --version
Alternatively we can check Java or JRE version with the GUI where we will write java about to the Start box like below.
About Java

This will open following Windows here version information is provided which is version 8 and Update 201.

We can also check the Java or JRE version from the following link where we need to click the Accept and Continue button on this page.
https://www.java.com/en/download/installed.jsp

Check Java or JRE Update
We can check if there is a Java or JRE update from different ways like checking the version. We can use GUI or Web in order to check Java or JRE updates. From the web, we can use the following URL to check Java or JRE Update.
https://www.java.com/en/download/installed.jsp

When we click our Java or JRE

We can see that your Java is Out of Date message with the A newer version of Java available. We have Java version 8.181 but the latest Java version is 8.201. We can update Java or JRE with the Download Java Now button which will continue classical Java Install which is explained above.
Update Java From Java Web Site
Well we can update Java or JRE on Windows operating systems in different ways. We will start with the web where we will visit following URL where we have been used for update check.
https://www.java.com/en/download/installed.jsp
Then we will click I Agree to the Terms and Want to Continue.
This will redirect us following page where Java Online installer will run. We will click Run command.

We will click Yes in the following screen to install and update Java with Administrator privileges.

We will click Install to start the installation.

This is the installation phase of the Java.

When the new version of the Java installation complete we will see a Windows which will list old or out-of-date versions of Java to uninstall. We will click Uninstall

Here is the uninstall process of old and out-of-date Java

When uninstall of old Java completed we will see the following screen. We can click Next

Now we can exit from the update of the Java.

Update Java From Java From GUI
We can update Java from GUI or Desktop by using Java Configuration tool. We can open the Java configuration tool from Computer->Control Panel->Java

Or writing Configure Java to the Start menu like below.

Then we will open the Update pane where we can find the Update button below.

We will see the following screen where we have to click Update. We can see that Java Update Available message which means there is an update version.

After this step, the update process will continue like web-based Java update.
Java is a general-purpose, object-oriented, and class-based programming language that is widely used by numerous developers. Its very design ensures that few implementation dependencies are used whenever this language is deployed.
As a programmer, you can rely on it to create complex applications for single PCs or distribution networks. Nowadays, a lot of websites, services, and applications rely on Java JRE to run. Thus, not having the latest version on your PC may prevent you from accessing them altogether.
Thanks to its overall security, reliability, and flexibility, this language is a trustworthy instrument in several fields.
From gaming consoles, data centers, smartphones, websites, and laptops to super-powerful science computers, Java (JRE) is there to provide a strong backbone.
Java’s system requirements
Although it was designed to work on a wide range of devices, it’s wise to check if your system is eligible to run Java JRE before rushing to deploy it. Without further ado, here’s the prerequisite list:
- Operating system: Windows 10, 8.1, 8, 7, Vista, Server 2008, Server 2012 (including R2)
- Architecture: works on both 32-bit and 64-bit operating systems
- Memory: at least 128 MB RAM
- Space: minimum 124 MB free HDD space for JRE (Java Runtime Environment) + 2 MB for Java Update
- Processor: at least a Pentium II 266 MHz CPU
- Browsers: Internet Explorer versions 9 and higher, Mozilla Firefox
You can see for yourselves that you don’t need a supercomputer to deploy and run Java (JRE). Its wide device accessibility has proven to be true to form, and we can move on with our review.
Our Review
How to remove Java completely from your Windows PC
If you previously used Java (JRE) on your PC, chances are you still have some older version available somewhere on your system or at the very least some residual files.
In this case, you might want to remove the old Java files before you proceed with deploying the latest version.
You can tackle this situation in two different ways:
- Use the Java Uninstall Tool
- Remove Java manually, like any other program
1. Using the Java Uninstall Tool
This tool can come in very handy, as it automates the process of identifying and removing Java from your PC completely. There’s no need to search for remaining files, as this utility can take care of everything for you.
- You will see the versions of Java that the tool detected and wants to remove
- It’s possible to select all Java versions to remove or just some of them
- You can use it to detect and uninstall Java versions 1.4.2 and higher
- This tool detects only Java versions that were deployed through the official installer, and not bundled editions

It comes in especially handy if you’ve installed several editions of JRE on your PC and have no idea how to get rid of them all. You can download the Java Uninstall Tool from here.
2. Uninstalling Java manually
It’s not necessarily more complicated to remove Java manually, but there are a bunch more steps you need to take.
Additionally, if you have multiple versions available on your system, you might miss some of them, rendering the uninstallation process ineffective.
With that in mind, here’s how to uninstall JRE manually on Windows 10:
- Click the Start button
- Choose Settings from the Start menu
- Press the Apps button in the Settings window
- Locate the Java edition you want to uninstall and click it
- Click the Uninstall button
- Wait for the process to finish
That’s all. We can’t stress this enough, but make sure you have removed every trace of old JRE files before you install the latest Java version on your Windows 10 PC. Trust us, it will save you a lot of hassle.
How to install Java (JRE) on Windows
It’s critical that you always have the latest stable version of Java (JRE) if you want to avoid incompatibility issues, runtime errors, or even crashes.
We’ll show you how to install the latest Java (JRE) version on your Windows 10 PC. Follow these steps:
- Go to the Java JRE download page
- Check the recommended version at the top of the page
- Scroll down to the Windows section
- Choose the appropriate installer version for you
- Wait for the download to complete
- Double-click the installer executable
- Follow the on-screen installer instructions
The installation part is not exactly difficult since all the configuration you need to do is choosing a destination path on your PC. However, you must be careful to choose the right installer from the website.
Currently, there’s an online installation tool, and two offline ones (one for 32-bit browsers, and another one for 64-bit ones).
Note: if you use 32-bit and 64-bit browsers on the same computer and want to use Java on each of them, you need to install both 32-bit and 64-bit versions of Java (JRE).
FAQ: Learn more about Java
- What is Java?
To put it shortly, Java is a great programming language that is used in a wide range of fields. You need to download its runtime environment (JRE) if you want to be able to run Java-based applications on your PC.
- How to update Java?
After you install it on your computer, Java will offer to keep itself updated automatically. Alternatively, you can set it to notify and remind you of updates without deploying them automatically, or you can download updates manually from the official website.
- How can I enable Java in Chrome?
Starting with version 42, you can no longer use Java in Chrome, since the browser no longer supports NPAPI (Java applet technology). You can still use it on versions 42 and earlier, but there’s really no point in doing so.