Jupyter Notebook is an open-source web application that allows you to create and share documents that contain live code, equations, visualizations, and narrative text. Uses include data cleaning and transformation, numerical simulation, statistical modeling, data visualization, machine learning, and much more.
Jupyter has support for over 40 different programming languages and Python is one of them. Python is a requirement (Python 3.3 or greater, or Python 2.7) for installing the Jupyter Notebook itself.
Jupyter Notebook can be installed by using either of the two ways described below:
- Using Anaconda:
Install Python and Jupyter using the Anaconda Distribution, which includes Python, the Jupyter Notebook, and other commonly used packages for scientific computing and data science. To install Anaconda, go through How to install Anaconda on windows? and follow the instructions provided. -
Using PIP:
Install Jupyter using the PIP package manager used to install and manage software packages/libraries written in Python. To install pip, go through How to install PIP on Windows? and follow the instructions provided.
Installing Jupyter Notebook using Anaconda:
Anaconda is an open-source software that contains Jupyter, spyder, etc that are used for large data processing, data analytics, heavy scientific computing. Anaconda works for R and python programming language. Spyder(sub-application of Anaconda) is used for python. Opencv for python will work in spyder. Package versions are managed by the package management system called conda.
To install Jupyter using Anaconda, just go through the following instructions:
Launching Jupyter: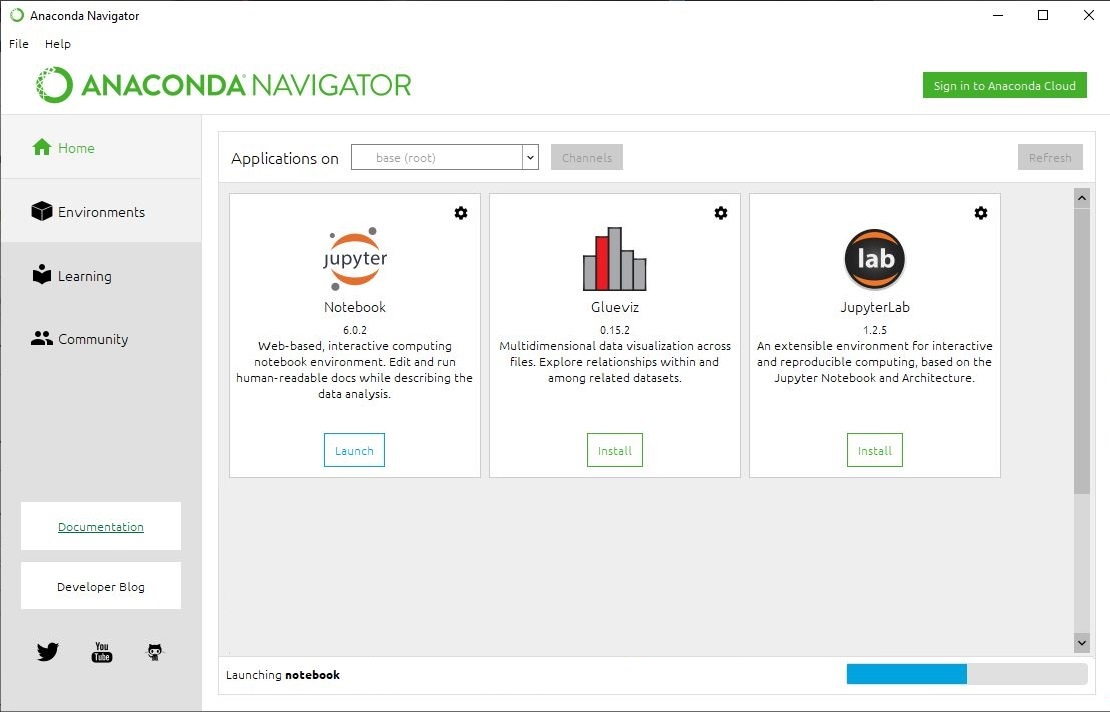

Installing Jupyter Notebook using pip:
PIP is a package management system used to install and manage software packages/libraries written in Python. These files are stored in a large “on-line repository” termed as Python Package Index (PyPI).
pip uses PyPI as the default source for packages and their dependencies.
To install Jupyter using pip, we need to first check if pip is updated in our system. Use the following command to update pip:
python -m pip install --upgrade pip

After updating the pip version, follow the instructions provided below to install Jupyter:
- Command to install Jupyter:
python -m pip install jupyter
- Beginning Installation:

- Downloading Files and Data:

- Installing Packages:

- Finished Installation:


Launching Jupyter:
Use the following command to launch Jupyter using command-line:
jupyter notebook

Being Pythonists it is very important to work with the best text editor/notebook so that the visibility of codes and various other diagrams are clear and understood by the people. The Python programming language contains an inbuilt text editor called IDLE and is highly preferred by developers because it provides numerous features for the users to play with starting from model creation to deployment.
There are many other alternative text editors to IDLE as well that provide high-end features to Python developers to carry out their tasks like Atom, Sublime, Notepad++, Spyder, Visual Studio, etc.
From so many text editors present for this programming language the most preferred one for the Data Science community is Jupyter. This special kind of Python notebook comes with an extension of .ipynb which stands for I Python Notebook.
The Python work that we usually do with normal editors gets saved with the extension of .py. Still, with this notebook, in hand, the extension is changed because this notebook provides a high-end command terminal where scientific computing can be performed with much ease. This I Python notebook can integrate with many existing web libraries for data visualization.
Now, as we know that Python is easily downloadable either through the official website or through Anaconda installation the question arises is Jupyter downloadable in the normal installation of Python, or do we need Anaconda to run Jupyter??
Also, as we know that Python is independent of the operating system we are working with so how to download the same in Windows 10? The answers to these questions are given below along with the working steps i.e. how to download Jupyter using plain Python:
Installing Jupyter on Windows 10 or 7
Please follow the following steps to install Jupyter NoteBook on Windows 10 or 7 without having an Anaconda setup.
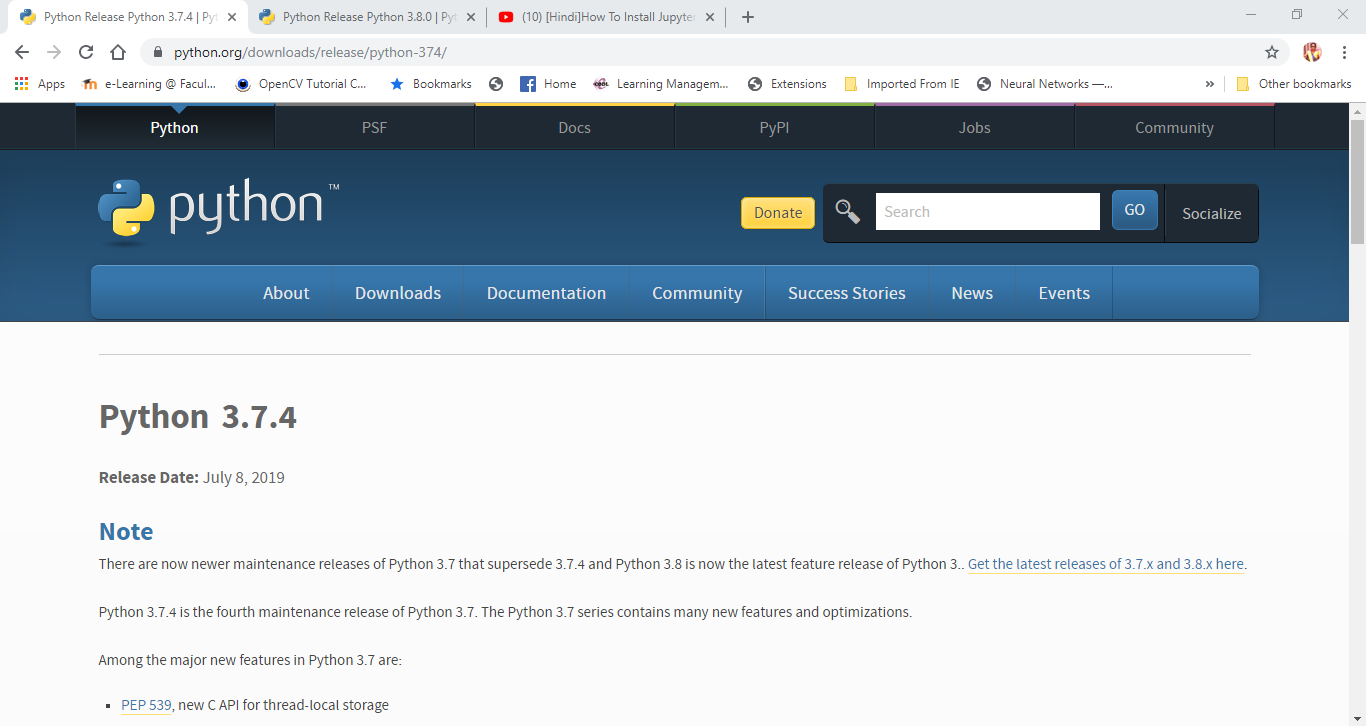
Download Python
- The first and foremost thing to download is Python from the official website which is python.org (Downloads section).
- Here you will find various versions of executable files for Windows, Mac, and Linux.
- Just click on the version you want to work with for Windows and processor 64-bit or 32-bit and start the installation.

Install Python 3.8.x 64-bit
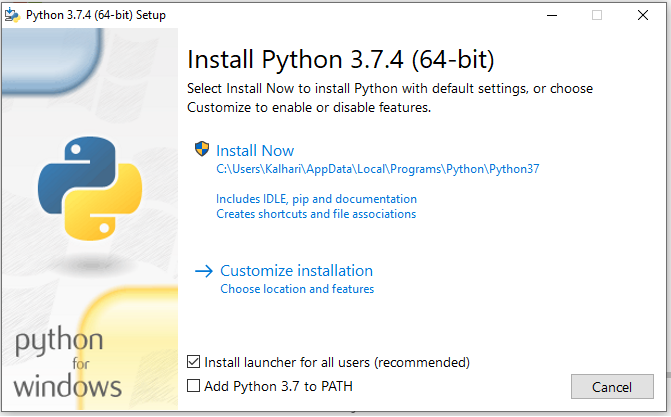
- Once the installation is finished click on the .exe file and it starts the setup for installation.
- The first page that opens in setup is the Install Python page where it will ask you to install python, customize your installation, install launchers for all users, and add Python to the path.
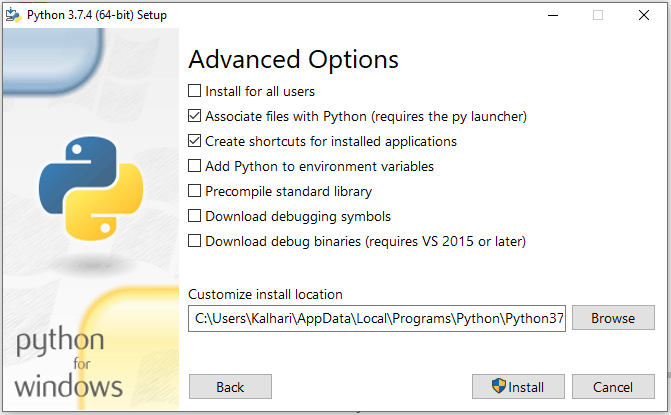
- Just make sure that you check the option of adding Python to the path and then click on customize the installation and check all the options getting displayed.
- Once you are finished with this just click on the install now option and wait for Python to get installed into your system.

Open Command Prompt and run Python
- Now after the installation finishes, to make sure that everything is properly installed just go to your command prompt and type python.
- If it is throwing no error and showing “Python 3.7.6 (tags/v3.7.6:43364a7ae0, Dec 19, 2019, 00:42:30) [MSC v.1916 64 bit (AMD64)] on win32 Type “help”, “copyright”, “credits” or “license” for more information” then congratulations you have successfully downloaded Python to your system and are ready to proceed to the next step that is, installing Jupyter.

Check whether PIP is Installed on Windows 10 or not
Again go to the command prompt and then make sure that pip is installed with Python and check that type pip in the command prompt. If it throws no error then there is a pip installed in your system. But don’t after Python setup it will be there.

Install Jupyter Notebook on Windows 10/7 using PIP
- Once you have made sure that everything is fine just type pip install jupyter and wait for the installation to finish.
- If everything goes right then Jupyter will get installed within the Python environment and to make sure that it is properly installed just type jupyter notebook in the command prompt.
- This will take you to the local host of your system where the Jupyter notebook will get integrated allowing the users to access its features and work on the same.

Start using Jupyter I Python notebook
- Within the Jupyter environment just click on New and start working with your very first I Python notebook.
- There is also a provision to upload existing notebooks within the environment and people can access this feature as and when required.

So this is how we can install Jupyter in your system (Windows 10) without downloading Anaconda.
FAQ
Can I run Jupyter without Anaconda?
Yes, we can run Jupyter notebook without Anaconds by installing directly on Windows 11 /10 or Linux. Here in this tutorial we already have discussed that.
Is Jupyter a Python IDE?
Ofcourse, Jupyter is an IDE – interactive development environment for Python programming. We can use a browser to access Jupyter, as it is web-based. Further, it is an open-source IDE that allows users to create and share documents of live code. Not only Python but also supports R and Julia programming languages.
Is Anaconda and Jupyter same?
Anaconda and Jupyter are not the same things, however, they are related. Both are open source, however, Anacona is a distribution of Python and R for data science and machine learning. Whereas, Jupyter Notebook is used to share Live code in a document form.
Jupyter is included in Anaconda, so when you install Anaconda, Jupyter will come automatically. Furthermore, Anaconda includes a package manager called CONDA to install various packages such as NumPy, pandas, and more. Also, unlike Anaconda, Jupyter can be used with multiple programming languages, including Python, R, and Julia,
Jupyter Notebook
![]()

The Jupyter notebook is a web-based notebook environment for interactive
computing.

Maintained versions
We maintain the two most recently released major versions of Jupyter Notebook, Notebook v5 and Classic Notebook v6. After Notebook v7.0 is released, we will no longer maintain Notebook v5. All Notebook v5 users are strongly advised to upgrade to Classic Notebook v6 as soon as possible.
The Jupyter Notebook project is currently undertaking a transition to a more modern code base built from the ground-up using JupyterLab components and extensions.
There is new stream of work which was submitted and then accepted as a Jupyter Enhancement Proposal (JEP) as part of the next version (v7): https://jupyter.org/enhancement-proposals/79-notebook-v7/notebook-v7.html
There is also a plan to continue maintaining Notebook v6 with bug and security fixes only, to ease the transition to Notebook v7: jupyter/notebook-team-compass#5 (comment)
Notebook v7
The next major version of Notebook will be based on:
- JupyterLab components for the frontend
- Jupyter Server for the Python server
This represents a significant change to the jupyter/notebook code base.
To learn more about Notebook v7: https://jupyter.org/enhancement-proposals/79-notebook-v7/notebook-v7.html
Classic Notebook v6
Maintainance and security-related issues are now being addressed in the 6.4.x branch.
A 6.5.x branch will be soon created and will depend on nbclassic for the HTML/JavaScript/CSS assets.
New features and continuous improvement is now focused on Notebook v7 (see section above).
If you have an open pull request with a new feature or if you were planning to open one, we encourage switching over to the Jupyter Server and JupyterLab architecture, and distribute it as a server extension and / or JupyterLab prebuilt extension. That way your new feature will also be compatible with the new Notebook v7.
Jupyter notebook, the language-agnostic evolution of IPython notebook
Jupyter notebook is a language-agnostic HTML notebook application for
Project Jupyter. In 2015, Jupyter notebook was released as a part of
The Big Split™ of the IPython codebase. IPython 3 was the last major monolithic
release containing both language-agnostic code, such as the IPython notebook,
and language specific code, such as the IPython kernel for Python. As
computing spans across many languages, Project Jupyter will continue to develop the
language-agnostic Jupyter notebook in this repo and with the help of the
community develop language specific kernels which are found in their own
discrete repos.
- The Big Split™ announcement
- Jupyter Ascending blog post
Installation
You can find the installation documentation for the
Jupyter platform, on ReadTheDocs.
The documentation for advanced usage of Jupyter notebook can be found
here.
For a local installation, make sure you have
pip installed and run:
Usage — Running Jupyter notebook
Running in a local installation
Launch with:
Running in a remote installation
You need some configuration before starting Jupyter notebook remotely. See Running a notebook server.
Development Installation
See CONTRIBUTING.md for how to set up a local development installation.
Contributing
If you are interested in contributing to the project, see CONTRIBUTING.md.
Community Guidelines and Code of Conduct
This repository is a Jupyter project and follows the Jupyter
Community Guides and Code of Conduct.
Resources
- Project Jupyter website
- Online Demo at jupyter.org/try
- Documentation for Jupyter notebook
- Korean Version of Installation
- Documentation for Project Jupyter [PDF]
- Issues
- Technical support — Jupyter Google Group
Contents
- Prerequisite: Python
- Installing Jupyter using Anaconda and conda
- Alternative for experienced Python users: Installing Jupyter with pip
This information explains how to install the Jupyter Notebook and the IPython
kernel.
Prerequisite: Python
While Jupyter runs code in many programming languages, Python is
a requirement (Python 3.3 or greater, or Python 2.7) for installing
the Jupyter Notebook.
We recommend using the Anaconda
distribution to install Python and Jupyter. We’ll go through its installation
in the next section.
Installing Jupyter using Anaconda and conda
For new users, we highly recommend installing Anaconda. Anaconda conveniently
installs Python, the Jupyter Notebook, and other commonly used packages for
scientific computing and data science.
Use the following installation steps:
-
Download Anaconda. We recommend
downloading Anaconda’s latest Python 3 version (currently Python 3.5). -
Install the version of Anaconda which you downloaded, following the
instructions on the download page. -
Congratulations, you have installed Jupyter Notebook. To run the notebook:
See Running the Notebook for more details.
Alternative for experienced Python users: Installing Jupyter with pip
Important
Jupyter installation requires Python 3.3 or greater, or
Python 2.7. IPython 1.x, which included the parts that later became Jupyter,
was the last version to support Python 3.2 and 2.6.
As an existing Python user, you may wish to install Jupyter using Python’s
package manager, pip, instead of Anaconda.
First, ensure that you have the latest pip;
older versions may have trouble with some dependencies:
pip3 install --upgrade pip
Then install the Jupyter Notebook using:
(Use pip if using legacy Python 2.)
Congratulations. You have installed Jupyter Notebook. See
Running the Notebook for more details.
Jupyter Notebook is a widely-used and powerful
data science tool
. In this article, we will walk you through how to install it, set it up on your local system, and how to use it. But before all that, let’s first understand Jupyter Notebook.
What is Jupyter Notebook?
Jupyter Notebook is an open-source web application. It is a notebook/advanced IDE that allows us to write code and display its output in a single document. As a consequence, many Python data scientists use it to run and explore data within a single document. With it, we can:
- Write code,
- Visualize output,
- Narrate text,
- Show mathematical equations,
- Execute code, and
- Do much other media-related stuff.
Jupyter notebook also makes it easy to share the code document along with the outputs in different formats. Although Jupyter Notebook supports over
40 Programming languages,
this article will only cover how to install Jupyter Notebook for Python and how to use it with Python.
Installing Jupyter Notebook on Windows, macOS, and Linux
There are two ways to install Jupyter Notebook for your Python environment:
- Using Anaconda
- Using Python pip
Before you wish to install Jupyter Notebook, make sure that Python and pip are already installed on your system. Here’s
how to install Python
and
how to install pip
. Also,
check your Python version
and make sure that it is Python 3.3 or newer.
How to Install Jupyter Notebook Using Anaconda
Anaconda is an open-source distribution that provides data science and scientific computing tools, including Jupyter Notebook,
Python and R
programming languages. Anaconda works on R and Python programming languages. Similar to Python pip, it acts as a package manager for managing data science, machine learning, and data processing packages. Many data scientists and beginners use Anaconda to install Jupyter Notebook and other data-science-related packages. This is because Anaconda provides a straightforward and simple interface to install Jupyter Notebook and other Data Science related packages and
programming languages
.
Steps to download Jupyter Notebook using Anaconda
Step 1: Download and Install Anaconda
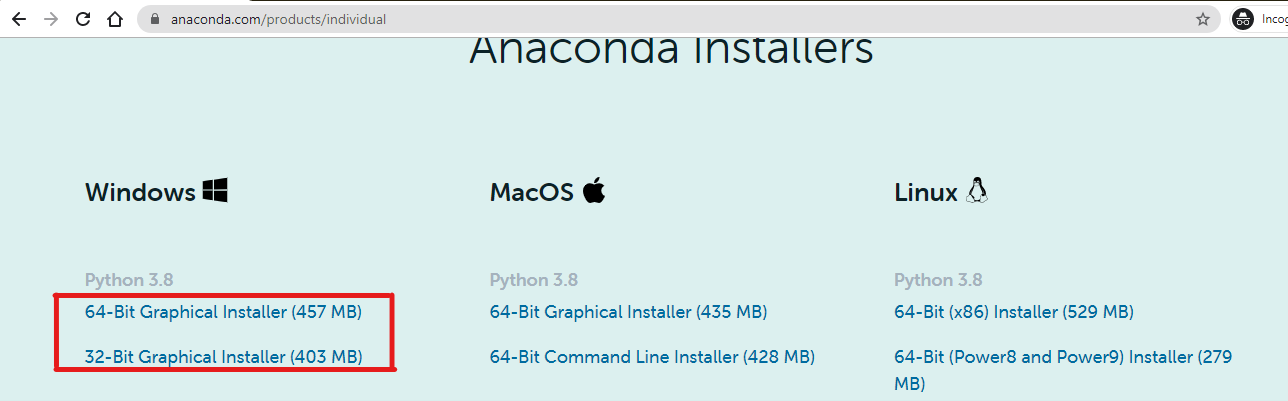
Visit the official web-site of
Anaconda
, and under the
products
section, click on the
individual
edition. From there, you can install the relevant Anaconda for your system. Right now, we are using windows, so we are downloading the Windows version, as demonstrated follows:
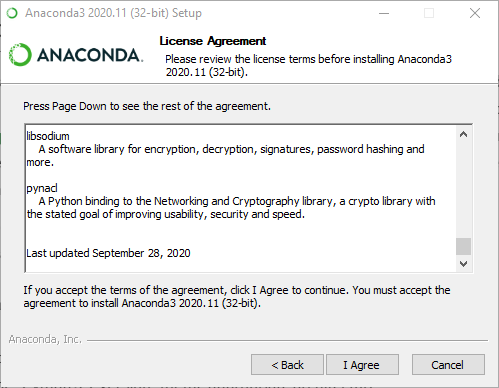
After downloading the Anaconda application, install it on your system.
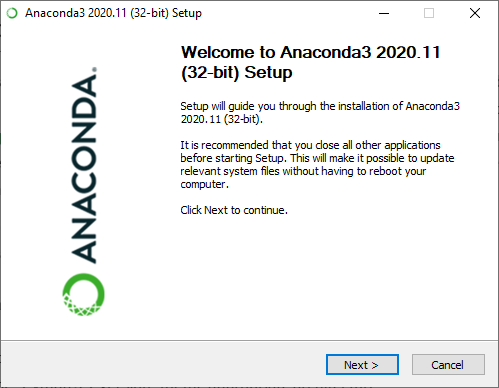
Click on the
I Agree
Button.
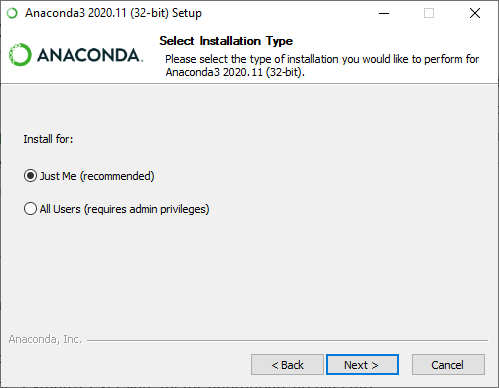
Checkmark the
Just Me.
Now, select the installation location.
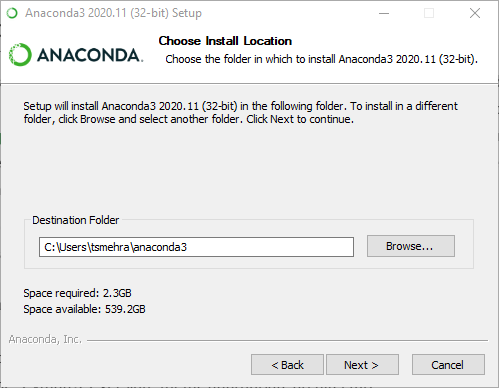
Register with
default Installed Python
.

This will install Anaconda on your system.
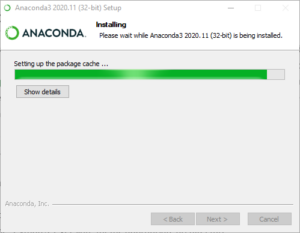
Click on
the Next
button.
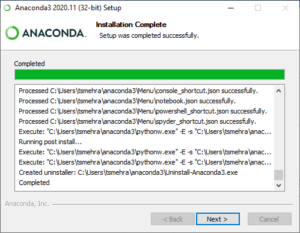
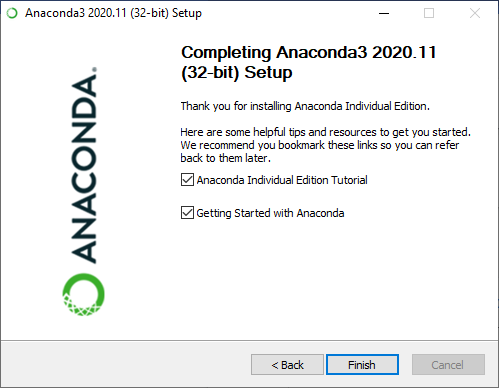
Click on the
Next
button and at last click on
Finish.
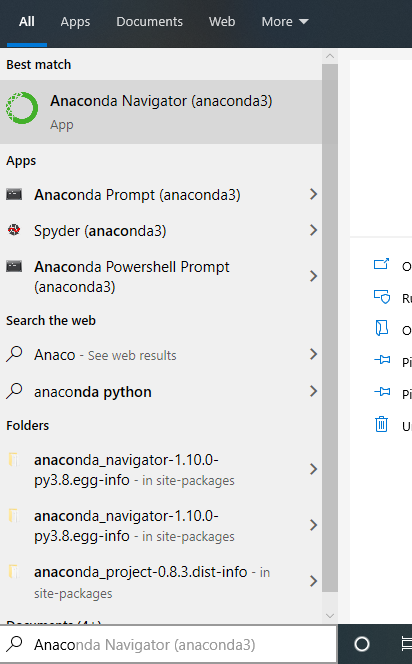
Step 2: Launch Anaconda Navigator
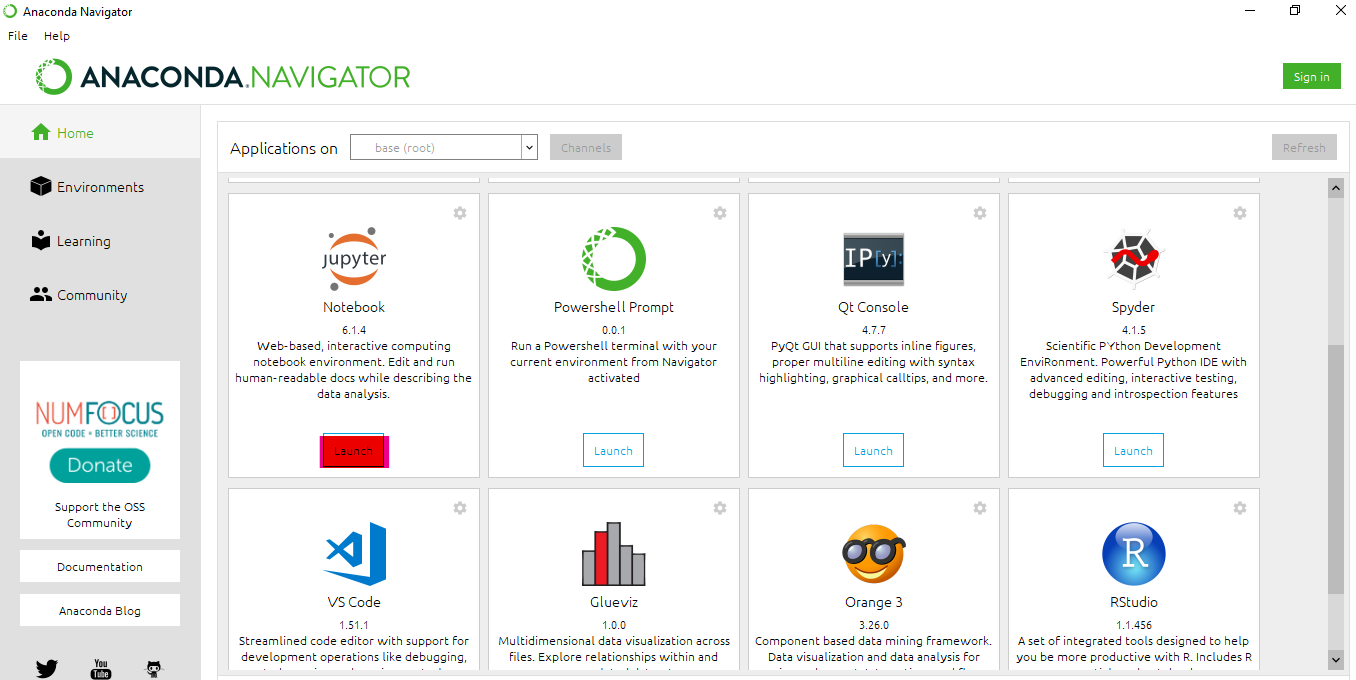
Step 3: Launch Jupyter Notebook
Jupyter Notebook will come pre-installed with the latest Anaconda version, so you just need to
Launch
it. If Jupyter Notebook is not pre-installed, you will see the option
Jupyter Notebook Install
, instead of
Jupyter Notebook Launch
. If this is so, go for it.
After Launching the Jupyter Notebook, you will see a similar screen like this:
Now Jupyter Notebook is running on your localhost. So now you can surf to the directory where you want to create your project and start coding.
How to Install Jupyter Notebook using Python pip
Anaconda is great, but it consumes many resources and may lag on your system. The pip is the python package manager that comes with the most Python distributions. And with a simple pip install command, Jupyter Notebook installs on your Python environment. Installing Jupyter Notebook using pip is very straightforward. And within two steps, you can install and run Jupyter Notebook in your system. This is the reason why installing Python with pip is very popular.
<Note>:
Before you use the pip command to install Jupyter Notebook make sure that Python and pip are installed on your system.
Step 1: Install Jupyter Notebook using pip
Using the pip install command, we can install Jupyter Notebook for our Python environment.
pip install notebook
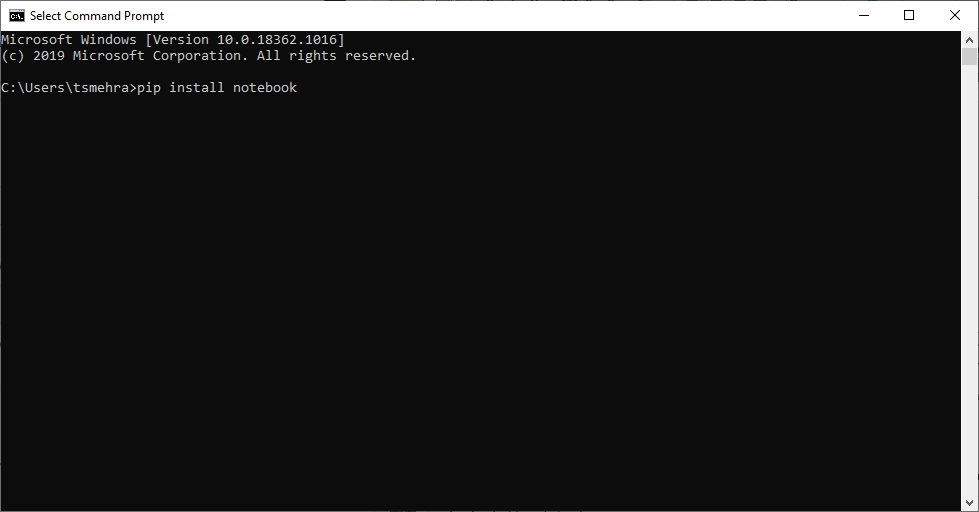
This may take some time.
<Note>
There is
no
such command as
pip install jupyter
. So be careful when you install Jupyter Notebook using Python pip.
Step 2: Launch Jupyter Notebook
Once the notebook package is installed, type the
jupyter notebook
command on your terminal or command prompt to launch the Jupyter Notebook.
jupyter notebook
After launching the Jupyter Notebook, you will see a similar screen to this:
Note:
After Launching the Jupyter Notebook from the command prompt or terminal, do not close the same as it will kill the Jupyter Notebook
.
Create Your First Notebook
So now that you have successfully downloaded and installed Jupyter Notebook for your Python environment, it’s time to create your first notebook. In this section, we will walk you through how to create and save a notebook. We will also discuss some of the core terms of Jupyter Notebook and write some Python code.
Run Jupyter Notebook
If you have installed Jupyter Notebook using Anaconda, you can run your Jupyter Notebook through the shortcut
Jupyter Notebook (Anaconda)
from your start menu. Else, you can open your
Anaconda navigator
and launch the Jupyter notebook. If you have Installed Jupyter Notebook using Python
pip
, you can use the
jupyter notebook
command in your command prompt, and it will open the Jupyter Notebook.
This will open the Jupyter notebook at the command prompt or terminal specified location. The command
jupyter notebook
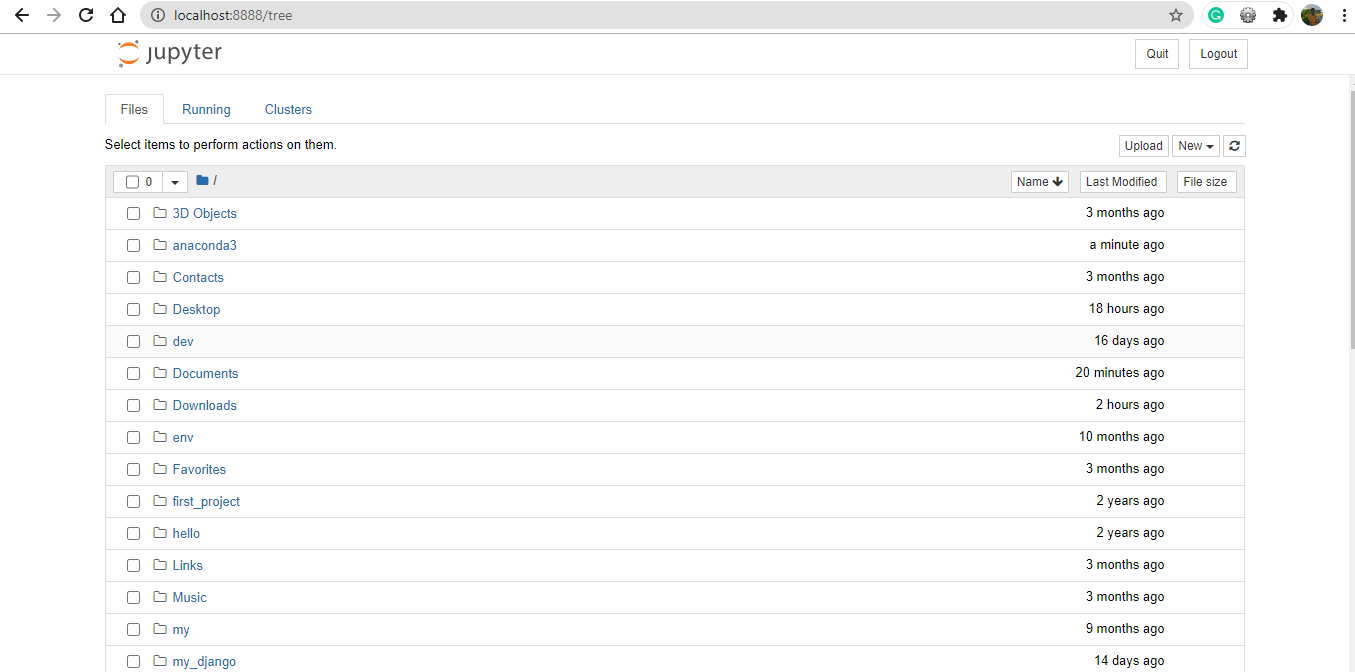
will open the Jupyter Notebook in your browser, and you will see a similar screen to this:
The above screen is the dashboard, it’s not a notebook. To create a new notebook, you need to click on the
New
button and select the
Python 3
option.
This will create a new
untitled.ipynb
notebook on the same directory.
The Notebook Interface
So far you have created a new Jupyter Notebook by the name
untitled. ipynb
. Now you can also rename your notebook by clicking on the untitled. The notebook is an advanced IDE, and here, you can write code. And like other IDEs and text editors, it also supports some shortcut commands. To see all the available shortcut commands, type
Ctrl + Shift + P
. There are two prominent terms associated with every notebook:
- Cell
- Kernel
Each of them is explained as follows:
Cell
The cell is the notebook’s body, and inside the cell, you can write the code and markdown. There are two types of cells:
-
In the
Code Cell,
you write the code that will be executed by the kernel. -
In the
Markdown
cell, we use the markdown language to perform the text formatting.
Code Cell example

Markdown Cell Example
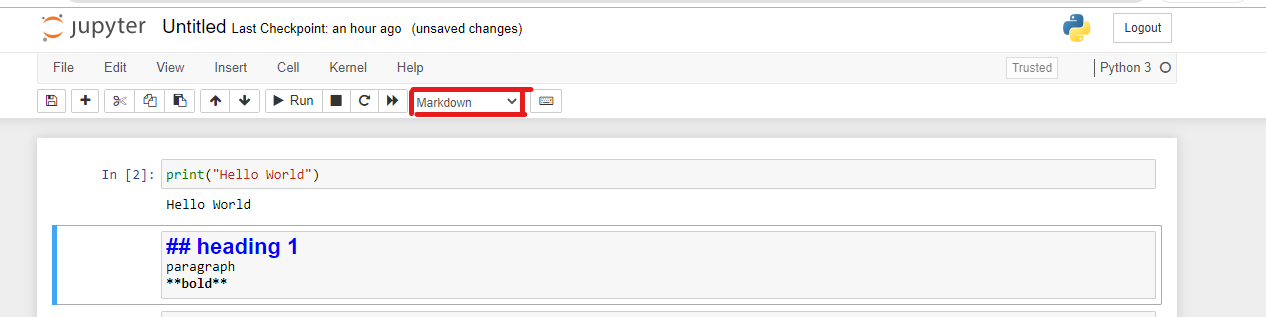
The type of Cell selected can be toggled from the menu. To execute the code and markdown written in the cell, use the
Shift + Enter
.
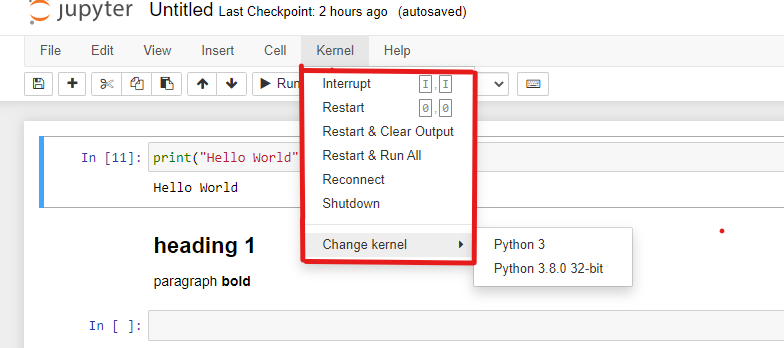
Kernel
Every notebook consists of a kernel. The kernel is the computing engine that executes the code written in the cell. The kernel is responsible for executing and showing code output. When we create our New notebook, we select Python3, and this set Python3 as a kernel for our notebook. Jupyter Notebook supports 40+ programming languages along with their different versions. And from the kernel menu, we can change our existing kernel.
Save and download the notebook
Once you have written and executed the code, you can save the notebook from the File option.
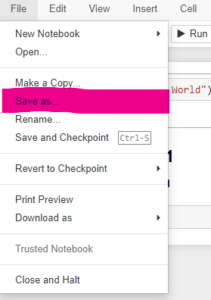
In the
File
menu, you will also get an option
Download as
where Jupyter Notebook download is available in 9 different formats.

You can choose the one you find useful.
Conclusion
Here in this article, we learned how to install Jupyter Notebook using Anaconda and Python pip command. Jupyter Notebook is one of the
Best Python IDEs
for data scientists and machine learning engineers. Although Jupyter Notebook installation could be challenging through Anaconda, it makes it easy to use other
data science packages
and programming languages. You can also install Jupyter Notebook using the pip command. For most of cases, you will be using it as it is very convenient doing so.
People are also reading:
-
Online Python Compiler
-
Python Blur Faces in Images
-
Automate Login Using Selenium in Python
-
How do I Upgrade the Python Installation in Windows 10?
-
Starting Python Coding on a Macbook
-
Data Visualization in Python
-
Python Modulo in Practice
-
How to Calculate the Square of a Number?
-
Python Developer Skills
-
How to use sys.argv in Python?
In this article, We will cover how to install Jupyter Notebook without Anaconda on Windows. Before the installation procedure let us try to understand what is Jupyter Notebook?
Jupyter Notebook
Jupyter Notebook is a free, open-source, and interactive web application that allows us to create and share documents containing live code, equations, visualizations, and narrative text. Some of the most important uses of Jupyter Notebook are data cleaning and transformation, numerical simulation, statistical modeling, data visualization, machine learning, and much more interesting.
Jupyter Notebook provides support for over 40 different programming languages. And the interesting thing is Python is one of them. To install the Jupyter Notebook in order to work with python needs the version of Python as follows: (Python 3.3 or greater, or Python 2.7).
Now as we are not installing Jupyter Notebook through Anaconda, but we install it with the help of PIP. Now there must be a question in your mind what is PIP?
So let us direct our discussion to PIP
What is PIP?
In Python, the package installer is known as PIP. PIP is basically a package management system that is mainly used to install and manage software packages/libraries that are written in Python.
-
And all the files are mainly stored in a large «on-line repository» which is termed as Python Package Index that is PyPI.
-
Thus the pip uses PyPI as its default source for the packages and their dependencies.
To install the Jupyter Notebook in your system, first of all, you need to check if PIP is already installed or not. You will need to write the command in your command prompt.The command to update the pip is as given below:
python -m pip install --upgrade pip
Then you will see this on your screen:

After the updation of pip, the steps to install Jupyter Notebook are as follows:
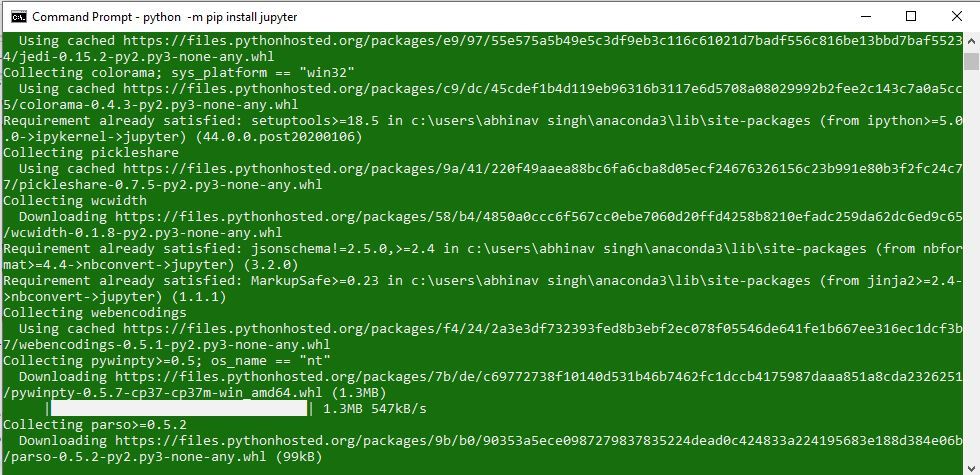
1. To Install the Jupyter, the command is as given below:
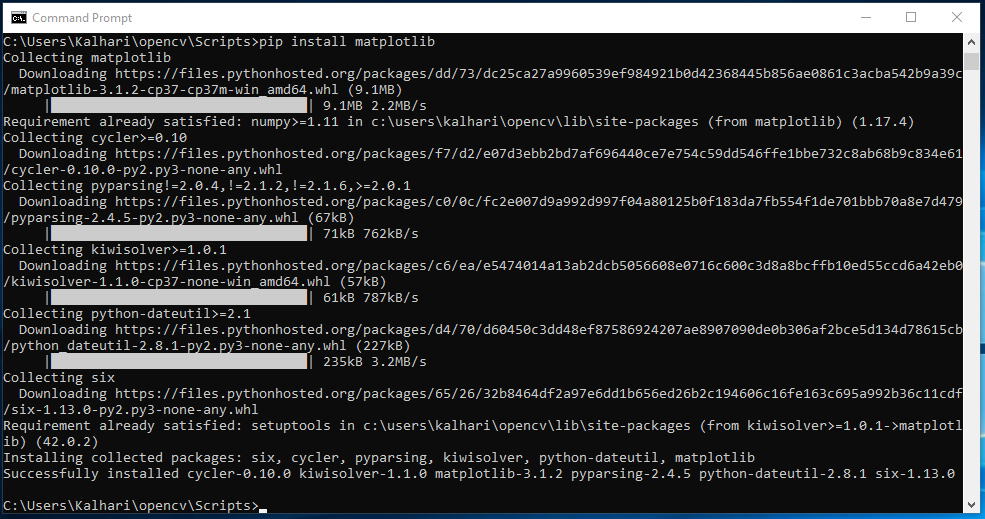
python -m pip install jupyter2. After the installation begins you will see this:

3. Installation of Packages and finish of Installation

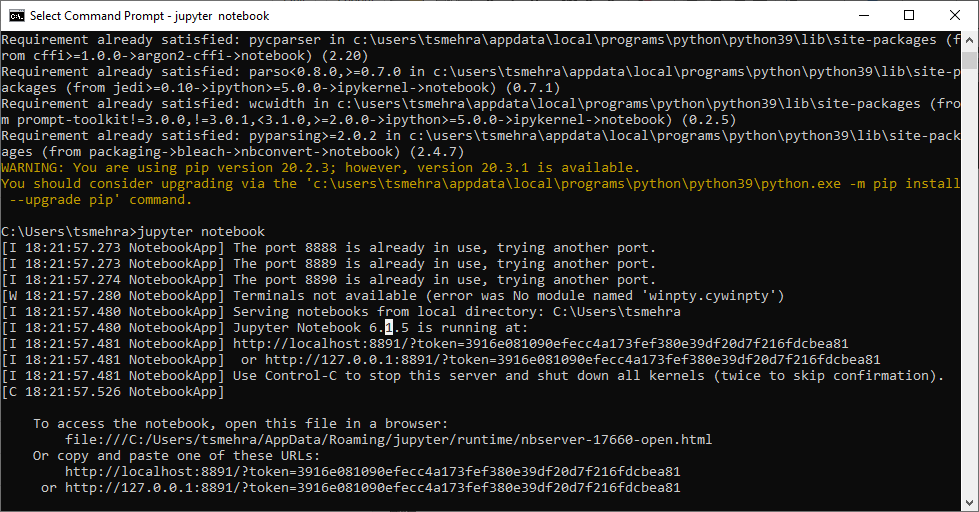
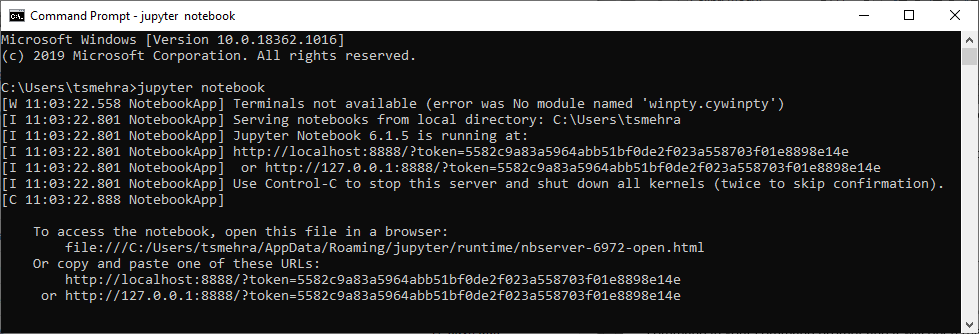
Launching the Jupyter in command prompt
To launch the Jupyter you need to write the following command
jupyter notebookAfter writing the above command in your cmd, you will see this:

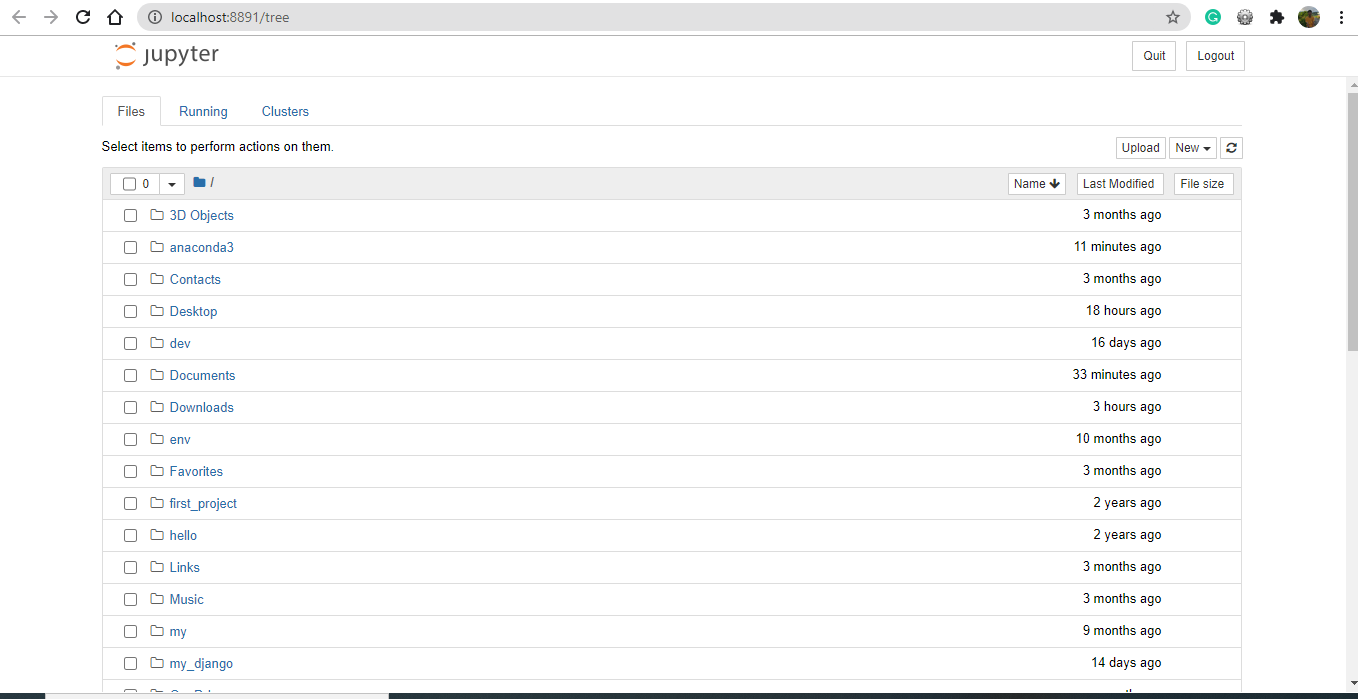
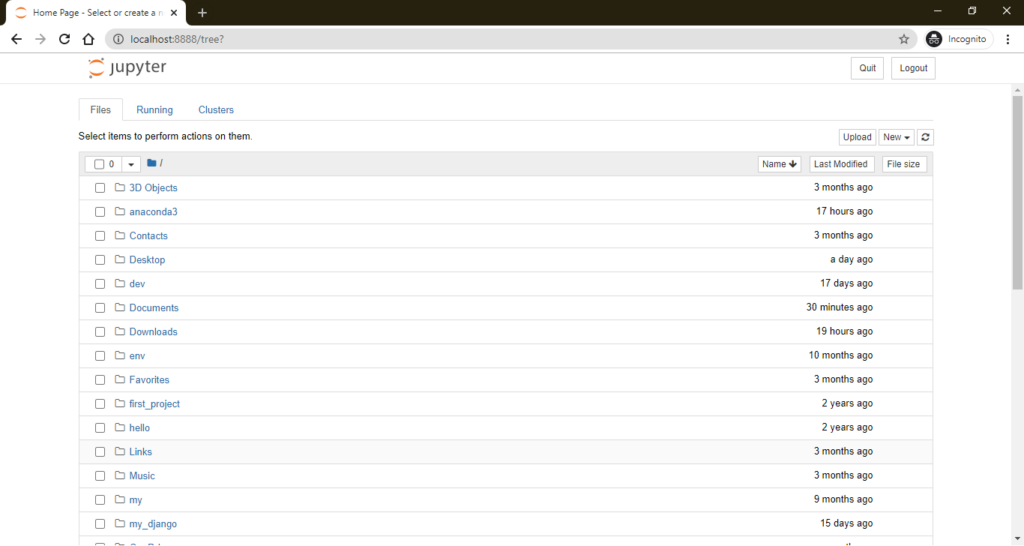
And then it will open this:

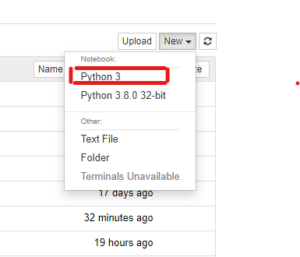
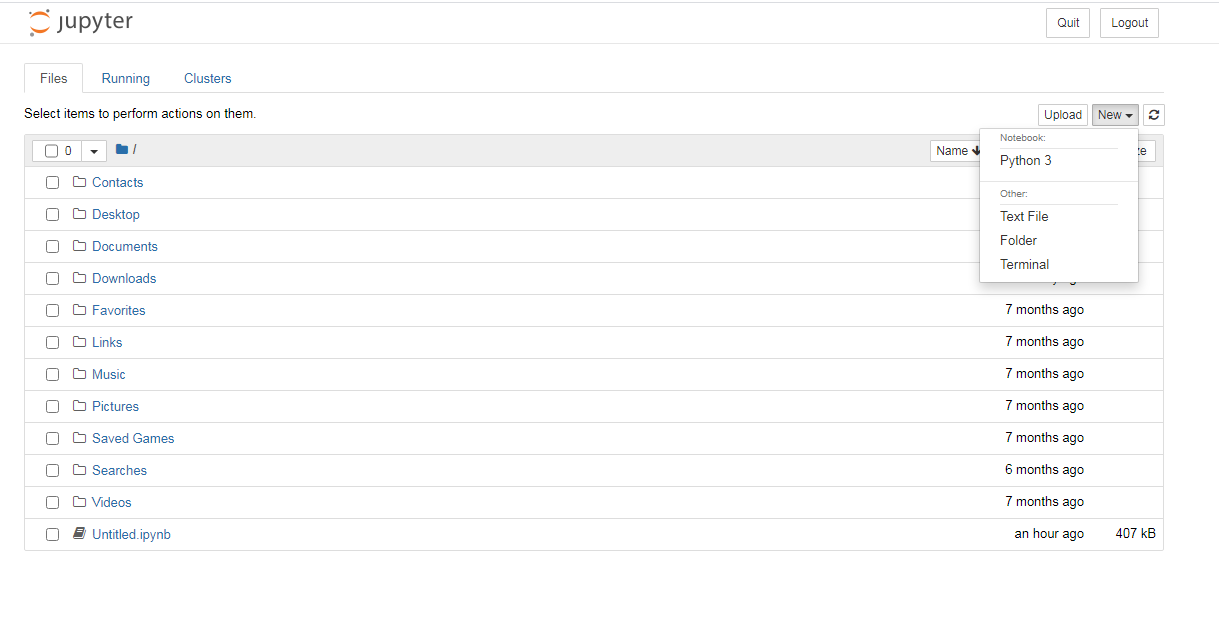
Now To create a Notebook where you will store and run your code you just need to make a click on «New» on the top on the right side; there you have four options: Python 3(notebook), Text File, Folder, and Terminal. Just click on Python 3 and start your coding.
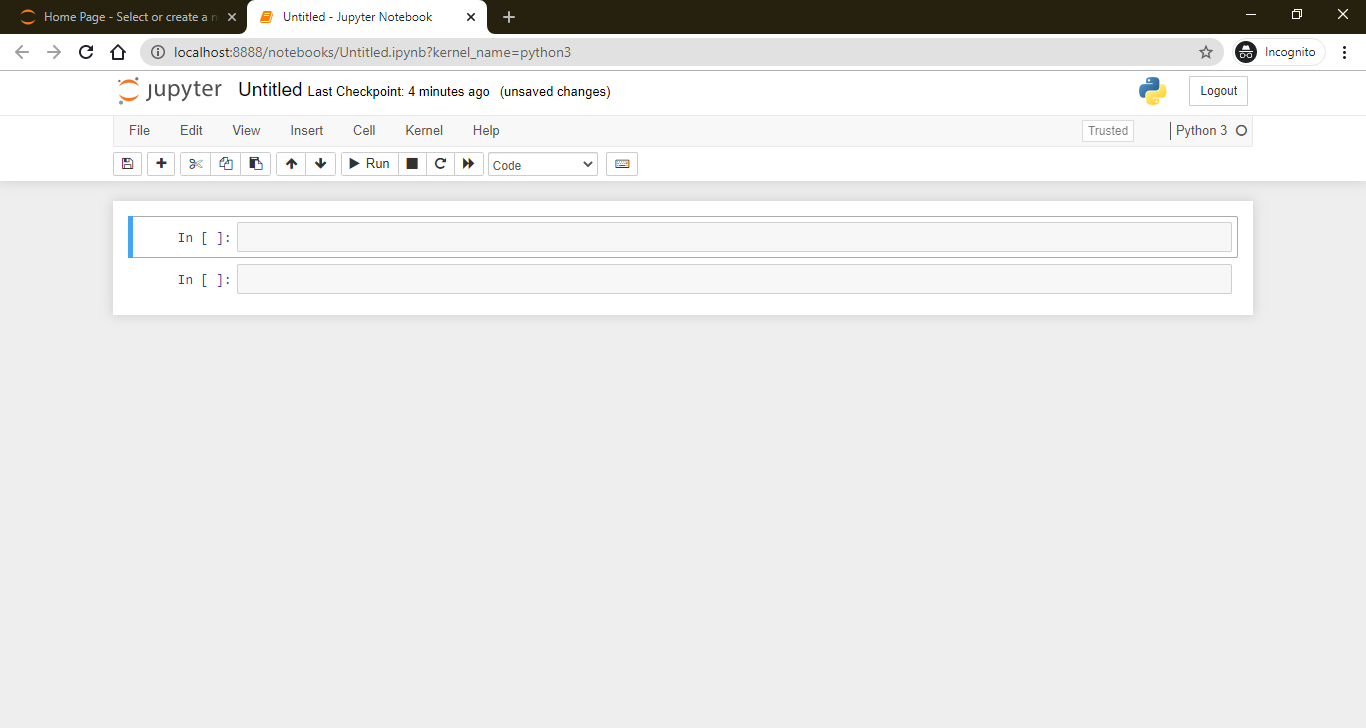
The notebook is always saved with (.ipynb) extension.
Now we will show you what exactly you will see on your screen:
Hopefully, you guys understood the installation of Jupyter without the help of Anaconda. For any doubts or queries, please comment below.
You may also like:
- Matplotlib in Jupyter Notebook
- Beginners Guide to Jupyter Notebook
- How to Install Burp Suite on Windows 10?
- What is Homebrew and How to Install it on Mac OSX
Installing Jupyter
Project Jupyter’s tools are available for installation via the Python Package Index, the leading repository of software created for the Python programming language.
This page uses instructions with pip, the recommended installation tool for Python. If you require environment management as opposed to just installation, look into conda, mamba, and pipenv.
JupyterLab
Install JupyterLab with pip :
Note: If you install JupyterLab with conda or mamba, we recommend using the conda-forge channel.
Installing Jupyter Notebook
This information explains how to install the Jupyter Notebook and the IPython kernel.
Prerequisite: Python
While Jupyter runs code in many programming languages, Python is a requirement (Python 3.3 or greater, or Python 2.7) for installing the Jupyter Notebook.
We recommend using the Anaconda distribution to install Python and Jupyter. We’ll go through its installation in the next section.
Installing Jupyter using Anaconda and conda
For new users, we highly recommend installing Anaconda. Anaconda conveniently installs Python, the Jupyter Notebook, and other commonly used packages for scientific computing and data science.
Use the following installation steps:
Download Anaconda. We recommend downloading Anaconda’s latest Python 3 version (currently Python 3.5).
Install the version of Anaconda which you downloaded, following the instructions on the download page.
Congratulations, you have installed Jupyter Notebook. To run the notebook:
Alternative for experienced Python users: Installing Jupyter with pip
Jupyter installation requires Python 3.3 or greater, or Python 2.7. IPython 1.x, which included the parts that later became Jupyter, was the last version to support Python 3.2 and 2.6.
As an existing Python user, you may wish to install Jupyter using Python’s package manager, pip , instead of Anaconda.
First, ensure that you have the latest pip; older versions may have trouble with some dependencies:
Then install the Jupyter Notebook using:
(Use pip if using legacy Python 2.)
Congratulations. You have installed Jupyter Notebook. See Running the Notebook for more details.
Install Python and Jupyter Notebook to Windows 10 (64 bit)

This blog post is a step-by-step tutorial to install Python and Jupyter Notebook to Windows 10 (64 bit). Python 3.3 or greater, or Python 2.7 is required to install the Jupyter Notebook.
- Download Python 3.7.4 from “https://www.python.org/downloads/release/python-374/” url
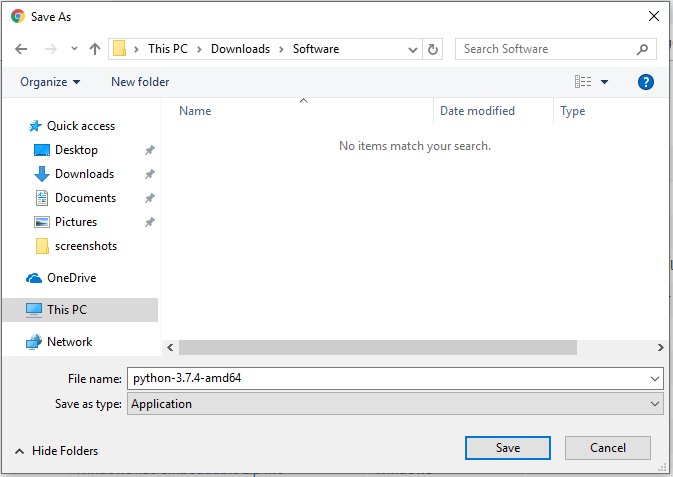
2. Choose and select “x86–64 executable installer” for Windows 10–64 bit computer

3. Select location to save the executable file.
4. Install Python 3.7.4 (64-bit) to your computer.

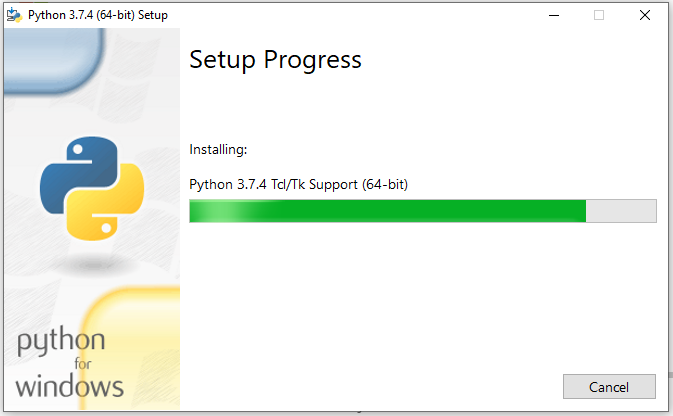
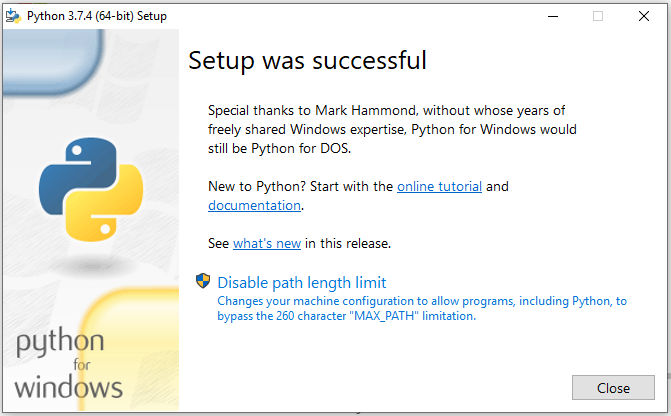
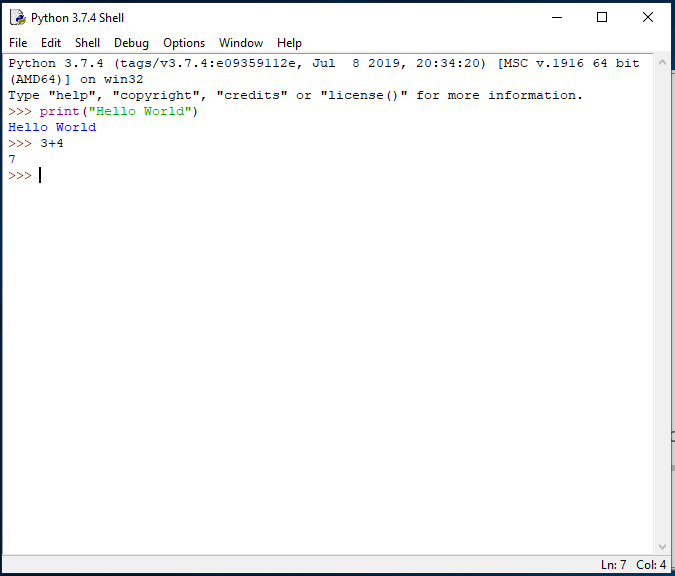
5. Check the installation by running “Idle”
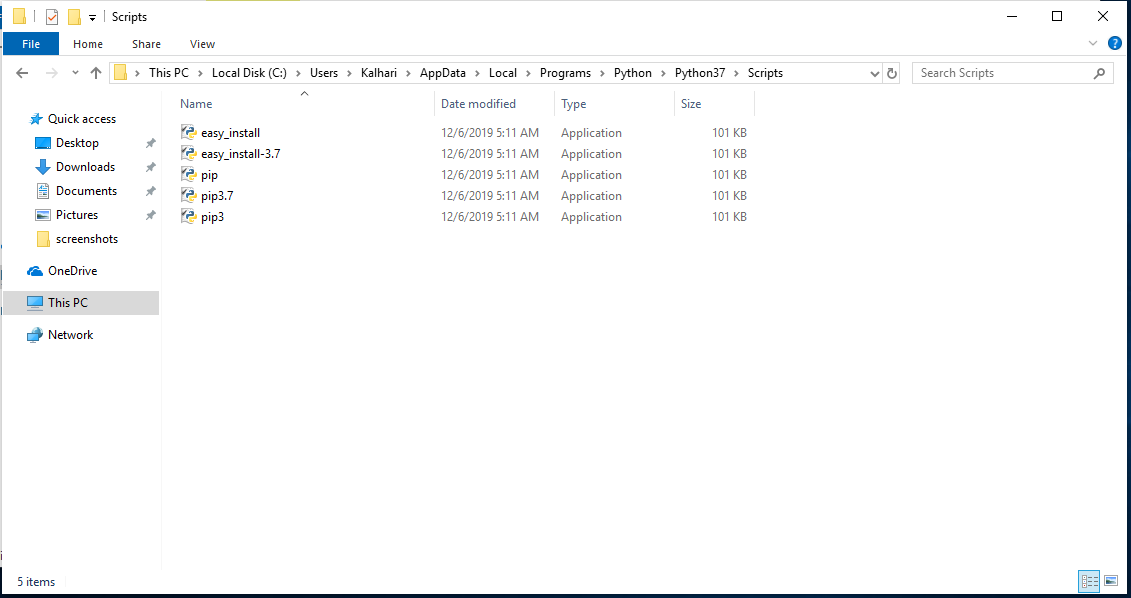
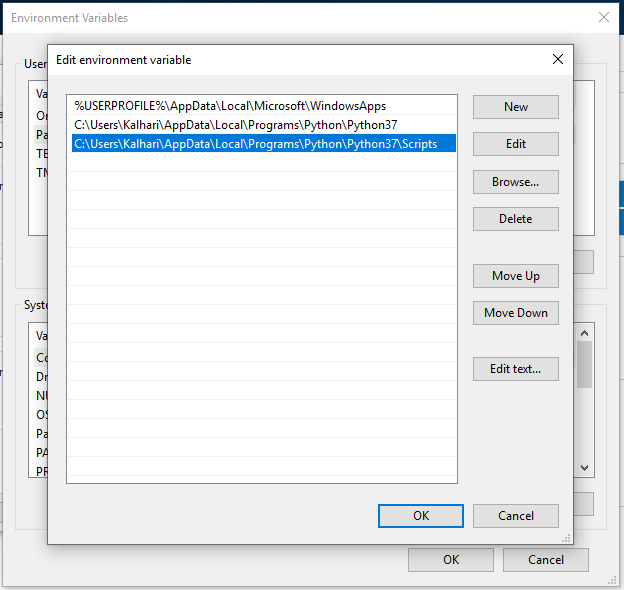
6. Set “Python37” path and “Python37/Scripts” path to environment variable
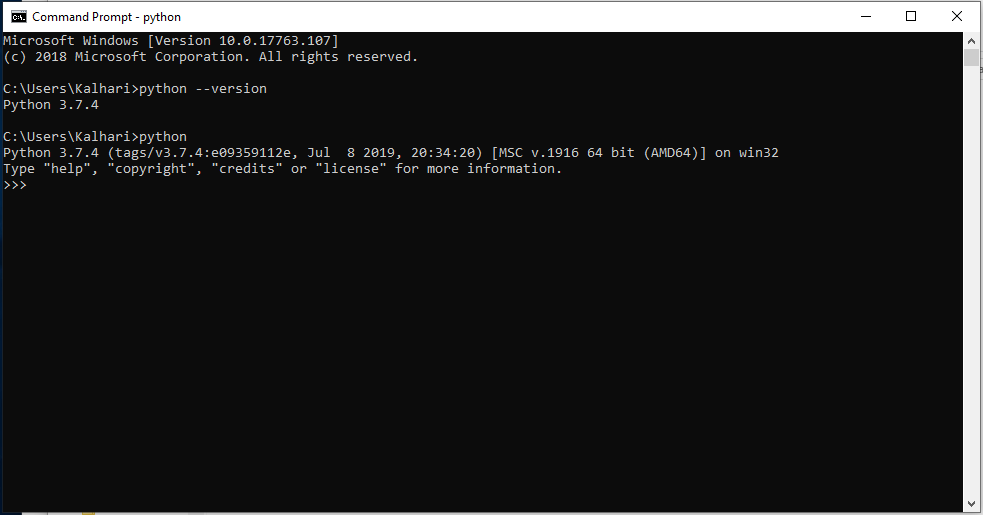
7. Open command prompt and check the python version using “python —version”
8. Install pip using “pip install virtualenv”

9. Upgrade pip using “python -m pip install -upgrade pip”

10. Create a virtual environment called opencv (“virtualenv opencv”)

11. Move to Scripts folder and activate opencv virtual environment using “activate.bat”

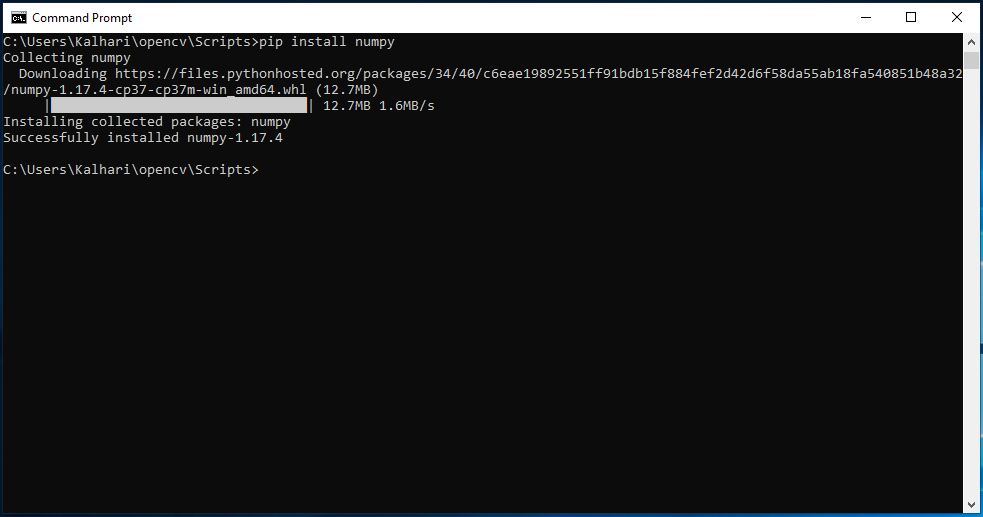
12. Install numpy using “pip install numpy”
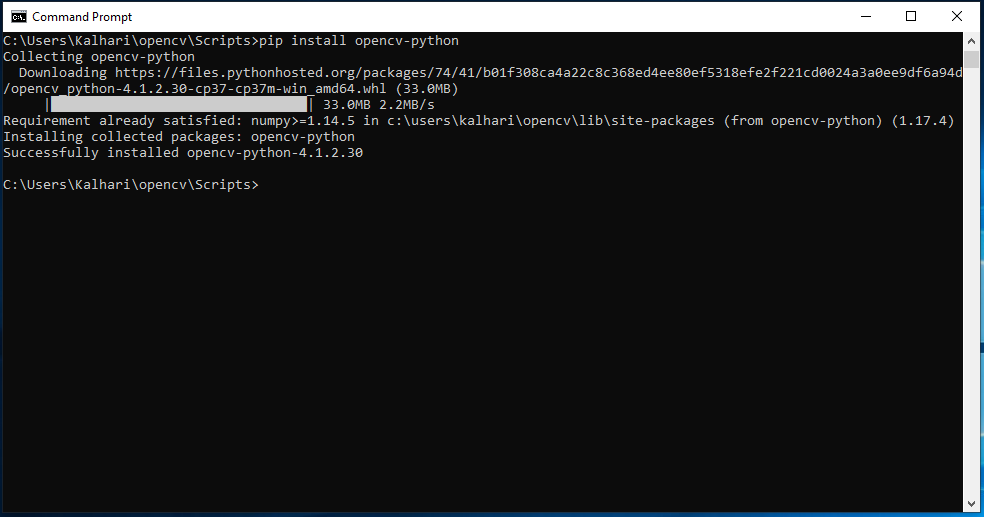
13. Install OpenCV using “pip install opencv-python”
14. Install Matplotlib using “pip install matplotlib”
15. Install Jupyter using “python -m pip install jupyter”

16. Run Jupyter Notebook using “jupyter notebook”

17. Start the notebook server and popup dashboard in browser using “localhost:8888/tree” url
Three Ways to Run Jupyter In Windows
The «Pure Python» Way
Make your way over to python.org, download and install the latest version (3.5.1 as of this writing) and make sure that wherever you install it, the directory containing python.exe is in your system PATH environment variable. I like to install it in the root of my C: drive, e.g. C:Python35, so my PATH contains that directory.
Once that’s installed, you’ll want to create a virtual environment, a lightweight, disposable, isolated python installation where you can experiment and install 3rd party libraries without affecting your «main» installation. To do this, open up a Powershell window, and enter the following commands (where «myenv» is the name of the virtualenv we’re going to create, you can use any name you like for this):
PS C:> python -m venv myenv
PS C:> myenvScriptsactivate
Then, let’s install jupyter and start up a notebook:
PS C:> pip install jupyter
PS C:> jupyter notebook
Incidentally, if you get a warning about upgrading pip, make sure to use the following incantation to upgrade (to prevent an issue on windows where pip is unable to upgrade its own executable in-place):
PS C:> python -m pip install --upgrade pip
Advantages: Uses «pure» python, official tools, and no external dependencies. Well supported, with plenty of online documentation and support communities.
Disadvantages: While many popular data analysis or scientific python libraries can be installed by pip on windows (including Pandas and Matplotlib), some (for example SciPy) require a C compiler and the presence of 3rd party C libraries on the system which are difficult to install on Windows.
Who is it for? Python users comfortable with the command line and the tools that ship with Python itself.
The Python Distributions
Because of the difficulty mentioned above in getting packages like SciPy installed on Windows, a few commercial entities have put together pre-packaged Python «distributions» that contain most, if not all, of the commonly used libraries for data analysis and/or scientific computing.
Anaconda is an excellent option for this. Download their Python 3.5 installer for Windows, run it, and in your Start menu you’ll have a bunch of neat new tools, including an entry for Jupyter Notebook. Click to start it up and it’ll launch in the background and open up your browser to the notebook console. It doesn’t get any easier than that.
Advantages: Simplest, fastest way to get started and it comes with probably everything you need for your scientific computing projects. And anything it doesn’t ship with you can still instalAl via its built in conda package manager.
Disadvantages: No virtualenv support, although the conda package manager provides very similar functionality with the conda create command. Relies on a commercial 3rd party for support.
Who is it for? People who want the quickest, easiest way to get Jupyter notebook up and running (IE, most people).
Docker
Docker is a platform for running software in «containers«, or self-contained, isolated processes. While it may sound similar in concept to python virtual environments, Docker containers are an entirely different kind of technology offering vast flexibility and power. Don’t let the flexibility and power and confusing terminology put you off though — Docker can be easy to get up and running on your PC and has some advantages of its own with respect to Python and Jupyter.
To get started on Windows, download the Docker Toolbox, which contains the tools you need to get up and running. Run the installer and make sure the checkbox to install Virtualbox is checked if you don’t already have Virtualbox or another virtualization platform (like VMWare Workstation) installed.
Once installed, you’ll have a «Docker Quickstart Terminal» shortcut in your Start Menu. Double click that shortcut and it will create your first Docker engine for you and set up everything you need automatically. Once you see a prompt in the terminal, you can use the docker run command to run Docker «images», which you can think of as pre-packaged bundles of software that will be automatically downloaded from the Docker Hub when you run them. There are many images on Docker Hub that offer Jupyter, including the official Jupyter Notebook image, and Anaconda itself if you want the full SciPy stack.
To run just the official Jupyter Notebook image in your Docker engine, type the following into the Docker Quickstart Terminal:
$ docker run --rm -it -p 8888:8888 -v "$(pwd):/notebooks" jupyter/notebook
After all the image’s «layers» are downloaded, it will start up. Make a note of the IP address listed in the terminal (for example, 192.168.99.100), and point your browser at that IP address, port 8888 (e.g. http://192.168.99.100:8888) and you’ll see the familiar Jupyter console, with both Python 2 and Python 3 kernels available.
Advantages: Use the flexibility and power of Docker! Honestly one of my favorite things about Docker is thinking of it as an open software distribution platform for things like the SciPy stack that are hard to install.
Disadvantages: Grapple with the flexibility and power of Docker! There are quite a few «gotchas» to be aware of when dealing with Docker, such as immutable containers, data volumes, arcane commands, and rapidly developing, occasionally buggy tooling.