OpenCV on Wheels
Pre-built CPU-only OpenCV packages for Python.
Check the manual build section if you wish to compile the bindings from source to enable additional modules such as CUDA.
Installation and Usage
-
If you have previous/other manually installed (= not installed via
pip) version of OpenCV installed (e.g. cv2 module in the root of Python’s site-packages), remove it before installation to avoid conflicts. -
Make sure that your
pipversion is up-to-date (19.3 is the minimum supported version):pip install --upgrade pip. Check version withpip -V. For example Linux distributions ship usually with very oldpipversions which cause a lot of unexpected problems especially with themanylinuxformat. -
Select the correct package for your environment:
There are four different packages (see options 1, 2, 3 and 4 below) and you should SELECT ONLY ONE OF THEM. Do not install multiple different packages in the same environment. There is no plugin architecture: all the packages use the same namespace (
cv2). If you installed multiple different packages in the same environment, uninstall them all withpip uninstalland reinstall only one package.a. Packages for standard desktop environments (Windows, macOS, almost any GNU/Linux distribution)
- Option 1 — Main modules package:
pip install opencv-python - Option 2 — Full package (contains both main modules and contrib/extra modules):
pip install opencv-contrib-python(check contrib/extra modules listing from OpenCV documentation)
b. Packages for server (headless) environments (such as Docker, cloud environments etc.), no GUI library dependencies
These packages are smaller than the two other packages above because they do not contain any GUI functionality (not compiled with Qt / other GUI components). This means that the packages avoid a heavy dependency chain to X11 libraries and you will have for example smaller Docker images as a result. You should always use these packages if you do not use
cv2.imshowet al. or you are using some other package (such as PyQt) than OpenCV to create your GUI.- Option 3 — Headless main modules package:
pip install opencv-python-headless - Option 4 — Headless full package (contains both main modules and contrib/extra modules):
pip install opencv-contrib-python-headless(check contrib/extra modules listing from OpenCV documentation)
- Option 1 — Main modules package:
-
Import the package:
import cv2All packages contain Haar cascade files.
cv2.data.haarcascadescan be used as a shortcut to the data folder. For example:cv2.CascadeClassifier(cv2.data.haarcascades + "haarcascade_frontalface_default.xml") -
Read OpenCV documentation
-
Before opening a new issue, read the FAQ below and have a look at the other issues which are already open.
Frequently Asked Questions
Q: Do I need to install also OpenCV separately?
A: No, the packages are special wheel binary packages and they already contain statically built OpenCV binaries.
Q: Pip install fails with ModuleNotFoundError: No module named 'skbuild'?
Since opencv-python version 4.3.0.*, manylinux1 wheels were replaced by manylinux2014 wheels. If your pip is too old, it will try to use the new source distribution introduced in 4.3.0.38 to manually build OpenCV because it does not know how to install manylinux2014 wheels. However, source build will also fail because of too old pip because it does not understand build dependencies in pyproject.toml. To use the new manylinux2014 pre-built wheels (or to build from source), your pip version must be >= 19.3. Please upgrade pip with pip install --upgrade pip.
Q: Import fails on Windows: ImportError: DLL load failed: The specified module could not be found.?
A: If the import fails on Windows, make sure you have Visual C++ redistributable 2015 installed. If you are using older Windows version than Windows 10 and latest system updates are not installed, Universal C Runtime might be also required.
Windows N and KN editions do not include Media Feature Pack which is required by OpenCV. If you are using Windows N or KN edition, please install also Windows Media Feature Pack.
If you have Windows Server 2012+, media DLLs are probably missing too; please install the Feature called «Media Foundation» in the Server Manager. Beware, some posts advise to install «Windows Server Essentials Media Pack», but this one requires the «Windows Server Essentials Experience» role, and this role will deeply affect your Windows Server configuration (by enforcing active directory integration etc.); so just installing the «Media Foundation» should be a safer choice.
If the above does not help, check if you are using Anaconda. Old Anaconda versions have a bug which causes the error, see this issue for a manual fix.
If you still encounter the error after you have checked all the previous solutions, download Dependencies and open the cv2.pyd (located usually at C:UsersusernameAppDataLocalProgramsPythonPythonXXLibsite-packagescv2) file with it to debug missing DLL issues.
Q: I have some other import errors?
A: Make sure you have removed old manual installations of OpenCV Python bindings (cv2.so or cv2.pyd in site-packages).
Q: Function foo() or method bar() returns wrong result, throws exception or crashes interpreter. What should I do?
A: The repository contains only OpenCV-Python package build scripts, but not OpenCV itself. Python bindings for OpenCV are developed in official OpenCV repository and it’s the best place to report issues. Also please check {OpenCV wiki](https://github.com/opencv/opencv/wiki) and the official OpenCV forum before file new bugs.
Q: Why the packages do not include non-free algorithms?
A: Non-free algorithms such as SURF are not included in these packages because they are patented / non-free and therefore cannot be distributed as built binaries. Note that SIFT is included in the builds due to patent expiration since OpenCV versions 4.3.0 and 3.4.10. See this issue for more info: https://github.com/skvark/opencv-python/issues/126
Q: Why the package and import are different (opencv-python vs. cv2)?
A: It’s easier for users to understand opencv-python than cv2 and it makes it easier to find the package with search engines. cv2 (old interface in old OpenCV versions was named as cv) is the name that OpenCV developers chose when they created the binding generators. This is kept as the import name to be consistent with different kind of tutorials around the internet. Changing the import name or behaviour would be also confusing to experienced users who are accustomed to the import cv2.
Documentation for opencv-python
The aim of this repository is to provide means to package each new OpenCV release for the most used Python versions and platforms.
CI build process
The project is structured like a normal Python package with a standard setup.py file.
The build process for a single entry in the build matrices is as follows (see for example .github/workflows/build_wheels_linux.yml file):
-
In Linux and MacOS build: get OpenCV’s optional C dependencies that we compile against
-
Checkout repository and submodules
- OpenCV is included as submodule and the version is updated
manually by maintainers when a new OpenCV release has been made - Contrib modules are also included as a submodule
- OpenCV is included as submodule and the version is updated
-
Find OpenCV version from the sources
-
Build OpenCV
- tests are disabled, otherwise build time increases too much
- there are 4 build matrix entries for each build combination: with and without contrib modules, with and without GUI (headless)
- Linux builds run in manylinux Docker containers (CentOS 5)
- source distributions are separate entries in the build matrix
-
Rearrange OpenCV’s build result, add our custom files and generate wheel
-
Linux and macOS wheels are transformed with auditwheel and delocate, correspondingly
-
Install the generated wheel
-
Test that Python can import the library and run some sanity checks
-
Use twine to upload the generated wheel to PyPI (only in release builds)
Steps 1—4 are handled by pip wheel.
The build can be customized with environment variables. In addition to any variables that OpenCV’s build accepts, we recognize:
CI_BUILD. Set to1to emulate the CI environment build behaviour. Used only in CI builds to force certain build flags on insetup.py. Do not use this unless you know what you are doing.ENABLE_CONTRIBandENABLE_HEADLESS. Set to1to build the contrib and/or headless versionENABLE_JAVA, Set to1to enable the Java client build. This is disabled by default.CMAKE_ARGS. Additional arguments for OpenCV’s CMake invocation. You can use this to make a custom build.
See the next section for more info about manual builds outside the CI environment.
Manual builds
If some dependency is not enabled in the pre-built wheels, you can also run the build locally to create a custom wheel.
- Clone this repository:
git clone --recursive https://github.com/opencv/opencv-python.git cd opencv-python- you can use
gitto checkout some other version of OpenCV in theopencvandopencv_contribsubmodules if needed
- you can use
- Add custom Cmake flags if needed, for example:
export CMAKE_ARGS="-DSOME_FLAG=ON -DSOME_OTHER_FLAG=OFF"(in Windows you need to set environment variables differently depending on Command Line or PowerShell) - Select the package flavor which you wish to build with
ENABLE_CONTRIBandENABLE_HEADLESS: i.e.export ENABLE_CONTRIB=1if you wish to buildopencv-contrib-python - Run
pip wheel . --verbose. NOTE: make sure you have the latestpipversion, thepip wheelcommand replaces the oldpython setup.py bdist_wheelcommand which does not supportpyproject.toml.- this might take anything from 5 minutes to over 2 hours depending on your hardware
- You’ll have the wheel file in the
distfolder and you can do with that whatever you wish- Optional: on Linux use some of the
manylinuximages as a build hosts if maximum portability is needed and runauditwheelfor the wheel after build - Optional: on macOS use
delocate(same asauditwheelbut for macOS) for better portability
- Optional: on Linux use some of the
Manual debug builds
In order to build opencv-python in an unoptimized debug build, you need to side-step the normal process a bit.
- Install the packages
scikit-buildandnumpyvia pip. - Run the command
python setup.py bdist_wheel --build-type=Debug. - Install the generated wheel file in the
dist/folder withpip install dist/wheelname.whl.
If you would like the build produce all compiler commands, then the following combination of flags and environment variables has been tested to work on Linux:
export CMAKE_ARGS='-DCMAKE_VERBOSE_MAKEFILE=ON'
export VERBOSE=1

python3 setup.py bdist_wheel --build-type=Debug
See this issue for more discussion: https://github.com/opencv/opencv-python/issues/424
Source distributions
Since OpenCV version 4.3.0, also source distributions are provided in PyPI. This means that if your system is not compatible with any of the wheels in PyPI, pip will attempt to build OpenCV from sources. If you need a OpenCV version which is not available in PyPI as a source distribution, please follow the manual build guidance above instead of this one.
You can also force pip to build the wheels from the source distribution. Some examples:
pip install --no-binary opencv-python opencv-pythonpip install --no-binary :all: opencv-python
If you need contrib modules or headless version, just change the package name (step 4 in the previous section is not needed). However, any additional CMake flags can be provided via environment variables as described in step 3 of the manual build section. If none are provided, OpenCV’s CMake scripts will attempt to find and enable any suitable dependencies. Headless distributions have hard coded CMake flags which disable all possible GUI dependencies.
On slow systems such as Raspberry Pi the full build may take several hours. On a 8-core Ryzen 7 3700X the build takes about 6 minutes.
Licensing
Opencv-python package (scripts in this repository) is available under MIT license.
OpenCV itself is available under Apache 2 license.
Third party package licenses are at LICENSE-3RD-PARTY.txt.
All wheels ship with FFmpeg licensed under the LGPLv2.1.
Non-headless Linux wheels ship with Qt 5 licensed under the LGPLv3.
The packages include also other binaries. Full list of licenses can be found from LICENSE-3RD-PARTY.txt.
Versioning
find_version.py script searches for the version information from OpenCV sources and appends also a revision number specific to this repository to the version string. It saves the version information to version.py file under cv2 in addition to some other flags.
Releases
A release is made and uploaded to PyPI when a new tag is pushed to master branch. These tags differentiate packages (this repo might have modifications but OpenCV version stays same) and should be incremented sequentially. In practice, release version numbers look like this:
cv_major.cv_minor.cv_revision.package_revision e.g. 3.1.0.0
The master branch follows OpenCV master branch releases. 3.4 branch follows OpenCV 3.4 bugfix releases.
Development builds
Every commit to the master branch of this repo will be built. Possible build artifacts use local version identifiers:
cv_major.cv_minor.cv_revision+git_hash_of_this_repo e.g. 3.1.0+14a8d39
These artifacts can’t be and will not be uploaded to PyPI.
Manylinux wheels
Linux wheels are built using manylinux2014. These wheels should work out of the box for most of the distros (which use GNU C standard library) out there since they are built against an old version of glibc.
The default manylinux2014 images have been extended with some OpenCV dependencies. See Docker folder for more info.
Supported Python versions
Python 3.x compatible pre-built wheels are provided for the officially supported Python versions (not in EOL):
- 3.6
- 3.7
- 3.8
- 3.9
- 3.10
Backward compatibility
Starting from 4.2.0 and 3.4.9 builds the macOS Travis build environment was updated to XCode 9.4. The change effectively dropped support for older than 10.13 macOS versions.
Starting from 4.3.0 and 3.4.10 builds the Linux build environment was updated from manylinux1 to manylinux2014. This dropped support for old Linux distributions.
Prerequisite: Python Language Introduction OpenCV is the huge open-source library for computer vision, machine learning, and image processing and now it plays a major role in real-time operation which is very important in today’s systems. By using it, one can process images and videos to identify objects, faces, or even the handwriting of a human. When it integrated with various libraries, such as Numpy, python is capable of processing the OpenCV array structure for analysis. To Identify image patterns and its various features we use vector space and perform mathematical operations on these features. To install OpenCV, one must have Python and PIP, preinstalled on their system. To check if your system already contains Python, go through the following instructions: Open the Command line(search for cmd in the Run dialog( + R). Now run the following command:
python --version
If Python is already installed, it will generate a message with the Python version available. 
pip -V

Downloading and Installing OpenCV:
OpenCV can be directly downloaded and installed with the use of pip (package manager). To install OpenCV, just go to the command-line and type the following command:
pip install opencv-python
Beginning with the installation:
To check if OpenCV is correctly installed, just run the following commands to perform a version check:
python
>>>import cv2
>>>print(cv2.__version__)
Introduction and Overview
This document contains instructions for installing and migrating to the latest release of OpenCV (version 3) and the Python bindings. In addition to some API changes, there are also changes to the Python interface (e.g. removal of cv2.cv) that may require changes in existing code to work with the new version of the cv2 module. After installation, see the next page, Migration & Changes, for details regarding the changes to the module and for help migrating existing Python code to the new version.
This page covers installing OpenCV 3 on Windows (using pre-built binaries) and Linux (compiled from source), including the Python interface (the cv2 module). OpenCV can be downloaded from the official OpenCV website. Note that this guide is written based on OpenCV version 3.1.0. After installation, it is recommended that you can check the version of OpenCV that Python is using:
import cv2
print cv2.__version__

# Should print 3.0.0-rc1 or newer.
Note that although OpenCV 3 is the latest release, by convention, the module is still named cv2.
Installing on Windows (pre-built binaries)
Using pre-built binaries is the quickest way to get a Python OpenCV environment up and running on Windows. Currently, only the Python 2 version of the cv2 module is built and included in the latest Windows release. Support for Python 3 (as well as adding other non-standard features/modules), requires compiling from source — see the official OpenCV documentation for details.
Downloading OpenCV and Python
To begin, download OpenCV for Windows (version 3.1, opencv-3.1.0.exe), and extract it to a directory of your choice. The Windows build includes both a 32-bit and 64-bit module for Python 2.7.
Before continuing, ensure that you have a working Python 2.7 installation, which can be downloaded from the Python website. This guide was tested using Python 2.7.9 (x86 installer / x64 installer). When installing, it is recommended that you allow the installer to add Python to your PATH environment variable, so you can run python and pip from a command prompt.
Installing Module Dependencies
The Python OpenCV cv2 module requires both the NumPy and SciPy stack. To get this, first ensure that you have a working python environment, and have pip installed (if not, use the links above, and ensure the Python folder is in your PATH variable).
Christoph Gohlke currently provides some (unofficial) pre-built Python packages for Windows, including NumPy and SciPy. Download the latest stable versions of NumPy and SciPy, and install them by calling pip install [module].whl from a command prompt. Note that you should download the version corresponding to your Python environment (2.7 in this case) and word length. For example, on 32-bit systems/interpreters:
pip install numpy-1.9.2+mkl-cp27-none-win32.whl
pip install scipy-0.15.1-cp27-none-win32.whl
And for 64-bit systems/interpreters:
pip install numpy-1.9.2+mkl-cp27-none-win_amd64.whl
pip install scipy-0.15.1-cp27-none-win_amd64.whl
After installing, you should be able to run import numpy and import scipy from a Python interpreter to verify that the modules were installed correctly. You can check what versions of NumPy and SciPy are installed from numpy.__version__ and scipy.__version__, respectively.
Installing Python-OpenCV Module
Lastly, we need to copy the OpenCV module into the local Python packages. In the files extracted from opencv-3.0.0-rc1.exe, go to the folder opencvbuildpython2.7, and open either the x86 (for 32-bit) or x64 (for 64-bit) folder. In each, there will be a cv2.pyd file.
Copy cv2.pyd directly into the Libsite-packages directory of your Python installation. For most users, this will be found at:
C:Python27Libsite-packages
Lastly, ensure that the OpenCV .dll files are somewhere in your system’s %PATH%, especially the opencv_ffmpeg310.dll (or opencv_ffmpeg310_64.dll for 64-bit systems) file required for loading video files.
Continue on to the Verifying Installation section to ensure everything was installed correctly, and the new version of OpenCV is being used. Also be sure to check out the next page, Migration & Changes, for details about the changes to the module and updating existing code.
Installing on Linux (compiling from source)
Although this guide is written for Ubuntu 12.04/14.04 and other variants (e.g. Xubuntu/Lubuntu/Kubuntu), the process should largely be the same on other versions, as well as similar Debian-like Linux distributions. Pay attention to the output of each command to ensure everything worked correctly, and if there are any issues during the build process, see the bottom of this document for possible mitigations
Downloading OpenCV
To begin, download OpenCV for Linux (version 3.1.0, opencv-3.1.0.zip), and extract it to a directory of your choice (e.g. ~/opencv-src). Create a build folder inside the folder where the archive was extracted (the directory containing the CMakeLists.txt file), and open a terminal session there. For example:
# Assuming the files were extracted to ~/opencv-src/...
cd ~/opencv-src
mkdir build
cd build
Execute all of following commands from the build sub-folder itself, so the compiled files will be placed there.
Installing Build Dependencies
To compile OpenCV, we must ensure that the required dependencies are available, including the build tools themselves. We can get the required ones using apt on Ubuntu, but first, ensure the package list is up-to-date by running apt-get update. Next, execute the following commands to get the required packages (see below for a one-line list of all):
sudo apt-get install cmake build-essential pkg-config

sudo apt-get install libgtk2.0-dev libtbb-dev

sudo apt-get install python-dev python-numpy python-scipy

sudo apt-get install libjasper-dev libjpeg-dev libpng-dev libtiff-dev

sudo apt-get install libavcodec-dev libavutil-dev libavformat-dev libswscale-dev

sudo apt-get install libdc1394-22-dev libv4l-dev
In single line:
sudo apt-get install cmake build-essential pkg-config libgtk2.0-dev libtbb-dev python-dev python-numpy python-scipy libjasper-dev libjpeg-dev libpng-dev libtiff-dev libavcodec-dev libavutil-dev libavformat-dev libswscale-dev libdc1394-22-dev libv4l-dev
Note that for additional OpenCV modules/features (e.g. GPU/CUDA support, or Python 3 module), you will need to download the respective development/SDK packages for those libraries as well. The dependencies listed above only cover building OpenCV itself and the Python 2.7 cv2 module.
Compiling and Installing OpenCV
Now that we have the required build dependencies, run cmake (again, in the build/ directory we created) to generate the Makefile to build OpenCV:
cmake -D CMAKE_BUILD_TYPE=Release -D CMAKE_INSTALL_PREFIX=/usr/local ..
If there are any errors, ensure that you downloaded all the required packages — the output should help track down what is missing. To ensure the Python module will be built, you should see python2 in the list of configured modules after running cmake:
[...]

--     Linker flags (Release):
--     Linker flags (Debug):
--     Precompiled headers:      YES
--
--   OpenCV modules:
--     To be built:              hal core flann imgproc ml [...] python2

[...]
If you do not see the python2 module listed, in the «To be built» list, check that you have the proper Python development packages installed, remove all files from the build/ folder, and try running the cmake command again.
Now, we can build OpenCV (and the Python module) using make, and install it to our system:
Ensure that the build was successful after calling make, and check the output before installing. If you run into build issues/errors, again ensure that you have all the required dependencies and header files on your system. If there are actual build issues with OpenCV itself, see the Linux Build Issues section below for some possible workarounds.
When installing OpenCV 3.0-rc1 on Ubuntu 12.04, I ran into build errors regarding some missing codec #define entries. As mentioned, the steps to do this are detailed below should you run into the same problem (the problem should be solved in version 3.1.0 and above). Ubuntu 14.04 and above should build successfully without requiring any modifications.
If the build was successful, but you can’t import cv2 from a Python shell after running make install, you can install the module manually by copying the cv2.so file we just built in the build/lib/ folder to /usr/local/lib/python2.7/dist-packages/. From the build/ folder, this can be done by:
sudo cp lib/cv2.so /usr/local/lib/python2.7/dist-packages/
After this step, the cv2 module is installed, and can now be imported by your Python environment. Continue on to the Verifying Installation section to ensure everything was installed correctly, and more importantly, that the correct version of OpenCV is being used by Python. You can also check out the next page, Migration & Changes, for details about changes to the cv2 module, and what changes need to be made to existing code to run with the updated module.
Verifying Installation
As mentioned previously, you can verify that the cv2 module was installed correctly by executing the following in a Python shell:
import cv2
print cv2.__version__
If the correct version string is printed (3.0.0-rc1 or newer if you used a more recent version), everything is installed correctly at this point!
Note that there are some major changes to the cv2 module hierarchy itself, and Python programs written with OpenCV 2.4.x in mind may not work properly anymore. See the next section, Migration & Changes for details about the changes, and how to modify programs to deal with the changes.
Linux Build Issues
On some systems you may run into issues when compiling OpenCV itself, depending on what packages are available. If the proper header files are available, but build issues still arise, try to see if there are any workarounds below for the problem.
Undefined AV_CODEC_ID_... in ffmpeg_codecs.hpp
If you run into an issue where build errors are caused by certain codecs not being defined, you can download a more recent version of ffmpeg_codecs.hpp from here, and replace it in the source code you downloaded/extracted in the modules/videoio/src/ folder.
Alternatively, you can declare them manually by editing the ffmpeg_codecs.hpp file itself by adding the missing codec entry for H263I, and renaming WNV to WNV1. You can see what changes have to be made by viewing this commit from the OpenCV GitHub project.
Once the file is updated, you can call make again from the build/ folder, and OpenCV should finish compiling without error now.
In this post, we will provide step by step instructions on how to install OpenCV 3 (C++ and Python) on Windows.
If you want to install OpenCV 4 from source, please check out this tutorial: Install OpenCV from source on Windows
If you want to install OpenCV 4 using a EXE file for C++ and Python, please check out this post.
We have used Windows Power Shell to run commands. Alternatively, you can use the command prompt too.
Step 1: Install Visual Studio
Download and install Visual Studio 2015 community edition from https://www.visualstudio.com/vs/older-downloads/. If you are finding it difficult to search for Visual Studio 2015, use this link. If you don’t have a Visual Studio Dev Essentials account, create account and login. Run installer, select “Custom” in “type of installation”.
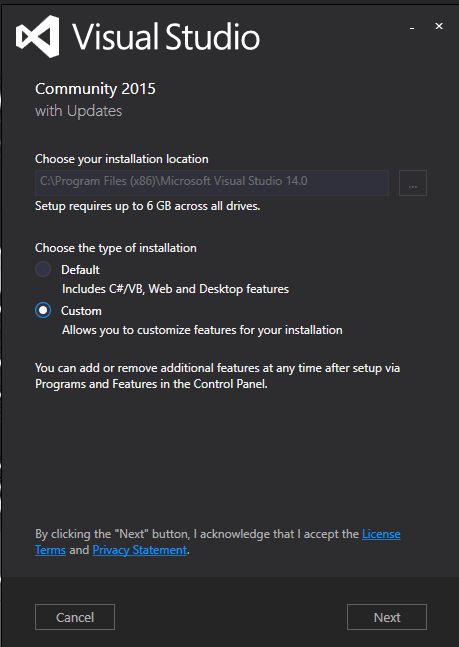
In next screen within Programming Languages, select Visual C++ and Python tools for Visual Studio. Click next.

Now click next. It will take some time to complete the installation.
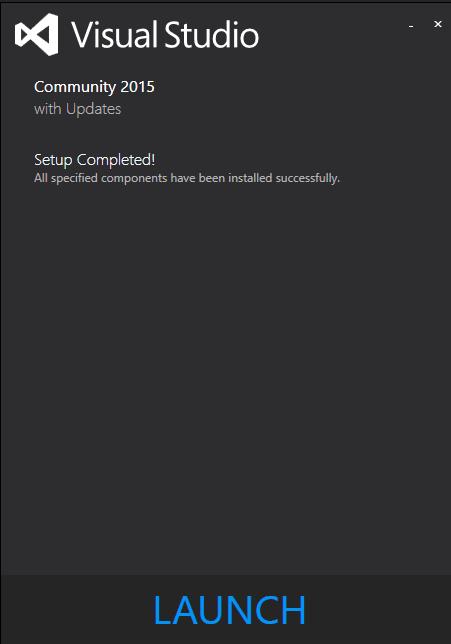
We have finished installation of Visual Studio 2015.
Note: Since Visual Studio 2017 fails to compile Dlib, we switched back to Visual Studio 2015.
Step 2: Install CMake
Download and install CMake v3.10.0 from https://cmake.org/download/.
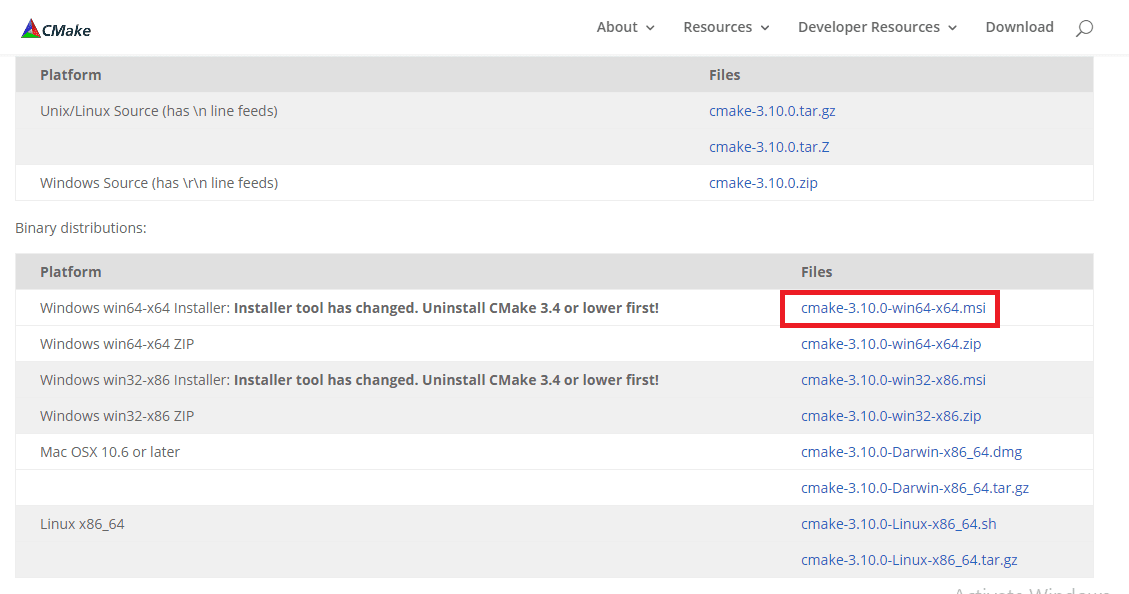
During installation select “Add CMake to system PATH”
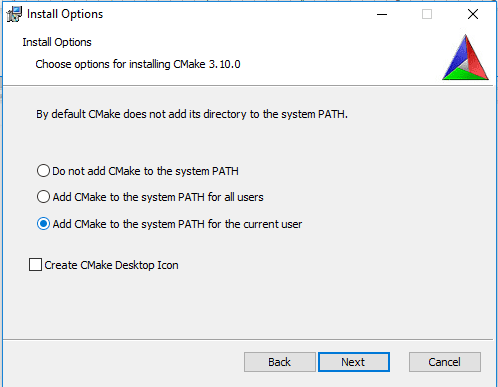
Step 3: Install Anaconda (a python distribution)
Download and install Anaconda 64-bit version from https://www.anaconda.com/products/individual#Downloads.
Note: Dlib ships a prebuilt binary for Python 3 and not Python 2. Building Dlib’s Python bindings from source is a hassle as you have to build Boost.Python first.
So it is advised to install Anaconda 3. In case you want to build OpenCV’s Python bindings for Python 2, you can install Anaconda 2 as well but you won’t be able to use Dlib in Python 2.
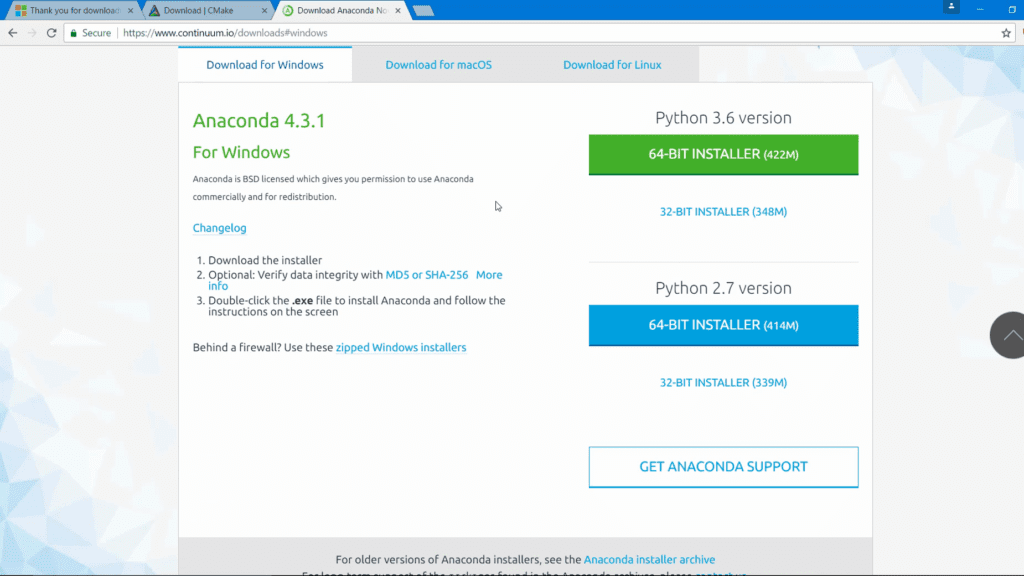
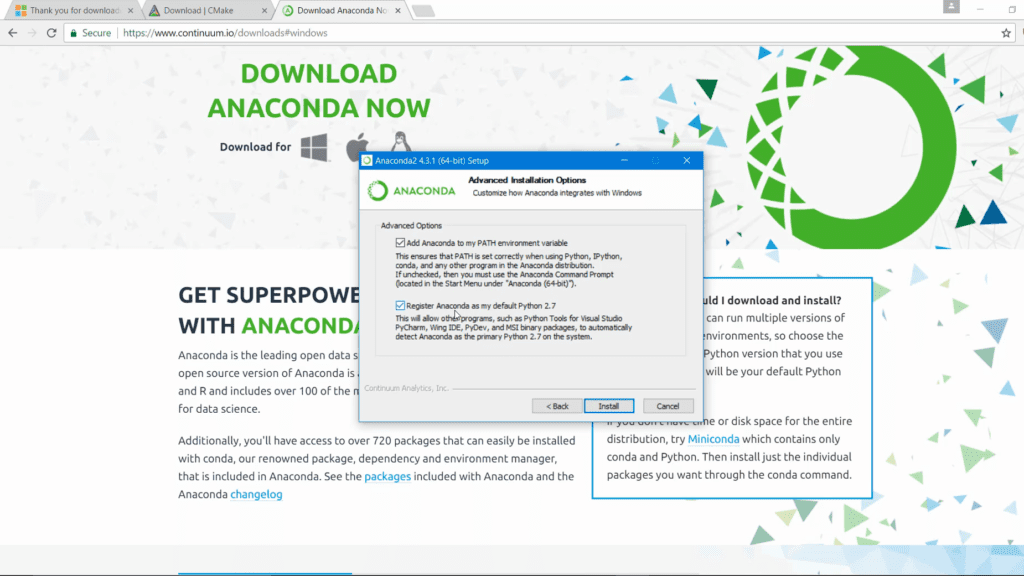
While installing Anaconda make sure that you check both options:
- Add Anaconda to my PATH environment variable
- Register Anaconda as my default Python
Step 4: Download and extract opencv-3.3.1 and opencv_contrib-3.3.1
Go to https://github.com/opencv/opencv/releases and download opencv-3.3.1 source code zip
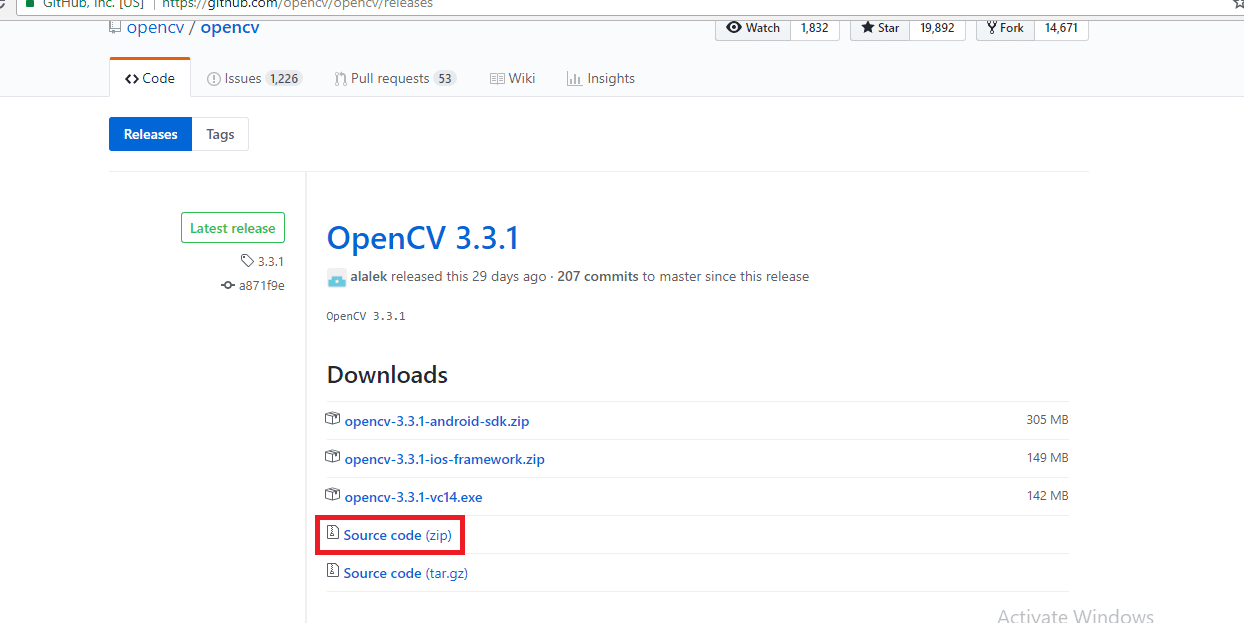
Go to https://github.com/opencv/opencv_contrib/releases and download opencv_contrib-3.3.1 source code zip
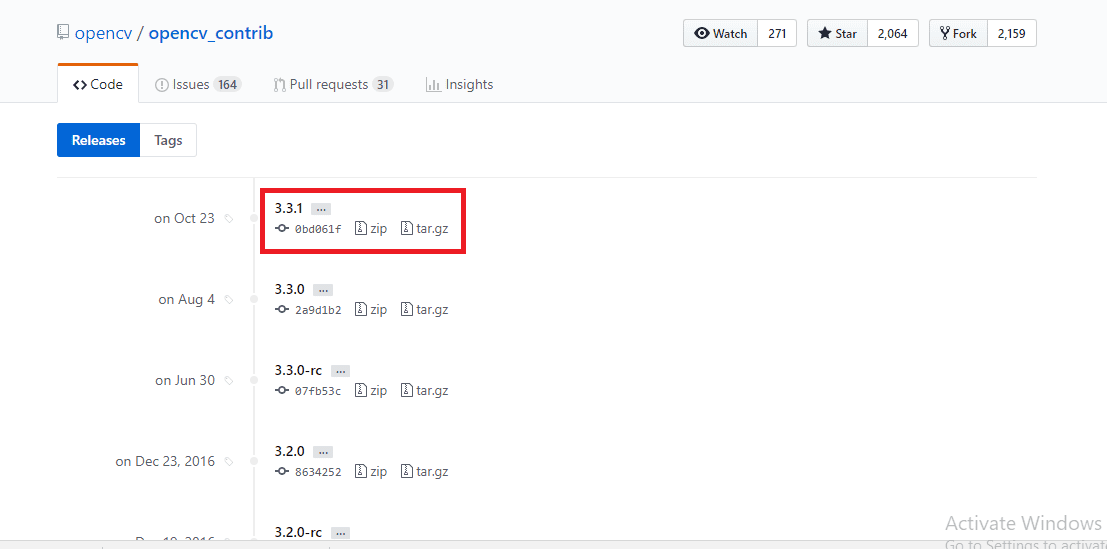
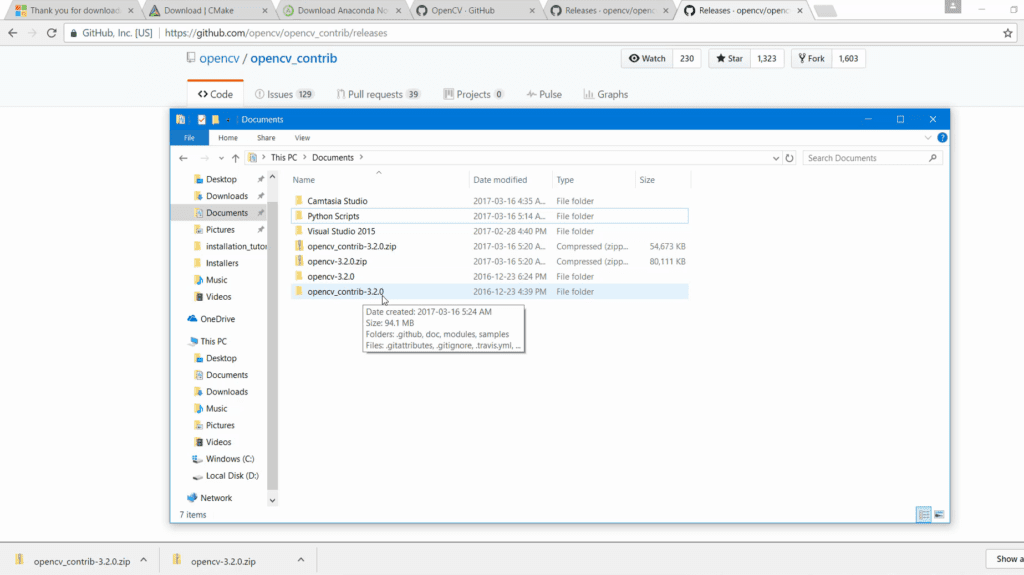
Extract both zip files. Although you can keep opencv and opencv_contrib folders anywhere, I suggest that you should keep both in the same directory. I have placed these two folders in “My Documents” directory.
NOTE : From hereon we will refer the path to opencv-3.3.1 folder as OPENCV_PATH. For example, in my case OPENCV_PATH is C:/Users/Vaibhaw Chandel/Documents/opencv-3.3.1
Depending upon where you have kept opencv-3.3.1 folder, this path would be different.
Step 5: Generate Visual Studio project using CMake
Run Cmake, in box “Where is the source code” write value of OPENCV_PATH (which is path to opencv-3.3.1 folder) and path to build directory. We will choose build directory as OPENCV_PATH/build
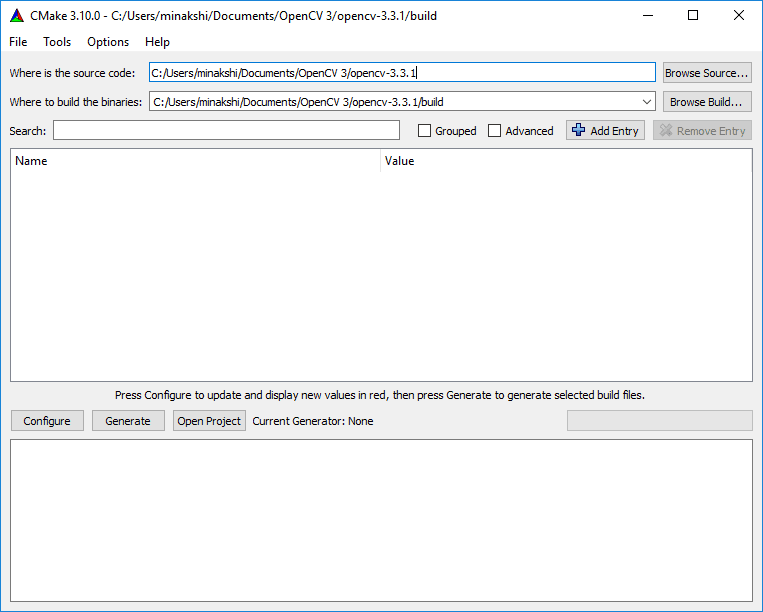
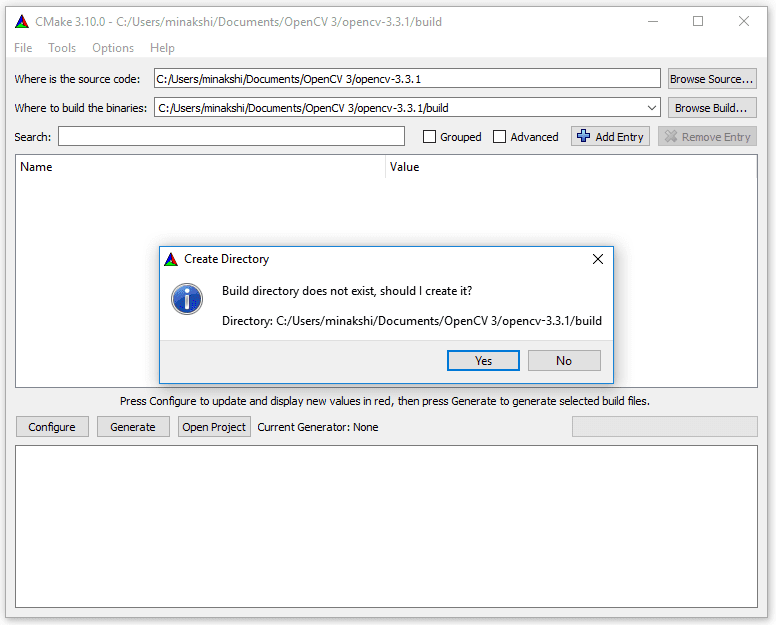
Now click configure.
You will be asked for permission to create the build folder. Click Yes.
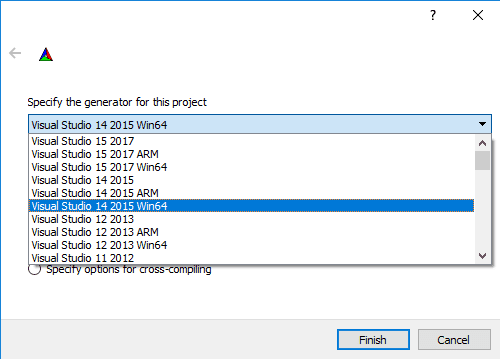
When prompted to select a compiler, select Visual Studio 14 2015 Win64.
Click finish and in the next window keep the default parameters checked.
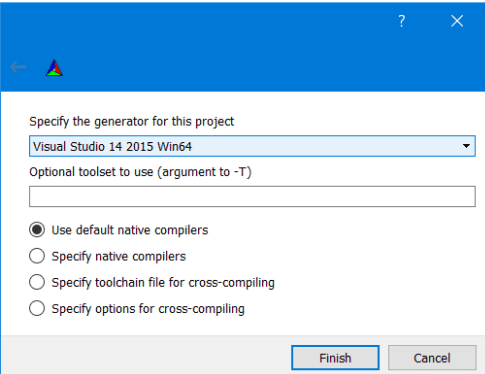
Click finish. Now CMake will look in the system directories and generate the makefiles.
Step 5.1: Additional changes to CMake config
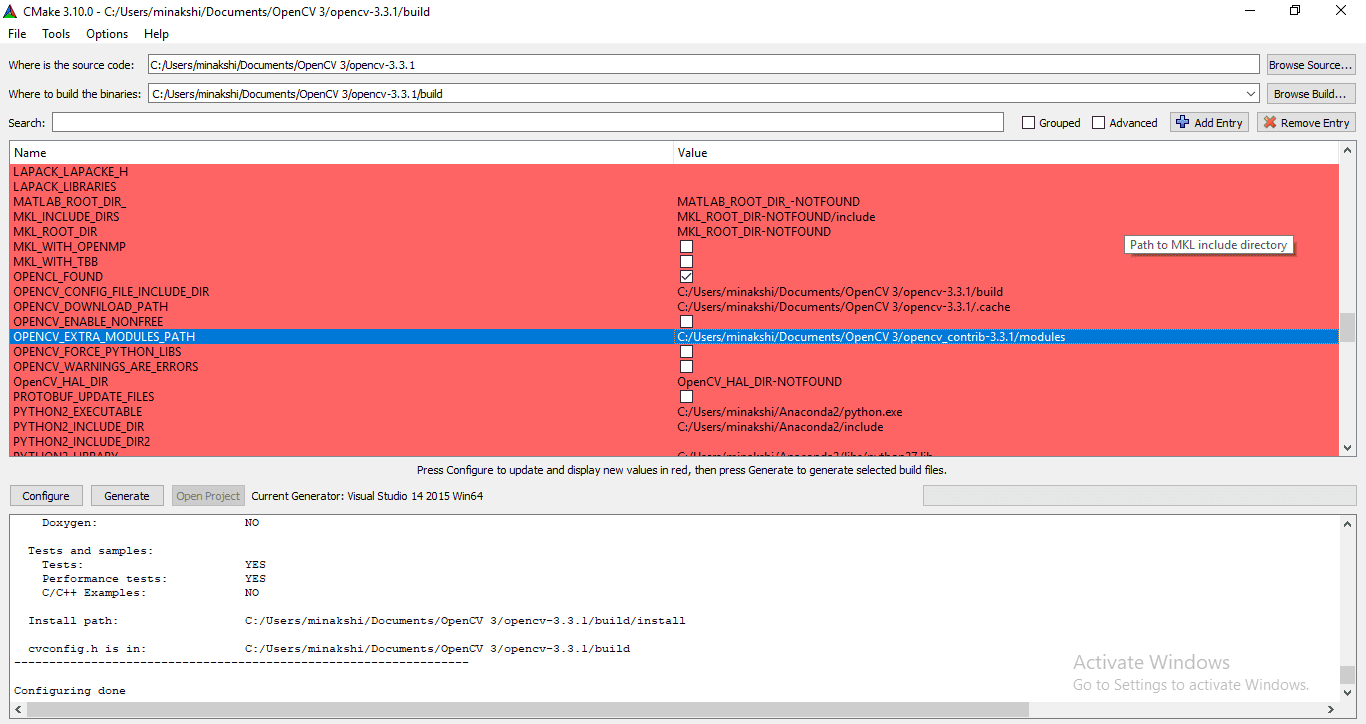
We will make few changes in the default configuration generated by CMake. Click on the images to see a larger version.
- Check “INSTALL_C_EXAMPLES” and “INSTALL_PYTHON_EXAMPLES”
- In flag “OPENCV_EXTRA_MODULES_PATH”, give path of modules directory within opencv_contrib-3.3.1. In our case we have kept opencv_contrib-3.3.1 in Documents folder so path is “C:/Users/Vaibhaw Chandel/Documents/opencv_contrib-3.3.1/modules”
Now click configure to apply these changes.
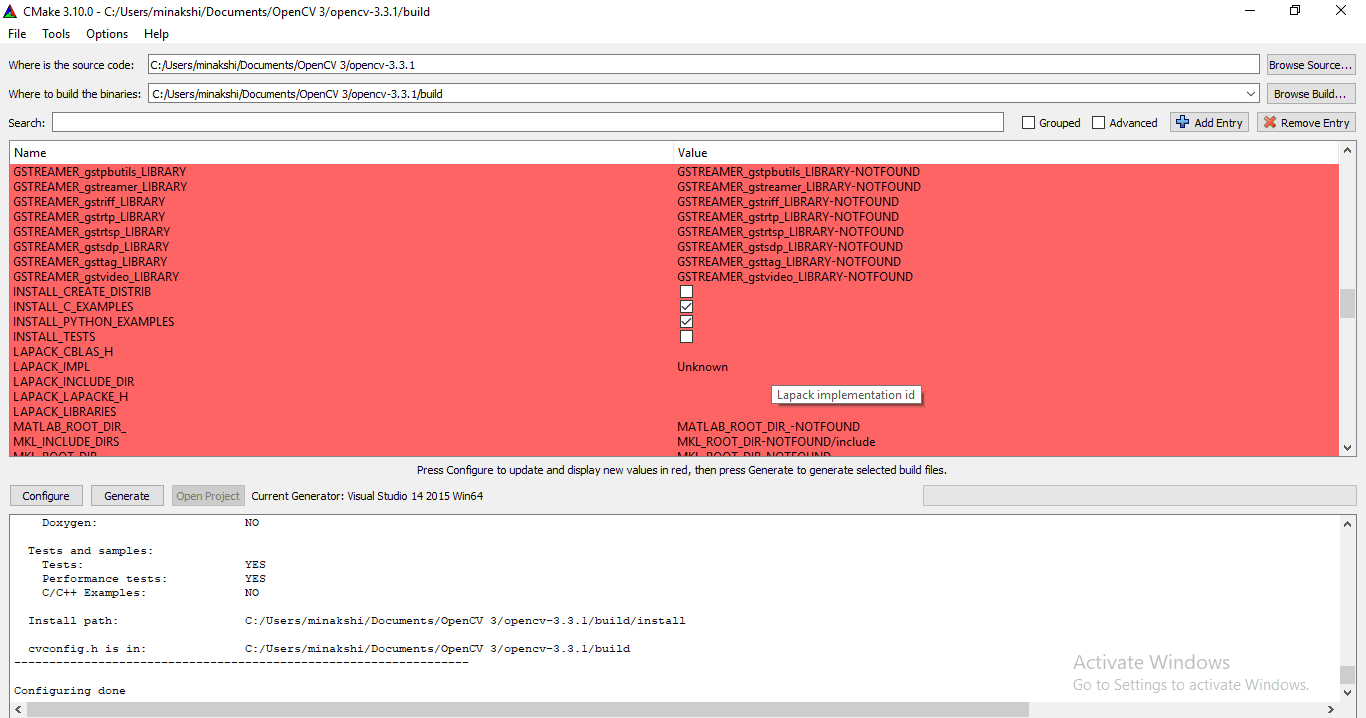
- On Windows 10, opencv_saliency module fails to build. So we will disable it. Uncheck BUILD_opencv_saliency
Now click on configure again to include this change.
Step 5.2 : Add Python paths for both Python2 and Python3 (optional)
This section is only for people who want to generate OpenCV binary for both Python2 and Python 3. If you are going to use just one Python either 2 or 3, you should skip this section.
CMake was unable to find paths for my Python3 files.
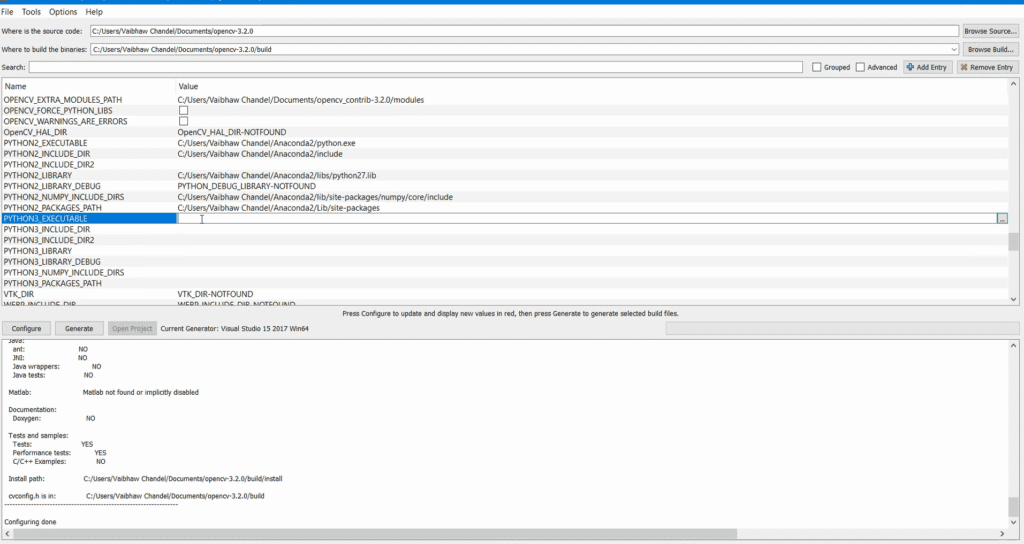
So I manually added paths for Python3.
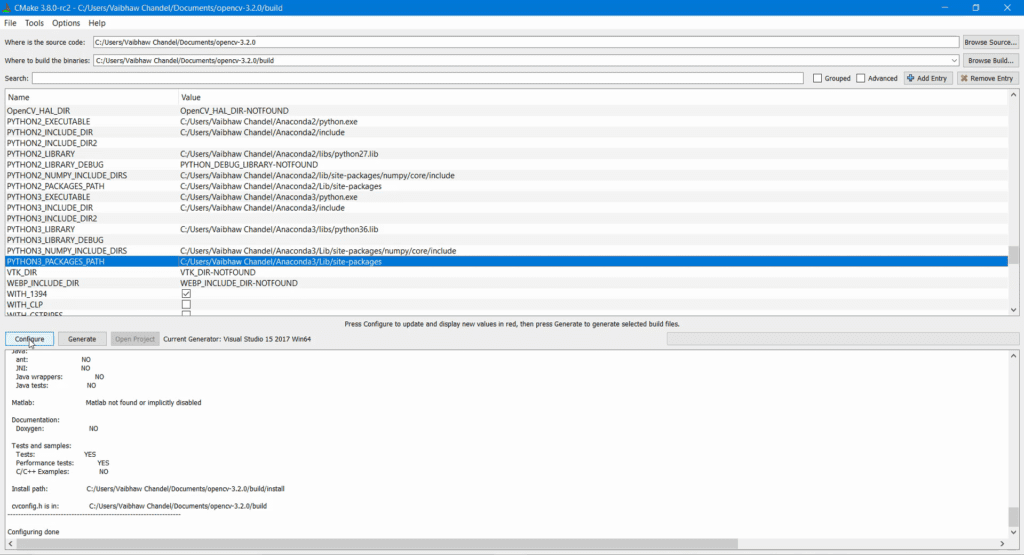
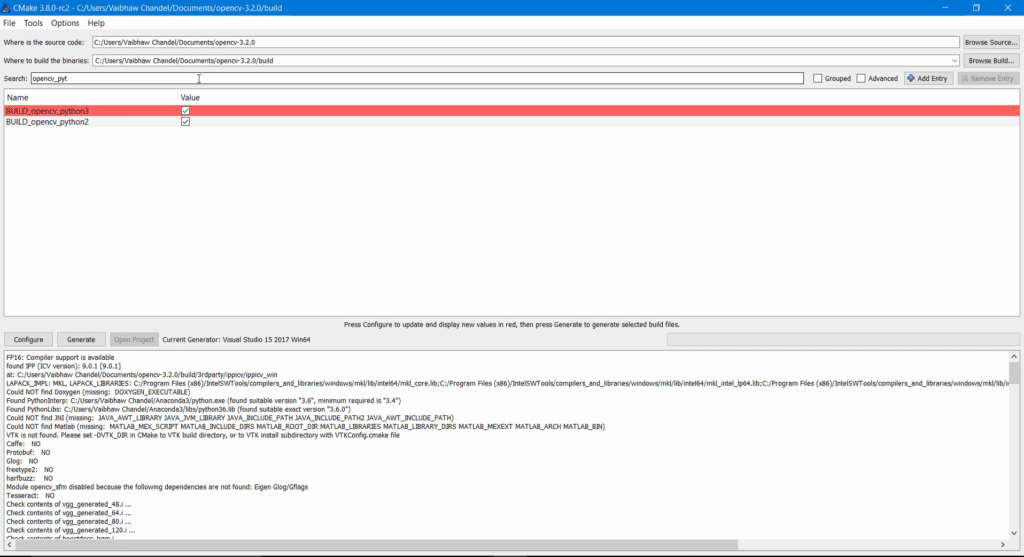
Now click configure again. After configuring is done, search opencv_python in search bar, both BUILD_opencv_python2 and BUILD_opencv_python3 will be automatically checked. Now we are sure that OpenCV binaries for both Python2 and Python 3 will be generated after compilation.
Step 5.3 : Generate build files
If CMake is able to configure without any errors it should say “Configuring done”.
Click generate.
Note: Whenever you make any changes(check/uncheck boxes or change path) to configuration generated by CMake, always click configure and generate.
Step 6: Compile OpenCV
Step 6.1:Compile opencv in Release mode
Open Windows Command Prompt (cmd).
Go to OPENCV_PATH/build directory and run this command
cmake.exe --build . --config Release --target INSTALL
Step 6.2 : Compile opencv in Debug mode
Open CMake GUI again as mentioned in Step 5.
- Search “python” in search box
- Uncheck INSTALL_PYTHON_EXAMPLES, BUILD_opencv_python3 and BUILD_opencv_python2
- Click configure
- Click generate
Now in windows command prompt
Go to OPENCV_PATH/build directory and run this command
cmake.exe --build . --config Debug --target INSTALL
Now that we have compiled OpenCV we will find out how to test a OpenCV project using CMake.
Step 7: Update System Environment Variables
Step 7.1 : Update environment variable – PATH
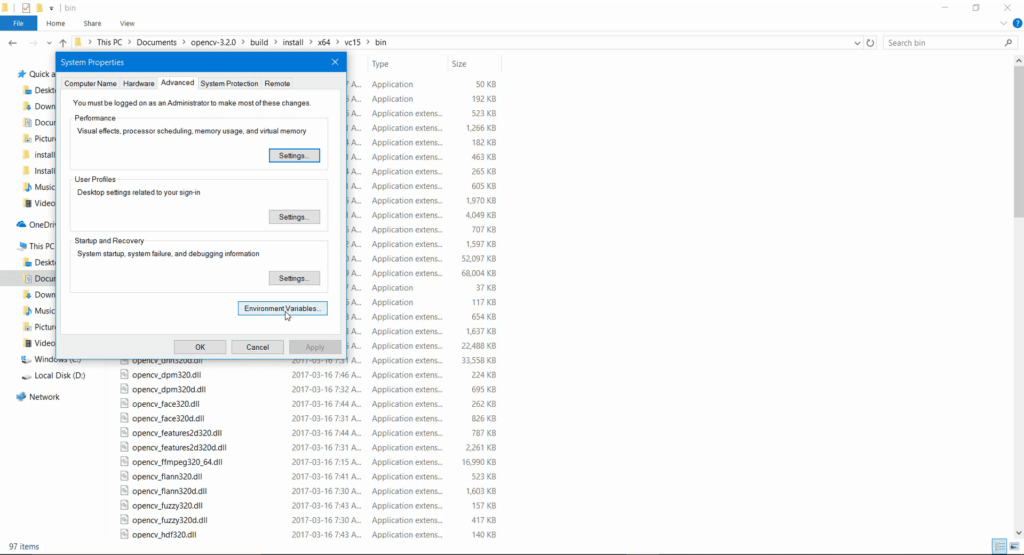
First of all we will add OpenCV dll files’ path to our system PATH. Press Windows Super key, search for “environment variables”
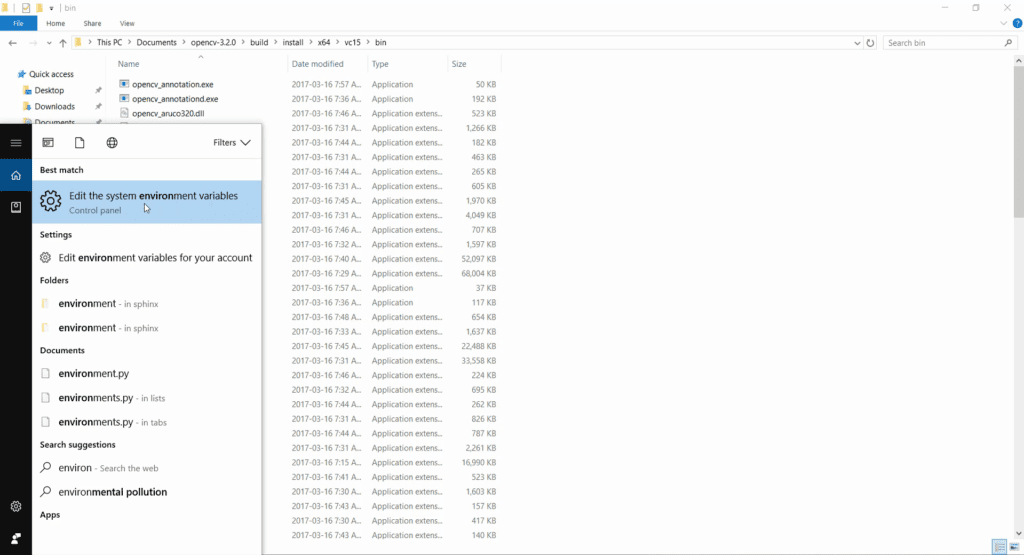
Click Environment Variables in System Properties window
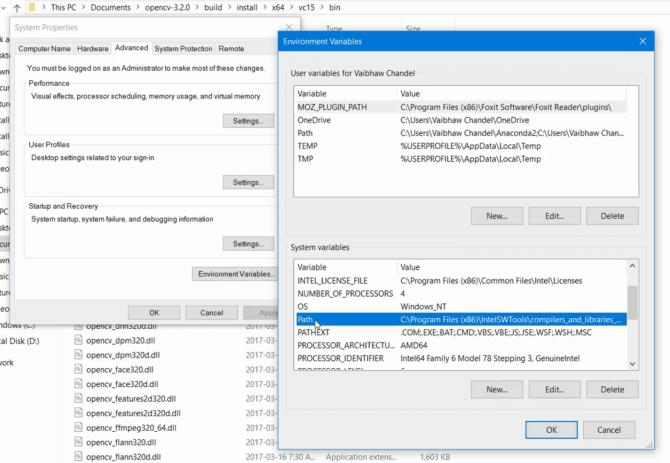
Under System Variables, Select Path and click edit
Click New, and give path to OPENCV_PATHbuildinstallx64vc14bin and click Ok. Depending upon where you have kept opencv-3.3.1 folder and what version of Visual Studio you used to compile OpenCV, this path would be different. In my case full path is:
C:UsersVaibhaw ChandelDocumentsopencv-3.3.1buildinstallx64vc14bin
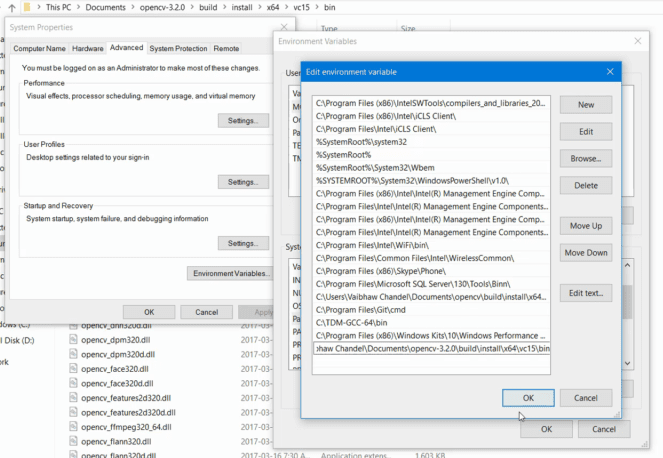
Now click Ok to save. Don’t close the Environment Variables window yet. We will update OPENCV_DIR variable in next step.
Step 7.2 : Update user environment variable – OPENCV_DIR
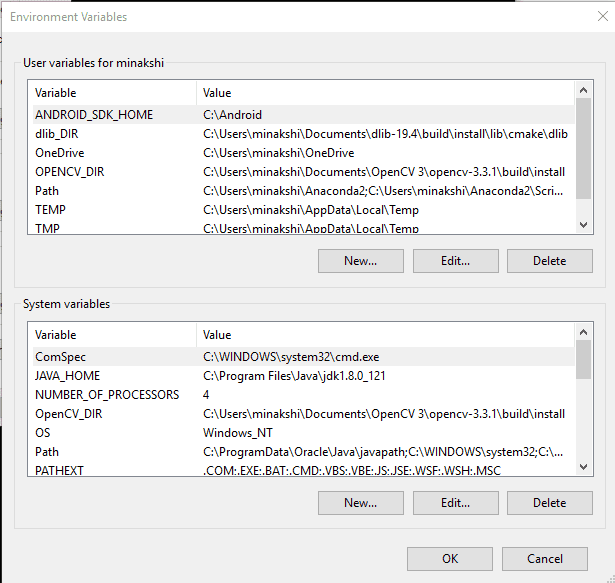
Click New in “User Variables” (upper half of right hand side window). Under variable name write OPENCV_DIR and under variable value write OPENCV_PATHbuildinstall.
As you can see in my case variable value is:
C:UsersVaibhaw ChandelDocumentsopencv-3.3.1buildinstall
This directory contains file “OpenCVConfig.cmake”. This is used by CMake to configure OpenCV_LIBS and OpenCV_INCLUDE_DIRS variables to generate project files.
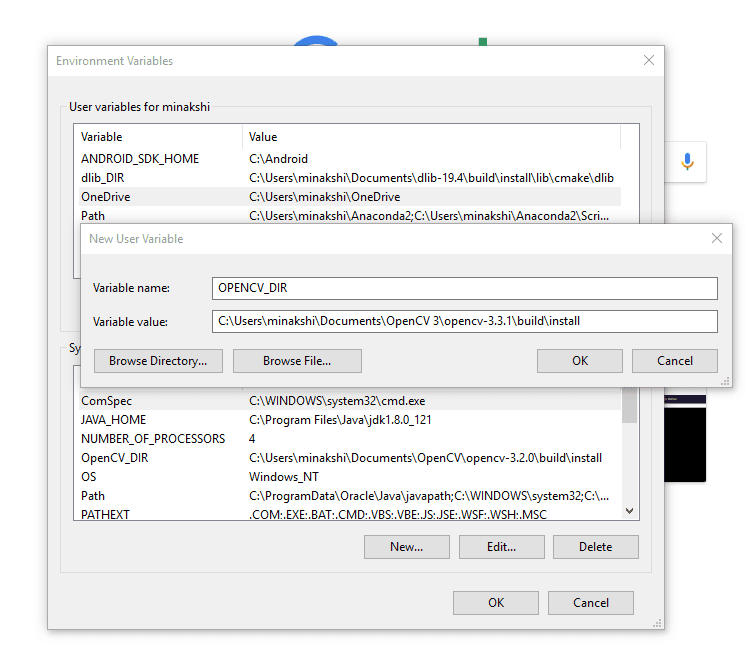
Now click OK to save and close environment variables window.
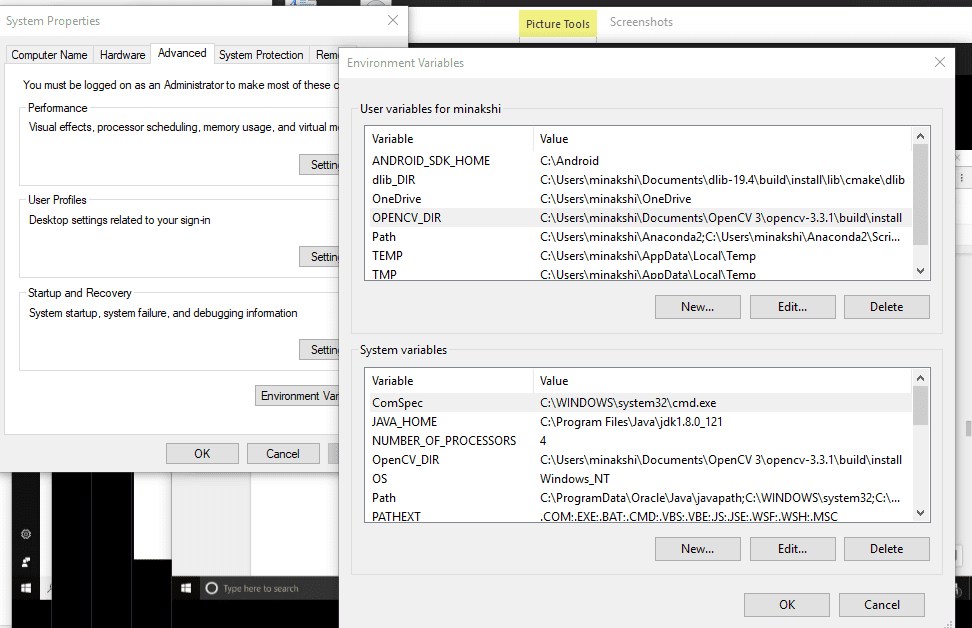
Note: If you have an open Command Prompt/Power Shell window before these values were updated, you have to close and open a new Command Prompt/Power Shell window again.
Step 8: Testing C++ code
Download this redEyeRemover code and extract it into a folder.
Now open Windows Power Shell and navigate to this directory.
Create a file named CMakeLists.txt and put this code in this file.
cmake_minimum_required(VERSION 2.8)
project( redEyeRemover )
find_package( OpenCV REQUIRED )
include_directories( ${OpenCV_INCLUDE_DIRS} )
add_executable( removeRedEyes removeRedEyes.cpp )
target_link_libraries( removeRedEyes ${OpenCV_LIBS} )
This file has information about opencv’s include and library paths.
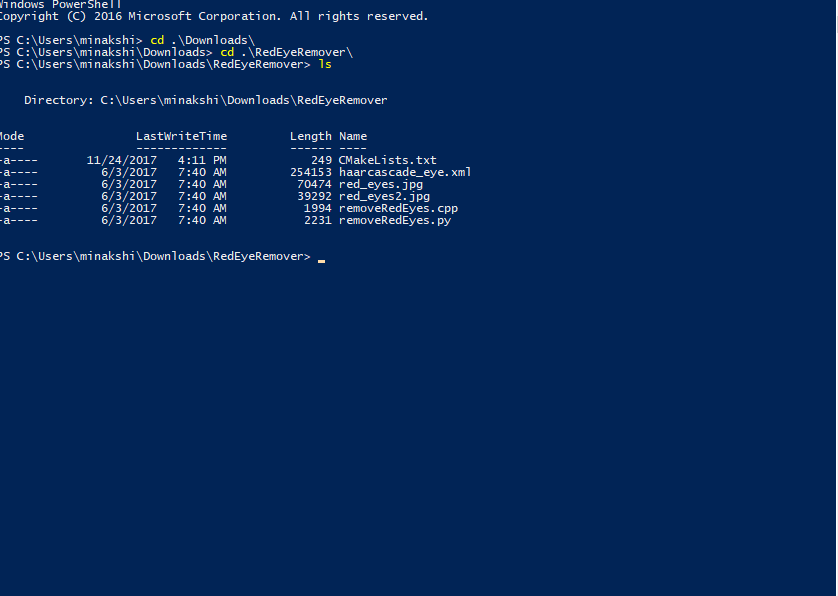
Now we will compile removeRedEyes.cpp and run it.
# create build directory
mkdir build
cd build
# create Visual Studio project files using cmake
cmake -G "Visual Studio 14 2015 Win64" ..
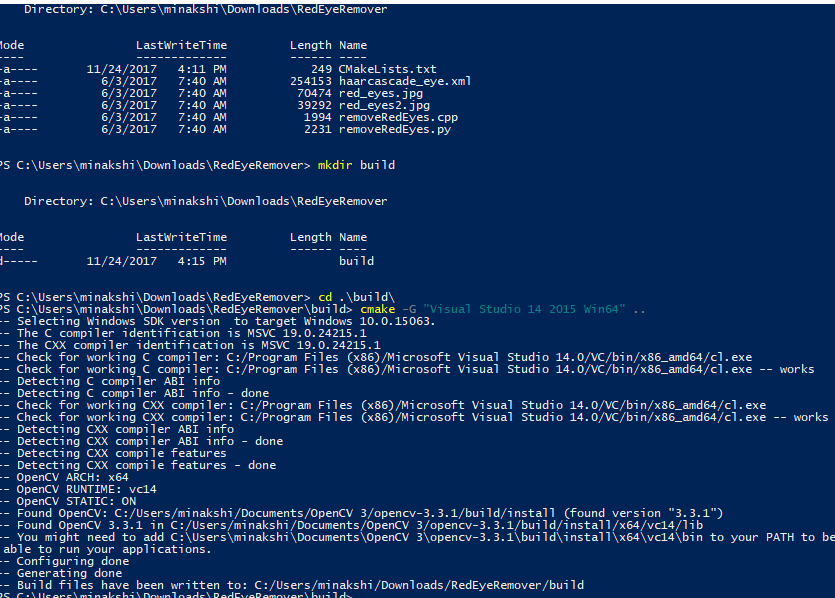
You can see in the screenshot below that CMake found the OpenCV on my machine.
Now we will build our application.
# build our application
cmake --build . --config Release
# once the build is complete, it will generate exe file in buildRelease directory
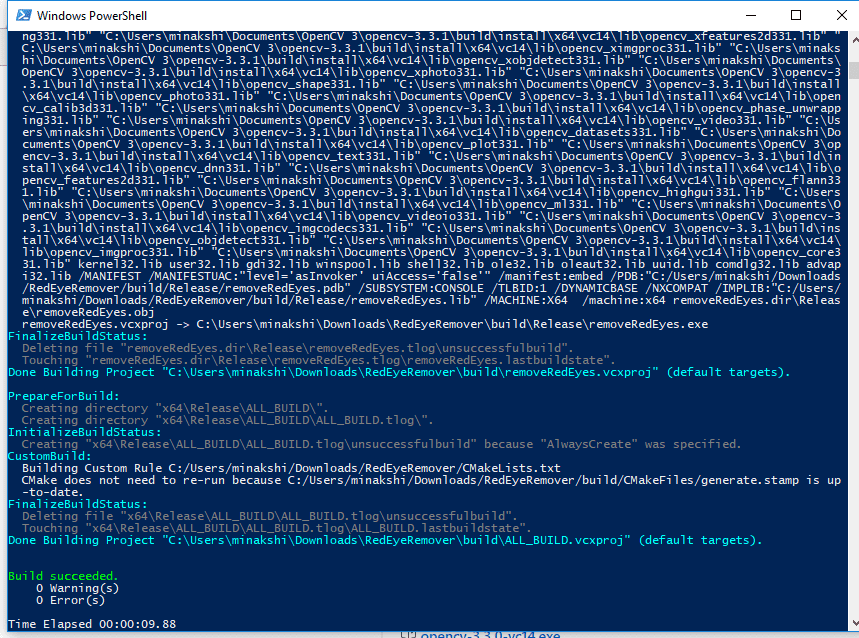
Since our C++ code assumes that jpg files are in the current directory, we will move to directory RedEyeRemover and run removeRedEyes.exe file from there.
cd ..
.buildReleaseremoveRedEyes.exe
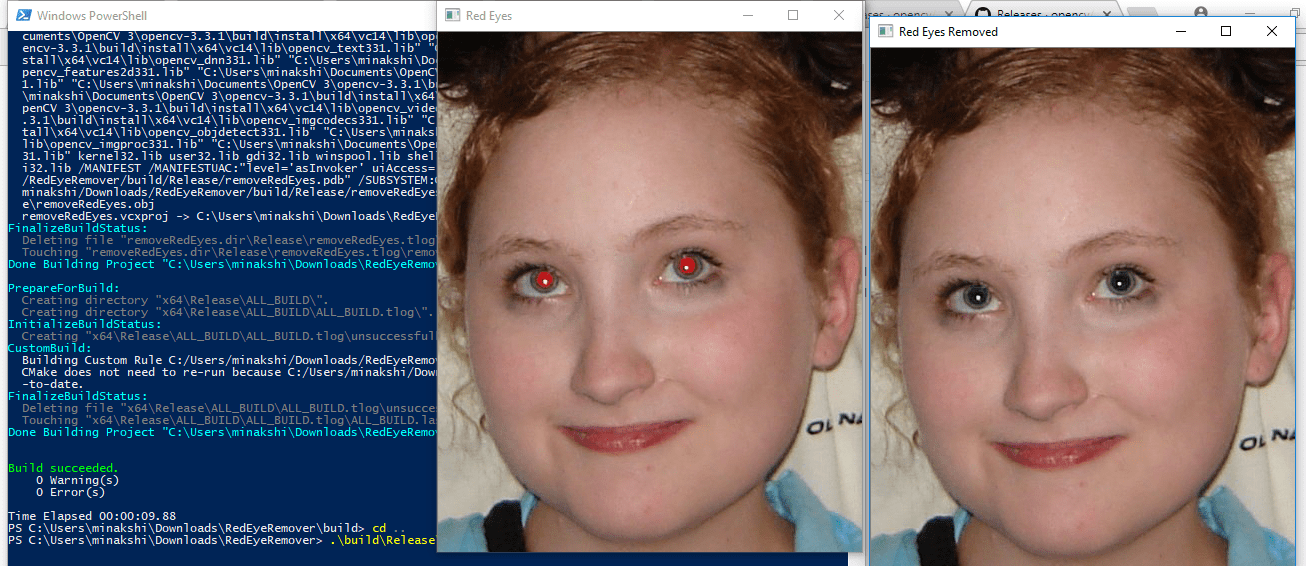
After running the application you will see two image windows, one with red eyes and another with black eyes.
Step 9: Testing Python code
Step 9.1 : Quick check
Quick way to check whether OpenCV for Python is installed correctly or not is to import cv2 in python interpreter.
Open command prompt in Windows, run python command. This will open Python interpreter. Run these two commands
import cv2
print(cv2.__version__)
Anaconda comes with a feature-rich Python interpreter called IPython. I tested these commands in IPython.
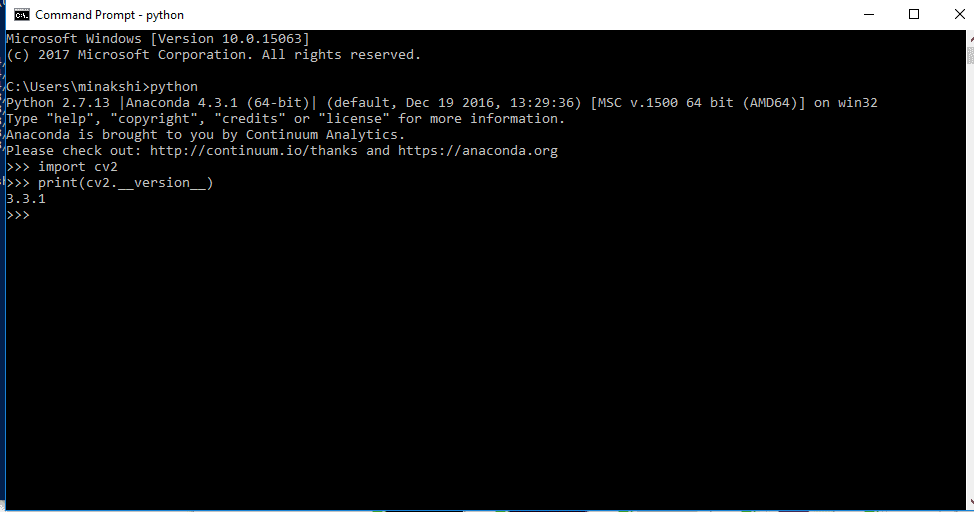
If OpenCV for Python is installed correctly, running command “import cv2” will give no errors. If any error comes up it means installation failed.
Step 9.2 : Testing redEyeRemover application
Open Windows Power Shell and navigate to directory where you have extracted RedEyeRemover.zip
Now run python code like this:
python .removeRedEyes.py
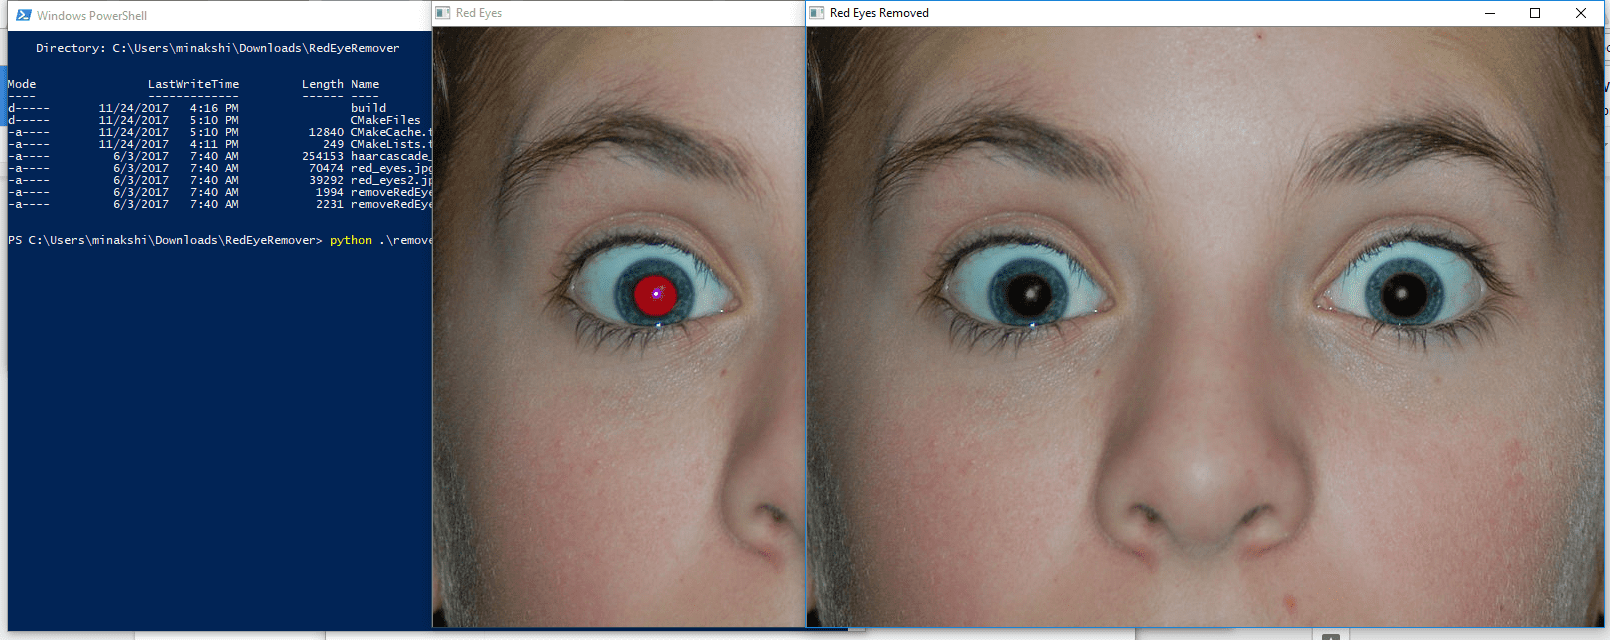
If the program runs successfully, you will see two image windows one with red-eyes other with black eyes.
Subscribe & Download Code
If you liked this article and would like to download code (C++ and Python) and example images used in this post, please click here. Alternately, sign up to receive a free Computer Vision Resource Guide. In our newsletter, we share OpenCV tutorials and examples written in C++/Python, and Computer Vision and Machine Learning algorithms and news.
Table of Contents
- Installing OpenCV on Windows
- Installing OpenCV Using Pip
- Having Problems Configuring Your Development Environment?
- Summary
- References
- Citation Information
In this tutorial, you will learn how to install OpenCV on Windows. This includes a complete guide to installation using prebuilt binaries.
After completing this blog post, you will be able to install OpenCV on your Windows machine on your own. You will also be able to choose the method that will suit you the best.
To learn how to Install OpenCV on Windows, just keep reading.
Hello and welcome to today’s tutorial. If you are here, I assume you must have a Windows computer or need to use one for Computer Vision. First, let me assure you of a doubt you might have nurtured.
Yes, it is possible to practice Deep Learning and Computer Vision on a Windows machine. We at PyImageSearch are firm believers in democratizing learning.
You do not need an expensive laptop to get started with OpenCV.
In this tutorial, we will guide you through the various ways you can follow to get OpenCV installed on your Windows computer.
Installing OpenCV Using Pip
Installing OpenCV Python using pip is fairly easy. However, there are a few things to keep in mind before we get started.
- This is a prebuilt CPU-only OpenCV package for Python. You cannot follow these steps if you are on a GPU-powered computer.
- These are unofficial prebuilt packages for installing OpenCV. They are not official OpenCV packages released by the OpenCV.org team.
- It is essential to have Python and pip installed on your Windows machine before you get started. If you do not have Python installed, please download and install the latest version from here.
With all the disclaimers and prerequisites done, let’s get started with some installation. Here are four OpenCV packages that are pip-installable on the PyPI repository:
- opencv-python: This repository contains just the main modules of the OpenCV library. If you’re a PyImageSearch reader, you do not want to install this package.
- opencv-contrib-python: The opencv-contrib-python repository contains both the main modules along with the contrib modules. This is the library we recommend you install, as it includes all OpenCV functionality.
- opencv-python-headless: Same as opencv-python but no GUI functionality. Useful for headless systems.
- opencv-contrib-python-headless: Same as opencv-contrib-python but no GUI functionality. Useful for headless systems.
You DO NOT want to install both opencv-python and opencv-contrib-python. Pick ONE of them.
Step 1: Make sure you have python and pip installed. Pip version 19.3 is the minimum supported version. This means a pip with a version higher than 19.3 is required.
To check the pip version, open your command prompt and type:
$ pip -V
This will let you know the version of pip you are using. To upgrade pip to the latest version type:
$ pip install --upgrade pip
Step 2 (optional): Create a virtual environment and install OpenCV there. Creating a virtual environment in Python is a very good practice, and we highly recommend it.
You can develop multiple projects without worrying if your libraries are going to crash with each other. This can be achieved through virtualenv and virtualenvwrapper as well as Anaconda. In this tutorial, we will use virtualenv and virtualenvwrapper.
$ pip install virtualenv virtualenvwrapper
$ pip install virtualenvwrapper-win
You’ll see some terminal output that sets up virtualenvwrapper. You now have access to new terminal commands:
- Create an environment with
mkvirtualenv. - Activate an environment (or switch to a different one) with
workon. - Deactivate an environment with
deactivate. - Remove an environment with
rmvirtualenv.
Read the documentation to get familiar with the commands.
Next, create a virtual environment called cv (you can name it anything you want) to install OpenCV.
$ mkvirtualenv cv -p python3
Switch to this environment using:
$ workon cv
Step 3: With everything taken care of, we finally start installing OpenCV on your Windows system.
$ pip install opencv-contrib-python
To check if OpenCV is installed properly, open a new command prompt and enter a Python shell using the following command:
$ python

>> import cv2
>> print(cv2.__version__)
And that’s it. OpenCV is successfully installed on your windows machine. You are ready to embark on your Computer Vision journey.
We recommend you go through some of our tutorials on OpenCV fundamentals to get yourself acquainted with the topic.
Having Problems Configuring Your Development Environment?
All that said, are you:
- Short on time?
- Learning on your employer’s administratively locked system?
- Wanting to skip the hassle of fighting with the command line, package managers, and virtual environments?
- Ready to run the code right now on your Windows, macOS, or Linux system?
Then join PyImageSearch University today!
Gain access to Jupyter Notebooks for this tutorial and other PyImageSearch guides that are pre-configured to run on Google Colab’s ecosystem right in your web browser! No installation required.
And best of all, these Jupyter Notebooks will run on Windows, macOS, and Linux!
What’s next? I recommend PyImageSearch University.
Course information:
64 total classes • 68 hours of on-demand code walkthrough videos • Last updated: January 2023
★★★★★ 4.84 (128 Ratings) • 15,800+ Students Enrolled
I strongly believe that if you had the right teacher you could master computer vision and deep learning.
Do you think learning computer vision and deep learning has to be time-consuming, overwhelming, and complicated? Or has to involve complex mathematics and equations? Or requires a degree in computer science?
That’s not the case.
All you need to master computer vision and deep learning is for someone to explain things to you in simple, intuitive terms. And that’s exactly what I do. My mission is to change education and how complex Artificial Intelligence topics are taught.
If you’re serious about learning computer vision, your next stop should be PyImageSearch University, the most comprehensive computer vision, deep learning, and OpenCV course online today. Here you’ll learn how to successfully and confidently apply computer vision to your work, research, and projects. Join me in computer vision mastery.
Inside PyImageSearch University you’ll find:
- ✓ 64 courses on essential computer vision, deep learning, and OpenCV topics
- ✓ 64 Certificates of Completion
- ✓ 68 hours of on-demand video
- ✓ Brand new courses released regularly, ensuring you can keep up with state-of-the-art techniques
- ✓ Pre-configured Jupyter Notebooks in Google Colab
- ✓ Run all code examples in your web browser — works on Windows, macOS, and Linux (no dev environment configuration required!)
- ✓ Access to centralized code repos for all 500+ tutorials on PyImageSearch
- ✓ Easy one-click downloads for code, datasets, pre-trained models, etc.
- ✓ Access on mobile, laptop, desktop, etc.
Click here to join PyImageSearch University
Summary
In this tutorial, we learned how to install OpenCV from prebuilt binaries. We also learned which package to install and how to create a virtual environment for working on the package. For all purposes of learning computer vision using Python, we highly recommend installing opencv-contrib-python using prebuilt binaries.
If you are looking to start your development journey in computer vision, check out some of our tutorials on OpenCV.
Happy learning 🙂
References
- PyImageSearch: Pip Install OpenCV guide
- Adam Hacks: Installing OpenCV on Windows
- PyPi: Pip install OpenCV
Citation Information
Raha, R. “Installing OpenCV on Windows,” PyImageSearch, D. Chakraborty, P. Chugh, A. R. Gosthipaty, S. Huot, K. Kidriavsteva, and A. Thanki, 2022, https://pyimg.co/b3q05
@incollection{Raha_2022_Installing-OpenCV-Windows,
  author = {Ritwik Raha},
  title = {Installing {OpenCV} on {W}indows},
  Booktitle = {PyImageSearch},
  editor = {Devjyoti Chakraborty and Puneet Chugh and Aritra Roy Gosthipaty and Susan Huot and Kseniia Kidriavsteva and and Abhishek Thanki},
  year = {2022},
  note = {https://pyimg.co/b3q05},
}
Want free GPU credits to train models?
- We used Jarvislabs.ai, a GPU cloud, for all the experiments.
- We are proud to offer PyImageSearch University students $20 worth of Jarvislabs.ai GPU cloud credits. Join PyImageSearch University and claim your $20 credit here.
In Deep Learning, we need to train Neural Networks. These Neural Networks can be trained on a CPU but take a lot of time. Moreover, sometimes these networks do not even fit (run) on a CPU.
To overcome this problem, we use GPUs. The problem is these GPUs are expensive and become outdated quickly.
GPUs are great because they take your Neural Network and train it quickly. The problem is that GPUs are expensive, so you don’t want to buy one and use it only occasionally. Cloud GPUs let you use a GPU and only pay for the time you are running the GPU. It’s a brilliant idea that saves you money.
JarvisLabs provides the best-in-class GPUs, and PyImageSearch University students get between 10-50 hours on a world-class GPU (time depends on the specific GPU you select).
This gives you a chance to test-drive a monstrously powerful GPU on any of our tutorials in a jiffy. So join PyImageSearch University today and try it for yourself.
Click here to get Jarvislabs credits now
Join the PyImageSearch Newsletter and Grab My FREE 17-page Resource Guide PDF
Enter your email address below to join the PyImageSearch Newsletter and download my FREE 17-page Resource Guide PDF on Computer Vision, OpenCV, and Deep Learning.
Введение
В данной статье речь пойдет о сборке и установке OpenCV 4 для C/C++, Python 2 и Python 3 из исходных файлов с дополнительными модулями CUDA 10 на ОС Windows.
Я постарался включить сюда все тонкости и нюансы, с которыми можно столкнуться в ходе установки, и про которые не написано в официальном мануале.
Сборка тестировалась для:
- Windows 8.1 + Visual Studio 2017 + Python 2/3 + CUDA 10.0 + GeForce 840m
- Windows 10 + Visual Studio 2019 + Python 2/3 + CUDA 10.0 + GeForce GTX 1060
Внимание! Сборка не подойдет для версии OpenCV 4.0.1 и/или CUDA ниже 10-й версии. CUDA 9 и ниже поддерживается OpenCV 3.
Что потребуется для установки
В моей сборке использовались следующие инструменты:
- CMake 3.15
- MS Visual Studio 2019 64-бит + средства CMake С++ для Windows
- Python 3.7.3 64-бит + NumPy 64-бит
- Python 2.7.16 64-бит + NumPy 64-бит
- CUDA 10.0
- CuDNN 7.6.2
- OpenCV 4.1.1 и OpenCV-contrib-4.1.1
Установка
Так как установка производится через консольные команды, то следует внимательно и аккуратно выполнять все шаги. Также, при необходимости, меняйте установочные пути на свои.
Для начала необходимо установить требуемое ПО, причем Visual Studio должна быть установлена до CUDA:
- CMake (версия >= 3.9.1)
- MS Visual Studio
- Python 3.7 (дистрибутив Anaconda3)
- CUDA 10.0
- CuDNN 7.6.2
После установки всех компонент убедитесь, что пути для CMake, Visual Studio, Python, CUDA, CuDNN прописаны в переменных PATH, PYTHONPATH, CUDA_PATH и cudnn соответственно.
Далее загружаем архивы исходников opencv-4.1.1 и opencv-contrib-4.1.1 в желаемое место (в моем случае это C:OpenCV).
git clone https://github.com/opencv/opencv.git -b "4.1.1"
git clone https://github.com/opencv/opencv_contrib.git -b "4.1.1"
Создаем папку build/ внутри opencv-4.1.1.
Далее сгенерируем файлы сборки с помощью cmake. Мы будем использовать консольный вариант cmake, так как cmake-gui путает типы некоторых переменных (например, OPENCV_PYTHON3_VERSION) и, как следствие, неправильно генерирует файлы.
Открываем консоль по пути C:OpenCV и прописываем переменные.
set "opencvSource=opencv-4.1.1"
set "opencvExtraModules=opencv_contrib-4.1.1/modules"
set "opencvBuild=%opencvSource%build"
set "compiler=Visual Studio 16 2019"
set "buildType=Release"Примечание. Для Visual Studio 2017 генератор пишется как «Visual Studio 15 2017 Win64» и без флага -A.
Также можно явно указать питоновские библиотеки для python 2 и python 3 на случай, если сборщик не сможет найти их автоматически.
set "python2_executable=C:/Python27/python.exe"
set "python2_include_dir=C:/Python27/include"
set "python2_library=C:/Python27/libs/python27.lib"
set "python2_numpy_include_dirs=C:/Python27/Lib/site-packages/numpy/core/include"
set "python2_packages_path=C:/Python27/Lib/site-packages"

set "python3_executable=C:/Users/root/Anaconda3/python.exe"
set "python3_include_dir=C:/Users/root/Anaconda3/include"
set "python3_library=C:/Users/root/Anaconda3/libs/python37.lib"
set "python3_numpy_include_dirs=C:/Users/root/Anaconda3/lib/site-packages/numpy/core/include"
set "python3_packages_path=C:/Users/root/Anaconda3/Lib/site-packages"Примечание. Обратите внимание на то, что библиотека NumPy должна быть той же разрядности, что и OpenCV. Проверить это легко:
import numpy.distutils.system_info as sysinfo
print(sysinfo.platform_bits)
Выполняем генерацию файлов сборки с помощью длинной команды ниже. При неудачной генерации или наличии ошибок после выполнения команды, повторную генерацию следует производить вычистив все файлы в build/ и .cache/.
cmake ^
-B"%opencvBuild%/" ^
-H"%opencvSource%/" ^
-G"%compiler%" ^
-Ax64 ^
-DCMAKE_BUILD_TYPE=%buildType% ^
-DBUILD_opencv_world=ON ^
-DINSTALL_TESTS=OFF ^
-DINSTALL_C_EXAMPLES=OFF ^
-DBUILD_EXAMPLES=OFF ^
-DOPENCV_EXTRA_MODULES_PATH="%opencvExtraModules%/" ^
-DBUILD_PROTOBUF=ON ^
-DBUILD_opencv_python_bindings_generator=ON ^
-DWITH_CUDA=ON ^
-DCUDA_FAST_MATH=ON ^
-DWITH_CUBLAS=ON ^
-DCUDA_ARCH_PTX=7.5 ^
-DBUILD_opencv_python2=ON ^
-DPYTHON2_EXECUTABLE="%python2_executable%" ^
-DOPENCV_PYTHON2_VERSION=2.7.16 ^
-DPYTHON2_INCLUDE_DIR="%python2_include_dir%" ^
-DPYTHON2_LIBRARY="%python2_library%" ^
-DPYTHON2_NUMPY_INCLUDE_DIRS="%python2_numpy_include_dirs%" ^
-DPYTHON2_PACKAGES_PATH="%python2_packages_path%" ^
-DBUILD_opencv_python3=ON ^
-DPYTHON3_EXECUTABLE="%python3_executable%" ^
-DOPENCV_PYTHON3_VERSION=3.7.3 ^
-DPYTHON3_INCLUDE_DIR="%python3_include_dir%" ^
-DPYTHON3_LIBRARY="%python3_library%" ^
-DPYTHON3_NUMPY_INCLUDE_DIRS="%python3_numpy_include_dirs%" ^
-DPYTHON3_PACKAGES_PATH="%python3_packages_path%"
Значение некоторых флагов
- BUILD_opencv_world – необязательный модуль, содержащий копии всех выбранных в ходе установки библиотек. Удобен при разработке на C++, так как вместо подключения кучи зависимостей opencv можно подключить одну зависимость opencv_world411.lib в проект
- INSTALL_EXAMPLES/INSTALL_TESTS – установка примеров/тестов кода opencv
- CUDA_FAST_MATH, WITH_CUBLAS – дополнительные модули для CUDA, призванные ускорить вычисления
- CUDA_ARCH_PTX – версия PTX инструкций для улучшения производительности вычислений
- OPENCV_EXTRA_MODULES_PATH – путь до дополнительных модулей из opencv-contrib (обязательно для CUDA)
- BUILD_PROTOBUF – для работы некоторых модулей opencv необходим Protobuf (сборщик opencv в любом случае поставит BUILD_PROTOBUF=ON)
Спустя примерно 10 минут в консоле должна появиться информация о сборке и завершающие строки «Configuring done» и «Generating done». Проверяем всю информацию, особенно разделы NVIDIA CUDA, Python 2, Python 3.
Далее собираем решение. На сборку может уйти несколько часов в зависимости от вашего процессора и версии Visual Studio.
cmake --build %opencvBuild% --target ALL_BUILD --config ReleaseУстанавливаем решение.
cmake --build %opencvBuild% --target INSTALL --config ReleaseПосле успешной установки создаем системную переменную OPENCV_DIR со значением C:OpenCVopencv-4.1.1buildinstallx64vc15bin и также добавляем ее в PATH.
Тест
Проверим работоспособность OpenCV с модулем CUDA на простом примере умножения матриц.
Подключение OpenCV в проект Visual Studio
- Установить тип сборки Release/x64 (для Debug следует собрать OpenCV с флагом Debug)
- Project Properties → C/C++ → General → Добавить строку «C:OpenCVopencv-4.1.1buildinstallinclude» в Additional Include Directories
- Project Properties → Linker → General → Добавить строку « C:OpenCVopencv-4.1.1buildinstallx64vc16lib» в Additional Library Directories
- Project Properties → Linker → General → Добавить «;opencv_world411.lib» («;opencv_world411d.lib» для Debug) в конец Additional Dependencies
Пример на Python 3
import numpy as np
import cv2 as cv
import time

rand = np.random.random((1024, 1024)).astype(np.float32)
h_array1 = np.stack([rand, rand],axis=2)
h_array2 = h_array1
d_array1 = cv.cuda_GpuMat()
d_array2 = cv.cuda_GpuMat()
d_array1.upload(h_array1)
d_array2.upload(h_array2)

start = time.time()
cv.cuda.gemm(d_array1, d_array2, 1, None, 0, None, 1)
end = time.time()
print("Time elapsed:", end - start, "sec")
Вывод в консоли
Time elapsed: 0.3130002021789551Пример на C++
#include <iostream>
#include <opencv2/opencv.hpp>
#include <opencv2/cudaarithm.hpp>

using namespace std;
using namespace cv;
using namespace cv::cuda;

int main() {

	Mat h_array1 = Mat::ones(1024, 1024, CV_32FC2);
	Mat h_array2 = Mat::ones(1024, 1024, CV_32FC2);
	Mat h_array3 = Mat::zeros(1024, 1024, CV_32FC2);
	Mat h_result;
	GpuMat d_array1, d_array2, d_array3, d_result;

	d_array1.upload(h_array1);
	d_array2.upload(h_array2);

	const clock_t begin_time = clock();
	cuda::gemm(d_array1, d_array2, 1.0, d_array3, 0.0, d_result);
	cout << "Time elapsed: " << (float(clock() - begin_time) / CLOCKS_PER_SEC) << " sec" << endl;

	d_result.download(h_result);

	return 0;
}
Вывод в консоли
Time elapsed: 0.354Удаление
Чтобы удалить OpenCV, нужно выполнить команду.
cmake --build %opencvBuild% --target uninstall --config Releaseи удалить системную переменную OPENCV_DIR и убрать путь до OpenCV из PATH.
Заключение
В статье мы рассмотрели установку OpenCV 4 для ОС Windows 10. Данный алгоритм тестировался на Windows 8.1 и Windows 10, но, в теории, может собираться и на Windows 7. За дополнительной информацией можно обратиться к списку источников ниже.
P.S. Напоследок сведем все установочные команды в один .bat файл для тех, кто хочет автоматизировать установку.
install_opencv411.bat
cd C:OpenCV

git clone https://github.com/opencv/opencv_contrib.git -b "4.1.1"
git clone https://github.com/opencv/opencv.git -b "4.1.1"

ren opencv opencv-4.1.1
ren opencv_contrib-4.1.1

set "opencvSource=opencv-4.1.1"
set "opencvExtraModules=opencv_contrib-4.1.1/modules"
set "opencvBuild=%opencvSource%build"
set "compiler=Visual Studio 16 2019"
set "buildType=Release"

set "python2_executable=C:/Python27/python.exe"
set "python2_include_dir=C:/Python27/include"
set "python2_library=C:/Python27/libs/python27.lib"
set "python2_numpy_include_dirs=C:/Python27/Lib/site-packages/numpy/core/include"
set "python2_packages_path=C:/Python27/Lib/site-packages"

set "python3_executable=C:/Users/root/Anaconda3/python.exe"
set "python3_include_dir=C:/Users/root/Anaconda3/include"
set "python3_library=C:/Users/root/Anaconda3/libs/python37.lib"
set "python3_numpy_include_dirs=C:/Users/root/Anaconda3/lib/site-packages/numpy/core/include"
set "python3_packages_path=C:/Users/root/Anaconda3/Lib/site-packages"

cmake ^
-B"%opencvBuild%/" ^
-H"%opencvSource%/" ^
-G"%compiler%" ^
-Ax64 ^
-DCMAKE_BUILD_TYPE=%buildType% ^
-DBUILD_opencv_world=ON ^
-DINSTALL_TESTS=OFF ^
-DINSTALL_C_EXAMPLES=OFF ^
-DBUILD_EXAMPLES=OFF ^
-DOPENCV_EXTRA_MODULES_PATH="%opencvExtraModules%/" ^
-DBUILD_PROTOBUF=ON ^
-DBUILD_opencv_python_bindings_generator=ON ^
-DWITH_CUDA=ON ^
-DCUDA_FAST_MATH=ON ^
-DWITH_CUBLAS=ON ^
-DCUDA_ARCH_PTX=7.5 ^
-DBUILD_opencv_python2=ON ^
-DPYTHON2_EXECUTABLE="%python2_executable%" ^
-DOPENCV_PYTHON2_VERSION=2.7.16 ^
-DPYTHON2_INCLUDE_DIR="%python2_include_dir%" ^
-DPYTHON2_LIBRARY="%python2_library%" ^
-DPYTHON2_NUMPY_INCLUDE_DIRS="%python2_numpy_include_dirs%" ^
-DPYTHON2_PACKAGES_PATH="%python2_packages_path%" ^
-DBUILD_opencv_python3=ON ^
-DPYTHON3_EXECUTABLE="%python3_executable%" ^
-DOPENCV_PYTHON3_VERSION=3.7.3 ^
-DPYTHON3_INCLUDE_DIR="%python3_include_dir%" ^
-DPYTHON3_LIBRARY="%python3_library%" ^
-DPYTHON3_NUMPY_INCLUDE_DIRS="%python3_numpy_include_dirs%" ^
-DPYTHON3_PACKAGES_PATH="%python3_packages_path%"

cmake --build %opencvBuild% --target ALL_BUILD --config Release
cmake --build %opencvBuild% --target INSTALL --config Release
Список источников
- docs.opencv.org/4.1.1/d3/d52/tutorial_windows_install.html
- www.learnopencv.com/install-opencv-4-on-windows
- jamesbowley.co.uk/build-opencv-4-0-0-with-cuda-10-0-and-intel-mkl-tbb-in-windows
- lightbuzz.com/opencv-cuda
- Глава «Building libraries from Source» книги Hands-on GPU-Accelerated Computer Vision with OpenCV and CUDA
I need to install cv2 for a script that has been written for me. I tried pip install cv2 and pip install open_cv and got the same problem — a warning message from dist.py and complains about zlib being not found. No cv2 installed. I also tried pyopenvc and pip install opencv-python.
So, I went to the opencv site and downloaded the relevant exe. Ran it — generated a heap of subdirectories and a make file and stuff.
What do I do now?
AMC
2,6027 gold badges12 silver badges34 bronze badges
asked Aug 15, 2018 at 4:34
Install opencv-python (which is an unofficial pre-built OpenCV package for Python) by issuing the following command:
pip install opencv-python
worbel
6,48912 gold badges52 silver badges63 bronze badges
answered Oct 18, 2018 at 18:17
EiconicEiconic
3,1761 gold badge9 silver badges19 bronze badges
4
run the following command by creating a virtual enviroment using python 3 and run
pip3 install opencv-python
to check it has installed correctly run
python3 -c "import cv2"
answered May 26, 2019 at 17:05
HamzaMushtaqHamzaMushtaq
1,59413 silver badges13 bronze badges
In pip package management, there are 4 different OpenCV packages all using the same namespace, cv2. Although they are not officially supported by OpenCV.org, they are commonly used in developers’ community. You could install any of them using the following command:
pip install PACKAGE_NAME
where PACKAGE_NAME can be
opencv-python(only contains main modules)opencv-contrib-python(contains both main and contrib modules)opencv-python-headless(same asopencv-pythonbut without GUI functionality)opencv-contrib-python-headless(same asopencv-contrib-pythonbut without GUI functionality)
You should only install one of them depending on your needs. If you accidentally installed multiple of them in the same environment, you can remove them using pip uninstall before installing the correct one again.
For more details, you can refer to the project description of OpenCV on Wheels.
As of 2021, all of these 4 packages are official OpenCV projects. Source: OpenCV Website.
answered Jun 18, 2020 at 23:15
Jack ChanJack Chan
1,02710 silver badges15 bronze badges
0
To Install the Current Latest version of OpenCV then use the below commands:
Use this Command:
pip install --upgrade opencv-python
If you’re facing problem in above command then try this :
pip install --upgrade opencv-contrib-python
To check the version of installed OpenCV:
import cv2
print(cv2.__version__)
answered Apr 22, 2021 at 8:22
Amar KumarAmar Kumar
2,2142 gold badges23 silver badges33 bronze badges
2
Simply use this for the so far latest version 4.1.0.
pip install opencv-contrib-python==4.1.0.25
For the default version use this:
pip install opencv-contrib-python
If you have a new Raspberry Pi and want to install OpenCV then this tutorial would be a good choice.
For Ubuntu/Linux users:
sudo apt install python3-opencv
answered Sep 2, 2019 at 4:07
TreesTrees
1,19710 silver badges19 bronze badges
As of 10/22/2019, I think the best answer is simply
conda install opencv
It appears opencv is now in the main Anaconda channel.
To see which packages (including opencv) are in the main Anaconda channel go to Anaconda Package Lists and follow the link corresponding to your python version and os version.
answered Oct 22, 2019 at 19:05
user3731622user3731622
4,5976 gold badges42 silver badges78 bronze badges
Everybody struggles initially while installing OpenCV. OpenCV requires a lot of dependencies in the backend. The best way to start with OpenCV is, install it in a virtual environment. I suggest that you use the Python Anaconda distribution and create a virtual environment using it. Then inside the virtual environment, you can install OpenCV using this command:
conda install -c conda-forge opencv
KetZoomer
2,5733 gold badges14 silver badges39 bronze badges
answered May 26, 2019 at 6:34
1
Please follow the command:
pip install opencv-python
then if you want to use:
import cv2
If it’s not worked due to any update, please follow the documentation
answered Dec 30, 2021 at 17:45
Make a virtual enviroment using python3
virtualenv env_name --python="python3"
and run the following command
pip3 install opencv-python
to check it has installed correctly run
python3 -c "import cv2"
answered May 26, 2019 at 0:59
HamzaMushtaqHamzaMushtaq
1,59413 silver badges13 bronze badges
To install open_cv you can go to this website or do this,
pip install opencv-contrib-python --upgrade
pip install opencv-python
You can test it by:
C:> python
>>> import cv2
>>> print(cv2.__version__)
'4.5.1' # your version may be a newer one
answered Mar 1, 2021 at 23:13
You can install opencv the normal way:
pip install opencv-python
If you are getting errors, you can do this:
pip install opencv-python-headless
answered Feb 11, 2021 at 23:38
la39zzla39zz
2463 silver badges7 bronze badges
-
Open anaconda command prompt and type in below command.
conda install -c conda-forge opencv -
Once the ‘Solving environment’ is done. It will ask to download dependencies. Type ‘y’.
-
It will install all the dependencies and then you are ready to code.
answered Feb 24, 2019 at 4:26
user3136136user3136136
2472 silver badges9 bronze badges
1
I recommend this for Python 3: Please install it this way with pip
pip3 install opencv-python
This will download and install the latest version of OpenCV.
colidyre
3,75112 gold badges36 silver badges48 bronze badges
answered Feb 29, 2020 at 16:57
TManTMan
412 bronze badges
You could try using below command-
pip install opencv-contrib-python
It will basically download the compatible version. If this command fails, you could upgrade you pip using below command-
python -m pip install –upgrade pip
If you need a pictorial guide, head over to Simple Steps to Install OpenCV in Windows
You can also try installing OpenCV from prebuilt binaries from the official OpenCV site.
answered Jun 10, 2020 at 16:41
->pip install opencv-python you can use this.
But if this code does not working then you can check python version on cmd and anaconda because they are different. So you type command in anaconda prompt and cmd, it will work. You can check this -> pip list
marc_s
721k173 gold badges1320 silver badges1442 bronze badges
answered Feb 10, 2022 at 6:52
- Open terminal
- Run the following command
pip install --trusted-host=pypi.org --trusted-host=files.pythonhosted.org opencv-python. - Hope it will work.
answered Jul 24, 2019 at 11:57
Installing cv2 or opencv-python using pip is sometimes a problem. I was having the same problem of installing cv2 with pip. The installation wasn’t a problem the problem was to import cv2 after installation. I was getting an Import Error so to fix this i import main from pip to install opencv-python. Try to run the following code in your python file then opencv-python will be installed
from pip._internal import main as install
try:
    import cv2
except ImportError as e:
    install(["install", "opencv-python"])
finally:
    pass
I hope this will help someone
answered Oct 26, 2020 at 14:03
crispengaricrispengari
6,8094 gold badges40 silver badges46 bronze badges
As a reference it might help someone… On Debian system I hard to do the following:
apt-get install -y libsm6 libxext6 libxrender-dev
pip3 install opencv-python
python3 -c "import cv2"
answered Jun 15, 2020 at 10:01
user3719458user3719458
3463 silver badges12 bronze badges
On Ubuntu you can install it for the system Python with
sudo apt install python3-opencv
answered Oct 23, 2020 at 14:28
if you are using Pycharm navigate settings > Project:name > Project interpreter just search the module by name(in this case OpenCV-python) and install it. worked for me
answered Feb 21, 2020 at 10:16
1
In case you use aarch64 platform with ARM64 cpu — and/or docker
On a development board on ARM64, no python-opencv version were found at all
version: NONE.
I’ve had to build from source. This allowed to include CUDA support.
In my case it was already available on the board but it wasn’t found on the development environment.
If compiling from source is out of reach, there are Dockers
Of course compiling will take some time (few hours on ARM core), but it is worthy process to know as most open source tools can be built this way in case of issues.
answered Jun 9, 2020 at 13:43
AlsushiAlsushi
3523 silver badges12 bronze badges
I’ve had this problem in Google Colab, It only worked with this specific package version.
!pip install "opencv-python-headless<4.3"
answered Mar 7, 2022 at 21:31
malekmalek
9541 gold badge10 silver badges17 bronze badges
There are two options-
pip install cv2
or
pip install opencv-python
Hope it helps.
answered Jul 2, 2019 at 11:03


