On Windows, you have two ways to load a PHP extension: either compile it into PHP, or
load the DLL. Loading a pre-compiled extension is the easiest and preferred way.
To load an extension, you need to have it available as a «.dll» file on your system.
All the extensions are automatically and periodically compiled by the PHP Group
(see next section for the download).
To compile an extension into PHP, please refer to
building from source documentation.
To compile a standalone extension (aka a DLL file), please refer to
building from source documentation. If the DLL file is available neither with your
PHP distribution nor in PECL, you may have to compile it before you can start using the
extension.
Where to find an extension?
PHP extensions are usually called «php_*.dll» (where the star represents the name of
the extension) and they are located under the «PHPext» folder.
PHP ships with the extensions most useful to the majority of developers. They are
called «core» extensions.
However, if you need functionality not provided by any core extension, you may still be
able to find one in » PECL. The PHP Extension Community Library (PECL) is a repository for
PHP Extensions, providing a directory of all known extensions and hosting facilities for
downloading and development of PHP extensions.
If you have developed an extension for your own uses, you might want to think about hosting
it on PECL so that others with the same needs can benefit from your time. A nice side effect
is that you give them a good chance to give you feedback, (hopefully) thanks, bug reports
and even fixes/patches. Before you submit your extension for hosting on PECL, please read
» PECL submit.
Which extension to download?
Many times, you will find several versions of each DLL:
-
Different version numbers (at least the first two numbers should match)
-
Different thread safety settings
-
Different processor architecture (x86, x64, …)
-
Different debugging settings
-
etc.
You should keep in mind that your extension settings should match all the
settings of the PHP executable you are using. The following PHP script will
tell you all about your PHP settings:
Or from the command line, run:
drive:\pathtophpexecutablephp.exe -i
Loading an extension
The most common way to load a PHP extension is to include it in your php.ini
configuration file. Please note that many extensions are already present in your
php.ini and that you only need to remove the semicolon to activate them.
Note that, on PHP version 7.2.0 and up, the extension name may be used instead of the extension’s file name. As this is OS-independent and easier, especially for newcomers, it becomes the recommended way of specifying extensions to load. File names remain supported for compatibility with prior versions.
;extension=php_extname.dll
extension=php_extname.dll
; On PHP version 7.2 and up, prefer :
extension=extname
zend_extension=another_extension
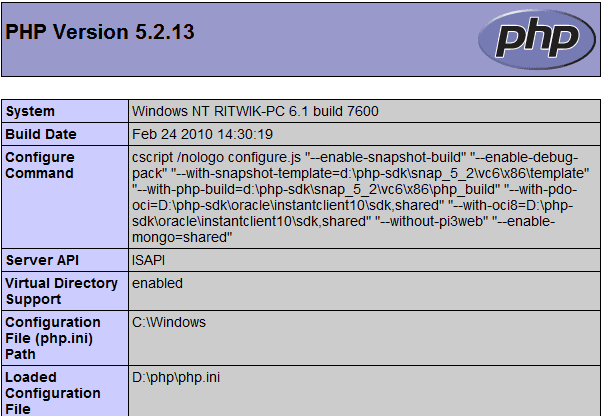
However, some web servers are confusing because they do not use the php.ini located alongside
your PHP executable. To find out where your actual php.ini resides, look
for its path in phpinfo():
Configuration File (php.ini) Path C:WINDOWS
Loaded Configuration File C:Program FilesPHP5.2php.ini
After activating an extension, save php.ini, restart the web server and check
phpinfo() again. The new extension should now have its own section.
Resolving problems
If the extension does not appear in phpinfo(), you should check your logs to
learn where the problem comes from.
If you are using PHP from the command line (CLI), the extension loading error can be read
directly on screen.
If you are using PHP with a web server, the location and format of the logs vary depending on
your software. Please read your web server documentation to locate the logs, as it does not
have anything to do with PHP itself.
Common problems are the location of the DLL and the DLLs it depends on, the value of the »
extension_dir» setting inside php.ini and compile-time setting mismatches.
If the problem lies in a compile-time setting mismatch, you probably didn’t download the right DLL.
Try downloading again the extension with the right settings. Again, phpinfo()
can be of great help.
ferdnyc at gmail dot com 
5 months ago
This is handwaved somewhat in the "Resolving problems" section, but mis-location of (non-extension) DLL files is often a problem when installing PHP extensions on Windows.
Many PHP extensions come with not only the extension DLL, but supplementary DLLs that are required by that extension. (For example, php_luasandbox.dll comes with lua5.1.dll, the lua interpreter it sandboxes.) Those other DLLs should go into the same directory as the php.exe binary, NOT the extension directory.
So, if php_luasandbox.dll is installed at C:PHP8.1extphp_luasandbox.dll, the interpreter would be located at C:PHP8.1lua5.1.dll. That allows the PHP binary C:PHP8.1php.exe to find those additional DLLs when required.
dario at 4assistance dot com 
25 days ago
On windows, drop your extension's dependencies into a dir of your choice, but outside of your php install. Add that dir to a path environment variable used by your php. Add <extension_name>.dll to your php's extension_dir, and update your php.ini (unless you're simply testing with php's cli).
bk at kaelberer-aio dot de 
8 days ago
In addition to the helpful comments of ferdnyc and dario: A few weeks ago I've set up a new W11 using PHP 8.1. (as a module) with Apache. It was working fine.
Today i wanted to install the PECL-extension php-amqp. This extension comes with two additional files that are said to be placed in PHPs main directory. It worked fine running from the command prompt but with Apache the extension failed with "Unable to load dynamic library 'amqp'".
I tried 100 ways to notate paths in php.ini and http.conf: c:, C:, , \, /, ". I also installed a new PHP in the root to get rid of the space in the path. It did not help.
When reading dario's comment i stumbeled across him mentioning "path environment variable". I checked that in Window's settings and I realized, that i had added PHP's path to the USER'S path-settings, but not to the SYSTEM'S path. That is why it worked in the command prompt but not when starting Apache as a service. After adding it there it worked fine.
PHP is a general-purpose server scripting language. It is a powerful and important tool for developing dynamic and interactive Web pages. It is widely used, free, fast, flexible, and pragmatic. After installing PHP and a web server on Windows, extensions are also needed because they provide added functionality. PHP with extensions is the best combination for the developers to develop more dynamic and interactive web pages or applications. Extensions can be chosen when PHP starts by modifying your php.ini.
There are so many extensions are built into the Windows version of PHP. To load more extensions you require .dll files in your system. An extension directive or extra DLL does not require loading these extensions. There are many ways to install extensions, the following is one of the ways to install php extensions on Windows.
Prerequisites: Web server(e.g. Apache, XAMPP).
Verifying the extension is installed or not
To verify the extension is installed or not you have to follow the following step:
Step 1: Create a new file in the root directory with an extension.php like findingexten.php. In this file write the following code:
<?php
// It will return all the configurations of the server
phpinfo();
?>
Step 2: Run this file in any browser and you will see the given extension is installed or not.
Installing PHP Extensions on Windows
To install PHP extension we need to follow the following steps:
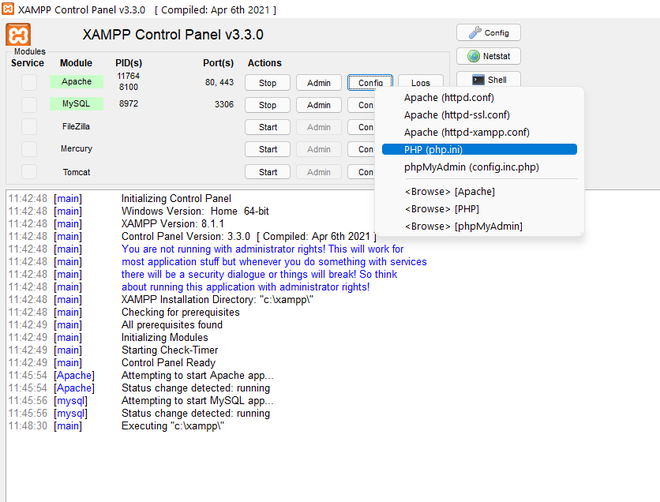
Step 1: Click on the Config button then select the php.ini file for your PHP installation, and open it in a text editor.
Step 2: Locate the line that specifies the location of the “extension = ” line.
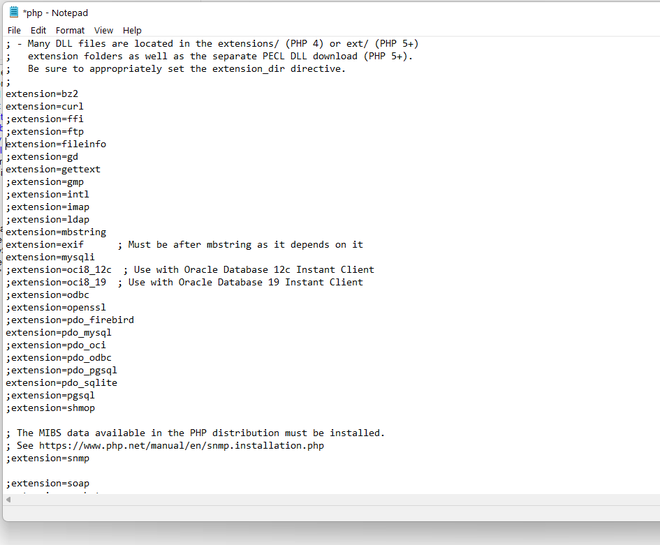
Step 3: Look for the extension you want to install and remove the semicolon preceding that line. For example, if you want to install an IMAP extension, remove the semicolon of the following line and save the file.
;extension = imap
extension = imap
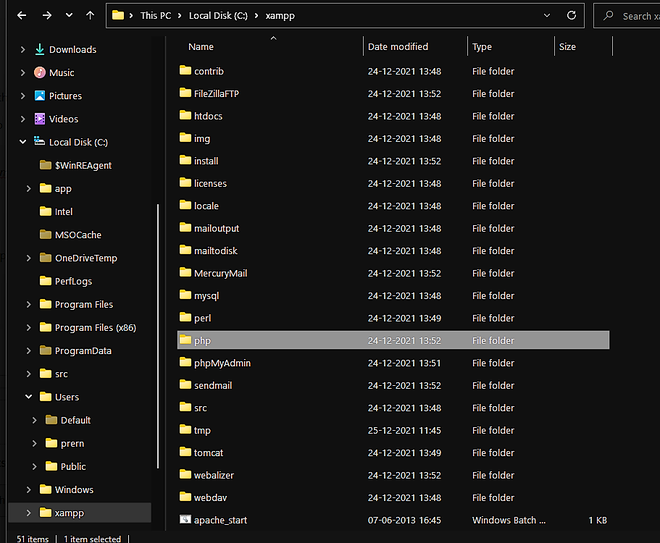
Step 4: Go to ‘php’ folder in the C:xampp
Step 5: Go to the ext folder and locate the .dll file of the extension you want to install.

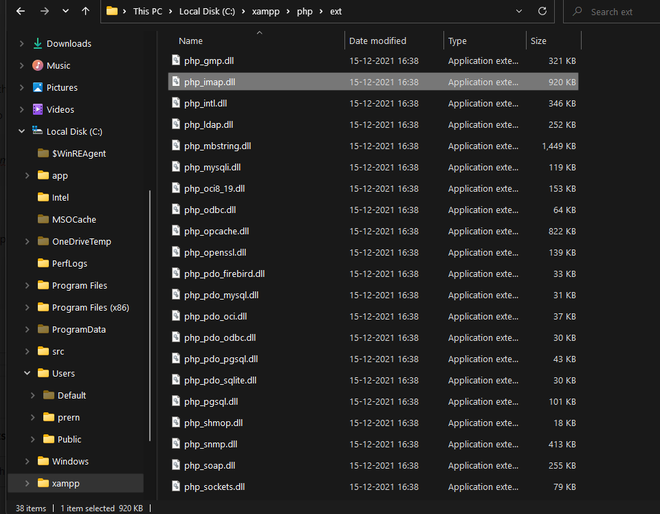
Step 6: Now copy the .dll file and paste it into the following folder:
C:WindowsSystem32

Step 7: Now restart XAMPP to see the effects.
После установки PHP и веб-сервера на ОС Windows может понадобиться
установить некоторые расширения для добавления функционала. Вы можете выбрать,
какие расширения будут загружаться при старте PHP, модификацией вашего файла
php.ini. Также вы можете загружать расширения динамически в ваших скриптах,
используя функцию dl().
Библиотеки DLL расширений PHP имеют префикс php_.
Многие расширения встроены в Windows-версию PHP.
Это значит, что дополнительные DLL-файлы и директива
extension не
используются для загрузки данных расширений.
Таблица расширений PHP
в Windows, содержащая список расширений, требующих (или обычно требующих) дополнительные
DLL-файлы. Ниже приведен список встроенных расширений (обновлено PHP 5.0.4):
BCMath,
Caledar,
COM,
Ctype,
DOM,
FTP,
LibXML,
Iconv,
ODBC,
PCRE,
Session,
SimpleXML,
SPL,
SQLite,
WDDX,
XML и
Zlib.
Место по умолчанию, в котором PHP ищет расширения —
C:php5. Для изменения
данной настройки согласно вашей установке PHP отредактируйте файл php.ini следующим образом:
-
измените опцию
extension_dir так, чтобы она
указывала на директорию, в которой расположены расширения или в которую вы поместили файлы
php_*.dll. Например:extension_dir = C:phpextensions
-
Включите одно или несколько расширений, которые вы хотите использовать,
раскомментировав в файле php.ini строки вида
extension=php_*.dll. Это делается удалением символа «;»
в начале строки для каждого расширения, которое вы хотите включить.Пример #1 Включение расширения Bzip2 в PHP-Windows
// измените следующую строку с ...
;extension=php_bz2.dll

// ... на
extension=php_bz2.dll
-
Некоторые расширения для своей работы требуют дополнительные библиотеки DLL.
Несколько из них находятся в распространяемом дистрибутиве PHP, в
в корневой директории, но некоторые расширения, например, Oracle
(php_oci8.dll), требуют наличия библиотек DLL, не включаемых в
дистрибутив PHP. Не забудьте включить директорию C:php в
системную переменную PATH (данный процесс описан в отдельном
разделе помощи). -
Некоторые из этих библиотек DLL не поставляются в дистрибутиве PHP. За деталями обратитесь
к странице документации конкретного расширения. Также прочтите раздел руководства
Установка расширений PECL, чтобы узнать дополнительную
информацию о PECL. Все большее число расширений PHP можно найти в
PECL, и данные расширения требуют
отдельной загрузки.
Замечание:
Если вы запустили PHP в качестве модуля сервера, не забудьте перезагрузить веб-сервер для
применения ваших изменений в файле php.ini.
Следующая таблица описывает некоторые доступные расширения и требуемые дополнительные библиотеки dll.
| Расширение | Описание | Примечания |
|---|---|---|
| php_bz2.dll | Функции сжатия bzip2 | — |
| php_calendar.dll | Функции преобразования календарей | — |
| php_crack.dll | Функции Crack | — |
| php_ctype.dll | Семейство функций ctype | — |
| php_curl.dll | Функции библиотеки CURL | Требует библиотеки libeay32.dll, ssleay32.dll (в комплекте дистрибутива PHP) |
| php_dba.dll | DBA: функции абстрактного слоя DataBase (dbm-стиль) | — |
| php_dbase.dll | Функции dBase | — |
| php_dbx.dll | Функции dbx | — |
| php_exif.dll | Функции EXIF | Требуется библиотека php_mbstring.dll. Библиотека php_exif.dll должна загружаться после php_mbstring.dll в файле php.ini. |
| php_fbsql.dll | Функции FrontBase | — |
| php_fdf.dll | FDF: функции формата данных «Forms Data Format» | Требуется библиотека fdftk.dll (в комплекте дистрибутива PHP) |
| php_filepro.dll | Функции filePro | Доступ только для чтения |
| php_ftp.dll | Функции FTP | — |
| php_gd2.dll | Библиотека функций обработки изображений GD | GD2 |
| php_gettext.dll | Функции Gettext |
В PHP версий <= 4.2.0 требуется библиотека gnu_gettext.dll (в комплекте дистрибутива PHP), в PHP версий >= 4.2.3 требуется библиотека libintl-1.dll и iconv.dll (в комплекте дистрибутива PHP). |
| php_hyperwave.dll | Функции HyperWave | — |
| php_iconv.dll | Функции конвертации кодировок ICONV | Требуется библиотека iconv-1.3.dll (в комплекте дистрибутива PHP), iconv.dll |
| php_ifx.dll | Функции Informix | Требуются библиотеки Informix |
| php_iisfunc.dll | Функции управления IIS | — |
| php_imap.dll | Функции IMAP POP3 и NNTP | — |
| php_ingres.dll | Функции Ingres | Требуются библиотеки Ingres |
| php_interbase.dll | Функции InterBase | Требуется библиотека gds32.dll (в комплекте дистрибутива PHP) |
| php_ldap.dll | Функции LDAP |
Требует libeay32.dll, ssleay32.dll (в комплекте дистрибутива PHP) |
| php_mbstring.dll | Функции для работы с многобайтовыми (Multi-Byte) строками | — |
| php_mcrypt.dll | Функции кодирования Mcrypt | Требуется библиотека libmcrypt.dll |
| php_mhash.dll | Функции Mhash | Требуется библиотека libmhash.dll (в комплекте дистрибутива PHP) |
| php_mime_magic.dll | Функции Mimetype | Требуется файл magic.mime (в комплекте дистрибутива PHP) |
| php_ming.dll | Функции Ming для Flash | — |
| php_msql.dll | Функции mSQL | Требуется библиотека msql.dll (в комплекте дистрибутива PHP) |
| php_mssql.dll | Функции MSSQL | Требуется библиотека ntwdblib.dll (в комплекте дистрибутива PHP) |
| php_mysql.dll | Функции MySQL | Требуется библиотека libmysql.dll (в комплекте дистрибутива PHP) |
| php_mysqli.dll | Функции MySQLi | Требуется библиотека libmysql.dll (libmysqli.dll в PHP версий <= 5.0.2) (в комплекте дистрибутива PHP) |
| php_oci8.dll | Функции Oracle 8 | Требуются клиентские библиотеки Oracle 8.1+ |
| php_openssl.dll | Функции OpenSSL | Требуется библиотека libeay32.dll (в комплекте дистрибутива PHP) |
| php_pdf.dll | Функции PDF | — |
| php_pgsql.dll | Функции PostgreSQL | — |
| php_shmop.dll | Функции для работы с разделяемой памятью | — |
| php_snmp.dll | Функции для использования протокола SNMP | Только на Windows NT! |
| php_soap.dll | Функции SOAP | — |
| php_sockets.dll | Функции для работы с сокетами | — |
| php_sybase_ct.dll | Функции Sybase | Требуются клиентские библиотеки Sybase |
| php_tidy.dll | Функции Tidy | — |
| php_tokenizer.dll | Функции Tokenizer | — |
| php_w32api.dll | Функции W32api | — |
| php_xmlrpc.dll | Функции XML-RPC | Требуется библиотека iconv.dll (в комплекте дистрибутива PHP) |
| php_xslt.dll | Функции XSLT |
Требуются библиотеки sablot.dll, expat.dll, iconv.dll (в комплекте дистрибутива PHP). |
| php_yaz.dll | Функции YAZ | Требуется библиотека yaz.dll (в комплекте дистрибутива PHP) |
| php_zip.dll | Функции для работы с файлами Zip | Доступ только для чтения |
| php_zlib.dll | Функции сжатия ZLib | — |
Вернуться к: Установка в системах Windows
I am using a Windows XP Home Edition. I need to install a few extensions to PHP — memcache, APC, .etc. And I would very much like to use PECL to make this happen. The problem is PECL takes it for granted that I will have certain programs on my computer. On another post, I read, for instance, that you need to have Microsoft Visual Studio C++ installed on your machine. However, the new version of Visual Studio, which I downloaded, does not have msdev.exe and instead uses vcbuild.exe, which has a completely different api and fails to compile the .dsp files that come with these modules.
So I tried to find a script that would upgrade the dsp to work with vcbuild.exe…and it turns out vcbuild.exe can do that, but of course that didn’t pan out.
Another thing I tried was to find a make script for Windows (nmake2make). But there was no make file in the module’s root folder.
I tried also downloading Cygwin and MinGW in hopes of finding a build script that would work as simply as in *nix operating systems, but to no avail.
How else do I use install PHP extensions on a Windows machine? Can anyone help me out of this predicament?
Last update on August 19 2022 21:51:14 (UTC/GMT +8 hours)
Obtaining PHP
- Download latest version of PHP from http://www.php.net/downloads.php.
- You can also download the .msi package i.e. windows installer of PHP from sourceforge.net
Prerequisite and running on your Windows system, else you will not be able to run PHP Scripts.
Alternatively, you can install WAMP server or AMPPS server to install PHP, MySQL, and Apache Web Server on your Windows machine.
Options for installing PHP on Windows
- You can install php on windows manually.
- You can run the .msi package, i.e. windows installer for php to install php.
- Besides full installation, you can install php extensions on an existing installation of PHP.
- You can upgrade to a higher version of PHP from an existing version.
Install PHP on Windows manually
You have to download zipped binary version of PHP from http://www.php.net/downloads.php.
Extract the downloaded file to php folder which must be created at the root of any of your windows drives (e.g. c:php or d:php).
Enter php folder and rename the file php.ini-recommonded to php.ini.
Open the file php.ini with any text editor and find extension_dir within the file.
Change the extension directory, i.e. if you have installed php in php folder of D drive, setting will be extension_dir=D:php.
Now you open Environment Variables (MyComputer -> System Properties -> Environment Variables), under system variables, select Path and click Edit,
in the Variable value, go to the end of the list and put a semicolon, then add D:php;D:phpext assuming D:php is the location of your php installation.
Then Click on New under system variable and add PHPRC against Variable name and D:php against Variable value.
Restart your system.
Install PHP on Windows using Windows installer
Simply run the .msi Windows installer file and follow the installation wizard.
Testing if PHP is installed properly
Create a php file containing code <?php echo phpinfo(); ?> and save it as test.php.
Run this file on your web server and if you get an output like this:
then you have installed PHP properly.
Install PHP extensions on Windows
What is a PHP extension?
A PHP extension is a piece of code which is not part of the core PHP and you need it to explore certain functionalities
of PHP (e.g. for using mysql you need mysql extension of PHP).
Many extensions are available out of the box in the PHP installer downloaded
from php.net or in the .msi package. But many need to be obtained separately from php.net.
In Windows, extensions come in the form of a .dll file which you can download from php.net.
How do you configure an extension on Windows?
You need to change the setting of extension dir in php.ini file. For example, If you are using PHP 5.0.3, and you have installed php in c:php, then you have to set extension_dir = C:phpext in your php.ini file.
After downloading the files needed, you have to open php.ini and enable a line pointing to an extension in question.
For enabling extensions, you have to uncomment a line in your php.ini file. For example, for enabling mysql extension, you have to change; extension = php_mysql.dll to extension = php_mysql.dll in your php.ini file.
You also need to restart your web server and php in order to complete the installation of a specific extension.
Sample php.ini
Previous: PHP Home
Next: Install php on Linux
PHP: Tips of the Day
PHP — how to best determine if the current invocation is from CLI or web server?
php_sapi_name is the function you will want to use as it returns a lowercase string of the interface type. In addition, there is the PHP constant PHP_SAPI.
Documentation can be found here: http://php.net/php_sapi_name
For example, to determine if PHP is being run from the CLI, you could use this function:
function isCommandLineInterface()
{
    return (php_sapi_name() === 'cli');
}
Ref : https://bit.ly/3p0YZaV
Sometimes it’s hard to know which PHP extensions you’ll need before you install PHP. In cases where you need to add extensions later on, you might get lucky and the extension could be in the repository of the OS you’re using. It might just be a simple sudo apt-get install php5-intl away. In other cases, however, you might need to install it from source – Phalcon is one such case, but it makes the procedure extremely simple by introducing vendor support, shortcuts and pre-written instructions for your OS to carry out. What if there’s no such thing for other extensions, though?
In this tutorial, we’ll go through installing some custom extensions on Linux systems (and OS X – the process is nearly identical). The procedure is very similar to what we already did on Nitrous.io, but adapted for local environments – more specifically, Laravel Homestead. You can easily derive installation instructions from this tutorial and apply them to other distros.
Booting the VM
If you haven’t already, read the Homestead post linked above and get it up and running. Immediately after running a new Homestead box, you should be able to do this:
That’s perfectly fine, this happens because the folder that’s mounted by default actually doesn’t contain any files yet. Now vagrant ssh into the VM, and execute the following commands:
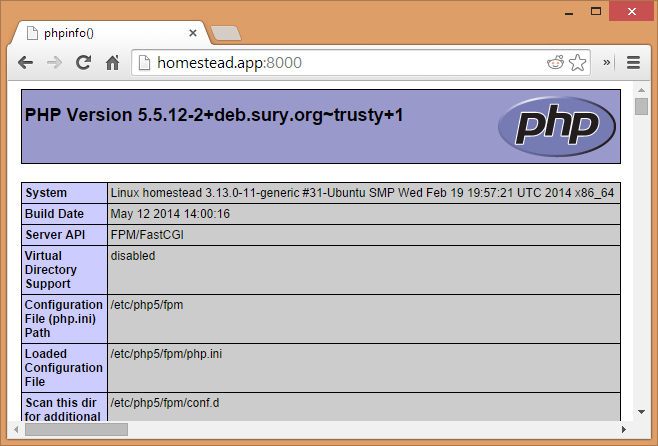
cd Code
git clone https://github.com/Swader/publicinfo
This creates a valid PHP Info file in the path that Homestead is set to by default. Refreshing the URL will now produce a PHPInfo screen:
Prepping the Environment
To build extensions from source, we need the PHP dev tools installed on our machine, as well as a compiler that can produce the extension file. Here’s how you install these prerequisites on various operating systems:
Ubuntu
sudo apt-get install php5-dev php5-mysql gcc libpcre3-devFedora
sudo yum install php-devel php-mysqlnd gcc libtoolRHEL
sudo yum install php-devel php-mysql gcc libtoolSuse
yast2 -i php5-pear php5-devel php5-mysql gccIf you’re using the most recent Homestead, all these tools will already be installed for you. With everything prepared, let’s start installing extensions.
Installing Extensions
There are two types of extensions you can install: bundled with PHP but not installed by default, and third party extensions. Third party extensions like Phalcon usually make the installation process much easier by providing shortcuts, as they don’t have to comply to certain traditions bundled PHP extensions are bound by.
First, let’s move into the home folder on the vm: cd ~. In there, make a downloads folder, and cd into it. When installing a bundled extension, you’ll need the source code of PHP on your machine, preferably one matching your current version. The version Homestead uses is 5.5.12, so I’ll be downloading that one:
wget http://be2.php.net/distributions/php-5.5.12.tar.bz2
tar xvjf php-5.5.12.tar.bz2
cd php-5.5.12
I’m using the Belgian mirror above, feel free to use that one or any other from the download archives.
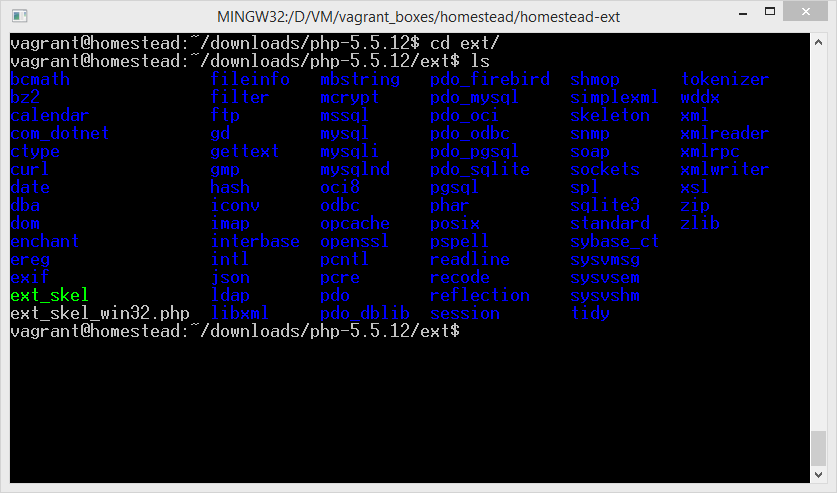
To see the sources of all bundled extensions, go into the ext folder inside the unarchived PHP source code folder and do a list with ls.
Installing a bundled extension
First, we’ll install the PHP-intl extension if you don’t have it installed already. If you do, that’s fine – the installation procedure you’ll see below is identical for every bundled PHP extension. The intl extension is for internationalization – read more here if you’re interested.
Seeing as the intl extension needs the ICU library as a prerequisite (as stated in the requirements), let’s install that first.
sudo apt-get install icu-devtools icu-doc libicu-dev libicu52 libicu52-dbgUnder other distributions, the installation instructions may vary. It’s best if you refer to the ICU site or your individual distribution’s docs for this step.
Once ICU is installed, do the following while still in the ext folder:
cd intl
phpize
./configure --enable-intl
make
sudo make install
Let’s explain what’s going on.
phpizeprepares the extension’s folder for compliation. It allows you to do the subsequent commands by creating aconfigurefile, and basically making the extension’s folder “think” it’s PHP itself. The procedure afterphpizeis, in fact, identical to what you would do when installing PHP from source – only in this case, just a fragment of PHP is compiled and prepared for use with the already compiled and installed PHP../configure --enable-intlconfigures the environment for compilation. It prepares everything the compiler will need to craft theintl.sofile which we’ll be using. Theenable-intlflag is necessary even though we’re in theintlfolder because the folder, effectively, thinks it is PHP, and we need to help it live that illusion. This command tells it: “Ok, you’re PHP’s source code. Now compile and install with the intl extension.”, when in fact, it’s the only part that can be installed from this folder.makewill compile the sources intointl.so, placing the file into the very folder you’re currently in, under themodulessubfolder.sudo make installwill move this file into the current PHP installation’s extensions folder.
All we need to do now is enable the extension by having php.ini consume it. We’ll do that later, let’s compile a third party extension first.
Installing a third party extension
We’ll be installing Mongo as a third party extension. There are binary distributions available for Mongo which make installation simpler, but let’s do it manually for the sake of education. We’ll assume you already have the actual Mongo installed, and are thus focusing only on the PHP extension. If you don’t have Mongo installed, refer to their installation docs.
git clone https://github.com/mongodb/mongo-php-driver
cd mongo-php-driver
phpize
./configure
make
sudo make install
This has built our mongo.so file, and placed it into the extensions folder of our PHP installation. We’ll enable it in the next section.
Enabling and Testing
To see if the compiled .so files are indeed in our PHP extensions folder, list out its contents:
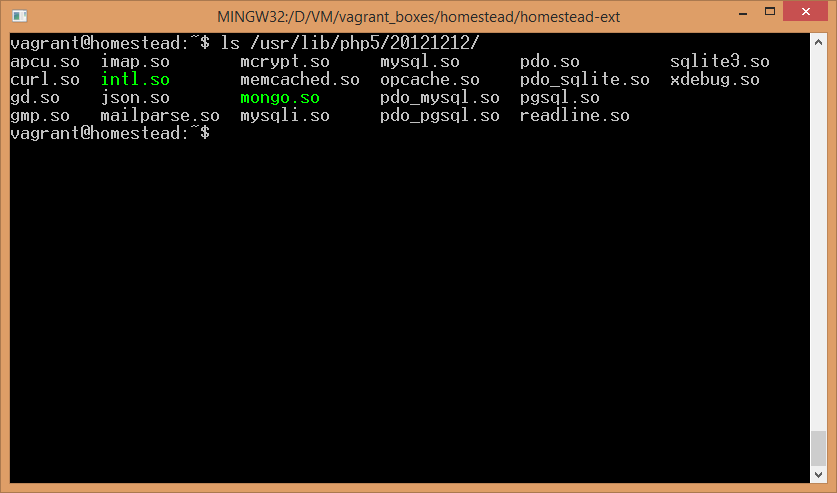
As you can see, there they are, highlighted in bright green.
To enable them, we need to tell php.ini about them. There are several ways to do this:
- You can put the lines
extension=mongo.soandextension=intl.sodirectly intophp.ini. This works, and is a perfectly valid approach in most cases. - You can create a separate
inifile for each of these, put them in a folder that gets auto-included afterphp.iniis loaded, and maintain separation and isolation ofphp.inithat way. This approach is healthier, though harder to accomplish. - You can combine 2) and the default tools for enabling PHP mods. Homestead uses this approach, and so will we.
cd `/etc/php5/mods-available`This folder is the repository of all such individual ini files. Create two new files here:
sudo touch mongo.ini
echo "extension=mongo.so" | sudo tee -a mongo.ini
sudo touch intl.ini
echo "extension=intl.so" | sudo tee -a intl.ini
These commands created two new ini files, each for one of the extensions we’ve previously built. As they are now in the mods-available folder, we can use the already available php5enmod (short for PHP enable mod) command line tool.
sudo php5enmod mongo
sudo php5enmod intl
Note: If you don’t have the php5enmod tool, symlinking the ini files into the conf.d folder of various php runtimes will do the trick:
ln -s /etc/php5/mods-available/mongo.ini /etc/php5/cli/conf.d/mongo.ini
ln -s /etc/php5/mods-available/intl.ini /etc/php5/cli/conf.d/intl.ini
ln -s /etc/php5/mods-available/mongo.ini /etc/php5/fpm/conf.d/mongo.ini
ln -s /etc/php5/mods-available/intl.ini /etc/php5/fpm/conf.d/intl.ini
The reason why there’s four entries is that we have the command line version of PHP and the FPM version of PHP. Each uses its own php.ini file, and each loads its own conf.d folder for extensions – hence, we need to add both extensions to both PHP versions if we want the extensions available all-around. Use this approach only if you don’t have the php5enmod tool.
Finally, let’s restart nginx and php-fpm to load these changes.
sudo service nginx restart
sudo service php5-fpm restart
To see if we’ve got them installed, refresh the PHPinfo screen from before and search for mongo and intl respectively.
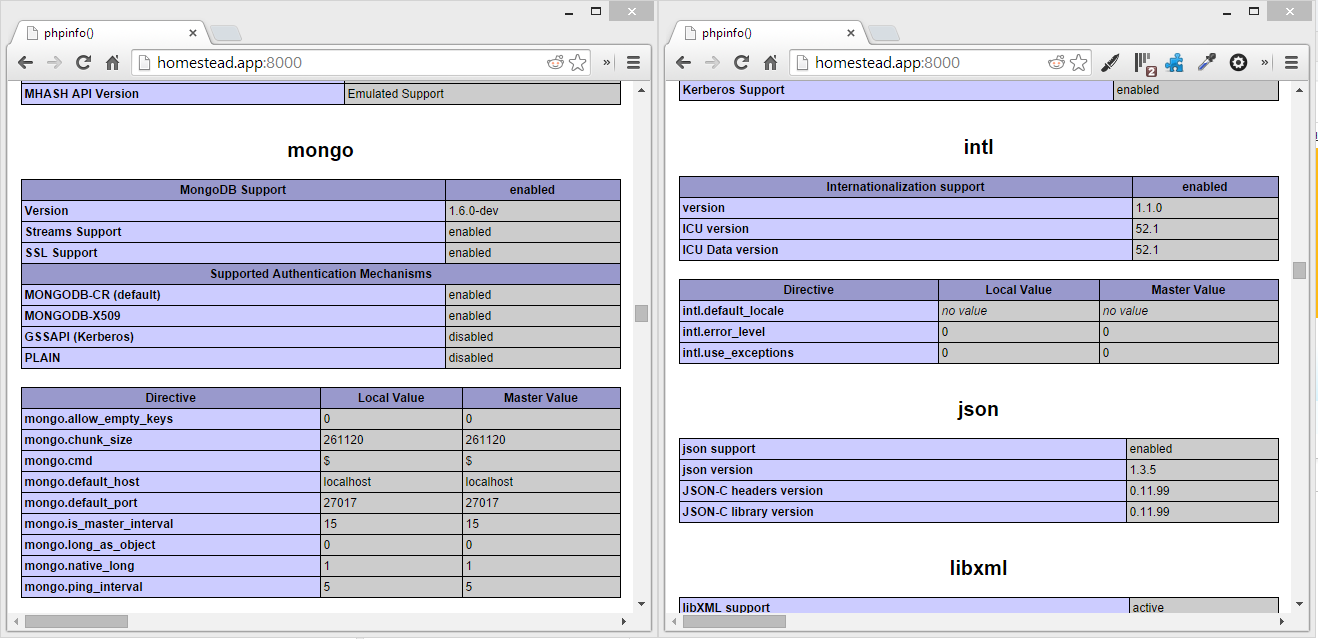
Success!
Removing Extensions
To remove extensions, there’s no need to delete any actual files unless you’re really low on space. You can do it in three ways:
- Run
php5dismodif you have the tool available. It’s the opposite of thephp5enmodtool mentioned above. The.sofiles will stay in place, and theinifiles will remain inmods-available, they just won’t load because their symlinks will be removed from thefpmandcliconf.dfolders. - Remove the symlinks manually. E.g.
sudo rm /etc/php5/cli/conf.d/mongo.ini - If you enabled the extensions by putting them directly into the
php.inifiles, remove those lines from thephp.inifiles, or better yet, comment them so that they remain accessible for further use should you ever change your mind.
Conclusion
As you can see, installing extensions from source is extremely simple, even if there are no precise instructions and even if the extension isn’t supported by an OS’s official repository. The next time you need to add an extension into your PHP installation on a *nix system (this tutorial applies to OS X as well), refer back to this post for a refresher.
Please leave your feedback below, and let me know if you’re confused by a specific extension and would like help with installing it.