-
Configuration
The first step of the installation procedure is to configure the source tree for your system and choose the options you would like. This is done by running the
configurescript. For a default installation simply enter:./configureThis script will run a number of tests to determine values for various system dependent variables and detect any quirks of your operating system, and finally will create several files in the build tree to record what it found.
You can also run
configurein a directory outside the source tree, and then build there, if you want to keep the build directory separate from the original source files. This procedure is called a VPATH build. Here’s how:mkdir build_dircd build_dir/path/to/source/tree/configure [options go here]makeThe default configuration will build the server and utilities, as well as all client applications and interfaces that require only a C compiler. All files will be installed under
/usr/local/pgsqlby default.You can customize the build and installation process by supplying one or more command line options to
configure. Typically you would customize the install location, or the set of optional features that are built.configurehas a large number of options, which are described in Section 17.4.1.Also,
configureresponds to certain environment variables, as described in Section 17.4.2. These provide additional ways to customize the configuration. -
Build
To start the build, type either of:
makemake all(Remember to use GNU make.) The build will take a few minutes depending on your hardware.
If you want to build everything that can be built, including the documentation (HTML and man pages), and the additional modules (
contrib), type instead:make worldIf you want to build everything that can be built, including the additional modules (
contrib), but without the documentation, type instead:make world-binIf you want to invoke the build from another makefile rather than manually, you must unset
MAKELEVELor set it to zero, for instance like this:build-postgresql: $(MAKE) -C postgresql MAKELEVEL=0 allFailure to do that can lead to strange error messages, typically about missing header files.
-
Regression Tests
If you want to test the newly built server before you install it, you can run the regression tests at this point. The regression tests are a test suite to verify that PostgreSQL runs on your machine in the way the developers expected it to. Type:
make check(This won’t work as root; do it as an unprivileged user.) See Chapter 33 for detailed information about interpreting the test results. You can repeat this test at any later time by issuing the same command.
-
Installing the Files
Note
If you are upgrading an existing system be sure to read Section 19.6, which has instructions about upgrading a cluster.
To install PostgreSQL enter:
make installThis will install files into the directories that were specified in Step 1. Make sure that you have appropriate permissions to write into that area. Normally you need to do this step as root. Alternatively, you can create the target directories in advance and arrange for appropriate permissions to be granted.
To install the documentation (HTML and man pages), enter:
make install-docsIf you built the world above, type instead:
make install-worldThis also installs the documentation.
If you built the world without the documentation above, type instead:
make install-world-binYou can use
make install-stripinstead ofmake installto strip the executable files and libraries as they are installed. This will save some space. If you built with debugging support, stripping will effectively remove the debugging support, so it should only be done if debugging is no longer needed.install-striptries to do a reasonable job saving space, but it does not have perfect knowledge of how to strip every unneeded byte from an executable file, so if you want to save all the disk space you possibly can, you will have to do manual work.The standard installation provides all the header files needed for client application development as well as for server-side program development, such as custom functions or data types written in C.
Client-only installation: If you want to install only the client applications and interface libraries, then you can use these commands:
make -C src/bin installmake -C src/include installmake -C src/interfaces installmake -C doc installsrc/binhas a few binaries for server-only use, but they are small.
Uninstallation: To undo the installation use the command make uninstall. However, this will not remove any created directories.
Cleaning: After the installation you can free disk space by removing the built files from the source tree with the command make clean. This will preserve the files made by the configure program, so that you can rebuild everything with make later on. To reset the source tree to the state in which it was distributed, use make distclean. If you are going to build for several platforms within the same source tree you must do this and re-configure for each platform. (Alternatively, use a separate build tree for each platform, so that the source tree remains unmodified.)
If you perform a build and then discover that your configure options were wrong, or if you change anything that configure investigates (for example, software upgrades), then it’s a good idea to do make distclean before reconfiguring and rebuilding. Without this, your changes in configuration choices might not propagate everywhere they need to.
17.4.1. configure Options
configure‘s command line options are explained below. This list is not exhaustive (use ./configure --help to get one that is). The options not covered here are meant for advanced use-cases such as cross-compilation, and are documented in the standard Autoconf documentation.
17.4.1.1. Installation Locations
These options control where make install will put the files. The --prefix option is sufficient for most cases. If you have special needs, you can customize the installation subdirectories with the other options described in this section. Beware however that changing the relative locations of the different subdirectories may render the installation non-relocatable, meaning you won’t be able to move it after installation. (The man and doc locations are not affected by this restriction.) For relocatable installs, you might want to use the --disable-rpath option described later.
--prefix=PREFIX-
Install all files under the directory
PREFIXinstead of/usr/local/pgsql. The actual files will be installed into various subdirectories; no files will ever be installed directly into thePREFIXdirectory. --exec-prefix=EXEC-PREFIX-
You can install architecture-dependent files under a different prefix,
EXEC-PREFIX, than whatPREFIXwas set to. This can be useful to share architecture-independent files between hosts. If you omit this, thenEXEC-PREFIXis set equal toPREFIXand both architecture-dependent and independent files will be installed under the same tree, which is probably what you want. --bindir=DIRECTORY-
Specifies the directory for executable programs. The default is
EXEC-PREFIX/bin/usr/local/pgsql/bin. --sysconfdir=DIRECTORY-
Sets the directory for various configuration files,
PREFIX/etc --libdir=DIRECTORY-
Sets the location to install libraries and dynamically loadable modules. The default is
EXEC-PREFIX/lib --includedir=DIRECTORY-
Sets the directory for installing C and C++ header files. The default is
PREFIX/include --datarootdir=DIRECTORY-
Sets the root directory for various types of read-only data files. This only sets the default for some of the following options. The default is
PREFIX/share --datadir=DIRECTORY-
Sets the directory for read-only data files used by the installed programs. The default is
DATAROOTDIR --localedir=DIRECTORY-
Sets the directory for installing locale data, in particular message translation catalog files. The default is
DATAROOTDIR/locale --mandir=DIRECTORY-
The man pages that come with PostgreSQL will be installed under this directory, in their respective
mansubdirectories. The default isxDATAROOTDIR/man --docdir=DIRECTORY-
Sets the root directory for installing documentation files, except “man” pages. This only sets the default for the following options. The default value for this option is
DATAROOTDIR/doc/postgresql --htmldir=DIRECTORY-
The HTML-formatted documentation for PostgreSQL will be installed under this directory. The default is
DATAROOTDIR
Note
Care has been taken to make it possible to install PostgreSQL into shared installation locations (such as /usr/local/include) without interfering with the namespace of the rest of the system. First, the string “/postgresql” is automatically appended to datadir, sysconfdir, and docdir, unless the fully expanded directory name already contains the string “postgres” or “pgsql”. For example, if you choose /usr/local as prefix, the documentation will be installed in /usr/local/doc/postgresql, but if the prefix is /opt/postgres, then it will be in /opt/postgres/doc. The public C header files of the client interfaces are installed into includedir and are namespace-clean. The internal header files and the server header files are installed into private directories under includedir. See the documentation of each interface for information about how to access its header files. Finally, a private subdirectory will also be created, if appropriate, under libdir for dynamically loadable modules.
17.4.1.2. PostgreSQL Features
The options described in this section enable building of various PostgreSQL features that are not built by default. Most of these are non-default only because they require additional software, as described in Section 17.2.
--enable-nls[=LANGUAGES]-
Enables Native Language Support (NLS), that is, the ability to display a program’s messages in a language other than English.
LANGUAGESis an optional space-separated list of codes of the languages that you want supported, for example--enable-nls='de fr'. (The intersection between your list and the set of actually provided translations will be computed automatically.) If you do not specify a list, then all available translations are installed.To use this option, you will need an implementation of the Gettext API.
--with-perl-
Build the PL/Perl server-side language.
--with-python-
Build the PL/Python server-side language.
--with-tcl-
Build the PL/Tcl server-side language.
--with-tclconfig=DIRECTORY-
Tcl installs the file
tclConfig.sh, which contains configuration information needed to build modules interfacing to Tcl. This file is normally found automatically at a well-known location, but if you want to use a different version of Tcl you can specify the directory in which to look fortclConfig.sh. --with-icu-
Build with support for the ICU library, enabling use of ICU collation features (see Section 24.2). This requires the ICU4C package to be installed. The minimum required version of ICU4C is currently 4.2.
By default, pkg-config will be used to find the required compilation options. This is supported for ICU4C version 4.6 and later. For older versions, or if pkg-config is not available, the variables
ICU_CFLAGSandICU_LIBScan be specified toconfigure, like in this example:./configure ... --with-icu ICU_CFLAGS='-I/some/where/include' ICU_LIBS='-L/some/where/lib -licui18n -licuuc -licudata'
(If ICU4C is in the default search path for the compiler, then you still need to specify nonempty strings in order to avoid use of pkg-config, for example,
ICU_CFLAGS=' '.) --with-llvm-
Build with support for LLVM based JIT compilation (see Chapter 32). This requires the LLVM library to be installed. The minimum required version of LLVM is currently 3.9.
llvm-configwill be used to find the required compilation options.llvm-config, and thenllvm-config-$major-$minorfor all supported versions, will be searched for in yourPATH. If that would not yield the desired program, useLLVM_CONFIGto specify a path to the correctllvm-config. For example./configure ... --with-llvm LLVM_CONFIG='/path/to/llvm/bin/llvm-config'
LLVM support requires a compatible
clangcompiler (specified, if necessary, using theCLANGenvironment variable), and a working C++ compiler (specified, if necessary, using theCXXenvironment variable). --with-lz4-
Build with LZ4 compression support.
--with-zstd-
Build with Zstandard compression support.
--with-ssl=LIBRARY-
Build with support for SSL (encrypted) connections. The only
LIBRARYsupported isopenssl. This requires the OpenSSL package to be installed.configurewill check for the required header files and libraries to make sure that your OpenSSL installation is sufficient before proceeding. --with-openssl-
Obsolete equivalent of
--with-ssl=openssl. --with-gssapi-
Build with support for GSSAPI authentication. On many systems, the GSSAPI system (usually a part of the Kerberos installation) is not installed in a location that is searched by default (e.g.,
/usr/include,/usr/lib), so you must use the options--with-includesand--with-librariesin addition to this option.configurewill check for the required header files and libraries to make sure that your GSSAPI installation is sufficient before proceeding. --with-ldap-
Build with LDAP support for authentication and connection parameter lookup (see Section 34.18 and Section 21.10 for more information). On Unix, this requires the OpenLDAP package to be installed. On Windows, the default WinLDAP library is used.
configurewill check for the required header files and libraries to make sure that your OpenLDAP installation is sufficient before proceeding. --with-pam-
Build with PAM (Pluggable Authentication Modules) support.
--with-bsd-auth-
Build with BSD Authentication support. (The BSD Authentication framework is currently only available on OpenBSD.)
--with-systemd-
Build with support for systemd service notifications. This improves integration if the server is started under systemd but has no impact otherwise; see Section 19.3 for more information. libsystemd and the associated header files need to be installed to use this option.
--with-bonjour-
Build with support for Bonjour automatic service discovery. This requires Bonjour support in your operating system. Recommended on macOS.
--with-uuid=LIBRARY-
Build the uuid-ossp module (which provides functions to generate UUIDs), using the specified UUID library.
LIBRARYmust be one of:-
bsdto use the UUID functions found in FreeBSD and some other BSD-derived systems -
e2fsto use the UUID library created by thee2fsprogsproject; this library is present in most Linux systems and in macOS, and can be obtained for other platforms as well -
osspto use the OSSP UUID library
-
--with-ossp-uuid-
Obsolete equivalent of
--with-uuid=ossp. --with-libxml-
Build with libxml2, enabling SQL/XML support. Libxml2 version 2.6.23 or later is required for this feature.
To detect the required compiler and linker options, PostgreSQL will query
pkg-config, if that is installed and knows about libxml2. Otherwise the programxml2-config, which is installed by libxml2, will be used if it is found. Use ofpkg-configis preferred, because it can deal with multi-architecture installations better.To use a libxml2 installation that is in an unusual location, you can set
pkg-config-related environment variables (see its documentation), or set the environment variableXML2_CONFIGto point to thexml2-configprogram belonging to the libxml2 installation, or set the variablesXML2_CFLAGSandXML2_LIBS. (Ifpkg-configis installed, then to override its idea of where libxml2 is you must either setXML2_CONFIGor set bothXML2_CFLAGSandXML2_LIBSto nonempty strings.) --with-libxslt-
Build with libxslt, enabling the xml2 module to perform XSL transformations of XML.
--with-libxmlmust be specified as well.
17.4.1.3. Anti-Features
The options described in this section allow disabling certain PostgreSQL features that are built by default, but which might need to be turned off if the required software or system features are not available. Using these options is not recommended unless really necessary.
--without-readline-
Prevents use of the Readline library (and libedit as well). This option disables command-line editing and history in psql.
--with-libedit-preferred-
Favors the use of the BSD-licensed libedit library rather than GPL-licensed Readline. This option is significant only if you have both libraries installed; the default in that case is to use Readline.
--without-zlib-
Prevents use of the Zlib library. This disables support for compressed archives in pg_dump and pg_restore.
--disable-spinlocks-
Allow the build to succeed even if PostgreSQL has no CPU spinlock support for the platform. The lack of spinlock support will result in very poor performance; therefore, this option should only be used if the build aborts and informs you that the platform lacks spinlock support. If this option is required to build PostgreSQL on your platform, please report the problem to the PostgreSQL developers.
--disable-atomics-
Disable use of CPU atomic operations. This option does nothing on platforms that lack such operations. On platforms that do have them, this will result in poor performance. This option is only useful for debugging or making performance comparisons.
--disable-thread-safety-
Disable the thread-safety of client libraries. This prevents concurrent threads in libpq and ECPG programs from safely controlling their private connection handles. Use this only on platforms with deficient threading support.
17.4.1.4. Build Process Details
--with-includes=DIRECTORIES-
DIRECTORIESis a colon-separated list of directories that will be added to the list the compiler searches for header files. If you have optional packages (such as GNU Readline) installed in a non-standard location, you have to use this option and probably also the corresponding--with-librariesoption.Example:
--with-includes=/opt/gnu/include:/usr/sup/include. --with-libraries=DIRECTORIES-
DIRECTORIESis a colon-separated list of directories to search for libraries. You will probably have to use this option (and the corresponding--with-includesoption) if you have packages installed in non-standard locations.Example:
--with-libraries=/opt/gnu/lib:/usr/sup/lib. --with-system-tzdata=DIRECTORY-
PostgreSQL includes its own time zone database, which it requires for date and time operations. This time zone database is in fact compatible with the IANA time zone database provided by many operating systems such as FreeBSD, Linux, and Solaris, so it would be redundant to install it again. When this option is used, the system-supplied time zone database in
DIRECTORYis used instead of the one included in the PostgreSQL source distribution.DIRECTORYmust be specified as an absolute path./usr/share/zoneinfois a likely directory on some operating systems. Note that the installation routine will not detect mismatching or erroneous time zone data. If you use this option, you are advised to run the regression tests to verify that the time zone data you have pointed to works correctly with PostgreSQL.This option is mainly aimed at binary package distributors who know their target operating system well. The main advantage of using this option is that the PostgreSQL package won’t need to be upgraded whenever any of the many local daylight-saving time rules change. Another advantage is that PostgreSQL can be cross-compiled more straightforwardly if the time zone database files do not need to be built during the installation.
--with-extra-version=STRING-
Append
STRINGto the PostgreSQL version number. You can use this, for example, to mark binaries built from unreleased Git snapshots or containing custom patches with an extra version string, such as agit describeidentifier or a distribution package release number. --disable-rpath-
Do not mark PostgreSQL‘s executables to indicate that they should search for shared libraries in the installation’s library directory (see
--libdir). On most platforms, this marking uses an absolute path to the library directory, so that it will be unhelpful if you relocate the installation later. However, you will then need to provide some other way for the executables to find the shared libraries. Typically this requires configuring the operating system’s dynamic linker to search the library directory; see Section 17.5.1 for more detail.
17.4.1.5. Miscellaneous
It’s fairly common, particularly for test builds, to adjust the default port number with --with-pgport. The other options in this section are recommended only for advanced users.
--with-pgport=NUMBER-
Set
NUMBERas the default port number for server and clients. The default is 5432. The port can always be changed later on, but if you specify it here then both server and clients will have the same default compiled in, which can be very convenient. Usually the only good reason to select a non-default value is if you intend to run multiple PostgreSQL servers on the same machine. --with-krb-srvnam=NAME-
The default name of the Kerberos service principal used by GSSAPI.
postgresis the default. There’s usually no reason to change this unless you are building for a Windows environment, in which case it must be set to upper casePOSTGRES. --with-segsize=SEGSIZE-
Set the segment size, in gigabytes. Large tables are divided into multiple operating-system files, each of size equal to the segment size. This avoids problems with file size limits that exist on many platforms. The default segment size, 1 gigabyte, is safe on all supported platforms. If your operating system has “largefile” support (which most do, nowadays), you can use a larger segment size. This can be helpful to reduce the number of file descriptors consumed when working with very large tables. But be careful not to select a value larger than is supported by your platform and the file systems you intend to use. Other tools you might wish to use, such as tar, could also set limits on the usable file size. It is recommended, though not absolutely required, that this value be a power of 2. Note that changing this value breaks on-disk database compatibility, meaning you cannot use
pg_upgradeto upgrade to a build with a different segment size. --with-blocksize=BLOCKSIZE-
Set the block size, in kilobytes. This is the unit of storage and I/O within tables. The default, 8 kilobytes, is suitable for most situations; but other values may be useful in special cases. The value must be a power of 2 between 1 and 32 (kilobytes). Note that changing this value breaks on-disk database compatibility, meaning you cannot use
pg_upgradeto upgrade to a build with a different block size. --with-wal-blocksize=BLOCKSIZE-
Set the WAL block size, in kilobytes. This is the unit of storage and I/O within the WAL log. The default, 8 kilobytes, is suitable for most situations; but other values may be useful in special cases. The value must be a power of 2 between 1 and 64 (kilobytes). Note that changing this value breaks on-disk database compatibility, meaning you cannot use
pg_upgradeto upgrade to a build with a different WAL block size.
17.4.1.6. Developer Options
Most of the options in this section are only of interest for developing or debugging PostgreSQL. They are not recommended for production builds, except for --enable-debug, which can be useful to enable detailed bug reports in the unlucky event that you encounter a bug. On platforms supporting DTrace, --enable-dtrace may also be reasonable to use in production.
When building an installation that will be used to develop code inside the server, it is recommended to use at least the options --enable-debug and --enable-cassert.
--enable-debug-
Compiles all programs and libraries with debugging symbols. This means that you can run the programs in a debugger to analyze problems. This enlarges the size of the installed executables considerably, and on non-GCC compilers it usually also disables compiler optimization, causing slowdowns. However, having the symbols available is extremely helpful for dealing with any problems that might arise. Currently, this option is recommended for production installations only if you use GCC. But you should always have it on if you are doing development work or running a beta version.
--enable-cassert-
Enables assertion checks in the server, which test for many “cannot happen” conditions. This is invaluable for code development purposes, but the tests can slow down the server significantly. Also, having the tests turned on won’t necessarily enhance the stability of your server! The assertion checks are not categorized for severity, and so what might be a relatively harmless bug will still lead to server restarts if it triggers an assertion failure. This option is not recommended for production use, but you should have it on for development work or when running a beta version.
--enable-tap-tests-
Enable tests using the Perl TAP tools. This requires a Perl installation and the Perl module
IPC::Run. See Section 33.4 for more information. --enable-depend-
Enables automatic dependency tracking. With this option, the makefiles are set up so that all affected object files will be rebuilt when any header file is changed. This is useful if you are doing development work, but is just wasted overhead if you intend only to compile once and install. At present, this option only works with GCC.
--enable-coverage-
If using GCC, all programs and libraries are compiled with code coverage testing instrumentation. When run, they generate files in the build directory with code coverage metrics. See Section 33.5 for more information. This option is for use only with GCC and when doing development work.
--enable-profiling-
If using GCC, all programs and libraries are compiled so they can be profiled. On backend exit, a subdirectory will be created that contains the
gmon.outfile containing profile data. This option is for use only with GCC and when doing development work. --enable-dtrace-
Compiles PostgreSQL with support for the dynamic tracing tool DTrace. See Section 28.5 for more information.
To point to the
dtraceprogram, the environment variableDTRACEcan be set. This will often be necessary becausedtraceis typically installed under/usr/sbin, which might not be in yourPATH.Extra command-line options for the
dtraceprogram can be specified in the environment variableDTRACEFLAGS. On Solaris, to include DTrace support in a 64-bit binary, you must specifyDTRACEFLAGS="-64". For example, using the GCC compiler:./configure CC='gcc -m64' --enable-dtrace DTRACEFLAGS='-64' ...
Using Sun’s compiler:
./configure CC='/opt/SUNWspro/bin/cc -xtarget=native64' --enable-dtrace DTRACEFLAGS='-64' ...
17.4.2. configure Environment Variables
In addition to the ordinary command-line options described above, configure responds to a number of environment variables. You can specify environment variables on the configure command line, for example:
./configure CC=/opt/bin/gcc CFLAGS='-O2 -pipe'
In this usage an environment variable is little different from a command-line option. You can also set such variables beforehand:
export CC=/opt/bin/gccexport CFLAGS='-O2 -pipe'./configure
This usage can be convenient because many programs’ configuration scripts respond to these variables in similar ways.
The most commonly used of these environment variables are CC and CFLAGS. If you prefer a C compiler different from the one configure picks, you can set the variable CC to the program of your choice. By default, configure will pick gcc if available, else the platform’s default (usually cc). Similarly, you can override the default compiler flags if needed with the CFLAGS variable.
Here is a list of the significant variables that can be set in this manner:
BISON-
Bison program
CC-
C compiler
CFLAGS-
options to pass to the C compiler
CLANG-
path to
clangprogram used to process source code for inlining when compiling with--with-llvm CPP-
C preprocessor
CPPFLAGS-
options to pass to the C preprocessor
CXX-
C++ compiler
CXXFLAGS-
options to pass to the C++ compiler
DTRACE-
location of the
dtraceprogram DTRACEFLAGS-
options to pass to the
dtraceprogram FLEX-
Flex program
LDFLAGS-
options to use when linking either executables or shared libraries
LDFLAGS_EX-
additional options for linking executables only
LDFLAGS_SL-
additional options for linking shared libraries only
LLVM_CONFIG-
llvm-configprogram used to locate the LLVM installation MSGFMT-
msgfmtprogram for native language support PERL-
Perl interpreter program. This will be used to determine the dependencies for building PL/Perl. The default is
perl. PYTHON-
Python interpreter program. This will be used to determine the dependencies for building PL/Python. If this is not set, the following are probed in this order:
python3 python. TCLSH-
Tcl interpreter program. This will be used to determine the dependencies for building PL/Tcl. If this is not set, the following are probed in this order:
tclsh tcl tclsh8.6 tclsh86 tclsh8.5 tclsh85 tclsh8.4 tclsh84. XML2_CONFIG-
xml2-configprogram used to locate the libxml2 installation
Sometimes it is useful to add compiler flags after-the-fact to the set that were chosen by configure. An important example is that gcc‘s -Werror option cannot be included in the CFLAGS passed to configure, because it will break many of configure‘s built-in tests. To add such flags, include them in the COPT environment variable while running make. The contents of COPT are added to both the CFLAGS and LDFLAGS options set up by configure. For example, you could do
make COPT='-Werror'
or
export COPT='-Werror'make
Note
If using GCC, it is best to build with an optimization level of at least -O1, because using no optimization (-O0) disables some important compiler warnings (such as the use of uninitialized variables). However, non-zero optimization levels can complicate debugging because stepping through compiled code will usually not match up one-to-one with source code lines. If you get confused while trying to debug optimized code, recompile the specific files of interest with -O0. An easy way to do this is by passing an option to make: make PROFILE=-O0 file.o.
The COPT and PROFILE environment variables are actually handled identically by the PostgreSQL makefiles. Which to use is a matter of preference, but a common habit among developers is to use PROFILE for one-time flag adjustments, while COPT might be kept set all the time.
Summary: in this tutorial, you will step by step learn how to install PostgreSQL on your local system.
- Install PostgreSQL on macOS
- Install PostgreSQL on Linux
PostgreSQL was developed for UNIX-like platforms, however, it was designed to be portable. It means that PostgreSQL can also run on other platforms such as macOS, Solaris, and Windows.
Since version 8.0, PostgreSQL offers an installer for Windows systems that makes the installation process easier and faster. For development purposes, we will install PostgreSQL version 12 on Windows 10.
There are three steps to complete the PostgreSQL installation:
- Download PostgreSQL installer for Windows
- Install PostgreSQL
- Verify the installation
1) Download PostgreSQL Installer for Windows
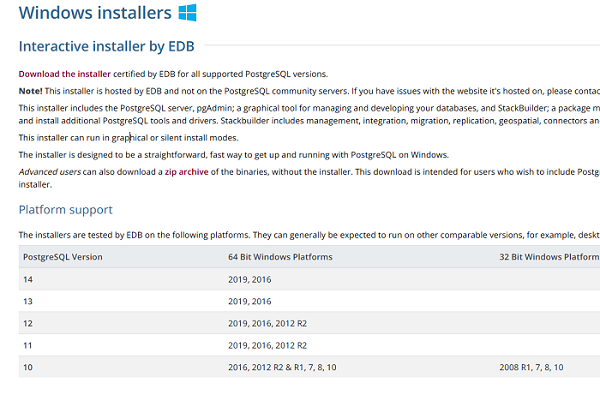
First, you need to go to the download page of PostgreSQL installers on the EnterpriseDB.
Second, click the download link as shown below:
It will take a few minutes to complete the download.
2) Install PostgreSQL on Window step by step
To install PostgreSQL on Windows, you need to have administrator privileges.
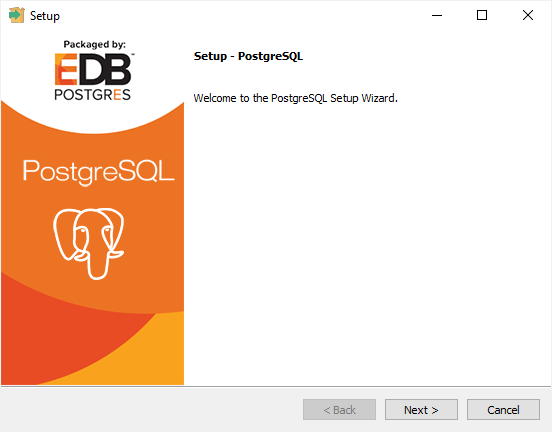
Step 1. Double click on the installer file, an installation wizard will appear and guide you through multiple steps where you can choose different options that you would like to have in PostgreSQL.
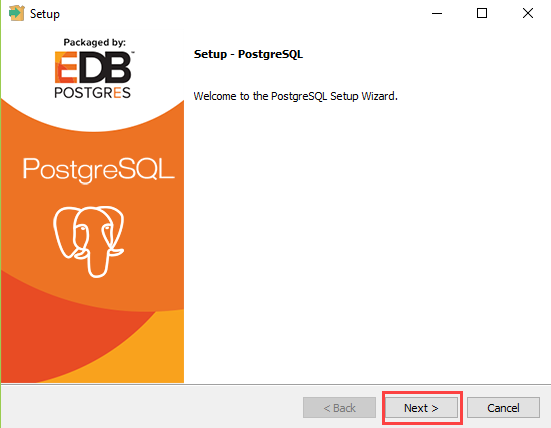
Step 2. Click the Next button
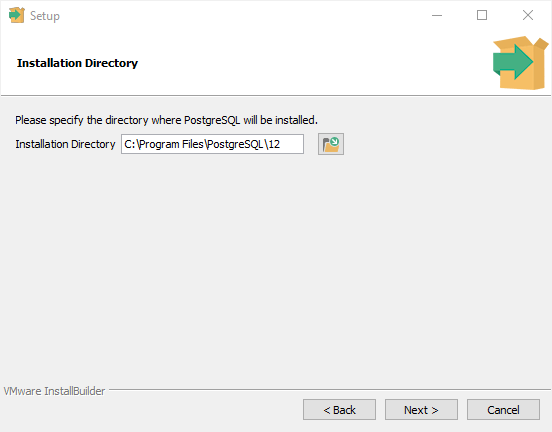
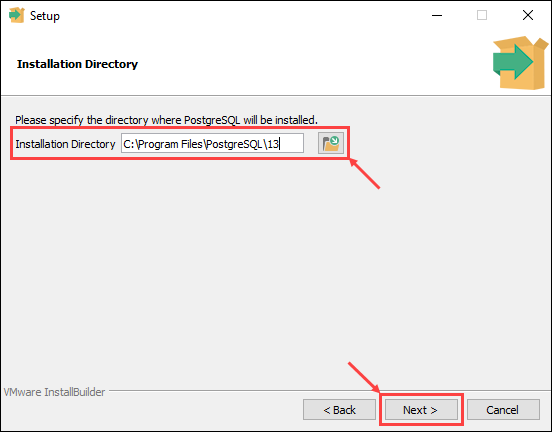
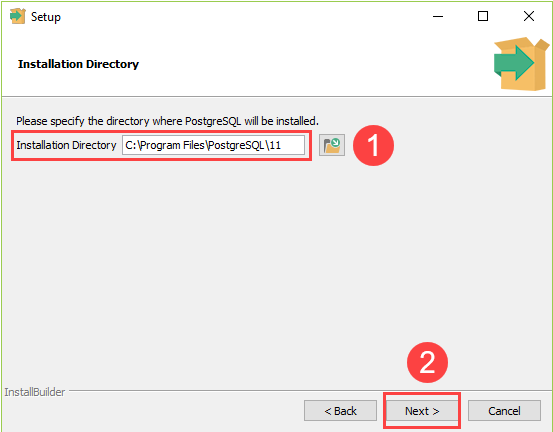
Step 3. Specify installation folder, choose your own or keep the default folder suggested by PostgreSQL installer and click the Next button
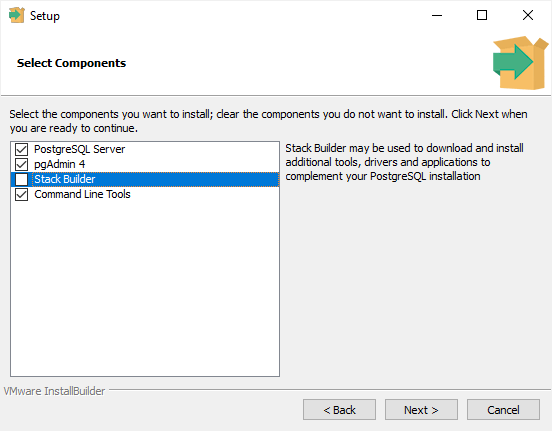
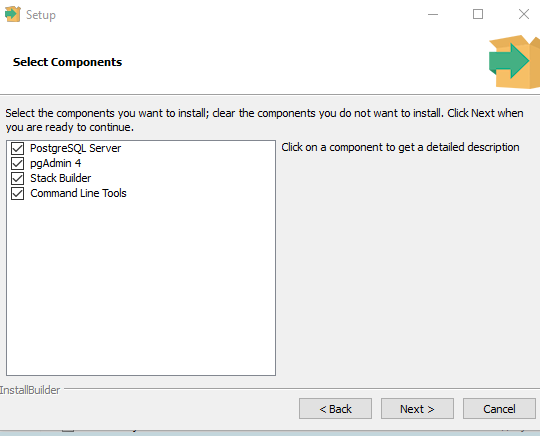
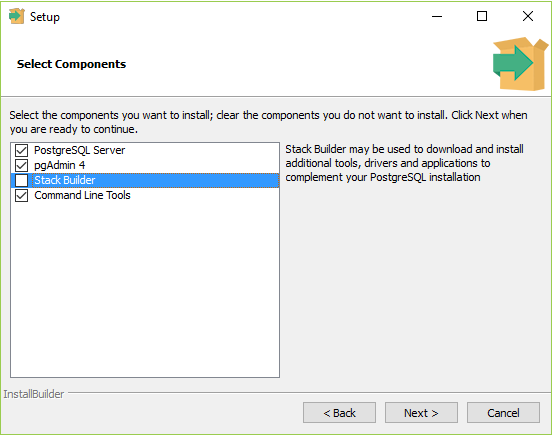
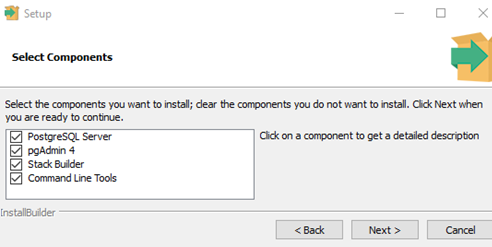
Step 4. Select software components to install:
- The PostgreSQL Server to install the PostgreSQL database server
- pgAdmin 4 to install the PostgreSQL database GUI management tool.
- Command Line Tools to install command-line tools such as psql, pg_restore, etc. These tools allow you to interact with the PostgreSQL database server using the command-line interface.
- Stack Builder provides a GUI that allows you to download and install drivers that work with PostgreSQL.
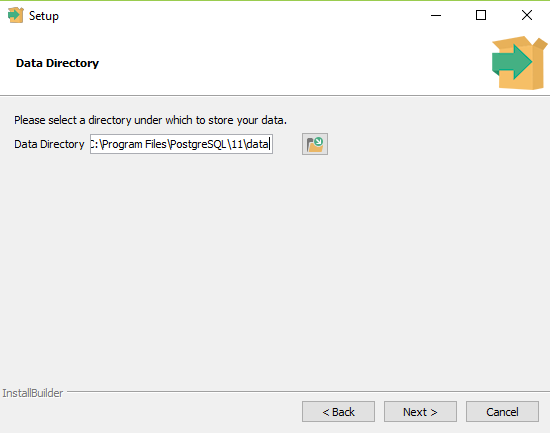
For the tutorial on this website, you don’t need to install Stack Builder so feel free to uncheck it and click the Next button to select the data directory:
Step 5. Select the database directory to store the data or accept the default folder. And click the Next button to go to the next step:

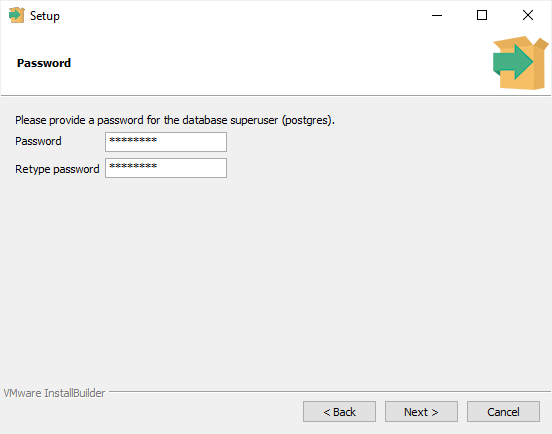
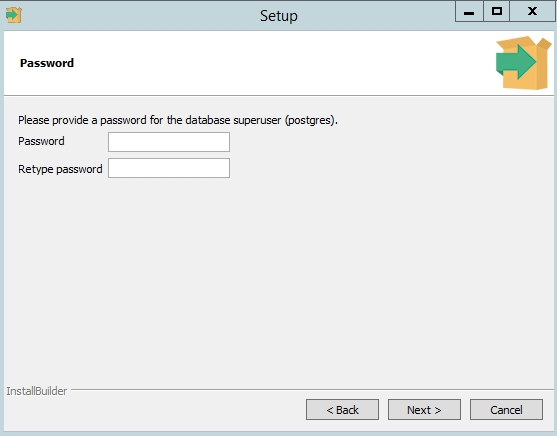
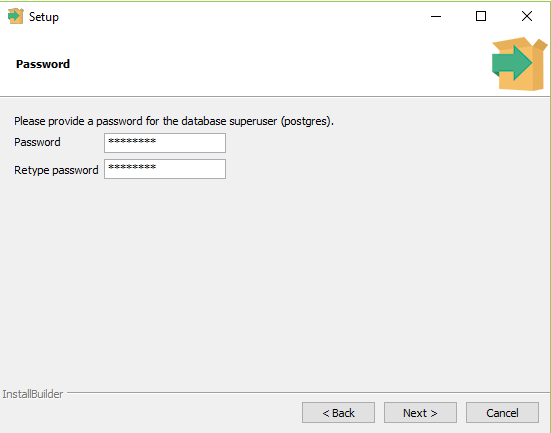
Step 6. Enter the password for the database superuser (postgres)
PostgreSQL runs as a service in the background under a service account named postgres. If you already created a service account with the name postgres, you need to provide the password of that account in the following window.
After entering the password, you need to retype it to confirm and click the Next button:
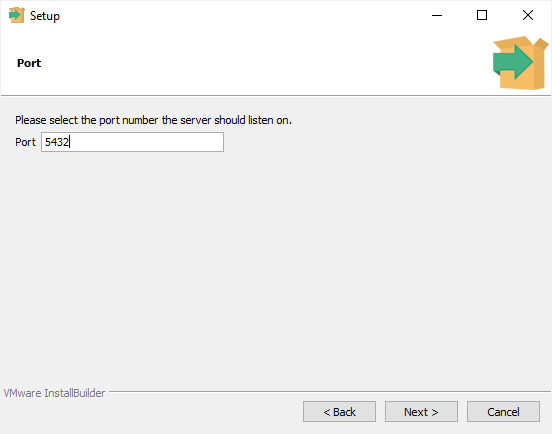
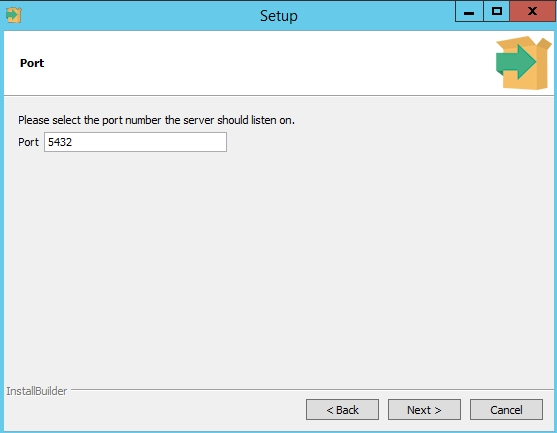
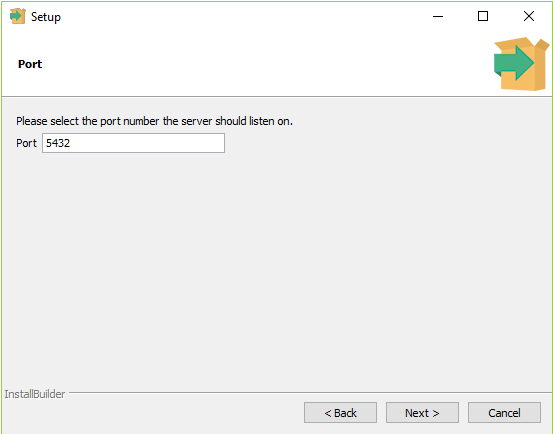
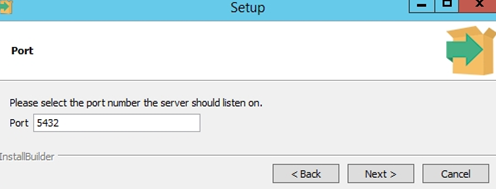
Step 7. Enter a port number on which the PostgreSQL database server will listen. The default port of PostgreSQL is 5432. You need to make sure that no other applications are using this port.
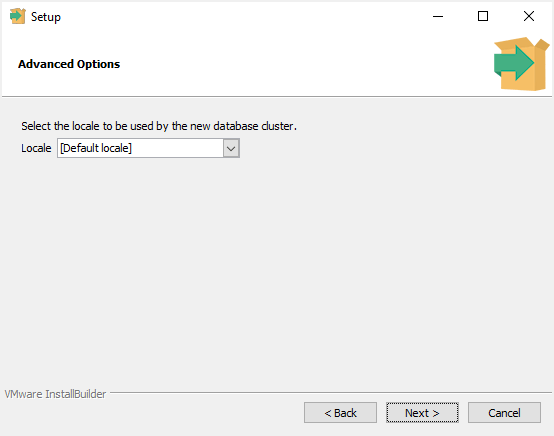
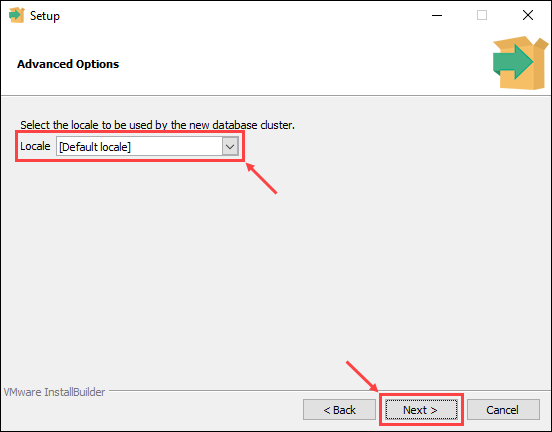
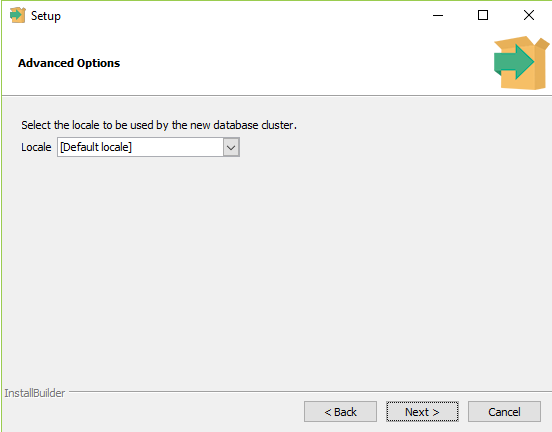
Step 8. Choose the default locale used by the PostgreSQL database. If you leave it as default locale, PostgreSQL will use the operating system locale. After that click the Next button.
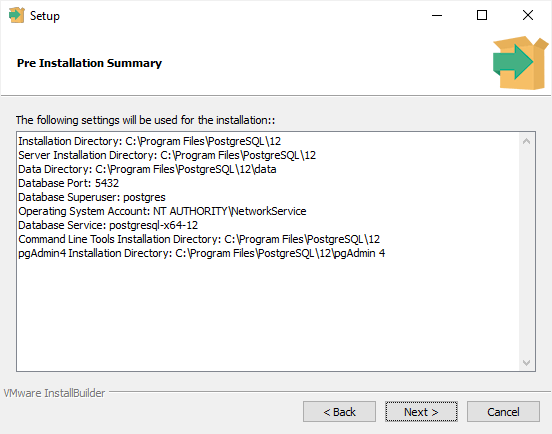
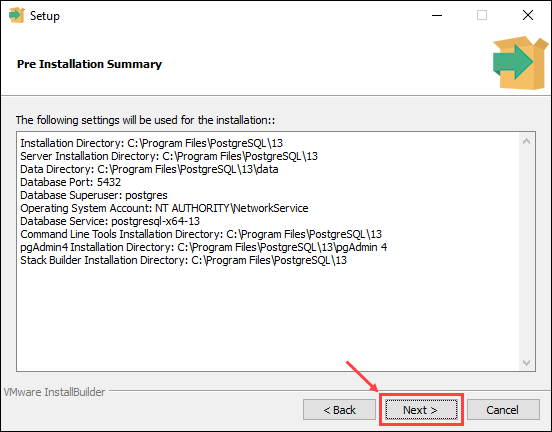
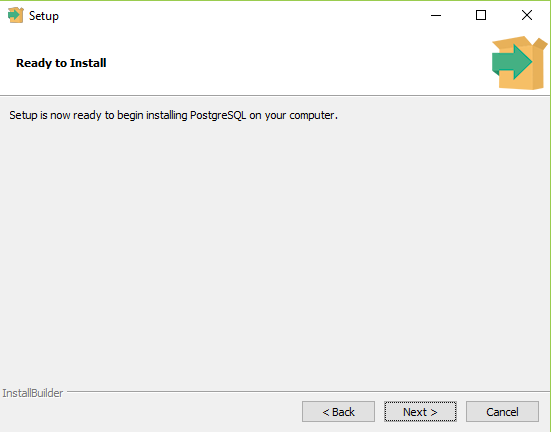
Step 9. The setup wizard will show the summary information of PostgreSQL. You need to review it and click the Next button if everything is correct. Otherwise, you need to click the Back button to change the configuration accordingly.
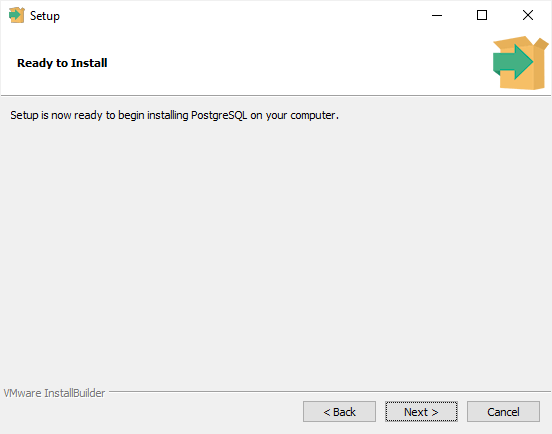
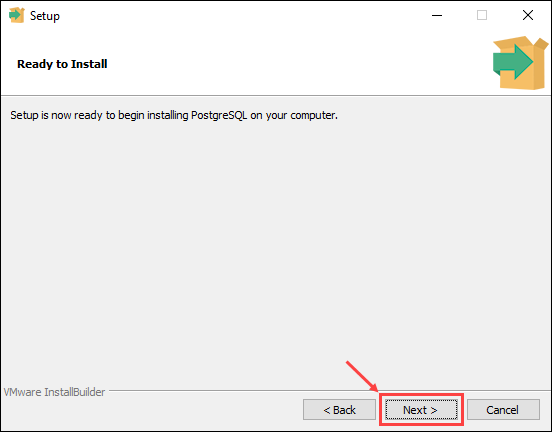
Now, you’re ready to install PostgreSQL on your computer. Click the Next button to begin installing PostgreSQL.
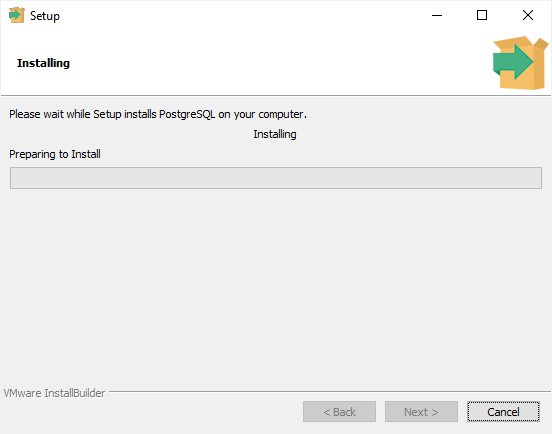
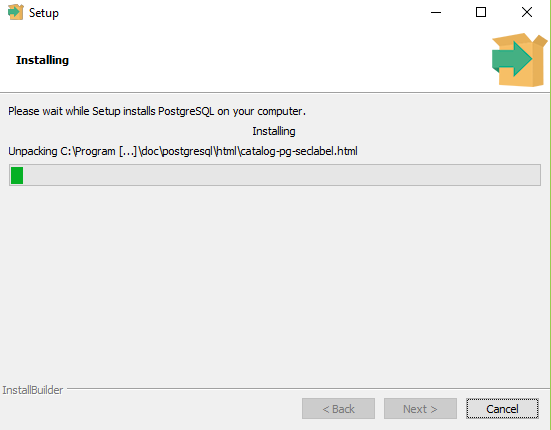
The installation may take a few minutes to complete.
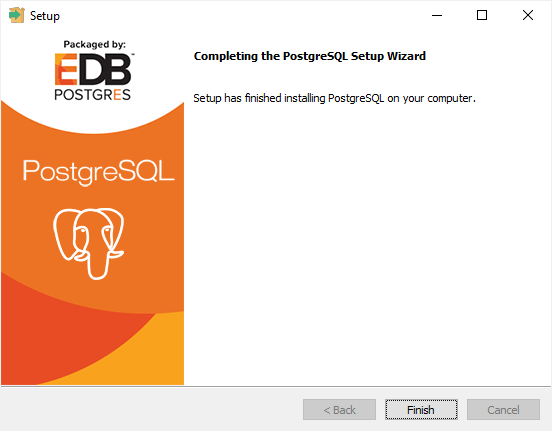
Step 10. Click the Finish button to complete the PostgreSQL installation.
3) Verify the Installation
There are several ways to verify the PostgreSQL installation. You can try to connect to the PostgreSQL database server from any client application e.g., psql and pgAdmin.
The quick way to verify the installation is through the psql program.
First, click the psql application to launch it. The psql command-line program will display.
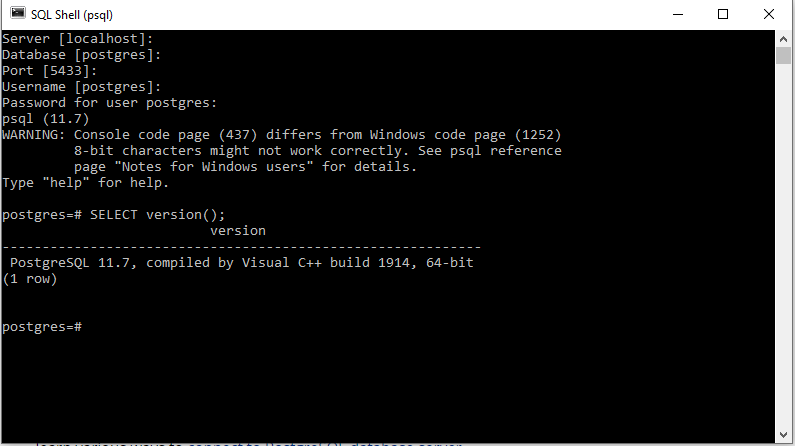
Second, enter all the necessary information such as the server, database, port, username, and password. To accept the default, you can press Enter. Note that you should provide the password that you entered during installing the PostgreSQL.
Code language: Shell Session (shell)
Server [localhost]: Database [postgres]: Port [5432]: Username [postgres]: Password for user postgres: psql (12.3) WARNING: Console code page (437) differs from Windows code page (1252) 8-bit characters might not work correctly. See psql reference page "Notes for Windows users" for details. Type "help" for help. postgres=#
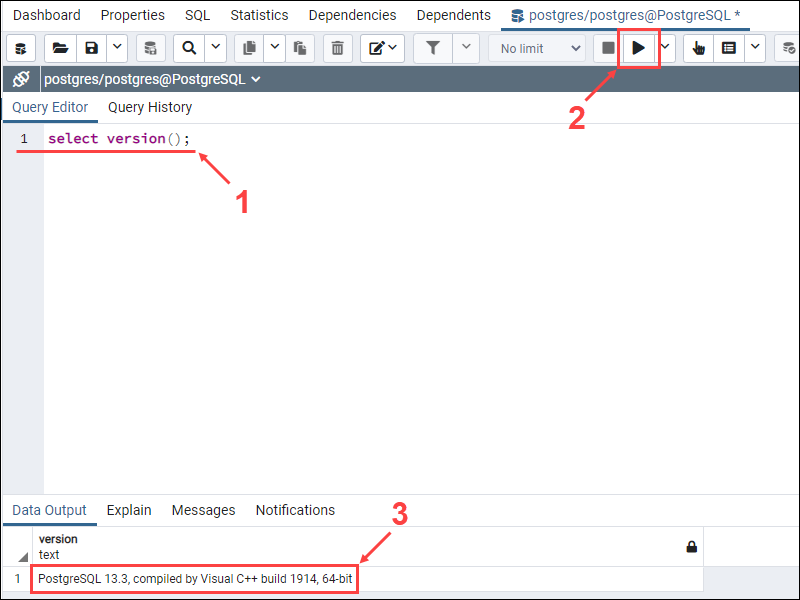
Third, issue the command SELECT version(); you will see the following output:
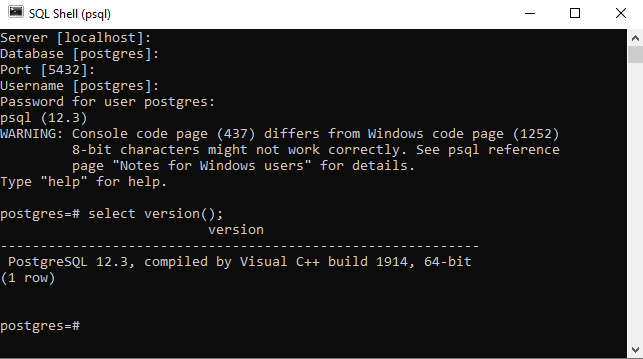
Congratulation! you’ve successfully installed PostgreSQL database server on your local system. Let’s learn various ways to connect to PostgreSQL database server.
Was this tutorial helpful ?
Introduction
PostgreSQL is an open-source, object-based relational database management system. It is well-known for its robustness, SQL compliance, and extensibility.
In this tutorial, we will go over the step-by-step process of installing PostgreSQL on Windows 10. We will also show different ways to connect to a PostgreSQL database and verify the installation.
Prerequisites
- A system running Windows 10
- Access to a user account with administrator privileges
Download PostgreSQL Installer
Before installing PostgreSQL, you need to download the installation file from the EDB website.
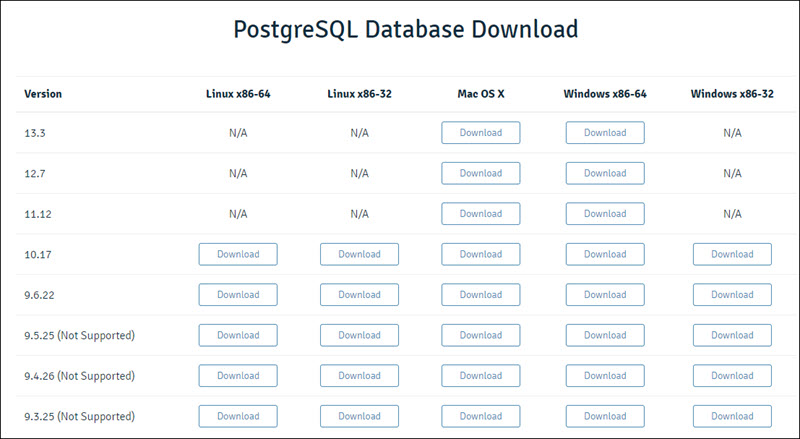
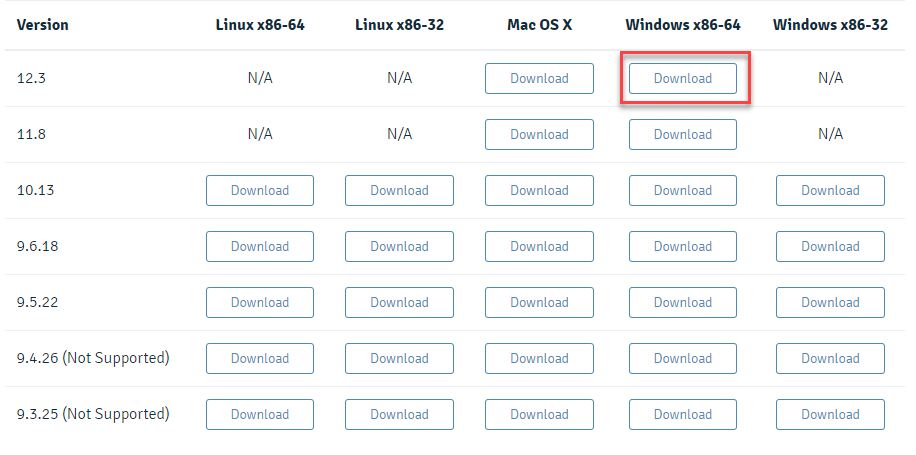
Find the Windows x86-64 category for the latest version of PostgreSQL and click the Download button.
Follow the steps below to install PostgreSQL on Windows:
1. Open the PostgreSQL install file to start the installation wizard. Click Next to continue.
2. Choose an install location for PostgreSQL and click Next to proceed.
3. Select which software components you want to install:
- PostgreSQL Server: Installs the PostgreSQL database server.
- pgAdmin 4: Provides a graphical interface for managing PostgreSQL databases.
- Stack Builder: Allows you to download and install additional tools to use with PostgreSQL.
- Command Line Tools: Installs the command line tool and client libraries. Required when installing PostgreSQL Server or pgAdmin 4.
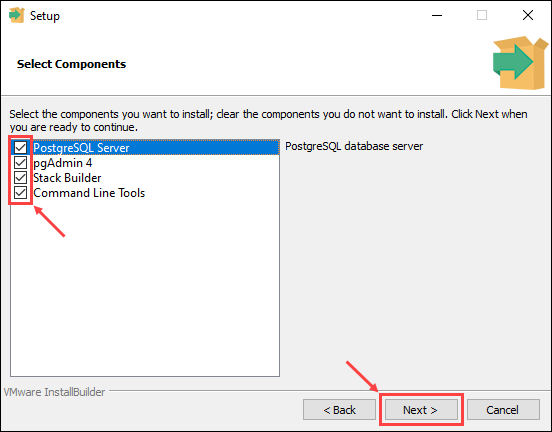
Once you check the boxes next to the components you want to install, click Next to continue.
4. Choose a database directory to store data and click Next to continue.

5. Enter and retype the password for the database superuser. Click Next to proceed.
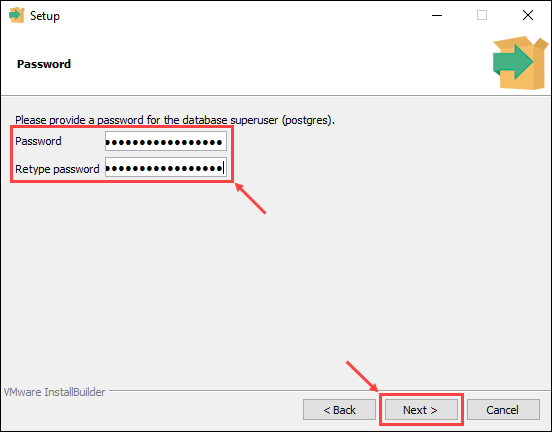
Note: PostgreSQL runs as a background process under a service called postgres. If you already have a service named postgres running, enter the password for that service account when prompted.
6. Enter the port number for the PostgreSQL server to listen on and click Next to continue.
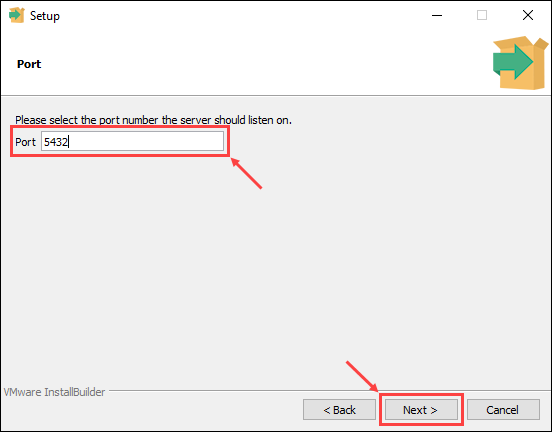
Note: The default port number for the PostgreSQL server is 5432. When entering a custom port number, make sure no other applications are using the port.
7. Choose the locale for the database to use. Selecting the [Default locale] option uses the locale settings for your operating system. Once you have chosen a locale, click Next to continue.
8. The last step offers a summary of the installation settings. Click Back if you want to change any of the settings you made, or click Next to proceed.
9. The setup wizard informs you it is ready to start the installation process. Click Next to begin installing PostgreSQL.
Connect to the PostgreSQL Database
You can verify the new PostgreSQL installation by connecting to the database using the SQL shell or the pgAdmin tool:
Connect to the PostgreSQL Database Using the SQL Shell (psql)
1. Open the SQL Shell (psql) in the PostgreSQL folder in the Start menu.
2. Enter the information for your database as defined during the setup process. Pressing Enter applies the default value, as shown in the square brackets.
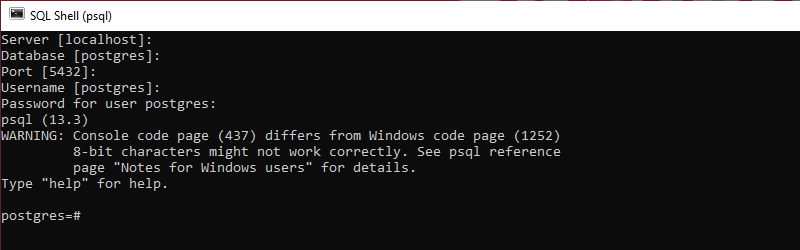
3. Verify the new database by using the command:
select version();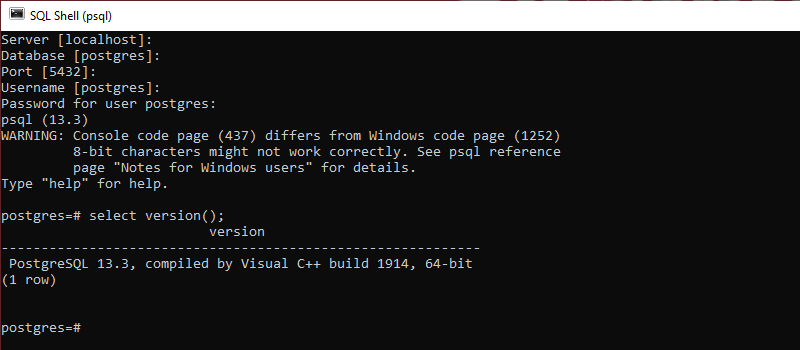
Connect to the PostgreSQL Database Using pgAdmin
1. Open the pgAdmin 4 tool from the PostgreSQL folder in the Start menu.
Note: pgAdmin requires you to set a master password at first launch.
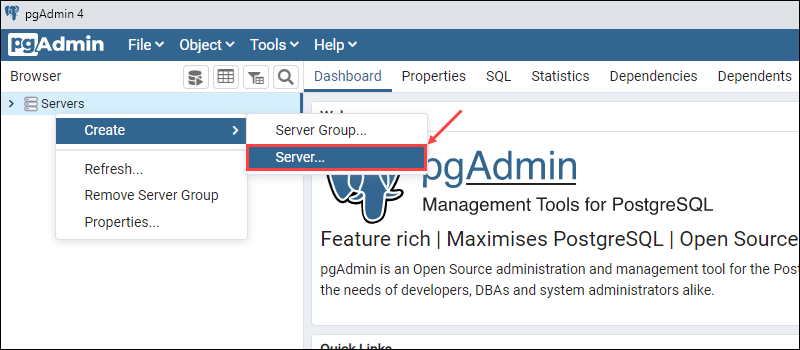
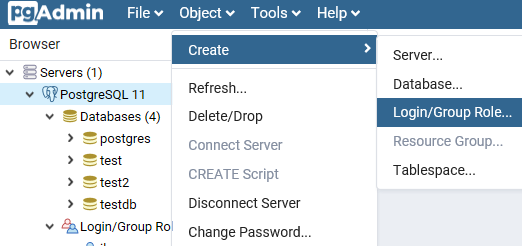
2. Right-click the Servers icon on the left-hand side. Select Create > Server to set up a new database server.
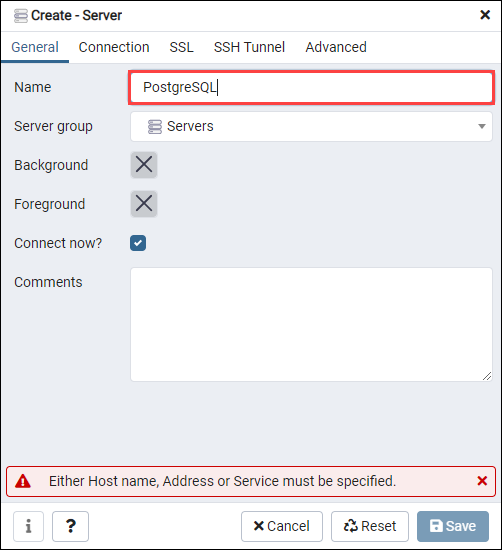
3. In the General tab, enter the name for the new database. In this example, we are using PostgreSQL as the database name.
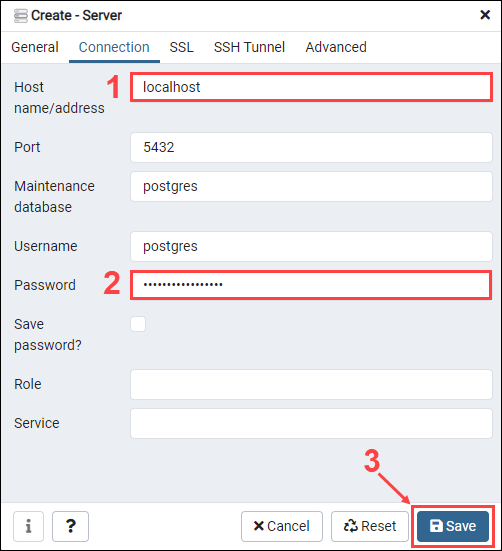
4. In the Connection tab, enter the hostname (default is localhost) and password selected during the setup process. Click Save to create the new database.
5. Expand the server display by clicking on the Servers > PostgreSQL icons on the left-hand side. Select the default postgres database.

6. In the Tools drop-down menu, click Query Tool to open the query editor.
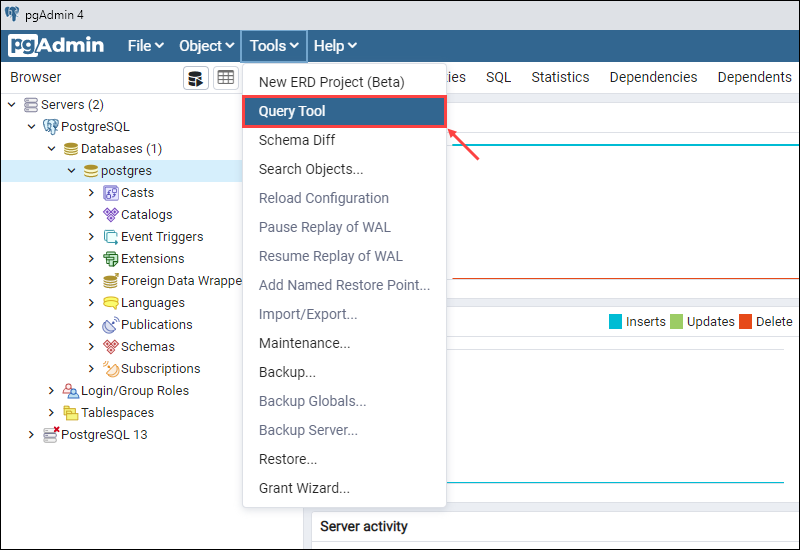
7. Verify the database in the query editor by entering the following command and clicking the Execute button:
select version();If the database is working properly, the current version of the database will appear in the Data Output section.
Conclusion
After following this tutorial, you should have PostgreSQL installed and working on your Windows system. You should also have your first PostgreSQL database set up and ready to use.
PostgreSQL — это бесплатная объектно-реляционная СУБД с мощным функционалом, который позволяет конкурировать с платными базами данных, такими как Microsoft SQL, Oracle. PostgreSQL поддерживает пользовательские данные, функции, операции, домены и индексы. В данной статье мы рассмотрим установку и краткий обзор по управлению базой данных PostgreSQL. Мы установим СУБД PostgreSQL в Windows 10, создадим новую базу, добавим в неё таблицы и настроим доступа для пользователей. Также мы рассмотрим основы управления PostgreSQL с помощью SQL shell и визуальной системы управления PgAdmin. Надеюсь эта статья станет хорошей отправной точкой для обучения работы с PostgreSQL и использованию ее в разработке и тестовых проектах.
Содержание:
- Установка PostgreSQL 11 в Windows 10
- Доступ к PostgreSQL по сети, правила файерволла
- Утилиты управления PostgreSQL через командную строку
- PgAdmin: Визуальный редактор для PostgresSQL
- Query Tool: использование SQL запросов в PostgreSQL
Установка PostgreSQL 11 в Windows 10
Для установки PostgreSQL перейдите на сайт https://www.postgresql.org и скачайте последнюю версию дистрибутива для Windows, на сегодняшний день это версия PostgreSQL 11 (в 11 версии PostgreSQL поддерживаются только 64-х битные редакции Windows). После загрузки запустите инсталлятор.

В процессе установки установите галочки на пунктах:
- PostgreSQL Server – сам сервер СУБД
- PgAdmin 4 – визуальный редактор SQL
- Stack Builder – дополнительные инструменты для разработки (возможно вам они понадобятся в будущем)
- Command Line Tools – инструменты командной строки
Установите пароль для пользователя postgres (он создается по умолчанию и имеет права суперпользователя).
По умолчание СУБД слушает на порту 5432, который нужно будет добавить в исключения в правилах фаерволла.
Нажимаете Далее, Далее, на этом установка PostgreSQL завершена.
Доступ к PostgreSQL по сети, правила файерволла
Чтобы разрешить сетевой доступ к вашему экземпляру PostgreSQL с других компьютеров, вам нужно создать правила в файерволе. Вы можете создать правило через командную строку или PowerShell.
Запустите командную строку от имени администратора. Введите команду:
netsh advfirewall firewall add rule name="Postgre Port" dir=in action=allow protocol=TCP localport=5432
- Где rule name – имя правила
- Localport – разрешенный порт
Либо вы можете создать правило, разрешающее TCP/IP доступ к экземпляру PostgreSQL на порту 5432 с помощью PowerShell:
New-NetFirewallRule -Name 'POSTGRESQL-In-TCP' -DisplayName 'PostgreSQL (TCP-In)' -Direction Inbound -Enabled True -Protocol TCP -LocalPort 5432
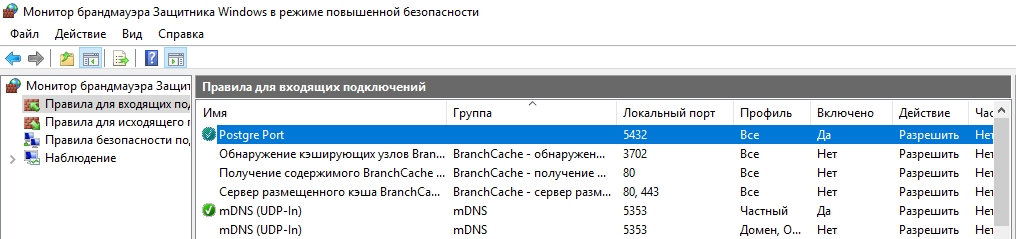
После применения команды в брандмауэре Windows появится новое разрешающее правило для порта Postgres.
Совет. Для изменения порта в установленной PostgreSQL отредактируйте файл postgresql.conf по пути C:Program FilesPostgreSQL11data.
Измените значение в пункте
port = 5432
. Перезапустите службу сервера postgresql-x64-11 после изменений. Можно перезапустить службу с помощью PowerShell:
Restart-Service -Name postgresql-x64-11

Более подробно о настройке параметров в конфигурационном файле postgresql.conf с помощью тюнеров смотрите в статье.
Утилиты управления PostgreSQL через командную строку
Рассмотрим управление и основные операции, которые можно выполнять с PostgreSQL через командную строку с помощью нескольких утилит. Основные инструменты управления PostgreSQL находятся в папке bin, потому все команды будем выполнять из данного каталога.
- Запустите командную строку.
Совет. Перед запуском СУБД, смените кодировку для нормального отображения в русской Windows 10. В командной строке выполните:
chcp 1251 - Перейдите в каталог bin выполнив команду:
CD C:Program FilesPostgreSQL11bin

Основные команды PostgreSQL:

PgAdmin: Визуальный редактор для PostgresSQL
Редактор PgAdmin служит для упрощения управления базой данных PostgresSQL в понятном визуальном режиме.
По умолчанию все созданные базы хранятся в каталоге base по пути C:Program FilesPostgreSQL11database.
Для каждой БД существует подкаталог внутри PGDATA/base, названный по OID базы данных в pg_database. Этот подкаталог по умолчанию является местом хранения файлов базы данных; в частности, там хранятся её системные каталоги. Каждая таблица и индекс хранятся в отдельном файле.
Для резервного копирования и восстановления лучше использовать инструмент Backup в панели инструментов Tools. Для автоматизации бэкапа PostgreSQL из командной строки используйте утилиту pg_dump.exe.
Query Tool: использование SQL запросов в PostgreSQL
Для написания SQL запросов в удобном графическом редакторе используется встроенный в pgAdmin инструмент Query Tool. Например, вы хотите создать новую таблицу в базе данных через инструмент Query Tool.
- Выберите базу данных, в панели Tools откройте Query Tool
- Создадим таблицу сотрудников:
CREATE TABLE employee
(
Id SERIAL PRIMARY KEY,
FirstName CHARACTER VARYING(30),
LastName CHARACTER VARYING(30),
Email CHARACTER VARYING(30),
Age INTEGER
);
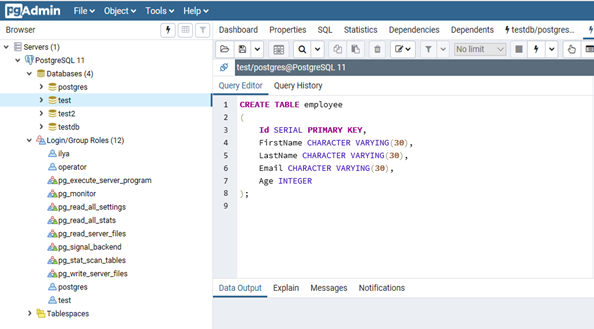
Id — номер сотрудника, которому присвоен ключ SERIAL. Данная строка будет хранить числовое значение 1, 2, 3 и т.д., которое для каждой новой строки будет автоматически увеличиваться на единицу. В следующих строках записаны имя, фамилия сотрудника и его электронный адрес, которые имеют тип CHARACTER VARYING(30), то есть представляют строку длиной не более 30 символов. В строке — Age записан возраст, имеет тип INTEGER, т.к. хранит числа.
После того, как написали код SQL запроса в Query Tool, нажмите клавишу F5 и в базе будет создана новая таблица employee.
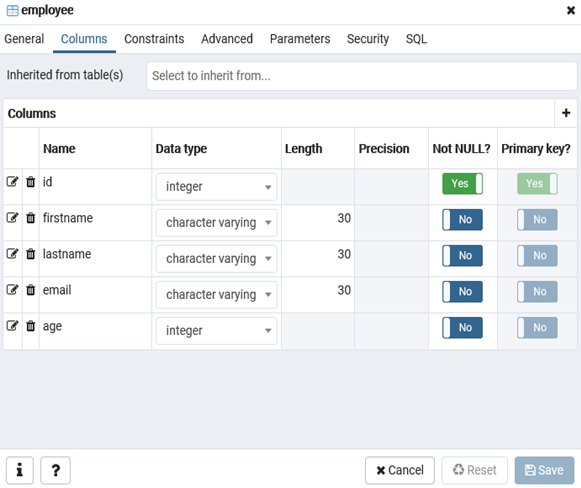
Для заполнения полей в свойствах таблицы выберите таблицу employee в разделе Schemas -> Tables. Откройте меню Object инструмент View/Edit Data.
Здесь вы можете заполнить данные в таблице.
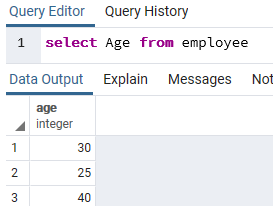
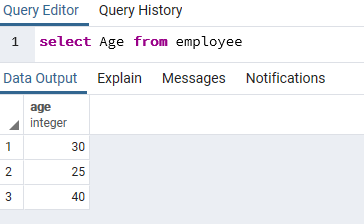
После заполнения данных выполним инструментом Query простой запрос на выборку:
select Age from employee;
Improve Article
Save Article
Improve Article
Save Article
This is a step-by-step guide to install PostgreSQL on a windows machine. Since PostgreSQL version 8.0, a window installer is available to make the installation process fairly easier.
We will be installing PostgreSQL version 11.3 on Windows 10 in this article.
There are three crucial steps for the installation of PostgreSQL as follows:
- Download PostgreSQL installer for Windows
- Install PostgreSQL
- Verify the installation
Downloading PostgreSQL Installer for Windows
You can download the latest stable PostgreSQL Installer specific to your Windows by clicking here
Installing the PostgreSQL installer
After downloading the installer double click on it and follow the below steps:
- Step 1: Click the Next button
- Step 2: Choose the installation folder, where you want PostgreSQL to be installed, and click on Next.
- Step 3: Select the components as per your requirement to install and click the Next button.
- Step 4: Select the database directory where you want to store the data an click on Next.
- Step 5: Set the password for the database superuser (Postgres)
- Step 6: Set the port for PostgreSQL. Make sure that no other applications are using this port. If unsure leave it to its default (5432) and click on Next.
- Step 7: Choose the default locale used by the database and click the Next button.
- Step 8: Click the Next button to start the installation.
- Wait for the installation to complete, it might take a few minutes.
- Step 9: Click the Finish button to complete the PostgreSQL installation.

Verifying the Installation of PostgreSQL
There are couple of ways to verify the installation of PostgreSQL like connecting to the database server using some client applications like pgAdmin or psql.
The quickest way though is to use the psql shell. For that follow the below steps:
- Step 1: Search for the psql shell in the windows search bar and open it.
- Step 2: Enter all the necessary information like the server, database, port, username, and
password and press Enter. - Step 3: Use the command SELECT version(); you will see the following result:
PostgreSQL is a free object-relational database management system able to compete with proprietary databases, like Microsoft SQL Server or Oracle. PostgreSQL supports user data, functions, operations, domains, and indexes. In this article, we’ll walk through the installation and brief overview of PostgreSQL database management. We will install PostgreSQL on Windows 10 computer, create a new database, add tables, and grant user access permissions. Also, we will show how to manage PostgreSQL using SQL shell and the visual PgAdmin tool. I hope this article will be a good starting point to learn PostgreSQL and use it in development or test projects.
Contents:
- How to Install PostgreSQL on Windows 10?
- Enable Remote Access to PostgreSQL Database
- Managing PostgreSQL Database from the Command Prompt
- PgAdmin: Graphical PostgreSQL Editor
- Using PostgreSQL Query Tool
How to Install PostgreSQL on Windows 10?
To install PostgreSQL, go to https://www.postgresql.org and download the latest version of the distribution for Windows. Today it is PostgreSQL 14 (it supports 64-bit Windows versions only). Then run the installer.
Check the following options during the installation:
- PostgreSQL Server – a database server;
- PgAdmin 4 – visual SQL editor;
- Stack Builder – additional developer tools (you may need them later);
- Command Line Tools.
Set a password for postgres user (it is created by default and has superuser privileges).

By default, the PostgreSQL database instance listens on port TCP 5432. You must add it to the exceptions list in your firewall.
Click Next, Next, and the installation of PostgreSQL is over.
Enable Remote Access to PostgreSQL Database
To allow network access to your PostgreSQL instance from remote computers, you need to create firewall rules. You can create a rule using a command line or PowerShell.
Run the command prompt as administrator. Enter the command below:
netsh advfirewall firewall add rule name="PostgreSQL" dir=in action=allow protocol=TCP localport=5432
- where rule name is a rule name
- localport is the allowed port number
Or, you can create a firewall rule allowing access to your PostgreSQL instance on port 5432 using PowerShell:
New-NetFirewallRule -Name 'POSTGRESQL-In-TCP' -DisplayName 'PostgreSQL (TCP-In)' -Direction Inbound -Enabled True -Protocol TCP -LocalPort 5432
After the command is applied, a new inbound rule for PostgreSQL port will appear in the Microsoft Defender Firewall.
Tip. To change the port number for an installed PostgreSQL instance, edit postgresql.conf in C:Program FilesPostgreSQL14data.
Change the value in port = 5432. Then restart your postgresql-x64-14 server service. You can restart the service using PowerShell:
Restart-Service -Name postgresql-x64-14
Learn more about how to configure PostgreSQL options in postgresql.conf using tuners.
Managing PostgreSQL Database from the Command Prompt
Let’s see how to manage PostgreSQL using the command prompt tools. The main PostgreSQL management tools are located in bin folder, so we will run all commands from this directory.
Run the command prompt and change to the bin directory:
CD "C:Program FilesPostgreSQL14bin"
Basic PostgreSQL commands:
- Check the PostrgreSQL version:
psql –V - Use the createdb command to create a new database:
createdb -U postgres testdb(where postgres is a super-user, testdb is a new database name). Enter the super-user password; - To view a list of active databases:
Psql -U postgres –l(password) - Create a new user:
createuser –U postgres myuser1(where myuser1 is a new user name); - Grant superuser privileges to the new user (don’t do this in a production deployment). Run the interactive PostgreSQL management shell:
psql –U postgres. Grant the privileges:ALTER ROLE operator SUPERUSER CREATEROLE CREATEDB;Now your user can create roles and databases; - To display a list of users and roles in PostgreSQL, run the command:
du
PgAdmin: Graphical PostgreSQL Editor
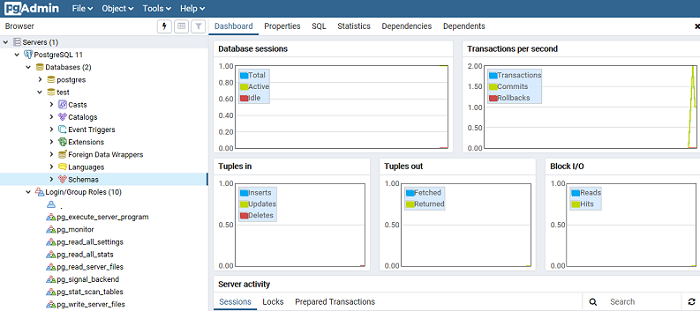
PgAdmin makes it easier to manage a PostgreSQL database in an intuitive visual mode.
To run the editor, click PgAdmin 4 in the Start menu and enter postgres (super-user) password.
Expand a list of active databases in the Servers pane.
You can quickly create a new user or group and grant them some privileges. To do it, open Object -> Create -> Create Login/Group.
To create a new database, just select Database in Object -> Create. Enter the database name and the owner.
By default, all PostrgeSQL databases are stored in base directory located in C:Program FilesPostgreSQL14database.
Each database has a sub-directory inside PGDATA/base named by the database OID in pg_database. By default, the database files are stored in the sub-directory. Each table and index are stored in a separate file.
To backup and restore the database, it is better to use the Backup option in the Tools menu. To backup PostgreSQL automatically, use the pg_dump.exe command prompt tool.
Using PostgreSQL Query Tool
To create SQL queries in the graphical editor, pgAdmin has the built Query Tool. For example, you want to create a new table in a database using Query Tool.
- Select a database and open Query Tool in the Tools menu.
- Create an employee table:
CREATE TABLE employee

(

Id SERIAL PRIMARY KEY,

FirstName CHARACTER VARYING(30),

LastName CHARACTER VARYING(30),

Email CHARACTER VARYING(30),

Age INTEGER

);
Idis the number of employee the SERIAL key is assigned to. This field contains a numerical value (1, 2, 3, etc.) that is increased by one with each new line. The next fields contain an employee’s first name and last name, their email address, and have a CHARACTER VARYING(30) type (30 characters max). TheAgefield contains an employee’s age and has an INTEGER type since it stores numbers. - After you have written the SQL query code in the Query Tool, press F5, and a new table (employee) will be created in the database;
- To fill in the fields in the table, select the employee table in Schemas -> Tables. Click View/Edit Data in the Object menu. Here you can fill in the data in the table;
- Then run a simple select SQL query using the Query Tool:
select Age from employee;