Introduction
psql is the standard command line interface for interacting with a PostgreSQL or TimescaleDB instance. Here we explain how to install psql on various platforms.
Before you start
Before you start, you should confirm that you don’t already have psql installed. In fact, if you’ve ever installed Postgres or TimescaleDB before, you likely already have psql installed.
psql --versionInstall on MacOS using Homebrew
First, install the Brew Package Manager
Second, update brew. From your command line, run the following commands:
brew doctor
brew update
brew install libpq
Finally, symlink psql (and other libpq tools) into /usr/local/bin:
brew link --force libpqInstall on Ubuntu 16.04,18.04 and Debian 9,10
Install on Ubuntu and Debian using the apt package manager:
sudo apt-get update
sudo apt-get install postgresql-client
Note: This only installs the psql client and not the PostgreSQL database.
Install Windows 10
We recommend using the installer from PostgreSQL.org.
Last step: Connect to your PostgreSQL server
Let’s confirm that psql is installed:
psql --versionNow, in order to connect to your PostgreSQL server, we’ll need the following connection params:
- Hostname
- Port
- Username
- Password
- Database name
There are two ways to use these params.
Option 1:
psql -h [HOSTNAME] -p [PORT] -U [USERNAME] -W -d [DATABASENAME]Once you run that command, the prompt will ask you for your password. (Which we specified with the -W flag.)
Option 2:
psql postgres://[USERNAME]:[PASSWORD]@[HOSTNAME]:[PORT]/[DATABASENAME]?sslmode=requireCongrats! Now you have connected via psql.
If you haven’t yet, you can head over to our documentation page and find out more about TimescaleDB, our open-source extension that makes PostgreSQL scalable.
The open-source relational database for time-series and analytics.
Published Oct 3, 2018
Today’s tip is how to have a lean mean PostgreSQL client machine by only installing the needed tools. Why install all of PostgreSQL when your database server is up in the cloud, managed like a Compose PostgreSQL.
Most instructions for installing the PostgreSQL tools assume you want the database installed too. It’s a reasonable assumption if you’re dealing with users who don’t have access to PostgreSQL in the cloud or on a remote server.
So, in this PostgreSQL Tip, we’ll look at how you can install just psql on Windows, Linux and macOS, allowing you to quickly get up and running and connected to your Compose PostgreSQL service. We’ll cover:
- macOS with Homebrew
- Ubuntu 16.04 and 18.04
- Red Hat Enterprise Linux 7 (and others)
- Fedora 27 and 28
- Windows 10
Let’s dive in.
macOS with Homebrew
We recommend Homebrew as a package manager for macOS. With Homebrew in place you’ll be able to install numerous applications, usually with the programs available in /usr/local/bin. Homebrew’s package for the PostgreSQL client tools is the libpq package. Brew makes it easy to install:
brew install libpq
There’s a small catch though: libpq won’t install itself in the /usr/local/bin directory. To make that happen, you need to run:
brew link --force libpq
Which will symlink all the tools, not just libpq, into the /usr/local/bin directory. You’re ready to run psql and start connecting now.
Ubuntu 16.04 and 18.04
Linux systems, unlike macOS, have a package manager built in. For Ubuntu (and Debian-based distributions) thats’s the apt command. The PostgreSQL client is distributed in the appositely named postgresql-client so all you need to do is run:
sudo apt-get install postgresql-client
This will install the PostgreSQL 10 client, which can happily connect to earlier versions of PostgreSQL.
Red Hat Enterprise Linux 7 (and others)
For Red Hat Enterprise Linux (or RHEL as it’s usually written), there’s a little more set up to do than Ubuntu. For RHEL, the package manager is yum. First, you need to point yum at the PostgreSQL repository like this:
sudo yum install https://download.postgresql.org/pub/repos/yum/10/redhat/rhel-7-x86_64/pgdg-redhat10-10-2.noarch.rpm
Yum goes to that URL and configures itself to use that package repository. With that done, you can add packages from it by name:
sudo yum install postgresql10
This installs just the client packages. If you are wondering where to find that repository URL, head to Linux Downloads (Red Hat Family) where you’ll find a form which will let you select the PostgreSQL version, platform and architecture and it’ll give you the appropriate instructions for that Red Hat variant — that includes CentOS, Scientific Linux, and Oracle Enterprise Linux. It also includes Fedora but read on…
Fedora 27 and 28
Fedora’s default repositories already have a PostgreSQL client available from them. So For Fedora 27 and 28 and later, install the PostgreSQL client from the terminal with:
sudo dnf install postgresql.x86_64
and that’s all you need to do.
Windows 10
On Windows 10, there’s a bit more work to be done. We currently recommend using the PostgreSQL installer from Enterprise DB. It’s a full installation package for PostgreSQL on Windows but you can set it to only install the command line tools like psql. Click on that link and select PostgreSQL 9.6 or 10 and Windows 10 as the platform. Once the executable file is downloaded, run it and you’ll see the following options:

Select only the «Command Line Tools» because we don’t need the server installed. After it installs, you’ll need to set up your Windows environment variables so that you can use the psql client in the command prompt.
Go to the Control Panel > System and Security > System and select Advanced system settings.

From there you’ll see a box called System Properties. Select Environment Variables. A window will appear with the two sets of environment variables. In the top set, marked «User variables for…» select the PATH entry and then click the Edit button. An edit window will appear. Click New and add the path to the psql client. Your path will depend on where PostgreSQL installed, but typically that would be:
C:Program FilesPostgreSQL10bin

After that, click OK a couple of times to go back to the desktop. Start a new Command Prompt and you should be able to run psql. With no server set and no server running locally, you’ll see the following which means that it’s working.

Start Connecting …
We’ve covered setting up the PostgreSQL client for multiple platforms so start connecting. If you have suggestions on what you’d like to see covered in our next PostgreSQL Tips, drop us a line to articles@compose.com and we’ll see how we can tip you too.
attribution Jan Kahánek via Unsplash
Install only the necessary tools for a lean, mean PostgreSQL client machine
Why install all of PostgreSQL when your database server is up in the cloud, managed as an IBM Cloud Database for PostgreSQL?
Most instructions for installing the PostgreSQL tools assume you want the database installed too. It’s a reasonable assumption if you’re dealing with users who don’t have access to PostgreSQL in the cloud or on a remote server.
In this PostgreSQL Tip, we’ll look at how you can install just psql on Windows, Linux, and macOS, allowing you to quickly get up and running and connected to your IBM Cloud Databases (ICD) for PostgreSQL service. We’ll cover the following:
-
macOS with Homebrew
-
Ubuntu 16.04 and 18.04
-
Red Hat Enterprise Linux 7 (and others)
-
Fedora 27 and 28
-
Windows 10
Let’s dive in.
macOS with Homebrew
We recommend Homebrew as a package manager for macOS. With Homebrew in place, you’ll be able to install numerous applications, usually with the programs available in /usr/local/bin. Homebrew’s package for the PostgreSQL client tools is the libpq package. Brew makes it easy to install:
brew install libpq
There’s a small catch though—libpq won’t install itself in the /usr/local/bin directory. To make that happen, you need to run:
brew link --force libpq
This will symlink all the tools (not just libpq) into the /usr/local/bin directory. You’re now ready to run psql and start connecting.
Ubuntu 16.04 and 18.04
Linux systems (unlike macOS) have a package manager built in. For Ubuntu (and Debian-based distributions) thats’s the apt command. The PostgreSQL client is distributed in the appositely named postgresql-client, so all you need to do is run the following:
sudo apt-get install postgresql-client
This will install the PostgreSQL 10 client, which can easily connect to earlier versions of PostgreSQL.
Red Hat Enterprise Linux 7 (and others)
For Red Hat Enterprise Linux (RHEL), there’s a little more set up to do than with Ubuntu. For RHEL, the package manager is yum. First, you need to point yum at the PostgreSQL repository like this:
sudo yum install https://download.postgresql.org/pub/repos/yum/10/redhat/rhel-7-x86_64/pgdg-redhat10-10-2.noarch.rpm
Yum goes to that URL and configures itself to use that package repository. With that done, you can add packages from it by name:
sudo yum install postgresql10
This installs just the client packages. If you are wondering where to find that repository URL, head to Linux Downloads (Red Hat Family). You’ll find a form which will let you select the PostgreSQL version, platform, and architecture, and it’ll give you the appropriate instructions for that Red Hat variant—that includes CentOS, Scientific Linux, and Oracle Enterprise Linux. It also includes Fedora.
Fedora 27 and 28
Fedora’s default repositories already have a PostgreSQL client available from them. So, for Fedora 27, 28, and later, install the PostgreSQL client from the terminal with:
sudo dnf install postgresql.x86_64
And that’s all you need to do!
Windows 10
On Windows 10, there’s a bit more work to be done. We currently recommend using the PostgreSQL installer from Enterprise DB. It’s a full installation package for PostgreSQL on Windows but you can set it to only install the command line tools like psql. Click on that link and select PostgreSQL 9.6 or 10 and Windows 10 as the platform. Once the executable file is downloaded, run it and you’ll see the following options:

Select only the Command Line Tools because we don’t need the server installed. After it installs, you’ll need to set up your Windows environment variables so that you can use the psql client in the command prompt.
Go to the Control Panel > System and Security > System and select Advanced system settings.

From there, you’ll see a box called System Properties. Select Environment Variables. A window will appear with the two sets of environment variables. In the top set (marked User variables for…), select the PATH entry and then click the Edit button. An edit window will appear. Click New and add the path to the psql client. Your path will depend on where PostgreSQL installed, but typically that would be:
C:Program FilesPostgreSQL10bin

After that, click OK a couple of times to go back to the desktop. Start a new Command Prompt, and you should be able to run psql. With no server set and no server running locally, you’ll see the following, which means that it’s working:

Summing up
Now that we’ve covered getting set up with the psql client for PostgreSQL, you can start connecting to IBM Cloud Databases for PostgreSQL without having to install PostgreSQL itself on your local machine. In future PostgreSQL Tips, we’ll cover some of the basic features and functions of the database using your new psql client.
Learn more about IBM Cloud Databases for PostgreSQL
Unfortunately there is no real client «only» installer.
What you can do, is to download the ZIP archive of the complete Postgres binaries:
http://www.enterprisedb.com/products-services-training/pgbindownload
and then remove the «server» part from it.
When you unzip it, you get the following directories:
bin
doc
include
lib
pgAdmin III
share
StackBuilder
symbols
You can remove the doc, include, pgAdmin III, StackBuilder and symbols directories. As far as I can tell (but I am not sure) the client also doesn’t need the share or lib directories, but you would need to test that. So that leaves only the bin directory.
I think the share directory could be needed for localized error messages in psql but I’m not sure about that.
Inside the bin directory you can essentially remove all .exe files (except psql.exe of course). You can also remove all wx*.dll files, they are only needed for pgAdmin. The libxml2.dll and libxslt.dll are also only needed for the server.
If you do want some of the other client tools, you might want to keep
- pg_dump.exe
- pg_dumpall.exe
- pg_restore.exe
One drawback of this approach is that this requires the Visual C++ Redistributable to be installed. But you can overcome that as well by simply putting the MSVCR120.DLL from some computer where it is installed into the bin directory.
So that leaves you with these files (from the bin directory) that are required for the psql client:
- iconv.dll (libiconv-2.dll in newer Postgres versions)
- libeay32.dll
- libintl-8.dll
- libpq.dll
- msvcr120.dll
- ssleay32.dll
- zlib1.dll
- psql.exe
Of course you can also take all that from an existing Postgres installation without the need to download the ZIP archive.
It is obviously not a real installer, but if you put the cleaned up directory into a ZIP file, you can distribute that and whoever needs it just unzips the archive. Personally I find unzip to be the best «installer» anyway (I also use that to install the Postgres server, the Windows installer just has too many quirks)
PostgreSQL — это бесплатная объектно-реляционная СУБД с мощным функционалом, который позволяет конкурировать с платными базами данных, такими как Microsoft SQL, Oracle. PostgreSQL поддерживает пользовательские данные, функции, операции, домены и индексы. В данной статье мы рассмотрим установку и краткий обзор по управлению базой данных PostgreSQL. Мы установим СУБД PostgreSQL в Windows 10, создадим новую базу, добавим в неё таблицы и настроим доступа для пользователей. Также мы рассмотрим основы управления PostgreSQL с помощью SQL shell и визуальной системы управления PgAdmin. Надеюсь эта статья станет хорошей отправной точкой для обучения работы с PostgreSQL и использованию ее в разработке и тестовых проектах.
Содержание:
- Установка PostgreSQL 11 в Windows 10
- Доступ к PostgreSQL по сети, правила файерволла
- Утилиты управления PostgreSQL через командную строку
- PgAdmin: Визуальный редактор для PostgresSQL
- Query Tool: использование SQL запросов в PostgreSQL
Установка PostgreSQL 11 в Windows 10
Для установки PostgreSQL перейдите на сайт https://www.postgresql.org и скачайте последнюю версию дистрибутива для Windows, на сегодняшний день это версия PostgreSQL 11 (в 11 версии PostgreSQL поддерживаются только 64-х битные редакции Windows). После загрузки запустите инсталлятор.

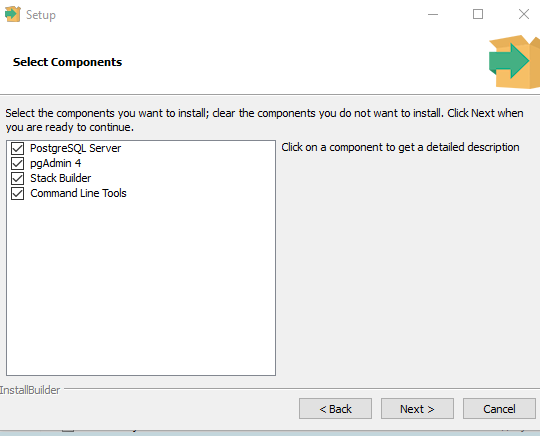
В процессе установки установите галочки на пунктах:
- PostgreSQL Server – сам сервер СУБД
- PgAdmin 4 – визуальный редактор SQL
- Stack Builder – дополнительные инструменты для разработки (возможно вам они понадобятся в будущем)
- Command Line Tools – инструменты командной строки
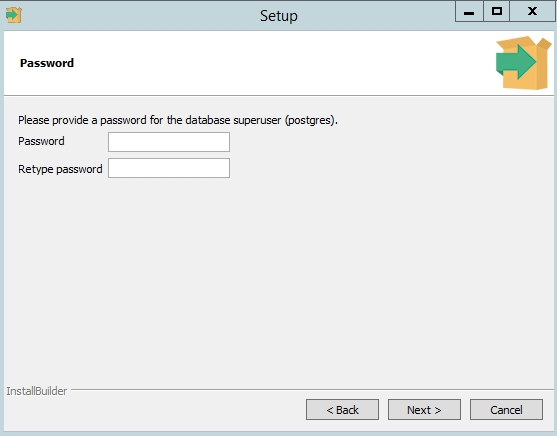
Установите пароль для пользователя postgres (он создается по умолчанию и имеет права суперпользователя).
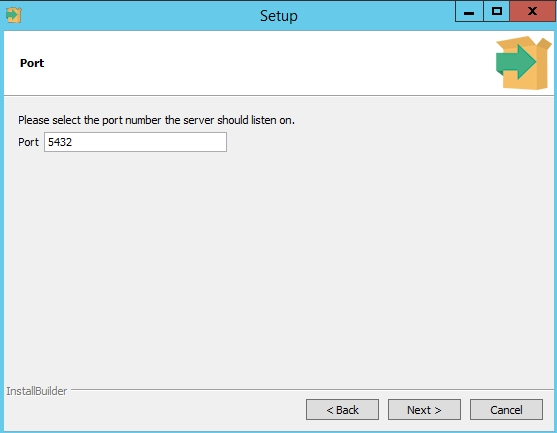
По умолчание СУБД слушает на порту 5432, который нужно будет добавить в исключения в правилах фаерволла.
Нажимаете Далее, Далее, на этом установка PostgreSQL завершена.
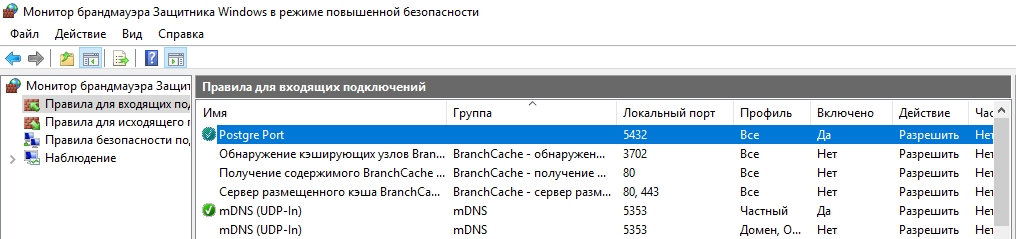
Доступ к PostgreSQL по сети, правила файерволла
Чтобы разрешить сетевой доступ к вашему экземпляру PostgreSQL с других компьютеров, вам нужно создать правила в файерволе. Вы можете создать правило через командную строку или PowerShell.
Запустите командную строку от имени администратора. Введите команду:
netsh advfirewall firewall add rule name="Postgre Port" dir=in action=allow protocol=TCP localport=5432
- Где rule name – имя правила
- Localport – разрешенный порт
Либо вы можете создать правило, разрешающее TCP/IP доступ к экземпляру PostgreSQL на порту 5432 с помощью PowerShell:
New-NetFirewallRule -Name 'POSTGRESQL-In-TCP' -DisplayName 'PostgreSQL (TCP-In)' -Direction Inbound -Enabled True -Protocol TCP -LocalPort 5432
После применения команды в брандмауэре Windows появится новое разрешающее правило для порта Postgres.
Совет. Для изменения порта в установленной PostgreSQL отредактируйте файл postgresql.conf по пути C:Program FilesPostgreSQL11data.
Измените значение в пункте
port = 5432
. Перезапустите службу сервера postgresql-x64-11 после изменений. Можно перезапустить службу с помощью PowerShell:
Restart-Service -Name postgresql-x64-11

Более подробно о настройке параметров в конфигурационном файле postgresql.conf с помощью тюнеров смотрите в статье.
Утилиты управления PostgreSQL через командную строку
Рассмотрим управление и основные операции, которые можно выполнять с PostgreSQL через командную строку с помощью нескольких утилит. Основные инструменты управления PostgreSQL находятся в папке bin, потому все команды будем выполнять из данного каталога.
- Запустите командную строку.
Совет. Перед запуском СУБД, смените кодировку для нормального отображения в русской Windows 10. В командной строке выполните:
chcp 1251 - Перейдите в каталог bin выполнив команду:
CD C:Program FilesPostgreSQL11bin

Основные команды PostgreSQL:

PgAdmin: Визуальный редактор для PostgresSQL
Редактор PgAdmin служит для упрощения управления базой данных PostgresSQL в понятном визуальном режиме.
По умолчанию все созданные базы хранятся в каталоге base по пути C:Program FilesPostgreSQL11database.
Для каждой БД существует подкаталог внутри PGDATA/base, названный по OID базы данных в pg_database. Этот подкаталог по умолчанию является местом хранения файлов базы данных; в частности, там хранятся её системные каталоги. Каждая таблица и индекс хранятся в отдельном файле.
Для резервного копирования и восстановления лучше использовать инструмент Backup в панели инструментов Tools. Для автоматизации бэкапа PostgreSQL из командной строки используйте утилиту pg_dump.exe.
Query Tool: использование SQL запросов в PostgreSQL
Для написания SQL запросов в удобном графическом редакторе используется встроенный в pgAdmin инструмент Query Tool. Например, вы хотите создать новую таблицу в базе данных через инструмент Query Tool.
- Выберите базу данных, в панели Tools откройте Query Tool
- Создадим таблицу сотрудников:
CREATE TABLE employee
(
Id SERIAL PRIMARY KEY,
FirstName CHARACTER VARYING(30),
LastName CHARACTER VARYING(30),
Email CHARACTER VARYING(30),
Age INTEGER
);
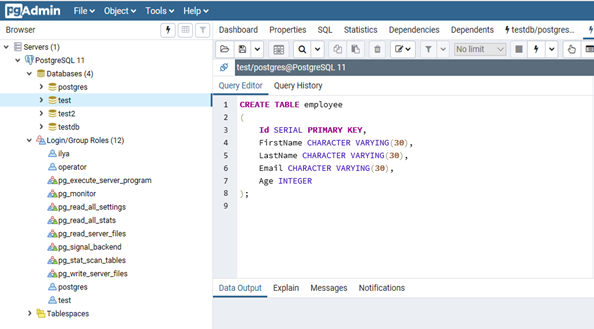
Id — номер сотрудника, которому присвоен ключ SERIAL. Данная строка будет хранить числовое значение 1, 2, 3 и т.д., которое для каждой новой строки будет автоматически увеличиваться на единицу. В следующих строках записаны имя, фамилия сотрудника и его электронный адрес, которые имеют тип CHARACTER VARYING(30), то есть представляют строку длиной не более 30 символов. В строке — Age записан возраст, имеет тип INTEGER, т.к. хранит числа.
После того, как написали код SQL запроса в Query Tool, нажмите клавишу F5 и в базе будет создана новая таблица employee.
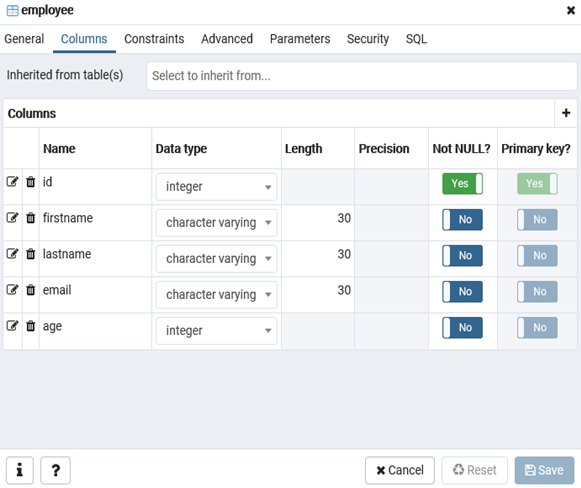
Для заполнения полей в свойствах таблицы выберите таблицу employee в разделе Schemas -> Tables. Откройте меню Object инструмент View/Edit Data.
Здесь вы можете заполнить данные в таблице.
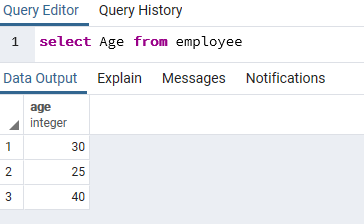
После заполнения данных выполним инструментом Query простой запрос на выборку:
select Age from employee;
Summary: in this tutorial, you will step by step learn how to install PostgreSQL on your local system.
- Install PostgreSQL on macOS
- Install PostgreSQL on Linux
PostgreSQL was developed for UNIX-like platforms, however, it was designed to be portable. It means that PostgreSQL can also run on other platforms such as macOS, Solaris, and Windows.
Since version 8.0, PostgreSQL offers an installer for Windows systems that makes the installation process easier and faster. For development purposes, we will install PostgreSQL version 12 on Windows 10.
There are three steps to complete the PostgreSQL installation:
- Download PostgreSQL installer for Windows
- Install PostgreSQL
- Verify the installation
1) Download PostgreSQL Installer for Windows
First, you need to go to the download page of PostgreSQL installers on the EnterpriseDB.
Second, click the download link as shown below:
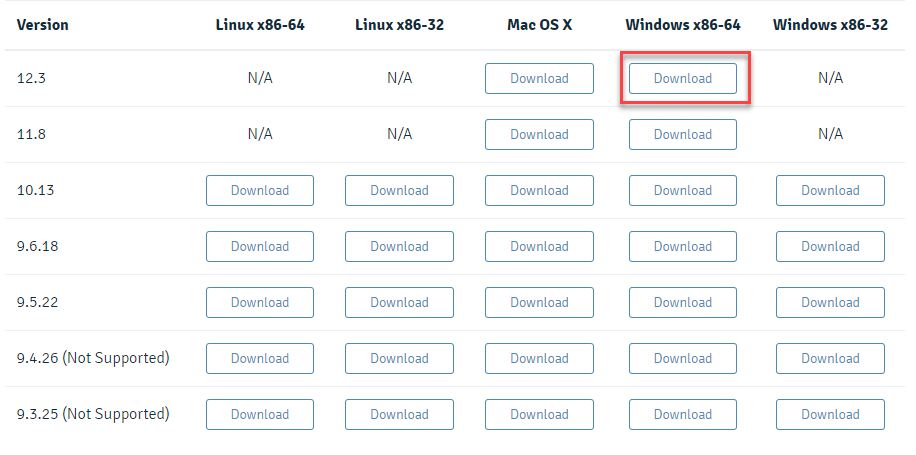
It will take a few minutes to complete the download.
2) Install PostgreSQL on Window step by step
To install PostgreSQL on Windows, you need to have administrator privileges.
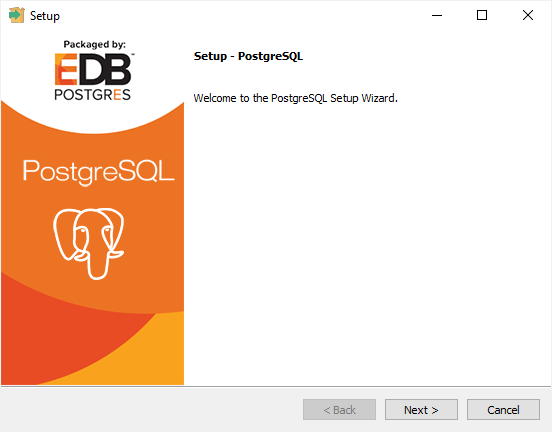
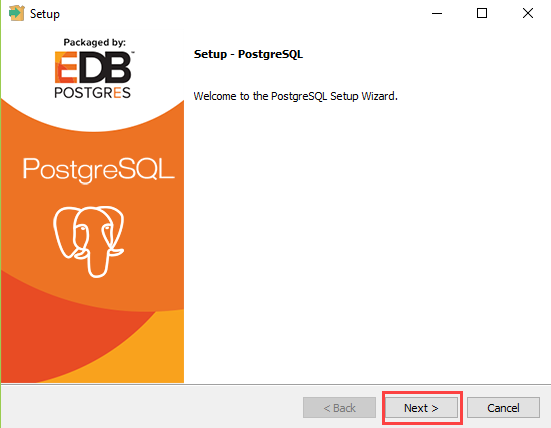
Step 1. Double click on the installer file, an installation wizard will appear and guide you through multiple steps where you can choose different options that you would like to have in PostgreSQL.
Step 2. Click the Next button
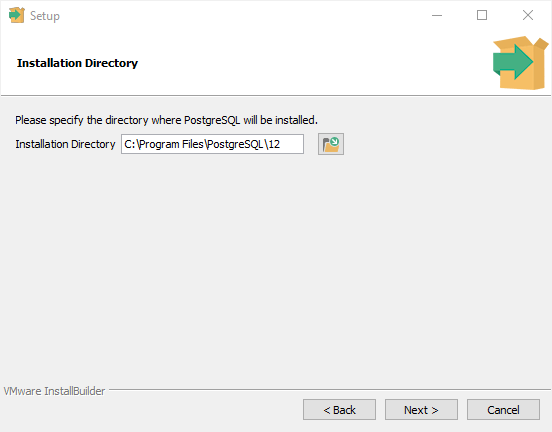
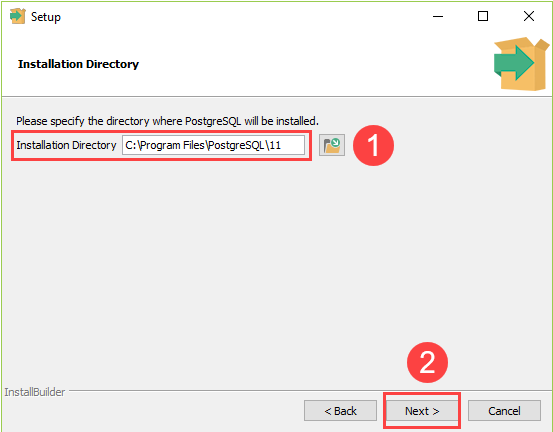
Step 3. Specify installation folder, choose your own or keep the default folder suggested by PostgreSQL installer and click the Next button
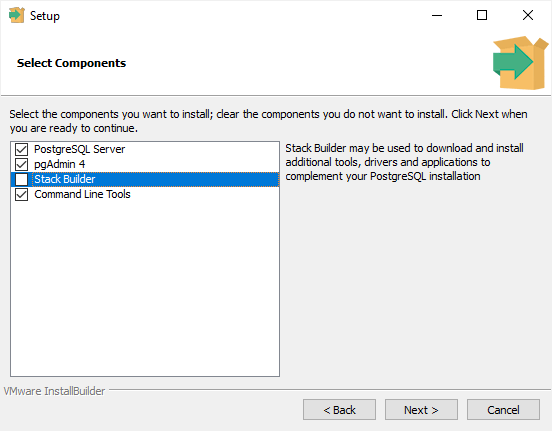
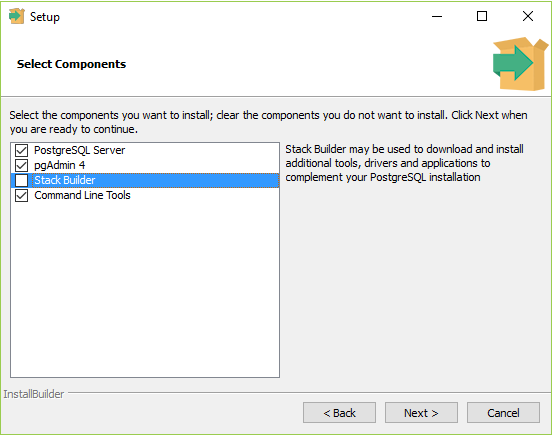
Step 4. Select software components to install:
- The PostgreSQL Server to install the PostgreSQL database server
- pgAdmin 4 to install the PostgreSQL database GUI management tool.
- Command Line Tools to install command-line tools such as psql, pg_restore, etc. These tools allow you to interact with the PostgreSQL database server using the command-line interface.
- Stack Builder provides a GUI that allows you to download and install drivers that work with PostgreSQL.
For the tutorial on this website, you don’t need to install Stack Builder so feel free to uncheck it and click the Next button to select the data directory:
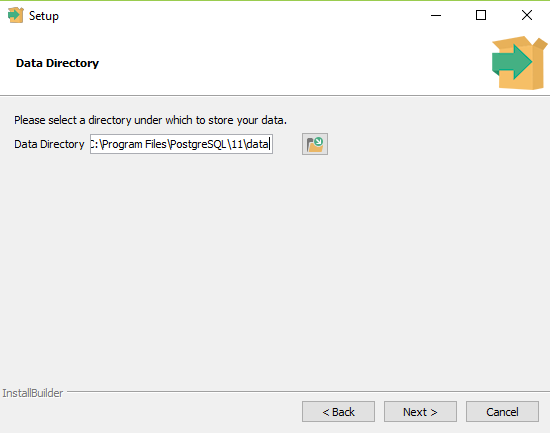
Step 5. Select the database directory to store the data or accept the default folder. And click the Next button to go to the next step:

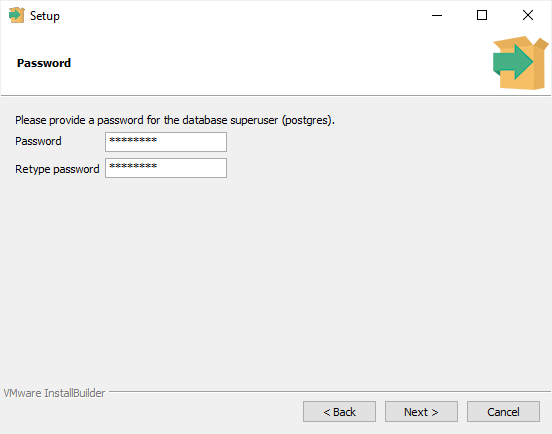
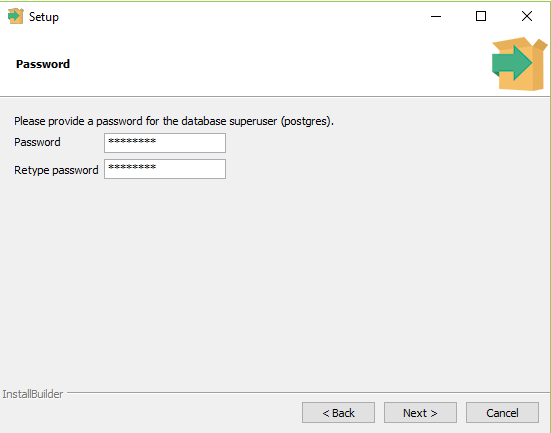
Step 6. Enter the password for the database superuser (postgres)
PostgreSQL runs as a service in the background under a service account named postgres. If you already created a service account with the name postgres, you need to provide the password of that account in the following window.
After entering the password, you need to retype it to confirm and click the Next button:
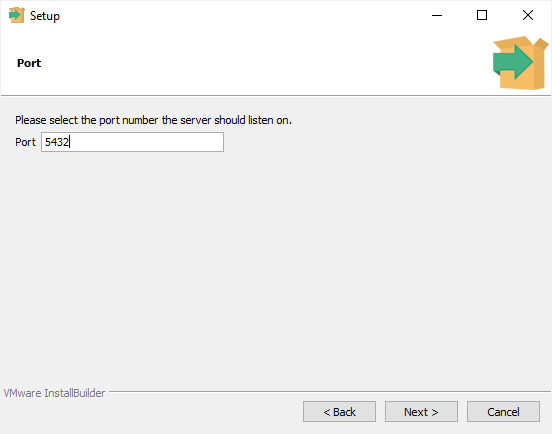
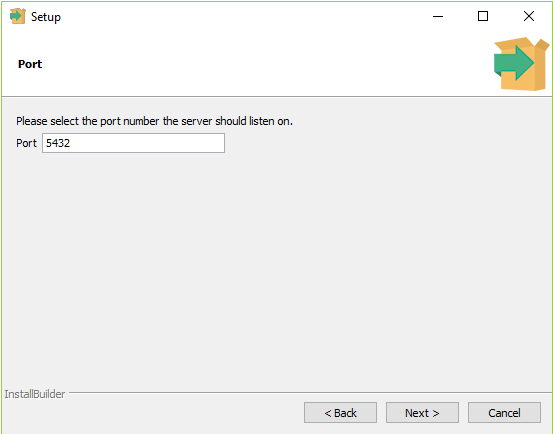
Step 7. Enter a port number on which the PostgreSQL database server will listen. The default port of PostgreSQL is 5432. You need to make sure that no other applications are using this port.
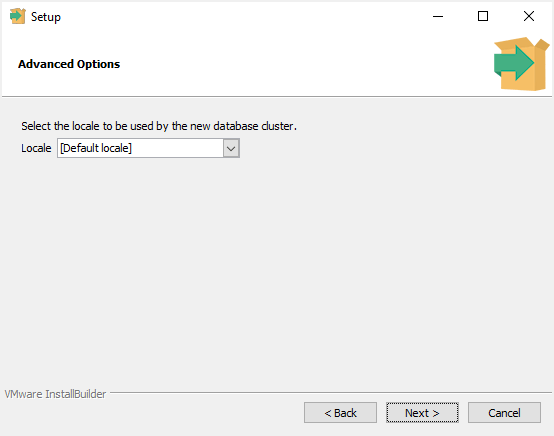
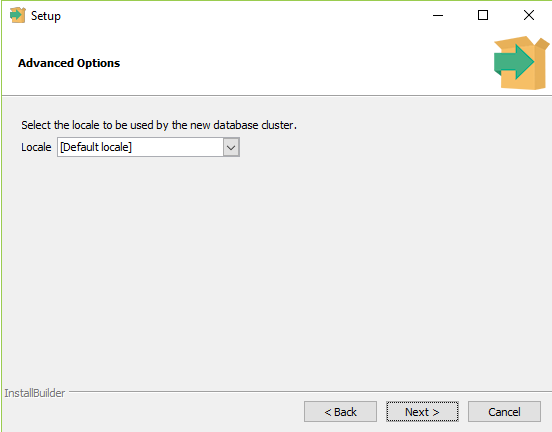
Step 8. Choose the default locale used by the PostgreSQL database. If you leave it as default locale, PostgreSQL will use the operating system locale. After that click the Next button.
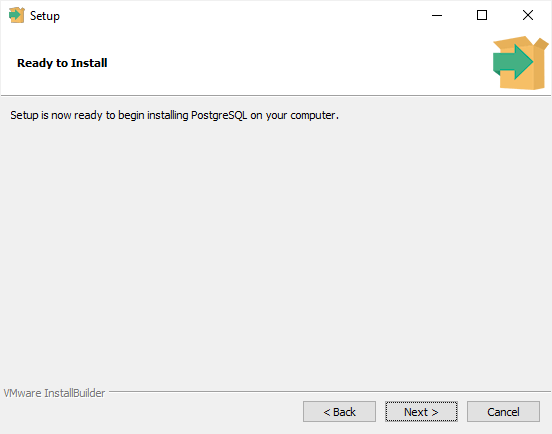
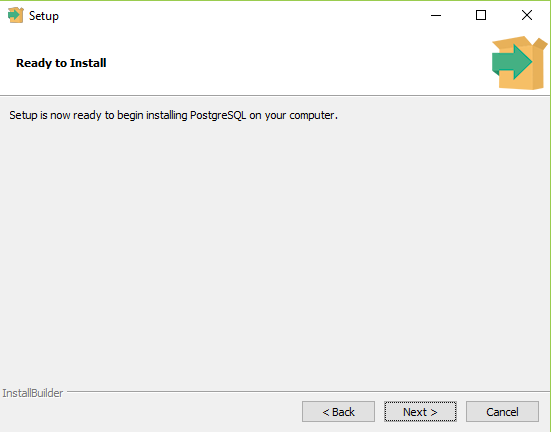
Step 9. The setup wizard will show the summary information of PostgreSQL. You need to review it and click the Next button if everything is correct. Otherwise, you need to click the Back button to change the configuration accordingly.
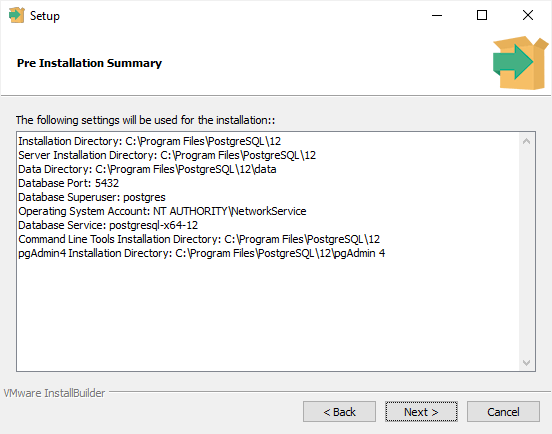
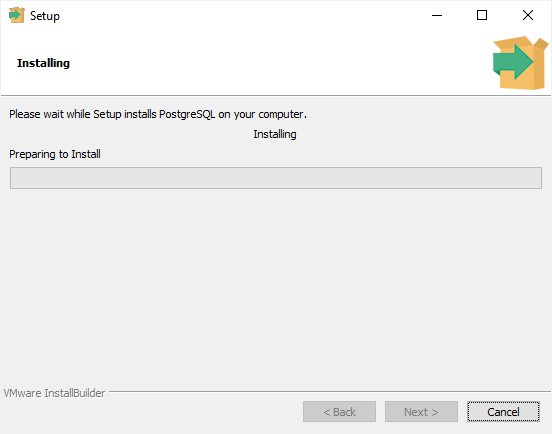
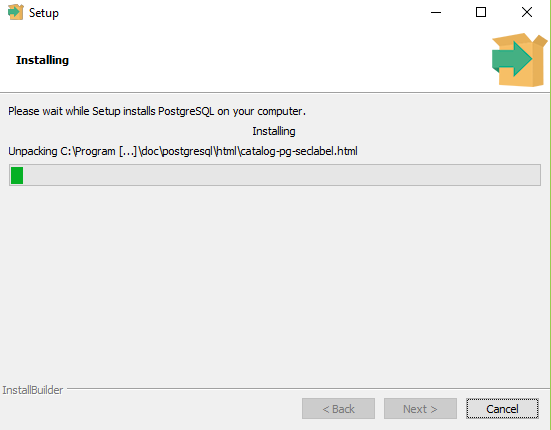
Now, you’re ready to install PostgreSQL on your computer. Click the Next button to begin installing PostgreSQL.
The installation may take a few minutes to complete.
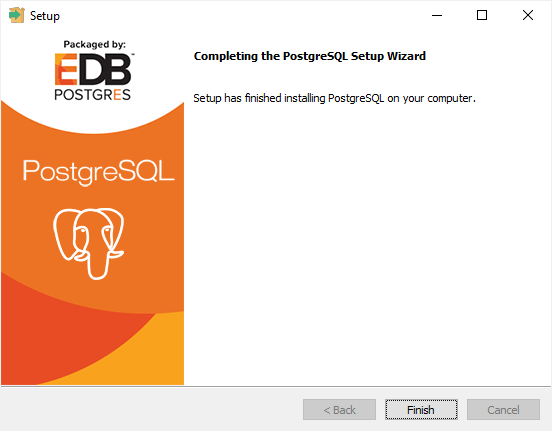
Step 10. Click the Finish button to complete the PostgreSQL installation.
3) Verify the Installation
There are several ways to verify the PostgreSQL installation. You can try to connect to the PostgreSQL database server from any client application e.g., psql and pgAdmin.
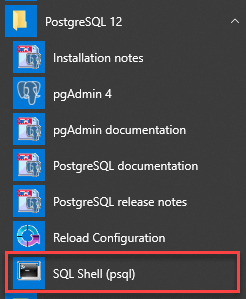
The quick way to verify the installation is through the psql program.
First, click the psql application to launch it. The psql command-line program will display.
Second, enter all the necessary information such as the server, database, port, username, and password. To accept the default, you can press Enter. Note that you should provide the password that you entered during installing the PostgreSQL.
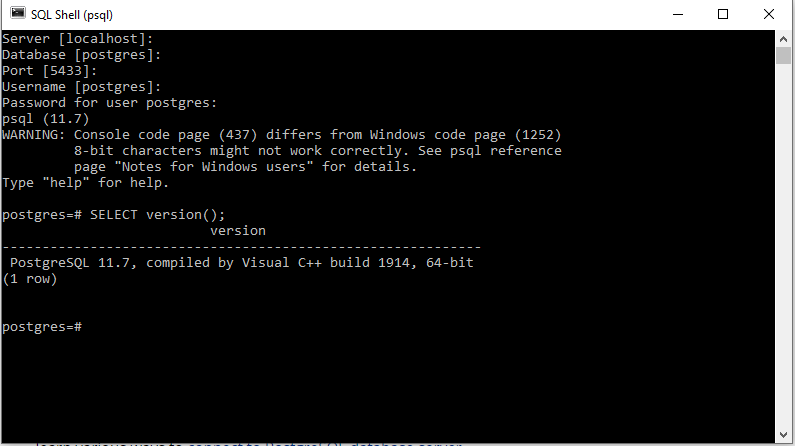
Code language: Shell Session (shell)
Server [localhost]: Database [postgres]: Port [5432]: Username [postgres]: Password for user postgres: psql (12.3) WARNING: Console code page (437) differs from Windows code page (1252) 8-bit characters might not work correctly. See psql reference page "Notes for Windows users" for details. Type "help" for help. postgres=#
Third, issue the command SELECT version(); you will see the following output:
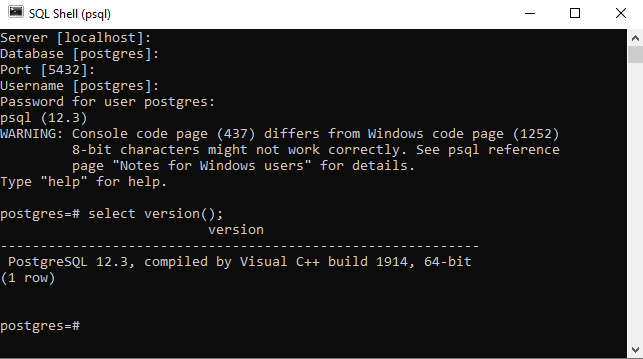
Congratulation! you’ve successfully installed PostgreSQL database server on your local system. Let’s learn various ways to connect to PostgreSQL database server.
Was this tutorial helpful ?
Improve Article
Save Article
Improve Article
Save Article
This is a step-by-step guide to install PostgreSQL on a windows machine. Since PostgreSQL version 8.0, a window installer is available to make the installation process fairly easier.
We will be installing PostgreSQL version 11.3 on Windows 10 in this article.
There are three crucial steps for the installation of PostgreSQL as follows:
- Download PostgreSQL installer for Windows
- Install PostgreSQL
- Verify the installation
Downloading PostgreSQL Installer for Windows
You can download the latest stable PostgreSQL Installer specific to your Windows by clicking here
Installing the PostgreSQL installer
After downloading the installer double click on it and follow the below steps:
- Step 1: Click the Next button
- Step 2: Choose the installation folder, where you want PostgreSQL to be installed, and click on Next.
- Step 3: Select the components as per your requirement to install and click the Next button.
- Step 4: Select the database directory where you want to store the data an click on Next.
- Step 5: Set the password for the database superuser (Postgres)
- Step 6: Set the port for PostgreSQL. Make sure that no other applications are using this port. If unsure leave it to its default (5432) and click on Next.
- Step 7: Choose the default locale used by the database and click the Next button.
- Step 8: Click the Next button to start the installation.
- Wait for the installation to complete, it might take a few minutes.
- Step 9: Click the Finish button to complete the PostgreSQL installation.

Verifying the Installation of PostgreSQL
There are couple of ways to verify the installation of PostgreSQL like connecting to the database server using some client applications like pgAdmin or psql.
The quickest way though is to use the psql shell. For that follow the below steps:
- Step 1: Search for the psql shell in the windows search bar and open it.
- Step 2: Enter all the necessary information like the server, database, port, username, and
password and press Enter. - Step 3: Use the command SELECT version(); you will see the following result: