Psycopg is a PostgreSQL adapter for the Python programming language. It is a
wrapper for the libpq, the official PostgreSQL client library.
Quick Install
For most operating systems, the quickest way to install Psycopg is using the
wheel package available on PyPI:
$ pip install psycopg2-binary
This will install a pre-compiled binary version of the module which does not
require the build or runtime prerequisites described below. Make sure to use
an up-to-date version of pip (you can upgrade it using something
like pip install -U pip).
You may then import the psycopg2 package, as usual:
import psycopg2

# Connect to your postgres DB
conn = psycopg2.connect("dbname=test user=postgres")

# Open a cursor to perform database operations
cur = conn.cursor()

# Execute a query
cur.execute("SELECT * FROM my_data")

# Retrieve query results
records = cur.fetchall()
psycopg vs psycopg-binary
The psycopg2-binary package is meant for beginners to start playing
with Python and PostgreSQL without the need to meet the build
requirements.
If you are the maintainer of a published package depending on psycopg2
you shouldn’t use psycopg2-binary as a module dependency. For
production use you are advised to use the source distribution.
The binary packages come with their own versions of a few C libraries,
among which libpq and libssl, which will be used regardless of other
libraries available on the client: upgrading the system libraries will not
upgrade the libraries used by psycopg2. Please build psycopg2 from
source if you want to maintain binary upgradeability.
Warning
The psycopg2 wheel package comes packaged, among the others, with its
own libssl binary. This may create conflicts with other extension
modules binding with libssl as well, for instance with the Python
ssl module: in some cases, under concurrency, the interaction between
the two libraries may result in a segfault. In case of doubts you are
advised to use a package built from source.
Change in binary packages between Psycopg 2.7 and 2.8
In version 2.7.x, pip install psycopg2 would have tried to install
automatically the binary package of Psycopg. Because of concurrency problems
binary packages have displayed, psycopg2-binary has become a separate
package, and from 2.8 it has become the only way to install the binary
package.
If you are using Psycopg 2.7 and you want to disable the use of wheel binary
packages, relying on the system libraries available on your client, you
can use the pip --no-binary option, e.g.:
$ pip install --no-binary :all: psycopg2
which can be specified in your requirements.txt files too, e.g. use:
psycopg2>=2.7,<2.8 --no-binary psycopg2
to use the last bugfix release of the psycopg2 2.7 package, specifying to
always compile it from source. Of course in this case you will have to meet
the build prerequisites.
Prerequisites
The current psycopg2 implementation supports:
-
Python versions from 3.6 to 3.11
-
PostgreSQL server versions from 7.4 to 15
-
PostgreSQL client library version from 9.1
Note
Not all the psycopg2 versions support all the supported Python versions.
Please see the release notes to verify when the support for
a new Python version was added and when the support for an old Python
version was removed.
Build prerequisites
The build prerequisites are to be met in order to install Psycopg from source
code, from a source distribution package, GitHub or from PyPI.
Psycopg is a C wrapper around the libpq PostgreSQL client library. To install
it from sources you will need:
-
A C compiler.
-
The Python header files. They are usually installed in a package such as
python-dev or python3-dev. A message such as error: Python.h: No
such file or directory is an indication that the Python headers are
missing. -
The libpq header files. They are usually installed in a package such as
libpq-dev. If you get an error: libpq-fe.h: No such file or directory
you are missing them. -
The pg_config program: it is usually installed by the
libpq-dev package but sometimes it is not in aPATHdirectory.
Having it in thePATHgreatly streamlines the installation, so try
runningpg_config --version: if it returns an error or an unexpected
version number then locate the directory containing the pg_config
shipped with the right libpq version (usually
/usr/lib/postgresql/X.Y/bin/) and add it to thePATH:$ export PATH=/usr/lib/postgresql/X.Y/bin/:$PATH
You only need pg_config to compile
psycopg2, not for its
regular usage.
Once everything is in place it’s just a matter of running the standard:
or, from the directory containing the source code:
$ python setup.py build
$ python setup.py install
Runtime requirements
Unless you compile psycopg2 as a static library, or you install it from a
self-contained wheel package, it will need the libpq library at runtime
(usually distributed in a libpq.so or libpq.dll file). psycopg2
relies on the host OS to find the library if the library is installed in a
standard location there is usually no problem; if the library is in a
non-standard location you will have to tell Psycopg how to find it,
which is OS-dependent (for instance setting a suitable
LD_LIBRARY_PATH on Linux).
Note
The libpq header files used to compile psycopg2 should match the
version of the library linked at runtime. If you get errors about missing
or mismatching libraries when importing psycopg2 check (e.g. using
ldd) if the module psycopg2/_psycopg.so is linked to the
right libpq.so.
Note
Whatever version of libpq psycopg2 is compiled with, it will be
possible to connect to PostgreSQL servers of any supported version: just
install the most recent libpq version or the most practical, without
trying to match it to the version of the PostgreSQL server you will have
to connect to.
Non-standard builds
If you have less standard requirements such as:
-
creating a debug build,
-
using pg_config not in the
PATH,
then take a look at the setup.cfg file.
Some of the options available in setup.cfg are also available as command
line arguments of the build_ext sub-command. For instance you can specify
an alternate pg_config location using:
$ python setup.py build_ext --pg-config /path/to/pg_config build
Use python setup.py build_ext --help to get a list of the options
supported.
Creating a debug build
In case of problems, Psycopg can be configured to emit detailed debug
messages, which can be very useful for diagnostics and to report a bug. In
order to create a debug package:
-
Download and unpack the Psycopg source package (the
.tar.gz
package). -
Edit the
setup.cfgfile adding thePSYCOPG_DEBUGflag to the
defineoption. -
Compile and install the package.
-
Set the
PSYCOPG_DEBUGenvironment variable:
-
Run your program (making sure that the
psycopg2package imported is the
one you just compiled and not e.g. the system one): you will have a copious
stream of informations printed on stderr.
Non-standard Python Implementation
The psycopg2 package is the current mature implementation of the adapter: it
is a C extension and as such it is only compatible with CPython. If you want
to use Psycopg on a different Python implementation (PyPy, Jython, IronPython)
there is a couple of alternative:
-
a Ctypes port, but it is not as mature as the C implementation yet
and it is not as feature-complete; -
a CFFI port which is currently more used and reported more efficient on
PyPy, but please be careful of its version numbers because they are not
aligned to the official psycopg2 ones and some features may differ.
Running the test suite
Once psycopg2 is installed you can run the test suite to verify it is
working correctly. From the source directory, you can run:
$ python -c "import tests; tests.unittest.main(defaultTest='tests.test_suite')" --verbose
The tests run against a database called psycopg2_test on UNIX socket and
the standard port. You can configure a different database to run the test by
setting the environment variables:
-
PSYCOPG2_TESTDB -
PSYCOPG2_TESTDB_HOST -
PSYCOPG2_TESTDB_PORT -
PSYCOPG2_TESTDB_USER
The database should already exist before running the tests.
If you still have problems
Try the following. In order:
-
Read again the Build prerequisites.
-
Read the FAQ.
-
Google for
psycopg2your error message. Especially useful the week
after the release of a new OS X version. -
Write to the Mailing List.
-
If you think that you have discovered a bug, test failure or missing feature
please raise a ticket in the bug tracker. -
Complain on your blog or on Twitter that
psycopg2is the worst package
ever and about the quality time you have wasted figuring out the correct
ARCHFLAGS. Especially useful from the Starbucks near you.
I’m using virtualenv and I need to install «psycopg2».
I have done the following:
pip install http://pypi.python.org/packages/source/p/psycopg2/psycopg2-2.4.tar.gz#md5=24f4368e2cfdc1a2b03282ddda814160
And I have the following messages:
Downloading/unpacking http://pypi.python.org/packages/source/p/psycopg2/psycopg2
-2.4.tar.gz#md5=24f4368e2cfdc1a2b03282ddda814160
  Downloading psycopg2-2.4.tar.gz (607Kb): 607Kb downloaded
  Running setup.py egg_info for package from http://pypi.python.org/packages/sou
rce/p/psycopg2/psycopg2-2.4.tar.gz#md5=24f4368e2cfdc1a2b03282ddda814160
    Error: pg_config executable not found.

    Please add the directory containing pg_config to the PATH
    or specify the full executable path with the option:

        python setup.py build_ext --pg-config /path/to/pg_config build ...

    or with the pg_config option in 'setup.cfg'.
    Complete output from command python setup.py egg_info:
    running egg_info

creating pip-egg-infopsycopg2.egg-info

writing pip-egg-infopsycopg2.egg-infoPKG-INFO

writing top-level names to pip-egg-infopsycopg2.egg-infotop_level.txt

writing dependency_links to pip-egg-infopsycopg2.egg-infodependency_links.txt

writing manifest file 'pip-egg-infopsycopg2.egg-infoSOURCES.txt'

warning: manifest_maker: standard file '-c' not found

Error: pg_config executable not found.


Please add the directory containing pg_config to the PATH

or specify the full executable path with the option:


    python setup.py build_ext --pg-config /path/to/pg_config build ...


or with the pg_config option in 'setup.cfg'.

----------------------------------------
Command python setup.py egg_info failed with error code 1
Storing complete log in C:Documents and SettingsanlopesApplication Datapipp
ip.log
My question, I only need to do this to get the psycopg2 working?
python setup.py build_ext --pg-config /path/to/pg_config build ...
![]()
Mazdak
103k18 gold badges158 silver badges186 bronze badges
asked Mar 24, 2011 at 14:33
![]()
3
Note: Since a while back, there are binary wheels for Windows in PyPI, so this should no longer be an issue for Windows users. Below are solutions for Linux, Mac users, since lots of them find this post through web searches.
Option 1
Install the psycopg2-binary PyPI package instead, it has Python wheels for Linux and Mac OS.
pip install psycopg2-binary
Option 2
Install the prerequsisites for building the psycopg2 package from source:
Debian/Ubuntu
Python 3
sudo apt install libpq-dev python3-dev
You might need to install python3.8-dev or similar for e.g. Python 3.8.
Python 2
sudo apt install libpq-dev python-dev
If that’s not enough, try
sudo apt install build-essential
or
sudo apt install postgresql-server-dev-all
as well before installing psycopg2 again.
CentOS 6
See Banjer’s answer
macOS
See nichochar’s answer
answered Mar 27, 2011 at 15:25
![]()
joarjoar
14.5k1 gold badge28 silver badges53 bronze badges
24
On CentOS, you need the postgres dev packages:
sudo yum install python-devel postgresql-devel
That was the solution on CentOS 6 at least.
![]()
Andomar
229k46 gold badges371 silver badges396 bronze badges
answered Oct 31, 2012 at 13:03
![]()
BanjerBanjer
7,9884 gold badges46 silver badges61 bronze badges
6
If you’re on a mac you can use homebrew
brew install postgresql
And all other options are here: http://www.postgresql.org/download/macosx/
![]()
Dharman♦
29.3k21 gold badges79 silver badges131 bronze badges
answered Oct 31, 2013 at 16:26
![]()
nichocharnichochar
2,6601 gold badge17 silver badges16 bronze badges
3
On Mac Mavericks with Postgres.app version 9.3.2.0 RC2 I needed to use the following code after installing Postgres:
sudo PATH=$PATH:/Applications/Postgres.app/Contents/Versions/9.3/bin pip install psycopg2
answered Dec 22, 2013 at 1:51
![]()
metasequoiametasequoia
6,8925 gold badges41 silver badges54 bronze badges
9
I recently configured psycopg2 on a windows machine. The easiest install is using a windows executable binary. You can find it at http://stickpeople.com/projects/python/win-psycopg/.
To install the native binary in a virtual envrionment, use easy_install:
C:virtualenvScripts> activate.bat
(virtualenv) C:virtualenvScripts> easy_install psycopg2-2.5.win32-py2.7-pg9.2.4-release.exe
![]()
jpmc26
27.5k12 gold badges92 silver badges146 bronze badges
answered Mar 24, 2011 at 15:01
![]()
Praveen GollakotaPraveen Gollakota
35.9k10 gold badges61 silver badges61 bronze badges
8
For Python 3 you should use sudo apt-get install libpq-dev python3-dev under Debian.
answered Oct 3, 2012 at 18:39
![]()
AndréAndré
1,9821 gold badge22 silver badges26 bronze badges
1
This is what worked for me (On RHEL, CentOS:
sudo yum install postgresql postgresql-devel python-devel
And now include the path to your postgresql binary dir with you pip install:
sudo PATH=$PATH:/usr/pgsql-9.3/bin/ pip install psycopg2
Make sure to include the correct path. Thats all 
UPDATE: For python 3, please install python3-devel instead of python-devel
answered Nov 20, 2014 at 15:14
![]()
radtekradtek
33.1k11 gold badges141 silver badges110 bronze badges
4
The answers so far are too much like magic recipes. The error that you received tells you that pip cannot find a needed part of the PostgreSQL Query library. Possibly this is because you have it installed in a non-standard place for your OS which is why the message suggests using the —pg-config option.
But a more common reason is that you don’t have libpq installed at all. This commonly happens on machines where you do NOT have PostgreSQL server installed because you only want to run client apps, not the server itself. Each OS/distro is different, for instance on Debian/Ubuntu you need to install libpq-dev. This allows you to compile and link code against the PostgreSQL Query library.
Most of the answers also suggest installing a Python dev library. Be careful. If you are only using the default Python installed by your distro, that will work, but if you have a newer version, it could cause problems. If you have built Python on this machine then you already have the dev libraries needed for compiling C/C++ libraries to interface with Python. As long as you are using the correct pip version, the one installed in the same bin folder as the python binary, then you are all set. No need to install the old version.
answered Jan 17, 2015 at 19:41
![]()
Michael DillonMichael Dillon
31.7k5 gold badges70 silver badges105 bronze badges
1
If you using Mac OS, you should install PostgreSQL from source.
After installation is finished, you need to add this path using:
export PATH=/local/pgsql/bin:$PATH
or you can append the path like this:
export PATH=.../:usr/local/pgsql/bin
in your .profile file or .zshrc file.
This maybe vary by operating system.
You can follow the installation process from http://www.thegeekstuff.com/2009/04/linux-postgresql-install-and-configure-from-source/
answered Apr 2, 2012 at 7:22
![]()
attomosattomos
1,1023 gold badges15 silver badges30 bronze badges
2
On Debian/Ubuntu:
First install and build dependencies of psycopg2 package:
# apt-get build-dep python-psycopg2
Then in your virtual environment, compile and install psycopg2 module:
(env)$ pip install psycopg2
answered Sep 6, 2015 at 14:27
![]()
Omid RahaOmid Raha
9,5241 gold badge59 silver badges64 bronze badges
0
Run below commands and you should be fine
$ apt-get update
$ apt install python3-dev libpq-dev
$ pip3 install psycopg2
![]()
Xeoth
1,1131 gold badge12 silver badges22 bronze badges
answered Jun 18, 2021 at 11:04
![]()
ChanceChance
3393 silver badges7 bronze badges
1
I’ve done this before where in windows you install first into your base python installation.
Then, you manually copy the installed psycopg2 to the virtualenv install.
It’s not pretty, but it works.
answered Feb 27, 2012 at 3:35
![]()
monkutmonkut
41.2k24 gold badges122 silver badges149 bronze badges
3
Before you can install psycopg2 you will need to install the python-dev package.
If you’re working from Linux (and possibly other systems but i can’t speak from experience) you will need to make sure to be quite exact about what version of python your running when installing the dev package.
For example when I used the command:
sudo apt-get install python3-dev
I still ran into the same error when trying to
pip install psycopg2
As I am using python 3.7 I needed to use the command
sudo apt-get install python3.7-dev
Once I did this I ran into no more issues. Obviously if your on python version 3.5 you would change that 7 to a 5.
answered May 20, 2019 at 14:42
![]()
GinoGino
95517 silver badges27 bronze badges
2
Besides installing the required packages, I also needed to manually add PostgreSQL bin directory to PATH.
$vi ~/.bash_profile
Add PATH=/usr/pgsql-9.2/bin:$PATH before export PATH.
$source ~/.bash_profile
$pip install psycopg2
answered Mar 30, 2013 at 9:51
![]()
2
For MacOS,
Use the below command to install psycopg2, works like charm!!!
env LDFLAGS="-I/usr/local/opt/openssl/include -L/usr/local/opt/openssl/lib" pip install psycopg2
answered Sep 25, 2020 at 6:51
![]()
HedgerHedger
1121 silver badge6 bronze badges
On windows XP you get this error if postgres is not installed …
answered Mar 14, 2012 at 12:42
![]()
Sam JosephSam Joseph
4,4944 gold badges30 silver badges46 bronze badges
2
I installed Postgresql92 using the RedHat / CentOS repository on PG’s downloads site http://www.postgresql.org/download/linux/redhat/
To get pg_config, I had to add /usr/pgsql-9.2/bin to PATH.
answered Sep 27, 2013 at 15:24
![]()
joedborgjoedborg
17.2k32 gold badges82 silver badges116 bronze badges
On Fedora 24: For Python 3.x
sudo dnf install postgresql-devel python3-devel

sudo dnf install redhat-rpm-config
Activate your Virtual Environment:
pip install psycopg2
answered Oct 11, 2016 at 2:09
![]()
Rajkumar RRajkumar R
7531 gold badge10 silver badges27 bronze badges
Psycopg2 Depends on Postgres Libraries.
On Ubuntu You can use:
apt-get install libpq-dev
Then:
pip install psycopg2
answered Jun 23, 2015 at 6:55
![]()
Manish GuptaManish Gupta
4,35816 gold badges53 silver badges103 bronze badges
1
I’ve been battling with this for days, and have finally figured out how to get the «pip install psycopg2» command to run in a virtualenv in Windows (running Cygwin).
I was hitting the «pg_config executable not found.» error, but I had already downloaded and installed postgres in Windows. It installed in Cygwin as well; running «which pg_config» in Cygwin gave «/usr/bin/pg_config», and running «pg_config» gave sane output — however the version installed with Cygwin is:
VERSION = PostgreSQL 8.2.11
This won’t work with the current version of psycopg2, which appears to require at least 9.1. When I added «c:Program FilesPostgreSQL9.2bin» to my Windows path, the Cygwin pip installer was able to find the correct version of PostgreSQL, and I was able to successfully install the module using pip. (This is probably preferable to using the Cygwin version of PostgreSQL anyway, as the native version will run much quicker).
answered Sep 26, 2012 at 3:31
![]()
SymmetricSymmetric
4,2865 gold badges32 silver badges49 bronze badges
On OpenSUSE 13.2, this fixed it:
sudo zypper in postgresql-devel
answered Jul 1, 2015 at 18:19
![]()
ElliottElliott
1,29112 silver badges12 bronze badges
For lowly Windows users were stuck having to install psycopg2 from the link below, just install it to whatever Python installation you have setup. It will place the folder named «psycopg2» in the site-packages folder of your python installation.
After that, just copy that folder to the site-packages directory of your virtualenv and you will have no problems.
here is the link you can find the executable to install psycopg2
http://www.lfd.uci.edu/~gohlke/pythonlibs/
answered Dec 21, 2014 at 21:33
![]()
Chris HawkesChris Hawkes
11.6k6 gold badges57 silver badges65 bronze badges
1
On Ubuntu I just needed the postgres dev package:
sudo apt-get install postgresql-server-dev-all
*Tested in a virtualenv
answered Jan 4, 2016 at 14:47
![]()
marcanuymarcanuy
22.5k9 gold badges63 silver badges113 bronze badges
I could install it in a windows machine and using Anaconda/Spyder with python 2.7 through the following commands:
!pip install psycopg2
Then to establish the connection to the database:
 import psycopg2
 conn = psycopg2.connect(dbname='dbname',host='host_name',port='port_number', user='user_name', password='password')
answered Apr 11, 2016 at 8:52
![]()
1
In Arch base distributions:
sudo pacman -S python-psycopg2
pip2 install psycopg2  # Use pip or pip3 to python3
answered Jul 9, 2016 at 9:29
![]()
iraj jelodariiraj jelodari
2,9983 gold badges35 silver badges45 bronze badges
On OSX 10.11.6 (El Capitan)
brew install postgresql
PATH=$PATH:/Library/PostgreSQL/9.4/bin pip install psycopg2
answered Feb 24, 2017 at 23:35
![]()
iNoobiNoob
1,3753 gold badges18 silver badges47 bronze badges
2
On OSX with macports:
sudo port install postgresql96
export PATH=/opt/local/lib/postgresql96/bin:$PATH
answered Mar 17, 2017 at 14:07
![]()
if pip is not working than you can download .whl file from here https://pypi.python.org/pypi/psycopg2
extract it..
than python setup.py install
answered Jan 23, 2018 at 12:21
![]()
UmerUmer
1,04312 silver badges31 bronze badges
I was having this problem, the main reason was with 2 equal versions installed. One by postgres.app and one by HomeBrew.
If you choose to keep only the APP:
brew unlink postgresql
pip3 install psycopg2
answered Jul 10, 2019 at 20:48
![]()
luisdemarchiluisdemarchi
1,36418 silver badges29 bronze badges
Installation on MacOS
Following are the steps, which worked for me and my team members while installing psycopg2 on Mac OS Big Sur and which we have extensively tested for Big Sur. Before starting make sure you have the Xcode command-line tool installed. If not, then install it from the Apple Developer site. The below steps assume you have homebrew installed. If you have not installed homebrew then install it. Last but not the least, it also assumes you already have PostgreSQL installed in your system, if not then install it. Different people have different preferences but the default installation method on the official PostgreSQL site via Enterprise DB installer is the best method for the majority of people.
-
Put up the linkage to
pg_configfile in your.zshrcfile by:
export PATH="$PATH:/Library/PostgreSQL/12/bin:$PATH". This way you are having linkage with thepg_configfile in the/Library/PostgreSQL/12/binfolder. So if your PostgreSQL installation is via other means, like Postgres.app or Postgres installation via homebrew, then you need to have in your.zshrcfile the link topg_configfile from thebinfolder of that PostgreSQL installation aspsycopg2relies on that. -
Install OpenSSL via Homebrew using the command
brew install openssl. The reason for this is thatlibpq, the library which is the basis ofpsycopg2, uses openssl —psycopg2doesn’t use it directly. After installing put the following commands in your.zshrcfile:export PATH="/usr/local/opt/openssl@1.1/bin:$PATH"export LDFLAGS="-L/usr/local/opt/openssl@1.1/lib"export CPPFLAGS="-I/usr/local/opt/openssl@1.1/include"
By doing this you are creating necessary linkages in your directory. These commands are suggested by brew while you install openssl and have been directly picked up from there.
-
Now comes the most important step, which is to install
libpqusing the commandbrew install libpq. This installs libpq library. As per the documentation
libpq is the C application programmer’s interface to PostgreSQL. libpq is a set of library functions that allow client programs to pass queries to the PostgreSQL backend server and to receive the results of these queries.
- Link libpq using
brew link libpq, if this doesn’t work then use the command:brew link libpq --force. - Also put in your
.zshrcfile the following
export PATH="/usr/local/opt/libpq/bin:$PATH". This creates all the necessary linkages forlibpqlibrary . - Now restart the terminal or use the following command
source ~/.zshrc.This works even when you are working in conda environment.
N.B.
pip install psycopg2-binaryshould be avoided because as per the developers of the psycopg2 library
The use of the -binary packages in production is discouraged because in the past they proved unreliable in multithread environments. This might have been fixed in more recent versions but I have never managed to reproduce the failure.
answered May 30, 2021 at 2:10
![]()
riskdoctorriskdoctor
2013 silver badges3 bronze badges
A common error you may encounter when using Python is modulenotfounderror: no module named ‘psycopg2’.
This error occurs when the Python interpreter cannot detect the Psycopg library in your current environment.
You can install Psycopg2 in Python 3 with python3 -m pip install psycopg2-binary.
This tutorial goes through the exact steps to troubleshoot this error for the Windows, Mac and Linux operating systems.
Table of contents
- ModuleNotFoundError: no module named ‘psycopg2’
- What is ModuleNotFoundError?
- What is Psycopg2?
- Always Use a Virtual Environment to Install Packages
- How to Install Psycopg2 on Windows Operating System
- Psycopg2 installation on Windows Using pip
- How to Install Psycopg2 on Mac Operating System using pip
- How to Install Psycopg2 on Linux Operating Systems
- Installing pip for Ubuntu, Debian, and Linux Mint
- Installing pip for CentOS 8 (and newer), Fedora, and Red Hat
- Installing pip for CentOS 6 and 7, and older versions of Red Hat
- Installing pip for Arch Linux and Manjaro
- Installing pip for OpenSUSE
- Psycopg2 installation on Linux with Pip
- How to Install Psycopg2 on Windows Operating System
- Installing Psycopg2 Using Anaconda
- Check Psycopg2 Version
- Summary
ModuleNotFoundError: no module named ‘psycopg2’
What is ModuleNotFoundError?
The ModuleNotFoundError occurs when the module you want to use is not present in your Python environment. There are several causes of the modulenotfounderror:
The module’s name is incorrect, in which case you have to check the name of the module you tried to import. Let’s try to import the re module with a double e to see what happens:
import ree---------------------------------------------------------------------------
ModuleNotFoundError Traceback (most recent call last)
1 import ree
ModuleNotFoundError: No module named 'ree'To solve this error, ensure the module name is correct. Let’s look at the revised code:
import re

print(re.__version__)2.2.1You may want to import a local module file, but the module is not in the same directory. Let’s look at an example package with a script and a local module to import. Let’s look at the following steps to perform from your terminal:
mkdir example_package

cd example_package

mkdir folder_1

cd folder_1

vi module.py
Note that we use Vim to create the module.py file in this example. You can use your preferred file editor, such as Emacs or Atom. In module.py, we will import the re module and define a simple function that prints the re version:
import re

def print_re_version():

    print(re.__version__)
Close the module.py, then complete the following commands from your terminal:
cd ../

vi script.py
Inside script.py, we will try to import the module we created.
import module

if __name__ == '__main__':

    mod.print_re_version()
Let’s run python script.py from the terminal to see what happens:
Traceback (most recent call last):
  File "script.py", line 1, in ≺module≻
    import module
ModuleNotFoundError: No module named 'module'
To solve this error, we need to point to the correct path to module.py, which is inside folder_1. Let’s look at the revised code:
import folder_1.module as mod

if __name__ == '__main__':

    mod.print_re_version()
When we run python script.py, we will get the following result:
2.2.1Lastly, you can encounter the modulenotfounderror when you import a module that is not installed in your Python environment.
What is Psycopg2?
Psycopg2 is a PostgreSQL database adapter for Python. It provides an API to connect to an external database.
The simplest way to install psycopg2 is to use the package manager for Python called pip. The following installation instructions are for the major Python version 3.
Always Use a Virtual Environment to Install Packages
It is always best to install new libraries within a virtual environment. You should not install anything into your global Python interpreter when you develop locally. You may introduce incompatibilities between packages, or you may break your system if you install an incompatible version of a library that your operating system needs. Using a virtual environment helps compartmentalize your projects and their dependencies. Each project will have its environment with everything the code needs to run. Most ImportErrors and ModuleNotFoundErrors occur due to installing a library for one interpreter and trying to use the library with another interpreter. Using a virtual environment avoids this. In Python, you can use virtual environments and conda environments. We will go through how to install psycopg2 with both.
How to Install Psycopg2 on Windows Operating System
First, you need to download and install Python on your PC. Ensure you select the install launcher for all users and Add Python to PATH checkboxes. The latter ensures the interpreter is in the execution path. Pip is automatically on Windows for Python versions 2.7.9+ and 3.4+.
You can check your Python version with the following command:
python3 --versionYou can install pip on Windows by downloading the installation package, opening the command line and launching the installer. You can install pip via the CMD prompt by running the following command.
python get-pip.pyYou may need to run the command prompt as administrator. Check whether the installation has been successful by typing.
pip --versionPsycopg2 installation on Windows Using pip
To install psycopg2, first create the virtual environment. The environment can be any name, in this we choose “env”:
virtualenv envYou can activate the environment by typing the command:
envScriptsactivateYou will see “env” in parenthesis next to the command line prompt. You can install psycopg2 within the environment by running the following command from the command prompt.
python3 -m pip install psycopg2-binaryWe use python -m pip to execute pip using the Python interpreter we specify as Python. Doing this helps avoid ImportError when we try to use a package installed with one version of Python interpreter with a different version. You can use the command which python to determine which Python interpreter you are using.
How to Install Psycopg2 on Mac Operating System using pip
Open a terminal by pressing command (⌘) + Space Bar to open the Spotlight search. Type in terminal and press enter. To get pip, first ensure you have installed Python3:
python3 --versionPython 3.8.8Download pip by running the following curl command:
curl https://bootstrap.pypa.io/get-pip.py -o get-pip.pyThe curl command allows you to specify a direct download link. Using the -o option sets the name of the downloaded file.
Install pip by running:
python3 get-pip.pyTo install psycopg2, first create the virtual environment:
python3 -m venv envThen activate the environment using:
source env/bin/activate You will see “env” in parenthesis next to the command line prompt. You can install psycopg2 within the environment by running the following command from the command prompt.
python3 -m pip install psycopg2-binaryHow to Install Psycopg2 on Linux Operating Systems
All major Linux distributions have Python installed by default. However, you will need to install pip. You can install pip from the terminal, but the installation instructions depend on the Linux distribution you are using. You will need root privileges to install pip. Open a terminal and use the commands relevant to your Linux distribution to install pip.
Installing pip for Ubuntu, Debian, and Linux Mint
sudo apt install python-pip3Installing pip for CentOS 8 (and newer), Fedora, and Red Hat
sudo dnf install python-pip3Installing pip for CentOS 6 and 7, and older versions of Red Hat
sudo yum install epel-release

sudo yum install python-pip3
Installing pip for Arch Linux and Manjaro
sudo pacman -S python-pipInstalling pip for OpenSUSE
sudo zypper python3-pipPsycopg2 installation on Linux with Pip
To install psycopg2, first create the virtual environment:
python3 -m venv envThen activate the environment using:
source env/bin/activate You will see “env” in parenthesis next to the command line prompt. You can install psycopg2 within the environment by running the following command from the command prompt.
Once you have activated your virtual environment, you can install psycopg2 using:
python3 -m pip install psycopg2-binaryInstalling Psycopg2 Using Anaconda
Anaconda is a distribution of Python and R for scientific computing and data science. You can install Anaconda by going to the installation instructions. Once you have installed Anaconda, you can create a virtual environment and install psycopg2.
To create a conda environment you can use the following command:
conda create -n psycopg2 python=3.8You can specify a different Python 3 version if you like. Ideally, choose the latest version of Python. Next, you will activate the project container. You will see “psycopg2” in parentheses next to the command line prompt.
source activate psycopg2Now you’re ready to install psycopg2 using conda.
Once you have activated your conda environment, you can install psycopg2 using the following command:
conda install -c anaconda psycopg2Check Psycopg2 Version
Once you have successfully installed psycopg2, you can check its version. If you used pip to install psycopg2, you can use pip show from your terminal.
python3 -m pip show psycopg2-binaryName: psycopg2-binary
Version: 2.9.3
Summary: psycopg2 - Python-PostgreSQL Database AdapterSecond, within your python program, you can import psycopg2 and then reference the __version__ attribute:
import psycopg2
print(psycopg2.__version__)2.9.3If you used conda to install psycopg2, you could check the version using the following command:
conda list -f psycopg2# Name Version Build Channel
psycopg2 2.8.5 py38hddc9c9b_0 anacondaSummary
Congratulations on reading to the end of this tutorial. The modulenotfounderror occurs if you misspell the module name, incorrectly point to the module path or do not have the module installed in your Python environment. If you do not have the module installed in your Python environment, you can use pip to install the package. However, you must ensure you have pip installed on your system. You can also install Anaconda on your system and use the conda install command to install psycopg2.
Go to the online courses page on Python to learn more about Python for data science and machine learning.
For further reading on missing modules in Python, go to the article:
- How to Solve Python ModuleNotFoundError: no module named ‘urllib2’.
- How to Solve ModuleNotFoundError: no module named ‘plotly’.
- How to Solve Python ModuleNotFoundError: no module named ‘boto3’.
Have fun and happy researching!
Project description
Psycopg is the most popular PostgreSQL database adapter for the Python
programming language. Its main features are the complete implementation of
the Python DB API 2.0 specification and the thread safety (several threads can
share the same connection). It was designed for heavily multi-threaded
applications that create and destroy lots of cursors and make a large number
of concurrent “INSERT”s or “UPDATE”s.
Psycopg 2 is mostly implemented in C as a libpq wrapper, resulting in being
both efficient and secure. It features client-side and server-side cursors,
asynchronous communication and notifications, “COPY TO/COPY FROM” support.
Many Python types are supported out-of-the-box and adapted to matching
PostgreSQL data types; adaptation can be extended and customized thanks to a
flexible objects adaptation system.
Psycopg 2 is both Unicode and Python 3 friendly.
Documentation
Documentation is included in the doc directory and is available online.
For any other resource (source code repository, bug tracker, mailing list)
please check the project homepage.
Installation
Building Psycopg requires a few prerequisites (a C compiler, some development
packages): please check the install and the faq documents in the doc dir
or online for the details.
If prerequisites are met, you can install psycopg like any other Python
package, using pip to download it from PyPI:
$ pip install psycopg2
or using setup.py if you have downloaded the source package locally:
$ python setup.py build
$ sudo python setup.py install
You can also obtain a stand-alone package, not requiring a compiler or
external libraries, by installing the psycopg2-binary package from PyPI:
$ pip install psycopg2-binary
The binary package is a practical choice for development and testing but in
production it is advised to use the package built from sources.
- Linux/OSX:
-

- Windows:
-
Download files
Download the file for your platform. If you’re not sure which to choose, learn more about installing packages.
Source Distribution
Built Distributions
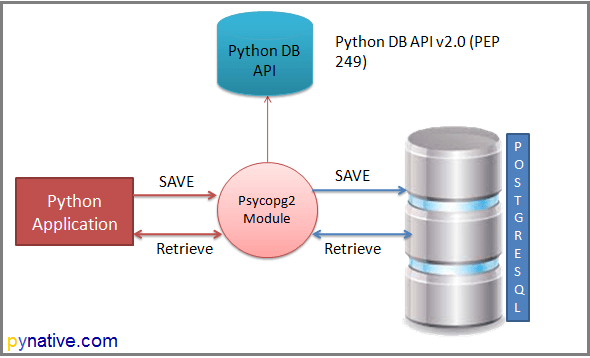
This Python PostgreSQL tutorial demonstrates how to use the Psycopg2 module to connect to PostgreSQL and perform SQL queries, database operations. There are many ways we can connect to a PostgreSQL database from Python, and in this tutorial, we’re going to explore several options to see how to achieve this.
Below is the list of available Python modules to work with the PostgreSQL database server.
Psycopg2pg8000py-postgresqlPyGreSQLocpgdbbpgsqlSQLAlchemy. SQLAlchemy needs any of the above to be installed separately.
Note: Above all modules adhere to Python Database API Specification v2.0 (PEP 249). This API is designed to encourage and maintain the similarity between the Python database modules to access databases. In other words, the syntax, method, and way of access the database are the same in all the above modules.
We stick to the Psycopg2 because it is arguably the most popular and stable module to work with PostgreSQL. Also, We are using Psycopg2 to work with PostgreSQL because of the following reasons.
- It is used in most of the Python and Postgres frameworks.
- It is also actively maintained and supports Python’s primary version, i.e., Python 3 and Python 2.
- It is thread-safe and designed for heavily multi-threaded applications. Note, threads can share the connections.
This Python PostgreSQL guide mainly focuses on the followings
- Installing Psycopg2 and use its API to access the PostgreSQL database
- Perform data insertion, data retrieval, data update, and data deletion through Python application.
- Next, it will cover PostgreSQL transaction management, connection pooling, and error-handling techniques to develop robust Python programs with PostgreSQL.
Let’s dive right in.
Table of contents
- Install Psycopg2 using the pip command
- Verify Psycopg2 installation
- Python PostgreSQL database connection
- Python example to connect PostgreSQL database
- Important points
- Create a PostgreSQL table from Python
- The mapping between Python and PostgreSQL types
- Constants and numeric conversion
- Perform PostgreSQL CRUD operations from Python
- Working with PostgreSQL date and time in Python
- Call PostgreSQL Function and Stored Procedure from Python
- Python PostgreSQL Transaction management
- Python PostgreSQL Connection Pooling
- Python PostgreSQL Exercise Project
Install Psycopg2 using the pip command
You need to install the current version of Psycopg2 (2.8.6) on your machine to use PostgreSQL from Python. This module is available on pypi.org.
Using the following pip command, you can install Psycopg2 on any operating system, including Windows, macOS, Linux, Unix, and Ubuntu.
pip install psycopg2You can also install a specific version using the following command.
pip install psycopg2=2.8.6If you are facing pip install error like “connection error: [SSL: CERTIFICATE_VERIFY_FAILED] certificate verify failed (_ssl.c:598)”. You can resolve this error by setting pypi.org and files.pythonhosted.org as trusted hosts. If you are facing a pip install error Please try following the command.
python -m pip install --trusted-host pypi.org --trusted-host files.pythonhosted.org --trusted-host pypi.python.org psycopg2The current psycopg2 module supports:
- Python version 2.7, and Python 3 versions from 3.4 to 3.8
- PostgreSQL server versions from 7.4 to 12
- PostgreSQL client library version from 9.1
Verify Psycopg2 installation
You should get the following messages after running the above command.
- Collecting psycopg2
- Downloading psycopg2-2.8.6
- Installing collected packages: psycopg2
- Successfully installed psycopg2-2.8.6
Please use the following command to install Psycopg2 If you are using anaconda.
conda install -c anaconda psycopg2Python PostgreSQL database connection
In this section, we will learn how to connect to PostgreSQL through Python using Psycopg2.
Arguments required to connect PostgreSQL database from Python
You need to know the following detail of the PostgreSQL server to perform the connection.
- Username: The username you use to work with PostgreSQL, The default username for the PostgreSQL database is Postgres.
- Password: Password is given by the user at the time of installing the PostgreSQL.
- Host Name: This is the server name or Ip address on which PostgreSQL is running. if you are running on localhost, then you can use localhost, or its IP, i.e., 127.0.0.0
- Database Name: Database name to which you want to connect. Here we are using Database named “postgres_db“.
How to Connect to PostgreSQL in Python
- Install Psycopg2 module
Install and import psycopg2 module. Import using a
import psycopg2statement so you can use this module’s methods to communicate with the PostgreSQL database. - Use the connect() method
Use the
psycopg2.connect()method with the required arguments to connect MySQL. It would return anConnectionobject if the connection established successfully - Use the cursor() method
Create a cursor object using the connection object returned by the connect method to execute PostgreSQL queries from Python.
- Use the execute() method
The
execute()methods run the SQL query and return the result. - Extract result using fetchall()
Use
cursor.fetchall()orfetchone()orfetchmany()to read query result. - Close cursor and connection objects
use
cursor.clsoe()andconnection.clsoe()method to close PostgreSQL connections after your work completes
Python example to connect PostgreSQL database
To connect the PostgreSQL database and perform SQL queries, you must know the database name you want to connect to, and if you have not created any database, I advise you to create one before proceeding further.
import psycopg2
from psycopg2 import Error

try:
    # Connect to an existing database
    connection = psycopg2.connect(user="postgres",
                                  password="pynative@#29",
                                  host="127.0.0.1",
                                  port="5432",
                                  database="postgres_db")

    # Create a cursor to perform database operations
    cursor = connection.cursor()
    # Print PostgreSQL details
    print("PostgreSQL server information")
    print(connection.get_dsn_parameters(), "n")
    # Executing a SQL query
    cursor.execute("SELECT version();")
    # Fetch result
    record = cursor.fetchone()
    print("You are connected to - ", record, "n")

except (Exception, Error) as error:
    print("Error while connecting to PostgreSQL", error)
finally:
    if (connection):
        cursor.close()
        connection.close()
        print("PostgreSQL connection is closed")
You should get the following output after connecting to PostgreSQL from Python
PostgreSQL server information
{'user': 'postgres', 'dbname': 'python_db', 'host': '127.0.0.1', 'port': '5432', 'tty': '', 'options': '', 'sslmode': 'prefer', 'sslcompression': '0', 'krbsrvname': 'postgres', 'target_session_attrs': 'any'}

You are connected to -  ('PostgreSQL 12.2)
PostgreSQL connection is closed
Important points
- In our example, we are executing a
SELECT version();query to fetch the PostgreSQL version. - Using the
Errorclass of Psycopg2, we can handle any database error and exception while working with PostgreSQL from Python. Using this approach, we can make our application robust. - The error class helps us to understand the error in detail. It returns an error message and error code if any.
- We can create as many cursors as we want from a single connection object. Cursors created from the same connection are not isolated, i.e., any changes done to the database by a cursor are immediately visible by the other cursors.
- Cursors are not thread-safe.
- We can retrieve query result using cursor methods such as
fetchone(),fetchmany(),fetcthall().
try-except-finally block
- We placed all our code in the try-except block to catch the database exceptions and errors that may occur during this process.
cursor.close() and connection.close()
- It is always good practice to close the cursor and connection object once your work gets completed to avoid database issues.
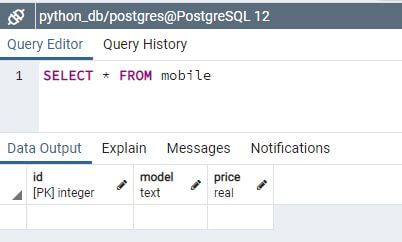
Create a PostgreSQL table from Python
This section will learn how to create a table in PostgreSQL from Python. In this example, we will create a “Mobile” table in PostgreSQL.
import psycopg2
from psycopg2 import Error

try:
    connection = psycopg2.connect(user="postgres",
                                  password="pynative@#29",
                                  host="127.0.0.1",
                                  port="5432",
                                  database="postgres_db")

    cursor = connection.cursor()
    # SQL query to create a new table
    create_table_query = '''CREATE TABLE mobile
          (ID INT PRIMARY KEY     NOT NULL,
          MODEL           TEXT    NOT NULL,
          PRICE         REAL); '''
    # Execute a command: this creates a new table
    cursor.execute(create_table_query)
    connection.commit()
    print("Table created successfully in PostgreSQL ")

except (Exception, Error) as error:
    print("Error while connecting to PostgreSQL", error)
finally:
    if connection:
        cursor.close()
        connection.close()
        print("PostgreSQL connection is closed")
Output
Table created successfully in PostgreSQL PostgreSQL connection is closed
Note: Note: In the end, we are committing our changes to the database using the commit() method.
The mapping between Python and PostgreSQL types
There is default mapping specified to convert Python types into PostgreSQL equivalent, and vice versa. Whenever you execute a PostgreSQL query using Python following table is used by psycopg2 to return the result in the form of Python objects.
| Python | PostgreSQL |
|---|---|
None |
NULL |
bool |
bool |
float |
real or double |
int |
smallintintegerbigint |
Decimal |
numeric |
str |
varchartext |
date |
date |
time |
timetimetz |
datetime |
timestamptimestamptz |
timedelta |
interval |
list |
ARRAY |
tuple |
Composite types IN syntax |
dict |
hstore |
Constants and numeric conversion
When you try to insert Python None and boolean values such as True and False into PostgreSQL, it gets converted into the proper SQL literals. The same case is with Python numerical types. It gets converted into equivalent PostgreSQL types.
For example, When you execute an insert query, Python numeric objects such as int, long, float, Decimal are converted into a PostgreSQL numerical representation. When you read from the PostgreSQL table, integer types are converted into an int, floating-point types are converted into a float, numeric/Decimal are converted into Decimal.
Perform PostgreSQL CRUD operations from Python
Now, we created a “mobile” table. Now let’ see how to perform insert, select, update, and delete PostgreSQL queries from Python.
In this section, We will learn how to perform PostgreSQL CRUD operations from Python.
Now, Let’s see the example.
import psycopg2

try:
    connection = psycopg2.connect(user="postgres",
                                  password="pynative@#29",
                                  host="127.0.0.1",
                                  port="5432",
                                  database="postgres_db")

    cursor = connection.cursor()
    # Executing a SQL query to insert data into  table
    insert_query = """ INSERT INTO mobile (ID, MODEL, PRICE) VALUES (1, 'Iphone12', 1100)"""
    cursor.execute(insert_query)
    connection.commit()
    print("1 Record inserted successfully")
    # Fetch result
    cursor.execute("SELECT * from mobile")
    record = cursor.fetchall()
    print("Result ", record)

    # Executing a SQL query to update table
    update_query = """Update mobile set price = 1500 where id = 1"""
    cursor.execute(update_query)
    connection.commit()
    count = cursor.rowcount
    print(count, "Record updated successfully ")
    # Fetch result
    cursor.execute("SELECT * from mobile")
    print("Result ", cursor.fetchall())

    # Executing a SQL query to delete table
    delete_query = """Delete from mobile where id = 1"""
    cursor.execute(delete_query)
    connection.commit()
    count = cursor.rowcount
    print(count, "Record deleted successfully ")
    # Fetch result
    cursor.execute("SELECT * from mobile")
    print("Result ", cursor.fetchall())


except (Exception, psycopg2.Error) as error:
    print("Error while connecting to PostgreSQL", error)
finally:
    if connection:
        cursor.close()
        connection.close()
print("PostgreSQL connection is closed")Output:
1 Record inserted successfully
Result  [(1, 'Iphone12', 1100.0)]
1 Record updated successfully
Result  [(1, 'Iphone12', 1500.0)]
1 Record deleted successfully
Result  []
PostgreSQL connection is closed
Please refer to the following tutorials to have more information on insert, update, and delete data from the PostgreSQL table using Python.
In the following tutorial, we will teach you how to pass parameters to SQL queries. We will learn how to use a parameterized query to pass Python variables and dynamic data into SQL queries.
- Insert data into the PostgreSQL Table from Python: Learn how to execute the SQL insert query from a Python application to add a record to the PostgreSQL table.
- Select data from PostgreSQL Table from Python: Learn how to execute a SQL select query from a Python application to fetch rows from the database table. We will also learn how to use fetchall(),
fetchmany()andfetchone()methods to read a limited number of rows from the table. - Update data of PostgreSQL table from Python: Learn how to execute SQL update query from Python application to modify a PostgreSQL table’s records.
- Delete data from PostgreSQL table from Python: Learn how to execute SQL delete query from Python application to delete records from a PostgreSQL table.
Working with PostgreSQL date and time in Python
This section will demonstrate how to work with PostgreSQL date and timestamp data types in Python and vice-versa. Most of the time, we work with date and time data. We insert date and time into the table and also read from it in our application whenever required.
In a usual scenario, when you execute the insert query with the datetime object, the Python psycopg2 module converts it into a PostgreSQL timestamp format to insert it in the table.
And when you execute a SELECT query from Python to read timestamp values from the PostgreSQL table, the psycopg2 module converts it into a datetime object.
We are using the “Item” table for this demo. Please copy and execute the below query on your PostgreSQL query tool to have adequate data for this operation.
CREATE TABLE item (
	item_id serial NOT NULL PRIMARY KEY,
	item_name VARCHAR (100) NOT NULL,
	purchase_time timestamp NOT NULL,
	price INTEGER NOT NULL
);
Let’s understand this scenario with a simple example. Here we will read purchase_time column from the PostgreSQL table and convert it into a Python datetime object.
import datetime

import psycopg2

try:
    connection = psycopg2.connect(user="postgres",
                                  password="pynative@#29",
                                  host="127.0.0.1",
                                  port="5432",
                                  database="postgres_db")

    cursor = connection.cursor()
    # Executing a SQL query to insert datetime into table
    insert_query = """ INSERT INTO item (item_Id, item_name, purchase_time, price) VALUES (%s, %s, %s, %s)"""
    item_purchase_time = datetime.datetime.now()
    item_tuple = (12, "Keyboard", item_purchase_time, 150)
    cursor.execute(insert_query, item_tuple)
    connection.commit()
    print("1 item inserted successfully")

    # Read PostgreSQL purchase timestamp value into Python datetime
    cursor.execute("SELECT purchase_time from item where item_id = 12")
    purchase_datetime = cursor.fetchone()
    print("Item Purchase date is  ", purchase_datetime[0].date())
    print("Item Purchase time is  ", purchase_datetime[0].time())

except (Exception, psycopg2.Error) as error:
    print("Error while connecting to PostgreSQL", error)
finally:
    if connection:
        cursor.close()
        connection.close()
print("PostgreSQL connection is closed")Output:
1 item inserted successfully
Item Purchase date is   2020-12-14
Item Purchase time is   12:47:45.854942
PostgreSQL connection is closed
Call PostgreSQL Function and Stored Procedure from Python
PostgreSQL function and the Stored procedure can perform different operations, such as data manipulation or data retrieval. We can execute such functions from Python.
Learn how to execute the PostgreSQL function and Stored procedure in Python.
Python PostgreSQL Transaction management
In this article, we will see how to manage PostgreSQL transactions from Python using psycopg2.
- Learn how to use the
commit()and therollback()method of aconnectionclass to manage database transactions and maintain the ACID properties. - Also, learn how to change the PostgreSQL transaction isolation level from Python.
Python PostgreSQL Connection Pooling
This section will let you know what a connection pool is and how to implement a PostgreSQL database connection pool using Psycopg2 in Python. Using Psycopg2, we can implement a connection pool for simple as well as multithreaded applications.
Use the Connection pool to increase the speed and performance of database-centric applications.
Python PostgreSQL Exercise Project
Solve our free Python database exercise project to practice and master the PostgreSQL database operations using Python.
In this exercise project, We will implement the Hospital Information System, which covers all database operations. In this Python database exercise, we will do database CRUD operations From Python. This practice exercise also covers transaction management and error-handling techniques.
Reference:
- Psycopg2
- PostgreSQL
- PEP 249
Introduction
Psycopg is a
PostgreSQL
adapter for the
Python
programming language. It is a
wrapper for the
libpq
, the official PostgreSQL client library.
The
psycopg2
package is the current mature implementation of the adapter: it
is a C extension and as such it is only compatible with
CPython
. If you want
to use Psycopg on a different Python implementation (PyPy, Jython, IronPython)
there is an experimental
porting of Psycopg for Ctypes
, but it is not as
mature as the C implementation yet.
The current
psycopg2
implementation supports:
- Python 2 versions from 2.6 to 2.7
- Python 3 versions from 3.2 to 3.6
- PostgreSQL server versions from 7.4 to 9.6
- PostgreSQL client library version from 9.1
Binary install from PyPI
psycopg2
is
available on PyPI
in the form of
wheel
packages for the
most common platform (Linux, OSX, Windows): this should make you able to
install a binary version of the module including all the dependencies simply
using:
Make sure to use an up-to-date version of
pip
(you can upgrade it
using something like
         pip


         install


         -U


         pip
)
Note
The binary packages come with their own versions of a few C libraries,
among which
libpq
and
libssl
, which will be used regardless of other
libraries available on the client: upgrading the system libraries will not
upgrade the libraries used by
psycopg2
. Please build
psycopg2
from
source if you want to maintain binary upgradeability.
Warning
Because the
psycopg
wheel package uses its own
libssl
binary, it is
incompatible with other extension modules binding with
libssl
as well,
for instance the Python
ssl
module: the result will likely be a
segfault. If you need using both
psycopg2
and other libraries using
libssl
please
install psycopg from source
.
If you prefer to use the system libraries available on your client you can use
the
pip
--no-binary
option:
$ pip install --no-binary psycopg2
which can be specified in your
requirements.txt
files too, e.g. use:
psycopg2>=2.7,<2.8 --no-binary :all:
to use the last bugfix release of the
psycopg2
2.7 package, specifying to
always compile it from source. Of course in this case you will have to meet
the
build prerequisites
.
Install from source
You can download a copy of Psycopg source files from the
Psycopg download
page
or from
PyPI
.
Build prerequisites
These notes illustrate how to compile Psycopg on Linux. If you want to compile
Psycopg on other platforms you may have to adjust some details accordingly.
Psycopg is a C wrapper around the
libpq
PostgreSQL client library. To install
it from sources you will need:
-
A C compiler.
-
The Python header files. They are usually installed in a package such as
python-dev
. A message such as
error: Python.h: No such file or
directory
is an indication that the Python headers are missing. -
The libpq header files. They are usually installed in a package such as
libpq-dev
. If you get an
error: libpq-fe.h: No such file or directory
you are missing them. -
The
pg_config
program: it is usually installed by the
libpq-dev
package but sometimes it is not in a
PATH
directory.
Having it in the
PATH
greatly streamlines the installation, so try
running
            pg_config


            --version
: if it returns an error or an unexpected
version number then locate the directory containing the
pg_config
shipped with the right libpq version (usually
/usr/lib/postgresql/X.Y/bin/
) and add it to the
PATH
:$ export PATH=/usr/lib/postgresql/X.Y/bin/:$PATH
You only need
pg_config
to compile
psycopg2
, not for its
regular usage.
Once everything is in place it’s just a matter of running the standard:
$ python setup.py build
$ python setup.py install
Runtime requirements
Unless you compile
psycopg2
as a static library, or you install it from a
self-contained wheel package, it will need the
libpq
library at runtime
(usually distributed in a
libpq.so
or
libpq.dll
file).
psycopg2
relies on the host OS to find the library if the library is installed in a
standard location there is usually no problem; if the library is in a
non-standard location you will have to tell somehow Psycopg how to find it,
which is OS-dependent (for instance setting a suitable
LD_LIBRARY_PATH
on Linux).
Note
The libpq header files used to compile
psycopg2
should match the
version of the library linked at runtime. If you get errors about missing
or mismatching libraries when importing
psycopg2
check (e.g. using
ldd
) if the module
psycopg2/_psycopg.so
is linked to the
right
libpq.so
.
Note
Whatever version of libpq
psycopg2
is compiled with, it will be
possible to connect to PostgreSQL servers of any supported version: just
install the most recent libpq version or the most practical, without
trying to match it to the version of the PostgreSQL server you will have
to connect to.
Non-standard builds
If you have less standard requirements such as:
-
creating a
debug build
,
-
using
pg_config
not in the
PATH
, -
supporting
mx.DateTime
,
then take a look at the
setup.cfg
file.
Some of the options available in
setup.cfg
are also available as command
line arguments of the
build_ext
sub-command. For instance you can specify
an alternate
pg_config
location using:
$ python setup.py build_ext --pg-config /path/to/pg_config build
Use
          python


          setup.py


          build_ext


          --help
to get a list of the options
supported.
Creating a debug build
In case of problems, Psycopg can be configured to emit detailed debug
messages, which can be very useful for diagnostics and to report a bug. In
order to create a debug package:
-
Download
and unpack the Psycopg source package.
-
Edit the
setup.cfg
file adding the
PSYCOPG_DEBUG
flag to the
define
option. -
Compile and install
the package.
-
Set the
PSYCOPG_DEBUG
environment variable:
-
Run your program (making sure that the
psycopg2
package imported is the
one you just compiled and not e.g. the system one): you will have a copious
stream of informations printed on stderr.
Running the test suite
Once
psycopg2
is installed you can run the test suite to verify it is
working correctly. You can run:
$ python -c "from psycopg2 import tests; tests.unittest.main(defaultTest='tests.test_suite')" --verbose
The tests run against a database called
psycopg2_test
on UNIX socket and
the standard port. You can configure a different database to run the test by
setting the environment variables:
-
PSYCOPG2_TESTDB
-
PSYCOPG2_TESTDB_HOST
-
PSYCOPG2_TESTDB_PORT
-
PSYCOPG2_TESTDB_USER
The database should already exist before running the tests.
If you still have problems
Try the following.
In order:
-
Read again the
Build prerequisites
.
-
Read the
FAQ
.
-
Google for
psycopg2
your error message
. Especially useful the week
after the release of a new OS X version. -
Write to the
Mailing List
.
-
Complain on your blog or on Twitter that
psycopg2
is the worst package
ever and about the quality time you have wasted figuring out the correct
ARCHFLAGS
. Especially useful from the Starbucks near you.
Рассказываем, как работать с PostgreSQL в Python и почему для этого мы используем именно модуль Psycopg2.
Во время разработки приложений часто нужно подключать и использовать базы данных для хранения информации. Самая распространенная база данных — PostgreSQL, поэтому мы расскажем, как работать в Python именно с ней. Для этого существует множество модулей, например:
- Psycopg2
- py-postgresql
- pg8000
Мы расскажем именно про модуль Psycopg2. И выбрали мы его по таким причинам:
- Распространенность — Psycopg2 использует большинство фреймворков Python
- Поддержка — Psycopg2 активно развивается и поддерживает основные версии Python
- Многопоточность — Psycopg2 позволяет нескольким потокам поддерживать одно и то же соединение
Установка Psycopg2
Для начала работы с модулем достаточно установить пакет при помощи pip:
pip install psycopg2-binary
Если в вашем проекте используется poetry, то при первоначальной настройке проекта нужно добавить psycopg2-binary в зависимости. Для добавления в уже существующий проект воспользуйтесь командой:
poetry add psycopg2-binary
Использование Psycopg2
Подключение к БД:
Для подключения к существующей базе данных необходимо знать основную информацию о вашей БД. Если вы не знаете, где ее взять, то пройдите сначала наш большой курс по Основам баз данных:
- Username — имя пользователя, которое вы используете для работы с PostgreSQL
- Password — пароль, который используется пользователем
- Host Name — имя сервера или IP-адрес, на котором работает PostgreSQL
- Database Name — имя базы данных, к которой мы подключаемся.
Для подключения к базе данных мы используем метод connect(), которому в качестве аргументов передаются вышеперечисленные данные:
import psycopg2

try:
    # пытаемся подключиться к базе данных
    conn = psycopg2.connect(dbname='test', user='postgres', password='secret', host='host')
except:
    # в случае сбоя подключения будет выведено сообщение в STDOUT
    print('Can`t establish connection to database')
Также подключение к базе данных может осуществляться с помощью Connection URI:
import psycopg2
try:
    # пытаемся подключиться к базе данных
    conn = psycopg2.connect('postgresql://user:password@host:port/database_name')
except:
    # в случае сбоя подключения будет выведено сообщение  в STDOUT
    print('Can`t establish connection to database')
Читайте также:
Вышел Python 3.11.0. В два раза быстрее, c детальным описанием ошибок и кучей новых типов
Взаимодействие Python с PostgreSQL
Итак, подключение к базе данных успешно выполнено. Дальше мы будем взаимодействовать с ней через объект cursor, который можно получить через метод cursor() объекта соединения. Он помогает выполнять SQL-запросы из Python.
# получение объекта курсора
cursor = conn.cursor()
С помощью cursor происходит передача запросов базе данных:
# Получаем список всех пользователей
cursor.execute('SELECT * FROM users')
all_users = cursor.fetchall()
cursor.close() # закрываем курсор
conn.close() # закрываем соединение
Для получения результата после выполнения запроса используются следующие команды:
cursor.fetchone()— вернуть одну строкуcursor.fetchall()— вернуть все строкиcursor.fetchmany(size=10)— вернуть указанное количество строк
Хорошей практикой при работе с базой данных является закрытие объекта cursor и соединения с базой. Для автоматизации этого процесса удобно взаимодействовать через контекстный менеджер, используя конструкцию with :
with conn.cursor as curs:
    curs.execute('SELECT * FROM users')
    all_users = cursor.fetchall()
В тот момент, когда объект cursor выходит за пределы конструкции with, происходит его закрытие и освобождение связанных с ним ресурсов.
По умолчанию результат возвращается в виде кортежа. Такое поведение возможно изменить, передав параметр cursor_factory в момент открытия объекта cursor, например, использовать NamedTupleCursor. Это вернет данные в виде именованного кортежа:
from psycopg2.extras import NamedTupleCursor
# …
with conn.cursor(cursor_factory=NamedTupleCursor) as curs:
    curs.execute('SELECT * FROM users WHERE name=%s', (name='Alfred'))
    alfred = curs.fetchone()
    alfred # (id=10, name='Alfred', age='90')
    # …
Выполнение запросов
Psycopg2 преобразует переменные Python в SQL значения с учетом их типа. Все стандартные типы Python адаптированы для правильного представления в SQL.
Передача параметров в SQL-запрос происходит с помощью подстановки плейсхолдеров %s и цепочки значений в качестве второго аргумента функции:
with conn.cursor() as curs:
    cusr.execute('SELECT id, name FROM users WHERE name=%s', ('John',))
    curs.fetchall()
    # …
with conn.cursor() as curs:
    cusr.execute(INSERT INTO users (name, age) VALUES (%s, %s), ('John', 19))
    # …
conn.close()
Подстановка значений в SQL-запрос используется для того, чтобы избежать атак типа SQL Injection. Также несколько полезных советов по построению запросов:
- Плейсхолдер должен быть
%sдаже если тип подставляемого значения отличается от строки - Не заключайте плейсходер в кавычки
- Если в запросе используется знак
%, он должен быть указан как%%
Продолжайте учиться:
На Хекслете есть несколько больших профессий, интенсивов и треков для джуниоров, мидлов и даже сеньоров: они позволят не только узнать новые технологии, но и прокачать уже существующие навыки
Посмотреть предложения Хекслета
Improve Article
Save Article
Improve Article
Save Article
psycopg2 is the most popular PostgreSQL database adapter for the Python programming language. It is a DB API 2.0 compliant PostgressSQL driver that is actively developed. It is designed for heavily multi-threaded applications that create and destroy lots of cursors and create a large number of “INSERTs” or “UPDATEs”.
Installation:
To install this module follow the below steps.
Step 1: First of all check whether Python is installed or not in your system. Do it by simply printing its version. Open the command prompt and run the command given below:
python --version
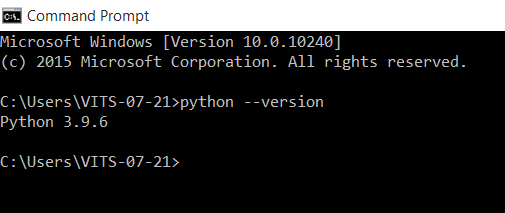
If python is not installed in your system, then you can install it running the given command in your command prompt.
pip install python
Step 2: Open the command prompt and run the below command to install psycopg2-binary. If it shows successfully installed then you are good to go.
pip install psycopg2-binary
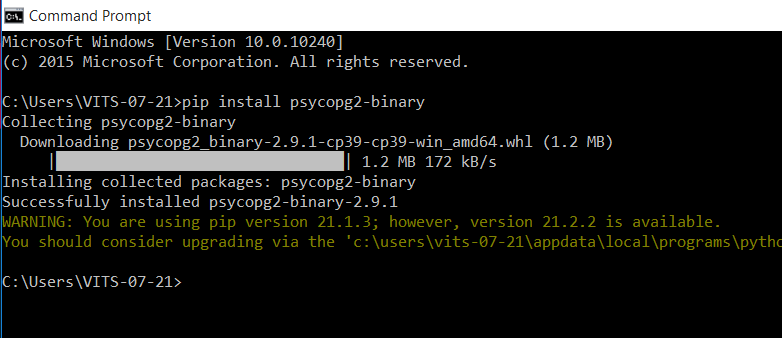
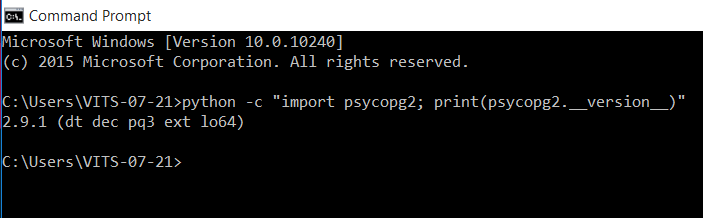
Step 3: Check if it is working or not. Do it simply by importing psycopg2 library and checking its version. Open the command prompt and put the command given below. Showing no error means our package is successfully installed.
python -c "import psycopg2; print(psycopg2.__version__)"
February 21, 2022

Databases are everywhere — in your phone, on your computer, and behind your beloved applications. But what’s a database worth if you can’t query data from it? In this article, we’ll show you examples of querying any PostgreSQL-based database from your Python code. First, you’ll gain a high-level understanding of PostgreSQL and database connectors. Later in the article, we’ll dive deep into actual code examples and other tips on how to use Python to query your database. Let’s get started!
What Is PostgreSQL?
PostgreSQL is one of the most popular open-source relational databases. Companies of all sizes and developers around the globe use it. According to DB-Engines, PostgreSQL ranks fourth among the most-popular databases in the world, and it has an upward trend. This isn’t a surprise, as you can find PostgreSQL databases behind many web and mobile applications — and even analytical software.
PostgreSQL also has a rich ecosystem with a vast number of tools and extensions that integrate well with the core database. For these reasons, PostgreSQL makes a great choice whether you need a transactional or an analytical database, or wish to build your own custom database solution.
Now that you have an idea of what PostgreSQL is, let’s cover how you can use Python to connect to the database.
How to Connect to PostgreSQL from Python?
In order to connect to a PostgreSQL database instance from your Python script, you need to use a database connector library. In Python, you have several options that you can choose from. Some libraries that are written in pure Python include pg8000 and py-postgresql. But the most popular and widely-known one is Psycopg2.
For the rest of this article, you’ll see examples of using Psycopg2 to connect to the database and query data.
But first, what is Psycopg2?
What Is Psycopg2?
Psycopg2 is the most widely known and used PostgreSQL connector library in Python. The Psycopg2 library implements the Python DB API 2.0 specifications and (under the hood) uses the C programming language as a wrapper around the libpq PostgreSQL library. Due to its C implementation, Psycopg2 is very fast and efficient.
You can use Psycopg2 to fetch one or more rows from the database based on a SQL query. If you want to insert some data into the database, that’s also possible with this library — with multiple options for single or batch inserting.
A completely rewritten implementation of the Python PostgreSQL connector is currently under active development: Psycopg3. Psycopg3 provides the same features as Psycopg2, alongside additional capabilities like asynchronous communication, data ingestion using COPY, and more. It strives to make better use of the functionalities provided by new Python and PostgreSQL generations.
How to Install Psycopg2
To use Psycopg2, you need to install it first. The easiest way is to use pip. As with other Python projects, it’s recommended to use a virtual environment for installing the library:
virtualenv env && source env/bin/activate
pip install psycopg2-binary
This snippet will install the Psycopg2 library into your Python virtual environment with all its dependencies. After this, you are able to import the psycopg2 module into your Python code and use it.
Should You Use Psycopg2 or Psycopg2-binary?
As you might have noticed, we installed the psycopg2-binary package, which is the binary version of Psycopg2. What this means is that this version of the library comes with its own version of C libraries, namely liboq and libssl. For Psycopg2 beginners and most users, this version is perfectly fine. On the other hand, if you wish Psycopg2 to use your system’s C libraries, you need to build Psycopg2 from source:
pip install psycopg2Psycopg2, being a database connector library, is essential in many serverless architecture-based data pipelines. Let’s quickly cover how you can install Psycopg2 in a serverless environment.
How to Install Psycopg2 in a Serverless Environment
Psycopg2 is often used in AWS Lambda functions or in other serverless environments. Because Psycopg2 depends on a couple of PostgreSQL libraries — which aren’t necessarily available in a serverless environment, or not easily — it’s recommended to use a pre-compiled version of the library, for example, this one.
You can also find other pre-compiled versions of Psycopg2 by searching for «psycopg2 serverless» or «psycopg2 aws lambda» keywords.
Finally, after installing Psycopg2 in your environment, here’s a quick tutorial on how to query data from your database.
How to Query PostgreSQL Using Python
In order to query your database, you need to use two Psycopg2 objects:
- a connection object
- a cursor object
First, you need to import the Psycopg2 module and create a connection object:
import psycopg2

conn = psycopg2.connect(database="db_name",
                        host="db_host",
                        user="db_user",
                        password="db_pass",
                        port="db_port")
As you can see, there are quite a few arguments you need to define in order to connect to the database. Here’s a quick summary of what each of these arguments means:
- database: the name of the database that you want to connect to (you can only connect to one database with one connection object)
- host: this is probably an IP address or a URL that points to the database server (e.g., xyz.example.com)
- user: the name of the PostgreSQL user
- password: the matching password for that user
- port: the port that the PostgreSQL server uses (usually 5432 if the server is hosted locally but can be other)
If you submitted the correct database credentials, you get a live database connection object that you can use to create a cursor object.
A cursor object will help you execute any queries on the database and retrieve data. Here’s how to create a cursor object:
cursor = conn.cursor()Now let’s query the database using the cursor we just created:
cursor.execute("SELECT * FROM example_table")We use the execute() function and submit a query string as its argument. This query that we submitted will be run against the database. It’s important to note that after the query executes, you still need to use one of the Psycopg2 functions to retrieve data rows:
fetchone()fetchall()fetchmany()
Let’s see how each of them works!
Example: fetchone()
The most basic way to fetch data from your database is to use the fetchone() function. This function will return exactly one row — the first row — after executing the SQL query.
Here’s an example:
print(cursor.fetchone())(1, 'Budapest', 'newly-built', 'after 2011', 30, 1)In this example, fetchone() returns one row from the database in the form of a tuple where the order of your data in the tuple will be based on the order of the columns you specified in the query.
Because of this, it’s important to make sure you specify the order of columns properly when you create the query string so you know which data is which in the tuple.
Example: fetchall()
What if you need more than just one row from your database? What if you need 10, 100, 1000, or more rows? You can use the fetchall() Psycopg2 function, which works the same way as fetchone() except that it returns not just one row as a result but all of them.
print(cursor.fetchall())[(1, 'Budapest', 'newly-built', 'after 2011', 30, 1),
(2, 'Budapest', 'newly-built', 'after 2011', 45, 2),
(3, 'Budapest', 'newly-built', 'after 2011', 32, 2),
(4, 'Budapest', 'newly-built', 'after 2011', 48, 2),
(5, 'Budapest', 'newly-built', 'after 2011', 49, 2),
(6, 'Budapest', 'newly-built', 'after 2011', 49, 2),
(7, 'Budapest', 'newly-built', 'after 2011', 71, 3),
(8, 'Budapest', 'newly-built', 'after 2011', 50, 2),
(9, 'Budapest', 'newly-built', 'after 2011', 50, 2),
(10, 'Budapest', 'newly-built', 'after 2011', 57, 3)]
[...]Notice how we get more rows back, not just one.
Example: fetchmany()
With fetchmany(), you have another option to retrieve multiple records from the database and have more control over the exact amount of rows retrieved.
print(cursor.fetchmany(size=5))[(1, 'Budapest', 'newly-built', 'after 2011', 30, 1),
(2, 'Budapest', 'newly-built', 'after 2011', 45, 2),
(3, 'Budapest', 'newly-built', 'after 2011', 32, 2),
(4, 'Budapest', 'newly-built', 'after 2011', 48, 2),
(5, 'Budapest', 'newly-built', 'after 2011', 49, 2)]Here we only receive five rows because we set the size argument to 5. This function gives you more control on a code-level over how many rows to return from your database table.
Wrapping Up
After you’re finished querying your database and using the connection object in your Python code, make sure to always close the connection using conn.close().
I hope this article was useful to help you get started with Python and PostgreSQL. I highly suggest reading the Psycopg2 documentation to learn more about different data retrieval methods, cursor classes, and more.
Happy coding!
Это руководство по PostgreSQL в Python описывает, как использовать модуль Psycopg2 для подключения к PostgreSQL, выполнения SQL-запросов и других операций с базой данных.
Здесь не инструкции по установки локального сервера, так как это не касается python. Скачайте и установите PostgreSQL с официального сайта https://www.postgresql.org/download/. Подойдут версии 10+, 11+, 12+.
Вот список разных модулей Python для работы с сервером базы данных PostgreSQL:
- Psycopg2,
- pg8000,
- py-postgreql,
- PyGreSQL,
- ocpgdb,
- bpsql,
- SQLAlchemy. Для работы SQLAlchemy нужно, чтобы хотя бы одно из перечисленных выше решений было установлено.
Примечание: все модули придерживаются спецификации Python Database API Specification v2.0 (PEP 249). Этот API разработан с целью обеспечить сходство разных модулей для доступа к базам данных из Python. Другими словами, синтаксис, методы и прочее очень похожи во всех этих модулях.
В этом руководстве будем использовать Psycopg2, потому что это один из самых популярных и стабильных модулей для работы с PostgreSQL:
- Он используется в большинстве фреймворков Python и Postgres;
- Он активно поддерживается и работает как с Python 3, так и с Python 2;
- Он потокобезопасен и спроектирован для работы в многопоточных приложениях. Несколько потоков могут работать с одним подключением.
В этом руководстве пройдемся по следующим пунктам:
- Установка Psycopg2 и использование его API для доступа к базе данных PostgreSQL;
- Вставка, получение, обновление и удаление данных в базе данных из приложения Python;
- Дальше рассмотрим управление транзакциями PostgreSQL, пул соединений и методы обработки исключений, что понадобится для разработки сложных программ на Python с помощью PostgreSQL.
Установка Psycopg2 с помощью pip
Для начала нужно установить текущую версию Psycopg2 для использования PostgreSQL в Python. С помощью команды pip можно установить модуль в любую операцию систему: Windows, macOS, Linux:
pip install psycopg2Также можно установить конкретную версию программы с помощью такой команды:
pip install psycopg2=2.8.6Если возникает ошибка установки, например «connection error: [SSL: CERTIFICATE_VERIFY_FAILED] certificate verify failed (_ssl.c:598)», то ее можно решить, сделав files.pythonhosted.org доверенным хостом:
python -m pip install --trusted-host pypi.org --trusted-host files.pythonhosted.org --trusted-host pypi.python.org psycopg2
Модуль psycopg2 поддерживает:
- Python 2.7 и Python 3, начиная с версии 3.4.
- Сервер PostgreSQL от 7.4 до 12.
- Клиентскую библиотеку PostgreSQL от 9.1.
Проверка установки Psycopg2
После запуска команды должны появиться следующие сообщения:
- Collecting psycopg2
- Downloading psycopg2-2.8.6
- Installing collected packages: psycopg2
- Successfully installed psycopg2-2.8.6
При использовании anaconda подойдет следующая команда.
conda install -c anaconda psycopg2В этом разделе рассмотрим, как подключиться к PostgreSQL из Python с помощью модуля Psycopg2.
Вот какие аргументы потребуются для подключения:
- Имя пользователя: значение по умолчанию для базы данных PostgreSQL – postgres.
- Пароль: пользователь получает пароль при установке PostgreSQL.
- Имя хоста: имя сервера или IP-адрес, на котором работает база данных. Если она запущена локально, то нужно использовать localhost или 127.0.0.0.
- Имя базы данных: в этом руководстве будем использовать базу
postgres_db.
Шаги для подключения:
- Использовать метод
connect()с обязательными параметрами для подключения базы данных. - Создать объект cursor с помощью объекта соединения, который возвращает метод
connect. Он нужен для выполнения запросов. - Закрыть объект cursor и соединение с базой данных после завершения работы.
- Перехватить исключения, которые могут возникнуть в процессе.
Создание базы данных PostgreSQL с Psycopg2
Для начала создадим базу данных на сервере. Во время установки PostgreSQL вы указывали пароль, его нужно использовать при подключении.
import psycopg2

from psycopg2 import Error

from psycopg2.extensions import ISOLATION_LEVEL_AUTOCOMMIT
try:

    # Подключение к существующей базе данных

    connection = psycopg2.connect(user="postgres",

                                  # пароль, который указали при установке PostgreSQL

                                  password="1111",

                                  host="127.0.0.1",

                                  port="5432")

    connection.set_isolation_level(ISOLATION_LEVEL_AUTOCOMMIT)

    # Курсор для выполнения операций с базой данных

    cursor = connection.cursor()

    sql_create_database = 'create database postgres_db'

    cursor.execute(sql_create_database)
except (Exception, Error) as error:

    print("Ошибка при работе с PostgreSQL", error)

finally:

    if connection:

        cursor.close()

        connection.close()

        print("Соединение с PostgreSQL закрыто")
Пример кода для подключения к базе данных PostgreSQL из Python
Для подключения к базе данных PostgreSQL и выполнения SQL-запросов нужно знать название базы данных. Ее нужно создать прежде чем пытаться выполнить подключение.
import psycopg2

from psycopg2 import Error

try:

    # Подключение к существующей базе данных

    connection = psycopg2.connect(user="postgres",

                                  # пароль, который указали при установке PostgreSQL

                                  password="1111",

                                  host="127.0.0.1",

                                  port="5432",

                                  database="postgres_db")

    # Курсор для выполнения операций с базой данных

    cursor = connection.cursor()

    # Распечатать сведения о PostgreSQL

    print("Информация о сервере PostgreSQL")

    print(connection.get_dsn_parameters(), "n")

    # Выполнение SQL-запроса

    cursor.execute("SELECT version();")

    # Получить результат

    record = cursor.fetchone()

    print("Вы подключены к - ", record, "n")

except (Exception, Error) as error:

    print("Ошибка при работе с PostgreSQL", error)

finally:

    if connection:

        cursor.close()

        connection.close()

        print("Соединение с PostgreSQL закрыто")
После подключения появится следующий вывод:
Информация о сервере PostgreSQL
{'user': 'postgres', 'dbname': 'postgres_db', 'host': '127.0.0.1', 'port': '5432', 'tty': '', 'options': '', 'sslmode': 'prefer', 'sslcompression': '0', 'krbsrvname': 'postgres', 'target_session_attrs': 'any'}

Вы подключены к -  ('PostgreSQL 10.13, compiled by Visual C++ build 1800, 64-bit',)

Соединение с PostgreSQL закрыто
Разбор процесса подключения в деталях
import psycopg2 — Эта строка импортирует модуль Psycopg2 в программу. С помощью классов и методов модуля можно взаимодействовать с базой.
from psycopg2 import Error — С помощью класса Error можно обрабатывать любые ошибки и исключения базы данных. Это сделает приложение более отказоустойчивым. Этот класс также поможет понять ошибку в подробностях. Он возвращает сообщение об ошибке и ее код.
psycopg2.connect() — С помощью метода connect() создается подключение к экземпляру базы данных PostgreSQL. Он возвращает объект подключения. Этот объект является потокобезопасным и может быть использован на разных потоках.
Метод connect() принимает разные аргументы, рассмотренные выше. В этом примере в метод были переданы следующие аргументы: user = "postgres", password = "1111", host = "127.0.0.1", port = "5432", database = "postgres_db".
cursor = connection.cursor() — С базой данных можно взаимодействовать с помощью класса cursor. Его можно получить из метода cursor(), который есть у объекта соединения. Он поможет выполнять SQL-команды из Python.
Из одного объекта соединения можно создавать неограниченное количество объектов cursor. Они не изолированы, поэтому любые изменения, сделанные в базе данных с помощью одного объекта, будут видны остальным. Объекты cursor не являются потокобезопасными.
После этого выведем свойства соединения с помощью connection.get_dsn_parameters().
cursor.execute() — С помощью метода execute объекта cursor можно выполнить любую операцию или запрос к базе данных. В качестве параметра этот метод принимает SQL-запрос. Результаты запроса можно получить с помощью fetchone(), fetchmany(), fetchall().
В этом примере выполняем SELECT version(); для получения сведений о версии PosgreSQL.
Блок try-except-finally — Разместим код в блоке try-except для перехвата исключений и ошибок базы данных.
cursor.close() и connection.close() — Правильно всегда закрывать объекты cursor и connection после завершения работы, чтобы избежать проблем с базой данных.
Создание таблицы PostgreSQL из Python
В этом разделе разберем, как создавать таблицу в PostgreSQL из Python. В качестве примера создадим таблицу Mobile.
Выполним следующие шаги:
- Подготовим запрос для базы данных
- Подключимся к PosgreSQL с помощью
psycopg2.connect(). - Выполним запрос с помощью
cursor.execute(). - Закроем соединение с базой данных и объект
cursor.
Теперь рассмотрим пример.
import psycopg2

from psycopg2 import Error

try:

    # Подключиться к существующей базе данных

    connection = psycopg2.connect(user="postgres",

                                  # пароль, который указали при установке PostgreSQL

                                  password="1111",

                                  host="127.0.0.1",

                                  port="5432",

                                  database="postgres_db")

    # Создайте курсор для выполнения операций с базой данных

    cursor = connection.cursor()

    # SQL-запрос для создания новой таблицы

    create_table_query = '''CREATE TABLE mobile

                          (ID INT PRIMARY KEY     NOT NULL,

                          MODEL           TEXT    NOT NULL,

                          PRICE         REAL); '''

    # Выполнение команды: это создает новую таблицу

    cursor.execute(create_table_query)

    connection.commit()

    print("Таблица успешно создана в PostgreSQL")

except (Exception, Error) as error:

    print("Ошибка при работе с PostgreSQL", error)

finally:

    if connection:

        cursor.close()

        connection.close()

        print("Соединение с PostgreSQL закрыто")
Вывод:
Таблица успешно создана в PostgreSQL
Соединение с PostgreSQL закрыто
Примечание: наконец, коммитим изменения с помощью метода commit().
Соответствие типов данных Python и PostgreSQL
Есть стандартный маппер для конвертации типов Python в их эквиваленты в PosgreSQL и наоборот. Каждый раз при выполнении запроса PostgreSQL из Python с помощью psycopg2 результат возвращается в виде объектов Python.
| Python | PostgreSQL |
|---|---|
| None | NULL |
| bool | bool |
| float | real double |
| int long |
smallint integer bigint |
| Decimal | numeric |
| str unicode |
varchar text |
| date | date |
| time | time timetz |
| datetime | timestamp timestamptz |
| timedelta | interval |
| list | ARRAY |
| tuple namedtuple |
Composite types IN syntax |
| dict | hstore |
Константы и числовые преобразования
При попытке вставить значения None и boolean (True, False) из Python в PostgreSQL, они конвертируются в соответствующие литералы SQL. То же происходит и с числовыми типами. Они конвертируются в соответствующие типы PostgreSQL.
Например, при выполнении запроса на вставку числовые объекты, такие как int, long, float и Decimal, конвертируются в числовые представления из PostgreSQL. При чтении из таблицы целые числа конвертируются в int, числа с плавающей точкой — во float, а десятичные — в Decimal.
Выполнение CRUD-операций из Python
Таблица mobile уже есть. Теперь рассмотрим, как выполнять запросы для вставки, обновления, удаления или получения данных из таблицы в Python.
import psycopg2

from psycopg2 import Error

try:

    # Подключиться к существующей базе данных

    connection = psycopg2.connect(user="postgres",

                                  # пароль, который указали при установке PostgreSQL

                                  password="1111",

                                  host="127.0.0.1",

                                  port="5432",

                                  database="postgres_db")

    cursor = connection.cursor()

    # Выполнение SQL-запроса для вставки данных в таблицу

    insert_query = """ INSERT INTO mobile (ID, MODEL, PRICE) VALUES (1, 'Iphone12', 1100)"""

    cursor.execute(insert_query)

    connection.commit()

    print("1 запись успешно вставлена")

    # Получить результат

    cursor.execute("SELECT * from mobile")

    record = cursor.fetchall()

    print("Результат", record)

    # Выполнение SQL-запроса для обновления таблицы

    update_query = """Update mobile set price = 1500 where id = 1"""

    cursor.execute(update_query)

    connection.commit()

    count = cursor.rowcount

    print(count, "Запись успешно удалена")

    # Получить результат

    cursor.execute("SELECT * from mobile")

    print("Результат", cursor.fetchall())

    # Выполнение SQL-запроса для удаления таблицы

    delete_query = """Delete from mobile where id = 1"""

    cursor.execute(delete_query)

    connection.commit()

    count = cursor.rowcount

    print(count, "Запись успешно удалена")

    # Получить результат

    cursor.execute("SELECT * from mobile")

    print("Результат", cursor.fetchall())

except (Exception, Error) as error:

    print("Ошибка при работе с PostgreSQL", error)

finally:

    if connection:

        cursor.close()

        connection.close()

        print("Соединение с PostgreSQL закрыто")
Вывод:
1 запись успешно вставлена
Результат [(1, 'Iphone12', 1100.0)]
1 Запись успешно удалена
Результат [(1, 'Iphone12', 1500.0)]
1 Запись успешно удалена
Результат []
Соединение с PostgreSQL закрыто
Примечание: не забывайте сохранять изменения в базу данных с помощью
connection.commit()после успешного выполнения операции базы данных.
Работа с датой и временем из PostgreSQL
В этом разделе рассмотрим, как работать с типами date и timestamp из PostgreSQL в Python и наоборот.
Обычно при выполнении вставки объекта datetime модуль psycopg2 конвертирует его в формат timestamp PostgreSQL.
По аналогии при чтении значений timestamp из таблицы PostgreSQL модуль psycopg2 конвертирует их в объекты datetime Python.
Для этого примера используем таблицу Item. Выполните следующий код, чтобы подготовить таблицу.
import psycopg2

from psycopg2 import Error

try:

    # Подключиться к существующей базе данных

    connection = psycopg2.connect(user="postgres",

                                  # пароль, который указали при установке PostgreSQL

                                  password="1111",

                                  host="127.0.0.1",

                                  port="5432",

                                  database="postgres_db")

    # Создайте курсор для выполнения операций с базой данных

    cursor = connection.cursor()

    # SQL-запрос для создания новой таблицы

    create_table_query = '''CREATE TABLE item (

	    item_id serial NOT NULL PRIMARY KEY,

	    item_name VARCHAR (100) NOT NULL,

    	    purchase_time timestamp NOT NULL,

	    price INTEGER NOT NULL

    );'''

    # Выполнение команды: это создает новую таблицу

    cursor.execute(create_table_query)

    connection.commit()

    print("Таблица успешно создана в PostgreSQL")

except (Exception, Error) as error:

    print("Ошибка при работе с PostgreSQL", error)

finally:

    if connection:

        cursor.close()

        connection.close()

        print("Соединение с PostgreSQL закрыто")
Рассмотрим сценарий на простом примере. Здесь мы читаем колонку purchase_time из таблицы и конвертируем значение в объект datetime Python.
import psycopg2

import datetime

from psycopg2 import Error

try:

    # Подключиться к существующей базе данных

    connection = psycopg2.connect(user="postgres",

                                  # пароль, который указали при установке PostgreSQL

                                  password="1111",

                                  host="127.0.0.1",

                                  port="5432",

                                  database="postgres_db")

    cursor = connection.cursor()

    # Выполнение SQL-запроса для вставки даты и времени в таблицу

    insert_query = """ INSERT INTO item (item_Id, item_name, purchase_time, price)

                              VALUES (%s, %s, %s, %s)"""

    item_purchase_time = datetime.datetime.now()

    item_tuple = (12, "Keyboard", item_purchase_time, 150)

    cursor.execute(insert_query, item_tuple)

    connection.commit()

    print("1 элемент успешно добавлен")

    # Считать значение времени покупки PostgreSQL в Python datetime

    cursor.execute("SELECT purchase_time from item where item_id = 12")

    purchase_datetime = cursor.fetchone()

    print("Дата покупки товара", purchase_datetime[0].date())

    print("Время покупки товара", purchase_datetime[0].time())

except (Exception, Error) as error:

    print("Ошибка при работе с PostgreSQL", error)

finally:

    if connection:

        cursor.close()

        connection.close()

        print("Соединение с PostgreSQL закрыто")
Вывод:
1 элемент успешно добавлен
Дата покупки товара 2021-01-16
Время покупки товара 20:16:23.166867
Соединение с PostgreSQL закрыто