Introduction
Ruby is a programming language and development environment. It’s often used in web applications, data analysis, and other general-purpose programming.
This guide will show you two options to install Ruby on a Windows 10 system.

Prerequisites
- A system running Windows 10, updated to version 2004 (May 2020)
- A user account with administrator privileges
- Access to the command line / powershell
(click Start > type “cmd” > right-click > Run as administrator OR Start > type “powershell” >right-click > Run as administrator)
About Ruby: Ruby was developed under the Linux and macOS architecture. There are two ways to run Ruby on Windows. The more straightforward method is to use the Ruby installer to install all the software packages required. The more robust method is to install the Linux subsystem on Windows 10, then use Linux commands to install Ruby.
Installing Ruby Using the RubyInstaller Tool
This process uses the latest version from the Ruby Developer Download page. There are multiple options on this page.
If the system is used for developing software, or you aren’t sure which to choose, use a version With Devkit (Developer’s Kit). If you only need to run Ruby applications, use the version Without Devkit.
Step 1: Download the RubyInstaller Tool
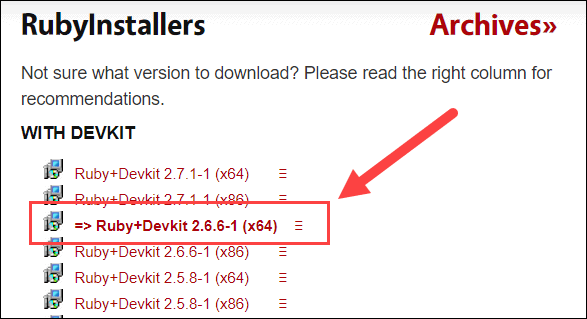
Use a web browser to navigate to the Download page (linked above). If no specific version is needed, select the bolded option:
Save the file and remember its location.
Step 2: Run the Ruby Installer
1. Browse to the location of the RubyInstaller tool, and double-click.
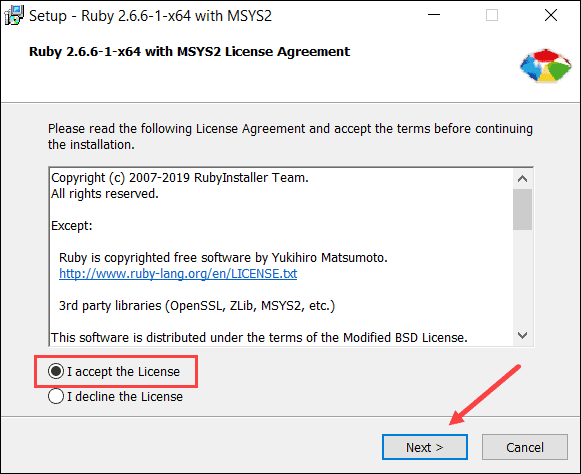
2. A Setup dialog launches and displays the License Agreement. Review it, tick the box to accept the agreement, then click Next.
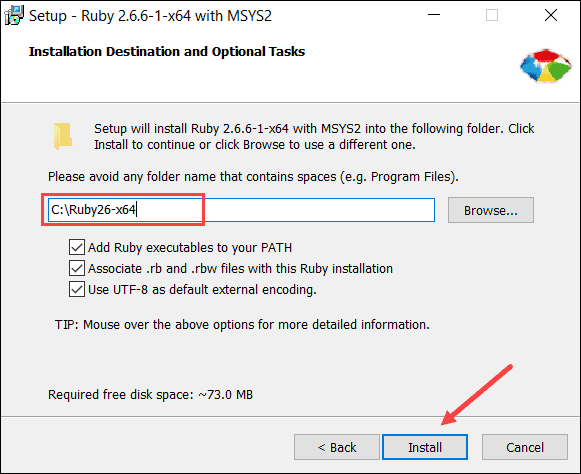
3. The installer asks to adjust the installation location and associated file types. Leave the defaults selected, unless the system requires differently, then click Install.
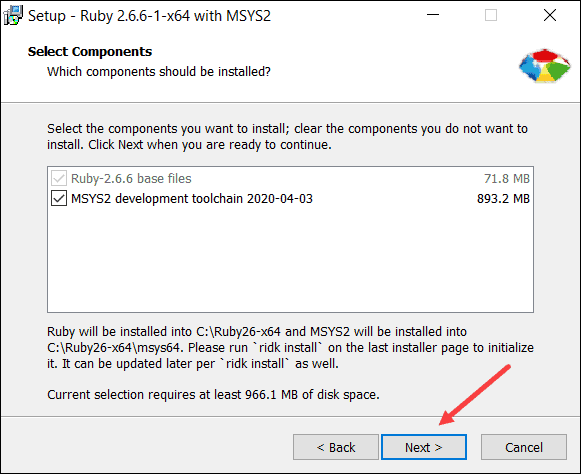
4. The system prompts to select components. Leave the default settings, and click Next.
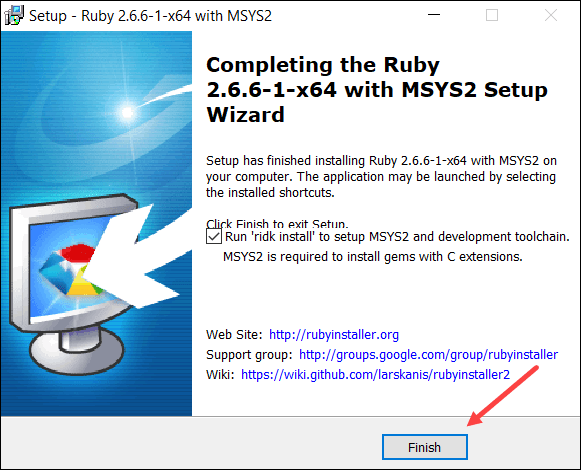
5. The Setup dialog runs for several minutes. When finished, it prompts to “Run ‘ridk install’ to setup MSYS2 and development toolchain.” Leave this checked and click Finish.
6. A black command-line-style window appears, labeled RubyInstaller2 for Windows. Select the components to install. Press Enter to install the default tools.
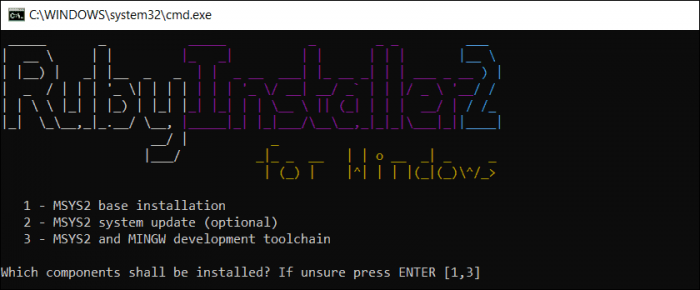
7. Once it finishes, press Enter again for the installer to close.
Step 3: Verify the Ruby Installation
If you have any terminal windows open, close them. Open a new terminal window, and enter the following:
ruby –vThe system displays the current version of Ruby installed on Windows 10.

Installing Ruby with the Linux Subsystem
Step 1: Enable the Windows Linux Subsystem (WSL)
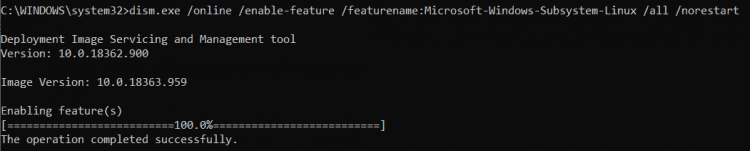
Open a command line, and enter the following command:
dism.exe /online /enable-feature /featurename:Microsoft-Windows-Subsystem-Linux /all /norestartThe system takes a few moments to enable the feature. Then, make sure to reboot the system for the changes to take place.
Step 2: Install Linux Distro
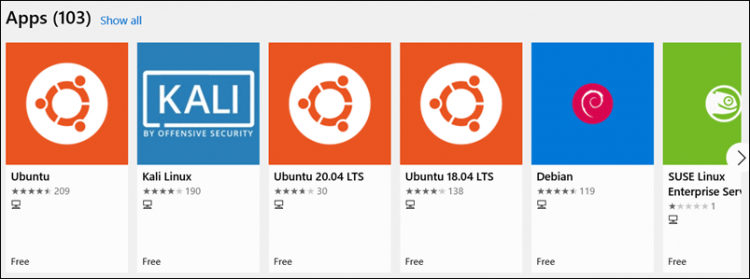
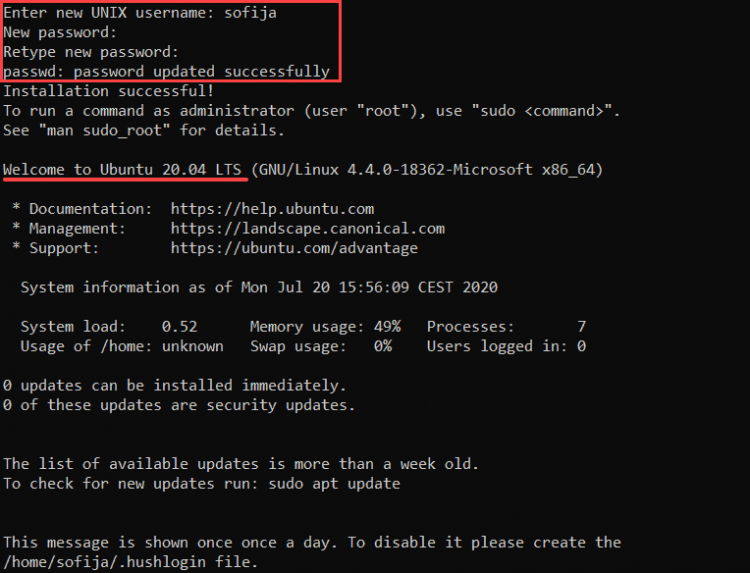
1. Once the system reboots, launch the Microsoft Store, click Search, and type Linux. The store lists several different versions of Linux that can run within Windows. If you don’t have a preference, Ubuntu 20.04 is a modern, easy-to-use version.
2. Select the version, then click Get.
3. The store displays that you now own the software. Select Install. You may be prompted to sign in with a Microsoft account. You may skip signing in.
4. Once the process finishes, you can either click Launch or exit the Microsoft Store.
5. Search for the Ubuntu Linux Subsystem in the Start Menu. Open it to complete the installation.
6. Follow the prompts and set up a user account and password for the Ubuntu subsystem. The output then notifies you have successfully installed Ubuntu.
Note: The Linux subsystem includes many tools commonly used in Linux. These include the BASH shell, the APT package manager, and others.
Step 3: Update the Linux Subsystem
When using Linux, it’s essential to update the system and software packages before installing new software.
To update your Linux subsystem, open a command line, and enter the following:
sudo apt updateAllow the process to complete. You may be prompted to confirm the installation of some packages – to do so, type y and Enter.
Note: The sudo command stands for SuperUser DO. It lets you run a single command as an administrator, maintaining security on the system while accessing essential tasks.
Step 4: Install Ruby
Once your Linux subsystem is fully installed and updated, install Ruby by entering the following:
sudo apt install ruby-fullConfirm the installation with y and Enter.
Step 5: Verify the Installation
To verify Ruby was successfully installed on Windows 10, enter the following command:
ruby –vThe system should display the current version of the installed Ruby software.
Conclusion
You should now have the Ruby programming language installed on Windows 10. Next, you may want to look into setting up Ruby on Rails.
Improve Article
Save Article
Improve Article
Save Article
Prerequisite: Ruby Programming Language
Before we start with the installation of Ruby on Windows, we must have first-hand knowledge of what Ruby is?. Ruby is a pure Object-Oriented language developed by Yukihiro Matsumoto (also known as Matz in the Ruby community) in the mid-1990s in Japan. Everything in Ruby is an object except the blocks but there are replacements too for it i.e procs and lambda. The objective of Ruby’s development was to make it act as a sensible buffer between human programmers and the underlying computing machinery.
Ruby is based on many other languages like Perl, Lisp, Smalltalk, Eiffel and Ada. It is an interpreted scripting language which means most of its implementations execute instructions directly and freely, without previously compiling a program into machine-language instructions.
Downloading and Installing Ruby
All the versions of Ruby for Windows can be downloaded from rubyinstaller.org. Download the latest version and follow the further instructions for its Installation.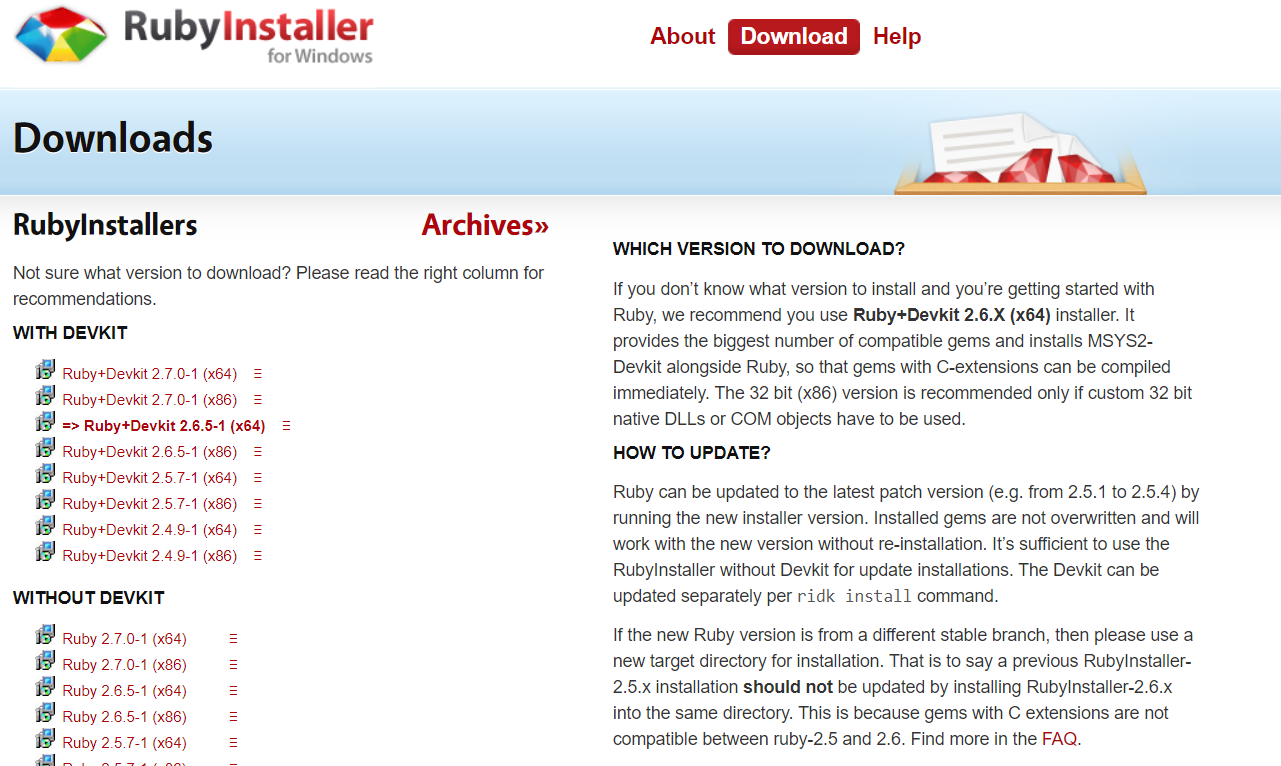
Beginning with the installation:
Installing MYSYS2 Components:
To check if Ruby installed correctly, perform a version check for the same using the following command on the command-line:
ruby -v

Here’s a sample Program to begin with the use of Ruby Programming:
Let’s consider a simple Hello World Program.
Using command-line, run the irb command. After this we can write the ruby code and it will run on command line.
Students using PC machines with Windows tend to run into problems installing all the tools necessary for the Ruby and Rails course. Why? There is no «one size fits all» installation setup for Windows machines. Installations can have errors and it can take some time and persistence to get Ruby set up on a Windows machine.
However, many students have gone through the Ruby and Rails course using Windows, and you can do it too! Keep in mind that there will be an in-class troubleshooting session where you can get help from your peers and your teacher. Our best recommendation is to take detailed notes on any issues that come up, the troubleshooting steps you took to address those issues, and any helpful resources you found along the way. You can share these notes with your peers, and they can share their notes with you.
Take note: if you run into any error that prevents you from completing all of the installation steps in this lesson, you should still continue with the remaining installation pre-work by installing Postgres.
Next up, we’ll cover two installation options for installing Ruby.
Using Windows Subsystem for Linux
If you are interested in Linux or have previous experience with using it, you can consider using the Windows Subsystem for Linux. It is much easier to set up all the tools you’ll need for Ruby and Rails within the Windows Subsystem for Linux. The downside, however, is that you’ll need to teach yourself quite a bit about Linux! We don’t provide Linux support at Epicodus so this option is best for students that are motivated to learn Linux on their own.
There are a lot of resources online for using the Windows Subsystem for Linux (WSL) to install Ruby and Rails on Windows 10 and up. We recommend doing some research and reading through some of the online guides to get a sense of using WSL. This can help you decide whether or not to pursue this route. Here are some resources to get you started:
- What is the Windows Subsystem for Linux?
- Frequently Asked Questions about Windows Subsystem for Linux
Using RubyInstaller
The following installation instructions cover what you need to do to set up all the Ruby tools you need on your Windows machine. Keep in mind that our instructions are broad because there’s no «one size fits all» installation setup for Windows machines. It’s possible that you will run into problems that you will have to troubleshoot. This is the approach we used for many years and it does work.
On Windows, the easiest way to install Ruby is with the RubyInstaller, which includes Ruby and a few other tools we’ll use throughout these lessons.
Make sure to install the Ruby+Devkit 3.1.2-1 version, to have a compatible version with the tools used in the curriculum. There is both a 64 bit (x64) and 32 bit (x86) version available. The built-in System Information program on Windows machines has information on which System Type your machine is using. Because the instructions on where to find this information vary based on your Windows version, if you don’t know how to find this information, we recommend a quick Google search to determine with version you should download.
After you’ve downloaded the correct Ruby+Devkit 3.1.2-1 from RubyInstaller, you should run the installer and follow along with the installation prompts. We recommend selecting the defaults for all options. Except, if RubyInstaller offers to download the Ruby documentation, we recommend against this. Why? There’s better documentation is available online.
When the RubyInstaller opens on Windows PowerShell, you should simply hit «enter» for both of the prompts.
Generally speaking, we recommend reading through terminal output and any error logs that come up in the installation process, as they can point what to look into that may be missing or causing an issue. Make sure to save these to a document that you can later share with others.
Verify Your Ruby Installation
In your GitBash, run this command:
$ ruby -v
You should get a response similar to: ruby 3.1.2p20 (2022-04-12 revision 4491bb740a) [x64-mingw-ucrt].
Also, confirm that you can access IRB (a REPL, which we’ll learn more about soon):
$ irb
irb(main):001:0>
To exit IRB, enter exit.
Resolving the Error this input device is not a TTY
Some Windows users run into issues using IRB. When accessing IRB and you get an error similar to this one:
the input device is not a TTY. If you are using mintty, try prefixing the command with 'winpty'.
This happens to some Windows users when they try to start an interactive terminal. This interactive terminal could be for Node, Ruby, Rails or another technology. The solution to this issue is exactly what the message suggests: prefix the command with winpty.
Using our example of accessing irb, the command should look like this:
$ winpty irb
So, what’s happening here? Under the hood, Git Bash uses MinTTY as a terminal emulator, and MinTTY is not compatible with Windows console programs. This is where winpty comes in. winpty is a program that provides an interface so that software like MinTTY can communicate with Windows console programs. When we spin up an interactive terminal like IRB on Windows, it sometimes runs into this communication issue and needs the help of winpty.
So, anytime you see the message about prefixing a command with winpty, do just that.
Alternatively, you can enter this command in GitBash so that it automatically handles this issue:
$ echo $'alias irb='winpty "$(which irb).cmd"'' >> ~/.bash_profile
What this code does is set up an alias for the irb command, so that every time you enter irb in GitBash, it actually executes winpty irb.
Install Rails
Finally, verify that you can install Rails at the same version we use at Epicodus:
$ gem install rails -v 7.0
Then, verify that Rails is working by navigating to the desktop and creating a new project:
$ rails new test_project
It will take a little time for Rails to spin up a new project. Once it’s complete, cd into test_project and start the Rails server:
$ rails s
You should see a message similar to the following:
Puma starting in single mode...
* Puma version: 5.6.4 (ruby 3.1.2-p20) ("Birdie's Version")
*  Min threads: 5
*  Max threads: 5
*  Environment: development
*          PID: 19756
* Listening on http://[::1]:3000
* Listening on http://127.0.0.1:3000
If not, take note of any errors and work through the possible errors and solutions listed below. To close the server enter ctrl + c.
After you’ve completed these steps, delete the test_project directory.
And with that, you’re ready to go with Rails!
Possible rails new or rails s Error with tzinfo-data or #<NameError: uninitialized constant Gem::Source
When running the rails new ... command or starting the Rails server with rails s and you receive error output related to tzinfo-data or #<NameError: uninitialized constant Gem::Source, try these steps:
- run
gem bundler updatein the command line - Then try creating a fresh project with
rails new second_test - Then try starting the Rails server of the
second_testproject withrails s
If this doesn’t resolve your issue, you should still take note of your specific error messages and any troubleshooting you did so you can share this information with your instructor.
Possible Rails Install Error with freedesktop.org.xml
When installing Rails and you get an error similar to this one:
Could not find MIME type database in the following locations:
["/usr/local/share/mime/packages/freedesktop.org.xml",
"/opt/homebrew/share/mime/packages/freedesktop.org.xml",
"/opt/local/share/mime/packages/freedesktop.org.xml",
"/usr/share/mime/packages/freedesktop.org.xml"]

Ensure you have either installed the shared-mime-info package for your
distribution, or
obtain a version of freedesktop.org.xml and set FREEDESKTOP_MIME_TYPES_PATH to
the location
of that file.
Try following these troubleshooting steps based off of this Stack Overflow:
- Open GitBash, and enter
touch ~/freedesktop.org.xml - Next enter
code ~/freedesktop.org.xmlto open this new file in VS Code. - Copy and paste the contents of this website into the
freedesktop.org.xmlfile, save, and exit. - Next, enter this into GitBash:
echo 'export FREEDESKTOP_MIME_TYPES_PATH="/c/Users/brooke/freedesktop.org.xml"' >> ~/.bash_profile, where you replacebrookewith your own user name. - Next, restart GitBash with
source ~/.bash_profile(or just restart your GitBash). - Next, retry the rails installation:
gem install rails -v 7.0
Optionally, Install Ruby Version Manager
As long as Windows users have installed Ruby+Devkit 3.1.2-1, there should be no need for a version manager for the Ruby/Rails curriculum at Epicodus. However, you should consider installing a Ruby Version Manager at some point so that you can switch between Ruby versions, especially if for your internship you will be working with Ruby. For this, we recommend Ruby Version Manager, a Ruby version manager that is compatible with Windows.
Why Use A Version Manager?
In an ideal world, developers would always use the latest, most perfect version of a language. In reality, updating older projects is often a huge pain point, especially in very large or dated projects. The version of Ruby you use for projects now will likely be different from the one you use a year from now, which in turn will be different from the version you use five years from now. However, you may still need to maintain past projects (especially if they’re work-related), which means you’ll need the ability to switch between different versions of Ruby in your personal environment.
This issue may also come up at Epicodus particularly for Mac users. Macs come with a version of Ruby that is installed globally, and this may conflict with the version of Ruby that we use in the coursework. You shouldn’t be expected to downgrade the Ruby version in your global environment in order for your projects to be compatible with Epicodus coursework; however, you should be able to use the same version we use at Epicodus. After all, it would be poor etiquette in the workplace to expect your work to use your version of Ruby instead of the other way around!
Like we mentioned above for Windows users, it’s not important to have a Ruby version manager for the Ruby/Rails coursework, as long as Windows users have installed Ruby+Devkit 3.1.2-1. However, it is important to get a version manager installed at some point, especially if you plan on contributing to open source Ruby projects or doing an internship that focuses on Ruby.