Sqlite is a serverless relational database management system, what we called as an embedded database. It is very lightweight and very easy to use. In this article we are going to see how to install sqlite database on Microsoft windows 10 operating system.
Sqlite3 installation file for windows 10 is a zip file, which contains the sqlite3.exe. What we have to do is Download and extract zip file to hard drive, then access the sqlite3.exe from the windows 10 command line.
Download sqlite3 for Windows 10
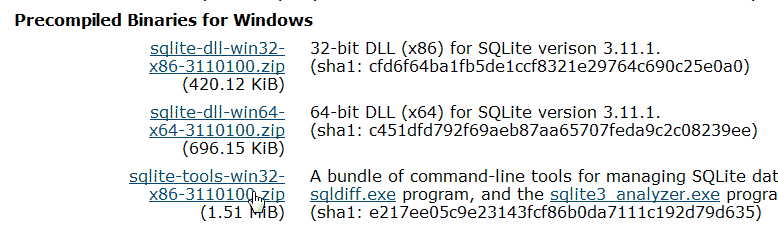
Go to sqlite3 download page and download the sqlite-tools zip file to your hardrive(Under the Precompiled Binaries for Windows).
Once you extract the zip file, you will find sqlite3.exe file, which is the command line shell we use to create and manage sqlite databases.
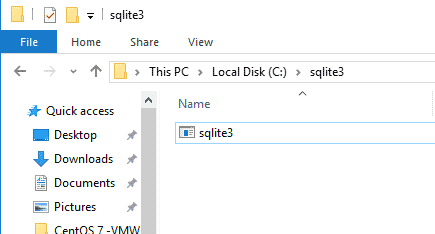
Create sqlite3 folder inside C Drive
Now create a folder called sqlite3 inside the C drive and copy the sqlite3.exe file to the folder you created.
Basically that’s all we have to do. We can now create sqlite databases using windows command prompt by moving to C:sqlite3 directory.
Example : Create sqlite database and table.
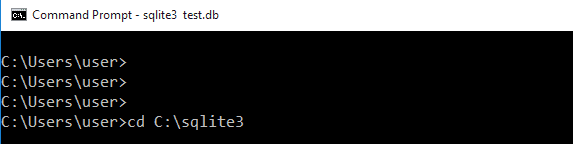
To create a database first open the Windows 10 command prompt(Start menu > All Apps > Windows System > Command Prompt). Then move to the C:sqlite3 folder using cd command.
Then use the sqlite3 command followed by the name of the database to create a database.
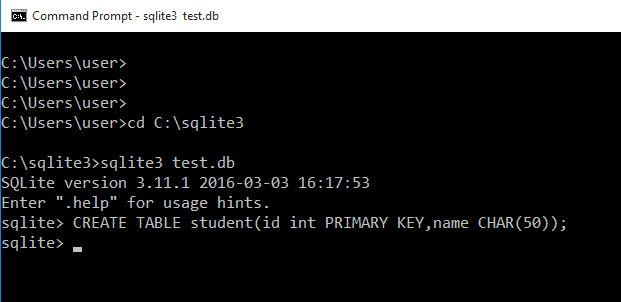
It is not necessary to use .db extension to the database name. You can put any extension you want or if you want, you can create the database without extension.
Add Sqlite3 to Windows Path Variable
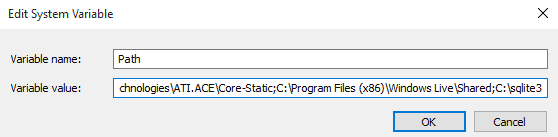
There is one more thing we could do. We can add sqlite to the Windows PATH variable, even though it is not essential. If we add Sqlite to the Windows 10 PATH variable we can access the sqlite3 command without moving to the C:sqlite3 folder.
- Open Advanced System Properties ( Control Panel > System and Security > System > Advanced System Settings).
- Click Environment Variables.
- Under the system variables, Select the PATH variable and click edit.
- Append ;C:sqlite3 at the end of the value and click ok(Do not forget the semicolon).
A Sqlite database is a one single file, which you can move to anywhere in your computer. Also you can move a database from one operating system to another without any problem.
How to Install SQLite on Windows 10, 2016, 2019, 2022 (SQLite3 Command). SQLite is popular tool due to its great feature and zero configuration needed. It is small and self contained database engine that has a lot of APIs for a variety of programming languages. This article will take you through the process of setting up SQLite on Windows 10, 2016, 2019, 2022.
What is SQLite
")
SQLite itself is an RDBMS (relational database management system). In addition, it is in the public domain, which means you are free to use its code for commercial or noncommercial use. As a result, you will not be legally restricted in terms of utilizing, modifying, or even distributing the platform.
As opposed to server/client SQL systems, like MySQL, SQLite has been optimized for simplicity, economy and requires relatively little configuration. In the context of that, it does not compete with server/client solutions.
SQLite is a very popular database management system because of the fact that it is lightweight and easy to manage.
With SQLite all data and the data objects are stored in a single file that can be accessed directly by any application. The file is stored on the file system and no further admin required to run SQLite.
However, SQLite is only capable of handling low to moderate volume HTTP requests and also the database size is usually limited to 2GB. Even SQLite has its limitations, its advantages have gained the attention of more users. The tools in SQLite in particular the SQLite3 Command Line CLI we examine here, work the same from one environment to the next.
Sqlite3
The SQLite project has simple command line program named sqlite3 or sqlite3.exe on Windows, which allows the user to manually enter and execute SQL statements against an SQLite database or a ZIP archive. In this article we go through steps how to use the sqlite3 program in Windows server.
In the next part of our article How to Install SQLite on Windows 10, 2016, 2019, 2022 (SQLite3 Command) we will point out SQLite advantages:
Benefits of SQLite
Improves Performance
SQLite is extremely small and lightweight RDBMS, it is self contained in a small footprint. Also, it is serverless and file based. Any other RDBMS like MySQL needs a separate server for functionality, also called server/client architecture.
In fact, SQLite may take up as little as 600KB of space, depending on the system you install it on. You do not have to worry about installing any dependencies in order to make it work.
The SQLite database itself is modest by nature. Objects composing them – such as tables, indexes, and schema – are centralized within a single OS file. The combination of all these factors can lead to solid performance, in addition to high levels of dependability and stability. More specifically, SQLite runs between 10 to 20 times faster than PostgreSQL, and two times faster than MySQL. Low traffic websites will notice the difference the most.
Easy Setup and Administration
SQLite requires no configuration or requirements from the beginning. It is serverless and requires no configuration files. This means there isn’t any installation process involved. Downloading the requisite SQLite Libraries is all you need to get started with your database. Your computer is under no significant strain because it uses a small amount of memory.
SQLite is also transactional. This will allow you to roll back changes in case of a program crash or if an editing attempt does not succeed. SQLite’s rollback function allows you to return a database’s version that existed before the edits were applied. Therefore, you can rest assured that your changes won’t cause irreversible damage.
SQLite offers simplicity as well as easy administration. Ultimately, this means you may not need a DBA to keep everything running smoothly.
SQLite Is Versatile, Portable, and Flexible
A platform that provides versatility is one of the most beneficial things when it comes to software. SQLite is a cross platform database engine that is known for its robust portability and functionality.
You can copy and transfer data between 32 bit and 64 bit operating systems, as well as between big endian and little endian architectures. Basically, SQLite can be installed, compiled, and run on a number of different platforms, including Linux, Windows, and Mac OS X.
Furthermore, since the SQLite database consists of only one file and not a collection of separate files, it is far more portable when it comes to flexibility. As a result, SQLite is suitable for a wider variety of computing platforms.
SQLLite reduces cost and complexity
License free and serverless. No need for lengthy and error prone procedural queries. SQLite can be easily extended in in future releases just by adding new tables and/or columns. It also preserve the backwards compatibility.
Follow this post, we will show you how how to Install SQLite on Windows 10, 2016, 2019, 2022 (SQLite3 Command).
Install SQLite on Windows 10, 2016, 2019, 2022 (SQLite3 Command)
Install SQLite on Windows
First, go to SQLite’s official website download page and download precompiled binaries from Windows section. Once the download is completed, you should see the downloaded file in the Windows Downloads directory.
Next, right click on the downloaded file and extract it inside the C:sqlite directory.

The window will look like this and you extract Compressed (Zipped) Folders and find a destination file as below

Next, open the Windows CMD and change the directory to C:sqlite using the following command:
Next, verify the SQLite version with the following command:
You will get the SQLite version in the following output:
SQLite version 3.38.5 2022-05-06 15:25:27
Enter ".help" for usage hints.
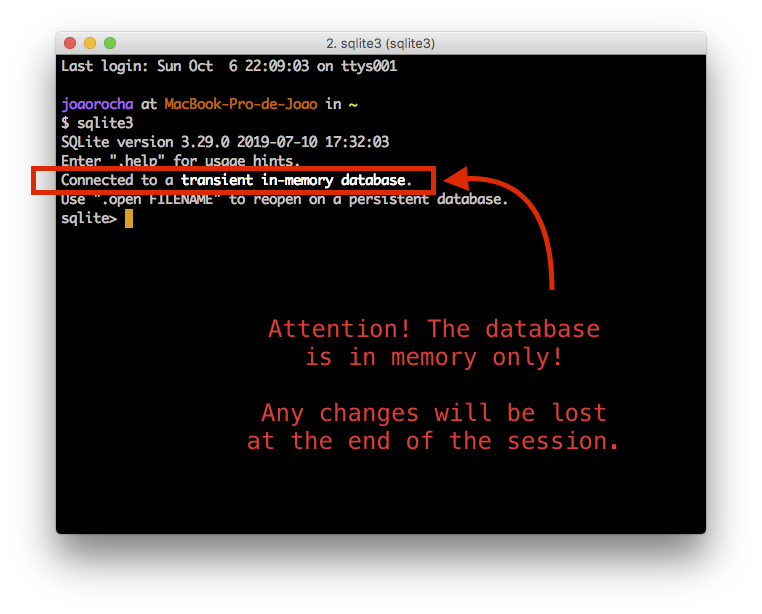
Connected to a transient in-memory database.
Use ".open FILENAME" to reopen on a persistent database.
sqlite>

Create a Database in SQLite
The basic syntax to create a database in SQLite is shown below:
sqlite3.exe database-name
Now, let’s create a database named employee.db using the following command:
You can also verify your created database with the following command:
You should see your created database in the following output:
main: C:sqliteemployee.db r/w
To get a list of all SQLite options, run the following command:
You should see the list of all SQLite options in the following output:
					.archive ... Manage SQL archives
.auth ON|OFF Show authorizer callbacks
.backup ?DB? FILE Backup DB (default "main") to FILE
.bail on|off Stop after hitting an error. Default OFF
.binary on|off Turn binary output on or off. Default OFF
.cd DIRECTORY Change the working directory to DIRECTORY
.changes on|off Show number of rows changed by SQL
.check GLOB Fail if output since .testcase does not match
.clone NEWDB Clone data into NEWDB from the existing database
.connection [close] [#] Open or close an auxiliary database connection
.databases List names and files of attached databases
.dbconfig ?op? ?val? List or change sqlite3_db_config() options
.dbinfo ?DB? Show status information about the database
.dump ?OBJECTS? Render database content as SQL
.echo on|off Turn command echo on or off
.eqp on|off|full|... Enable or disable automatic EXPLAIN QUERY PLAN
.excel Display the output of next command in spreadsheet
.exit ?CODE? Exit this program with return-code CODE
.expert EXPERIMENTAL. Suggest indexes for queries
Create a Table in SQLite
CREATE TABLE engineer(id integer NOT NULL, name text NOT NULL, persontype text NOT NULL, length integer NOT NULL);
To verify the created table, run the following command:
You should see the following output:
Now, insert some data into the table using the following command:
					INSERT INTO engineer VALUES (1, "Ram", "Junagadh", 528);
INSERT INTO engineer VALUES (2, "Vikash", "Surat", 734);
INSERT INTO engineer VALUES (3, "Raj", "London", 1200);

Next, verify the inserted data using the following command:
You should see the content of a table in the following output:
					1|Ram|Junagadh|528
2|Vikash|Surat|734
3|Raj|London|1200
To view the data based on ID, use the following command:
SELECT * FROM engineer WHERE id IS 2;
You should see the following output:
Update a Table in SQLite
You can use the ALTER TABLE command to change the table. For example, to add a new column named age, run the following command:
ALTER TABLE engineer ADD COLUMN age integer;
Next, add the new age value for each rows using the following command:
					UPDATE engineer SET age = 80 WHERE id=1;
UPDATE engineer SET age = 50 WHERE id=2;
UPDATE engineer SET age = 90 WHERE id=3;
Next, verify the table data using the following command:
You should see the following output:
					1|Ram|Junagadh|528|80
2|Vikash|Surat|734|50
3|Raj|London|1200|90
To display the table data in a table format, you will need to enable the headers in SQLite. You can enable it using the following command:
You can now see the table data in the table format using the following command:
You should see the following output:
					id name persontype length age
-- ------ ---------- ------ ---
1 Ram Junagadh 528 80
2 Vikash Surat 734 50
3 Raj London 1200 90
To exit from the SQLite shell, run the following command:
Backup and Restore SQLite Database
To backup an SQLite database to a text file, run the following command:
sqlite3 employee.db .dump > employee.dump.sql
If you want to create a backup in sqlite format, run the following command:
sqlite3 employee.db ".backup employee.backup.sqlite"
To restore a backup from the text formated dump file, run the following command:
sqlite3 employee.db < employee.dump.sql
To restore a backup from the SQLite formatted dump file, run the following command:
sqlite3 employee.db ".restore employee.backup.sqlite"
Great! We have learned How to Install SQLite on Windows 10, 2016, 2019, 2022 (SQLite3 Command).
How to Install SQLite on Windows 10, 2016, 2019, 2022 (SQLite3) Conclusion
In this post, we explained how to install SQLite on a Windows server. We also explained how to interact with the SQLite shell to create and manage databases and tables in SQLite. I hope you can now easily use SQLite in the development environment.
- About
- Installing SQLite3
- Manual Installation (portable)
- Automatic installation
- macOS
- Linux (debian-based distros such as Ubuntu and derivatives)
- Installing the Graphical User Interface
- MacOS
- Linux
- Starting SQLite
- In a FEUP machine
- In your own computer
- Useful commands
- Creating your first database
- Executing SQL statements
- Reading from a file
- Saving to a file
- Keeping the Database state in a file
- Pragma Statements
- Syntax
- PRAGMA foreign_keys
- References and Tutorials
- Miscellaneous scripts
About
SQLite is a lightweight Database Management System (DBMS) which allows its users to implement a relational schema and run SQL queries over it, without the need for a standalone database server. This is convenient because the setup is minimal and the database can be easily bundled with application files.
SQlite is portable, which means that you can install it on any computer, even when you do not have Administration privileges. It is also quite interesting for mobile development in platforms such as Android or iOS.
SQLite implements ACID (Atomic, Consistent, Isolated, and Durable) transactions. This makes it possible to rollback all changes made during transactions in the event of a system crash or power loss.
SQLite does not, however, implement the SQL Standard.
For our classes we will be using SQLite3.
Installing SQLite3
All FEUP computers have sqlite3 already installed, so you should not need to carry out this step in those machines. If you want to install it in your personal laptop for home work or study, read on.
Manual Installation (portable)
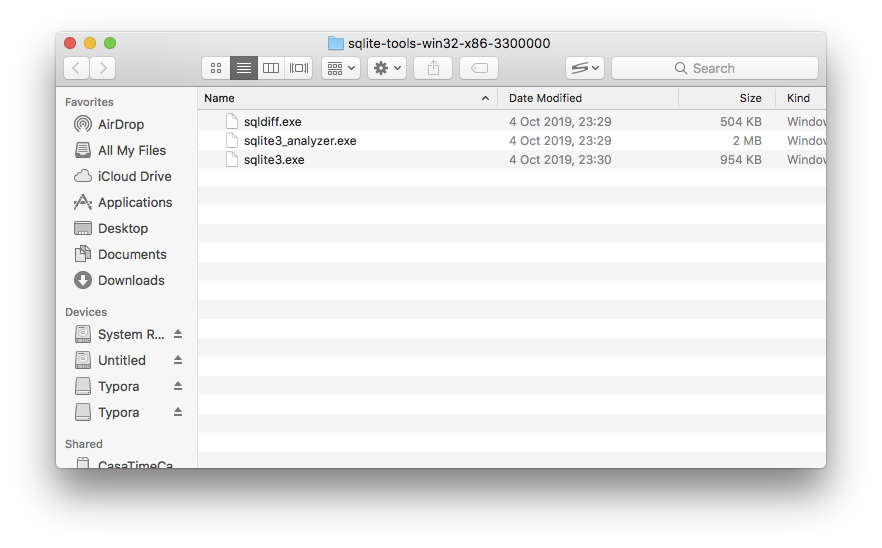
- Download the precompiled binaries for
sqlite-toolsfrom the website and unzip them to a folder in your computer. Please choose the appropriate file depending on your operating system (Windows, Linux or macOS).- For Windows, I recommend you unzip the download into
C:sqlite3. For other OS’s you should use your home folder, like~/sqlite3.
- For Windows, I recommend you unzip the download into
- Navigate to the folder where you extracted your download
- You should see 3 files:
Automatic installation
macOS
- Install HomeBrew
- Open Terminal
- Type
brew install sqlite3and press Enter.
Linux (debian-based distros such as Ubuntu and derivatives)
- Open Terminal emulator
- Type
sudo apt-get update && sudo apt-get install sqlite3and press Enter.
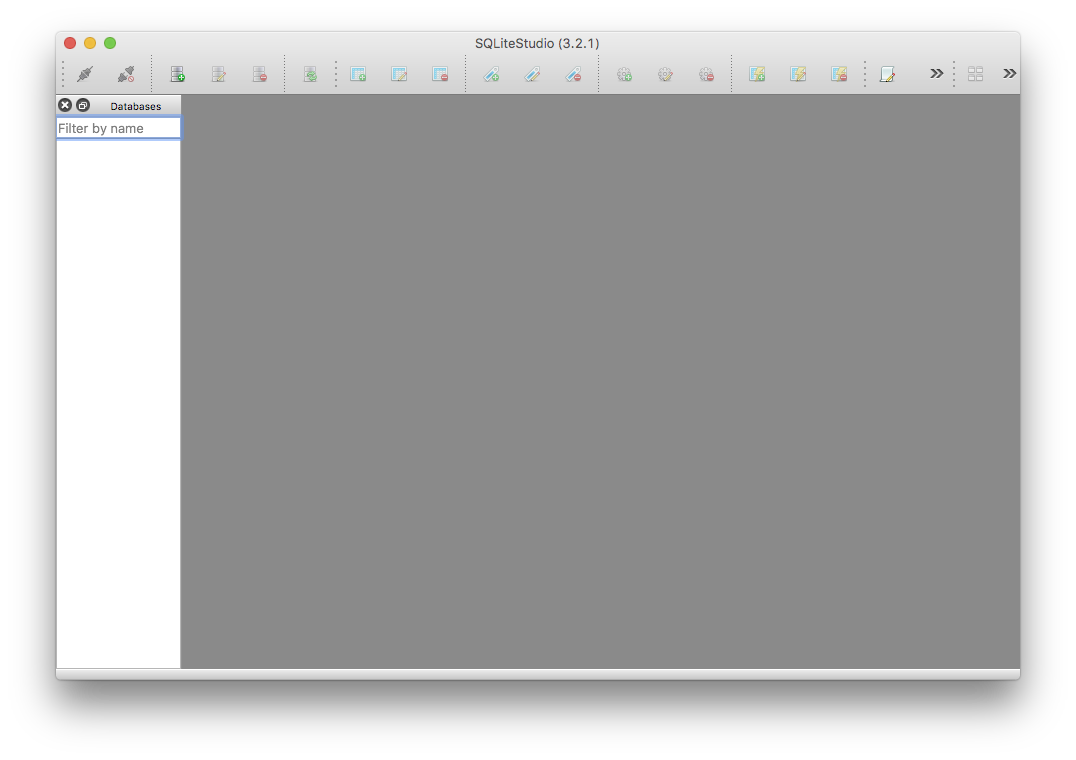
Installing the Graphical User Interface
We will also be using a GUI (Graphical User Interface) to manipulate our SQLite databases. SQLiteStudio is free and runs on every Operating System. Detailed installation instructions for Windows, Mac and Linux are available here.
MacOS
For macOS you can use homebrew. Just run the following command: brew cask install sqlitestudio.
Linux
For Linux, unzip the installer in the downloads page. Open the Terminal, cd to the Downloads folder and make the installer executable by running the command chmod +x ./InstallSQLiteStudio-3.2.1. Then run it: ./InstallSQLiteStudio-3.2.1. The installer should start up.
Starting SQLite
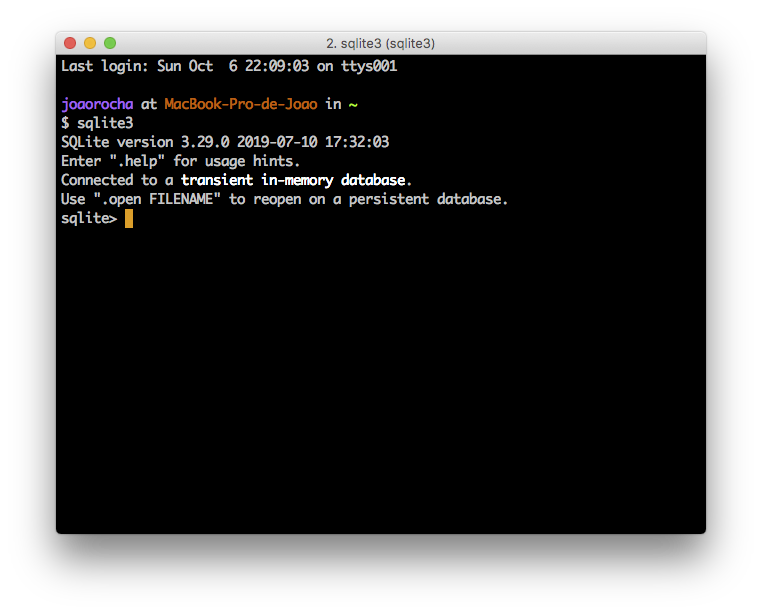
In a FEUP machine
- Press the
Windows Key + R. A small window will pop up. - Type
cmd.exeand press Enter. - A command line window will pop up.
- Type sqlite3 and press Enter.
- You will now be in the SQLite3 command line.
In your own computer
To create a database you must first navigate to the folder where sqlite3 is installed. Assuming that you unzipped the downloaded files to C:sqlite as previously explained, do this:
- Press the
Windows Key + R. A small window will pop up. - Type
cmd.exeand press Enter. - A command line window will pop up.
- Type
C: - Type
cd C:sqlite3 - Type
sqlite3.exeand press Enter. - You will now be in the SQLite3 command line.
Useful commands
| Command | Description |
|---|---|
| .databases | List names and files of attached databases |
| .dump | Dump the database or a specific table in an SQL text format |
| .exit / .quit | Exit the SQLite shell |
| .headers | Turn display of headers on or off, when displaying output of SQL statements |
| .help | Show available commands |
| .import | Import data from a file into a table |
| .mode | Set output mode |
| .open | Open a database from a file |
| .output | Redirect the output to a file |
| .read | Execute SQL statements from a file |
| .save | Write in-memory database into a file |
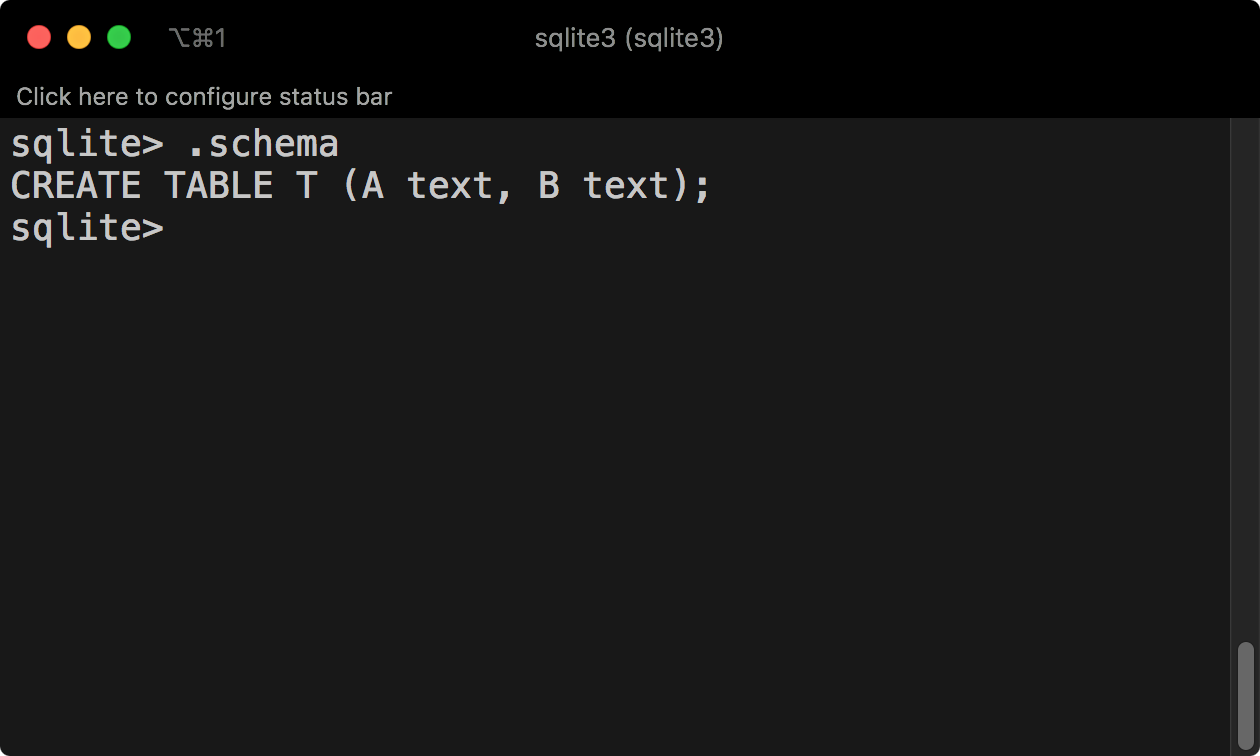
| .schema | Show the CREATE statements used for the whole database or for a specific table |
| .show | Show current values for various settings |
| .show | List names of tables |
Creating your first database
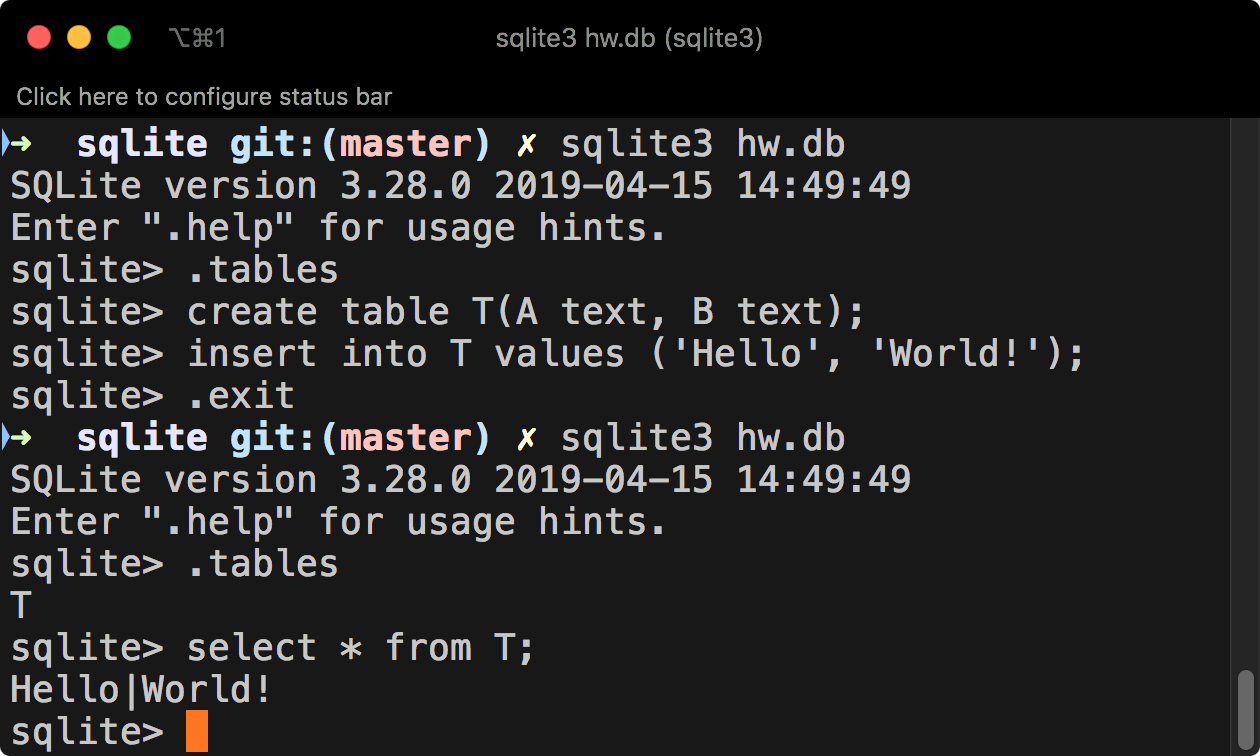
When you first run sqlite3, any changes will be saved in memory only. This means that if you close the window, all changes will be lost.
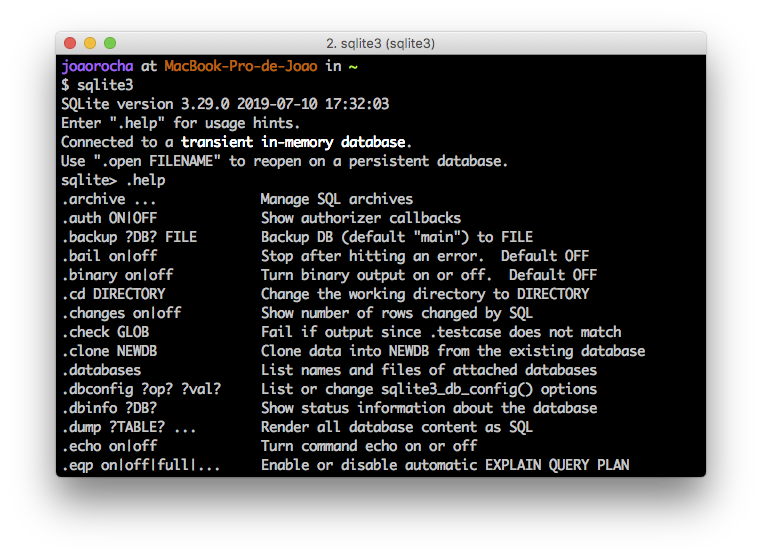
You can see the list of all commands by typing .help:
Executing SQL statements
There are two main ways of running SQL in the prompt; the first is to write code directly, the other is to create a .sql file and read it in the prompt.
Here is a piece of code to get you started:
1
2
3
4
5
6
7
8
9
10
11
12
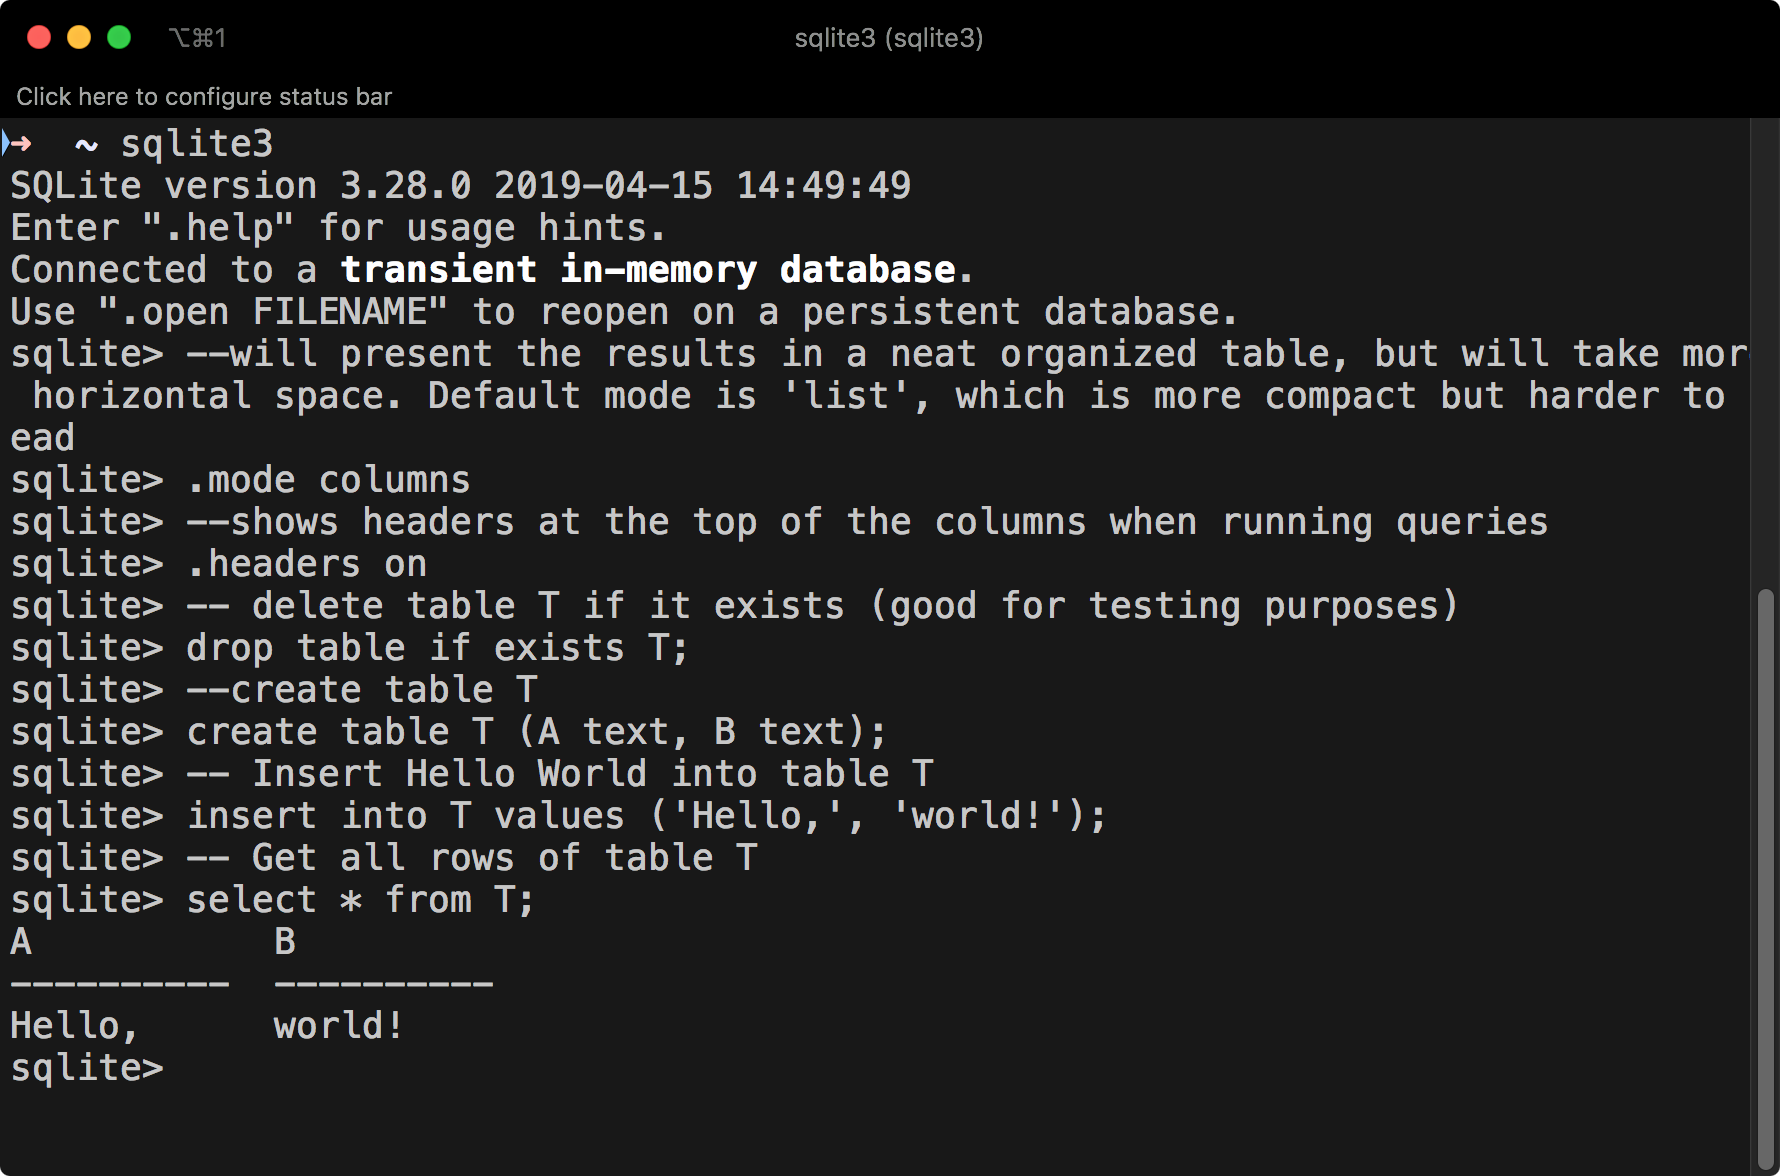
--will present the results in a neat organized table, but will take more horizontal space. Default mode is 'list', which is more compact but harder to read
.mode columns
--shows headers at the top of the columns when running queries
.headers on
-- delete table T if it exists (good for testing purposes)
drop table if exists T;
--create table T
create table T (A text, B text);
-- Insert Hello World into table T
insert into T values ('Hello,', 'world!');
-- Get all rows of table T
select * from T;
You should see this result:
Reading from a file
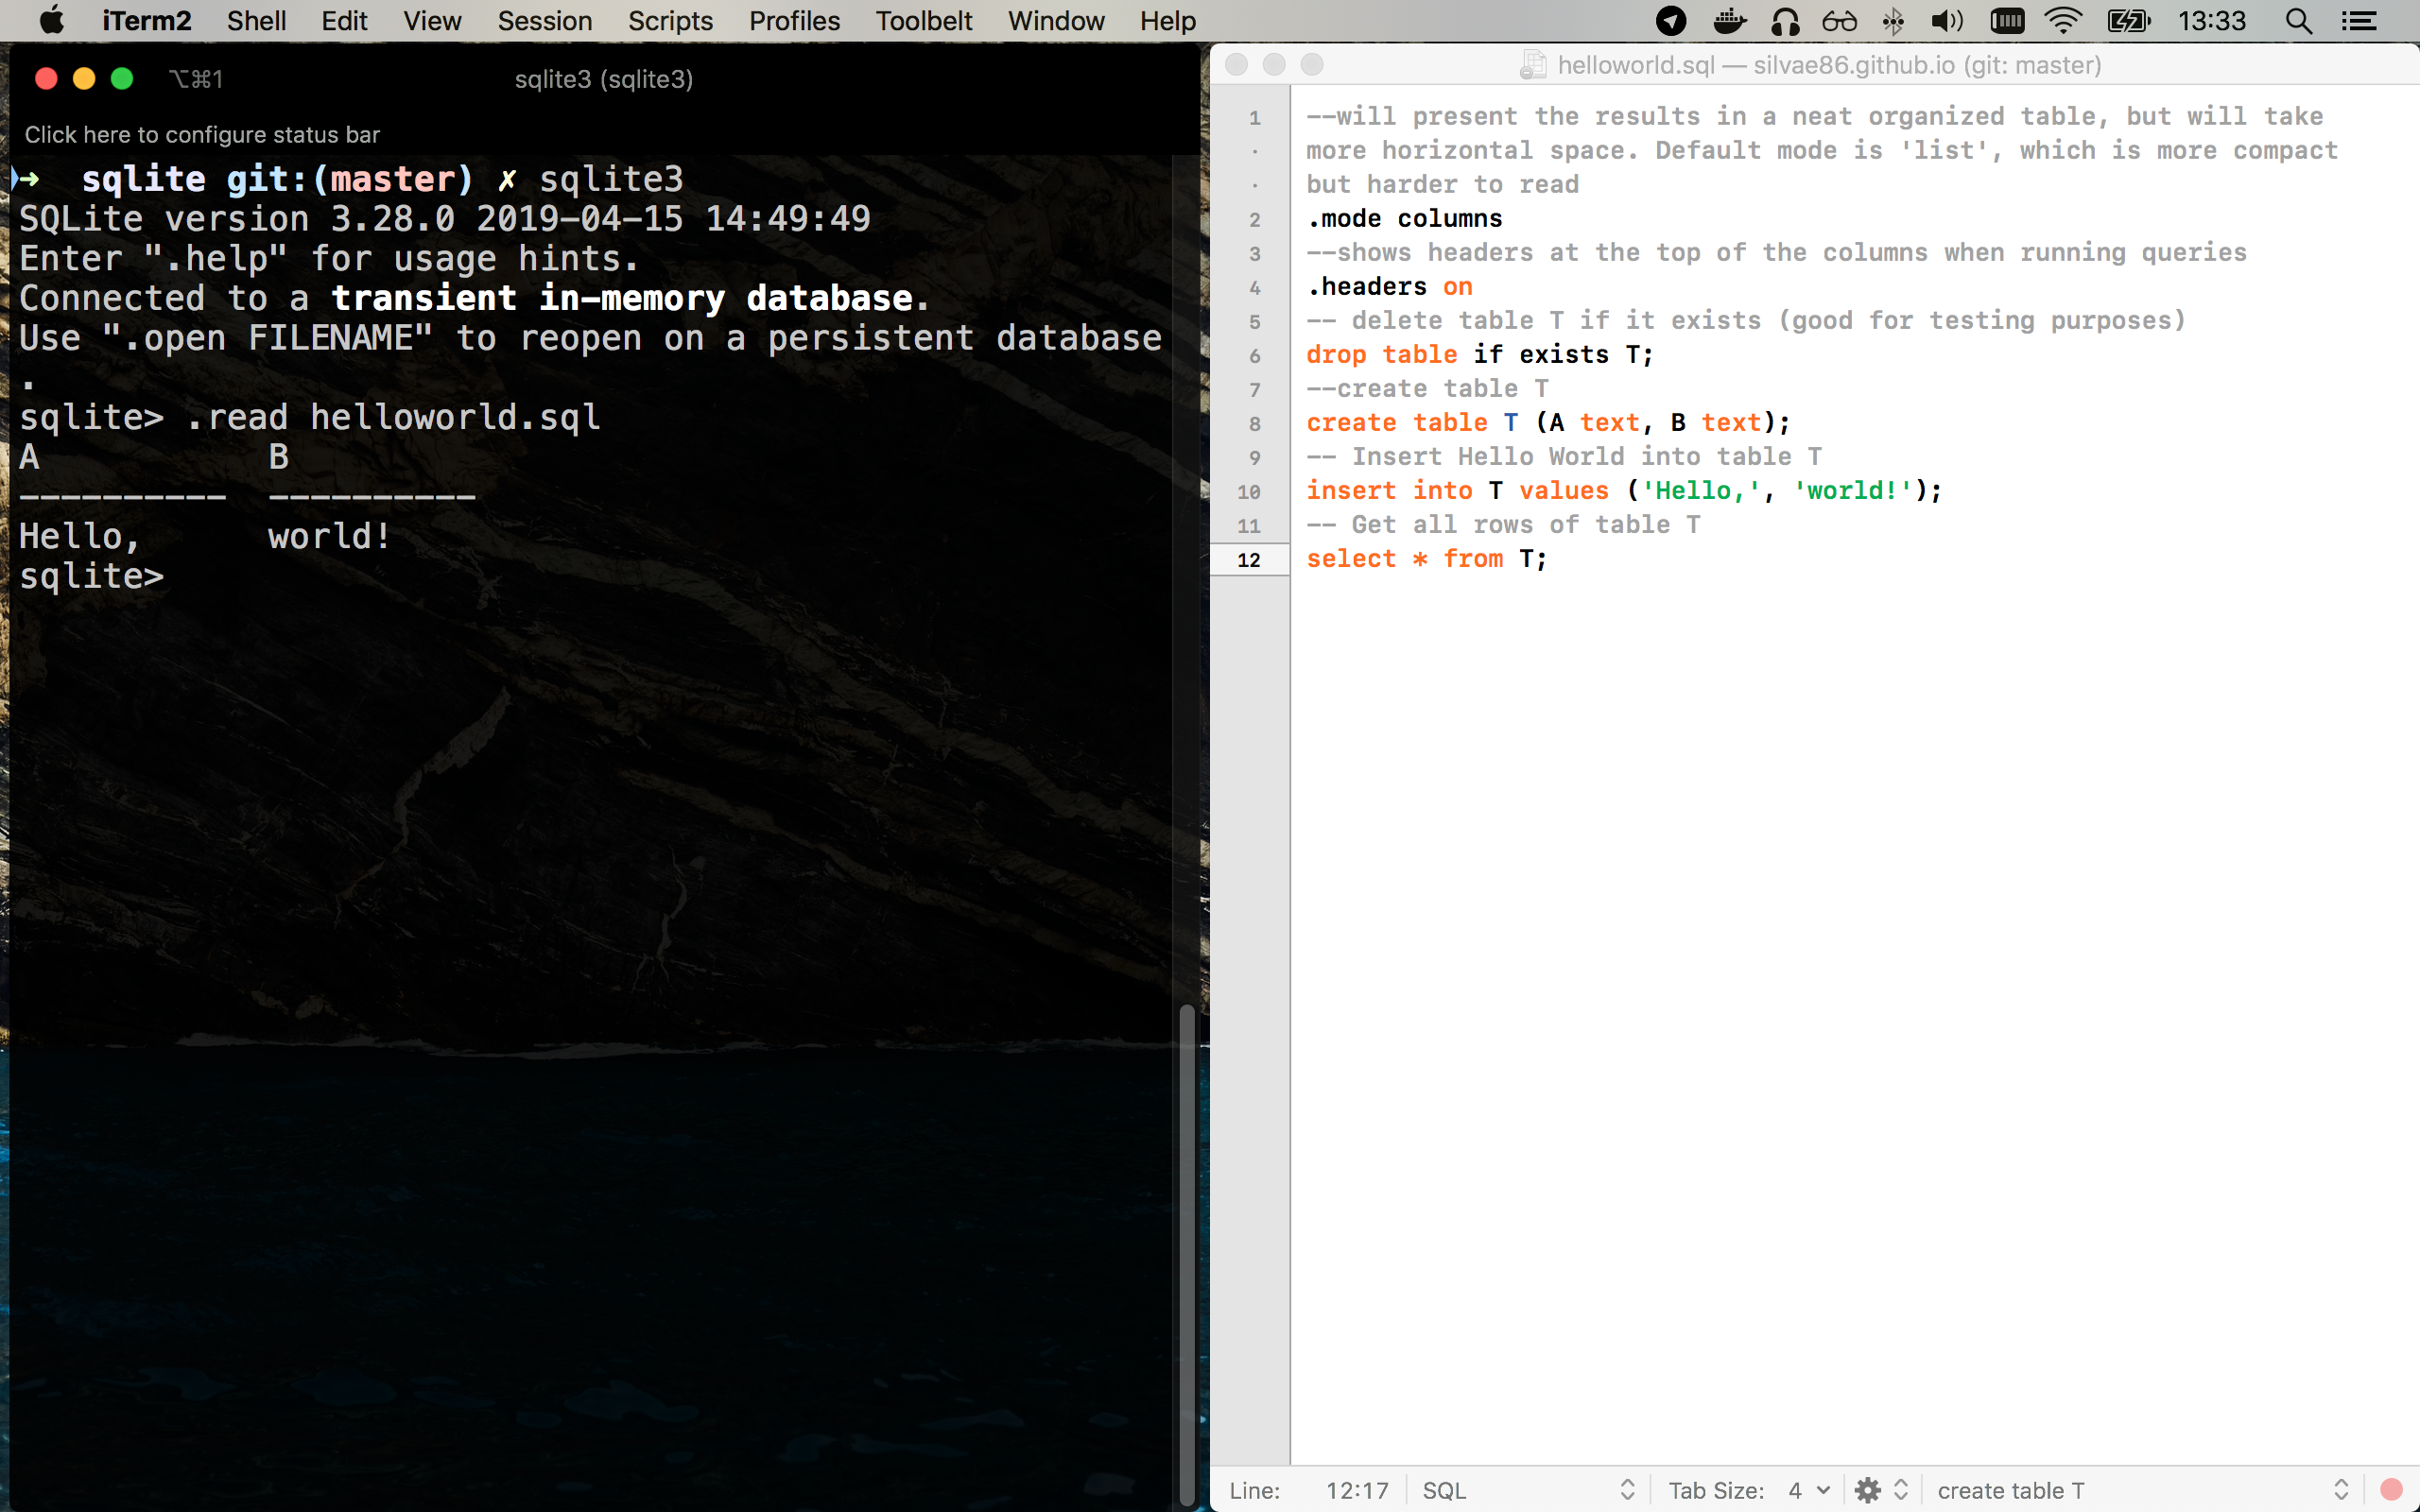
Another, more powerful way is to save the sequence of commands and statements in a text file (say, “helloworld.sql”), thus creating a script that you can run via .read. This works as long as you have the sql file in the same folder as you are running sqlite3:
Saving to a file
In any case, you can later save the SQL statements that you’ve used both to create the database (CREATE TABLE statements) and to populate its tables (INSERT INTO statements). For that, you can use the .schema (for the schema creation statements only) or the .dump` (for both creation and insertion statements) commands:
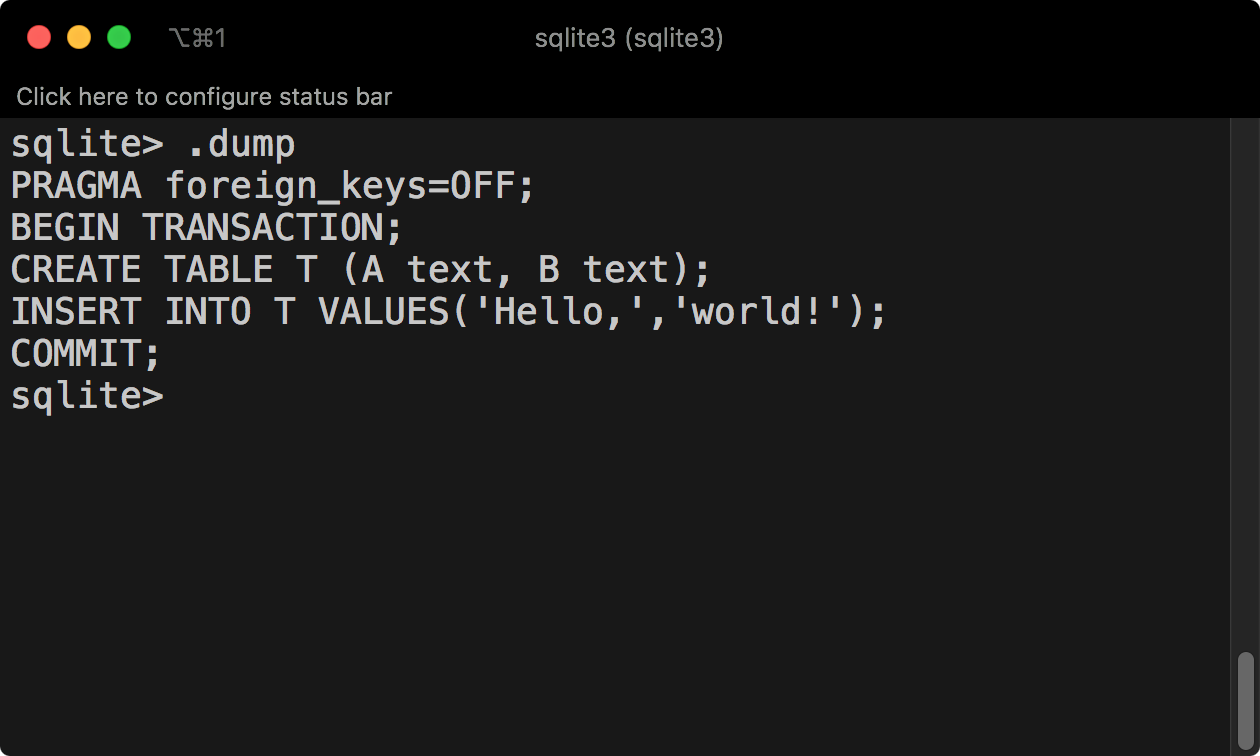
If you want to save these statements into a file you can later read from (using the .read command as shown above), all you need to do is to use the .output command to redirect any output to a file:
1
2


.output helloworld.sql
.dump
The contents of the “helloworld.sql” file should be the statements listed above.
Keeping the Database state in a file
The state of the database can be maintained persistently in a file, avoiding the need to store SQL statements that can be later read (using .read as shown above).
In order to do that, you simply need to add an argument to the sqlite3 application: the name of the database to use.
If the file provided as an argument to sqlite3 does not exist, SQLite will create it automatically. Any changes made in the database are persistently stored in that file, without the need for specific save commands (such as .dump).
The following example illustrates the creation and use of a persistent database:
An alternative to using the database file name as an argument to sqlite3 is to use the .open command within SQLite. This still ensures that any changes to the database are automatically stored in the persistent file.
Similarly, if no file was provided as an argument to sqlite3 you can use the .save command to save the database to a file. Notice however that this does not trigger automatic saves of any additional changes that are made in the database.
Pragma Statements
The PRAGMA statement is an SQL extension specific to SQLite and used to modify the operation of the SQLite library or to query the SQLite library for internal (non-table) data.
Syntax
A PRAGMA statement is formed by the keyword PRAGMA followed by the actual “pragma” that is being defined. A pragma has a name and can take one argument. The argument may be in parentheses or separated from the pragma name by an equal sign. The two syntaxes yield identical results. In many pragmas, the argument is a Boolean and can be one of: 1/yes/true/on; 0/no/false/off.
PRAGMA foreign_keys
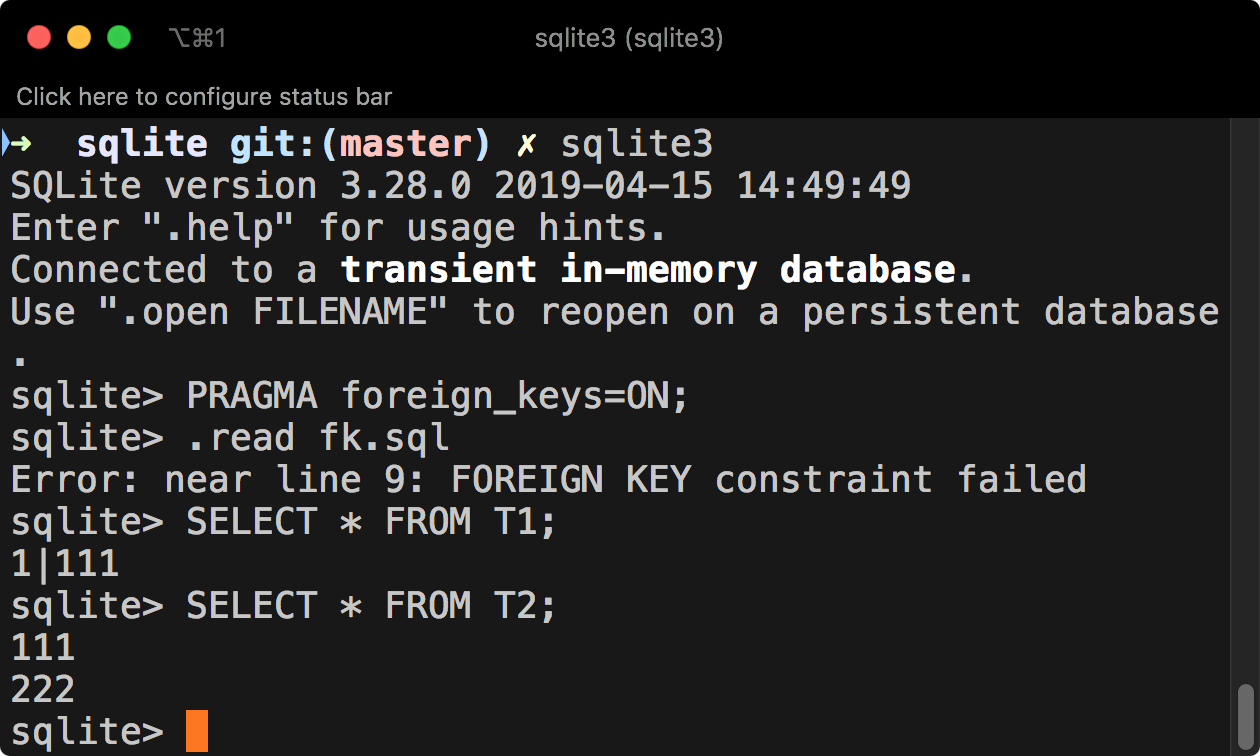
This is a very important pragma, as it may be used to set the enforcement of foreign key constraints.
Consider the following SQL statements, which violate a foreign key constraint:
1
2
3
4
5
6
7
8
9
10
11
12


create table T1 (
	Id NUMBER PRIMARY KEY,
	Id2 NUMBER REFERENCES T2(Id)
);
create table T2 (
	Id NUMBER PRIMARY KEY
);

insert into T2 values (111);
insert into T2 values (222);
insert into T1 values (1,111);
insert into T1 values (2,333);
Since in the current version of SQLite foreign key constraint enforcement is disabled by default, loading these statements from a file, say fk.sql, does not raise any error:
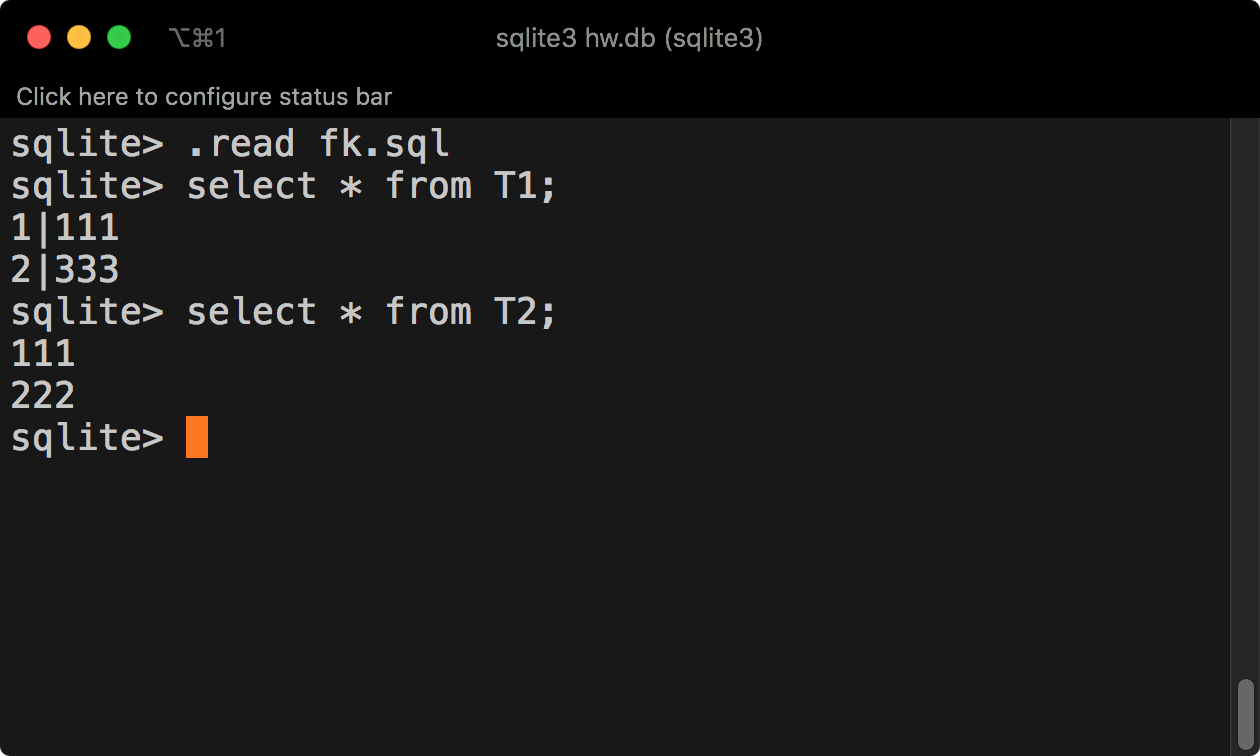
If we turn on foreign key constraint enforcement, we get an error detecting the constraint violation:
References and Tutorials
- SQLite
- home page.
- documentation.
- SQLite Studio Quickstart page.
- Tutorials
- SQLite Tutorial
- SQLite Tutorial by TutorialsPoint
- SQLite quickstart guide by Carla Lopes.
Miscellaneous scripts
Running all .sql files in the current directory (only Mac or Linux):
1


for i in $(ls *.sql); do echo $i; cat $i | sqlite3; done
SQLite offers a lot of different installation packages, depending on your operating systems. It also offers a lot of APIs for a broad range of programming languages.
In this tutorial, you will learn-
- Download & Install SQLite Package Installer
- SQLite Studio – Manager and Administration
- Introducing Sample database
Download & Install SQLite Package Installer
Installation packages available for Windows 10 users:
From the SQLite official website in the download section. The following screenshot allows you to download different SQLite’s installation packages for Windows:

The command line shell program:
The highlighted download package is called the Command-Line Program (CLP). CLP is a command line application that let you access the SQLite database management system and all the features of the SQLite. Using CLP, you can create and manage the SQLite database. And it is the tool that we will use throughout the tutorial.
- 32-bit DLL(x86): The SQLite Database system core library for x86 platforms.
- 64-bit DLL (x64): The SQLite Database system core library for x64 platforms.
Installing the Command-Line Program (CLP) on your machine:
In the following steps, you will find the steps for how to install the Command-Line Program (CLP) on your machine:
Step 1) Download the highlighted download package from the previous image to your PC. It is a “zip” file.
Step 2) Extract the zip file. You will find the “sqlite3.exe” in the extracted file as following:

Step 3) Open My Computer, and double-click the partition “C” to navigate to it:

Step 4) Create a new directory “sqlite“:

Step 5) Copy the file “sqlite3.exe” into it. This is what we will use through the tutorials to run SQLite queries:

However, there are some other packages for different purposes. They are not required. But you might need it if you are using a different OS than Windows you can get the Linux or Mac OS version of SQLite.
Also, you can get the documentation or source code from there if you wish. You can also get the API for Windows Phone 8 or .Net and other programming languages.
Here are some other different packages for different purposes:
- The Source Code and some alternative Source Code Formats – The complete source code that made up the SQLite.
- The documentation – The documentation of the SQLite as HTML pages. It is the same online documentation, but downloadable as HTML page so that you can open them offline.
- Precompiled Binaries for Linux.
- Precompiled Binaries for Mac OS X (x86).
- Precompiled Binaries for Windows Phone 8 – SDK and components to develop an application for Windows Phone 8 that uses SQLite databases.
- Precompiled Binaries for Windows Runtime – SDK and other components for developing an application to connect to SQLite databases for the Windows Runtime platforms.
- Precompiled Binaries for .NET – these are some set of DLLs and .NET libraries that you can use them from .NET application to connect to SQLite databases.
SQLite Studio – Manager and Administration
There are lots of SQLite management tools that make working with SQLite databases easier. Instead of creating and managing databases using a command line, these tools provide a set of GUI tools that let you create and manage the database.
The official SQLite website has dozens of such tools listed; you can view them from here: SQLite Management Tools. Here is the recommended one
SQLite Studio: It is a portable tool that doesn’t require an installation. It supports both SQLite3 and SQLite2. You can easily import and export data to various formats like CSV, HTML, PDF, JSON. Its open source and supports Unicode.

Introducing Sample database
In the following steps, we will create the sample database that we will use throughout the tutorials:
Step 1) Open a text file and paste the following commands into it:
CREATE TABLE [Departments] (
    [DepartmentId] INTEGER  NOT NULL PRIMARY KEY,
    [DepartmentName] NVARCHAR(50)  NULL
);
INSERT INTO Departments VALUES(1, 'IT');
INSERT INTO Departments VALUES(2, 'Physics');
INSERT INTO Departments VALUES(3, 'Arts');
INSERT INTO Departments VALUES(4, 'Math');

CREATE TABLE [Students] (
    [StudentId] INTEGER  PRIMARY KEY NOT NULL,
    [StudentName] NVARCHAR(50) NOT NULL,
    [DepartmentId] INTEGER  NULL,
    [DateOfBirth] DATE NULL,
    FOREIGN KEY(DepartmentId) REFERENCES Departments(DepartmentId)
);
INSERT INTO Students VALUES(1, 'Michael', 1, '1998-10-12');
INSERT INTO Students VALUES(2, 'John', 1, '1998-10-12');
INSERT INTO Students VALUES(3, 'Jack', 1, '1998-10-12');
INSERT INTO Students VALUES(4, 'Sara', 2, '1998-10-12');
INSERT INTO Students VALUES(5, 'Sally', 2, '1998-10-12');
INSERT INTO Students VALUES(6, 'Jena', NULL, '1998-10-12');
INSERT INTO Students VALUES(7, 'Nancy', 2, '1998-10-12');
INSERT INTO Students VALUES(8, 'Adam', 3, '1998-10-12');
INSERT INTO Students VALUES(9, 'Stevens', 3, '1998-10-12');
INSERT INTO Students VALUES(10, 'George', NULL, '1998-10-12');

CREATE TABLE [Tests] (
    [TestId] INTEGER NOT NULL PRIMARY KEY,
    [TestName] NVARCHAR(50) NOT NULL,
    [TestDate] DATE NULL
);
INSERT INTO [Tests] VALUES(1, 'Mid Term IT Exam', '2015-10-18');
INSERT INTO [Tests] VALUES(2, 'Mid Term Physics Exam', '2015-10-23');
INSERT INTO [Tests] VALUES(3, 'Mid Term Arts Exam', '2015-10-10');
INSERT INTO [Tests] VALUES(4, 'Mid Term Math Exam', '2015-10-15');

CREATE TABLE [Marks] (
    [MarkId] INTEGER NOT NULL PRIMARY KEY,
    [TestId] INTEGER NOT NULL,
    [StudentId] INTEGER  NOT NULL,
    [Mark] INTEGER  NULL,
    FOREIGN KEY(StudentId) REFERENCES Students(StudentId),
    FOREIGN KEY(TestId) REFERENCES Tests(TestId)
);

INSERT INTO Marks VALUES(1, 1, 1, 18);
INSERT INTO Marks VALUES(2, 1, 2, 20);
INSERT INTO Marks VALUES(3, 1, 3, 16);
INSERT INTO Marks VALUES(4, 2, 4, 19);
INSERT INTO Marks VALUES(5, 2, 5, 14);
INSERT INTO Marks VALUES(6, 2, 7, 20);
INSERT INTO Marks VALUES(7, 3, 8, 20);
INSERT INTO Marks VALUES(8, 3, 9, 20);
Step 2) Save the file as “TutorialsSampleDB.sql” in the following directory “C:sqlite“.
Step 3) Open the Windows Command Line tool (cmd.exe) from the start menu, type “cmd” and open it.
Step 4) It will open in the default path, you need to navigate to the “C:sqlite” folder we had created earlier in this tutorial by the following command “cd “C:sqlite”:

Step 5) Write the following command,
sqlite3 TutorialsSampleDB.db < TutorialsSampleDB.sql
The command should be completed successfully, and you should see no output after that command as the following screenshot:

Step 6) You should now be able to see the database file “TutorialsSampleDB.db” created in the directory “C:sqlite“:

 When one is developing in .NET with Visual Studio and other Microsoft tools, it is easy to lose sight of alternative solutions to common problems. MS does a competent job of creating a tightly integrated development tool chain, where available MS products (both free and paid) offer reasonable default choices which generally get the job done.
Given this, .NET devs often fail to explore outside this arena, or try on alternate solutions which might acquit themselves equally as well, or better, to the problem at hand. Also, of course, there is always a learning curve to new choices, and we often choose the familiar out of simple expediency.
Image by shinichi | Some Rights Reserved
- Getting Started — Using SQLite on Windows
- Open a New Database and Create Some Tables from the SQLite3 Console
- Entering SQL in the SQLite Console
- Formatting the Console Output
- Change the Display Mode for the SQLite Console
- Executing Script Files from the SQLite Console Using the .Read Command
- Wrap Multiple Actions in Transactions for Instant Performance Boost
- GUI-Based Tools
- Additional Resources and Items of Interest
Some Background
SQLite is an awesome, open source, cross-platform, freely available file-based relational database. Database files created on Windows will move seamlessly to OSX or Linux OSes. The tools (in particular the SQLite3 Command Line CLI we examine here) work the same from one environment to the next.
It is also not new. If you have been around for a while, you doubtless know SQLite has been in active and open development for well over a decade, and is widely used in many different scenarios and operating environments. In fact, SQLite.org estimates that SQLite is in fact the most widely deployed SQL database solution in the world. Their most recent figures (albeit from 2006) would indicate that there are over 500 million deployments of SQLite (this number is no doubt higher by now).
SQLite documentation is also widely regarded as above average in completeness and usability, providing both new and experienced users a well-developed canonical resource for learning and troubleshooting.
SQLite was originally designed by D. Richard Hipp in 2000 for the U.S. Navy, with the goal of allowing SQLite-based programs to function without installing a database management system, and without requiring a system administrator (from Wikipedia). These design requirements result in, as the SQLite site describes it, «a software library that implements a self-contained, serverless, zero-configuration, transactional SQL database engine.»
Until recently, I had not spent much time with SQLite. However, in developing the Biggy project, we decided that the core supported database systems would be cross-platform and open source. We wanted both a full-on client/server option, as well as a file-based relational database option. For our file-based relational database we chose SQLite, after exploring other alternatives.
In fitting SQLite into the Biggy workflow, I got to the chance to familiarize myself with SQLite, its strengths, some weaknesses, some peculiarities to watch for, and some tips and tricks for getting the most out of the product.
In this post, we will get familiar with the basics of using the database in a Windows environment. Next post, we will explore integration with .NET development, and Visual Studio. But, learn the hard way first always say, so… let’s get our command line on.
Getting Started — Using SQLite on Windows
Before we look at using SQLite in Visual Studio, let’s walk through the basics of using SQLite in a Windows environment outside the IDE.
First, download the pre-compiled binaries from the SQLite Downloads page. At a minimum, you will want the binaries for the Win32 x86 SQLite DLL, and for the SQLite x86 Command Shell. Unzip the contents of the files in a folder named C:SQLite3 (or whatever other location suits your needs). Then add C:SQLite3 to your PATH variable so that you can invoke the SQLite Command Shell right from the Windows console.
In your new directory C:SQLite3, you should now have the following items:
- sqlite3.def
- sqlite3.dll
- sqlite3.exe
If we run the sqlite3.exe, we are greeted with a Console Application designed to allow us to work with SQLite databases.
The SQLite Console
The command prompt is easy to use. Text entered without the «.» qualifier will be treated as SQL (and succeed or fail accordingly). There are a set of commands preceded with the «.» qualified which are application commands. An example is shown in the console window above, where we are instructed to use the .open command to open a database file.
The complete list of SQLite console commands is beyond the scope of this article, but we will walk through a list of the most useful ones here.
Open a New Database and Create Some Tables from the SQLite3 Console
The SQLite3 Console will open in the current directory (or in the directory in which the .exe is found, if you double-click in the GUI). Let’s start by opening a new Windows terminal (which should generally open in our home directory), create a new sub-directory named sqlite_data, and navigating into that folder:
Create a new Directory and Navigate Into the New Directory
C:UsersJohn> mkdir sqlite_databases
C:UsersJohn> cd sqlite_databases
Next, let’s try on that .open command. Open sqlite3 and open a new database in the directory we just created
Open SQlite3.exe and Open a New Database File:
C:UsersJohnsqlite_databases>sqlite3
sqlite> .open test.sqlite
Your console output should now look like this:
Console Output after Opening SQLite3 and Creating a New Database File:

Next, let’s create a few tables to play with.
Entering SQL in the SQLite Console
Recall that plain text entered without the «.» qualifier will be interpreted by the SQLite console as SQL. There are a few additional things to bear in mind:
- SQL text may span multiple lines — the enter key will not cause the text following the prompt to execute until it is ended with a semi-colon.
- You can create multi-line SQL statements simply by hitting the Enter key without ending the statement with a semi-colon.
- SQLite uses either square brackets or double-quotes as delimiters for object names, in cases where the literal column name would not be allowed. For example,
Last Namewould NOT be a valid column name, but will work as[Last Name]. Likewise, the keywordGroupis not allowed as a column name, but"Group"will work. - SQLite is not case-sensitive. Unlike some other databases (most notably Postgresql), casing in both the SQL syntax, and in object names, is ignored.
So, with that said, let’s create a table or two. We will keep this really basic, since we are interested in how the console works, more so that a SQLite SQL syntax tutorial.
Create a Table in a Single-Line Statement:

Above, we just kept typing our whole SQL statement, and allowed the console to wrap the text when it needed to (that lovely Windows console, with its under-developed display characteristics…). Kinda ugly and hard to read. Let’s try a multi-line statement.
Create a Table Using a Multi-Line Statement:

Aside from the ugliness that is the Windows Console, that’s a little more readable.
Now let’s add a few records.
Insert Records into Test Database:

Notice how the case of my SQL doesn’t matter in the above? And, yes, as a matter of fact, that IS a syntax error in the midst of things there. I accidentally used an angle bracket instead of a paren…
So now, we have added a little data. Let’s read it back:
Select Data from Users Table:

Here we see that for unrelated reasons (ahem… I closed the wrong window…), I had to exit the application, and then go back in. However, once I opened our test.sqlite database, I was able to enter a standard SELECT statement, and return the data.
See that ...>? That was the result of me forgetting to add the semi-colon at the end of my SELECT statement. If you do that (and you WILL…), simply add a semi-colon on the continued line, and the statement will execute (remember, until SQLite3 sees a semi-colon, it will continue to interpret text input as more SQL).
Formatting the Console Output
We can tell SQLite3 how we would like our data displayed. For example, we may prefer to see a more tabular display, with columns and headers. To accomplish this, we use a few of those application commands, prefixed with a period.
Change the Display Mode for the SQLite Console
We can use the following two commands to change the display mode and use columns and headers in our console output:
Use Column Display Mode with Headers in SQLite3
sqlite> .mode column
sqlite> .headers on
If we run our SELECT statement again, the output looks like this:
Console Output Using Columns and Headers:

Executing Script Files from the SQLite Console Using the .Read Command
Of course, typing in SQL in the console can become painful. While it is fine for quick-and-diry queries and maintenance tasks, doing a lot of work is better accomplished by scripting out what you need in a text file, and then executing that from the Console.
To see this in action, we will download my personal favorite test database, the Chinook database. Chinook has a database script for most of the popular database platforms, providing a handy way to use the same data set for evaluating multiple platforms (among other things). Download the Chinook Database, extract the .zip file, and locate the Chinook_Sqlite_AutoIncrementPKs.sql file. To keep things simple, drop a copy of it into your sqlite_databases folder, so it is in the current directory. Then, also to keep out typing down, rename the file you just moved to simply «Chinook.sql«.
We can execute SQL scripts using the SQLite .read command. To illustrate, we will read in the Chinook database.
You will notice a couple things when we do this. First, the console may show an error (which you can see in the image below), but the script is still running — errors are logged out to the console.
Second, executing this script in its current form is SLOOOOWWWW. This is due to a peculiarity with SQLite we will address momentarily, but was not addressed by the creators of the Chinook Database script.
Execute SQL Script from the SQLite Console Using the .Read Command
sqlite> .read Chinook.sql
The script may run for a good number of minutes, so go grab a cup of coffee or something. your computer has not seized up. The Console will return when the script is finished (really, this took about 10 minutes on my machine, but we’re going to fix that…
<Coffeee Brake . . .>
Ok. Now that the script has finished running, let’s use the .tables command to see a list of the tables in our database. If everything worked as we expect, we should see our own users and groups tables, as well as a bunch of new ones populated with Chinook data.
List Tables Using the .Tables Command:
sqlite> .tables
We should see something like this:
Console Output from .Tables Command:

Now, why the hell did it take so long to run that script??!!
Wrap Multiple Actions in Transactions for Instant Performance Boost
SQLite is inherently transaction-based. Meaning, unless you specify otherwise, each statement will be treated as an individual transaction, which must succeed, or be rolled back.
Transactions are a key feature of relational databases, and critical in the big scheme of things. However, individually, transactions add significant performance overhead, and when we are inserting (or updating, or otherwise modifying) thousands of records in multiple tables, treating each insert as an individual transaction slows things WAAAAYYYY DOWWN.
This is a known issue with SQLite. I say «issue» because, despite the fact that the implementation is intentional, the solution to «why are inserts on SQLite so slow» in not immediately obvious, and the internet is stuffed with variations on this question.
Similarly, the Chinook Database implementation neglects this important detail, and the many inserts used to populate Chinook data are treated as individual transactions, and thus run really slow.
Here is the fix:
If we go through the Chinook.sql script and place a BEGIN; statement before the inserts for each table, and a COMMIT; statement at the end of the INSERTs for each table, we will see several orders magnitude better performance from this script.
We can skip wrapping the DROP and CREATE table statements in transactions for our purposes here. As an example, open the file in your favorite text editor, go through and find the beginning of the INSERTs for the Genre table. Add a BEGIN; and COMMIT; clause like so:
Wrap Table Inserts in Transactions:
BEGIN;
INSERT INTO [Genre] ([Name]) VALUES ('Rock');
INSERT INTO [Genre] ([Name]) VALUES ('Jazz');
... Etc ...
INSERT INTO [Genre] ([Name]) VALUES ('Alternative');
INSERT INTO [Genre] ([Name]) VALUES ('Classical');
INSERT INTO [Genre] ([Name]) VALUES ('Opera');
COMMIT;
Now scroll on down, and do the same for each table. When you are done, let’s create a dedicated Chinook database to try it out.
Open the Windows Console, navigate back to sqlite_databases directory, run sqlite3, and open a new database named chinook.db. Then use .read to execute the chinook.sql script again:
Read Chinook Script into Chinook.db:
C:UsersJohn>cd sqlite_databases
C:UsersJohnsqlite_databases>sqlite3
sqlite> .open chinook.db
sqlite> .read chinook.sql
Next, use the .tables command again to see that all the tables were created. The console output should look like this:
Console Output from Execution after Wrapping Table Inserts in Transactions:

We see there is still a little error bugaboo at Line 1 (most likely due to some unicode issue at the beginning of the file — welcome to the world of scripts). However, we can see if our data imported fairly easily:
Select Artists from the Chinook Artists Table:

GUI-Based Tools
We’ve covered enough here that we can explore what SQLite has to offer from the Windows console, and become familiar with this fantastic little database. Of course, there are other tools available to work with SQLite databases, including a terrific multi-platform GUI-based interface, SQLiteBrowser, which is a very competent management interface for SQLite databases.
As mentioned previously, the documentation available at SQL.org is first-rate, and there are a host of other resources out there as well.
SQLite is a handy, mature, highly performant database which is easy to use, and works on all the major OS platforms. Database files created on a Windows machine can move seamlessly between OSX and *Nix OSes, as can most of the tools designed to work with them.
I like to start everything with the most fundamental tools available, and then once I have developed a solid understanding of the system, move on up to more advanced tools. Take some time and get to know SQLite from the basic CLI interface. You won’t regret it.
Additional Resources and Items of Interest
- Command Line Shell for SQLite — Reference at SQLite.org
- SQLite Syntax — Reference at SQLite.org
- Database Browser for SQLite
- Adding and Editing PATH Environment Variables in Windows
- C#: Using Reflection and Custom Attributes to Map Object Properties
CodeProject
My name is John Atten, and my username on many of my online accounts is xivSolutions. I am Fascinated by all things technology and software development. I work mostly with C#, Javascript/Node.js, Various flavors of databases, and anything else I find interesting. I am always looking for new information, and value your feedback (especially where I got something wrong!)