| title | description | ms.date | ms.topic | ms.author | author | ms.custom |
|---|---|---|---|---|---|---|
|
Get started with OpenSSH for Windows |
Learn how to install and connect to remote machines using the OpenSSH Client and Server for Windows. |
01/11/2023 |
quickstart |
roharwoo |
robinharwood |
contperf-fy21q4 |
Get started with OpenSSH for Windows
Applies to: Windows Server 2022, Windows Server 2019, Windows 10 (build 1809 and later)
OpenSSH is a connectivity tool for remote sign-in that uses the SSH protocol. It encrypts all traffic between client and server to eliminate eavesdropping, connection hijacking, and other attacks.
An OpenSSH-compatible client can be used to connect to Windows Server and Windows client devices.
[!IMPORTANT]
If you downloaded the OpenSSH beta from the GitHub repo at PowerShell/Win32-OpenSSH, follow the instructions listed there, not the ones in this article. Some information in the Win32-OpenSSH repository relates to prerelease product that may be substantially modified before it’s released. Microsoft makes no warranties, express or implied, with respect to the information provided there.
Prerequisites
Before you start, your computer must meet the following requirements:
- A device running at least Windows Server 2019 or Windows 10 (build 1809).
- PowerShell 5.1 or later.
- An account that is a member of the built-in Administrators group.
Prerequisites check
To validate your environment, open an elevated PowerShell session and do the following:
-
Type winver.exe and press enter to see the version details for your Windows device.
-
Run
$PSVersionTable.PSVersion. Verify your major version is at least 5, and your minor version at least 1. Learn more about installing PowerShell on Windows. -
Run the command below. The output will show
Truewhen you’re a member of the built-in Administrators group.(New-Object Security.Principal.WindowsPrincipal([Security.Principal.WindowsIdentity]::GetCurrent())).IsInRole([Security.Principal.WindowsBuiltInRole]::Administrator)
Install OpenSSH for Windows
GUI
Both OpenSSH components can be installed using Windows Settings on Windows Server 2019 and Windows 10 devices.
To install the OpenSSH components:
-
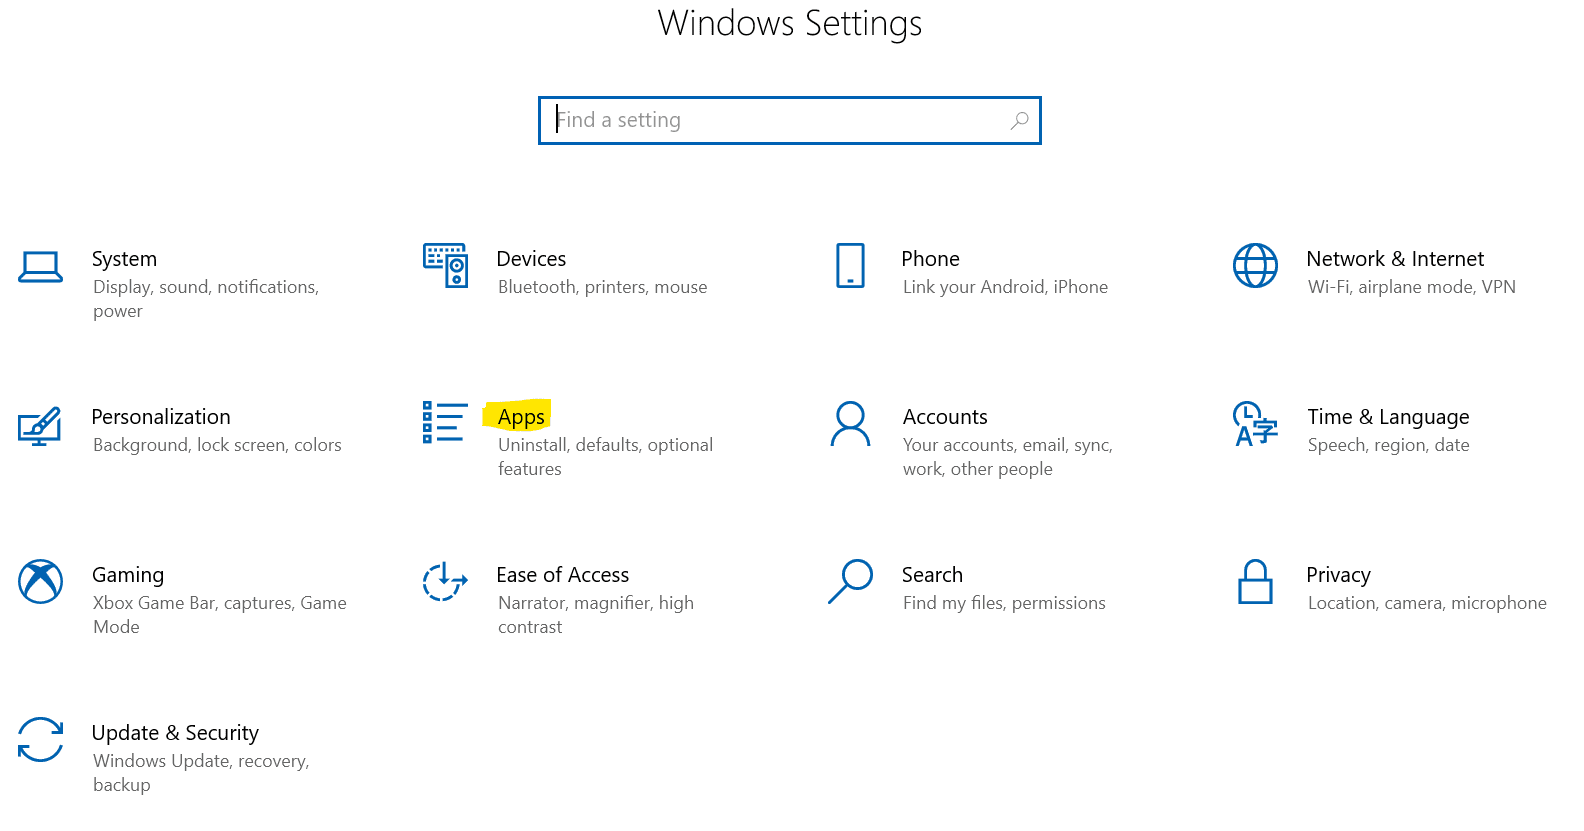
Open Settings, select Apps, then select Optional Features.
-
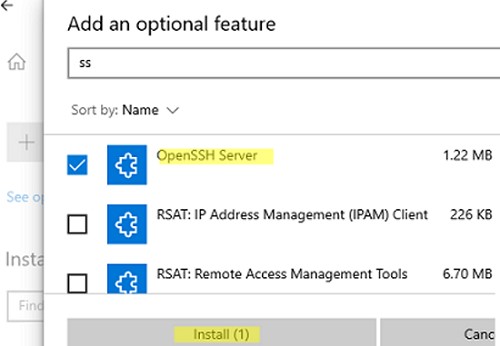
Scan the list to see if the OpenSSH is already installed. If not, at the top of the page, select Add a feature, then:
- Find OpenSSH Client, then select Install
- Find OpenSSH Server, then select Install
-
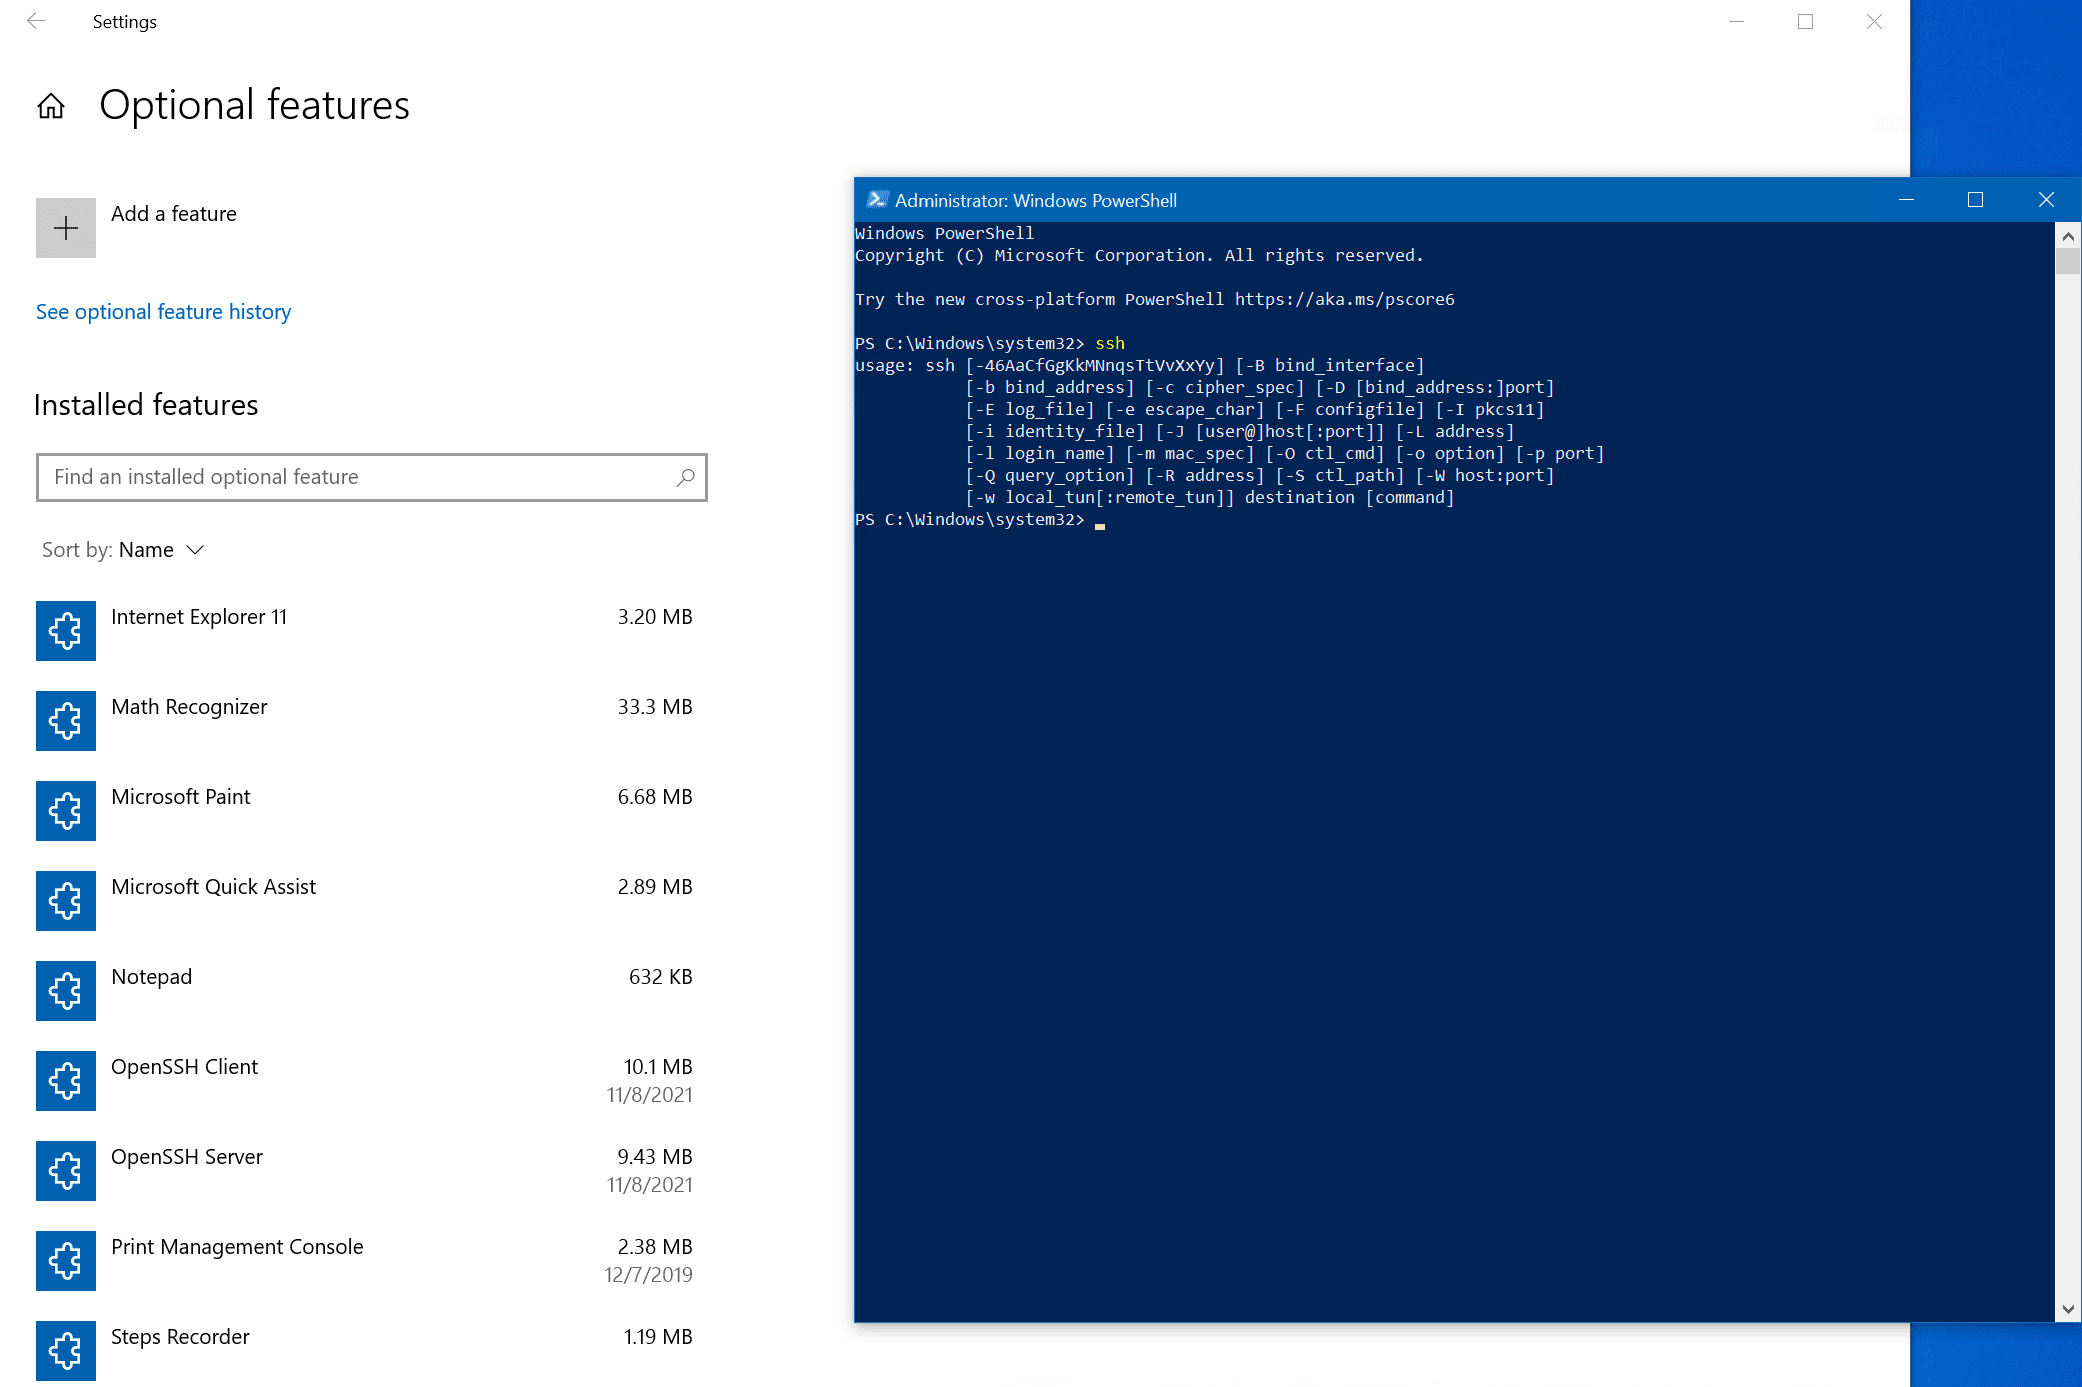
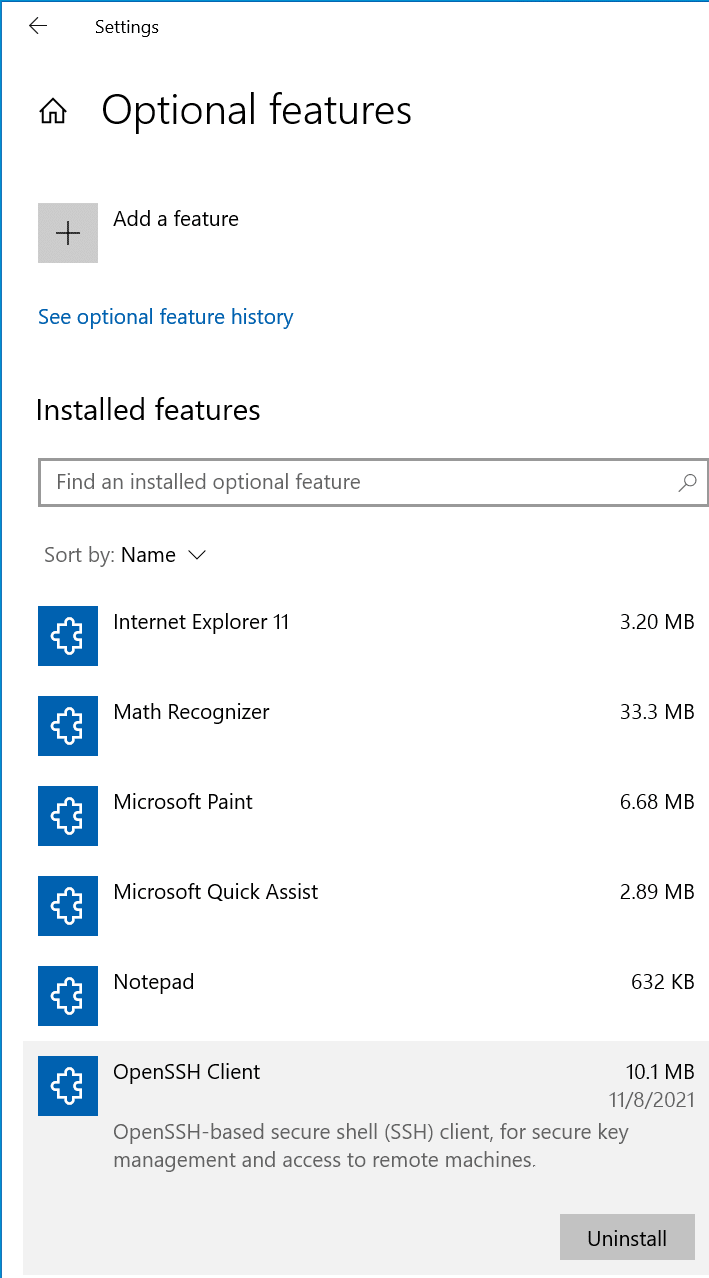
Once setup completes, return to Apps and Optional Features and confirm OpenSSH is listed.
-
Open the Services desktop app. (Select Start, type services.msc in the search box, and then select the Service app or press ENTER.)
-
In the details pane, double-click OpenSSH SSH Server.
-
On the General tab, from the Startup type drop-down menu, select Automatic.
-
To start the service, select Start.
[!NOTE]
Installing OpenSSH Server will create and enable a firewall rule namedOpenSSH-Server-In-TCP. This allows inbound SSH traffic on port 22. If this rule is not enabled and this port is not open, connections will be refused or reset.
PowerShell
To install OpenSSH using PowerShell, run PowerShell as an Administrator.
To make sure that OpenSSH is available, run the following cmdlet:
Get-WindowsCapability -Online | Where-Object Name -like 'OpenSSH*'
The command should return the following output if neither are already installed:
Name  : OpenSSH.Client~~~~0.0.1.0
State : NotPresent

Name  : OpenSSH.Server~~~~0.0.1.0
State : NotPresent
Then, install the server or client components as needed:
# Install the OpenSSH Client
Add-WindowsCapability -Online -Name OpenSSH.Client~~~~0.0.1.0

# Install the OpenSSH Server
Add-WindowsCapability -Online -Name OpenSSH.Server~~~~0.0.1.0
Both commands should return the following output:
Path          :
Online        : True
RestartNeeded : False
To start and configure OpenSSH Server for initial use, open an elevated PowerShell prompt (right click, Run as an administrator), then run the following commands to start the sshd service:
# Start the sshd service
Start-Service sshd

# OPTIONAL but recommended:
Set-Service -Name sshd -StartupType 'Automatic'

# Confirm the Firewall rule is configured. It should be created automatically by setup. Run the following to verify
if (!(Get-NetFirewallRule -Name "OpenSSH-Server-In-TCP" -ErrorAction SilentlyContinue | Select-Object Name, Enabled)) {
    Write-Output "Firewall Rule 'OpenSSH-Server-In-TCP' does not exist, creating it..."
    New-NetFirewallRule -Name 'OpenSSH-Server-In-TCP' -DisplayName 'OpenSSH Server (sshd)' -Enabled True -Direction Inbound -Protocol TCP -Action Allow -LocalPort 22
} else {
    Write-Output "Firewall rule 'OpenSSH-Server-In-TCP' has been created and exists."
}
Connect to OpenSSH Server
Once installed, you can connect to OpenSSH Server from a Windows or Windows Server device with the OpenSSH client installed. From a PowerShell prompt, run the following command.
ssh domainusername@servername
Once connected, you get a message similar to the following output.
The authenticity of host 'servername (10.00.00.001)' can't be established.
ECDSA key fingerprint is SHA256:(<a large string>).
Are you sure you want to continue connecting (yes/no)?
Entering yes adds that server to the list of known SSH hosts on your Windows client.
At this point, you’ll be prompted for your password. As a security precaution, your password won’t be displayed as you type.
Once connected, you’ll see the Windows command shell prompt:
domainusername@SERVERNAME C:Usersusername>
Uninstall OpenSSH for Windows
GUI
To uninstall OpenSSH using Windows Settings:
- Open Settings, then go to Apps > Apps & Features.
- Go to Optional Features.
- In the list, select OpenSSH Client or OpenSSH Server.
- Select Uninstall.
PowerShell
To uninstall the OpenSSH components using PowerShell, use the following commands:
# Uninstall the OpenSSH Client
Remove-WindowsCapability -Online -Name OpenSSH.Client~~~~0.0.1.0

# Uninstall the OpenSSH Server
Remove-WindowsCapability -Online -Name OpenSSH.Server~~~~0.0.1.0
You may need to restart Windows afterwards if the service was in use at the time it was uninstalled.
Next steps
Now that you’ve installed OpenSSH Server for Windows, here are some articles that might help you as you use it:
- Learn more about using key pairs for authentication in OpenSSH key management
- Learn more about the OpenSSH Server configuration for Windows
As a seasoned, or even new IT Pro, you’re likely an avid user of Putty, using secure shell (SSH) to connect to Unix/Linux servers, computers, and even Windows machines for an efficient and secure remote command-line experience. Well, did you know Windows 10, Windows 11, and Windows Server 2019 (and Windows Server 2022) include an open-source implementation of SSH?
Table of Contents
- How is SSH implemented in Windows?
- Install OpenSSH using Windows Settings
- Install OpenSSH using PowerShell
- Start and configure OpenSSH Server
- Using SSH in Windows Terminal
- Connect to OpenSSH Server
- Uninstall OpenSSH using Windows Settings
- Uninstall OpenSSH using PowerShell
In this mega ‘how-to’ guide, you’ll learn how to install and configure OpenSSH on Windows. Find out how to connect remotely to Linux, Unix, Oracle, Windows, Windows Server, and other operating systems via the secure command line.
How is SSH implemented in Windows?
There are two separate components of OpenSSH in Windows – an SSH client and an SSH server. Microsoft implemented both in Windows using OpenSSH Client and OpenSSH Server respectively.
And there are also two main methods to install and uninstall these components in Windows. The OpenSSH Client feature is installed by default in higher-end versions of Windows.
The Client is like the functionality of Putty. It allows you to make ‘client’ connections to other servers and devices using various secure protocols.
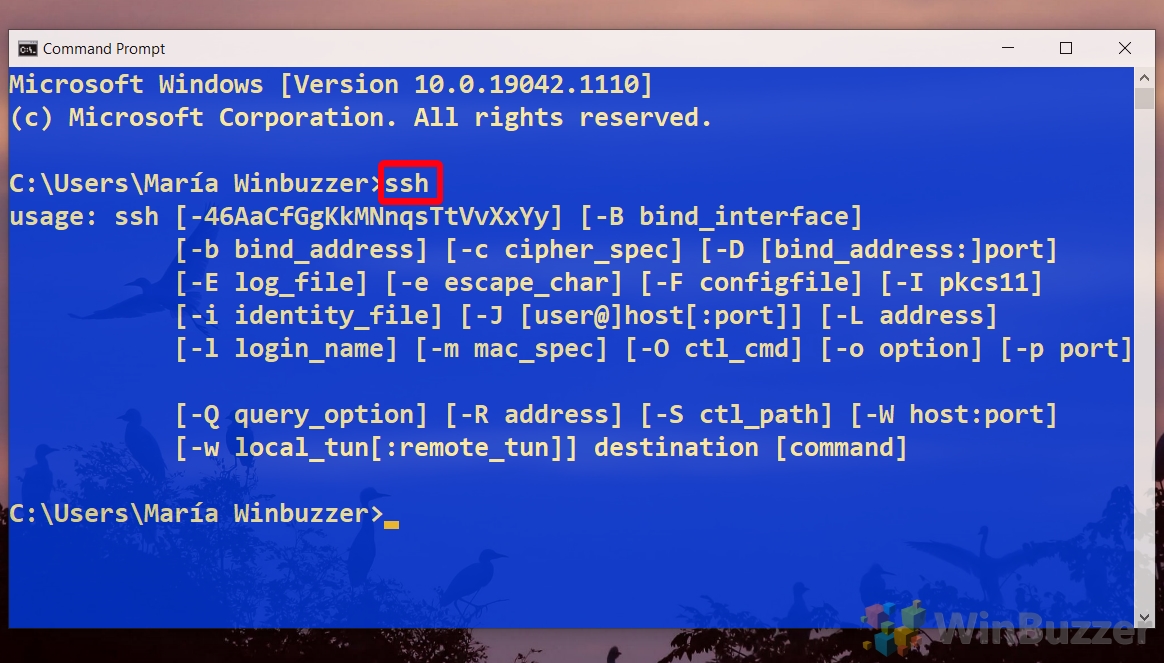
You can confirm if you have the client installed by opening a command prompt or PowerShell prompt and typing ‘ssh’ and hitting Enter. You will be provided with an overview of how to use the ssh command if it is already installed.

Install OpenSSH using Windows Settings
To install OpenSSH Client, let’s first use the more modern approach – Windows Settings.
First, click the Start button, then click Settings. Next, click the ‘Apps‘ category.
Click the ‘Add a feature’ ‘+‘ at the top of the ‘Optional features’ window.
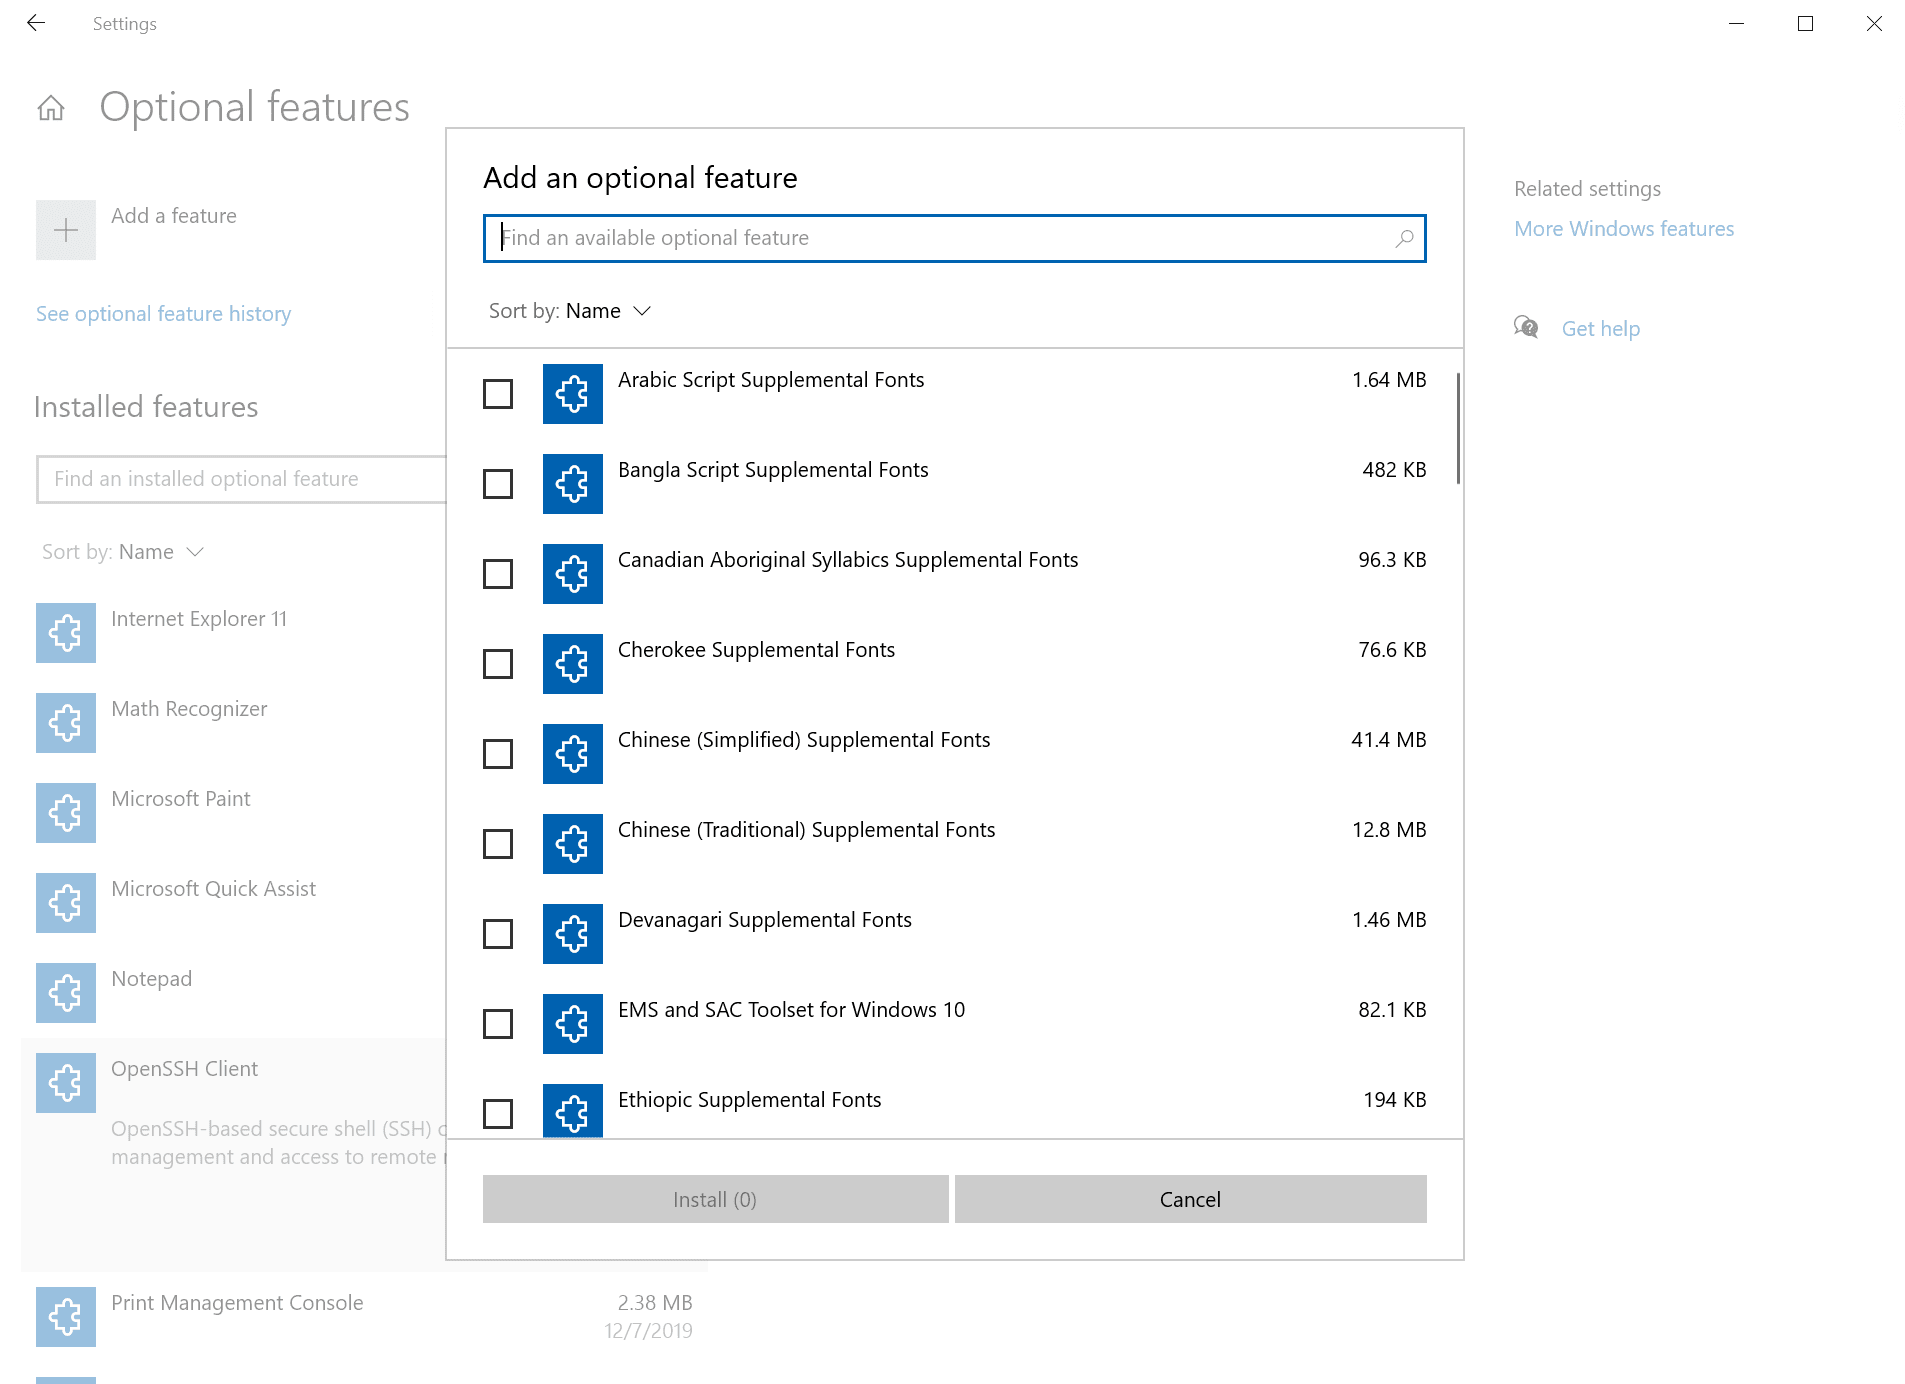
Scroll down to ‘OpenSSH Client’, place a checkmark next to it and click the ‘Install’ button. Wait a few moments, and we’re good!
Install OpenSSH using PowerShell
The other core method to installing OpenSSH is using PowerShell. Fire up an administrative PowerShell prompt and type in this command to install the ‘OpenSSH Client’ feature.
Add-WindowsCapability -Online -Name OpenSSH.Client~~~~0.0.1.0
You can run this command to confirm the feature is installed.
Get-WindowsCapability -Online | Where-Object Name -like 'OpenSSH*'
Start and configure OpenSSH Server
As you may have noticed, you can install OpenSSH Client and OpenSSH Server on Windows 10 and Windows Server 2019/2022 (You need at least Windows Server 2019 to host OpenSSH Server). I will now switch to one of my Windows Server 2022 servers and demonstrate how to start up the ‘Server’ part of the implementation and test connections from Windows 10.
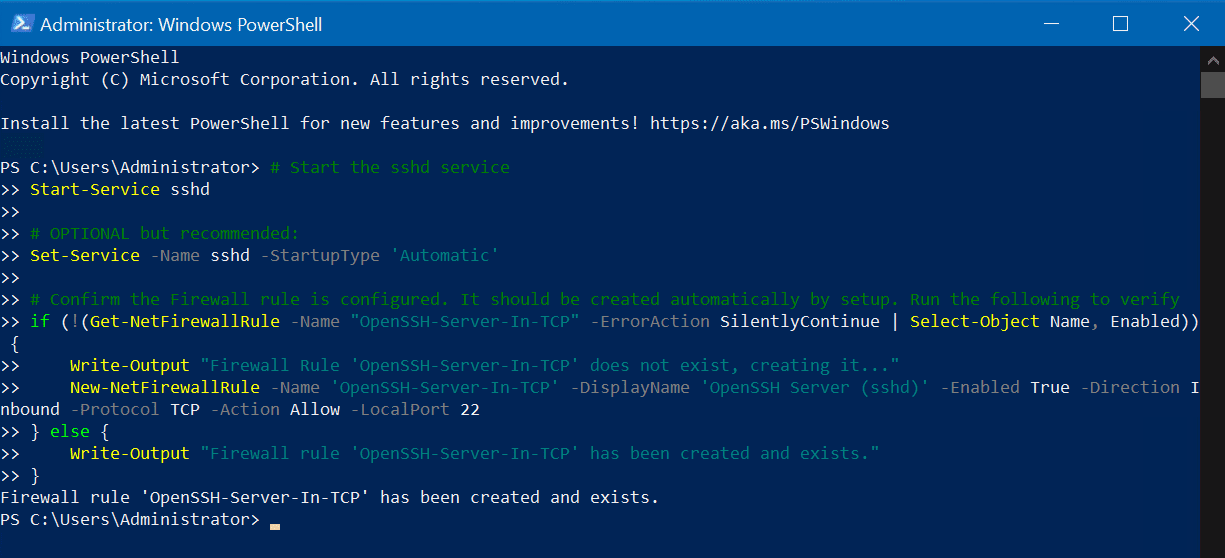
Fire up another administrative PowerShell prompt and run these commands.
# Start the sshd service
Start-Service sshd

# OPTIONAL but recommended:
Set-Service -Name sshd -StartupType 'Automatic'

# Confirm the Firewall rule is configured. It should be created automatically by setup. Run the following to verify
if (!(Get-NetFirewallRule -Name "OpenSSH-Server-In-TCP" -ErrorAction SilentlyContinue | Select-Object Name, Enabled)) {
    Write-Output "Firewall Rule 'OpenSSH-Server-In-TCP' does not exist, creating it..."
    New-NetFirewallRule -Name 'OpenSSH-Server-In-TCP' -DisplayName 'OpenSSH Server (sshd)' -Enabled True -Direction Inbound -Protocol TCP -Action Allow -LocalPort 22
} else {
    Write-Output "Firewall rule 'OpenSSH-Server-In-TCP' has been created and exists."
}
This will start the secure SSH service (Server), set its service settings to ‘Automatic’ so it runs every time the server boots, and verify all the appropriate Windows Firewall rules are in place to allow client connections on TCP localport 22 through Windows Server’s built-in Windows Defender software-based firewall.
Success!
Using SSH in Windows Terminal
If you’ve gotten on the Windows Terminal bandwagon like many an IT Pro that I’ve spoken with, you’ll be pleased to know you can set up new profiles to fire up OpenSSH connections to your favorite servers at the touch of a profile dropdown button!
Let me show you the steps you can perform to add a profile for OpenSSH in your lovely Windows Terminal configuration. This will allow you to open your favorite SSH connection right from the profile dropdown in Windows Terminal, or even launch it when Windows Terminal starts on your computer.
First, launch Windows Terminal if it’s not already running on your computer.
Click the arrow dropdown to the right of the ‘+’ sign and click Settings.
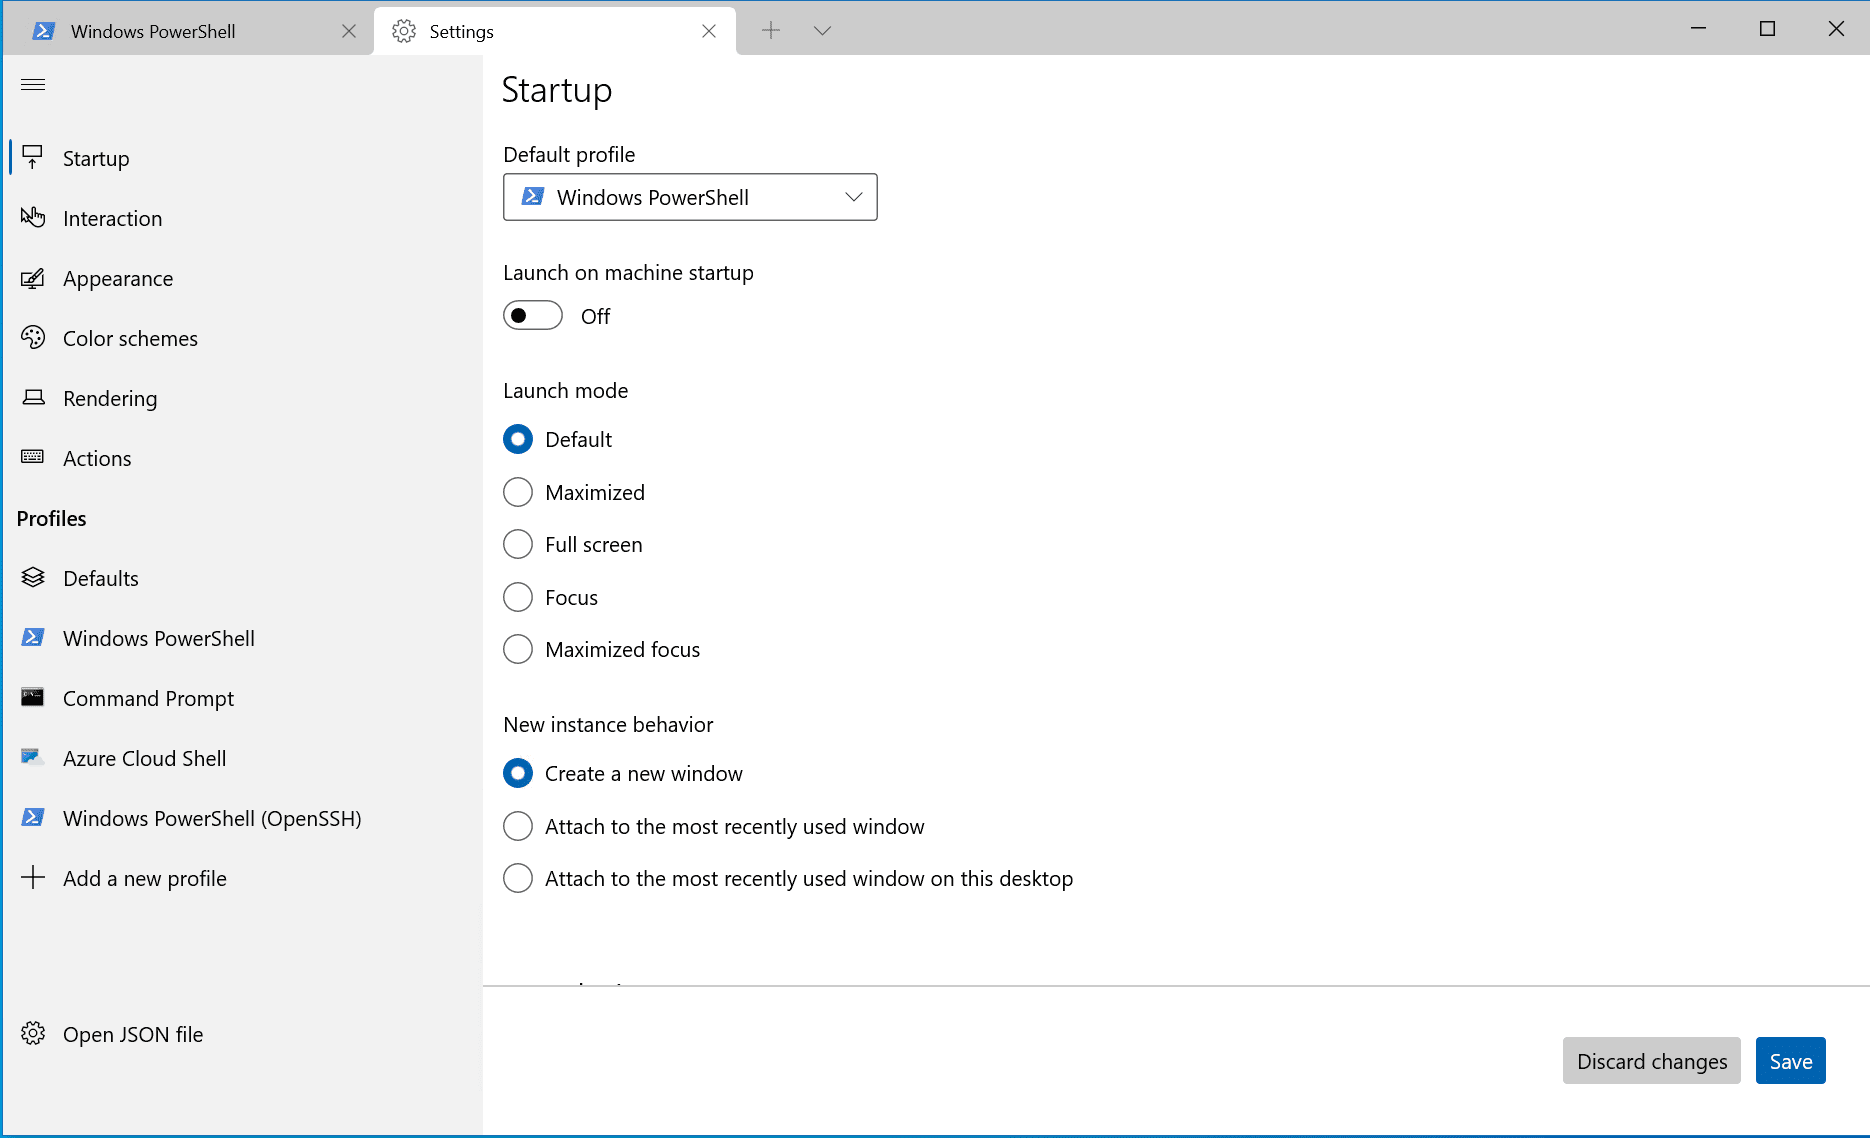
Click the ‘+ Add a new profile’ link at the bottom of the Profiles list. Click to select the ‘Windows PowerShell’ profile to choose as a template and click the ‘Duplicate’ button. You can choose whatever you prefer in the Name, Starting directory, and Tab title fields, including a different icon if you wish, but the key is in the ‘Command line’ field.

You have the option of typing in our custom ‘ssh’ command or appending said command to the end of whichever console you’re launching/using (cmd.exe, powershell.exe, etc.). We are using the following to connect to my ‘WS22-FS02′ server where ‘OpenSSH Server’ is installed: ‘ssh username@servername.’
Or, in our case, ‘ssh administrator@ws22-fs02′. Then, be sure to click Save in the lower-right corner of the Settings page. (Don’t worry if some of the syntax here doesn’t ‘click’ yet…you’ll learn a bit more about connecting to SSH in the next section – Connect to OpenSSH Server.)
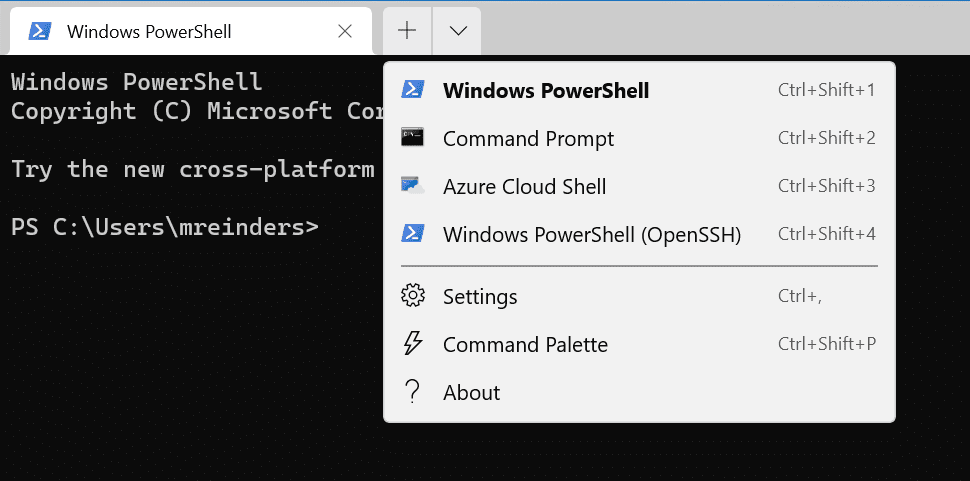
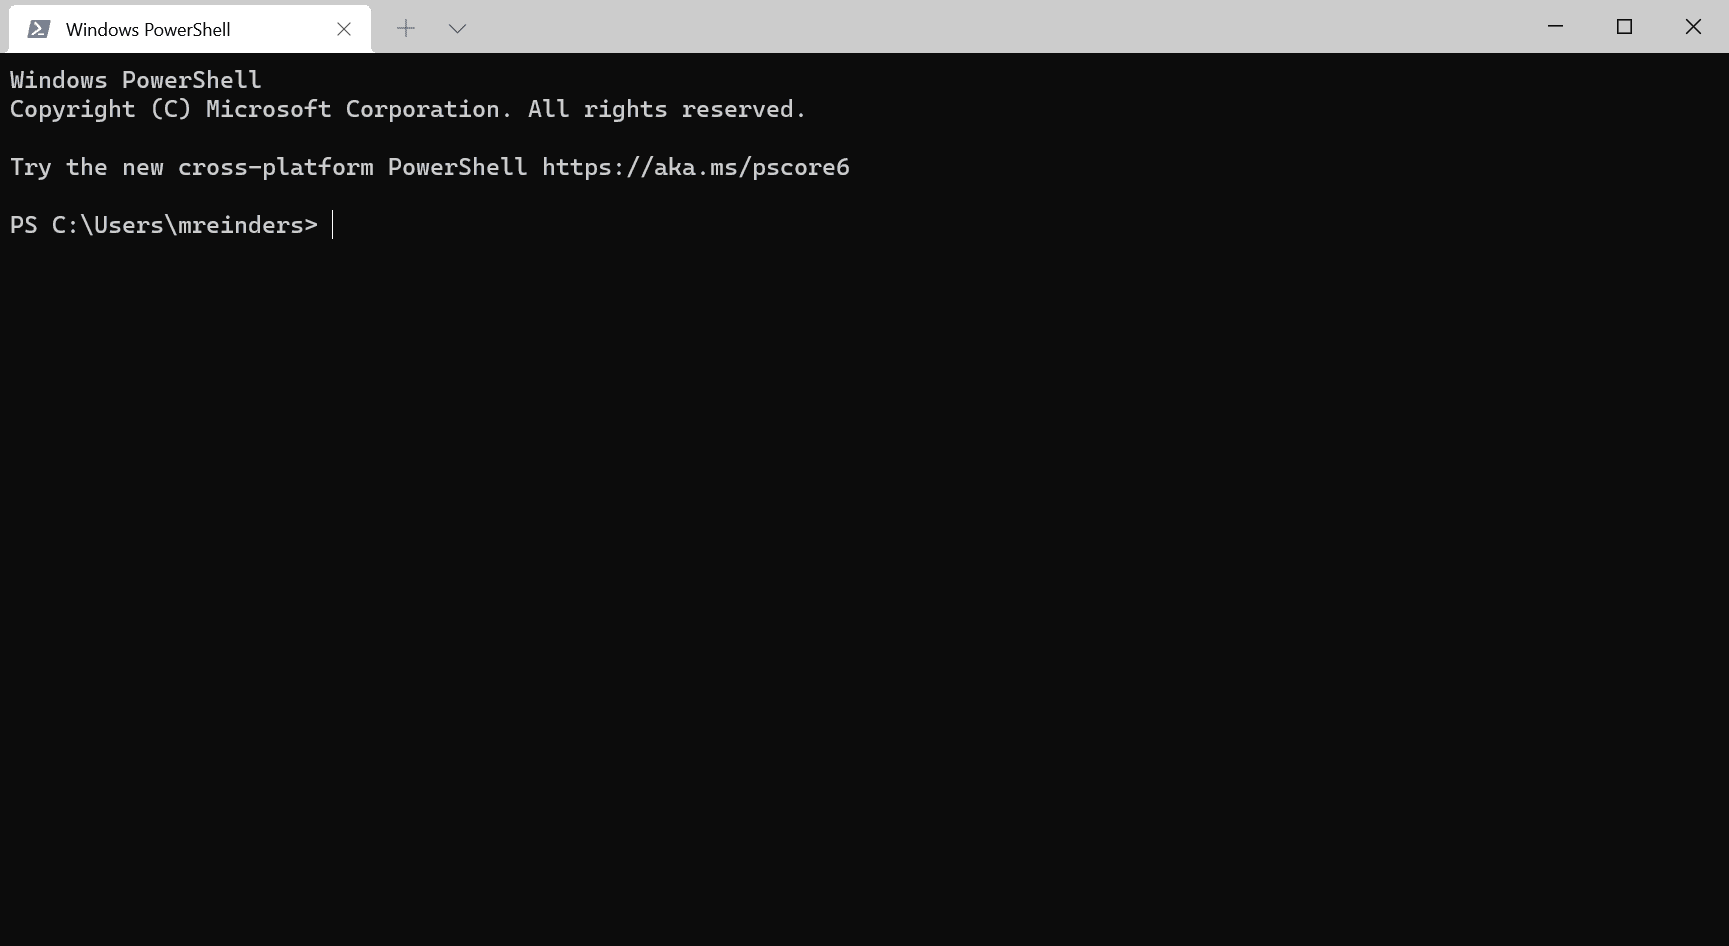
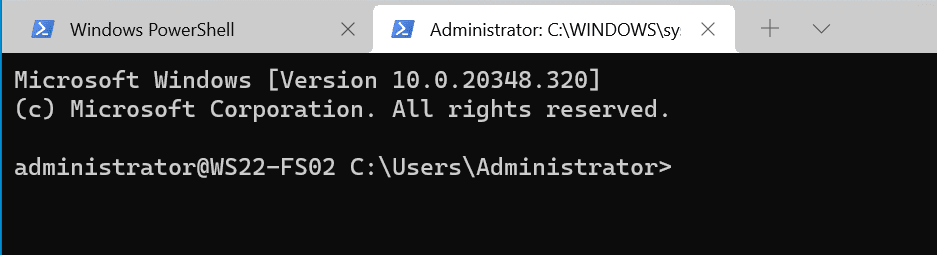
Now, click the same dropdown arrow and click your new profile. In my case “Windows PowerShell (OpenSSH)”. You’ll be prompted for credentials (again, you’ll understand in the next section…). Enter them, and voila!
Connect to OpenSSH Server
We are making excellent progress. We have our Windows Server 2022 server (WS22-FS02) configured to accept SSH incoming connections. We have the OpenSSH Client feature installed and verified on our Windows 10 system. We’ll first try a basic connectivity test by pinging the server.
We’ll then type in ‘ssh username@servername‘. Because the server’s name is ‘ws22-fs02’, we’ll use ‘ssh administrator@ws22-fs02’. We’ll get prompted for the account’s password because by default, the SSH server in Windows is set to use password authentication.
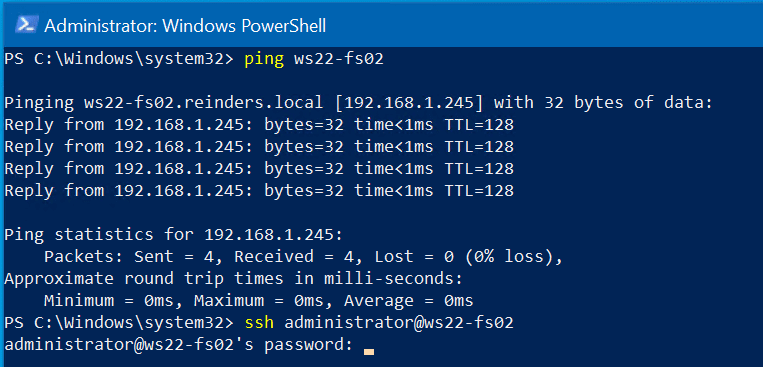
Enter your password and we’re in!
We are now running an administrative command prompt remotely and securely from our Windows 10 computer, using native open-source SSH. Pretty slick, huh?
Uninstall OpenSSH using Windows Settings
If you ever need to uninstall OpenSSH components for security, compliance, or any other reason, it’s straightforward via Windows Settings. Let’s walk you through.
First, click the Start button, and click on Settings. Click the Apps category heading, then Optional Features.
Click ‘OpenSSH Client‘ and click the Uninstall button.

Go ahead and reboot your computer if it prompts you to (assuming you can, should, and no one will yell at you for Rebooting the Exchange Server!!!) One of my favorite online IT Pro videos to watch from many years ago. Some of you will definitely resonate… (The Website is Down #1)
Uninstall OpenSSH using PowerShell
There are strikingly similar PowerShell commands to run to uninstall OpenSSH features in Windows compared to Installing them. I know, right? Mesmerizing. Go ahead and run this command to validate which OpenSSH components are installed on your system.
Get-WindowsCapability -Online | Where-Object Name -like 'OpenSSH*'

Run the following command to uninstall OpenSSH Client from your computer.
Remove-WindowsCapability -Online -Name OpenSSH.Client~~~~0.0.1.0

As you can see, I ran the ‘Get-WindowsCapability’ command again after the feature was uninstalled to confirm. All looks good!
There, that wasn’t so bad. Honestly, it’s pretty straightforward to get up and running fast with OpenSSH in Windows.
The latest builds of Windows 10 and Windows 11 include a built-in server and client that are based on OpenSSH. This means now you can remotely connect to Windows 10/11 or Windows Server 2019 using any SSH client, similar to Linux distros. In this article, we’ll show you how to configure OpenSSH on Windows 10 and Windows 11, and connect to it using Putty or any other SSH client.
OpenSSH is an open-source, cross-platform version of Secure Shell (SSH) that is used by Linux users for a long time. This project is currently ported to Windows and can be used as an SSH server on almost any version of Windows. OpenSSH is built-in into the operating system image in the latest versions of Windows Server 2022/2019 and Windows 11.
How to Enable SSH Server on Windows 10?
Make sure your build of Windows 10 is 1809 or newer. The easiest way to do this is by running the command:
winver

Note. If you have an older Windows 10 build installed, you can update it through Windows Update or using an ISO image with a newer Windows 10 build (you can create an image using the Media Creation Tool). If you don’t want to update your Windows 10 build, you can manually install the Win32-OpenSSH port for Windows from GitHub.
You can enable the OpenSSH server in Windows 10 through the graphical Settings panel:
- Go to Settings > Apps > Apps and features > Optional features (or run the command ms-settings:appsfeatures);

- Click Add a feature, select OpenSSH Server (OpenSSH-based secure shell (SSH) server, for secure key management and access from remote machines), and click Install.


You can also install the sshd server using PowerShell:
Add-WindowsCapability -Online -Name OpenSSH.Server*

Or using DISM:
dism /Online /Add-Capability /CapabilityName:OpenSSH.Server~~~~0.0.1.0
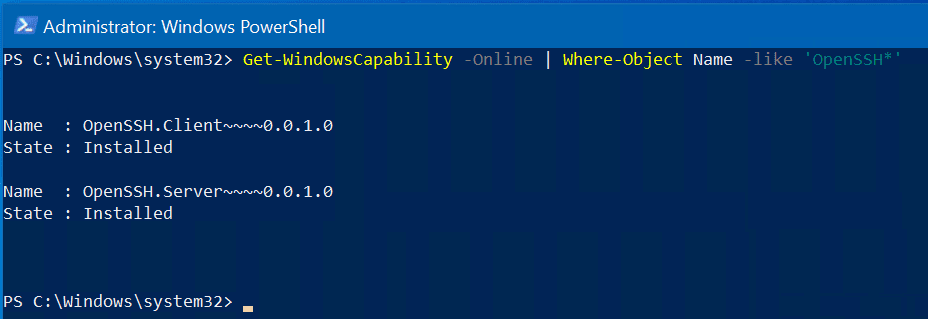
If you want to make sure the OpenSSH server is installed, run the following PS command:
Get-WindowsCapability -Online | ? Name -like 'OpenSSH.Server*'

Name : OpenSSH.Server~~~~0.0.1.0

State : Installed

Use the following PowerShell command to uninstall the SSH server:
Remove-WindowsCapability -Online -Name OpenSSH.Server~~~~0.0.1.0
How to Install SSH Server on Windows 11?
Also, you can add the OpenSSH Server on Windows 11.
- Go to Settings > Apps > Optional features;
- Click View Features;

- Select OpenSSH Server from the list and click Next > Install;

- Wait for the installation to complete.


The OpenSSH binaries are located in the C:WindowsSystem32OpenSSH folder.

Configuring SSH Service on Windows 10 and 11
Check the status of ssh-agent and sshd services using the PowerShell Get-Service command:
Get-Service -Name *ssh*

As you can see, both services are in a Stopped state and not added to the automatic startup list. To start services and configure autostart for them, run the following commands:
Start-Service sshd

Set-Service -Name sshd -StartupType 'Automatic'

Start-Service ‘ssh-agent’

Set-Service -Name ‘ssh-agent’ -StartupType 'Automatic'

You also need to allow incoming connections to TCP port 22 in the Windows Defender firewall settings. You can open the port using netsh:
netsh advfirewall firewall add rule name=”SSHD service” dir=in action=allow protocol=TCP localport=22
Or you can add a firewall rule to allow SSH traffic using PowerShell:
New-NetFirewallRule -Name sshd -DisplayName 'OpenSSH Server (sshd)' -Enabled True -Direction Inbound -Protocol TCP -Action Allow -LocalPort 22
You can configure various OpenSSH server settings in Windows using the %programdata%sshsshd_config configuration file.

For example, you can disable password authentication and leave only key-based auth with:
PubkeyAuthentication yes

PasswordAuthentication no
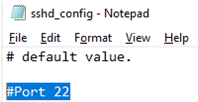
Here you can also specify a new TCP port (instead of the default TCP 22 port) on which the SSHD will accept connections. For example:
Port 2222
Using the directives AllowGroups, AllowUsers, DenyGroups, DenyUsers, you can specify users and groups who are allowed or denied to connect to Windows via SSH:
- DenyUsers theitbrosjbrown@192.168.1.15 — denies connections to username jbrown from 192.168.1.15 host;
- DenyUsers theitbros* — prevent all users from theitbros domain to connect host using ssh;
- AllowGroups theitbrosssh_allow — only allow users from theitbrosssh_allow to connect host.
The allow and deny rules of sshd are processed in the following order: DenyUsers, AllowUsers, DenyGroups, and AllowGroups.
For example, to allow to connect to SSH under mylocaluser1 account from 192.168.31.100 host, add the following directive:
AllowUsers mylocaluser1@192.168.31.100
After making changes to the sshd_config file, you need to restart the sshd service:
Get-Service sshd| Restart-Service –force

Connect to Windows via SSH
Now you can connect to Windows 10 using any SSH client. To connect from Linux, use the command:
ssh -p 22 admin@192.168.1.90
Here, the admin is a local Windows user under which you want to connect. This account must be a member of the built-in Administrators group. 192.168.1.90 is an IP address of your Windows 10 computer.

After that, a Windows command prompt window will open in the SSH session.
You can use the Putty client to connect to a Windows computer via SSH:
- Download and run putty.exe;
- Enter the hostname or IP address of the remote Windows host you want to connect over SSH;
- Select the Connection type: SSH and make sure port 22 is specified;

- Click Open;
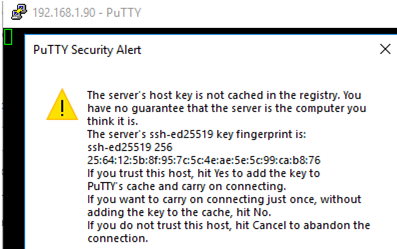
- The first time you connect to a Windows host via SSH, a Security Alert will appear asking you to confirm that you want to add the ssh-ed25519 key fingerprint of the remote machine to your local cache. If you trust this host, click the Accept button. This will add that server to the list of known SSH hosts;

Note. OpenSSH server fingerprint stored in a file C:ProgramDatasshssh_host_ecdsa_key.pub. You can determine the current ECDSA key fingerprint on a Windows 10 host with the command:ssh-keygen -lf C:ProgramDatasshssh_host_ed25519_key.pub

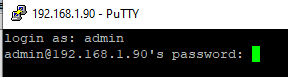
- A Putty window will appear. Here you need to specify the Windows username and password that you want to use to connect to SSH;

- Once logged in, the command line of the remote Windows host will open;
- You can now interactively run commands on the remote host.


You can also use the built-in Windows SSH client to connect to another Windows host. Install the ssh.exe client on Windows using the command:
Add-WindowsCapability -Online -Name OpenSSH.Client*
Now you can connect to a remote SSH host directly from the Windows command prompt. Use the following command:
ssh root@192.168.13.202
The first time you connect, you will also need to add the fingerprint of the SSH server’s ECDSA key to the list of known hosts. To do this, type “yes” > “enter”.

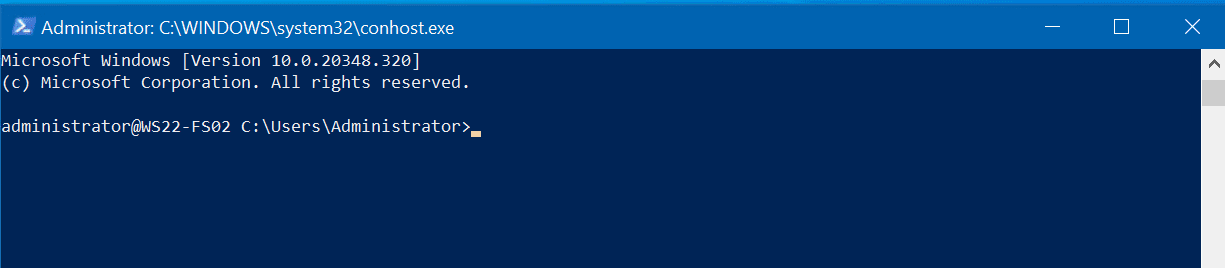
Enter the user’s password. The command line C:Windowssystem32conhost.exe should appear: 
You can now use the OpenSSH.Client tools (scp.exe, sftp.exe) to copy a file between hosts using the SSH protocol. The following command will copy the local test1.log file to a remote Windows SSH host:
scp.exe D:PStest1.log root@192.168.13.202:c:temp
![]()
If you prefer to use Windows Terminal, you can add the required SSH host profiles to it for quick connection:
- Run Windows Terminal and go to its Settings;
- Click the Add a new profile button in the Profiles section;

- Specify that you want to create a duplicate of Windows PowerShell profile;

- Specify a profile name (“SSH Windows 10 DEVPC” in this example);
- In the Command line parameter, specify the connection string to your SSH host. For example: %SystemRoot%System32WindowsPowerShellv1.0powershell.exe ssh root@192.168.13.202

- Save the profile;
- Now in the Windows Terminal menu you will have a separate option for a quick SSH connection to a Windows host.


Hint. In some scenarios, you will need to run the PowerShell.exe cli instead of the cmd.exe shell when logging in via SSH on Windows 10. You can do this by running the following command in Windows 10 (under the admin account):
New-ItemProperty -Path "HKLM:SOFTWAREOpenSSH" -Name DefaultShell -Value "C:WindowsSystem32WindowsPowerShellv1.0powershell.exe" -PropertyType String -Force
Now, you change the default OpenSSH shell. From here, when connecting to Windows via SSH, you will immediately see PowerShell prompt instead of cmd.exe.

If you want to use key-based ssh authentication instead of password authentication, you need to generate a key using ssh-keygen on your client. In such a case, the contents of the id_rsa.pub file must be copied to the c:usersadmin.sshauthorized_keys file in Windows 10.
After that, you can connect from your Linux client to Windows 10 without a password. Use the command:
ssh -l admin@192.168.1.90
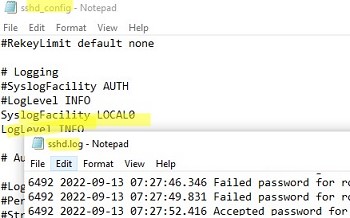
In previous versions of OpenSSH on Windows, all of the sshd service logs were written to the text file C:ProgramDatasshlogssshd.log by default.
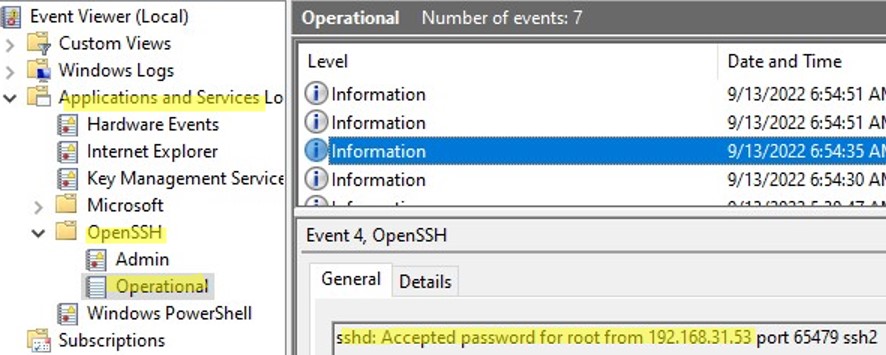
On Windows 11, SSH logs can be viewed using the Event Viewer console (eventvwr.msc). All SSH events are available in a separate section Application and Services Logs > OpenSSH > Operational.
For example, the screenshot shows an example of an event with a successful connection to the computer via SSH. You can see the ssh client’s IP address (hostname) and the username used to connect.
Sshd: Accepted password for jbrown from 192.168.14.14. port 49833 ssh2

- About
- Latest Posts

I enjoy technology and developing websites. Since 2012 I’m running a few of my own websites, and share useful content on gadgets, PC administration and website promotion.
SSH-server based on the OpenSSH package is part of the operating system in all modern versions of Windows. In this article, we’ll show you how to install and configure the OpenSSH server on Windows 10/11 and Windows Server 2022/2019 and connect to it remotely via a secure SSH connection (just like in Linux 🙂).
Contents:
- How to Install OpenSSH Server on Windows?
- Configuring SSH Server on Windows
- Sshd_config: OpenSSH Server Configuration File
- How to Connect to a Remote Windows Computer via SSH?
- Checking SSH Connection Logs in Windows
How to Install OpenSSH Server on Windows?
The OpenSSH Server package is a part of all modern versions of Windows 10 (starting with 1803), Windows 11, and Windows Server 2022/2019 as a Feature on Demand (FoD). To install the OpenSSH server, open the elevated PowerShell prompt and run the command:
Get-WindowsCapability -Online | Where-Object Name -like ‘OpenSSH.Server*’ | Add-WindowsCapability –Online
Or using DISM:
dism /Online /Add-Capability /CapabilityName:OpenSSH.Server~~~~0.0.1.0
If your computer is directly connected to the Internet, the OpenSSH.Server package will be downloaded and installed on Windows.
You can also install OpenSSH on Windows 10/11 through the modern Settings panel (Settings -> Apps and features -> Optional features -> Add a feature). Find Open SSH Server in the list and click Install.
On computers in disconnected (offline) environments, you can install the OpenSSH Server from the Feature on Demand ISO image (available in your account on the Microsoft websites: MSDN or my.visualstudio.com). Download the ISO and extract its contents to the E:FOD folder (you can only extract the file OpenSSH-Server-Package~31bf3856ad364e35~amd64~~.cab) and install the Windows feature from the local repository:
Add-WindowsCapability -Name OpenSSH.Server~~~~0.0.1.0 -Online -Source E:FOD
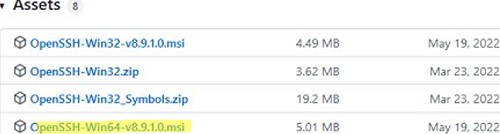
An MSI installer for OpenSSH for Windows is also available in the official Microsoft repository on GitHub (https://github.com/PowerShell/Win32-OpenSSH/releases/). For example, for Windows 10 x64, you need to download and install the OpenSSH-Win64-v8.9.1.0.msi package. The following PowerShell command will download the MSI file and install the OpenSSH client and server on your computer:
Invoke-WebRequest https://github.com/PowerShell/Win32-OpenSSH/releases/download/v8.9.1.0p1-Beta/OpenSSH-Win64-v8.9.1.0.msi -OutFile $HOMEDownloadsOpenSSH-Win64-v8.9.1.0.msi -UseBasicParsing

msiexec /i $HOMEDownloadsOpenSSH-Win64-v8.9.1.0.msi
You can install an OpenSSH server in previous Windows versions as well (Windows 8.1, Windows Server 2016/2012R2/2012). Check the example on how to install and configure Win32-OpenSSH in the article “How to Configure SFTP Server (SSH FTP) on Windows?”.
To make sure the OpenSSH server has been installed, run the command:
Get-WindowsCapability -Online | ? Name -like 'OpenSSH.Ser*'
State : Installed

Configuring SSH Server on Windows
After installing the OpenSSH server on Windows, two services are added:
- ssh-agent (OpenSSH Authentication Agent) – can be used to manage private keys if you have configured SSH key authentication;
- sshd (OpenSSH SSH Server).
You need to change the startup type of the sshd service to automatic and start the service using PowerShell:
Set-Service -Name sshd -StartupType 'Automatic'

Start-Service sshd

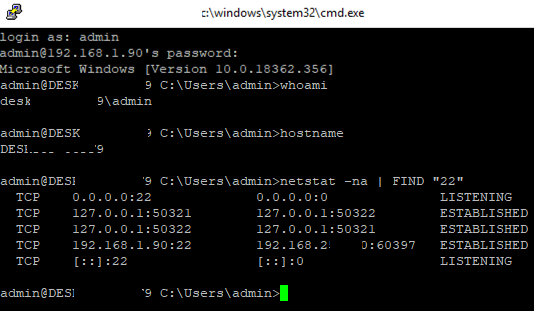
Use the netstat command to make sure that the SSH server is running and waiting for the connections on TCP port 22:
netstat -na| find ":22"

Make sure that Windows Defender Firewall allows inbound connections to Windows through TCP port 22:
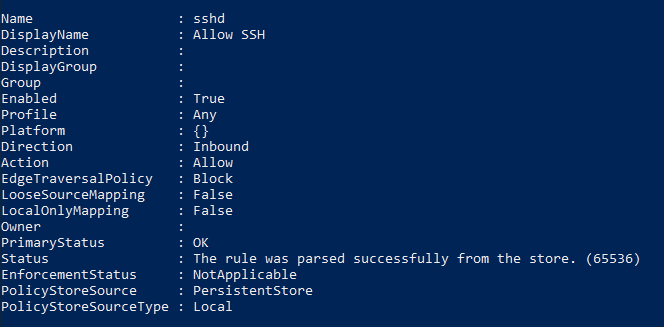
Get-NetFirewallRule -Name *OpenSSH-Server* |select Name, DisplayName, Description, Enabled
Name DisplayName Description Enabled
---- ----------- ----------- -------
OpenSSH-Server-In-TCP OpenSSH SSH Server (sshd) Inbound rule for OpenSSH SSH Server (sshd) True

If the rule is disabled (Enabled=False) or missing, you can create a new inbound rule using the New-NetFirewallRule cmdlet:
New-NetFirewallRule -Name sshd -DisplayName 'OpenSSH Server (sshd)' -Enabled True -Direction Inbound -Protocol TCP -Action Allow -LocalPort 22
By default, key OpenSSH components are located in these folders:
- OpenSSH Server executables:
C:WindowsSystem32OpenSSH(sshd.exe, ssh.exe, ssh-keygen.exe, sftp.exe, etc.) - The sshd_config file (created after the first service start of the service):
C:ProgramDatassh - The authorized_keys file and keys can be stored in the user profile folder:
%USERPROFILE%.ssh
Sshd_config: OpenSSH Server Configuration File
You can change your OpenSSH server settings in the config file: %programdata%sshsshd_config. This is a plain text file with a set of directives. You can use any text editor for editing:
start-process notepad C:Programdatasshsshd_config
For example, to deny SSH connection for a specific domain user account (or all users in the specified domain), add these directives to the end of the file:
DenyUsers woshubadmin@192.168.1.10
DenyUsers corp*
To allow SSH connection to the specific domain security group only:
AllowGroups woshubsshadmins
You can allow access to a local user group:
AllowGroups sshadmins
By default, all Windows users can connect to OpenSSH. Directives in the sshd_config files are processed in the following order: DenyUsers, AllowUsers, DenyGroups, AllowGroups.
You can deny SSH login for the accounts with administrator privileges. In this case, if you need to perform any privileged actions in your SSH session, you will have to use runas.
DenyGroups Administrators
The following directives allow you to access Windows using SSH private keys or a password.
PubkeyAuthentication yes
PasswordAuthentication yes
You can change the default TCP/22 port on which OpenSSH Server connections are accepted in the sshd_config configuration file using the Port directive.
After making any changes to the sshd_config file, you need to restart the sshd service
restart-service sshd
How to Connect to a Remote Windows Computer via SSH?
Now you can try to connect to your Windows 10 computer using the SSH client (I’m using putty in this example).
You can use the built-in Windows SSH client to connect to a remote host. To do this, open the command prompt and run the following command:
ssh max@192.168.13.12
In this example, max is the username on the remote Windows computer, and 192.168.13.12 is the IP address or DNS name of the computer.
Note that you can use the following username formats when connecting to Windows via SSH:
max@server1– local Windows usermax@woshub.com@server1– Active Directory user or Microsoft/Azure account (use the UserPrincipalName format)woshubmax@server1– NetBIOS name format
In an Active Directory domain, you can use Kerberos authentication in SSH. To do this, you need to enable the following directive in sshd_config:
GSSAPIAuthentication yes
You can now transparently connect to an SSH server from a domain-joined Windows machine with a domain user session. In this case, the user’s password will not be requested, and SSO authentication via Kerberos will be performed:
ssh -K server1
The first time you connect, you will be prompted to add the host to the list of known SSH hosts (C:Usersyour_user.sshknown_hosts).
Click Yes, and login under your Windows user account.
If the SSH connection is successful, you will see the cmd.exe shell prompt.
admin@win10pc C:Usersadmin>

You can run different commands, scripts, and apps in the SSH command prompt.
I prefer working in the PowerShell console. To start it, run:
powershell.exe

In order to change the default cmd.exe shell in OpenSSH to PowerShell, make changes to the registry using the following PowerShell command:
New-ItemProperty -Path "HKLM:SOFTWAREOpenSSH" -Name DefaultShell -Value "C:WindowsSystem32WindowsPowerShellv1.0powershell.exe" -PropertyType String –Force

Restart your SSH connection and make sure that PowerShell is now used as a default SSH shell (this is indicated by the prompt PS C:Usersadmin>).

The PowerShell prompt has been started in my SSH session, where the usual functions work: tab autocomplete, PSReadLine syntax highlighting, command history, etc. If the current user is a member of the local administrators’ group, all session commands are executed elevated even if UAC is enabled.
OpenSSH server on Windows can be used in various SSH tunneling scenarios.
Checking SSH Connection Logs in Windows
By default in Windows SSH server connection logs are written not to text files, but to a separate event log via Event Tracing for Windows (ETW). Open the Event Viewer console (eventvwr.msc ) and navigate to Application and services logs -> OpenSSH -> Operational.
If you successfully connect to the SSH server using a password, an event will appear in the log:
EventID: 4
sshd: Accepted password for root from 192.168.1.53 port 65749 ssh2
If SSH key authentication was performed, you will see the following event:
sshd: Accepted publickey for locadm from 192.168.1.53 port 61426
ssh2: ED25519 SHA256:FEHDEC/G42FS23209C2KMb4335923pigN31s3qMK322lGibD
If you want the SSH connection logs to be written to a local text file, you need to enable the following parameters in the sshd_config file:
SyslogFacility LOCAL0
LogLevel INFO
Restart the sshd service and make sure that the SSH server logs are now written to a plain text file C:ProgramDatasshlogssshd.log
— Advertisement —
Hello, how are you? In the previous article, we saw how to enable Telnet in Windows Server. This protocol is very useful, but it has a serious security breach. For that reason, we recommend using the SSH connection. It is a remote administration protocol that allows users to control and modify their remote servers over the Internet. To do this, it uses an authentication mechanism. The protocol works by authenticating a remote user and transferring inputs from the client to the host. It then retransmits the output back to the client. But most importantly, the communication is delivered encrypted so the security is much higher than Telnet. In view of the above, let’s see how to install an SSH client and server in Windows 10.
Prerequisite
In order to enjoy all the benefits of this protocol, it is necessary to have a Windows version equal to or greater than 1803.
Installing the SSH client
First, let’s verify the SSH client installation. With this intention, enter in Windows Settings pressing the combination Win+I. Once there, select Apps

Then click on Optional features.

In the next window, you will see all the optional functions. Then scroll down to find the OpenSSH Client. In this case, the client is already installed, so there is nothing else to do. In case it is not, just click on the install button.

Add SSH server in Windows 10
From the previous screen please click on Add a feature:

Now scroll down and select OpenSSH Server. Press install and wait a few seconds while the function is installed. Once the action is executed, please restart the computer to confirm the changes.

Configure OpenSSH Server to start with Windows.
From now on the client and the SSH server are installed. For the SSH server to be activated every time we start Windows we will have to do the following. Press the Win+R combination and run services.msc

Then scroll down and select OpenSSH SSH Server and OpenSSH Authentication Agent:

Now what we are going to do is to activate them so that they start every time you start Windows. With that intention double-click on OpenSSH Authentication Agent and in the startup type select Automatic. Then press Apply and finally accept.

We will repeat this procedure with the OpenSHH SSH Server Service

As we did in the previous step, restart the computer to set the changes. With these steps, we will be able to install the server and the SSH client in Windows 10.
Testing the SSH client and server
After restarting the computer, it is necessary to verify if the SSH services are active. To do this, open a PowerShell as administrator by pressing the Win+X combination.

Then execute the following command:
Get-Service -Name *ssh*
If all goes well, you will see the next result in the PowerShell, showing the two services running:

Configuring the Windows firewall
In order to have access to our computer through SSH we have to configure the Windows Firewall. To do this we open a PowerShell as administrator and execute the following command:
.netsh advfirewall firewall add rule name="SSHD Port" dir=in action=allow protocol=TCP localport=22

It then tests whether the SSH server is listening on port 22. For this purpose, from a PowerShell with administrator privileges runs the following command:
.netstat -bano | .more.com

Connect to an SSH server from Windows.
From now on we can connect remotely to an SSH server. To execute it, it is necessary to know 3 parameters:
- User name
- Server IP Address
- Know the port where the SSH server is listening. In this case, the port is 22.
- User password
Once this data is known, open a PowerShell and run the following command:
ssh -p 22 [email protected]
Then add the password to access the remote computer. And you will have access via PowerShell to the SSH server.

Conclusion
Finally, we have seen how to install an SSH client and server in Windows 10. This way we will be able to remotely manage any device that uses this protocol. Additionally, security is increased because the communication between host and client is encrypted. In this way, our data remains safe from possible attackers. This is all for the moments, before saying goodbye I want to invite you to see our post about Telnet in Windows Server.

Contents
- 1 How to Install the SSH Client on Windows 10
- 2 How to Use SSH Commands in Windows 10
- 3 How to Open a Port in Firewall or Enable the Telnet Client
Using SSH on Windows 10 used to be a pain that required third-party software such as PuTTy. In 2018, though, Microsoft enabled native SSH commands via an OpenSSH Windows integration.
If you’re unfamiliar with SSH, it stands for Secure Shell, a protocol typically used for connecting to Linux servers. The command-line SSH tool lets you log into your server and run commands remotely to perform any required task.
The Integrated OpenSSH for Windows Client
The OpenSSH client for Windows is installed by default on Windows Server 2019 and Windows 10 build 1809 and later. However, if SSH commands aren’t working for you, it’s because you need to enable them in your Windows features. We’re going to walk you through enabling SSH on Windows 10 via this method, then show you how to use it. Let’s get started:
How to Install the SSH Client on Windows 10
Though Windows 10 OpenSSH is installed by default on most versions, it may not be for everyone. Thankfully, enabling SSH only takes a few seconds. Here’s how:
- Press the Search button and type “Optional feature”
Click the top result, which should read, “Add an optional feature”.

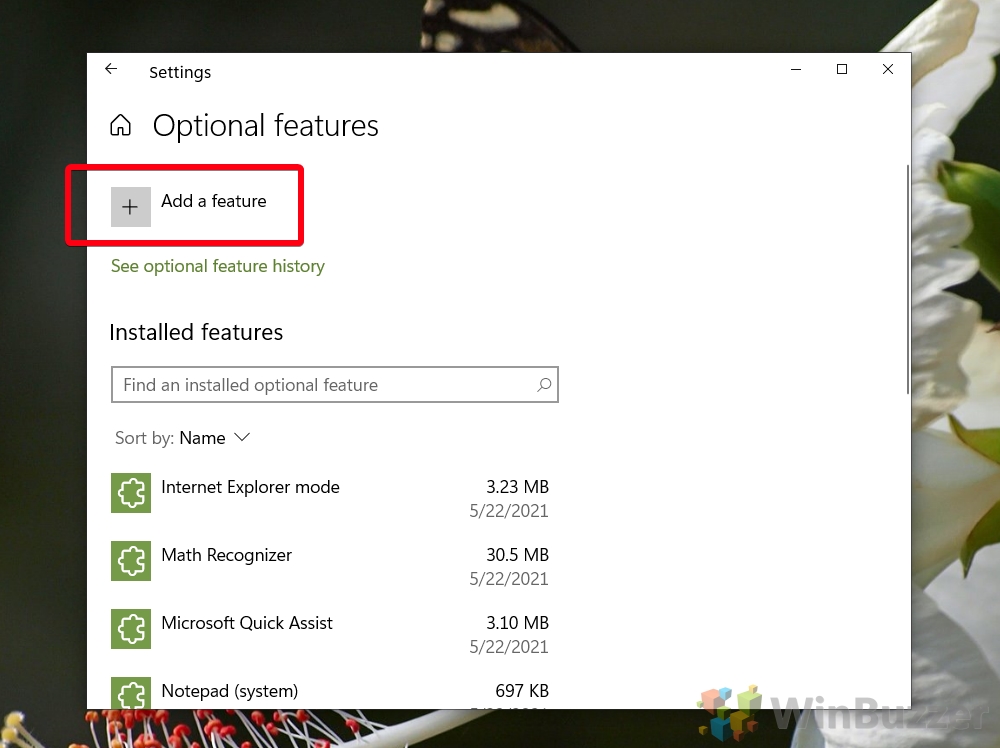
- Click “Add a feature” in Settings

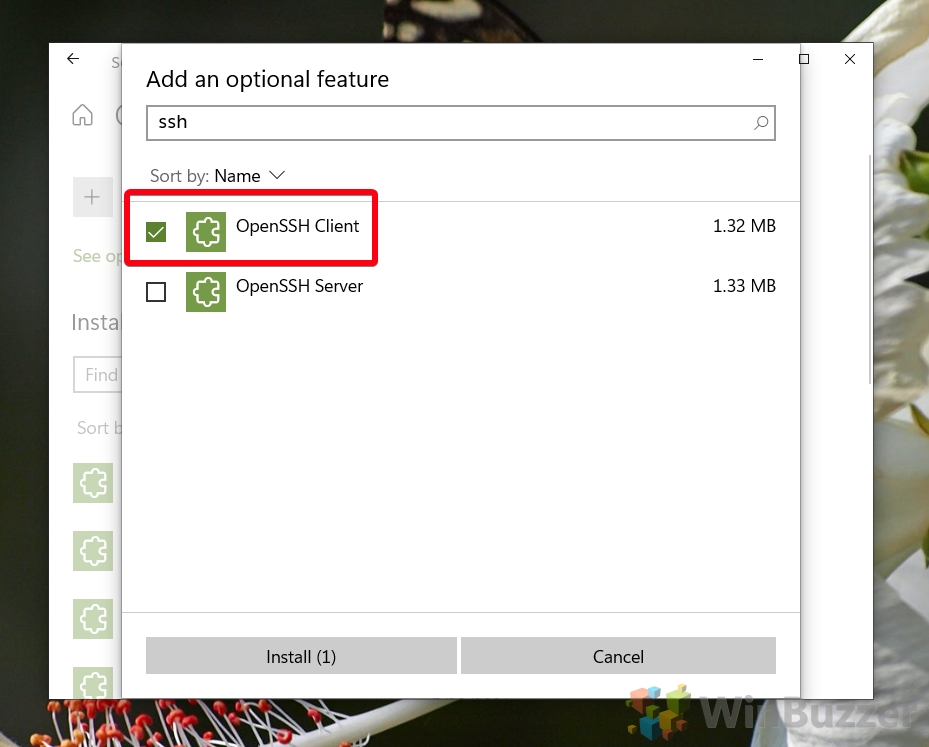
- Install the Windows OpenSSH Client
Type “SSH” in the optional features search bar, then tick the entry that reads “OpenSSH Client”. Finally, click the “Install” button at the bottom of your Window. The process will take a few seconds to complete and shouldn’t require a restart.


Once you have the Windows 10 SSH client installed, using it is a simple matter. You can use Command Prompt for this, or PowerShell SSH, whichever you prefer. The SSH commands are the same across both applications, so you can still follow along.
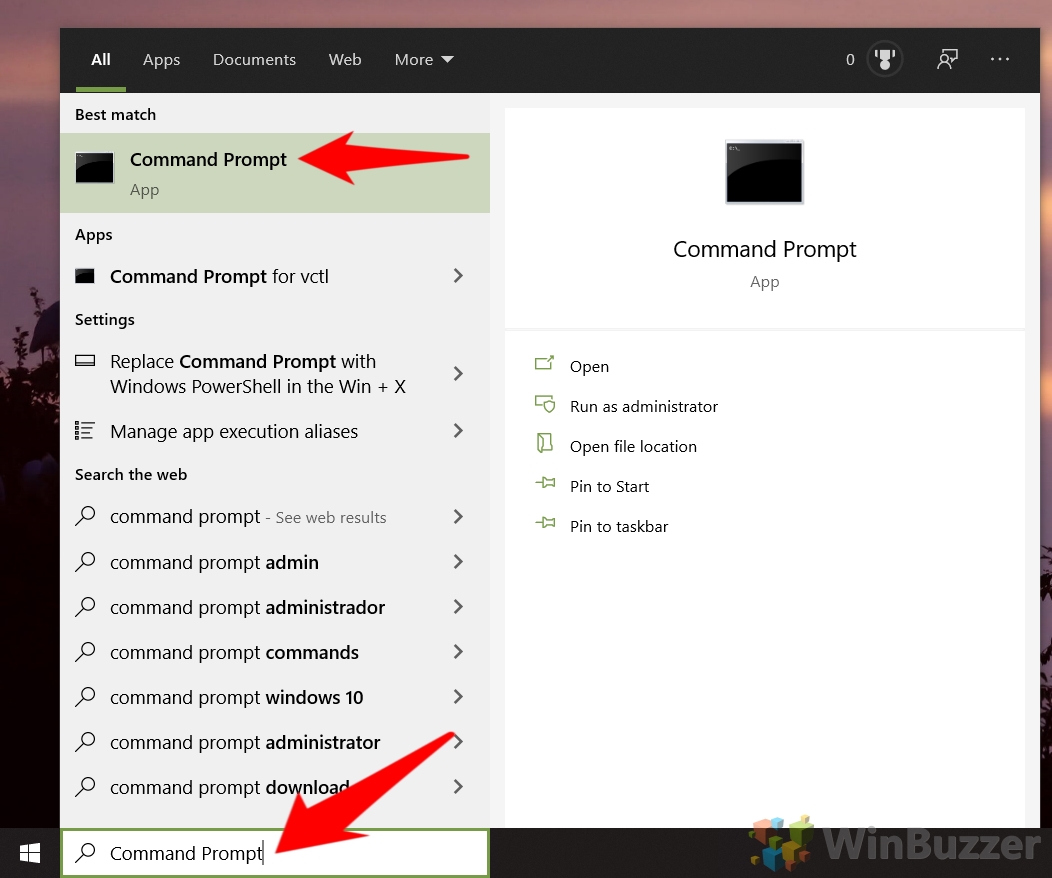
- Open Command Prompt (or PowerShell)
Press Start and then type “Command Prompt”. Click the top result.

- Run the SSH command to view its usage guide
Command Prompt will return a full list of options and syntax for you to use as you require.

- Connect to your server via your Windows Open SSH client
In most cases, you won’t need the above options to connect to your SSH server. Instead, you can simply run:
ssh [email protected]
You’ll be prompted for your server’s root password, which you can type and press Enter to log in.
If your server uses a different port to the standard for SSH, you can specify it by adding
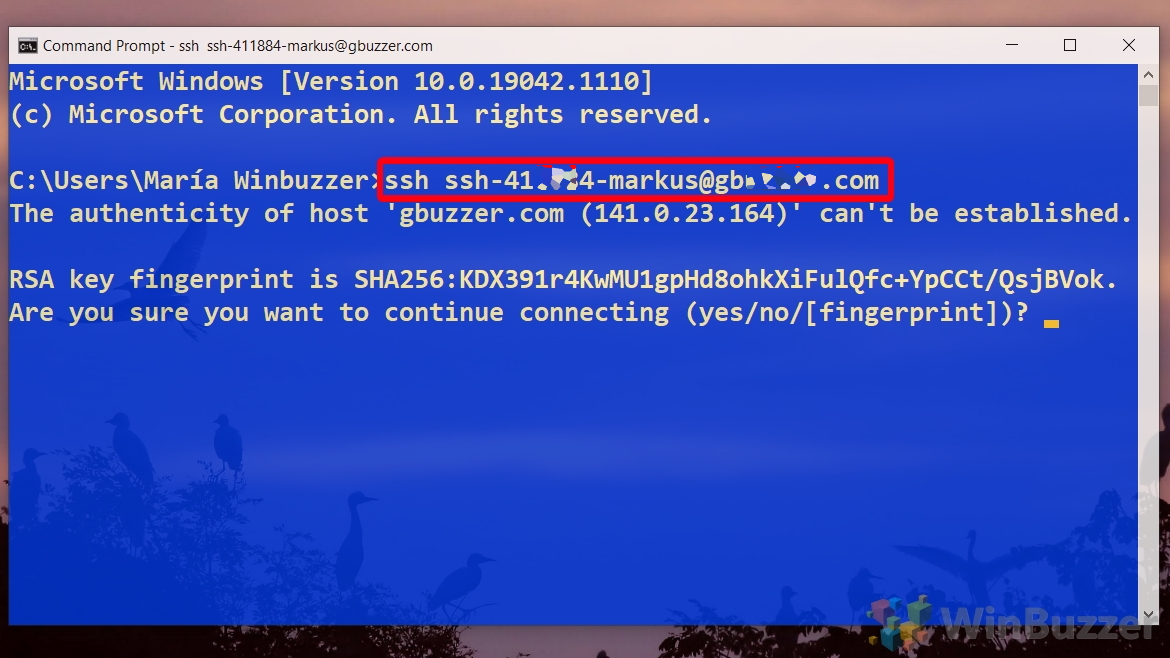
-p portnumberto the end of your command.The first time you connect to a server, you’ll receive a warning asking if you’re sure you want to connect. Type
yesand press Enter to connect.
How to Open a Port in Firewall or Enable the Telnet Client
Now you know how to install SSH on Windows. However, if you’re still having issues, you may need to follow our tutorial on how to open or close a port in Windows 10 Firewall to add an exception for your SSH port.
Finally, if your server uses the older Telnet protocol, you may want to follow our tutorial on how to enable the Telnet client in Windows 10 instead.
The Secure Shell (SSH) protocol and the OpenSSH project have been around for decades on Linux. But OpenSSH on Windows hasn’t been embraced in the Windows world until recently. As such, a Windows Server doesn’t typically come pre-built and ready to go and requires some setup.
Not a reader? Watch this related video tutorial!
Not seeing the video? Make sure your ad blocker is disabled.
In this tutorial, you’re going to learn how to SSH into your Windows Server just as easily as Linux. You’ll learn how to get OpenSSH installed (or updated) on Windows, add appropriate firewall rules, and configure public key, password, and certificate-based authentication.
Prerequisites
To effectively follow the examples and demos in this article, you’ll need to meet these requirements below.
- A Windows Server machine – This article will use Windows Server 2019 Datacenter. The server this tutorial will use will have a user account called june and will connect to the server at the IP address of 40.117.77.227 with a hostname of ataWindows.
- A local computer with PowerShell 7.1 installed. PowerShell 7.1 is available in Windows, Linux, and macOS. The examples in this article use PowerShell 7.1 in Windows 10.
Downloading OpenSSH
Unlike Linux servers, Windows servers do not have an out-of-the-box SSH server running. But Microsoft has released an open-source port of OpenSSH for Windows. With this release, you can now set up an SSH server on a Windows machine.
To get started, you’ll first need to download OpenSSH. To do so, follow the steps below:
- Connect to the desktop on a Windows Server using Remote Desktop (RDP) or your preferred desktop manager client.
2. On your Windows Server desktop, open an elevated Windows PowerShell console.
3. Next, copy the code below, paste it in the PowerShell window, and press Enter. This script will download the latest OpenSSH release, which as of this writing, is v8.1.0.0p1-Beta to the current working directory.
If you like to save the PowerShell code to download OpenSSH, you can also open a code editor like Windows PowerShell ISE or Visual Studio Code and save it in there.
## Set network connection protocol to TLS 1.2
## Define the OpenSSH latest release url
$url = 'https://github.com/PowerShell/Win32-OpenSSH/releases/latest/'
## Create a web request to retrieve the latest release download link
$request = [System.Net.WebRequest]::Create($url)
$request.AllowAutoRedirect=$false
$response=$request.GetResponse()
$source = $([String]$response.GetResponseHeader("Location")).Replace('tag','download') + '/OpenSSH-Win64.zip'
## Download the latest OpenSSH for Windows package to the current working directory
$webClient = [System.Net.WebClient]::new()
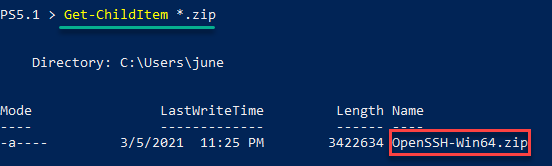
$webClient.DownloadFile($source, (Get-Location).Path + 'OpenSSH-Win64.zip')4. The OpenSSH-Win64.zip file should now be in your current working directory. Verify this by running the command below.
As you can see below, the OpenSSH-Win64.zip file exists in the directory.
Installing OpenSSH
After you’ve downloaded OpenSSH-Win64.zip, the next step is to install OpenSSH on the server. There’s no installation wizard in case you’re expecting it.
- While still in the same PowerShell session, copy the code below and run it in PowerShell. This code extracts the OpenSSH-Win64.zip file contents to C:Program FilesOpenSSH.
# Extract the ZIP to a temporary location
Expand-Archive -Path .OpenSSH-Win64.zip -DestinationPath ($env:temp) -Force
# Move the extracted ZIP contents from the temporary location to C:Program FilesOpenSSH
Move-Item "$($env:temp)OpenSSH-Win64" -Destination "C:Program FilesOpenSSH" -Force
# Unblock the files in C:Program FilesOpenSSH
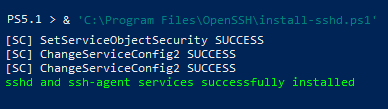
Get-ChildItem -Path "C:Program FilesOpenSSH" | Unblock-File2. After extracting the ZIP file, run the command below in PowerShell to execute the script C:Program FilesOpenSSHinstall-sshd.ps1. This script installs the OpenSSH SSH Server service (sshd) and OpenSSH Authentication Agent service (sshd-agent).
& 'C:Program FilesOpenSSHinstall-sshd.ps1'You can see the expected result below.
To ensure that the SSH server starts automatically, run the command below in PowerShell.
## changes the sshd service's startup type from manual to automatic.
 Set-Service sshd -StartupType Automatic
## starts the sshd service.
 Start-Service sshd
Adding a Windows Firewall Rule to Allow SSH Traffic
This procedure is applicable only if your Windows Server is using the Windows Firewall. For servers using third-party firewalls, refer to your firewall documentation on how to allow port 22.
Installing OpenSSH does not automatically create a firewall exception rule to allow SSH traffic. Therefore, your next task is to create the firewall rule manually.
One of the easiest ways to create a new Windows Firewall rule is with PowerShell and the New-NetFirewallRule cmdlet. The command below creates a firewall rule called Allow SSH that allows all inbound TCP traffic destined to port 22.
Copy the command below and run it in PowerShell.
New-NetFirewallRule -Name sshd -DisplayName 'Allow SSH' -Enabled True -Direction Inbound -Protocol TCP -Action Allow -LocalPort 22The below screenshot shows the expected output in PowerShell after creating the firewall rule.
Connecting with SSH using Password Authentication
At this point, you’ve installed OpenSSH on Windows and performed the initial server configuration. The next step is to test whether connecting via SSH actually works.
To test your newly configured SSH server, let’s now run the ssh command on your local computer.
The same steps in this section also apply when connecting to a Linux SSH server.
1. From your local computer this time, open PowerShell.
2. Next, run the command below to start the SSH login process. Make sure to change the username and the remote host of your Windows Server.
3. Since you’re connecting for the first time to the server, you will see a prompt saying that the authenticity of the host can’t be established. The message means that your computer does not recognize the remote host yet. Type yes and press Enter to continue.
4. When prompted for the password, type in your account password and press enter.

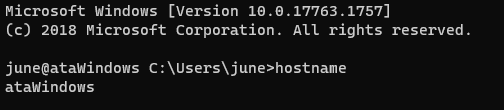
5. After logging in, as you can see in the screenshot below, you’ll arrive at the remote host’s command prompt. Suppose you want to confirm that you’ve entered the session on the remote host. To do so, type hostname, and press Enter. The command should return the remote computer name.
Changing the Default Shell for OpenSSH to PowerShell
When you first logged in to your Windows SSH server, you’ll notice that the default shell or command interpreter is CMD. Having CMD as the default SSH shell is fine, but if you prefer to use PowerShell as the default shell instead, follow these steps.
To change the default OpenSSH shell from CMD to PowerShell:
First, open an elevated PowerShell window on your Windows Server, if you don’t have one open already.
Next, create a new registry string value called DefaultShell in the registry key HKLM:SOFTWAREOpenSSH. Set the DefaultShell string data to the Windows PowerShell path C:WindowsSystem32WindowsPowerShellv1.0powershell.exe.
New-ItemProperty -Path "HKLM:SOFTWAREOpenSSH" -Name DefaultShell -Value "C:WindowsSystem32WindowsPowerShellv1.0powershell.exe" -PropertyType String -ForceThe screenshot below shows the expected result of the command.

Configuring Public Key Authentication
In the previous sections, you connected with a username and password. this works but a more secure way to authenticate with an SSH server is by using a key pair.
In a nutshell, a key pair consists of two keys called the public key and private key, which constitute a set of security credentials to prove your identity.
The public key is stored on the server, while the private key stays on the local computer. You must treat a private key like your password. If the private key is compromised, anyone can use it to gain access to your SSH server.
Public keys have to be on the server. But where? For OpenSSH on Windows, the SSH server reads the public keys from the C:ProgramDatasshadministrators_authorized_keys file. But this file does not exist by default. You must create one first.
Follow these steps below to create the administrators_authorized_keys file and set its proper access control list (ACL).
On the Windows Server:
1. Open an elevated Windows PowerShell console if not already.
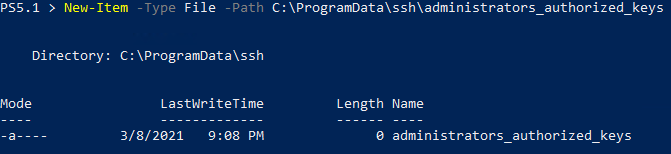
2. Copy the command below and run it in PowerShell. This command creates the administrators_authorized_keys file using the New-Item cmdlet.
New-Item -Type File -Path C:ProgramDatasshadministrators_authorized_keysYou should see a result similar to the screenshot below.
3. Next, get the ACL currently assigned to the ssh_host_dsa_key file and copy that ACL to the administrators_authorized_keys file. To do so, run the command below.
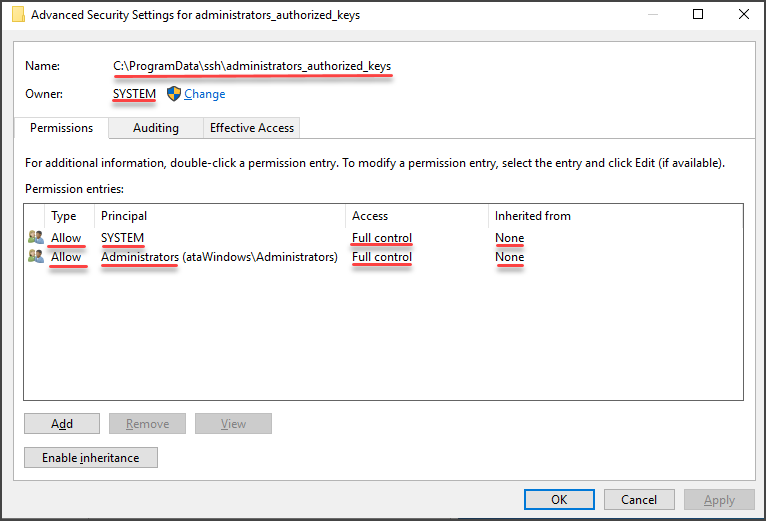
get-acl C:ProgramDatasshssh_host_dsa_key | set-acl C:ProgramDatasshadministrators_authorized_keysThe OpenSSH service requires that only the Administrators group and the SYSTEM account have access to the administrators_authorized_keys file. And copying the ACL of ssh_host_dsa_key to administrators_authorized_keys makes sense because the ACL is already set.
4. Now open up Windows Explorer.
5. Navigate to the C:ProgramDatassh folder.
6. Right-click on the administrators_authorized_keys file and click Properties.
7. On the properties page, click on the Security Tab and click Advanced.
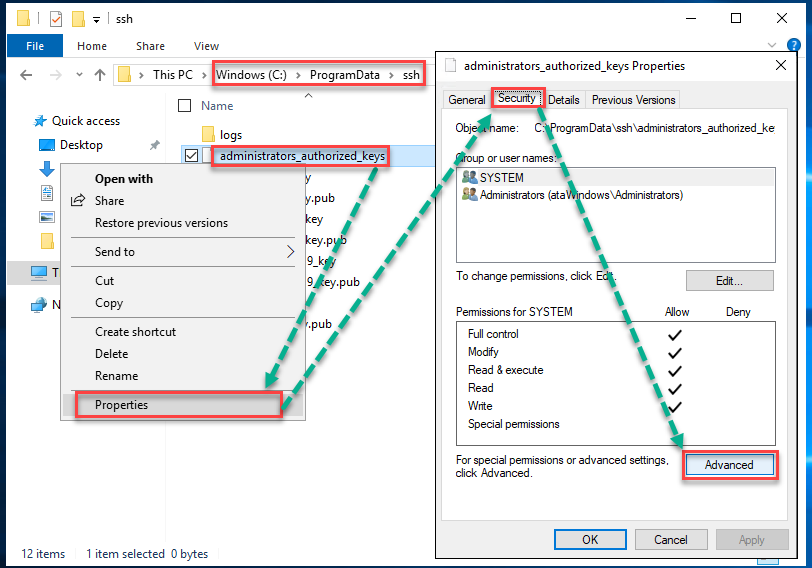
8. Then, confirm if the permissions are as shown like in the image below.
Generating a New SSH Key Pair
To generate a new SSH key pair, use the ssh-keygen command, which is part of the OpenSSH client tools built-in to Windows 10 (and above) and most Linux operating systems.
The example shown in this section works on both Windows and Linux computers.
On your local computer, in a PowerShell console:
1. Navigate to your home folder’s .ssh directory by running the command below.
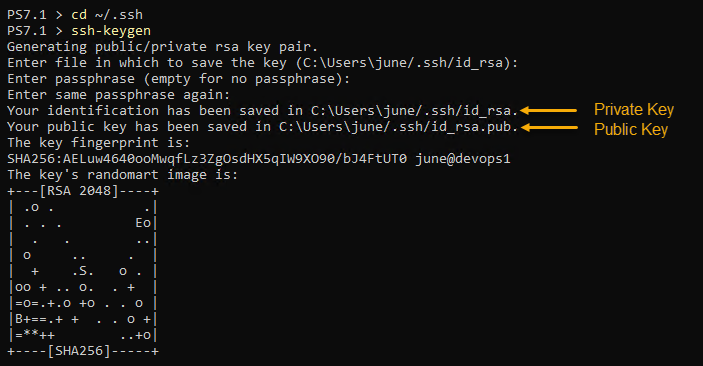
2. Next, type in the command ssh-keygen and press Enter. When asked to enter a file location to save the key you’re generating, keep the default location and press Enter. Doing so allows your SSH client to find your SSH keys when authenticating automatically.
In Windows, the default key file is C:Users<username>.sshid_rsa.
3. At the next prompt, leave the passphrase blank. At this point, you do not have to use a passphrase for testing.
Adding a passphrase to your private key significantly increases its security. A passphrase acts as a second-factor authentication (2FA) to your private key.
You’ll notice that the command created two files; id_rsa (private key) and id_rsa.pub (public key).
Deploying the Public Key to the Windows SSH Server
Now that you’ve generated your private-public key pair, your next step is to copy the public key to the C:ProgramDatasshadministrators_authorized_keys file on the SSH server.
On your local computer, in a PowerShell console:
1. Copy the code below and run it in PowerShell. Make sure to change the username and IP address first. You can refer to the comment above each command to know what each command does.
# Read the public key
 $public_key = Get-Content ~/.ssh/id_rsa.pub
# Append the public key to the administrators_authorized_keys on the server using ssh.
 ssh [email protected] "'$($public_key)' | Out-File C:ProgramDatasshadministrators_authorized_keys -Encoding UTF8 -Append"
2. Enter your password when prompted, and ssh will proceed to copy the public key. You will see a similar result, as shown below.

Connecting with SSH using Public Key Authentication
Now that you’ve copied your public key to your SSH server, you no longer need to use a password to authenticate. As you can see below, ssh did not prompt for a password.

Configuring Certificate Authentication
Like public key authentication, certificate authentication is passwordless or passphrase-protected. To enable certificate login, follow the same procedure of generating a key pair sans deploying the public key to the SSH server.
You do not need to map the public key to the authorized_keys or administrators_authorized_keys files on the SSH server. Instead, the public key is signed using a certificate authority (CA) key.
Creating the Certificate Authority (CA) Key
Generating the CA keys for signing is similar to generating a user key pair that you did earlier in this article. Only this time, you’ll need to specify a filename for the new CA keys. To do so, on your Windows Server in a PowerShell console:
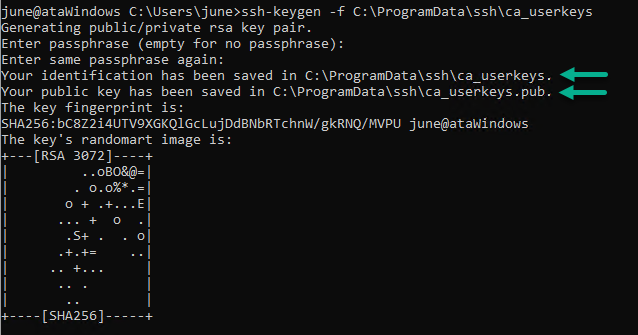
Execute the ssh-keygen command as shown below. This command creates the CA key in C:ProgramDatasshca_userkeys, but feel free to use a different file name. Using a different filename will not affect the CA key functionality.
When asked for a passphrase, leave the passphrase empty and press Enter.
ssh-keygen -f C:ProgramDatasshca_userkeysYou can see below that the command created two files. ca_userkeys, which is the private key, and ca_userkeys.pub, which is the public key.
Now that you’ve generated the CA keys, tell the SSH server to trust the CA and where to find the CA key. To do this, add a new line TrustedUserCAKeys path/to/ca_userkeys.pub to the C:ProgramDatasshsshd_config file on the server.
Run the commands below to append the configuration item in the file sshd_config.
# If the SSH server is Windows
 echo TrustedUserCAKeys C:ProgramDatasshca_userkeys.pub>> C:ProgramDatasshsshd_config
Signing the User’s Public Key
At this point, you’ve generated the CA keys and configured the SSH server to trust the CA public key file. What’s left now is to sign your user public key.
On your local computer, in a PowerShell console:
1. Copy the id_rsa.pub file to your home drive on the SSH server using the SCP command. Make sure to change the username and IP address to the correct values.
2. Log in to your Windows Server using ssh. Once logged in, run ssh-keygen to sign the user’s public key. You’ll notice that the command below used several parameters. Let’s break them down.
-s C:ProgramDatasshca_userkeys– specify the CA key’s location for signing the public key. In this example, the CA key is the one you generated.-I id_username– specify the ID you want to assign to the signed user public key. Change theid_usernamevalue to any name you want.-V +4w– this parameter specifies the validity period for the signed key. In this example,+4wmeans that the signed user key will be valid for four weeks. You can change this value to your preferred validity period.-n username– this is the username of whom will own the signed public key.<path to id_rsa.pub>– this is the user public key’s location to sign (Windows).
ssh-keygen -s C:ProgramDatasshca_userkeys -I id_username -V +4w -n username ~/id_rsa.pubAfter you run the command in your SSH session, you should get a similar output, as shown below. As you can see, the command generated a new file called id_rsa-cert.pub, which is the signed user certificate.

3. Now, navigate back to your local computer PowerShell session and copy the id_rsa-cert.pub file from the server to your local computer. Change the username and IP address to the correct values first before running the command.
After the copy completes, you’ll find the signed user certificate in your home folder, as shown below.

Connecting with SSH using Certificate Authentication
You’ve configured certificate authentication, and now you have your user certificate. You should now test if you can connect the SSH server with certificate authentication.
The command to connect to SSH with a certificate is the same as using a password or public key. But, if you enabled public key authentication previously, disable it first. Otherwise, ssh will keep using your key pair instead of your certificate.
To disable your key-pair, remove your public key from the administrators_authorized_keys file. To do so, follow these steps.
Note that the succeeding commands will empty the whole administrators_authorized_keys file, effectively removing all mapped public keys. If you don’t want to clear all mapped public keys, use a text editor to remove selected public keys from each file manually.
While SSHed into the Windows Server:
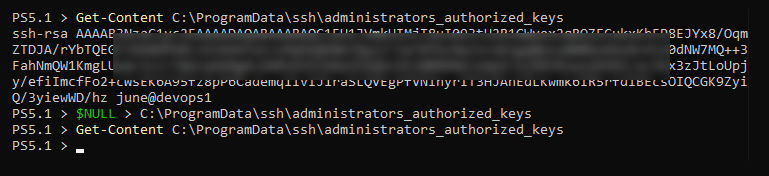
1. Run the below code in PowerShell to empty the administrators_authorized_keys file.
# Clear the administrators_authorized_keys file
 $NULL > C:ProgramDatasshadministrators_authorized_keys
# Confirm that the administrators_authorized_keys is empty
 Get-Content C:ProgramDatasshadministrators_authorized_keys
2. At this point, the authorized_keys and administrators_authorized_keys files are empty, as you can see in the screenshot below.
3. Type exit and press Enter to disconnect from your SSH session. You’ll be back to your PowerShell session.
4. After removing the public keys, your next ssh login attempt will use certificate authentication. The login experience will be the same as public key authentication.

Conclusion
You’ve now set up an OpenSSH Windows Server from scratch all the way to exploring and setting up various authentication means. You can now connect to your Windows Servers exactly how you would with Linux!