Windows 10 Windows 8.1 Windows 7 Windows Media Player More…Less
Windows Media Player is available for Windows-based devices. Use this table to find the right version of the Player for your system. (If you’ve got a Mac, you can download Windows Media Components for QuickTime to play Windows Media files.)
Which version of Windows am I running?
|
Operating system/browser |
Player version |
How to get it |
|---|---|---|
|
Windows 10 |
Windows Media Player 12 |
Included in clean installs of Windows 10 as well as upgrades to Windows 10 from Windows 8.1 or Windows 7. In some editions of Windows 10, it’s included as an optional feature that you can enable. To do that, select the Start button, then select Settings > Apps > Apps & features > Manage optional features > Add a feature > Windows Media Player, and select Install. Enable Windows Media Player DVD playback isn’t included. Go to the DVD playback for Windows page to find out how to add DVD playback to Windows 10. |
|
Windows 8.1 |
Windows Media Player 12 |
Included in Windows 8.1 and Windows 8.1 Pro, but doesn’t include DVD playback. Go to the DVD playback for Windows page to find out how to add DVD playback to Windows 8.1. For Windows Media Player 12 for Windows 8.1 N and KN editions, get the Media Feature Pack. |
|
Windows RT 8.1 |
N/A |
Windows Media Player isn’t available for Windows RT 8.1. |
|
Windows 7 |
Windows Media Player 12 |
Included in Windows 7 Starter, Home Premium, Professional, Ultimate, and Enterprise editions. For Windows 7 N or KN editions, get the Media Feature Pack. |
|
Mac OS X |
Windows Media Components for QuickTime |
Get it now |
If you want to reinstall Windows Media Player, try the following:
-
Click the Start button, type features, and select Turn Windows features on or off.
-
Scroll down and expand Media Features, clear the Windows Media Player check box, and click OK.
-
Restart your device. Windows Media Player should be uninstalled.
-
Repeat step 1.
-
Scroll down and expand Media Features, select the Windows Media Player check box, and click OK.
-
Restart your device. Windows Media player should now be reinstalled.
Note: To troubleshoot issues like playback and codec problems, see the «Get help» section in Windows Media Player.
Need more help?
Each owner of a personal computer has a lot of videos and albums with music on the hard disk, which require a player to view and listen to. One of the most popular is Windows Media Player, which can play almost all known media formats. You can download the player from the official website of Microsoft. New versions of the media player offer users even more options — both a new interface and the ability to directly download music from online music stores.

To install Windows Media Player correctly, you must close all active programs. This is not just a warning to avoid all kinds of conflicts between software. The thing is that a number of Microsoft applications, for example, the Internet Explorer browser, use some of the player’s components in their work. For correct and complete installation, they must be inactive, including the previous version of Windows Media Player. To do this, you need to make sure that there is no icon corresponding to the program in the system tray. It is best to go to the «Toolbox» and uncheck the box next to «Windows Media Player».
In order to install Windows Media Player yourself, you need to go to the folder with the saved distribution and double-click on the installer icon (as a rule, this is a file named MP8Setup.exe, where MP stands for Media Player, and the number stands for the version number).
In the first installation window that appears, the program detects whether there are active programs and will offer to close them. By clicking the «Next» button, information with the License Agreement will appear, which the user must read and accept the terms of the agreement. To do this, click the «I Accept» button.
In the new window to set privacy settings, it is recommended that you uncheck the boxes next to “Obtain licenses automatically for protected content” and “Send unique player code to content providers”. It is also recommended that you uncheck the box next to «Keep log of files and addresses in the player», as this information may be available to other users of the computer. After making your choice, click the «Next» button again.
The installer will prompt you to select Windows Media Player as your primary MP3 player. If users have other players, then on the «File types» tab, uncheck the «MP3 audio files» box. Thus, Windows Media Player will not pretend to play them without the user’s permission.
In the next tab «Additional features» it is proposed to place the player icon on the desktop or on the quick launch bar. Depending on your preferences, you can either uncheck the corresponding labels, or leave. By clicking on the «Finish» button, the installer will exit. When you start Windows Media Player for the first time, it will search your computer for media files and add them to the collection.
Popular by topic
Проигрыватель Windows Media Player 12 доступен практически во всех версиях Windows 10 и Windows 11 по умолчанию, и его просто нужно установить. В редакциях Windows N и NK плеер не доступен, так как эти редакции предназначены для пользования в Европе и комиссия заставила Mcirosoft исключить данный плеер. Кроме того, Media Player можно скачать с официального сайта Mcirosoft, если у вас его не оказалось, так как Microsoft в скором избавится от него.
В данной инструкции разберем, как скачать Windows Media Player последней 12 версии для Windows 10, Windows 11, редакций N и NK, и как установить его без скачивания, так как он имеется уже в системе.
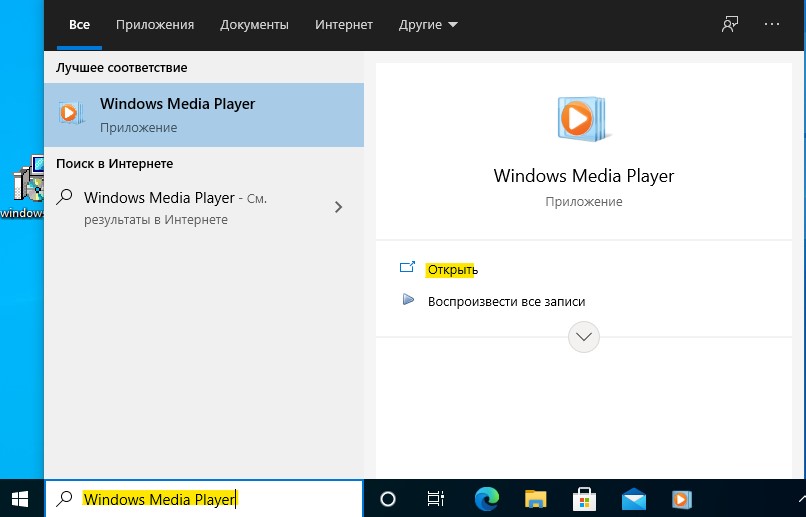
- В поиске меню пуска напишите «Windows Media Player» и нажмите «Открыть».

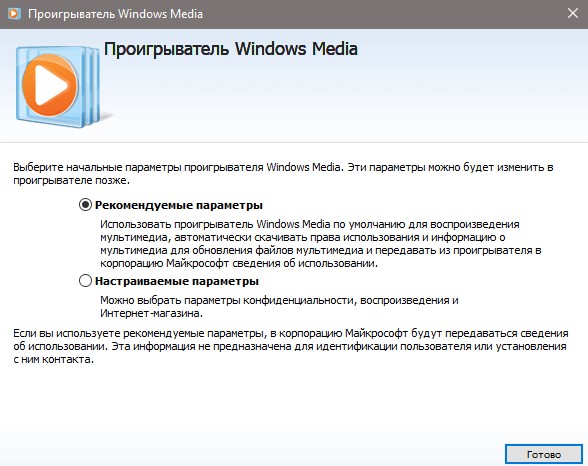
- Выберите «Рекомендуемые параметры» и нажмите готово.

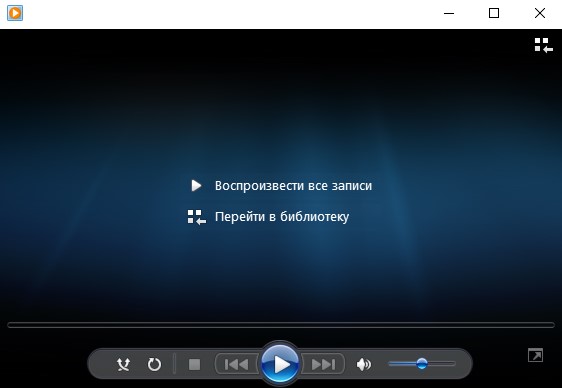
- Далее у вас появится проигрыватель Windows Media Player 12.

Что делать если его нет в поиске?
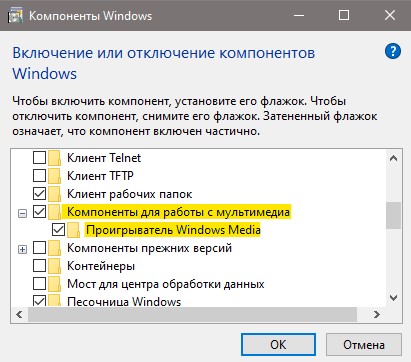
В некоторых редакциях как HOME, плеер Windows Media Player нужно установить в компонентах приложений. Для Windows 10 и Windows 11 проделайте следующие шаги:
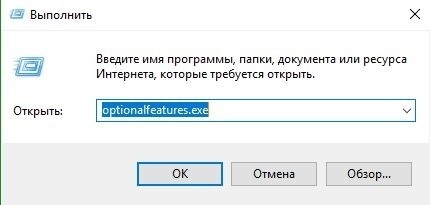
- Нажмите сочетание кнопок Win+R и введите optionalfeatures.exe.

- Найдите в списке «Компоненты для работы с мультимедиа«, разверните и установите галочки, после чего нажмите OK. Далее напишите в поиске Windows Media Player, описано выше способом.

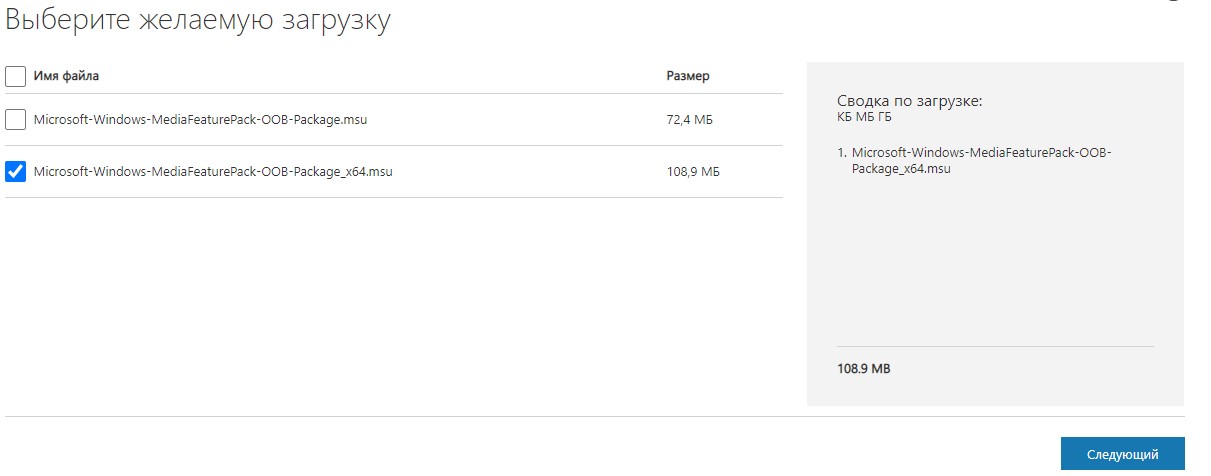
Если в вашей системе нет плеера Media Player, так как она из редакций N или NK, то можно скачать с официального сайта Microsoft. Если у вас 32 разрядная система, то выберите первый вариант, если x64, то Package_x64.msu.
- Media Feature Pack
Смотрите еще:
- Как скачать windows 10, 8, 7 официально с сайта microsoft
- Как скачать драйвера для Windows 10
- Включить и Скачать DirectPlay для Windows 10
- Как скачать, установить и обновить DirectX на ПК
- Код 52: Не удается проверить цифровую подпись драйвера
[ Telegram | Поддержать ]
Изначально Windows Media Player (версия 12) входит в состав ОС Windows 7 / 8 / 10. В свою очередь представленное руководство будет полезно тем, кто пользуется Windows XP или Vista, и хочет разобраться, как установить этот популярный медиаплеер.
Шаг 1. Загрузка
В браузере открываем страницу плеера Windows Media Player на сайте MyDiv. Здесь мы кликаем на ссылку, подсвеченную зеленым цветом:
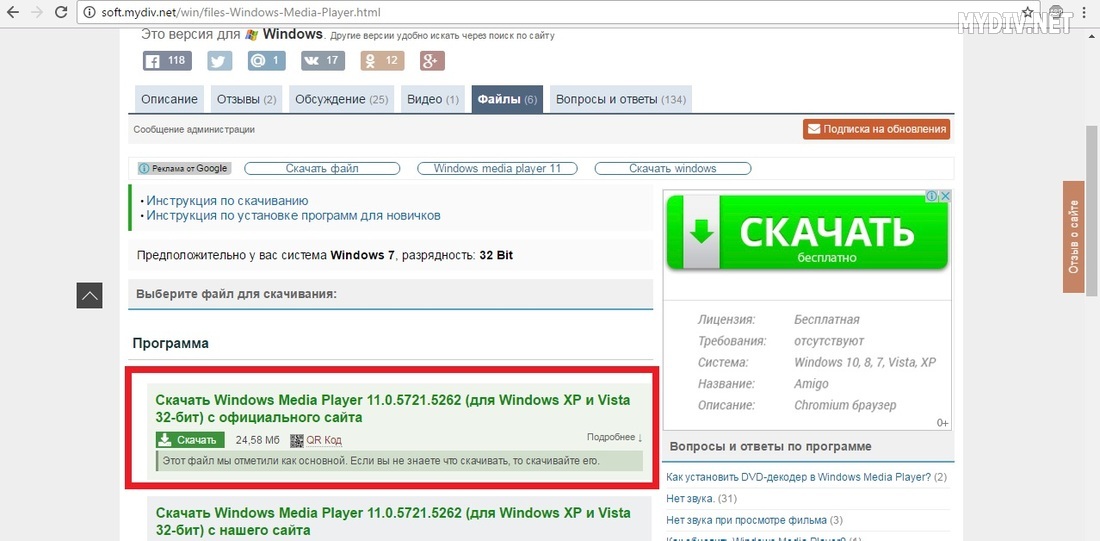
Ждем, пока загрузится установщик плеера, и запускаем его.
Шаг 2. Проверка
Перед установкой нас попросят проверить подлинность операционной системы. Нажимаем кнопку Проверить:

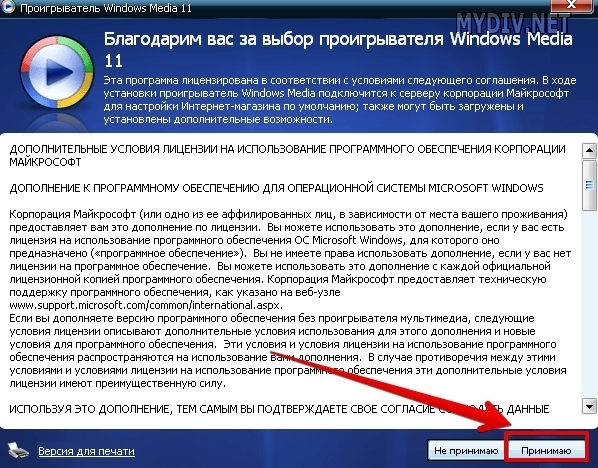
Шаг 3. Условия лицензии
После проверки нам предложат прочесть дополнительные условия лицензионного соглашения. Читаем текст документа, после чего кликаем на Принимаю:
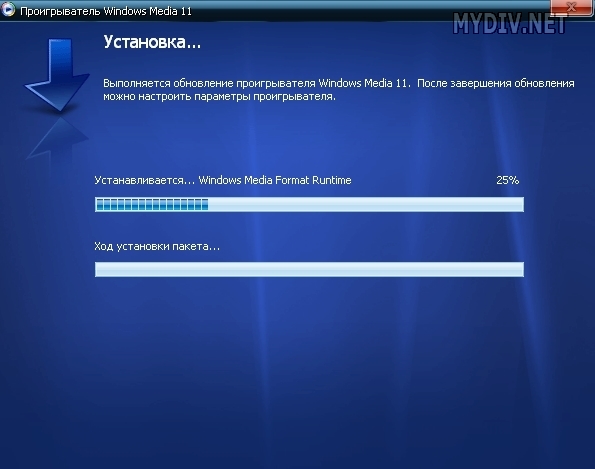
Шаг 4. Установка
Необходимо подождать некоторое количество времени, пока идет подготовка файлов:
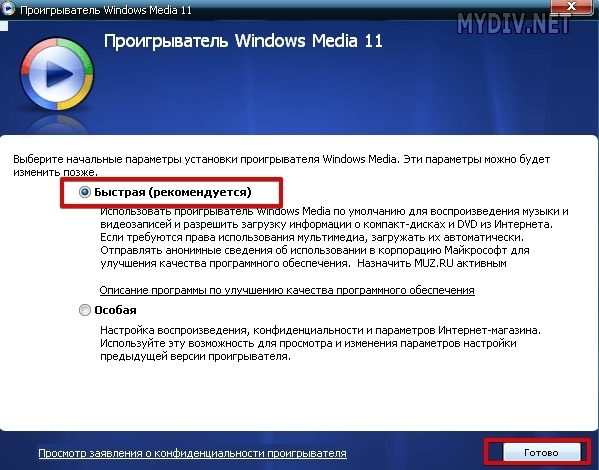
Далее нам необходимо выбрать тип установки. Быстрая предусмотрена для новичков, а особая – для продвинутых пользователей. Выбираем Быстрая и жмем Готово:
Шаг 5. Запуск плеера
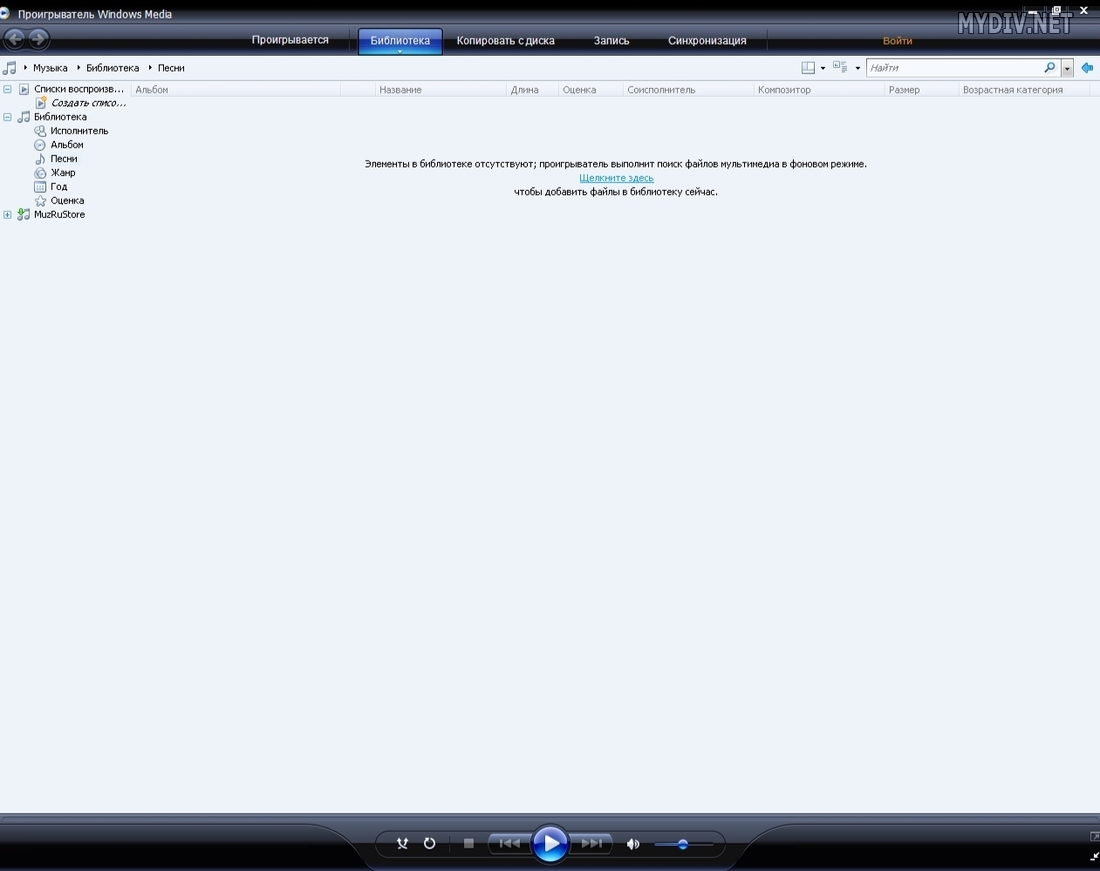
По окончанию установки плеер запустится автоматически:
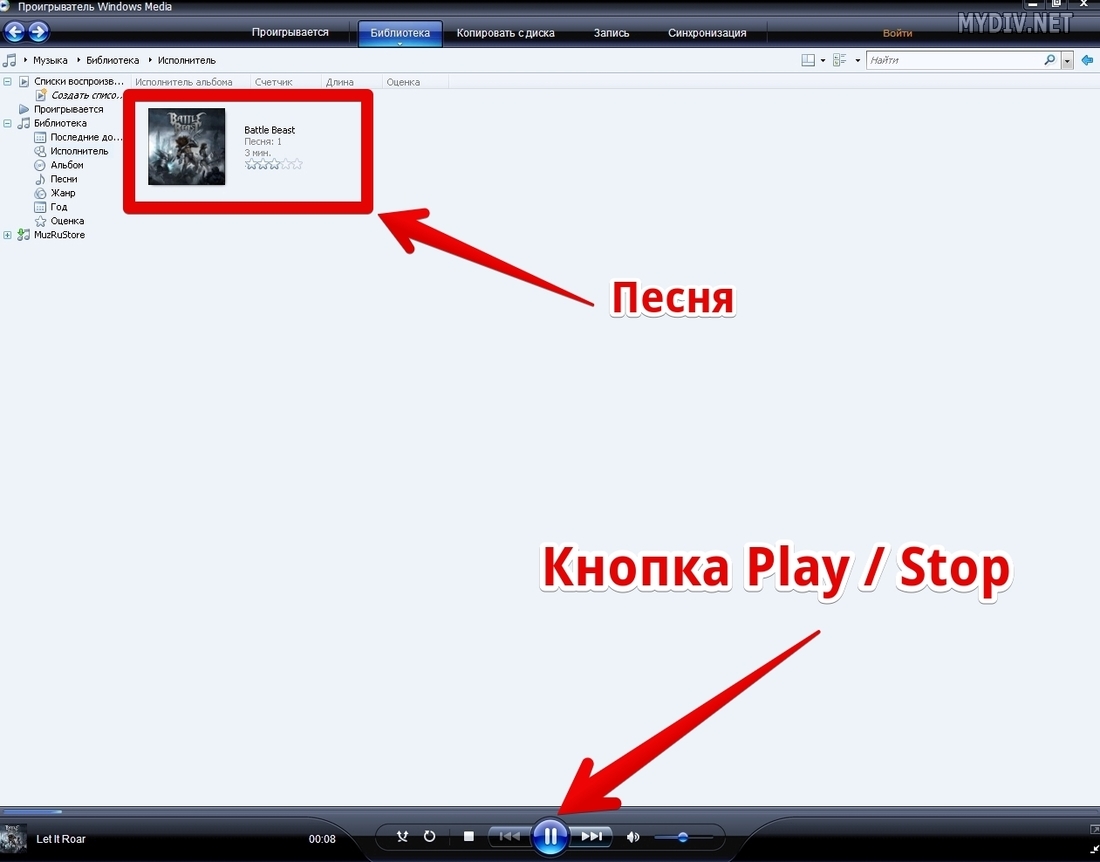
Переносим прямо в плеер любую музыкальную композицию, выделяем ее и кликаем на кнопку Play / Stop, чтобы протестировать звук:
В этой статье мы обсудим шаги по установке нового Media Player в Windows 11. Даже если вы новичок, вы можете запустить его в кратчайшие сроки, если вы немного знаете, как работает Windows.
Загрузите необходимые файлы проигрывателя Windows 11 Media
1. Во-первых, открыть этот сайт чтобы загрузить MSIXBUNDLE нового Media Player в Windows 11. После открытия веб-сайта установите в раскрывающемся меню слева от текстового поля значение «PackageFamilyName». После этого вставьте приведенный ниже контент в текстовое поле. Затем выберите «Быстро» в раскрывающемся меню справа от текстового поля и нажмите кнопку «ОК» (галочка).
Microsoft.ZuneMusic_8wekyb3d8bbwe
2. Теперь вы найдете длинный список результатов. Вам нужно только загрузить файл MSIXBUNDLE. Найдите имя файла, указанное ниже, и загрузите его. В Chrome вам нужно щелкнуть ссылку правой кнопкой мыши и выбрать «Сохранить ссылку как…». Размер файла составляет примерно 34 МБ.
Microsoft.ZuneMusic_11.2110.34.0_neutral_ ~ _8wekyb3d8bbwe.msixbundle
Измените файл проигрывателя Windows 11 Media
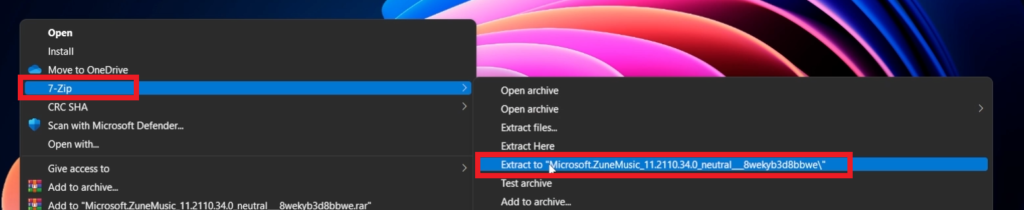
1. После того, как вы загрузили пакет MSIX для проигрывателя Windows 11 Media, загрузите 7-Zip (Бесплатно). Это позволит вам получить доступ к файлу MSIXBUNDLE и извлечь его.
2. После установки откройте 7-Zip и найдите MSIXBUNDLE, который вы скачали, в разделе выше. Выберите файл и нажмите «Извлечь» вверху. Файлы будут мгновенно извлечены в ту же папку / диск. В появившемся всплывающем окне нажмите «ОК».
3. Затем откройте извлеченную папку.
4. После этого прокрутите вниз и найдите пакет x64 MSIX, как показано на снимке экрана ниже. Выберите его и еще раз нажмите «Извлечь» вверху. Эти файлы будут извлечены в ту же папку.
5. Прокрутите вверх и откройте извлеченную папку x64.
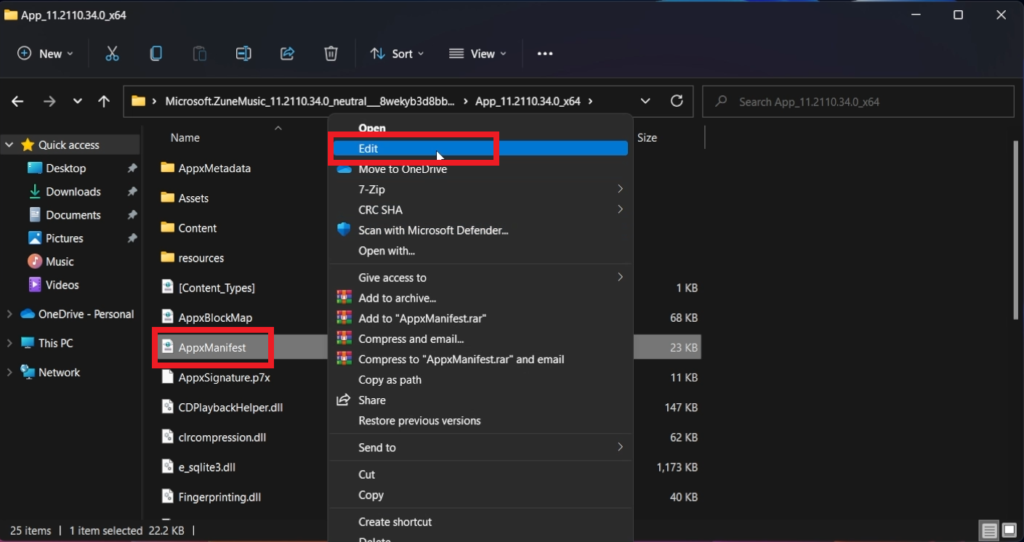
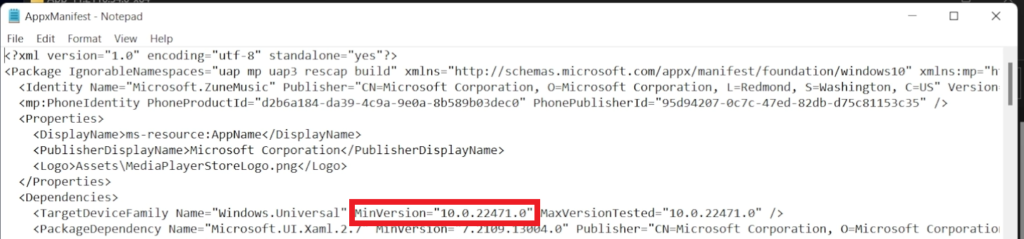
6. Здесь кликните правой кнопкой мыши файл «AppxManifest.xml» и выберите «Изменить».
7. Откройте файл в Блокноте и перейдите к 11-й строке. Здесь в MinVersion измените сборку ОС на 10.0.22000.0. Вот и все. Теперь сохраните файл Блокнота и закройте его.
8.В той же папке x64 удалите следующие файлы и папку (при желании перед удалением создайте резервную копию). Вы можете нажать «Удалить» вверху. Теперь вы можете закрыть 7-Zip.
AppxBlockMap.xml
AppxSignature.p7x
[Content_Types].xml
AppxMetadata folder
Установите новый медиаплеер в стабильной сборке Windows 11
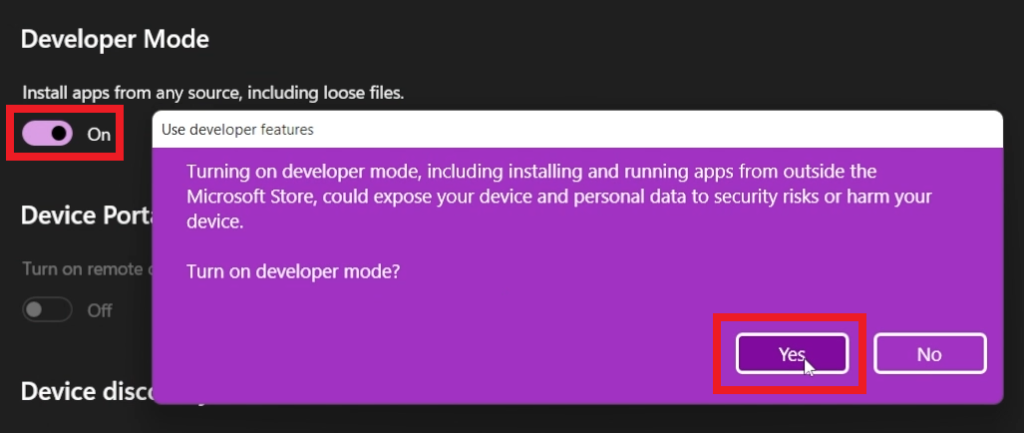
1. Теперь, когда вы изменили MSIXBUNDLE, давайте установим новый Media Player в стабильной сборке Windows 11. Сначала нажмите клавишу Windows один раз и введите слово «разработчик» без кавычек. Затем выберите «Настройки разработчика» в результатах поиска.
2. Здесь включите режим разработчика с помощью переключателя «Устанавливать приложения из любого источника, включая незакрепленные файлы». В следующем запросе выберите «Да».
3. После этого снова нажмите клавишу Windows и найдите PowerShell. На экране результатов поиска кликните «Запуск от имени администратора» на правой панели.
4. В окне PowerShell вставьте приведенную ниже команду, чтобы удалить существующий пакет Groove Music.
Get-AppxPackage * zune * | Удалить-AppxPackage -AllUsers
5. После этого перейдите к извлеченной папке MSIXBUNDLE и откройте папку x64. Найдите здесь файл «AppxManifest.xml», который мы изменили в разделе выше. Кликните его правой кнопкой мыши и выберите «Копировать как путь».
6. Вернитесь в окно PowerShell и введите следующую команду. Обязательно замените путь к файлу на путь, который вы скопировали на шаге выше. Кликните правой кнопкой мыши окно PowerShell, и путь будет включен в конец. Наконец, нажмите Enter.
Add-AppxPackage -Register filepath
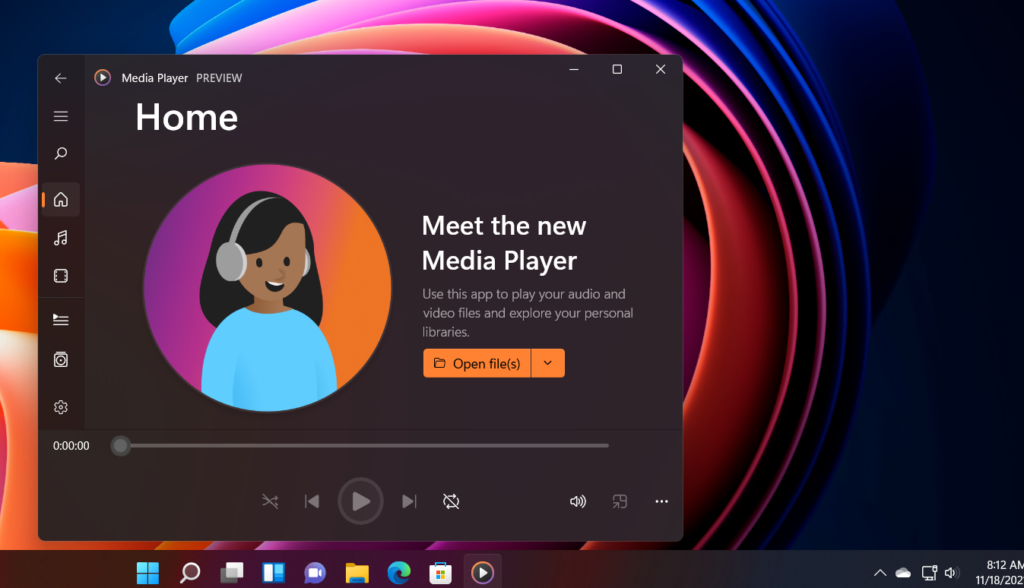
7. Теперь откройте меню «Пуск», и вы обнаружите, что на вашем компьютере установлен новый проигрыватель Windows 11 Media. Нажмите, чтобы открыть его, и вы сможете использовать его без каких-либо проблем. Вы также можете выполнить поиск «Media Player» в меню «Пуск», и он появится. Вот несколько снимков экрана, демонстрирующих пользовательский интерфейс нового медиаплеера:
Вот как вы можете установить новый Media Player в Windows 11, не дожидаясь выпуска стабильной сборки. Шаги могут показаться длинными, но как только вы поймете основы, все станет довольно легко.
Не говоря уже о том, что этот метод также может пригодиться для загрузки других приложений Windows в Windows 10 и 11.
Если у вас есть какие-либо вопросы, дайте нам знать в разделе комментариев ниже.
In this article, I will show you how to install the new Media Player App in Windows 11, on any version. For those of you who don’t know, this is only available on the Dev Channel of the Windows Insider Program, but you will be able to install it on any Windows 11 version, using the method that I will show you in this video.
First of all, you will need to go to this website. Select PackageFamilyName, paste the value below, change to Fast, and then click on the checkmark:
Microsoft.ZuneMusic_8wekyb3d8bbwe
Scroll down to the bottom and download the file with the name Microsoft.ZuneMusic_11.2110.34.0_neutral_~_8wekyb3d8bbwe.msixbundle. If you are using Edge click on it, if you are using Chrome, right-click on it and then click on Save Link As.

Allow the file to Download, if Microsoft doesn’t recognize the publisher.
Also Download 7zip from this link, because we will use it to extract the contents of the Package.
Right-click on the downloaded package, click on Show more options, hover over to 7zip, and click on Extract to…
Go into the extracted folder, scroll to the bottom and locate the package named App_11.2110.34.0_x64.
Right-click on it, click on Show more options, hover over to 7zip, and click on Extract to…
Go into the extracted folder and locate the file named AppxManifest. Right-click on it, click on Show more options, and then click on Edit.
Notepad will open and go to the 11th line. Change the MinVersion value to 10.0.22000.0
Save the file, and from that location also Delete these 4 files:
AppxMetadata
[Content_Types].xml
AppxBlockMap.xml
AppxSignature.p7x
Now you will need to enable the Developer Mode in Windows 11. Open the Settings App in Windows 11, search for developer and turn on Developer Mode and then click on Yes.
Open Powershell as administrator and in Powershell you will need to run 2 commands.
This command will uninstall Groove Music from your Operating System, because the new Media Player App cannot work with Groove Music installed on the system.
Get-AppxPackage *zune* | Remove-AppxPackage -AllUsersThis command will install the new Media Player App in Windows 11 (make sure to copy your location of the AppxManifest file, by right-clicking on it and then Save as Path):
Add-AppxPackage -Register <location of the file>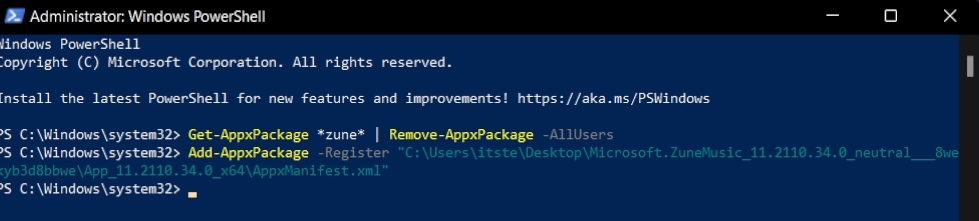
You can now open the new Media Player App in Windows 11.
For a more in-depth explanation, you can watch the video below from the youtube channel.
![]()
Download Article
![]()
Download Article
Windows Media Player (WMP) is a digital media player developed by Microsoft for playing audio and video files and viewing images on a computer with the Windows operating system. If you are having problems with Windows Media Player on your Windows 7 computer, you need to reinstall it. Here is how to reinstall Windows Media Player.
-

1
Click the «Start» button in the lower left corner of the screen, and then click «Control Panel» to open the Control Panel window.
-
2
Type «Windows Features» in the Control Panel search box, and press «Enter.» Click «Turn Windows Features On or Off.»
Advertisement
-
3
Uncheck the «Windows Media Player» check box in the Media Features section.
-
4
Click «Yes» to confirm that you want to uninstall Windows Media Player.
-
5
Close the «Windows and Features» window by clicking the «X» in the upper right-hand corner.
-
6
Close the Control Panel.
-
7
Click the «Start» button in the lower left corner of the screen, and move the cursor to the right of «Shutdown,» to click «Restart» to restart your computer.


Advertisement
-
1
Click the «Start» button in the lower left corner of the screen, and then click «Control Panel» to open the Control Panel window.
-
2
Type «Windows Features» in the Control Panel search box, and press «Enter.»
-
3
Check the «Windows Media Player» check box in the Media Features section.
-
4
Click the «OK» button to save the changes.
-
5
Close the Control Panel window.


Advertisement
-
1
Click the «Start» button on the lower left corner of the screen, and then click «Control Panel» to open the Control Panel window.
-
2
Double-click «Add or Remove Programs.»
-
3
Find «Windows Media Player» in the list of programs, click it to select it, and then click «Remove.»
-
4
Follow the onscreen instructions to uninstall Windows Media Player from your computer.


Advertisement
-
1
Navigate to the Windows Media Player download site from the Microsoft website to reinstall WMP 11.
-
2
Click the blue «Download» button in the Windows XP section.
-
3
Save the file to your desktop, or to a location you will remember.
-
4
Double-click the «Windows Media Player» installation file on your desktop or the location you saved, and click «Run» to start the installation.
-
5
Click the «Validate» button to validate your copy of Windows XP when prompted.
- When the authentication is completed, click «I Accept» to agree to the license agreement.
-
6
Click «Next» to continue with the installation.
-
7
Wait for Windows Media Player to install on your computer.
- Do not use your computer during this process. When the installation is complete, either select «Express Settings,» which is the default configuration settings, or select «Custom Settings» to manually configure Windows Media Player settings.
-
8
Click «Finish» and Windows Media Player will open on your screen and automatically import media files stored on your computer.


Advertisement
Add New Question
-
Question
In Windows 7, the photos are in Windows media center. How to bring photos to Windows media player?

Wanyama Edward
Community Answer
Open Windows media center then minimize the folder, open Windows media player minimize it. Click on Windows media center, pick and drag a photo to Windows media player.
Ask a Question
200 characters left
Include your email address to get a message when this question is answered.
Submit
Advertisement
-
You cannot reinstall Media Player on an unvalidated copy of the Windows operating system.
-
The first time Windows Media Player opens on your computer, it will automatically search your hard drive for all media files, and then automatically import them into Windows Media Player.
Thanks for submitting a tip for review!
Advertisement
About This Article
Thanks to all authors for creating a page that has been read 159,272 times.