| title | description | keywords | ms.date | ms.topic | adobe-target |
|---|---|---|---|---|---|
|
Manual installation steps for older versions of WSL |
Step by step instructions to manually install WSL on older versions of Windows, rather than using the wsl install command. |
wsl, install, BashOnWindows, bash, windows subsystem for linux, install ubuntu on windows, enable WSL2, linux on windows |
11/12/2021 |
article |
true |
Manual installation steps for older versions of WSL
For simplicity, we generally recommend using the wsl --install to install Windows Subsystem for Linux, but if you’re running an older build of Windows, that may not be supported. We have included the manual installation steps below. If you run into an issue during the install process, check the installation section of the troubleshooting guide.
Step 1 — Enable the Windows Subsystem for Linux
You must first enable the «Windows Subsystem for Linux» optional feature before installing any Linux distributions on Windows.
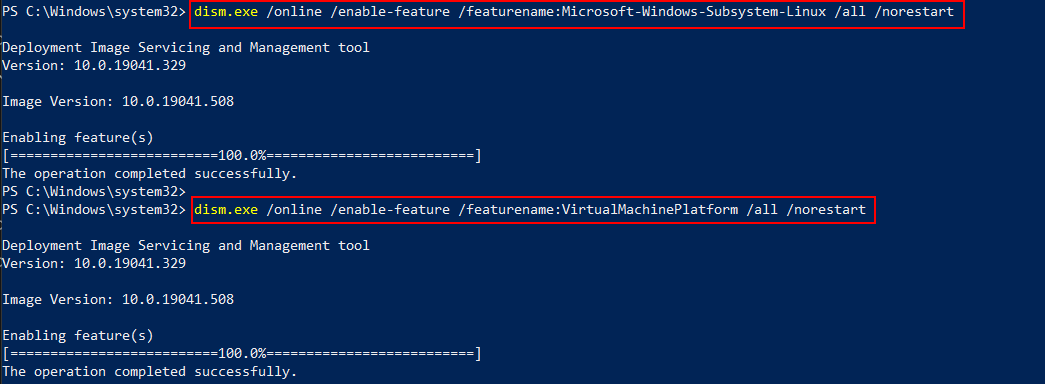
Open PowerShell as Administrator (Start menu > PowerShell > right-click > Run as Administrator) and enter this command:
dism.exe /online /enable-feature /featurename:Microsoft-Windows-Subsystem-Linux /all /norestart
We recommend now moving on to step #2, updating to WSL 2, but if you wish to only install WSL 1, you can now restart your machine and move on to Step 6 — Install your Linux distribution of choice. To update to WSL 2, wait to restart your machine and move on to the next step.
Step 2 — Check requirements for running WSL 2
To update to WSL 2, you must be running Windows 10…
- For x64 systems: Version 1903 or later, with Build 18362 or later.
- For ARM64 systems: Version 2004 or later, with Build 19041 or later.
or Windows 11.
[!NOTE]
Builds lower than 18362 do not support WSL 2. Use the Windows Update Assistant to update your version of Windows.
To check your version and build number, select Windows logo key + R, type winver, select OK. Update to the latest Windows version in the Settings menu.
[!NOTE]
If you are running Windows 10 version 1903 or 1909, open «Settings» from your Windows menu, navigate to «Update & Security» and select «Check for Updates». Your Build number must be 18362.1049+ or 18363.1049+, with the minor build # over .1049. Read more: WSL 2 Support is coming to Windows 10 Versions 1903 and 1909.
Step 3 — Enable Virtual Machine feature
Before installing WSL 2, you must enable the Virtual Machine Platform optional feature. Your machine will require virtualization capabilities to use this feature.
Open PowerShell as Administrator and run:
dism.exe /online /enable-feature /featurename:VirtualMachinePlatform /all /norestart
Restart your machine to complete the WSL install and update to WSL 2.
Step 4 — Download the Linux kernel update package
-
Download the latest package:
- WSL2 Linux kernel update package for x64 machines
[!NOTE]
If you’re using an ARM64 machine, please download the ARM64 package instead. If you’re not sure what kind of machine you have, open Command Prompt or PowerShell and enter:systeminfo | find "System Type". Caveat: On non-English Windows versions, you might have to modify the search text, translating the «System Type» string. You may also need to escape the quotations for the find command. For example, in Germansysteminfo | find '"Systemtyp"'. -
Run the update package downloaded in the previous step. (Double-click to run — you will be prompted for elevated permissions, select ‘yes’ to approve this installation.)
Once the installation is complete, move on to the next step — setting WSL 2 as your default version when installing new Linux distributions. (Skip this step if you want your new Linux installs to be set to WSL 1).
[!NOTE]
For more information, read the article changes to updating the WSL2 Linux kernel, available on the Windows Command Line Blog.
Step 5 — Set WSL 2 as your default version
Open PowerShell and run this command to set WSL 2 as the default version when installing a new Linux distribution:
wsl --set-default-version 2
Step 6 — Install your Linux distribution of choice
-
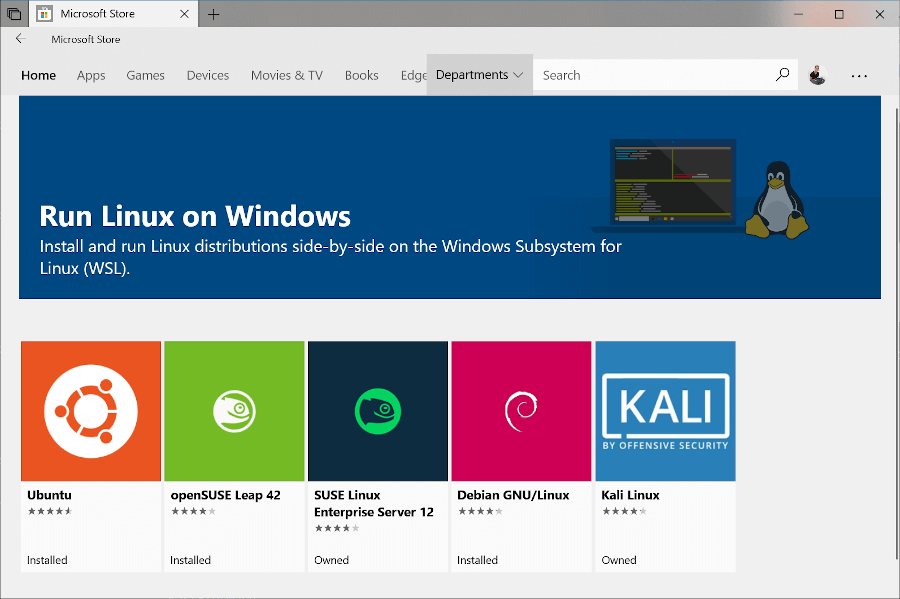
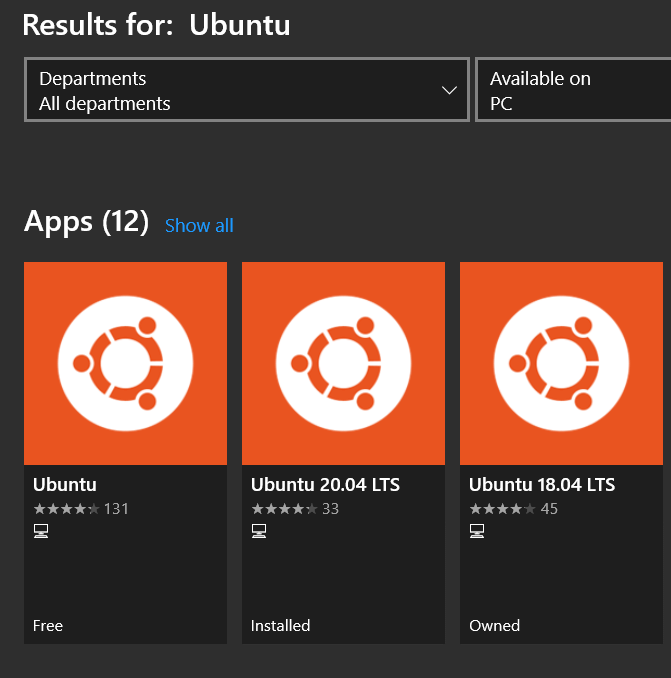
Open the Microsoft Store and select your favorite Linux distribution.

The following links will open the Microsoft store page for each distribution:
- Ubuntu 18.04 LTS
- Ubuntu 20.04 LTS
- Ubuntu 22.04 LTS
- openSUSE Leap 15.1
- SUSE Linux Enterprise Server 12 SP5
- SUSE Linux Enterprise Server 15 SP1
- Kali Linux
- Debian GNU/Linux
- Fedora Remix for WSL
- Pengwin
- Pengwin Enterprise
- Alpine WSL
- Raft(Free Trial)
-
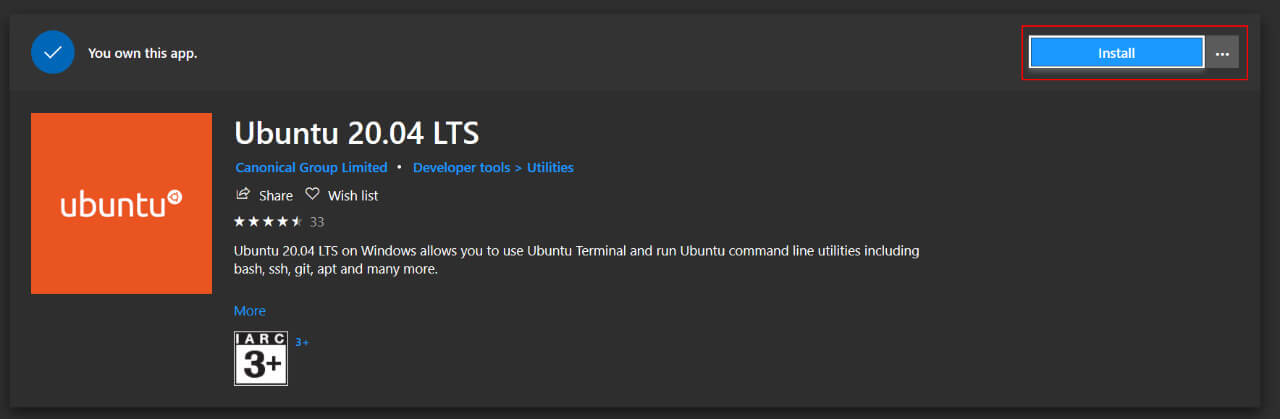
From the distribution’s page, select «Get».


The first time you launch a newly installed Linux distribution, a console window will open and you’ll be asked to wait for a minute or two for files to de-compress and be stored on your PC. All future launches should take less than a second.
You will then need to create a user account and password for your new Linux distribution.

CONGRATULATIONS! You’ve successfully installed and set up a Linux distribution that is completely integrated with your Windows operating system!
Troubleshooting installation
If you run into an issue during the install process, check the installation section of the troubleshooting guide.
Downloading distributions
There are some scenarios in which you may not be able (or want) to, install WSL Linux distributions using the Microsoft Store. You may be running a Windows Server or Long-Term Servicing (LTSC) desktop OS SKU that doesn’t support Microsoft Store, or your corporate network policies and/or admins do not permit Microsoft Store usage in your environment. In these cases, while WSL itself is available, you may need to download Linux distributions directly.
If the Microsoft Store app is not available, you can download and manually install Linux distributions using these links:
- Ubuntu
- Ubuntu 22.04 LTS
- Ubuntu 20.04
- Ubuntu 20.04 ARM
- Ubuntu 18.04
- Ubuntu 18.04 ARM
- Ubuntu 16.04
- Debian GNU/Linux
- Kali Linux
- SUSE Linux Enterprise Server 12
- SUSE Linux Enterprise Server 15 SP2
- SUSE Linux Enterprise Server 15 SP3
- openSUSE Tumbleweed
- openSUSE Leap 15.3
- openSUSE Leap 15.2
- Oracle Linux 8.5
- Oracle Linux 7.9
- Fedora Remix for WSL
This will cause the <distro>.appx packages to download to a folder of your choosing.
If you prefer, you can also download your preferred distribution(s) via the command line, you can use PowerShell with the Invoke-WebRequest cmdlet. For example, to download Ubuntu 20.04:
Invoke-WebRequest -Uri https://aka.ms/wslubuntu2004 -OutFile Ubuntu.appx -UseBasicParsing
[!TIP]
If the download is taking a long time, turn off the progress bar by setting$ProgressPreference = 'SilentlyContinue'
You also have the option to use the curl command-line utility for downloading. To download Ubuntu 20.04 with curl:
curl.exe -L -o ubuntu-2004.appx https://aka.ms/wslubuntu2004
In this example, curl.exe is executed (not just curl) to ensure that, in PowerShell, the real curl executable is invoked, not the PowerShell curl alias for Invoke-WebRequest.
Once the distribution has been downloaded, navigate to the folder containing the download and run the following command in that directory, where app-name is the name of the Linux distribution .appx file.
Add-AppxPackage .app_name.appx
Once the Appx package has finished downloading, you can start running the new distribution by double-clicking the appx file. (The command wsl -l will not show that the distribution is installed until this step is complete).
If you are using Windows server, or run into problems running the command above you can find the alternate install instructions on the Windows Server documentation page to install the .appx file by changing it to a zip file.
Once your distribution is installed, follow the instructions to create a user account and password for your new Linux distribution.
Install Windows Terminal (optional)
Using Windows Terminal enables you to open multiple tabs or window panes to display and quickly switch between multiple Linux distributions or other command lines (PowerShell, Command Prompt, Azure CLI, etc). You can fully customize your terminal with unique color schemes, font styles, sizes, background images, and custom keyboard shortcuts. Learn more.
Install Windows Terminal.

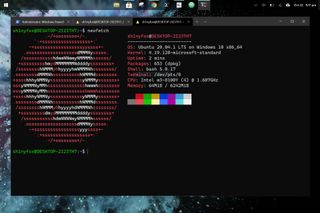
Microsoft dropped plenty of jaws when it launched the Windows Subsystem for Linux, a way to run actual Linux inside Windows without the need to set up a virtual machine. The project has seen a ton of support, and WSL2 is the latest and greatest.
It takes things a little further and adds yet more awesomeness to the Linux experience on Windows 10 and Windows 11. Now, with the release of version 1.0, it has never been easier to set up WSL2 on your Windows machine, with GUI apps now even supported on Windows 10, too.
Simplified setup of WSL2 on Windows 10 and Windows 11
There is now a new, extremely simplified way to get WSL2 up and running on your Windows 10 and Windows 11 PC. To get the very latest version you need to be running Windows 10 version 21H1, 21H2, or 22H2, or on Windows 11 21H2 with all of the November updates applied.
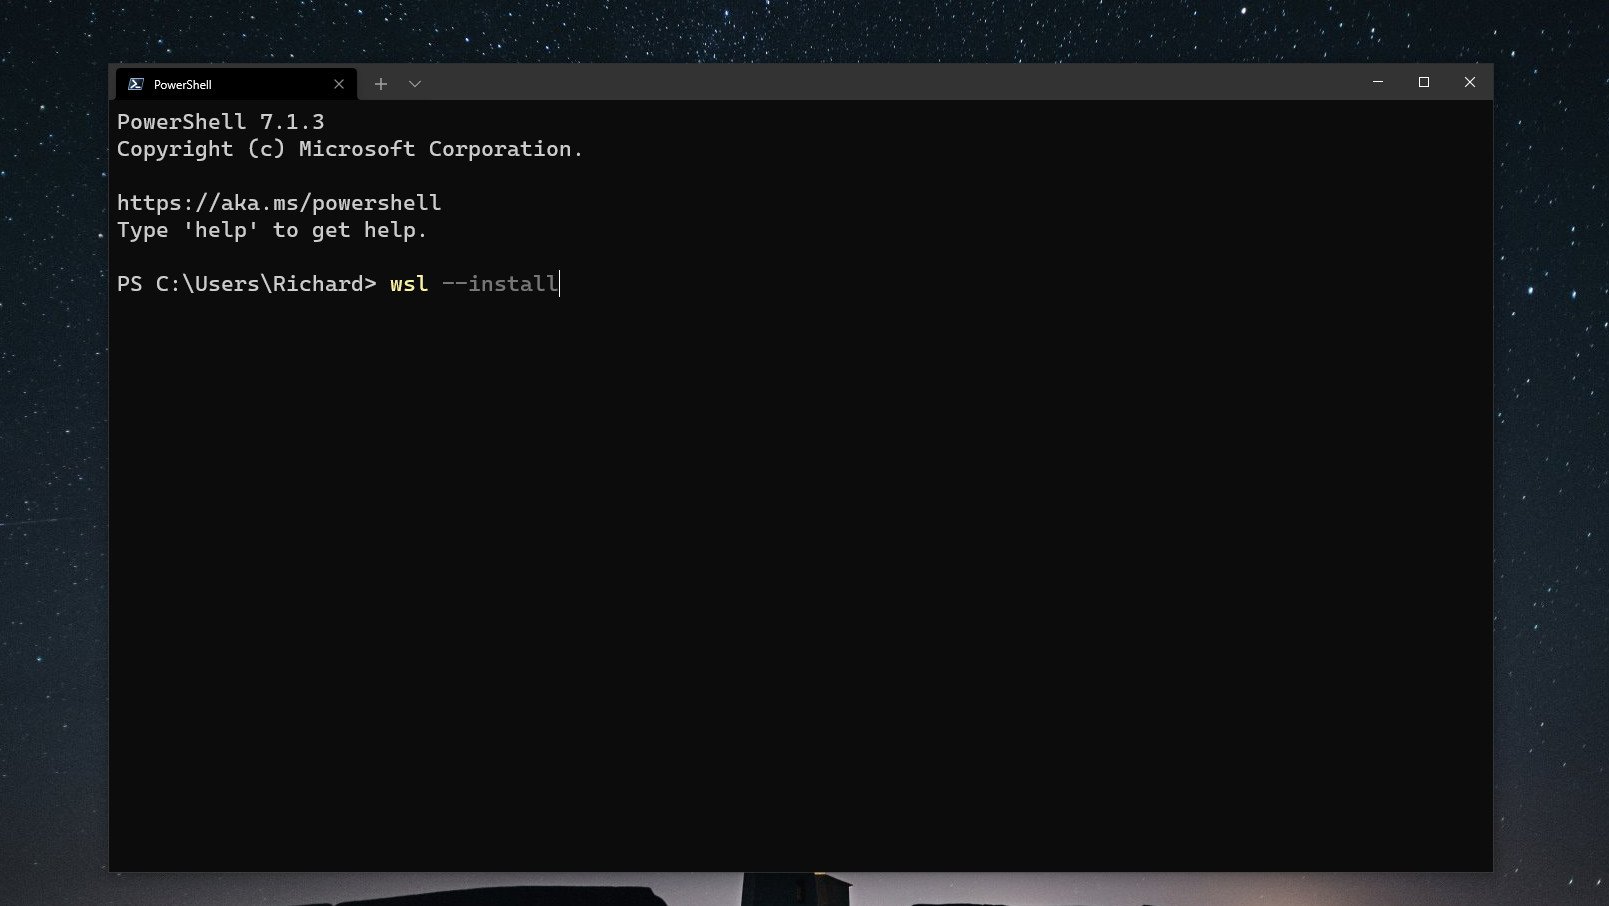
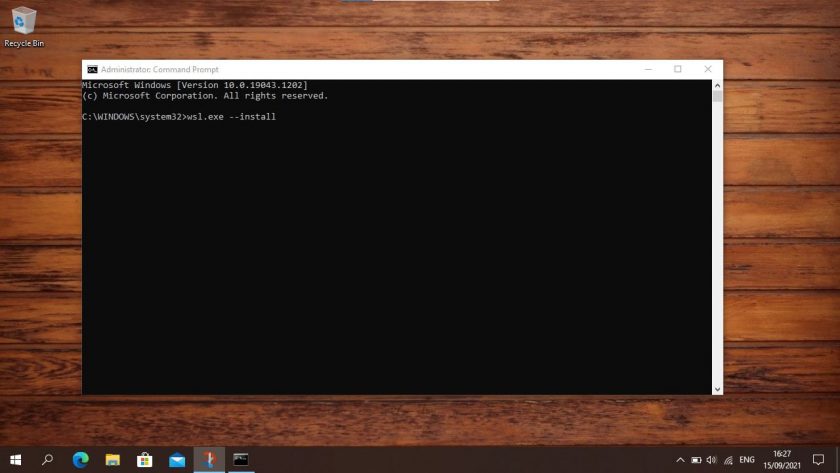
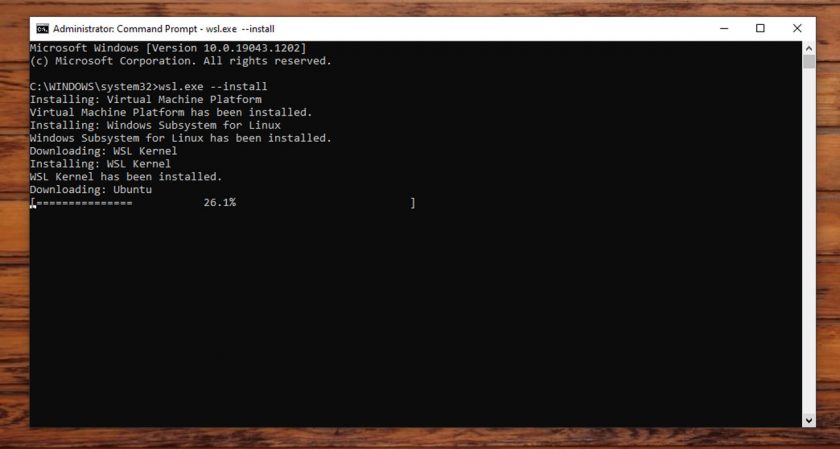
Once this is in place, open up PowerShell and enter this command:
wsl --installThat’s it. The setup process will begin and you can relax until it’s finished. By default, WSL will enable all system features required and it will download and install Ubuntu. If you don’t want a distribution installed during setup you can add the — no-distribution tag to the installation command.
WSL is now distributed through the Microsoft Store and the simplified installation process will pull this version in. Alternatively, you can download it directly from its Microsoft Store listing (opens in new tab).
You will also require the optional Windows Subsystem for Linux component if you wish to also use WSL 1 alongside WSL 2.
How to enable Windows Subsystem for Linux optional component for WSL 1
WSL2 is now the standard, but if for any reason you also want to use WSL1 alongside it, you’ll need the optional Windows Subsystem for Linux component enabling. Fortunately, you can do this in two ways. The first is by adding —enable-wsl1 to the install command used above.
But you can also enable the component at any time, even after you already have WSL2 up and running. Open PowerShell as administrator and enter this command:
dism.exe /online /enable-feature /featurename:Microsoft-Windows-Subsystem-Linux /all /norestartEventually, you will need to reboot your PC, adding norestart means you won’t be immediately kicked out of whatever you’re doing. If you want to reboot immediately, simply omit this from the end of the command.
Setting WSL2 for your Linux distros
The good thing about WSL2 is that it doesn’t replace WSL1. It just runs alongside it. This means you can run Linux installs with a combination of different versions. You’re able to set either as default as well as setting a version specifically to each Linux distro you have on your PC.
Let’s break down some of the key commands to use in PowerShell that you’ll need to know.
Setting WSL2 as default
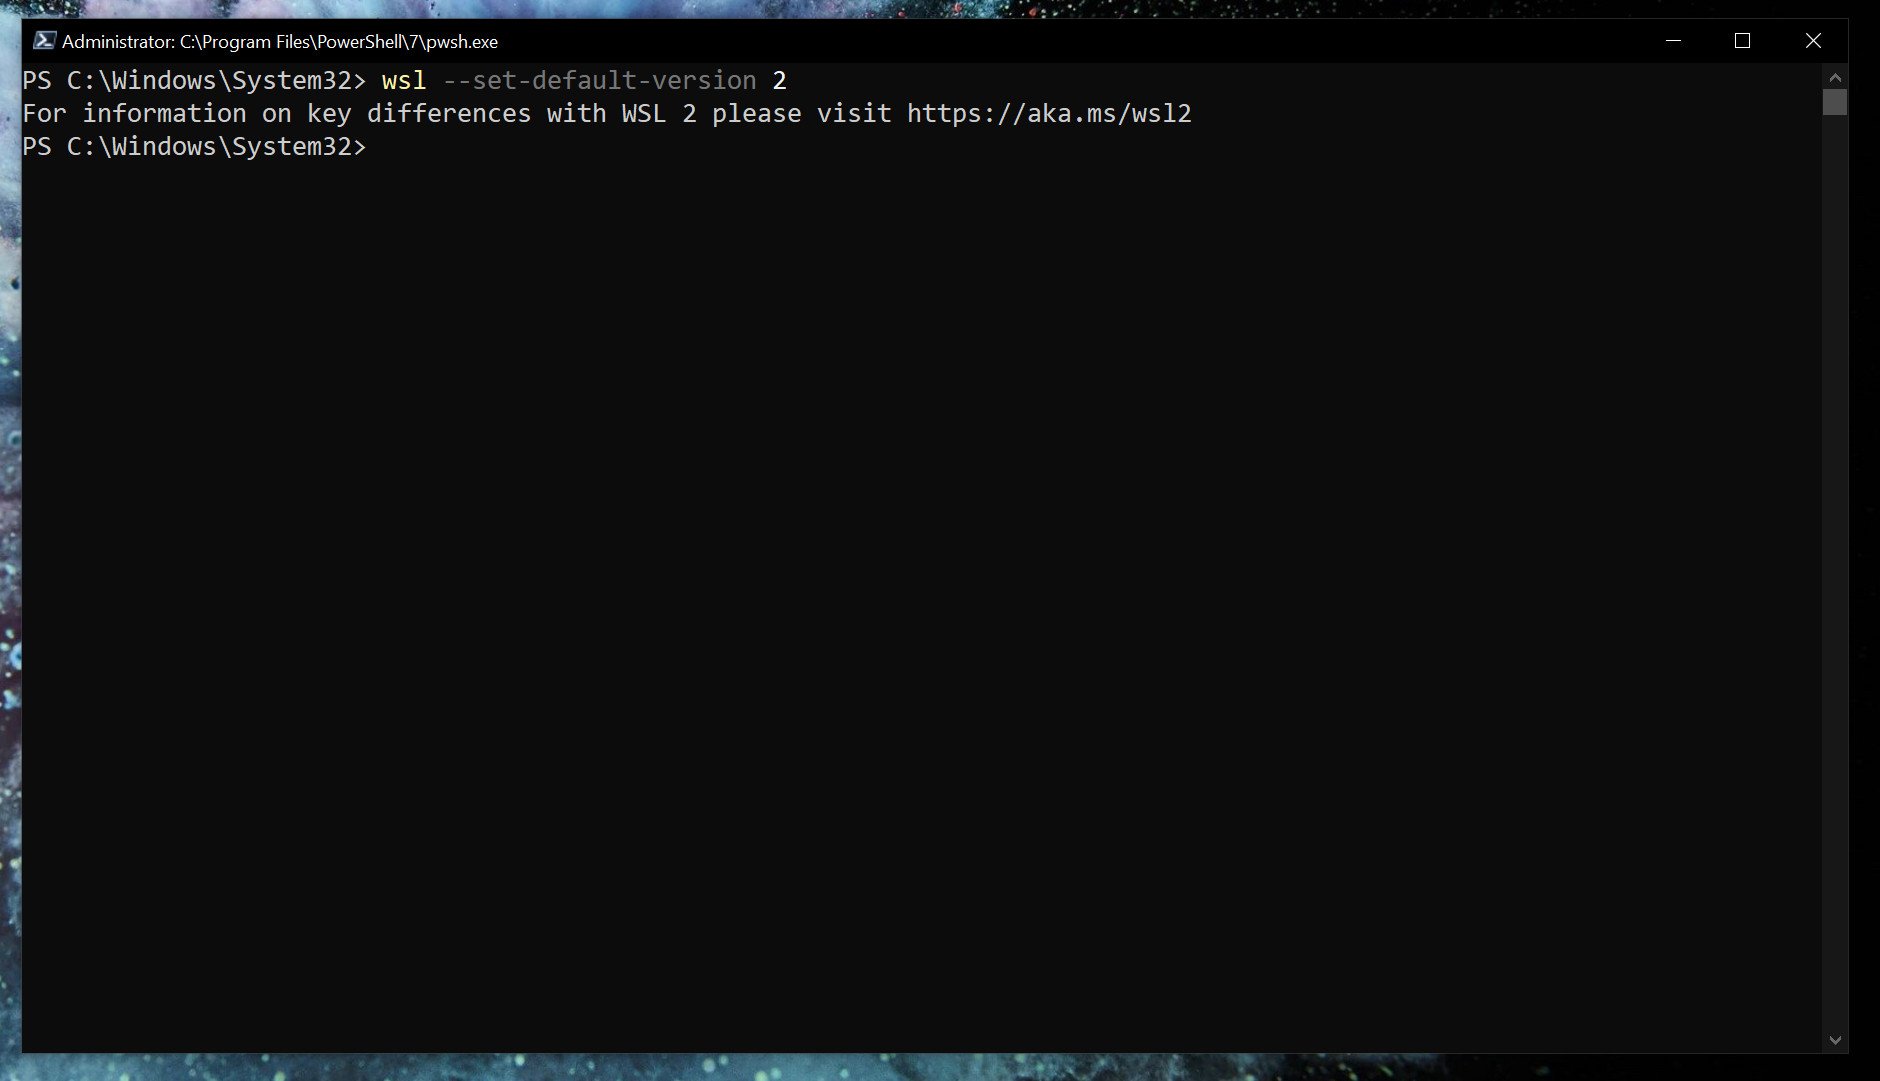
If you want everything to run on WSL2 as soon as you install it, you can set it as the default version.
wsl --set-default-version 2Listing installed Linux distros and their WSL version
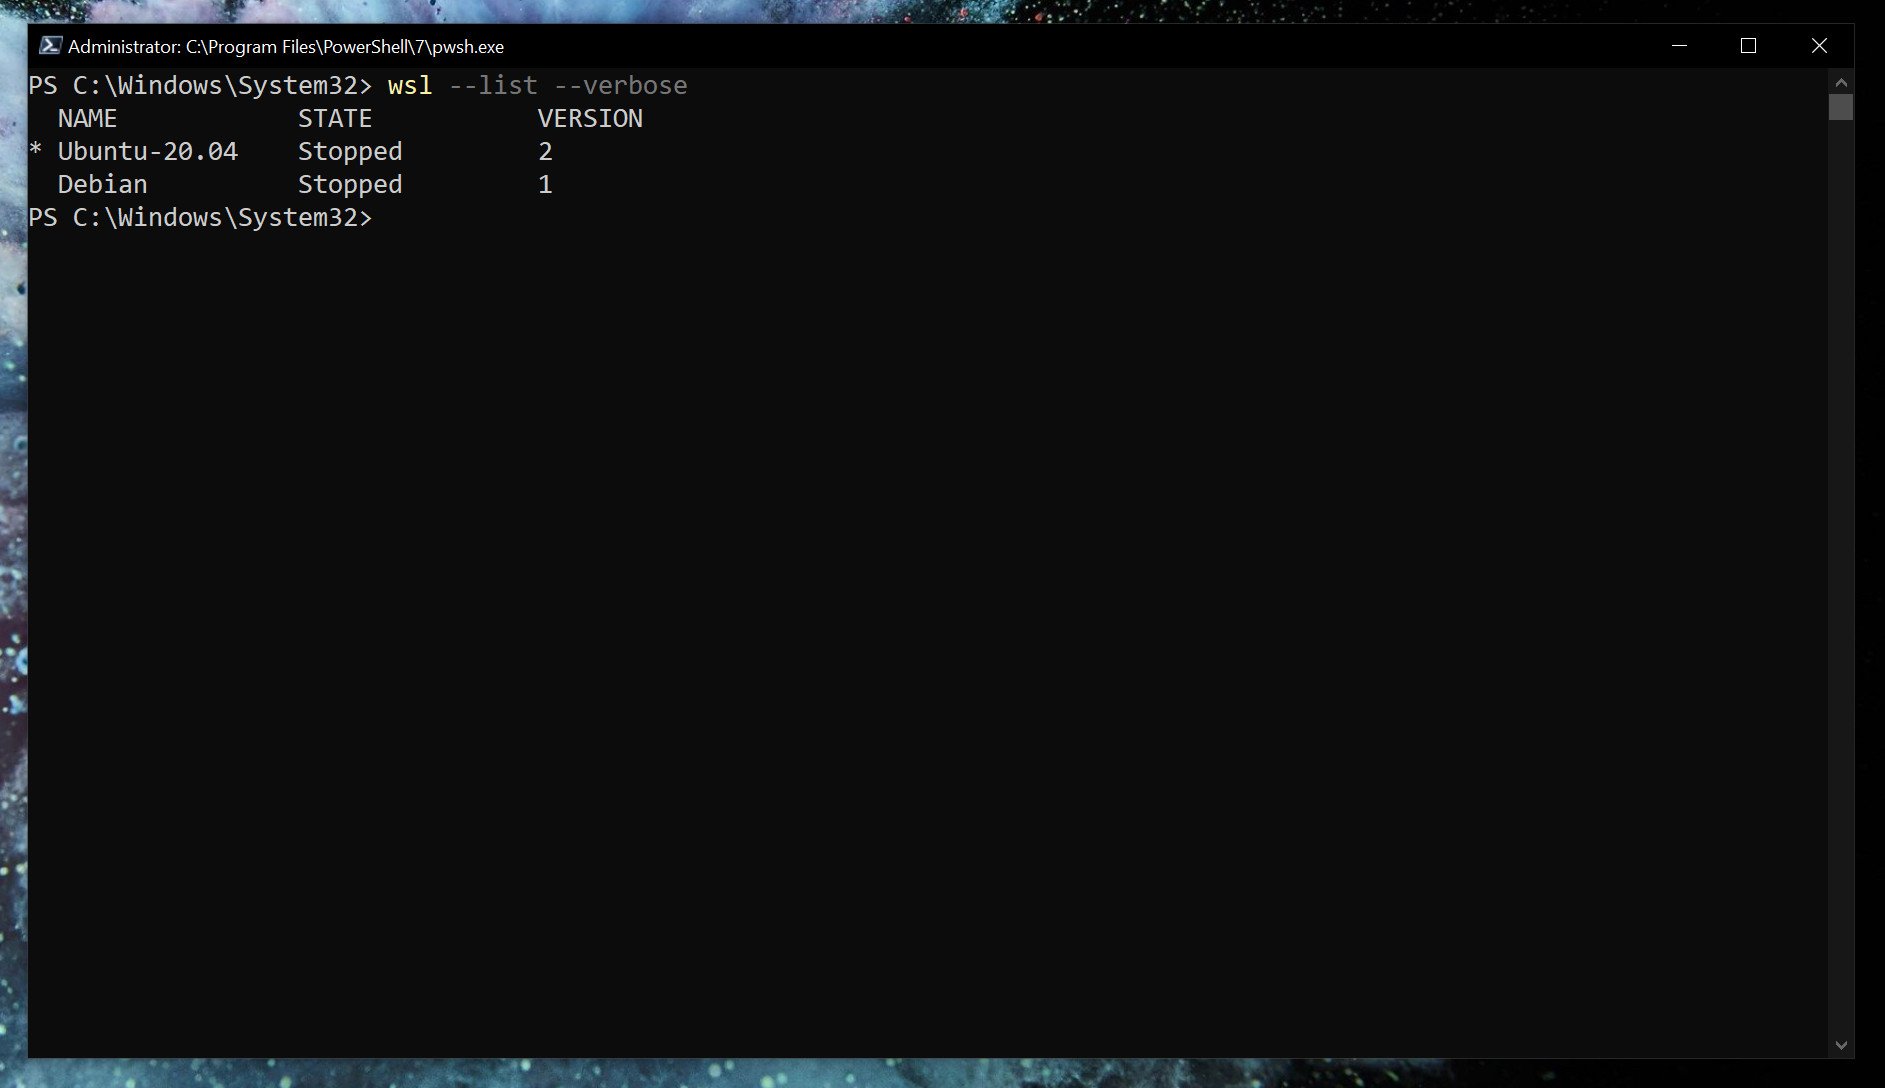
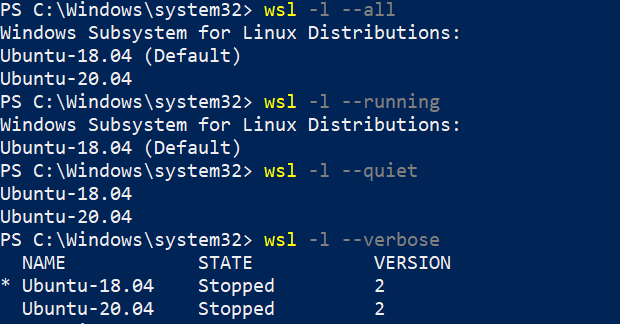
With WSL2 set as default, any Linux installs after that will use it automatically. You can easily check which version of WSL your installed Linux distros are using.
wsl --list --verbose Using the verbose flag will give you the breakdown of which version of WSL is attached to which Linux installation. Without it, you’ll simply get a list of the versions of Linux you have installed.
Changing the version of WSL per Linux installation
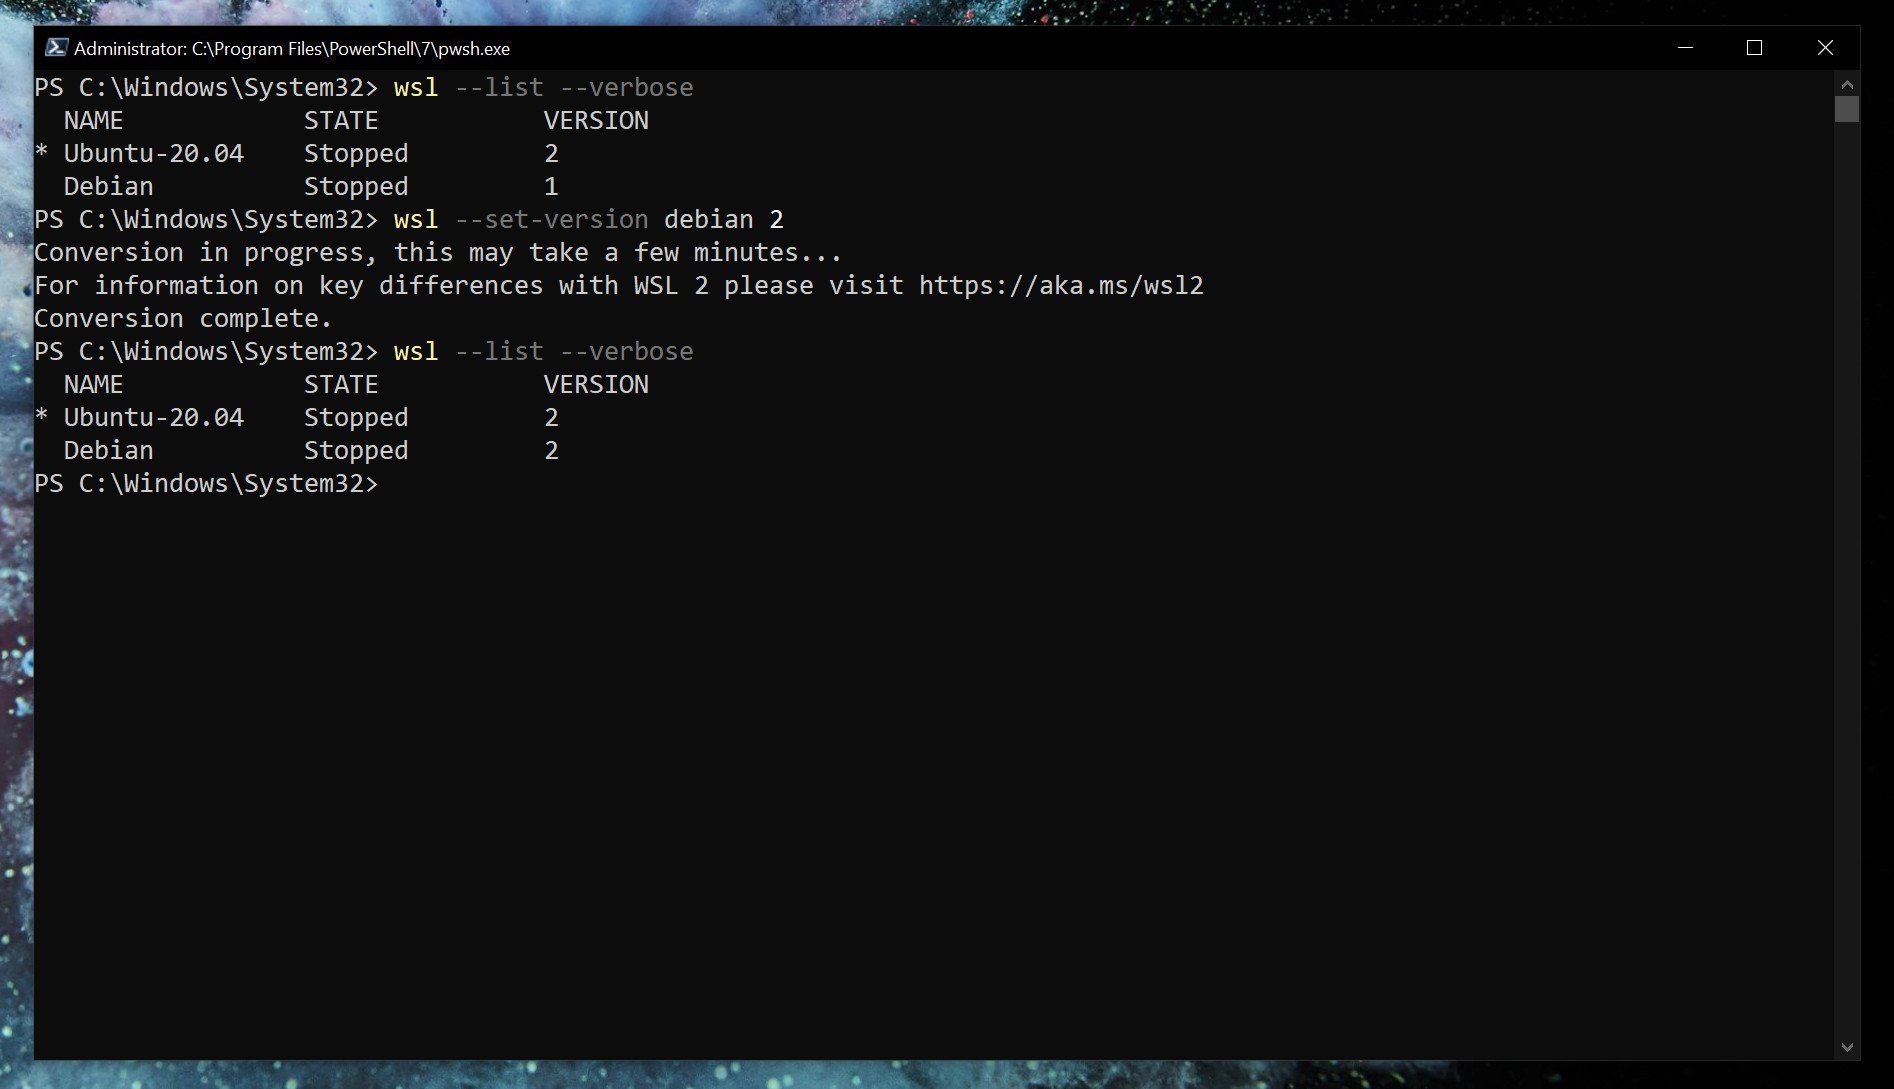
While setting WSL2 as default will apply it to anything you install afterward. If you’re already set up, you’ll need to manually convert. Likewise, if you wish to go between versions 1 and 2 or run a mixture on your system, you can do that.
wsl --set-version <distribution name=""> <versionnumber></versionnumber></distribution>So, as an example, if you have a Debian installation on WSL that you need to convert to WSL2, you’d enter
wsl --set-version debian 2Launch specific Linux installations in PowerShell
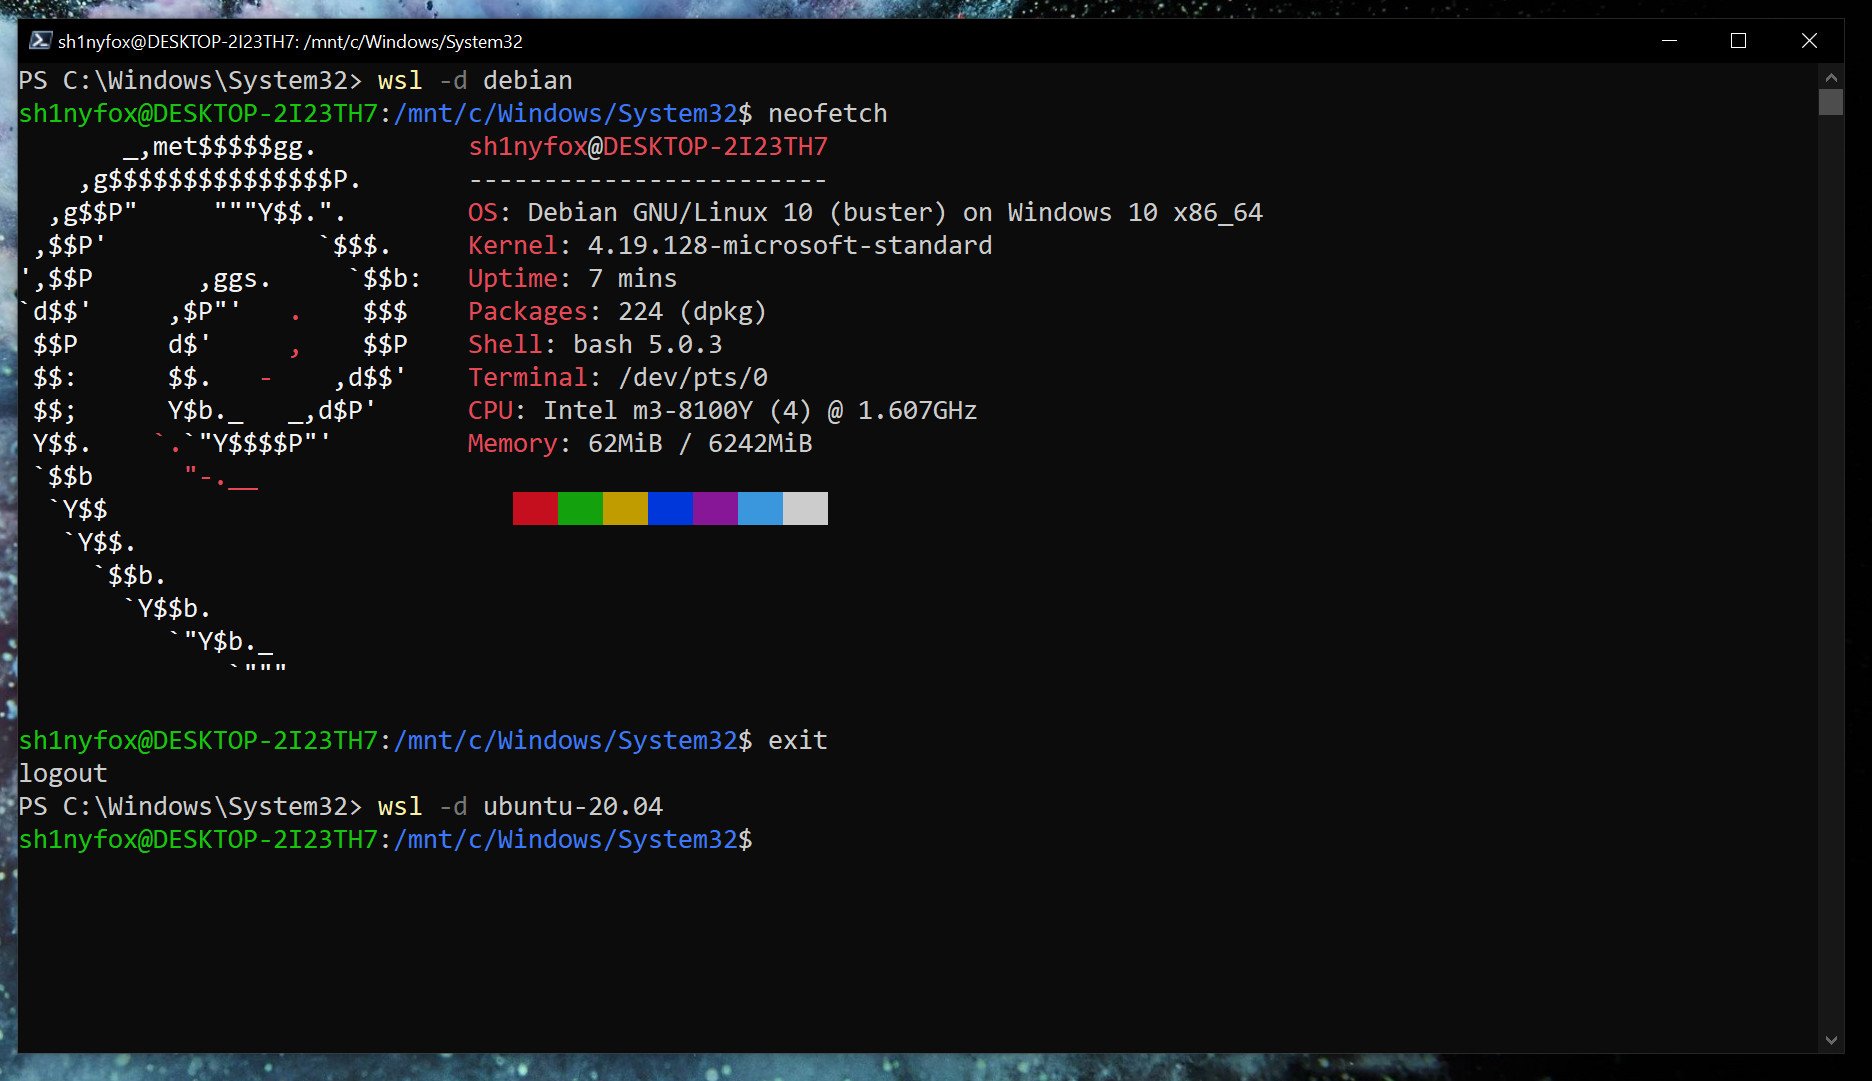
If you only have one version of Linux installed, simply typing
wslin PowerShell will launch you into the associated bash shell. But if you have multiple, you can launch a specific distro with this command.
wsl -d <distribution name=""></distribution>Once you’re done, typing
exitwill take you back into PowerShell.
From here on out, you’re ready to go forth and install all the Linux you want. Our full guide will help you along the way, but once WSL2 is set up how you like it, it just fades into the background.
It’s also worth grabbing the Windows Terminal app from the Microsoft Store if you’re using WSL. While you can just use the standard terminal installed with each or launch through PowerShell as shown above, Windows Terminal has a neat tabbed interface that lets you run multiple shells at once. Have PowerShell, Linux, Azure Cloud Shell, and even Command Prompt, all open together side-by-side in one window.

(opens in new tab)
Cutting-edge operating system
A refreshed design in Windows 11 enables you to do what you want effortlessly and safely, with biometric logins for encrypted authentication and advanced antivirus defenses.
Get the best of Windows Central in in your inbox, every day!
Richard Devine is a Managing Editor at Windows Central with over a decade of experience. A former Project Manager and long-term tech addict, he joined Mobile Nations in 2011 and has been found on Android Central and iMore as well as Windows Central. Currently, you’ll find him steering the site’s coverage of all manner of PC hardware and reviews. Find him on Mastodon at mstdn.social/@richdevine
К написанию данной статьи меня побудил вопрос на Тостере, связанный с WSL. Я, после нескольких лет использования систем на ядре Linux, около полугода назад перешел к использованию Windows 10 на домашнем ПК. Зависимость от терминала и Linux окружения в моей работе практически сразу привели меня к вопросу: или ставить виртуалку или попробовать WSL. Я выбрал второе, и остался вполне доволен.
Под катом я расскажу как установить и настроить WSL, на какие я наткнулся проблемы и ограничения, как запускать Linux приложения из Windows и наоборот, а так же как интегрировать элементы окружения Xfce в окружение рабочего стола Windows.

Никогда не думал, что однажды вернусь на Windows, но повод попробовать мне дали стечения обстоятельств: жена, далекая от IT, дергала почти каждый раз, когда у нее возникала необходимость воспользоваться компом; проснулась ностальгия по одной игре, но она никак не хотела адекватно работать под wine; а тут еще мне подарили коробочную Windows 10 Pro. WSL я поставил чуть ли не сразу после установки системы, поигрался несколько вечеров, понял, что продукт для моих задач годный, но хочется более привычный терминал и вообще некоторых удобств.
Установка WSL и дистрибутива
Сразу оговорюсь, в интернете можно найти описание установки с помощью выполнения команды lxrun /install в командной строке или консоли PowerShell. Данный способ больше не работает (после выхода WSL в стабильный релиз). Насколько мне известно, сейчас WSL можно установить только из Microsoft Store вместе с предпочитаемым дистрибутивом.
Так же отмечу, что когда установку производил я, на выбор были доступны дистрибутивы OpenSUSE, SUSE Linux Enterprise и Ubuntu 16.04 — последний я и установил. Сейчас также доступны Ubuntu 18.04, Debian 9 и Kali Linux, возможно появятся и другие дистрибутивы. Действия по установке могут отличаться. Так же, часть проблем описанных в статье может быть уже исправлена.
Находим в магазине желаемый дистрибутив и устанавливаем. Установка пройдет быстро, так как скачает только эмулятор ядра Linux и утилиту для запуска подсистемы, которая окажется в системной папке в трех экземплярах: wsl.exe, bash.exe и ubuntu.exe (вместо ubuntu будет имя Вашего дистрибутива). Все они равнозначны и делают одно и то же — запускают собственный эмулятор терминала, в нем linux’овый bash работающий под эмулятором ядра. При первом же запуске нас попросят придумать логин и пароль для пользователя по умолчанию, а после произойдет непосредственно установка дистрибутива. В качестве пользователя по умолчанию указываем root без пароля — это потребуется для дальнейших шагов. Безопасность не пострадает, кроме того при подготовке материалов к статье, в англоязычном туториале, я наткнулся на информацию, что новые версии WSL теперь делают пользователем по умолчанию root без пароля без лишних вопросов.
Дожидаемся установки. Далее первым делом стоит обновить зеркала apt на ближайшие. Для этого понадобится CLI текстовый редактор. В комплекте только vi, я же больше предпочитаю nano, поэтому ставлю его:
apt install nanosudo вводить не требуется, так как мы уже под root’ом. Отредактируем файл /etc/apt/sources.list:
nano /etc/apt/sources.listУ меня лучше всего работают зеркала Яндекса, поэтому мой файл выглядит так:
deb http://mirror.yandex.ru/ubuntu/ xenial main universe restricted
deb-src http://mirror.yandex.ru/ubuntu/ xenial main universe  restricted

deb http://mirror.yandex.ru/ubuntu/ xenial-security main universe restricted
deb-src http://mirror.yandex.ru/ubuntu/ xenial-security main universe restricted

deb http://mirror.yandex.ru/ubuntu/ xenial-updates main universe restricted
deb-src http://mirror.yandex.ru/ubuntu/ xenial-updates main universe restricted
Нажимаем Ctrl+O для сохранения и Ctrl+X для выхода. Теперь можно обновить систему до актуального состояния:
apt update && apt upgradeПосле обновления можно создать нашего основного пользователя. В данной статье я назову его user1, Вы же можете задать привычное имя:
addgroup --gid 1000 user1
adduser --home /home/user1 --shell /bin/bash --uid 1000 -G user1,sudo user1
Далее переходим в папку юзера, зайдем под ним, установим пароль и отредактируем файл ~/.bashrc:
cd /home/user1
su user1
passwd
nano .bashrc
Мой базовый .bashrc выглядит так
# If not running interactively, don't do anything
case $- in
    *i*) ;;
      *) return;;
esac

# don't put duplicate lines or lines starting with space in the history.
# See bash(1) for more options
HISTCONTROL=ignoreboth

# append to the history file, don't overwrite it
shopt -s histappend

# for setting history length see HISTSIZE and HISTFILESIZE in bash(1)
HISTSIZE=1000
HISTFILESIZE=2000

# check the window size after each command and, if necessary,
# update the values of LINES and COLUMNS.
shopt -s checkwinsize

# If set, the pattern "**" used in a pathname expansion context will
# match all files and zero or more directories and subdirectories.
#shopt -s globstar

# make less more friendly for non-text input files, see lesspipe(1)
[ -x /usr/bin/lesspipe ] && eval "$(SHELL=/bin/sh lesspipe)"

# set variable identifying the chroot you work in (used in the prompt below)
if [ -z "${debian_chroot:-}" ] && [ -r /etc/debian_chroot ]; then
    debian_chroot=$(cat /etc/debian_chroot)
fi

# set a fancy prompt (non-color, unless we know we "want" color)
case "$TERM" in
    xterm|xterm-color|*-256color) color_prompt=yes;;
esac

# uncomment for a colored prompt, if the terminal has the capability; turned
# off by default to not distract the user: the focus in a terminal window
# should be on the output of commands, not on the prompt
#force_color_prompt=yes

if [ -n "$force_color_prompt" ]; then
    if [ -x /usr/bin/tput ] && tput setaf 1 >&/dev/null; then
    # We have color support; assume it's compliant with Ecma-48
    # (ISO/IEC-6429). (Lack of such support is extremely rare, and such
    # a case would tend to support setf rather than setaf.)
    color_prompt=yes
    else
    color_prompt=
    fi
fi

if [ "$color_prompt" = yes ]; then
    if [[ ${EUID} == 0 ]] ; then
        PS1='${debian_chroot:+($debian_chroot)}[33[01;31m]h[33[01;34m] W $[33[00m] '
    else
        PS1='${debian_chroot:+($debian_chroot)}[33[01;32m]u@h[33[00m] [33[01;34m]w $[33[00m] '
    fi
else
    PS1='${debian_chroot:+($debian_chroot)}u@h w $ '
fi
unset color_prompt force_color_prompt

# If this is an xterm set the title to user@host:dir
case "$TERM" in
xterm*|rxvt*)
    PS1="[e]0;${debian_chroot:+($debian_chroot)}u@h wa]$PS1"
    ;;
*)
    ;;
esac

# enable color support of ls and also add handy aliases
if [ -x /usr/bin/dircolors ]; then
    test -r ~/.dircolors && eval "$(dircolors -b ~/.dircolors)" || eval "$(dircolors -b)"
    alias ls='ls --color=auto'
    #alias dir='dir --color=auto'
    #alias vdir='vdir --color=auto'

    alias grep='grep --color=auto'
    alias fgrep='fgrep --color=auto'
    alias egrep='egrep --color=auto'
fi

# colored GCC warnings and errors
#export GCC_COLORS='error=01;31:warning=01;35:note=01;36:caret=01;32:locus=01:quote=01'

# some more ls aliases
alias ll='ls -alF'
alias la='ls -A'
alias l='ls -CF'

# Add an "alert" alias for long running commands.  Use like so:
#   sleep 10; alert
alias alert='notify-send --urgency=low -i "$([ $? = 0 ] && echo terminal || echo error)" "$(history|tail -n1|sed -e '''s/^s*[0-9]+s*//;s/[;&|]s*alert$//''')"'

# Alias definitions.
# You may want to put all your additions into a separate file like
# ~/.bash_aliases, instead of adding them here directly.
# See /usr/share/doc/bash-doc/examples in the bash-doc package.

if [ -f ~/.bash_aliases ]; then
    . ~/.bash_aliases
fi

# enable programmable completion features (you don't need to enable
# this, if it's already enabled in /etc/bash.bashrc and /etc/profile
# sources /etc/bash.bashrc).
if ! shopt -oq posix; then
  if [ -f /usr/share/bash-completion/bash_completion ]; then
    . /usr/share/bash-completion/bash_completion
  elif [ -f /etc/bash_completion ]; then
    . /etc/bash_completion
  fi
fi
Все, подсистема готова к использованию… почти…
Установка X-сервера, Xfce и прочих GUI’шных приложений
Первая же проблема, на которую я натолкнулся — bash-completion в предлагаемом эмуляторе терминала работал, мягко говоря, некорректно. Кроме того, данный эмулятор не умеет вкладки, а каждый его экземпляр запускает все в новом пространстве процессов, с отдельным init’ом (который кстати не заменить). Мне захотелось нормальный эмулятор терминала, некоторых других GUI приложений, а так же панельку, чтоб это все быстро запускать.
Когда я гуглил этот вопрос, я наткнулся на множество проблем, вроде необходимости перевода dbus на tcp протокол. На данный момент всех этих проблем нет. В подсистеме нормально работают unix-domain-socket’ы и все спокойно общается через них.
Первым делом нам понадобится X-сервер, притом установленный в основную систему (в Windows). Лично я использую для этих целей VcXsrv — порт X11 на Windows. Официальный сайт указанный в about самой утилиты его сейчас не предоставляет, поэтому гуглим установщик и устанавливаем все по умолчанию.
Пока идет установка возвращаемся в терминал WSL, командой exit выходим обратно в root’а. Первым делом настроим русские локали:
locale-gen ru_RU
locale-gen ru_RU.UTF-8
update-locale
Далее установим некоторые компоненты Xfce. Можно конечно установить его целиком из мета-пакета, но большинство компонентов нам не понадобится, а модульная архитектура Xfce позволяет нам поставить только необходимое:
apt install -y xfce4-session xfce4-notifyd xfce4-appfinder xfce4-panel xfce4-quicklauncher-plugin xfce4-whiskermenu-plugin xfce4-xkb-plugin xfce4-settings xfce4-terminal xfce4-taskmanager mousepadЗапускать каждый раз окружение руками не очень удобно, поэтому я автоматизировал данный процесс. Для этого в основной системе создадим в удобном для нас месте папку, а в ней 3 файла для запуска:
- config.xlaunch — файл настроек для VcXsrv
<?xml version="1.0" encoding="UTF-8"?> <XLaunch WindowMode="MultiWindow" ClientMode="NoClient" LocalClient="False" Display="0" LocalProgram="xcalc" RemoteProgram="xterm" RemotePassword="" PrivateKey="" RemoteHost="" RemoteUser="" XDMCPHost="" XDMCPBroadcast="False" XDMCPIndirect="False" Clipboard="True" ClipboardPrimary="True" ExtraParams="" Wgl="True" DisableAC="False" XDMCPTerminate="False" /> -
x-run.vbs — WSL всегда запускается со своим эмулятором терминала, если его закрыть — завершатся все его дочерние процессы. Чтоб данное окно не мозолило глаза, неплохо его запускать скрытым. К счастью в Windows встроен интерпретатор VBScript, который позволяет это сделать в одну строчку:
WScript.CreateObject("Shell.Application").ShellExecute "wsl", "cd /home/user1; DISPLAY=:0 LANG=ru_RU.UTF-8 su user1 -c xfce4-session", "", "open", 0Поясню, что здесь происходит. Мы говорим VBscript выполнить приложение wsl с параметром
cd /home/user1; DISPLAY=:0 LANG=ru_RU.UTF-8 su user1 -c xfce4-session, папка запуска нам не важна, поэтому пустая строка, действие open — запуск, 0 — скрытый режим. Самому wsl мы отдаем команду на выполнение: переход в папку пользователя, затем с установкой переменных окружения DISPLAY (дисплей X-сервера) и LANG (используемая локаль) мы запускаем xfce4-session от имени нашего пользователя user1 (благодаря команде su) - start.bat — batch файл для запуска, по желанию его можно засунуть в автозагрузку
start config.xlaunch
wscript x-run.vbs
Далее можем запустить наш start.bat и настроить панель Xfce под себя. Замечу, что здесь я наткнулся на еще одну проблему — панель прекрасно отображается поверх всех окон, но вот выделить себе место, как панель на рабочем столе Windows она не может. Если кто знает решение данной проблемы, поделитесь в комментариях.
Ну и под конец данной части, скриншот моего рабочего стола:

Взаимодействие окружения Windows и окружения подсистемы Linux
Запускать Linux приложения напрямую из Windows можно через те же 3 команды — bash, wsl или ubuntu. Не забываем, что по умолчанию запуск идет от root, поэтому стоит понижать привилегии через su, так же нужно не забывать передавать переменную окружения DISPLAY=:0 если приложению требуется X-сервер. Так же нужно менять папку, из которой должно работать приложение, через cd внутри WSL. Пример, посчитаем md5 для file.txt на диске D средствами Linux’овой md5sum:
wsl md5sum < d:file.txtДоступ к файловой системе Linux так же имеется, лежит она в %localappdata%PackagesCanonicalGroupLimited.UbuntuonWindows_79rhkp1fndgscLocalStaterootfs. Читать таким образом файлы можно, а вот писать — не желательно, можно поломать файловую систему. Думаю проблема в том, что Windows не умеет работать с правами и владельцами файловой системы Linux.
Из Linux так же можно запускать Windows приложения. Просто запускаем exe-шник и он выполнится в основной системе.
Диски Windows монтируются в /mnt в соответствии со своими буквами в нижнем регистре. Например диск D будет смонтирован в /mnt/d. Из Linux можно свободно читать и писать файлы Windows. Можно делать на них симлинки. Права у таких файлов всегда будут 0777, а владельцем будет root.
Сетевой стек у подсистемы общий с Windows. Сервер поднятый в Linux будет доступен на localhost в Windows и наоборот. Однако unix-domain-socket для Windows будет просто пустым файлом, работать с этим можно только внутри Linux. Выход во внешнюю сеть у Linux так же есть, в том числе можно слушать порты, если этого не запрещает фаервол.
ifconfig в Linux и ipconfig в Windows выдают одинаковую информацию о сетевых интерфейсах.
Из диспетчера задач Windows можно спокойно прибить процесс внутри подсистемы Linux. Однако Linux увидит только свои процессы.
Особенности, ограничения и подводные камни
Ядро Linux в WSL не настоящее. Это всего лишь прослойка-эмулятор, которая часть Linux-специфичных задач выполняет сама, а часть проксирует напрямую в ядро winNT. Большая часть api в нем реализована, но не все. Свое ядро собрать не получится, как и не получится подключить модули ядра (.ko, Kernel Object).
Init процесс у WSL тоже свой и заменить его, например, на system.d не выйдет. У меня давно есть желание написать менеджер демонов на go, который бы работал с файлами юнитов system.d и предоставлял бы схожий интерфейс, да все руки не доходят.
Нет поддержки openFUSE, соответственно примонтировать виртуальную или удаленную файловую систему не получится. Так же нельзя сделать mount из файла, mount вообще ничего кроме bind здесь, похоже, не умеет.
Так же нет никакой возможности разбить файловую систему Linux на несколько разделов/дисков.
Прямой доступ к железу практически отсутствует. Все таки мы находимся в песочнице Windows, а не в полноценном Linux. /dev и /sys заметно пустуют, в них лишь проц да виртуальные устройства. Доступ к GPU — только через X-сервер, напрямую — никак, так что нейросети обучать придется в Windows.
В JS разработке столкнулся с тем, что electron.js отказался запускаться в WSL, пришлось дублировать окружение node.js в Windows.
Итоги
Статья получилась довольно длинной, надеюсь, что она окажется еще и полезной.
WSL для меня лично оказался инструментом вполне юзабельным, решающим мои задачи fullstack backend разработчика. Виртуалка с Linux за полгода так и не понадобилась. По общим ощущениям Windows+WSL намного функциональнее, чем Linux+Wine.
Пока писал статью, обнаружил, что в Microsoft Store появилась сборка WSL с Debian 9.3, данный дистрибутив мне более симпатичен, чем Ubuntu, поэтому буду пробовать ставить.
- To install WSL2 on Windows 10, open Command Prompt as admin and run “wsl –install.”
- The command will install all the WSL2 components and the Ubuntu Linux distro.
- To install a specific distro, run “wsl –install -d DISTRO-NAME.”
- To update the WSL2 kernel, run the “wsl –update” command.
WSL2 (Windows Subsystem for Linux version 2) is a new version of the architecture that allows you to use Linux on top of Windows 10 natively (using a lightweight virtual machine) and replaces WSL.
The feature runs an actual Linux kernel in a virtual machine, which improves performance and app compatibility over the previous version while maintaining the same experience as the first release.
This guide will teach you the steps to install the Windows Subsystem for Linux 2 on Windows 10.
- Install WSL2 on Windows 10
- Install WSL2 on Windows 10 (older versions)
Microsoft has simplified the installation process of the WSL on Windows 10 to only one command that downloads and installs all the required components, including the virtual machine platform and Ubuntu Linux by default.
To install Windows Subsystem for Linux on Windows 10, use these steps:
-
Open Start on Windows 10.
-
Search for Command Prompt, right-click the top result, and select the Run as administrator option.
-
Type the following command to install the WSL on Windows 10 and press Enter:
wsl --install

-
Restart your computer to finish the WSL installation on Windows 10.
-
Continue with the Linux distro setup as necessary.

Once you complete the steps, the required Linux components will automatically install the latest version of the Ubuntu Linux distribution.
Install WSL with specific distro
To install WSL with a specific distro on Windows 10, use these steps:
-
Open Start.
-
Search for Command Prompt, right-click the top result, and select the Run as administrator option.
-
Type the following command to view a list of available WSL distros to install on Windows 10 and press Enter:
wsl --list --online
Quick note: At the time of this writing, you can install Ubuntu, Debian, Kali Linux, openSUSE, and SUSE Linux Enterprise Server.
-
Type the following command to install the WSL with a specific distro on Windows 10 and press Enter:
wsl --install -d DISTRO-NAME

Remember to replace “DISTRO-NAME” in the command with the distro’s name to install, such as Debian.
-
Restart your computer.
-
Continue with the Linux distro setup as necessary.

After you complete the steps, the Windows Subsystem for Linux 2 components will install with the distro of Linux you specified.
Update WSL kernel
To update the WSL kernel to the latest version on Windows 10, use these steps:
-
Open Start.
-
Search for Command Prompt, right-click the top result, and select the Run as administrator option.
-
Type the following command to update the WSL kernel and press Enter:
wsl --update


Once you complete the steps, if an update is available, it will download and install on the device.
If the update command doesn’t work, open Settings > Update & Security > Windows Update > Advanced options, and turn on the “Receive updates for other Microsoft products when you update Windows” toggle switch.
Install WSL2 on Windows 10 (older versions)
Alternatively, you can still install WSL on Windows 10 version 1909 and older versions using the legacy processes. The process requires enabling WSL1, the Virtual Machine Platform, converting existing distros (if applicable), and configuring the Windows Subsystem for Linux 2 as the new default for future distro installations.
If you have an ARM64 system, the Linux integration is supported on version 2004 and higher.
Enable Windows Subsystem for Linux
If you are not already using Linux on Windows 10, you must enable the Windows Subsystem for Linux (version 1) with these steps:
-
Open Start on Windows 10.
-
Search for Turn Windows features on or off and click the top result to open the app.
-
Check the “Windows Subsystem for Linux” option.

-
Click the OK button.
-
Click the Restart button.

Once you complete the steps, you must enable the Virtual Machine Platform feature.
Enable Virtual Machine Platform
To enable the Virtual Machine Platform on Windows 10, use these steps:
Important: The motherboard and processor must support virtualization, and the option has to be enabled on the Basic Input/Output System (BIOS) or Unified Extensible Firmware Interface (UEFI).
-
Open Start.
-
Search for PowerShell, right-click the top result, and select the Run as administrator option.
-
Type the following command to enable the Virtual Machine Platform feature and press Enter:
Enable-WindowsOptionalFeature -Online -FeatureName VirtualMachinePlatform

-
Restart your computer.

After you complete the steps, you can set the Windows Subsystem for Linux version 2 as the new default architecture and convert existing distros.
Enable Windows Subsystem for Linux 2
To start using WSL2 or covert WSL distros to WSL2, use these steps:
-
Download this WSL 2 kernel update (required).
-
Double-click the wsl_update_x64.msi file and apply the update.
-
Open Start.
-
Search for PowerShell, right-click the top result, and select the Run as administrator option.
-
Type the following command to set Windows Subsystem for Linux 2 your default architecture for new distros that you install, and press Enter:
wsl --set-default-version 2

-
(Optional) Type the following command to convert the distro from WSL to WSL 2 and press Enter:
wsl --set-version Ubuntu 2
In the command, change “Ubuntu” for the distro’s name you want to convert. If you do not know the distro’s name, use the
wsl -l -vcommand.


Once you complete the steps, your device will start using the new version of Windows Subsystem for Linux as the default architecture. (See video tutorial on the Pureinfotech YouTube channel.)
Confirm distro platform
To confirm distros are using the Windows Subsystem for Linux 2, use these steps:
-
Open Start.
-
Search for PowerShell, right-click the top result, and select the Run as administrator option.
-
Type the following command to verify the version of the distro and press Enter:
wsl --list --verbose
-
Confirm the distro version is 2.

After you complete the steps, you will know if the process was successful or if you need to troubleshoot any of the steps.
Ever since Windows added the support for Windows Subsystem for Linux (WSL), it has become easy for admins, developers, and power users to step into the world of Linux. Before WSL support was added, users had to rely on heavy virtualization tools (such as VirtualBox, VMware Workstation, and Hyper-V) or even dual-boot configurations to run a Linux instance.
Contents
- Introduction to Windows Subsystem for Linux
- Differences between WSL and traditional VM
- When to choose WSL 2
- When to choose a traditional VM
- Prerequisites for WSL
- Install WSL in Windows 11
- Manually install Windows Subsystem for Linux
- Install and manage Linux distros in WSL
- List the available Linux distros
- Install a Linux distro
- List installed Linux distros
- Change the default WSL Distro
- Run and terminate Linux distros
- Change the WSL version
- Remove a Linux distro
- Mount a disk in WSL 2
- Update the WSL Linux kernel
- File sharing between Windows and the WSL distro
- Author
- Recent Posts

Surender Kumar has more than twelve years of experience in server and network administration. His fields of interest are Windows Servers, Active Directory, PowerShell, web servers, networking, Linux, virtualization, and penetration testing. He loves writing for his blog.
Latest posts by Surender Kumar (see all)
- Extending LVM space in Ubuntu — Thu, Feb 2 2023
- Backup in Proxmox VE — Thu, Jan 26 2023
- Snapshots in Proxmox VE — Wed, Jan 25 2023
In this article, I will cover the basics of Windows Subsystem for Linux, how to install it in Windows 11, and how to run an Ubuntu Linux container in WSL. You can also run any other version of Linux in WSL.
Introduction to Windows Subsystem for Linux
Windows Subsystem for Linux is an optional feature added to Windows 10 and later versions that allows users to run a Linux instance, including most command-line tools and applications, directly on Windows without using any traditional virtual machine or dual-boot configuration.
The WSL feature was originally added to Windows 10 version 1607 (Anniversary Update) and requires an x64-bit version of Windows. On Server operating systems, it is available for installation in Server 2016 version 1803.
The initial version of WSL (now known as WSL v1 or WSL 1) does not use the real Linux kernel. Instead, a translation layer between the Linux distribution and the Windows NT kernel translates and handles all the kernel-level operations.

Windows Subsystem for Linux v1 architecture
A lot has changed since the initial launch of WSL. The newer version (known as WSL v2 or WSL 2) was released with Windows 10 version 1903, build 18362 (May 2019 Update); it included various architectural and performance improvements, particularly the use of the real Linux kernel. In WSL 2, in place of the translation layer, a real Linux kernel runs inside a lightweight utility virtual machine (VM), though this is not a traditional VM. This new architecture has resulted in a significant increase in file system performance and full system call compatibility.

Windows Subsystem for Linux v2 architecture
Differences between WSL and traditional VM
While WSL 2 uses Microsoft’s Hyper-V as a hypervisor under the hood to run the utility VM, it does not require you to enable Windows’ Hyper-V role or feature; WSL works perfectly fine without it.
Please remember that WSL is not a full replacement for a traditional VM. Let me tell you why.
With the help of a hypervisor, a traditional VM creates an isolated environment in your host system that acts as a separate virtual computer with all the hardware components, such as CPU, RAM, and storage. This architecture allows a user to have a completely isolated system with a guest operating system.
However, this is not the case with WSL. While WSL 2 does run a real Linux kernel in a Hyper-V–based utility VM, it works completely behind the scenes; hence, the user does not need to install and manage the operating system or any other resources as with a traditional VM.
When to choose WSL 2
- You have a less powerful computer.
- You need a smaller memory or storage footprint.
- You need faster I/O performance.
- You don’t want to waste your time installing and managing the virtual machine.
- You need to run a Linux distribution (distro) for development and testing purposes.
When to choose a traditional VM
- You have a powerful computer for which resources (such as memory, CPU, and storage) are not a concern.
- You need to run an operating system other than GNU/Linux.
- You need a completely isolated and full-fledged system environment.
- You want to manage the operating system, applications, and resources.
- You want to run production-level workloads.
- You need advanced virtualization features, such as snapshots and load balancing.
In a nutshell, both WSL and traditional VM have several pros and cons; whether you want to run a Linux distro within WSL or within a traditional virtualization platform (such as VirtualBox, Hyper-V, or VMware Workstation) depends entirely on your interest and use case. I hope the aforementioned points will help you make an informed decision.
Prerequisites for WSL
Your system must have certain prerequisites before you can run WSL.
- It must have x64-bit and ARM64 processors.
- To run WSL 1 on an x64 system, it must be running at least Windows 10 version 1607 (Anniversary Update).
- To run WSL 2 on an x64 system, it must be running at least Windows 10 version 1903, build 18362 (May 2019 Update).
- To run WSL 2 on an ARM64 system, it must be running at least Windows 10 version 2004 (build 19041 or higher).
To check the operating system version and build number, you can type the winver command in the RUN dialog and press Enter.
Install WSL in Windows 11
If your system is running Windows 10 version 2004 (build 19041 or higher) or Windows 11, Microsoft has made it incredibly easy to install WSL 2. Just launch the PowerShell console with an elevated privilege and run the following command:
wsl --install
This command enables the optional Windows features required for WSL, downloads the latest Linux kernel, sets WSL 2 as the default, and installs the Ubuntu Linux distro for you.

Install WSL using PowerShell The latest method
Once the command is finished, you can restart your computer using the Restart-Computer -Force command.
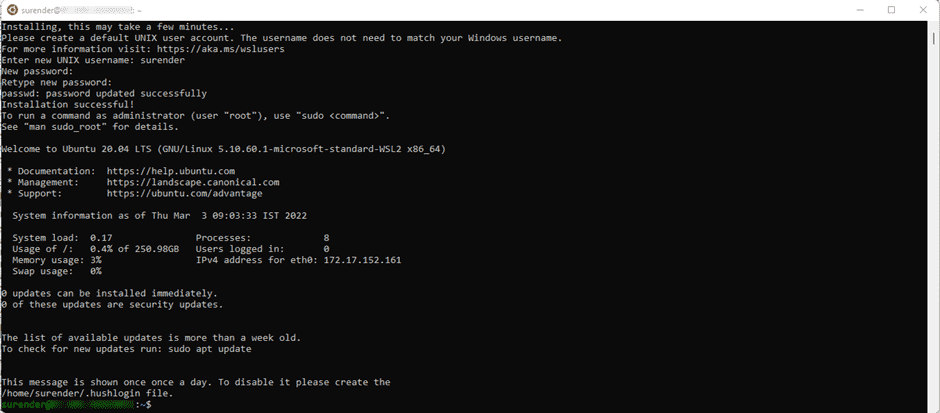
After the restart, the WSL installation will resume automatically, and you will see an Ubuntu Linux terminal, which will ask you to set the username and password for the Ubuntu WSL instance.
Ubuntu Linux running in the WSL instance
Manually install Windows Subsystem for Linux
If you are running an older Windows 10 build or prefer installing WSL manually, you can follow the manual installation steps laid out below.
Launch the Windows PowerShell console with an elevated privilege and run the following command:
Enable-WindowsOptionalFeature -Online -FeatureName 'Microsoft-Windows-Subsystem-Linux' -All -NoRestart

Enable the WSL feature using PowerShell The manual method
Many people still prefer using WSL 1. If you also want the same, you can restart your system at this stage and directly jump to Point 5 after rebooting. If you would rather use WSL 2, please continue to the next point. Make sure your system meets the prerequisites for running WSL 2.
The next step is to run the following command:
Enable-WindowsOptionalFeature -Online -FeatureName 'VirtualMachinePlatform' -All -NoRestart

Enable the Virtual Machine Platform feature using PowerShell The manual method
Now use the following command to restart your system:
Restart-Computer -Force
After the system has restarted, download the latest kernel package for your system using the following links and install the package:
- WSL 2 Linux kernel for x64 systems
- WSL 2 Linux kernel for ARM64 systems
Once the kernel package is installed, your system should be running WSL 1 by default. To change the default version to WSL 2, run the following command in an elevated PowerShell console:
wsl --set-default-version 2
Now you can install any Linux distro of your choice. We will cover that in the next section.
Install and manage Linux distros in WSL
Now that you have installed WSL in your system, you can run and manage your Linux distros using PowerShell. Launch the PowerShell console with an elevated privilege and use the commands mentioned in this section.
List the available Linux distros
To see the list of all the Linux distros available for installation with WSL in the online store, you can use the following command:
wsl --list --online
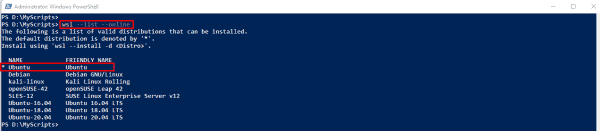
WSL list online
You can also use the short-version command wsl -l -o, which will yield a list of all the supported Linux distros available online for installation in your system.
If you’re thinking that this list is quite small and that you cannot see the distro of your choice, rest assured that there is a way you can import any Linux distro in WSL. But that is a manual method involving multiple steps. Hopefully, we’ll discuss that later.
Install a Linux distro
Once you have the list of available distros for your system, you can use the following command for installation:
wsl --install -d kali-linux

Install a Linux distro in WSL
This command installs Kali Linux in WSL. Of course, you can replace kali-linux with the name of the distro you want to install. Once installed, Kali Linux will be launched in a terminal.

Kali Linux in WSL Initial setup
List installed Linux distros
To see the list of all the Linux distros installed in your system, you can use the following command:
wsl --list --verbose

WSL list verbose
You can also use the short-version command wsl -l -v, which will show a list of all the Linux distros installed in your system.
To list only the instances that are currently running, you can use the following command:
wsl --list --running

List of only the running instances in WSL
Change the default WSL Distro
Have you noticed a small asterisk (*) right next to the distro name when you run the wsl -l -v command? This asterisk represents the default distro for WSL. The wsl —status command also shows the current default distro. The default distro is the one that runs when you run wsl in a command line without specifying the —distribution (or -d) parameter.
For example, in my system, docker-desktop is set as the default distro. Changing the default distro to kali-linux can be done with the following command:
wsl --set-default kali-linux

Changing the default distro in WSL
Run and terminate Linux distros
To run any distro and connect to it, you can directly use the following command in PowerShell or the command prompt:
wsl --distribution kali-linux --user surender
Run and connect a WSL distro with a specific user
Run and connect a WSL distro with a specific user.
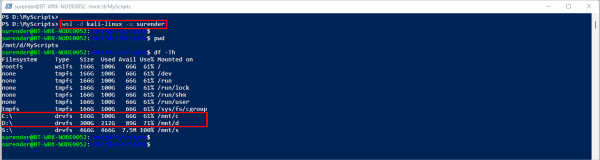
After using the above command, you will be directly logged in to the Kali Linux bash shell. The good thing is that your Windows drives are automatically mounted under /mnt, so you can seamlessly transfer the files between Windows and the WSL instance.
To terminate (or stop) a WSL instance, you can use the following command:
wsl --terminate kali-linux

Terminate or stop a single WSL instance
This command stops a particular Linux distro (Kali Linux in this case). If your system has multiple Linux distros that are running, you can use the following command to stop them all at once:
wsl --shutdown
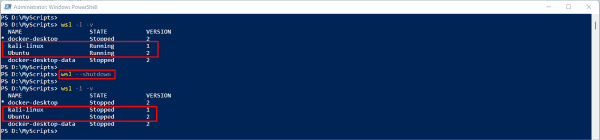
Stop all Linux instances using WSL shutdown
This command immediately stops all the running Linux distros as well as the utility VM.
Change the WSL version
As mentioned earlier, WSL 1 runs by default after installation. To change the WSL version globally, you can use the following command:
wsl --set-default-version 2

Set the default WSL version
This command changes the default WSL to WSL 2. If you want to use WSL 1, you can type 1 instead of 2 in the command. Setting the default version to WSL 2 means that every Linux distro you will install in this system will be running in WSL 2.
Apart from changing the WSL version globally, which will affect all future WSL instances, you can set the WSL version specifically for the selected Linux distro. To do this, use the following command:
wsl --set-version kali-linux 1
This command converts the Kali Linux distro to WSL 1. It could take a while for the conversion process to finish and for the change to be verified; you will see the VERSION column of the wsl -l -v command, as shown in the following image:

Change the WSL version for a particular distro
Please note that the WSL instance will be stopped during the version change process.
Remove a Linux distro
To remove or uninstall a Linux distro from WSL, you need to unregister the distro using the following command:
wsl --unregister ubuntu

Unregister a distro from WSL
This command unregisters a Linux distro (Ubuntu in this case). Please note that this command will permanently erase all the data, settings, and applications within that distro.
Mount a disk in WSL 2
A cool feature available in WSL 2 is the ability to mount disks that are not supported by Windows. Please note that this feature is available only in WSL 2 running on Windows 11 (build 22000 or higher). Furthermore, the Linux distro in which you plan to mount the disk should be running in WSL 2.
This feature is particularly useful when you want to access the contents of a disk formatted with a Linux file system that is not supported by Windows. To do this, you can mount the disk using the wsl —mount command and then access the contents using WSL.
A quick overview—Windows can recognize FAT, NTFS, ReFS, exFAT, and a few other file systems, but the EXT3 and EXT4 file systems are not supported. exFAT is a cross-platform file system that is equally supported on Windows, Linux, and MacOS.
For demonstration purposes, I just connected a virtual disk formatted with the EXT4 file system. As this disk is formatted in EXT4, Windows won’t recognize it, and nothing will show up in File Explorer.
To access its contents, we can mount this storage device and make it available for Linux distros. However, before mounting the disk, we need to get the device ID for the particular disk using the following PowerShell command:
Get-CimInstance -query 'SELECT * from Win32_DiskDrive'

The Get CimInstance command used to obtain the device ID
Note down the device ID returned by the above command and use it to mount the disk using the following command:
wsl --mount <DeviceID>
This command mounts the specified disk and makes it available to all the Linux distros in WSL. You can use the —bare parameter to make the disk available in WSL without mounting it to all distros. The —type parameter can be used to specify the file system for the disk. If you don’t know the file system, you can skip this parameter.
The image below displays the commands I used:

Mount and access a disk in WSL
After entering the bash terminal, I used the lsblkid command to list the partitions available on the disk. Once I obtained the partition’s name, I mounted the partition inside the /mnt/vdisk/ directory using the regular mount command. Following this, I could read the contents of the disk.
Once you finish accessing the contents and want to unmount the disk, you can use the following command:
wsl --unmount <DeviceID>

Unmount the disk in WSL
Update the WSL Linux kernel
By default, the WSL Linux kernel will be automatically updated with Windows updates. However, to manually check and update the kernel, you can use the following commands:
wsl --status
This command shows the status of WSL, including the default distro name, WSL version, and kernel version.
wsl --update
This command forcefully checks and updates the kernel version if an update is available.

Check and update the kernel in WSL
File sharing between Windows and the WSL distro
As mentioned above, your Windows drives are automatically mounted under /mnt inside the Linux distro; hence, you can seamlessly transfer files between Windows and the WSL instance. To transfer files, you should navigate to the mounted drive and start accessing the files as you normally would in the Linux terminal.
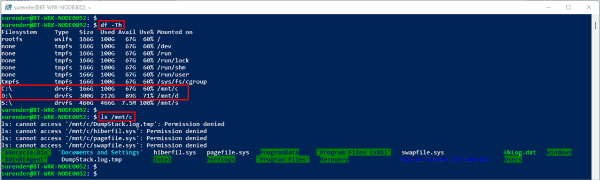
Access Windows drives in WSL
If you would like to view the Linux files directly inside Windows File Explorer, you can use the following command in the bash terminal of the Linux distro:
explorer.exe .
Please make sure you don’t miss the period (.) at the end of the command.

Launch File Explorer in WSL
This will open File Explorer in Windows directly inside your current working directory in the Linux distro.

Open File Explorer in WSL
This is extremely helpful if you’re a developer. You can use this trick to manage your projects and files in Windows as well as in Linux distros, taking advantage of Linux build tools that are not normally available in Windows.
And that’s the end of this guide.
Subscribe to 4sysops newsletter!
In the next article, we will discuss how you can export your favorite Linux distro and make it available in WSL 2, assuming the distro is not available for installation from the Microsoft online store by default.
The Windows Subsystem for Linux (WSL) runs a GNU/Linux Environment which includes most of the command-line utilities and applications on top of Windows OS. Traditionally there are many ways we can set up Linux OS to work with. Either it can be a dual boot, running through VMWare or VirtualBox, or installing it as our main OS.
Now with Windows Subsystem for Linux, adds a new capability eliminating the overhead of setting up the OS from scratch. It is easy to set up with WSL and Install Linux and get going. To know more about the architecture of WSL refer to “Microsoft Build 2019 – BRK3068”.
Here we will be setting up WSL 2 which is the latest release. WSL 2 is part of Windows 10, version 2004 released in May 2020. WSL 1 used a translation or compatibility layer between Linux and Windows while WSL 2 uses virtual machine technology to allow you to run a real Linux kernel directly on Windows 10.
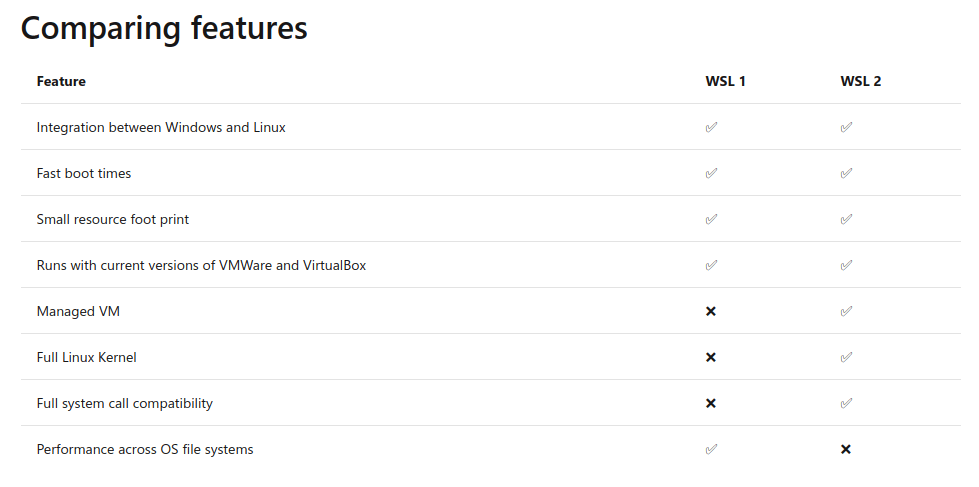
Comparisons Between WSL 1 and WSL 2
Before Installing WSL 2 you need Windows 10, Version 1903, Build 18362, or higher.
Enable the Windows Subsystem and Virtual Machine for Linux
You must first enable the “Windows Subsystem for Linux” and Virtual Machine Platform optional features before installing any Linux distributions on the Windows system. The WSL 2 uses Virtual Machine technology instead of a translation layer to communicate between Windows and Linux.
Open PowerShell as Administrator and run the following commands to turn on WSL and VM feature and reboot the system once.
Enable Windows Subsystem for Linux
dism.exe /online /enable-feature /featurename:Microsoft-Windows-Subsystem-Linux /all /norestart
Enable Virtual Machine for Linux
dism.exe /online /enable-feature /featurename:VirtualMachinePlatform /all /norestart
Install Your Linux Distribution of Choice on Windows
Open the Microsoft Store and select your favorite Linux distribution.
For demonstration purposes, we will install Ubuntu, go to Microsoft store, and in the search bar type Ubuntu.
Open Ubuntu 20.04 LTS and click Install.
Launching Ubuntu is pretty easy in Windows. Just go to search and type Ubuntu, it will show all the installed versions of Ubuntu.
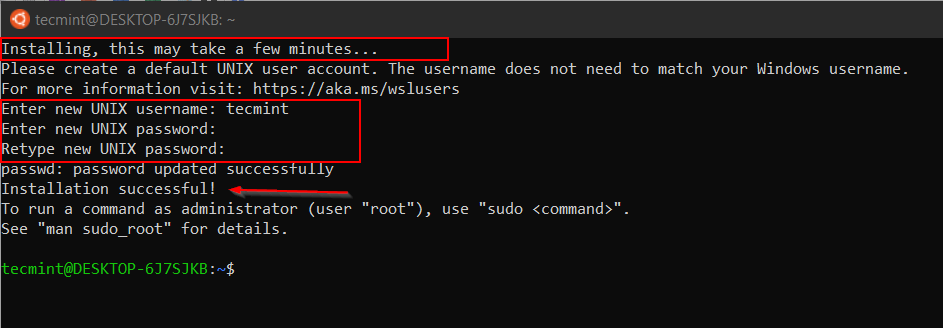
You can also pin that in the Windows Taskbar or if you are using a new Windows Terminal you can configure in it. Now we will launch Ubuntu 20.04. If you are launching it for the first time it will take some time to set up a few things at the backend then it will prompt us to set username and password.
At this stage, you may receive an error to install the kernel component. To fix this error you have to manually download and install WSL2 Linux Kernel.
0x1bc WSL 2 requires an update to its kernel component.
For information please visit https://aka.ms/wsl2kernel
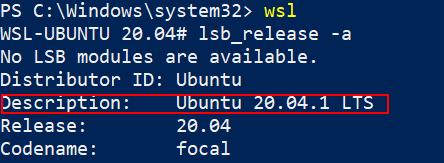
Now I have configured both 18.04 and 20.04 in the same way as shown in the previous section. Open the shell and type the following command to check the Distribution and Release of your Ubuntu.
lsb_release -a

Now we are done with installing Ubuntu on Windows. Within less time we can have a functional distro where we can start installing tools and packages like docker, ansible, git, python, etc. as per our requirement.
Learn Windows Subsystem Commands for Linux Distro
There are few options we can use to launch our Linux Distribution directly from PowerShell or CMD prompt.
1. Type the following command, which will show the list of options we can use along with wsl.
wsl -help
2. Check the installed version of distribution by running the command the following command.
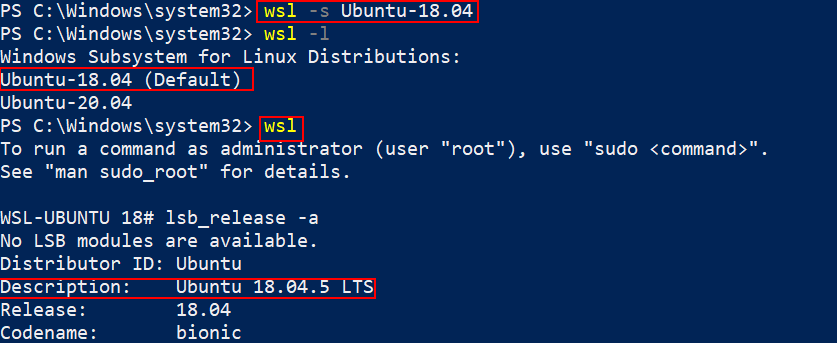
wsl -l

From the output of this command, you can see two versions of Ubuntu is installed and Ubuntu 20.04 is set to be launched as default.
3. Default Distribution (Ubuntu 20.04) can be launched by simply typing.
wsl
4. Change the default Linux distribution by running the command.
wsl -s Ubuntu-18.04
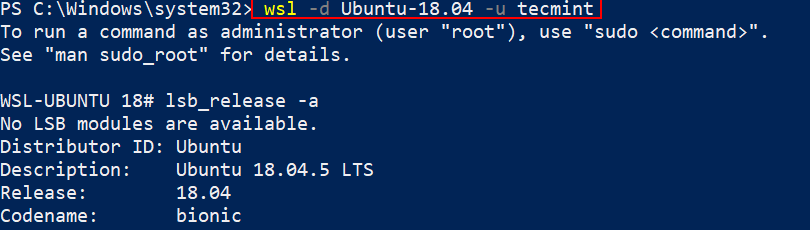
5. Connect to specific distribution with a specific user by running the command.
wsl -d Ubuntu-18.04 -u tecmint
6. We can pass a few flags along with the "wsl -l" command to check the status of the distribution.
wsl -l --all– List all distributions.wsl -l --running– List only distributions that are currently running.wsl -l --quiet– Only show distribution names.wsl -l --verbose– show detailed information about all distributions.
7. By running the following command, we can check what WSL version my Linux Distribution is running with.
wsl -l -v
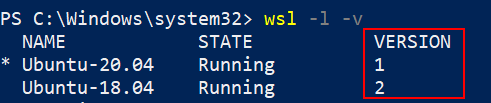
My Ubuntu 20.04 is running with version WSL 1 since it is configured long back. I can convert that to WSL 2 by running the command.
wsl --set-version Ubuntu-20.04 2
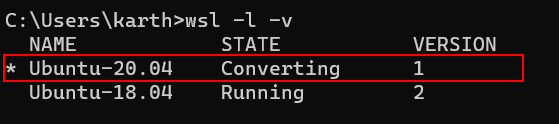
This will take some time to complete and you can see “Conversion Complete” when WSL 1 is converted to WSL 2.

When running the --set-version command, open another PowerShell window and run wsl -l -v to check the current state. It will show as “Converting”.
wsl -l -v
You can run the following command again to check the current WSL version. Both my Distribution will now be running with WSL2.
wsl -l -v

We can also set WSL2 as the default version so when we install new distribution it will run with WSL2. You can set the default version by running.
wsl --set-default-version 2
![]()
In this article, we have seen how to configure WSL 2 to install Ubuntu Linux on Windows and learned a few command-line options that we can use from PowerShell or cmd prompt.
During Installation, you may encounter different errors which I have not encountered, in that case, the official troubleshooting document will be a good place to start. Also, take a look at the official FAQ section from Microsoft documentation to get more insight about WSL.
If You Appreciate What We Do Here On TecMint, You Should Consider:
TecMint is the fastest growing and most trusted community site for any kind of Linux Articles, Guides and Books on the web. Millions of people visit TecMint! to search or browse the thousands of published articles available FREELY to all.
If you like what you are reading, please consider buying us a coffee ( or 2 ) as a token of appreciation.

We are thankful for your never ending support.

If you want to try out the improved Windows Subsystem for Linux 2 (aka WSL 2) in the latest Windows versions here’s how — I cover everything you need to do to install it, in this post.
WSL 2 is a big upgrade to the original WSL Microsoft introduced in 2017. More than a simple version bump, WSL 2 is faster, more versatile, and uses a real Linux kernel for the first time.
Plus, new Linux kernel updates will be released as Windows 10 software updates — which is kinda crazy when you think about it!
Improved performance was Microsoft’s motivation for created the souped-up WSL2. And it figured the best way to do that was to add full system call compatibility, i.e. put a real Linux kernel right at the heart of things.
“[This] new architecture presents a better platform for the WSL team to deliver features that make WSL an amazing way to run a Linux environment in Windows,” say Microsoft of the tech.
The crazy shows no sign of abating either as Microsoft plans to let users run desktop Linux apps on Windows 10 and leverage GPU-intensive tasks.
And the best news is that it is much easier to install WSL on Windows 10, as this updated guide shows.
Requirements
To install WSL 2 on Windows 10 you need the minimum:
- Windows 10 May 2020 (2004), Windows 10 May 2019 (1903), or Windows 10 November 2019 (1909)
- A computer with Hyper-V Virtualization support
I’d be mighty surprised if anyone who’s reading this guide doesn’t meet those requirements but, if you don’t you can use WSL 1 rather than WSL 2.
What’s awesome is that if you use Windows 10 May 2020 (2004) update or later you can install WSL2 with a single command, or a single click — no hassle.
Installing WSL 2 on OS Build 2004 (or later)
To install WSL 2 on Windows 10 OS Build 2004 or later you can open a command prompt (with Administrator permissions) and type in the following command:
wsl.exe --install
As soon as you hit enter the process gets to work enabling WSL, any optional features required, fetches the latest WSL Linux kernel version, and installs Ubuntu as the default distro:
Once done, reboot your computer. Log in to Windows 10 and the command prompt will open again. This time you’ll be walked through setting up Ubuntu with a username and password (these don’t need to be the same as your Windows username and password).
Once done you can you can launch the ‘Ubuntu’ app from the Start Menu to get started, or install the Microsoft Terminal app to start exploring your newly-installed Ubuntu install — don’t forget to run an apt update && apt upgrade though — this is a REAL Ubuntu system, after all!
Install WSL 2 (Old Method)
If you use an older version of Windows 10 you can still install WSL 2 (Microsoft backported WSL 2 to older versions of Windows 10 in Windows Update KB4566116) but the process isn’t as simple as in the 2004 update.
To install WSL 2 on Windows 10 (OS Build 1909 or 1903) you need to follow 4 steps:
- Enable WSL 2
- Enable ‘Virtual Machine Platform’
- Set WSL 2 as default
- Install a Linux distro
I walk through each step in turn below. I recommend using the PowerShell app, which you need to run as an administrator. You can find PowerShell in the Windows Start Menu.
Note: it is possible to install WSL 1 using a GUI too but it’s much faster to use the command line, and since WSL is a CLI tool it kinda makes sense too!
Step 1. Enable WSL
Regardless of which version of WSL you want to use you first need to enable it. To do this open the PowerShell tool as an Administrator and run the command below. Be careful not to mistype or leave out any character in the command:
dism.exe /online /enable-feature /featurename:Microsoft-Windows-Subsystem-Linux /all /norestart
Only want to use WSL 1? You can skip to step 4.
Step 2. Enable ‘Virtual Machine Platform’
WSL 2 requires Windows 10’s “Virtual Machine Platform” feature to be enabled. This is separate from Hyper-V and hands some of the more interesting platform integrations available in the new version of the Windows Subsystem for Linux.
To enable Virtual Machine Platform on Windows 10 (2004) open PowerShell as Administrator and run:
dism.exe /online /enable-feature /featurename:VirtualMachinePlatform /all /norestart
To enable Virtual Machine Platform on Windows 10 (1903, 1909) open PowerShell as Administrator and run:
Enable-WindowsOptionalFeature -Online -FeatureName VirtualMachinePlatform -NoRestart
To ensure all of the relevant bits and pieces fall neatly in to place you should restart your system at this point or you may find that things don’t work as intended.
Step 3. Set WSL 2 as default
Open PowerShell as Administrator and run this command to set WSL 2 as the default version of WSL:
wsl --set-default-version 2
You can (at any time) configure a distro to run in WSL 1 mode if you need to.
Step 4. Install a distro
With WSL and the necessary virtualisation tech all in place all that is left for you to do is pick and install a Linux distro from the Microsoft Store.
Several different distros are available, including OpenSUSE, Pengwin, Fedora Remix, and Alpine Linux. But my personal recommendation is (naturally) Ubuntu 20.04 LTS (though 18.04 LTS and 16.04 LTS are also available).
To install Ubuntu on Windows 10 open the Microsoft Store app, search for “Ubuntu 20.04”, and hit the “Get” button:
Ubuntu 20.04 LTS on the Microsoft Store
Whilst you in the Microsoft Store I highly recommend that you also install the open source Windows Terminal app. This tool is designed to give you the best possible WSL experience:
Windows Terminal on the Microsoft Store
5. Use WSL 2
When you installed Ubuntu (or a different Linux distro) a shortcut was added to the Start Menu. Use this to “open” Ubuntu (or whichever distro you chose). The first time you run the distro things will seem a little slow. This is expected; the distro has to unpack and decompress all of its contents — just don’t interrupt the process.
You will also be promoted to set a username and password for use on the distro. Try to pick something you won’t forget.
Convert Ubuntu on WSL 1 to WSL 2
If you use WSL 1 you can upgrade an existing WSL 1 installation to WSL 2. To convert an existing WSL 1 distro to WSL 2 run the following in PowerShell, e..g,:
wsl.exe --set-version Ubuntu 2
You should replace ‘Ubuntu’ with the name of whichever distro your WSL 1 install runs.
Let me know if this guide worked for you in the comments!