![]()
Download Article
Expert guide to USB drive Windows installation
![]()
Download Article
This wikiHow teaches you how to use a USB flash drive to install a version of the Windows operating system onto a Windows computer. Using a USB flash drive is useful when your computer doesn’t have a CD drive or when you don’t have an operating system installation disc.
-

1
Check the computer’s architecture number. Before you download an installation tool for your preferred operating system, you’ll need to know whether the computer on which you want to install Windows runs a 32-bit system or a 64-bit system.
- Make sure that you do this on the computer on which you’re going to install Windows.
-
2
Make sure that you have at least a 8-gigabyte flash drive. Windows needs at least eight gigabytes of space for its installation file.
- Flash drives are fairly cheap; you can get a 16-gigabyte flash drive—twice times the space you need—for less than $10.
Advertisement
-
3
Plug the flash drive into your computer. The flash drive should fit into one of your computer’s rectangular USB ports.
-
4
Format the flash drive to FAT32 or exFAT. When formatting your flash drive, click the File system drop-down box, then click FAT32 or exFAT in the drop-down menu.
- Formatting your flash drive will erase everything on it.
-
5
Download the Windows installation tool. Open the Windows 10 download page, then click Download tool now at the bottom of the page.
-
6
Run the installation tool. Double-click the «MediaCreationTool» EXE file, click Yes when prompted, accept any terms, and fill out any on-screen sections until you get to the installation section.
- As part of the installation tool, you’ll be prompted to select a language, an edition of Windows, and an architecture for the setup process. Make sure to use the same architecture here as you found in step two of this part.
-
7
Create your bootable flash drive. Once the installation section of the Media Creation Tool window opens, click the «Create installation media» checkbox, click Next, select your computer’s language, edition, and architecture, click Next, click the flash drive’s name, and click Next.
-
8
Wait for the flash drive setup to complete. This may take several minutes. Once all of the setup files have downloaded (or pasted) into the flash drive, you can proceed with changing your computer’s boot order.


Advertisement
-
1
Check the computer’s architecture number. Before you download an installation tool for your preferred operating system, you’ll need to know whether the computer on which you want to install Windows runs a 32-bit system or a 64-bit system.
- Make sure that you do this on the computer on which you’re going to install Windows.
-
2
Make sure that you have at least a 4-gigabyte flash drive. Windows needs at least four gigabytes of space for its installation file.
- Flash drives are fairly cheap; you can get a 16-gigabyte flash drive—four times the space you need—for less than $10.
-
3
Plug the flash drive into your computer. The flash drive should fit into one of your computer’s rectangular USB ports.
-
4
Format the flash drive to FAT32 or exFAT. When formatting your flash drive, click the File system drop-down box, then click FAT32 or exFAT in the drop-down menu.
- Formatting your flash drive will erase everything on it.
-
5
Download the Windows disk image. Open the Windows 8.1 download page, scroll down and select a version of Windows 8.1, click Confirm, select a language and click Confirm, and click either 32-Bit Download or 64-Bit Download in the middle of the page. This will prompt the disk image (ISO) file to download.
-
6
Make the flash drive bootable. If you’re installing Windows 8.1, you’ll need to use Command Prompt or another bootable USB method to ensure that your computer will recognize your USB flash drive as a software installation location.
-
7
Add the ISO to the flash drive. Copy the downloaded ISO file by selecting it and pressing Ctrl+C, then open your formatted, bootable flash drive and press Ctrl+V. The ISO file will appear on the flash drive after a few minutes, after which point you can proceed with changing your computer’s boot order.


Advertisement
-
1
Go to the computer on which you want to install Windows. If you’re merely trying to install a new version of Windows on your existing computer, skip this step.
-
2
Plug in your USB flash drive. Insert the USB flash drive into a USB port on the computer.
-
3
Prompt the computer to restart. Click Start
, click Power
, and click Restart. Your computer will begin to restart.
- If the computer is off, press its power button to turn it on, then move to the next step. If the computer turns on when you open its lid or move the mouse, you’ll still need to restart it before proceeding.
-
4
Rapidly press the computer’s BIOS key. As soon as the computer’s startup screen appears (the screen right after the computer shuts down and is beginning to restart), begin pressing the BIOS key. Your computer’s BIOS key will vary depending on the manufacturer, but it will usually be one of the function keys (e.g., F2), Esc, or Del.[1]
- You can check your computer’s BIOS key online or in the manual that came with your computer.
- Many computers will flash a «Press [key] to enter setup» (or similar) message at the bottom of the screen as your computer is starting up. This is the key that you should press.
- If you miss your opportunity and the computer finishes the restart cycle, you’ll need to restart it and try again.
-
5
Find the «Boot Order» section. This section is usually in the Advanced or Advanced Options tab, but each BIOS menu is different. The «Boot Order» section will have a list of different startup locations, including your hard drive’s name and your CD drive.[2]
-
6
Select your flash drive’s name. Using the arrow keys, move the highlight bar down until it’s covering the flash drive’s name.[3]
- On some computers, you’ll instead select Removable Storage or Removable Drives (or something similarly titled).
-
7
Move the flash drive to the top of the list. You’ll usually do this by pressing the + key until the flash drive is at the top, but check the legend at the bottom or on the side of the BIOS screen to see if your controls are different.[4]
-
8
Save your changes and exit the BIOS. There’s usually a key that you can press to do this, so check the legend to see what it is and then press it.
- You may have to press another key to confirm this decision.
-
9
Restart your computer again if necessary. If your computer doesn’t greet you with a «Press any key» screen and instead finishes the restart cycle, restart it again to boot from the flash drive. This will launch the Windows setup process.


Advertisement
-
1
Press any key when prompted. When you see the «Press any key» line of text, press any key on your computer’s keyboard to proceed with the Windows installation.
-
2
Select a language and region. When the Windows installation window pops up, select a language, region, and any other preferences listed there.
- You may also be prompted to select keyboard settings here.
- On Windows 7, you’ll check the «I agree» box here instead, then skip ahead to the «Select a partition» step.
-
3
Click Next. It’s in the lower-right corner of the page.
-
4
Enter your product key. When prompted, type in the product key that came with your computer or installation disc, then click Next.
- On Windows 10, you must first click Install now. You can also skip the product key entry for now by clicking the Skip option.
- On Windows 7, you won’t be asked for your product key until after the installation is complete.
-
5
Agree to the terms of use. Check the «I agree» box, then click Next.
-
6
Select a custom installation. Check the «Custom» box, then click Next
-
7
Select an installation partition. Double-click the partition on which you want to install Windows, then confirm your choice when prompted. You may also need to select the empty partition and click Next to prompt the installation process to begin.
- On Windows 7, you’ll select the partition that you want to use, click Delete, confirm the decision when prompted, click the empty hard drive, and click Next to begin the installation process.
-
8
Wait for Windows to finish installing. Your computer may restart several times during this process, and the installation may take several minutes to over an hour depending on your computer’s speed.
-
9
Follow any on-screen instructions. After Windows is installed on the computer, you’ll be asked to set up a few more preferences (e.g., your language, account name, email address, etc.) before you can begin using Windows.
- On Windows 7, you’ll be asked to enter your product key here.


Advertisement
Add New Question
-
Question
How do I change my computer’s boot order?

Luigi Oppido is the Owner and Operator of Pleasure Point Computers in Santa Cruz, California. Luigi has over 25 years of experience in general computer repair, data recovery, virus removal, and upgrades. He is also the host of the Computer Man Show! broadcasted on KSQD covering central California for over two years.
Computer & Tech Specialist
Expert Answer
You’ll have to change this in the system’s BIOS. Restart your computer and before it fully boots up, press the BIOS key, which is one of the function keys on your keyboard’s top row. On the BIOS screen, you can then go into the settings and change the priority order so that your flash drive loads Windows first.
-
Question
I want to install Windows but am being prompted that there is a missing operating system. What now?
Have you put the OS on the drive? If not, install it on there. You can also try to install an *.iso file on the drive.
-
Question
What if I’m putting in a brand new hard drive?
If you are installing from scratch, you will still need to create the boot media using one of the above steps on a working computer. Once the boot media is created, you will use it on the computer that has a new hard drive. Just remember that with a new hard drive and installation, you need to get a registration code to activate Windows.

See more answers
Ask a Question
200 characters left
Include your email address to get a message when this question is answered.
Submit
Advertisement
-
Navigating the BIOS can be extremely frustrating since no two BIOS pages are identical. To negate this frustration, find your computer’s manual and look up the BIOS information there.
Advertisement
About This Article
Thanks to all authors for creating a page that has been read 1,297,930 times.
Is this article up to date?
If you want to install or repair Windows 10 on a computer, one of the most common ways is to use a USB drive with the necessary files. That’s what this guide is all about. I will show you the easiest and most reliable way to prepare and put Windows 10 onto a USB drive.
Table Of Contents
- How to put Windows 10 installation files onto a USB
- 1. Accept license terms (if you agree)
- 2. Choose installation type
- 3. Check or uncheck recommended options
- 4. Choose USB flash Drive
- 5. Select your destination drive
- 6. The download and installation will proceed
- 7. Completed
- Booting from the prepared Windows 10 USB drive
- Enter the BIOS
- Change the boot order in the BIOS
- Select a boot drive (preferred method)
- Booting from the USB drive
- If something goes wrong
- Making Windows portable
- Conclusion
To put Windows 10 onto a USB drive, download and run Microsoft’s Media Creation tool to prepare the USB drive properly. It will prepare the USB drive for the FAT32 file system and do everything required to make it bootable and ready to use for running the setup for Windows 10.
We no longer have to rely on a CD or DVD to contain installation files. Using a bootable USB drive will reduce the time it takes to install Windows, and it is one of the best options when choosing storage media.
Besides, getting your hands on a DVD drive or disk is becoming more difficult.
Now I’ll show you the procedure in detail to easily create a USB drive so that you can boot from it and install Windows 10 onto any machine.

How to put Windows 10 installation files onto a USB
Firstly, you will need to go and download the Windows 10 Media Creation Tool from Microsoft’s website and grab the tool now.
You can download the same tool for Windows 11 instead, depending on your preference as to which version of Windows you want.
Make sure you have plugged your USB drive into a free USB socket directly on your computer. Don’t plug it into any USB hubs if you can.
Caution: Make sure you have backed up your USB drive before attempting this procedure. Anything that’s on there will be gone for good.
From there, run the application once it has completed downloading. To do this, double-click on the downloaded file to begin the process.
Note: I highly recommend you unplug all USB drives that you have plugged into your computer, except the one you want the Windows 10 installation files installed.
Follow these instructions to create installation media:
1. Accept license terms (if you agree)

Once you have read through the software license terms and agree to them, click on the Accept button to continue.
2. Choose installation type

3. Check or uncheck recommended options

If you aren’t using the computer you are currently using to install your new Windows 10, uncheck the Use the recommended options for this PC check box. Otherwise, leave it checked.

If you uncheck the option, choose the appropriate language. Additionally, select either the 64-bit or 32-bit operating system (check your hardware architecture or processor specs on the target machine first), then click on the Next button to continue.
4. Choose USB flash Drive

Choose the USB flash drive option. In some cases where you want to keep the Windows 10 ISO file for manual installation to other USB flash drives using a tool like Rufus, you can choose the ISO file option instead.
Click on the Next button to proceed to the next step.
5. Select your destination drive

Select the target USB drive on which you want the installation files to be installed, then click on the Next button to move on to the next step.
6. The download and installation will proceed
The Media Creation Tool will download the Windows installation files and prepare the USB flash drive by erasing it and setting up a new partition. It will then copy all the downloaded files onto your USB drive. This will take a bit of time, so be patient.
7. Completed

The process is complete, and now you have Windows 10 successfully set up on a bootable USB drive. You can use this USB drive on as many computers as you like.
Booting from the prepared Windows 10 USB drive
It can also be noted that having an internet connection isn’t mandatory from this point onward.
From here, you will have to select the correct boot device in the computer’s bios that you wish to install Windows 10 on.
Enter the BIOS
In most cases, it’s simply a case of tapping the F12 or delete key when your computer first power on and posts. Some computers have a full-screen logo with some key commands listed somewhere.
If things move along too quickly and you cannot see these specific key presses listed there, try pressing the Pause key on the keyboard and see if it pauses on the post screen. You can press any other key to unpause it.
If that fails, try recording the post-screen with your smartphone slow-motion video. Then, play the recorded video back and pause it where you can see the keystroke information.
Change the boot order in the BIOS
Just remember, if you enter the BIOS and set the first boot device to your USB drive, you will have to undo that modification once the first boot has taken place from the Windows 10 setup.
Otherwise, it will keep booting up from the USB drive, and you won’t make any progress with the installation process, and you will be stuck performing the same initial first part of the Windows setup over and over each time the computer restarts.
Select a boot drive (preferred method)
It is more convenient to select the USB drive from the boot selection menu of the BIOS if you can. This will boot from your USB drive temporarily until the next restart.
This is achieved by pressing a hotkey for the boot menu instead of entering the BIOS itself.
If your motherboard doesn’t support this functionality, you must enter the BIOS and change the boot priority, as explained above.
Booting from the USB drive
If your changes in the BIOS were successful, the installation process installed onto the USB drive should launch and will look similar to a normal Windows boot initially.
After the initial loading screen, a Windows Setup window will appear.
You must complete a series of selections, including language selection, provide your Windows key, and prepare the hard drive or SSD for installation.
The process is fairly straightforward for most people and shouldn’t take long to complete.
If something goes wrong
Please read my troubleshooting guide about why Windows 10 won’t install from a USB drive if you encounter problems when trying to execute this guide.
If this whole process still doesn’t work out for you, another option would be to buy a USB with Windows 10 already on it. It also comes with a license key, so everything is taken care of for you.
Making Windows portable
If you want to take your Windows copy wherever you go, consider EaseUS OS2Go.
Think of it as a cloned installation of your current Windows installation that you can run on any computer, even a Mac.
It’s a convenient way to always have a personal live copy to boot into wherever you are, even if your computer has crashed and you no longer can boot into Windows.
With this tool’s assisted step-by-step wizard, it is easy to set up any USB flash drive.
View EaseUS OS2Go
Conclusion
That’s how you get Windows 10 on a USB drive to install it onto any computer’s hard drive or SSD.
You can use it for a clean install or for other repair purposes.
Over time I have tested many different methods to accomplish this. However, most of them are unnecessary unless you run into problems caused by unconventional hardware setups.
With minimal effort, Microsoft has tried to make it easy for anyone to use their tool and have Windows 10 up and running in very little time.

Marlo has always been obsessed with computers his whole life. After working for 25 years in the computer and electronics field, he now enjoys writing about computers to help others. Most of his time is spent in front of his computer or other technology to continue to learn more. Read more about Marlo
Whether you want to install a clean copy of Windows 10 on a new PC or need to reinstall Windows 10 to repair system errors, you would need a bootable USB installation drive. Windows 10 provides a facility to create bootable installation media using a USB flash drive, DVD, or ISO file. However, most modern computers or laptops no longer have CD/DVD drives. A USB, however, is compatible with every PC and laptop, and you can easily turn it into a bootable installation drive. Hence, a lot of users ask for a way to install Windows 10 from USB. Read this article to know how to install Windows 10 from USB drive. We’ve mentioned all that you need for Windows 10 installation. Let’s get started!
Why Create a Windows Installation Media with USB?
USB drive is a portable device. It is compatible with every PC and laptop. Even if your system does not have a CD/DVD drive, it will still have a USB port. You can easily make a USB drive bootable, and install Windows 10 without any hassle.
How to Install Windows 10 from USB
There are a few steps you need to follow to install Windows 10 from USB drive. Let’s get started with all you need to have:
What you need:
- A new or formatted USB flash drive of size minimum 5GB.
- Source A: Working Windows PC to format the USB flash drive
- Destination PC – PC on which you’ll install Windows 10 OS
Step 1 — Format USB drive and set the primary partition as ACTIVE
You need to have a new or formatted USB drive to create a bootable media install Windows 10 from USB. If you don’t have a new USB drive, you can format the available drive with FAT32/NTFS/Re File System.
Now, follow the given steps:
- Connect the USB drive to source PC.
- Press Windows + X and choose to open Disk Management.
- Right-click on the USB drive partition and click Format.
- Choose the FAT32 file system to be able to boot with UEFI support.
- Next, right-click on the drive partition and select ‘Mark Partition as Active.’ (See Image 1)
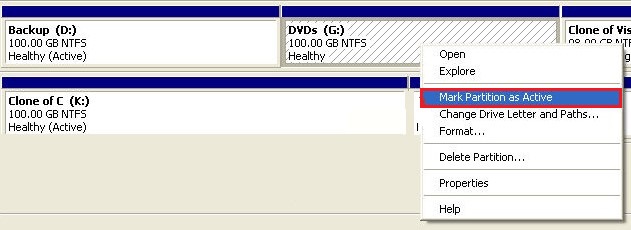
Image 1: Mark USB drive partition as Active
Step 2 — Build a bootable media with Media Creation Tool
You need to create the bootable media to boot your system and install Windows 10 from USB drive. Follow the given instructions to build the bootable media using the Media Creation Tool:
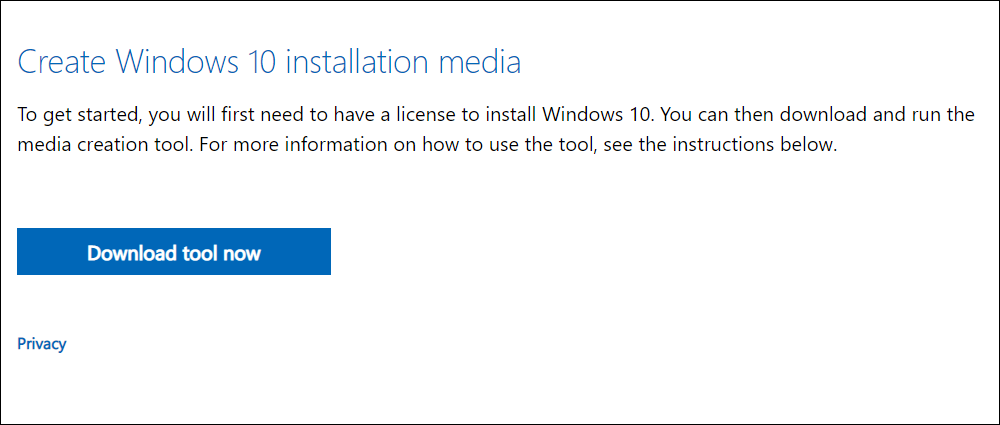
- Open Microsoft Download Windows 10 page and navigate to ‘Download tool now.’ (See Image 2)
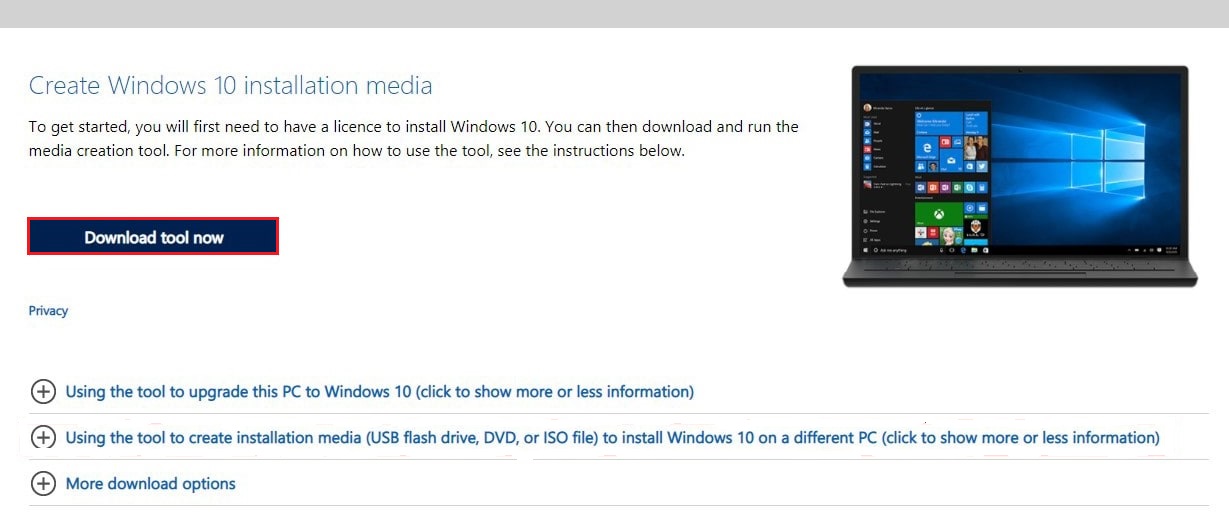
Image 2: Go to Microsoft Download Windows 10 page
- The media creation tool exe file will be downloaded. Open that file to run Windows 10 Setup and click Accept. (See Image 3)
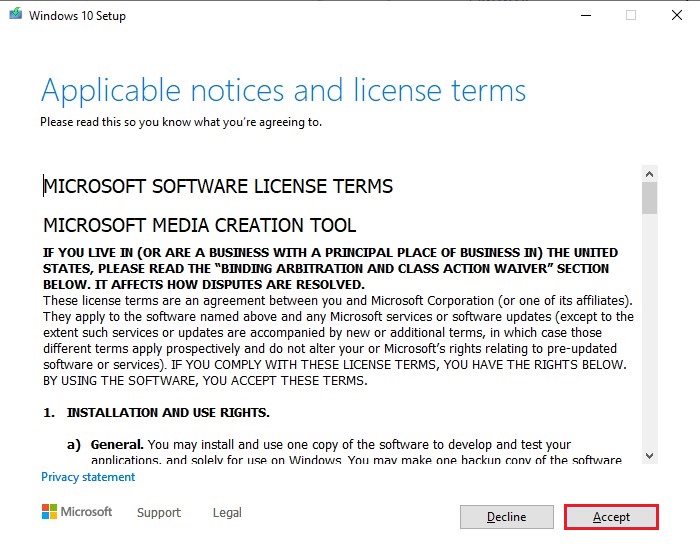
Image 3: Accept the Microsoft software license and Microsoft Media Creation tool
- Next, select Create installation media (USB flash drive, DVD, or ISO file) for another PC > Next. (See Image 4)
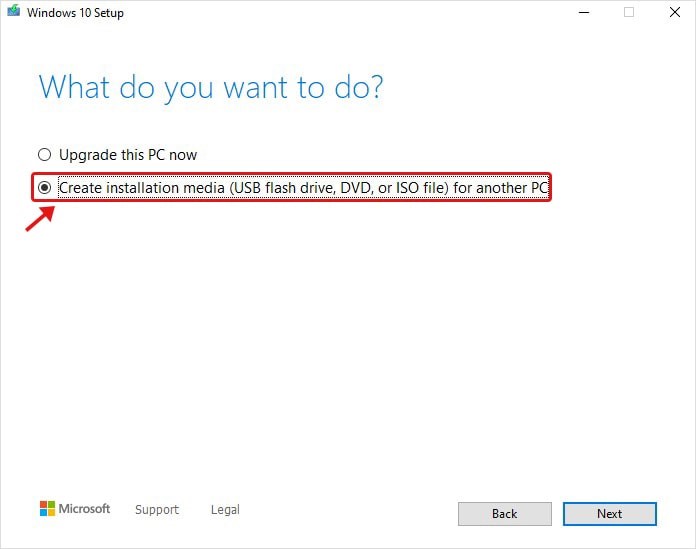
Image 4: Choose ‘Create installation media’
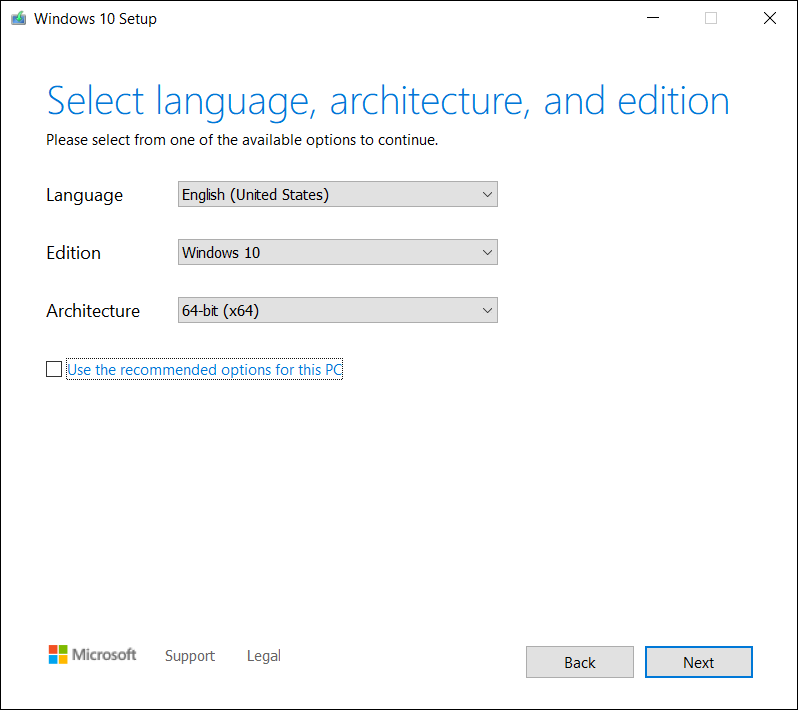
- Select language, architecture, and edition and click Next. (See Image 5)
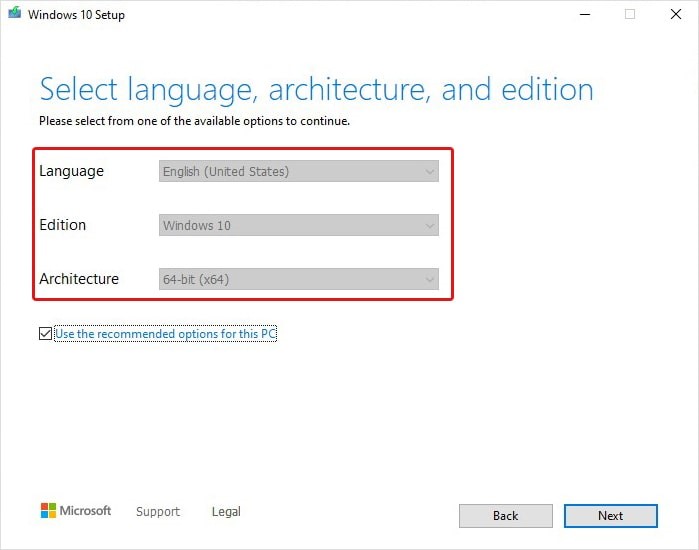
Image 5: Choose language, architecture, and edition
- On the ‘Choose which media to use’ wizard, select USB flash drive and click Next. (See Image 6)
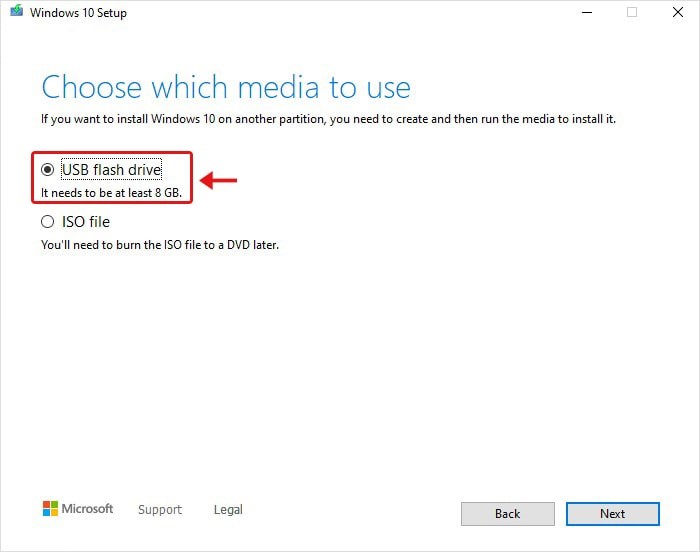
Image 6: Select USB flash drive and click Next
- On selecting the USB drive, it will delete everything.
Caution: Don’t use the USB drive containing your important files and folders, as this method will wipe everything on the drive. Additionally, don’t use your backup drive to create a bootable media drive.
- The process to create bootable media will start. Wait until the process ends. Once done, close the window.
Your USB installation media will be ready. Now, move on to the next step.
Step 3 — Change your computer’s boot order
Change the boot order of your system on which you want to install Windows 10. You need to enter the BIOS setup utility (by pressing F2/12) to change the boot order. Once done, restart your system and choose to boot it from the USB drive.
Step 4 — Method to Install Windows 10 from USB
- Now that you’ve booted your system with the USB drive, you can choose your preferred language, currency, time zone, and keyboard settings. Click Next. (See Image 7)
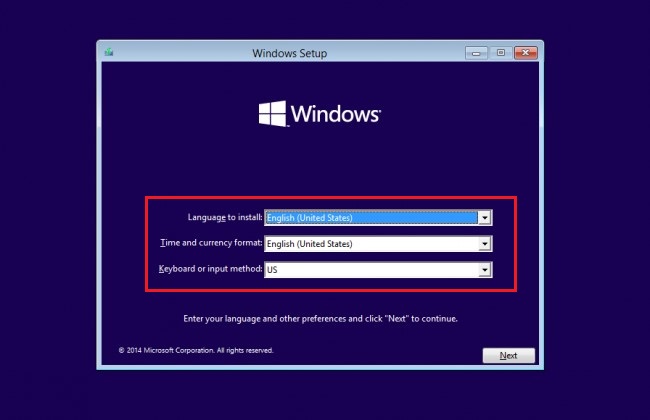
Image7: Choose language and other settings to proceed
- Click Install Now and choose to install Windows 10 version and click Next to proceed. (See Image

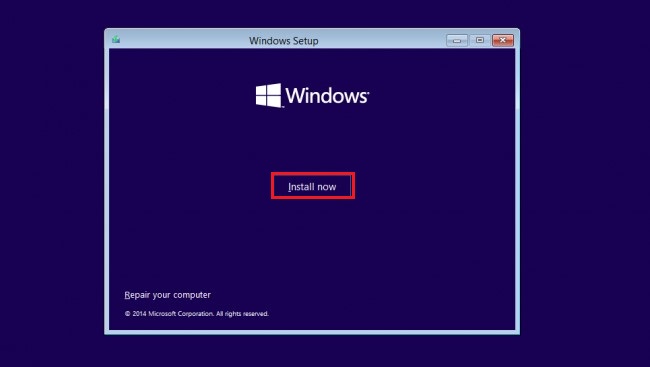
Image 8: Click Install now to proceed
- Choose the system partition on which the OS will be installed. Usually, Windows is installed on C: drive partition.
- Select the drive partition and click Format it. (See Image 9)
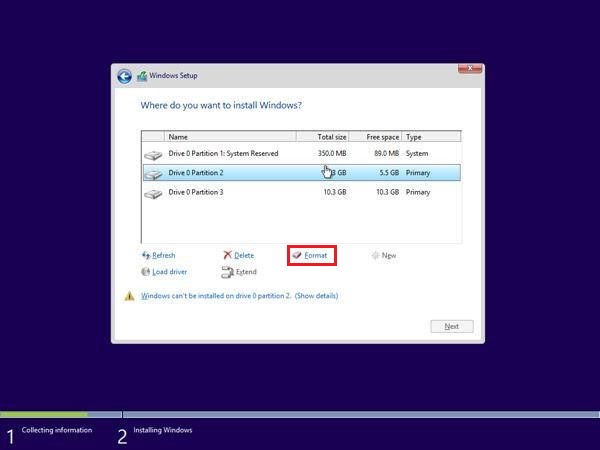
Image 9: format the drive partition
- Now, select the formatted partition to install Windows 10 from USB and click Next.
- The process of Windows 10 installation will initiate. The system may reboot a few times during the process. Don’t try to shut it down or restart forcefully.
- Once the process is done, the system will reboot, and you can choose to optimize the system setting as per your convenience using the ‘Custom’ option. Or you can click ‘Use express settings’ and opt for the recommended settings. (See Image 10)
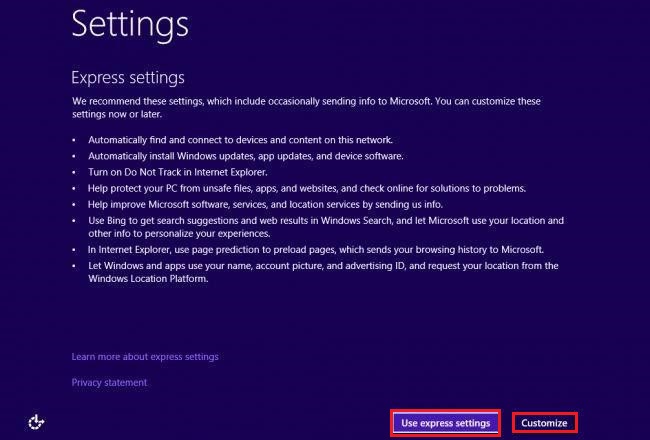
Image 10: Use custom or express settings
- Now, you can choose to sign in to the Microsoft account. If you don’t want to sign in right now, you may choose to ‘Skip this Step’ and proceed with setting up your PC. (See Image 11)
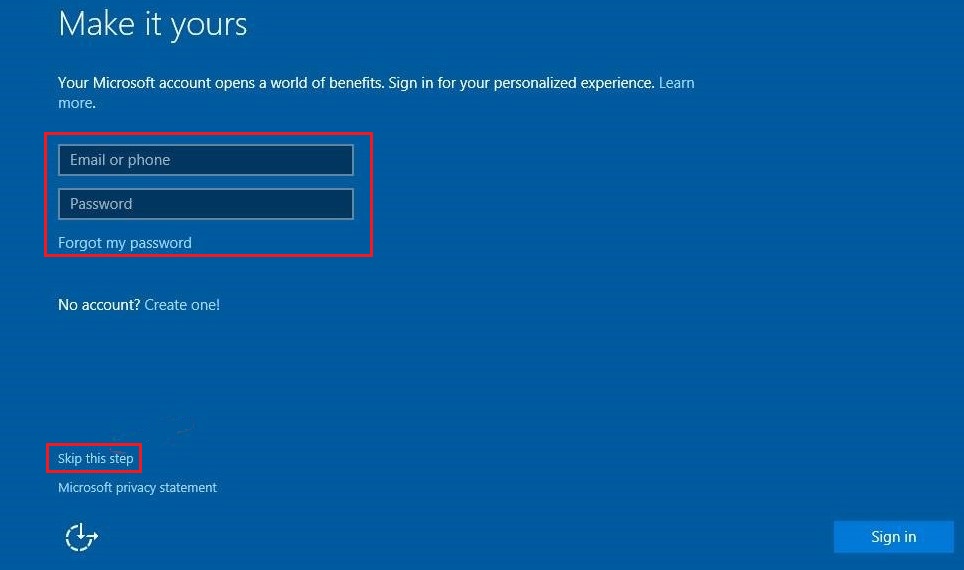
Image 11: Sign in to your Microsoft account or skip it to set up your PC
- And that’s all. Your Windows 10 installation will be successfully done.
What if I need to reinstall Windows 10 to repair my system? How can I do that?
Method to Reinstall Windows 10 from USB drive
You may need to reinstall Windows 10 from USB when your system encounters different errors, such as System Won’t Boot error, Disk Boot Failure, or SMART Hard Disk Error, etc. Sometimes, installed Windows may be corrupted due to interruption in the installation process. Irrespective of the reason, you can reinstall Windows 10 using the same USB installer you used to install Windows 10. Follow the given steps:
- Turn off your system on which you want to reinstall Windows 10.
- Connect the USB installation media created with the Windows Media Creation tool.
- Boot your System from a USB drive and set the time, language, currency, and keyboard settings to meet your requirements; then click Next.
- Now, click Repair your computer > Troubleshoot > Reset this PC. (See Image 12)
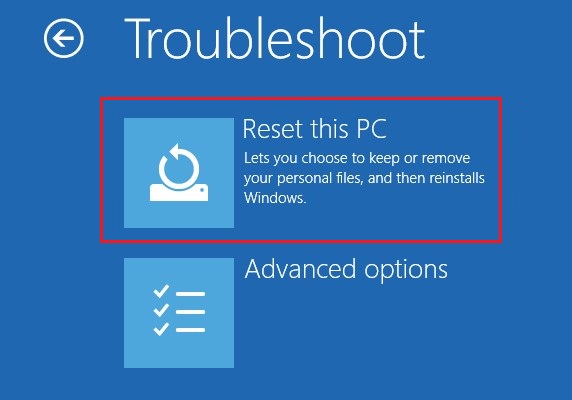
Image 12: Choose to Reset your PC
- Now, choose between ‘Keep my files’ and ‘Remove everything.’ (See Image 13)
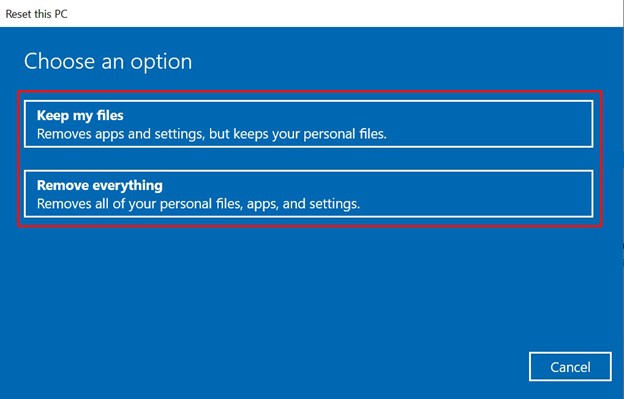
Image 13: Choose to remove everything
- Select ‘Remove all the files only from the drive where Windows is installed,’ and then click Next. (See Image 14)
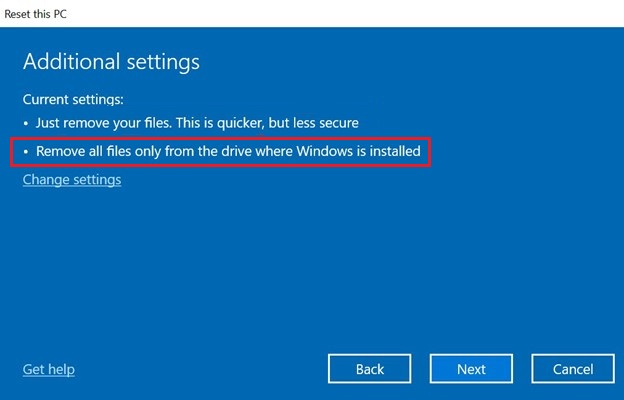
Image 14: Select ‘Remove all files only from the drive where Windows is installed.’
- It will lead your Windows 10 to the installation process from the USB drive. Follow the on-screen instructions to complete the process.
- Wait until the process completes, and then restart your system.
You should be able to reinstall Windows 10 from USB. You may now install Windows update and the latest available drivers to set up your system.
What about my data? Can I get my data back?
Installing or reinstalling Windows 10 wipes the entire data from the partition on which it is installed. This process formats the whole partition, deleting programs, drivers, software, leading to data loss situations. Therefore, it’s always recommended to take a backup of your data. However, if you don’t have any backup and have reinstalled Windows, don’t worry! You can retrieve data even after reinstalling Windows using a Windows data recovery software, such as Stellar Data Recovery Professional.
This easy-to-use yet powerful data recovery software can efficiently restore any data from formatted, corrupted, or even crashed Windows PCs and external storage drives, such as HDD, SSD, USB drives, etc.
The software also comes with a ‘Create Recovery Drive’ feature that helps you create bootable USB media to boot into crashed or non-bootable systems to recover data. Using bootable USB drive media created with this software can help you recover data but not reinstall Windows 10. Check out the below-given video to learn more about how to recover after reinstalling Windows.
Final Thoughts
You would need a bootable USB drive to install or reinstall Windows 10 on your PC/laptop. The ideal method to create bootable media is using Windows Media Creation Tool. In this article, we’ve covered all the steps to install Windows 10 from USB drive. If you’re reinstalling Windows 10 on your system for any reason, we suggest you take a backup of your system first. However, if you forgot to take backup of your system data and reinstalled Windows 10, you can still get back your data using powerful data recovery software.
Also Read: How to Create Recovery Media for your Windows 10 PC
Need to install a fresh copy of Windows? Booting Windows 10 (and Windows 7) from a USB stick is straightforward. Within minutes, you can have a fresh new version of Windows installed on your PC, laptop, or media center.
Here’s everything you need to know about installing a fresh copy of Windows 10 from a bootable USB stick.
Why Boot a Windows Installation From USB?
If your spare PC doesn’t have an optical drive, or you’re out of DVDs, a bootable USB stick is ideal.
After all, a USB stick is portable, and you can guarantee it is compatible with every desktop and laptop computer. While some computers might be missing a DVD drive, they all have a USB port.
It’s also quicker to install Windows 10 from a USB stick. A USB drive can be made bootable faster than an optical drive can; it also installs the operating system quicker.
To install Windows 7 or Windows 10 from a USB stick, it should have at least 16 GB of storage. Before proceeding, ensure that your USB flash drive has been formatted.
Ensuring USB Stick Has UEFI Boot Support
Before you download a bootable Windows installation image, it’s important to know the difference between UEFI and BIOS.
Older PCs rely on the basic input/output system (BIOS) to boot the operating system and manage data between the operating system and devices. For the past decade, UEFI (Unified Extensible Firmware Interface) has replaced BIOS, adding legacy support. UEFI can assist with PC diagnosis and repair without additional software or media.
Fortunately, the most common methods of performing a Windows 10 USB install support UEFI and legacy BIOS hardware. So, whichever option you choose should work for your hardware.
Preparing the Windows 10 Bootable USB
Before proceeding, insert your formatted USB flash stick in your PC or laptop.
Ready to install Windows 10? While several methods exist, the easiest way to do this is to use the Windows 10 Media Creation Tool.
To grab this, head to the Microsoft Download Windows 10 page, and click Download tool now.
Save the tool to your computer. It’s around 20 MB, so it shouldn’t take too long on a fast connection. Note that creation of the bootable Windows 10 USB installer requires an internet connection.
Create a Bootable USB Installer for Windows 10
Once downloaded, launch the media creation tool and click Accept when prompted. Then follow the steps below to create your bootable USB installer for Windows 10:
- Select Create installation media (USB flash drive, DVD, or ISO file) for another PC

- Click Next and set the preferred Language
- Carefully select the correct Windows 10 Edition and system Architecture
- To make changes, clear the checkbox labeled Use the recommended options for this PC

- Hit Next
- Choose USB flash drive, then Next, and select the USB drive from the list
- Click Next again

This final step prompts the download of the Windows 10 installation files.
Wait while the bootable USB Windows 10 installer is created. How long this take will depend on your internet speed. Several gigabytes of data will be installed. If you don’t have a fast internet connection at home, consider downloading from a library or your place of work.
Installing Windows 10 With a Bootable USB Drive
With the installation media created, you’re ready to install Windows 10 from USB. As the USB drive is now bootable, simply remove it from your PC, then insert it into the target device.
Power up the computer you’re installing Windows 10 on and wait for it to detect the USB drive. If this doesn’t happen, reboot, this time pressing the key to access the UEFI/BIOS or boot menu. Ensure the USB device is detected, then select it as the main boot device.
The subsequent reboot should detect the Windows 10 installation media. You’re now ready to install Windows 10, so commence the installation wizard.
Once you’ve worked through the wizard, Windows 10 will be installed. Note that some installation may continue after you log in, so be patient. It’s also worth checking for Windows Updates (Settings > Updates & Security > Windows Update) after installation. This ensures you’re running the very latest version of Windows 10.
How to Install Windows 7 From a Bootable USB Drive
So, that was all about installing your Windows 10.
But what if you’ve had enough of Windows 10? If you own a valid license for Windows 7, you can also install this from a bootable USB drive.
The process is largely similar, although for older PCs you won’t need to worry about UEFI support. Windows 7 is a great option for newer PCs in terms of being comparatively lightweight. However, support for the operating system ends in January 2020. As such, you should ensure that you upgrade to a more secure operating system when the times come.
See our full guide to installing Windows 7 from a bootable USB drive for details.
How to Reinstall and Repair Windows 10 From USB
Once you’ve installed Windows 10 from the bootable USB drive, it’s tempting to format the entire USB drive so that you can reuse the drive later on. While this is fine, it might be worth leaving it alone as a dedicated Windows 10 installation and repair drive.
The reason is simple. Not only can you install Windows 10 from the drive, you can also reinstall Windows 10 with a USB stick. So, if Windows 10 is not behaving in the expected manner, you can rely on the USB stick to reinstall it.
Here’s how to reinstall Windows 10 with your bootable USB stick:
- Switch off the PC that needs reinstalling
- Insert the USB stick
- Switch on the computer
- Wait for the bootable Windows 10 disk to be detected (you may need to adjust the boot order as explained above)
- Set the Language, Time and currency format, and Keyboard to meet your requirements, then Next
- Ignore the Install button and instead click Repair your computer
- Select Troubleshoot > Reset this PC
- You have two options: Keep my files and Remove everything – both options will lead to Windows 10 being reinstalled from the USB stick, one with your files retained, one without
When you’ve completed reinstalling Windows 10, everything should work as intended once more.
Keep Your Bootable Windows 10 Installation USB Drive Safe
Wrapping it all up, making a bootable Windows USB drive is simple:
- Format a 16 GB (or higher) USB flash device
- Download the Windows 10 media creation tool from Microsoft
- Run the media creation wizard to download the Windows 10 installation files
- Create the installation media
- Eject the USB flash device
While you should expect largely trouble-free computing from Windows 10, it’s a good idea to keep the USB boot drive safe. After all, you never know when a hard disk drive can crash, or a partition table will corrupt.
The Windows boot drive features various repair tools that can be used if Windows 10 will not boot. Store the boot drive in a memorable place where it can be easily retrieved for troubleshooting or reinstalling Windows later.
Are you struggling to install New Windows version on your PC? Well, you can quickly boot Window 10/7 using a USB drive.
With a blink of an eye, you can install the latest version of Windows on your computer system. Here’s everything you should know about Windows 10 bootable USB tool.
Why Update Your Windows Version Using a USB Drive
If you are falling short of DVDs and your PC does not have a free optical drive, then USB drive serves the option for booting your system.
This portable device is compatible with almost all desktop gadgets and laptops. Using a mobile device like USB offer a much simpler and straightforward way to boot your device.
Minimum 8GB of storage is required for this also the USB drive should be well formatted before booting the system.
Read More: How To Update Device Drivers on Windows 10
What You Need Before Installing Windows 10 From USB
Well, this post will guide you on how to Install Windows 10 from USB, but before jumping towards the step. Here are the things that you need before installing Windows 10 from USB. Have a quick look at them!
- DVD or Windows 10 install .iso file.
- USB flash drive which has at least 8 GB free space.
- A PC where you can format the USB Flash Drive.
- A PC on which you’ll install the new Windows.
So, these are all that you need before installing Windows 10 from USB. After this, follow the following steps!
Step 1:- To format the drive you have to connect the USB flash drive to the other PC that you have. And, later on, make sure to set the partition as Active.
Step 2:- Then, copy and paste the Windows setup file to the formatted USB Flash Drive. And, for doing so, you can use File Explorer.
Step 3:- Now, install the Windows to the new system via connecting a USB flash drive to a new system. After following the directions to install Windows on a new PC, do not forget to pull back the USB flash drive.
This is how you can install Windows 10 from USB drive with much ease.
Ensure That Your Device is UEFI Boot Support
Before we move ahead, let’s first understand the difference between UEFI and BIOS. BIOS stands for basic input/output system and was majorly used to manage data between system devices and OS.
However, UEFI which stands for Unified Extensible Firmware Interface has wholly taken over BIOS in the last decade.
Fortunately, you can use either of the two mechanisms to boot your computer using a USB drive.
Read More: Best Uninstaller Software For Windows 10, 8, 7
How to Prepare Windows 10 Bootable USB Drive
Using Windows 10 bootable USB tools to install windows is the easiest and quickest way. To start with, connect a well-formatted USB drive to your system. There are various ways of installing Windows 10, but the most straightforward and fastest way is with the help of a windows 10 media creation tool download.
To use this, go to the Windows 10 Microsoft download page. And then hit the “Download tool now” button.
The next step is to create windows 10 installation media, follow the simple steps to get your job done. Ensure that you have a legitimate license to download Windows 10. Once confirmed, you can easily install and run the media creation tool on your system.
- Next step is to save this lightweight tool on your system.
- Open the Media creation tool.
- From the next prompted window, click on “Accept” to confirm.
- In the displayed window, you will be given 2 options, choose “Create installation media” (ISO file, USB flash drive, or DVD).
- Click on the “Next” button now.
- Now set Windows 10 edition, language, and system architecture.
- In case you are unable to change the settings, uncheck the box with says, “Use the recommended options for this system/PC”.
- Click on the “Next” button.
- From the displayed window, choose “USB Flash” followed by the “Next” button.
- From the list of drives, choose the relevant USB drive and hit “Next” to start the download process.
Downloading Windows 10 With a Portable USB Drive
Once you have successfully created the installation media, installing Windows 10 gets exceptionally easy. You can now use this bootable USB to update the targeted device.
Switch on the PC you wish to update and then connect the USB drive and wait for it to get detected. Once the USB drive is adequately detected, you can start the installation process.
You can also similarly install Windows 7.
Read More: Update Latest Canon Printer Drivers for Windows 10, 8, 7
How to Make a Bootable USB Drive
Follow the simple step-by-step guide to create a bootable USB drive.
- To start with, you need a minimum of 8GB USB drive.
- Next, install the Windows media creation tool.
- To download Windows 10 installation files, run the media creation wizard.
- Once the installation media is created, eject the USB flash drive.
- And there you have it, a well-formatted bootable USB drive.
Through the help of the above steps, you can easily create a bootable USB drive to install windows 10 from USB on a new PC.
Closing Words
From here, you’ll be familiar with how you can install Windows 10 from USB on a new PC. Through this write-up, we’ve explained to you how you can make a bootable USB drive. Along with this, we’ve also told you what you need before installing Windows 10 from a USB drive.
Hopefully, now you’ll get to know exactly what you need to do to install Windows 10 from a USB drive. Still, if you’ll face any sort of difficulty while doing so, then do let us know through the comment box below! We assure you to help you out. And, don’t forget to subscribe to our Newsletter to stay updated. Till then, Happy Installing!