2012-11-15 Revised to use either Win7 bcdboot or Win8 bcdboot.
RMPrepUSB Blog – please leave a comment or feedback on RMPrepUSB or this Tutorial (please mention Tutorial number).
PLEASE NOTE: I highly recommend Win8ToGo instead of running Windows 7 from a USB drive. To boot Windows 8 from USB – please see Tutorial #53. Win8ToGo is designed to run from a USB drive and supports USB 3.0 booting – it will be far more ‘stable’ than Win7ToGo.
INTRODUCTION
Please note: This tutorial enables you to prepare a USB drive so thatyou can boot directly to Windows 7 from the USB drive. So now you can try Windows 7 without needing to install it onto your internal hard disk! IT WILL ONLY WORK ON A USB 2.0 PORT (see instructions at the end of this page for instructions on how to add USB 3 drivers).
NEW! You might like to try WinToUSB which make it very easy to prepare a bootable USB drive containing Win7/8/10 To Go. For ‘Removable’ USB flash drives, be sure to choose the VHD option (for Win8/10) or it won’t boot!
This tutorial does not make a Windows installer USB drive, it actually puts a copy of Windows 7 onto a USB drive and makes it bootable. When you have made it, you can boot from it as follows:
- Connect the prepared external USB drive (hard disk or Flash drive) to the target system (use a USB 2.0 port NOT a USB 3.0 port!)
- Switch on the system
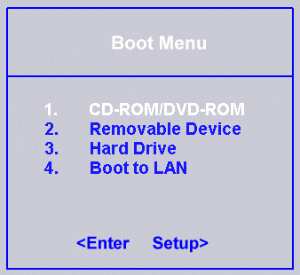
- Select the USB drive as the boot device in the BIOS boot menu
- Now allow the system to boot to Windows 7 directly from the USB drive.
– it does not matter what is on the internal hard disk of the target system, even if the internal hard disk is broken/not working.https://www.youtube.com/embed/uvWGV9YJxfQ
Alternate video here.
This tutorial as based on fujianabc‘s Reboot.pro forum post ‘NT 6.x fast installer: install Win7 directly to USB external drive’ and his excellent scripts (now with reg tweak by ‘cdob’ from reboot.pro -USBBootWatcher is no longer required). The instructions in that forum post #1 & #2 and some of the prompts in the installer.cmd file that fujianabc provides were however confusing and potentially dangerous (you could accidentally corrupt your system drive) – so I have slightly modified his script to make it clearer and easier to use. It also now automatically finds and uses the 3 files that are needed from the MS WAIK, so you don’t need to manually copy them first.
The instructions below assume that you have a USB drive (USB Hard Disk – recommended, or USB Flash drive – slow!) and you want to install Windows 7 onto it using a Windows 7 install DVD (or ISO file) as the source. You can use any 32/64-bit mix – e.g. use a Windows 7 64-bit PC to install say Vista 32-bit OS from a Vista 32-bit installation DVD onto a USB drive, or use a Windows XP system to install Windows 7 64-bit onto a USB drive using this method. Note that some CPUs’ (e.g. some netbook Atom 32-bit CPUs) won’t run a 64-bit OS, so a 32-bit version of Windows 7 is usually best for these.
Note that there are some pitfalls with this Windows USB drive once you have successfully made it:
- You will need to activate Windows using a valid Product Key (which will be locked to the hardware you booted it on) if you want a fully functional version of Windows for over 30 days
- You cannot just plug the USB drive into another system. If you want to move it to another system (once you have booted it on one system) then you need to sysprep it (see ADDENDUM at the end of this page). This is because on first boot, a fresh copy of Windows will detect what hardware is on the system and install the correct drivers (including the drivers for the boot drive). If you try to boot that USB drive on another system without running Sysprep, you may just get a BSOD (0x0000007B blue screen of death error).
- No drivers are included in the image if a plain Windows installation DVD is used as the source DVD. You will need to install drivers once Win7 is booting.
- A USB Flash drive will be quite slow (1-2 hours!) to install and run Windows from, unless you use a fast USB 3 Flash drive, such as BUSBI Boost USB 3 (even on a USB 2 port, USB 3 Flash drives are usually faster than USB 2 drives, but not, of course, as fast as a standard USB hard drive or USB 3 drives on USB 3 ports). I highly recommend you use a USB hard drive or a USB 3 Flash drive.
- Windows 7 does not contain many USB 3 compatible drivers – so if you try to boot from a USB 3.0 port it will probably crash!
Alternatively – using this method, you could remove an internal hard drive from a system, connect it to your main PC (either directly or using a USB drive caddy), format it and install Windows onto it using the Installer.cmd script in the tutorial, and then put the hard drive back into the original system (or a different system) and boot it.
The procedure below works and has been tested using an ISO of the RTM/Gold version of Windows 7 and the SP1 version of Windows 7.Unsupported embed
AIM
To install a bootable Windows 7 (or Vista or Win2K8) OS onto an external USB drive.
You need to follow this tutorial using a Windows PC (or possibly by booting to WinPE v2 or v3).
The Windows files are taken from a source installation DVD or a mounted ISO file. If you do not have a Windows 7 source DVD, you can download an ISO file (see External Links page)
EQUIPMENT REQUIRED:
- A USB hard drive of at least 10GB NTFS formatted (which may be wiped during this process). A Flash drive can be used but it will be slow!
- The whole Microsoft WAIK for Windows 7 installed (or at least the files bootsect.exe, bcdboot.exe and imagex.exe) or see Tutorial #83 for a method of obtaining these files in about 30 seconds without needing to download and install the whole WAIK (Note: Download the Windows 8 WAIK files, the Win 7 WAIK download does not contain bootsect.exe).
- The NT6_Fast_Installer.zip download from the Downloads page
- A Windows 7 installation DVD (or ISO file which you can mount as a drive letter) – see here to download a copy of Windows 7.
- (optional) RMPrepUSB to partition the USB hard drive
The system you use is assumed to be a Windows 7 system, although if you install the WAIK, these instructions should work on an XP system or later OS.
METHOD
1.You need to have a source DVD or a mounted ISO file (mounted as a drive letter). If you only have an ISO file, you can use SlySoft Virtual Clone Drive or ImDisk or any similar software to mount the ISO as a drive volume – e.g. O:. This allows the script to access the files within the ISO file as a drive letter.
2. You may need to partition and format the target USB disk using RMPrepUSB if it is not already formatted as NTFS. Even if it is formatted as NTFS, ensure the partition is ‘Active’ to make it bootable (‘Mark partition as Active’ in Windows Disk Manager). It is better and easier to re-format the drive using RMPrepUSB as shown below.
Note: Windows 7 MUST see an Active partition when it first boots – otherwise you will receive a “starting system services” – “Setup could not configure Windows to run on this computer’s hardware” error message. Subsequent boots do not seem to need an Active partition present, but on first boot Win7 does! If you try to boot Win7 without an active partition and then reboot it after setting the partition active, it may not work (i.e. it is broken!)
IMPORTANT: The USB disk volume must be formatted as NTFS and must be allocated a drive letter by Windows.

Set RMPrepUSB settings 1 to 5, then click 6 Prepare Drive.
If it fails to format, click on 6 Prepare Drive again.
3. Download NT6_Fast_Installer.zip (works for Win7 RTM/Gold and Win 7 SP1) from the Downloads page and extract the contents to an empty folder on your PC’s hard drive – let us say you cretae a new folder on the hard disk is called C:NT6Inst for the sake of this Tutorial.
4. Download and install the Microsoft Windows 8 WAIK files.
If you don’t want to install the WAIK, you will need to manually copy the correct versions of bootsect.exe, imagex.exe and bcdboot.exe (bcdboot.exe is already in Win7) to the C:NT6Inst folder.
See Tutorial #83 for a method of obtaining these files in about 30 seconds without needing to download and install the whole WAIK. Download the files from the Windows 8 WAIK and copy them to the C:NT6Inst folder. If you are running on a 64-bit version of Windows (not installing, but actually using a 64-bit version of Windows to prepare the drive) then use the amd64 versions, if you are using a 32-bit version of Windows then use the x86 versions of the tools.
If you are unable to use the GetWaikTools utility, you can also download the imagex/bootsect/bcdboot utilities from the MS download here.
If you already have the Windows 7 or Windows 8 WAIK installed, the 3 files needed will be found and automatically copied to your C:NT6Inst when you run the Installer.cmd script.
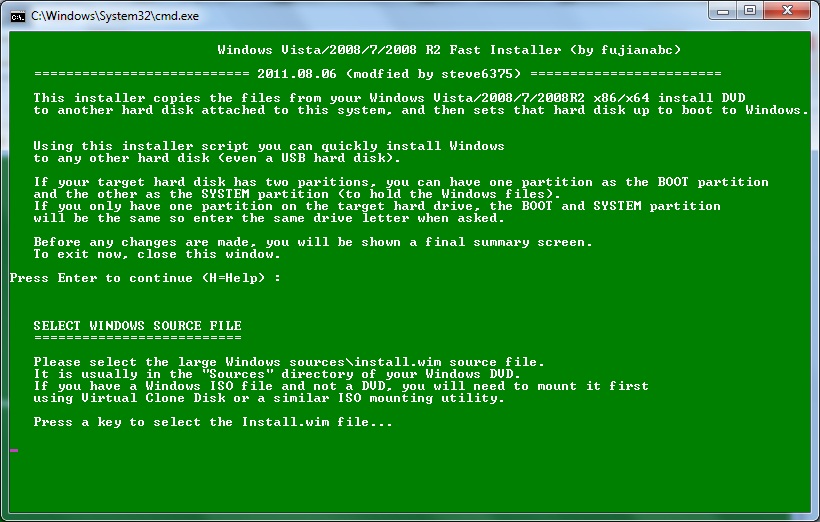
5. Right-click on the file C:NT6InstINSTALLER.cmd and choose Run as Administrator. If any files are missing you will be informed.
6. You should now see a green window with some text. Hit Enter and the Enter again.
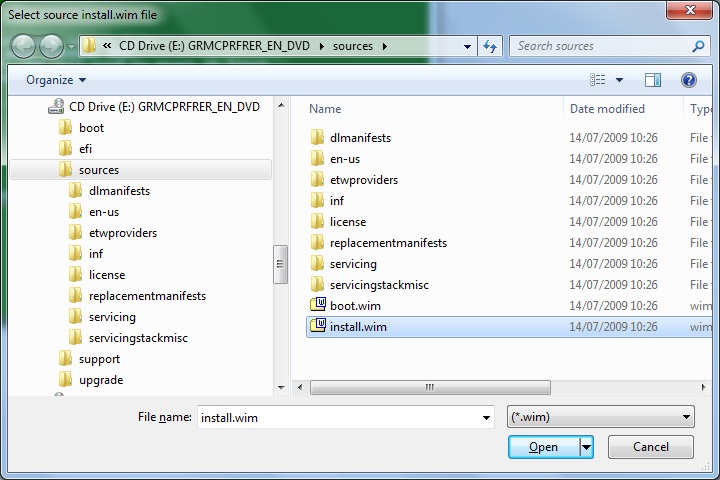
7. Now find the Install.wim file on your Windows installation DVD (or mounted ISO volume) – double-click to select it:
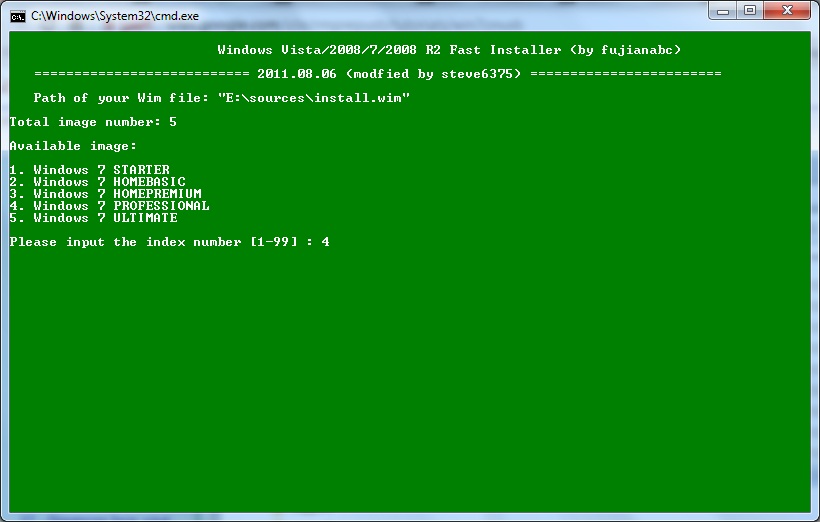
8. You will now be presented with a list of different Editions – these were all within the Install.wim file that you selected, choose the one you want to install (remember that you will need an activation key which matches the version you choose, if you want to activate Windows).
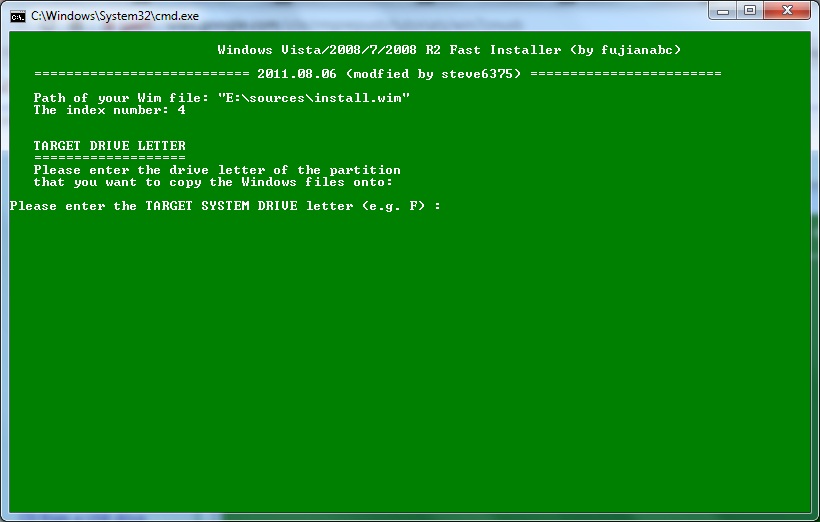
9. Now you will be asked to select the target USB hard disk that you want to install Windows onto:
Note: If the USB disk has files on it, the script will try to format it for you, you will need to enter in the volume name to confirm this.
10. Now enter in the same USB drive letter again for the boot partition (use the same USB drive letter again):

11. You will now be asked if the disk is a USB disk – answer Y.
If however, you intend to disconnect the drive and put the drive inside another system (e.g. notebook) before you boot from it, then say No to this question.
12. Unless you have a Vista or Server 2k8 source DVD, you will be asked what drive letter you want Windows to use when it boots from the USB drive. Use the default by hitting Enter.
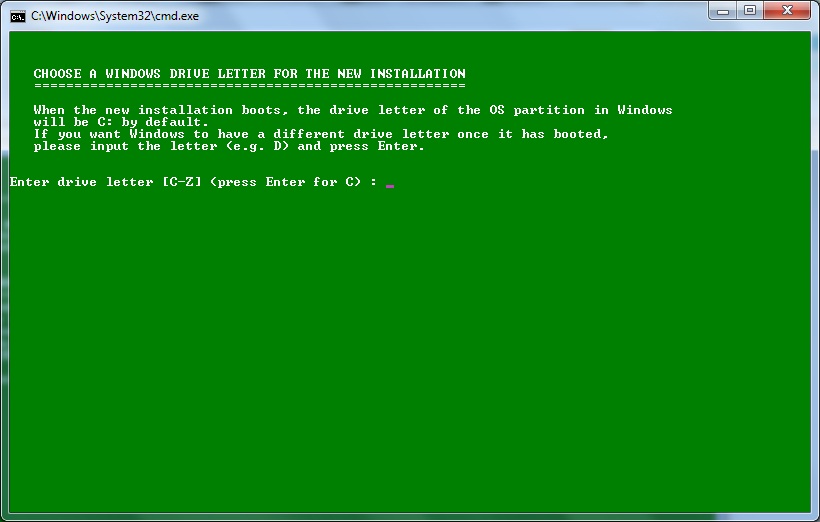
13. You will now be presented with a final summary screen – hit Enter to start the installation and wait a while.
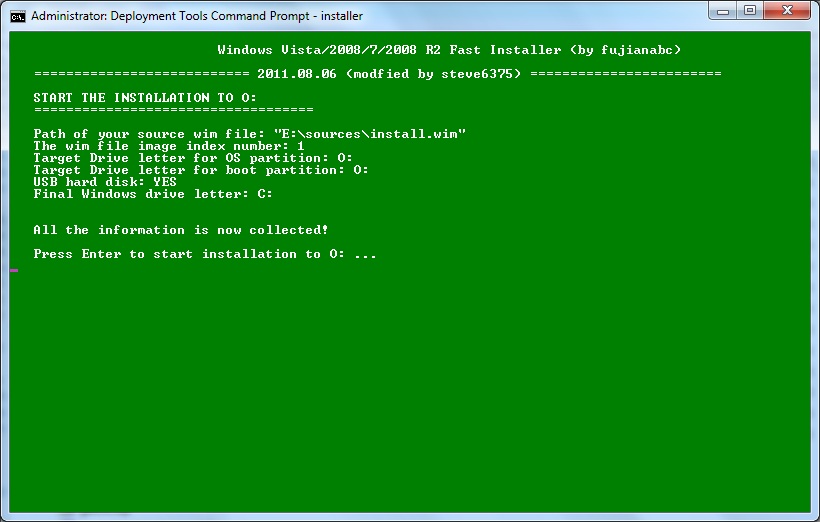
Check this carefully before you hit Enter!
Note that the Target Drive letters should be the same if your USB drive only has one partition.
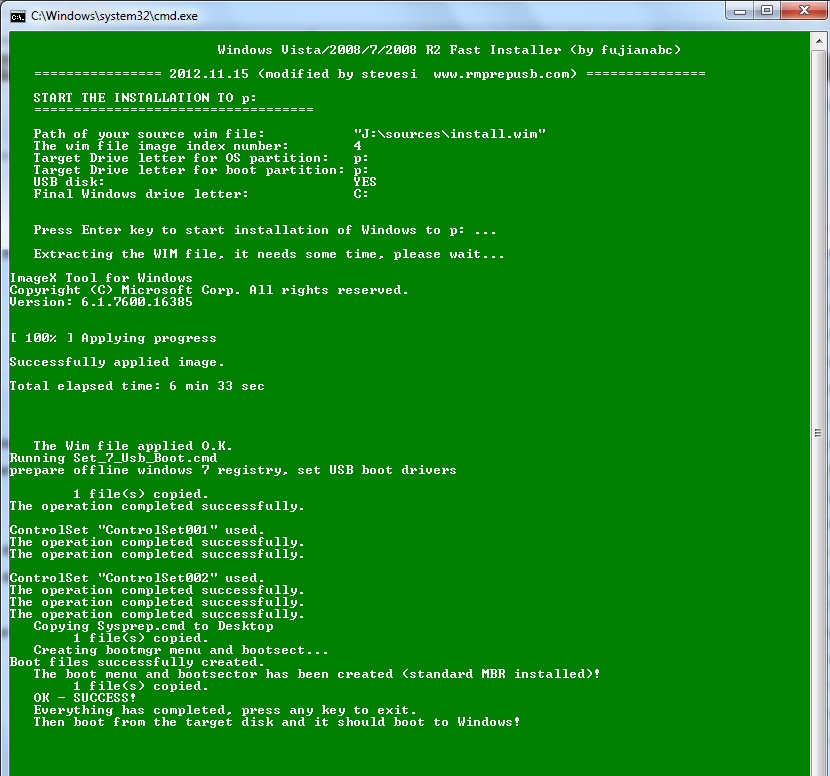
Installation completes in just 7 minutes for a USB 3.0 Hard Disk install
BOOTING THE USB DRIVE
Now use the Windows Safely Remove USB Device System Tray icon to dismount the USB drive and then try it on a system to see if it boots!
Don’t forget that once you have booted the image on one system, it will probably crash if booted on a different system because the correct drivers for the first system will already be installed on the previous boot.
Once Win7 is running, you will also need to add the correct third-party drivers to get all the hardware working correctly.
To speed up the Windows installation, once booted from the USB drive and in Windows, go to Device Manager and select Disk Drive and double-click on it. Then select the Policies tab and enable the Better Performance (Enable write caching) option.
WARNING: If you have installed the ‘Gold RTM’ first version of Windows, do not update the version with a Service Pack update (SP1) as this could break the installation – instead re-install using the SP1 ISO/DVD. Normal hotfixes and updates will be OK though.
PAGEFILE RELOCATION (VIRTUAL MEMORY)
If Windows runs out of system memory (RAM) then it normally ‘pages’ chunks of unused memory to a special file called a pagefile (pagefile.sys). This means that you can run applications that require say 6GB of memory on a 4GB system.
If you boot Windows 7 from a USB disk on a system that also has a working internal fixed hard disk, then Windows will automatically create and use a pagefile.sys file (a pagefile) on the system’s internal hard drive partition. However, this will prevent you from formatting or re-partitioning the internal hard drive (if you wanted to) because the volume containing the pagefile.sys file will always be held ‘open’ by Windows.
If you boot from a USB Flash drive on a system that does not have an internal Hard disk, Windows will warn you that it cannot create a pagefile – Windows will not create a pagefile on a ‘removable’ disk.
If you wish to make Windows create the page file on your USB hard drive instead of the internal hard disk in your system, follow the instructions on reboot.pro by karyonix here (and here for the latest 32/64 bit version of diskmod and registry entries). Note that you should NOT use a pagefile on a USB Flash drive as it will be even slower and will also wear out the Flash memory.
ADDENDUM – BOOTING FROM A DIFFERENT SYSTEM
If you want to connect the USB drive to a different system, you may need to sysprep the drive – otherwise it may crash on boot and also could prevent it from booting on the original system again too (changes/corrupts boot files and registry)!
A Sysprep cmd file should be already present on the Windows Desktop, once the system has booted from the USB drive – if you right-click on this and Run as Administrator it will reset and shutdown the system. You can then boot the USB drive on a different system that has different hardware. This sysprep command should run from an administrator command prompt and uses the command: WindowsSystem32sysprepsysprep.exe /oobe /generalize /shutdown
Once the computer shuts down, you can boot the USB drive on a different system which has different hardware. If you want to move it to another system again or back to the first system, don’t forget to run Sysprep again before you move it!
TROUBLESHOOTING
If the BCDBOOT command fails with a [0xC000003a] error Warning: Resource files missing … then you probably are running the Installed.cmd script on a Windows system that has booted from a UEFI BIOS instead of an MBR BIOS. In this case download bcdboot.exe from the Windows 8 WAIK and replace the version in your C:NT6Inst folder with the Windows 8 version and run Installer.cmd again.
If you are using a USB HDD drive and Windows 7 boots and shows a ‘Performance Options‘ form, this is due to having no page file. Windows will not create a page file on a removable drive. If you have no internal disk available, you can create a page file on the USB drive using this fix – see http://reboot.pro/9461/#entry86619.
“Setup could not configure Windows to run on this computer’s hardware” – Ensure on first boot, there is a partition marked as Active.
ADD USB 3.0 DRIVERS TO AN OFFLINE IMAGE BY USING DISM
Check this post here and here for instructions.
I have not tetsed the following instructions and so I cannot vouch that they will work!
Note: You will need to download and install the Windows 7 or 8 WAIK onto your ‘office’ computer first before you can run DISM.
Before you run Installer.cmd to make the USB drive, you first need to add the USB 3 drivers to the sourcesinstall.wim file.
First extract the install.wim file from the Windows 7 install ISO onto your hard disk so that it can be modified.
It is suggested that you disable your antivirus software and close all Explorer windows now.
At an elevated (Run as Administrator) command prompt, navigate to the Windows OEM Preinstallation Kit (Windows OPK) servicing folder, and type the following command to retrieve the name or index number for the image you want to modify.
Dism /Get-WimInfo /WimFile:C:testimagesinstall.wim
An index or name value is required for most operations that specify a WIM file.
Type the following command to mount the offline Windows image contained in the install.wim file (change the name value to exactly the name of the version you intend to use, as listed).
Dism /Mount-Wim /WimFile:K:Sourcesinstall.wim /Name:”Windows 7 xxxx” /MountDir:C:testoffline
Instead of using /Name:”xxx” you can use for instance /Index:2 (for image number 2)
At a command prompt, type the following command to add a specific driver to the image. You will need to have the correct USB 3.0 Windows 7 driver files available for the intended target system(s).
Dism /Image:C:testoffline /Add-Driver /Driver:C:driversmyUSB3driver.INF
Multiple drivers can be added on one command line if you specify a folder instead of an .inf file. To install all of the drivers in a folder and all its subfolders use the /recurse option. For example,
Dism /Image:C:testoffline /Add-Driver /Driver:c:driversUSB3drivers /Recurse
To install an unsigned driver, use /ForceUnsigned to override the requirement that drivers installed on X64-based computers must have a digital signature. For example,
Dism /Image:C:testoffline /Add-Driver /Driver:C:driversmydriver.INF /ForceUnsigned
Review the contents of the WindowsInf directory in the mounted Windows image to ensure that the .inf files were installed using Windows Explorer. Drivers added to the Windows image are named Oem*.inf. This is to ensure unique naming for new drivers added to the computer. For example, the files MyDriver1.inf and MyDriver2.inf are renamed Oem0.inf and Oem1.inf.
At a command prompt, type the following command to commit the changes and unmount the image.
Dism /Unmount-Wim /MountDir:C:testoffline /Commit
Now run the Installer.cmd to install Windows 7 to your USB device.
Adding Intel USB 3.0 drivers
I received this email from L. Douglas:
I followed the steps at the end of your tutorial and was able to get the Intel USB 3.0 drivers added in to my install.wim image.
One word of caution: Disable antivirus during this process. It blocked Dism from making the changes it needed to do.
I then was able to install to the USB HDD and it booted fine from USB 2.0 port. Unfortunately, Trying to boot from USB 3.0 port would still bluescreen.
I went into the registry after booting from USB 2.0 and changed:
HKEY_LOCAL_MACHINE -> SYSTEM -> ControlSet001 -> services -> iusb3hub
and
HKEY_LOCAL_MACHINE -> SYSTEM -> ControlSet001 -> services -> iusb3xhc
for both of those entries, I changed “Start” to “0” and “Group” to “Boot Bus Extender”
This will vary based on the USB3 driver in use, but this worked for the Intel USB3 drivers.
Also see reboot.pro and here.
Создание дистрибутива Windows Vista на флэш-диске
Установка операционной системы Windows Vista с флэш-носителя
Преимущества Установки Windows Vista с флэш-диска
До недавнего времени одна из проблем, связанных с операционной системой Windows XP, заключалась в том, что не существовало способа ее установки с USB флэш-носителя (например с USB флэш-брелока). Единственное, что можно было сделать, это загрузить (но не инсталлировать) на компьютер с USB флэш-носителя урезанную версию Windows XP типа Windows PE. И для того, чтобы изготовить такую загрузочную флэшку, требовалось специальное программное обеспечение.
Однако с выходом Windows Vista проблема перестала существовать. Для установки Windows Vista на компьютер совсем необязательно использовать загрузочный DVD (размер дистрибутива занимает более 2 Гбайт, поэтому про CD-диски можно забыть). Инсталлировать Windows Vista можно и с обычной USB-флэшки, причем для этого не нужны никакие специализированные программы.
В настоящей статье мы расскажем о том, как изготовить загрузочную USB-флэшку с дистрибутивом Windows Vista, который можно применять для инсталляции операционной системы на компьютер.
Создание дистрибутива Windows Vista на флэш-диске
Итак, для изготовления USB-флэшки с загрузочным дистрибутивом Windows Vista нам понадобится USB флэш-носитель размером 4 Гбайт или более, а также дистрибутив операционной системы Windows Vista на DVD-диске. Почему нужна флэшка размером не менее 4 Гбайт? Дело в том, что дистрибутив Windows Vista занимает немногим более 2 Гбайт и на флэшку размером 2 Гбайт просто не поместится. Следующий же возможный размер флэш-накопителя — это уже 4 Гбайт (промежуточных размеров не существует). При этом абсолютно неважно, что используется в качестве флэш-накопителя — USB-брелок или карта флэш-памяти стандарта CompactFlash с соответствующим картридером. Конечно, для создания флэш-дистрибутива Windows Vista желательно применять скоростные флэш-носители.
Кроме того, необходимо, чтобы компьютер, на котором планируется установить операционную систему Windows Vista с иcпользованием USB флэш-носителя, поддерживал загрузку с USB-носителя (BIOS всех современных материнских плат позволяет производить загрузку с USB-носителя).
Для изготовления загрузочного флэш-диска с дистрибутивом Windows Vista можно воспользоваться стандартными средствами Windows Vista для работы с дисками.
Итак, подключаем флэш-диск к компьютеру и загружаем консоль для работы с дисками: Контрольная панель —> Администрирование —> Управление компьютером —> Управление дисками (рис. 1).

Рис. 1. Консоль управления дисками
Далее выбираем диск, соответствующий флэш-носителю (в нашем случае это Диск 1), щелкаем по нему правой кнопкой мыши и в контекстном меню выбираем пункт Удалить том (рис. 2). Выполнение данной команды приведет к удалению логического раздела (партиции) с нашего диска.

Рис. 2. Контекстное меню в консоли управления дисками
Затем, еще раз щелкнув правой кнопкой мыши на том же диске, в контекстном меню выбираем пункт Создать простой том… В результате запустится Мастер создания простых томов, который будет последовательно открывать диалоговые окна, соответствующие разным этапам создания простого тома.
На первом этапе будет предложено указать размер создаваемого тома. По умолчанию раздел создаваемого простого тома на диске соответствует максимальному доступному объему диска, и менять в данном случае ничего не нужно (рис. 3).
")
Рис. 3. Установка размера создаваемого логического диска
(простого тома)
На следующем этапе работы Мастера создания простых томов будет предложено присвоить букву вновь создаваемому тому. По умолчанию Мастер создания простых томов будет присваивать новому тому первую незанятую букву (рис. 4). Менять в данном случае тоже ничего не нужно.

Рис. 4. Назначение буквы для создаваемого логического диска
Далее Мастер создания простых томов предложит отформатировать созданный раздел с выбором файловой системы. В качестве файловой системы необходимо использовать FAT32 с размером кластера по умолчанию (рис. 5).

Рис. 5. Форматирование полученного раздела
с созданием файловой системы FAT32
После завершения работы Мастера создания простых томов необходимо повторно выбрать флэш-диск в консоли управления дисками и, щелкнув по нему правой кнопкой мыши, в контекстном меню выбрать пункт Сделать раздел активным. После выполнения данной операции флэш-диск будет полностью подготовлен для копирования на него дистрибутива Windows Vista с DVD-диска. Однако, прежде чем приступать к копированию содержимого DVD-диска, необходимо в диалоговом окне Свойства папки на закладке Вид отметить пункт Показывать скрытые папки и файлы. Для доступа к этому диалоговому окну открываем в проводнике любой диск или папку и в меню задач нажимаем на кнопку Упорядочить. В открывшемся контекстном меню переходим к пункту Свойства папок и поиска. Выбор этого пункта приводит к открытию диалогового окна Свойства папки. После этого остается лишь скопировать содержимое DVD-диска с дистрибутивом Windows Vista на флэш-носитель.
Описанную процедуру создания дистрибутива Windows Vista на флэш-носителе можно реализовать и из командной строки с помощью программы diskpart, входящей в Windows Vista. Более того, если в качестве флэш-диска применяется карта памяти типа CompactFlash, то такой способ является единственно возможным. Дело в том, что при работе с картами CompactFlash стандартные средства (консоль управления дисками) могут не позволить удалить том (логический диск) на карте. Но утилита diskpart с этим препятствием прекрасно справляется. Кроме того, для некоторых флэш-носителей описанный выше способ создания дистрибутива не подходит, а при использовании утилиты diskpart проблем не возникает.
Итак, для работы с утилитой diskpart запускаем консоль командной стоки (для этого в диалоговом окне Выполнить набираем команду cmd). Далее запускаем программу diskpart. После этого, дабы не ошибиться с выбором диска, вводим команду list disk. В результате будут отображены все диски, подключенные к системе. В этом списке необходимо найти диск, соответствующий подключенному флэш-накопителю. В нашем случае — это Disk 1. Выбираем его (команда Select disk 1) и удаляем логический раздел на этом диске (команда clean). После этого вновь создаем основной логический раздел (команда Create partition primary) и выбираем его (команда Select partition 1). Присваиваем созданному логическому разделу статус Активный (команда Active) и форматируем его с файловой системой FAT32 (команда Format fs=fat32). После этого присваиваем отформатированному логическому диску букву (команда Assign) и выходим из программы diskpart (рис. 6).

Рис. 6. Подготовка флэш-диска
с помощью программы diskpart
Осталось узнать букву, присвоенную логическому разделу на флэш-диске, и скопировать в этот раздел дистрибутив операционной системы Windows Vista с DVD-диска. При желании выполнить эту процедуру из командной строки можно воспользоваться командой xcopy d:*.* /s/e/f e:, где d: соответствует DVD-приводу, а e: — логическому разделу на флэш-диске (буквы, соответствующие дискам, могут быть и другими).
Далее представлен листинг команд для создания дистрибутива Windows Vista на флэш-диске:
- diskpart (запуск утилиты для работы с дисками из командной строки)
- list disk (просмотр имеющихся дисков)
- select disk 1 (выбор диска, соответствующего флэш-носителю (в нашем случае Диск 1)
- clean (удаление логического раздела на выбранном диске)
- create partition primary (создание основного логического раздела на выбранном диске)
- select partition 1 (выбор основного логического диска)
- active (присвоение статуса «активный» созданному логическому разделу)
- format fs=fat32 (форматирование диска с файловой системой FAT32)
- assign (присвоение буквы вновь созданному логическому диску)
- exit (выход из программы diskpart)
- xcopy d:*.* /s/e/f e: (копирование дистрибутива Windows Vista с DVD-диска d: на флэш-диск e:)
Установка операционной системы Windows Vista с флэш-носителя
Процесс установки операционной системы Windows Vista на компьютер с использованием дистрибутива на флэш-диске почти ничем не отличается от аналогичного процесса с применением DVD-диска. Однако одна особенность у него все-таки есть. Перед началом установки необходимо подключить флэш-диск к компьютеру, затем включить компьютер и войти в BIOS. В настройках BIOS необходимо поменять порядок загрузки, выбрав в качестве первого устройства флэш-диск (если он подключен к компьютеру, то его название будет присутствовать в списке доступных устройств). После этого можно устанавливать операционную систему обычным способом.
Преимущества Установки Windows Vista с флэш-диска
По сравнению с традиционным способом установки операционной системы Windows Vista с DVD-диска установка с использованием флэш-диска имеет два очевидных преимущества. Во-первых, скорость ее значительно выше (предполагается, что применяются высокоскоростные флэш-диски с интерфейсом USB 2.0), а во-вторых, поскольку дистрибутив Windows Vista занимает немногим более 2 Гбайт, свободное место на флэш-диске можно использовать для записи необходимых программ. К примеру, можно создать флэш-диск, на котором будут записаны дистрибутив Windows Vista, обновления к операционной системе, пакет Microsoft Office 2007, программа-антивирус и т.д. Но самое главное — в любой момент можно легко изменять состав этих программ и использовать один флэш-диск для развертывания всей системы.
КомпьютерПресс 4’2007
![]()
Download Article
![]()
Download Article
Need to install Windows 7 on a computer with no drive? Do you want to create a backup installer in case your install cd becomes damaged? Follow these steps to get the Windows install files onto a bootable USB thumb drive.
Easy Way
- Connect the USB to the pc (if you have already copied the files and made it bootable), Open the folder containing the installation files.
- Rename the file ‘Boot.mgr’ to ‘ntldr’ ,(without the ‘ ) and it will work!
- *Imp*And please boot from the USB first, not the harddisk. Most of the PC support pressing the ‘F12’ or ‘Del’ button
-

1
Install a free burning program. There are a number of free burning utilities available online. You need one that can create ISO files.
- If you received your Windows 7 as a downloadable ISO file from Microsoft, you can skip to the next section.
-
2
Insert your Windows 7 DVD. Open your new burning program. Look for an option such as “Copy to Image” or “Create Image.” If prompted, select your DVD drive as the source.
Advertisement
-
3
Save your ISO file. Choose an easy to remember name and location for the file. The ISO you make will be equal in size to the disc you are copying. This means it can take up several gigabytes of space on your hard drive. Be sure you have enough storage available.
- Creating the ISO can take a long time, depending on the speed of your computer and DVD drive.


Advertisement
-
1
Download Windows 7 USB/DVD Download Tool. This is available for free from Microsoft. Despite its name, this tool works with Windows Vista ISOs as well. You can run this tool on virtually any version of Windows.
-
2
Select the Source file. This is the ISO that you created or downloaded in the first section. Click Next.
-
3
Select USB device. You are given the option to either burn to a DVD or create a USB device. For this guide, click USB Device.
-
4
Choose your USB device. Make sure that your flash drive is connected correctly. You will need at least 4GB space on your flash drive to copy over the Windows installation.
-
5
Wait while program works. The program will format the USB drive to boot correctly, then copy the ISO file onto the drive. The copying process can take up to 15 minutes to complete, depending on the speed of your machine.


Advertisement
-
1
Plug-in your Flash Drive. First plug-in your USB stick to your USB port and copy all the content to a safe location in your hard drive.
-
2
Run Command Prompt as an administrator. To open a command prompt, go to the Start menu and search for CMD. Right-click on it and select Run as Administrator to use it with admin rights.
-
3
Using the Diskpart utility find the drive number of your flash drive. To do so, type in the following command in the command prompt: DISKPART
- Running DISKPART will display the version of DISKPART you are running and the name of your PC.
- Type “list disk” to see a display of all your connected disk drives. Make a note of the number assigned to your Flash drive.
-
4
Format the drive. Execute the following list of commands one-by-one. Make sure you replace Disk 1 with the proper Disk number from DISKPART.
select disk 1cleancreate partition primaryselect partition 1activeformat fs=NTFS QUICKassignexit -
5
Make the flash drive bootable. Use the bootsect utility that is shipped with Windows 7/Vista. To do so:
- Insert the Windows 7/Vista DVD and note down the drive letter of the DVD drive. For this guide, the DVD drive is D: and the USB drive is G:.
- Navigate to the directory where bootsect is found.
D:cd d:boot - Use the bootsect to make the USB Drive bootable. This updates the drive with BOOTMGR compatible code and prepares it to boot Windows 7/Vista.
BOOTSECT.EXE /NT60 G: - Close the Command Prompt windows.
-
6
Copy all files from the Windows 7/Vista DVD to the formatted USB stick. The safest and the fastest way would be to use the Windows Explorer. Open the disk, select everything, and drag it into your flash drive. This could take a few minutes to copy.


Advertisement
-
1
Change the boot order. To boot from the USB drive, you will have to set the BIOS to boot from USB first instead of the hard drive. To open the BIOS, reset your computer and hit the displayed key to enter Setup. The key varies by manufacturer, but is usually F2, F10, F12, or Del.
- Open the Boot menu in your BIOS. Change the 1st Boot Device to your USB drive. Be sure that it is inserted, or you may not be given an option to choose it. Depending on your manufacturer, it may say Removable Device or list your flash drive’s model.
-
2
Save changes and reboot. If you set the boot order correctly, your Windows 7 or Vista installation will load after the manufacturer’s logo disappears.
-
3
Install Windows. The installation process will load and the Windows setup will begin. Check out our guide on installing Windows 7 for an in-depth walkthrough.


Advertisement
Add New Question
-
Question
Whenever I select my ISO file, Windows 7 USB/DVD says it is invalid. How do I fix that?

Try re-downloading the ISO. It’s probably corrupted if Win7 says it’s invalid.
-
Question
What if I don’t have a 7/Vista Inst DVD?
You will need to buy one or download an ISO file from the Microsoft website.

Ask a Question
200 characters left
Include your email address to get a message when this question is answered.
Submit
Advertisement
Video
About This Article
Article SummaryX
1. Install a free disc burning app.
2. Insert a Windows 7 DVD.
3. Open the burning app.
4. Select Create Image or Copy to image.
5. Save the ISO file.
6. Download Windows 7 USB/DVD Download Tool from Microsoft.com.
7. Run the tool to create the disc.
8. Make the disc bootable.
Did this summary help you?
Thanks to all authors for creating a page that has been read 2,239,367 times.
Is this article up to date?
This tutorial will help you in creating a bootable USB drive of Windows Vista which you can use to install Vista in any system. It might become very useful when you don’t have access to DVD drive.
1. First format your USB drive in NTFS file system. You can do it by attaching your USB drive to your system and then format it from My Computer window.
2. Now open Command Prompt as Administrator using any method given here.
3. Now type diskpart in Command Prompt window and press Enter. It’ll launch DiskPart program:

4. Now provide following command:
list volume
It’ll show a list of all drives in your system. Look for your USB drive entry. As in the below screenshot, the USB drive is “G” which you can determine from its “Type” entry.
Now you have to select the USB drive volume by providing select volume no. command. Since in our case volume no. of USB drive is “Volume 4”, the command would be:
select volume 4
Now we have to make this drive active. So provide active command:
active
Now exit from DiskPart using exit command.
exit

5. Now we need to create Boot sector on USB drive. We’ll use “bootsect.exe” utility for this task. You can find this utility in Windows Vista setup disk. It’ll be present in “Boot” directory.
Now provide following command in Command Prompt:
bootsect /nt60 G:
Here G is drive letter of USB drive. Replace it with the correct drive letter if your system has some other letter for USB drive.

6. At last, copy all files/folders from Vista Setup DVD to your USB drive and you have done.
Now you can boot using your USB drive and can install Windows Vista in any system.
PS: You can also take a look at some free tools to automatically create bootable USB drives to install Windows using following link:
Ultimate Collection of Best Freeware to Create Bootable USB Drive to Install Windows and Linux
You are here: Home » Windows Vista » How to Create Bootable USB Drive to Install Windows Vista?
This guide explains how to create a Windows bootable USB drive for the following Windows versions: Windows XP, Windows Vista, Windows 7, Windows 8, Windows 8.1, Windows 10, and Windows 11.
Creating a bootable USB drive will allow you to install Windows from the USB drive directly.
To be able to install Windows from a USB, you need have one of the following:
- the ISO image of the Windows version
- or the original installation disc of the Windows version
If you don’t have either, you can instead download an EasyRE ISO image that can be made into a bootable USB or CD to restore your PC.
Contents
- 1 Prerequisites
- 1.1 USB Drive
- 1.2 BIOS/UEFI configuration
- 1.3 ISO image
- 2 Create a Windows XP bootable USB
- 2.1 Using Easy USB Creator 2.0
- 2.2 If you have the installation disc (CD)
- 3 Create a Windows Vista bootable USB
- 3.1 If you have the ISO image
- 3.1.1 Using Easy USB Creator 2.0
- 3.1.2 Using Windows 7 USB/DVD Download Tool
- 3.2 If you have the installation disc (DVD)
- 3.1 If you have the ISO image
- 4 Create a Windows 7 bootable USB
- 4.1 If you have the ISO image
- 4.1.1 Using Easy USB Creator 2.0
- 4.1.2 Using Windows 7 USB/DVD Download Tool
- 4.2 If you have the installation disc (DVD)
- 4.1 If you have the ISO image
- 5 Create a Windows 8 / 8.1 bootable USB
- 5.1 If you have the ISO image
- 5.1.1 Using Easy USB Creator 2.0
- 5.1.2 Using Windows 7 USB/DVD Download Tool
- 5.2 If you have the installation disc (DVD)
- 5.1 If you have the ISO image
- 6 Create a Windows 10 bootable USB
- 6.1 If you have the ISO image
- 6.1.1 Using Easy USB Creator 2.0
- 6.1.2 Using Windows 7 USB/DVD Download Tool
- 6.2 If you have the installation disc (DVD)
- 6.1 If you have the ISO image
- 7 Troubleshooting
- 7.1 Setup cannot find the End User Licensing Agreement (EULA)
- 7.2 Download Windows 7 USB/DVD Download Tool
- 7.3 Bootable USB will not boot
- 8 More Information
- 8.1 Support Links
- 8.2 Applicable Systems
Prerequisites
Before you start creating a bootable USB flash drive to install Windows (XP, Vista, 7, 8, 8.1, 10), you need to make sure that:
- The USB drive is empty and properly formatted
- The USB drive is bootable
- Your BIOS/UEFI is properly configured to boot from the USB flash drive first
- You have the ISO image of Windows XP, Vista, 7, 8 or 8.1. If you have the original Windows installation disc, you can use that instead of the ISO image.
- Software needed to write the ISO image to the USB drive or alternatives, such as Easy USB Creator 2.0 by NeoSmart or the Windows 7 USB/DVD Download Tool by Microsoft.
USB Drive
The USB drive you want to make bootable should have at least 4 GB in available size.
BIOS/UEFI configuration
To make sure that your BIOS/UEFI is configured to boot from a USB drive, follow our Boot from USB drive guide. You need to make sure that:
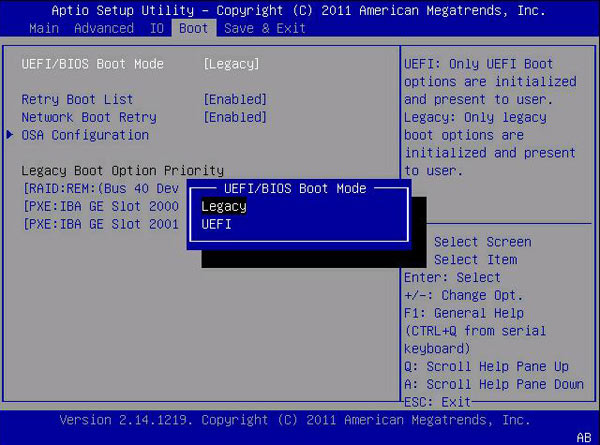
If a Boot Device menu doesn’t appear on your screen where the USB drive is plugged-in, check the BIOS/UEFI settings. A Boot Device menu can look like this, depending on your computer model and Windows version:
If you are using a new computer with UEFI/EFI, make sure that the Boot Legacy option is enabled:
If you’re using a computer with Fast Boot option, make sure that Fast Boot is disabled.
If your BIOS menu doesn’t list a USB item in the BIOS settings, it may mean that it can’t boot from a USB drive. You can try with the USB drive plugged-in and then boot into BIOS directly.
If the item doesn’t appear, you need to use the original Windows installation CD or DVD to install Windows or access the repair tools.
If you need to use the repair tools of an original Windows installation CD/DVD, you can also use Easy Recovery Essentials (download link) and run Automated Repair to automatically find and fix boot errors.

Download Easy Recovery Essentials
ISO image
If you don’t have the ISO image to create the bootable USB drive, you can download an official image from Microsoft’s website.
You need to have the product (or license) key.
Create a Windows XP bootable USB
You can create a bootable USB drive with Windows XP by following these instructions.
Using Easy USB Creator 2.0
Easy USB Creator can quickly convert the ISO images into bootable USB drives, with just a single click:
Download Easy USB Creator 2.0
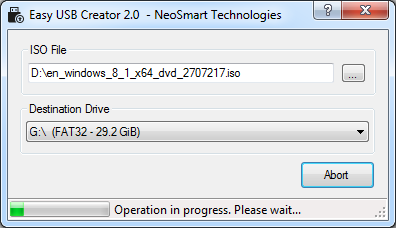
To burn Windows XP to a USB drive using Easy USB Creator 2.0, simply follow these steps:
- Download USB Creator 2.0
- Install Easy USB Creator 2.0
- Browse the Windows XP ISO Image to load at the ISO File field
- Select the destination of your USB Drive at the Destination Drive field
- Start
Easy USB Creator 2.0 supports both USB 2.0 and USB 3.0.
It’s compatible with Windows XP, Windows Vista, Windows 7, Windows 8, Windows 8.1, Windows 10 plus the Windows Server editions (2003, 2008, 2012). You must have .NET Framework 2.0 or higher in order to use Easy USB Creator 2.0
If you have the installation disc (CD)
If you have the original Microsoft Windows XP Professional installation CD, you can use the CD to create a bootable USB using PE Builder.
It’s important to have the following before you start:
- The Windows Server 2003 SP1 archive. If not, download from Microsoft now: Microsoft Windows Server 2003 Service Pack 1 (32 bit)
- The PE Builder software (BartPE). If not, download BartPE
- The original CD of Windows XP Professional, not a Windows XP Home CD.
A Windows XP Home CD will not work.
To create the bootable drive with Windows XP, follow these steps:
- Boot into the system
- Download the PE Builder software from http://www.nu2.nu/pebuilder/
- Install the PE Builder to
C:. The final path should beC:PEBuilderto make the next steps easier.
Inside the PEBuilder folder, create a new folder named SRSP1. This folder’s path should be C:PEBuilderSRSP1.
- Download the Windows Server 2003 SP1 archive from http://www.microsoft.com/en-us/download/details.aspx?id=1143…
- Rename the archive downloaded from Microsoft to
MS-WS-SP1.exe - Open Command Prompt. You can also open it by typing
cmdin the Run dialog box and pressing Enter afterwards. - Type the
cdcommand to go to the folder where the MS-WS-SP1.exe file exists:cd c:downloads
Don’t type MS-WS-SP1.exe in the path above. You only need to go to the folder where the file exists.
Replace
c:downloadswith the letter of the drive and the directory where the MS-WP-SP1.exe file exists. - Type
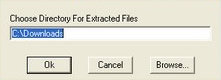
MS-WS-SP1.exe -xto begin the extraction process, press Enter - Choose to extract the files to the same folder, e.g.
c:downloads:
PEBuilder: Extract Files
- In Command Prompt, you now need to go to the extract folder at the i386 sub-folder.To do so, type the same
cdcommand, if you’re still at the c:downloads folder in Command Prompt and you haven’t created a new folder for the extracted files:cd i386
If you created a new folder for the extract files, say Extract, in c:downloads, update the cd command to go to that folder:
cd c:downloadsExtract
Then, type
cd i386, press Enter - Once inside the i386 folder via Command Prompt, type:
copy setupldr.bin c:PEBuilderSRSP1
Replace
c:PEBuilderwith the path where the PE Builder software is installed, if this was changed in previous steps. - While still in Command Prompt, expand the ramdisk.sys file with this command:
expand -r ramdisk.sy_ c:PEBuilderSRSP1
Replace
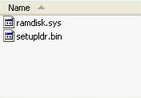
c:PEBuilderwith the path where the PE Builder software is installed, if this was changed in previous steps. - Go to My Computer
- Go to PEBuilder folder
- Go to SRSP1 folder
- Check that you have the 2 files listed there: setupldr.bin and ramdisk.sys

PEBuilder: Check that you have the files copied
- Insert the Windows XP Professional CD in the disk tray
- Launch PE Builder
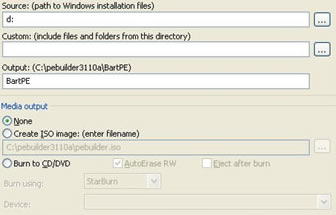
- Make the following changes before you click Build:

BartPE: Configuration for Windows XP USB
- At the Source field, type the letter of the drive for the Windows XP CD, e.g. e:
- At the Output field, type BartPE
- Leave the Custom field blank
- Media output should be None
- Click Build
- When the build process is complete, click Close
- Go to Command Prompt and then go to the PEBuilder folder by typing the
cdcommand:cd c:PEBuilder
- Type this command (make sure the USB flash drive is not removed) and press Enter:
pe2usb -f d:
Replace
d:with the letter of the drive where your USB flash drive is loaded. - Type
YES, when prompted to begin the process. Press Enter after typing YES. - Press any key to exit the pe2usb process, after the process is complete
- Safely remove the USB flash drive from the port
- Remove the Windows XP CD from the disk try
- Reboot the system to check if the USB flash drive is now bootable with Windows XP Professional
If your computer doesn’t boot into the USB drive directly, go to Prerequisites > BIOS/UEFI configuration or read the Boot from USB drive guide to configure your BIOS menu to boot from a USB device first.
Create a Windows Vista bootable USB
Depending if you have the ISO image of Windows Vista or the original DVD, you can use Easy USB Creator 2.0 or the diskpart utility to create the bootable USB.
If you have the ISO image
Using Easy USB Creator 2.0
Easy USB Creator can quickly convert the ISO images into bootable USB drives, with just a single click:

Download Easy USB Creator 2.0
To burn Windows Vista to a USB drive using Easy USB Creator 2.0, simply follow these steps:
- Download USB Creator 2.0
- Install Easy USB Creator 2.0
- Browse the Windows Vista ISO Image to load at the ISO File field
- Select the destination of your USB Drive at the Destination Drive field
- Start
Easy USB Creator 2.0 supports both USB 2.0 and USB 3.0.
It’s compatible with Windows XP, Windows Vista, Windows 7, Windows 8, Windows 8.1, Windows 10 plus the Windows Server editions (2003, 2008, 2012). You must have .NET Framework 2.0 or higher in order to use Easy USB Creator 2.0
Using Windows 7 USB/DVD Download Tool
To create the bootable drive with the Windows 7 USB/DVD Download Tool, follow the steps from Using the Windows 7 USB/DVD Download Tool from Windows 8/8.1.
While the name is “Windows 7”, you can use the tool for Windows Vista systems too.
If you have the installation disc (DVD)
To create a bootable USB with Windows Vista and install the operating system from that USB drive, follow the steps.
You’ll be using the diskpart utility, available in Windows Vista, to make the USB drive bootable. You’ll copy the files from the installation disc (DVD) to the USB drive after the diskpart utility process is finished.
The instructions are:
- Boot your computer
- Open Command Prompt and run it as Administrator.You can go at Start > All Programs Accessories > Command Prompt or type
cmdin the search field.To run Command Prompt as Administrator, right-click on the Command Prompt item and select Run as Administrator. - When Command Prompt opens, type this command and press Enter:
cd c:windowssystem32
Replace
c:with the letter of the driver where your Windows Vista is installed: C:, D: etc. - Insert the USB flash drive in the USB port
- Type:
diskpart
- Press Enter
- Type:
list disk
- Press Enter
- After you press Enter for the list disk command, Command Prompt will list the drives that are connected to your computer. Find the USB drive and its corresponding number.

Command Prompt: list disk
- Then, type this command:
select disk X
Where
Xis the number of the USB flash drive listed by Command Prompt.The confirmation message should be:
Disk 1 is now the selected disk.
- Press Enter
- Type
cleanand press Enter - Type
create partition primaryand press Enter - Type
select partition 1and press Enter - Type
activeand press Enter - Type this command and press Enter afterwards:
format fs=ntfs
It may take a few minutes to format the entire USB flash drive, depending on its size. However, you can use the quick parameter to format the drive more quickly:
format fs=ntfs quick
- Type
assign, press Enter - Type
exit, press Enter - Insert the Windows Vista DVD in the optical drive
- Go to My Computer
- Note the letter of the drive where the Windows Vista DVD is loaded, e.g. D:, E:
- Go back to Command Prompt and check if the USB flash drive has been formatted
- When the format process is complete, type this command and press Enter:
d: cd boot
Replace
D:with the letter of the drive where the Windows Vista DVD is loaded - Then type
cd bootand press Enter - Type this command and press Enter:
bootsect.exe /nt60 f:
Where
f:is the letter of the drive where your USB flash drive is loaded - Copy all files from the Windows Vista DVD on the USB flash drive.To open the contents of the DVD (and not load the splash screen of the Windows Vista DVD), right-click on the drive and click Open.

If you followed the above instructions correctly, the USB flash drive should now be bootable with Windows Vista.
You can check this by plugging the USB and rebooting the system. To make sure that your computer boots from a USB drive first, and not from the hard disk, go to BIOS/UEFI configuration.
Create a Windows 7 bootable USB
You can create the bootable USB drive with Windows 7, if:
- you have the ISO image of Windows 7
- or you have the original installation DVD of Windows 7
If you have the ISO image
Using Easy USB Creator 2.0
Easy USB Creator can quickly convert the ISO images into bootable USB drives, with just a single click:
Download Easy USB Creator 2.0
To burn Windows 7 to a USB drive using Easy USB Creator 2.0, simply follow these steps:
- Download USB Creator 2.0
- Install Easy USB Creator 2.0
- Browse the Windows 7 ISO Image to load at the ISO File field
- Select the destination of your USB Drive at the Destination Drive field
- Start
Easy USB Creator 2.0 supports both USB 2.0 and USB 3.0.
It’s compatible with Windows XP, Windows Vista, Windows 7, Windows 8, Windows 8.1, Windows 10 plus the Windows Server editions (2003, 2008, 2012). You must have .NET Framework 2.0 or higher in order to use Easy USB Creator 2.0
Using Windows 7 USB/DVD Download Tool
The Windows 7 USB/DVD Download Tool is available to download and you can use it to create a bootable ISO image from the ISO image you purchased and downloaded from Microsoft.
Before you continue with these instructions, please make sure that:
- You have the Windows 7 USB/DVD Download Tool downloaded. If not, download Windows 7 USB/DVD Download Tool now.
- You have the Windows 7 ISO Image ready
The instructions are:
- Download Windows 7 USB/DVD Download Tool from http://wudt.codeplex.com/ and launch it
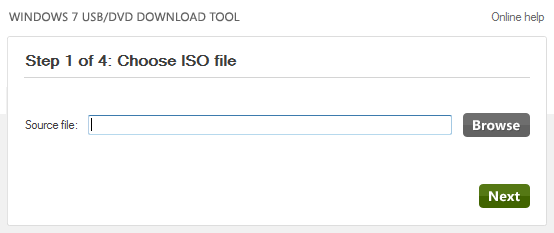
- At the Source File field, click Browse and find the Windows 7 ISO image on your computer and load it

Windows 7 USB/DVD Download Tool: Source File
- Click Next
- Select USB Device
- Select the USB flash drive from the drop down menu
- Click Begin copying
- Exit the application, when the process is complete
If you have the installation disc (DVD)
You can use a USB flash drive (see Prerequisites for more information) to install Windows 7 from.
To do so, you need to make the USB flash drive bootable first and then use the original Windows 7 installation disc (DVD) to copy the contents of the DVD to the USB drive.
The diskpart utility, part of Windows 7, will be used.
Follow these steps (similar to Create a Windows Vista bootable USB > If you have an installation disc):
- Start the computer
- Open Command Prompt as Administrator. Go at Start > All Programs Accessories > right-click on the Command Prompt item and select Run as Administrator.
- Enter the password for the Administrator account
- At Command Prompt, type:
cd c:windowssystem32
Replace
c:with the letter of the driver where your Windows 7 is installed: C:, D: etc. - Press Enter
- Insert the USB drive that you want to make bootable in an available port
- Type
diskpartand press Enter - Type
list diskand press EnterCommand Prompt: list disk
- Find the USB drive and its corresponding number in the list provided by Command Prompt
- Type this command and press Enter:
select disk X
Where
Xis the number of the USB drive listed by Command Prompt above.The confirmation message should be:
Disk 1 is now the selected disk.
- Type
clean, press Enter - Type
create partition primary, press Enter - Type
select partition 1, press Enter - Type
active, press Enter - Type
format fs=ntfsand press Enter.
You can use the quick parameter to format the drive more quickly: format fs=ntfs quick
- Insert the Windows 7 DVD and go to My Computer. Note the letter of the drive where the DVD is loaded, e.g. D:, E:
- Type
assign, press Enter - Type
exit, press Enter - After the format process is complete, type this command in Command Prompt and press Enter:
d: cd boot
Where
d:with the letter of the drive where the Windows 7 DVD is loaded. - Type
cd boot, press Enter - Type this command and press Enter:
bootsect.exe /nt60 f:
Where
f:is the letter of the drive where the USB flash drive is loaded - Open the contents of the Windows 7 DVD: right-click on the drive and click Open
- Copy all files from the DVD to the USB
Create a Windows 8 / 8.1 bootable USB
Depending if you have the ISO image of Windows Vista or the original DVD, you can use Easy USB Creator 2.0 to create the USB if you have the ISO image or the diskpart utility to create the bootable USB, if you have the DVD.
If you have the ISO image
Using Easy USB Creator 2.0
Easy USB Creator can quickly convert the ISO images into bootable USB drives, with just a single click:
Download Easy USB Creator 2.0
To burn Windows 8 or 8.1 to a USB drive using Easy USB Creator 2.0, simply follow these steps:
- Download USB Creator 2.0
- Install Easy USB Creator 2.0
- Browse the Windows 8 or Windows 8.1 ISO Image to load at the ISO File field
- Select the destination of your USB Drive at the Destination Drive field
- Start
Easy USB Creator 2.0 supports both USB 2.0 and USB 3.0.
It’s compatible with Windows XP, Windows Vista, Windows 7, Windows 8, Windows 8.1, Windows 10 plus the Windows Server editions (2003, 2008, 2012). You must have .NET Framework 2.0 or higher in order to use Easy USB Creator 2.0
Using Windows 7 USB/DVD Download Tool
The Windows 7 USB/DVD Download Tool is available to download and you can use it to create a bootable ISO image from the ISO image you purchased and downloaded from Microsoft.
While the name is “Windows 7”, you can use this tool on a Windows 8 or 8.1 system too.
Before you continue with these instructions, please make sure that:
- You have the Windows 7 USB/DVD Download Tool downloaded. If not, download the Windows 7 USB/DVD Download Tool now.
- You have the Windows 8 or 8.1 ISO Image ready
The instructions are:
- Launch the Windows 7 USB/DVD Download Tool
- At the Source File field, click Browse and find the Windows 8 or 8.1 ISO image on your computer
Windows 7 USB/DVD Download Tool: Source File
- Click Next
- Insert the USB flash drive in an available port on your computer. Make sure it’s loaded in My Computer.
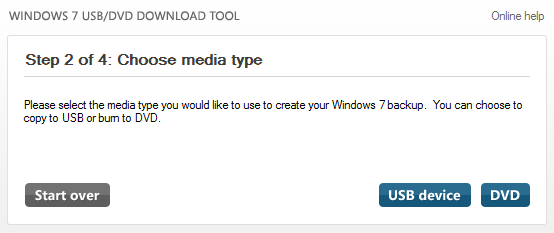
- At Step 2, select USB Device to write the ISO image to the USB drive. You can click DVD to write the ISO image to a DVD instead.
Windows 7 USB/DVD Download Tool: Choose Media Type
- At Step 3, select the USB flash drive from the drop down menu. If the drive isn’t loaded yet, you can click on the Refresh icon next to the drop down menu.
- Click Begin copying
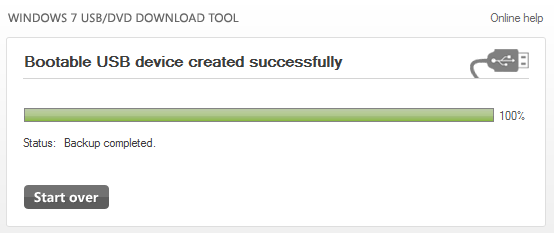
- When done, exit the Windows 7 USB/DVD Download Tool
Windows 7 USB/DVD Download Tool: Done
If you have the installation disc (DVD)
If you have the original installation disc (DVD) of Microsoft Windows 8 or Windows 8.1 you can create a bootable USB drive.
To do so, follow the steps below:
- Boot into Windows 8 or 8.1
- Open Command Prompt as Administrator. To do so, press the and C key to search for
cmd. From the search results list, right-click on Command Prompt
- Click Run as administrator

- Enter the password, when prompted
- When Command Prompt opens, type this command and press Enter:
diskpart
- Insert the USB flash drive in the port
- Type
list disk, press EnterCommand Prompt: list disk
- Identify the number next of the USB drive in the list provided by the list disk command
- Type
select disk X, press Enter. ReplaceXwith the number of the USB drive listed from above steps.
Command Prompt: select disk
The confirmation message should be:
Disk 1 is now the selected disk.
- Type
clean, press Enter - Type
create partition primary, press Enter - Type
select partition 1, press Enter - Type
active, press Enter - Type
format fs=ntfs, press Enter. To have the USB drive formatted more quickly, add the quick parameter:format fs=ntfs quick - Type
assign, press Enter - Type
exit, press Enter - Copy the contents of the Windows 8 DVD or 8.1 DVD to the USB flash drive


Create a Windows 10 bootable USB
If you have the ISO image
Using Easy USB Creator 2.0
Easy USB Creator can quickly convert the ISO images into bootable USB drives, with just a single click:

Download Easy USB Creator 2.0
To burn Windows 10 to a USB drive using Easy USB Creator 2.0, simply follow these steps:
- Download USB Creator 2.0
- Install Easy USB Creator 2.0
- Browse the Windows 10 ISO Image to load at the ISO File field
- Select the destination of your USB Drive at the Destination Drive field
- Start
Easy USB Creator 2.0 supports both USB 2.0 and USB 3.0.
It’s compatible with Windows XP, Windows Vista, Windows 7, Windows 8, Windows 8.1, Windows 10 plus the Windows Server editions (2003, 2008, 2012). You must have .NET Framework 2.0 or higher in order to use Easy USB Creator 2.0
Using Windows 7 USB/DVD Download Tool
The Windows 7 USB/DVD Download Tool is available to download and you can use it to create a bootable ISO image from the ISO image you purchased and downloaded from Microsoft.
While the name is “Windows 7”, you can use this tool on a Windows 10 system too.
Before you continue with these instructions, please make sure that:
- You have the Windows 7 USB/DVD Download Tool downloaded. If not, download the Windows 7 USB/DVD Download Tool now.
- You have the Windows 10 ISO Image ready
The instructions are:
- Launch the Windows 7 USB/DVD Download Tool
- At the Source File field, click Browse and find the Windows 10 ISO image on your computer
Windows 7 USB/DVD Download Tool: Source File
- Click Next
- Insert the USB flash drive in an available port on your computer. Make sure it’s loaded in My Computer.
- At Step 2, select USB Device to write the ISO image to the USB drive. You can click DVD to write the ISO image to a DVD instead.
Windows 7 USB/DVD Download Tool: Choose Media Type
- At Step 3, select the USB flash drive from the drop down menu. If the drive isn’t loaded yet, you can click on the Refresh icon next to the drop down menu.
- Click Begin copying
- When done, exit the Windows 7 USB/DVD Download Tool
Windows 7 USB/DVD Download Tool: Done
If you have the installation disc (DVD)
If you have the original installation disc (DVD) of Microsoft Windows 10 you can create a bootable USB drive.
To do so, follow the steps below:
- Boot into Windows 10
- Open Command Prompt as Administrator. To do so, press the and C key to search for
cmd. From the search results list, make sure Command Prompt is the chosen result than use the “Run as Administrator” option on the side:
- Enter the password, when prompted
- When Command Prompt opens, type this command and press Enter:
diskpart
- Insert the USB flash drive in the port
- Type
list disk, press EnterCommand Prompt: list disk
- Identify the number next of the USB drive in the list provided by the list disk command
- Type
select disk X, press Enter. ReplaceXwith the number of the USB drive listed from above steps.Command Prompt: select disk
The confirmation message should be:
Disk 1 is now the selected disk.
- Type
clean, press Enter - Type
create partition primary, press Enter - Type
select partition 1, press Enter - Type
active, press Enter - Type
format fs=ntfs, press Enter. To have the USB drive formatted more quickly, add the quick parameter:format fs=ntfs quick - Type
assign, press Enter - Type
exit, press Enter - Copy the contents of the Windows 10 DVD to the USB flash drive

Troubleshooting
Setup cannot find the End User Licensing Agreement (EULA)
You may receive this error when trying to write a Windows (XP, Vista, 7, 8, 8.1) ISO Image to a USB drive and make it bootable:
Setup cannot find the End User Licensing Agreement (EULA) Setup cannot continue.

To Quit, Press F3
If so, the ISO image might be corrupted. In this case, you can try:
- download a new ISO image from Microsoft
- use the original installation disc instead to create the bootable drive (instructions for using the disc instead of the ISO image are available in this guide for all Windows versions)
- use Easy Recovery Essentials if you’re looking for accessing repair tools. Run EasyRE’s Automated Repair feature to automatically scan and fix various boot errors. Other features are available.
Download Windows 7 USB/DVD Download Tool
To download the Windows 7 USB/DVD Download Tool, go to http://wudt.codeplex.com/.
Bootable USB will not boot
To make sure that the USB drive will boot when starting your computer, make sure that:
- Your BIOS configuration allows USB drives to boot first and then boot from hard disk. Follow the steps from BIOS/UEFI configuration or the our Boot from USB drive guide.
If you created the bootable USB drive using the Windows 7 USB/DVD Download Tool, new computers with UEFI might not boot from the USB as it’s been formatted using NTFS and not FAT32.
To get around this, follow these steps:
- After the Windows 7 USB/DVD Download Tool successfully created the bootable USB drive, go to My Computer and copy all contents from the USB drive to a folder on your Desktop
Windows 7 USB/DVD Download Tool: Done
- Right-click on the USB Drive in My Computer and format it as FAT32
- After the format process is complete, copy all files from the folder you created on your Desktop back to the USB drive
More Information
Support Links
- Easy Recovery Essentials for Windows – our repair and recovery disk.
It’s an easy-to-use and automated diagnostics disk. It’s available for Windows 8, Windows 7 and Windows Vista. It’s also available for Windows XP and Windows Server.
Read more at Windows Recovery Disks.
- The NeoSmart Support Forums, member-to-member technical support and troubleshooting.
- Get a discounted price on replacement setup and installation discs: Windows XP, Windows Vista, Windows 7, Windows 8, Windows 10, Windows 11.
Applicable Systems
This Windows-related knowledgebase article applies to the following operating systems:
- Windows XP (all editions)
- Windows Vista (all editions)
- Windows 7 (all editions)
- Windows 8 (all editions)
- Windows 8.1 (all editions)
- Windows 10 (all editions)
- Windows 11 (all editions)
- Windows Server 2003 (all editions)
- Windows Server 2008 (all editions)
- Windows Server 2012 (all editions)
Propose an edit
Downloading Windows Vista: Your Options Explained


- Tweet
- Share
Windows Vista is a very old Microsoft operating system. It was released in January 2007. Mainstream support ended in 2012 and extended support (i.e., critical flaw patches and security updates) ended in 2017. Lifewire retains this information as reference for tech experts and info-sec professionals who have legitimate, even if rare, needs to test something with Vista. For ordinary home hobbyists, we recommend using Windows 10 or trying one of the many Linux distributions with a Vista-like look-and-feel.
Have you lost your original Windows Vista DVD or need Windows Vista on a flash drive and figure downloading it as an ISO image is the way to go?
If you’re without the installation files for Windows Vista and you need to get your hands on them, downloading certainly makes sense—but think again.
Where Can I Download Windows Vista?

There isn’t a single, completely legal way to download Windows Vista.
The Windows Vista operating system was never sold online from Microsoft, nor from other legitimate retailers. Online distribution of Windows didn’t start until Windows 7 and, of course, continues today through Windows 10. In fact, good luck finding even a boxed copy of Windows Vista. You might find a few folks selling Vista on Amazon but there isn’t usually any kind of regular stock.
The here-and-there copies of Windows Vista you might find for sale from sites you’ve never heard of are probably selling illegal copies alongside fake or stolen product keys.
So what do you do? You do have a few not-so-legal options, which we’ll explain:
Download Windows Vista via a Torrent Site
A number of copies of Windows Vista in ISO format exist floating around various torrent directories, all easy to grab with a free torrent client. Unfortunately, you never know which one of these Vista torrent downloads are hacked, full of malware and other issues you don’t want to deal with.
We don’t recommend that you download Windows Vista via a torrent.
Download Windows Vista From GetIntoPC.com
One site, GetIntoPC.com, hosts both 64-bit and 32-bit versions of Windows Vista in ISO format, ready to download: Windows Vista Home Premium Free Download ISO 32-Bit 64-Bit.
As far as we can tell, these are clean (malware-free), perfect ISO images of those two editions of Windows Vista Home Premium.
It’s doubtful that Microsoft has explicitly condoned the hosting of those Windows Vista downloads, but they probably don’t care that much, either. You’ll still need a valid product key to install it, which is really what you’re paying for when you pay for a version of Windows.
Don’t Download Windows Vista—Replace It Instead
Another option is to request a replacement of your Windows Vista DVD from either Microsoft or your computer maker.
If you bought a boxed copy of Windows Vista yourself, like from a store in town or an online retailer, you might have luck requesting a replacement disc directly from Microsoft. Contact the Microsoft Supplemental Parts Team and explain your situation to them.
If you bought your computer with Windows Vista already installed on it, you’ll need to contact your computer maker directly for a replacement Vista DVD, or at least a Restore Disc. Have these details ready before calling: your purchase date, your Vista product key (probably located on a sticker on your computer), and any other information you have about your computer.
How to Get Windows Vista Onto a Flash Drive
If you actually do have your Windows Vista installation DVD but are just interested in getting that onto a flash drive so you can install Vista on a computer that way, you don’t have to download Vista to do this.
See How to Install Windows 7 From USB for help. The process works for Windows Vista, too.
This is a tutorial to explain you how download and install Windows Vista.
We give you many versions of Windows Vista (.iso).
You can install your computer for free, but you need to have a license to activate Windows Vista.
You can found your license under your laptop or on the case of your computer. The license looks like this :
 Windows Vista License key
Table of Contents
Download Windows Vista, choose your version :
Windows Vista Starter 32 Bit
This iso file contains the english version of Windows Vista Starter 32 Bit.
Windows Vista Home Basic 32 Bit
This iso file contains the english version of Windows Vista Home Basic 32 Bit.
Windows Vista Home Basic 64 Bit
This iso file contains the english version of Windows Vista Home Basic 64 Bit.
Windows Vista Home Premium 32 Bit
This iso file contains the english version of Windows Vista Home Premium 32 Bit.
Windows Vista Home Premium 64 Bit
This iso file contains the english version of Windows Vista Home Premium 64 Bit.
Windows Vista Professional 32 Bit
This iso file contains the english version of Windows Vista Professional 32 Bit.
Windows Vista Professional 64 Bit
This iso file contains the english version of Windows Vista Professional 64 Bit.
Windows Vista Ultimate 32 Bit
This iso file contains the english version of Windows Vista Ultimate 32 Bit.
Windows Vista Ultimate 64 Bit
This iso file contains the english version of Windows Vista Ultimate 64 Bit.
For install Windows Vista we have a simple and fast method. We’ll need a USB stick of at least 8 gigabytes to use as a boot drive and a software : Windows 7 USB DVD download tool.
If you don’t have a USB stick you can use a DVD-Rom.
- Creation of the USB stick Windows installation :
- Start Windows 7 USB DVD download tool.
- Click Browse.

- Search and select the iso of Windows Vista.

- Click on Next.

- Click on USB device if you use an USB stick or DVD of you use a DVD-ROM.

- Selection you device, then click Begin copying.

- A window will appear, click Erase USB Device.

- A window will appear again, click Oui.

- Now, please be patient …


- When the operation is complete, the progress bar will turn green.

- You can close the software.
- Install Windows from USB stick :
- Restart your computer.
- Press the key F2 or Del (it’s depends on the configurations).

- Go on tab : Boot, then choose on first position : Removable Devices.

- Go on tab : Exit, choose Exit Saving Changes.

- Choose Yes.

- When the computer will restart, the installation of Windows will start, just follow instructions :
- Home
- Buyers Guide
- Build PC
- Hardware
- Software
- Tech News
This step-by-step guide demonstrates how to install Windows Vista.
The best way to install Windows Vista is to do a clean install. It is not difficult to perform a clean installation. Before you perform the installation I recommend that you check Windows Vista System Requirements list to ensure that your hardware is supported by Vista. If you don’t have Windows Vista drivers for all your hardware, it is a good idea to download all the drivers from the hardware manufacturers website and save all the necessary drivers on a CD-R before you start the installation.
Windows Vista DVD is bootable. In order to boot from the DVD you need to set the boot sequence. Look for the boot sequence under your BIOS setup and make sure that the first boot device is set to CD-ROM/DVD-ROM.
Step 1 – Place Windows Vista DVD in your dvd-rom drive and start your PC. Windows Vista will start to boot up and you will get the following progress bar.

Step 2 – The next screen allows you to setup your language, time and currency format, keyboard or input method. Choose your required settings and click next to continue.

Step 3 – The next screen allows you to install or repair Windows Vista. Since we are doing a fresh install we will click on “install now”.

Step 4 – You can now type the product key that came with your Windows vista.

Step 5 – If you do not enter the product key you can still proceed with the installation in which case Windows will ask you which version of Vista you have purchased. Windows Vista Home Basic, Home Premium, Ultimate, Business etc. Select the version you have purchased and click next.
Please note, although you can select any version of Windows and proceed to next stage. It is not good idea to select a different version to the one you have purchased because you will not be able to activate Windows at a later stage. Windows Vista can detect which version you have purchased once you enter your product key.

Step 6 – Tick “I accept the licence terms” and press next.
We previously discussed How to Install Windows XP from a bootable USB Flash Drive . Here is a tutorial on How to Install Windows Vista on your PC from a USB Flash Drive. In order to do that, first you need to make a bootable USB drive and load the vista operating system files on that. This is very much useful to install vista on your computer without an Installation CD / DVD .
Making a bootable Windows Vista installation USB drive is far simpler than doing so for Windows XP because the utility is built into the operating system and can be deployed from the Command Prompt itself. All you would need is
How to make your own Windows Vista bootable USB Drive :
Step 1: Start Windows Vista, insert the pen drive into the computer’s USB port. Start Command Prompt, type ‘diskpart’ and press [Enter].
Step 2: Type ‘list disk’ and press [Enter]. Carefully note down the USB flash drive’s disk number listed here. In this case it would be ‘Disk 1’
Step 3: Type ‘Select disk 1’ and press [Enter]. Here the Diskpart utility is instructed to choose the disk 1 as the drive to be worked on.

Step 4: Type ‘Clean’ and press [Enter]. This command clears out all the information of the volumes, partitions, boot sectors and the MBR from the USB flash drive.
Step 5: Type ‘Create partition primary’ and press [Enter]. This command will create a primary partition on the USB flash drive.
Step 6: Type ‘Select partition 1’ and press [Enter]. This command instructs the Diskpart utility to select the newly created partition.

Step 7: Type ‘Active’ and press [Enter]. This command will make the current partition (primary) active to enable the USB flash drive to boot from.
Step 8: Type ‘Format fs=fat32’ and press [Enter]. This command formats the selected drive partition using the FAT32 file system.
Step 9: Type ‘Assign’ and press [Enter]. This command assigns a drive letter to the newly formatted partition. As there is no drive letter specified in the command line, the next available drive letter is assigned to the drive.
Step 10: Exit from the Diskpart utility using the ‘exit’ command and pressing [Enter]. Now insert the Windows Vista DVD in the optical drive and type the command ‘xcopy e:*.* /s /e /f F:’ and press[Enter]. This command will dump all the contents of the Windows Vista DVD onto the USB flash drive.

Your USB drive is now ready to install Windows Vista on any computer. Just set the boot sequence in the BIOS of the system to boot from the USB, insert the USB flash drive into the computers USB port and turn on the computer. Follow the regular installation for Windows Vista.
Note: Installing Windows XP or Windows Vista from a USB flash drive is much faster as compared to installing from a CD/DVD. A high-speed flash drive would make a difference.
Also check out Our articles on Windows OS like Windows XP, Windows Vista and Windows 7.
I have asked a question regarding Windows Vista Business before and I decided to try to install Windows Vista with the help of an USB. I was able to do it for Windows 8 and 10 Pro with no problems.
However, I wasn’t able to find a reliable source to download the windows vista onto the USB. Most of them came with pre-install applications and never with the windows.
I was wondering if you have any realiable sources where I can download Windows Vista Buisness.
Thank you in advance for all your replies
There are no reliable, legal Vista ISO downloads available.
You can borrow and use a Microsoft Vista DVD (Retail or OEM System Builders License) , that contains the files for the various Vista Editions (Home Basic, Home Premium, Business and Ultimate) to be installed. The Product Key on your Computer / Laptop case determines which Edition is installed.
The COA sticker, which has the Product Key on it, is either on the underside of the Laptop or in the Battery Compartment.
With a Desktop it is either on the side, rear or top of the Computer Case.

Other Manufacturers’ Recovery DVDs are not to be used for the above purpose.
And you need to know the “bit” version for Vista, as 32bit and 64bit Editions come on different DVDs.
Here is how to do a clean install of Vista, using a Microsoft Vista DVD:
“How to Do a Clean Install and Setup with a Full Version of Vista”
And once the Operating System is installed, go to your Computer Manufacturer’s website and obtain the latest Drivers for your particular Model Computer or Laptop.
When you use Phone Activation don’t follow the Auto Prompts but instead hold on for a real person to assist you.
“How to Activate Vista Normally and by Phone Activation”
Microsoft is the one who says yay or nay for Activation.
You have to go through them, but lately a lot of posters have been referred back to here by them when using phone activation.
If that happens use this method of contacting Microsoft: contact MS support
Bill Smithers – Microsoft MVP July 2013 – Dec 2020
5 people were helped by this reply
Did this solve your problem?
Sorry this didn’t help.
Great! Thanks for marking this as the answer.
How satisfied are you with this reply?
Thanks for your feedback, it helps us improve the site.
This step-by-step guide demonstrates how to install Windows Vista.
The best way to install Windows Vista is to do a clean install. It is not difficult to perform a clean installation. Before you perform the installation I recommend that you check Windows Vista System Requirements list to ensure that your hardware is supported by Vista. If you don’t have Windows Vista drivers for all your hardware, it is a good idea to download all the drivers from the hardware manufacturers website and save all the necessary drivers on a CD-R before you start the installation.
Windows Vista DVD is bootable. In order to boot from the DVD you need to set the boot sequence. Look for the boot sequence under your BIOS setup and make sure that the first boot device is set to CD-ROM/DVD-ROM.
Step 1 – Place Windows Vista DVD in your dvd-rom drive and start your PC. Windows Vista will start to boot up and you will get the following progress bar.
Step 2 – The next screen allows you to setup your language, time and currency format, keyboard or input method. Choose your required settings and click next to continue.
Step 3 – The next screen allows you to install or repair Windows Vista. Since we are doing a fresh install we will click on “install now”.
Step 4 – You can now type the product key that came with your Windows vista.
Step 5 – If you do not enter the product key you can still proceed with the installation in which case Windows will ask you which version of Vista you have purchased. Windows Vista Home Basic, Home Premium, Ultimate, Business etc. Select the version you have purchased and click next.
Please note, although you can select any version of Windows and proceed to next stage. It is not good idea to select a different version to the one you have purchased because you will not be able to activate Windows at a later stage. Windows Vista can detect which version you have purchased once you enter your product key.
Step 6 – Tick “I accept the licence terms” and press next.
Step 7 – Choose the type of installation you want to perform. You will notice that upgrade option is disabled as we have booted from the DVD-R. Therefore we can only select Custom (advanced) option which basically installs a clean copy of Windows from scratch.
Step 8 – Choose where you would like to install Windows Vista. If you have a new unpartitioned hard drive you would get your hard drive listed as shown on the image below. If have have an old hard drive with data or other partitions it will show up as logical drives. You can select the drive options (advanced) to format, delete, or create new partitions. Because I am using a single new hard drive I will select next to continue. Windows will create a partition and format it using NTFS files system.
Step 9 – Windows starts the installation process and starts copying all the necessary files to your hard drive as shown on the image below. It will go through various stages of the setup and will reboot your system few times. When your PC reboots it attempts to boot from CD as its the first boot device. Do not press any key during the boot prompt so Windows Vista will continue with the installation by booting from your hard drive.
Step 10 – After installation copy process is complete you are presented with the Setup Windows dialogue box as show below. At this stage you need to choose a user name, password and a picture for your user account. The account you create here is the Administrator account which is the main account for your Windows Vista that has all the privileges. Click next continue.
Step 11 – Now you need to choose your computer name and desktop background. Click next to continue.
Step 12 – Choose whether your want to Help protect Windows automatically. Select “Use recommenced settings” to continue.
Step 13 – Review your time and date settings. Select your time zone, correct the date and time and click next to continue.
Next screen presents you to select your computers current location. You can choose between home, work, public location. Choose home to continue. You will finally get a “Thank you” screen which confirms the end of the interactive installation process. This is not the end of the setup process. There are still many after installation configuration to be done. Click next to continue.
Step 14 – Windows now runs a benchmark type of application which checks the performance of your system. You will see a status bar at bottom which shows the progress. Once the process is complete you will be presented with the logon screen.
Step 15 – Finally you have the logon screen. Just type your password and press enter or click on the arrow to logon to Windows Vista for the first time.
Step 16 – Soon as you logon you will be presented with welcome center. You can use the welcome center to configure, customize, and update Windows vista.
Step 17 – Finally you need to check if all your hardware has been detected correctly. You can do so by checking your device manager. To access device manager click Start menu -> Control panel -> System -> Device manager. You will see all your hardware listed as shown below. You need to check if you have any yellow exclamation marks next to the name of the device similar to “USB 10/100 LAN” on image below. This indicates the driver has not been installed for this device.
At this stage you need to install Windows Vista drivers by double clicking on “USB 10/100 LAN” or your device. The properties dialog box will appear. Click on Reinstall Driver. Then you can choose whether you want to install the driver from the internet (if available) or install manually from a CD or other media
Once you have removed all the yellow exclamation marks from the device manager your Windows Vista configuration would be fully complete.
Introduction
Advances in cloud technologies have led many users to use Windows Azure Web Sites to host both a production site and test site, as it makes it easy to test various configurations without impacting their own personal computers. If you still prefer to do this on your desktop, you can install IIS on it, as well as other applications and extensions easily using the MicrosoftВ® Web Platform Installer (Web PI). To learn more about the Web PI, see Learn about and install the Web PI.
If you choose to install IIS 7.0 or above manually, you can use this article for guidance.
Before You Begin
Ensure that you have installed one of the editions of Windows Vista or Windows 7 on which IIS 7 and above is supported before you proceed. Not all IIS features are supported on all editions of Windows Vista and Windows 7. Home Basic and Starter editions include only limited basic features of IIS. To see a list of which features are supported on the edition of Windows you are using, see one of the following:
Also be sure that you have administrative user rights on the computer. By default, you do not have administrative user rights if you are logged on as a user other than the built-in administrator, even if you were added to the local Administrators group on the computer (this is a new security feature in Windows ServerВ® 2008 called Local User Administrator). Log on either to the built-in administrator account, or explicitly invoke applications as the built-in administrator by using the runas command-line tool.
Note that you can run runas /user:administrator cmd.exe so that every application you run from that command line will be elevated, eliminating the need to use the runas syntax from that command line.
If you are logged on to an account other than the built-in local administrator account, you may see the following security alert dialog box.

Figure 1: Windows Security (User Account Control)
Install IIS 7 or Above
To open the Windows Features dialog box, click Start, and then click Control Panel.

Figure 2: Windows Vista Start menu
In the Control Panel, click Programs.

Figure 3: Control Panel Home
Click Turn Windows features on or off.

Figure 4: Control Panel install options
You may receive the Windows Security warning. Click Allow to continue. The Windows Features dialog box is displayed.

Figure 5: Windows Security dialog box
Expand Internet Information Services.Additional categories of IIS features are displayed. Select Internet Information Services to choose the default features for installation.

Figure 6: Windows Features dialog box – IIS
Expand the additional categories displayed, and select any additional features you want to install, such as Web Management Tools.

Figure 7: Windows Features dialog box – IIS feature selection
If you are installing IIS for evaluation purposes, you may want to select additional features to install. Select the check boxes for all IIS features you want to install, and then click OK to start installation.

Figure 8: Windows Features dialog box – Installation selection
The progress indicator appears.

Figure 9: Progress indicator
When the installation completes, the Windows Features dialog box closes, and the Control Panel is displayed.

Figure 10: Control Panel Home page
IIS is now installed with a default configuration on Windows Vista or Windows 7. To confirm that the installation succeeded, type the following URL into your browser, http://localhost.

Figure 11: Default Web site
Next, you can use Internet Information Services Manager to manage and configure IIS. To open IIS Manager, click Start, type inetmgr in the Search Programs and Files box, and then press ENTER.

Figure 12: Default Web Site Home page
If you want to use ASP, MicrosoftВ® ASP.NET, or PHP, install the modules needed to host these pages; this can be done during the installation of IIS or after the installation is complete.
Use Unattended Setup to Install IIS 7.0 and above
IIS can also be installed unattended on Windows Vista. For detailed instructions and scripts, see Using Unattended Setup to Install IIS 7.0 and Above.
How to install driver manually windows XP/Vista/Windows 7 – In most cases you will find that the Windows drivers found here are self-extracting (.exe) archives. Click the desired file. When prompted, we recommend setting the destination to your desktop. Create a new folder and move the archive into it. Click the file, it will then extract the software and related files inside of your new folder automatically.
If a driver downloads as a .ZIP file: Extract the content and save to a folder on your Desktop. Open the folder and look if there’s a Setup.exe file. If you see a Setup.exe double click to run it
But if the top level of the folder doesn’t include a Setup.exe installation file, try directing Windows to the folder you want it to install
- Right-click the downloaded ZIP-file and then click Extract All Files. Double-click the folder that has the same name as the downloaded file.
- Click Start, then right-click My Computer (or Computer) and click Manage.
- In the Computer Management window, on the left, click Device Manager.
- Click the + sign in front of the device category for which you wish to install the driver.
- Right-click the device, and select Update Driver. The Hardware Update Wizard opens.
- For using Windows Update, select No, not this time and click Next.
- Select Install from a list or specific location (Advanced), and click Next.
- In the window for search and installation options, select Search for the best driver in these locations, and select the Include this location in the search check box.
- Click Browse, and navigate to the folder that contains the driver files. Click OK when this folder is selected.
- Back in the Hardware Update Wizard, click Next. Windows will search for the driver and install it automatically. When the installation is complete, click Finish.
Once driver installation is complete you can delete the folder on your Desktop. (But you may want to save it somewhere should you ever need to reinstall the driver again)
Want to improve this question? Update the question so it’s on-topic for Stack Overflow.
Closed 4 years ago .
I am doing .net programming in addition to c and c++ development and want more flexibility on my home machine. I want to be able to have both Linux (probably Ubuntu) and Windows Vista on my home computer. Is there a way I can install both and on boot be prompted for which one to start? Is there a way to set Windows to default?
I have seen this before in CS labs in undergrad.
Also, I assume there would be no problem if I were to use Windows 32-bit along with Ubuntu 64-bit. Any advise?
16 Answers 16
The latest versions of Ubuntu include an installer called Wubi, which installs Ubuntu as a windows application (ie: it can be uninstalled from Add/Remove programs) and sets up the dual boot for you! It’s great for those who want to give Linux a try without a system overhaul!
You can dual boot, but I would recommend using a Virtual Machine for what you want to do.
You should note that dual booting Windows and Linux can be a little risky and is a bit permanent. Running in a Virtual Machine means that you can run the Linux install in a window and not worry about it affecting your development machine at all. The software will not know the difference, so your testing is not affected.
Consider that the Virtual Machine is like a sandbox, where you can try new and different things out, without fear of consequences.
Virtual machines do run with a bit of overhead, and therefore you should not expect to be playing games or anything through them. I would say it is very much like logging into a machine through Remote Desktop (good LAN connection) as far as performance goes.
EDIT: There is also VirtualBox that you could check out. Thanks for the helpers in my comments for that one.
I, too, recommend using a virtual machine for this purpose.
I’ve had problems with Virtual PC on some Linux distros (Fedora Core comes to mind), but no problems with VMWare or Virtual Box.

Think very hard before installing another operating system even as dual boot. It is rarely simple, even with installers like Ubuntu’s that don’t require you to mess around on a command line. There is a good risk you’ll spend days trying to get your usual OS back to normal especially if you’re using Vista.
VMWare and Virtual PC are both good options. Do a test install on one of these and use the OS for a while before making the decision to install.
One other great thing about using a virtual machine is that you only have to worry about getting your network settings sorted on your main OS, because VMWare (etc) will borrow those.
Also, try using the operating system on Live CD or DVD to start with if at all possible. You may also find that you can run an OS from a USB stick. This is obviously good for portability – but note that you can also carry your virtual machines on a removable USB drive.
All you have to do is go to http://www.ubuntu.com/getubuntu/download and follow the directions. I downloaded Ubuntu, burned it to CD, and rebooted with the CD in the drive. I did not have to get a second hard drive or worry about it messing with my Vista Home Premium installation.
With Ubuntu (as with most distros with a Live CD install) all you need to do is pop in a disc, boot, and click through the menus. The dual boot is set up perfectly by default, you don’t even have to think about it. I’ve done this with Ubuntu, Debian, PC Linux OS, Freespire, and Xandros on my Vista Home Premium machine and they all worked that way.
If you are paranoid, then you should back up your PC. As cheap as hard drives (USB or internal) are these days, there really is no excuse to not have a full back up of your system. It’s too easy. I use Acronis True Image, but I’ve heard good things about Norton Ghost as well.
Regadless, you don’t need Wubi or VMWare, or any virtual anything, a straight install with a dual boot set up is the default on a typical Live CD Linux install and it works even with Vista.
This tutorial will help you to install and set up the OpenVPN protocol to use NordVPN on your Windows Vista computer. Here’s a step by step guide:
2. After the file finishes downloading, open it and launch the installer.
3. During the installation, you will be asked if you want to continue. Please click Continue.
4. As OpenVPN requires.NET framework to function properly, you will be prompted to install it if you haven’t got it installed yet.
5. After the installation is completed, go to https://nordvpn.com/servers/tools/.
6. You will see a recommended server for best performance. Click ‘Show available protocols’ under the suggested server.
7. Several options will show up. Click on ‘Download config’ next to OpenVPN TCP and ‘Download config’ next to OpenVPN UDP. You need to download only these two configurations.
8. After the download finishes, go to a folder where the configuration files have been downloaded and copy them. Click and drag to select both OpenVPN configurations, then right-click on one and select Copy.
9. Go to the OpenVPN installation folder: Open My Computer – Local Disk (C:) – Program Files – OpenVPN – configs.
10. Paste the configuration files here. You can do this by right-clicking on the folder window and selecting Paste.
11. You have successfully uploaded the configuration files. Now you are ready to connect!
12. In the system application tray located at the bottom-right corner of your screen, right-click on the OpenVPN Client icon (it should look like a gray monitor with a lock), select one of the configurations you have just uploaded and click ‘Connect’.
13. You will be prompted to enter your service credentials for your NordVPN account. You can find your NordVPN service credentials at the Nord Account dashboard. Copy the credentials using the buttons on the right.

14. Enter your username and password and click OK. In just a couple of seconds, you will be connected to VPN.
Learn why a clean install of the OS is preferred for installing Vista, and review the starting process for a Microsoft Windows Vista clean install.
In this selection from Windows Vista Secrets, authors Brian Livingston and Paul Thurrott explain why a clean install of the OS is preferred for installing Microsoft Windows Vista. The authors also review the processes to begin setup for a Microsoft Windows Vista clean install.
A clean install of the operating system is our preferred method for installing Windows Vista. Although it’s possible to upgrade to Windows Vista from certain previous Windows versions this path is perilous and can often result in a Frankenstein-like system where only some of your applications work properly. In our opinion, it’s best to start with a clean slate when moving to a new operating system, especially a major release like Windows Vista.
Follows these steps to install Windows Vista as a clean install:
Insert the Windows Vista DVD in your PC’s optical drive and reboot. After the BIOS screen flashes by, you may see a message alerting you to Press any key to boot from the CD or DVD. If so, press a key. Some systems, however, do not provide this warning and will instead boot from the DVD by default.
Secret: If your system does not boot from the DVD, you may need to change the system’s boot order so that the optical drive is checked before the first hard drive. To do this, you will have to consult your PC’s documentation, as each PC handles this process a little differently.

From inauspicious beginnings such as these come great things.
A black screen with a progress bar and the text “Windows is loading files” will appear as shown above.

These settings apply only to Setup, not the eventual Windows Vista installation.
Eventually, the screen will display a multicolored drape effect and the initial Setup window appears as shown above. Here, you can preconfigure the language, time and currency formats, and keyboard or input method you’ll use during Setup.

This window jumpstarts Setup and the Windows Vista recovery tools.
Click Next. The Install Now window appears as shown in the above screen shot. To continue with Interactive Setup, click Install Now.
Secret: This window also provides a way to access Windows Vista’s new recovery tools. If you run into a problem with Windows Vista later, such as not being able to boot into Windows for some reason, you can boot your system with the Setup DVD and use these tools to help fix the problem.

Spread ’em. This is where Microsoft ensures you’re genuine.
In the next window, (shown above) enter your Windows Vista product key. This is a 25-digit alphanumeric string—in blocks of 5 separated by dashes—that you will find on a bright yellow product key sticker somewhere in your Windows Vista packaging. You can also optionally choose to have Windows Vista automatically activate for you.
Secret: Do not lose this product key or give it away to anyone. Each Windows Vista product key is valid for exactly one PC. After you’ve installed Windows Vista and activated it—which ties the product key to your hardware—you won’t be able to use this number again on another PC, at least not easily. Note, however, that you will have no problems reinstalling Windows Vista on the same PC using this same product key. If for some reason you are unable to electronically activate Windows later, Vista will provide a phone number so you can do it manually.

Sign over all your rights simply by clicking a single check box.
In the next window, you must agree to the End User License Agreement (EULA). Although very few people actually read this document, you should take the timeas it outlines your legal rights with regards to your usage of Windows Vista. Our understanding of the legalese in this document is that Microsoft exerts certain rights over your first-born and soul. In the screen shot above you can see the EULA windows.
How to perform a clean install of Microsoft Windows Vista
Introduction
Starting a clean install of Microsoft Windows Vista
Continuing with a clean install of Microsoft Windows Vista
Completing a clean install of Microsoft Windows Vista
While the majority of our readers here at WinBeta are tech-savvy, reinstalling Windows can feel like a daunting process to some. In the past, reinstalling an operating system required quite a lot of knowledge about machine drivers and the task of dealing with text-based installation systems. However, today, installing an operating system such as Windows can be quite natural. Take a look at the required steps, and note that the method can be applied to install Windows 7, Windows 8, or Windows 10.
Backing Up Your Data
The first major step is to ensure your data is safely backed up. Whether you use local backups or the magic of the cloud, you need to make sure the precious memories you have do not get erased. When reinstalling an operating system from scratch, everything you have on the hard drive will be erased – EVERYTHING. Be sure to backup your photos, videos, music, documents, game data, and everything else you need. Of course, we recommend checking out OneDrive for online backup, but other excellent solutions including Dropbox or a Western Digital external drive.
Downloading the Required Drivers
In the days of Windows XP, your computer would start up to the horror of being able to do almost nothing before drivers were installed. Today, operating systems such as Windows 7, Windows 8, and Windows 10, can automatically detect most of the drivers needed for your PC. However, we want to download the proper drivers from your OEM to ensure the best performance. Below, we have provided a link to some of the most popular OEM support websites.
Once you have arrived at your OEM’s website, there should be an option for you to enter your machine’s model number to begin downloading drivers. In the world of Windows 7/8/10, many users will find they just need to download the essentials including the video, audio, trackpad, and Wi-Fi drivers — the option is up to you. We recommend downloading your drivers ahead of time and saving them to a flash drive. You can install the drivers after you install Windows, but a network driver may not be available, and thus you might not be able to connect to the Internet.
Prepare the Installation Media
There are quite a few mediums you can use to install Windows including flash drives and DVDs. If you have a DVD with Windows on it, then you are set. Otherwise, if you have an ISO file, you can either burn it to a DVD or install it to a flash drive. You can visit this support page from Microsoft to learn more about the various options and what is best for your install procedure. Most machines can boot from USB, but it is important to note that some older machines (early 2000’s) lack the ability and thus installing via a DVD is your only option –- Note: this is a rarity.
Install Windows on your PC
After you have backed up all your data and checked it twice, we are ready to begin. Insert your USB stick or DVD into your PC and start it up while tapping your computer’s “boot menu key”. You can quickly find the key by performing a quick Google search. Most computers use the “F12” key as their boot menu key.
Performing the above operating should now allow you to select which device on your computer you wish to boot. Select either the USB flash drive or DVD, based on which installation media you chose. In general, you can use the arrow keys and “Enter” key to make your selection.
The Windows installation media should now start up. After the interface is loaded, continue by selecting the “Install Now” option. Enter your Windows product key and accept Microsoft’s terms and conditions to continue to process.
You will now be asked to select what type of Windows installation you want to proceed with and where you want to install it. Select the “upgrade” option to continue. On the next screen, you will see a Hard Drive to install Windows – if you have Windows already installed you will see a number of partitions. Click on each partition and delete it if such is the situation. When you are left with one hard drive labeled “Drive 0 Unallocated Space” you are ready to continue.
Select the unallocated space and select “Next”. Windows will now configure your hard drive and prepare it for installation. That is all we have to do for now. Simply sit back, grab a cup of coffee, and allow your PC to restart a few times as it finishes the installation.
Once your computer has booted up to the Personalization Screen (Windows 8 and Windows 10) or “Set Up Windows” screen (Windows Vista), you can create a user account and login to the desktop. Windows has officially been installed.
Install Your Drivers and The Latest Updates
Now is the time to use the USB flash drive you have loaded with various drivers. Install the drivers you have downloaded, and allow the PC to reboot when finished. If you have an issue with something not working, such as audio, be sure to visit your OEM’s site and install the correct driver needed.
Once your drivers are installed, be sure to run Windows Update, which will keep your computer up to date and may even find newer variations of the drivers you have just installed.
Congratulations, You’re Done
That is all there is to it. You can now move the data you backed up onto your newly formatted Windows PC and begin making it your home once again. Don’t forget to reinstall any software you may need to use.
- Home
- Buyers Guide
- Build PC
- Hardware
- Software
- Tech News
Step 7 – Choose the type of installation you want to perform. You will notice that upgrade option is disabled as we have booted from the DVD-R. Therefore we can only select Custom (advanced) option which basically installs a clean copy of Windows from scratch.

Step 8 – Choose where you would like to install Windows Vista. If you have a new unpartitioned hard drive you would get your hard drive listed as shown on the image below. If have have an old hard drive with data or other partitions it will show up as logical drives. You can select the drive options (advanced) to format, delete, or create new partitions. Because I am using a single new hard drive I will select next to continue. Windows will create a partition and format it using NTFS files system.

Step 9 – Windows starts the installation process and starts copying all the necessary files to your hard drive as shown on the image below. It will go through various stages of the setup and will reboot your system few times. When your PC reboots it attempts to boot from CD as its the first boot device. Do not press any key during the boot prompt so Windows Vista will continue with the installation by booting from your hard drive.

Step 10 – After installation copy process is complete you are presented with the Setup Windows dialogue box as show below. At this stage you need to choose a user name, password and a picture for your user account. The account you create here is the Administrator account which is the main account for your Windows Vista that has all the privileges. Click next continue.

Step 11 – Now you need to choose your computer name and desktop background. Click next to continue.

Step 12 – Choose whether your want to Help protect Windows automatically. Select “Use recommenced settings” to continue.

Step 13 – Review your time and date settings. Select your time zone, correct the date and time and click next to continue.

Next screen presents you to select your computers current location. You can choose between home, work, public location. Choose home to continue. You will finally get a “Thank you” screen which confirms the end of the interactive installation process. This is not the end of the setup process. There are still many after installation configuration to be done. Click next to continue.
I was trying to install AppLocale for Windows 7 and received this message:
There is a problem with this Windows Installer package. A program required for this install to complete could not be run. Contact your support personnel or package vendor.
Turns out, the AppLocale installer needs to be run with administrator privileges in order to complete applocale installation successfully on Windows Vista or Windows 7. However, apploc.msi (or any other .msi) does not offer you a “Run as administrator” on the right click menu. There are many ways around this, one being running a command prompt as an administrator and launching the installer through the prompt.
AppLocale installer needs to be run with administrator privileges in order to install on Windows 7 and Windows Vista
If you are not familiar with command prompt, here is what to do:
- Hit the start button and type “cmd”, you will see “cmd.exe” under Programs
- Right click and select “Run as administrator” and click “Yes” on the confirmation window
- Run apploc.msi through this command prompt – if your apploc.msi is under “Downloads”, this command would be “C:Usersuser_nameDownloadsapploc.msi”
For those who are not familiar with apploc, it lets you launch a code-page based application in a different locale then your system’s setting. Lets say you have an html file with Japanese encoding Shift-JIS and want to launch it with Notepad to make some changes. If your system locale is set to anything else than jp, you will see a bunch of question marks and garbage characters when you open the file with Notepad. You can either change your system locale which will require a reboot, or launch it with AppLocale which will simulate the environment.
This article is about how to install Windows Vista in computer and system requirement for Windows Vista.
Most of the users are interested to know about how to install Windows Vista on their computer.
This article helps to know how to install the windows vista.
All you have to do is follow these simple steps to install the Microsoft Windows Vista on your computer.
1) Very first of all you have to know that whether you computer is compatible for windows vista or not.
Please check all the below points before starting the installation.
[i] 1 gigahertz (GHz) for 32-bit or 64-bit processor or
800 megahertz (MHz) processor and 512 MB of system memory
[ii] 1 gigabyte (GB) system memory and 512 megabytes (MB) for Home Basic
[iii] 40 GB hard drive with at least 15 GB of available space and 20 GB for Home Basic)
or 20 GB hard drive with at least 15 GB of available space
[iv] DVD-ROM drive or CD-ROM drive
[v] Support for Super VGA graphics
If your system is according to above configuration then you can install Windows Vista on your system.
2) If all the above points are fulfilled then start the installation.
3) Insert the Microsoft Windows Vista CD. Now you can see the black screen appears.

4) After some time you will view the Graphical User Interface (GUI) while starting the installation.
5) Now select the appropriate language for your windows vista. Then press Next button

6) Now you will see the windows with the option Install Now.

7) Now you have to enter the Product Key. So that it starts installation.

 Now select the License Terms:-

9) Now select the Custom (Advanced) Installation option.

10) Now select the appropriate partition from your hard disk to install the windows vista.
Then click on Apply option.

11) Now Windows Vista Set up will start copying the files on your computer. It will take some time to copying on your computer.

12) Now it will start installing the files on your computer. This will also take some time.

13) After installing the files on your computer. It will automatically reboot your computer.

14) After installing the files on your computer. It will complete the installation and once again it will reboot your computer.

15) After few minutes you will view the screen for the username and password. Enter your username and password.

16) You can enter the name for your computer also.

17) Now select the option for the Windows Updates options.


18) Now wait for few minutes. You will see that a window is checking the performance of your computer.
That’s it now you will see that Windows Vista is preparing the Desktop on your computer.
Now you will see the below image screen on your computer desktop. That’s it your Windows Vista is ready to use.
Table of contents
- How to download Iris on Windows Vista?
- How to install Iris on Windows Vista?
- How to run Iris on Windows Vista?
How to download blue light filter on Windows Vista?
You can download Iris on your computer from here:
https://iristech.co/download-now
How to install blue light filter on Windows Vista?
Locate the file on your PC and Right click -> Properties

Click Unblock then click Ok to allow Iris installer to run

Now Right click -> Open or Double click it with the Left mouse button
An installation window will open. Click the Next button, then read and Agree with the Iris EULA


Iris will start to install itself into the computer Local folder

In my case this is
The reason it’s not installed in Program Files is, that not everyone has admin access on their machine, for example in the office.
This enables everyone to install Iris easy, even if you don’t have the Administrator password of your PC. The installation is also a little bit easier
After a couple of seconds, the installation will finish and the Settings window will open
How to run blue light filter on Windows Vista?

Iris will also start automatically when you turn ON your PC
You can now click the X button to minimize Iris into the tray
If you double click this icon the settings window will open again
If you Right click it you will get some fast options
If you want access to more options you can support the project and buy Iris Pro
From a PC that already had XP or Vista
With the release of Windows 7, there will be those people who still will want to revert back to Vista or XP for some reason or another. If you want to uninstall Windows 7 and go back to the previous OS, you may or may not be able to do so.
In this post, I will break down all the options and scenarios for uninstalling Windows 7 from a computer that already had an operating system, such as Windows XP or Vista. If you want further information about Windows 7, check out my previous post on the differences between the different versions of Windows 7.

The first thing to note is that you can only upgrade a Windows Vista computer to Windows 7, not Windows XP. If you already have XP, you will have to do a clean install of Windows 7.
However, if you have a computer with Windows XP and you install Windows 7 ON TOP of Windows XP, then you can actually revert back to XP. So if you have a computer with XP and you want to go to Windows 7, do NOT format your hard drive! Just pop in the disk, boot from the CD and install Windows 7.
In this case, Windows created a folder called Windows.old in the root of the Windows partition with the previous operating system and data. You can follow the step by step instructions on how to revert to a previous installation of Windows after installing Windows 7.
Now let’s say you upgraded Windows Vista to Windows 7. In this case, you are CANNOT revert back to Windows Vista. It’s a one way process and so you should be aware of this when going from Vista to Windows 7.
In order to go back to Vista, you will have to perform a clean install of Windows Vista, meaning you will have to backup all your data and then restore it manually later. You will also have to reinstall all of your programs.
Finally, if you installed Windows 7 on a separate partition to create a multi-boot system and now want to remove Windows 7, you most likely can remove it without messing anything up.

Note that this will only work if the older version of Windows was installed first. If you installed Windows 7 and then installed Windows XP or Vista to create a multi-boot system, you cannot remove Windows 7.
As long as you installed Windows 7 as the second OS, you first have to boot your computer into the older version of Windows and either delete or format the partition with Windows 7 installed on it.
You have to do this so that the older version of Windows can reclaim the disk space and use it. You can do this by right-clicking on My Computer, choosing Manage and then clicking on Disk Management in the left hand list.
Right-click on the volume where Windows 7 is installed and choose Format or Delete Volume.

Now you have to remove Windows 7 from the multi-boot screen. You can do this by going to Start, Control Panel, System and Security, Administrative Tools, System Configuration.
Click on the Boot tab and click on the listing for Windows 7. Click Delete and then Restart.

That’s it! Once you format the Windows 7 partition and remove it from the multi-boot screen, you will be able to restart your computer and have it automatically load the previous installation of Windows! Enjoy!
Founder of Help Desk Geek and managing editor. He began blogging in 2007 and quit his job in 2010 to blog full-time. He has over 15 years of industry experience in IT and holds several technical certifications. Read Aseem’s Full Bio
Related Articles
- How to Extract Windows XP From a Recovery CD
- How to Connect Multiple USB Printers
- How to Repair Windows XP SP3
- How to Remove Printers With Batch Files
- How to Fix Windows XP Without a Toshiba Disk
- How to Transfer Files From C: Drive to F: Drive
You can uninstall Microsoft’s Windows Vista operating system and install Windows XP if you prefer the older operating system or experience compatibility issues with Vista. Removing Windows Vista will completely wipe the contents of your computer, so you should back up your important files and programs before uninstalling the operating system. Use an external hard drive to store your back up files during the process. You then can copy them back to your computer after you finishing installing Windows XP.
Step 1
Plug the external hard drive into your Windows Vista computer. Copy any files, folders and programs from your computer to the external hard drive. You also can use back-up software to automate the back-up process. Unplug the drive when you are finished.
Step 2
Insert the Windows XP installation disk into the computer’s CD drive. Restart the computer. Press any key on the computer before Windows Vista loads to boot from the installation disc.
Step 3
Follow the onscreen instructions to begin the installation. Accept the End User License Agreement when prompted.
Step 4
Highlight the C: drive containing Windows Vista when prompted to select an installation destination. Press “D” to delete the partition and then “L” to confirm. Press “C” to create a new partition from the unallocated drive space. Select the NTFS file system.
Step 5
Enter the Windows Product Key located on the Windows XP packaging or on the bottom of the computer case if your PC originally came with Windows XP. Enter your time zone, region and computer name when prompted. The computer will restart when the installation completes. Remove the XP disk from the CD drive.
Step 6
Plug the external hard drive into your computer and copy your files and programs into Windows XP.
Content Type Install & Setup
Article ID 000005831
Last Reviewed 09/16/2020
To manually install the Intel® Graphics Driver in the Windows Vista* operating system, follow these steps:
Your computer manufacturer might have customized drivers and software to enable or alter features, or provide improved operation on your computer. Contact the manufacturer for the latest updates and technical support information.
If you can no longer get driver support from your computer manufacturer, you can download generic Intel drivers.
Unzip the file and put the contents in a designated location or folder.
Click Start > Computer > Properties > Device Manager.
Click Continue.
Double-click Display adapters.
Right-click the Intel® Graphics Controller and click Update driver software. 
Click Browse my computer for driver software.
Click Browse and navigate to the location you placed the extracted driver files. 
Select the Graphics folder, and click OK. 
Click Next. 
The message, Windows* has successfully updated your driver software displays after successful installation. Click Close to complete the installation wizard and restart your system when prompted. 
Still holding onto a computer running Windows XP or Windows Vista? It may be time to upgrade to Windows 10.
Windows 10 is now available. Microsoft is currently offering the operating system for free for a limited time to Windows 7, Windows 8, and Windows 8.1 users. While this is great news for a majority of PC owners, those of you still holding on to a Windows XP or Windows Vista machine may be feeling left behind. All isn’t lost, however, and there are still upgrade options available. Here’s what you can do:
Do nothing
No one is forcing you to update to Windows 10 . There are plenty of happy people with computers that “just work” running Windows XP or Windows Vista. Microsoft, however, no longer issues security updates and patches for Windows XP. This means that your PC is more vulnerable to malware. Windows Vista will no longer be receiving these patches in April of 2017.
Windows 10 isn’t like the horrors you may have heard about with Windows 8. In fact, it isn’t all that different from Vista or XP from a visual standpoint. Sure, there are some differences, but you will find a familiar Start button and the desktop interface you have come to know and love with Windows. In addition, however, Windows 10 also adds the helpful Cortana voice assistant to the desktop, a new Edge Web browser replaces Internet Explorer, and there’s even Xbox One game streaming.
See if you can update to Windows 10
The requirements to run Windows 10 are the same as Windows 7. If your system meets the minimum hardware requirements, you can do a clean install of Windows but it will cost you. A copy of Windows 10 Home retails for $119, while Windows 10 Pro costs $199. There’s also the Windows 10 Pro Pack for $99. This will let you upgrade from Windows 10 Home to the Pro edition at a later time.
The good news is that you won’t need a system with incredibly high-end hardware to run Windows 10 , but some older machine may still not be capable of running it. Windows 10 requirements are:
- Processor: 1GHz CPU or faster
- RAM: 1GB (32-bit) or 2GB (64-bit)
- Disk space: 16GB (32-bit) or 20GB (64-bit)
- Graphics: DirectX 9-capable video card with WDDM driver
Scrap your old PC, and get a shiny new one that can run Windows 10
Even if your machine meets the minimum system requirements to run Windows 10 , it may not do so very smoothly. It may be a better investment to buy a new PC, especially given that it costs $120 to purchase Windows 10. There are many laptops that range from as little as $200 to $500 that are capable of running Windows 10 without any known problems.
There a lot of Windows laptops to choose from, but these are the ones that CNET section editor Dan Ackerman has found to be the best for Windows 10 .

This article aims at solving a problem faced by most computer users when trying to setup a dual boot by installing an Operating System older than the currently installed OS. When you install Windows XP after installing Windows Vista or 7 the latter’s boot menu disappears and your PC directly boots into Windows XP. But solving the problem is just a simple matter of executing a few commands.
Step 1: Install Windows XP
So you have a PC with Windows Vista or 7 and want to install Windows XP, don’t worry about anything now just go ahead and install it. Just remember to install it on a partition that DOES NOT have Windows Vista/7 installed. After installation is over you’ll find that there is no option to boot into Windows Vista/7. Don’t panic just follow the remaining steps
Step 2: Reviving the Windowx Vista or 7 boot menu
Boot your computer using the Windows Vista or 7 DVD, select the language and click “Repair your Computer” option. After it scans for your windows installation select the OS and click next. Open “Command Prompt” and type the following commands
bootrec /fixmbr
bootrec /fixboot
 Execute the commnds in the repair mode command line
Now we’re back to the Windows Vista/7 boot menu but what happened to Windows XP . It has disappeared now 🙁 No problem we’ll add a boot entry for Windows XP in the boot menu
Step 3: Adding Windows XP to the boot menu
After Windows Vista/7 loads you’ll have to open a command line with administrative privileges. For this go to Start menu -> All Programs -> Accessories -> right-click command prompt select “Run as administrator”. Type bcdedit and note the partition of
Note down the partition of
Now execute the following commands to add a Windows XP boot entry
bcdedit /create /d “Windows XP”
bcdedit /set device partition=DeviceHarddiskVolume1
bcdedit /set path ntldr
bcdedit /displayorder /addlast
The “partition” specified in the second command is the partition of . Don’t ever make a mistake while entering this command if you do this boot entry won’t work. After this is done restart your computer and enjoy the results. If you have any problems ask away using the comment form.
 This tutorial will show you how to install new Windows Vista Sidebar gadgets from Microsoft’s Windows Marketplace, a download center for Windows-specific software.
Any gadget you install can be uninstalled at a later stage; not all gadgets have to be displayed on the Windows Sidebar. If you exceed the amount of visible gadgets, the Sidebar supports multiple “screens” of gadgets through which you can navigate with just a few clicks.
Downloading new Sidebar gadgets
Permanently removing gadgets is done through Windows Vista’s Gadget Gallery application. To open the Gadget Gallery, click on the plus sign shown at the top of the Windows Sidebar.
The bottom right corner of Windows Vista’s Gadget Gallery displays a “Get more gadgets online” link: it points to the portion of the Windows Marketplace dedicated to Sidebar gadgets: direct link.
Windows Vista gadgets do not have the same level of “permissions” as regular, full-fledged applications: nonetheless, you should always use your best judgment when downloading and installing new Vista gadgets (let alone new applications) onto your computer. Downloading new gadgets from a trusted source like the official gadget gallery (now including gadgets for both Windows Vista and Windows 7), is that malware and spyware are less likely to find their way in official gadget download sites than in other, unmonitored sites.
Installing new Sidebar gadgets in Windows Vista
 We located a sample gadget we would like to download and install from the Windows Marketplace. This gadget happens to be free, as most of them, but some gadgets are distributed as “shareware” (not free software).
We click the “Download” button; you will need to confirm your understanding that unverified gadgets are uploaded and available from the Windows Marketplace; next, Windows Vista will want your confirmation that you did in fact initiated the gadget installation process.
A couple clicks later, Windows Vista has installed our new gadget, now visible at the top of the Sidebar. By default, newly installed gadgets are placed docked in the Sidebar, but you can always drag them anywhere else on the screen.
This is it, all Sidebar gadgets in Windows Vista install the same way!
Uninstalling new gadgets not needed!
Once you download and install a new gadget in Windows Vista, it is automatically added to the sidebar: should you decide that the gadget is no longer useful for the moment, you do not need to uninstall it! Just closing the gadget will temporarily remove it from the sidebar, without actually uninstalling it permanently from your computer. Two other Windows Vista tutorials will respectively show you: how to remove a gadget from the sidebar, and how to uninstall, or delete, a gadget from Windows Vista.
This guide works 100% for Vista & Windows 7, unlike most of the guides out there. The method is very simple and hassle free. Needless to say, your motherboard should support USB Boot feature to make use of the bootable USB drive.
Follow the steps below to create bootable Windows 7/Vista USB drive, which will enable you to install Windows 7/Vista easily.
1. Plug-in your USB flash drive to USB port and move all contents from the USB drive to a safe location on your system.
2. Extract the WINRAR/WINZIP files to the safe location on your computer.
3. Open Command Prompt with admin rights by one of the following methods:
-Type “cmd” in Start menu search box and hit Ctrl+ Shift+ Enter.
-Go to Start menu > All programs > Accessories, right click on
Command Prompt and select Run as administrator.
4. Type in the following commands in the Command Prompt:
-Type DISKPART and hit ENTER to see the below message.
– LIST DISK
– SELECT DISK 1
– CLEAN
– CREATE PARTITION PRIMARY
– SELECT PARTITION 1
– ACTIVE
– FORMAT FS=FAT32 (Format process may take few seconds)
– ASSIGN
– EXIT
-Type XCOPY C:WINDOWS7*.*/S/E/F E:
5. After all the files have finished copying from C: to E:, type command EXIT and hit ENTER.
6. The booting is successfully updated on all targeted volumes.
* User doesn’t have to insert a CD/DVD. Can work on a computer running without an CD/DVD drives.
Want to master Microsoft Excel and take your work-from-home job prospects to the next level? Jump-start your career with our Premium A-to-Z Microsoft Excel Training Bundle from the new Gadget Hacks Shop and get lifetime access to more than 40 hours of Basic to Advanced instruction on functions, formula, tools, and more.
The other day I showed you how to create a Windows XP unattended installation CD using a program called nLite. Today I would like to show you how to create an unattended installation CD for Windows Vista using a program called vLite. This unattended installation CD works the same way as the one for Windows XP and allows you to automate the whole process of installing Windows, drivers, updates, as well as configuring Windows just the way you like it.
For this tutorial, you will need a Windows Vista installation DVD and a product key if you don’t want to be prompted to enter one during the installation. You will also need a blank CD or DVD if you would like to burn your unattended installation when you are finished.
Step 1: Download and install vLite . When you are finished run the program.
Step 2: You will be asked to locate your Windows Vista installation files. Click “Browse” and choose your Windows Vista installation DVD. You will then be asked where you would like to save your Windows Vista installation files. Create a new folder, name it whatever you like, and click “OK”. vLite will now begin to copy the installation files from the DVD to the folder you created. When it is finished, click “Next”.

Step 3: Here you will be able to select which options you would like to configure. Click “All” and then click “Next”.
Step 4: Here you will be able to add all of the needed Windows updates to your unattended installation so you don’t have to install them later. Before you can add them, you will need to download the updates manually and save them to your computer. The easiest way to do this is by using Windows Updates Downloader. Once they are downloaded, click “Insert” and select them all. You can also set specific drivers to install when Windows installs by clicking on the “Drivers” tab and adding them. You can do the same thing with language packs by clicking on the “Language Pack” tab. When you are finished, click “Next”.
Step 5: Next you will be able to remove components that you don’t want installed during the installation process. When you are finished click “Next”.
Step 6: Here you will be able to tweak some additional security, system, and explorer settings. When you are finished click “Next”.
Step 7: Now you will be able to configure the unattended installation settings. If you have a product key, enter it in so you aren’t prompted for it later. When you are finished, click “Apply”.
Step 8: You will be prompted with a window asking you to choose an apply method. The “Just Apply The Changes” radio button will be clicked by default which is fine. The “Apply And Rebuild” method takes a lot longer but saves you more space. Don’t use this setting if your image contains more than one version of Vista. Click “OK” and vLite will now begin building your unattended Windows installation.
Step 9: You will now be able to burn your unattended Windows installation to a CD or DVD. You can also create an ISO file that you can burn later.
You are now ready to install Vista using your unattended installation CD. If you have any experience with vlite or unattended Windows installations, please feel free to post comments.
 Windows Vista пришла на смену XP и по задумке специалистов должна была полностью заменить хорошую, но уже немного устаревшую систему. На практике же получилось, что XP продержалась до 2014 года, а Виста быстро собрала множество негативных отзывов и так и не стала популярной среди обычных пользователей.
Тем не менее, даже сейчас у пользователей иногда возникает вопрос, как установить Windows Vista с флешки. Праздный это интерес или жизненная необходимость – не так важно; порядок установки, с которым вы сейчас познакомитесь, от этого не изменится.
Создание установочного носителя
Для создания установочной флешки вам понадобится:
- Предварительно загруженный дистрибутив Windows Vista.
- USB-накопитель объемом не менее 4 Гб.
Записать дистрибутив на носитель вы можете двумя способами: с помощью командной строки Windows и используя специальную утилиту – например, UltraISO.
Командная строка
Вставьте флеш-накопитель и запустите командную строку, нажав Win+R и введя «cmd».
- Введите команду «diskpart» и нажмите Enter.

- Введите команду «list disk», чтобы увидеть список всех подключенных дисков. Найдите свой флеш-накопитель (обращайте внимание на объем, так как буквы в командной строке не прописываются) и запомните его номер.
- Выберите накопитель с помощью команды «select disk 2», где 2 – это номер диска, который вы определили в предыдущем пункте.
- Очистите носитель с помощью команды «clean».
- Введите «create partition primary», чтобы создать новый раздел.
- Выберите раздел под номером 1 с помощью команды «select partition 1».
- Пометьте раздел как активный – «active».
- Введите команду «format fs=NTFS», чтобы запустить форматирование.
- Назначьте флешку букву – «assign letter=Z».
- Напишите «Exit», чтобы завершить работу DiskPart.


Последний этап – копирование файлов дистрибутива на флешку. Удобнее всего сделать это c помощью утилиты 7-Zip.
Запустите 7-Zip и найдите через проводник ISO-образ Windows Vista. Выберите его и нажмите «Извлечь».
Укажите свой накопитель в строке «Распаковать в…» и нажмите «ОК».
В результате на вашем съемном носителе должны появиться такие файлы:
Сторонний софт
Если вы не хотите разбираться с командной строкой и в ручном режиме записывать файлы Windows Vista на флеш-накопитель, воспользуйтесь функциональными возможностями специальных утилит.
Давайте на примере программы UltraISO посмотрим, как создается установочная флешка. Вам понадобится:
- Скачанная и установленная утилита UltraISO.
- Загруженный дистрибутив Windows Vista.
- USB-накопитель объемом не менее 4 Гб.
Подключите флешку к компьютере и запустите UltraISO. Выберите пробный период, чтобы не платить за использование программы.
- Раскройте меню «Файл» и выберите пункт «Открыть».

- Найдите через проводник загруженный предварительно образ Виндовс Виста и нажмите «Открыть».

- Раскройте меню «Самозагрузка» и нажмите «Записать образ Жесткого диска».
- В появившемся окне в строке «Disk Drive» выберите свой носитель и нажмите «Форматировать».
- Выберите тип файловой системы (NTFS) и нажмите «Начать».

- После окончания процедуры форматирования нажмите «Записать».

- Дождитесь окончания записи, чтобы получить свою установочную флешку.


Выбор приоритета загрузки
После создания установочной флешки необходимо правильно настроить БИОС, выбрав приоритет загрузки. Если вы пробовали установить Windows XP с флешки, то должны быть знакомы с этой процедурой, но для уверенности повторим порядок действий.
- Подключите флеш-накопитель через USB-порт и перезагрузите компьютер.
- Нажмите при запуске клавишу F8, F2 или Delete (в зависимости от версии БИОС; нужная клавиша отображается на стартовом экране).

- Найдите вкладку «Boot» и выставите в ней приоритет загрузки. Первым должен загружаться носитель, подключенный через USB-порт, далее – винчестер и оптический диск.
- Выйдите из BIOS, сохранив внесенные изменения путем нажатия клавиши F10.

После изменения приоритета загрузки и последующей перезагрузки компьютера на экране должно появиться окно установки Windows Vista.
Выберите язык инсталляции и нажмите «Далее».
Нажмите кнопку «Установить», чтобы запустить процесс инсталляции системы.
Введите ключ продукта (если вы устанавливаете лицензионную версию).
Ознакомьтесь с условиями лицензионного соглашения и примите его условия.
Выберите полную установку, чтобы записать на жесткий диск все компоненты Windows Vista.
Выберите диск, на который собираетесь записать новую систему, и нажмите кнопку «Настройка».
Запустите форматирование раздела винчестера и дождитесь окончания этой процедуры. Все имеющиеся на диске данные будут уничтожены.
После окончания форматирования нажмите кнопку «Далее».
Начнется установка Windows, во время которой компьютер будет несколько раз перезагружаться.
Вам остается только ждать окончания инсталляции, которая продлится около 20-30 минут.
Первоначальная настройка Vista
После окончания процесса инсталляции Windows Vista на экране появится окно, где вам нужно будет указать имя пользователя. Здесь же можно установить пароль на компьютер, если вам нужно сохранить свою личную информацию конфиденциальной.
В следующем окне необходимо прописать имя компьютера, которое затем можно использовать для идентификации машины в локальной сети.
В окне «Автоматическая защита» выберите пункт «Использовать рекомендуемые параметры» или отложите решение – настроить безопасность системы можно затем самостоятельно через «Панель управления».
Выберите часовой пояс и нажмите кнопку «Далее», чтобы перейти к финальному окну настройки Виндовс Виста.
Нажмите «Пуск» – на экране появится рабочий стол Vista. Теперь вы можете начинать работать непосредственно с системой, подключая оборудование и устанавливая нужное программное обеспечение.
Если у вас нет другого компьютера, имеющего доступ в интернет, то оправдано будет заранее записать на другой съемный накопитель драйверы для оборудования.
Сразу после установки Windows Vista вы не сможете выйти в интернет, так как сетевая карта с большой долей вероятности не определится системой корректно. Поэтому подготовьте программное обеспечение заблаговременно, чтобы потом не столкнуться с трудностями при подключении оборудования.
-
This guide will teach you how to create a bootable usb drive or memory card that can be used to install Windows Vista or Windows 7.
This is the ideal way to install Windows on a netbook as the majority of netbooks have no optical drive.
First you need to format your usb drive / memory card as NTFS, this can be done by right clicking on the drive in my computer and selecting format.
Next open a Command Prompt window from Start menu, it can be found under accessories. Right-click on Command Prompt and select the «Run as administrator» option.
Now type diskpart in the Command Prompt window and press Enter, this will load the DiskPart program.
Now type the following command: list volume
This will show a list of all the drives in your computer, make a note of the volume your usb drive is.
We now need to select the usb drives volume number,
In this case we would type select volume 7 as the usb drive is listed as volume 7The drive needs to be made active so type: active to mark the drive as active
Now exit diskpart by typing exit
Now we need to create a boot sector on USB drive so your computer can boot from it, we will use the bootsect.exe utility which can be found on the Windows 7 / Windows Vista DVD under the boot folder or downloaded form here.
Ensure it is copied to the desktop or wherever you are currently working from in command prompt (in dos cd foldername changes the folder and cd.. moves back a folder)
Now enter bootsect /nt60 I:
Here I is the letter of my usb drive, replace it with the correct letter for your system, (Find this out by looking at what drive letter your usb stick is in my computer)
Now all you need to do is copy the files across from your Windows 7 or Vista DVD.
Now all you need to do is startup the computer you wish to install Windows on and tell it to boot from the usb drive or memory card, this will be different depending on the computer.
On my MSI Wind netbook I can press F11 and select which device you wish to boot from. Some older computers and laptops might not support booting from USB.
There you go, Windows 7 installing from the SD card in the laptops card reader.
Attached Files:
-

P.KID
Addict- Joined:
- Dec 27, 2008
- Messages:
- 720
- Likes Received:
- 159
- Location:
-
Unkown
Really nice tut!
im gonna try it out.P.s nice laptop
-
Dark Scyth
Moderator- Joined:
- Mar 3, 2009
- Messages:
- 2,594
- Likes Received:
- 459
I had trouble here, it said that it was an invalid command or something?
EDIT: lol well now I’m going to bed (3:21AM) -
Did you put the : after the drive letter?
I forgot that when doing the screenshots for this guide and it took me a while to figure out what I was doing wrong.
-
Dark Scyth
Moderator- Joined:
- Mar 3, 2009
- Messages:
- 2,594
- Likes Received:
- 459
Yeah, I did that and there was still the same error.
EDIT: I think I figured out the problem, I’m testing it right now
Yeah, its impossible…I can’t do it, whenever I rightclick it and then run as admin it does C:Windowssystem32>
So if I don’t it does go to user but then I can’t do it.So I guess I need to know how to make this one and only profile on this PC Admin.
-
Thank you for sharing this information. Learning alot the simple way.
-
Dark Scyth
Moderator- Joined:
- Mar 3, 2009
- Messages:
- 2,594
- Likes Received:
- 459
My friend has a 4GB memory stick that he doesn’t use anymore, would that be able to work too? He used it with his PSP, but he has an 8GB now.
-
Type “cd..” without the quotes until you get back to your C: drive
Then type “cd users” “cd your-user-name” then “cd desktop”
The command prompt working windows should now be your desktop
-
Dark Scyth
Moderator- Joined:
- Mar 3, 2009
- Messages:
- 2,594
- Likes Received:
- 459
I’ll give it a try…and hope it works. THANKS!!! That was excellent help! lol 4:14AM and i’m getting Windows 7 completely installed before I go to bed…so I’ll be going to bed in an hour or so and then waking up a hour later.
-
Great guild worked like a charm
-
If you go in to the sources folder and delete ei.cfg you will then be prompted which edition to install, very useful to be able to install every edition from one USB drive.
-
lol i can do all of that in about 3 steps download win 7 iso extract iso with 7 zip copy the iso folders set bios to boot from usb wollah done also theres a app that automates most of this called wintoflash
WinToFlash — Install Windows from usb — Home page
-
Thats true now, however this guide was created long before any automated tools existed… and you might just learn something in the process
-
Very good guide. Made my stick a while ago, sorted.
-
bookmarked !
-
jessenic
Minecraft Guy- Joined:
- Nov 17, 2008
- Messages:
- 276
- Likes Received:
- 77
- Location:
-
Finland
Official tool from Microsoft
That is alot easier -
This tutorial was created way before any easy tools existed for it
nice to know there is something official for it now. -
409lakeside
New Member- Joined:
- Sep 4, 2012
- Messages:
- 2
- Likes Received:
- 0
- Location:
-
Texas
when I type «active» it says «There is no partition selected. Please select a partition and try again.» any ideas?
-
Have you done «select volume 7« where 7 is the number of your usb drive is?
-
409lakeside
New Member- Joined:
- Sep 4, 2012
- Messages:
- 2
- Likes Received:
- 0
- Location:
-
Texas
got iti had to use «list partition», «select partition 1», then «active»
![[IMG]](https://users.digiex.net/insanenutter/guides/usbinstall/1.jpg)
![[IMG]](https://users.digiex.net/insanenutter/guides/usbinstall/2.jpg)
![[IMG]](https://users.digiex.net/insanenutter/guides/usbinstall/3.jpg)
![[IMG]](https://users.digiex.net/insanenutter/guides/usbinstall/4.jpg)
![[IMG]](https://users.digiex.net/insanenutter/guides/usbinstall/5.jpg)
![[IMG]](https://users.digiex.net/insanenutter/guides/usbinstall/6.jpg)
![[IMG]](https://users.digiex.net/insanenutter/guides/usbinstall/7.jpg)
![[IMG]](https://users.digiex.net/insanenutter/guides/usbinstall/8.jpg)
![[IMG]](https://users.digiex.net/insanenutter/guides/usbinstall/9.jpg)

 im gonna try it out.
![[IMG]](https://upload.digiex.net/files/h1n3kfl1fekynfyn2fag.jpg)
")
")
