Windows XP 64-bit Installation
Windows XP 64-bit requires specific XP 64-bit drivers. Windows XP is now 20 years old and the last release of XP 64-bit SP3 was in 2009. Because manufacturers had to release two sets of drivers for XP (32-bit and 64-bit) and because XP 64-bit was not popular and has many limitations, very few modern 64-bit XP drivers are available. XP 64 was really only intended to be used for specific applications requiring more than 4 GiB of RAM, it was not intended as a ‘consumer’ desktop OS.
Easy2Boot uses the DriverPack.net set of Mass Storage Drivers, but there is no 64-bit XP Mass Storage Driver pack available for 10 year-old, or more recent, systems.
For this reason, you can only install XP 64-bit ISOs using Easy2Boot if the Mass Storage Drivers are already in the XP ISO. This means that 64-bit can only be installed to very old hardware which uses old chipsets and IDE (or perhaps old SATA) controllers. You will need a modified XP 64-bit Install ISO which has added 64-bit Mass Storage drivers (e.g. as prepared by nLite).
Modern graphics, USB and audio XP 64-bit drivers are not available. Many 64-bit and 32-bit applications will not run on XP 64.
Unless your system is over 10 years old and uses IDE hard disks, XP 64 is probably not going to work!
Install XP 64-bit using E2B
The following instructions only apply if you are using a 64-bit XP Install ISO.
For XP 64-bit ISOs, the numbers ‘64‘ must be in the ISO’s file name – e.g. Windows_XP_SP3_64-bit.iso.
If possible, set the BIOS hard disk controller configuration settings to LegacyIDE (not AHCI/SATA).
Use latest XP 64 SP1 ISO file.
- Copy the XP 64-bit ISO files to the _ISOWINDOWSXP folder.
- Boot from your E2B drive, press Ctrl-I for the Windows Install menu and then Alt+1 for Step 1.
- Choose from the list of XP ISOs.
- You will see some instructions about pressing F6 – on some systems pressing F6 during Windows XP Setup is not necessary. So try without pressing F6 first.
If required – select 64-bit FiraDisk driver after pressing F6. See Tutorial 30 for how XP ISO installs work using FiraDisk, etc.
Note: Only old systems will show internal hard disks. Modern systems will not list any internal hard disks!
5. Continue with the text mode setup and allow the system to reboot after the copy-files stage has completed
6. Reboot back to the E2B USB drive (do NOT allow the computer to boot from the internal HDD).
Select Ctrl-I and Alt+2 for Step 2.
7. The system should now boot from the internal HDD and continue the GUI Setup phase of the XP install. It may be necessary to confirm the loading of some drivers during this phase.
8. Once XP has been fully installed, you can delete the storage drivers which show up as errors in Device Manager and then install all drivers for your hardware in the usual way. For details on how to install Windows XP using the 2-step FiraDisk method see the instructions in Tutorial #30
(Hint: if you get BSOD in Step 1, try without pressing F6).
If E2B does not seem to work with your ISO and system, try WinSetupFromUSB instead.
In this article, we will examine how to set up and use Windows XP SP1 x64 Professional on a new virtual machine using Oracle VM VirtualBox 7.0 on the Windows 11 operating system.

How to Set Up Windows XP x64 SP1 Pro on Windows 10 / 11 using Oracle VM VirtualBox 7
Developed by Microsoft, the Windows XP operating system was released on October 25, 2001, for home and business computers, laptops, desktops, media, and tablet computers.
The biggest difference of this operating system type, whose first code name is called Whistler, is that it supports 32 Bit and 64 Bit architectures.
Maximizing the user experience, Windows XP is at the forefront of performance, stability, and security. It is the first operating system to have product activation methods to prevent software piracy, which has become a threat to software developers.
Key features of Windows XP include Internet Explorer 6, Windows Media Player, downgrade/rollback device drivers, remote assistant, advanced firewall, system restore, wireless connectivity, application compatibility mode, and CD Burner.
Although Microsoft ended support for the XP system on April 8, 2014, there are still many people using this system today. This can create a serious vulnerability for both the local network and the Internet network. Therefore, we do not recommend users install Windows XP instead of Windows 10 or Windows 11 on their host computer.
However, users who want to use and experience Windows XP or play old games can install it on virtual machines. Thus, they can choose a safer way by using XP on an up-to-date operating system.
Before you can create a virtual machine on your host, your host processor must support the virtualization feature. Otherwise, you cannot set up a virtual computer on your host. You can take a look at this article to control the virtualization feature of your CPU.
How to Create a New Virtual Machine for Windows XP
After installing the Oracle VM VirtualBox virtualization software on your host operating system, you must make the settings of the VM you will create correctly in order to use Windows XP without any problems. Creating a VM that matches the hardware capacity of your physical host computer is important in terms of performance and compatibility.
Step 1
Open your Oracle VirtualBox program and open the virtual machine creation wizard from the tool menu on the program’s homepage or from the New shortcut.

Step 2
The first thing you need to do when the virtual machine preparation window opens is to type the name of the operating system you will install in the Name field. After typing Windows XP in the Name field, the values in the Type and Version fields will be automatically adjusted according to the system you are typing.
If you see the 32-bit value in the Version field after typing Windows XP and you are going to install 64-bit, configure this value manually.
You can change the location where you will install the virtual machine in the Folder section. For example, if you want to install on an external SSD or HDD storage device, select Other from the pop-up window and then select the installation location from your host computer.
To add a Windows XP ISO file to the virtual pc, select Other from the ISO Image drop-down menu.

Step 3
Select the Windows XP Professional 64 Bit SP1 image file that you downloaded to your computer from the table below the article and open it.

Step 4
In 7.x versions of VirtualBox, you can see the unattended installation option as the user interface has changed. If you use this option, you can prepare a system with preconfigured settings such as username or product key.
If you prefer to install the system manually, select Skip Unattended Installation and click Next.

Step 5
Configure a RAM size of 4096 MB (4 GB) for Windows XP as the base memory size. If your host computer has a high RAM capacity, you can configure this value as a minimum of 4 GB or 8 GB.
In addition, configure the number of virtual processors as 4 so that you can use your virtual computer more efficiently.

Step 6
Since you will be installing Windows XP from scratch in the virtual hard disk settings, you must select the Create a virtual hard disk now option. If you have an XP virtual disk that you have already installed, you must select the Add an existing hard disk file option.
In VirtualBox 6.x versions, you can see the old settings on the virtual disk screen. For example, if you are not going to use a VM you installed on VirtualBox with other virtualization software, choose VDI (VirtualBox Disk Image). You can use the VDI disk type in other software, but Oracle always recommends using the VDI type.
If you want to use as much disk space as the capacity of the virtual disk file on the disk where you will install the virtual machine, you can choose Fixed Size. Fixed Size can improve the performance of the VM, but it unnecessarily fills up the host disk space.
Therefore, by selecting Dynamically Allocated, only the disk space needed by the VM will be automatically allocated over the host disk. Do not change the path in File Location and Size to save the virtual disk to the installation location you set in the first step of the VM wizard.
For Windows XP, you can change the virtual disk size to a minimum of 30 GB, but you can determine the disk size according to the work you will do.

Step 7
After adjusting the hardware settings of the Windows XP guest machine, check again and close the VM wizard.

Step 8
Click Settings to better configure the hardware settings of the guest operating system.

Step 9
To enable file sharing between the host and the virtual machine in the settings window of the VM, configure the Shared Clipboard and Drag and Drop features as Bidirectional in the General / Advanced tab.
So you can share files or copy/paste text both from host to VM and VM to host.

Step 10
To install Windows XP on the virtual pc, select the Optical device as the primary boot device in the Boot Order list in the System / Motherboard settings to be able to add the ISO file to the optical drive.

Step 11
If you plan to use virtualization software on your virtual computer, enable the Nested VT-x/AMD-V feature from the processor device.

Step 12
Enable Nested Paging for better memory management between your host and VM.
In some cases, you may need to manually select the virtualization interface in the Acceleration tab in the system settings of the virtual PC. Paravirtualization Interface is in Default mode by default.
Default mode will automatically select a virtualization engine according to the type of system to be installed, but since no VTx interface is selected for XP, you can change the value here to Hyper-V.

Step 13
Enable 3D acceleration in the Display / Screen settings of the virtual machine and configure the Video Memory size to 128 MB.
NOTE: Even if you enable 3D graphics acceleration on Windows XP in VirtualBox version 6.1, the Direct3D Acceleration feature is unfortunately no longer supported. If you still want to use Direct3D support, you need to install one of the 6.0 versions of VirtualBox on your system.

Step 14
By default, the Host I/O Cache feature for the IDE controller is enabled in the storage volumes of the virtual PC. If the Host I/O cache is not enabled, don’t forget to enable it for virtual disk performance.

Step 15
Check the Solid-State Drive (SSD) option to configure the WindowsXP.vdi virtual disk file as an IDE SSD.

Step 16
After preparing your Virtual PC, click the Start button to proceed to the steps of installing Windows XP on VirtualBox.

How to Install Windows XP
After preparing the Windows XP virtual computer, you need to install Windows using the ISO image of the system. After running the VM with the image file as the startup disk, when the setup wizard opens, you should install it as if you were installing the system on a real computer.
Step 1
At the Windows XP Professional Setup screen, you must press Enter to begin installing Windows immediately. Otherwise, you can press F3 to exit the wizard or R to repair your system.

Step 2
You must press Page Down to read the full text of the Windows XP license agreement in the setup wizard. After reading the license agreement, press the F8 key to accept and continue the installation.

Step 3
Press the C key to configure the unallocated disk space. Or you can press Enter to have the wizard automatically organize the disk space and format the system disk.

Step 4
To create a new partition, you need to edit the disk space to be allocated after clicking C. It is recommended that you use the entire disk space, as virtual machines generally use smaller disk space.
For example, if you configure the virtual disk size to 100 GB, it may make more sense to allocate 20 GB for system setup and 80 GB for backup.

Step 5
Press Enter to start the Windows XP installation on the new partition you created.

Step 6
Quickly format the virtual disk of the guest machine using the NTFS file system.

Step 7
Wait while the setup wizard formats your virtual disk.

Step 8
After the virtual disk is formatted so that the files can be copied, the system files of XP will begin to be copied to the disk.

Step 9
After the system files are copied, your virtual computer will restart automatically in 15 seconds. You can press Enter to reboot your virtual system immediately. After your guest machine restarts, the installation will continue.

Step 10
Configure the region and language options of Windows XP according to the country you live in.

Step 11
Type a name for the user account you will use in your virtual system and click Next.

Step 12
Enter a Windows XP Pro product key you have and click Next.

Step 13
If you are going to use your Windows guest machine in a network environment with more than one computer, make sure that the computer name is different from other devices.
Type the PC name you want to use in the Computer Name field and also create a new password for the Administrator account with full authority in your virtual system, or leave the relevant fields blank to avoid creating a password and click Next.

Step 14
Configure the date, time, and time zone settings of your virtual computer according to the location you live in and click Next.

Step 15
If you want to use your VM in your physical network environment in the Networking Settings window, you must tick Custom Settings and make the relevant settings. Or you can continue the installation by selecting Typical Settings in general.

Step 16
According to your network structure, if you are going to make the virtual machine a member of a Domain environment that provides an Active Directory service, you must select the Yes option and type your Domain information.
To use your VM for personal use without subscribing to a Domain environment, select WORKGROUP and click Next.

Step 17
Wait while Windows XP is installed on the guest machine.

Step 18
Wait while the Microsoft Windows XP x64 operating system boots up.

Step 19
After the Windows XP system files are copied, your system will reboot and your desktop environment will be ready.

Step 20
Right-click on My Computer, then click System Properties from the options that appear and check the system information.

How to Install Guest Additions
After installing Windows XP with a virtual computer, you need to install Guest Additions in order to use full-screen resolution, transfer files between the host and the VM, and use the host computer’s hardware on the VM.
Step 1
Right-click on My Computer and click Manage to open the Computer Management window. After clicking Device Manager, check the drivers that are not installed on your system.

Step 2
Under normal circumstances, when installing Guest Additions on Windows XP, you will encounter an Unsigned Driver warning. This is not an error, but the driver for some devices cannot be fully installed.
To circumvent the unsigned driver barrier, you need to change a setting in the Group Policy settings. Open Start / Run and type gpedit.msc in the text box and click the OK button.
When the Group Policy Object Editor is opened, go to Windows Settings > Security Settings > Local Policies > Security Options and click “Devices: Unsigned driver installation behavior” from the options under Security Options.
Change the Devices: Unsigned driver installation behavior setting to Silently Succeed and restart your virtual computer after clicking OK.

Step 3
After your guest system is turned on, this time click on Devices / Insert Guest Additions CD Image to install the guest add-ons software.

Step 4
When the Guest Additions installation wizard starts, click Next to continue.

Step 5
Continue without changing the installation location of the guest add-ons software.

Step 6
You can see that Direct3D Support is not enabled in the Choose Components window of the setup wizard. Direct3D support for older operating systems has been discontinued in version 6.1 of VirtualBox. So if you still want to use this feature, you need to install the 6.0 versions of VirtualBox.

Step 7
After installing the tools of your guest system, restart your system.

Step 8
After restarting your VM, view Device Manager again and this time you can see all drivers installed successfully.

Step 9
You can use your virtual machine in full-screen resolution or scaled mode with the options in the View tab from the tool menu of VirtualBox.

Step 10
When you try to copy a text document from the desktop of your host computer to your virtual computer with the Drag and Drop method, you can see that the process is successful.

How to Configure Shared Folder
Unfortunately, folder copying to the virtual machine fails on old systems. Before you can copy a folder, you must archive the folder using Winrar or 7-Zip and then copy it to the VM.
Since it takes time to archive a folder with larger file sizes, you can transfer data faster by creating a public folder for your VM on your host computer and configuring the Shared Folder.
Step 1
Click Devices / Shared Folders / Shared Folders Settings on your Windows XP virtual PC.

Step 2
Click the green + button in Shared Folders settings and open the Add Share window. Specify the folder you created on your host PC in the Folder Path section.
Check the Auto-Mount and Make Permanent options and click OK to add the shared folder as a network drive.

Step 3
When you open the My Computer window, you can see that the Shared Folder has been added as a network drive.
After viewing the network connections, switch to the Folder structure and click Entire Network / VirtualBox Shared Folders on the left, and you can see that you can access the folder on the host over the network.

Step 4
Create a folder in the shared folder created on your host system and check that this folder is created simultaneously in your VM.

How to Check Internet Connection
After installing a virtual system with Oracle VM VirtualBox or other virtualization software, network, and Internet connection settings are automatically configured. If the services of your virtualization software are corrupted, you may not be able to access the Internet. In such a case, you need to repair VirtualBox and restart your PC.
Network settings of Windows XP guest machines running on Oracle VM are configured with NAT coupler by default and a different block is created than the IP block you use in your real network.
Step 1
Open Run and execute the CMD command to check if the Internet connection is working smoothly in your virtual system. After opening the CMD prompt, ping the Google servers using the ping 8.8.8.8 command.

Step 2
If the ping test is successful, visit the Google homepage using the Internet Explorer browser and check that your Internet connection is healthy.

How to Enable and Install USB 3.0 Driver
Normally, USB 3.0 support cannot be enabled on a Windows XP VM. But you can fix this problem by replacing the USB controller.
You can use USB 2.0 devices in the virtual machine without any problems, but you can transfer files faster by enabling the newer technology USB 3.0 or USB 3.1 support.
Step 1
Before enabling USB 3.0 on a Windows XP guest machine, download the RENESAS Driver from the table at the bottom of the article and copy it to your system and double-click the setup file to start the wizard.

Step 2
Click Next in the Renesas Electronics USB 3.0 Host Controller Driver wizard.

Step 3
Accept the license agreement of the Renesas Electronics USB driver software and click Next.

Step 4
Click the Install button to build the USB 3.0 driver.

Step 5
After installing the USB 3.0 driver on Windows XP, close the wizard by clicking Finish.

Step 6
Close Oracle VM VirtualBox on your host system and go to the location where it is installed. Right-click on C:Program FilesOracleVirtualBox and then click Open in Terminal.
./VBoxManage setextradata 'Windows XP' VBoxInternal/Devices/usb-xhci/0/Config/ChipType uPD720201
Step 7
Open the Oracle program and select USB 3.0 (xHCI) Controller from the USB controller types and click OK.
 Controller")
Step 8
Open the Oracle program again and after running your virtual PC, open Device Manager and check the Universal Serial Bus (USB) Controller device.

Step 9
Plug your flash memory into one of the USB 3.0 ports of your host computer and create a folder named Backup in it as an example.

Step 10
After inserting your flash memory, click Devices / USB / Kingston DataTraveler 3.0 on the virtual machine.

Step 11
After adding your flash memory to your virtual PC, Mass Storage drivers will be installed automatically. When you open My Computer, you will now be able to see your USB stick of KINGSTON or any other brand.
When you check the USB 3.0 memory in Device Manager, you can see it listed in Disk Drives.

How to Change Video Memory to 256 MB
A maximum of 128 MB of GPU memory can be set for Windows XP in Oracle software, but there is a simple way to increase this size.
Step 1
First, execute the dxdiag command in the Run window on your virtual machine and click Yes in the DirectX Diagnostic Tool window.

Step 2
Click the Display tab on DirectX Diagnostic Tools and check the Total Memory size and check that the GPU memory is 128 MB.

Step 3
Close your virtual computer and VirtualBox program and open PowerShell again in the location where VirtualBox is installed and execute the following command.
./VBoxManage modifyvm 'Windows XP' --vram 256
Step 4
Run Oracle VM VirtualBox and check the Display / Screen / Video Memory size of 256 MB in the settings of your VM, and you can see that the operation was successful.

Step 5
When you run your Windows XP guest machine and open the dxdiag tool again, this time you can see that the total graphics memory size in the Display tab is 256 MB.

How to Upgrade Windows XP SP1 to SP2
If you want to upgrade to SP2 after installing the Service Pack 1 (SP1) version of Windows XP on the guest machine, download the ISO image from the table at the bottom of the article and follow the steps below.
Step 1
First of all, to view the properties of the XP system installed on your VM, right-click on My Computer and open Properties and check the Service Pack version.

Step 2
To add the SP2 ISO file to the VM, click Devices / Optical Drivers and click Choose a disk file and select the Installer image you downloaded to your computer and click Open.

Step 3
When the Readme HTML page opens automatically on your virtual system, close it.

Step 4
Open My Computer, right click / Open on the CD drive.

Step 5
Double-click the SRSP2 command script in the Service Pack 2 CD image and start the installation. Click Next in the Windows x64 Service Pack 2 installation wizard.
 Installation")
Step 6
Accept the SP2 license agreement and click Next. If you want to downgrade Windows XP from SP2 to SP1 later, make a note of the location in Uninstall Folder. Continue with Next to continue SP2 installation.

Step 7
Wait while your virtual Windows XP system updates to SP2. When the SP2 setup wizard is complete, click Finish to restart your virtual system.

Step 8
When you re-examine the system properties, you can see that Service Pack 2 (SP2) has been successfully installed.

Video
Installing Old Versions
VirtualBox Version
YouTube Video
Slide
Windows XP ISO ve USB Driver Download
Windows XP Pro x64 SP1 ISO + SP2 (EN)
Related Articles
♦ How to Install Windows 7 on VirtualBox
♦ How to Install Windows Vista on VirtualBox
♦ How to Install Windows 8.1 on VirtualBox
♦ How to Install Windows 10 on VirtualBox
♦ How to Install VirtualBox on Ubuntu
After the fairly crappy time I had installing the 64 bit version of Win XP on my computer and peicing together various bits of information contained in various threads on this board in order to make it work, I’ve decided that I’m going to attempt to write as complete a tutorial as possible detailing the install process from beginning to end in hopes that it helps prevent people from running into the same problems I did. Anyways:
Step 1 — Acquire a copy of Windows XP 64-bit
Obviously you need a copy before you can install it, and you can get a free beta copy of Windows XP 64-bit Edition from here:
http://www.microsoft.com/windowsxp/64bit/downloads/upgrade.asp
You can either download the file (it’s about 450 MB, though if you’re on broadband your transfer will be over fairly quickly…microsoft.com servers always seem to offer excellent download speeds), or have physical CD’s shipped to you. Either way it doesn’t cost anything, all you have to do is fill out their form, and they’ll give you your stuff.
Step 1a — Burn the .iso file to a CD
This section is probably wholly unnecessary, but for the sake of completeness, I’ll include it…
If you had microsoft ship you a premade CD, skip this step. However, if you downloaded your copy of Win XP 64, you’ll need to burn the image file you downloaded to a CD before you can use it. To do this, open your preferred burning software (I’d recommend using Nero), and select «Burn Image» (or the equivalent option for your software), and specify the .iso file you downloaded as the image file to burn. You should have your CD in a matter of minutes.
Make certain that you note and record the CD-key contained in the e-mail microsoft sent you. Writing this on the CD would be a good idea, as would printing out a copy of the e-mail.
NOTE: Do not burn the ISO file itself to a CD (i.e. create a new data CD and just drag the ISO file into the compilation window)…this will not work as it will put the file itself onto the disc, rather than the CD image contained within the ISO, which is what you want.
Step 2 — Prepare your system
Carefully preparing things before you attempt to install Windows XP 64 can save you a lot of headaches when install time actually comes.
First of all you want to make sure you have a seperate drive/partition to install Windows XP 64 onto (unless you’re crazy enough to want a beta operating system to be your full-time OS…and I’ve seen Win XP 64 in action, and trust me, you do not want this just yet). If you are using RAID make sure you are using the VIA controller and not the Promise controller as from what I’ve heard there are no 64-bit drivers out yet for the Promise RAID controller. Also if you are using RAID, be sure to read the following thread, which details the process of putting the 64-bit RAID drivers onto a floppy disk, and follow the instructions carefully:
https://forum-en.msi.com/index.php?threadid=40859&sid=
Next, download all applicable drivers you can and save them in a sensible place (like c:win64drivers). If the driver comes in an archive, be sure to pre-extract it as well (Win XP 64 does not come with native zip/rar support). It’s okay if you don’t want to get/cannot find all the drivers you’ll need for your system, but at the very least make sure you download and extract the 64-bit ethernet adapter driver appropriate to your setup (most likely the RealTek RTL8169/8110 drivers), otherwise you’ll be without internet (which makes downloading additional driver and program files kind of difficult). You may also want to pre-download the installation files for some of the more essential program, like Winzip and WinRAR. The best place I found to find 64-bit drivers is located here:
http://www.planetamd64.com/modules/mx_pafiledb/dload.php?sid=
Step 3 — Configure your BIOS
Certain BIOS settings can screw up the install process, causing it to lock up at certain points, so it’s worth taking the time to make sure things are set properly.
Anyways, reboot your computer and go to the BIOS setup area, and make sure that «USB Legacy Support» is disabled, and that «Cool’n’Quiet» support is enabled…this will help reduce the chances of your installer hanging. I found that after my install had completed I was able to re-enable USB Legacy support and have everything still work fine, but your results may vary, and different BIOS versions may have different effects on the installer. I installed with BIOS version 1.20.
While you’re here, check your Boot Order settings and make sure that your CD/DVD drive is listed before your HDD is, and then insert your Windows XP 64 CD into the drive. Save your settings and exit.
Step 4 — Installing Windows XP 64
When the computer reboots from step 3, you should see a message that says «Press any key to boot from CD..,» so locate the «any» key and press it, and the windows installer will load.
If you’ve done everything mentioned in the above steps, your install process should hopefully be a painless one, free of the errors and random stupid crap that caused me to spend several hours doing something that shouldn’t have taken more than 30 minutes. Select your desired install path (being careful to make sure that you’re not installing over your 32-bit Windows) and enter information as requested. If you need access to your RAID array during the install process, then be sure to press F6 when it asks you, and load the driver off of the floppy disk you created.
If all goes well with the install Windows XP 64 should boot, and you can go and install all those handy driver files and software programs that you prepared in Step 2, and get your ethernet adapter working, and so on. Reboot your system after installing the updated drivers, and if windows successfully loads, then congratulations, your install was successful.
NOTE: Do not install the MSI LiveUpdate software from the CD, as I did this and when Windwos loaded I would get a message saying «The service is not started» and when I clicked «Ok» the system would spontaneously reboot. Disabling the software fixed this problem.
…I think that’s all. Let me know if I’ve missed anything.
Содержание
- Создание виртуальной машины для Windows XP
- Настройка виртуальной машины для Windows XP
- Установка Windows XP на VirtualBox
- Вопросы и ответы

В этой статье мы расскажем, как установить Windows XP в качестве виртуальной операционной системы, используя программу VirtualBox.
Читайте также: Как пользоваться VirtualBox
Прежде, чем инсталлировать систему, для нее необходимо создать виртуальную машину — ее Windows будет воспринимать как полноценный компьютер. Для этого и предназначена программа VirtualBox.
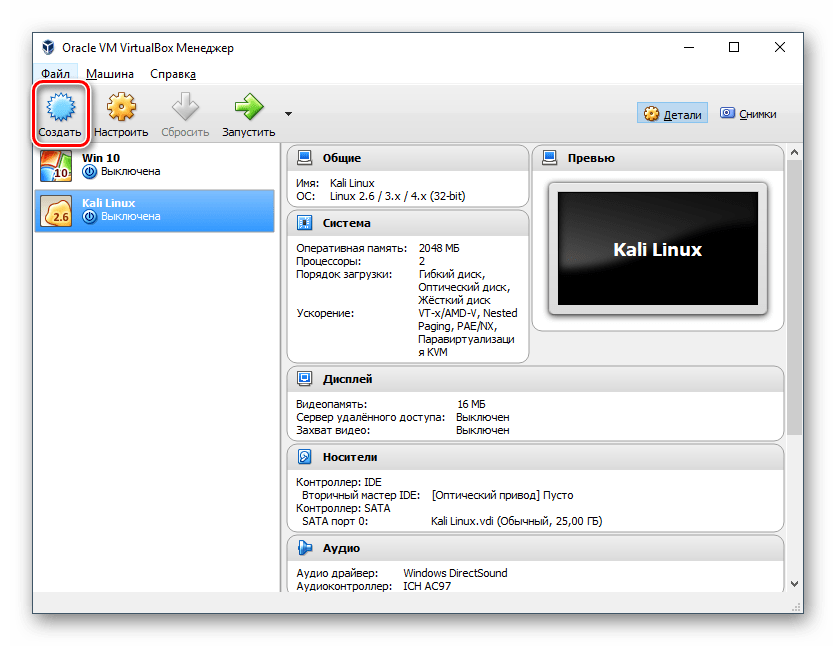
- Запустите VirtualBox Менеджер и нажмите на «Создать».

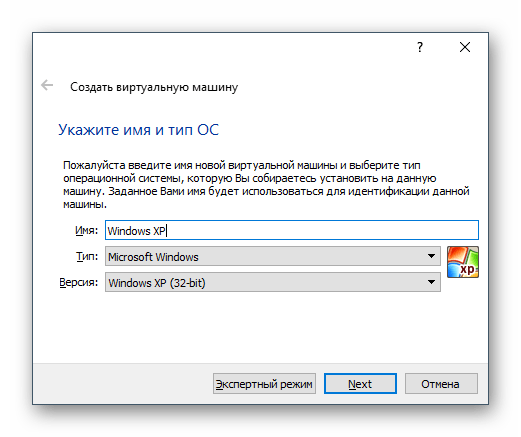
- В поле «Имя» впишите «Windows XP» — остальные поля будут заполнены автоматически.

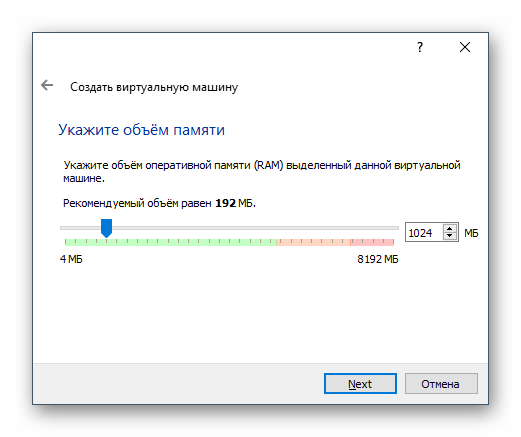
- Решите, сколько RAM вы хотите выделить под устанавливаемую ОС. VirtualBox рекомендует использовать минимум 192 МБ оперативной памяти, но если есть возможность, то используйте 512 или 1024 МБ. Так система не будет тормозить даже при высоком уровне загруженности.
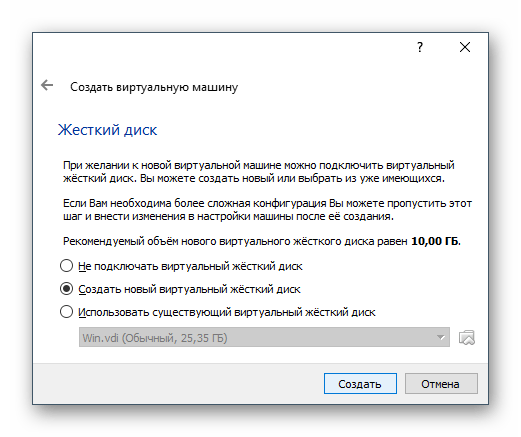
- Вам будет предложено выбрать виртуальный накопитель, который можно подключить к этой машине. Нам это не нужно, поскольку мы собираемся установить Windows, используя ISO-образ. Следовательно, настройку в этом окне менять не нужно — оставляем все как есть и нажимаем на «Создать».
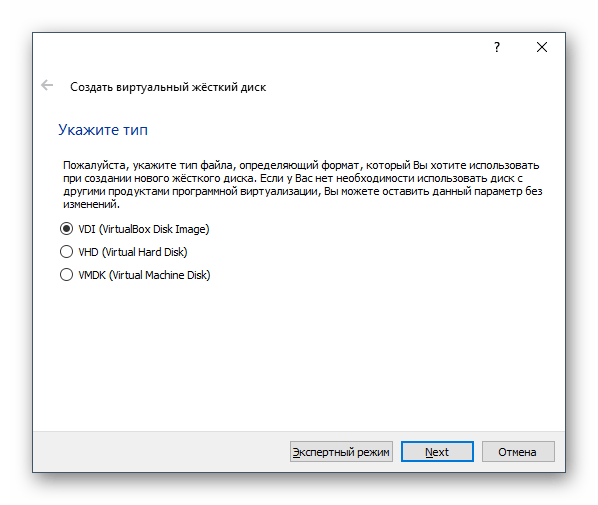
- Тип выбранного диска оставьте «VDI».

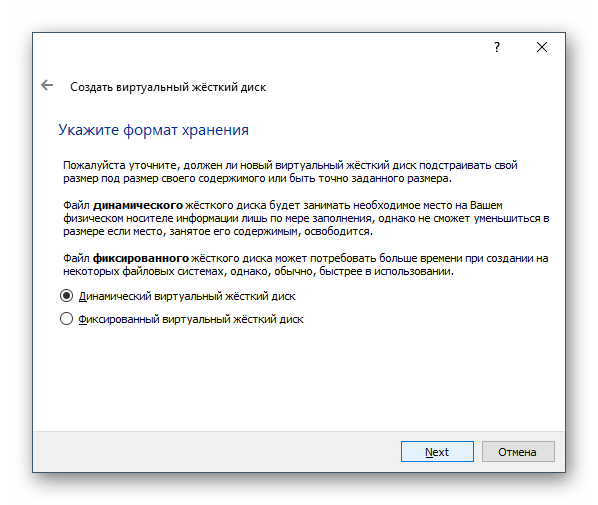
- Укажите подходящий формат хранения. Рекомендуется использовать «Динамический».
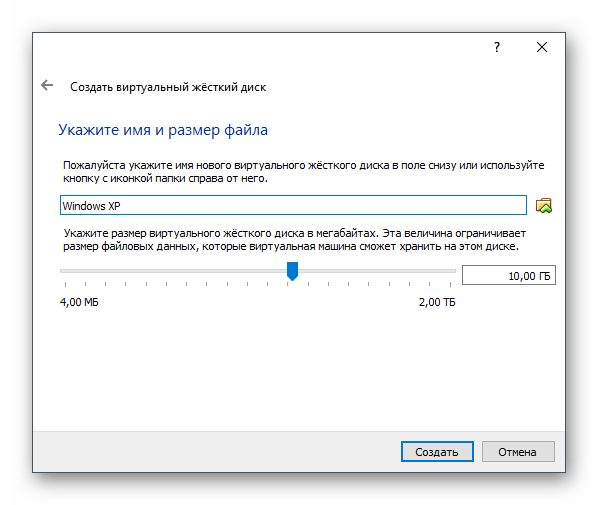
- Укажите количество гигабайт, которое вы желаете выделить под создание виртуального жесткого диска. VirtualBox рекомендует выделить 10 ГБ, но вы можете задать и другую величину.
Если на предыдущем шаге вы выбрали вариант «динамический», то Windows XP изначально займет на жестком диске только установочный объем (не более 1,5 ГБ), а затем, по мере ваших действий внутри этой ОС, виртуальный накопитель сможет расшириться максимум до 10 ГБ.
При «фиксированном» формате на физическом HDD сразу же будет занято 10 ГБ.
На создании виртуального HDD этот этап заканчивается, и можно переходить к настройке VM.
Настройка виртуальной машины для Windows XP
Перед установкой Виндовс можно выполнить еще несколько настроек для повышения производительности. Это — необязательная процедура, поэтому ее можно пропустить.
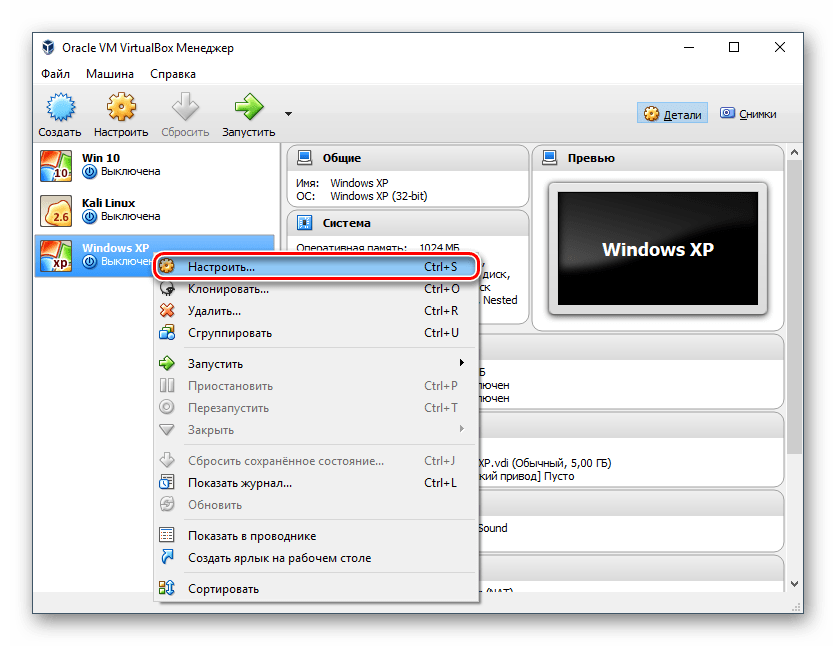
- В левой части VirtualBox Менеджера вы увидите созданную виртуальную машину для Windows XP. Нажмите по ней правой кнопкой мыши и перейдите в «Настроить».
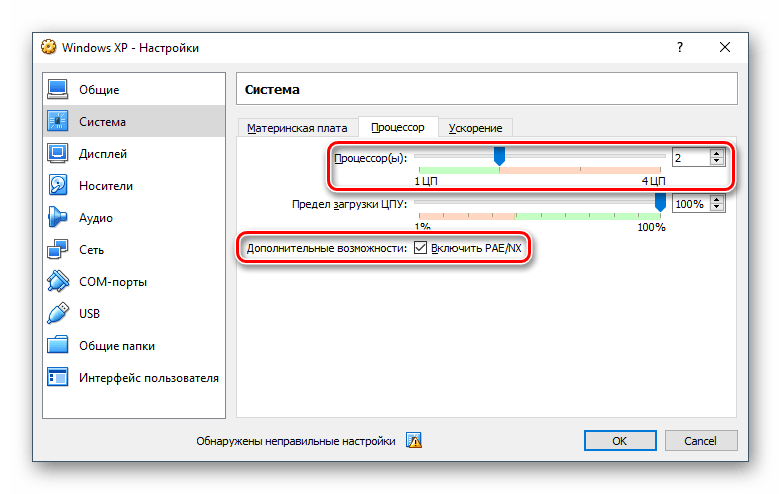
- Переключитесь на вкладку «Система» и увеличьте параметр «Процессор(ы)» с 1 до 2. Для улучшенной их работы задействуйте режим работы PAE/NX, поставьте напротив него галочку.

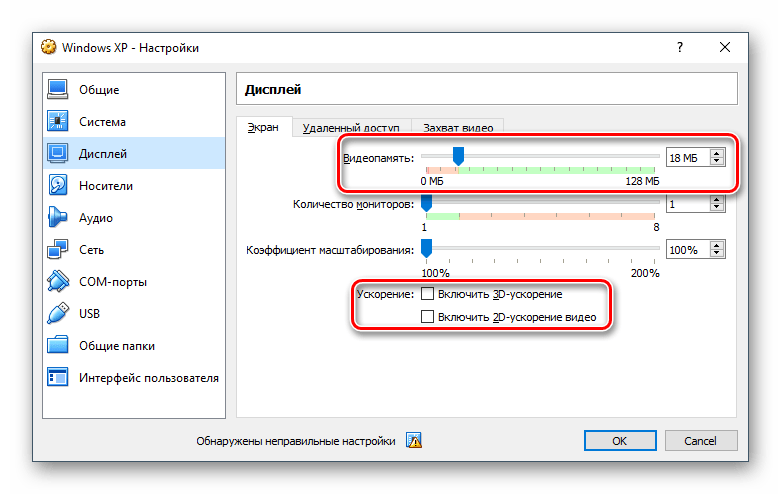
- Во вкладке «Дисплей» вы можете немного увеличить количество видеопамяти, но не переусердствуйте — для устаревшей Windows XP будет достаточно совсем небольшой прибавки.
Также вы можете поставить галочки напротив параметра «Ускорение», включив 3D и 2D.
- При желании вы можете настроить и другие параметры.
После настройки VM можно приступать к установке ОС.
Установка Windows XP на VirtualBox
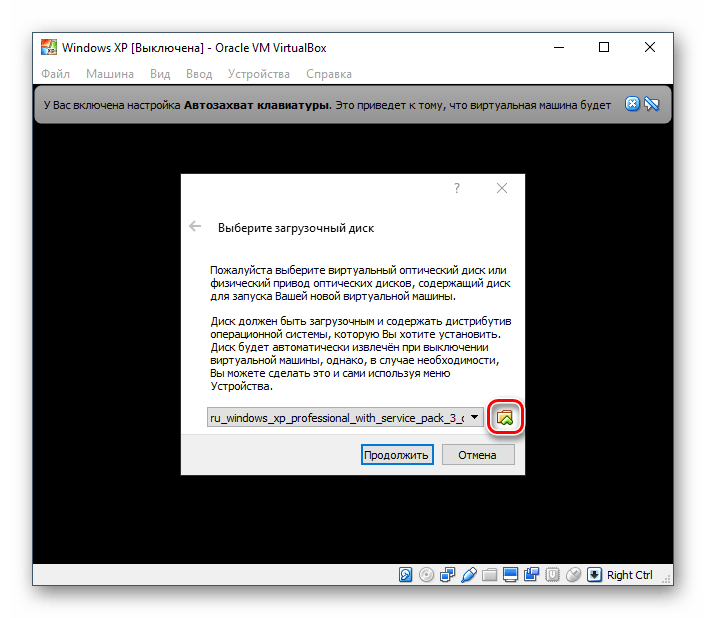
- В левой части VirtualBox Менеджера выделите созданную виртуальную машину и нажмите на кнопку «Запустить».
- Вам будет предложено выбрать загрузочный диск для запуска. Нажмите на кнопку с папкой и укажите место, где расположен файл с образом операционной системы.

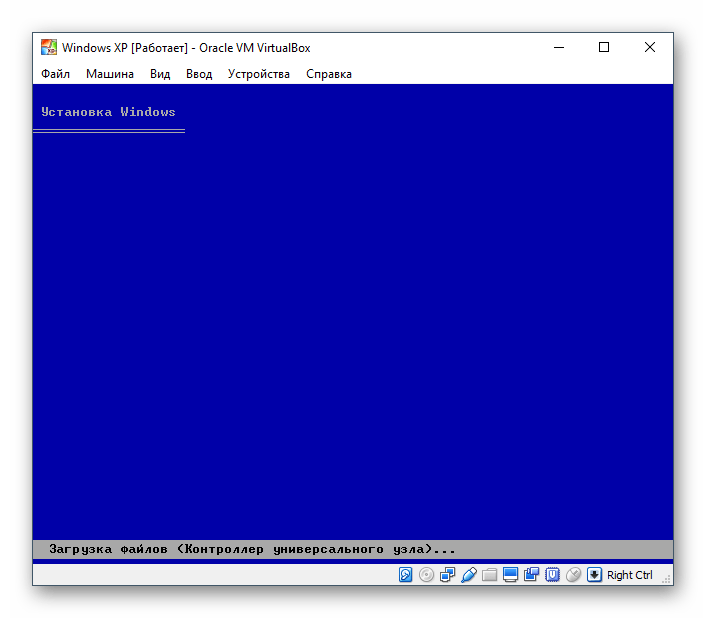
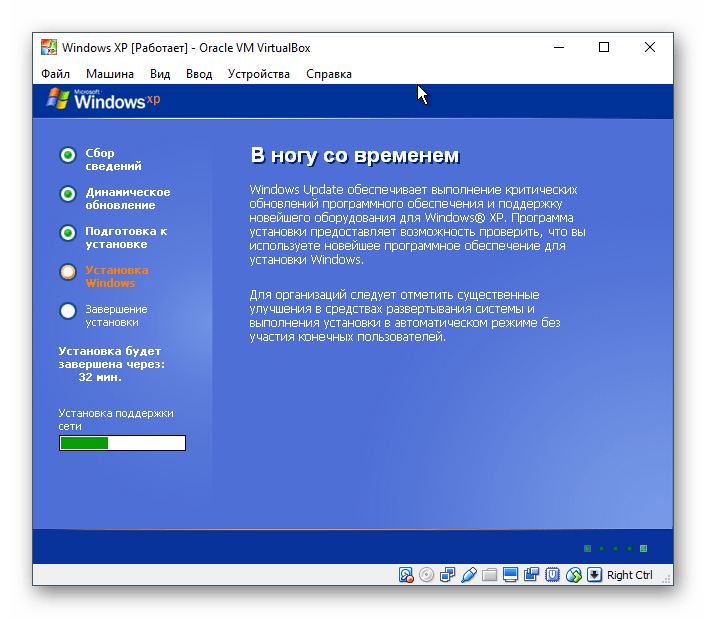
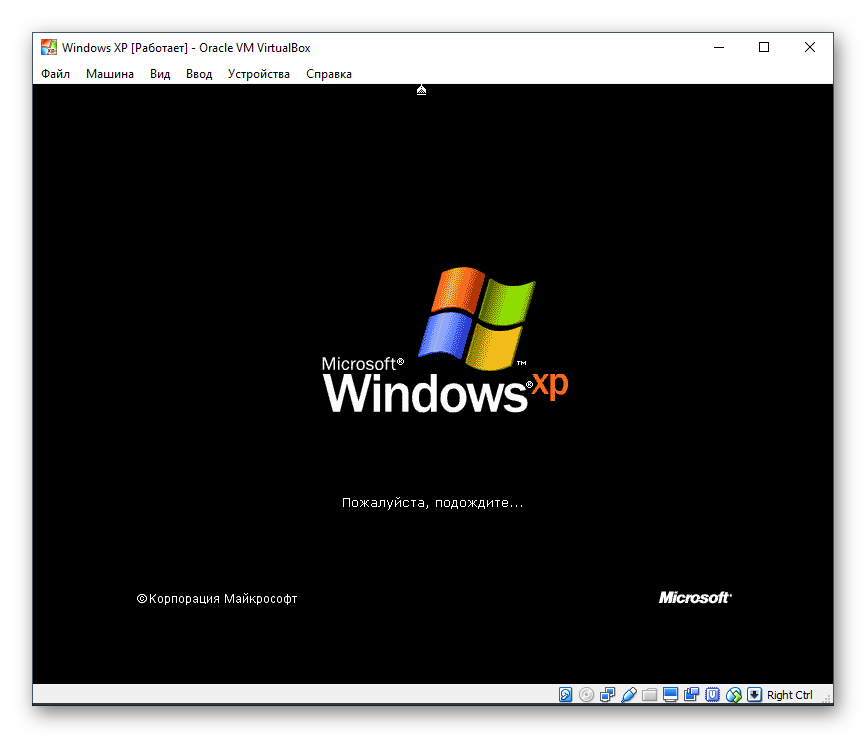
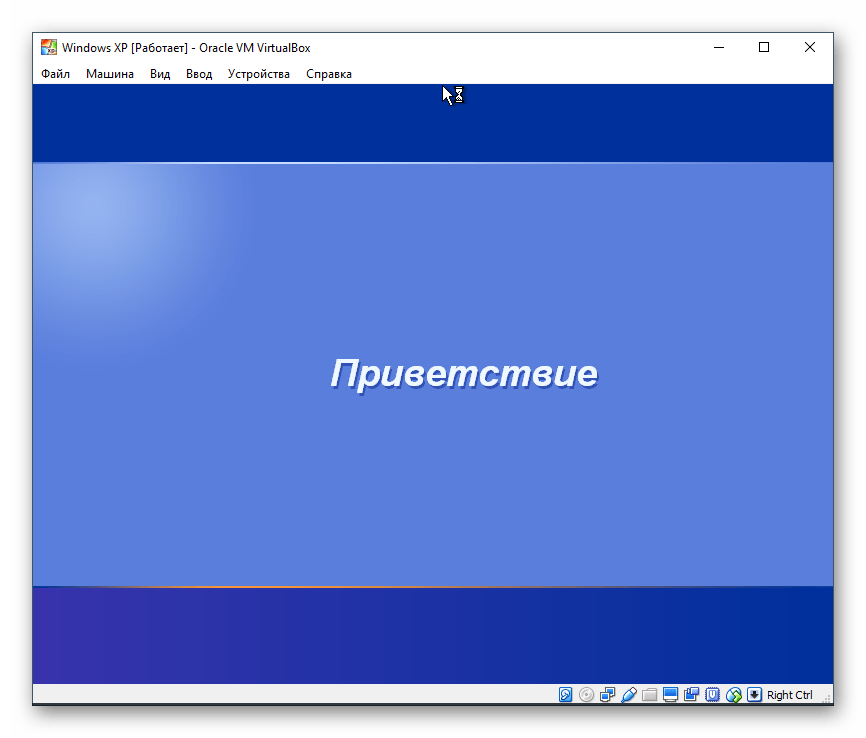
- Запустится установочная утилита Windows XP. Свои первые действия она выполнит автоматически, и вам потребуется немного подождать.
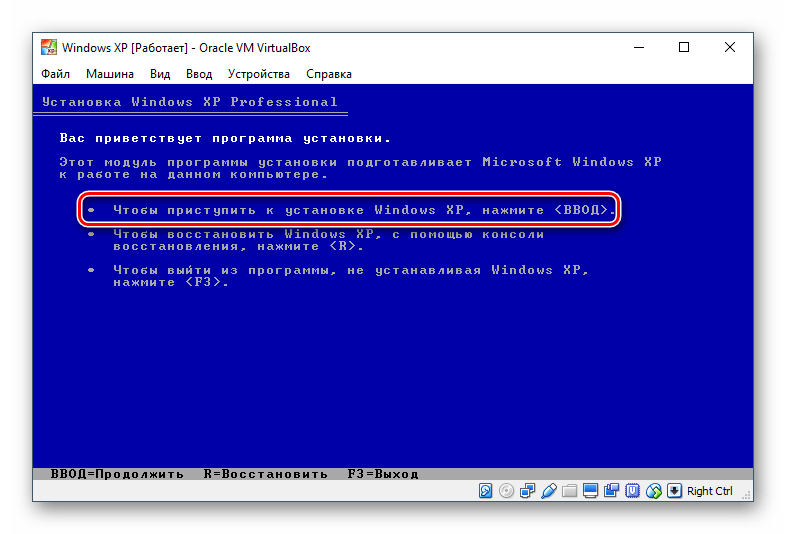
- Вас поприветствует установочная программа и предложит приступить к установке, нажав клавишу «Ввод». Здесь и далее под этой клавишей будет подразумеваться клавиша Enter.

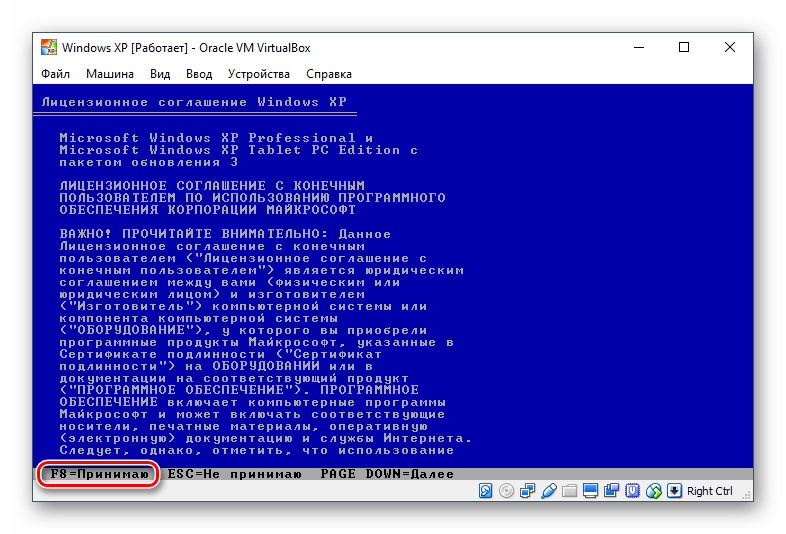
- Откроется лицензионное соглашение, и если вы с ним согласны, то нажмите на клавишу F8, чтобы принять его условия.
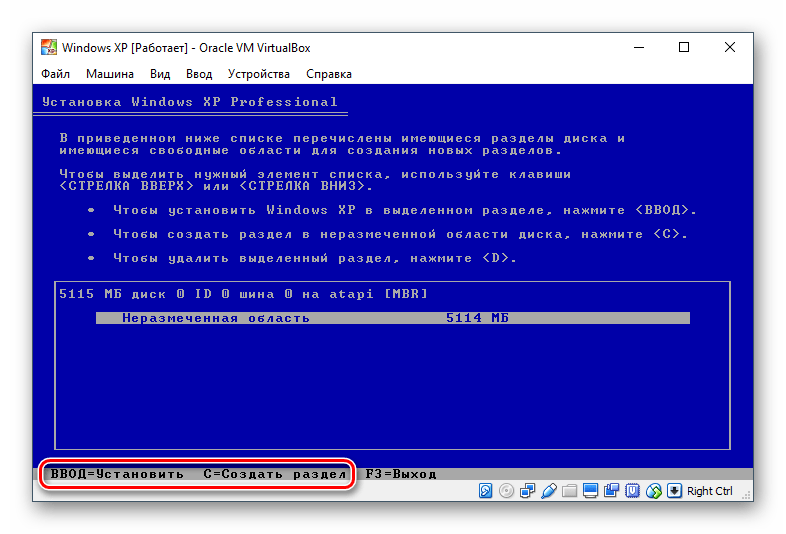
- Установщик попросит выбрать диск, куда будет установлена система. VirtualBox уже создал виртуальный жесткий диск объемом, который вы выбрали на шаге 7 при создании виртуальной машины. Поэтому нажмите Enter.
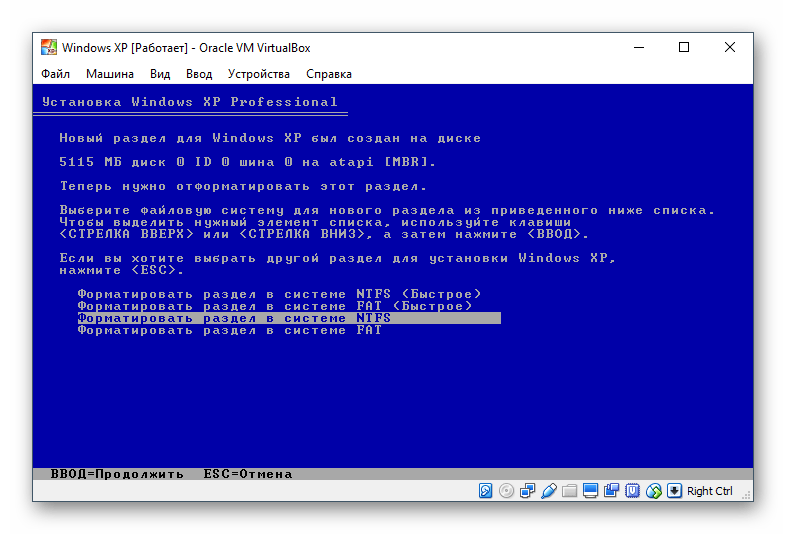
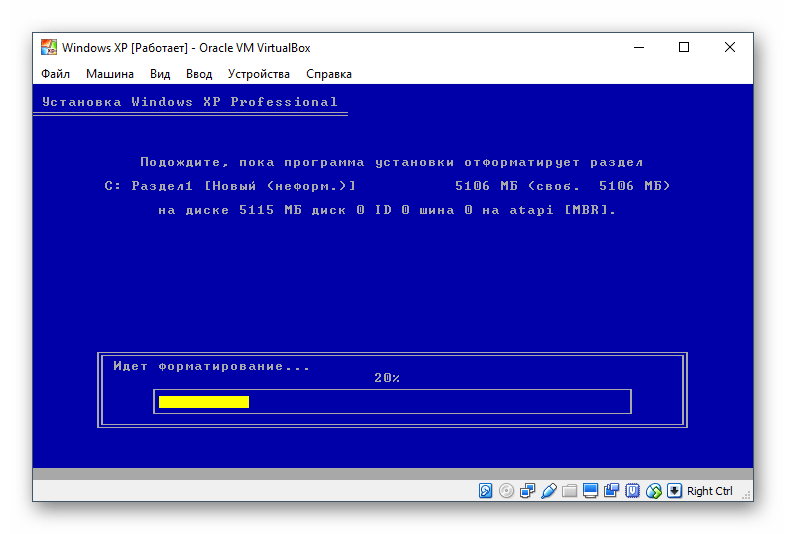
- Эта область еще не размечена, поэтому установщик предложит ее отформатировать. Выберите один из четырех доступных вариантов. Рекомендуем использовать параметр «Форматировать раздел в системе NTFS».
- Дождитесь, пока будет отформатирован раздел.
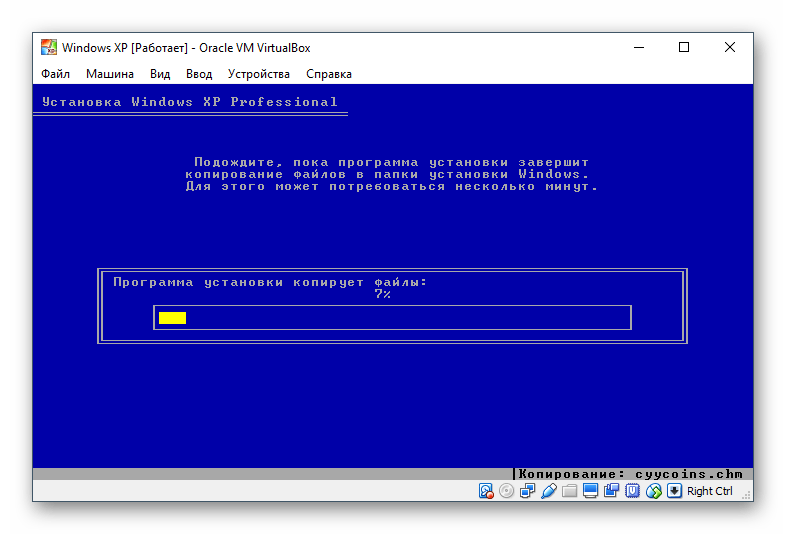
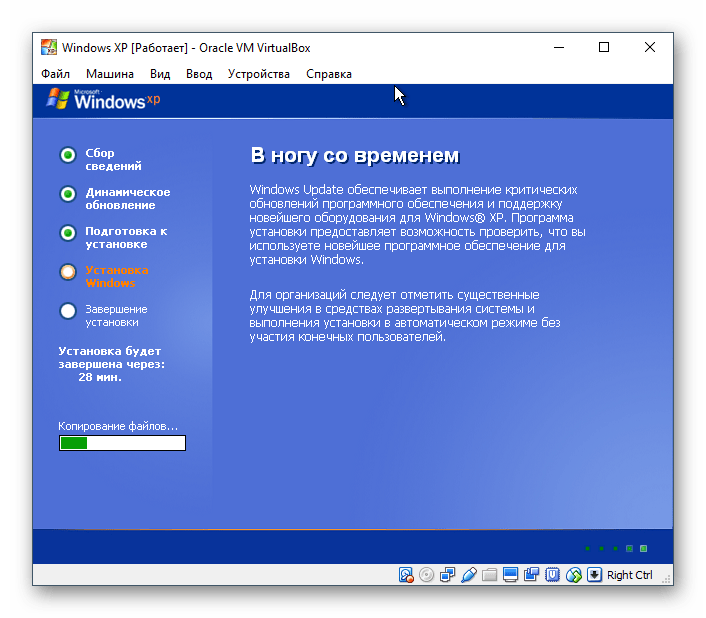
- Программа установки в автоматическом режиме выполнит копирование некоторых файлов.
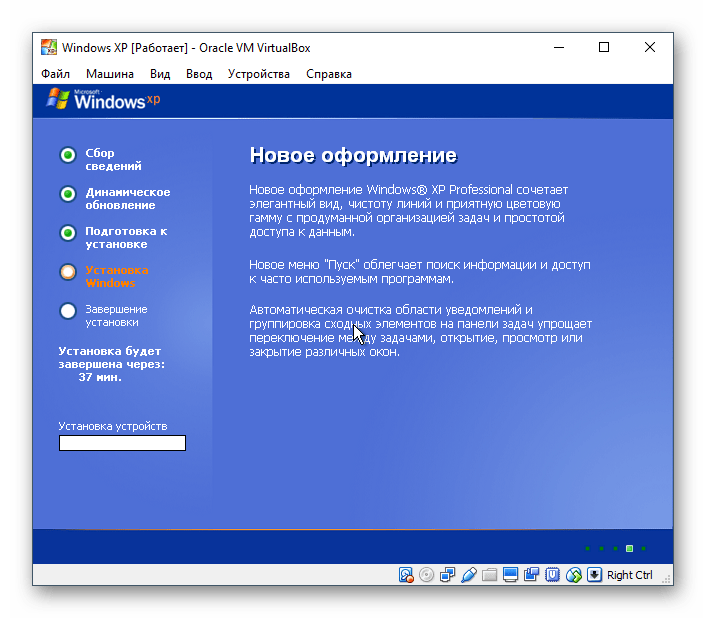
- Откроется окно с непосредственной установкой Windows, и сразу же начнется установка устройств, подождите.
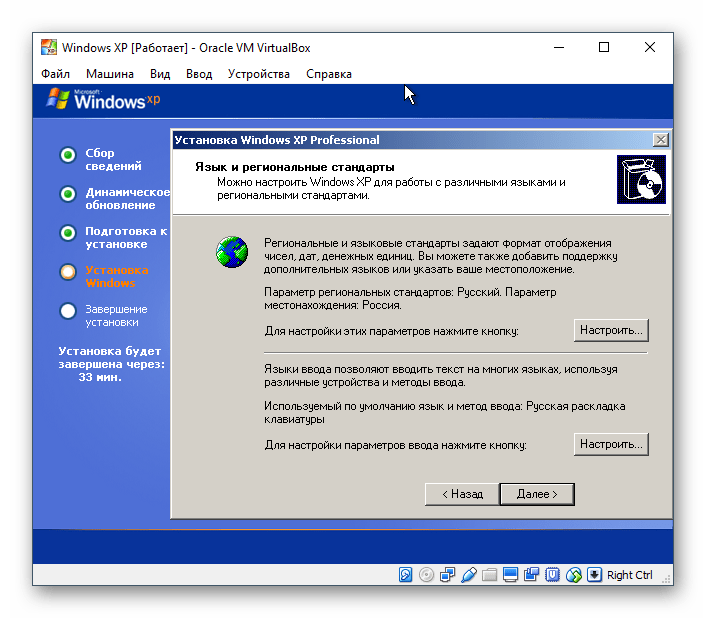
- Проверьте правильность выбранных установщиком настроек языка системы и раскладки клавиатуры.
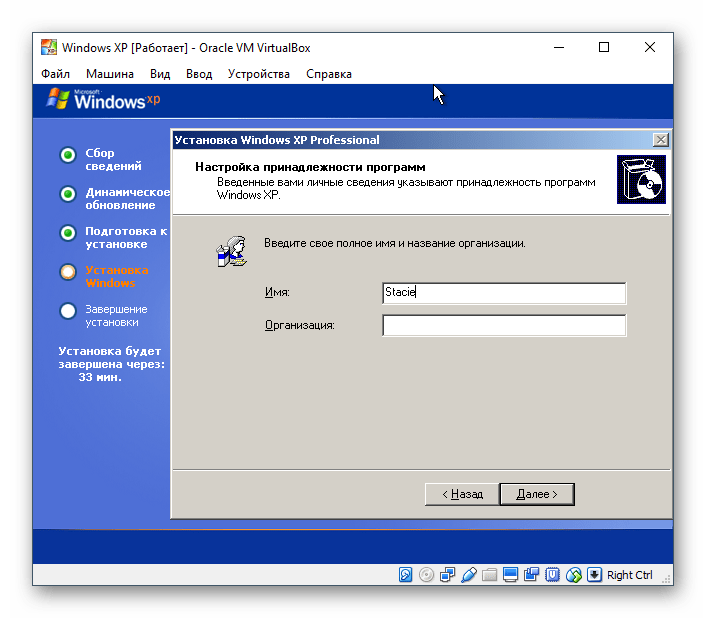
- Введите имя пользователя, имя организации вводить не нужно.
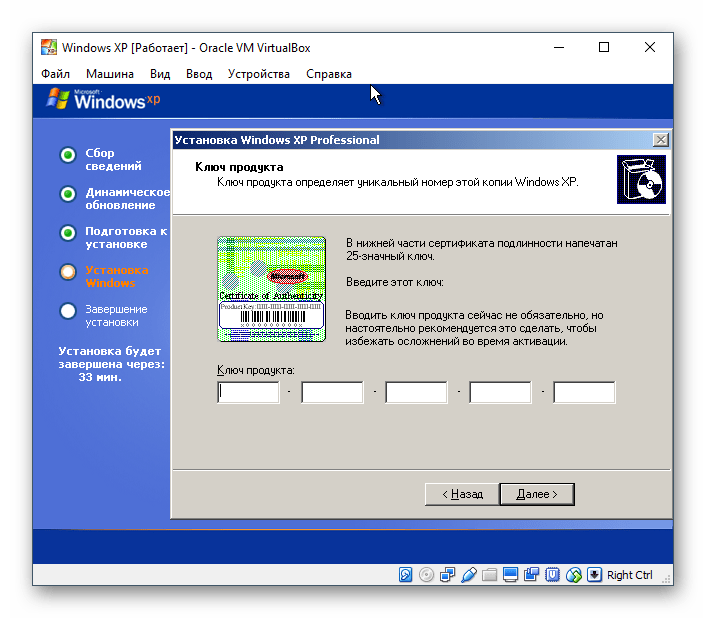
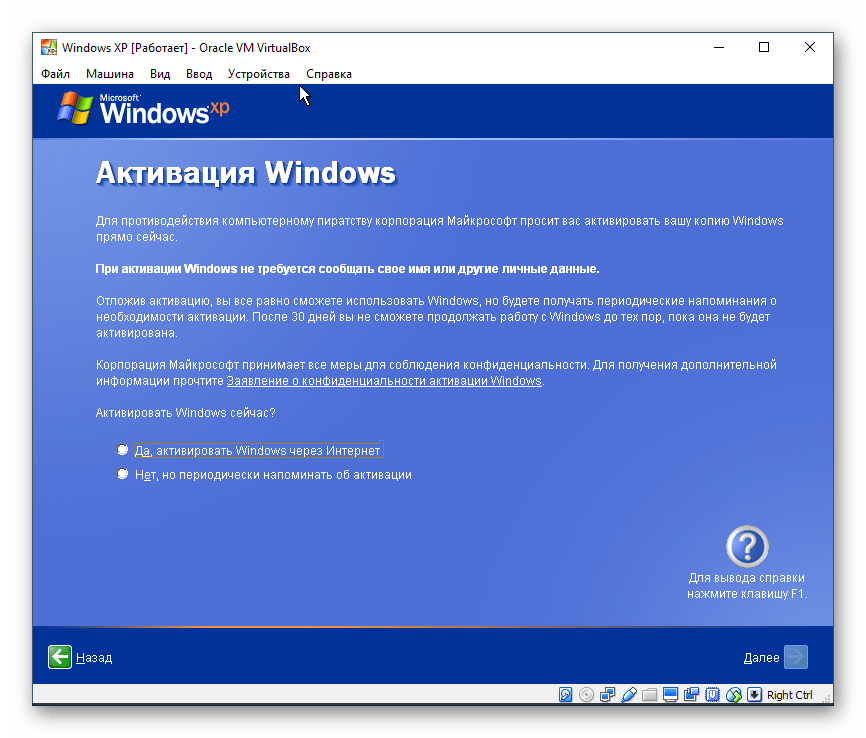
- Введите ключ активации, если он есть. Вы можете активировать Windows позднее.
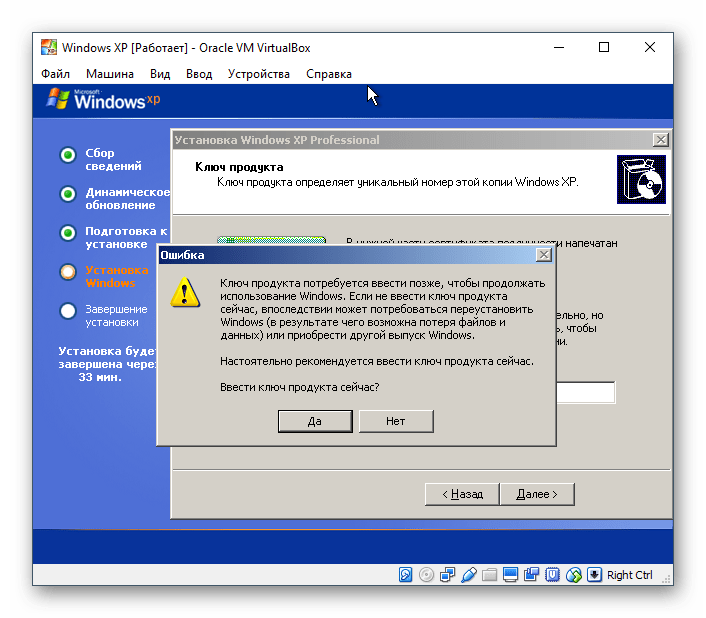
- Если вы желаете отложить активацию, то в окне подтверждения выберите «Нет».
- Укажите имя компьютера. Вы можете установить пароль для учетной записи «Администратор». Если в этом нет необходимости — пропустите ввод пароля.
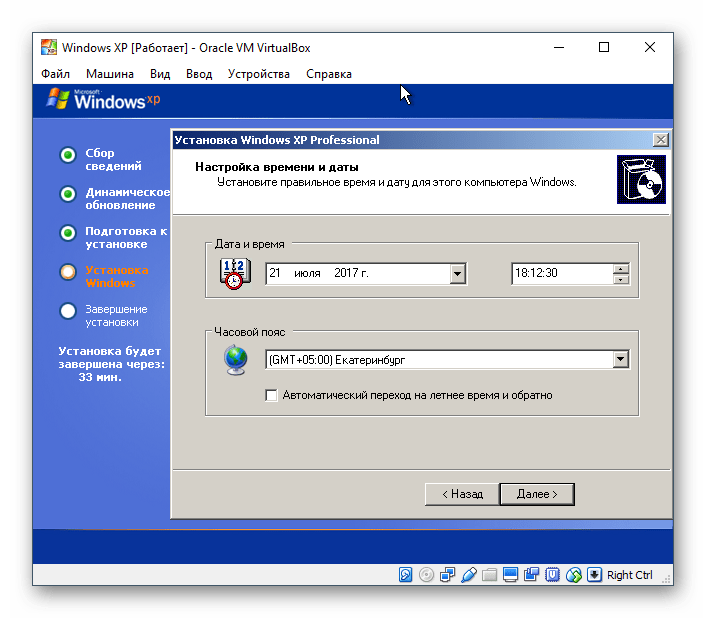
- Проверьте дату и время, при необходимости измените эти сведения. Укажите свой часовой пояс, найдя город в списке. Жители России могут снять галочку с пункта «Автоматический переход на летнее время и обратно».
- Продолжится автоматическая установка ОС.
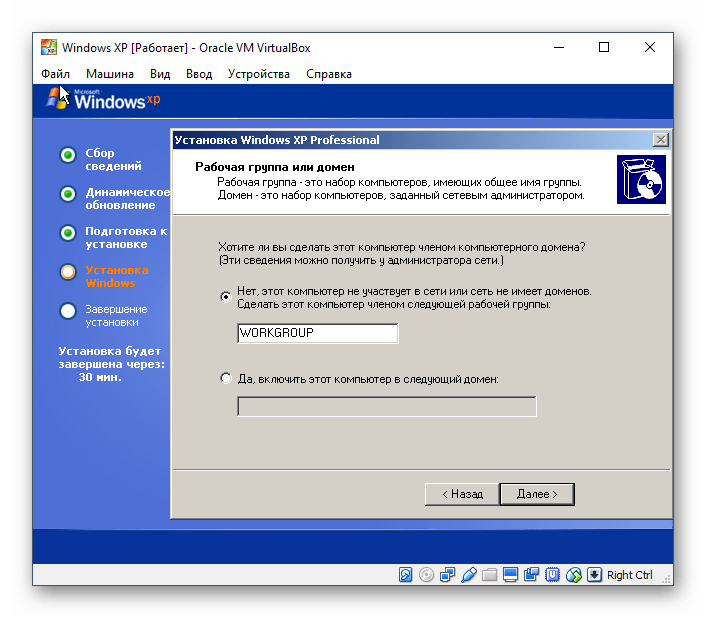
- Программа установки предложит настроить сетевые параметры. Для обычного выхода в интернет выберите «Обычные параметры».
- Шаг с настройкой рабочей группы или домена можно пропустить.
- Дождитесь, пока система закончит автоматическую установку.
- Виртуальная машина будет перезагружена.
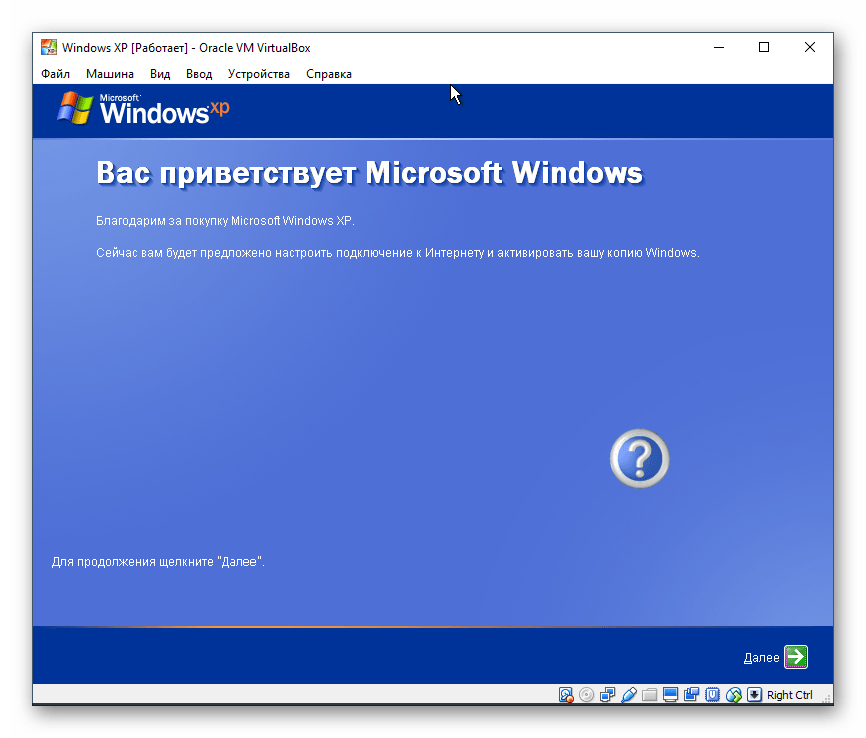
- После перезагрузки необходимо выполнить еще несколько настроек.

- Откроется приветственное окно, в котором нажмите «Далее».
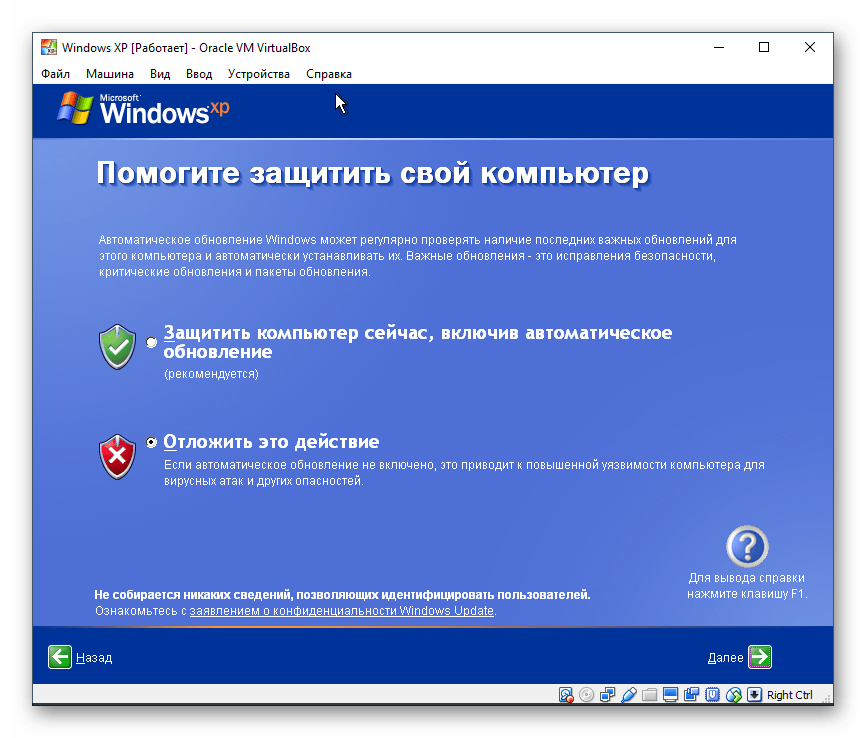
- Установщик предложит включить или отключить автоматическое обновление. Задайте параметр в зависимости от личных предпочтений.
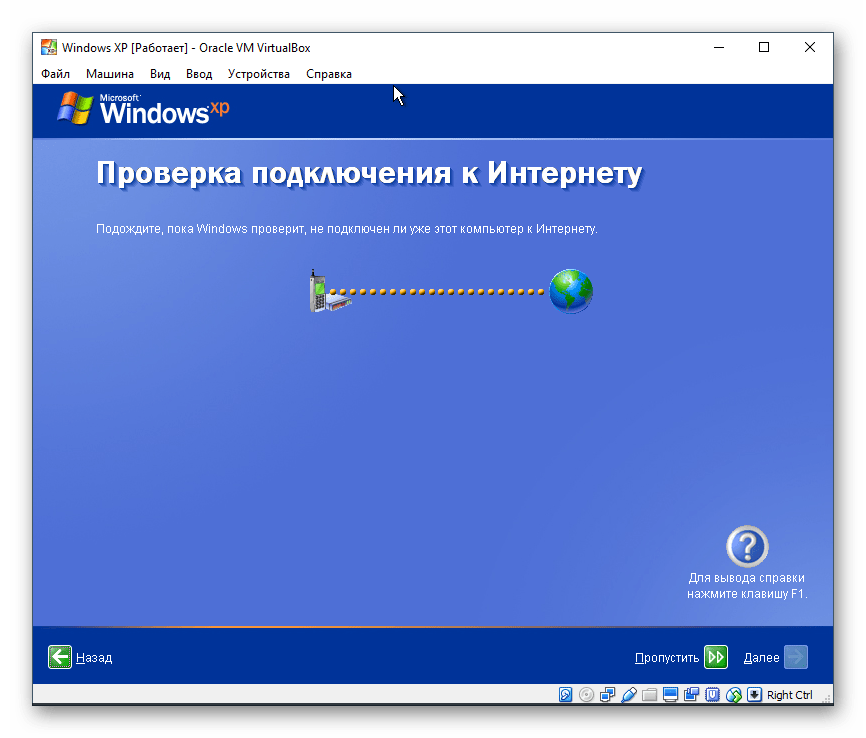
- Дождитесь, пока будет проверено подключение к интернету.
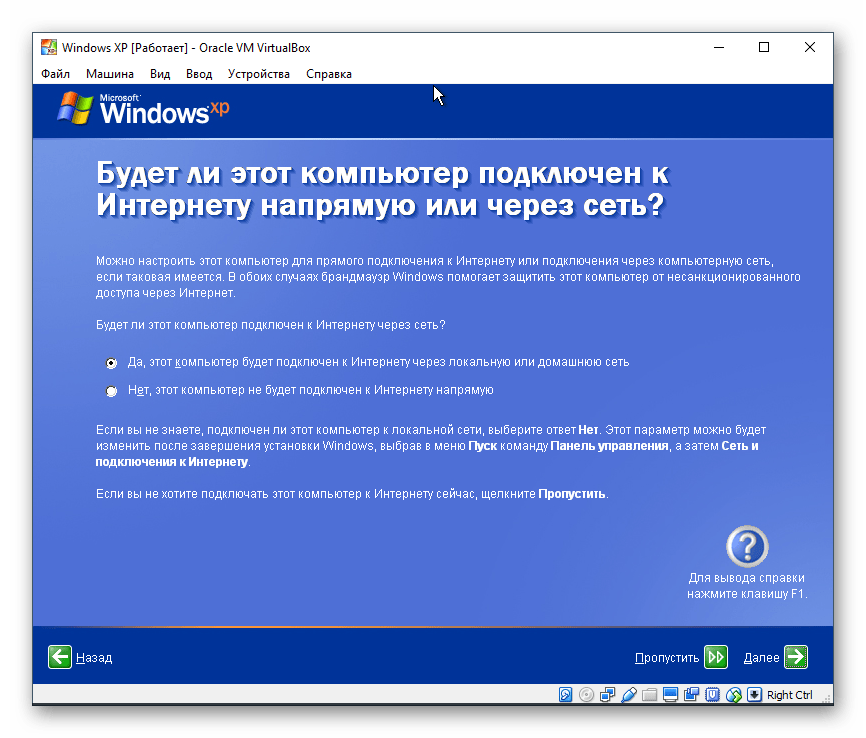
- Выберите, будет ли компьютер подключен к интернету напрямую.
- Вам будет повторно предложено активировать систему, если вы этого еще не сделали. Если не активировать Виндовс сейчас, то это можно будет сделать в течение 30 суток.
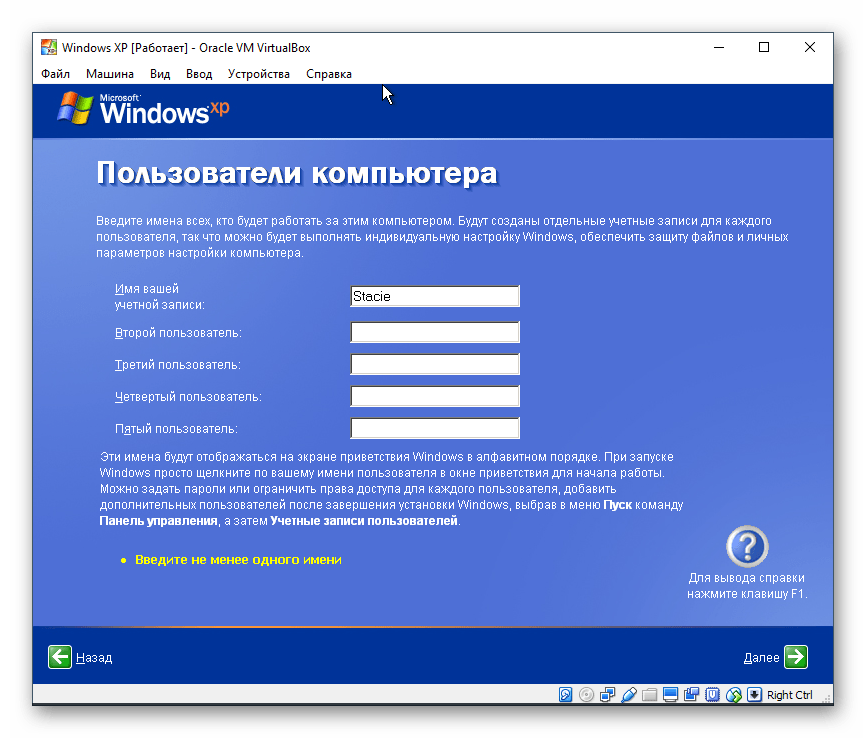
- Придумайте имя учетной записи. Необязательно придумывать 5 имен, достаточно ввести одно.
- На этом шаге настройка будет завершена.
- Начнется загрузка Windows XP.


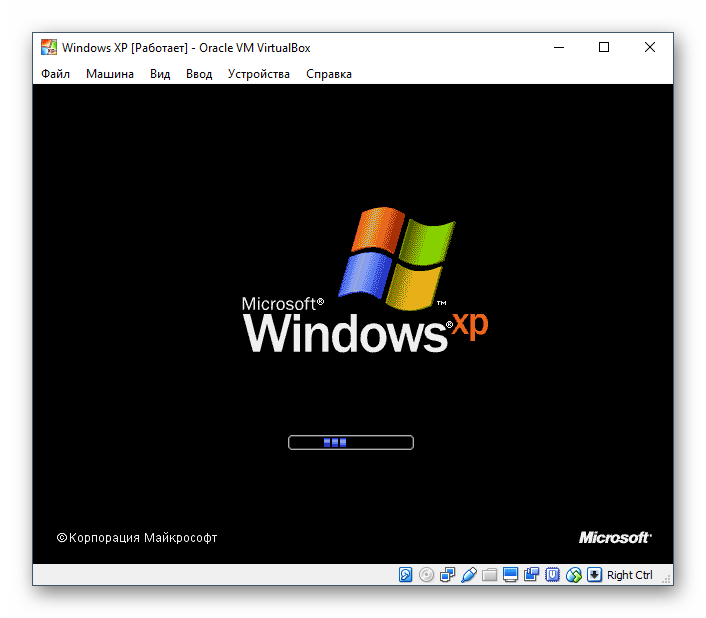
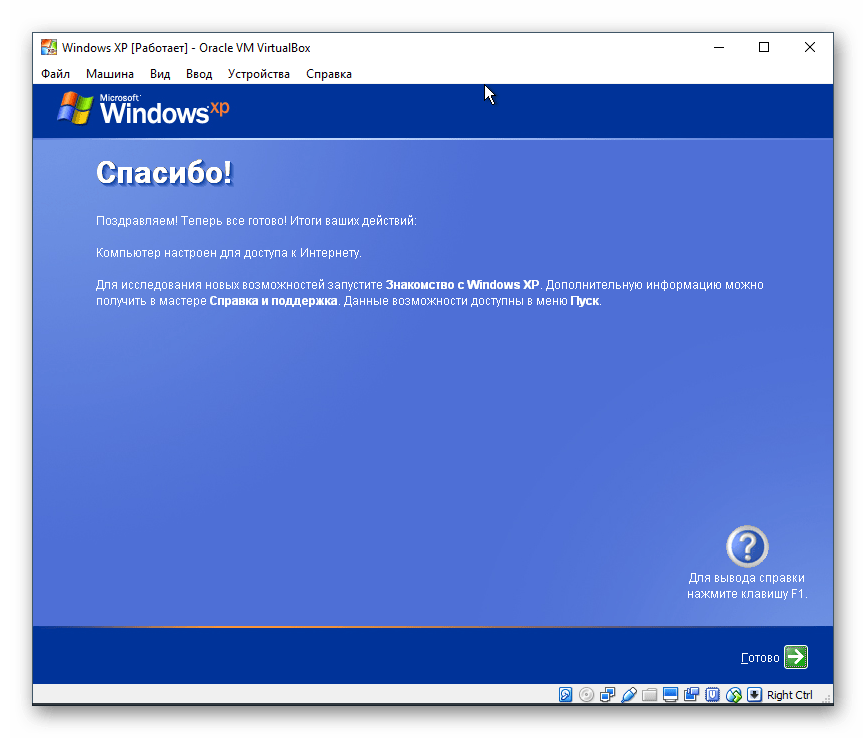
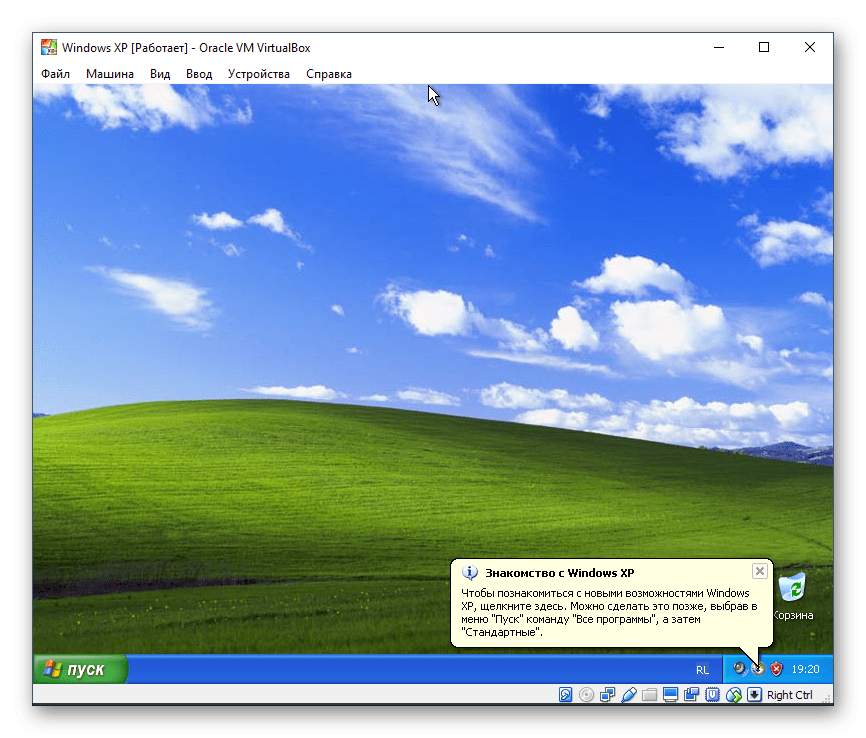
После загрузки вы попадете на рабочий стол и сможете начать пользоваться операционной системой.
Установка Windows XP на VirtualBox очень проста и не занимает много времени. При этом пользователю нет необходимости искать драйвера, совместимые с компонентами ПК, как это было бы необходимо делать при обычной установке Windows XP.

Еще статьи по данной теме: