
How to install Git on any OS
Git can be installed on the most common operating systems like Windows, Mac, and Linux. In fact, Git comes installed by default on most Mac and Linux machines!
Checking for Git
To see if you already have Git installed, open up your terminal application.
- If you’re on a Mac, look for a command prompt application called «Terminal».
- If you’re on a Windows machine, open the windows command prompt or «Git Bash».
Once you’ve opened your terminal application, type git version. The output will either tell you which version of Git is installed, or it will alert you that git is an unknown command. If it’s an unknown command, read further and find out how to install Git.
Install Git Using GitHub Desktop
Installing GitHub Desktop will also install the latest version of Git if you don’t already have it. With GitHub Desktop, you get a command line version of Git with a robust GUI. Regardless of if you have Git installed or not, GitHub Desktop offers a simple collaboration tool for Git. You can learn more here.
Install Git on Windows
- Navigate to the latest Git for Windows installer and download the latest version.
- Once the installer has started, follow the instructions as provided in the Git Setup wizard screen until the installation is complete.
- Open the windows command prompt (or Git Bash if you selected not to use the standard Git Windows Command Prompt during the Git installation).
- Type
git versionto verify Git was installed.
Note: git-scm is a popular and recommended resource for downloading Git for Windows. The advantage of downloading Git from git-scm is that your download automatically starts with the latest version of Git included with the recommended command prompt, Git Bash . The download source is the same Git for Windows installer as referenced in the steps above.
Install Git on Mac
Most versions of MacOS will already have Git installed, and you can activate it through the terminal with git version. However, if you don’t have Git installed for whatever reason, you can install the latest version of Git using one of several popular methods as listed below:
Install Git From an Installer
- Navigate to the latest macOS Git Installer and download the latest version.
- Once the installer has started, follow the instructions as provided until the installation is complete.
- Open the command prompt «terminal» and type
git versionto verify Git was installed.
Note: git-scm is a popular and recommended resource for downloading Git on a Mac. The advantage of downloading Git from git-scm is that your download automatically starts with the latest version of Git. The download source is the same macOS Git Installer as referenced in the steps above.
Install Git from Homebrew
Homebrew is a popular package manager for macOS. If you already have Homwbrew installed, you can follow the below steps to install Git:
- Open up a terminal window and install Git using the following command:
brew install git. - Once the command output has completed, you can verify the installation by typing:
git version.
Install Git on Linux
Fun fact: Git was originally developed to version the Linux operating system! So, it only makes sense that it is easy to configure to run on Linux.
You can install Git on Linux through the package management tool that comes with your distribution.
Debian/Ubuntu
- Git packages are available using
apt. - It’s a good idea to make sure you’re running the latest version. To do so, Navigate to your command prompt shell and run the following command to make sure everything is up-to-date:
sudo apt-get update. - To install Git, run the following command:
sudo apt-get install git-all. - Once the command output has completed, you can verify the installation by typing:
git version.
Fedora
- Git packages are available using
dnf. - To install Git, navigate to your command prompt shell and run the following command:
sudo dnf install git-all. - Once the command output has completed, you can verify the installation by typing:
git version.
Note: You can download the proper Git versions and read more about how to install on specific Linux systems, like installing Git on Ubuntu or Fedora, in git-scm’s documentation.
Other Methods of Installing Git
Looking to install Git via the source code? Learn more here.
Contribute to this article on GitHub.
Get started with git and GitHub
Review code, manage projects, and build software alongside 40 million developers.
Sign up for GitHub
Sign in
Updated: 06/30/2020 by

By default, Git is installed on Linux and macOS computers as a command line option. However, Microsoft Windows does not include a Git command. Below are the steps on how to install and use Git and GitHub on Microsoft Windows.
Installing Git on Windows
- Open the Git website.
- Click the Download link to download Git. The download should automatically start.
- Once downloaded, start the installation from the browser or the download folder.
- In the Select Components window, leave all default options checked and check any other additional components you want installed.
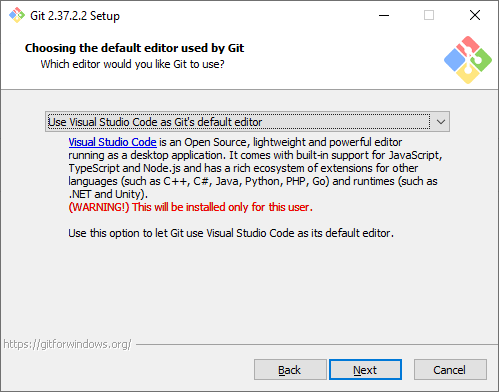
- Next, in the Choosing the default editor, used by Git unless you’re familiar with Vim we highly recommend using a text editor you’re comfortable using. If Notepad++ is installed, we suggest using it as your editor. If Notepad++ is not installed, you can cancel the install and install Notepad++ and then restart the GitHub install.
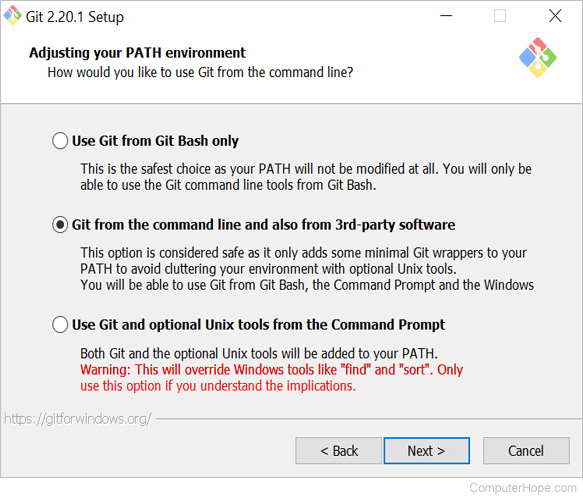
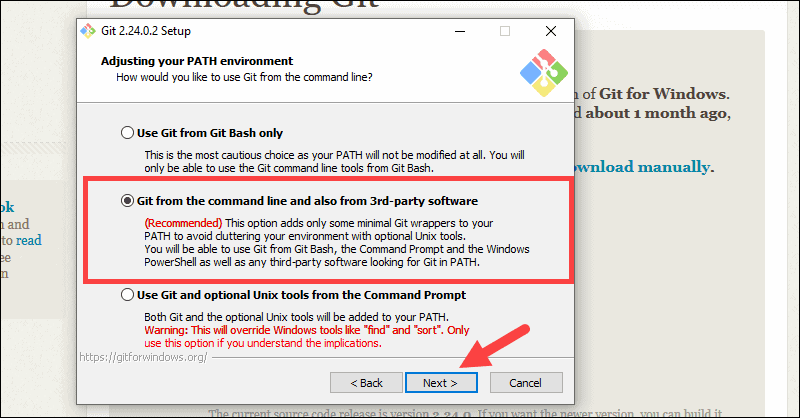
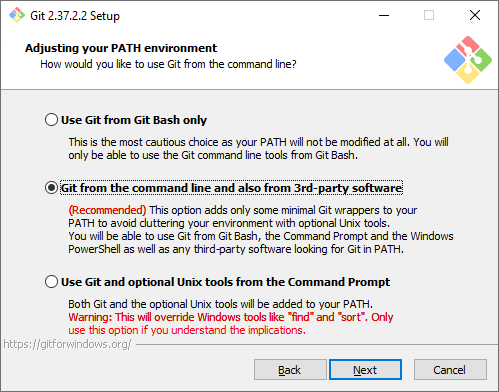
- Next, in the Adjusting your PATH environment, we recommend keeping the default Use Git from the command line and also from 3rd-party software as shown below. This option lets you use Git from either Git Bash or the Windows Command Prompt.
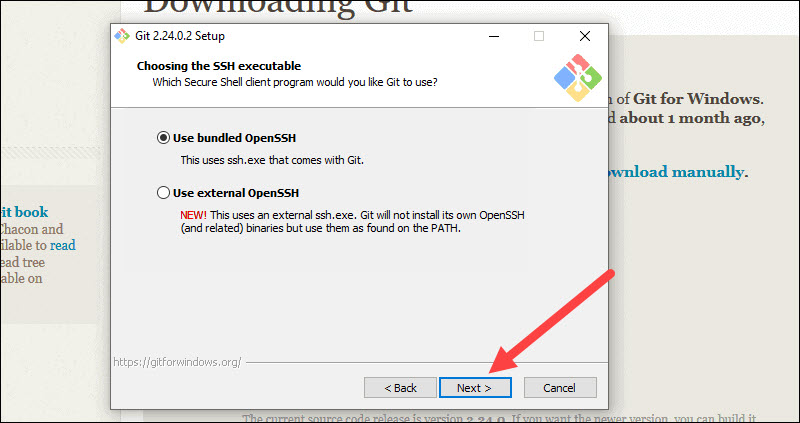
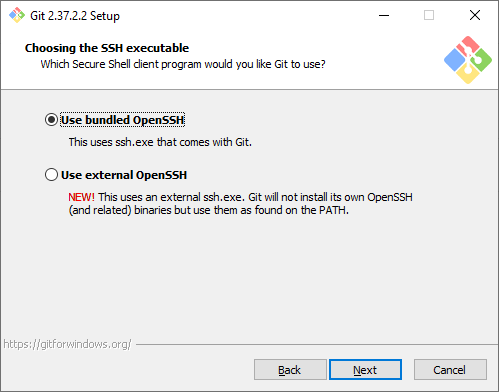
- Next, we recommend leaving the default selected as Use OpenSSH.
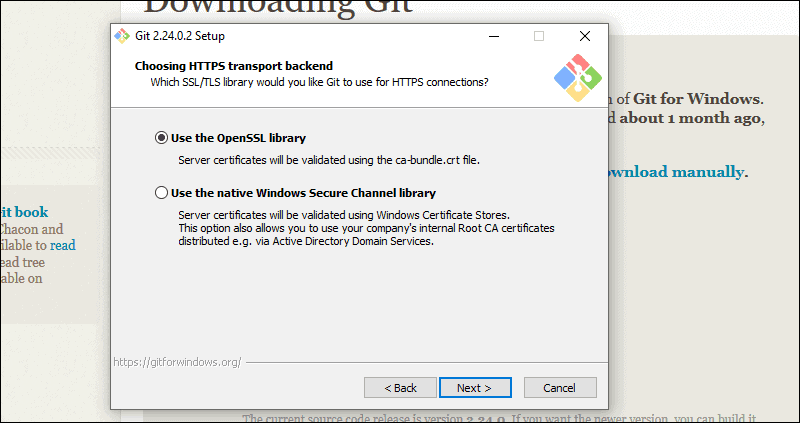
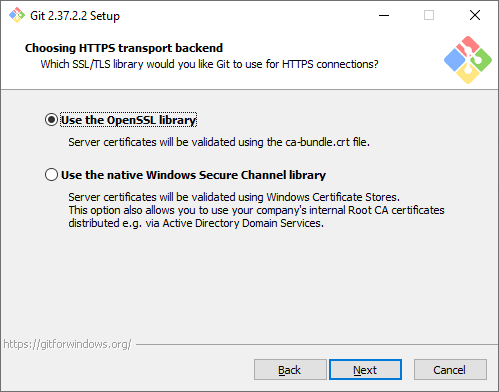
- Next, in Choosing HTTPS transport backend, leave the default Use the OpenSSL library selected.
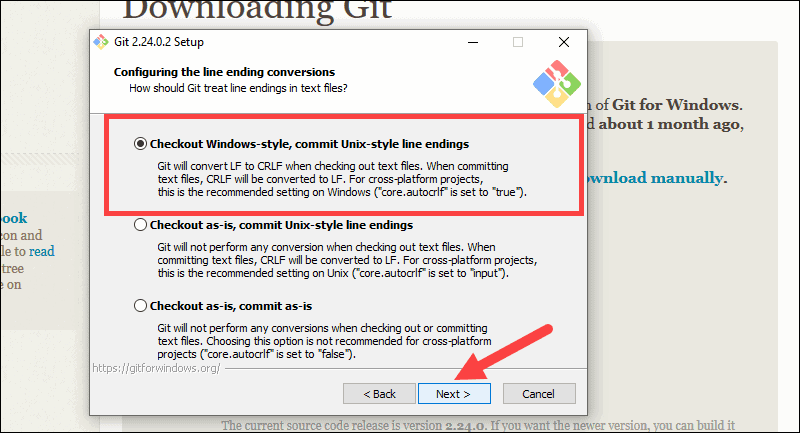
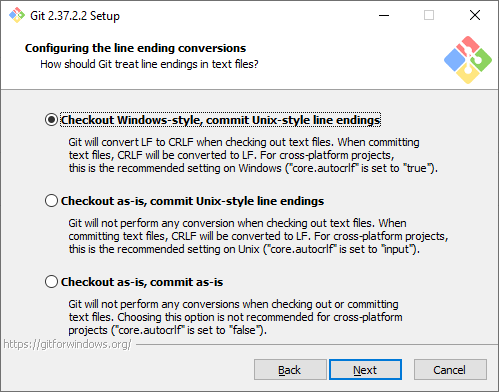
- In the Configuring the line ending conversions, select Checkout Windows-style, commit Unix-style line endings unless you need other line endings for your work.
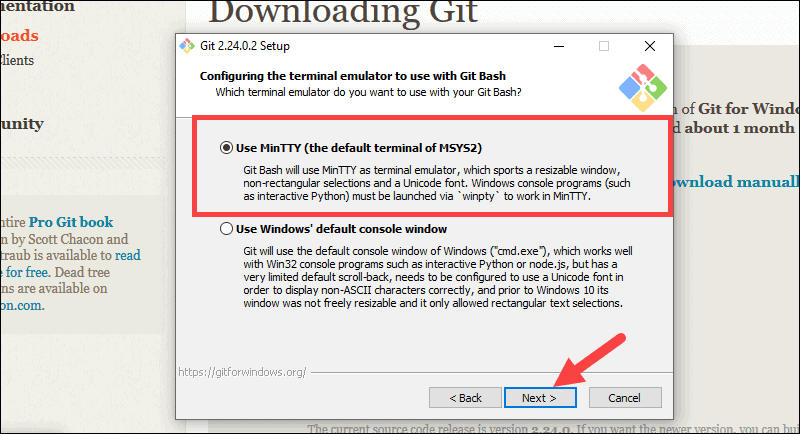
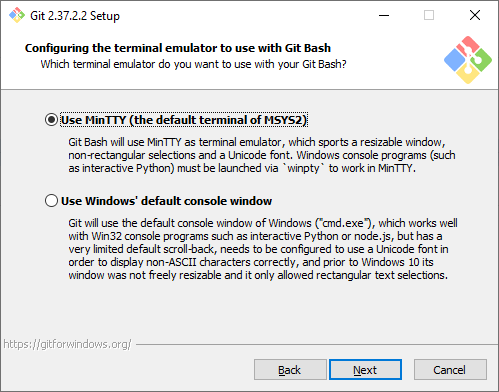
- In the Configuring the terminal emulator to use with Git Bash window, select Use MinTTY (the default terminal of MSYS2).
- On the Configuring extra options window, leave the default options checked unless you need symbolic links.
- Click the Install button
- Once completed, you can check the option to Launch Git Bash if you want to open a Bash command line or, if you selected the Windows command line, run Git from the Windows command line.
Tip
We highly recommend you use Git from the command line and not use a GUI interface. You’ll only be using the command line to interface with Git to manage the files. Editing can still be done through a text editor or IDE of your choice. If you’re new to the command line, you can find help with navigating the Windows command line and Linux (Bash) through the links below.
- How to use the Windows command line (DOS).
- Linux shell tutorial.
Configuring and connecting to a remote repository
In our example, we’re using GitHub as a storage for our remote repository. Below are the steps on how you can connect to a GitHub repository. If you are new to GitHub, see: How to create a GitHub repository.
- From the command line, move to the directory you want to contain your Git repository.
- How to change a directory or open a folder.
- Type the following command to configure your Git username, where <your name> will be your GitHub username.
git config --global user.name "<your name>"
- After entering the above command, you’ll be returned to the command prompt. Next, enter your e-mail address by typing the following command, where <your e-mail> is your e-mail address.
git config --global user.email "<your e-mail>"
- Once the above steps are completed, you’ll be ready to connect to a remote repository. To find the repository address, go to a repository on GitHub and click the Clone or download repository link to get the address. For example, we’ve created a repository called «example» at https://github.com/Computerhope/example.git address. Copy the address to your clipboard.
- Once copied go back to the command line and type the following command, where <URL> is the address you copied. To paste that address into the command line right-click in the command line window and click paste.
git clone <URL>
- Once the Git repository is created, you’ll have a new directory in your current directory with the name of the Git repository.
- Once the Git remote repository is cloned to your local repository, a new folder in the current directory should appear with the name of the Git repository. For example, in our «example» Git we would have a new directory called «example». Use the cd command to change into the new directory.
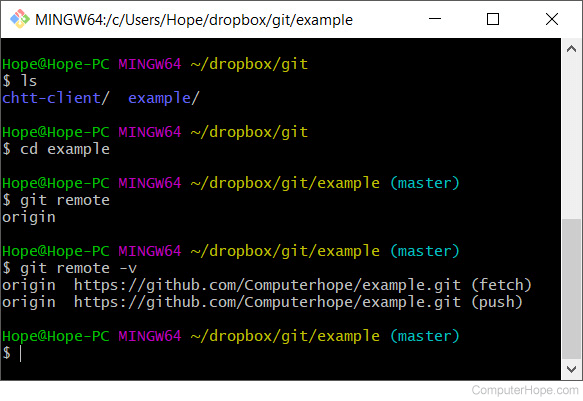
- Once in the new directory, type the following command to list the remote repositories.
git remote
- If successful, the output is «origin,» a special name that refers to the remote repository.
- To see the aliases (URL or path), type the following command.
git remote -v
Running each of the above commands give you an output similar to what is shown in our example below.
Now that you’ve connected to a remote repository on GitHub you’re ready to start working on the files and pushing and pulling files as you update the files.
Working in your local repository and pushing files
After following the above steps and cloning a remote repository, you can work on the files as you normally would. You can create new files or edit existing files from the command line or your favorite text editor. Below, are the steps of creating a new file, pushing that file, editing an existing file, and pushing the update.
Creating a new file and pushing to remote repository
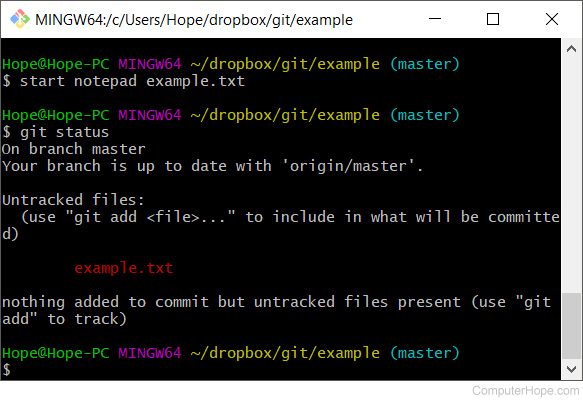
- Create a new file in the Git directory by typing the following command from either the Bash or Windows command line. The following command opens and creates a file called example.txt in Notepad. In Git Bash, you could also use the touch command to create a blank new file and then type «start <name of file>» to open the file in your favorite text editor.
start notepad example.txt
- In the text editor, enter some text into the file and save and exit the file.
- Back at the command line type the following command to get the current status of your branch and untracked files.
git status
- Git displays a window similar to the example shown below, showing that the file we created is new and untracked by Git.
- We’ll now want to add this file to Git to be tracked by typing the following command. If your file is not named «example.txt,» you’d want to change the text to the name of your file.
git add example.txt
- After entering the above command, the file is added as a new file also known as staging. Typing git status again shows you in green that the file is a new file that is ready to be committed.
- Next, type the following command to commit the changes made in the local workspace to the local repository. In the example below, our notes «First example» should be notes that would make sense everyone working on your project.
git commit -m "First example"
Note
You can also type git commit with no additional tags or options. However, when doing this it opens a vim like editor that can be difficult for those not familiar with the vim to use. If you type this command press «i» to enter insert mode and type the notes for the commit on the first line, press Esc, and then type «:wq» to save, exit, and commit. We suggest using the above command because it’s easier for more people to use.
- Finally, now that changes are moved from your workspace into your local repository it’s ready to be pushed to the remote repository. Type the following command to push all changes to the remote repository.
Tip
If you want to follow the progress, you can type git status again to see the current status. You can also type git log to see a log of changes.
git push
Note
You’ll be asked for your GitHub username and password if your computer has not logged in to Git from the command line.
Once the file is pushed, it appears in your GitHub remote repository and is available to everyone else who’re working with the same repository.
Modifying a file and pushing to remote repository
- Edit and modify one or more files in your Git.
- Type git status to see the status of all the files not yet committed from the workspace to the local repository.
- Type the following command to add all files. The single period indicates that you want all files to be added to the local repository. Some people may also use git add -A to add all.
Tip
You can also use wildcards instead of a period. For example, if you wanted to add all text files you could type *.txt instead of a single period to only add text files.
git add .
- Once the files are added, type the following command to commit. Change the notes to apply to your commit.
git commit -m "Second update"
- Finally, type git push to push the commit to the remote repository.
Tip
If you’re working with a lot of other people, we’d recommend you pull (explained below) before committing. If your local repository is not the same as the remote repository (excluding your new changes), the commit fails. For example, if someone has added new files to the remote repository while you’ve been working and you try commit, it fails until you pull.
Pulling or fetching updates from the remote repository
If it’s been awhile since you’ve committed any work, perform the git pull command to get the latest updates from the remote repository and merge them into your local repository. By pulling updates from a repository before committing, it verifies your local repository and the remote repository are the same and prevents merge conflicts.
To get all changes without merging, run the git fetch command to grab all of the latest updates from the remote repository without merging changes.
How to deal with a Git merge conflict
When multiple people are working with the same files, you’re going to encounter merge conflicts. When a conflict occurs, Git modifies your local files and it is up to you to manually fix the files with the conflicts.
Tip
Use the git status command to see the status and merge conflict information.
Open the file with the conflict to start correcting the errors. In the example file below, we had a text file with one line of text and in the local repository we added the text «update1» to the file. However, during the same time, the remote repository file was modified and added «update2» to the file on the same line. Git marks conflicts with «<<<<<<< HEAD» for lines in the current branch and everything after «=======» as the remote changes followed by «>>>>>>> < hash >» to mark the end.
Another file that is uploaded in-between pulls.
<<<<<<< HEAD
update1
=======
update2
>>>>>>> 62ee0eeba2e5b94d10574c1a6a68216e9b392e4c
To resolve this merge conflict, we would need to decide what text we wanted to keep, update, or remove. In this example, we want to keep «update1» and «update2» in the order they’re listed so we would only need to remove the Git markings to make the file resemble the following example.
Another file that is uploaded in-between pulls.
update1
update2
Note
If you’re working with a big file, it’s a good idea to search the file for «HEAD» because there may be more than one conflict.
Once the changes are made in the file, we could save the file and then perform the following git commands to update the fixes.
git add .
git commit -m "Fixed the merge conflict"
git push origin master
The example given in this merge conflict is a basic example. When dealing with a file with more than a few lines of text or big sections of code, a merge conflict can get more confusing. To make it easier to deal with merge conflicts, you can use the command git mergetool to use a merge tool, such as WinMerge or another popular merge tool.
Creating a Git branch
Creating a branch lets you create a duplicate of the master (trunk) and make several updates without affecting the master. For example, when developing a program if a big fix was need that could take weeks or months, a branch could be created for that fix. Once you’ve fixed the bug, you could merge your branch back into the master.
To create a branch in your local repository, follow the steps below.
- In the Git master directory, type the following command, where «<New Branch>» is the name of the new branch name. For example, we could call the branch «examplebranch».
git branch <New Branch>
- Next, type the following command to switch to the branch.
git checkout <Branch Name>
- After entering the above command, the prompt (in Git Bash) changes from «master» to the branch name to indicate you’re working in a branch.
- From this point, you can continue to use Git and modify the files how you have in the past.
- To see all available branches, you can use the git branch command. For example, typing git branch displays your local repository branches. Typing git branch -a displays all local and remote repositories.
- If you need to push the branch to the remote repository, you can run the following command.
git push --set-upstream origin <Branch Name>
- Finally, if you need to switch back to the master branch, you can type the following command.
git checkout master
How to merge a branch back into the master
After completing your work, you’ll want to merge it back into the master or another branch by following the steps below.
- Move into the branch you want to merge into. For example, if you wanted to merge back into the master, type the following command.
git checkout master
- Once in the master, type the following command to merge the branch.
git merge <Branch Name>
- Once the merge is performed, add the files.
- Next, commit the changes.
- Once merged and committed, push the merge by typing the following command. If you get conflicts during the merge, see our how to deal with merge conflicts section.
git push
How to delete a local and remote branch
If, after merging a branch you no longer want to keep the local or remote branch, you can perform the following commands.
To delete the local branch, type the following command.
git branch -d <Branch Name>
To delete the remote branch, type the following command.
git push origin --delete <Branch Name>
Before you start using Git, you have to make it available on your computer.
Even if it’s already installed, it’s probably a good idea to update to the latest version.
You can either install it as a package or via another installer, or download the source code and compile it yourself.
Installing on Linux
If you want to install the basic Git tools on Linux via a binary installer, you can generally do so through the package management tool that comes with your distribution.
If you’re on Fedora (or any closely-related RPM-based distribution, such as RHEL or CentOS), you can use dnf:
$ sudo dnf install git-allIf you’re on a Debian-based distribution, such as Ubuntu, try apt:
$ sudo apt install git-allFor more options, there are instructions for installing on several different Unix distributions on the Git website, at https://git-scm.com/download/linux.
Installing on macOS
There are several ways to install Git on a Mac.
The easiest is probably to install the Xcode Command Line Tools.
On Mavericks (10.9) or above you can do this simply by trying to run git from the Terminal the very first time.
If you don’t have it installed already, it will prompt you to install it.
If you want a more up to date version, you can also install it via a binary installer.
A macOS Git installer is maintained and available for download at the Git website, at https://git-scm.com/download/mac.
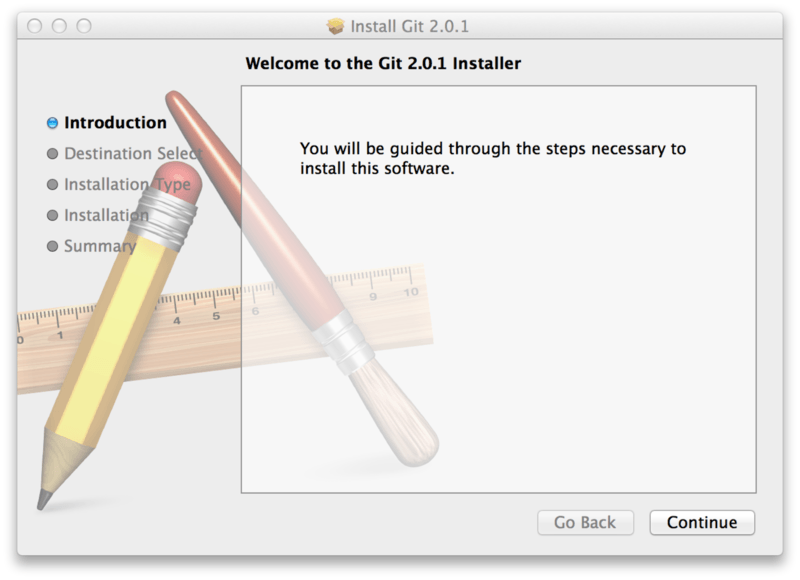
Figure 7. Git macOS Installer
Installing on Windows
There are also a few ways to install Git on Windows.
The most official build is available for download on the Git website.
Just go to https://git-scm.com/download/win and the download will start automatically.
Note that this is a project called Git for Windows, which is separate from Git itself; for more information on it, go to https://gitforwindows.org.
To get an automated installation you can use the Git Chocolatey package.
Note that the Chocolatey package is community maintained.
Installing from Source
Some people may instead find it useful to install Git from source, because you’ll get the most recent version.
The binary installers tend to be a bit behind, though as Git has matured in recent years, this has made less of a difference.
If you do want to install Git from source, you need to have the following libraries that Git depends on: autotools, curl, zlib, openssl, expat, and libiconv.
For example, if you’re on a system that has dnf (such as Fedora) or apt-get (such as a Debian-based system), you can use one of these commands to install the minimal dependencies for compiling and installing the Git binaries:
$ sudo dnf install dh-autoreconf curl-devel expat-devel gettext-devel
  openssl-devel perl-devel zlib-devel
$ sudo apt-get install dh-autoreconf libcurl4-gnutls-dev libexpat1-dev
  gettext libz-dev libssl-dev
In order to be able to add the documentation in various formats (doc, html, info), these additional dependencies are required:
$ sudo dnf install asciidoc xmlto docbook2X
$ sudo apt-get install asciidoc xmlto docbook2x|
Note |
Users of RHEL and RHEL-derivatives like CentOS and Scientific Linux will have to enable the EPEL repository to download the |
If you’re using a Debian-based distribution (Debian/Ubuntu/Ubuntu-derivatives), you also need the install-info package:
$ sudo apt-get install install-infoIf you’re using a RPM-based distribution (Fedora/RHEL/RHEL-derivatives), you also need the getopt package (which is already installed on a Debian-based distro):
$ sudo dnf install getoptAdditionally, if you’re using Fedora/RHEL/RHEL-derivatives, you need to do this:
$ sudo ln -s /usr/bin/db2x_docbook2texi /usr/bin/docbook2x-texidue to binary name differences.
When you have all the necessary dependencies, you can go ahead and grab the latest tagged release tarball from several places.
You can get it via the kernel.org site, at https://www.kernel.org/pub/software/scm/git, or the mirror on the GitHub website, at https://github.com/git/git/releases.
It’s generally a little clearer what the latest version is on the GitHub page, but the kernel.org page also has release signatures if you want to verify your download.
Then, compile and install:
$ tar -zxf git-2.8.0.tar.gz
$ cd git-2.8.0
$ make configure
$ ./configure --prefix=/usr
$ make all doc info
$ sudo make install install-doc install-html install-info
After this is done, you can also get Git via Git itself for updates:
$ git clone git://git.kernel.org/pub/scm/git/git.gitIntroduction
Git is a widely used open-source software tracking application used to track projects across different teams and revision levels.
This guide will show you how to install Git on Windows.
Prerequisites
- Administrator privileges
- Access to a command-line
- Your favorite coding text editor
- Username and password for the Github website (optional)
Steps For Installing Git for Windows
Installing Git prompts you to select a text editor. If you don’t have one, we strongly advise you to install prior to installing Git. Our roundup of the best text editors for coding may help you decide.
Note: If you are new to Git, refer to our post How Does Git Work to learn more about Git workflow and Git functions.
Download Git for Windows
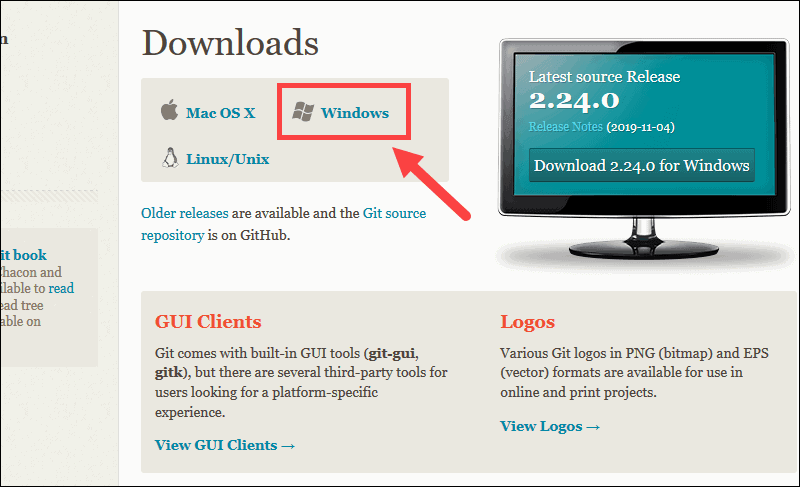
1. Browse to the official Git website: https://git-scm.com/downloads
2. Click the download link for Windows and allow the download to complete.
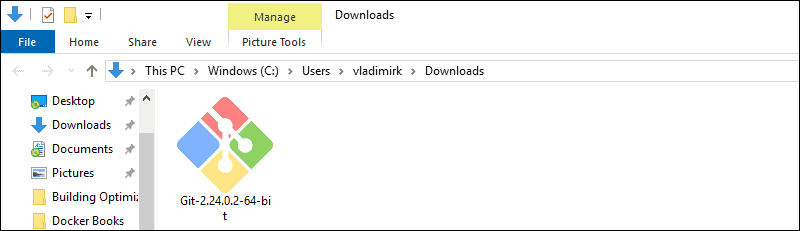
Extract and Launch Git Installer
3. Browse to the download location (or use the download shortcut in your browser). Double-click the file to extract and launch the installer.
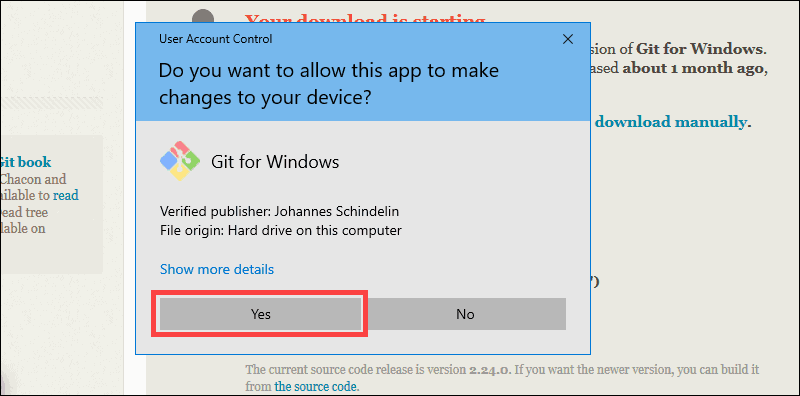
4. Allow the app to make changes to your device by clicking Yes on the User Account Control dialog that opens.
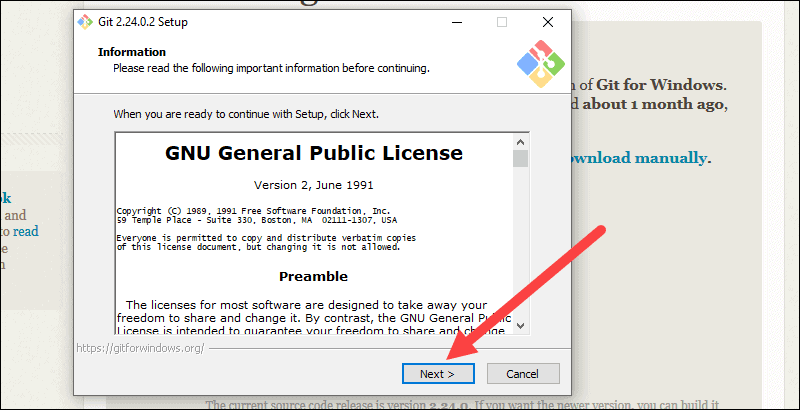
5. Review the GNU General Public License, and when you’re ready to install, click Next.
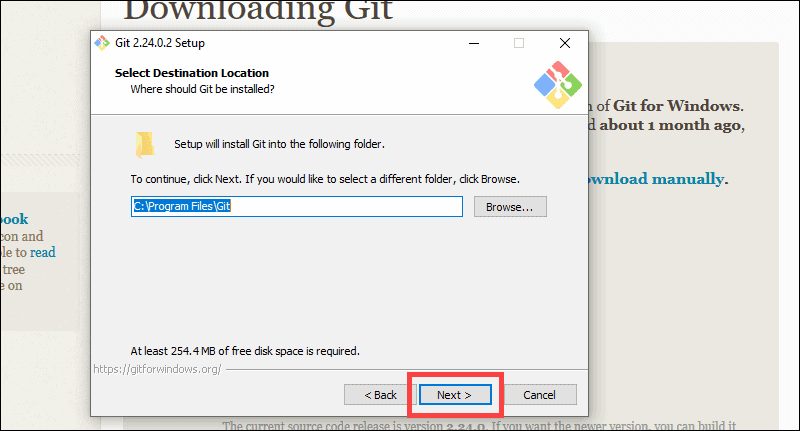
6. The installer will ask you for an installation location. Leave the default, unless you have reason to change it, and click Next.
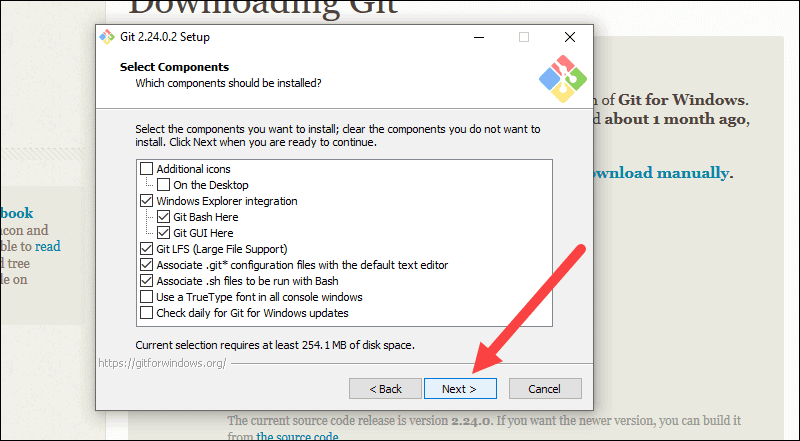
7. A component selection screen will appear. Leave the defaults unless you have a specific need to change them and click Next.
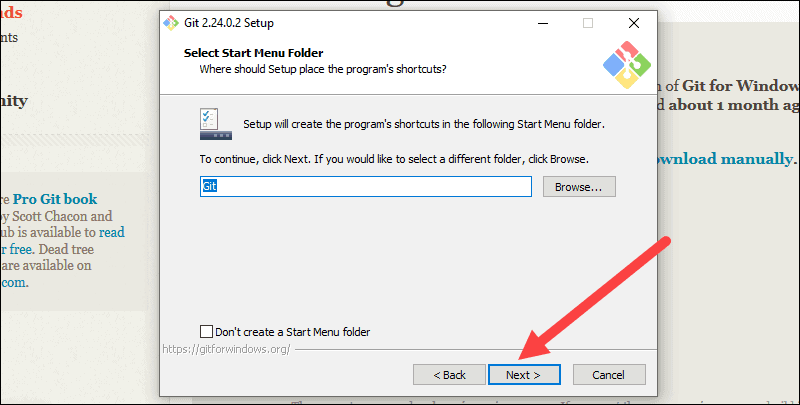
8. The installer will offer to create a start menu folder. Simply click Next.
9. Select a text editor you’d like to use with Git. Use the drop-down menu to select Notepad++ (or whichever text editor you prefer) and click Next.

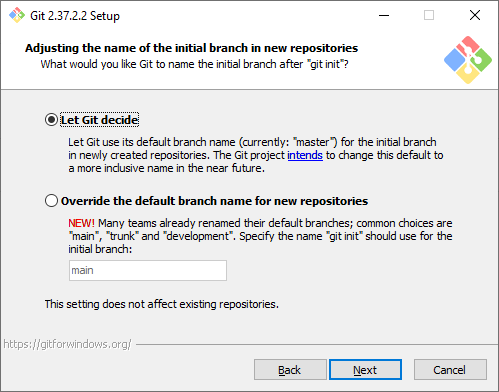
10. The next step allows you to choose a different name for your initial branch. The default is ‘master.’ Unless you’re working in a team that requires a different name, leave the default option and click Next.

11. This installation step allows you to change the PATH environment. The PATH is the default set of directories included when you run a command from the command line. Leave this on the middle (recommended) selection and click Next.
Server Certificates, Line Endings and Terminal Emulators
12. The installer now asks which SSH client you want Git to use. Git already comes with its own SSH client, so if you don’t need a specific one, leave the default option and click Next.
13. The next option relates to server certificates. Most users should use the default. If you’re working in an Active Directory environment, you may need to switch to Windows Store certificates. Click Next.
14. The next selection converts line endings. It is recommended that you leave the default selection. This relates to the way data is formatted and changing this option may cause problems. Click Next.
15. Choose the terminal emulator you want to use. The default MinTTY is recommended, for its features. Click Next.
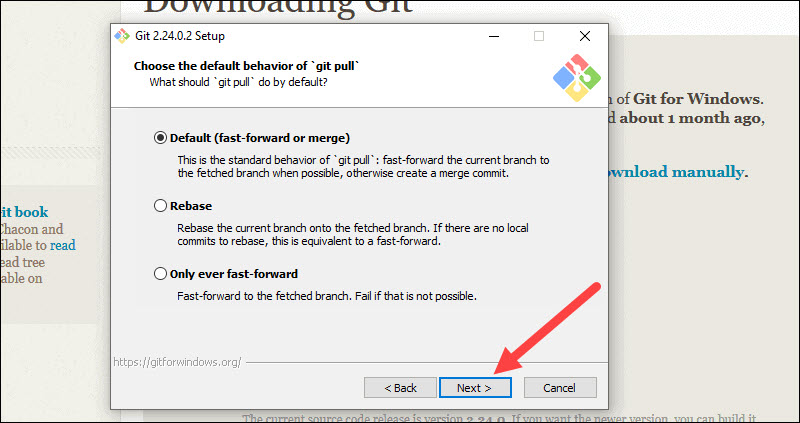
16. The installer now asks what the git pull command should do. The default option is recommended unless you specifically need to change its behavior. Click Next to continue with the installation.
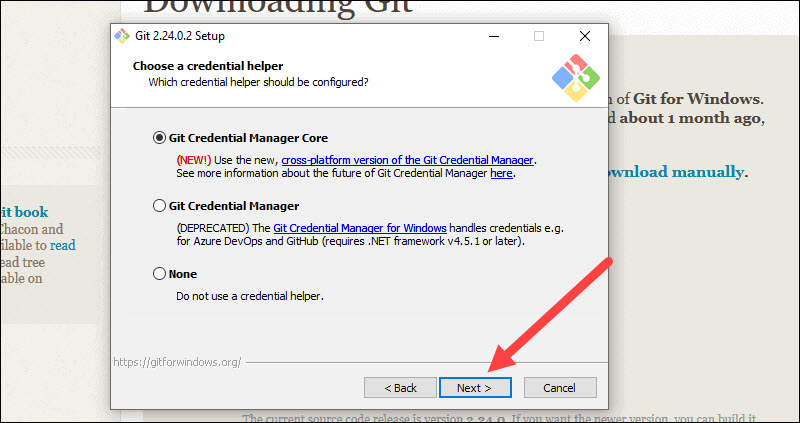
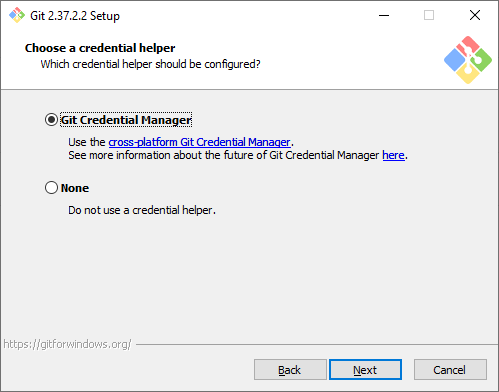
17. Next you should choose which credential helper to use. Git uses credential helpers to fetch or save credentials. Leave the default option as it is the most stable one, and click Next.
Additional Customization Options
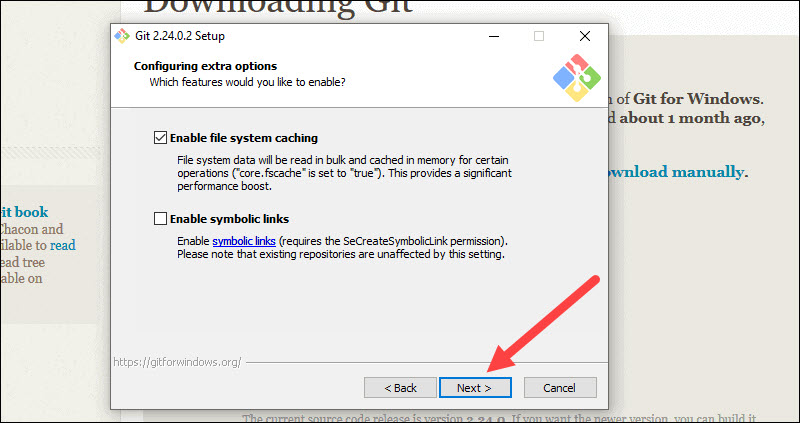
18. The default options are recommended, however this step allows you to decide which extra option you would like to enable. If you use symbolic links, which are like shortcuts for the command line, tick the box. Click Next.
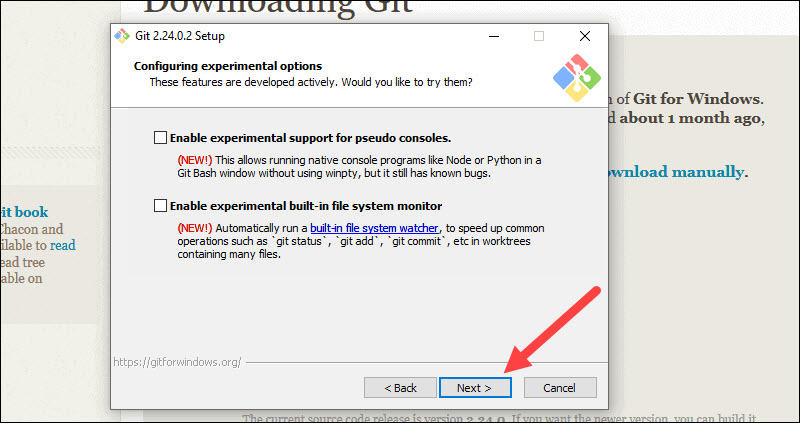
19. Depending on the version of Git you’re installing, it may offer to install experimental features. At the time this article was written, the options to include support for pseudo controls and a built-in file system monitor were offered. Unless you are feeling adventurous, leave them unchecked and click Install.
Complete Git Installation Process
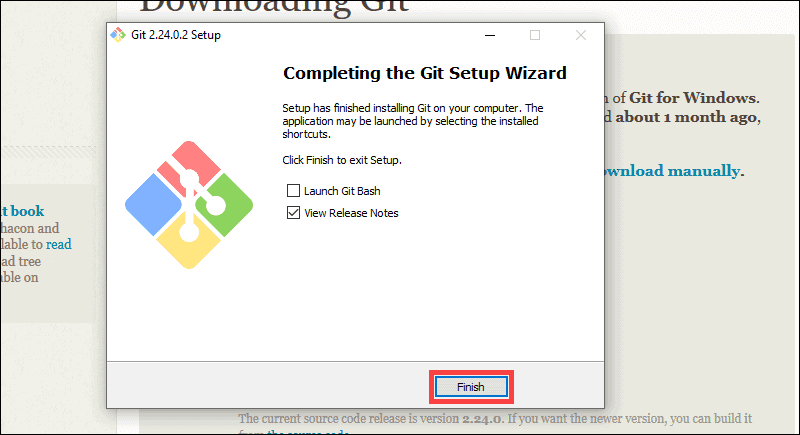
20. Once the installation is complete, tick the boxes to view the Release Notes or Launch Git Bash, then click Finish.
How to Launch Git in Windows
Git has two modes of use – a bash scripting shell (or command line) and a graphical user interface (GUI).
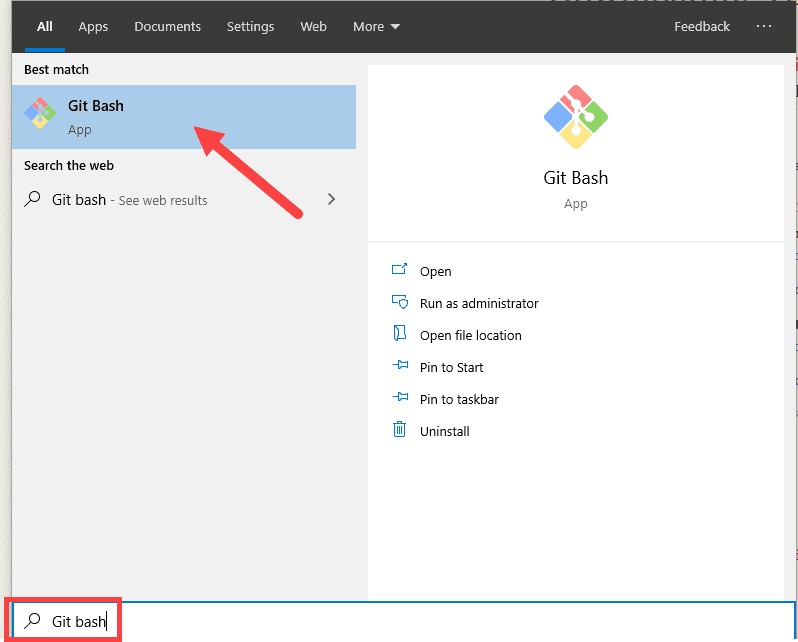
Launch Git Bash Shell
To launch Git Bash open the Windows Start menu, type git bash and press Enter (or click the application icon).
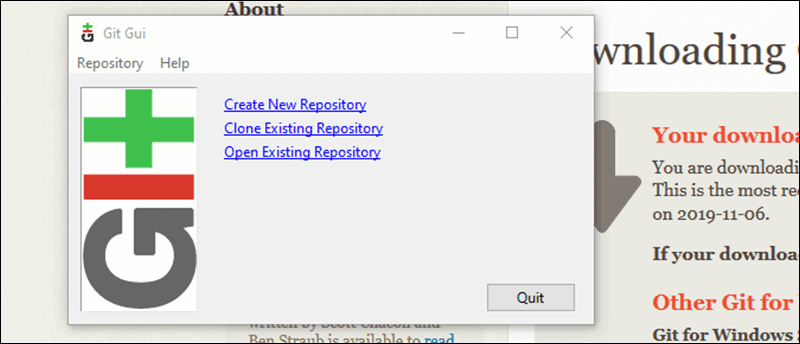
Launch Git GUI
To launch Git GUI open the Windows Start menu, type git gui and press Enter (or click the application icon).
Connecting to a Remote Repository
You need a GitHub username and password for this next step.
Create a Test Directory
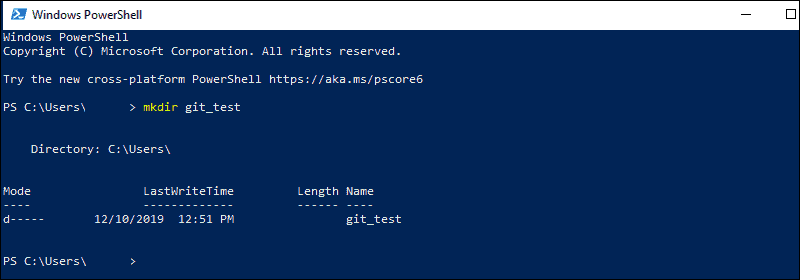
Open a Windows PowerShell interface by pressing Windows Key + x, and then i once the menu appears.
Create a new test directory (folder) by entering the following:
mkdir git_testAn example of the PowerShell output.
Change your location to the newly created directory:
cd git_testNote: If you already have a GitHub repository, use the name of that project instead of git_test.
Configure GitHub Credentials
Configure your local Git installation to use your GitHub credentials by entering the following:
git config --global user.name "github_username"git config --global user.email "email_address"Note: Replace github_username and email_address with your GitHub credentials.
Clone a GitHub Repository
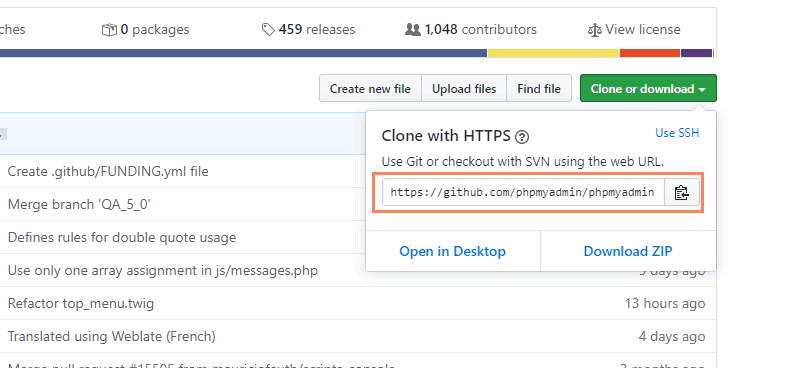
Go to your repository on GitHub. In the top right above the list of files, open the Clone or download drop-down menu. Copy the URL for cloning over HTTPS.
Switch to your PowerShell window, and enter the following:
git clone repository_urlImportant: In the example above, the command will clone the repository over HTTPS. Another option is cloning with SSH URLs. For that option to work, you must generate an SSH key pair on your Windows workstation and assign the public key to your GitHub account.
List Remote Repositories
Your working directory should now have a copy of the repository from GitHub. It should contain a directory with the name of the project. Change to the directory:
cd git_projectNote: Replace git_project with the actual name of the repository you downloaded. If it’s not working, you can list the contents of the current directory with the ls command. This is helpful if you don’t know the exact name or need to check your spelling.
Once you’re in the sub-directory, list the remote repositories:
git remote -vPushing Local Files to the Remote Repository
Once you’ve done some work on the project, you may want to submit those changes to the remote project on GitHub.
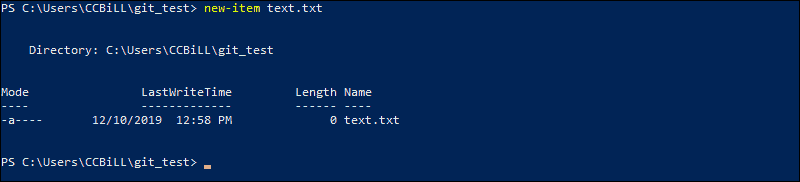
1. For example, create a new text file by entering the following into your PowerShell window:
new-item text.txt2. Confirmation that the new file is created.
3. Now check the status of your new Git branch and untracked files:
git status4. Add your new file to the local project:
git add text.txt5. Run git status again to make sure the text.txt file has been added. Next, commit the changes to the local project:
git commit -m "Sample 1"6. Finally, push the changes to the remote GitHub repository:
git pushYou may need to enter your username and password for GitHub.
Note: You can remove a remote repository if the need for it no longer exists. To learn how, visit our guide How to Remove a Git Remote.
Conclusion
You now have a working installation of Git on your Windows system. After installing Git on your Windows, you might find helpful how to update Git. Use Git’s features to coordinate work among programmers on a project.
For Linux and MacOS installation guides, check out our articles on installing Git on Ubuntu, CentOS and MacOS.
Введение
В этой инструкции покажем, как установить Git на Windows, и поможем выбрать правильные параметры при установке. Затем создадим репозиторий и зафиксируем в нем изменения. Все это поможет вам сделать первые шаги в освоении Git.
Git — это одна из самых популярных систем контроля версий (VCS). Такие системы помогают разработчикам хранить и версионировать исходный код приложений, настройки систем и другие текстовые файлы. И хотя ничего не мешает использовать VCS в других областях, чаще всего они применяются именно в IT.
Каждое состояние файлов в Git можно зафиксировать (сделать коммит), причем это навсегда останется в истории репозитория. Поэтому можно в любой момент посмотреть историю изменений файлов, сравнить различные версии и отменить отдельные изменения.
Также Git упрощает ведение параллельной разработки несколькими членами команды. Для этого используется ветвление. Условно можно сказать, что в Git-репозитории есть одна основная ветка, в которой хранится текущая стабильная версия исходного кода. Когда разработчик хочет изменить этот код, он «откалывает» себе отдельную ветку от основной и работает в ней. Когда работа закончена, он «вливает» изменения в основную ветку, чтобы его доработками смогли воспользоваться другие члены команды.
На самом деле все это описание довольно грубое, и по работе с Git можно написать не одну статью. На официальном сайте Git есть бесплатная электронная книга, в том числе она переведена на русский язык. А в этой статье мы сосредоточимся на установке Git в Windows и его первоначальной настройке.
Установка Git в Windows
Переходим на официальный сайт Git, в раздел загрузок. Мы увидим несколько вариантов установки: разные разрядности, портативная версия и даже установка из исходников. Мы выберем Standalone-версию, для этого проще всего нажать ссылку Click here to download, она всегда ведет на самую актуальную версию. Запускаем скачанный файл.
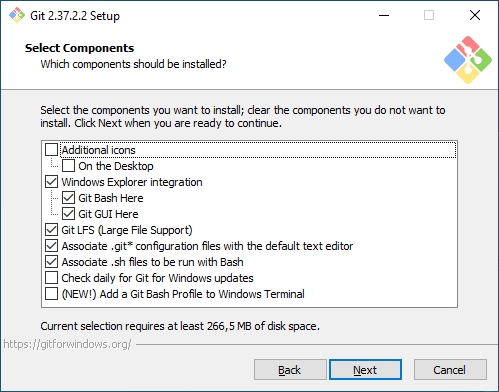
Выбор компонентов. Первый экран — выбор компонентов для установки. Если вам нужны дополнительные иконки на рабочем столе, или если вы хотите, чтобы Git ежедневно проверял наличие новой версии, — отметьте соответствующие опции. Остальные параметры лучше оставить по умолчанию.
Текстовый редактор по умолчанию. Необходимо выбрать редактор, который будет использовать Git — например, когда вы будете писать сообщение для коммита. Это не обязательно должен быть редактор, в котором вы планируете писать исходный код.
По умолчанию в установщике выбран Vim — консольный текстовый редактор, который для многих может показаться сложным в освоении. Если вы не знакомы с Vim и при этом хотите именно консольный редактор — выберите nano. Если у вас уже установлен какой-нибудь текстовый редактор — выбирайте его. Мы для примера будем использовать VSCode.
Название первой ветки. Тут нужно выбрать, как Git будет называть первую ветку в каждом репозитории. Раньше такая ветка всегда называлась master, но со временем это стало напоминать о временах рабства, и многие проекты и компании стали переименовывать ветки в своих репозиториях. Поэтому разработчики Git добавили эту опцию, чтобы название первой ветки можно было изменить. Мы будем придерживаться старого поведения и оставим название master.
Способ использования Git. Первая опция сделает Git доступным только из командной строки Git Bash. Это не очень удобно, потому что не позволит пользоваться Git-ом из других оболочек или интегрировать его с редактором кода. Вторая опция самая оптимальная (ее мы и выберем) — она позволяет работать с Git-ом из разных оболочек и интегрировать его с другими приложениями. Третья опция кроме установки Git также «перезапишет» некоторые системные команды Windows аналогами из Unix, и эту опцию нужно выбирать только если вы точно понимаете, что делаете.
Выбор SSH-клиента. Изначально Git поставлялся со встроенным SSH-клиентом, но недавно появилась опция, где можно использовать внешний клиент. Если у вас уже что-то установлено на компьютере — можете выбрать вторую опцию. Мы же остановимся на первой, так как предварительно ничего не устанавливали.
Выбор SSL/TLS библиотеки. По умолчанию Git будет использовать свою OpenSSL библиотеку с заранее определенным списком корневых сертификатов. Обычно этого достаточно, но если вам нужно работать со внутренними репозиториям внутри компании, которые используют самоподписанные сертификаты, выберите вторую опцию. Тогда Git будет использовать библиотеку и сертификаты из вашей операционной системы.
Символы перевода строки. Существует два основных способа формирования конца строки в файлах — CRLF и LF. Первый используется в Windows, второй — в Unix-like системах. Первая опция позволяет извлекать файлы из репозитория в Windows-стиле, при этом отправлять файлы в репозиторий в Unix-стиле. Мы рекомендуем использовать этот вариант, потому что он лучше всего подходит для кросс-платформенной команды, когда над одним кодом могут работать разработчики на разных ОС.
Эмулятор терминала. Эмулятор, который будет использоваться в командной строке Git Bash. MinTTY — удобный вариант, поэтому он выбран по умолчанию. Встроенный эмулятор CMD не очень удобен, у него есть некоторые ограничения, поэтому выбирайте его, только если делаете это осознанно.
Стратегия git pull. Первая опция будет пытаться обновить историю коммитов без создания коммитов слияния. Это самый оптимальный и часто используемый вариант, оставим его.

Credential Manager. Установка этого параметра позволит Git запоминать логины и пароли для подключения к удаленным репозиториям (например, GitHub, GitLab или корпоративное хранилище) и не вводить их постоянно.
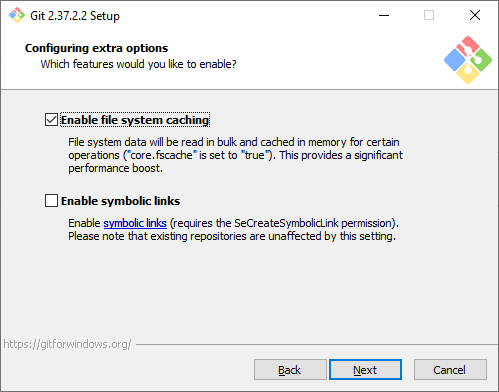
Дополнительные настройки. Кэширование позволит ускорить работу Git, эту опцию рекомендуем оставить. А вот символические ссылки нам не нужны.
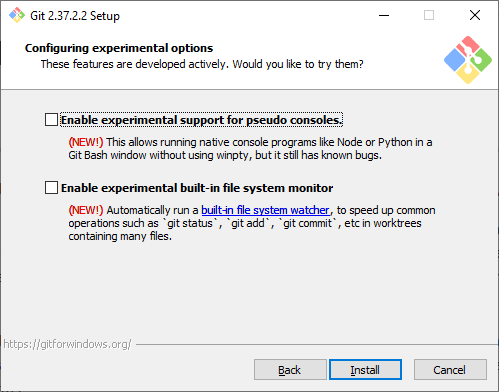
Экспериментальные настройки. Эти опции еще не переведены в стабильную стадию, поэтому их использование рекомендуется, только если вы точно понимаете, что делаете. Мы не будем ничего отмечать.
Git установлен и готов к работе.
Установка в различные дистрибутивы Linux
Также коротко покажем, как можно установить Git в различные дистрибутивы Linux. Как правило, самостоятельно скачивать ничего не нужно, достаточно воспользоваться встроенным в дистрибутив пакетным менеджером.
Debian
pt-get install gitUbuntu
add-apt-repository ppa:git-core/ppa # apt update; apt install gitFedora 21
yum install gitFedora 22+
dnf install gitGentoo
emerge --ask --verbose dev-vcs/gitArch Linux
man -S gitOpenSUSE
ypper install gitMageia
rpmi gitFreeBSD
pkg install gitOpenBSD
g_add gitRHEL, CentOS, Oracle Linux и др.
Как правило, пакетный установит довольно старую версию Git, поэтому рекомендуется собирать Git из исходных кодов, или воспользоваться сторонним репозиторием IUS Community.
Первоначальная настройка и создание репозитория
Перед началом работы с Git нужно указать свое имя и email, которые в дальнейшем будут записываться в историю изменений при каждом коммите. В будущем это позволит понять, кто именно внес те или иные изменения.
Откроем любое из приложений — Git Bash или Git CMD. Первое — это командная строка в стиле Linux, второе — командная строка в стиле Windows. Выбирайте то, что вам ближе. Мы выберем Git Bash и выполним две команды:
git config --global user.email "git-user@selectel.ru"
git config --global user.name "Selectel Git User"
Теперь Git полностью готов к работе. Давайте создадим репозиторий и зафиксируем в нем первое изменение (сделаем коммит). Для начала создадим каталог для будущего репозитория и сразу перейдем в него:
mkdir first-repo && cd first-repoСоздаем новый репозиторий в этом каталоге:
git initУвидим ответ:
Initialized empty Git repository in C:/Users/git_user/first-repo/.git/.Это означает, что в директории создан новый репозиторий. Далее создадим текстовый файл, назовем его README.md, и напишем в нем любой текст. Но сам по себе этот файл не попадет в следующий коммит. Мы должны проиндексировать изменения, то есть явно сказать Git-у, что этот файл нужно учитывать в следующем коммите:
git add README.mdДалее введем команду:
git commitОткроется текстовый редактор, который мы выбирали на этапе установки Git. Тут нам нужно ввести комментарий для коммита, то есть кратко описать изменение, которое мы сделали. Мы напишем такой комментарий:
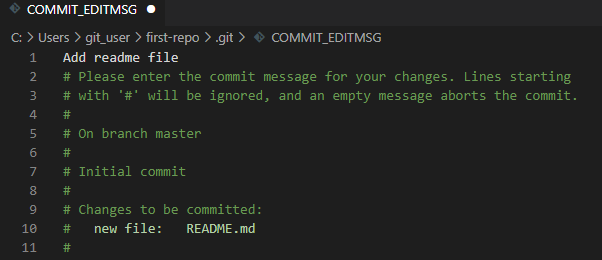
Обратите внимание, что Git автоматически добавил небольшую подсказку в это окно. При этом она не войдет в коммит, потому что в начале строки стоит символ решетки, и Git проигнорирует ее. Но она может быть полезна для дополнительной проверки: мы видим название текущей ветки и список файлов, которые войдут в коммит.
Сохраним файл и закроем редактор. Увидим примерно следующее сообщение:
[master (root-commit) 2b8f7a5] Add readme file
 1 file changed, 3 insertions(+)
 create mode 100644 README.md
Мы успешно сделали первый коммит.
Работа с Git в визуальном интерфейсе
Сам по себе Git — это утилита командной строки. Но не всем может быть удобно запоминать и писать команды в терминале, поэтому часто разработчики пользуются графическим интерфейсом. Есть несколько вариантов:
- Встроенный GUI. В базовой установке Git есть две простые утилиты: gitk и git gui. Но у них довольно старый интерфейс и пользоваться ими не всегда удобно.
- Отдельные графические утилиты. Они могут быть понятны и красивы, но неудобны тем, что код нужно писать в одной программе, а для работы с Git нужно переключаться в другую. Примеры таких программ: GitKraken, Sourcetree, GitAtomic. Большой список таких клиентов есть на официальном сайте Git.
- Встроенные в IDE или текстовый редактор. В большинстве популярных редакторов кода или IDE уже есть поддержка Git. Как правило, ничего дополнительно настраивать не нужно. Мы рассмотрим именно такой вариант на примере редактора VSCode.
Откроем директорию с репозиторием в редакторе VSCode. Внесите любое изменение в файл README.md и сохраните изменения. Обратите внимание, что в левой части редактора кое-что изменилось:
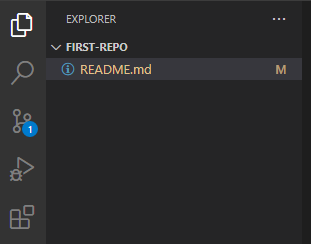
- Файл README.md подсветился желтым цветом, а рядом с ним появилась буква M (означает Modified — изменен).
- На панели Source Code появилась цифра 1, означающая, что есть одно изменение, которое можно зафиксировать.
Перейдем на панель Source Code. Слева находится список файлов, которые были изменены. Если кликнем на файл, то увидим какие именно изменения мы внесли: в этом случае добавили новую строчку This is the second commit.

Теперь давайте зафиксируем наши изменения. Рядом с названием файла нажмем на «плюс», чтобы проиндексировать его. Это аналогично команде git add, которую мы выполняли ранее. Затем в поле Message внесем комментарий и нажмем кнопку Commit. Это аналогично команде git commit.
Поздравляем, вы сделали уже два коммита в свой репозиторий!
Заключение
Итак, мы рассмотрели процесс установки Git под Windows, рассказали об основных параметрах установки и последующей настройки. Увидели, как репозиторий и внести в него первый коммит. Познакомились с работой в командной строке и с помощью графического интерфейса.
- Choose a terminal
- Confirm Git is installed
- Configure Git
- Choose a repository
-
Clone a repository
- Clone with SSH
-
Clone with HTTPS
- Clone using a token
-
Convert a local directory into a repository
- Add a remote
- View your remote repositories
- Download the latest changes in the project
-
Branches
- Create a branch
- Switch to a branch
- View differences
- View the files that have changes
-
Add and commit local changes
- Stage and commit all changes
- Send changes to GitLab.com
- Delete all changes in the branch
- Unstage all changes that have been added to the staging area
- Undo most recent commit
- Merge a branch with default branch
- Advanced use of Git through the command line
- Synchronize changes in a forked repository with the upstream
Git is an open-source distributed version control system. GitLab is built
on top of Git.
You can do many Git operations directly in GitLab. However, the command line is required for advanced tasks,
like fixing complex merge conflicts or rolling back commits.
If you’re new to Git and want to learn by working in your own project,
learn how to make your first commit.
For a quick reference of Git commands, download a Git Cheat Sheet.
For more information about the advantages of working with Git and GitLab:
- Watch the GitLab Source Code Management Walkthrough video.
- Learn how GitLab became the backbone of the Worldline development environment.
To help you visualize what you’re doing locally, you can install a
Git GUI app.
Choose a terminal
To execute Git commands on your computer, you must open a terminal (also known as command
prompt, command shell, and command line). Here are some options:
- For macOS users:
- Built-in Terminal. Press ⌘ command + space and type
terminal. - iTerm2. You can integrate it with Zsh and Oh My Zsh for color highlighting and other advanced features.
- Built-in Terminal. Press ⌘ command + space and type
- For Windows users:
- Built-in command line. On the Windows taskbar, select the search icon and type
cmd. - PowerShell.
- Git Bash. It is built into Git for Windows.
- Built-in command line. On the Windows taskbar, select the search icon and type
- For Linux users:
- Built-in Linux Terminal.
Confirm Git is installed
You can determine if Git is already installed on your computer by opening a terminal
and running this command:
If Git is installed, the output is:
If your computer doesn’t recognize git as a command, you must install Git.
Configure Git
To start using Git from your computer, you must enter your credentials
to identify yourself as the author of your work. The username and email address
should match the ones you use in GitLab.
-
In your shell, add your user name:
git config --global user.name "your_username" -
Add your email address:
git config --global user.email "your_email_address@example.com" -
To check the configuration, run:
git config --global --listThe
--globaloption tells Git to always use this information for anything you do on your system.
If you omit--globalor use--local, the configuration applies only to the current
repository.
You can read more on how Git manages configurations in the
Git configuration documentation.
Choose a repository
Before you begin, choose the repository you want to work in. You can use any project you have permission to
access on GitLab.com or any other GitLab instance.
To use the repository in the examples on this page:
- Go to https://gitlab.com/gitlab-tests/sample-project/.
- In the upper right, select Fork.
- Choose a namespace for your fork.
The project becomes available at https://gitlab.com/<your-namespace>/sample-project/.
You can fork any project you have access to.
Clone a repository
When you clone a repository, the files from the remote repository are downloaded to your computer,
and a connection is created.
This connection requires you to add credentials. You can either use SSH or HTTPS. SSH is recommended.
Clone with SSH
Clone with SSH when you want to authenticate only one time.
- Authenticate with GitLab by following the instructions in the SSH documentation.
- Go to your project’s landing page and select Clone. Copy the URL for Clone with SSH.
- Open a terminal and go to the directory where you want to clone the files. Git automatically creates a folder with the repository name and downloads the files there.
-
Run this command:
git clone git@gitlab.com:gitlab-tests/sample-project.git -
To view the files, go to the new directory:
You can also
clone a repository and open it directly in Visual Studio Code.
Clone with HTTPS
Clone with HTTPS when you want to authenticate each time you perform an operation
between your computer and GitLab.
- Go to your project’s landing page and select Clone. Copy the URL for Clone with HTTPS.
- Open a terminal and go to the directory where you want to clone the files.
-
Run the following command. Git automatically creates a folder with the repository name and downloads the files there.
git clone https://gitlab.com/gitlab-tests/sample-project.git -
GitLab requests your username and password.
If you have enabled two-factor authentication (2FA) on your account, you cannot use your account password. Instead, you can do one of the following:
-
Clone using a token with
read_repositoryorwrite_repositorypermissions. - Install Git Credential Manager.
If you have not enabled 2FA, use your account password.
-
Clone using a token with
-
To view the files, go to the new directory:
Clone using a token
Clone with HTTPS using a token if:
- You want to use 2FA.
- You want to have a revocable set of credentials scoped to one or more repositories.
You can use any of these tokens to authenticate when cloning over HTTPS:
- Personal access tokens.
- Deploy tokens.
- Project access tokens.
- Group access tokens.
git clone https://<username>:<token>@gitlab.example.com/tanuki/awesome_project.git
Convert a local directory into a repository
You can initialize a local folder so Git tracks it as a repository.
- Open the terminal in the directory you’d like to convert.
-
Run this command:
A
.gitfolder is created in your directory. This folder contains Git
records and configuration files. You should not edit these files
directly. - Add the path to your remote repository
so Git can upload your files into the correct project.
Add a remote
You add a “remote” to tell Git which remote repository in GitLab is tied
to the specific local folder on your computer.
The remote tells Git where to push or pull from.
To add a remote to your local copy:
- In GitLab, create a project to hold your files.
- Visit this project’s homepage, scroll down to Push an existing folder, and copy the command that starts with
git remote add. -
On your computer, open the terminal in the directory you’ve initialized, paste the command you copied, and press enter:
git remote add origin git@gitlab.com:username/projectpath.git
After you’ve done that, you can stage your files and upload them to GitLab.
View your remote repositories
To view your remote repositories, type:
The -v flag stands for verbose.
Download the latest changes in the project
To work on an up-to-date copy of the project, you pull to get all the changes made by users
since the last time you cloned or pulled the project. Replace <name-of-branch>
with the name of your default branch
to get the main branch code, or replace it with the branch name of the branch
you are currently working in.
git pull <REMOTE> <name-of-branch>
When you clone a repository, REMOTE is typically origin. This is where the
repository was cloned from, and it indicates the SSH or HTTPS URL of the repository
on the remote server. <name-of-branch> is usually the name of your
default branch, but it may be any
existing branch. You can create additional named remotes and branches as necessary.
You can learn more on how Git manages remote repositories in the
Git Remote documentation.
Branches
A branch is a copy of the files in the repository at the time you create the branch.
You can work in your branch without affecting other branches. When
you’re ready to add your changes to the main codebase, you can merge your branch into
the default branch, for example, main.
Use branches when you:
- Want to add code to a project but you’re not sure if it works properly.
- Are collaborating on the project with others, and don’t want your work to get mixed up.
A new branch is often called feature branch to differentiate from the
default branch.
Create a branch
To create a feature branch:
git checkout -b <name-of-branch>
Branch names cannot contain empty spaces and special characters. Use only lowercase letters, numbers,
hyphens (-), and underscores (_).
Switch to a branch
All work in Git is done in a branch.
You can switch between branches to see the state of the files and work in that branch.
To switch to an existing branch:
git checkout <name-of-branch>
For example, to change to the main branch:
View differences
To view the differences between your local unstaged changes and the latest version
that you cloned or pulled:
View the files that have changes
When you add, change, or delete files or folders, Git knows about the changes.
To check which files have been changed:
Add and commit local changes
When you type git status, locally changed files are shown in red. These changes may
be new, modified, or deleted files or folders.
-
To stage a file for commit:
git add <file-name OR folder-name> -
Repeat step 1 for each file or folder you want to add.
Or, to stage all files in the current directory and subdirectory, typegit add .. -
Confirm that the files have been added to staging:
The files should be displayed in green text.
-
To commit the staged files:
git commit -m "COMMENT TO DESCRIBE THE INTENTION OF THE COMMIT"
Stage and commit all changes
As a shortcut, you can add all local changes to staging and commit them with one command:
git commit -a -m "COMMENT TO DESCRIBE THE INTENTION OF THE COMMIT"
Send changes to GitLab.com
To push all local changes to the remote repository:
git push <remote> <name-of-branch>
For example, to push your local commits to the main branch of the origin remote:
Sometimes Git does not allow you to push to a repository. Instead,
you must force an update.
Delete all changes in the branch
To discard all changes to tracked files:
This action removes changes to files, not the files themselves.
Untracked (new) files do not change.
Unstage all changes that have been added to the staging area
To unstage (remove) all files that have not been committed:
Undo most recent commit
To undo the most recent commit:
This action leaves the changed files and folders unstaged in your local repository.
You can learn more about the different ways Git can undo changes in the
Git Undoing Things documentation.
Merge a branch with default branch
When you are ready to add your changes to
the default branch, you merge the feature branch into it:
git checkout <default-branch>
git merge <feature-branch>
In GitLab, you typically use a merge request to merge your changes, instead of using the command line.
To create a merge request from a fork to an upstream repository, see the
forking workflow.
Advanced use of Git through the command line
For an introduction of more advanced Git techniques, see Git rebase, force-push, and merge conflicts.
Synchronize changes in a forked repository with the upstream
To create a copy of a repository in your namespace, you fork it.
Changes made to your copy of the repository are not automatically synchronized with the original.
To keep the project in sync with the original project, you need to pull from the original repository.
You must create a link to the remote repository to pull
changes from the original repository. It is common to call this remote repository the upstream.
You can now use the upstream as a <remote> to pull new updates
from the original repository, and use the origin
to push local changes and create merge requests.
Часть 2
Что такое Git и зачем он нужен?
Git — это консольная утилита, для отслеживания и ведения истории изменения файлов, в вашем проекте. Чаще всего его используют для кода, но можно и для других файлов. Например, для картинок — полезно для дизайнеров.
С помощью Git-a вы можете откатить свой проект до более старой версии, сравнивать, анализировать или сливать свои изменения в репозиторий.
Репозиторием называют хранилище вашего кода и историю его изменений. Git работает локально и все ваши репозитории хранятся в определенных папках на жестком диске.
Так же ваши репозитории можно хранить и в интернете. Обычно для этого используют три сервиса:
-
GitHub
-
Bitbucket
-
GitLab
Каждая точка сохранения вашего проекта носит название коммит (commit). У каждого commit-a есть hash (уникальный id) и комментарий. Из таких commit-ов собирается ветка. Ветка — это история изменений. У каждой ветки есть свое название. Репозиторий может содержать в себе несколько веток, которые создаются из других веток или вливаются в них.
Как работает
Если посмотреть на картинку, то становиться чуть проще с пониманием. Каждый кружок, это commit. Стрелочки показывают направление, из какого commit сделан следующий. Например C3 сделан из С2 и т. д. Все эти commit находятся в ветке под названием main. Это основная ветка, чаще всего ее называют master . Прямоугольник main* показывает в каком commit мы сейчас находимся, проще говоря указатель.

В итоге получается очень простой граф, состоящий из одной ветки (main) и четырех commit. Все это может превратиться в более сложный граф, состоящий из нескольких веток, которые сливаются в одну.

Об этом мы поговорим в следующих статьях. Для начала разберем работу с одной веткой.
Установка
Основой интерфейс для работы с Git-ом является консоль/терминал. Это не совсем удобно, тем более для новичков, поэтому предлагаю поставить дополнительную программу с графическим интерфейсом (кнопками, графиками и т.д.). О них я расскажу чуть позже.
Но для начала, все же установим сам Git.
-
Windows. Проходим по этой ссылке, выбираем под вашу ОС (32 или 64 битную), скачиваем и устанавливаем.
-
Для Mac OS. Открываем терминал и пишем:
#Если установлен Homebrew
brew install git

#Если нет, то вводим эту команду.
git --version
#После этого появится окно, где предложит установить Command Line Tools (CLT).
#Соглашаемся и ждем установки. Вместе с CLT установиться и git-
Linux. Открываем терминал и вводим следующую команду.
# Debian или Ubuntu
sudo apt install git

# CentOS
sudo yum install git
Настройка
Вы установили себе Git и можете им пользоваться. Давайте теперь его настроим, чтобы когда вы создавали commit, указывался автор, кто его создал.
Открываем терминал (Linux и MacOS) или консоль (Windows) и вводим следующие команды.
#Установим имя для вашего пользователя
#Вместо <ваше_имя> можно ввести, например, Grisha_Popov
#Кавычки оставляем
git config --global user.name "<ваше_имя>"

#Теперь установим email. Принцип тот же.
git config --global user.email "<адрес_почты@email.com>"
Создание репозитория
Теперь вы готовы к работе с Git локально на компьютере.
Создадим наш первый репозиторий. Для этого пройдите в папку вашего проекта.
#Для Linux и MacOS путь может выглядеть так /Users/UserName/Desktop/MyProject
#Для Windows например С://MyProject
cd <путь_к_вашему_проекту>

#Инициализация/создание репозитория
git init
Теперь Git отслеживает изменения файлов вашего проекта. Но, так как вы только создали репозиторий в нем нет вашего кода. Для этого необходимо создать commit.
#Добавим все файлы проекта в нам будующий commit
git add .
#Или так
git add --all

#Если хотим добавить конкретный файл то можно так
git add <имя_файла>

#Теперь создаем commit. Обязательно указываем комментарий.
#И не забываем про кавычки
git commit -m "<комментарий>"
Отлично. Вы создали свой первый репозиторий и заполнили его первым commit.
Процесс работы с Git
Не стоит после каждого изменения файла делать commit. Чаще всего их создают, когда:
-
Создан новый функционал
-
Добавлен новый блок на верстке
-
Исправлены ошибки по коду
-
Вы завершили рабочий день и хотите сохранить код
Это поможет держать вашу ветки в чистоте и порядке. Тем самым, вы будете видеть историю изменений по каждому нововведению в вашем проекте, а не по каждому файлу.
Визуальный интерфейс
Как я и говорил ранее, существуют дополнительные программы для облегчения использования Git. Некоторые текстовые редакторы или полноценные среды разработки уже включают в себя вспомогательный интерфейс для работы с ним.
Но существуют и отдельные программы по работе с Git. Могу посоветовать эти:
-
GitHub Desktop
-
Sourcetree
-
GitKraken
Я не буду рассказывать как они работают. Предлагаю разобраться с этим самостоятельно.
Создаем свой первый проект и выкладываем на GitHub
Давайте разберемся как это сделать, с помощью среды разработки Visual Studio Code (VS Code).
Перед началом предлагаю зарегистрироваться на GitHub.
Создайте папку, где будет храниться ваш проект. Если такая папка уже есть, то создавать новую не надо.
После открываем VS Code .

-
Установите себе дополнительно анализаторы кода для JavaScript и PHP
-
Откройте вашу папку, которую создали ранее
После этого у вас появится вот такой интерфейс
-
Здесь будут располагаться все файлы вашего проекта
-
Здесь можно работать с Git-ом
-
Кнопка для создания нового файла
-
Кнопка для создания новой папки
Если ваш проект пустой, как у меня, то создайте новый файл и назовите его
index.html. После этого откроется окно редактирование этого файла. Напишите в нем!и нажмите кнопкуTab. Автоматически должен сгенерироваться скелет пустой HTML страницы. Не забудьте нажатьctrl+sчтобы файл сохранился.
Давайте теперь перейдем во вкладу для работы с Git-ом.
Откроется вот такое окно:
-
Кнопка для публикации нашего проекта на GitHub
-
После нажатия на кнопку
1, появится всплывающее окно. Нужно выбрать второй вариант или там где присутствует фраза...public repository
Если вы хотите создать локальный репозиторий и опубликовать код в другой сервис, то необходимо нажать на кнопку
Initialize Repository. После этого, вручную выбрать сервис куда публиковать.
После того, как выбрали «Опубликовать на GitHub публичный репозиторий» (пункт 2), программа предложит вам выбрать файлы, которые будут входить в первый commit. Проставляем галочки у всех файлов, если не проставлены и жмем ОК . Вас перекинет на сайт GitHub, где нужно будет подтвердить вход в аккаунт.
Вы создали и опубликовали репозиторий на GitHub.
Теперь сделаем изменения в коде и попробуем их снова опубликовать. Перейдите во вкладку с файлами, отредактируйте какой-нибудь файл, не забудьте нажать crtl+s (Windows) или cmd+s (MacOS), чтобы сохранить файл. Вернитесь обратно во вкладу управления Git.
Если посмотреть на значок вкладки Git, то можно увидеть цифру 1 в синем кружке. Она означает, сколько файлов у нас изменено и незакоммичено. Давайте его закоммитим и опубликуем:
-
Кнопка для просмотра изменений в файле. Необязательно нажимать, указал для справки
-
Добавляем наш файл для будущего commit
-
Пишем комментарий
-
Создаем commit
-
Отправляем наш commit в GitHub
Поздравляю, вы научились создавать commit и отправлять его в GitHub!
Итог
Это первая вводная статья по утилите Git. Здесь мы рассмотрели:
-
Как его устанавливать
-
Как его настраивать
-
Как инициализировать репозиторий и создать commit через консоль
-
Как на примере VS Code, опубликовать свой код на GitHub
Забегая вперед, советую вам погуглить, как работают следующие команды:
git help # справка по всем командам
git clone
git status
git branch
git checkout
git merge
git remote
git fetch
git push
git pull
P.S. Для облегчения обучения, оставлю вам ссылку на бесплатный тренажер по Git.
https://learngitbranching.js.org/
В телеграмм канале Step by Step , я публикую еще больше материала и провожу обучающие стримы, для всех желающих.
Git is the most popular version control system (VCS) among programmers and developers for software development. It’s free and open-source and available for all major operating systems: Linux, macOS, and Windows.

If you’re new to software development, learning Git is considered an essential skill. But in order to get started, the first step is to install and configure it on your computer.
However, since this can be confusing for some, here’s a guide discussing Git and demonstrating the steps to install and configure Git on Windows.
What Is Git and Why Do You Need It?
Git is a distributed version control system used to collaborate and maintain projects. It was created by Linus Torvalds for the development of the Linux kernel and later ported to macOS and Windows operating systems.
Being a DVCS, Git doesn’t have a centralized repository. Instead, when someone clones a Git repository, it’s mirrored entirely on that person’s computer along with the complete history of changes ever made to it.
Using Git, you can manage all your projects and collaborate with other developers in real-time quickly and efficiently without risking the chances of accidentally modifying the original source code (or project files).
Following are some of the reasons why you need to use Git:
- It simplifies and speeds up the process of managing project files.
- It allows multiple developers to work on a project simultaneously.
- It helps avoid code conflicts in a project with multiple developers.
- It mirrors a repository as is on a system to allow you to work independently—even offline.
- It allows you to track changes made to a file.
- It lets you restore previous versions of files in case of mistaken changes.
Git can be installed on Windows in a few different ways. You can either use an automated installation setup or take advantage of the Chocolatey package manager to install Git via the command line or install it directory from the source for the latest version.
1. Installing Git Using Chocolatey
Chocolatey is a Windows package manager that helps you install and update software packages on your Windows PC. It works with all versions of Windows, starting with Windows 7.
To use Chocolatey, you first need to install it on your PC. For this, open the Windows Command Prompt with administrative privileges and run the following command:
@"%SystemRoot%System32WindowsPowerShellv1.0powershell.exe" -NoProfile -InputFormat None -ExecutionPolicy Bypass -Command "[System.Net.ServicePointManager]::SecurityProtocol = 3072; iex ((New-Object System.Net.WebClient).DownloadString('https://community.chocolatey.org/install.ps1'))" && SET "PATH=%PATH%;%ALLUSERSPROFILE%chocolateybin"
Alternatively, you can run PowerShell with administrative privileges and run:
@"%SystemRoot%System32WindowsPowerShellv1.0powershell.exe" -NoProfile -InputFormat None -ExecutionPolicy Bypass -Command "[System.Net.ServicePointManager]::SecurityProtocol = 3072; iex ((New-Object System.Net.WebClient).DownloadString('https://community.chocolatey.org/install.ps1'))" && SET "PATH=%PATH%;%ALLUSERSPROFILE%chocolateybin"
Once Chocolatey is installed, restart the CMD or PowerShell. Now, enter the command below and hit Enter to install Git on your computer:
choco install git.install
Follow the prompts to finish the installation. When it’s finished, use the following command to verify the installation:
git --version
To upgrade Git, run:
choco upgrade git.install
2. Installing Git Using Installer
If you’re not comfortable working with a CLI, you can use the Git installer to install Git on your Windows PC. To do this, first, download the Git installer from the link below.
Download: Git Installer
Once downloaded, run the file. On the User Account Control prompt, tap Yes to bring up the installation window.
Hit Next to continue with the setup.

On the Select Components window, tick the checkboxes for Additional icons, Windows Explorer integration (Git Bash Here and Git GUI Here), and Add a Git Bash Profile to Windows Terminal. Click Next.

When asked to choose the default editor for Git, hit the dropdown button and select your editor of choice. By default, Git is set to use the Vim text editor, but since it can be intimidating for some, there are other text editors to choose from, such as Atom, Notepad++, Visual Studio Code, and Sublime Text. Select one and hit Next.

Next, you need to set the default name for the initial branch you create in your repositories. Selecting Let Git decide uses master, which is what most people use. However, you can set a custom name by choosing Overrise the default branch name for new repositories and entering the name in the text field below. Once selected, tap Next.

On the Adjusting your PATH environment screen, select Git from the command line and also from 3rd-party software. Doing so will allow you to use Git from Git Bash, Command Prompt, PowerShell, or any other software. Click Next to proceed.

Choose Use the OpenSSL library as the transport backend to validate server certificates and click Next.
In the line ending conversions options, choose Checkout Windows-style, commit Unix-style endings to avoid cross-platform compatibility issues. Hit Next.
Now, select MinTTY (the default terminal of MSYS2) for better compatibility and hit Next.
 For the default git pull behavior, choose Default (fast-forward or merge). With this setting, when you use git pull, it’ll fast-forward the current branch to the fetches brand when possible. If not, it’ll create a merge commit. Click on Next to proceed.
When asked to choose a credential helper, select Git Credential Manager Core and hit Next.

On the extra options screen, check off Enable file system caching to speed up your Git operations and click Next. If you want, you can also select Enable symbolic links to improve pathname resolution.
Leave the experimental features unselected and tap Install to begin Git installation on your PC. Once it’s complete, hit Finish.
Now, to confirm if Git has been installed, Run Git Bash. Alternatively, open CMD with administrative privileges and run:
git --version
If it returns a version number, this means Git is installed and ready to use.
How to Configure Git on Windows
Once you’ve installed Git on your PC, it’s time to configure some of its settings to adjust its look and behavior. You only need to do this once, and the configurations will stick around forever—even after you update Git.
Setting Up User Identity
First things first, every commit you make to Git repositories requires a username and email address attached to it. To avoid having to feed it for your every commit, Git lets you set up your default user identity. That way, all your commits use the same identity (username and email address).
To set up your identity, in an elevated Command Prompt, run:
git config --global user.name "Your Name"
git config --global user.email youremail@example.com
Here, –global option will set your default identity for all repositories. However, if you’d like to set it for a particular repository, you can do so by going into that repository folder and running the command without the –global option.
Once done, verify the changes by running:
git config --list

Alternatively, you can also access the Git config file by navigating to C:Usersuser_name and finding the .gitconfig file.
Configuring SSH for Git on Windows
SSH (Secure SHell) is a protocol for secure network communication between two systems. Using SSH with Git allows you to securely move files between your PC and Git repositories and issue various Git commands remotely over a secure channel.
Not just that, but it also allows takes away the need to feed in your username and password every time you want to commit changes to a repository.
To generate an SSH key, open Git Bash and run the following command:
ssh-keygen -t rsa -b 4096 -C "your_email_address"
Next, it’ll prompt you to confirm the location to store the SSH key. Hit Enter to continue with the default location. You now need to set a passphrase to add an extra layer of security to SSH. Enter a strong password and press Enter.
Lastly, you now need to add the SSH key to the SSH agent. To do this, you first need to enable OpenSSH. For this, open Task Manager (Ctrl + Shift + Esc), click on the Services tab, and tap on Open Services at the bottom.

Here, find OpenSSH Authentication Agent and double-click on it. Tap the Start button below Service status to start it and click OK.

Now, open CMD in elevated mode and run:
start-ssh-agent
Once the SSH agent is up and running, go to Git Bash and run the command below to add the SSH key you generated a few steps earlier:
ssh-add ~/.ssh/id_rsa
When prompted for a passphrase, enter one you set earlier and hit Enter to set the identity.
Successfully Managing Your Projects With Git
If you followed this guide closely, you should have Git up and running on your Windows computer. And subsequently, you should be able to use it to manage all your project files and collaborate with other developers (if you’re working with a team).
Furthermore, to take your experience up a notch and manage your Git repositories more efficiently, you can also use GitHub: a cloud-based hosting service for managing Git repositories.
Was this article helpful?
YesNo
TechPP is supported by our audience. We may earn affiliate commissions from buying links on this site.