The chances are that besides GNU make, you’ll also need many of the coreutils. Touch, rm, cp, sed, test, tee, echo and the like. The build system might require bash features, if for nothing else, it’s popular to create temp file names from the process ID ($$$$). That won’t work without bash. You can get everything with the popular POSIX emulators for Windows:
- Cygwin (http://www.cygwin.org/) Probably the most popular one and the most compatible with POSIX. Has some difficulties with Windows paths and it’s slow.
- GNUWin (http://gnuwin32.sourceforge.net/) It was good and fast but now abandoned. No bash provided, but it’s possible to use it from other packages.
- ezwinports (https://sourceforge.net/projects/ezwinports) My current favorite. Fast and works well. There is no bash provided with it, that can be a problem for some build systems. It’s possible to use make from ezwinports and bash from Cygwin or MSYS2 as a workaround.
- MSYS 1.19 abandoned. Worked well but featured very old make (3.86 or so)
- MSYS2 (https://www.msys2.org/) Works well, second fastest solution after ezwinports. Good quality, package manager (pacman), all tooling available. I’d recommend this one.
- MinGW abandoned? There was usually MSYS 1.19 bundled with MinGW packages, that contained an old make.exe. Use mingw32-make.exe from the package, that’s more up to date.
Note that you might not be able to select your environment. If the build system was created for Cygwin, it might not work in other environments without modifications (The make language is the same, but escaping, path conversion are working differently, $(realpath) fails on Windows paths, DOS bat files are started as shell scripts and many similar issues). If it’s from Linux, you might need to use a real Linux or WSL.
If the compiler is running on Linux, there is no point in installing make for Windows, because you’ll have to run both make and the compiler on Linux. In the same way, if the compiler is running on Windows, WSL won’t help, because in that environment you can only execute Linux tools, not Windows executables. It’s a bit tricky!
For tech enthusiasts, Make is a very neat way of building applications. Whether you’re trying to package your app or install somebody else’s, Make makes things easier.
Make isn’t available in Windows. When downloading a Windows application we download a setup file of EXE format. There’s no telling what these setup files may contain. You may even be downloading malware with exe format.
Below we have compiled a few different approaches to installing Make in Windows.
What is Make?
GNU.org tells Make is a tool that controls the generation of programs from its source files. In simple terms, the Make tool takes the source code of the application as input and produces the application as output.
Make is targeted for applications that follow the Free and Open Source Software (FOSS) principle. It was originally designed to work across Linux systems only. The source code can be modified in any way we want before we package it up for use.
Installing Make on Windows
Using Winget
Winget tool by Windows manages installation and upgrade of application packages in Windows 10 and 11. To use this tool, you need to have at least Windows 10 or later installed on your PC.
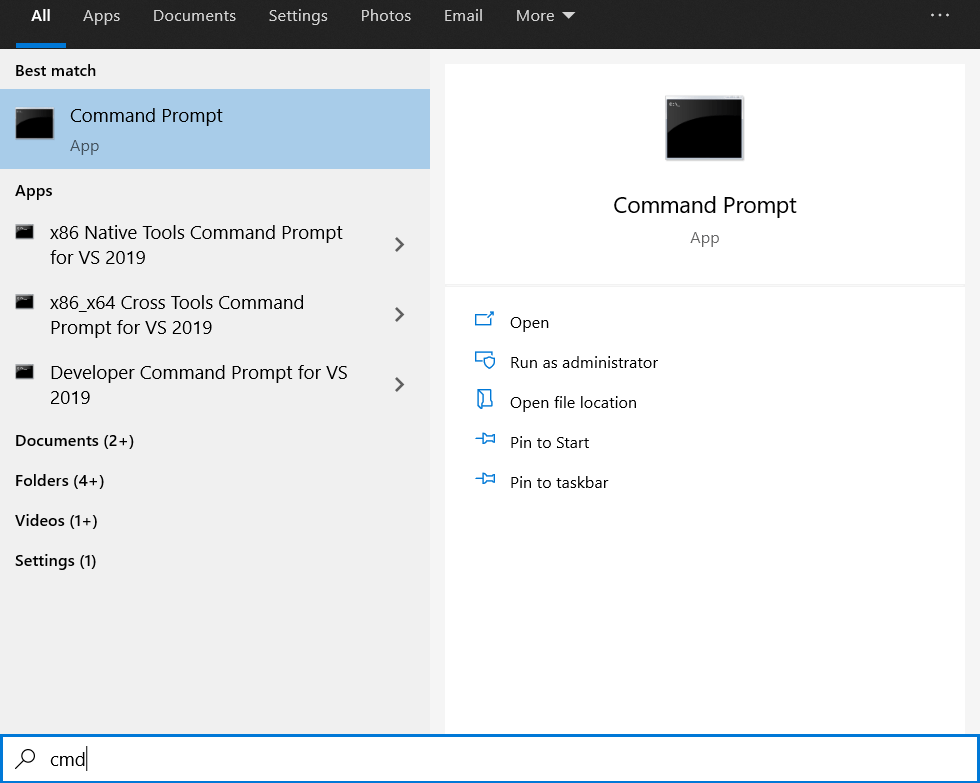
- Press Win + R together to open the Run window.
- Type cmd and press Enter to bring up the Command Prompt.
- Type the command
Winget install GnuWin32.makeand press Enter.
- Type Y to agree to source agreements.
- After installation, press Win + R again.
- Type
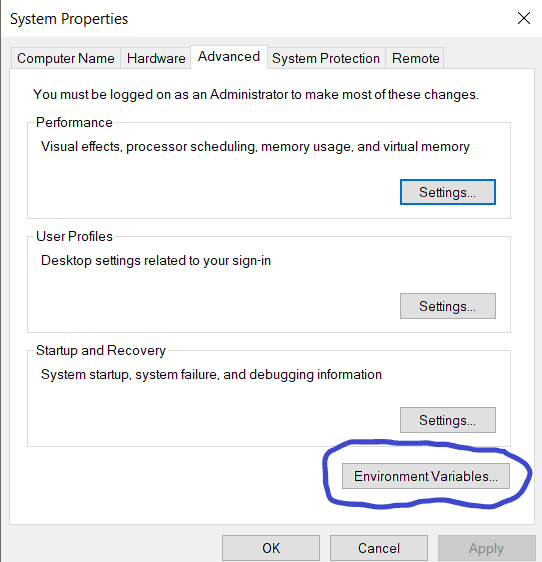
systempropertiesadvancedand press Enter.
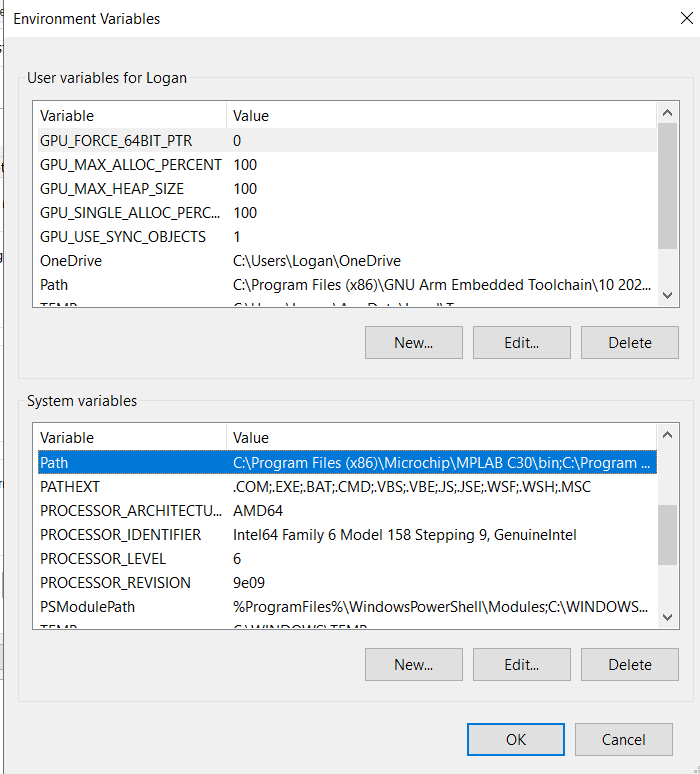
- Select Environment Variables under the Advanced tab.

- Under System variables, select New.
- Under the variable name, enter make.
- Under Variable value, enter
C:Program Files(x86)GnuWin32binmake.exe. - Or, select Browse File and go to the above location.

- Press on OK.


Using Chocolatey
Using Chocolatey is a great way to install make if you do not meet the minimum requirements for Winget. It is a package manager and installer for the Windows platform. For anyone familiar with Ubuntu, it is the equivalent of apt command for software installation.
Since Make is not directly available in Windows, we need to install the package manager first. Then, we will use this package manager to install the make tool.
- Press Win + X keys together to open the Power menu.
- Select Windows Powershell(Admin).
- Type the command ‘
Set-ExecutionPolicy Bypass -Scope Process -Force; iex ((New-Object System.Net.WebClient).DownloadString('https://community.chocolatey.org/install.ps1'))'and press Enter.
- Downloads and installs chocolatey as available from their official source.
- Type
chocoto verify if the installation worked. - Now, type the command ‘
choco install make‘ to install Make. - Go to the installation directory
C:Program Files(x86)GnuWin32to confirm the installation worked.


Using WSL
Using WSL or Windows Subsystem for Linux, we can install Make directly on our PC. WSL is released by Windows so this is the most preferred way of installing Make on Windows.
For WSL, we will install Ubuntu inside our Windows.
- Press Win + X keys together to open the Power menu.
- Select Windows Powershell(Admin).
- Type the command ‘
Wsl – install‘ and press Enter.
- Restart your PC.
- Go to the Start Menu and type Ubuntu to bring up the Ubuntu command line.
- Type the following ‘
Sudo apt install gcc build-essential make -y‘ and press Enter. - Wait until the installation completes.


Using MinGW
MinGW is one of the older ways to install Make on Windows. MinGW is a collection of minimal GNU files for Windows. Note that using this method, you will have to type the ming32-make instead of the make command. Both do the same work except ming32-make is the MinGW version of make.
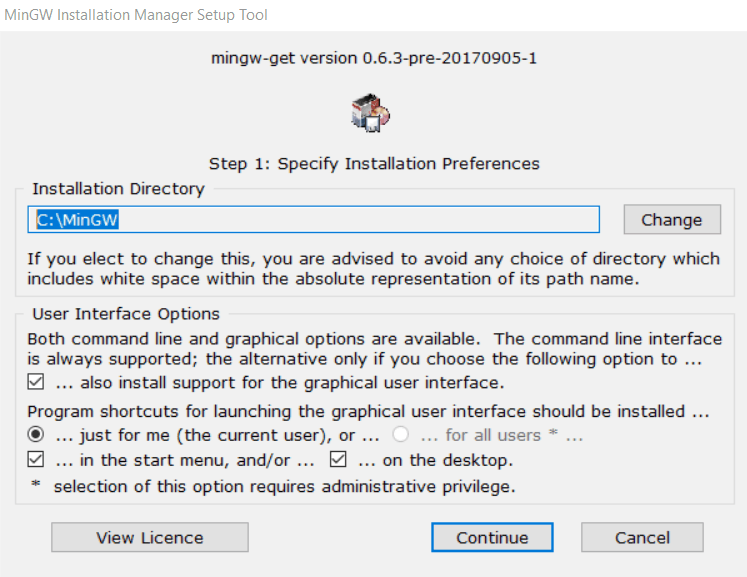
- Download the latest version of MinGW-get-setup.exe.
- Install MinGW by opening the setup file.

- Turn off installing graphical interface.
- Select Continue to start installation.

- Go to the installation directory and locate the bin folder.
- Make sure MinGW-get.exe exists.
- Press Win + R together to open the Run window.
- Type
systempropertiesadvancedand press Enter. - Select Environment Variables under the Advanced tab.
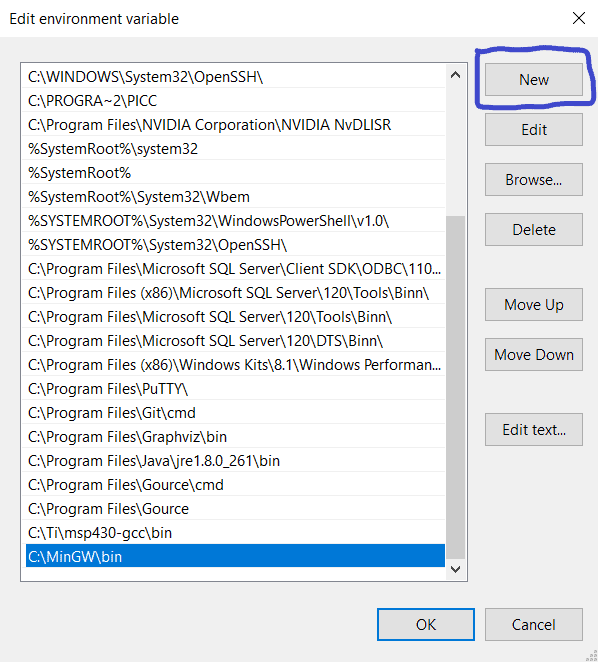
- Under System variables, double-click on Path.
- Select New.

- Type the location of MinGW-get.exe. E.g.
C:MinGWbin - Select OK.
- Press Win + X together to open the Power menu.
- Select Windows Powershell.
- Type the command ‘
Mingw-get install mingw32-make‘ and press Enter.


Using Make on Windows is pretty much the same as Linux or other platforms. You need to start with a makefile along with the source code of the program.
- Go to the location of the source code.
- Do a right-click and select Text document under New.
- Give it the name Makefile.

- Assuming the source code is source.c, paste the following lines in your makefile as given in this tutorial.
- Finally, open Command Prompt and go to the source code location using the cmd command.
- Type make and press Enter.
- You can now share and open the output file as an application.
- You can also modify the source code source.c any number of times and make will compile it as application output.


If you want to learn more about using the Make command, there’s entire documentation on its usage.
As the field of DevOps and build release engineering continues to grow, many new tools are being developed to help make building and releasing applications easier. One of the tools that has been in use for many years is Make, which is still heavily used by engineers today.
A Makefile is a simple text file consisting of targets, which can invoke different actions depending on what has been configured. For example, with a Makefile, you can invoke a build of your application, deploy it, or run automated tests and it can dramatically increase the efficiency of your workflow.
Initially, it was Stuart Feldman who began working on the Make utility back in 1976 at Bell Labs. However, the version of Make most commonly used today is GNU Make, which was introduced in the late 1980s.
While the tool was originally meant to run on Linux, Make’s popularity has interested those working on other operating systems as well. There are several ways to run Makefiles on Windows, and in this article you’ll be introduced to each option and learn about their strengths and weaknesses.
Using Make on Windows
Before looking at the different options available, you should know why you want to run Makefiles on Windows in the first place. Or rather, if you’re working on Windows, why are you even interested in Makefiles?
Historically, the biggest reason for wanting Makefiles to run on Windows is that the developers in your organization are working on Windows. Seeing as how the de facto standard for languages like C and C++ is to use Make, it’s no wonder that Windows users want the ability to use Make as well.
As applications and infrastructure become more modern, the cloud is another reason for wanting Makefiles on Windows. Many infrastructure engineers want their applications to be run on Linux, likely led by the adoption of tools like Docker and containerization in general. Additionally, on Linux, a Makefile is the primary tool to use in many cases, especially when it comes to building native Linux applications. However, many engineers are still using Windows on their workstations, leading to the question of how to run Makefiles on Windows. Let’s dive into the possible answers.
Chocolatey

Linux users have been using package managers for decades, yet they’ve never gained much traction on Windows. Up until the release of winget, the concept of a package manager was never something that was natively included on Windows. Instead, Rob Reynolds started working on an independent package manager back in 2011 that would come to be known as Chocolatey. Chocolatey is now widely used on Windows to install packages, and you can use it to install make as well.
To do so, run the following command in an Administrative PowerShell window:
Set-ExecutionPolicy Bypass -Scope Process -Force; [System.Net.ServicePointManager]::SecurityProtocol = [System.Net.ServicePointManager]::SecurityProtocol -bor 3072; iex ((New-Object System.Net.WebClient).DownloadString('https://community.chocolatey.org/install.ps1'))You can find the newest installation instructions at any time on the Chocolatey website.
Once Chocolatey is installed, you may have to close down the PowerShell window and open it back up. After that, run the following command:
Once the script is done running, make will be installed. You may need to restart the PowerShell window again, but at this point you are ready to use Makefiles on Windows.
Chocolatey will likely be the most popular option for those who want to stick to a pure Windows installation. It’s easy to install, easy to use, and you don’t need to jump through any hoops or workarounds to get it working.
At this point, you can use make just like you otherwise would, and you can test it by running make -v.
Cygwin
Historically, one of the most popular ways of running any type of Linux functionality on Windows has been to use Cygwin. Cygwin aims to give a Linux feeling to Windows by holding a large collection of GNU and open source tools. It’s important to note that this does not mean it will give you native Linux functionality. However, it does allow you to use Linux tools on Windows. There’s a big difference between the two; for instance, Cygwin does not have access to Unix functionality like signals, PTYs, and so on. It’s a great tool for when you want to use familiar Linux commands but still want them to be run on Windows.
To use Cygwin for Makefiles, start by downloading and installing Cygwin. During the installation, you’ll see a window popping up asking you what packages you want to install. In the top left corner, make sure to select Full and then search for make.

Your search will give you a list of several different packages. You want to choose the one that’s labeled just as make. Change the dropdown menu where it says Skip to the latest version.

Now you can finish the installation by clicking Next in the bottom right corner. Once the installation is done, you can open up Cygwin and verify that make has been installed by executing make --version.
NMAKE
One of the alternatives that you’ll often hear about regarding running Makefiles on Windows is NMAKE. While it is an alternative to make, note that you cannot simply take your existing Makefiles from Linux and run them using NMAKE; they have to be ported.
First of all, the compilers are different on Windows and Linux, so if you are specifying your compiler in your Makefile, you’ll have to change that to whatever is relevant on Windows. At the same time, you’ll have to change the flags that you send to the compiler, because Windows typically denotes the flags using / instead of -.
On top of that, it doesn’t recognize all the syntax that you’re used to from GNU Make, like .PHONY. Lastly, Windows obviously doesn’t recognize the commands that work on Linux, so if you have specified any Linux-specific commands in your Makefiles, you’ll also have to port them.
All in all, if your entire organization uses Windows and you simply want the typical functionality of GNU Make, then NMAKE is a viable solution. However, if you just want to quickly run your traditional Makefiles on Windows, NMAKE is not the answer.
CMake

As with NMAKE, CMake is not a direct way to run your Makefiles on Windows. Instead, CMake is a tool to generate Makefiles, at least on Linux. It works by defining a CMakeLists.txt file in the root directory of your application. Once you execute cmake, it generates the files you need to build your application, no matter what operating system you’re on.
On Linux, this means that it creates Makefiles for you to run, but on Windows it may mean that it creates a Visual Studio solution.
CMake is a great solution if you don’t care too much about running Makefiles specifically, but you want the functionality, namely the ease of use in a build process, that you can get from Makefiles.
Windows Subsystem for Linux
The Windows Subsystem for Linux (WSL) is an honorable mention. It’s cheating a bit to say that it’s a way to run Makefiles “on Windows,” as your Makefiles won’t actually be running on Windows.
If you haven’t heard of WSL before, here’s an extremely oversimplified explanation: It uses Hyper-V to create a hyper-optimized virtual machine on your computer, in which it runs Linux. Basically, you get a native Linux kernel running on your Windows computer, with a terminal that feels as if it’s part of Windows.
You should look into WSL if what you care about most is having Windows as your regular desktop environment, but you’re fine with all of your programming and development going on inside of Linux.
Conclusion
As you can see, there are a few different ways you can be successful in running Makefiles on Windows. However, you do need to be wary of the fact that it will never be a perfect solution. Every solution is in some way a workaround, and the closest you’ll get to feeling like you’re using native Makefiles while using Windows is to install something like WSL.
If all this becomes too tedious for you and you’re looking for an easier alternative to optimize your builds, then check out Earthly. Earthly has taken all the best parts of Makefiles and combined them with the best parts of Dockerfiles to help make your build processes more streamlined and effective.
While you’re here:
Earthly is the effortless CI/CD framework.
Develop CI/CD pipelines locally and run them anywhere!
Make is an incredibly powerful tool for managing application compilation, testing and installation, or even setting up the development environment. It comes standard on Linux and macOS, and it is therefore widely adopted. But how can you get started with Make on Windows?
I’ve previously written about using Make for Python development, you might find it interesting.
If you are using Windows Subsystem for Linux (WSL/WSL2), then you can easily install make with the sudo apt install make command. However, if you want to have the command available natively on a normal terminal prompt then you need to install a Windows-specific version.
How to install Make on Windows?
The easiest way to configure Make is to use the Chocolatey package manager for Windows. It will handle downloading the correct executable, installing it, and making sure that the command is added to the system path.
- Install Chocolatey if you don’t already have it installed
- Open an elevated terminal (Run as administrator)
- Type the command
choco install make, approve the installation if prompted
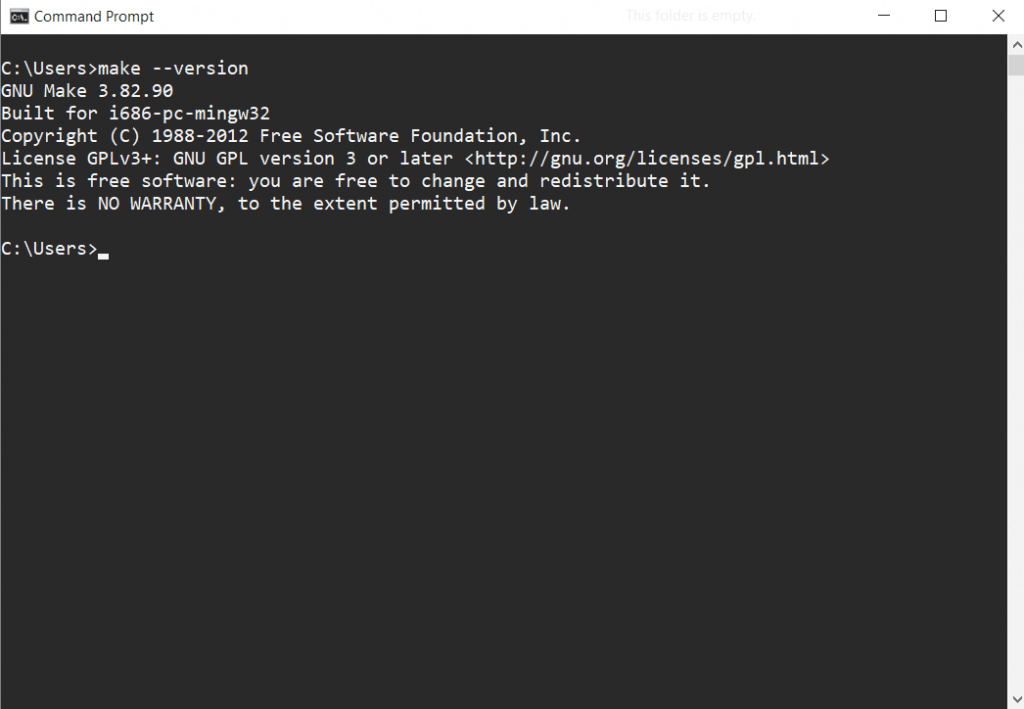
Next, verify that make works, and then you can start using it normally:
>> make --version
GNU Make 4.3
Built for Windows32
Copyright (C) 1988-2020 Free Software Foundation, Inc.
License GPLv3+: GNU GPL version 3 or later <http://gnu.org/licenses/gpl.html>
This is free software: you are free to change and redistribute it.
There is NO WARRANTY, to the extent permitted by law.
Alternatively, if you’d prefer to use the new native Windows package manager you can use this winget command:
>> winget install GnuWin32.Make
This will download the installer and run it for you automatically. Make will also be added to the list of installed programs so you can uninstall it from the Add or remove programs section. You will still get the following error since the installer does not add make to the system path:
make : The term 'make' is not recognized as the name of a cmdlet,
function, script file, or operable program...
To make it executable you need to open the Start menu and search for Edit the system environment variables. Click Environment Variables, then under System variables choose Path and click Edit. Click New and insert C:Program Files (x86)GnuWin32bin, then save the changes. Open a new terminal and test that the command works.
As of writing this article the current version that gets installed with winget is 3.81, so it is older than the one from Chocolatey. You may want to take that into consideration when choosing the installation method. You can check which version would be installed with winget show GnuWin32.Make.
Using Make on Windows
From a syntax perspective there is no difference between Linux and Windows. You still need to write a Makefile and define the shell commands in tab-indented sections. However, the commands themselves need to be adjusted for the changed operating system.
Normally on a Makefile each line runs on a separate shell. If you need to run many commands from the same shell instance then they should be defined on the same line and chained together with the && operator.
.PHONY: test
test: venv
	.venvScriptsactivate && python -m unittest discover

.PHONY: venv
venv:
	python -m venv venv
The above example defines phony Make targets for setting up a Python virtual environment and running unit tests. Assuming that you have installed Python, running make test should execute successfully, running zero unit tests since it couldn’t find any.
If you need to make your Makefile support different operating systems, then you have to also detect the operating system to be able to run a different set of commands for each OS. With Windows the added difficulty is that in some cases (MSYS, MINGW) you actually need to use the Linux commands.
This answer on Stack Overflow has one solution for finding the correct environment, relying on how the system Path is delimited by semicolons ; unlike all other OSes. We can use that information to make our small example Makefile work natively on both Windows and Linux:
ACTIVATE := ./venv/bin/activate
PYTHON := python3
ifeq '$(findstring ;,$(PATH))' ';'
	ACTIVATE := .venvScriptsactivate
	PYTHON := python
endif

.PHONY: venv
venv:
	$(PYTHON) -m venv venv

.PHONY: test
os: venv
	$(ACTIVATE) && $(PYTHON) -m unittest discover
The command for activating the virtual environment is different on Windows compared to other OSes. Also the Python executable is named python on Windows, but on Linux you need to use python3. The conflicting commands can be defined as variables and then referenced in the targets.
Similarly, if you’re compiling C or C++ code, you need to use gcc or g++ on Linux, and cl on the Windows developer command prompt. Also the command arguments will need to be different.
Conclusion
It’s possible to use Make natively on Windows, and it’s not even that difficult. If you’re accustomed to using Bash and Linux commands then the switch to PowerShell commands might require a bit of adaptation. Definitely the biggest challenge is to write Makefiles that support different operating systems, but as we saw that can be accomplished with some tricks.
2015-11-17 NOTE: This year we made R packages before we used make The hope is, therefore, that the make that ships with Rtools is all we need. So hopefully we can ignore this?
Install make on Microsoft Windows
We are still working out the best way to install make on Windows. Our current best recommendation is to install msysGit, which includes make as well as git and bash.
Download and install msysGit. The two software packages msysGit and Git for Windows are related. Both install git and bash, but only msysGit installs make. The programs installed by msysGit are found by default in C:msysGitbin. Here is the complete list of programs included with msysGit. For this activity, RStudio needs to be able to find in your PATH environment variable the program make, the shell bash, other utilities like rm and cp, and Rscript.
Here is another alternative for installing make alone:
- Go to the Make for Windows web site.
- Download the Setup program.
- Install the file you just downloaded and copy to your clipboard the directory in which it is being installed.
- FYI: The default directory is
C:Program Files (x86)GnuWin32
- FYI: The default directory is
- You now have
makeinstalled, but you need to tell Windows where to find the program. This is called updating yourPATH. You will want to update thePATHto include thebindirectory of the newly installed program.
Update your PATH
If you installed Make for Windows (as opposed to the make that comes with Git for Windows), you still need to update your PATH.
These are the steps on Windows 7 (we don’t have such a write-up yet for Windows 8 – feel free to send one!):
- Click on the Windows logo.
- Right click on Computer.
- Select Properties.
- Select Advanced System Settings.
- Select Environment variables.
- Select the line that has the
PATHvariable. You may have to scroll down to find it. - Select Edit.
- Go to the end of the line and add a semicolon
;, followed by the path where the program was installed, followed bybin.- Typical example of what one might add:
;C:Program Files (x86)GnuWin32bin
- Typical example of what one might add:
- Click Okay and close all the windows that you opened.
- Quit RStudio and open it again.
- You should now be able to use
makefrom RStudio and the command line.
Issues we are still clarifying
See issue 58 for what seems to be the most comprehensive statement of the Windows situation.
What are the tricky bits?
- Getting the same
Makefileto “work” via RStudio’s Build buttons/menus and in the shell. And, for that matter, which shell? Git Bash or ??? - Ensuring
make,Rscript,pandoc,rm, etc. can be found = updatingPATH. - Getting
maketo use the correct shell.- See issue 54 on the Discussion repo.
Makefile — это файл утилиты «make», который сохраняется вместе с кодом в репозитории. Makefile помещают в корень проекта, работает он в двух направлениях:
как программный код,
как документация к проекту.
Сам по себе файл Makefile представляет собой набор структурированных программных команд, которые запускает утилита «make».
Makefile и утилита «make» представляют собой единый инструмент, который объединяет различные программные команды в одном месте и обеспечивает самодокументирование программы. То есть вы пишите программный код, а он самостоятельно вписывается в файл Makefile в виде уникальной структуры.
Makefile и «make» обязательно нужно использовать в больших проектах, когда программирование ведется в нескольких репозиториях и большим количеством разработчиков. В таких проектах работа ведется в запутанном ритме. Сначала одни программисты работают над репозиторием, потом другие. Потом приходят третьи молодые программисты, пытаются разобраться, что вообще происходит в коде, и не могут, потому что предыдущие профессионалы писали в своем стиле, применяя собственный подход и понимание происходящего. Новичку бывает трудно разобрать запутанный код, потому что никто уже и не помнит, кто и что там писал. Чтобы не было подобных ситуаций, придумали Makefile и утилиту «make». Они все структурируют и облегчают восприятие чужого кода.
Make и Makefile — что это?
Makefile и утилита «make» были придуманы для того, чтобы автоматизировать сборку программ и библиотек из программного кода. Такой функционал оказался востребованным среди программистов, поэтому «эта парочка» быстро обрела популярность. Программисты смекнули, что использовать Makefile можно не только для сборки библиотек, но и в других программах. Главное, за что ценят утилиту «make», — это автоматизация сборки. На сегодняшний день использовать Makefile в большом проекте — это стандарт среди разработчиков любых уровней.
Фактически утилита «make» нужна только для того, чтобы запустить файл Makefile, а точнее, «цели», прописанные в этом файле. Шаблон Makefile выглядит таким образом:
#Makefile
Цель№1: <наименование цели>
команда№1 #<описывается команда, которая должна выполниться>
команда№2 #<описывается команда, которая должна выполниться>
Важные замечания по шаблону Makefile:
когда задаете имя цели, можно использовать дефис «-» и подчеркивание «_»;
список команд будет выполняться в порядке очередности, но каждая следующая команда активируется только в том случае, если предыдущая выполнилась без ошибок;
команды разделяются между собой табуляцией — это важно;
после того как закончилось описание одной цели, нужно оставить пустую строку, так как пустая строка отделяет одну цель от другой.
Поэтому формирование Makefile в собственном проекте — это ответственное дело. Нужно корректно разделить команды на цели и задать им понятные имена, чтобы потом было легче понять, что за цель была описана. То есть из Makefile не нужно делать «свалку кода» — нужно изначально придерживаться строгой и понятной структуры. Таким образом, Makefile будет служить для того, для чего был задуман.
Как запустить Makefile
Если Makefile уже сформирован в программе, тогда запустить его достаточно просто. Главное, чтобы утилита «make» была инсталлирована на вашем устройстве. Обычно она инсталлирована по умолчанию.
Чтобы запустить «make» в Linux, нужно в терминале ввести команду:
$ make
После запуска утилита «make» найдет файл Makefile и выполнит первую цель, которая в нем записана. Также при запуске можно указать цель, которую нужно активировать. Например:
$ make <имя цели>
Если нужно, тогда можно указать несколько целей в одном Makefile, которые нужно активировать.
В Windows также можно запустить файл Makefile. Для этого нужно открыть Visual Studio и перейти в нем в каталог, который содержит файл Makefile. Потом нужно ввести команду:
nmake -f Makefile.win
Заключение
Сегодня мы определили, что такое Makefile. По сути, это файл, который помогает собирать и структурировать большие программы. Он используется совместно с утилитой «make», которая на большинстве устройств предустановлена. Именно при помощи этой утилиты и командной строки можно запустить Makefile. В следующих статьях мы обсудим, как создать и редактировать уже созданный Makefile.
The accepted answer is a bad idea in general because the manually created make.exe will stick around and can potentially cause unexpected problems. It actually breaks RubyInstaller: https://github.com/oneclick/rubyinstaller2/issues/105
An alternative is installing make via Chocolatey (as pointed out by @Vasantha Ganesh K)
Another alternative is installing MSYS2 from Chocolatey and using make from C:toolsmsys64usrbin. If make isn’t installed automatically with MSYS2 you need to install it manually via pacman -S make (as pointed out by @Thad Guidry and @Luke).
make is a GNU command so the only way you can get it on Windows is installing a Windows version like the one provided by GNUWin32. Anyway, there are several options for getting that:
-
The most simple choice is using Chocolatey. First you need to install this package manager. Once installed you simlpy need to install
make(you may need to run it in an elevated/admin command prompt) :choco install make -
Other recommended option is installing a Windows Subsystem for Linux (WSL/WSL2), so you’ll have a Linux distribution of your choice embedded in Windows 10 where you’ll be able to install
make,gccand all the tools you need to build C programs. -
For older Windows versions (MS Windows 2000 / XP / 2003 / Vista / 2008 / 7 with msvcrt.dll) you can use GnuWin32.
An outdated alternative was MinGw, but the project seems to be abandoned so it’s better to go for one of the previous choices.
GNU make is available on chocolatey.
-
Install chocolatey from here.
-
Then,
choco install make.
Now you will be able to use Make on windows.
I’ve tried using it on MinGW, but it should work on CMD as well.
If you’re using Windows 10, it is built into the Linux subsystem feature. Just launch a Bash prompt (press the Windows key, then type bash and choose «Bash on Ubuntu on Windows»), cd to the directory you want to make and type make.
FWIW, the Windows drives are found in /mnt, e.g. C: drive is /mnt/c in Bash.
If Bash isn’t available from your start menu, here are instructions for turning on that Windows feature (64-bit Windows only):
https://docs.microsoft.com/en-us/windows/wsl/install-win10
Overview
Make is a “build tool”, allowing us to control the execution of a set of command line statements to assemble pipelines that define what gets executed when. Using make,
our entire workflow becomes transparent and reproducible.
 Tip
Tip
Why Build Tools?
Imagine you have built a complex project, consisting of dozens of datafiles and scripts.
Also imagine you haven’t worked on the project for a few weeks, and now wish to continue
your work where you left off.
The big questions then become:
- In which order do the files need to be executed?
- Which files are up-to-date and do not have to be executed again?
For this purpose, we use a workflow management system — or, in technical terms — “build tool”.
Build tools will allow us to control the execution of a set scripts by by running them from the command line.
Some reasons we push this topic are:
- Your workflow / order of execution is explicitly documented.
- Each time you run
make, it only executes each script if the output is expected to be different from the last time your ran it. That is, it runs ‘partial builds.’ - If multiple users work on the project, they can easily execute code that others have written.
Installation
We will use make to automate the execution of our projects with a “single click”, so that our entire work flow is reproducible.
For Windows Users
We will install make so that it plays nicely with your Anaconda/Python distribution and the Windows command line.
Watch our YouTube video, in which we walk you through the setup on Windows.
Download make
Please download make here.
 Warning
Making make available via the PATH settings on Windows.
We need to update our PATH settings; these settings are a set of directories that Windows uses to “look up” software to startup.
- Open the settings for environment variables
    - Right-click on Computer.
    - Go to "Properties" and select the tab "Advanced System settings".
    - Choose "Environment Variables"
- Alternatively, type "environment variable" (Dutch: omgevingsvariabelen) in your Windows 10 search menu, and press Enter.

-  Select `Path` from the list of user variables. Choose `Edit`.
    - **Windows 7 and 8 machines:**
        If you chose your installation directory to be `C:Program FilesGnuWin32bin` during your installation (i.e., you did use the default directory), copy and paste the following string without spaces at the start or end:

        `;C:Program Files (x86)GnuWin32bin`

    - **Windows 10 machines:**
        - Click `New` and paste the following string:

        `C:Program Files (x86)GnuWin32bin`

        - Click on `OK` as often as needed.
For Mac Users
- Please install X-code command line tools, which includes
make.
Open a terminal by searching for it with spotlight, cmd + spacebar then type terminal and press Return when it appears. Then, copy and paste the following:
For Linux Users
Make is pre-installed on Linux operating systems so there is nothing to be done.
Verifying Your Installation
To check that Make is installed and working correctly, open a terminal session and type (then hit the return key):
If everything is working correctly, you should get the following output:
make: *** No targets specified or no makefile found. Stop.
Related
Posts
MinGW (“Minimalist GNU for Windows”) is a complete runtime environment for gcc to support binaries native to Windows 64-bit and 32-bit operating systems. With MinGW we can build C programs for windows. This tool is also required to build C-programs for microcontrollers. We will be seeing how to write codes for microcontrollers without using the any IDE. And we will use the MinGW compiler along with the microcontroller family toolchain to build the code. We will install mingw and configure it for running the “make” files
This post is the first step in the complete build process. In this post, we will look at installing mingw and adding it to the environment variables.
1.1 Download MingGW
It contains Make that we will be using in Command Prompt on Windows 10.
1.2 Install MinGW
We will now see how to install minGW. In this step, we will look at the important options that need to be selected.
Keep the Installation Directory the same as shown below.
1.2.1 Navigate to your Desktop
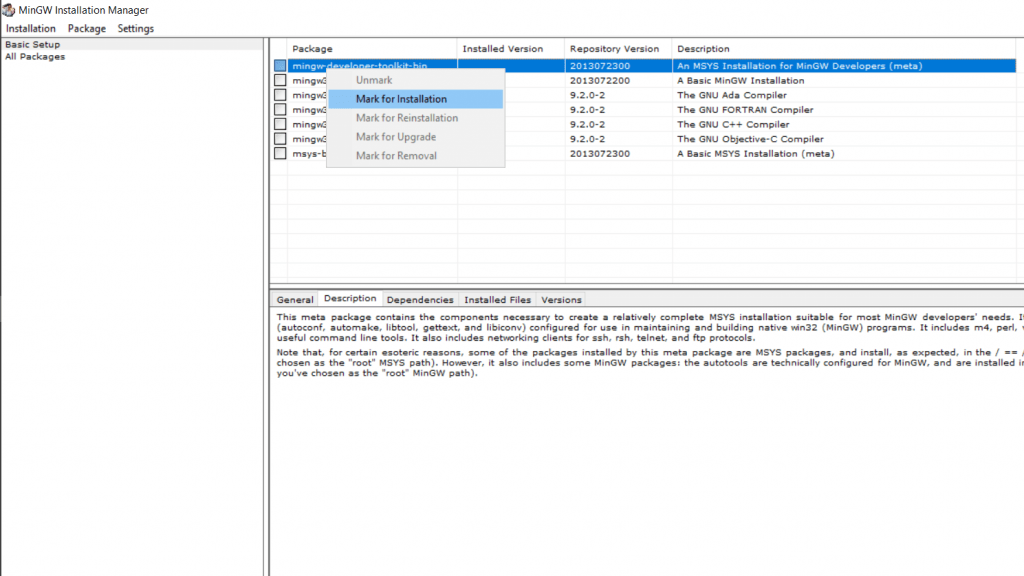
Open MinGW Installer. Select Basic Setup, navigate to Packages and Right click on “mingw-developer-toolkit-bin”, “mingw32-base-bin” and “msys-base-bin” Packages and select Mark for Installation.
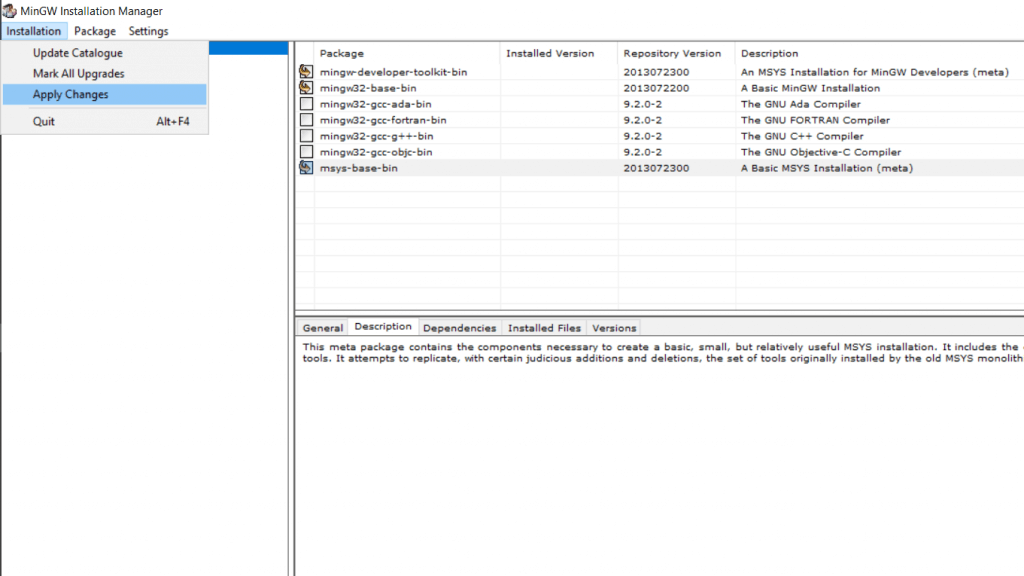
1.2.2 Navigate to the Top left corner and Left click on Installation then click Apply Changes.
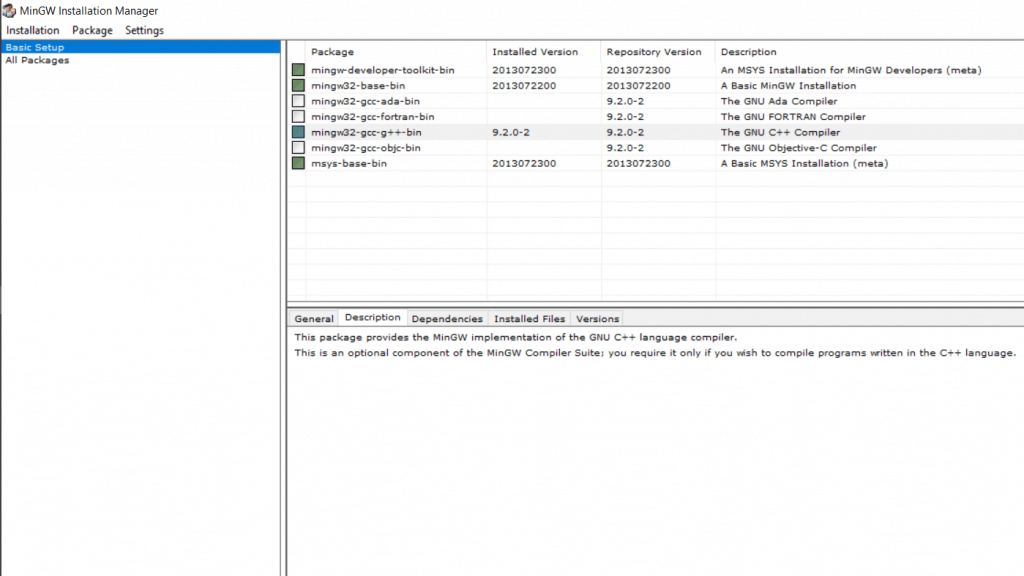
1.2.3 The packages should now be Green (if not, just repeat the process), if they are successfully installed then close the Installation Manager.
1.3 Rename to Make
Navigate to C:MingGWbin. Rename “mingw32-make” to “make”. This will make it easier to use Make in the Command Prompt.

1.3.1 Let’s add Make for usage in Command Prompt.
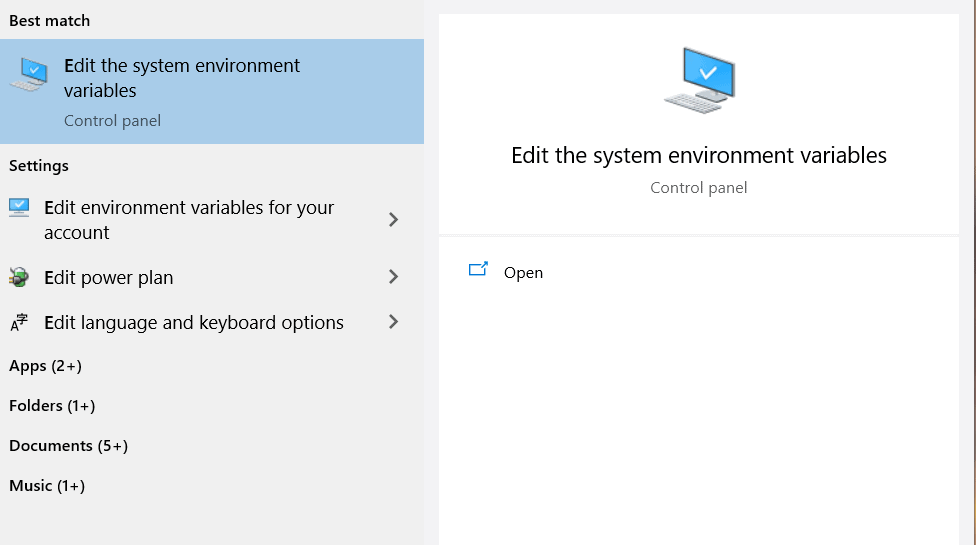
Press the “Windows Icon” on your keyboard, search and open “Edit the system environment variables”.
1.3.2 Click on “Environment Variables”
1.3.2 Under “System variables”, scroll down to “Path” and double-click.
1.3.3 Click on “New” and add the location “C:MingGWbin” to environment variable and press “OK”.
1.4 Testing Make
Press the “Windows Icon” on your keyboard, search and open “Command Prompt”.
1.4.1 Type “make –version” to confirm that it works. Recheck Step 1.3 – 1.4 if it doesn’t work.