Using GCC with MinGW
In this tutorial, you configure Visual Studio Code to use the GCC C++ compiler (g++) and GDB debugger from mingw-w64 to create programs that run on Windows.
After configuring VS Code, you will compile and debug a simple Hello World program in VS Code. This tutorial does not teach you about GCC, GDB, Mingw-w64, or the C++ language. For those subjects, there are many good resources available on the Web.
If you have any problems, feel free to file an issue for this tutorial in the VS Code documentation repository.
Prerequisites
To successfully complete this tutorial, you must do the following steps:
-
Install Visual Studio Code.
-
Install the C/C++ extension for VS Code. You can install the C/C++ extension by searching for ‘c++’ in the Extensions view (⇧⌘X (Windows, Linux Ctrl+Shift+X)).

-
Get the latest version of Mingw-w64 via MSYS2, which provides up-to-date native builds of GCC, Mingw-w64, and other helpful C++ tools and libraries. You can download the latest installer from the MSYS2 page or use this link to the installer.
-
Follow the Installation instructions on the MSYS2 website to install Mingw-w64. Take care to run each required Start menu and
pacmancommand. -
Install the Mingw-w64 toolchain (
pacman -S --needed base-devel mingw-w64-x86_64-toolchain). Run thepacmancommand in a MSYS2 terminal. Accept the default to install all the members in thetoolchaingroup. -
Add the path to your Mingw-w64
binfolder to the WindowsPATHenvironment variable by using the following steps:- In the Windows search bar, type ‘settings’ to open your Windows Settings.
- Search for Edit environment variables for your account.
- Choose the
Pathvariable in your User variables and then select Edit. - Select New and add the Mingw-w64 destination folder path to the system path. The exact path depends on which version of Mingw-w64 you have installed and where you installed it. If you used the settings above to install Mingw-w64, then add this to the path:
C:msys64mingw64bin. - Select OK to save the updated PATH. You will need to reopen any console windows for the new PATH location to be available.

Check your MinGW installation
To check that your Mingw-w64 tools are correctly installed and available, open a new Command Prompt and type:
gcc --version
g++ --version
gdb --version
- If you don’t see the expected output or
g++orgdbis not a recognized command, make sure your PATH entry matches the Mingw-w64 binary location where the compilers are located. If the compilers do not exist at that PATH entry, make sure you followed the instructions on the MSYS2 website to install Mingw-w64. - If
gcchas the correct output but notgdb, then you need to install the packages you are missing from the Mingw-w64 toolset.- Missing the
mingw-w64-gdbpackage is one cause of the «The value of miDebuggerPath is invalid.» message upon attempted compilation if your PATH is correct.
- Missing the
Create Hello World
From a Windows command prompt, create an empty folder called projects where you can place all your VS Code projects. Then create a sub-folder called helloworld, navigate into it, and open VS Code in that folder by entering the following commands:
mkdir projects
cd projects
mkdir helloworld
cd helloworld
code .
The «code .» command opens VS Code in the current working folder, which becomes your «workspace». Accept the Workspace Trust dialog by selecting Yes, I trust the authors since this is a folder you created.
As you go through the tutorial, you will see three files created in a .vscode folder in the workspace:
tasks.json(build instructions)launch.json(debugger settings)c_cpp_properties.json(compiler path and IntelliSense settings)
Add a source code file
In the File Explorer title bar, select the New File button and name the file helloworld.cpp.

Add hello world source code
Now paste in this source code:
#include <iostream>
#include <vector>
#include <string>

using namespace std;

int main()
{
    vector<string> msg {"Hello", "C++", "World", "from", "VS Code", "and the C++ extension!"};

    for (const string& word : msg)
    {
        cout << word << " ";
    }
    cout << endl;
}
Now press ⌘S (Windows, Linux Ctrl+S) to save the file. Notice how the file you just added appears in the File Explorer view (⇧⌘E (Windows, Linux Ctrl+Shift+E)) in the side bar of VS Code:

You can also enable Auto Save to automatically save your file changes, by checking Auto Save in the main File menu.
The Activity Bar on the far left lets you open different views such as Search, Source Control, and Run. You’ll look at the Run view later in this tutorial. You can find out more about the other views in the VS Code User Interface documentation.
Note: When you save or open a C++ file, you may see a notification from the C/C++ extension about the availability of an Insiders version, which lets you test new features and fixes. You can ignore this notification by selecting the
X(Clear Notification).
Explore IntelliSense
In your new helloworld.cpp file, hover over vector or string to see type information. After the declaration of the msg variable, start typing msg. as you would when calling a member function. You should immediately see a completion list that shows all the member functions, and a window that shows the type information for the msg object:
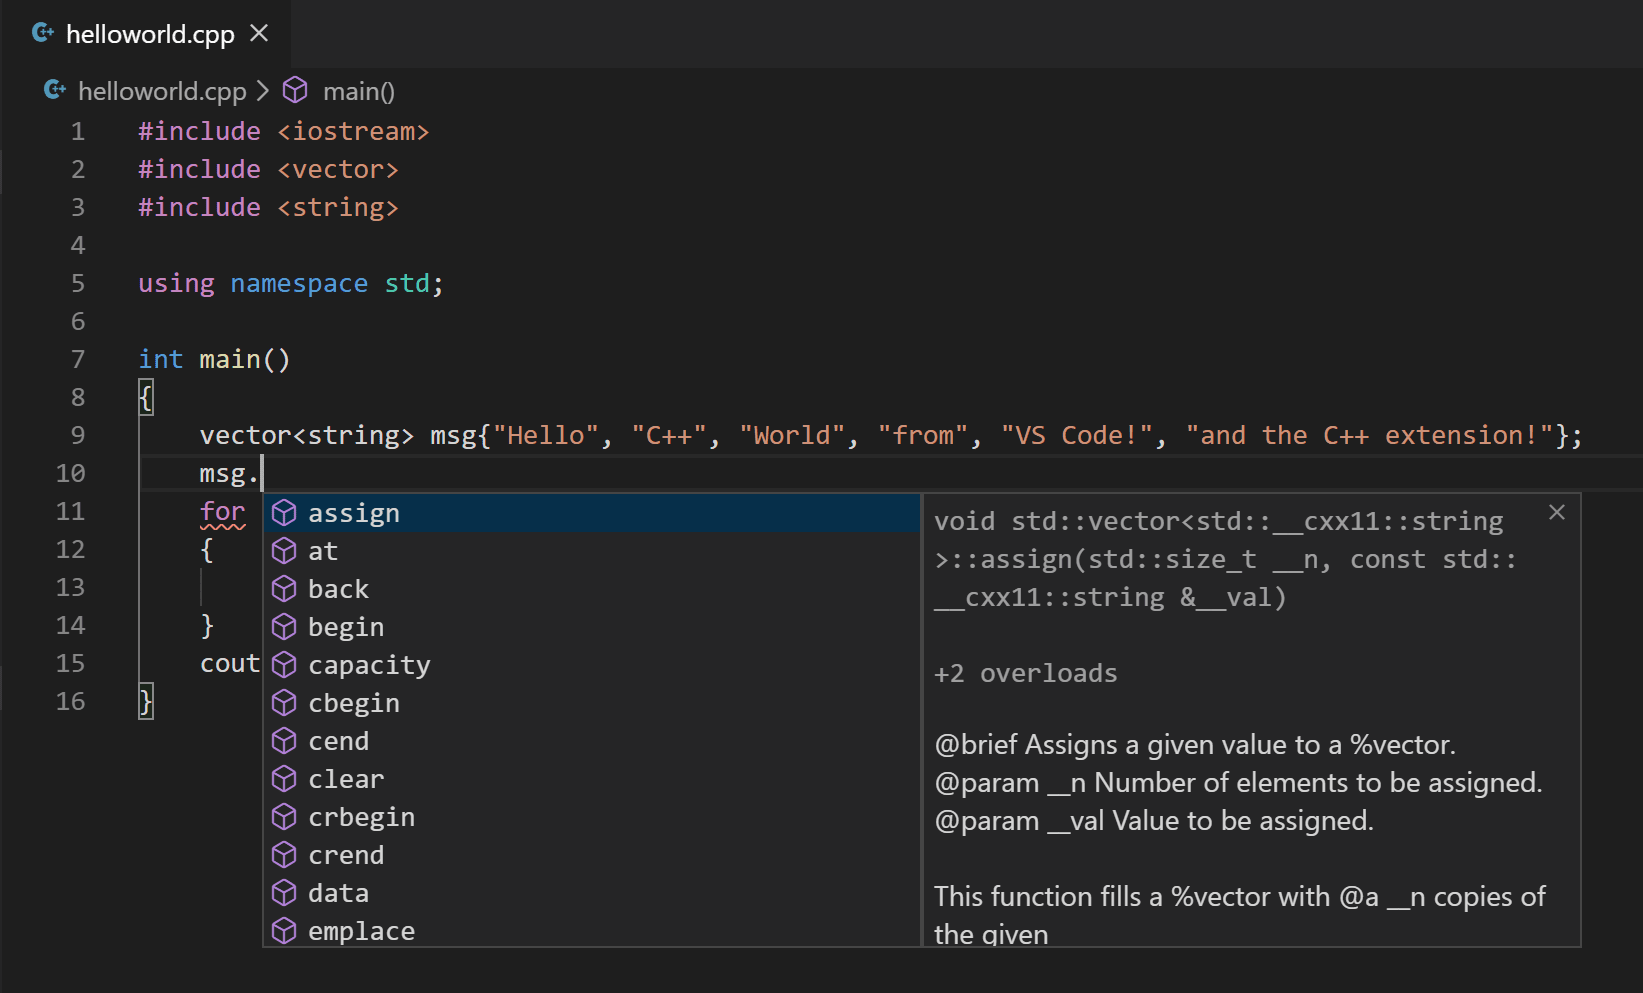
You can press the Tab key to insert the selected member; then, when you add the opening parenthesis, you will see information about any arguments that the function requires.
Run helloworld.cpp
Remember, the C++ extension uses the C++ compiler you have installed on your machine to build your program. Make sure you have a C++ compiler installed before attempting to run and debug helloworld.cpp in VS Code.
-
Open
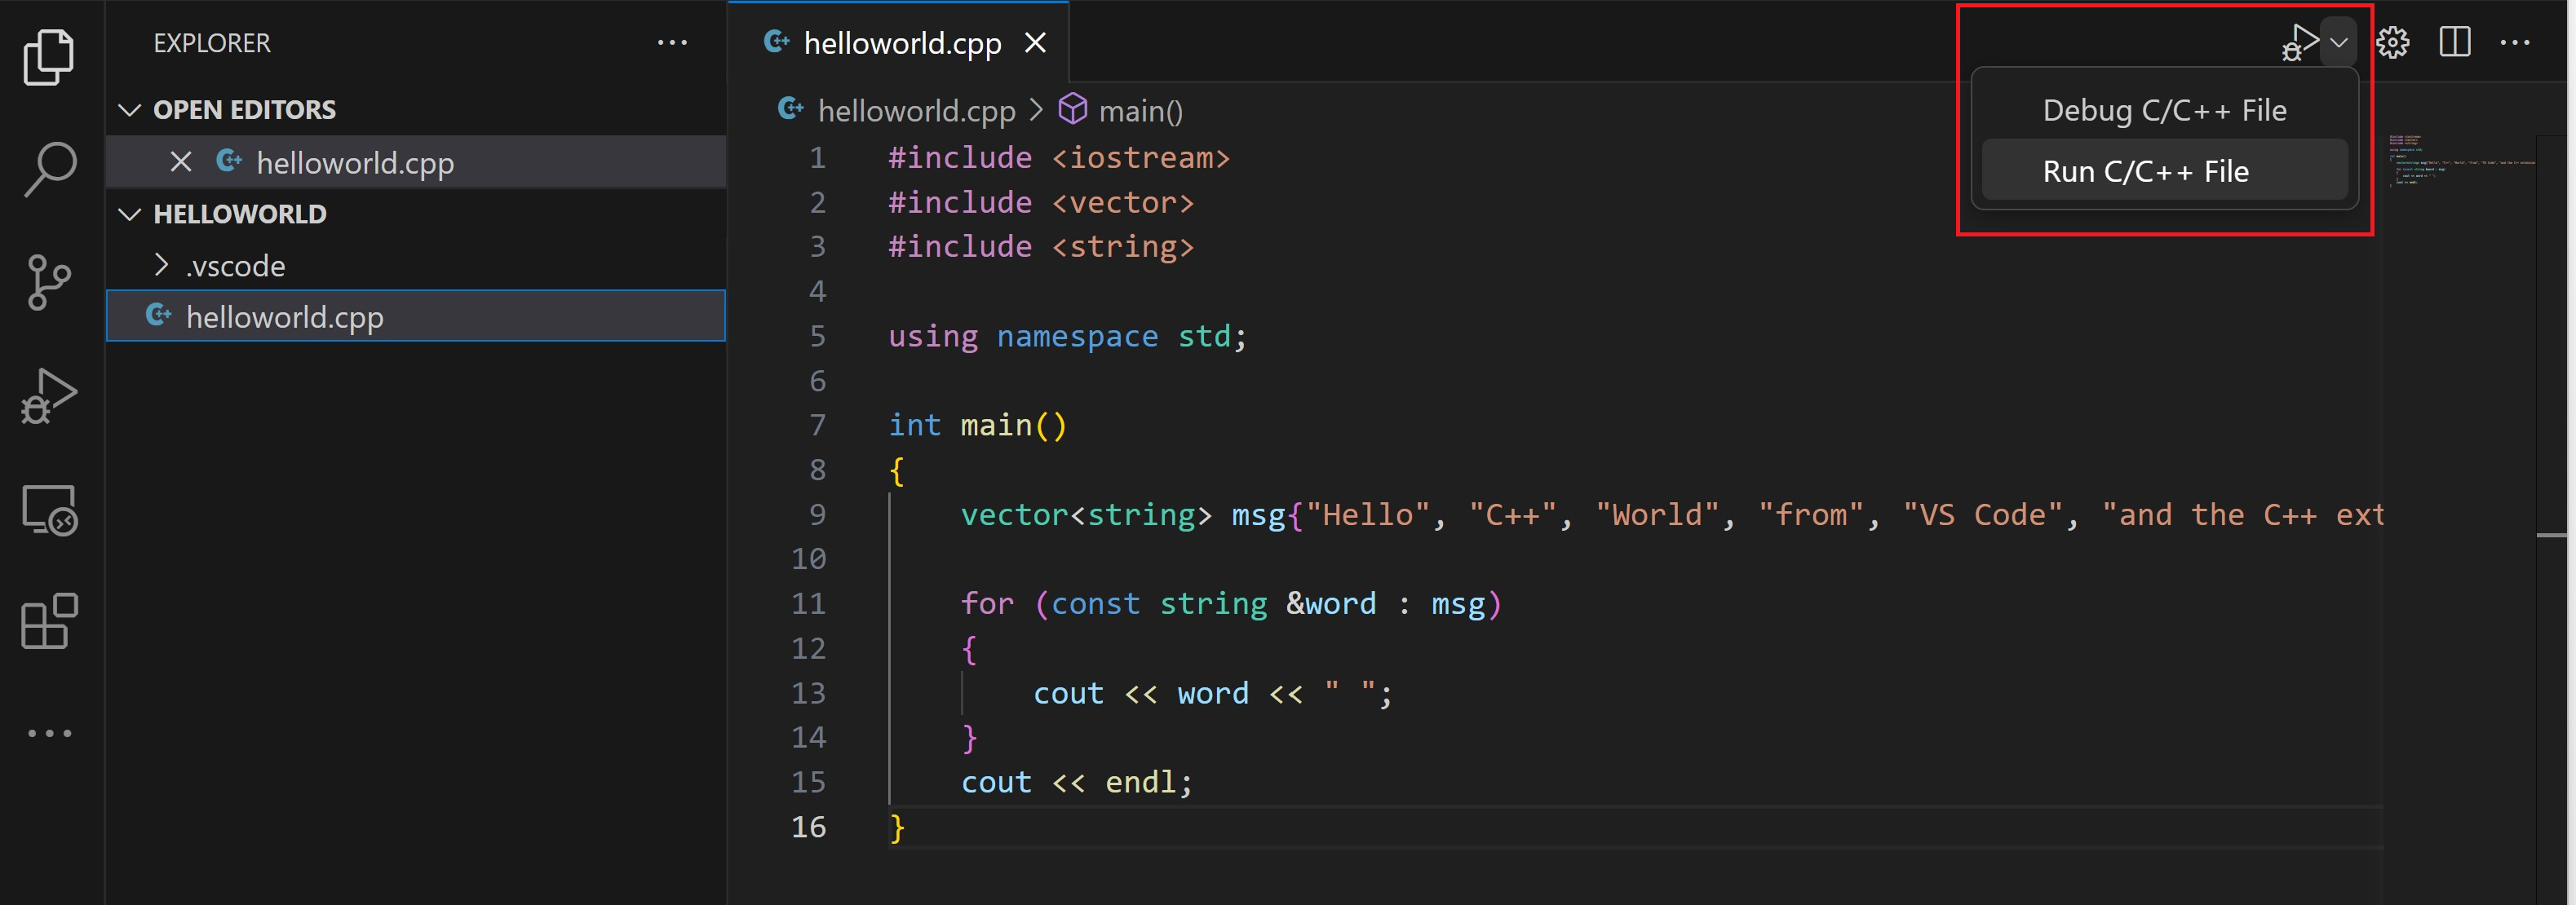
helloworld.cppso that it is the active file. -
Press the play button in the top right corner of the editor.
-
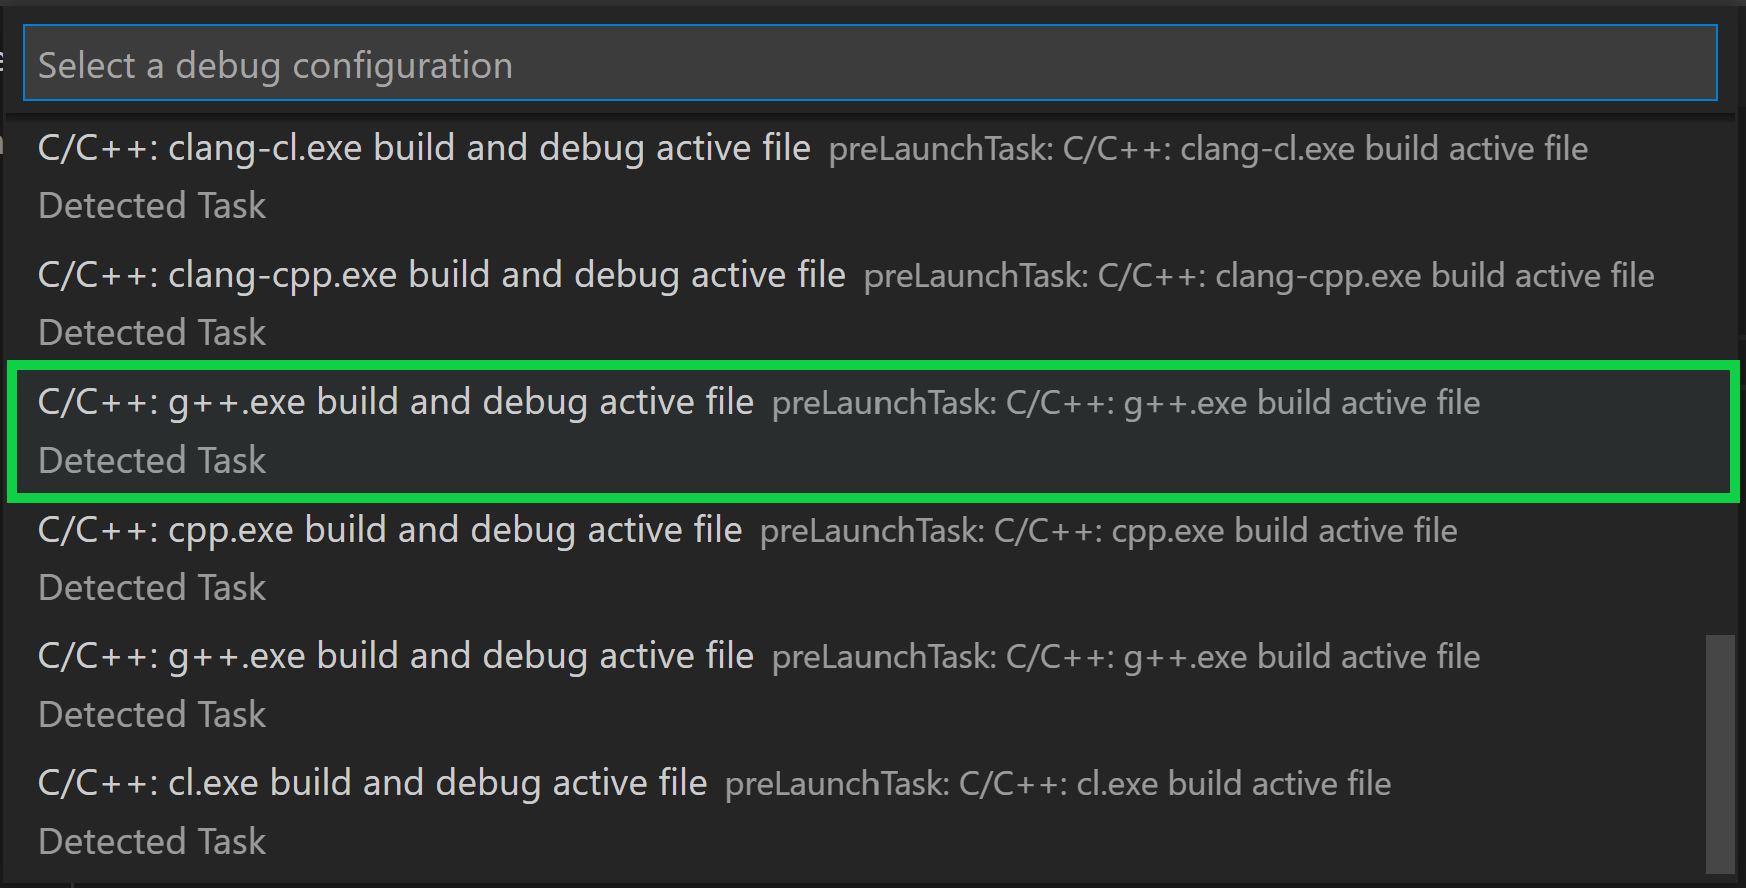
Choose C/C++: g++.exe build and debug active file from the list of detected compilers on your system.
You’ll only be asked to choose a compiler the first time you run helloworld.cpp. This compiler will be set as the «default» compiler in tasks.json file.
-
After the build succeeds, your program’s output will appear in the integrated Terminal.

The first time you run your program, the C++ extension creates tasks.json, which you’ll find in your project’s .vscode folder. tasks.json stores build configurations.
Your new tasks.json file should look similar to the JSON below:
{
  "tasks": [
    {
      "type": "cppbuild",
      "label": "C/C++: g++.exe build active file",
      "command": "C:\msys64\mingw64\bin\g++.exe",
      "args": [
        "-fdiagnostics-color=always",
        "-g",
        "${file}",
        "-o",
        "${fileDirname}\${fileBasenameNoExtension}.exe"
      ],
      "options": {
        "cwd": "${fileDirname}"
      },
      "problemMatcher": ["$gcc"],
      "group": {
        "kind": "build",
        "isDefault": true
      },
      "detail": "Task generated by Debugger."
    }
  ],
  "version": "2.0.0"
}
Note: You can learn more about
tasks.jsonvariables in the variables reference.
The command setting specifies the program to run; in this case that is g++.
The args array specifies the command-line arguments that will be passed to g++. These arguments must be specified in the order expected by the compiler.
This task tells g++ to take the active file (${file}), compile it, and create an executable file in the current directory (${fileDirname}) with the same name as the active file but with the .exe extension (${fileBasenameNoExtension}.exe), resulting in helloworld.exe for our example.
The label value is what you will see in the tasks list; you can name this whatever you like.
The detail value is what you will as the description of the task in the tasks list. It’s highly recommended to rename this value to differentiate it from similar tasks.
From now on, the play button will read from tasks.json to figure out how to build and run your program. You can define multiple build tasks in tasks.json, and whichever task is marked as the default will be used by the play button. In case you need to change the default compiler, you can run Tasks: Configure default build task. Alternatively you can modify the tasks.json file and remove the default by replacing this segment:
    "group": {
        "kind": "build",
        "isDefault": true
    },
with this:
"group": "build",
Modifying tasks.json
You can modify your tasks.json to build multiple C++ files by using an argument like "${workspaceFolder}/*.cpp" instead of ${file}.This will build all .cpp files in your current folder. You can also modify the output filename by replacing "${fileDirname}\${fileBasenameNoExtension}.exe" with a hard-coded filename (for example "${workspaceFolder}\myProgram.exe").
Debug helloworld.cpp
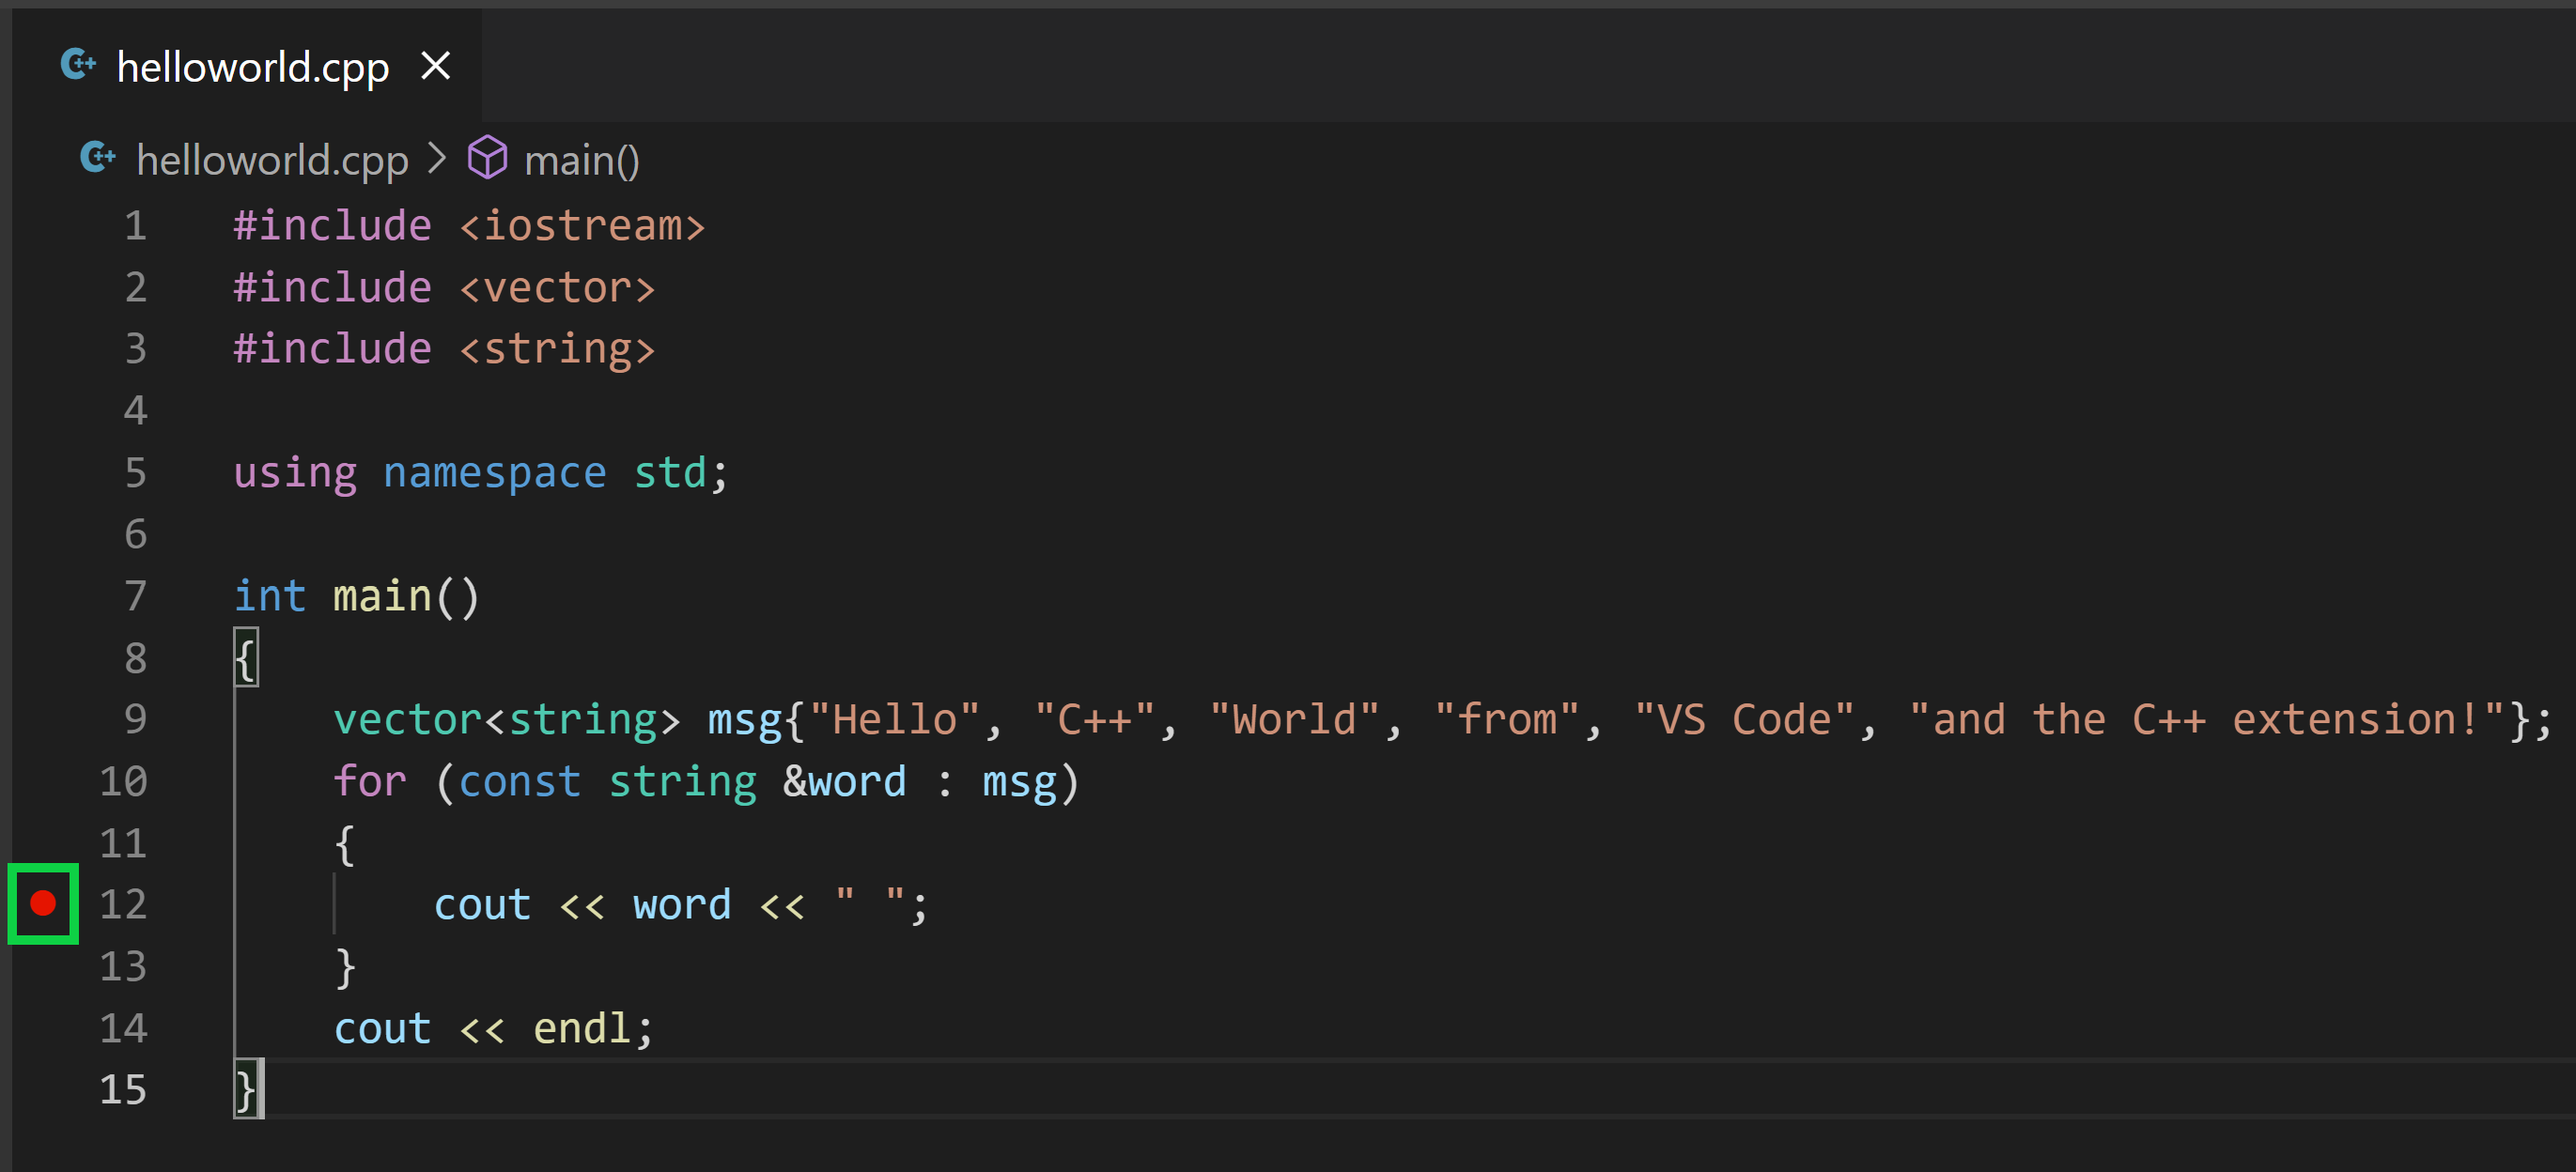
- Go back to
helloworld.cppso that it is the active file. - Set a breakpoint by clicking on the editor margin or using F9 on the current line.
- From the drop-down next to the play button, select Debug C/C++ File.
- Choose C/C++: g++ build and debug active file from the list of detected compilers on your system (you’ll only be asked to choose a compiler the first time you run/debug
helloworld.cpp).
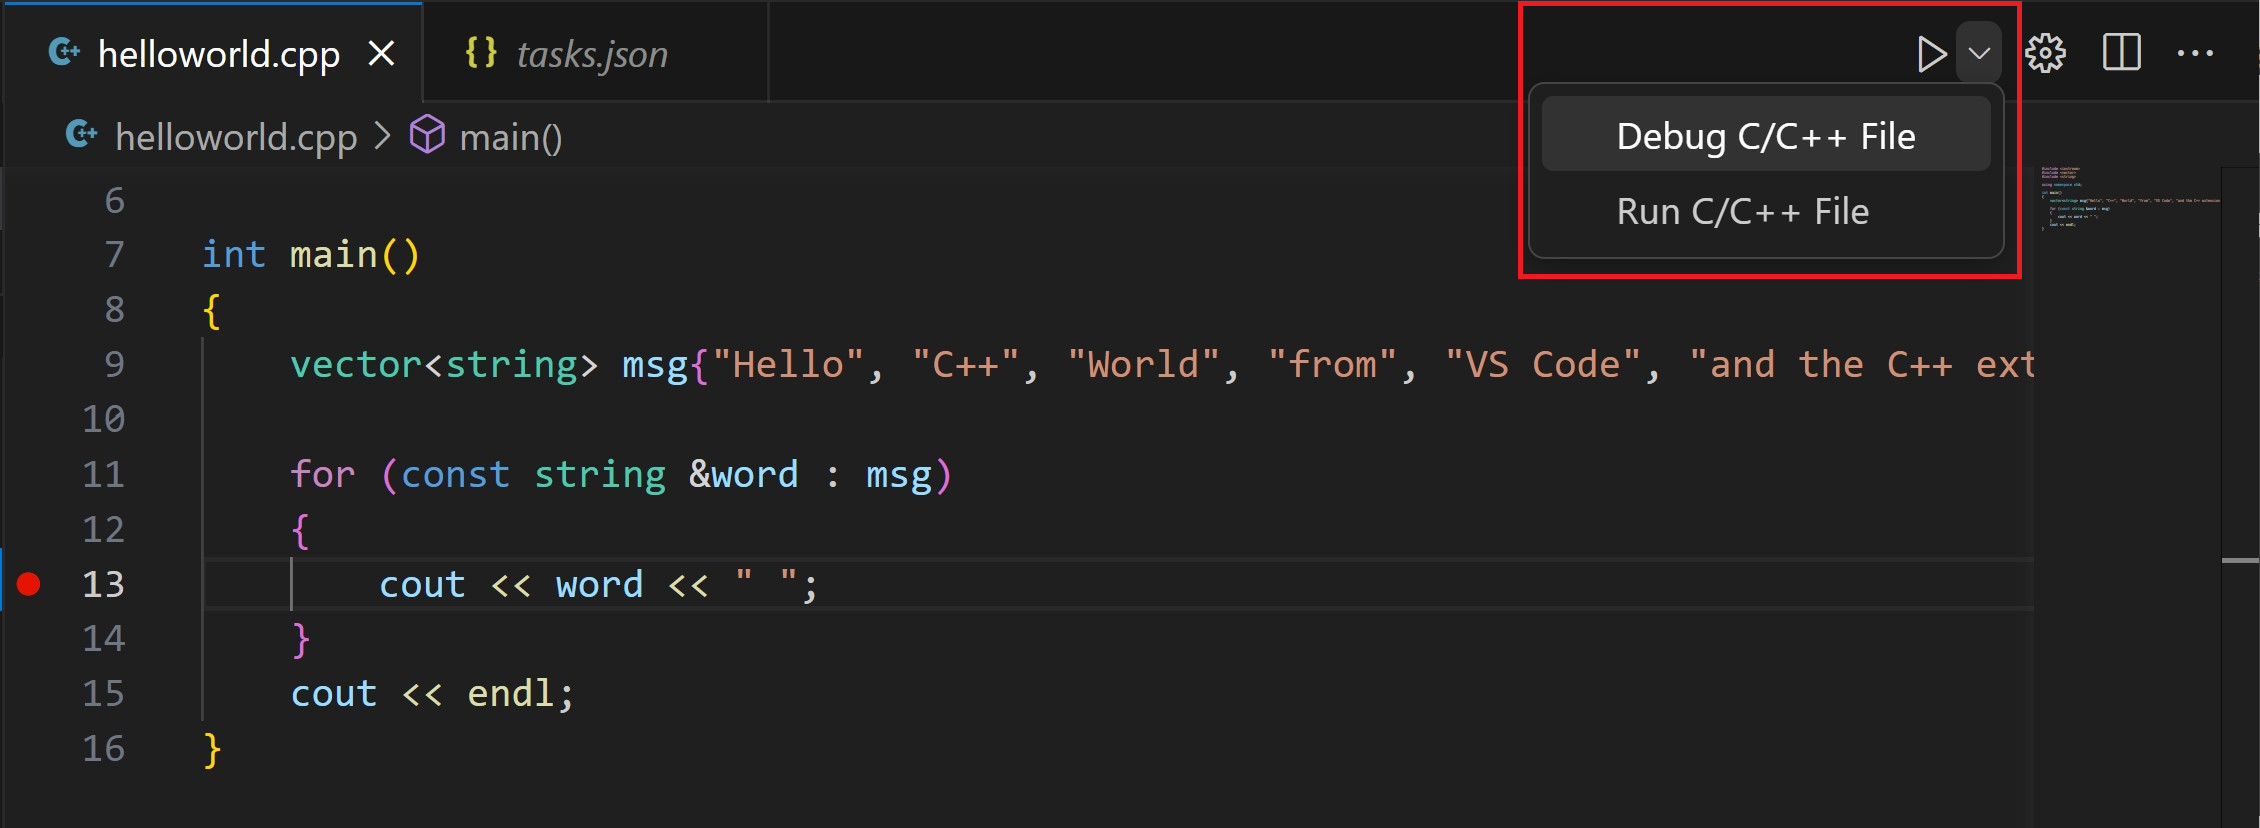
The play button has two modes: Run C/C++ File and Debug C/C++ File. It will default to the last-used mode. If you see the debug icon in the play button, you can just click the play button to debug, instead of using the drop-down.

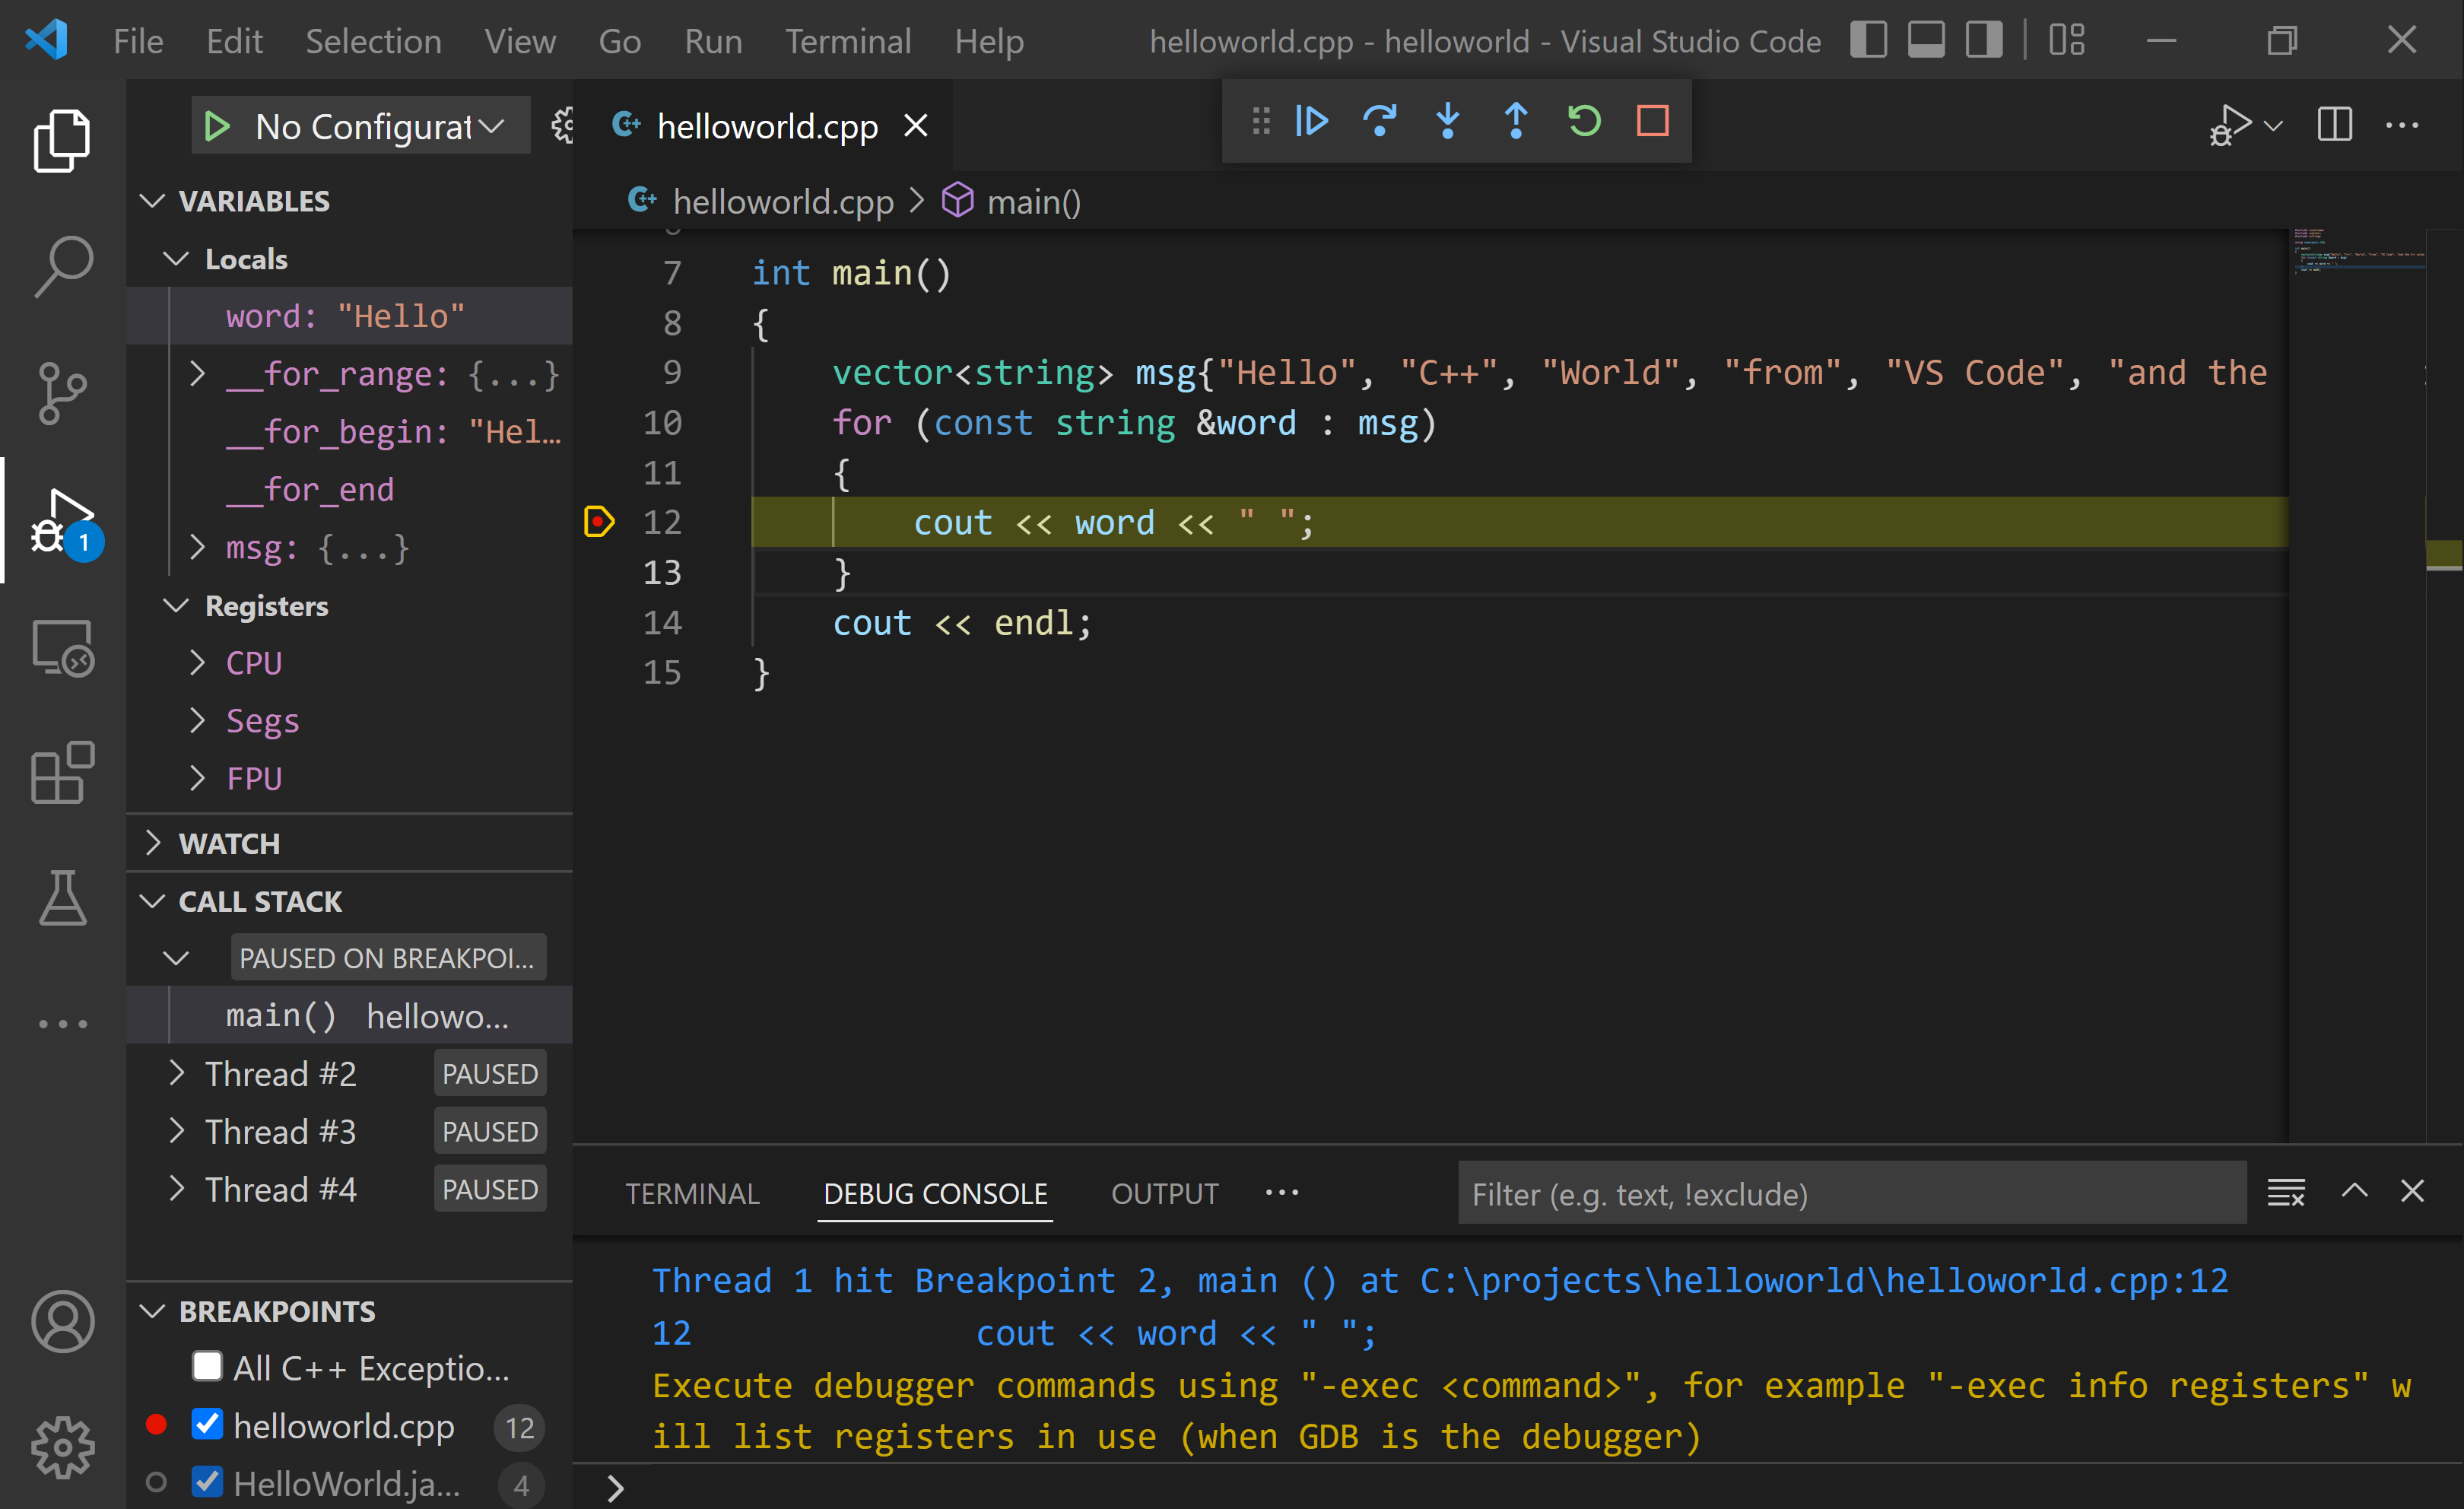
Explore the debugger
Before you start stepping through the code, let’s take a moment to notice several changes in the user interface:
-
The Integrated Terminal appears at the bottom of the source code editor. In the Debug Output tab, you see output that indicates the debugger is up and running.
-
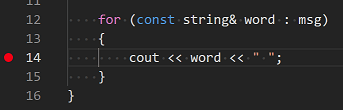
The editor highlights the line where you set a breakpoint before starting the debugger:
-
The Run and Debug view on the left shows debugging information. You’ll see an example later in the tutorial.
-
At the top of the code editor, a debugging control panel appears. You can move this around the screen by grabbing the dots on the left side.

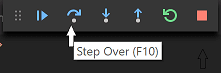
Step through the code
Now you’re ready to start stepping through the code.
-
Click or press the Step over icon in the debugging control panel.
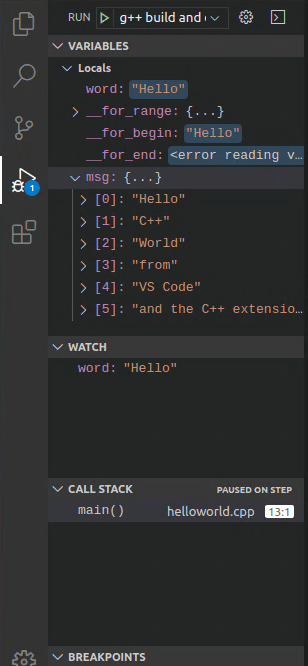
This will advance program execution to the first line of the for loop, and skip over all the internal function calls within the
vectorandstringclasses that are invoked when themsgvariable is created and initialized. Notice the change in the Variables window on the left.In this case, the errors are expected because, although the variable names for the loop are now visible to the debugger, the statement has not executed yet, so there is nothing to read at this point. The contents of
msgare visible, however, because that statement has completed. -
Press Step over again to advance to the next statement in this program (skipping over all the internal code that is executed to initialize the loop). Now, the Variables window shows information about the loop variables.
-
Press Step over again to execute the
coutstatement. (Note that as of the March 2019 release, the C++ extension does not print any output to the Debug Console until the loop exits.) -
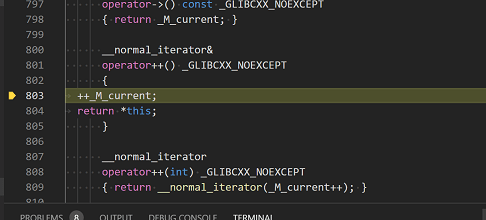
If you like, you can keep pressing Step over until all the words in the vector have been printed to the console. But if you are curious, try pressing the Step Into button to step through source code in the C++ standard library!
To return to your own code, one way is to keep pressing Step over. Another way is to set a breakpoint in your code by switching to the
helloworld.cpptab in the code editor, putting the insertion point somewhere on thecoutstatement inside the loop, and pressing F9. A red dot appears in the gutter on the left to indicate that a breakpoint has been set on this line.Then press F5 to start execution from the current line in the standard library header. Execution will break on
cout. If you like, you can press F9 again to toggle off the breakpoint.When the loop has completed, you can see the output in the Integrated Terminal, along with some other diagnostic information that is output by GDB.

Set a watch
Sometimes you might want to keep track of the value of a variable as your program executes. You can do this by setting a watch on the variable.
-
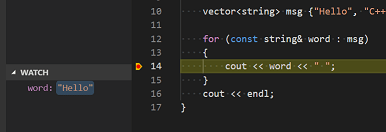
Place the insertion point inside the loop. In the Watch window, click the plus sign and in the text box, type
word, which is the name of the loop variable. Now view the Watch window as you step through the loop. -
Add another watch by adding this statement before the loop:
int i = 0;. Then, inside the loop, add this statement:++i;. Now add a watch forias you did in the previous step. -
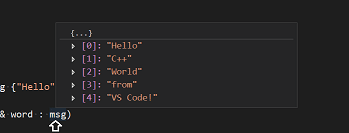
To quickly view the value of any variable while execution is paused on a breakpoint, you can hover over it with the mouse pointer.
Customize debugging with launch.json
When you debug with the play button or F5, the C++ extension creates a dynamic debug configuration on the fly.
There are cases where you’d want to customize your debug configuration, such as specifying arguments to pass to the program at runtime. You can define custom debug configurations in a launch.json file.
To create launch.json, choose Add Debug Configuration from the play button drop-down menu.

You’ll then see a dropdown for various predefined debugging configurations. Choose C/C++: g++.exe build and debug active file.
VS Code creates a launch.json file, which looks something like this:
{
  "version": "0.2.0",
  "configurations": [
    {
      "name": "C/C++: g++.exe build and debug active file",
      "type": "cppdbg",
      "request": "launch",
      "program": "${fileDirname}\${fileBasenameNoExtension}.exe",
      "args": [],
      "stopAtEntry": false,
      "cwd": "${fileDirname}",
      "environment": [],
      "externalConsole": false,
      "MIMode": "gdb",
      "miDebuggerPath": "C:\msys64\mingw64\bin\gdb.exe",
      "setupCommands": [
        {
          "description": "Enable pretty-printing for gdb",
          "text": "-enable-pretty-printing",
          "ignoreFailures": true
        }
      ],
      "preLaunchTask": "C/C++: g++.exe build active file"
    }
  ]
}
In the JSON above, program specifies the program you want to debug. Here it is set to the active file folder (${fileDirname}) and active filename with the .exe extension (${fileBasenameNoExtension}.exe), which if helloworld.cpp is the active file will be helloworld.exe. The args property is an array of arguments to pass to the program at runtime.
By default, the C++ extension won’t add any breakpoints to your source code and the stopAtEntry value is set to false.
Change the stopAtEntry value to true to cause the debugger to stop on the main method when you start debugging.
From now on, the play button and F5 will read from your
launch.jsonfile when launching your program for debugging.
C/C++ configurations
If you want more control over the C/C++ extension, you can create a c_cpp_properties.json file, which will allow you to change settings such as the path to the compiler, include paths, C++ standard (default is C++17), and more.
You can view the C/C++ configuration UI by running the command C/C++: Edit Configurations (UI) from the Command Palette (⇧⌘P (Windows, Linux Ctrl+Shift+P)).

This opens the C/C++ Configurations page. When you make changes here, VS Code writes them to a file called c_cpp_properties.json in the .vscode folder.
Here, we’ve changed the Configuration name to GCC, set the Compiler path dropdown to the g++ compiler, and the IntelliSense mode to match the compiler (gcc-x64).

Visual Studio Code places these settings in .vscodec_cpp_properties.json. If you open that file directly, it should look something like this:
{
  "configurations": [
    {
      "name": "GCC",
      "includePath": ["${workspaceFolder}/**"],
      "defines": ["_DEBUG", "UNICODE", "_UNICODE"],
      "windowsSdkVersion": "10.0.18362.0",
      "compilerPath": "C:/msys64/mingw64/bin/g++.exe",
      "cStandard": "c17",
      "cppStandard": "c++17",
      "intelliSenseMode": "windows-gcc-x64"
    }
  ],
  "version": 4
}
You only need to add to the Include path array setting if your program includes header files that are not in your workspace or in the standard library path.
Compiler path
The extension uses the compilerPath setting to infer the path to the C++ standard library header files. When the extension knows where to find those files, it can provide features like smart completions and Go to Definition navigation.
The C/C++ extension attempts to populate compilerPath with the default compiler location based on what it finds on your system. The extension looks in several common compiler locations.
The compilerPath search order is:
- First check for the Microsoft Visual C++ compiler
- Then look for g++ on Windows Subsystem for Linux (WSL)
- Then g++ for Mingw-w64.
If you have Visual Studio or WSL installed, you may need to change compilerPath to match the preferred compiler for your project. For example, if you installed Mingw-w64 version 8.1.0 using the i686 architecture, Win32 threading, and sjlj exception handling install options, the path would look like this: C:Program Files (x86)mingw-w64i686-8.1.0-win32-sjlj-rt_v6-rev0mingw64bing++.exe.
Troubleshooting
MSYS2 is installed, but g++ and gdb are still not found
You must follow the steps on the MSYS2 website and use the MSYS CLI to install Mingw-w64, which contains those tools. You will also need to install the full Mingw-w64 toolchain (pacman -S --needed base-devel mingw-w64-x86_64-toolchain) to get the gdb debugger.
MinGW 32-bit
If you need a 32-bit version of the MinGW toolset, consult the Downloading section on the MSYS2 wiki. It includes links to both 32-bit and 64-bit installation options.
Next steps
- Explore the VS Code User Guide.
- Review the Overview of the C++ extension.
- Create a new workspace, copy your
.vscodeJSON files to it, adjust the necessary settings for the new workspace path, program name, and so on, and start coding!
5/13/2022
MinGW (“Minimalist GNU for Windows”) is a complete runtime environment for gcc to support binaries native to Windows 64-bit and 32-bit operating systems. With MinGW we can build C programs for windows. This tool is also required to build C-programs for microcontrollers. We will be seeing how to write codes for microcontrollers without using the any IDE. And we will use the MinGW compiler along with the microcontroller family toolchain to build the code. We will install mingw and configure it for running the “make” files
This post is the first step in the complete build process. In this post, we will look at installing mingw and adding it to the environment variables.
1.1 Download MingGW
It contains Make that we will be using in Command Prompt on Windows 10.
1.2 Install MinGW
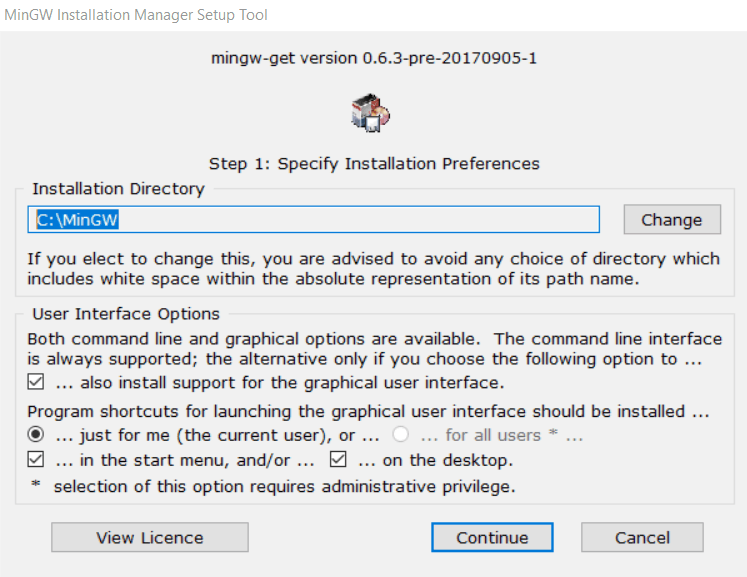
We will now see how to install minGW. In this step, we will look at the important options that need to be selected.
Keep the Installation Directory the same as shown below.
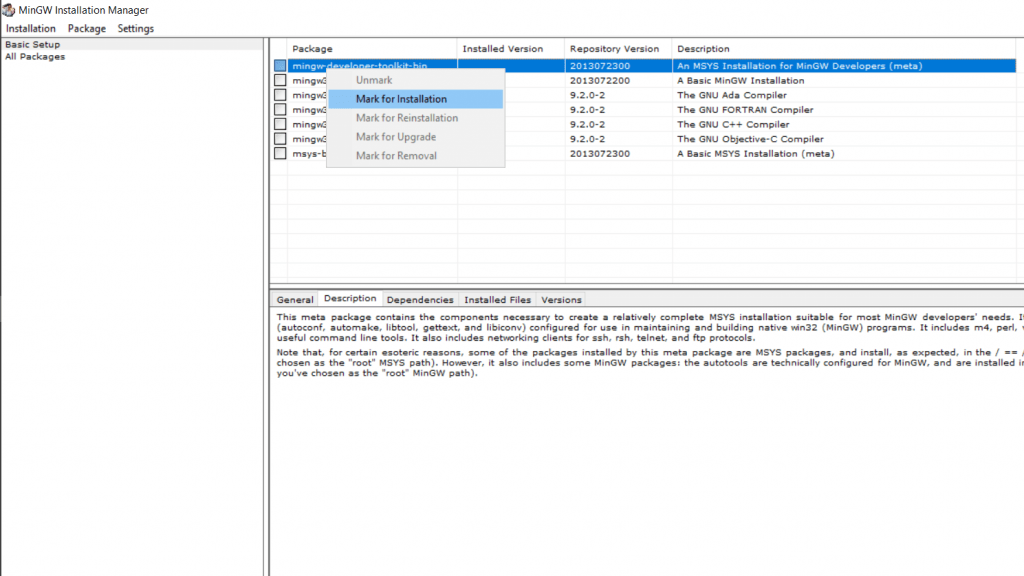
1.2.1 Navigate to your Desktop
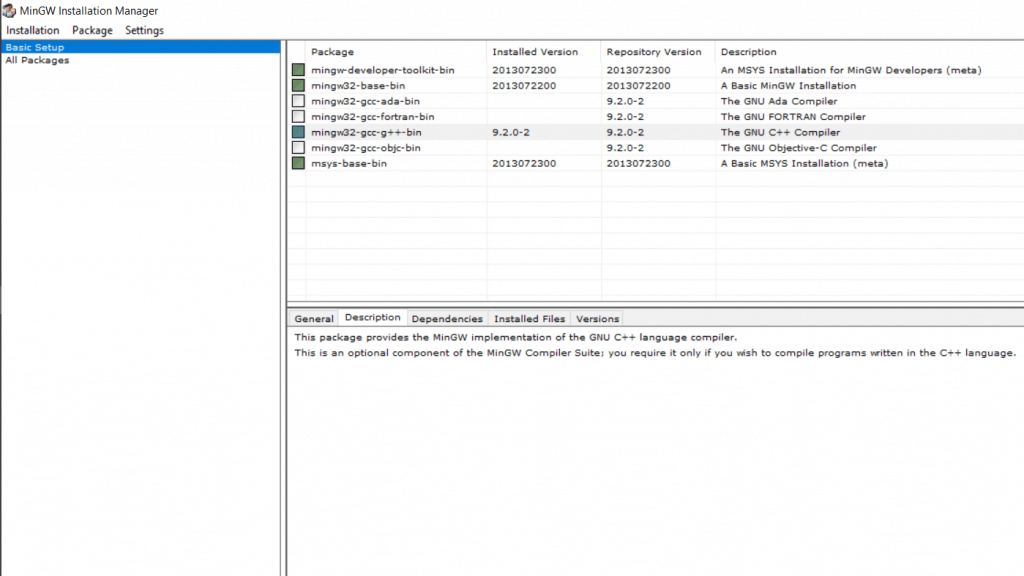
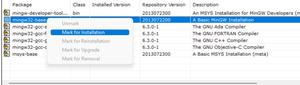
Open MinGW Installer. Select Basic Setup, navigate to Packages and Right click on “mingw-developer-toolkit-bin”, “mingw32-base-bin” and “msys-base-bin” Packages and select Mark for Installation.
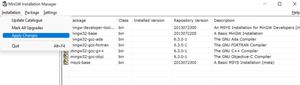
1.2.2 Navigate to the Top left corner and Left click on Installation then click Apply Changes.
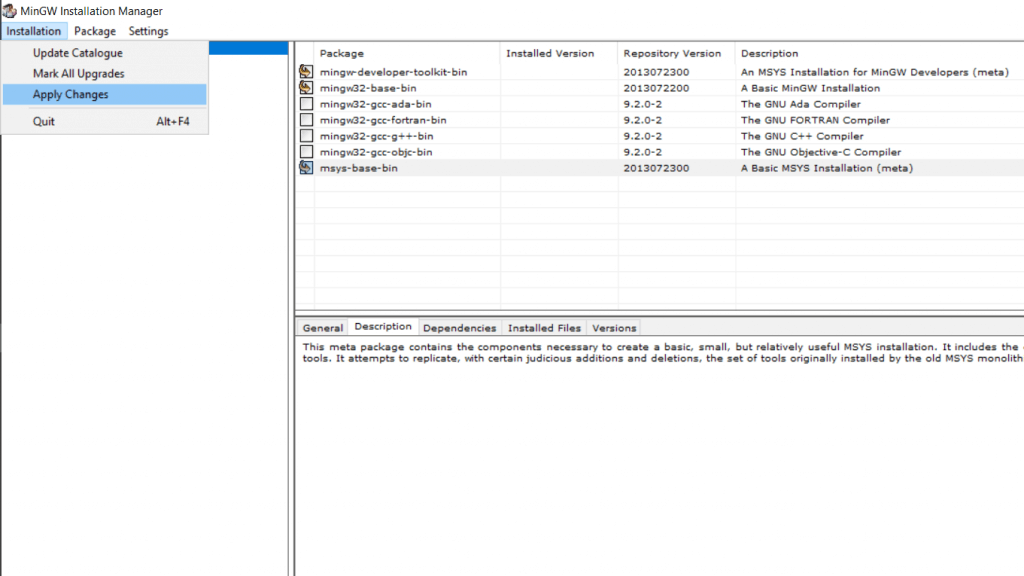
1.2.3 The packages should now be Green (if not, just repeat the process), if they are successfully installed then close the Installation Manager.
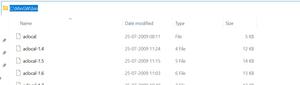
1.3 Rename to Make
Navigate to C:MingGWbin. Rename “mingw32-make” to “make”. This will make it easier to use Make in the Command Prompt.

1.3.1 Let’s add Make for usage in Command Prompt.
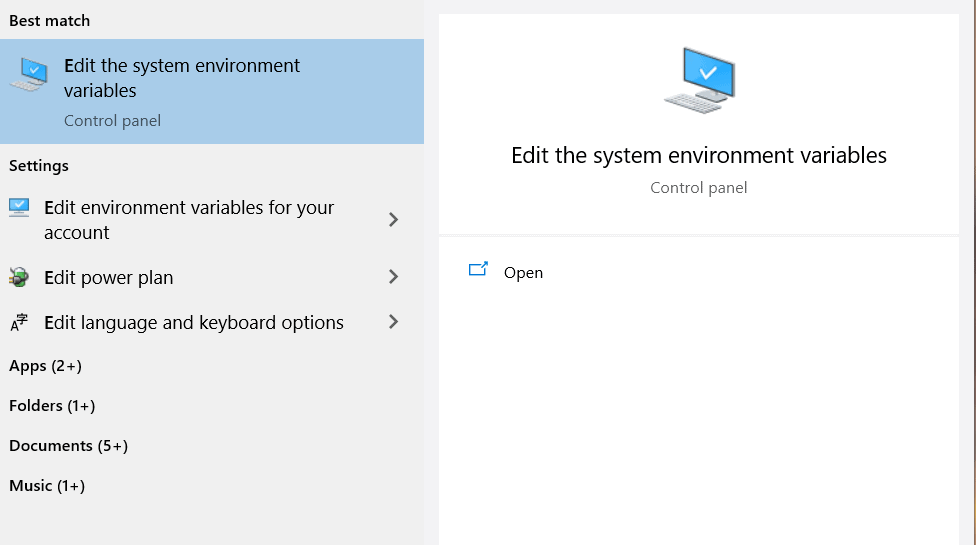
Press the “Windows Icon” on your keyboard, search and open “Edit the system environment variables”.
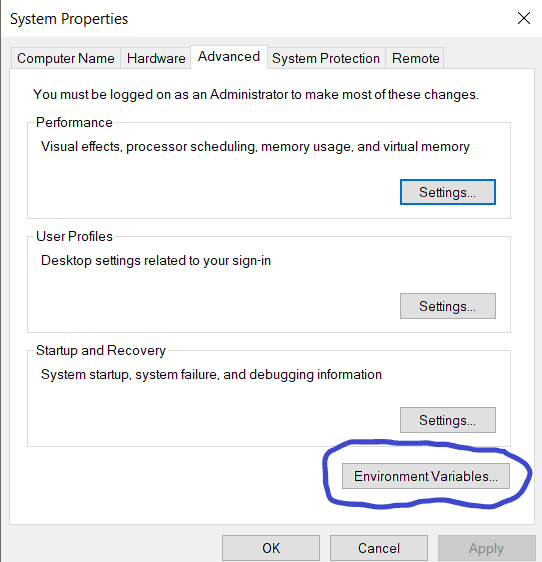
1.3.2 Click on “Environment Variables”
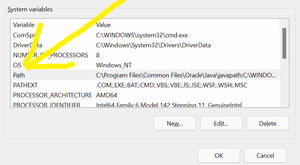
1.3.2 Under “System variables”, scroll down to “Path” and double-click.
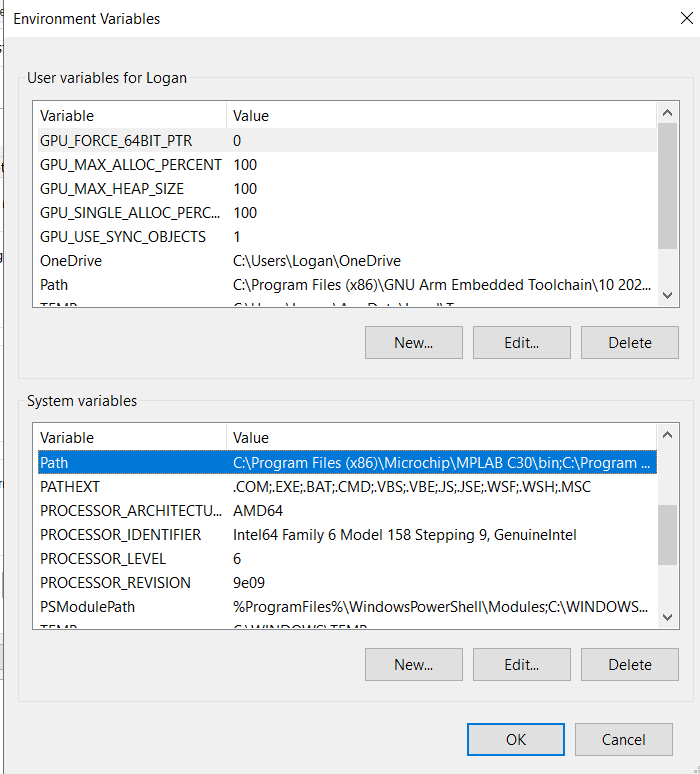
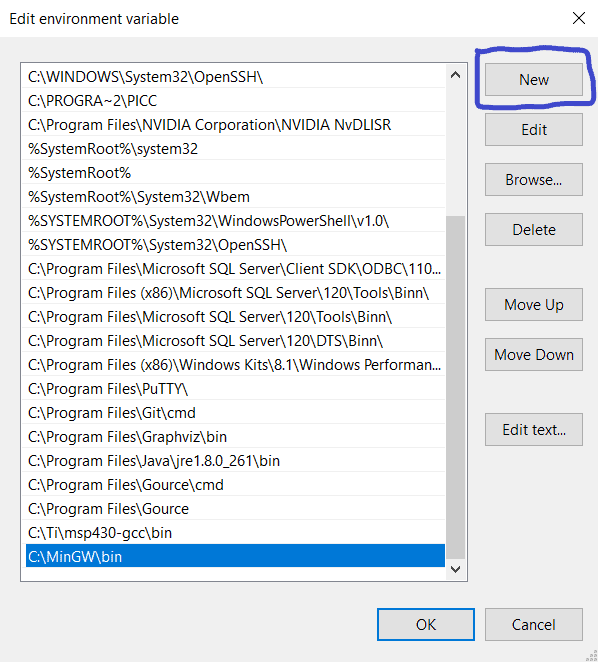
1.3.3 Click on “New” and add the location “C:MingGWbin” to environment variable and press “OK”.
1.4 Testing Make
Press the “Windows Icon” on your keyboard, search and open “Command Prompt”.
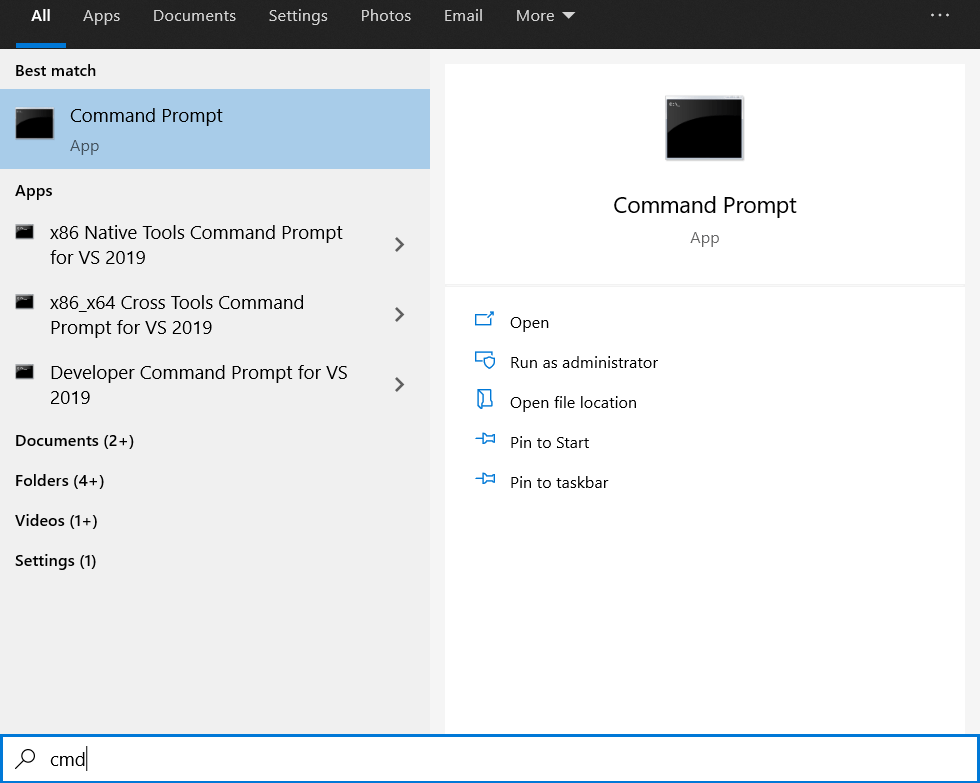
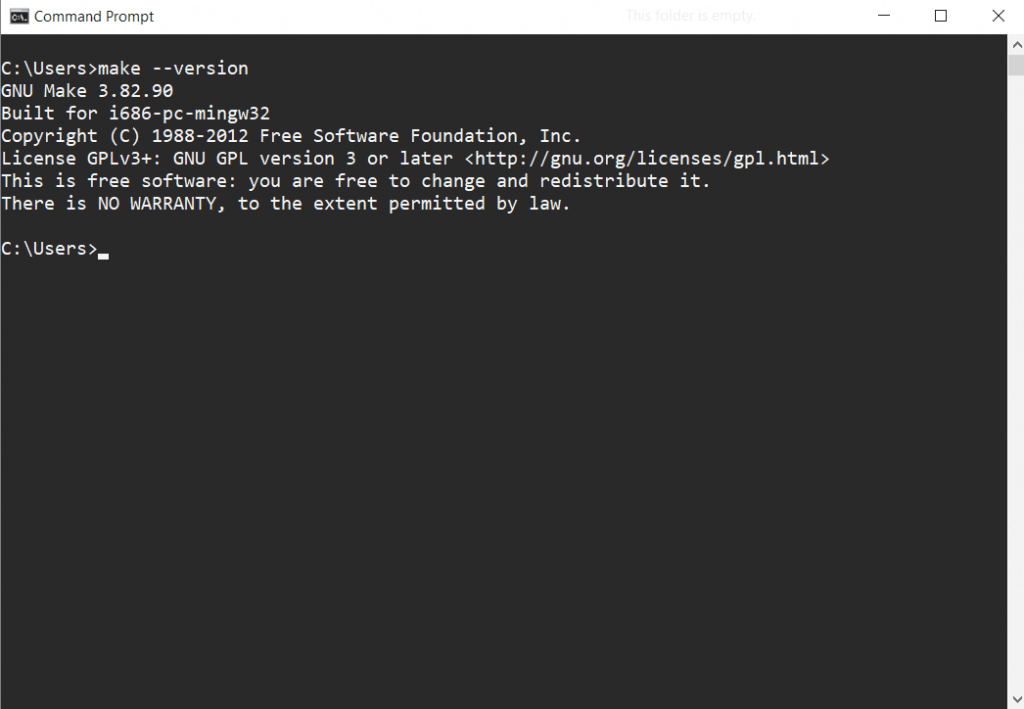
1.4.1 Type “make –version” to confirm that it works. Recheck Step 1.3 – 1.4 if it doesn’t work.
What command does one have to enter at the command line in Windows 7 to compile a basic C program?
Like I am literally wondering what you type in the command prompt, to compile a .c file.
I tried:
> gcc foo.c
But it says:
'gcc' is not recognized as an internal or external command,
 operable program or batch file.
I also tried:
> minGW foo.c
But I got back:
 'minGW' is not recognized as an internal or external command,
  operable program or batch file.
I have a path environment variable set to where MinGW is installed:
C:Program Files (x86)CodeBlocksMinGWbin
I can’t really find any information on where I’m going wrong, and can’t find anything in the official MinGW documentation, as it seems like this is something so simple, sort of an embarrassing question, that it’s figured people know what to do?
![]()
asked May 19, 2012 at 1:48
![]()
2
It indicates it couldn’t find gcc.exe.
I have a path environment variable set to where MinGW is installed
Maybe you haven’t set the path correctly?
echo %path%
shows the path to gcc.exe? Otherwise, compilation is similar to Unix:
gcc filename.c -o filename
![]()
answered May 19, 2012 at 2:09
![]()
8
I’ve had this problem and couldn’t find why it kept happening. The reason is simple: Once you have set up the environment paths, you have to close the CMD window, and open it again for it be aware of new environment paths.
![]()
answered Feb 24, 2014 at 11:32
![]()
Herz3hHerz3h
1011 silver badge2 bronze badges
1
First:
Add your minGW’s bin folder directory ( ex: Cmingw64bin ) in System variables => Path. visual example
Compile:
.c: gcc filename.c -o desire
.cpp: g++ filename.cpp -o desire
Run:
desire/ or ./desire
answered Jan 10, 2019 at 3:52
![]()
AharrFarisAharrFaris
911 silver badge5 bronze badges
0
Just set the environment variable to the EXACT path to gcc.exe like this:
C:Program Files (x86)CodeBlocksMinGWbingcc.exe
![]()
pb2q
57.6k18 gold badges145 silver badges146 bronze badges
answered Sep 11, 2012 at 7:44
![]()
makmak
1,3441 gold badge13 silver badges20 bronze badges
1
I encountered the same error message after unpacking MinGW archives to C:MinGW and setting the path to environment variable as C:MinGWbin;.
When I try to compile I get this error!
gcc: error: CreateProcess: No such file or directory
I finally figured out that some of the downloaded archives were reported broken while unpaking them to C:MinGW (yet I ignored this initially).
Once I deleted the broken files and re-downloaded the whole archives again from SourceForge, unpacked them to C:MinGW successfully the error was gone, and the compiler worked fine and output my desired hello.exe.
I ran this:
gcc hello.c -o hello
The result result was this (a blinking underscore):
_
![]()
answered Oct 9, 2012 at 2:54
![]()
KunleKunle
111 bronze badge
I had the same problem with .c files that contained functions (not main() of my program). For example, my header files were «fact.h» and «fact.c», and my main program was «main.c» so my commands were like this:
E:proj> gcc -c fact.c
Now I had an object file of fact.c (fact.o). after that:
E:proj>gcc -o prog.exe fact.o main.c
Then my program (prog.exe) was ready to use and worked properly. I think that -c after gcc was important, because it makes object files that can attach to make the program we need. Without using -c, gcc ties to find main in your program and when it doesn’t find it, it gives you this error.
![]()
answered Jan 19, 2015 at 10:48
![]()
You can permanently include the directory of the MinGW file, by clicking on My Computer, Properties, Advanced system settings, Environment variables, then edit and paste your directory.
![]()
jgillich
68.5k6 gold badges55 silver badges83 bronze badges
answered Apr 7, 2015 at 21:32
![]()
Instead of setting the %PATH% you may enter your msys shell. In standard msys and mingw installation gcc is in path, so you can run gcc or which gcc.
I have a batch file sh.bat on my Windows 7, in %PATH%:
C:langmsysbinsh.exe --login %*
Whenever I want to use gcc I enter cmd, then sh, then gcc. I find it very convenient.
When working with linux originated software avoid spaced directories like Program Files. Install them rather to Program_Files. The same regards to tools that you may want to run from msys environment.
answered Sep 20, 2012 at 8:58
![]()
JarekczekJarekczek
7,2763 gold badges44 silver badges66 bronze badges
If you pasted your text into the path variable and added a whitespace before the semicolon, you should delete that and add a backslash at the end of the directory (;C:Program Files (x86)CodeBlocksMinGWbin
answered Jan 4, 2013 at 17:49
![]()
I once had this kind of problem installing MinGW to work in Windows, even after I added the right System PATH in my Environment Variables.
After days of misery, I finally stumbled on a thread that recommended uninstalling the original MinGW compiler and deleting the C:MinGW folder and installing TDM-GCC MinGW compiler which can be found here.
You have options of choosing a 64/32-bit installer from the download page, and it creates the environment path variables for you too.
answered Oct 7, 2014 at 13:54
![]()
Feyisayo SonubiFeyisayo Sonubi
1,0425 gold badges15 silver badges27 bronze badges
Where is your gcc?
My gcc is in «C:Program FilesCodeBlocksMinGWbin».
"C:Program FilesCodeBlocksMinGWbingcc" -c "foo.c"
"C:Program FilesCodeBlocksMinGWbingcc" "foo.o" -o "foo 01.exe"
![]()
answered Jul 10, 2015 at 19:53
![]()
AmirAmir
1,57017 silver badges24 bronze badges
I am quite late answering this question (5 years to be exact) but I hope this helps someone.
I suspect that this error is because of the environment variables instead of GCC. When you set a new environment variable you need to open a new Command Prompt! This is the issue 90% of the time (when I first downloaded GCC I was stuck with this for 3 hours!) If this isn’t the case, you probably haven’t set the environment variables properly or you are in a folder with spaces in the name.
Once you have GCC working, it can be a hassle to compile and delete every time. If you don’t want to install a full ide and already have python installed, try this github project: https://github.com/sophiadm/notepad-is-effort
It is a small IDE written with tkinter in python. You can just copy the source code and save it as a .py file
answered May 21, 2017 at 18:37
![]()
dwmyfrienddwmyfriend
2341 silver badge10 bronze badges
In Windows 10, similar steps can be followed in other versions of windows.
Right Click on «My Computer» select Properties, Goto Advanced System Settings -> Advanced -> Select «Environment Variables..» .
Find «Path» select it and choose edit option -> Click on New and add «C:MinGWbin» (or the location of gcc.exe, if you have installed at some other location) -> Save and restart command prompt. Gcc should work.
answered Jan 18, 2018 at 5:15
![]()
MinGW also called as Minimalistic GNU for Windows is a popular compiler for C and C++ and used for the development of native MS-Windows applications. It does not depend on any 3rd party tools or libraries but relies on the several DLLs provided by Microsoft as components of the operating system. Out of these DLLs, MSVCRT.DLL i.e. Microsoft C runtime library is the primary one. Apart from the system components, the threaded applications must use freely distributable thread support DLL, provided as part of MinGW itself. You may consider using Cygwin for POSIX application deployment.
Below listed are the features and components provided by MinGW. You may also refer MinGW for more details.
- A port of the GNU Compiler Collection (GCC), including C, C++, ADA and Fortran compilers;
- GNU Binutils for Windows (assembler, linker, archive manager)
- A command-line installer, with optional GUI front-end, (mingw-get) for MinGW and MSYS deployment on MS-Windows
- A GUI first-time setup tool (mingw-get-setup), to get you up and running with mingw-get.
In this tutorial, we will install MinGW on windows and write, compile, and execute our Hello World program in C++.
Step 1 — Download MinGW
Go to the Download Page to start downloading mingw-w64. It will show various download options as shown in Fig 1.

Fig 1
Download MinGW-W64-builds as highlighted in Fig 1.
You may also download and install MinGW Installation Manager in case you are planning only for the 32-bit compiler. The MinGW-W64 provides both 32-bit and 64-bit compilers.

Fig 2
Download MinGW Installation Manager as highlighted in Fig 2.
Step 2 — Install MinGW-W64
Now execute the MinGW-W64-builds executable downloaded by us in the previous step. It will show the welcome screen as shown in Fig 3.

Fig 3
Click on the Next Button to continue with the installation. It will show the settings screen as shown in Fig 4.

Fig 4
Note that I have selected x86_64 architecture in order to support 64-bit instructions. You may continue with i686 for 32-bit instructions. Also, I have selected the posix option of Threads settings for programs involving multithreading. You may select the win32 option based on your needs. Now click on the Next Button to continue with the installation. The next screen asks for the installation path as shown in Fig 5.

Fig 5
Make sure that you provide an installation path without any spaces. Now click on the Next Button to finish the installation.
It might show you error specific to fail to download. I tried a few times and got success in 3rd attempt. You may also continue with manual installation in case it failed multiple times. You can simply download the archive of MinGW-W64 and extract it to the desired location.
It will show the download progress and status as shown in Fig 6, Fig 7, and Fig 8.

Fig 6

Fig 7

Fig 8
Now click on the Next Button after download completes. It will show the success message as shown in Fig 9.

Fig 9
Click on the Finish Button to close the installer. Now add the bind directory of MinGW-W64 to the system path as shown in Fig 10.

Fig 10
Step 3 — Install MinGW
In this step, we will install the MinGW distributed by the official website as shown in Fig 2. Execute the installer downloaded in previous steps. It will show the welcome screen as shown in Fig 11.

Fig 11
Click on the Install Button to start the installation. It will ask for the installation directory as shown in Fig 12.

Fig 12
Click on the Continue Button to start the installation. It will show the progress as shown in Fig 13 and Fig 14.

Fig 13

Fig 14
Click on the Continue Button to launch the installation manger as shown in Fig 15.

Fig 15
Choose the package GCC as shown in Fig 16.

Fig 16
Click on the Apply Button to apply the changes as shown in Fig 17.

Fig 17
Click on the Apply Changes Button. It will show the confirmation message as shown in Fig 18.

Fig 18
Click on the Apply Button to install GCC. It will show the Package progress as shown in Fig 19 and Fig 20.

Fig 19

Fig 20
Click on the Close Icon and also close the installation manager to complete the installation of the compiler required to compile the programs.
You may add the MinGW path to bin directory which is C:cppmingwbin in my case to system path as we did for MinGW-W64. Make sure that you keep only one compiler path at a time among MinGW and MinGW-W64.
Step 4 — Getting started with C — Hello World
Write your first C program as shown below and save in a file hello.c.
#include<stdio.h>int main() {	printf( "Hello World" );
}
Compile and execute the program using the command as shown below.
# Compile and make executable
gcc hello.c -o hello.exe
It will compile the program and generate the executable i.e. hello.exe. We can simply type hello to execute the program. It will print Hello World on the console as shown in Fig 21.

Fig 21
Step 5 — Getting started with C++ — Hello World
We can repeat the previous step to write the Hello World program in C++. Write your first C++ program as shown below and save it to hello.cpp.
#include<iostream>using namespace std;
int main() {
cout << "Hello World";
return 0;
}
Compile and execute the program using the command as shown below.
# Compile and make executable
g++ hello.cpp -o hello.exe
It will compile the program and generate the executable i.e. hello.exe. We can simply type hello to execute the program. It will print Hello World on the console as shown in Fig 22.

Fig 22
This is how we can install MinGW and MinGW-W64 and configure the system path to access the executables from the command line. We also wrote our first C and CPP programs, compiled and executed them to print Hello World on the console.
July 19th, 2017
Building cross-platform C and C++ code is easier than ever with Visual Studio 15.3 Preview 4. The latest preview improves support for alternative compilers and build environments such as MinGW and Cygwin. MinGW (Minimalist GNU for Windows), in case you are not familiar with it, is a compiler in the GCC family designed to run natively on Windows. If you are interested in a quick rundown of this new functionality, check out our latest GoingNative episode on Channel 9.
Most MinGW installations, however, include much more than just a compiler. Most distributions of MinGW include a whole host of other tools that can be used to build and assemble software on Windows using the familiar GNU toolset. MinGW build environments often contain an entire POSIX development environment that can be used to develop both native Windows software using POSIX build tools and POSIX software that runs on Windows with the help of an emulation layer.
Please download the preview and try out the latest C++ features. You will need to also make sure you install the Linux Tools for C++ workload in addition to Desktop C++ to use these new features. You can learn more about Open Folder on the Microsoft docs site. We are looking forward to your feedback.
Why MinGW
There are three reasons why you might want to use MinGW on Windows. The first is simply compiler compatibility. We all love MSVC, but the reality is that some codebases are designed from the ground up under the expectation that they will be built with GCC. This is especially true for many cross-platform projects. Porting these codebases to support MSVC can be a costly endeavor when all you want to do is get up and running with your code. With MinGW you can be up and running in minutes instead of days.
There is, however, an even more compelling reason to use MinGW than source compatibility with GCC. MinGW environments are not just a compiler, but include entire POSIX build environments. These development environments allow cross-platform projects to build on Windows with few if any modifications to their build logic. Need Make or AutoTools, it’s already installed – if you are using an environment like MSYS2 nearly every tool you might need is only a single package management command away.
Finally, some MinGW distributions such as MSYS2 allow you to build native POSIX software on Windows without porting the code to Win32. This is accomplished by an emulation layer that allows native POSIX tools to run on Windows. This same layer is what allows all your favorite POSIX build tools to run in the MinGW environment.
Install MinGW on Windows
Getting started with MinGW is simple once you have installed the latest Visual Studio Preview. First, you will need to make sure that you select the C++ workload when you install Visual Studio. Next, you will need to download MinGW itself. There are actually many ways to install MinGW. If you are particularly adventurous you can build it from source, but it is much easier to install any of the popular binary distributions. One of the more popular distributions is MSYS2 (getting started guide). A standard MSYS2 installation installs three build environments: POSIX build environments to natively target 32-bit and 64-bit Windows, and an emulation layer to build POSIX software that targets Windows.
If you have a particular project in mind that you are working with, it is also worth checking out if they have any project-specific instructions on how to install MinGW. Some projects even include their own custom tailored MinGW distributions.
Use MinGW with Visual Studio
It has been possible to use GCC based compilers with Visual Studio projects for some time already, but many cross-platform projects that build with MinGW on Windows are not organized into Solution and Visual C++ project files. Creating these assets for a real-world project can be time consuming. To streamline onboarding cross-platform projects into Visual Studio, we now support opening folders directly, and in the latest preview it is easier than ever to use alternative compilers and build environments such as MinGW.
With “Open Folder” you can edit your code with full IntelliSense, build, and debug with the same fidelity as is available with full Solution and C++ project files. However, instead of authoring hundreds of lines of XML you just need to write a small amount of JSON. Even better, you only need to write the JSON for the features you need. For instance, if you only want to edit code in the IDE and stick to the command line for everything else, you only need to write a few lines of JSON to enable IntelliSense.
Edit with Accurate IntelliSense
To get the most out of IntelliSense when using “Open Folder” you will need to create a CppProperties.json file. You can create this file by selecting “Project->Edit Settings->CppProperties.json…” from the main menu.

This file is automatically populated with four configurations: “Debug” and “Release” for the x86 and x64 architectures. If you don’t need all of these configurations you can remove them to reduce clutter. Next, you will need to configure a few options to get IntelliSense that is consistent with your MinGW build.
In each configuration, you may notice an “intelliSenseMode” key. For MinGW and other GCC based compilers you should set this to “windows-clang-x86” or “windows-clang-x64” depending on your architecture.
Next, you will need to add the include paths for your project. Configuration specific include paths can be added to the “includePath” array under each configuration. You can add project-wide include paths here as well but it may be easier to add them to the “INCLUDE” environment variable, by adding an “environment” block to your configuration file as a peer to “configurations”:
"environments": [
  {
    "MINGW_PREFIX": "C:/msys64/mingw64",
    "MINGW_CHOST ": "x86_64-w64-mingw32",
    "MINGW_PACKAGE_PREFIX": "mingw-w64-x86_64",
    "MSYSTEM": "MINGW64",
    "MSYSTEM_CARCH": "x64_64",
    "MSYSTEM_PREFIX": "${env.MINGW_PREFIX}",
    "SHELL": "${env.MINGW_PREFIX}/../usr/bin/bash",
    "TEMP": "${env.MINGW_PREFIX}/../tmp",
    "TMP": "${env.TEMP}",
    "PATH": "${env.MINGW_PREFIX}/bin;${env.MINGW_PREFIX}/../usr/local/bin;${env.MINGW_PREFIX}/../usr/bin;${env.PATH}",
    "INCLUDE": "project/lib/include;${env.MINGW_PREFIX}/mingw/include"
  }
],
Note: MINGW_PREFIX should point to your MinGW installation, if you installed MSYS2 with default settings this directory will be “C:/msys64/mingw64”.
Most GCC based compilers, including MinGW, automatically include certain system header directories. For full IntelliSense, you will need to add these to the include path list. You can get a list of these standard includes by running:
echo | gcc -Wp,-v -x c++ - -fsyntax-only
Build with MinGW
Once you have set up IntelliSense (with “MINGW_PREFIX” and its related environment variables defined and added to “PATH”), building with MinGW is quite simple. First, you will need to create a build task. Right click your build script (or any other file you would like to associate with the task) and select “Configure Tasks”:
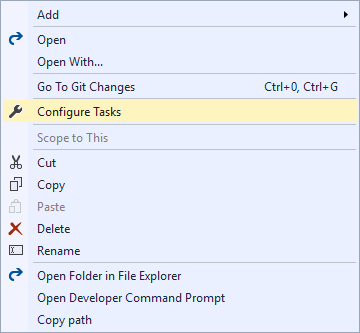
This will create a “tasks.vs.json” file if you don’t already have one and create a stub. Since MinGW and its tools are already on the PATH, as configured in CppProperties.json, you can configure the task to use them like this:
{
  "version": "0.2.1",
  "tasks": [
    {
      "taskName": "build-all",
      "appliesTo": "hello.cpp",
      "contextType": "build",
      "type": "launch",
      "command": "${env.comspec}",
      "args": [
        "g++ -o helloworld.exe -g hello.cpp"
      ]
    }
  ]
}
This example is simple – it only builds one file – but this can call into Make or any other build tools supported by MinGW as well. Once you save this file, you should have a “Build” option available for any files matched by the “appliesTo” tag.
Selecting “Build” from the context menu will run the command and stream any console output to the Output Window.
Debug MinGW Applications
Once you have configured your project to build, debugging can be configured with by selecting a template. Once you have built an executable, find it in the folder view and select “Debug and Launch Settings” from the executable’s context menu in the Solution Explorer:
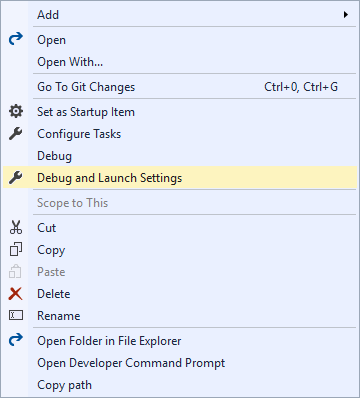
This will allow you to select a debugger template for this executable:
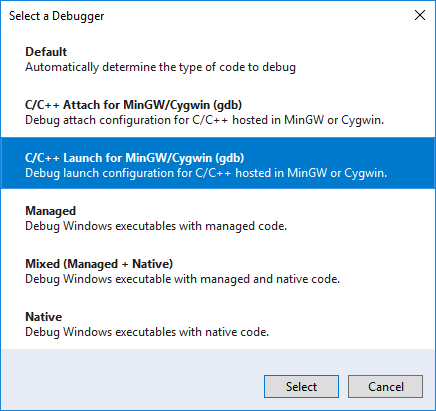
This will create an entry in the “launch.vs.json” file that configures the debugger:
{
  "version": "0.2.1",
  "defaults": {},
  "configurations": [
    {
      "type": "cppdbg",
      "name": "helloworld.exe",
      "project": "helloworld.exe",
      "cwd": "${workspaceRoot}",
      "program": "${debugInfo.target}",
      "MIMode": "gdb",
      "miDebuggerPath": "${env.MINGW_PREFIX}\bin\gdb.exe",
      "externalConsole": true
    }
  ]
}
In most cases, you won’t have to modify this at all, as long as you defined “MINGW_PREFIX” in the “CppProperties.json” file. Now you are ready to edit, build, and debug the code. You can right click the executable and select “Debug” in the context menu or select the newly added launch configuration in the debug dropdown menu to use F5. You should be able to use breakpoints and other debugging features like the Locals, Watch, and Autos Windows. If you are having trouble hitting breakpoints, make sure your build command was configured to emit GDB compatible symbols and debugging information.
Finally, to complete the full inner loop, you can add an “output” tag to your build task in “tasks.vs.json”. For instance:
"output": "${workspaceRoot}\helloworld.exe",
What About Cygwin and Other Compilers in the GCC Family
While we have discussed MinGW specifically in this post, it is worth keeping in mind that very little of the content above is specific to MinGW. These topics apply equally well to other compilers and build environments so long as they can produce binaries that can be debugged with GDB. With minimal modification, the instructions under the “Use MinGW with Visual Studio” section above should work fine with other environments such as Cygwin and even other compilers like Clang. In the future, Open Folder will support an even greater variety of compilers and debuggers – some out of the box, some with a little bit of extra configuration that may be specific to your projects.
Send Us Feedback
To try out the latest and greatest C++ features and give us some early feedback, please download and install the latest Visual Studio 2017 Preview. As always, we welcome your feedback. Feel free to send any comments through e-mail at visualcpp@microsoft.com, through Twitter @visualc, or Facebook at Microsoft Visual Cpp.
If you encounter other problems with Visual Studio 2017 please let us know via Report a Problem, which is available in both the installer and the IDE itself. For suggestions, let us know through UserVoice. We look forward to your feedback!

Will Buik
Program Manager, Visual Studio C++ IDE
Improve Article
Save Article
Improve Article
Save Article
MinGW is a native C/C++ compiler(GCC) which have free distributable import libraries and header files for building native Windows applications. In this tutorial, we are going to install MinGW for C/C++. These are a few steps that we have to perform to successfully install MinGW on our device.
How to Install the MinGW Tools for C/C++?
Step 1: Go to the MinGW website and click on Download. It will start downloading in 5 seconds.
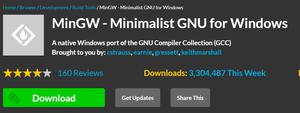
Step 2: Double click and open the exe MinGW file and click install. It will automatically start downloading all the setups for the MinGW.
Step 3: After all of the setup click Continue. Now the MinGW installation manager will pop up.
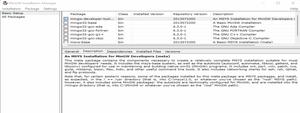
Step 4: In the installation manager right click on every option and then click Mark for Installation.
Step 5: In the Installation, option-click Apply changes. And then select Apply. It will start downloading all the files. It will take 5-6 minutes. After finishing click on Close.
How to Change Environment Variables for MinGW
After successful installation of MinGW, next step is to change the environment location for MinGW.
Step 1: Go to the C drive on your device and search for the MinGW folder. And in the MinGW folder go to the bin folder and copy its path.
Step 2: Go to the control panel then go to System then Advanced system settings and then Environment variables.
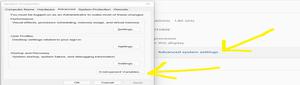
Step 3: In the system variables search for path and then select Edit. Now add a new path to it by clicking New. Now paste the path and click ok.
This marks the complete installation of MinGW in the system.
In this tutorial ,
We will learn How to install 64 bit (GCC) GNU Compiler Collection (Mingw-w64 port) on a Windows 10 system using MSYS2 installer for C/C++ software development.
|

GNU Compiler Collection (GCC) is an compiler produced by the GNU Project supporting various programming languages like for Objective-C, Objective-C++, Fortran, Ada, D and Go. Here we will be concentrating only C/C++ development on Windows 10.
GCC along with other utilities like GNU Binutils for Windows (assembler, linker, archive manager), set of freely distributable Windows specific header files and static import libraries have been ported to Windows platform and is available in the following flavors.
- MinGW — («Minimalist GNU for Windows») which can be used for creating 32 bit native executable on Windows platform
- Mingw-w64 — 64bit
Please note that we will not be covering WSL or Windows Subsystem for Linux.
What is Mingw-w64

Mingw-w64 is a fork off MinGW which provides a more complete Win32 API implementation including Win64 support,C99 support, DDK, DirectX.Mingw-w64 can generate 32 bit and 64-bit executables for x86 under the target names i686-w64-mingw32 and x86_64-w64-mingw32.
Here we will be using Mingw-w64 for C/C++ native application development using Windows API as most modern PC are now 64 bit.
Mingw-w64 Project does not provide any binaries for download from its website instead it maintains a list of Pre-built toolchains and packages provided by other vendors.
These prebuilt toolchains contains GCC, Debugger ,Package Manager ,Terminals and a set of other Unix tools like curl, openssl, sed, awk etc which can be used for development on Windows Platform.

Here we will be using a Mingw-w64 package called MSYS2 Software Distribution
MSYS2

MSYS2 is a collection of tools and libraries providing the developer with an easy-to-use environment for building, installing and running native Windows software.
MSYS2 Software Distribution consists of
- command line terminal called mintty,
- Bash,
- tools like tar and awk
- build systems like autotools,
all based on a modified version of Cygwin. Despite some of these central parts being based on Cygwin, the main focus of MSYS2 is to provide a build environment for native Windows software and the Cygwin-using parts are kept at a minimum.
To install and remove various software packages internally MSYS2 uses Pacman as their package manager.
MSYS2 is sponsored by Microsoft Open Source Programs Office through their FOSS Fund.
- Download MSYS2 Software Distribution (Mingw-w64) for Windows
- Download extra MSYS2 Packages from Repo here
Installing MSYS2 on Windows
Installing MSYS2 on Windows 10 is quite easy. Download the executable using the above link and run it
After the binary is installed on your system ,
MSYS2 comes with different environments/subsystems and the first thing you have to decide is which one to use.
The differences among the environments are mainly environment variables, default compilers/linkers, architecture, system libraries used etc.
If you are unsure, go with UCRT64.

UCRT (Universal C Runtime) is a newer version which is also used by Microsoft Visual Studio by default.
It should work and behave as if the code was compiled with MSVC.

You can start a terminal .The default terminal is Mintty (above)
Install GCC on Windows using Pacman on Windows 10
MSYS2 on Windows 10 uses pacman as its package manager.
After installing MSYS2 ,you can check the installed packages by typing
$pacman -Q
on the Mintty terminal.

This will list all the available packages on your system.
GCC will not be installed by default, So you can go to the package repo and search for gcc.

You can now use pacman to install gcc
$pacman -S gcc

After which you can check GCC by issuing the whereis command.
$whereis gcc

Compiling C/C++ file on Windows10 using GCC (MingW-w64/MSYS2)
First we will compile a simple c file using gcc.
Code below ,Save as main_c.c
#include<stdio.h>
int main()
{
  printf("Hello World");
  return 0;
}
Compile and run the code using the below commands
$ gcc -o main_c main_c.c
$ ./main_c

Compiling a C++ code using GCC (MingW-w64/MSYS2)
Code below, Save as main_cpp.cpp
#include <iostream>
using namespace std;
int main()
{
    cout << "Hello from MSYS2n!";
    cout << "Compiled C++ Filen!";
}
Compile and run the code using the below commands
$ g++ -o main_cpp main_cpp.cpp
$ ./main_cpp

Compiling a Win32/64 API GUI C code using GCC (MingW-w64/MSYS2)
Now we will compile a Win32/64 GUI application using GCC (MingW-w64/MSYS2) on Windows 10 .
We will create a Window and a Message Box using Win32 native api and configure the gcc to compile and link to the native system API.
Copy the below code and save it as win.c
#include<Windows.h>

int WINAPI WinMain(HINSTANCE hInstance,     //the instance of the program
                      HINSTANCE hPrevInstance, //the previous instance
                   LPSTR lpCmdLine,         //ptr to command line args
                   int nCmdShow)            //display properties
{
    HWND h;
    h = CreateWindow("BUTTON",
                        "Hit me",
                        WS_OVERLAPPEDWINDOW,
                        350,300,250,100,0,0,
                         hInstance,0); //Create a window with BUTTON class

    ShowWindow(h,nCmdShow);   //show the window
     MessageBox(0,"Press Me","Waiting",MB_OK); //used to display window
}
You can compile the Win32 API code on GCC using the following command
$ gcc -o win  win.c -Wl,--subsystem,windows  -lgdi32

$ ./win
Here
-
The -Wl,—subsystem,windows linker switch ensures that the application is built as a Windows GUI application, and not a console application. Failing to do so would result in a console window being displayed whilst your application runs
-
You should link with the gdi32 library using «—lgdi32 » otherwise the code will complain about «undefined reference to GetStockObject«.

Наверное, многие разработчики сталкивались с проблемой выбора или создания окружения для программирования. На мой взгляд, бесплатное окружение на основе порта компилятора gcc (MinGW) и какая-нибудь IDE, совместимая с ним – наиболее приемлемый выбор.
В этой статье я рассмотрю установку компилятора, его интеграцию с интегрированной средой разработки, его настройку, установку и компиляцию сторонних библиотек. Рассмотрю некоторые полезные утилиты для облегчения сборки исходного кода и системы контроля версий файлов.
Статья со временем будет обновляться и дополняться.
Данный мануал создавался с целью быть пособием и заметкой для разработчиков, помочь им собрать и настроить собственное окружение для разработки нативных приложений в семействе OS Windows.
Содержание:
1. Установка и настройка тулчейна MinGW/MSYS и дополнительного ПО
Давайте разберемся, что такое MinGW, а что такое MSYS и для чего они нужны.
MinGW – сокращение от “Minimalist GNU for Windows”, по своей сути MinGW является небольшой и лаконичной средой разработки нативных приложений для семейства OS Microsoft Windows.
MinGW предоставляет полный набор Open Source инструментов для программирования, который подходит для разработки нативного Windows приложения, которое не будет зависеть от C-Runtime библиотек каких-либо третьих сторон.
MinGW поддерживает идею минимализма, поэтому он никогда не будет полностью поддерживать среду исполнения POSIX, для развертывания POSIX приложений на Windows, для их полной поддержки существует Cygwin. В первую очередь MinGW предназначен для использования разработчиками, которые привыкли работать с компилятором gcc.
MinGW включает в себя:
- Порт GNU Compiler Collection (GCC), который включает в себя компиляторы таких языков, как: C, C++, ADA и Fortran.
- Порт GNU Binutils для Windows (as, ld, ar)
- Консольный установщик (mingw-get) для MinGW и MSYS
- Графический установщик (mingw-get-inst)
MSYS – сокращение от “Minimal SYStem”, это порт командной оболочки Bourne Shell (sh) для Windows. Он предлагается в качестве альтернативы “cmd.exe” от Microsoft’а. Оболочка хорошо подходит для портирования существующих приложений и библиотек, которые есть в *nix системах и включает в себя небольшой выбор портов инструментов Unix, облегчающих задачу портирования.
Комбинация MinGW и MSYS предоставляет разработчикам небольшую независимую среду, которая может быть легко загружена на съемные носители, не требуя добавления записей в файлы реестра.
Полезные ссылки:
Официальный сайт MinGW
Вики по MinGW [ENG]
<< Перейти к содержанию
1.1. Устанавливаем MinGW, оболочку MSYS и настраиваем окружение
1.1.1. Скачиваем официальный онлайн-установщик MinGW, на данный момент последняя версия установщика 20120426: mingw-get-inst-latest.exe
Запускаем установщик, нажимаем “Next”, “Next”, выбираем “Use pre-packaged repository catalogues”:
Жмем “Next” и соглашаемся с лицензией, снова “Next”, и теперь выбираем путь для установки:
Рекомендуется выбирать путь без пробелов, лучше всего устанавливать MinGW в корень диска, т.е в “C:MinGW”. Я выбрал “C:QtMinGW”, так удобнее будет подключить MinGW к IDE QtCreator. Если вы планируете дальше интегрировать свой тулчейн в какую-нибуть IDE, сделайте аналогично и нажмите “Next”. Необходимость наличия группы ярлыков в меню “Пуск” – по вашему желанию. Но можно не создавать (отметив галочкой “Don’t create a Start Menu folder) и нажать “Next”.
Выбираем следующие пакеты:
- C Compiler
- C++ Compiler
- MSYS Basic System
- MinGW Developer ToolKit
и жмем “Next”
затем подтверждаем установку выбранных пакетов кнопкой “Install”.
Откроется консольное окно, в котором будет отображаться процесс скачивания и установки пакетов. Проследите, чтобы процесс выполнялся без ошибок (например, если будут недоступны сервера репозитория, необходимо повторить попытку установки с этими же параметрами позже) и дождитесь завершения процесса.
Теперь необходимо добавить в переменную окружения PATH путь до директории “C:QtMinGWbin”. Делается это следующим образом (для Win7, для остальных систем по аналогии):
1.1.1.1. Нажмите правой клавишей мышки на ярлык “Компьютер” и кликните на пункт меню “Свойства”.
1.1.1.2. Кликните слева на пункт “Дополнительные параметры системы”, в появившемся окне нажмите кнопку “Переменные среды”.
1.1.1.3. В верхнем списке переменных найдите переменную “Path”, кликните на нее два раза для редактирования.
1.1.1.4. Добавьте путь до директории “bin”. В моем случае это будет “C:QtMinGWbin”, разделение путей выполняется символом “;”.
1.1.1.5. Подробнее можно прочесть здесь.
Все, тулчейн MinGW и его оболочка MSYS установлены. Теперь можно перейти к установке дополнительных программ, которые помогут облегчить нам жизнь.
1.1.2. Установка дополнительных пакетов и полезные команды и утилиты.
Сразу после установки MinGW и MSYS будет полезно установить некоторые пакеты.
Для этого запускаем файл “C:QtMinGWmsys1.0msys.bat”, для которого, кстати, полезно будет создать ярлык, и набираем там такие команды (переход на новую строку аналогичен нажатию клавиши “Enter”):
mingw-get install msys-man
mingw-get install msys-wget
mingw-get install msys-zip
mingw-get install msys-unzip
mingw-get install msys-bzip2
mingw-get install msys-perl
Команда “mingw-get install” аналогична популярной на разных Linux-дистрибутивах, наверное, знакомой многим, команде “apt-get install”. Обе эти команды скачают и установят вам нужный пакет из репозиториев.
Список доступных пакетов для установки можно посмотреть по команде “mingw-get show”, для лучшего восприятия его можно отсортировать следующим образом:
mingw-get show | grep "Package: "
Удалить установленный пакет можно командой “mingw-get remove выбранный_вами_пакет”
Обновить пакет можно командой “mingw-get upgrade выбранный_вами_пакет”, команда “mingw-get upgrade” обновит все пакеты вашего тулчейна полностью.
На этом базовая настройка тулчейна закончена, можно приступить к сборке/переносу проектов или более тонкой настройке.
1.1.3. Какие утилиты будет полезно использовать вместе с MinGW?
Для редактирования исходников и других файлов можно использовать консольный редактор “vim”, который идет в комплекте с MinGW’ом.
Но если вы привыкли к оконному интерфейсу, воспользуйтесь отличнейшим редактором – Notepad++.
Для распаковки содержимого архивов можно использовать консольные команды или архиваторы с GUI, такие как WinRar, например.
Лично я рекомендую использовать 7-zip.
1.1.4. Что можно почитать?
Список литературы можно найти здесь: http://www.linuxcenter.ru/
Основы работы в консоли
Интерпретатор командного языка shell
Самые необходимые команды *nix для обработки ввода/вывода
Совет по поводу определения fstab
<< Перейти к содержанию
1.2. Настройка MinGW/MSYS: используем продвинутую консоль, вместо msys.bat
Возможно многим разработчикам стандартный шел, вызываемый по “msys.bat” покажется унылым и скучным:
Еще бы, работать в такой консоли достаточно неудобно, хотя бы из-за отсутствия нормального копипаста.
Но к счастью, есть такой проект как ConEmu от Maximus5‘а, являющийся продвинутым форком ConEmu by Zoin.
ConEmu – это очень удобный и симпатичный терминал, поддерживающий вкладки. Его подробнейшее описание, написанное самим автором этой программы, можно прочитать здесь. Самым главным преимуществом для меня является нормальный копипаст. Здесь он реализован просто замечательно, с помощью левой кнопки мышки или сочетания “Alt + Левая кнопка мышки” можно выделить блок или строку в консоли соответственно. После выделения строка сразу автоматом скопируется в буфер. Сочетание клавиш “Ctrl + V” или клик левой клавишей мышки вставляет первую строку из буфера, а “Shift + Insert + Enter” вставляет сразу все строки.
Для связки ConEmu и MinGW, нам необходимо скачать специально подготовленные пакеты ConEmu для MinGW. Установка весьма проста и тривиальна – нужно лишь распаковать “-mingw32” и “-mingw64” пакеты в корневую папку компилятора (в моем случае это “C:QtMinGW”).
Если вы не хотите настраивать консоль, можете скачать уже настроенную мной:
Скачать ConEmu.zip, 1.7 MB
Выглядит она следующим образом (изображение кликабельно):
И устанавливается абсолютно аналогично.
На мой взгляд панелька в стиле терминала Quake, выезжающая сверху экрана по нажатию “Ctrl + ~”, не только эффектно выглядит, но и очень удобна в использовании.
При желании, конечно, можно все очень и очень гибко настраивать под себя, программа ConEmu имеет множество настроек и совместима со всеми последними OS семейства Windows.
<< Перейти к содержанию
1.3. Компиляция и установка утилиты pkg-config
Официальный сайт pkg-config: http://pkg-config.freedesktop.org/
pkg-config это утилита, которая предоставляет общий интерфейс для получения информации об установленных в системе программных библиотеках с целью компиляции программ из исходного кода.
В нашем случае она нужна для компиляции некоторых библиотек и проектов.
1.3.1. Скачиваем последнюю версию исходников pkg-config’а, на момент написания статьи это 0.28: pkg-config-0.28.tar.gz
1.3.2. Распаковываем архив в папку “C:Qtbuild”, исходники pkg-config’а должны быть в папке “C:Qtbuildpkg-config-0.28”.
1.3.3. Компилируем pkg-config и библиотеку GNU C Library (glibc), идущую в комплекте:
Запускаем “C:QtMinGWmsys1.0msys.bat” или ConEmu и набираем в консольном окне такие команды:
Кстати, небольшой, но полезный совет! Если у вас многоядерный процессор, то при вызове утилиты make можно воспользоваться ключом “-jX”, где X – число одновременно выполняемых потоков компиляции, которое зависит от количества ядер процессора n. Обычно рекомендуется брать X = n + 1, но если процессор поддерживает технологию Hyper-threading, то число потоков следует брать X = 2 · N + 1. То есть команды компиляции для двухъядерного процессора будут следующими: “make -j3” и “make -j3 install”. Благодаря распараллеливанию компиляции время сборки крупных проектов значительно сокращается.
export CFLAGS="-march=native"
cd /c/Qt/build/pkg-config-0.28
./configure --with-internal-glib --prefix=/mingw
make
make install
export -n CFLAGS
Утилита и библиотека скомпилировались и установились.
1.3.4. Чтобы обойти ошибку в MSYS, следует выполнить в консоли блок таких команд:
cat > /mingw/bin/pkg-config.sh << "EOF"
#!/bin/sh
if pkg-config "$@" > /dev/null 2>&1 ; then
res=true
else
res=false
fi
pkg-config "$@" | tr -d \r && $res

EOF
Это создаст файл “pkg-config.sh” в папке “C:QtMinGWbin”
1.3.5. Теперь нужно сделать скрипт исполнительным и добавить переменную в альтернативное окружение:
chmod ugo+x /mingw/bin/pkg-config.sh &&
echo "PKG_CONFIG=/mingw/bin/pkg-config.sh" >> /etc/profile.local &&
echo "export PKG_CONFIG" >> /etc/profile.local
1.3.6. Когда вам понадобится альтернативное окружение, вы всегда можете подгрузить его командой:
source /etc/profile.local
<< Перейти к содержанию
1.4. Установка CMake, примеры использования
Официальный сайт CMake: http://www.cmake.org
CMake (cross platform make) – это кроссплатформенная система автоматизации генерации файлов для сборки программного обеспечения из исходного кода.
CMake не занимается непосредственно сборкой исходных кодов, он лишь генерирует файлы для управления сборкой проекта из файлов “CMakeLists.txt”. Это могут быть:
- Обычные Makefile, которые используются в системах Unix для сборки с помощью утилиты make;
- Файлы projects/workspaces (*.dsp/*.dsw) в системах Windows для сборки с помощью Microsoft Visual C++;
- Проекты XCode в Mac OS X.
1.4.1 Установка CMake:
1.4.1.1. Скачиваем установочный пакет CMake с официального сайта (последняя версия на момент написания статьи – 2.8.10.2): cmake-2.8.10.2-win32-x86.exe
1.4.1.2. Сохраняем установочный пакет в любое удобное для вас место и запускаем “cmake-2.8.10.2-win32-x86.exe”.
1.4.1.3. Щелкаем “Далее”, соглашаемся с лицензией, выбираем пункт “Add CMake to the system PATH for all users”
Эта опция установит в переменную окружения PATH ту папку, в которой будет установлен CMake.
Ярлык создаем по желанию, щелкаем “Далее”.
1.4.1.4. Выбираем папку, в которую будет установлен CMake. Я рекомендую выбрать папку “C:QtCMake”, так как потом можно будет легко интегрировать его со средой разработки (IDE). Щелкаем “Далее”.
1.4.1.5. При желании можно создать группу ярлыков в меню “Пуск”. Щелкаем “Установить”, ждем окончания установки и нажимаем “Готово”. Всё! CMake установлен.
1.4.2 Примеры использования CMake:
1.4.2.1. Немного основ, общие советы.
Для сборки проекта с помощью CMake в корневой директории проекта создается файл “CMakeLists.txt”, описывающий этот проект и его зависимости. Примеры компилирования библиотек с помощью утилиты CMake можно найти здесь:
Компиляция и установка библиотеки OpenAL
Компиляция и установка библиотеки ALUT (freealut)
1.4.2.2. Пример моего “CMakeLists.txt” для сборки примера “oldglutdemo.c” из пункта 2.2.9.1, с использованием библиотеки GLUT:
project(GLUT-Req)
cmake_minimum_required(VERSION 2.8)
aux_source_directory(. SRC_LIST)

set(CMAKE_LIBRARY_PATH ${CMAKE_LIBRARY_PATH} "C:/Qt/MinGW/lib")
set(CMAKE_INCLUDE_PATH ${CMAKE_INCLUDE_PATH} "C:/Qt/MinGW/include/GL;C:/Qt/MinGW/include")

##########################################################
find_package(OpenGL REQUIRED)
if(NOT OPENGL_FOUND)
    message(SEND_ERROR "Failed to find OpenGL")
    return()
else()
    include_directories(${OPENGL_INCLUDE_DIR})
endif()
##########################################################
find_package(GLUT REQUIRED)
if(NOT GLUT_FOUND)
    message(SEND_ERROR "Failed to find GLUT")
    return()
else()
    include_directories(${GLUT_INCLUDE_DIR})
endif()
##########################################################

link_libraries(${OPENGL_LIBRARY} ${GLUT_LIBRARIES})
add_executable(${PROJECT_NAME} ${SRC_LIST})
Текст выше нужно выделить и сохранить в файл с именем “CMakeLists.txt”, затем файл “oldglutdemo.c” и “CMakeLists.txt” нужно поместить в отдельную папку, например “C:QtbuildGLUTglut-3.7.6cmake-test”.
Далее набираем в консольном окне такие команды:
cmake -G "MSYS Makefiles"
make
make install
И в итоге получаем исполнительный файл “GLUT-Req.exe”. Обратите внимание на:
set(CMAKE_LIBRARY_PATH ${CMAKE_LIBRARY_PATH} "C:/Qt/MinGW/lib")
set(CMAKE_INCLUDE_PATH ${CMAKE_INCLUDE_PATH} "C:/Qt/MinGW/include/GL;C:/Qt/MinGW/include")
Без установки этих переменных CMake не видит библиотеку GLUT.
1.4.2.3. Переменные:
cmake -DCMAKE_INSTALL_PREFIX:PATH="/mingw" -DCMAKE_C_FLAGS:STRING="-march=i686" -DCMAKE_CPP_FLAGS:STRING="" -DCMAKE_CXX_FLAGS:STRING=""
-DCMAKE_EXE_LINKER_FLAGS:STRING="-L/usr/local/lib -L/opt/local/lib" -DCMAKE_MODULE_LINKER_FLAGS:STRING="-L/usr/local/lib -L/opt/local/lib"
-DCMAKE_SHARED_LINKER_FLAGS:STRING="-L/usr/local/lib -L/opt/local/lib" -G "MSYS Makefiles"
Из названий переменных все должно быть понятно:
-DCMAKE_INSTALL_PREFIX:PATH #- путь, куда будет устанавливаться программа после "make install".
-DCMAKE_C_FLAGS:STRING #- Установка флагов для файлов "*.c"
-DCMAKE_CPP_FLAGS:STRING / -DCMAKE_CXX_FLAGS:STRING #- Установка флагов для файлов "*.cpp" и "*.cxx" соответственно.
-DCMAKE_EXE_LINKER_FLAGS:STRING / -DCMAKE_MODULE_LINKER_FLAGS:STRING / -DCMAKE_SHARED_LINKER_FLAGS:STRING #- Установка файлов линковки.
Каталог с исходниками можно оставить в чистом состоянии. Для этого следует перейти в сборочный каталог (в данном случае “build_project”) и разверенуть в него дерево исходного кода с последующей генерацией Makefile’ов. Пример:
cd build_project/
cmake -G "MSYS Makefiles" --build ../project/src/
В аргумент “build” необходимо прописать путь до каталога с исходным кодом, который нужно оставить чистым. После выполнения команды в каталоге “build_project/” создастся полная копия дерева проекта и в этом каталоге можно будет выполнять дальнейшую сборку.
1.4.2.4. Кросскомпиляция с помощью CMake.
В папке с проектом создаем файл с расширением “.cmake”, например, “Toolchain-eldk-ppc74xx.cmake”, с подобным содержимым:
# this one is important
SET(CMAKE_SYSTEM_NAME Linux)
#this one not so much
SET(CMAKE_SYSTEM_VERSION 1)

# specify the cross compiler
SET(CMAKE_C_COMPILER   /opt/eldk-2007-01-19/usr/bin/ppc_74xx-gcc)
SET(CMAKE_CXX_COMPILER /opt/eldk-2007-01-19/usr/bin/ppc_74xx-g++)

# where is the target environment
SET(CMAKE_FIND_ROOT_PATH  /opt/eldk-2007-01-19/ppc_74xx /home/alex/eldk-ppc74xx-inst)

# search for programs in the build host directories
SET(CMAKE_FIND_ROOT_PATH_MODE_PROGRAM NEVER)
# for libraries and headers in the target directories
SET(CMAKE_FIND_ROOT_PATH_MODE_LIBRARY ONLY)
SET(CMAKE_FIND_ROOT_PATH_MODE_INCLUDE ONLY)
И конфигурируем проект:
cmake -DCMAKE_TOOLCHAIN_FILE=Toolchain-eldk-ppc74xx.cmake
Если переменная “CMAKE_FIND_ROOT_PATH_MODE_PROGRAM” установлена в NEVER, то будут использоваться инструменты из недр вашей системы. Если она установлена в ONLY, то будут использованы инструменты из каталога “CMAKE_FIND_ROOT_PATH/bin”. В этом случае следует быть осторожным, так как из поля видимости CMake пропадают некоторые кросс-утилиты из состава binutils, например tuple-ar и tuple-ranlib. Решить эту поблему можно с помощью создания симлинков на эти инструменты. Симлинки следует расположить в директорию “CMAKE_FIND_ROOT_PATH/bin”. В противном случае, при сборке проекта может возникать следующая ошибка:
Error running link command: No such file or directory
Подробнее можно прочесть тут: CMake Cross Compiling
1.4.3 Что почитать про CMake? (литература):
Из наиболее полезного:
- CMake Documentation [ENG]
- Введение в CMake [RUS]
- Используем Cmake для создания Makefile [RUS]
<< Перейти к содержанию
http://exlmoto.ru/mingw-development-environment/
http://www.linux.org.ru/forum/desktop/10819573
https://msys2.github.io/
C/C++ is a general-purpose, mid-level programming language. To get started with C/C++ language we need to install MinGW compiler or an IDE (Integrated development Environment) such as Codeblock, Dev C++ etc.
C and C++ uses same compiler as C++ is a superset of C language only few programs that may compile in C, but not in C++.
Before writing programs we need a compiler installed on your computer. We can use compiler using command prompt and IDE as mention earlier. In this article you will study both ways of compiling your code.
Finding the best Compiler:
There are many compiler available to download and install both free and paid. Some of the compilers are Codeblocks, Dev C++, Visual studio, Netbeans, Turbo C++ etc. And there are many online compiler like ideon.com, codepad.org, codechef which you can use if don’t want to install anything.
Note: We use Codeblocks compiled program on hellocodies.com
Warning: If you are beginner don’t use Turbo C++. You endup hating programming with this compiler.
So lets install MinGW on you local environment and all other IDE will be explained in next article.
1. Download MinGW Tools and Double click the downloaded file to install.
2. A window popup asking you to change directory ( change if you want or leave it)
3. Then click install and click continue

4. Again a new popup window opens asking you to select required component
5. Click the tick box and select mark for installation to base-bin, gcc-g++-bin, and gcc-obj-bin (you can also select all).
6. From main menu click on Installation>> apply changes and again click Apply. Wait for minute to install than click close.

MinGW compiler is installed on your computer. Now you have set path variable for compiler.
1. Open directory where you installed MinGW>> bin folder and copy the path (for example: C:MinGWbin).
2. Now right click on MY-COMPUTER on desktop. Select Properties >> Advance system setting.
3. Click on Environment variable in popup window and click on PATH >> Edit from below options.

4. Click on New and paste the directory path (C:MinGWbin) and click three times OK to exit.

Now it’s done compiler installed and path is set
Let’s Verify compiler
Open command prompt and type gcc hit enter. If it shows:
C:UsersXXXXX>gcc
GCC: fatal error: no input file
Compilation terminate
it means everything installed and set properly. Refer below image
Try simple C program Example
- Open notepad and Copy above code to notepad and save it to desktop for easy access as example.c extension
#include<stdio.h>

int main()
{
printf(“hellocodies.com”)

return 0;
}
- Now open command prompt.
- Type > > cd desktop
- Changed directory look like this C:UsersxxxxxDesktop>
- Type
gcc –o example.exe example.c. - Hit enter
- Program got compiled now you can see a example.exe file on your desktop
- Type example.exe in CMD to see output

Example of C++ program
- Copy below program to notepad and save it to desktop with .cpp extension
#include<iostream>
using namespace std;

int main()
{
cout< <"hellocodies.com";

return 0;
}
- Open command prompt
- Type > > cd desktop
- Directory look like this C:UsersxxxxxDesktop>
- Type
g++ –o example2.exe example2.cpp. - Hit enter
- Program got compiled
- Type example2.exe to see output

Comeback after to see installation of IDE compilers on windows, mac and Linux platforms.
Don’t forget to give your feedback.