Watch Now This tutorial has a related video course created by the Real Python team. Watch it together with the written tutorial to deepen your understanding: Python Basics: Setting Up Python
Installing or updating Python on your computer is the first step to becoming a Python programmer. There are a multitude of installation methods: you can download official Python distributions from Python.org, install from a package manager, and even install specialized distributions for scientific computing, Internet of Things, and embedded systems.
This tutorial focuses on official distributions, as they’re generally the best option for getting started with learning to program in Python.
In this tutorial you’ll learn how to:
- Check which version of Python, if any, is installed on your machine
- Install or update Python on Windows, macOS, and Linux
- Use Python on mobile devices like phones or tablets
- Use Python on the Web with online interpreters
No matter what operating system you’re on, this tutorial has you covered. Find your operating system below and dive in!
How to Install Python on Windows
There are three installation methods on Windows:
- The Microsoft Store
- The full installer
- Windows Subsystem for Linux
In this section, you’ll learn how to check which version of Python, if any, is installed on your Windows computer. You’ll also learn which of the three installation methods you should use. For a more comprehensive guide, check out Your Python Coding Environment on Windows: Setup Guide.
How to Check Your Python Version on Windows
To check if you already have Python on your Windows machine, first open a command-line application, such as PowerShell.
You can also use cmd.exe or Windows Terminal.
With the command line open, type in the following command and press Enter:
C:> python --version
Python 3.8.4
Using the --version switch will show you the version that’s installed. Alternatively, you can use the -V switch:
C:> python -V
Python 3.8.4
In either case, if you see a version less than 3.8.4, which was the most recent version at the time of writing, then you’ll want to upgrade your installation.
If you’re interested in where the installation is located, then you can use the where.exe command in cmd.exe or PowerShell:
C:> where.exe python
C:UsersmertzAppDataLocalProgramsPythonPython37-32python.exe
Note that the where.exe command will work only if Python has been installed for your user account.
What Your Options Are
As mentioned earlier, there are three ways to install the official Python distribution on Windows:
-
Microsoft Store package: The most straightforward installation method on Windows involves installing from the Microsoft Store app. This is recommended for beginner Python users looking for an easy-to-set-up interactive experience.
-
Full Installer: This approach involves downloading Python directly from the Python.org website. This is recommended for intermediate and advanced developers who need more control during the setup process.
-
Windows Subsystem for Linux (WSL): The WSL allows you to run a Linux environment directly in Windows. You can learn how to enable the WSL by reading the Windows Subsystem for Linux Installation Guide for Windows 10.
In this section, we’ll focus on only the first two options, which are the most popular installation methods in a Windows environment.
If you want to install in the WSL, then you can read the Linux section of this tutorial after you’ve installed the Linux distribution of your choice.
The two official Python installers for Windows aren’t identical. The Microsoft Store package has some important limitations.
Limitations of the Microsoft Store Package
The official Python documentation has this to say about the Microsoft Store package:
The Microsoft Store package is an easily installable Python interpreter that is intended mainly for interactive use, for example, by students. (Source)
The key takeaway here is that the Microsoft Store package is “intended mainly for interactive use.” That is, the Microsoft Store package is designed to be used by students and people learning to use Python for the first time.
In addition to targeting beginning Pythonistas, the Microsoft Store package has limitations that make it ill-suited for a professional development environment. In particular, it does not have full write access to shared locations such as TEMP or the registry.
Windows Installer Recommendations
If you’re new to Python and focused primarily on learning the language rather than building professional software, then you should install from the Microsoft Store package. This offers the shortest and easiest path to getting started with minimal hassle.
On the other hand, if you’re an experienced developer looking to develop professional software in a Windows environment, then the official Python.org installer is the right choice. Your installation won’t be limited by Microsoft Store policies, and you can control where the executable is installed and even add Python to PATH if necessary.
How to Install From the Microsoft Store
If you’re new to Python and looking to get started quickly, then the Microsoft Store package is the best way to get up and running without any fuss. You can install from the Microsoft Store in two steps.
Step 1: Open the Python App Page in the Microsoft Store
Open the Microsoft Store app and search for Python.
You’ll likely see multiple versions that you can choose to install:
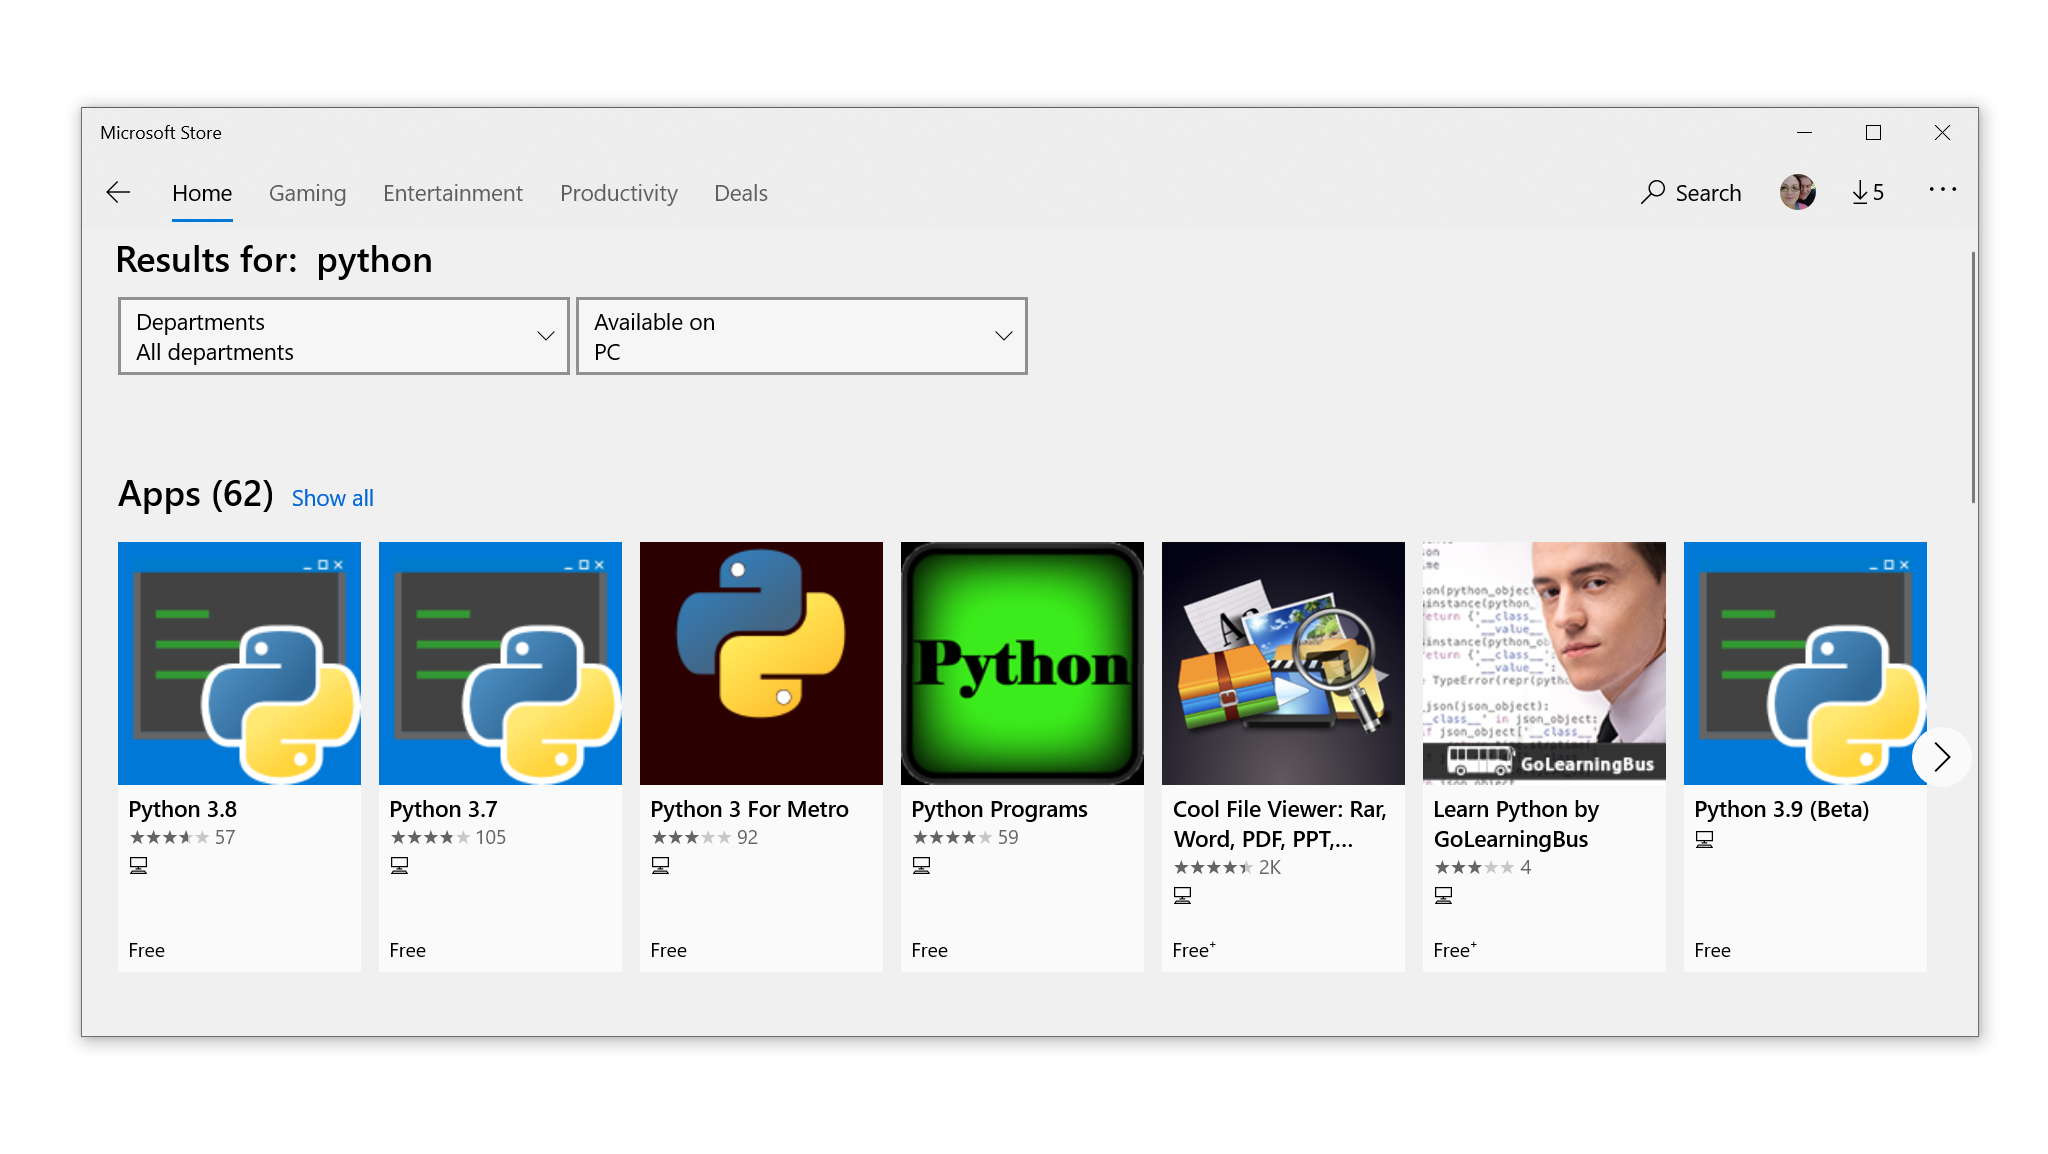
Select Python 3.8, or the highest version number you see available in the app, to open the installation page.
Alternatively, you can open PowerShell and type the following command:
If you don’t already have a version of Python on your system, then when you press Enter, the Microsoft Store will automatically launch and take you to the latest version of Python in the store.
Step 2: Install the Python App
After you’ve selected the version to be installed, follow these steps to complete the installation:
-
Click Get.
-
Wait for the application to download. When it’s finished downloading, the Get button will be replaced with a button that says Install on my devices.
-
Click Install on my devices and select the devices on which you’d like to complete the installation.
-
Click Install Now and then OK to start the installation.
-
If the installation was successful, then you’ll see the message “This product is installed” at the top of the Microsoft Store page.
Congratulations! You now have access to Python, including pip and IDLE!
How to Install From the Full Installer
For professional developers who need a full-featured Python development environment, installing from the full installer is the right choice. It offers more customization and control over the installation than installing from the Microsoft Store.
You can install from the full installer in two steps.
Step 1: Download the Full Installer
Follow these steps to download the full installer:
-
Open a browser window and navigate to the Python.org Downloads page for Windows.
-
Under the “Python Releases for Windows” heading, click the link for the Latest Python 3 Release — Python 3.x.x. As of this writing, the latest version was Python 3.8.4.
-
Scroll to the bottom and select either Windows x86-64 executable installer for 64-bit or Windows x86 executable installer for 32-bit.
If you aren’t sure whether to select the 32-bit or the 64-bit installer, then you can expand the box below to help you decide.
For Windows, you can choose either the 32-bit or the 64-bit installer. Here’s the difference between the two:
-
If your system has a 32-bit processor, then you should choose the 32-bit installer. If you attempt to install the 64-bit version on a 32-bit processor, then you’ll get an error at the beginning and the install will fail.
-
On a 64-bit system, either installer will work for most purposes. The 32-bit version will generally use less memory, but the 64-bit version performs better for applications with intensive computation.
If you’re unsure which version to pick, go with the 64-bit version.
If you have a 64-bit system and would like to switch from 64-bit Python to 32-bit (or vice versa), then you can just uninstall Python and then reinstall it by downloading the other installer from Python.org.
When the installer is finished downloading, move on to the next step.
Step 2: Run the Installer
Once you’ve chosen and downloaded an installer, run it by double-clicking on the downloaded file. A dialog box like the one below will appear:
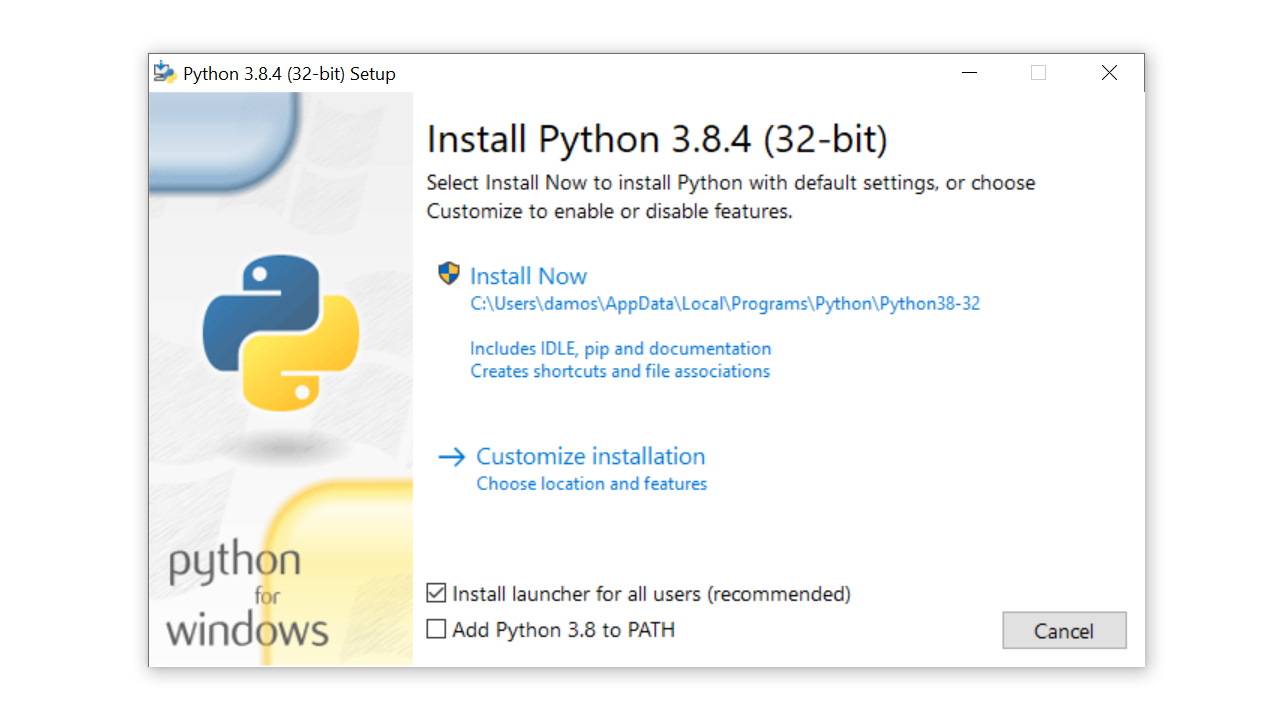
There are four things to notice about this dialog box:
-
The default install path is in the
AppData/directory of the current Windows user. -
The Customize installation button can be used to customize the installation location and which additional features get installed, including
pipand IDLE. -
The Install launcher for all users (recommended) checkbox is checked default. This means every user on the machine will have access to the
py.exelauncher. You can uncheck this box to restrict Python to the current Windows user. -
The Add Python 3.8 to
PATHcheckbox is unchecked by default. There are several reasons that you might not want Python onPATH, so make sure you understand the implications before you check this box.
The full installer gives you total control over the installation process.
Customize the installation to meet your needs using the options available on the dialog box. Then click Install Now. That’s all there is to it!
Congratulations—you now have the latest version of Python 3 on your Windows machine!
How to Install Python on macOS
Python 2 comes preinstalled on older versions of macOS. This is no longer the case for current versions of macOS, starting with macOS Catalina.
There are two installation methods on macOS:
- The official installer
- The Homebrew package manager
In this section, you’ll learn how to check which version of Python, if any, is installed on your macOS device. You’ll also learn which of the two installation methods you should use.
How to Check Your Python Version on a Mac
To check which Python version you have on your Mac, first open a command-line application, such as Terminal.
With the command line open, type in the following commands:
# Check the system Python version
$ python --version

# Check the Python 2 version
$ python2 --version

# Check the Python 3 version
$ python3 --version
If you have Python on your system, then one or more of these commands should respond with a version number.
For example, if Python 3.6.10 were already set up on your computer, then the python3 command would display that version number:
$ python3 --version
Python 3.6.10
You’ll want to get the latest version of Python if any of these conditions is true:
- None of the above commands returns a version number.
- The only version you see displayed is in the Python 2.X series.
- You have a version of Python 3 that isn’t the latest available, which was version 3.8.4 as of this writing.
What Your Options Are
There are two ways to install the official Python distribution on macOS:
-
The official installer: This method involves downloading the official installer from the Python.org website and running it on your machine.
-
The Homebrew package manager: This method involves downloading and installing the Homebrew package manager if you don’t already have it installed, and then typing a command into a terminal application.
Both the official installer and the Homebrew package manager will work, but only the official installer is maintained by the Python Software Foundation.
The distributions installed by the official installer and the Homebrew package manager aren’t identical. Installing from Homebrew has some limitations.
Limitations of Installing From Homebrew
The Python distribution for macOS available on Homebrew doesn’t include the Tcl/Tk dependency required by the Tkinter module. Tkinter is the standard library module for developing graphical user interfaces in Python and is in fact an interface for the Tk GUI toolkit, which isn’t part of Python.
Homebrew doesn’t install the Tk GUI toolkit dependency. Instead, it relies on an existing version installed on your system. The system version of Tcl/Tk may be outdated or missing entirely and could prevent you from importing the Tkinter module.
macOS Installer Recommendations
The Homebrew package manager is a popular method for installing Python on macOS because it’s easy to manage from the command line and offers commands to upgrade Python without having to go to a website. Because Homebrew is a command-line utility, it can be automated with bash scripts.
However, the Python distribution offered by Homebrew isn’t controlled by the Python Software Foundation and could change at any time. The most reliable method on macOS is to use the official installer, especially if you plan on doing Python GUI programming with Tkinter.
How to Install From the Official Installer
Installing Python from the official installer is the most reliable installation method on macOS. It includes all the system dependencies needed for developing applications with Python.
You can install from the official installer in two steps.
Step 1: Download the Official Installer
Follow these steps to download the full installer:
-
Open a browser window and navigate to the Python.org Downloads page for macOS.
-
Under the “Python Releases for Mac OS X” heading, click the link for the Latest Python 3 Release — Python 3.x.x. As of this writing, the latest version was Python 3.8.4.
-
Scroll to the bottom and click macOS 64-bit installer to start the download.
When the installer is finished downloading, move on to the next step.
Step 2: Run the Installer
Run the installer by double-clicking the downloaded file. You should see the following window:
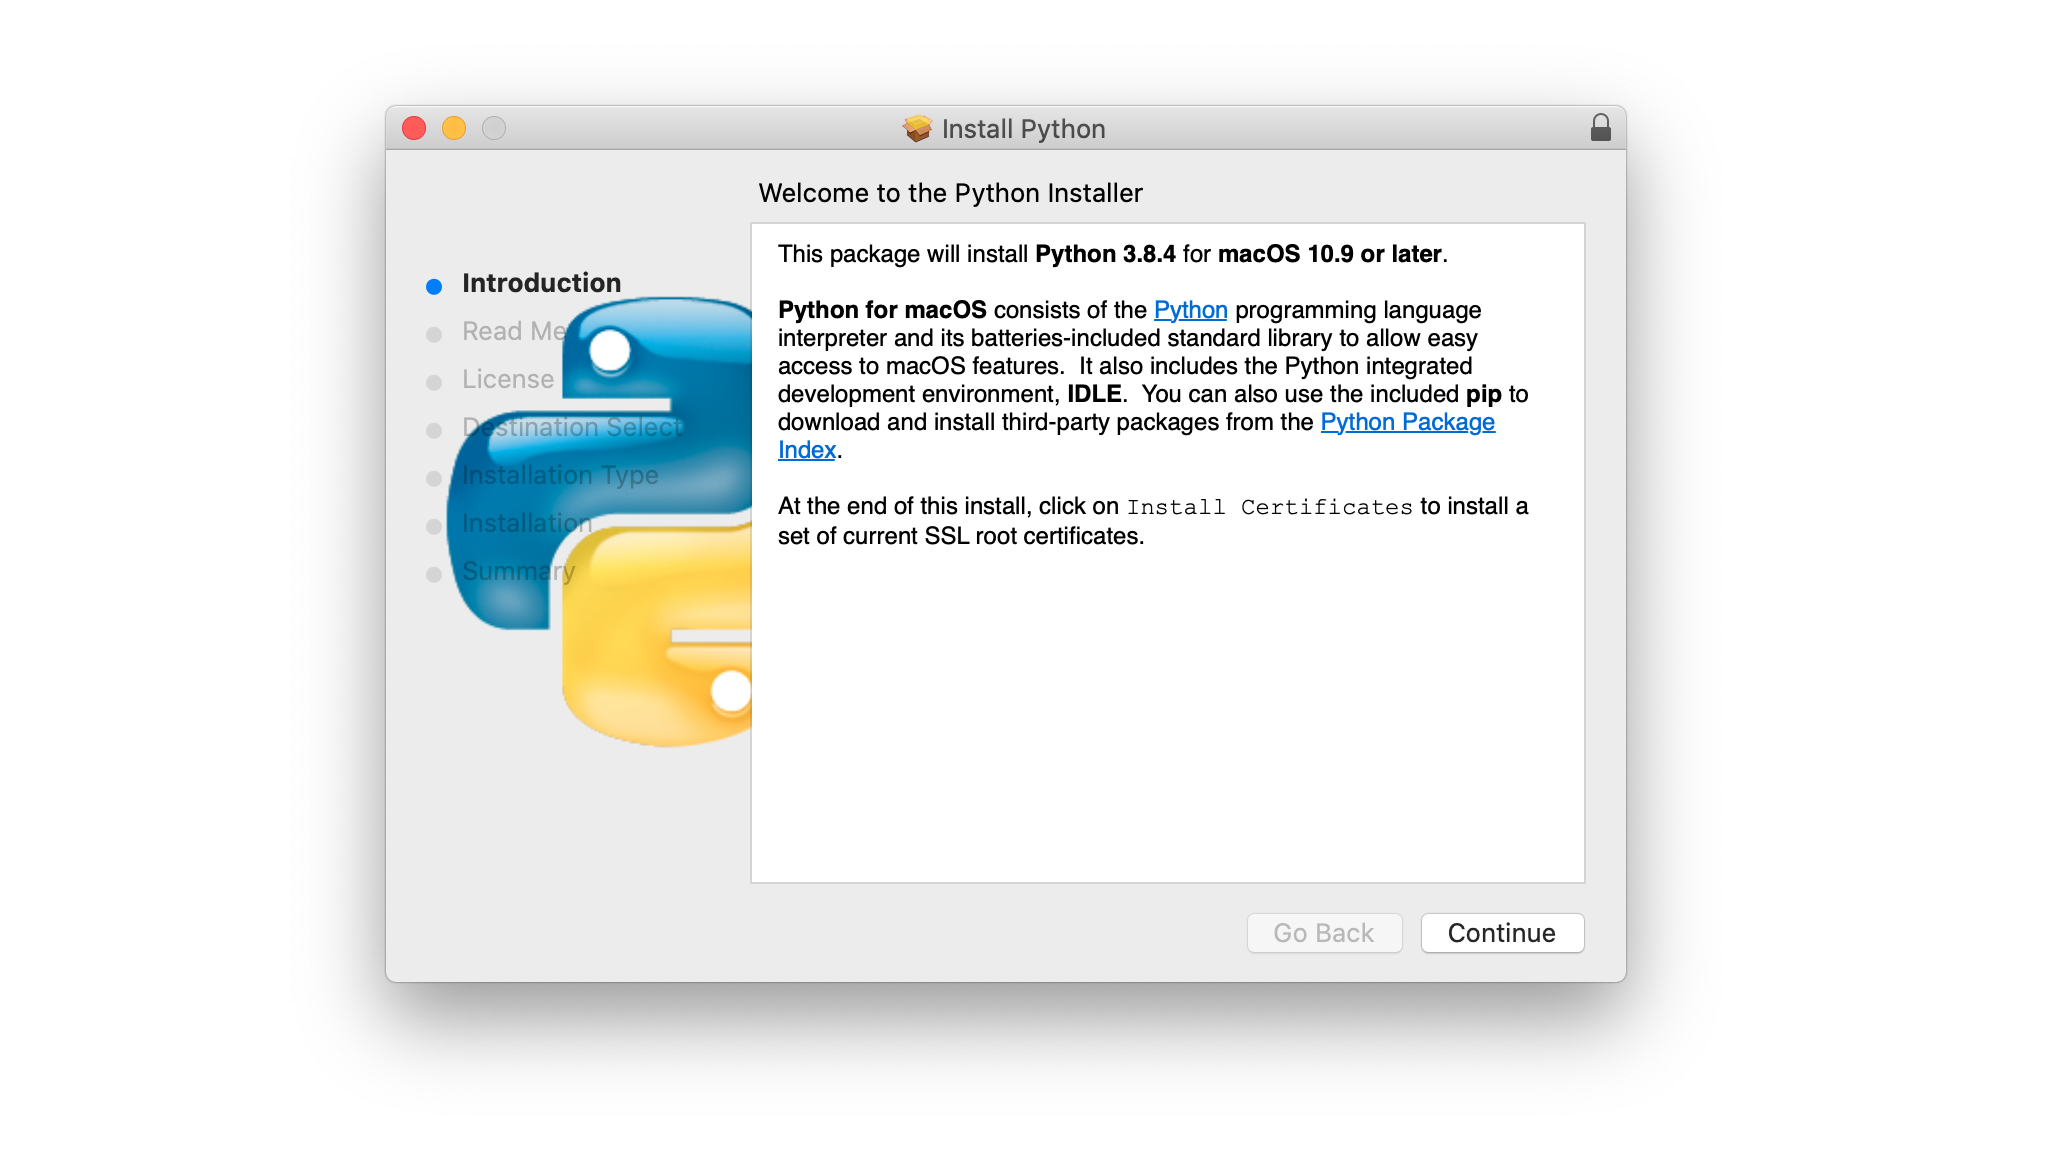
Follow these steps to complete the installation:
-
Press Continue a few times until you’re asked to agree to the software license agreement. Then click Agree.
-
You’ll be shown a window that tells you the install destination and how much space it will take. You most likely don’t want to change the default location, so go ahead and click Install to start the installation.
-
When the installer is finished copying files, click Close to close the installer window.
Congratulations—you now have the latest version of Python 3 on your macOS computer!
How to Install From Homebrew
For users who need to install from the command line, especially those who won’t be using Python to develop graphical user interfaces with the Tkinter module, the Homebrew package manager is a good option. You can install from the Homebrew package manager in two steps.
Step 1: Install Homebrew
If you already have Homebrew installed, then you can skip this step. If you don’t have Homebrew installed, then use the following procedure to install Homebrew:
-
Open a browser and navigate to http://brew.sh/.
-
You should see a command for installing Homebrew near the top of the page under the tile “Install Homebrew.” This command will be something like the following:
$ /bin/bash -c "$(curl -fsSL https://raw.githubusercontent.com/Homebrew/install/master/install.sh)"Highlight the command with your cursor and press Cmd+C to copy it to your clipboard.
-
Open a terminal window and paste the command, then press Enter. This will begin the Homebrew installation.
-
Enter your macOS user password when prompted.
Depending on your Internet connection, it may take a few minutes to download all of Homebrew’s required files. Once the installation is complete, you’ll end up back at the shell prompt in your terminal window.
Now that Homebrew is installed, you’re ready to install Python.
Step 2: Install Python
Follow these steps to complete the installation with Homebrew:
-
Open a terminal application.
-
Type in the following command to upgrade Homebrew:
$ brew update && brew upgrade
Installing with Homebrew is now as straightforward as running the command brew install python3. This will download and set up the latest version of Python on your machine.
You can make sure everything went correctly by testing if you can access Python from the terminal:
-
Open a terminal.
-
Type
pip3and press Enter. -
You should see the help text from Python’s
pippackage manager. If you get an error message runningpip3, then go through the install steps again to make sure you have a working installation.
Congratulations—you now have Python on your macOS system!
How to Install Python on Linux
There are two installation methods on Linux:
- Using your operating system’s package manager
- Building Python from source code
In this section, you’ll learn how to check which version of Python, if any, is on your Linux computer. You’ll also learn which of the two installation methods you should use.
How to Check Your Python Version on Linux
Many Linux distributions come packaged with Python, but it probably won’t be the latest version and may even be Python 2 instead of Python 3. You should check the version to make sure.
To find out which version of Python you have, open a terminal window and try the following commands:
# Check the system Python version
$ python --version

# Check the Python 2 version
$ python2 --version

# Check the Python 3 version
$ python3 --version
If you have Python on your machine, then one or more of these commands should respond with a version number.
For example, if you already had Python 3.6.10 on your computer, then the python3 --version command would display that version number:
$ python3 --version
Python 3.6.10
You’ll want to get the latest version of Python if your current version is in the Python 2.X series or is not the latest version of Python 3 available, which was 3.8.4 as of this writing.
What Your Options Are
There are two ways to install the official Python distribution on Linux:
-
Install from a package manager: This is the most common installation method on most Linux distributions. It involves running a command from the command line.
-
Build from source code: This method is more difficult than using a package manager. It involves running a series of commands from the command line as well as making sure you have the correct dependencies installed to compile the Python source code.
Not every Linux distribution has a package manager, and not every package manager has Python in its package repository. Depending on your operating system, building Python from source code might be your only option.
Which installation method you use mainly boils down to whether your Linux OS has a package manager and whether you need to control the details of the installation.
Linux Installation Recommendations
The most popular way to install Python on Linux is with your operating system’s package manager, which is a good choice for most users. However, depending on your Linux distribution, Python may not be available through a package manager. In this case, you’ll need to build Python from source code.
There are three main reasons that you might choose to build Python from source code:
-
You can’t download Python from your operating system’s package manager.
-
You need to control how Python gets compiled, such as when you want to lower the memory footprint on embedded systems.
-
You want to try out beta versions and release candidates of the latest and greatest version before it’s generally available.
To complete the installation on your Linux machine, find your Linux distribution below and follow the steps provided.
How to Install on Ubuntu and Linux Mint
In this section, you’ll learn how to install Python using Ubuntu’s apt package manager. If you’d like to build Python from source code, skip ahead to the How to Build Python From Source Code section.
Depending on the version of the Ubuntu distribution you run, the process for setting up Python on your system will vary. You can determine your local Ubuntu version by running the following command:
$ lsb_release -a
No LSB modules are available.
Distributor ID: Ubuntu
Description:    Ubuntu 16.04.4 LTS
Release:        16.04
Codename:       xenial
Follow the instructions below that match the version number you see under Release in the console output:
-
Ubuntu 18.04, Ubuntu 20.04 and above: Python 3.8 doesn’t come by default on Ubuntu 18.04 and above, but it is available in the Universe repository. To install version 3.8, open a terminal application and type the following commands:
$ sudo apt-get update
$ sudo apt-get install python3.8 python3-pip
Once the installation is complete, you can run Python 3.8 with the
python3.8command andpipwith thepip3command. -
Linux Mint and Ubuntu 17 and below: Python 3.8 isn’t in the Universe repository, so you need to get it from a Personal Package Archive (PPA). For example, to install from the “deadsnakes” PPA, use the following commands:
$ sudo add-apt-repository ppa:deadsnakes/ppa
$ sudo apt-get update
$ sudo apt-get install python3.8 python3-pip
Once the installation is complete, you can run Python 3.8 with the
python3.8command and runpipwith thepip3command.
Congratulations! You now have Python 3 set up on your machine!
How to Install on Debian Linux
Before you can install Python 3.8 on Debian, you’ll need to install the sudo command. To install it, execute the following commands in a terminal:
$ su
$ apt-get install sudo
$ sudo vim /etc/sudoers
After that, open the /etc/sudoers file using the sudo vim command or your favorite text editor. Add the following line of text to the end of the file, replacing your_username with your actual username:
your_username ALL=(ALL) ALL
Now you can skip ahead to the How to Build Python From Source Code section to finish installing Python.
How to Install on openSUSE
Building from source is the most reliable way to set up Python on openSUSE. To do that, you’ll need to install the development tools, which can be done in YaST via the menus or by using zypper:
$ sudo zypper install -t pattern devel_C_C
This might take a while to complete as it installs over 150 packages. Once it’s completed, skip ahead to the How to Build Python From Source Code section.
How to Install on CentOS and Fedora
Python 3.8 isn’t available in the CentOS and Fedora repositories, so you’ll have to build Python from source code. Before you compile Python, though, you need to make sure your system is prepared.
First, update the yum package manager:
Once yum finishes updating, you can install the necessary build dependencies with the following commands:
$ sudo yum -y groupinstall "Development Tools"
$ sudo yum -y install gcc openssl-devel bzip2-devel libffi-devel
When everything is finished installing, skip ahead to the How to Build Python From Source Code section.
How to Install on Arch Linux
Arch Linux is fairly diligent about keeping up with Python releases. It’s likely you already have the latest version. If not, use the following command to update Python:
When Python is finished updating, you should be all set!
How to Build Python From Source Code
Sometimes your Linux distribution doesn’t have the latest version of Python, or maybe you just want to be able to build the latest, greatest version yourself. Here are the steps you need to take to build Python from source:
Step 1: Download the Source Code
To start, you need to get the Python source code. Python.org makes this fairly straightforward. If you go to the Downloads page, then you’ll see the latest source for Python 3 at the top. Just make sure you don’t grab Legacy Python, Python 2!
When you select the Python 3 version, you’ll see a “Files” section at the bottom of the page. Select Gzipped source tarball and download it to your machine. If you prefer a command-line method, you can use wget to download the file to your current directory:
$ wget https://www.python.org/ftp/python/3.8.4/Python-3.8.4.tgz
When the tarball finishes downloading, there are a few things you’ll need to do to prepare your system for building Python.
Step 2: Prepare Your System
There are a few distro-specific steps involved in building Python from scratch. The goal of each step is the same on all distros, but you might need to translate to your distribution if it doesn’t use apt-get:
-
First, update your package manager and upgrade your packages:
$ sudo apt-get update $ sudo apt-get upgrade -
Next, make sure you have all of the build requirements installed:
# For apt-based systems (like Debian, Ubuntu, and Mint)
$ sudo apt-get install -y make build-essential libssl-dev zlib1g-dev
       libbz2-dev libreadline-dev libsqlite3-dev wget curl llvm
       libncurses5-dev libncursesw5-dev xz-utils tk-dev

# For yum-based systems (like CentOS)
$ sudo yum -y groupinstall "Development Tools"
$ sudo yum -y install gcc openssl-devel bzip2-devel libffi-devel
It’s fine if you already have some of the requirements installed on your system. You can execute the above commands and any existing packages will not be overwritten.
Now that your system is ready to go, it’s time to start building Python!
Step 3: Build Python
-
Once you have the prerequisites and the TAR file, you can unpack the source into a directory. Note that the following command will create a new directory called
Python-3.8.3under the one you’re in:$ tar xvf Python-3.8.4.tgz $ cd Python-3.8.4 -
Now you need to run the
./configuretool to prepare the build:$ ./configure --enable-optimizations --with-ensurepip=installThe
enable-optimizationsflag will enable some optimizations within Python to make it run about 10 percent faster. Doing this may add twenty or thirty minutes to the compilation time. Thewith-ensurepip=installflag will installpipbundled with this installation. -
Next, you build Python using
make. The-joption simply tellsmaketo split the building into parallel steps to speed up the compilation. Even with the parallel builds, this step can take several minutes: -
Finally, you’ll want to install your new version of Python. You’ll use the
altinstalltarget here to avoid overwriting the system Python. Since you’re installing into/usr/bin, you’ll need to run as root:
It might take a while to finish installation. Once it’s done, you can verify that Python is set up correctly.
Step 4: Verify Your Installation
Test that the python3.8 --version command returns the latest version:
$ python3.8 --version
Python 3.8.4
If you see Python 3.8.4, then you’re all set!
If you have some extra time on your hands, you can also run the test suite to make sure everything is working properly on your system.
To run the test suite, type the following command:
You’ll probably want to find something else to do for a while, as your computer will be running tests for some time. If all the tests pass, then you can be confident that your brand-new Python build is working as expected!
How to Install Python on iOS
The Pythonista app for iOS is a full-fledged Python development environment that you can run on your iPhone or iPad. It features a Python editor, technical documentation, and an interpreter all rolled into a single app.
Pythonista is surprisingly fun to use. It’s a great little tool when you’re stuck without a laptop and want to work on your Python skills on the go. It comes with the complete Python 3 standard library and even includes full documentation that you can browse offline.
To set up Pythonista, you need to download it from the iOS app store.
How to Install Python on Android
If you have an Android tablet or phone and want to practice Python on the go, there are several options available. The one that we found most reliably supports Python 3.8 is Pydroid 3.
Pydroid 3 features an interpreter that you can use for REPL sessions, and it also allows you to edit, save, and execute Python code.
You can download and install Pydroid 3 from the Google Play store. There is a free version and also a paid Premium version that supports code prediction and code analysis.
Online Python Interpreters
If you want to try out the examples in this tutorial without setting up Python on your machine, then there are several websites that offer an online Python interpreter:
- Python.org Online Console
- Repl.it
- Python Fiddle
- Trinket
- Python Anywhere
These cloud-based Python interpreters may not be able to execute some of the more complex examples in this tutorial, but they’re adequate for running most of the code and may be a nice way to get started. More information on using these sites is presented in the next tutorial in this series.
Conclusion
Congratulations! You now have access to the latest version of Python for your system. Your Python journey is just beginning.
In this tutorial you’ve learned how to:
- Check which version of Python, if any, is installed on your system
- Install the latest version of Python on Windows, macOS, and Linux
- Use Python on mobile devices like phones or tablets
- Use Python on the Web with online interpreters
You’re now ready to get started programming in Python! Be sure to share your progress and any questions you may have in the comments below.
Watch Now This tutorial has a related video course created by the Real Python team. Watch it together with the written tutorial to deepen your understanding: Python Basics: Setting Up Python
This document aims to give an overview of Windows-specific behaviour you should
know about when using Python on Microsoft Windows.
3.1. Installing Python
Unlike most Unix systems and services, Windows does not include a system
supported installation of Python. To make Python available, the CPython team
has compiled Windows installers (MSI packages) with every release for many years. These installers
are primarily intended to add a per-user installation of Python, with the
core interpreter and library being used by a single user. The installer is also
able to install for all users of a single machine, and a separate ZIP file is
available for application-local distributions.
3.1.1. Supported Versions
As specified in PEP 11, a Python release only supports a Windows platform
while Microsoft considers the platform under extended support. This means that
Python 3.6 supports Windows Vista and newer. If you require Windows XP
support then please install Python 3.4.
3.1.2. Installation Steps
Four Python 3.6 installers are available for download — two each for the
32-bit and 64-bit versions of the interpreter. The web installer is a small
initial download, and it will automatically download the required components as
necessary. The offline installer includes the components necessary for a
default installation and only requires an internet connection for optional
features. See Installing Without Downloading for other ways to avoid downloading
during installation.
After starting the installer, one of two options may be selected:
If you select “Install Now”:
- You will not need to be an administrator (unless a system update for the
C Runtime Library is required or you install the Python Launcher for Windows for all
users) - Python will be installed into your user directory
- The Python Launcher for Windows will be installed according to the option at the bottom
of the first page - The standard library, test suite, launcher and pip will be installed
- If selected, the install directory will be added to your
PATH - Shortcuts will only be visible for the current user
Selecting “Customize installation” will allow you to select the features to
install, the installation location and other options or post-install actions.
To install debugging symbols or binaries, you will need to use this option.
To perform an all-users installation, you should select “Customize
installation”. In this case:
- You may be required to provide administrative credentials or approval
- Python will be installed into the Program Files directory
- The Python Launcher for Windows will be installed into the Windows directory
- Optional features may be selected during installation
- The standard library can be pre-compiled to bytecode
- If selected, the install directory will be added to the system
PATH - Shortcuts are available for all users
3.1.3. Removing the MAX_PATH Limitation
Windows historically has limited path lengths to 260 characters. This meant that
paths longer than this would not resolve and errors would result.
In the latest versions of Windows, this limitation can be expanded to
approximately 32,000 characters. Your administrator will need to activate the
“Enable Win32 long paths” group policy, or set the registry value
HKEY_LOCAL_MACHINESYSTEMCurrentControlSetControlFileSystem@LongPathsEnabled
to 1.
This allows the open() function, the os module and most other
path functionality to accept and return paths longer than 260 characters when
using strings. (Use of bytes as paths is deprecated on Windows, and this feature
is not available when using bytes.)
After changing the above option, no further configuration is required.
Changed in version 3.6: Support for long paths was enabled in Python.
3.1.4. Installing Without UI
All of the options available in the installer UI can also be specified from the
command line, allowing scripted installers to replicate an installation on many
machines without user interaction. These options may also be set without
suppressing the UI in order to change some of the defaults.
To completely hide the installer UI and install Python silently, pass the
/quiet option. To skip past the user interaction but still display
progress and errors, pass the /passive option. The /uninstall
option may be passed to immediately begin removing Python — no prompt will be
displayed.
All other options are passed as name=value, where the value is usually
0 to disable a feature, 1 to enable a feature, or a path. The full list
of available options is shown below.
| Name | Description | Default |
|---|---|---|
| InstallAllUsers | Perform a system-wide installation. | 0 |
| TargetDir | The installation directory | Selected based on InstallAllUsers |
| DefaultAllUsersTargetDir | The default installation directory for all-user installs |
%ProgramFiles%Python X.Y or %ProgramFiles(x86)%Python X.Y |
| DefaultJustForMeTargetDir | The default install directory for just-for-me installs |
%LocalAppData%ProgramsPythonXY or%LocalAppData%ProgramsPythonXY-32 |
| DefaultCustomTargetDir | The default custom install directory displayed in the UI |
(empty) |
| AssociateFiles | Create file associations if the launcher is also installed. |
1 |
| CompileAll | Compile all .py files to.pyc. |
0 |
| PrependPath | Add install and Scripts directories tho PATH and .PY toPATHEXT |
0 |
| Shortcuts | Create shortcuts for the interpreter, documentation and IDLE if installed. |
1 |
| Include_doc | Install Python manual | 1 |
| Include_debug | Install debug binaries | 0 |
| Include_dev | Install developer headers and libraries |
1 |
| Include_exe | Install python.exe andrelated files |
1 |
| Include_launcher | Install Python Launcher for Windows. | 1 |
| InstallLauncherAllUsers | Installs Python Launcher for Windows for all users. |
1 |
| Include_lib | Install standard library and extension modules |
1 |
| Include_pip | Install bundled pip and setuptools | 1 |
| Include_symbols | Install debugging symbols (*.pdb) | 0 |
| Include_tcltk | Install Tcl/Tk support and IDLE | 1 |
| Include_test | Install standard library test suite | 1 |
| Include_tools | Install utility scripts | 1 |
| LauncherOnly | Only installs the launcher. This will override most other options. |
0 |
| SimpleInstall | Disable most install UI | 0 |
| SimpleInstallDescription | A custom message to display when the simplified install UI is used. |
(empty) |
For example, to silently install a default, system-wide Python installation,
you could use the following command (from an elevated command prompt):
python-3.6.0.exe /quiet InstallAllUsers=1 PrependPath=1 Include_test=0
To allow users to easily install a personal copy of Python without the test
suite, you could provide a shortcut with the following command. This will
display a simplified initial page and disallow customization:
python-3.6.0.exe InstallAllUsers=0 Include_launcher=0 Include_test=0
    SimpleInstall=1 SimpleInstallDescription="Just for me, no test suite."
(Note that omitting the launcher also omits file associations, and is only
recommended for per-user installs when there is also a system-wide installation
that included the launcher.)
The options listed above can also be provided in a file named unattend.xml
alongside the executable. This file specifies a list of options and values.
When a value is provided as an attribute, it will be converted to a number if
possible. Values provided as element text are always left as strings. This
example file sets the same options and the previous example:
<Options>
    <Option Name="InstallAllUsers" Value="no" />
    <Option Name="Include_launcher" Value="0" />
    <Option Name="Include_test" Value="no" />
    <Option Name="SimpleInstall" Value="yes" />
    <Option Name="SimpleInstallDescription">Just for me, no test suite</Option>
</Options>
3.1.5. Installing Without Downloading
As some features of Python are not included in the initial installer download,
selecting those features may require an internet connection. To avoid this
need, all possible components may be downloaded on-demand to create a complete
layout that will no longer require an internet connection regardless of the
selected features. Note that this download may be bigger than required, but
where a large number of installations are going to be performed it is very
useful to have a locally cached copy.
Execute the following command from Command Prompt to download all possible
required files. Remember to substitute python-3.6.0.exe for the actual
name of your installer, and to create layouts in their own directories to
avoid collisions between files with the same name.
python-3.6.0.exe /layout [optional target directory]
You may also specify the /quiet option to hide the progress display.
3.1.6. Modifying an install
Once Python has been installed, you can add or remove features through the
Programs and Features tool that is part of Windows. Select the Python entry and
choose “Uninstall/Change” to open the installer in maintenance mode.
“Modify” allows you to add or remove features by modifying the checkboxes —
unchanged checkboxes will not install or remove anything. Some options cannot be
changed in this mode, such as the install directory; to modify these, you will
need to remove and then reinstall Python completely.
“Repair” will verify all the files that should be installed using the current
settings and replace any that have been removed or modified.
“Uninstall” will remove Python entirely, with the exception of the
Python Launcher for Windows, which has its own entry in Programs and Features.
3.1.7. Other Platforms
With ongoing development of Python, some platforms that used to be supported
earlier are no longer supported (due to the lack of users or developers).
Check PEP 11 for details on all unsupported platforms.
- Windows CE is still supported.
- The Cygwin installer offers to install the Python
interpreter as well (cf. Cygwin package source, Maintainer releases)
See Python for Windows
for detailed information about platforms with pre-compiled installers.
3.2. Alternative bundles
Besides the standard CPython distribution, there are modified packages including
additional functionality. The following is a list of popular versions and their
key features:
- ActivePython
- Installer with multi-platform compatibility, documentation, PyWin32
- Anaconda
- Popular scientific modules (such as numpy, scipy and pandas) and the
condapackage manager. - Canopy
- A “comprehensive Python analysis environment” with editors and other
development tools. - WinPython
- Windows-specific distribution with prebuilt scientific packages and
tools for building packages.
Note that these packages may not include the latest versions of Python or
other libraries, and are not maintained or supported by the core Python team.
3.3. Configuring Python
To run Python conveniently from a command prompt, you might consider changing
some default environment variables in Windows. While the installer provides an
option to configure the PATH and PATHEXT variables for you, this is only
reliable for a single, system-wide installation. If you regularly use multiple
versions of Python, consider using the Python Launcher for Windows.
3.3.1. Excursus: Setting environment variables
Windows allows environment variables to be configured permanently at both the
User level and the System level, or temporarily in a command prompt.
To temporarily set environment variables, open Command Prompt and use the
set command:
C:>set PATH=C:Program FilesPython 3.6;%PATH%
C:>set PYTHONPATH=%PYTHONPATH%;C:My_python_lib
C:>python
These changes will apply to any further commands executed in that console, and
will be inherited by any applications started from the console.
Including the variable name within percent signs will expand to the existing
value, allowing you to add your new value at either the start or the end.
Modifying PATH by adding the directory containing
python.exe to the start is a common way to ensure the correct version
of Python is launched.
To permanently modify the default environment variables, click Start and search
for ‘edit environment variables’, or open System properties, Advanced
system settings and click the Environment Variables button.
In this dialog, you can add or modify User and System variables. To change
System variables, you need non-restricted access to your machine
(i.e. Administrator rights).
Note
Windows will concatenate User variables after System variables, which may
cause unexpected results when modifying PATH.
The PYTHONPATH variable is used by all versions of Python 2 and
Python 3, so you should not permanently configure this variable unless it
only includes code that is compatible with all of your installed Python
versions.
3.3.2. Finding the Python executable
Changed in version 3.5.
Besides using the automatically created start menu entry for the Python
interpreter, you might want to start Python in the command prompt. The
installer has an option to set that up for you.
On the first page of the installer, an option labelled “Add Python to PATH”
may be selected to have the installer add the install location into the
PATH. The location of the Scripts folder is also added.
This allows you to type python to run the interpreter, and
pip for the package installer. Thus, you can also execute your
scripts with command line options, see Command line documentation.
If you don’t enable this option at install time, you can always re-run the
installer, select Modify, and enable it. Alternatively, you can manually
modify the PATH using the directions in Excursus: Setting environment variables. You
need to set your PATH environment variable to include the directory
of your Python installation, delimited by a semicolon from other entries. An
example variable could look like this (assuming the first two entries already
existed):
C:WINDOWSsystem32;C:WINDOWS;C:Program FilesPython 3.6
3.4. Python Launcher for Windows
New in version 3.3.
The Python launcher for Windows is a utility which aids in locating and
executing of different Python versions. It allows scripts (or the
command-line) to indicate a preference for a specific Python version, and
will locate and execute that version.
Unlike the PATH variable, the launcher will correctly select the most
appropriate version of Python. It will prefer per-user installations over
system-wide ones, and orders by language version rather than using the most
recently installed version.
3.4.1. Getting started
3.4.1.1. From the command-line
Changed in version 3.6.
System-wide installations of Python 3.3 and later will put the launcher on your
PATH. The launcher is compatible with all available versions of
Python, so it does not matter which version is installed. To check that the
launcher is available, execute the following command in Command Prompt:
You should find that the latest version of Python you have installed is
started — it can be exited as normal, and any additional command-line
arguments specified will be sent directly to Python.
If you have multiple versions of Python installed (e.g., 2.7 and 3.6) you
will have noticed that Python 3.6 was started — to launch Python 2.7, try
the command:
If you want the latest version of Python 2.x you have installed, try the
command:
You should find the latest version of Python 2.x starts.
If you see the following error, you do not have the launcher installed:
'py' is not recognized as an internal or external command,
operable program or batch file.
Per-user installations of Python do not add the launcher to PATH
unless the option was selected on installation.
3.4.1.2. Virtual environments
New in version 3.5.
If the launcher is run with no explicit Python version specification, and a
virtual environment (created with the standard library venv module or
the external virtualenv tool) active, the launcher will run the virtual
environment’s interpreter rather than the global one. To run the global
interpreter, either deactivate the virtual environment, or explicitly specify
the global Python version.
3.4.1.3. From a script
Let’s create a test Python script — create a file called hello.py with the
following contents
#! python
import sys
sys.stdout.write("hello from Python %sn" % (sys.version,))
From the directory in which hello.py lives, execute the command:
You should notice the version number of your latest Python 2.x installation
is printed. Now try changing the first line to be:
Re-executing the command should now print the latest Python 3.x information.
As with the above command-line examples, you can specify a more explicit
version qualifier. Assuming you have Python 2.6 installed, try changing the
first line to #! python2.6 and you should find the 2.6 version
information printed.
Note that unlike interactive use, a bare “python” will use the latest
version of Python 2.x that you have installed. This is for backward
compatibility and for compatibility with Unix, where the command python
typically refers to Python 2.
3.4.1.4. From file associations
The launcher should have been associated with Python files (i.e. .py,
.pyw, .pyc files) when it was installed. This means that
when you double-click on one of these files from Windows explorer the launcher
will be used, and therefore you can use the same facilities described above to
have the script specify the version which should be used.
The key benefit of this is that a single launcher can support multiple Python
versions at the same time depending on the contents of the first line.
3.4.2. Shebang Lines
If the first line of a script file starts with #!, it is known as a
“shebang” line. Linux and other Unix like operating systems have native
support for such lines and they are commonly used on such systems to indicate
how a script should be executed. This launcher allows the same facilities to
be used with Python scripts on Windows and the examples above demonstrate their
use.
To allow shebang lines in Python scripts to be portable between Unix and
Windows, this launcher supports a number of ‘virtual’ commands to specify
which interpreter to use. The supported virtual commands are:
/usr/bin/env python/usr/bin/python/usr/local/bin/pythonpython
For example, if the first line of your script starts with
The default Python will be located and used. As many Python scripts written
to work on Unix will already have this line, you should find these scripts can
be used by the launcher without modification. If you are writing a new script
on Windows which you hope will be useful on Unix, you should use one of the
shebang lines starting with /usr.
Any of the above virtual commands can be suffixed with an explicit version
(either just the major version, or the major and minor version) — for example
/usr/bin/python2.7 — which will cause that specific version to be located
and used.
The /usr/bin/env form of shebang line has one further special property.
Before looking for installed Python interpreters, this form will search the
executable PATH for a Python executable. This corresponds to the
behaviour of the Unix env program, which performs a PATH search.
3.4.3. Arguments in shebang lines
The shebang lines can also specify additional options to be passed to the
Python interpreter. For example, if you have a shebang line:
Then Python will be started with the -v option
3.4.4. Customization
3.4.4.1. Customization via INI files
Two .ini files will be searched by the launcher — py.ini in the current
user’s “application data” directory (i.e. the directory returned by calling the
Windows function SHGetFolderPath with CSIDL_LOCAL_APPDATA) and py.ini in the
same directory as the launcher. The same .ini files are used for both the
‘console’ version of the launcher (i.e. py.exe) and for the ‘windows’ version
(i.e. pyw.exe)
Customization specified in the “application directory” will have precedence over
the one next to the executable, so a user, who may not have write access to the
.ini file next to the launcher, can override commands in that global .ini file)
3.4.4.2. Customizing default Python versions
In some cases, a version qualifier can be included in a command to dictate
which version of Python will be used by the command. A version qualifier
starts with a major version number and can optionally be followed by a period
(‘.’) and a minor version specifier. If the minor qualifier is specified, it
may optionally be followed by “-32” to indicate the 32-bit implementation of
that version be used.
For example, a shebang line of #!python has no version qualifier, while
#!python3 has a version qualifier which specifies only a major version.
If no version qualifiers are found in a command, the environment variable
PY_PYTHON can be set to specify the default version qualifier — the default
value is “2”. Note this value could specify just a major version (e.g. “2”) or
a major.minor qualifier (e.g. “2.6”), or even major.minor-32.
If no minor version qualifiers are found, the environment variable
PY_PYTHON{major} (where {major} is the current major version qualifier
as determined above) can be set to specify the full version. If no such option
is found, the launcher will enumerate the installed Python versions and use
the latest minor release found for the major version, which is likely,
although not guaranteed, to be the most recently installed version in that
family.
On 64-bit Windows with both 32-bit and 64-bit implementations of the same
(major.minor) Python version installed, the 64-bit version will always be
preferred. This will be true for both 32-bit and 64-bit implementations of the
launcher — a 32-bit launcher will prefer to execute a 64-bit Python installation
of the specified version if available. This is so the behavior of the launcher
can be predicted knowing only what versions are installed on the PC and
without regard to the order in which they were installed (i.e., without knowing
whether a 32 or 64-bit version of Python and corresponding launcher was
installed last). As noted above, an optional “-32” suffix can be used on a
version specifier to change this behaviour.
Examples:
- If no relevant options are set, the commands
pythonand
python2will use the latest Python 2.x version installed and
the commandpython3will use the latest Python 3.x installed. - The commands
python3.1andpython2.7will not consult any
options at all as the versions are fully specified. - If
PY_PYTHON=3, the commandspythonandpython3will both use
the latest installed Python 3 version. - If
PY_PYTHON=3.1-32, the commandpythonwill use the 32-bit
implementation of 3.1 whereas the commandpython3will use the latest
installed Python (PY_PYTHON was not considered at all as a major
version was specified.) - If
PY_PYTHON=3andPY_PYTHON3=3.1, the commands
pythonandpython3will both use specifically 3.1
In addition to environment variables, the same settings can be configured
in the .INI file used by the launcher. The section in the INI file is
called [defaults] and the key name will be the same as the
environment variables without the leading PY_ prefix (and note that
the key names in the INI file are case insensitive.) The contents of
an environment variable will override things specified in the INI file.
For example:
- Setting
PY_PYTHON=3.1is equivalent to the INI file containing:
- Setting
PY_PYTHON=3andPY_PYTHON3=3.1is equivalent to the INI file
containing:
[defaults]
python=3
python3=3.1
3.4.5. Diagnostics
If an environment variable PYLAUNCH_DEBUG is set (to any value), the
launcher will print diagnostic information to stderr (i.e. to the console).
While this information manages to be simultaneously verbose and terse, it
should allow you to see what versions of Python were located, why a
particular version was chosen and the exact command-line used to execute the
target Python.
3.5. Finding modules
Python usually stores its library (and thereby your site-packages folder) in the
installation directory. So, if you had installed Python to
C:Python, the default library would reside in
C:PythonLib and third-party modules should be stored in
C:PythonLibsite-packages.
To completely override sys.path, create a ._pth file with the same
name as the DLL (python36._pth) or the executable (python._pth) and
specify one line for each path to add to sys.path. The file based on the
DLL name overrides the one based on the executable, which allows paths to be
restricted for any program loading the runtime if desired.
When the file exists, all registry and environment variables are ignored,
isolated mode is enabled, and site is not imported unless one line in the
file specifies import site. Blank paths and lines starting with # are
ignored. Each path may be absolute or relative to the location of the file.
Import statements other than to site are not permitted, and arbitrary code
cannot be specified.
Note that .pth files (without leading underscore) will be processed normally
by the site module.
When no ._pth file is found, this is how sys.path is populated on
Windows:
- An empty entry is added at the start, which corresponds to the current
directory. - If the environment variable
PYTHONPATHexists, as described in
Environment variables, its entries are added next. Note that on Windows,
paths in this variable must be separated by semicolons, to distinguish them
from the colon used in drive identifiers (C:etc.). - Additional “application paths” can be added in the registry as subkeys of
SOFTWAREPythonPythonCoreversionPythonPathunder both the
HKEY_CURRENT_USERandHKEY_LOCAL_MACHINEhives. Subkeys which have
semicolon-delimited path strings as their default value will cause each path
to be added tosys.path. (Note that all known installers only use
HKLM, so HKCU is typically empty.) - If the environment variable
PYTHONHOMEis set, it is assumed as
“Python Home”. Otherwise, the path of the main Python executable is used to
locate a “landmark file” (eitherLibos.pyorpythonXY.zip) to deduce
the “Python Home”. If a Python home is found, the relevant sub-directories
added tosys.path(Lib,plat-win, etc) are based on that
folder. Otherwise, the core Python path is constructed from the PythonPath
stored in the registry. - If the Python Home cannot be located, no
PYTHONPATHis specified in
the environment, and no registry entries can be found, a default path with
relative entries is used (e.g..Lib;.plat-win, etc).
If a pyvenv.cfg file is found alongside the main executable or in the
directory one level above the executable, the following variations apply:
- If
homeis an absolute path andPYTHONHOMEis not set, this
path is used instead of the path to the main executable when deducing the
home location.
The end result of all this is:
- When running
python.exe, or any other .exe in the main Python
directory (either an installed version, or directly from the PCbuild
directory), the core path is deduced, and the core paths in the registry are
ignored. Other “application paths” in the registry are always read. - When Python is hosted in another .exe (different directory, embedded via COM,
etc), the “Python Home” will not be deduced, so the core path from the
registry is used. Other “application paths” in the registry are always read. - If Python can’t find its home and there are no registry value (frozen .exe,
some very strange installation setup) you get a path with some default, but
relative, paths.
For those who want to bundle Python into their application or distribution, the
following advice will prevent conflicts with other installations:
- Include a
._pthfile alongside your executable containing the
directories to include. This will ignore paths listed in the registry and
environment variables, and also ignoresiteunlessimport siteis
listed. - If you are loading
python3.dllorpython36.dllin your own
executable, explicitly callPy_SetPath()or (at least)
Py_SetProgramName()beforePy_Initialize(). - Clear and/or overwrite
PYTHONPATHand setPYTHONHOME
before launchingpython.exefrom your application. - If you cannot use the previous suggestions (for example, you are a
distribution that allows people to runpython.exedirectly), ensure
that the landmark file (Libos.py) exists in your install directory.
(Note that it will not be detected inside a ZIP file, but a correctly named
ZIP file will be detected instead.)
These will ensure that the files in a system-wide installation will not take
precedence over the copy of the standard library bundled with your application.
Otherwise, your users may experience problems using your application. Note that
the first suggestion is the best, as the other may still be susceptible to
non-standard paths in the registry and user site-packages.
Changed in version 3.6:
- Adds
._pthfile support and removesapplocaloption from
pyvenv.cfg.- Adds
pythonXX.zipas a potential landmark when directly adjacent
to the executable.
Deprecated since version 3.6:
Modules specified in the registry under
Modules(notPythonPath)
may be imported byimportlib.machinery.WindowsRegistryFinder.
This finder is enabled on Windows in 3.6.0 and earlier, but may need to
be explicitly added tosys.meta_pathin the future.
3.6. Additional modules
Even though Python aims to be portable among all platforms, there are features
that are unique to Windows. A couple of modules, both in the standard library
and external, and snippets exist to use these features.
The Windows-specific standard modules are documented in
MS Windows Specific Services.
3.6.1. PyWin32
The PyWin32 module by Mark Hammond
is a collection of modules for advanced Windows-specific support. This includes
utilities for:
- Component Object Model (COM)
- Win32 API calls
- Registry
- Event log
- Microsoft Foundation Classes (MFC)
user interfaces
PythonWin is a sample MFC application
shipped with PyWin32. It is an embeddable IDE with a built-in debugger.
3.6.2. cx_Freeze
cx_Freeze is a distutils
extension (see Extending Distutils) which wraps Python scripts into
executable Windows programs (*.exe files). When you have done this,
you can distribute your application without requiring your users to install
Python.
3.6.3. WConio
Since Python’s advanced terminal handling layer, curses, is restricted to
Unix-like systems, there is a library exclusive to Windows as well: Windows
Console I/O for Python.
WConio is a wrapper for
Turbo-C’s CONIO.H, used to create text user interfaces.
3.7. Compiling Python on Windows
If you want to compile CPython yourself, first thing you should do is get the
source. You can download either the
latest release’s source or just grab a fresh checkout.
The source tree contains a build solution and project files for Microsoft
Visual Studio 2015, which is the compiler used to build the official Python
releases. These files are in the PCbuild directory.
Check PCbuild/readme.txt for general information on the build process.
For extension modules, consult Building C and C++ Extensions on Windows.
3.8. Embedded Distribution
New in version 3.5.
The embedded distribution is a ZIP file containing a minimal Python environment.
It is intended for acting as part of another application, rather than being
directly accessed by end-users.
When extracted, the embedded distribution is (almost) fully isolated from the
user’s system, including environment variables, system registry settings, and
installed packages. The standard library is included as pre-compiled and
optimized .pyc files in a ZIP, and python3.dll, python36.dll,
python.exe and pythonw.exe are all provided. Tcl/tk (including all
dependants, such as Idle), pip and the Python documentation are not included.
Note
The embedded distribution does not include the Microsoft C Runtime and it is
the responsibility of the application installer to provide this. The
runtime may have already been installed on a user’s system previously or
automatically via Windows Update, and can be detected by finding
ucrtbase.dll in the system directory.
Third-party packages should be installed by the application installer alongside
the embedded distribution. Using pip to manage dependencies as for a regular
Python installation is not supported with this distribution, though with some
care it may be possible to include and use pip for automatic updates. In
general, third-party packages should be treated as part of the application
(“vendoring”) so that the developer can ensure compatibility with newer
versions before providing updates to users.
The two recommended use cases for this distribution are described below.
3.8.1. Python Application
An application written in Python does not necessarily require users to be aware
of that fact. The embedded distribution may be used in this case to include a
private version of Python in an install package. Depending on how transparent it
should be (or conversely, how professional it should appear), there are two
options.
Using a specialized executable as a launcher requires some coding, but provides
the most transparent experience for users. With a customized launcher, there are
no obvious indications that the program is running on Python: icons can be
customized, company and version information can be specified, and file
associations behave properly. In most cases, a custom launcher should simply be
able to call Py_Main with a hard-coded command line.
The simpler approach is to provide a batch file or generated shortcut that
directly calls the python.exe or pythonw.exe with the required
command-line arguments. In this case, the application will appear to be Python
and not its actual name, and users may have trouble distinguishing it from other
running Python processes or file associations.
With the latter approach, packages should be installed as directories alongside
the Python executable to ensure they are available on the path. With the
specialized launcher, packages can be located in other locations as there is an
opportunity to specify the search path before launching the application.
3.8.2. Embedding Python
Applications written in native code often require some form of scripting
language, and the embedded Python distribution can be used for this purpose. In
general, the majority of the application is in native code, and some part will
either invoke python.exe or directly use python3.dll. For either case,
extracting the embedded distribution to a subdirectory of the application
installation is sufficient to provide a loadable Python interpreter.
As with the application use, packages can be installed to any location as there
is an opportunity to specify search paths before initializing the interpreter.
Otherwise, there is no fundamental differences between using the embedded
distribution and a regular installation.
3.9. Other resources
January 13, 2022
Tutorial: Installing Python on Windows

Python is a popular open-source, high-level programming language. It’s intuitive, and it offers many helpful tools and libraries — Python is a powerful data science asset to have in your toolkit. To start working with Python, we first need to download it and install it on our operating system (in this case, Windows).
There are two main ways of installing Python on Windows: installation from the official Python website or from Anaconda, a convenient distribution of Python and R programming languages. Choose the first option if you are a programmer using Python for various purposes: creating websites, network programming, developing software applications. If instead, your work is focused on data science and machine learning, then Anaconda is the best choice for you. Essentially, Anaconda is a powerful data science platform that provides more than 1500 built-in Python and R data science packages — and also the most popular Python IDEs. With Anaconda, you can choose to use the graphical user interface (GUI) instead of the command line. Also, it is adapted for processing large amounts of data, easily working with different environments and applications, and managing the package versions.
Check if Python is already installed
Before starting the installation process, we want to check if Python is already installed on your computer (e.g., by a previous user), and if so, which version of Python. To do so, open the command line application Command Prompt (in Windows search, type cmd and press Enter) or Windows PowerShell (right-click on the Start button and select Windows PowerShell) and type there python -V. If you found that Python is already installed on your computer and want to check the path of the installation, run where.exe python in the command line application.
Install Python on Windows from the official Python website
If you see that Python isn’t installed, you can use the official Python website to install it.
Step 1. Open the Python Releases for Windows page, select Python version, and download Python executable installer

Here you can choose whether to download Python 2 or Python 3 (or both). Later, we will discuss in more detail the technical steps of downloading and installing both Python 2 and Python 3, but first, let’s determine which of them (or both) you really need.
Python 3 is a more recent version of Python released in 2008 and designed to fix the issues in Python 2. In comparison to Python 2, Python 3 has a simpler and more intuitive syntax, it offers a wide range of useful libraries (especially for data science), and a large community of Python developers maintain it. In contrast, Python 2 is no longer supported. Hence, downloading the latest Python 3 release is generally the best choice if you aren’t certain which version to use. You will most likely need only Python 3 if you’re going to work with new projects.
However, in some cases, you may also need Python 2. For example, if some of your company’s projects are written in Python 2, which is incompatible with Python 3, you might have to run older scripts. Also, sometimes, you may want to use a Python package that hasn’t been updated in Python 3. In such situations, You’ll need Python 2.
If you select the latest Python 2 release to download, choose Windows x86-64 MSI installer, which will identify your Windows version (32-bit or 64-bit) automatically:
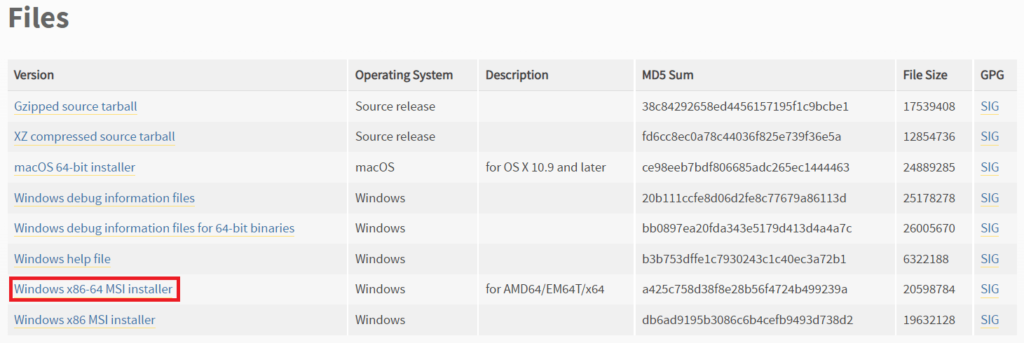
To download the latest Python 3 release, you have to manually choose the installer that suits your Windows version:

Step 2. Run the installer
Let’s follow this process step-by-step separately for Python 2 and Python 3. Remember that, depending on your needs, you can install either one of them or both of them. It will cause no issues, and you will always be able to choose which Python version to work in.
Python 2.
Run the downloaded executable file for Python 2 that you will find in your Downloads folder. Select at each step the following options:
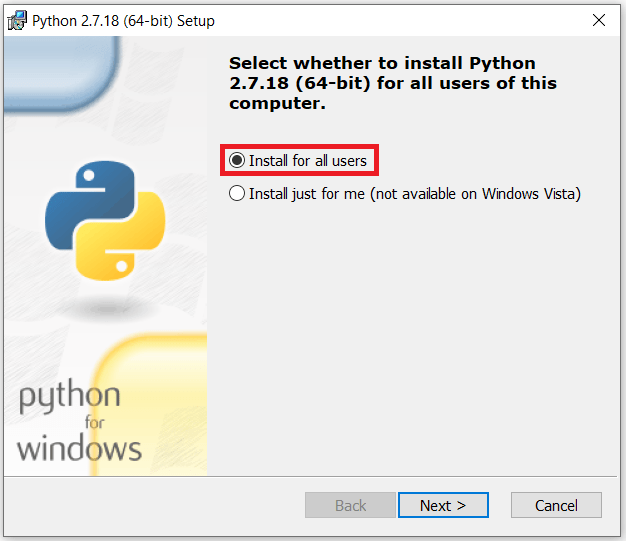
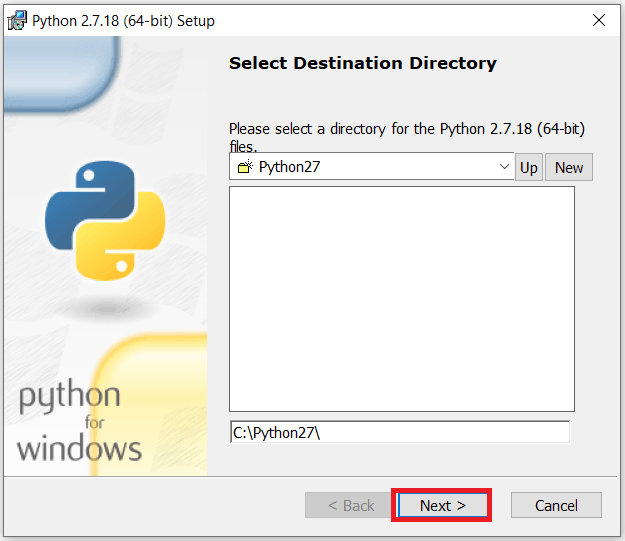

After that, just confirm everything at each pop-up window to complete the installation.
Now you have the latest Python 2 release successfully installed.
Python 3.
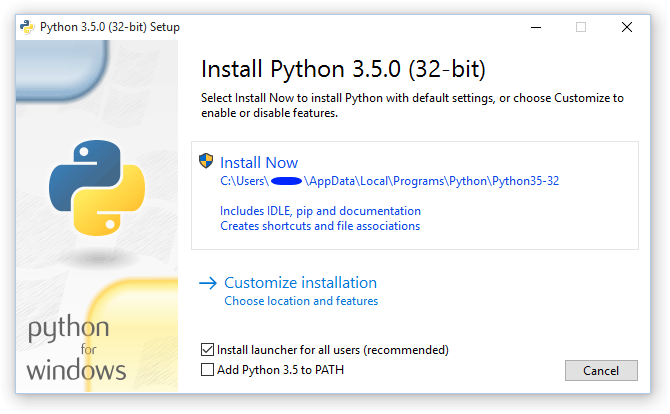
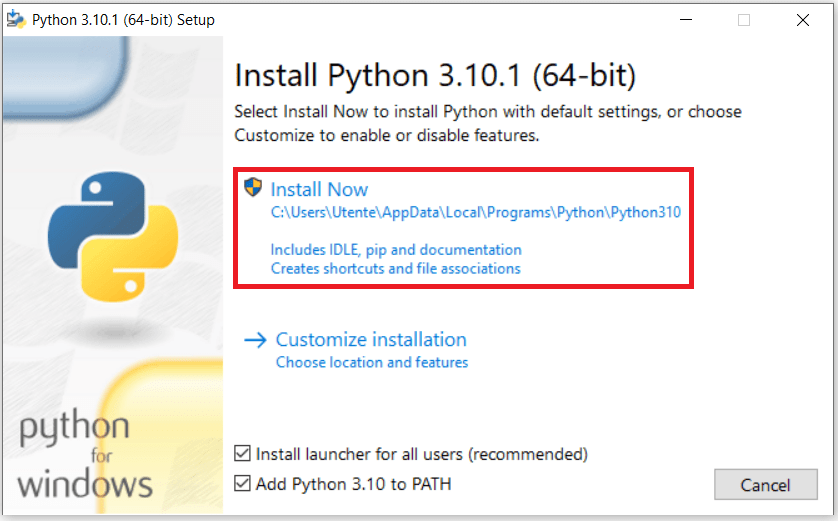
Download installer for Python 3, and find it in your Downloads folder. On the first pop-up window, select both checkboxes at the bottom to enable adding Python to your path in Windows automatically. Then select Install Now:

The installation process can take a few minutes. Then, in the next window, select Disable path length limit to avoid potential issues with long path names in the future:

The latest Python 3 release has been installed on your computer.
Step 3. Verify if Python was successfully installed on Windows
If you installed only one version of Python, open the command line and run python -V. If you installed both Python 2 and Python 3, you have to make a small adjustment that we will discuss in the following (optional) step.
Step 4 (only if you installed both Python 2 and Python 3). Reassign system variables
This step is necessary for being able to easily access both Python versions from the command line.
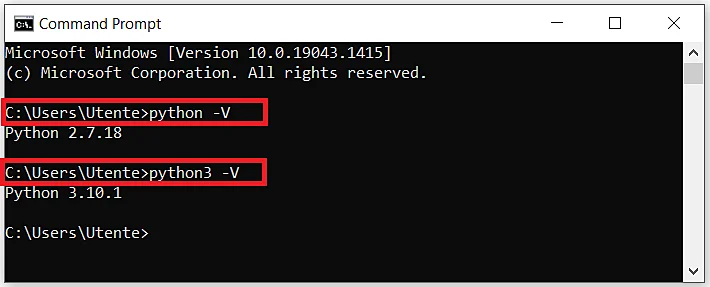
If you now run python in the command line, you will see only the version of Python 2 (in our case, Python 2.7.18). It happened because, even though you enabled the system path for both Python versions, the installers were saved as the variable sets of different levels of the path: system level (Python 2) and user level (Python 3). In such cases, priority is given to the system path, hence to Python 2. You can verify it by exploring the environment variables of Windows: in Windows search, type advanced system settings, select View advanced system settings, open the Advanced tab, click the Environment Variables button. In the pop-up window, you will see that Python 3 is related to the user variables, while Python 2 is related to the system variables:

To fix this issue, you can assign different access to Python 3: python3 instead of just python:
- Open the
File Explorerapp in Windows search, and find the folder where you installed Python 3. By default, the path should be the following: C:UsersusernameAppDataLocalProgramsPythonPython310 - Make a copy of the
python.exefile, and rename this copy aspython3.exe:

- Re-open the command line.
- Now, you can return to Step 3 and verify the Python version for both Python 2 and Python 3:
Install Python on Windows from Anaconda Navigator
Instead of the full installer from the official Python website, you can use open-source Anaconda Navigator, a popular Python and R distribution for data science and machine learning tasks.
Step 1. Open the official Anaconda website, and select Individual Edition in the menu of Products

Step 2. Download the installer
The system will automatically suggest the most suitable package for your operating system (Windows):

Step 3. Run the installer
Find the downloaded installer for Anaconda in your Downloads folder, and run it:

During the installation process leave all the options as default on all the screens. In one of the windows, though, you can decide to change the installation location, but it is generally best to leave it as it is:

The installation process can take a few minutes.
Now Anaconda has been successfully installed on your computer.
How to run your first Python code on Windows
Now that you have installed Python, whether from the official Python website or using Anaconda Navigator, you’re ready to run your first Python code.
If you installed Python from the official Python website
Type idle in Windows search, and select the necessary version of IDLE (in the case you installed different Python versions, there will be corresponding versions of IDLE):
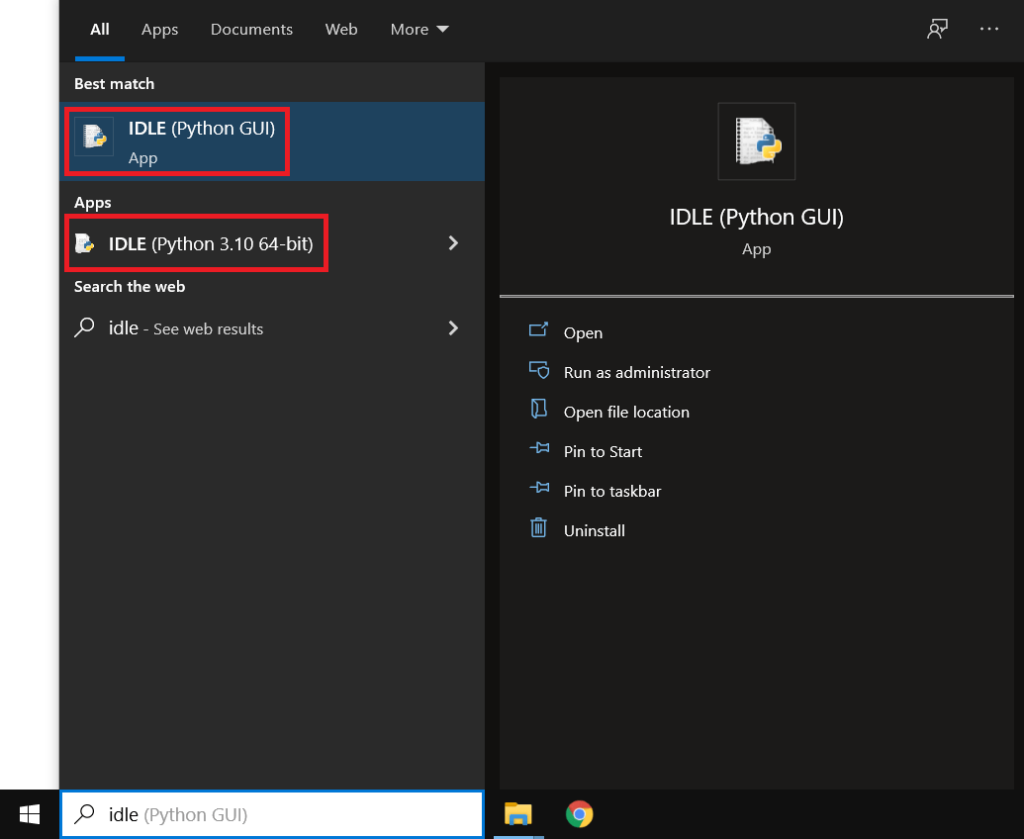
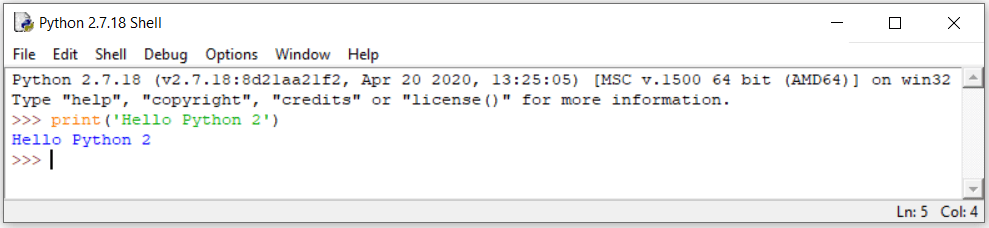
Now you can start coding, even in parallel in different Python versions:

If you installed Python from Anaconda Individual Edition
- Type
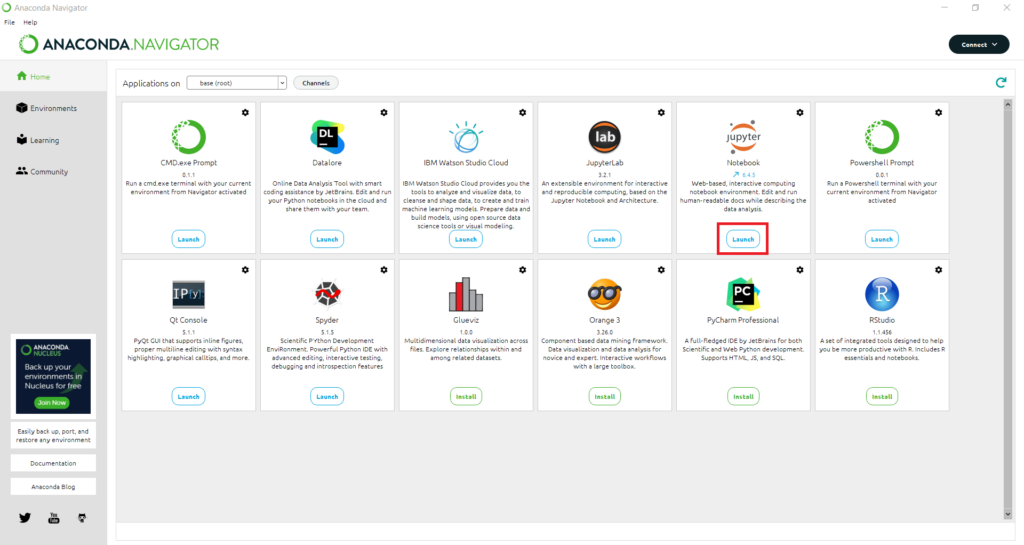
anacondain Windows search, and openAnaconda Navigator:

- Choose from many applications the most suitable one for your purposes. For example, you can opt for Jupyter Notebook, a popular data science application for creating and sharing documents combining code, charts, and storytelling:
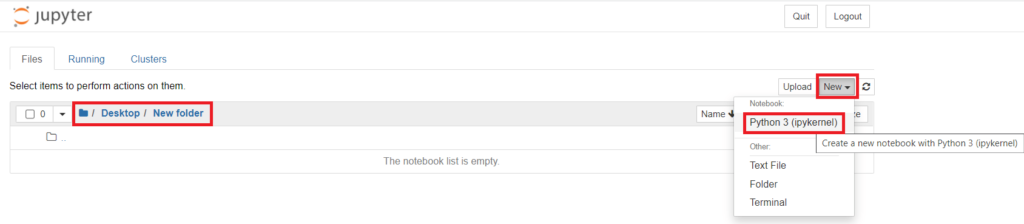
- Navigate to the folder where you are going to save your code, and create a new Python notebook:
- Start coding:

How to update Python to the latest version on Windows
If you installed Python from the official Python website
Just as you did when initially installing Python, open the Python Releases for Windows page, select the latest Python release, download and run the suitable installer.
If the latest release is just a new Python patch of the same major version as your current version (e.g., 3.9.8 and 3.9.9), you will see the following option in the pop-up window:

In this case, the latest Python version will be installed on your computer, and the previous version will be removed. You need to restart your machine afterward.
If the latest release is a new major version of Python with respect to your current version (e.g., 3.9 and 3.10), you will see the same option as on the initial installation:
In this case, the latest Python release will be installed on your computer but also the previous version will remain. If necessary, you can uninstall it manually using the Control Panel.
If you installed Python from Anaconda Individual Edition
Type anaconda in Windows search, and open Anaconda Prompt. To update the Python version for the base (root) environment to the latest Python version available for the current Anaconda release, run conda update python.
(Side note: You may need first to update Anaconda itself to the latest version, by running conda update conda.)
In the snapshot below, you can see that after updating the Python version on Anaconda to the latest version, nothing actually changed: the version remained 3.9.7, instead of being updated to the latest (currently) Python version 3.10.1:
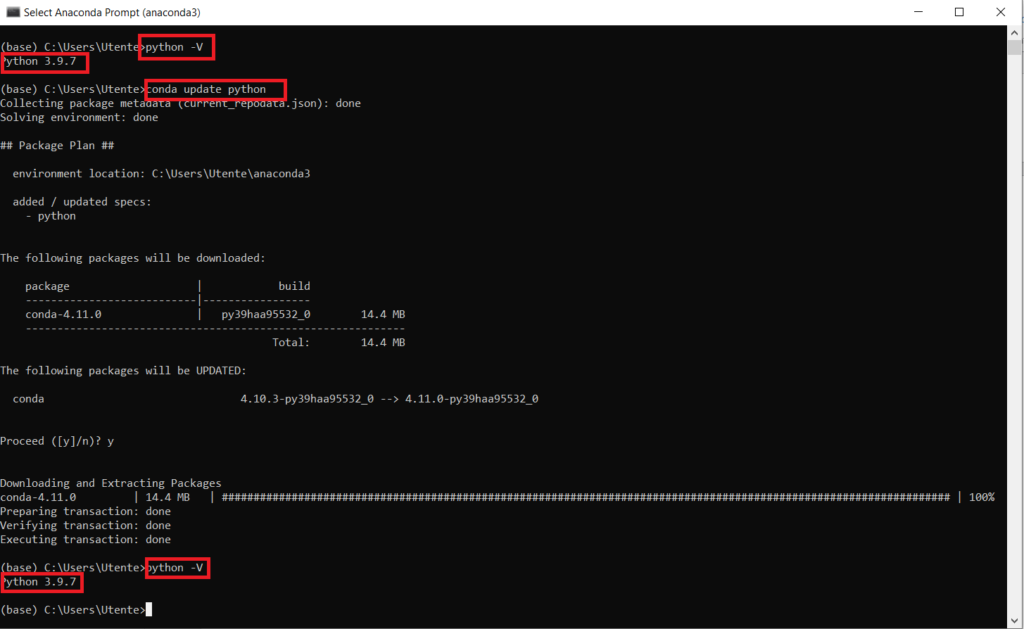
This happened because Python 3.9.7 is the latest possible Python version available for the current Anaconda release.
You can wait for the next Anaconda release, or consider creating a new virtual environment on Anaconda:
conda create -n python10 python=3.10
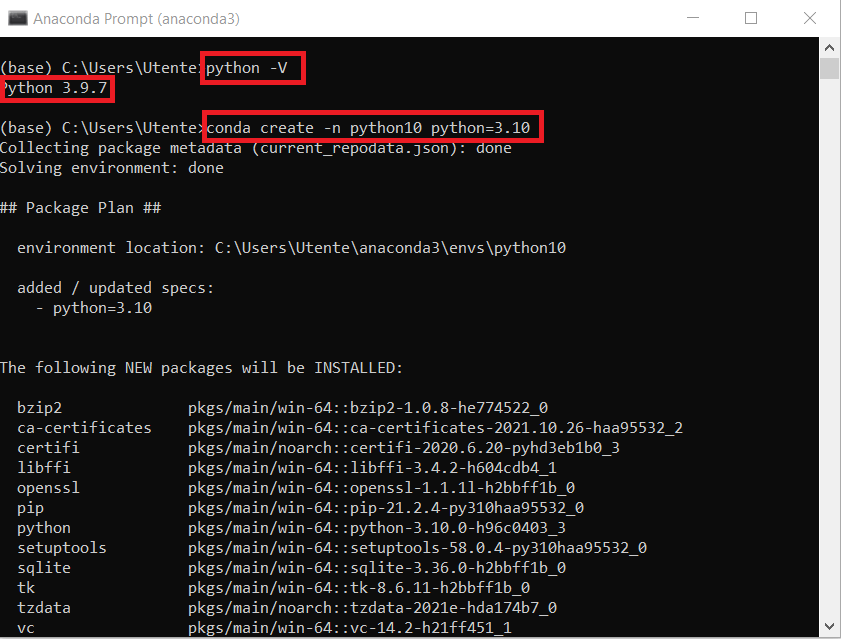
Above, you created a virtual Anaconda environment called python10 (feel free to give it any other name), with the official latest version Python 3.10.
Now, to be able to work in this environment, you have to activate it, running conda activate python10:

Notice how the name of the active environment changed from base to python10. Also, notice that if you check the Python version, you will see that it has been updated to Python 3.10.0.
Unfortunately, it isn’t possible to specify the exact patch of the latest version when creating a new virtual environment (meaning that you can only write python=3.10 and not python=3.10.1).
You can continue coding in Python 3.10.0 in the created virtual environment from the command line. Alternatively, since Anaconda is, first of all, a convenient GUI Interface, you can go again to Anaconda Navigator, select the new environment, install any applications you need (if they are available for that environment), and start working there.
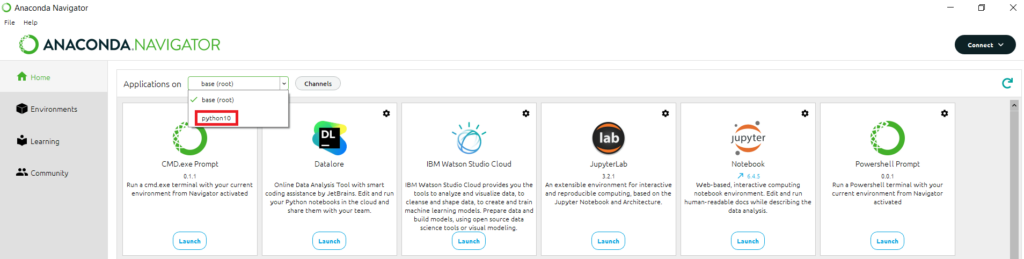
You can also easily create a new virtual environment with a necessary Python version directly from Anaconda Navigator:
- Open the
Environmentstab of Anaconda Navigator. - Press the
Createbutton at the bottom of the screen. - Give a name to the new environment, and select the version of Python.
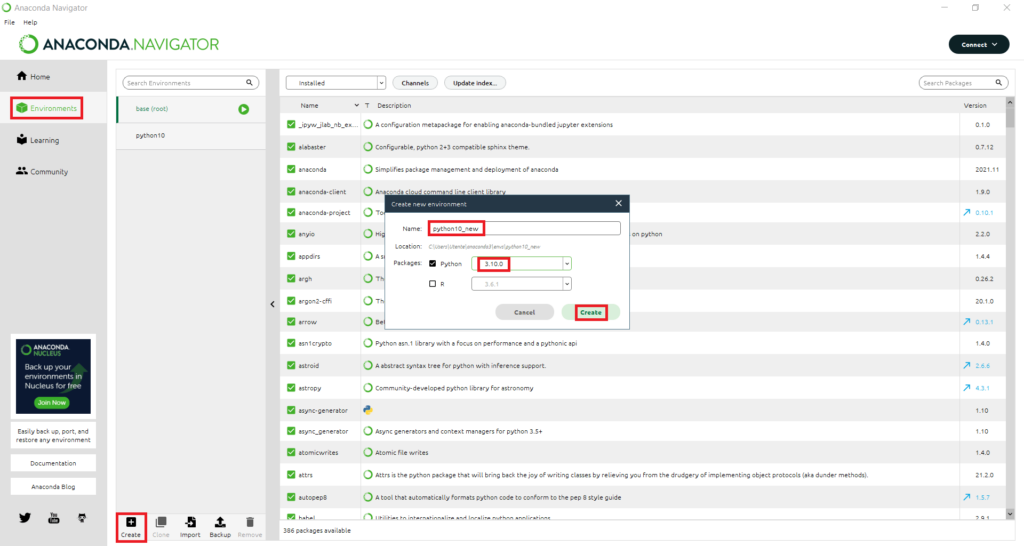
A new environment called python10_new has been created:
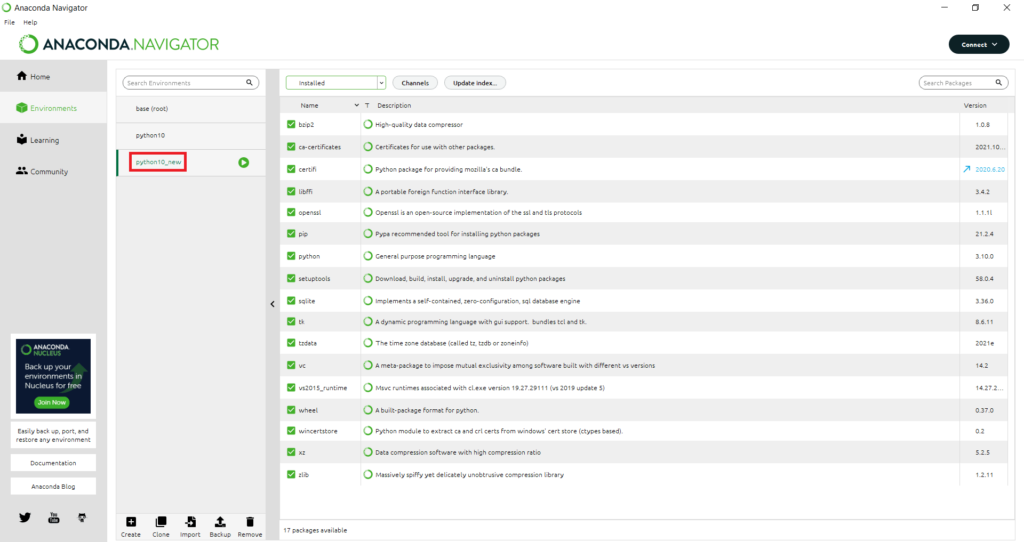
- Go to the Home tab, where the new environment will be already selected automatically.
- Install any available applications you need and start coding.
Conclusion
In this tutorial, you have learned how to correctly download and install Python both from the official website and Anaconda, update it to the latest version if necessary, and run Python scripts on Windows. Now you have all the necessary tools and settings to start working in Python.
This document aims to give an overview of Windows-specific behaviour you should know about when using Python on Microsoft Windows.
Unlike most Unix systems and services, Windows does not include a system supported installation of Python. To make Python available, the CPython team has compiled Windows installers (MSI packages) with every release for many years. These installers are primarily intended to add a per-user installation of Python, with the core interpreter and library being used by a single user. The installer is also able to install for all users of a single machine, and a separate ZIP file is available for application-local distributions.
As specified in PEP 11, a Python release only supports a Windows platform while Microsoft considers the platform under extended support. This means that Python 3.11 supports Windows 8.1 and newer. If you require Windows 7 support, please install Python 3.8.
There are a number of different installers available for Windows, each with certain benefits and downsides.
The full installer contains all components and is the best option for developers using Python for any kind of project.
The Microsoft Store package is a simple installation of Python that is suitable for running scripts and packages, and using IDLE or other development environments. It requires Windows 10 and above, but can be safely installed without corrupting other programs. It also provides many convenient commands for launching Python and its tools.
The nuget.org packages are lightweight installations intended for continuous integration systems. It can be used to build Python packages or run scripts, but is not updateable and has no user interface tools.
The embeddable package is a minimal package of Python suitable for embedding into a larger application.
4.1. The full installer
4.1.1. Installation steps
Four Python 3.11 installers are available for download — two each for the 32-bit and 64-bit versions of the interpreter. The web installer is a small initial download, and it will automatically download the required components as necessary. The offline installer includes the components necessary for a default installation and only requires an internet connection for optional features. See Installing Without Downloading for other ways to avoid downloading during installation.
After starting the installer, one of two options may be selected:
If you select “Install Now”:
- You will not need to be an administrator (unless a system update for the C Runtime Library is required or you install the Python Launcher for Windows for all users)
- Python will be installed into your user directory
- The Python Launcher for Windows will be installed according to the option at the bottom of the first page
- The standard library, test suite, launcher and pip will be installed
- If selected, the install directory will be added to your
PATH - Shortcuts will only be visible for the current user
Selecting “Customize installation” will allow you to select the features to install, the installation location and other options or post-install actions. To install debugging symbols or binaries, you will need to use this option.
To perform an all-users installation, you should select “Customize installation”. In this case:
- You may be required to provide administrative credentials or approval
- Python will be installed into the Program Files directory
- The Python Launcher for Windows will be installed into the Windows directory
- Optional features may be selected during installation
- The standard library can be pre-compiled to bytecode
- If selected, the install directory will be added to the system
PATH - Shortcuts are available for all users
4.1.2. Removing the MAX_PATH Limitation
Windows historically has limited path lengths to 260 characters. This meant that paths longer than this would not resolve and errors would result.
In the latest versions of Windows, this limitation can be expanded to approximately 32,000 characters. Your administrator will need to activate the “Enable Win32 long paths” group policy, or set LongPathsEnabled to 1 in the registry key HKEY_LOCAL_MACHINESYSTEMCurrentControlSetControlFileSystem.
This allows the open() function, the os module and most other path functionality to accept and return paths longer than 260 characters.
After changing the above option, no further configuration is required.
Changed in version 3.6: Support for long paths was enabled in Python.
4.1.3. Installing Without UI
All of the options available in the installer UI can also be specified from the command line, allowing scripted installers to replicate an installation on many machines without user interaction. These options may also be set without suppressing the UI in order to change some of the defaults.
To completely hide the installer UI and install Python silently, pass the /quiet option. To skip past the user interaction but still display progress and errors, pass the /passive option. The /uninstall option may be passed to immediately begin removing Python — no confirmation prompt will be displayed.
All other options are passed as name=value, where the value is usually 0 to disable a feature, 1 to enable a feature, or a path. The full list of available options is shown below.
|
Name |
Description |
Default |
|---|---|---|
|
InstallAllUsers |
Perform a system-wide installation. |
0 |
|
TargetDir |
The installation directory |
Selected based on InstallAllUsers |
|
DefaultAllUsersTargetDir |
The default installation directory for all-user installs |
|
|
DefaultJustForMeTargetDir |
The default install directory for just-for-me installs |
|
|
DefaultCustomTargetDir |
The default custom install directory displayed in the UI |
(empty) |
|
AssociateFiles |
Create file associations if the launcher is also installed. |
1 |
|
CompileAll |
Compile all |
0 |
|
PrependPath |
Prepend install and Scripts directories to |
0 |
|
AppendPath |
Append install and Scripts directories to |
0 |
|
Shortcuts |
Create shortcuts for the interpreter, documentation and IDLE if installed. |
1 |
|
Include_doc |
Install Python manual |
1 |
|
Include_debug |
Install debug binaries |
0 |
|
Include_dev |
Install developer headers and libraries. Omitting this may lead to an unusable installation. |
1 |
|
Include_exe |
Install |
1 |
|
Include_launcher |
Install Python Launcher for Windows. |
1 |
|
InstallLauncherAllUsers |
Installs the launcher for all users. Also requires |
1 |
|
Include_lib |
Install standard library and extension modules. Omitting this may lead to an unusable installation. |
1 |
|
Include_pip |
Install bundled pip and setuptools |
1 |
|
Include_symbols |
Install debugging symbols ( |
0 |
|
Include_tcltk |
Install Tcl/Tk support and IDLE |
1 |
|
Include_test |
Install standard library test suite |
1 |
|
Include_tools |
Install utility scripts |
1 |
|
LauncherOnly |
Only installs the launcher. This will override most other options. |
0 |
|
SimpleInstall |
Disable most install UI |
0 |
|
SimpleInstallDescription |
A custom message to display when the simplified install UI is used. |
(empty) |
For example, to silently install a default, system-wide Python installation, you could use the following command (from an elevated command prompt):
python-3.9.0.exe /quiet InstallAllUsers=1 PrependPath=1 Include_test=0
To allow users to easily install a personal copy of Python without the test suite, you could provide a shortcut with the following command. This will display a simplified initial page and disallow customization:
python-3.9.0.exe InstallAllUsers=0 Include_launcher=0 Include_test=0
    SimpleInstall=1 SimpleInstallDescription="Just for me, no test suite."
(Note that omitting the launcher also omits file associations, and is only recommended for per-user installs when there is also a system-wide installation that included the launcher.)
The options listed above can also be provided in a file named unattend.xml alongside the executable. This file specifies a list of options and values. When a value is provided as an attribute, it will be converted to a number if possible. Values provided as element text are always left as strings. This example file sets the same options as the previous example:
<Options>
    <Option Name="InstallAllUsers" Value="no" />
    <Option Name="Include_launcher" Value="0" />
    <Option Name="Include_test" Value="no" />
    <Option Name="SimpleInstall" Value="yes" />
    <Option Name="SimpleInstallDescription">Just for me, no test suite</Option>
</Options>
4.1.4. Installing Without Downloading
As some features of Python are not included in the initial installer download, selecting those features may require an internet connection. To avoid this need, all possible components may be downloaded on-demand to create a complete layout that will no longer require an internet connection regardless of the selected features. Note that this download may be bigger than required, but where a large number of installations are going to be performed it is very useful to have a locally cached copy.
Execute the following command from Command Prompt to download all possible required files. Remember to substitute python-3.9.0.exe for the actual name of your installer, and to create layouts in their own directories to avoid collisions between files with the same name.
python-3.9.0.exe /layout [optional target directory]
You may also specify the /quiet option to hide the progress display.
4.1.5. Modifying an install
Once Python has been installed, you can add or remove features through the Programs and Features tool that is part of Windows. Select the Python entry and choose “Uninstall/Change” to open the installer in maintenance mode.
“Modify” allows you to add or remove features by modifying the checkboxes — unchanged checkboxes will not install or remove anything. Some options cannot be changed in this mode, such as the install directory; to modify these, you will need to remove and then reinstall Python completely.
“Repair” will verify all the files that should be installed using the current settings and replace any that have been removed or modified.
“Uninstall” will remove Python entirely, with the exception of the Python Launcher for Windows, which has its own entry in Programs and Features.
© 2001–2022 Python Software Foundation
Licensed under the PSF License.
https://docs.python.org/3.11/using/windows.html
Python
3.11
-
Using Python on a Mac
Bob Savage <bobsavage@mac.com> Python a Mac running macOS is principle very similar to any other Unix platform, but there are number of additional features
-
Using Python on Unix platforms
Python comes preinstalled most Linux distributions, and available as package others.
-
4.2. The Microsoft Store package
New in version 3.7.2.
-
4.6. Configuring Python
To run Python conveniently from a command prompt, you might consider changing some default environment variables Windows.
python-on-windows
A step-by-step guide on installing Python and using the Command Prompt for Windows
- Version: 1.1.0
- Date: 2017-01-03
- Author: Alberto Pettarin (contact)
- License: Creative Commons Attribution 4.0 International (CC BY 4.0)
Overview
Do you want to run a Python program under Windows,
but you have no experience using the Command Prompt?
This guide is for you!
I will walk you through the installation of Python
and I will explain the basics of the Command Prompt.
After reading this page (and practicing a bit),
you should be able to run a Python program
confidently and safely.
What Is Python?
Python is a
high-level, general-purpose programming language
which allows people to easily create and share programs
for a variety of applications.
The Python project is a free (libre)/open source software (FLOSS) initiative,
managed by the Python Software Foundation.
You can download, install, and use Python for free
on several platforms,
including Linux, Mac OS X, and Windows computers.
Python enables the development of FLOSS programs,
which are created for free
by millions of volunteers around the globe
and shared in source code form.
This means that the end user
who receives or downloads a Python program
can actually check that the program does what
is supposed to do, and nothing more
(unlike closed-source programs,
which send personal information to third parties,
show you advertisements, or
damage your computer).
More details on Python can be found on the
official Python page
and on its
Wikipedia page.
In practice, to use a Python program you need two pieces of software:
- the Python interpreter, which is the «master» program
that reads the source code of a Python program,
and «execute» it; and - the source code of the Python program,
usually consisting of one or more files with.pyextension,
which performs the specific task you are interested in.
This guide explains how to install the former,
and it shows how to run the latter
in the Command Prompt of Windows,
with a complete, real-life example.
Installing Python On Windows
The preliminary step consists in installing
the Python interpreter (i.e., the «master program»)
on your computer.
Installing Python is a one-time operation.
If you already installed Python in the past
(for example, to run a different program),
you do not need to install it again,
and you can skip to the next section.
Step 0: Should I Get Python 2 Or Python 3?
At the time of writing (2017-01-01),
there are two main versions of Python:
Python 2 (2.7.13) and Python 3 (3.6.0).
Discussing the technical differences between these two versions
is beyond the scope of this guide.
It suffices to say that
some Python programs work with both versions of Python,
while other Python programs work only
with Python 2 but not with Python 3,
or vice versa.
You should get the version of Python that the program
you are interested in recommends.
If the latter does not specify a version,
get the latest Python 3 version available.
If you later discover that your Python program
does not work with the Python version you installed,
do not worry: just uninstall it, and install the other one!
In the rest of the guide we assume you need Python 3.
Step 1: Download The Installer
First, open your Web browser and
go to https://python.org/:

Click on the Download > Latest Python 3.6.0 link.
You will get a page listing all the new features of Python 3.6.0:

Scroll down until you see the list of available downloads:

If you have a recent Windows computer,
very likely it is a 64-bit machine,
so you should download the file labeled Windows x86-64 executable installer,
and save it on your Download folder or on your Desktop:

Downloading the file will take from few seconds to a few minutes,
depending on the bandwidth of your Internet connection.
(If you have an older PC that you know is a 32-bit computer,
download the Windows x86 executable installer instead.
You can tell whether your PC is a 32-bit or a 64-bit machine
by reading the System Information in the Windows Control Panel.)
Step 2: Install Python
Double-click on the file you just downloaded
to start the installation wizard:

By default, the Add Python 3.6 to PATH option is disabled,
but you should select it,
as it makes running Python programs much much easier.
Most users should click the Install Now button,
which installs Python with the default settings.
(If you want to personalize your installation
or you are told to enable some advanced features,
click on the Customize installation option instead.)
The installer might ask you for administrative privileges
or for confirmations like the following:

You can safely answer Yes.
A progress bar will appear:

until the installation completes with the following message:

Starting with Python 3.6.0,
it is recommended to click on
the Disable path length limit option,
before closing the installer.
If you do so, you will get a final confirmation dialog:

You can terminate the installation by clicking the Close button.
Congratulations, you have your first Python installation under your belt!
Using The Command Prompt
Most Python programs are command line interface (CLI) utilities,
which means that they are not operated
via a graphical user interface (GUI),
also known as «the program window».
Instead, they must be executed
in the Command Prompt of Windows,
also known as «shell» or «terminal».
Running a CLI program means
typing a command string on the Command Prompt of Windows,
following a certain syntax
which depends on what the program is supposed to do.
You can think of this act as reciting the «right spell»
to get your job done.
Opening A Command Prompt
To open the Command Prompt,
locate the Command Prompt icon in your Start menu
(or use the search bar):

Click on the icon. A black window appears:

The first two lines printed in the window
show the version of the Command Prompt.
The last line, which reads C:UsersIEUser> in the screenshot above,
is the prompt, where you can actually type commands.
The prompt line always starts
with the location of the working directory,
that is, the folder where the command prompt is currently acting upon
(C:UsersIEUser in the screenshot above),
and ends with the > character.
The prompt normally opens in the home directory of the current user:
in fact, we are in C:UsersIEUser,
because the user is called IEUser.
If your Windows username is Olga,
it is likely you will see
C:UsersOlga instead.
(Different versions of Windows might have different paths for home directories.)
In the documentation of Python programs you might find a $ character
before examples of commands, as follows:
$ python my_awesome_program.py
because on Linux and Mac OS X machines
the terminal prompt is usually a $ character.
You should not type the $ character,
it is just a placeholder for your actual prompt.
For any practical purpose,
you can mentally replace the $ with your actual prompt,
like C:UsersIEUser> in the example above,
as if the documentation was as follows:
C:UsersIEUser> python my_awesome_program.py
(You will actually type only python my_awesome_program.py and
hit the Enter/Return key.)
The Three Safety Rules
By issuing commands on the Command Prompt,
you can accidentally delete your own files or damage Windows,
so you must be careful.
Do not be afraid or discouraged:
you do not stop using knives just because
you can cut your fingers with them!
By following Three Safety Rules,
you can operate the prompt safely:
- Never issue a command without understanding what it does,
and only run programs obtained from developers that you trust. - If anything happens in the prompt that you do not understand,
you can simply click on the «X» on the right top corner
to close the Command Prompt window
(and hopefully nothing bad will happen to your files). - Always copy your Python program in a separate
folder, and always make copies of your input files in it,
so that you can just throw away the Python program folder
if something goes wrong, and start over.
Changing The Working Directory (cd)
As said above, the command prompt normally opens
in the home directory of your user:
If you want to change the current working directory,
you can use the cd command.
For example, to move to the C: directory
(the root directory of your C: drive),
you type cd C:
and press the Enter/Return key:

Notice that the prompt changed to C:>.
Listing The Contents Of The Working Directory (dir)
If you want a list of the files or subdirectories
contained in the current working directory,
issue the dir command, without arguments:

The prompt shows a list of directories and files
that are contained in the C: drive:
in the above screenshot they are
BGinfo, PerfLogs, …, Windows.
At this point, if you want to enter the Users directory,
you can simply type cd Users, and so on.
If you want to go up one level, type cd ..
(two full stop character).
For example, if you are in C:Users and give a cd ..,
you will end up in C:.
If you want to clear the prompt window, use the cls command.
Checking That Python Is Installed Correctly
If you selected the Add Python to PATH option,
you can run the Python interpreter (and any Python program)
from any current working directory.
To check this, give the python --version command:

The Python version will be printed
(e.g., Python 3.6.0)
and you will get back to the Windows prompt.
You just ran Python in non-interactive mode,
meaning that you provided a precise command
(«Python, print the version number you are»),
the Python interpreter performed what you asked for,
and then it returned control to the Command Prompt of Windows.
The non-interactive mode is how most Python programs work.
If you forget to add the --version parameter
after the python command,
you will enter the interactive Python shell instead:

Notice how the prompt changed to >>>.
To exit the Python shell, and return to the Command Prompt,
just type quit() and hit the Enter/Return key:

Discussing the interactive shell is beyond the scope of this guide,
since most programs you are interested in are non-interactive.
Running A Python Program
Excellent, now you have all the tools required
to run a Python program on the command line.
As an illustration,
I will use my simple Python script
export-kobo,
which reads annotations and highlights
from the database file of a Kobo eReader device (KoboReader.sqlite),
and prints them on the prompt or exports them to an output file.
Step 1: Download The Source Code
First, download the source code of the Python program you want to run.
This usually implies downloading either a single Python source code file
(with extension .py), or a ZIP file containing several Python source code files
and other resource files that you need to uncompress somewhere on your disk.
The exact details depend on your Python program,
hence be sure to carefully read its install documentation.
You can download the prescribed files with your browser,
and then copy/uncompress them using the Windows graphical file manager.
In our example, we download the raw file
export-kobo.py
from the GitHub repository.
Remember Safety Rule 3
(«copy your Python files into a separate folder»)?
We put the downloaded export-kobo.py file
in a new folder C:export-kobo:

Note that we also copied
the KoboReader.sqlite file
(the input of our Python program)
from our Kobo eReader
to the same folder.
Step 2: Open A Command Prompt And cd There
Then, open a Command Prompt as explained above,
and change the current working directory to the folder
where you put your Python program source files.
In our example, cd C:export-kobo:
A simpler alternative to using the cd command
takes advantages of the Windows file explorer.
Just navigate the file explorer to the folder
where your Python code is:

and select the
File > Open command prompt > Open command prompt
menu:

you will get a new Command Prompt window,
already located at the correct directory:

Step 3: Run The Python Program
At this point, we are ready to run our program.
Type python export-kobo.py KoboReader.sqlite --list and hit Enter/Return:

The Python interpreter will load our export-kobo.py program,
and run it with arguments KoboReader.sqlite and --list.
Clearly, the semantics of the arguments vary from program to program,
depending on what each program is supposed to do.
In our case, export-kobo.py will read the file
whose name is passed as the first parameter (KoboReader.sqlite)
and it will list (--list option) the titles of all the eBooks
with annotations or highlights in the database.
If we specify different command arguments, for example
python export-kobo.py KoboReader.sqlite --csv --output exported.csv,
we will get a different behavior:

In particular, this second command exported all the information
contained in the KoboReader.sqlite file into
the newly created file named exported.csv in CSV format:

You must check the documentation of your Python program
to know the semantics of its arguments.
Usually, if you run a Python program without arguments
you will get a synopsis of the accepted arguments:

If a -h or --help argument is given,
then a more verbose help message will be printed:

Congratulations, now you should be able
to download and run a Python program on your own!
Acknowledgments
- Louise Schofield nee Stokes for suggesting using the file explorer menu
to open the command prompt at a given directory
Originally created by Guido van Rossum in 1991, Python is a versatile programming language used by makers on the Raspberry Pi, system administrators in the data center, and even by Industrial Light and Magic to bring our movies to life.
Python is a great language to learn, and thanks to the Raspberry Pi for the past decade there have been countless tutorials covering the gamut of programming projects.
Whether you are a Python veteran, a “pythonista” or a complete newcomer to the language, installing Python on Windows is an easy task. In this how to we will walk you through installing Python 3 on Windows and show two editors, one for beginners and the other for intermediate and advanced users, and how you can get coding with this fantastic language.
Installing Python 3 on Windows 10 and 11
The installation process for Python 3 on Windows is simple, with only a couple of extra steps that we have to follow. These steps enable us to access Python from anywhere on our system and install software using its built-in package manager. Installing Python in this manner enables the creation of projects that work with the operating system, for example notifications and automated system tasks.
1. Open a browser to the Python website and download the Windows installer.
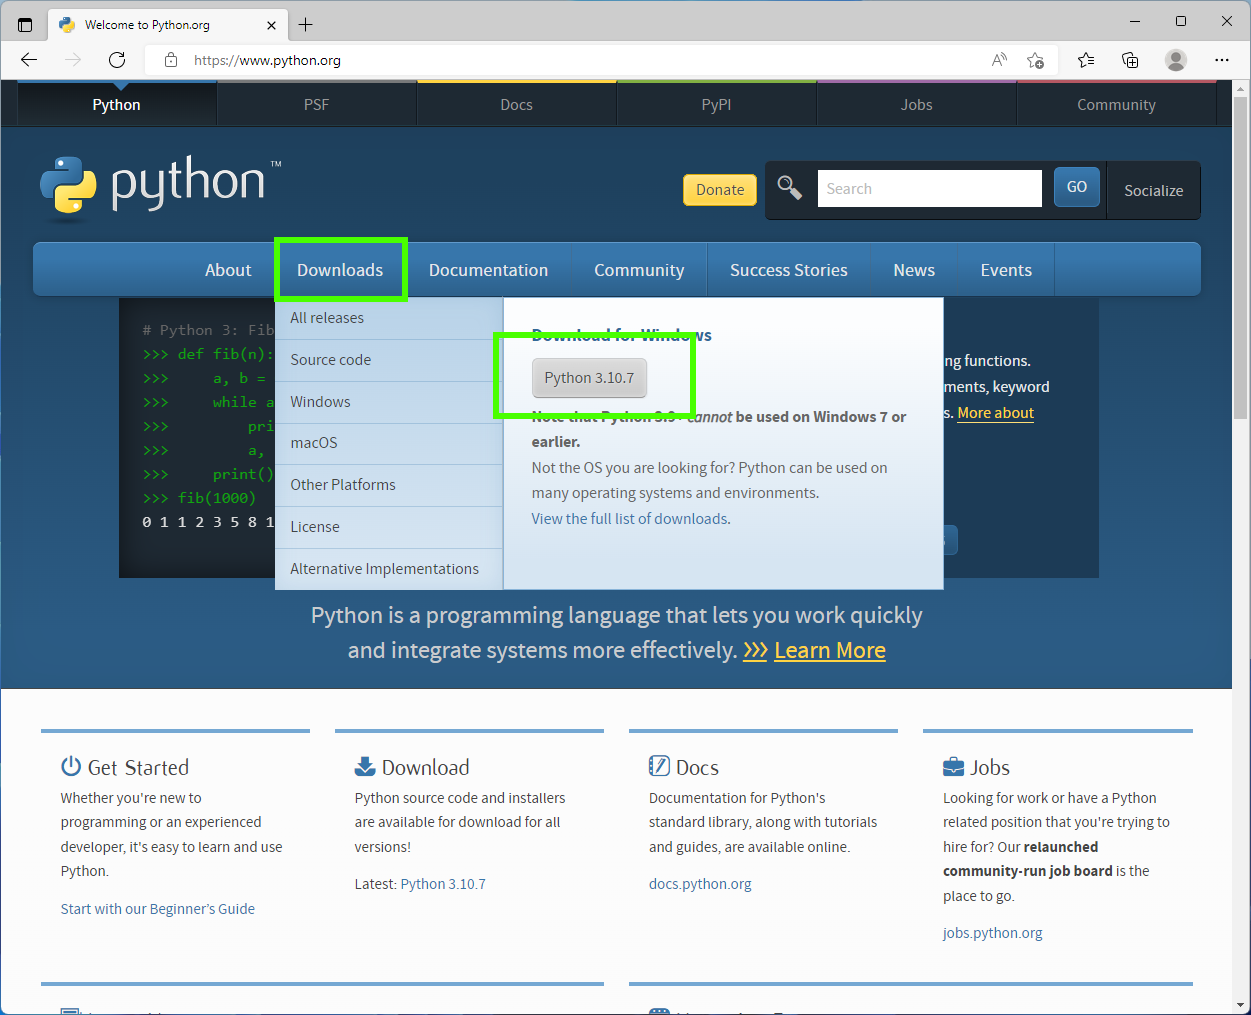
2. Double click on the downloaded file and install Python for all users, and ensure that Python is added to your path. Click on Install now to begin. Adding Python to the path will enable us to use the Python interpreter from any part of the filesystem.
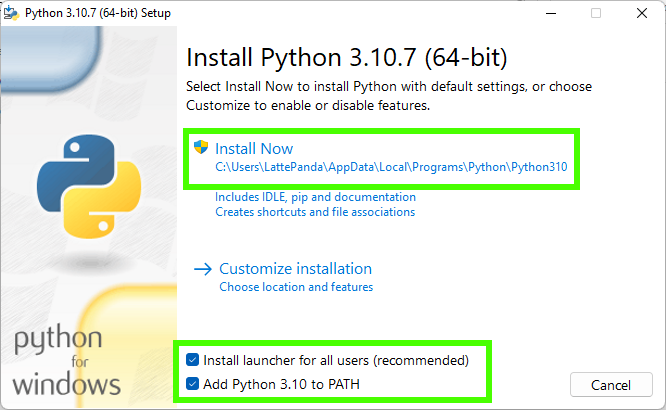
3. After the installation is complete, click Disable path length limit and then Close. Disabling the path length limit means we can use more than 260 characters in a file path.

4. Click Close to end the installation.
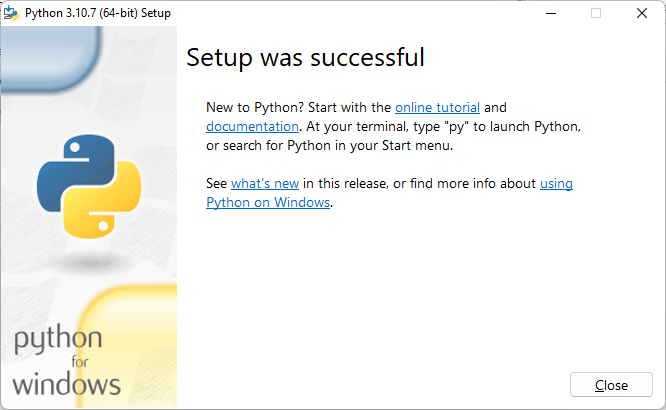
Running Python in Windows
1. Open a Command Prompt and type “python” then press Enter.
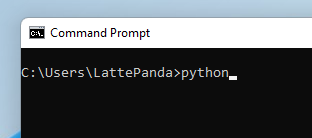
2. Create a short Python script that uses a for loop to print a message to the Python shell ten times. Press space four times to indent the second line, otherwise Python will produce an error. Press Enter to run the code.
for i in range(10):
    print(“Python in the command prompt”)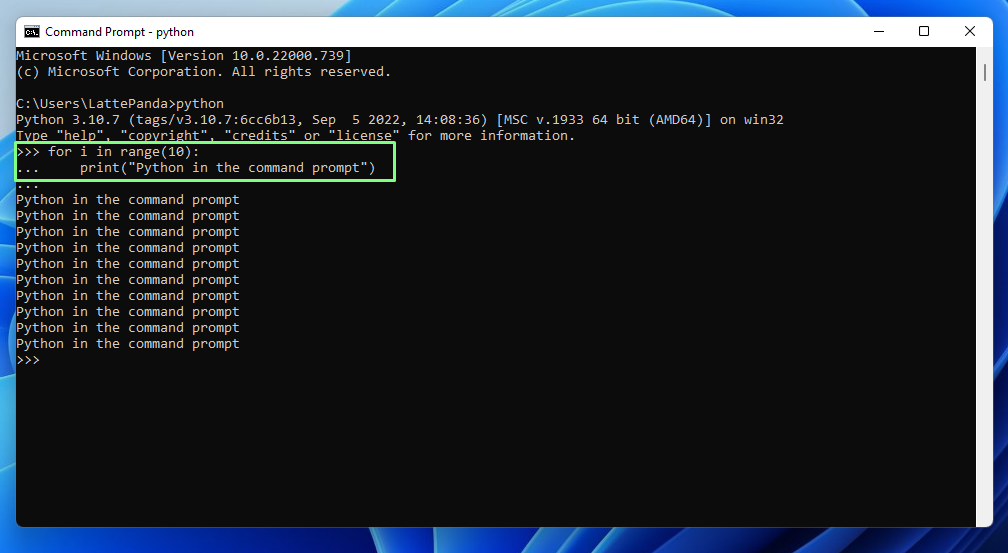
Python comes with its own package manager, pip, that is used to install, update and remove modules of pre-written Python code. These modules provide us with extra functionality. To demonstrate we will use pip to install the pyjokes module, a collection of programmer jokes.
1. Open a Command Prompt and use pip to install pyjokes then press Enter.
pip install pyjokes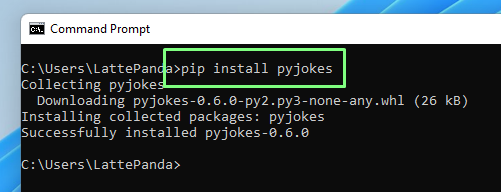
2. Open the Python interpreter.

3. Import the pyjokes module and then print a joke from the module. In our case, we got a “hip hip hurray” take on an array containing two hips.
import pyjokes
print(pyjokes.get_joke())
4. More modules can be found using the PyPi Package Index.
Beginning Python With Mu
If you have never written a line of Python code, then Mu is for you. Created by Nicholas Tollervey, Mu is designed with beginners in mind. The simple interface means we can focus on our code. But don’t underestimate Mu as under the hood we have tools to validate our code and to work with a diverse range of boards such as Raspberry Pi Pico, Adafruit CircuitPython and many MicroPython boards, including those from Lego.
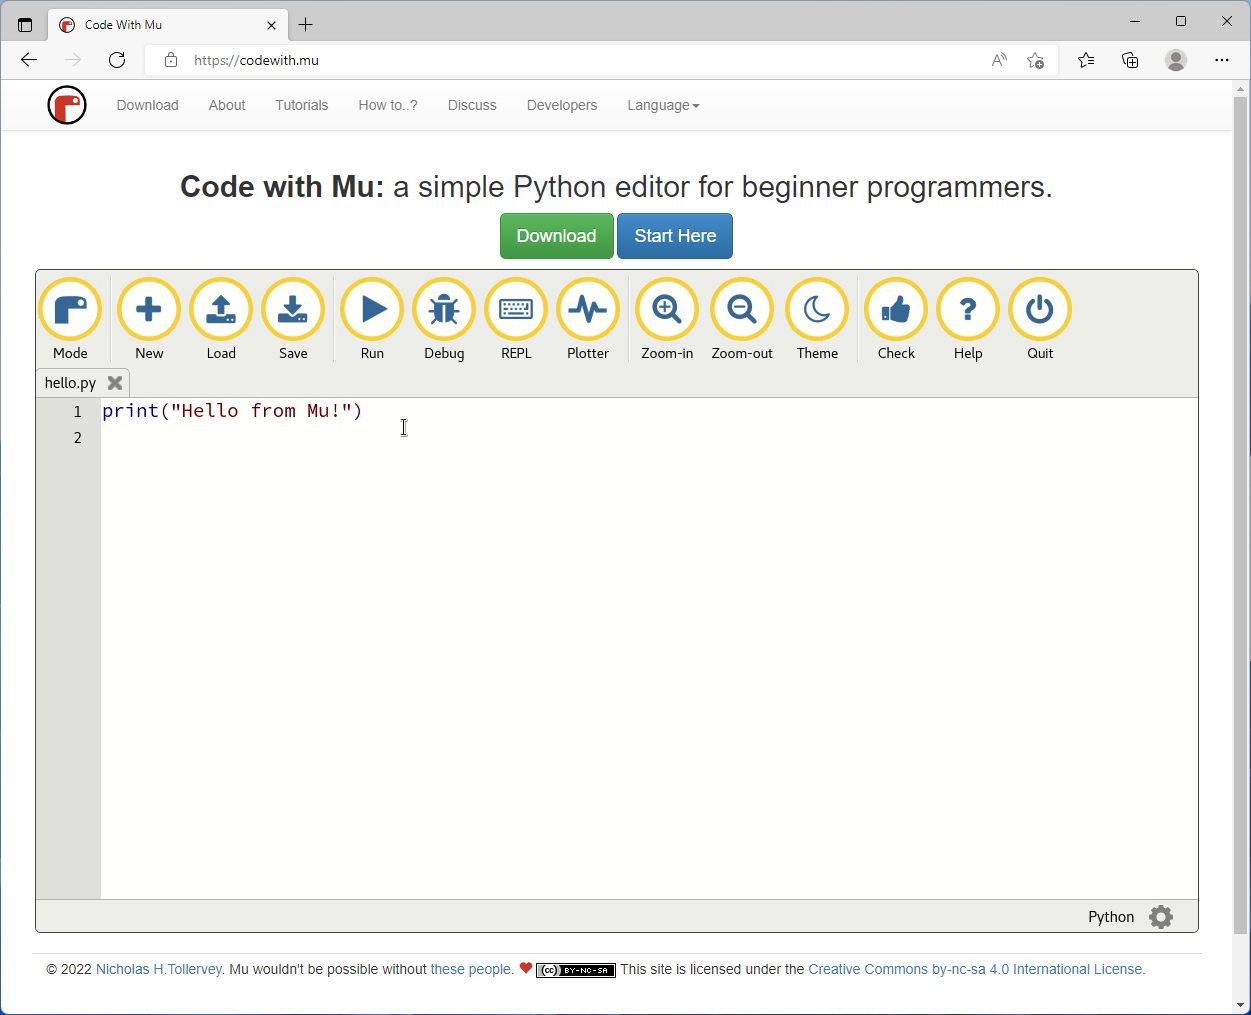
1. Open a browser to the Mu website and download the Windows installer.
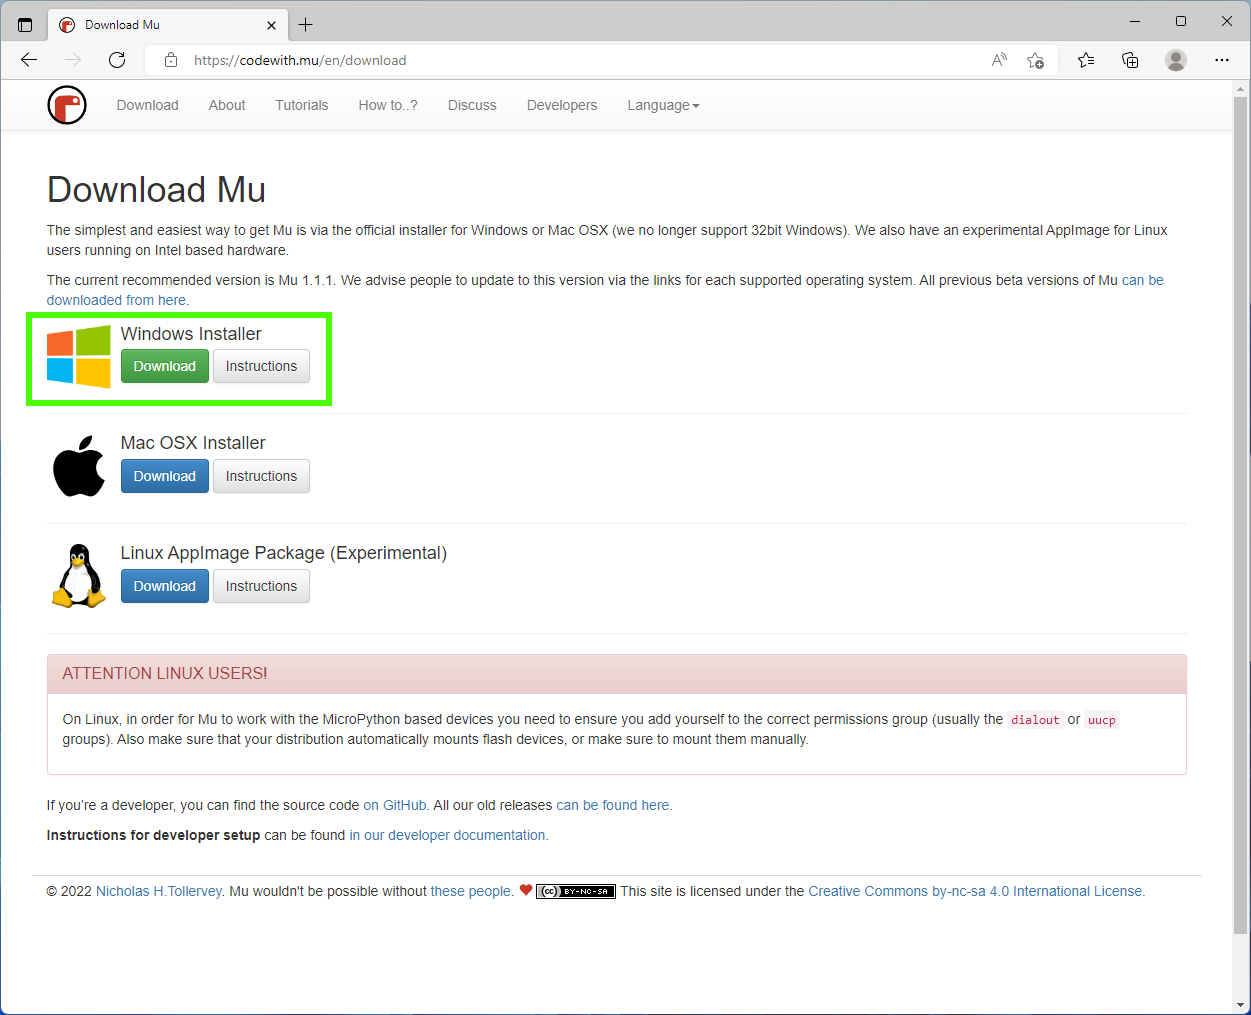
2. Go to the Downloads folder and double click the Mu file to begin installation.
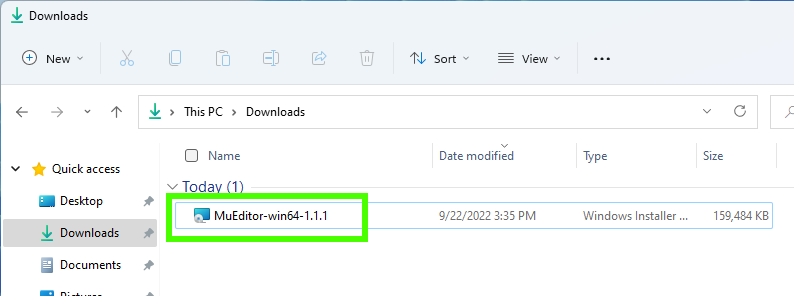
3. Accept the license agreement and click Install. The install process will take a few moments to complete.
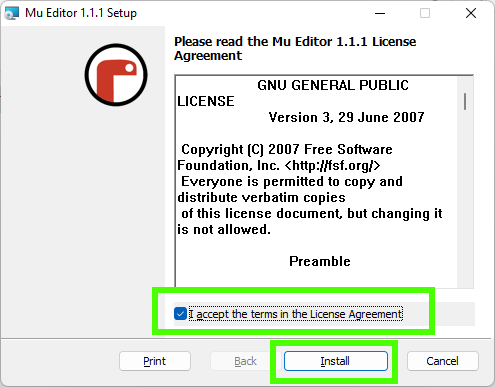
4. Click on Launch Mu Editor and then click Finish. This will close the installer and start Mu.
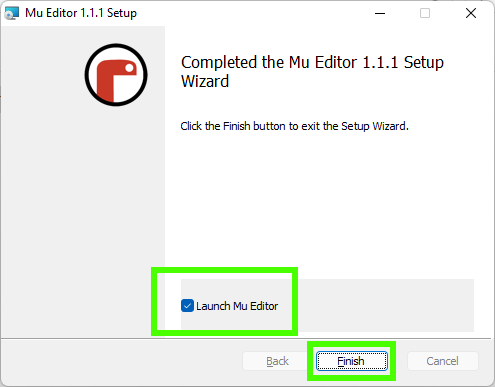
5. Wait for Mu to start. Mu’s first launch can take some time to complete, subsequent boots will be much faster.
The Mu Editor Interface
Mu was designed with beginners in mind and this is reflected in the user interface. It is uncluttered and easy to understand.
The user interface is broken down into three areas.
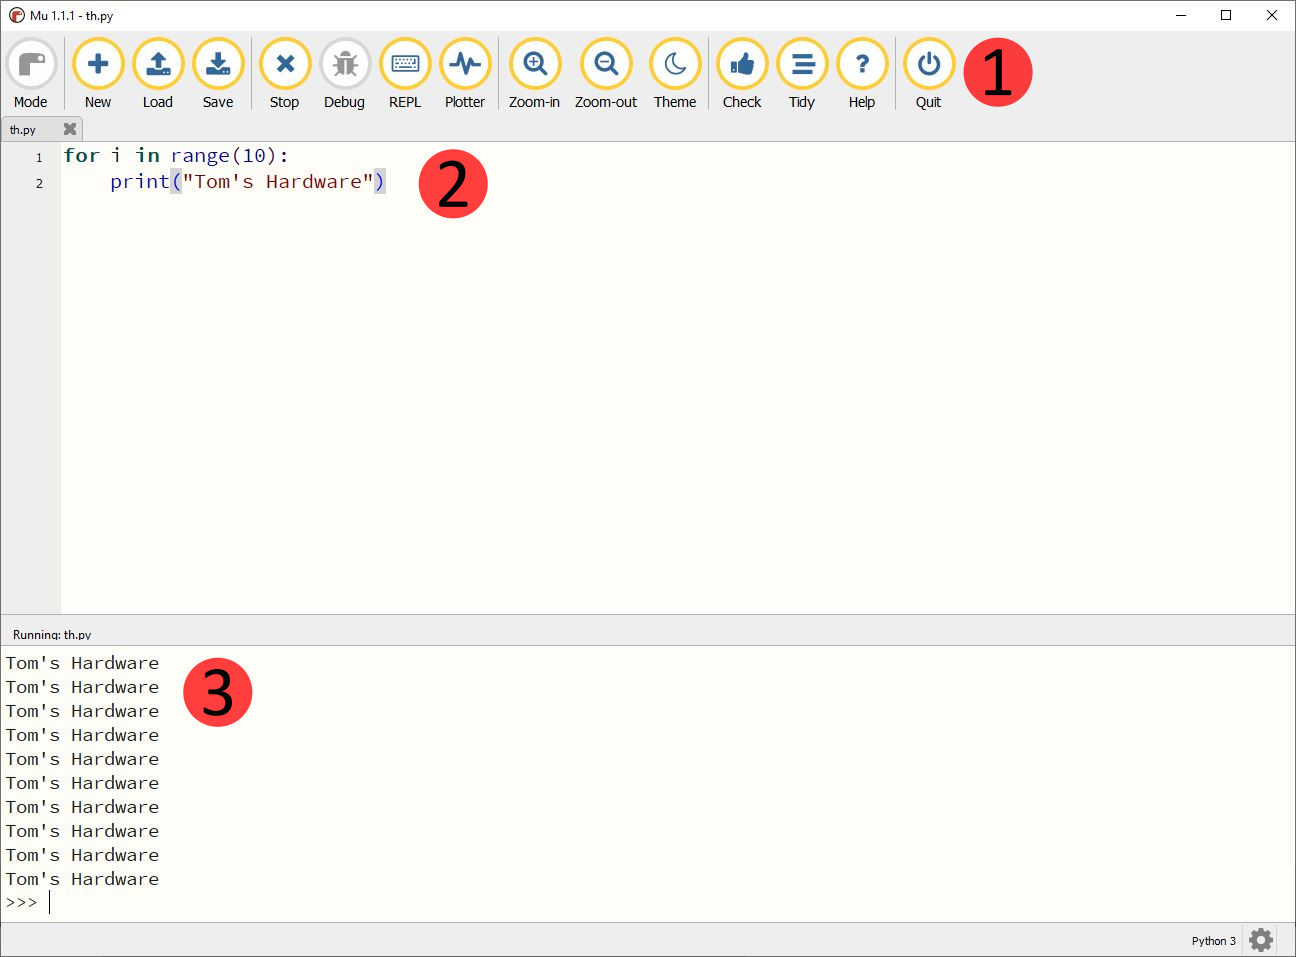
- The menu bar. Large icons and clear text identify the function of each button. We can create, save and load files. We can also run and stop our code. The Python Shell (REPL, Read, Eval, Print, Loop) is available to test ideas. A plotter can be used to visualize data via a graph. We can zoom in and out of the code, useful when presenting to large groups. A builtin checker and tidy application will check and format your code using Python style guidelines.
- The coding area. Here we write the code for our projects.
- The Python shell. It can output the results of our code and it can be used to access the REPL.
We can easily write Python code in Mu. The default is to write Python 3 code, to be run on our machine. This is where the ease of Mu works against it, as there is no means to install Python modules. Modules are libraries of code that can be used to add new features, for example RPi.GPIO and GPIO Zero are modules that enable Python to talk to the Raspberry Pi GPIO.
If you are starting out with Python, Mu is an excellent choice to introduce the language.
Mu Modes
Mu has one feature that elevates it above other beginner editors. Mu has a “Mode” button which can be used to write Python, MicroPython and CircuitPython.
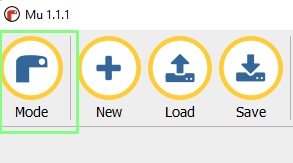
2. Select the Mode from the list. Mu comes with a plethora of modes. We can write Python 3, make games using PyGame Zero or build websites/apps using Flask. Write MicroPython for the Raspberry Pi Pico, micro:bit. ESP, Pyboard and Lego Spike. Or we can use Adafruit’s CircuitPython to create physical computing projects.
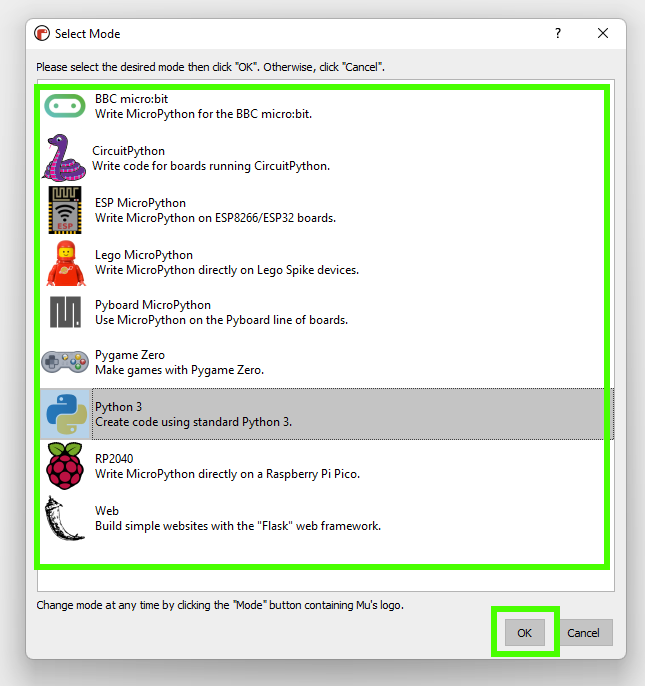
Connecting a Raspberry Pi Pico, MicroPython or CircuitPython board will trigger Mu to ask if we would like to change the mode to match the board. To demonstrate this we’ll write a short project to blink the Pcio’s onboard LED.
To follow this part of the how to you will need a Raspberry Pi Pico.
1. With Mu open, connect a Raspberry Pi Pico to your computer.
2. Using the pop-up, change the mode for the Raspberry Pi Pico (RP2040).
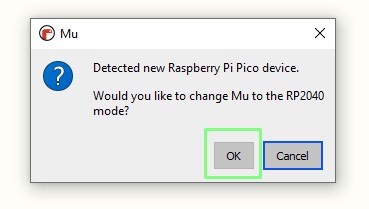
3. The Mu editor is now in RP2040 mode, so click on REPL to open the MicroPython shell (REPL) on the Pico.
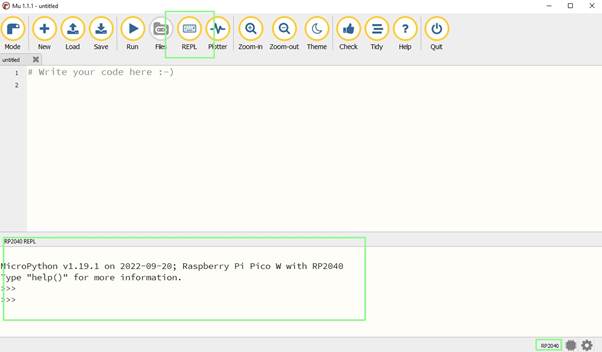
4. In the editor import two modules, first to enable access to the GPIO, the second to add pauses to the code.
import machine
from time import sleep
5. Create an object, led and use it to set the onboard LED as an output. For the Raspberry Pi Pico W use the line of code with ‘LED’, for the original Pico use the line of code with 25. The Pico has the LED connected to GPIO 25, but the Pico W does not.
Raspberry Pi Pico W
led = machine.Pin('LED', machine.Pin.OUT)Raspberry Pi Pico
led = machine.Pin(25, machine.Pin.OUT)6. Create a for loop that iterates 10 times, each time the loop runs it will toggle the LED on / off, print a message to the REPL and sleep for 0.1 seconds.
for i in range(10):
    led.toggle()
    print("BLINK")
sleep(0.1)
7. Click Save and save the file as blink.py to your computer.
8. Click Run to start the code on the Pico. The LED on the Pico will blink on and off and the REPL will show the “BLINK” message.
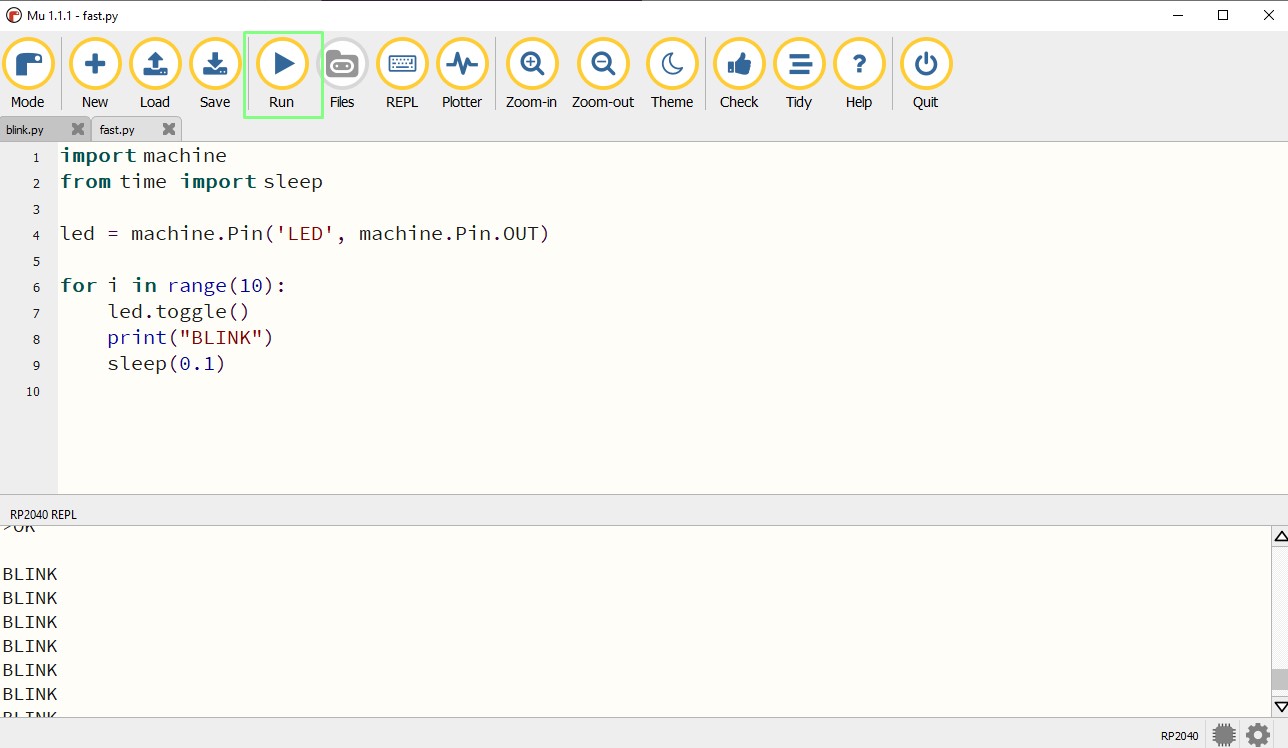
You know your stuff, and you need a lightweight editor to get your Python code done. Sure you can install Visual Studio Code, PyCharm etc. But if you just need to edit a few project files, Notepad++ is for you. Notepad++ is a Swiss Army Knife of an editor, and it works exceptionally well with Python. Here we will install Notepad++ and set it up to run our Python code at the press of a button.
Note that you will need to install the Python 3 interpreter, the steps for which are at the start of this how to.
1. Open a browser to the Notepad++ website and download the latest Windows installer.
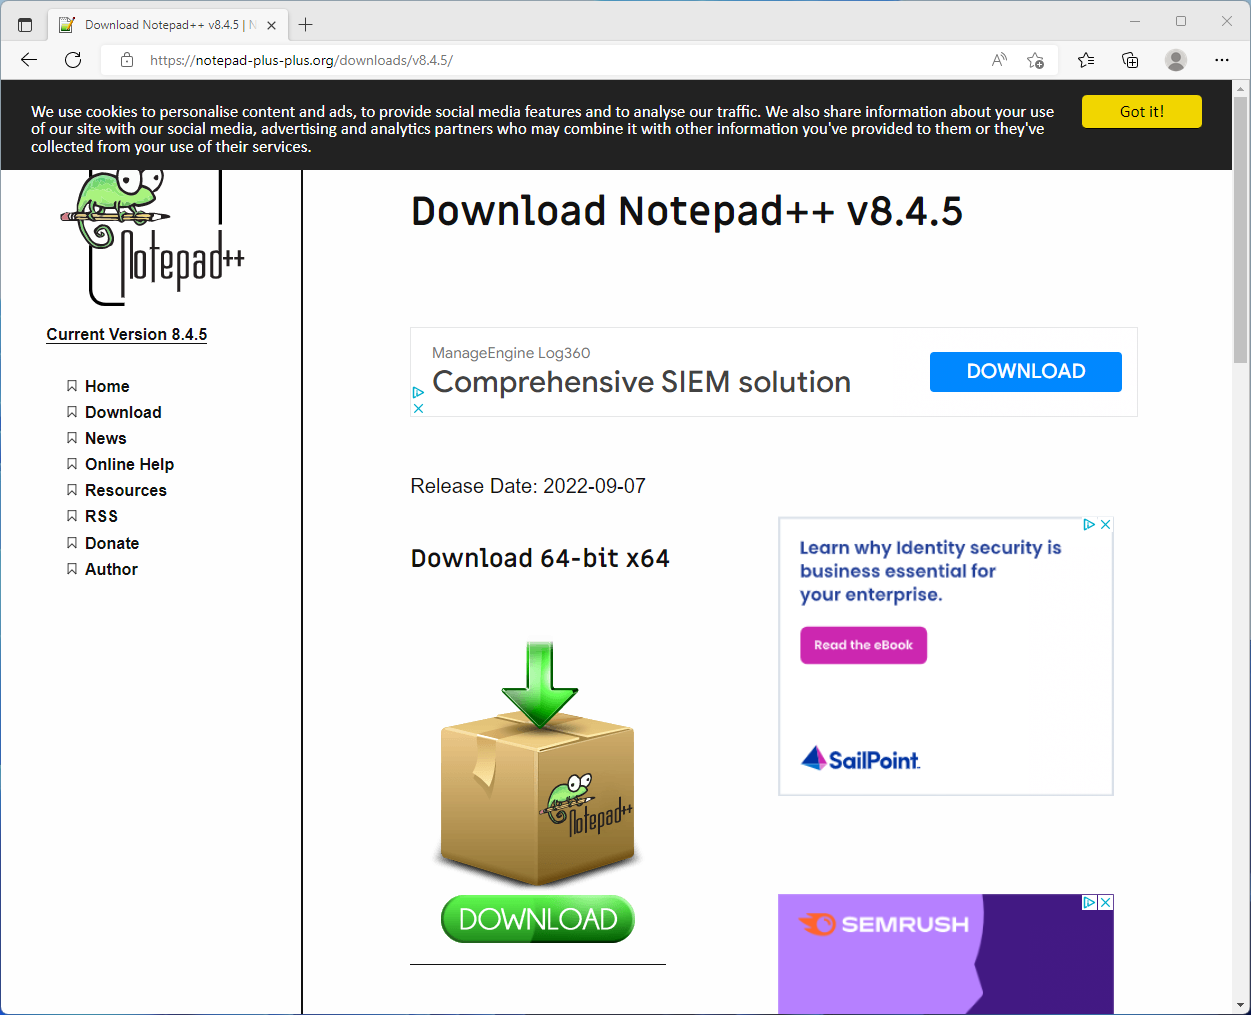
2. In the your Downloads folder, double click on the file to start the installer.
3. Set your preferred language and click OK.
4. Select Next.
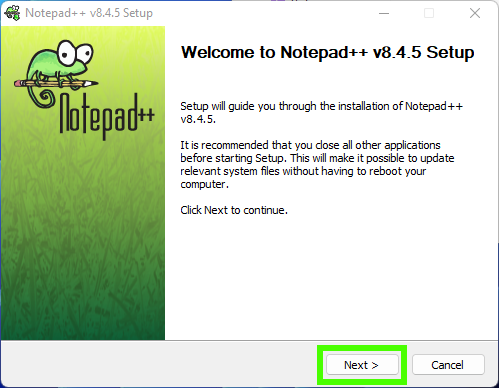
5. Select “I Agree”.

6. Click Next.
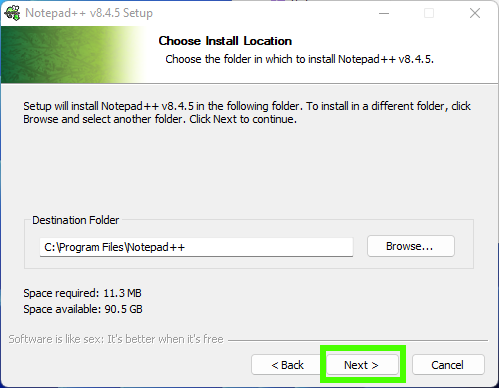
7. Click Next.
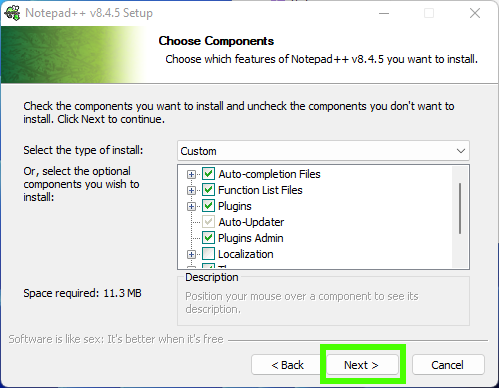
8. Click Install to begin the process.
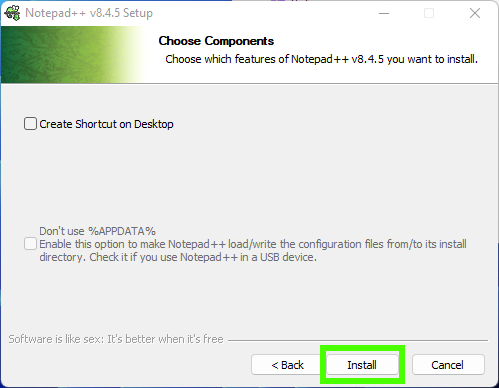
9. Check “Run Notepad++” and click Finish to end the installation and open Notepad++.

The Notepad++ Interface
Notepad++ has a more involved user interface than Mu, and this reflects the flexibility of the editor. Notepad++ is much more than a Python editor, we can use it to write PHP, Perl, JSON etc.
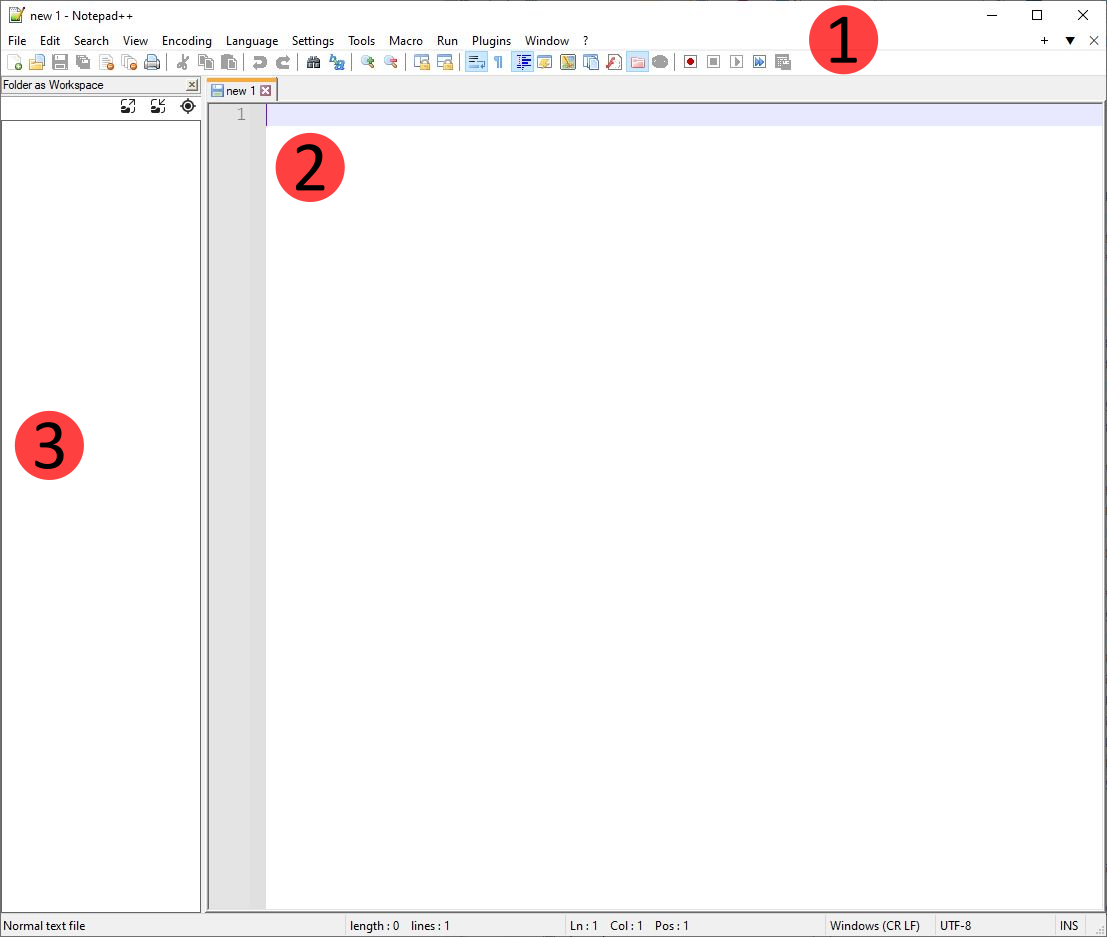
- Menus. Here we can load projects, save, create macros and install plugins for specific languages.
- Editor. The code for our project is created here.
- Workspace. If we are working on a large project with multiple project files, we can load the folder as a workspace and have quick access to the files.
Running Python code in Notepad++
1. Create a simple Python project that uses a for loop to print a message to the Python shell.
for i in range(10):
    print("Writing Python in Notepad++")
2. Save the code as for_loop.py.
3. Click on Run >> Run..
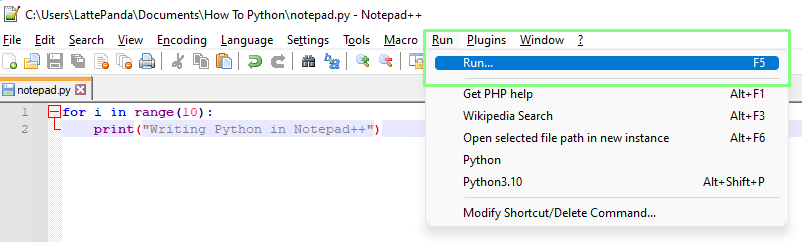
4. Click on … and navigate to the Python executable file. Select the file and the path will be added to the dialog box. At the end of the path, add -i «$(FULL_CURRENT_PATH)» to force Notepad++ to open the file. Click Save.
Example path to Python
C:UsersLattePandaAppDataLocalProgramsPythonPython310python.exe -i "$(FULL_CURRENT_PATH)"
5. Create a shortcut called Python3.10 to launch the Python interpreter then click OK. We chose ALT + SHIFT + P as it didn’t conflict with other shortcuts on our system.
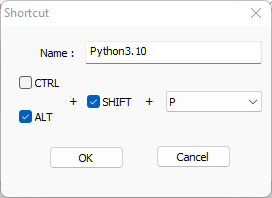
6. Use your shortcut to run the Python code.
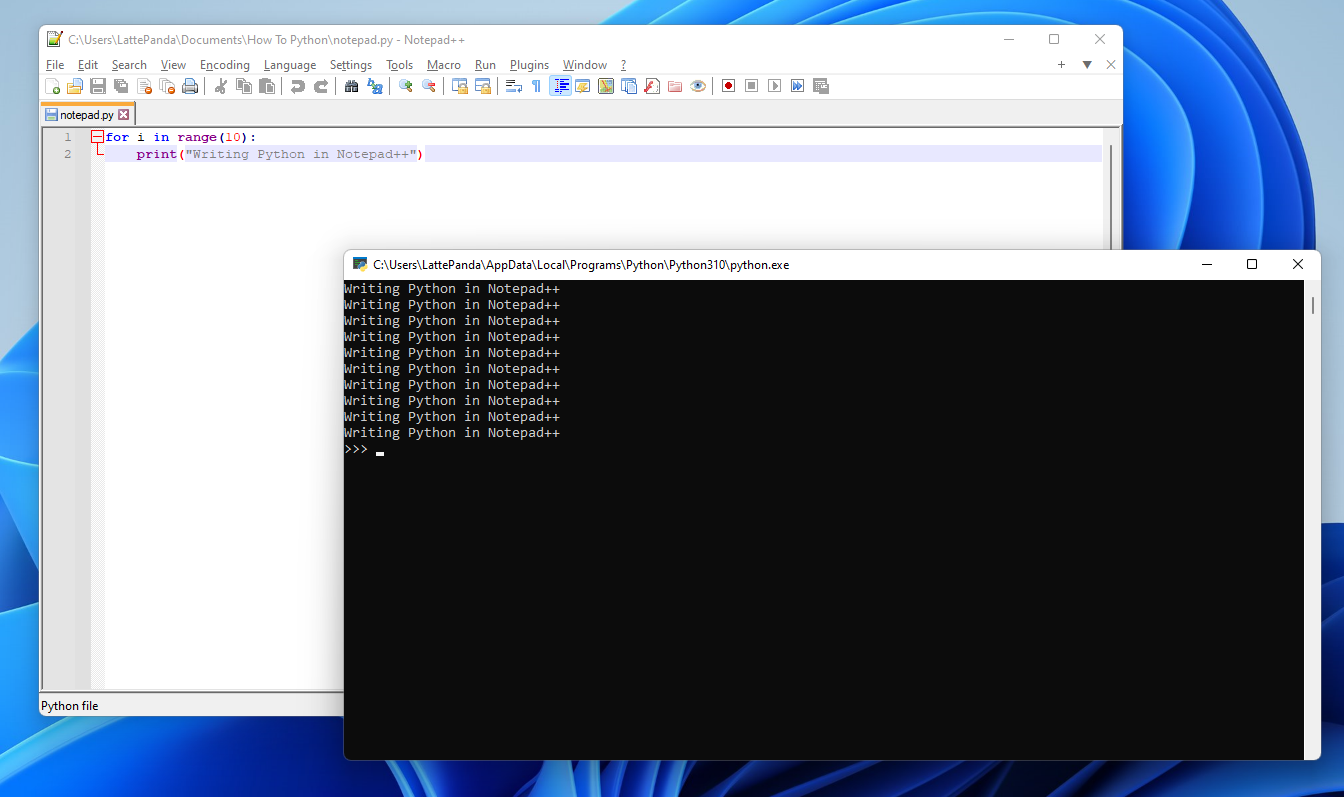
Get instant access to breaking news, in-depth reviews and helpful tips.