В Windows 10 и Windows Server 2019 появился встроенный SSH клиент, который вы можете использовать для подключения к *Nix серверам, ESXi хостам и другим устройствам по защищенному протоколу, вместо Putty, MTPuTTY или других сторонних SSH клиентов. Встроенный SSH клиент Windows основан на порте OpenSSH и предустановлен в ОС, начиная с Windows 10 1809.
Содержание:
- Установка клиента OpenSSH в Windows 10
- Как использовать SSH клиенте в Windows 10?
- SCP: копирование файлов из/в Windows через SSH
Установка клиента OpenSSH в Windows 10
Клиент OpenSSH входит в состав Features on Demand Windows 10 (как и RSAT). Клиент SSH установлен по умолчанию в Windows Server 2019 и Windows 10 1809 и более новых билдах.
Проверьте, что SSH клиент установлен:
Get-WindowsCapability -Online | ? Name -like 'OpenSSH.Client*'

В нашем примере клиент OpenSSH установлен (статус: State: Installed).
Если SSH клиент отсутствует (State: Not Present), его можно установить:
- С помощью команды PowerShell:
Add-WindowsCapability -Online -Name OpenSSH.Client* - С помощью DISM:
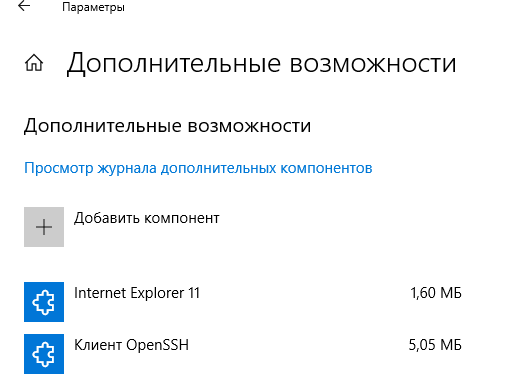
dism /Online /Add-Capability /CapabilityName:OpenSSH.Client~~~~0.0.1.0 - Через Параметры -> Приложения -> Дополнительные возможности -> Добавить компонент. Найдите в списке Клиент OpenSSH и нажмите кнопку Установить.
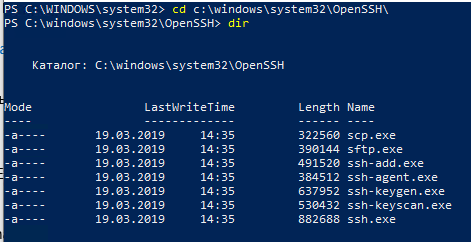
]Бинарные файлы OpenSSH находятся в каталоге c:windowssystem32OpenSSH.
- ssh.exe – это исполняемый файл клиента SSH;
- scp.exe – утилита для копирования файлов в SSH сессии;
- ssh-keygen.exe – утилита для генерации ключей аутентификации;
- ssh-agent.exe – используется для управления ключами;
- ssh-add.exe – добавление ключа в базу ssh-агента.
Вы можете установить OpenSSH и в предыдущих версиях Windows – просто скачайте и установите Win32-OpenSSH с GitHub (есть пример в статье “Настройка SSH FTP в Windows”).
Как использовать SSH клиенте в Windows 10?
Чтобы запустить SSH клиент, запустите командную строку
PowerShell
или
cmd.exe
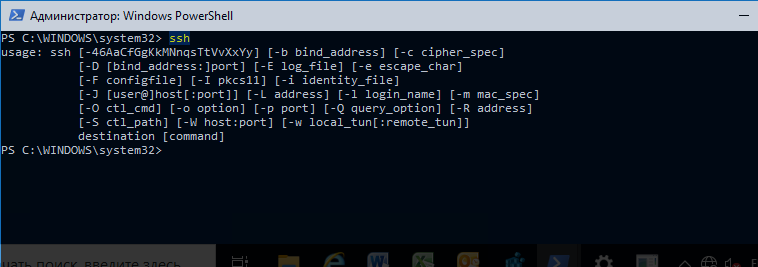
. Выведите доступные параметры и синтаксис утилиты ssh.exe, набрав команду:
ssh
usage: ssh [-46AaCfGgKkMNnqsTtVvXxYy] [-b bind_address] [-c cipher_spec]
[-D [bind_address:]port] [-E log_file] [-e escape_char]
[-F configfile] [-I pkcs11] [-i identity_file]
[-J [[email protected]]host[:port]] [-L address] [-l login_name] [-m mac_spec]
[-O ctl_cmd] [-o option] [-p port] [-Q query_option] [-R address]
[-S ctl_path] [-W host:port] [-w local_tun[:remote_tun]]
destination [command]
Для подключения к удаленному серверу по SSH используется команда:
ssh [email protected]
Если SSH сервер запущен на нестандартном порту, отличном от TCP/22, можно указать номер порта:
ssh [email protected] -p port
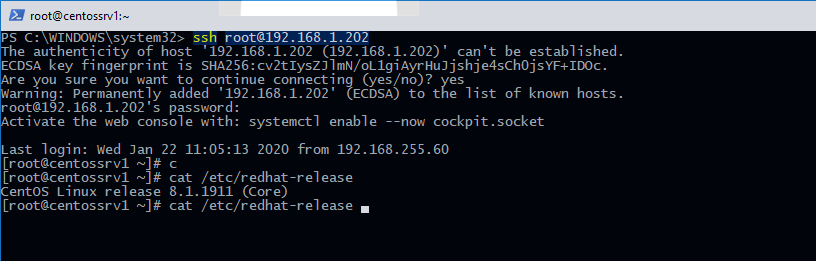
Например, чтобы подключиться к Linux хосту с IP адресом 192.168.1.202 под root, выполните:
ssh [email protected]
При первом подключении появится запрос на добавление ключа хоста в доверенные, наберите yes -> Enter (при этом отпечаток ключа хоста добавляется в файл C:Usersusername.sshknown_hosts).
Затем появится запрос пароля указанной учетной записи, укажите пароль root, после чего должна открытся консоль удаленного Linux сервера (в моем примере на удаленном сервере установлен CentOS 8).
С помощью SSH вы можете подключаться не только к *Nix подобным ОС, но и к Windows. В одной из предыдущих статей мы показали, как настроить OpenSSH сервер на Windows 10 и подключиться к нему с другого компьютера Windows с помощью SSH клиента.
Если вы используете SSH аутентификацию по RSA ключам (см. пример с настройкой SSH аутентификации по ключам в Windows), вы можете указать путь к файлу с закрытым ключом в клиенте SSH так:
ssh [email protected] -i "C:Usersusername.sshid_rsa"
Также вы можете добавить ваш закрытый ключ в SSH-Agent. Сначала нужно включить службу ssh-agent и настроить ее автозапуск:
set-service ssh-agent StartupType ‘Automatic’
Start-Service ssh-agent
Добавим ваш закрытый ключ в базу ssh-agent:
ssh-add "C:Usersusername.sshid_rsa"
Теперь вы можете подключиться к серверу по SSH без указания пути к RSA ключу, он будет использоваться автоматически. Пароль для подключения не запрашивается (если только вы не защитили ваш RSA ключ отдельным паролем):
ssh [email protected]
Еще несколько полезных аргументов SSH:
-
-C
– сжимать трафик между клиентом и сервером (полезно на медленных и нестабильных подключениях); -
-v
– вывод подробной информации обо всех действия клиента ssh; -
-R
/
-L
– можно использовать для проброса портов через SSH туннель.
SCP: копирование файлов из/в Windows через SSH
С помощью утилиты scp.exe, которая входит в состав пакета клиента SSH, вы можете скопировать файл с вашего компьютера на SSH сервер:
scp.exe "E:ISOCentOS-8.1.1911-x86_64.iso" [email protected]:/home

Можно рекурсивно скопировать все содержимое каталога:
scp -r E:ISO [email protected]:/home
И наоборот, вы можете скопировать файл с удаленного сервера на ваш компьютер:
scp.exe [email protected]:/home/CentOS-8.1.1911-x86_64.iso e:tmp
Если вы настроите аутентификацию по RSA ключам, то при копировании файлов не будет появляться запрос на ввод пароля для подключения к SSH серверу. Это удобно, когда вам нужно настроить автоматическое копирование файлов по расписанию.
Итак, теперь вы можете прямо из Windows 10 подключаться к SSH серверам, копировать файлы с помощью scp без установки сторонних приложений и утилит.
I see this post is very old, but in my search for an answer to this very question, I was unable to unearth a solution from the vast internet super highway. I, therefore, hope I can contribute and help someone as they too find themselves stumbling for an answer. This simple, natural question does not seem to be documented anywhere.
On Windows 10 Pro connecting to Windows 10 Pro, both running OpenSSH (Windows version 7.7p1, LibreSSL 2.6.5), I was able to find a solution by trial and error. Though surprisingly simple, it took a while. I found the required syntax to be
BY EXAMPLE INSTEAD OF MORE OBSCURE AND INCOMPLETE TEMPLATES:
Transferring securely from a remote system to your local system:
scp user@remotehost:DmySrcCodeProjectFooBarsomefile.cpp C:myRepoProjectFooBar
or going the other way around:
scp C:myRepoProjectFooBarsomefile.cpp user@remotehost:DmySrcCodeProjectFooBar
I also found that if spaces are in the path, the quotations should begin following the remote host name:
scp user@remotehost:"DMy Long Folder Namesomefile.cpp" C:myRepoSimplerNamerBro
Also, for your particular case, I echo what Cornel says:
On Windows, use backslash, at least at conventional command console.
Kind Regards.
RocketCityElectromagnetics
How to use Secure Copy Protocol(SCP) to transfer files securely on Windows and Mac
This article describes how to use SCP (Secure Copy Protocol) to transfer files quickly and securely from the command line.
- What is SCP?
- Using an SCP client
- Windows operating systems
- Mac OS X and Linux operating systems
- More Information
What is SCP?
Secure Copy (SCP) is a protocol based on SSH (Secure Shell) that provides secure file transfers between two computers. With SCP, you can quickly transfer files using the command line, which is often faster and easier than using a client with a graphical interface. Additionally, you can use this command-line functionality in your own batch files and scripts to automate file transfers.
For information about how to securely transfer files using a client with a graphical interface, please see this article.
Using an SCP client
Follow the appropriate procedure below for your computer’s operating system to use SCP.
Windows operating systems
Microsoft Windows does not include an SCP client, so you must download one first. A2 Hosting recommends PSCP, a free program that you can download here.
PSCP is part of the PuTTY tool suite for Windows. For information about how to access your account using SSH and PuTTY, please see this article.
After you have downloaded the PSCP executable to your local computer, you should add the directory where pscp.exe is located to your path so you can run it from any directory. After you do this, you are ready to transfer files to and from your A2 Hosting account. To do this, follow these steps:
- Open a DOS command window. To do this, click Start, click Run, type cmd, and then press Enter.
- To upload a file to your A2 Hosting account, type the following command. Replace both occurrences of username with your A2 Hosting username, and example.com with your site’s domain name. Additionally, replace file with the name of the file on your local computer that you want to upload, and replace destination with the destination directory on your A2 Hosting account:
pscp -P 7822 file username@example.com:/home/username/destination
- Make sure you use an uppercase P to specify the SCP port number.
- The default SCP port number for SSH is 22. However, A2 Hosting uses a different SCP port for security reasons.
- Type your password when you are prompted to do so. PSCP uploads the file to the destination directory that you specified.
-
To download a file from your A2 Hosting account, type the following command. Replace both occurrences of username with your A2 Hosting username, and example.com with your site’s domain name. Additionally, replace file with the name of the file on your A2 Hosting account that you want to download, and replace destination with the destination directory on your local computer:
pscp -P 7822 username@example.com:/home/username/file destination
To download the file to the current directory, type a period (.) for the destination.
-
Type your password when you are prompted to do so. PSCP downloads the file to the destination directory that you specified.
There are a few additional options that you may find useful when working with PSCP:
- The -p option preserves the original file’s attributes, such as modification and access times.
- The -r option enables you to recursively copy entire directories. For example, if you want to download the entire public_html directory to the current directory on your local computer, type the following command:
pscp -r -P 7822 [email protected]:/home/username/public_html .
- To view a list of all PSCP options, type pscp at the command line.
Mac OS X and Linux operating systems
Both Mac OS X and Linux include the scp client program, so you do not have to download a special client. To use the scp program, follow these steps:
- Open a terminal window. The procedure to do this depends on your operating system and desktop environment.
- On Mac OS X, click Applications, click Utilities, and then click Terminal.
-
To upload a file to your A2 Hosting account, type the following command. Replace username with your A2 Hosting username, and example.com with your site’s domain name. Additionally, replace file with the name of the file on your local computer that you want to upload, and replace destination with the destination directory on your A2 Hosting account:
scp -P 7822 file username@example.com:~/destination
- Make sure you use an uppercase P to specify the SCP port number. Note that this is the opposite of the ssh client program, which uses a lowercase p to specify the SCP port number.
- The default SCP port for SSH is 22. However, A2 Hosting uses a different port for security reasons.
- Type your password when you are prompted to do so. Scp uploads the file to the destination directory that you specified.
-
To download a file from your A2 Hosting account, type the following command. Replace username with your A2 Hosting username, and example.com with your site’s domain name. Additionally, replace file with the name of the file on your A2 Hosting account that you want to download, and replace destination with the destination directory on your local computer:
scp -P 7822 username@example.com:~/file destination
To download the file to the current directory, type a period (.) for the destination.
-
Type your password when you are prompted to do so. Scp downloads the file to the destination directory that you specified.
There are a few additional options that you may find useful when working with scp:
- The -p option preserves the original file’s attributes, such as modification and access times.
- The -r option enables you to recursively copy entire directories. For example, if you want to download the entire public_html directory to the current directory on your local computer, type the following command:
scp -rP 7822 [email protected]:~/public_html .
- To view the complete scp documentation, type man scp at the command line.
More Information
For more information about SCP, please visit http://en.wikipedia.org/wiki/Secure_copy.
SCP (Secure Copy) is a command-line utility that allows you to securely copy files from one computer to another over a secure, encrypted connection. It uses the SSH protocol to provide a secure connection to the remote system.
With the scp command you can securely copy files or directories in the following ways:
- From your local system to a remote system
- From a remote system to your local system
- Between two remote systems, while sending the commands from your local system.
The SCP command-line utility is available in most Linux distributions.
In this tutorial we’ll cover how to use the scp command in various scenarios to securely transfer files from one computer to another, using practical examples. We’ll also show you some of the most frequent options that you can use with the scp command to customize your file transfers.
SCP is usually used to refer to both SCP (the command-line utility, developed by the OpenSSH Project), as well as Secure Copy Protocol, which is the protocol used by the utility.
SCP is based on the Secure Shell (SSH) protocol, and it comes with a similar set of options, and is provided in most SSH implementations.
It uses credentials (such as passwords or SSH keys) for authentication, and it secures your transfers by encrypting both passwords and the transferred data, so your contents should be impervious to snooping.
A related protocol is SFTP (Secure File Transfer Protocol), however SCP does not have some of the capabilities that SFTP does, such as resuming broken transfers or remote file manipulation, like deletion.
SCP is similar to rsync, but unlike rsync, scp can only securely copy files and cannot sync directories.
Table of Contents
- About the SCP Command
- Before You Begin
- Requirements
- Useful Info
- SCP Command Syntax
- Securely Copy Files and Directories Between Two Hosts With the SCP Command
- 1. Copy a Local File to a Remote Host Using SCP Command
- Copy Multiple Local Files to a Remote Host
- 2. Copy a Remote File to Your Local Machine Using SCP Command
- Copy Multiple Remote Files to Your Local Machine
- 3. Copy a File between Two Remote Hosts Using the SCP Command
- Copy Files Between Two Remote Hosts That Are Not in The Same Network
- 5. Copy Files with Certain Extensions With the SCP Command
- 6. Copy a Directory Recursively With the SCP Command
- 1. Copy a Local File to a Remote Host Using SCP Command
- SCP Options
- SCP Verbose Mode (-v, -vv, -vvv)
- Transfer and Compress Files on The Fly (-C)
- Limit Bandwidth Usage (-l)
- Specify Port Number (-P)
- Set a Different Cipher (-c)
- Force SCP to Use IPv4 or IPv6 Addresses (-4 / -6)
- Automate File Transfers Using a SCP Shell Script
- SSH Key (Identity File) Path (-i) with the SCP Command
- Using Multiple SCP Command Options
- Preserve File Modification/Access Times and Modes With the SCP Command (-p)
- How to Resume Interrupted SCP File Transfers
- Resume Interrupted File Transfers with SFTP Reget or Reput
- Installing SCP (Optional)
- Install SCP on Linux
- Install SCP on Debian-based Distros
- Install SCP on RHEL-based Distros
- Install SCP on Windows
- pscp (Putty) – Windows SCP via Command-line
- Copy Files from Windows to Linux with PSCP
- Copy Files from Linux to Windows with PSCP
- WinSCP – GUI Version of SCP
- Install SCP on Linux
- Conclusion
Before You Begin
Requirements
- To be able to transfer files from/to remote hosts via
scp, you need the user’s authentication credentials – such as user/password or SSH keys. - To be able to transfer files between systems you must have at least read permissions on the source file and write permissions on the destination system.
Useful Info
By default, scp operates on port 22 unless you change it using a command-line option.
You can use SCP with Linux, Mac, and Windows.
SCP should already be installed on Linux and Mac, however on Windows you have to install it – if you’re on Windows please see the section below on installing SCP on Windows.
When transferring large files, you’ll probably have to wait some time for the transfers to finish. For various reasons, you may not want to have to keep the command line open for hours. A solution here is running the scp command inside a terminal multiplexer such as screen or tmux, which allow you to leave commands running even if you log off.
SCP Command Syntax
The basic syntax of the SCP command is the following.
scp [OPTIONS] [[[email protected]]SOURCE_HOST:]file1 [[[email protected]]DESTINATION_HOST:]file2
Let’s break down and explain what the above expression means:
[OPTIONS]: Options alter the scp command’s behavior, such as changing the encryption cipher, ssh_config location, identity file location, limit bandwidth, change SSH port, recursive copy, and others.
You can check all available options by running man scp in the command line or read the scp man page online.
[[[email protected]]SOURCE_HOST:]file1: This is the source file, the file to be copied.
If you’re copying from your local machine then you should just specify the relative (~/file1) or absolute path (/home/edxd/file1).
If the source file is located on a remote system, then you’ll have to specify the user and host ([email protected]_source_ip) followed by the colon (:) separator, and then the file’s absolute or relative path.
For example: [email protected]:/var/www/file1.txt
[[[email protected]]DESTINATION_HOST:]file2: This is the destination file, where the file is going to be copied.
If you’re copying to a remote host, it should include the user and host specification [email protected]_destination_ip:/path/to/file2.
If you’re copying from a remote host to your machine, the absolute or relative path where you want the file copied, such as just /path/to/file2.
There are a few ways you can handle the remote user and host specifications.
You can use:
- an IP address:
[email protected] - a domain name:
[email protected] - a host defined in the
/etc/hostsfile - a host defined in
~/.ssh/config(or%userprofile%.sshconfigon Windows, usuallyC:Usersyour_user.sshconfig)
Securely Copy Files and Directories Between Two Hosts With the SCP Command
1. Copy a Local File to a Remote Host Using SCP Command
It’s one of the most straightforward SCP commands you can carry out. We’re copying a single file (example.txt) from our computer to our remote host, which has .
To copy a local file to a remote host run a command like:
scp /path/to/example.txt [email protected]:/remote/path
Let’s quickly explain the above command.
/path/to/example.txt is the path to the file you want to copy from your local computer, remote_user is the user on the remote server, 121.134.21.14 is the IP of the remote host.
Next, comes a colon : after which you can specify the path where you want the file to be copied (/remote/path/). The copied file will retain it’s original name.
Here is a video to illustrate how this works. I’ll run the following command:
scp example.txt [email protected]:/home/stelixd
In the video below, on the left, we have a terminal on our local computer, and on the right we have the terminal of an Ubuntu remote server.
1. SCP Command — Copy a file from your local computer to a remote host
If you are connecting to your remote host for the first time, you will see the prompt Are you sure you want to continue connecting (Yes/no)?.
Assuming you trust the remote server, type Yes, press Enter, and fill in the user password (if you’re not using SSH keys).
When we execute the ls command on the remote server, you can see the example.txt was successfully copied.
You can also specify a new name for the file (/remote/path/file1_new_name):
scp /path/to/file1 [email protected]:/remote/path/file1_new_name
Copy Multiple Local Files to a Remote Host
You can also copy multiple files on our remote host in a single command. In my case I’ll transfer movie1.mp4, movie2.mp4, movie3.mp4, and movie4.mp4.
To transfer multiple files with the scp command just include all of them in the command, separated by a space:
scp movie1.mp4 movie2.mp4 movie3.mp4 movie4.mp4 [email protected]:/home/stelixd
2. Copy a Remote File to Your Local Machine Using SCP Command
To copy a remote file to your local machine using the scp command, just use the remote location as the source file, and the local location as the destination:
scp [email protected]:/home/stelixd/example.txt example.txt
Copy Multiple Remote Files to Your Local Machine
To copy multiple files from our remote host to our local machine, use the following syntax:
scp [email protected]_destination:/some/remote/directory/{file1,file2,file 3} /some/local/directory
Where [email protected]_destination is your remote host details, /some/remote/directory/ is a directory on your remote host, and {file1,file2,file3} are the files we want to transfer, separated by a comma, in escaped () curly braces {}.
Escaping is a method that allows us to tell a computer to do something special with the text we supply or to ignore the special function of a character. To tell the computer that it should expect an escape character we use a special escape marker, we usually make use of the backslash , such as we have done with the curly braces ({, }).
Here is an example of me transferring 3 empty files from a remote server to a local computer:
scp mrtest:/home/edxd/{file1,file2,file3} /home/stelixd/
Output
file1 100% 5120KB 2.5MB/s 00:01
file2 100% 11MB 8.1MB/s 00:01
file3 100% 8192KB 8.0MB/s 00:00
3. Copy a File between Two Remote Hosts Using the SCP Command
With the scp command you can securely copy files from a remote host directly to another remote host, all without having to SSH into any of them.
You’ll just send the command from a third machine, such as your local computer. The following command will copy file1 between two remote machines:
scp [email protected]_host_1:/var/www/file1 [email protected]_host_2:/var/www/file2
Video Demo
Here is an example where I copy a file between two remote hosts with scp:
scp [email protected]:/home/edxd/my_file [email protected]:/home/stelixd
5. SCP Command — Copy Files Across Remote Hosts
Important: In some cases scp hangs, and doesn’t prompt you for both passwords so it can proceed with the transfer, and I’m not yet sure the reason for this.
One solution for this is setting up SSH-key based authentication between the computer issuing the command, and both the remote hosts.
Copy Files Between Two Remote Hosts That Are Not in The Same Network
Usually you can transfer files between remote machines with the scp command because they are on the same network, with routers between them that route the traffic.
But there are instances where you need to transfer files between remote machines that aren’t on the same network, because there are no routers between them, however you can connect to both of them from your computer.
With the scp command you have an option to transfer files through the third machine sending the command, such as your local computer. You can do this with the -3 option.
The following command will copy files from two machines through the machine that is sending the command.
scp -3 [email protected]_host_1:/var/www/file1 [email protected]_host_2:/var/www/file2
Video Demo
An example of the above command.
scp -3 [email protected]:/home/edxd/my_file [email protected]:/home/stelixd
5. SCP Command — Copy Files Across Remote Hosts (Route)
5. Copy Files with Certain Extensions With the SCP Command
To securely copy files of a specific type using the scp command you can run a command such as:
scp [email protected]_host:'/directory/*.{html,php}' /destination/folder
Important Note: Please note the pair of single quotes ', along with the * wildcard, and curly braces with comma separated extensions. This will cause the shell to turn the expression into:
scp [email protected]_host:/directory/*.html [email protected]_host:/directory/*.php /destination/folder
6. Copy a Directory Recursively With the SCP Command
To copy a directory along with all its contents, we will include the -r (recursive) parameter in our SCP command. This command will copy a directory and all its contents:
scp -r transfer_folder [email protected]_host:/remote/path/
Let’s copy the transfer_folder directory on our local computer to our remote host.
scp -r transfer_folder [email protected]:/home/stelixd
Video Demo
3. SCP Command — Copy a Directory Recursively
SCP Options
You can easily view the scp command’s options in your command-line by running man scp. We’ll explore a few of these options here.
SCP Verbose Mode (-v, -vv, -vvv)
By enabling verbose mode with the scp command, you can see debug information for SCP – essentially you’re seeing everything happening behind the scenes.
The more -v you use, the more verbose the output will be. The maximum number of -v is 3.
Video Demo
For our example we’ll copy a few files movie1.mp4, movie2.mp4, movie3.mp4 and movie4.mp4 using -v.
4. SCP Command — Copy Files Verbose Mode
Transfer and Compress Files on The Fly (-C)
If you are copying a large file or multiple files over a slow network, you can use the -C parameter, which will enable the scp command to compress the files before transferring them over the internet.
That may also save on your bandwidth if bandwidth is an issue. On reasonably fast connections, this might just slow things down, however.
Note: We have included the -v (verbose) parameter in the command below to see what is happening behind the scenes.
scp -vC example_file [email protected]:/home/stelixd
Video Demo
6. SCP Command — Compress and Copy Files
Limit Bandwidth Usage (-l)
When you’re copying a file from your local computer to a remote host, think of it as an upload process. Now, if the upload bandwidth used by the SCP command is high, it might impact the network or other processes and devices also uploading data.
Luckily, we can use the -l parameter and specify the bandwidth used by the SCP command in Kilobits/sec (kbps).
Important: Even though we specify the transfer rate in Kilobits/sec (kbps), the transfer rate will be displayed in Kilobytes/sec (KB/s). A Kilobyte is made up of 8 Kilobits. So when we specify, say scp -l 1600, we’re saying we want a transfer rate of 1600 Kilobits, which in KB/s means 1600 / 8 = 200 KB/s. As another example, if you want to limit transfer to 300 KB/s, you multiply 300 * 8 = 2400 Kilobits. So we run scp -l 2400.
In the command below, we will set our SCP transfer bandwidth to 800 Kb/s (800 * 8 = 6400 Kilobits/sec).
scp -l 6400 example_file [email protected]:/home/stelixd
7. SCP Command — Limit Bandwidth Usage
Specify Port Number (-P)
By default, SSH uses port 22.
For security reasons and other related measures, some people prefer changing this default port and configuring a custom port to work with the SSh service. You will need to specify the custom SSH port in your SCP command using the -P parameter in such a situation.
We haven’t configured any custom port in our case, and we will just enter port 22.
scp -P 22 example_file [email protected]:/home/stelixd
8. SCP Command — Specify Port Number
Set a Different Cipher (-c)
To securely copy files securely over a network, scp uses the AES encryption algorithm. To specify a different algorithm, use the -c parameter. For this example, we will use the aes128-ctr cipher. Some ciphers are more secure and others are faster than others.
Note: This -c parameter is a lowercase character, unlike our -C (uppercase) used for file compression.
scp -c aes128-ctr example_file [email protected]:/home/stelixd
9. SCP Command — Set a Different Cipher
Force SCP to Use IPv4 or IPv6 Addresses (-4 / -6)
You can specify whether the scp command should use IPv4 or IPv6, with the -4 and -6 options.
To use IPv4:
scp -4 /path/to/file1 [email protected]_host:/remote/path/
To use IPv6:
scp -6 /path/to/file1 [email protected]:/remote/path/
Automate File Transfers Using a SCP Shell Script
If you have files or directories that you copy regularly, you can create a simple bash script and save the time of writing those long commands on the terminal.
There are various ways you can write scripts to use the SCP command.
In this example I’ll create a simple script that requests a target file or directory that I manually input, then it loops through some destinations in a file (that I’ve set beforehand), and transfers the file I entered to those destinations.
I created a file called destination_address.txt in the /tmp directory. This text file will hold the [email protected]_address:/destination of our remote host. In this case, I want to transfer files to my remote server, in the ~/remote_transfers folder.
[email protected]:~/remote_transfers/
Now let’s create our bash script:
echo "=================="
echo "Running SCP Script"
echo "=================="
echo -e "Enter the path to the file you wish to copy:c"
read file

for dest in cat /tmp/destination_address.txt; do
scp -r $file ${dest}

done
We will save our script as scp_script.sh. To make the script executable, remember to run the command chmod +x scp_script.sh.
To run it I’ll run:
sudo bash scp_script.sh
10. SCP Command — Automate File Transfers Using a SCP Shell Script
SSH Key (Identity File) Path (-i) with the SCP Command
If you have configured SSH key-based authentication, you can use the -i option and specify the path to the identity file.
Identity files come in different formats, depending on your setup and environment. For example .pub is the file format used by SSH, .pem can be used for AWS when you created your key-pair.
The following command connects to a remote host using an SSH Key.
scp -i /path/to/ssh_key.pub /path/to/local_file [email protected]_host:path/to/remote/file
Using Multiple SCP Command Options
You can use multiple options in the same command. Some flags can be combined. If you check man scp you should see the scp command’s full syntax, which should give you a good idea on what flags you can combine:
scp [-346BCpqrTv] [-c cipher] [-F ssh_config] [-i identity_file] [-J destination] [-l limit] [-o ssh_option] [-P port] [-S program] source ... target
Preserve File Modification/Access Times and Modes With the SCP Command (-p)
To preserve modification times, access times, and modes with the scp command you can use the -p flag:
scp -p /path/to/example.txt [email protected]:/remote/path
How to Resume Interrupted SCP File Transfers
The scp command does not understand range-request or partial transfer, such as HTTP does. As such, scp implementations, such as our command-line utility can’t resume interrupted downloads.
However, there are simple ways to resume interrupted scp transfers, by using other utilities that have this capability.
A very easy and straightforward way of resuming aborted downloads is using the sftp interactive commands reput and reget.
Resume Interrupted File Transfers with SFTP Reget or Reput
SFTP (SSH File Transfer Protocol) is a related secure transfer protocol, which is used to access, manage and transfer files using SSH.
To read more on sftp and its’ options you can run man sftp or read the sftp manual page online.
It works a little different than the scp command, as it offers an option to run interactive commands after connecting to a remote server.
The two interactive commands that can help us resume interrupted downloads or uploads are:
1. reget: resumes downloads
2. reput: resumes upload
In the following example we start downloading a 700 mebgabyte file called bytexd.txt from a remote server, that we interrupt by pressing Ctrl + C, when it’s at 9%:
scp [email protected]_host:/remote/directory/bytexd.txt bytexd.txt
Output
bytexd.txt 9% 65MB 3.1MB/s 03:34 ETA
To continue the download we’ll have to connect to the remote host using sftp:
sftp [email protected]_host
You will have to authenticate, such as you would with scp or ssh.
When you’re logged in with sftp you’ll notice your prompt has changed into:
sftp>
Now we can run interactive commands.
You can also run commands such as cd and ls to navigate and find your files. Read more on all available interactive commands in the man page.
To resume the download, we’ll run the reget interactive command, followed by the file path on the remote directory:
sftp> reget /remote/directory/bytexd.com
Output
Resuming /remote/directory/bytexd.txt to bytexd.txt
/remote/directory/bytexd.txt 10% 73MB 771.1KB/s 13:53 ETA
Installing SCP (Optional)
On Linux and Mac, scp is usually already installed, and on Windows you’ll most likely have to install it yourself.
Install SCP on Linux
Installing scp will different, depending on your distro.
Install SCP on Debian-based Distros
To install scp on Debian-based distros (such as Debian, Ubuntu, Linux Mint, and others) run:
sudo apt install openssh-client
Install SCP on RHEL-based Distros
To install scp on RHEL-based distros (such as CentOS, Fedora, Rocky Linux, AlmaLinux, and others) run:
sudo dnf install openssh-clients
Install SCP on Windows
The scp command doesn’t come installed on Windows so we’ll have to install it ourselves. We’ll cover two common ways. There are probably more out there, but these two are popular and tested.
pscp (Putty) – Windows SCP via Command-line
PSCP (PuTTY Secure Copy) is similar to scp and comes bundled with PuTTY, probably the most used SSH client for Windows. It is free and open-source.
You can download and install Putty from the developer’s (Simon Tatham) website, if you don’t have it already.
You can also download and install pscp.exe separately, if you prefer.
After installing it, open a new command shell (like cmd.exe) and run:
pscp
You should see something like:
PuTTY Secure Copy client
Release 0.74
Usage: pscp [options] [[email protected]]host:source target
       pscp [options] source [source...] [[email protected]]host:target
       pscp [options] -ls [[email protected]]host:filespec
Options:
  -V        print version information and exit
  -pgpfp    print PGP key fingerprints and exit
  -p        preserve file attributes
  -q        quiet, don't show statistics
  -r        copy directories recursively
  -v        show verbose messages
  -load sessname  Load settings from saved session
  -P port   connect to specified port
  -l user   connect with specified username
  -pw passw login with specified password
  -1 -2     force use of particular SSH protocol version
  -4 -6     force use of IPv4 or IPv6
  -C        enable compression
  -i key    private key file for user authentication
  -noagent  disable use of Pageant
  -agent    enable use of Pageant
  -hostkey aa:bb:cc:...
            manually specify a host key (may be repeated)
  -batch    disable all interactive prompts
  -no-sanitise-stderr  don't strip control chars from standard error
  -proxycmd command
            use 'command' as local proxy
  -unsafe   allow server-side wildcards (DANGEROUS)
  -sftp     force use of SFTP protocol
  -scp      force use of SCP protocol
  -sshlog file
  -sshrawlog file
            log protocol details to a file
File path notation is different for Windows that for Linux. With pscp you must specify the file paths appropriately for each operating system.
Copy Files from Windows to Linux with PSCP
To copy files from Windows to Linux, using pscp you can run something like:
pscp c:pathtofile [email protected]_host:/path/to/file
Copy Files from Linux to Windows with PSCP
To copy files from Linux to Windows using pscp:
pscp [email protected]_host:/path/to/file c:pathtofile
WinSCP – GUI Version of SCP
WinSCP is a very popular GUI (graphical user interface) software, for Windows, that allows copying files between local and remote hosts, and supports the following file transfer protocols – SCP, FTP, FTPS, SFTP, WebDAV and S3.
It’s very straightforward and easy to use. To install it follow the instructions in the install guide , and you can read about its features and other useful information in the Documentation.
Many Windows users prefer WinSCP since it mainly offers a graphical user interface and offers functionalities such as:
- Drag & Drop: Simply using the interface to drag/drop files to copy them from the local to the remote system, and vice versa.
- Synchronizing: Which synchronizes content of a local directory onto the remote directory, vice versa, or even full sync which means that any modification made on either system, it will be applied to the other system.
- Resuming Transfers
- .. many more that you can find in the WinSCP Docs
Conclusion
This post has given you a detailed guide on using the scp command to transfer files securely, and how to use some of the most common options. To easily see all the scp command options, along with their explanations, you can run the man scp command in your command-line, or you can read them online.
If you have any questions or requests, then feel free to let us know in the comments section and we’ll get back to you as soon as we can.
Secure Shell (SSH) has been used for many years to remotely access systems, and a common need has been to transfer files to those systems, along with a standard terminal connection.
Secure Copy Protocol (SCP) was developed to utilize the same SSH mechanism to transfer files between servers. SCP is available with most SSH clients that are commonly preinstalled on most Linux operating systems.
Using SCP on Windows
If you would like to use SCP on Windows, it is usable by installing the OpenSSH Client feature for Windows. There are third party packages that can provide the executable, but as of Windows 10, this is the most convenient method and often installed by default.
Add-WindowsCapability -Online -Name OpenSSH.Client~~~~0.0.1.0
SCP Options
SCP has a number of options to enable controlling the connection and suit most connection scenarios.
These options are relevant to the 8.3 release of SCP.
- -3 — Copies between two remote hosts are transferred through the local host of SCP. If this option is not used, then files transfer directly between the two remote hosts, bypassing the localhost.
- -4 — Force SCP to only use IPv4 addresses.
- -6 — Force SCP to only use IPv6 addresses. Note that all IPv6 addresses must be enclosed in square brackets.
- -B — Enters Batch mode, which will prevent the asking for passwords or passphrases.
- -C — Enable Compression on the underlying SSH connection (passes the -C flag to SSH)
- -c — Change the cipher that is used and is passed directly to SSH.
- -F — Specify an alternate ssh_config file and is passed directly to SSH.
- -i — Select the private key (identity) file for public key authentication.
- -J — Connect to a target host by first making an SCP connection to a jump host and then establishing a TCP forwarding connection to the ultimate destination. Multiple hops may be configured through comma-separated destinations.
- -l — Limit the used bandwidth as specified in KBit/s.
- -o — Pass any number of different SSH options as specified in the formats used in ssh_config.
- -P — Specify the Port to connect to.
- -p — Preserve the modification times, access times, and modes from the original file (note this is a lowercase p).
- -q — Disable the progress meter as well as warning and diagnostic messages from SSH by enabling quiet mode.
- -r — Copy entire directories recursively.
- -S — Name of the program to use for the encrypted connection. This program may replace SSH but must understand SSH options.
- -T — Disable strict filename checking. The downside to this is that there is an expectation that the server will not send unexpected filenames. This was added to account for the differences in a filename that different server types could serve.
- -v — Set a verbose mode, which is useful for debugging.
As you can see there are a large number of options that make it easy to configure your connection to make even the most complex of connections work properly.
Examples
The simplest example is by transferring files from one server to another.
scp ~/backup.tar root@server:~/backup.tar
Of course, this assumes an extremely simple server connection. Oftentimes you may have a more complex connection with different ports and using a public/private key.
scp -P 55534 -i ~/.ssh/id_ed25519 ~/backup.tar root@server:~/backup.tar
Port 55534 is a randomly chosen port that may assist in obscuring the SSH servers.
Transferring a directory of files from the local system to a remote computer is just as easy.
scp -r ~/backups/ root@server:~/backups/
Perhaps you have limited bandwidth and want to make sure you do not saturate the link when transferring backup files (as in this example). You can use the -l option to specify KBit/s to transfer at. Additionally, we want to preserve modification times, access times, and modes from the original files, so we use the -p option.
scp -l 800 -p -r ~/backups/ root@server:~/backups/
Alternatives
In recent years, it has been noted by the creators of OpenSSH that SFTP is a better alternative, but there are limitations to how SFTP works versus SCP that may influence what tool you use. The reason that you may not want to use SCP is due to the -T and -r options. With the -r option, it’s possible for a malicious server to evaluate a shell script that could overwrite a file such as .ssh/authorized_keys, as an example. Additionally, using the -T option will disable strict filename checking, and causes a similar situation where it may be possible for a malicious server to overwrite files that it should not.
SFTP is not as flexible as SCP, which also translates into stricter checking of filenames that are transferred, but the downside to this is the loss of flexibility to run server scripts to return collections of files to return.
Conclusion
As you can see, SCP is an extremely useful utility that has been around for many years and used by countless system administrators. As with any utility, there are positives and negatives, but with a proper understanding, SCP becomes an excellent tool to have in one’s toolkit.
Windows 10 now has OpenSSH built in.
https://docs.microsoft.com/en-us/windows-server/administration/openssh/openssh_install_firstuse
Get an admin command prompt
Open PowerShell as an Administrator.
Check available versions
Get-WindowsCapability -Online | ? Name -like 'OpenSSH*'
Install client
Add-WindowsCapability -Online -Name OpenSSH.Client~~~~0.0.1.0
Install server
Add-WindowsCapability -Online -Name OpenSSH.Server~~~~0.0.1.0
Start server and enable at boot
Start-Service sshd
Set-Service -Name sshd -StartupType 'Automatic'
Find your Windows IP address
ipconfig
On your remote (Linux) machine, find your IP address.
ifconfig
Create a public SSH key
ssh-keygen.exe
Copy public key from local (Windows) to remote (Linux) machine so you don’t have to type in a password all the time.
Note that ssh-copy-id is not currently available on Windows.
cat C:UsersYOU/.ssh/id_rsa.pub | ssh USER@REMOTE_IP 'mkdir -p ~/.ssh && cat >> ~/.ssh/authorized_keys'
Do the same on your Linux machine (Note, ssh-copy-id does not work)
ssh-keygen # if needed
cat ~/.ssh/id_rsa.pub | ssh USER@WINDOWS_IP 'mkdir -p ~/.ssh && type con >> C:/Users/YOU/.ssh/authorized_keys'
-
The method above did not work for me, so I ended up manually SCPing the public key over and pasting it into the C:/Users/YOU/.ssh/authorized_keys file.
-
That still did not work, so I had to modify the sshd_config file.
-
Open Notepad as Administrator
-
Open %programdata%sshsshd_config
-
Add the following lines:
-
        Match User YOU
             AuthorizedKeysFile C:/Users/YOU/.ssh/authorized_keys
- Reboot
Create a password on Windows if you don’t already have one
System Settings...Sign-in options
— Note, you can still disable the Windows login screen by a) Setting the ‘Require sign-in’ option to never and b) Using the ‘netplwiz’ command and unticking the ‘Users must enter password…’ checkbox.
Now you should be able to SSH or SCP from your Linux machine
scp FILE WINDOWS_IP:C:/Users/YOU/Desktop
When you are working on the multiple servers, copying files between two servers is a common task for any system administrator. In this case, the SCP utility is the best choice for any system administrator.
SCP stands for “Secure Copy Protocol” is a Linux command-line tool used to transfer files and directories securely between two servers.
By default, GUI mode is not installed in Linux servers. SCP utility makes it easier for Linux system administrator to manage the multiple servers from the command-line.
SCP utility is based on the SSH, as so you will need a username and password of the source and target system to transfer the files.
In this tutorial, we will show you how to transfer files and directories between two systems using SCP file transfers!
Basic Syntax
The basic syntax of the scp command is shown below:
scp [OPTION] local-file-or-directory user@remote-ip:/directory/
You can use the above command to transfer files and directories from a local system to remote system.
scp [OPTION] user@remote-ip:/remote-file /local-directory
You can use the above command to transfer files and directories from a remote system to local system.
scp [OPTION] user@remote-ip:/directory/ user@remote-ip:/directory/
You can use the above command to transfer files and directories from one remote system to another remote system.
A brief explanation of each option in SCP command are shown below:
*Note: all these options are Case sensitive!
- -r
This option will copy files and directories recursively. - -v
This option will display verbose output during the copying process. - -P
This option is used to specify the ssh port number of the target host when the target host using the different SSH port. - -l
This option is used to limit the bandwidth while copying the files and directories. - -q
This option skips the SSH warning message. - -p
This option will preserve permissions, modes and access time of files while copying. - -i
This option is used to specify the SSH private key.
Transfer Files and Directories with SCP in Linux
The SCP utility allows you to transfer files between, local to remote, remote to local and remote to remote systems.
In this section we will show you how to transfer files and directories between them.
Local to Remote System Transfers:
Local to Remote File Transfers:
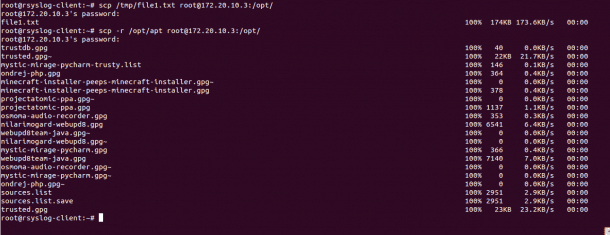
To transfer a file named file1.txt located inside /tmp directory from a local system to the remote system directory /opt use the following command:
scp /tmp/file1.txt root@172.20.10.3:/opt/
You will be asked to provide remote system’s root user password to transfer the file as shown below:
root@172.20.10.3's password:

file1.txt                                                                                                    100%  174KB 173.6KB/s   00:00
You can use the option -v with SCP to see the verbose output during the file transfer:
scp -v /tmp/file1.txt root@172.20.10.3:/opt/
Local to Remote Directories/Folders Transfers:
To transfer a directory named apt located inside /opt from a local system to the remote system directory /opt recursively use the following command:
scp -r /opt/apt root@172.20.10.3:/opt/
Provide remote system’s root user password to transfer the directory as shown below:
trustdb.gpg                                                                                                  100%   40     0.0KB/s   00:00

trusted.gpg~                                                                                                 100%   22KB  21.7KB/s   00:00

mystic-mirage-pycharm-trusty.list                                                                            100%  146     0.1KB/s   00:00

ondrej-php.gpg                                                                                               100%  364     0.4KB/s   00:00

minecraft-installer-peeps-minecraft-installer.gpg~                                                           100%    0     0.0KB/s   00:00

minecraft-installer-peeps-minecraft-installer.gpg                                                            100%  378     0.4KB/s   00:00

projectatomic-ppa.gpg~                                                                                       100%    0     0.0KB/s   00:00

projectatomic-ppa.gpg                                                                                        100% 1137     1.1KB/s   00:00

osmoma-audio-recorder.gpg                                                                                    100%  353     0.3KB/s   00:00

nilarimogard-webupd8.gpg                                                                                     100% 6541     6.4KB/s   00:00

webupd8team-java.gpg~                                                                                        100%    0     0.0KB/s   00:00

nilarimogard-webupd8.gpg~                                                                                    100%    0     0.0KB/s   00:00

mystic-mirage-pycharm.gpg                                                                                    100%  366     0.4KB/s   00:00

webupd8team-java.gpg                                                                                         100% 7140     7.0KB/s   00:00

osmoma-audio-recorder.gpg~                                                                                   100%    0     0.0KB/s   00:00

mystic-mirage-pycharm.gpg~                                                                                   100%    0     0.0KB/s   00:00

ondrej-php.gpg~                                                                                              100%    0     0.0KB/s   00:00

sources.list                                                                                                 100% 2951     2.9KB/s   00:00

sources.list.save                                                                                            100% 2951     2.9KB/s   00:00

trusted.gpg                                                                                                  100%   23KB  23.2KB/s   00:00
Example:
Remote to Local Transferring:
Remote to Local File Transfers:
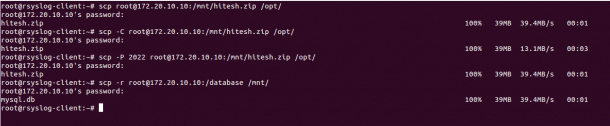
To transfer a file named hitesh.zip located inside /mnt directory of the remote to the local system’s directory /opt use the following command:
scp root@172.20.10.10:/mnt/hitesh.zip /opt/
You can increase the transfer speed by enabling the compression using the option -C with SCP as shown below:
scp -C root@172.20.10.10:/mnt/hitesh.zip /opt/
If your remote server uses SSH port 2022, then you can use -P option to specify the remote SSH port as shown below:
scp -P 2022 root@172.20.10.10:/mnt/hitesh.zip /opt/
Remote to Local Directory/Folders Transfers:
To transfer a directory named /etc from the remote system to local system’s directory /mnt recursively use the following command:
scp -r root@172.20.10.10:/database /mnt/
Example:
Remote to Remote System Transfers:
Remote to Remote File Transfers:
In order to transfer files and directories between two remote servers. You will need to configure SSH key-based authentication between both remote servers.
To transfer a file named /etc/rc.local from the one remote system (172.20.10.3) to another remote system’s (172.20.10.5) directory /opt use the following command:
scp root@172.20.10.3:/etc/rc.local root@172.20.10.5:/opt/
To transfer a directory named /mnt/apt from the one remote system (172.20.10.3) to another remote system’s (172.20.10.5) directory /opt use the following command:
scp -r root@172.20.10.3:/mnt/apt root@172.20.10.5:/opt/

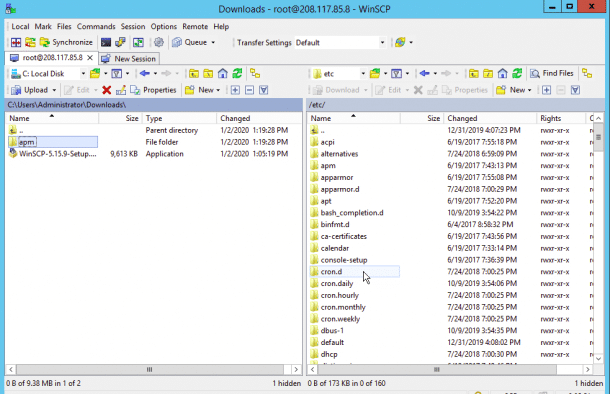
Transfer Files and Directories with SCP in Windows (7, 8, 10, and Server)
If you are working on the Windows system and want to transfer files and directories from Windows to Linux and Linux to Windows system. Then, you can achieve this using WinSCP utility.
WinSCP is a free and open-source SCP and SFTP client for Windows based operating systems.
Transfer files between Windows and Linux system follow the below steps:
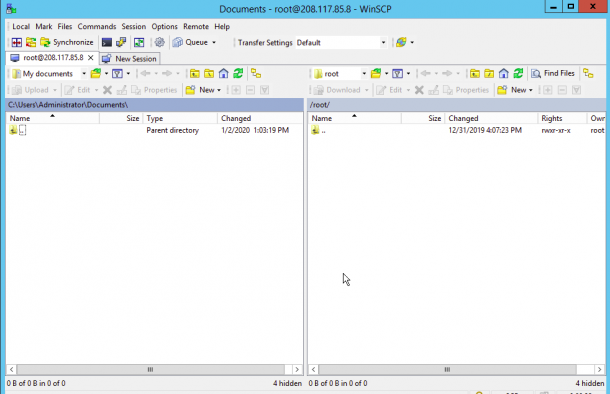
1. On the windows system, launch the WinSCP utility as shown below:
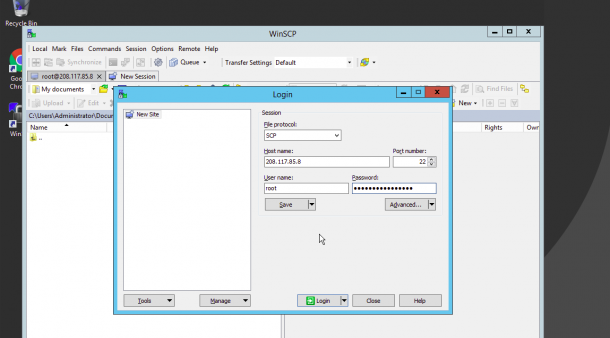
Now provide the following information:
- File Protocol : Select SCP as file transfer protocol.
- Host name : Provide your Linux server IP address.
- Port number : Provide your Linux server SSH port.
- User name : Provide the user name of your Linux server.
- Password : Provide your user’s password.
2. Now click on the Login button. You should see the following page:
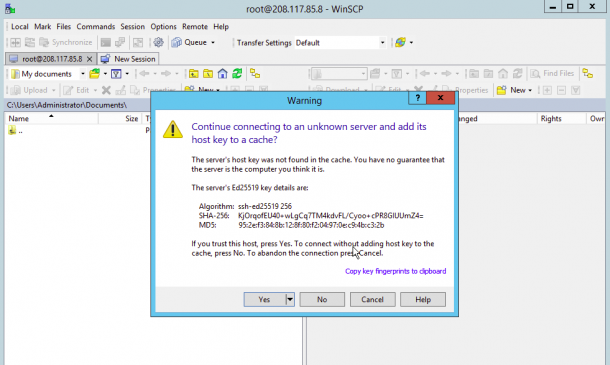
Click on the Yes button to verify the host. Once you are connected to the Linux server, you should see the following page:
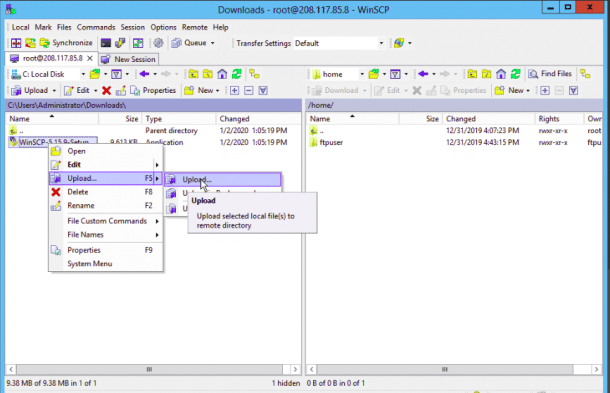
On the left pane, right-click on the file you want to upload on the Linux server and click on the Upload button as shown below:
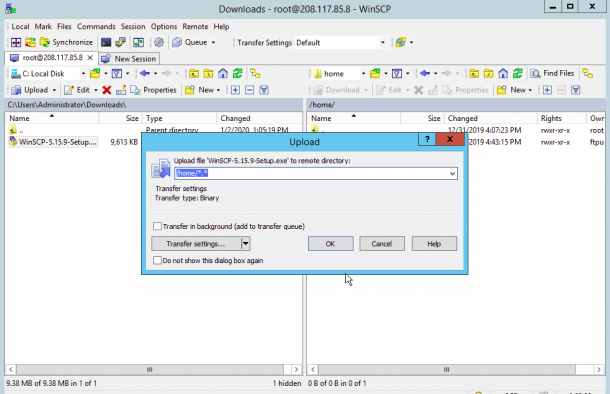
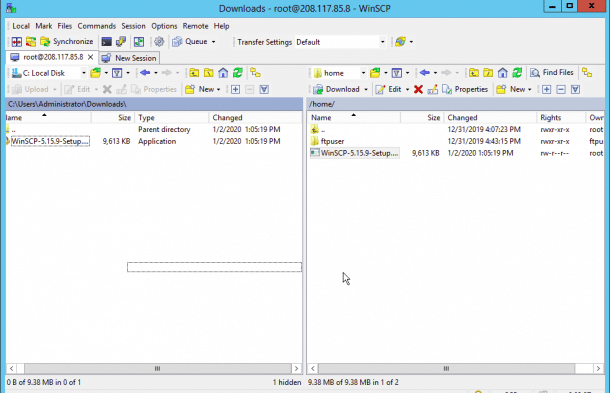
Now, provide the path of the Linux server’s directory and click on the OK button. Once the file has been uploaded, you should see the following page:
3. On the right pane, right-click on the directory you want to download from the Linux server to the Windows system and click on the Download button as shown below:


Now, provide the path of the Windows system directory and click on the OK button. Once the file has been uploaded, you should see the following page.
Conclusion
In the above tutorial, we’ve learned how to transfer files and directories from Linux to Linux, Windows to Linux and Linux to Windows. Feel free to ask questions below in the comments section if you have any!