![]()
Download Article
![]()
Download Article
Want to install a fresh version of Windows 10 on your PC? If you’re running another operating system or setting up a new PC, you can easily install Windows 10 from an installation disc or USB flash drive. Upgrading from an earlier version like Windows 7 or 8.1 is even easier—no flash drive or DVD required! This wikiHow article will walk you through installing or upgrading to Windows 10 on any PC.
-

1
Connect a blank USB flash drive or insert a blank writable DVD. You can install Windows 10 by creating a bootable USB flash drive or DVD that contains the Windows 10 installation files. You’ll need a USB flash drive that’s at least 8GB, or any blank DVD to get started.[1]
- If you already have Windows 10 installed on the PC and just want to reinstall it, it’ll be easiest to reinstall it from within Windows 10 instead of creating installation media.
- If you want to upgrade from Windows 7 or Windows 8.1, you won’t need to create an installation disc or drive. However, you will need to follow most of this method to start the upgrade.
-
2
Make sure you have a product key. If you bought Windows 10 through Microsoft using your Microsoft account, your product key is already linked to your account. If you bought Windows 10 from another retailer, you’ll have a 25-character product key that you’ll need to have handy to activate Windows.[2]
- If you don’t have a product key or you’re installing Windows 10 on a new hard drive, make sure you’ve linked your Windows 10 digital license to your Microsoft account before you start the installation.[3]
Head to Settings > Update & Security > Activation from the current installation—if the activation status says Windows is activated with a digital license, click Add an account and follow the on-screen instructions to link your Microsoft account. - If you’re upgrading from an earlier version and your PC qualifies for a free upgrade, you won’t need a product key.
Advertisement
- If you don’t have a product key or you’re installing Windows 10 on a new hard drive, make sure you’ve linked your Windows 10 digital license to your Microsoft account before you start the installation.[3]
-
3
-
4
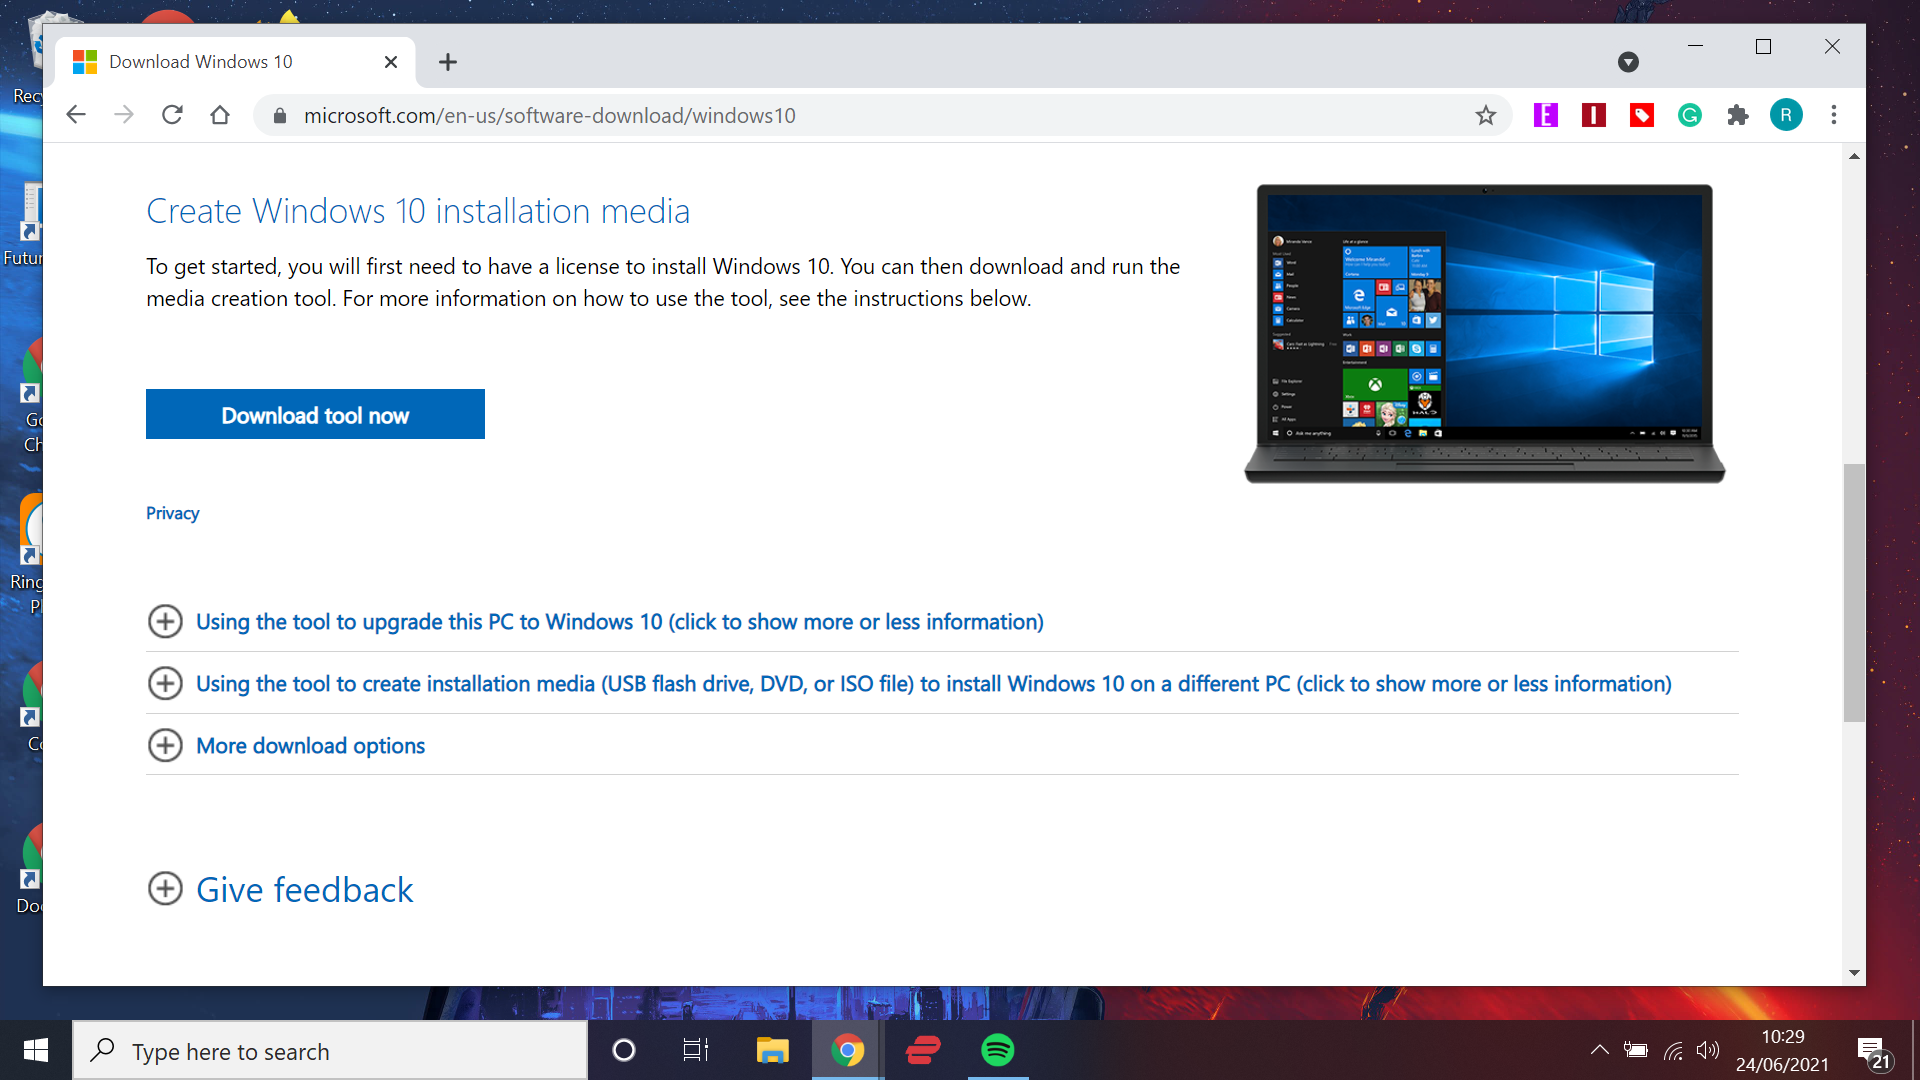
Click Download tool now. This is a blue button in the middle of the page. This downloads the Media Creation Tool, which you’ll use to create your installation media (or start your upgrade).
-
5
Double-click the downloaded file. Its name begins with «MediaCreationTool» and ends with «.exe.» You’ll find it in your default download folder, which is usually called Downloads.
- Click Yes when prompted to allow the installer to run.
-
6
Click Accept to accept the license. It’s in the bottom-right corner of the window.
-
7
Select «Create installation media» and click OK. This option lets you create a Windows installation disc or drive that will work on any compatible PC, not just the one you’re using now.
- If you’re updating your PC from an earlier version of Windows, select Upgrade this PC now instead, and then follow the on-screen instructions to install Windows 10. You’re done!
-
8
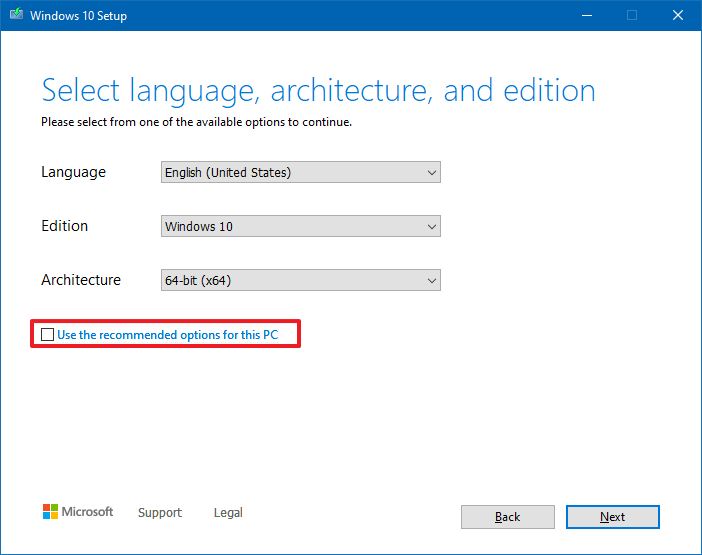
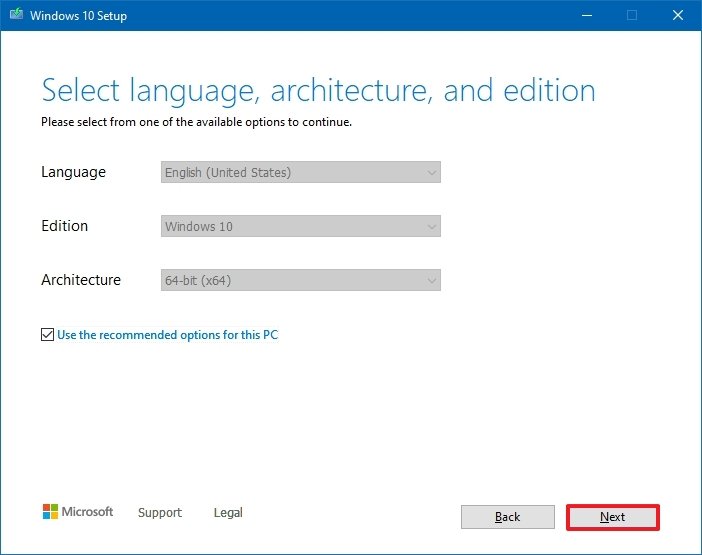
Select your preferences and click Next. If you’re installing Windows on the current PC, you can keep the default options. If you need to install on a different PC, make sure you choose the language and edition for which you have a license, and select the architecture (64-bit or 32-bit) that matches the PC you’re going to install on.
- If you’re not sure about the architecture, you can choose Both from the menu.
-
9
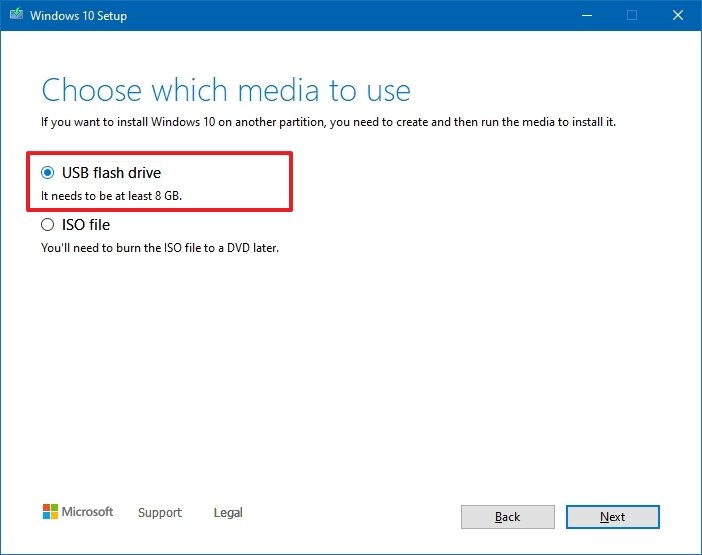
Choose an installation type and click Next. An ISO file is a type of file that can be burned to a DVD, so choose that option if you plan to create a DVD. Otherwise, choose the USB flash drive option.
-
10
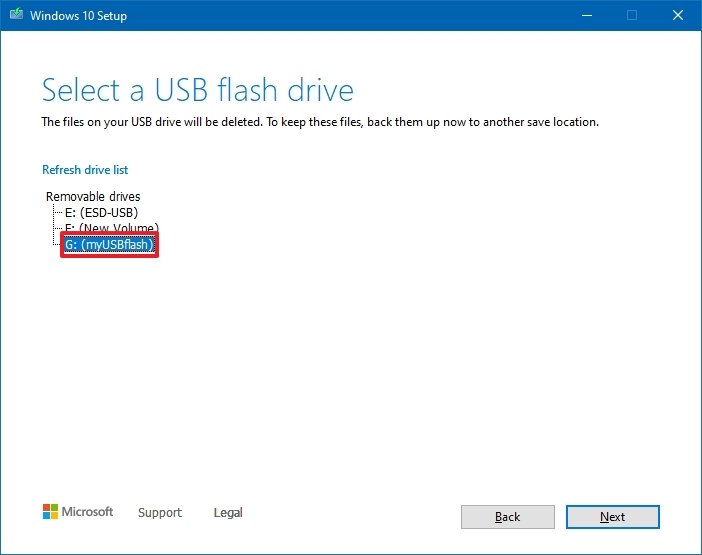
Create your installation media. The steps are a little different depending on what you’re doing:
- Flash drive: Select your flash drive from the list, click Next, and wait for the installation files to install. When the process is complete, click Finish.
- DVD/ISO: Click Save to save the ISO file to your computer—it may take a while because the file is large and has to be downloaded. Once downloaded, you’ll see a progress screen that monitors the download. When the download is complete, click Open DVD burner on the «Burn the ISO file to a DVD» screen, select your DVD burner, and then click Burn to create your DVD.


Advertisement
-
1
Connect your Windows 10 installation media. If you created a flash drive, connect it to the PC on which you want to install Windows 10. If you made a DVD, insert it into the drive now.
-
2
Boot the PC into the BIOS. If your PC is not already set up to boot from your flash or optical drive, rebooting from your installation media won’t work. You’ll need to make a quick change in your BIOS to change the boot order. There are a few ways to get in:
- Windows 8.1 or 10: From Windows, open Settings, select Update & Recovery or Update & Security, and go to Recovery > Restart now > Troubleshoot > Advanced Options > UEFI Firmware Settings > Restart.
-
Any PC: Reboot the PC and immediately start pressing (over and over again) the keyboard key required by your PC to enter «Setup,» or the BIOS. The key varies by computer, but here are some of the most common keys:
- Acer and Asus: F2 or Del
- Dell: F2 or F12
- HP: ESC or F10
- Lenovo: F1, F2, or Fn + F2
- Lenovo ThinkPads: Enter + F1.
- MSI: DEL
- Microsoft Surface Tablets: Press and hold the volume-up button.
- Samsung and Toshiba: F2
- Sony: F1, F2, or F3
-
3
Go to the Boot tab. You’ll use the arrow keys to select it.
- The Boot tab may instead say Boot Options or Boot Order, depending on your computer’s manufacturer.
-
4
Select a device from which to boot. You have a couple of options here:
- For a USB flash drive, select the Removable Devices option.
- For a disc installation, select the CD-ROM Drive or Optical Drive option.
-
5
Press the + key until your boot option is first. Once either Removable Devices or CD-ROM Drive is at the top of the list, your computer will select your choice as its default boot option.
- On some computers, you’ll instead press one of the function keys (e.g., F5 or the arrow keys to navigate an option up to the top of the menu. The key will be listed on the right side of the screen.
-
6
Save your settings. You should see a key prompt (e.g., F10 at the bottom of the screen that correlates to «Save and Exit». Pressing it will save your settings and restart your computer.
-
7
Wait for your computer to restart. Once your computer finishes restarting, you’ll see a window here with your geographical data. You’re now ready to begin setting up your Windows 10 installation.


Advertisement
-
1
Click Next when prompted. You can also change the options on this page (e.g., the setup language) before continuing if need be.
-
2
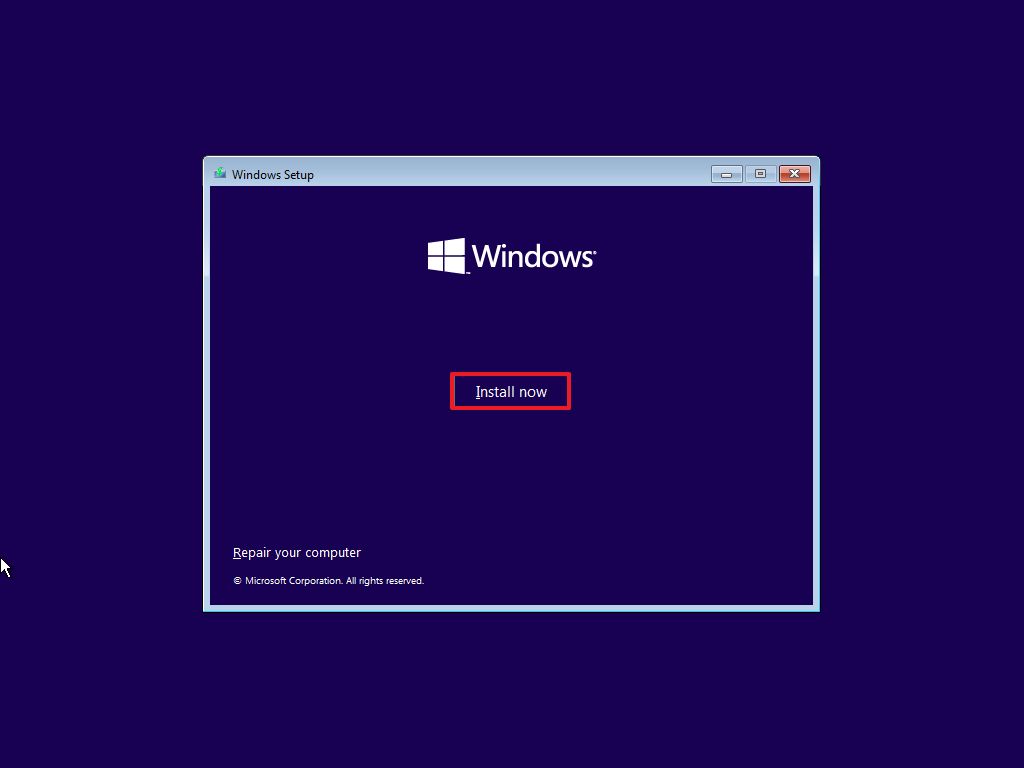
Click Install Now. It’s in the middle of the window.
-
3
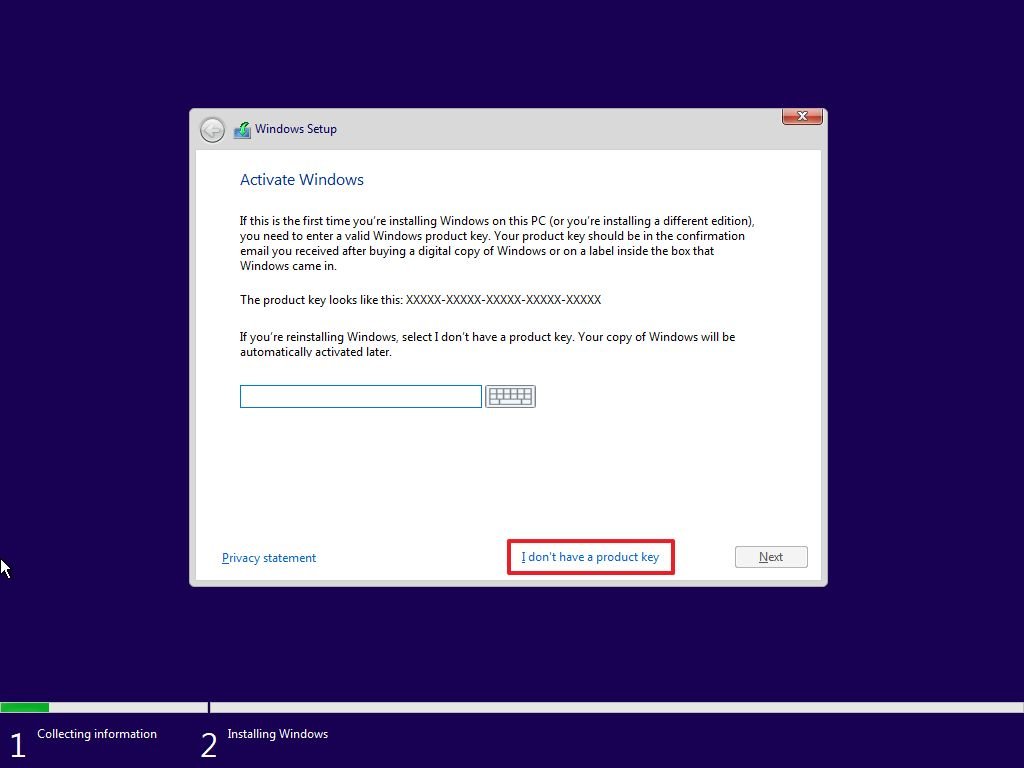
Enter your Windows 10 key, then click Next. If you don’t have a Windows 10 key, instead click Skip in the bottom-right corner of the screen.
- If you’ve already installed Windows 10 on this PC and were signed in with your Microsoft account, your key should be linked to your account. When prompted, just sign in with your Microsoft account and Windows will locate your key.[4]
- If you’ve changed hardware in the PC, such as replacing the motherboard, you can activate Windows after installing by going to Settings > Update & Security > Activation > Troubleshoot > I changed hardware on this device recently. Sign in with your Microsoft account when prompted, choose This is the device I’m using right now, and then click Activate.
- If you’ve already installed Windows 10 on this PC and were signed in with your Microsoft account, your key should be linked to your account. When prompted, just sign in with your Microsoft account and Windows will locate your key.[4]
-
4
Follow the on-screen instructions to install Windows 10. You’ll be asked to perform a few tasks, such as connecting to Wi-Fi and choosing some preferences. Once the installation is complete, you’ll have a fresh new installation of Windows 10.
- If you’re upgrading from an earlier version of Windows, you’ll be asked if you want to upgrade the current operating system or do a custom install. If you choose Upgrade, you’ll preserve existing apps and files.


Advertisement
Add New Question
-
Question
Will I lose my data if I reinstall Windows 10?

Based on step 5 above, when it prompts «Which type of installation do you want?», you should select «Upgrade» to keep your files and settings. If you select «Custom», you will have a clean installation and all of the files and settings of your previous version of Windows will be cleaned.
-
Question
What button do I press for boot options?
This is commonly F12, but can vary, depending on manufacturer. Your system will tell you which key to press upon first turning on the machine.
-
Question
My laptop has the key embedded in its motherboard, so do I need to enter it again?
It should detect the key if it’s on your motherboard. If not, you can re-enter the key.
See more answers
Ask a Question
200 characters left
Include your email address to get a message when this question is answered.
Submit
Advertisement
-
If you don’t enter a Windows 10 activation key when prompted to do so, you’ll receive a free trial of Windows 10. After the trial ends, you’ll be prompted to purchase and enter an activation key.
Thanks for submitting a tip for review!
Advertisement
About This Article
Article SummaryX
1. Insert your installation DVD or drive.
2. Restart the PC.
3. Select the option to boot from the media.
4. Select your language preferences and click Next.
5. Click Install Now.
6. Enter your product key and click Next.
7. Accept the terms.
8. Follow the on-screen instructions.
Did this summary help you?
Thanks to all authors for creating a page that has been read 714,805 times.
Is this article up to date?
(Image credit: Future)
A clean installation of Windows 10 is the process of erasing everything to start with a fresh copy of the operating system when a computer has problems. For example, this method can resolve performance, memory, startup, shutdown, and app issues. Also, it’s perhaps the best approach to remove viruses and other types of malware, and it can help to improve battery life.
In addition, it’s an excellent solution to remove preloaded bloatware (unnecessary preloaded software) from Windows 10. You can use this method to decommission a computer without giving away your personal information. Or you can set up a new installation after replacing the hard drive.
Furthermore, if you have had the same setup for some time, a clean installation is a great option to upgrade to the latest version of Windows 10 or upgrade from an older version (such as Windows 7 and Windows 8.1), minimizing the risks of problems during and after the process.
This guide will walk you through the complete process of performing a clean installation of Windows 10.
How to prepare PC for clean install of Windows 10
As you prepare to proceed with a clean installation of Windows 10, completing some essential tasks is recommended to minimize issues and potential data loss.
If you already have a backup of the computer and files. You have an activation product key. The device can start from a USB flash drive, and non-essential peripherals are disconnected. Then, you can skip this part and jump to the bootable media creation and a clean install process.
Create backup
The install process of Windows 10 deletes everything on the drive, which means that backing up the entire device (or at least your files) is a crucial step unless you don’t have anything important you want to keep.
Back up entire system
You should create a temporary backup to revert the settings or recover files if something goes wrong during the installation.
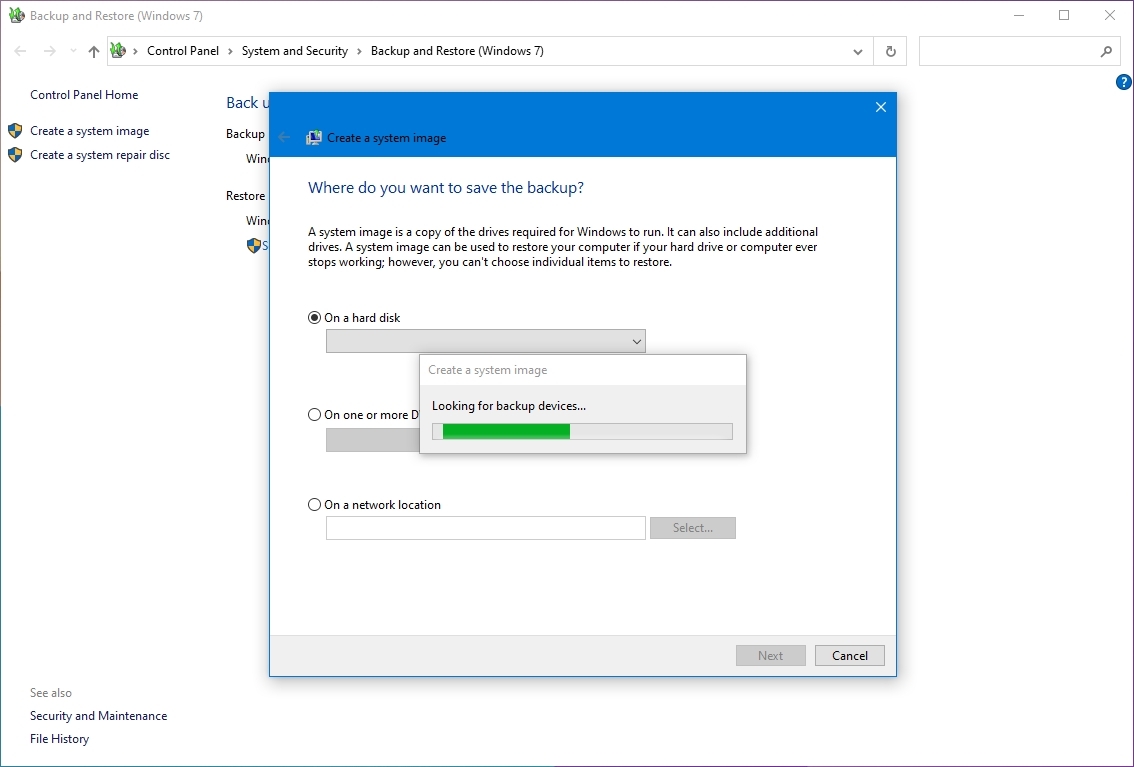
You can choose many different solutions, but the easiest way to create a full backup is to use the System Image Backup legacy tool available on Windows 10. It’s a deprecated feature, but it continues to work. The tool is also available for Windows 8.1 and Windows 7.
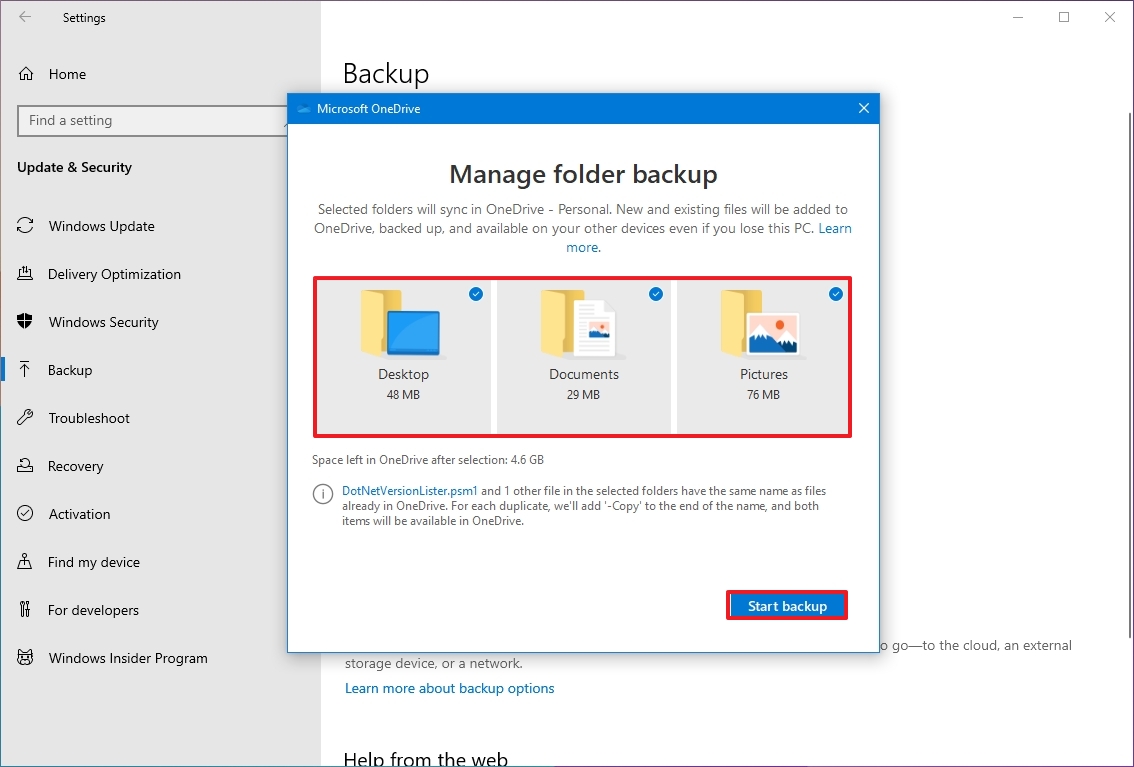
Back up files to OneDrive
If you need to back up your documents, pictures, and other important files, you can upload the data to OneDrive or another cloud storage service.
In case you use OneDrive, you can also use the backup settings page to sync your profile folders, including Documents, Pictures, and Desktop, to the cloud automatically.
To configure OneDrive backup on Windows 10, use these steps:
- Open Settings.
- Click on Update & Security.
- Click on Backup.
- Under the «Back up files to OneDrive» section, click the «Back up files» option.
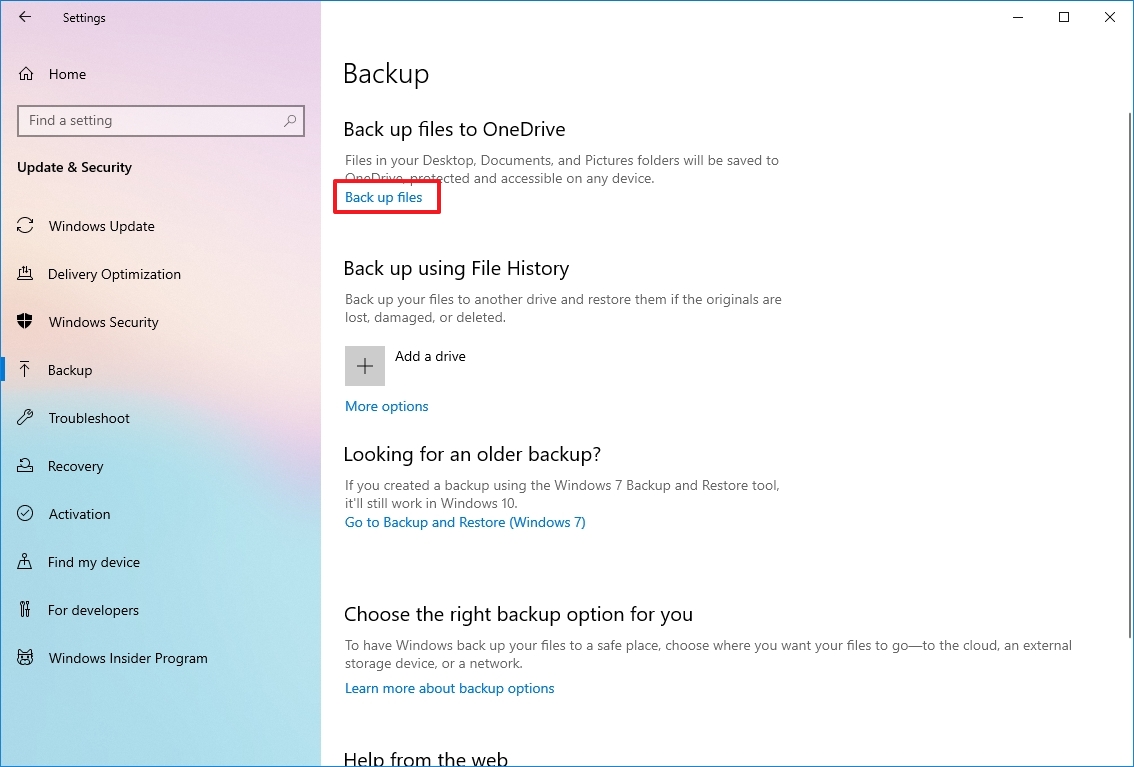
- (Optional) Click to clear the folder you don’t want to back up in the cloud.
- Click the Start backup button.
Back up files to external storage
If you have a lot of data, syncing the files to the cloud can be expensive and take a long time, and the available space may not even be enough. If this is the case, perhaps the best option would be to copy the files to an external USB hard drive.
To create a file backup manually, connect an external drive with enough storage space to your Windows 10 computer, and use these steps:
- Open File Explorer.
- Type the following path in the address bar and press Enter: %HOMEPATH%

- Click the Select all button from the «Home» tab.
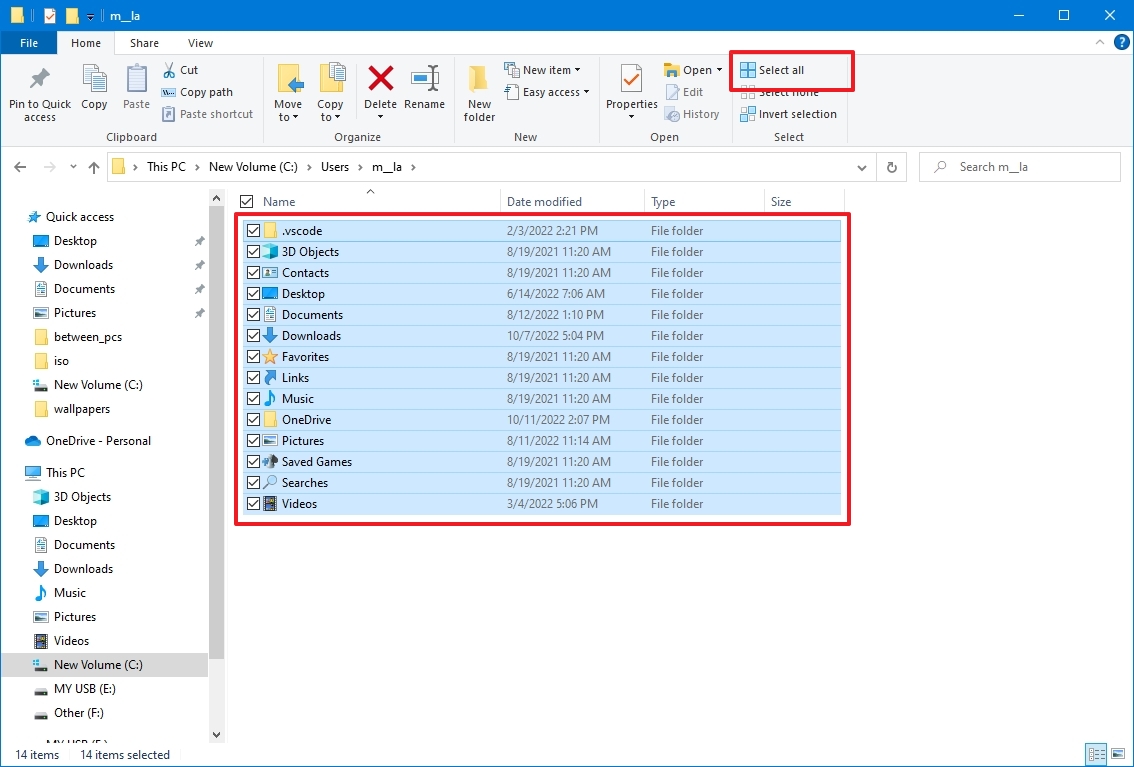
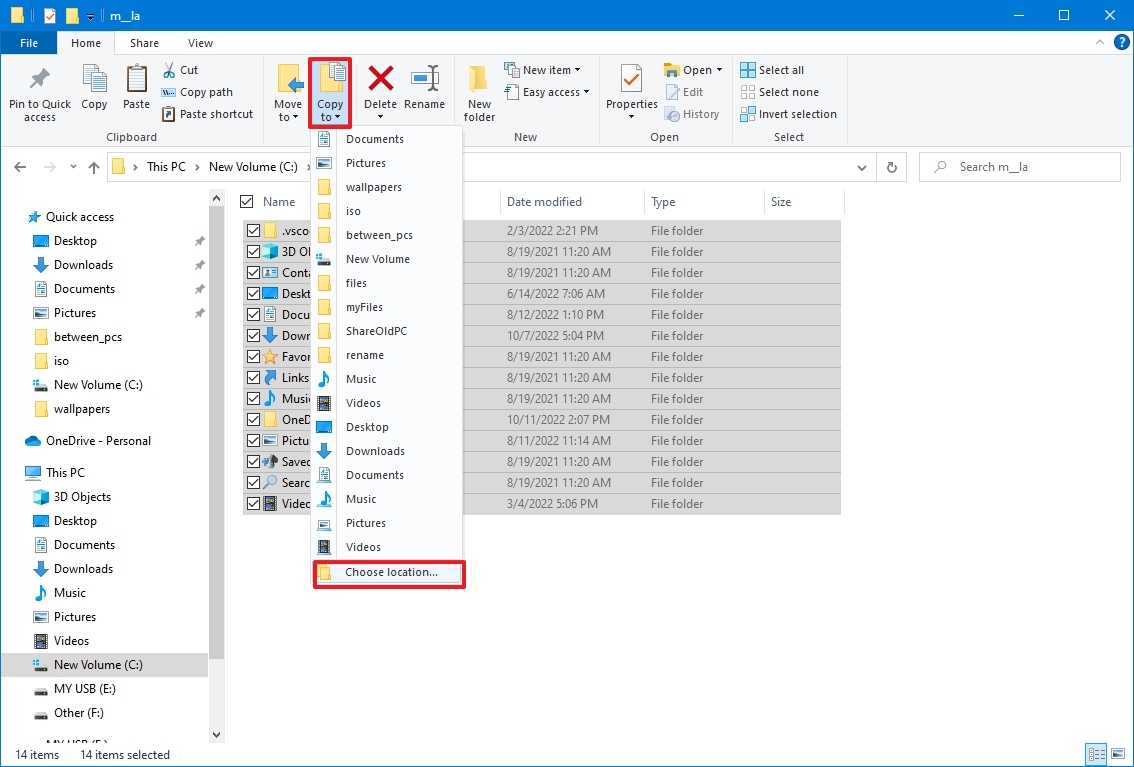
- Click the Copy to button from the «Home» tab.
- Select the Choose location option.
- Select the destination location.
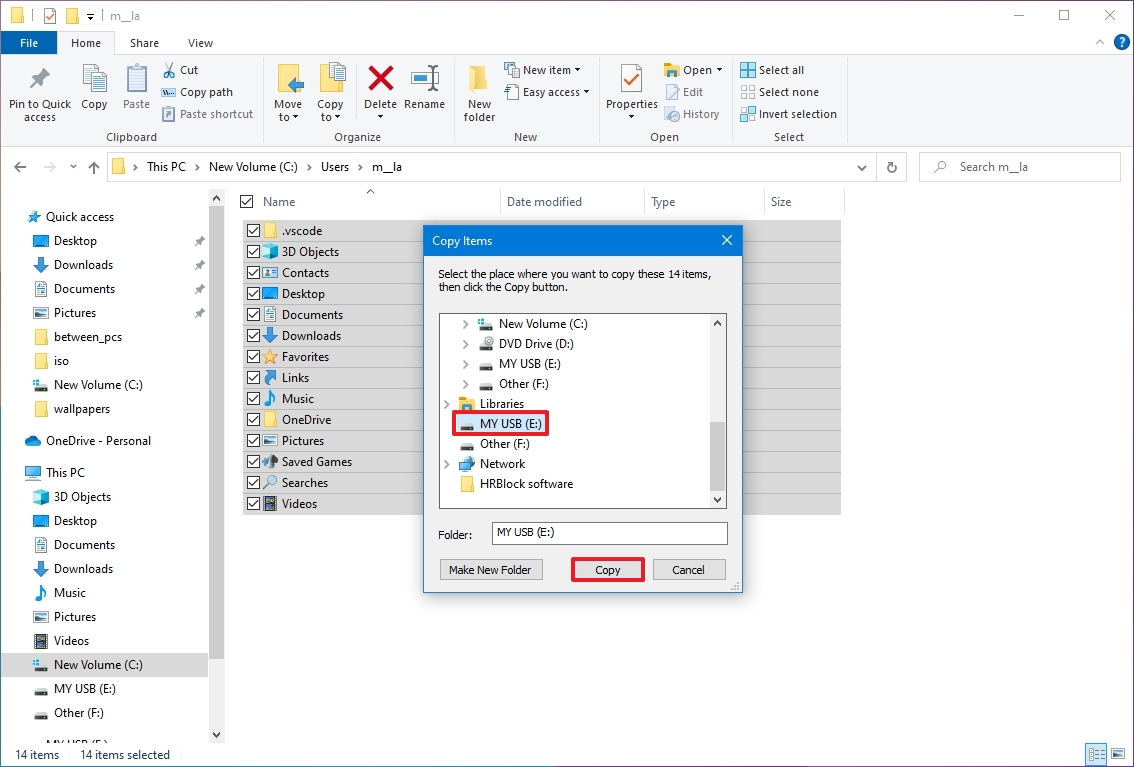
- Click the Copy button.
After you complete the steps, repeat the instructions to back up the remaining accounts (as necessary). In addition to copying your files, creating a list of the installed programs with their respective product keys (if applicable) is also a good idea to know the apps to reinstall after the installation.
If you usually don’t sync passwords and bookmarks with an online service, now’s a good time to export your browser credentials and links, as you’ll need them later to access your online services.
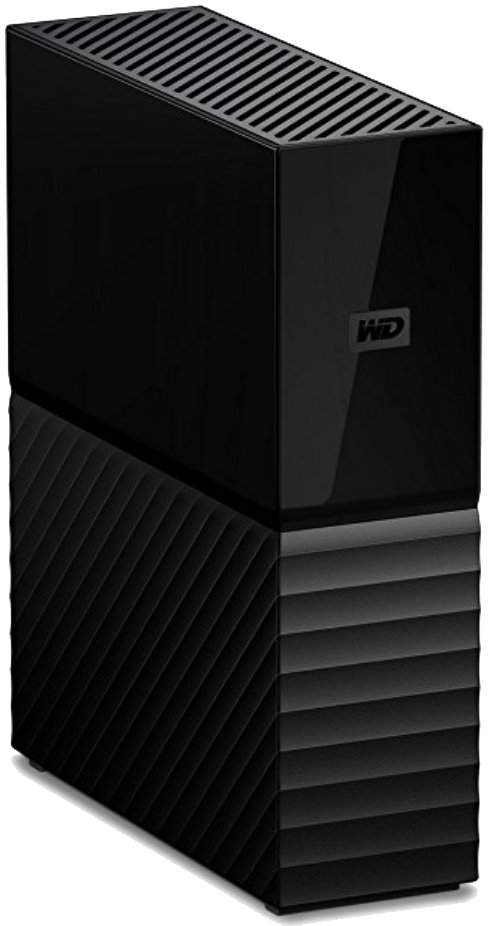
In case you don’t have an external hard drive or one without enough space, we recommend the Western Digital Elements Desktop Hard Drive because of its portability, capacity, and price.
(opens in new tab)
Western Digital Elements Desktop Hard Drive
Bulk storage
If you’re in the market for an external drive to store file backups, look no further than the Western Digital Elements Desktop Hard Drive. Get up to 18TB of storage and connect with USB-A 3.0 for fast file transfers.
Check Windows 10 activation
Although after activating Windows 10, you no longer have to provide a product key for reinstallation on the same computer. Once the new installation completes, the system will automatically reactivate when it connects to the internet.
To confirm whether Windows 10 is properly activated, use these steps:
- Open Settings.
- Click on Update & Security.
- Click on Activation.
- Under the «Windows» section, confirm the activation. If the computer has been properly activated, you’ll see one of these messages:
- Windows is activated with a digital license: The installation has been activated, but it isn’t linked to your Microsoft account.
- Windows is activated with a digital license linked to your Microsoft account: The installation has been activated, and the license is linked to your Microsoft account.
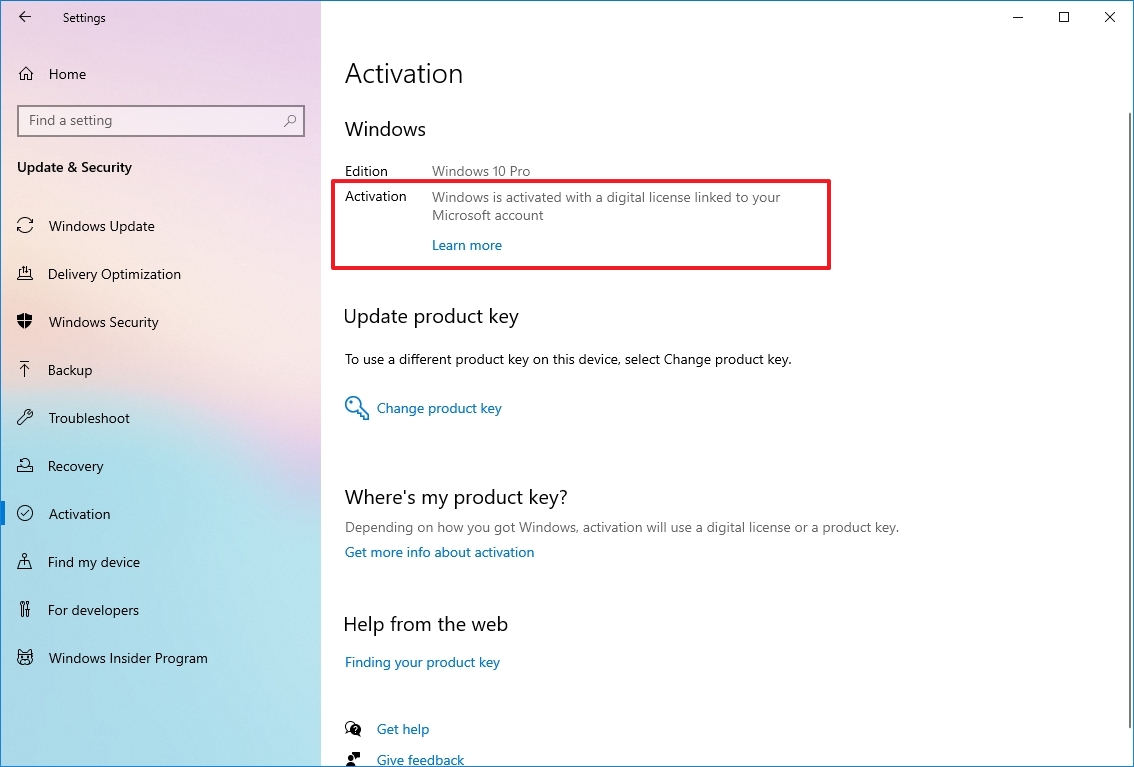
After you complete the steps, Windows 10 should automatically reactivate after the clean installation if your current setup is activated.
Obtain Windows 10 genuine key
If you have to set up an installation on a computer that never had an activated version of Windows 10, or you plan to upgrade from Windows 8.1 or Windows 7, you will have to purchase a valid license from the Microsoft Store (opens in new tab), Amazon, or another retailer.
Download essential drivers
Windows 10 can detect and install most drivers automatically. However, it’s usually recommended to download at least the essential drivers before the process (such as for the network adapter and graphics card), as a precaution, in case the setup fails to add these drivers correctly, especially on custom computer builds.
You can use our guide to install device drivers on Windows 10.
Here’s a list of the most popular manufacturers to download the latest device drivers:
- Dell (opens in new tab)
- HP (opens in new tab)
- Lenovo (opens in new tab)
- ASUS (opens in new tab)
- Acer (opens in new tab)
- Samsung (opens in new tab)
- MSI
Confirm Windows 10 requirements
If the device already has Windows 10, the following major update will likely meet the minimum hardware requirements. However, if you’re about to upgrade a computer running Windows 7 or Windows 8.1, you want to check that the device meets the minimum requirements.
Here are the minimum requirements to install Windows 10 versions 21H2, 22H2, and higher:
- Processor: 1GHz or System on a Chip (SoC).
- Memory: 1GB for 32-bit or 2GB for 64-bit.
- Storage: 32GB for 64-bit or 32-bit.
- Graphics card: DirectX 9 or later with WDDM 1.0 driver.
- Display: 800×600.
You can use these instructions to check the device technical specifications to confirm you can do a clean install of Windows 10.
Change boot order on firmware
It’s also important to ensure the computer can boot from a USB flash drive. If this is not the case, you’ll need to change the Basic Input/Output System (BIOS) or Unified Extensible Firmware Interface (UEFI) on the motherboard.
Change boot order using UEFI
On computers already running Windows 10 or 8.1, you can access the settings to change the boot order within the desktop interface.
UEFI settings on Windows 10
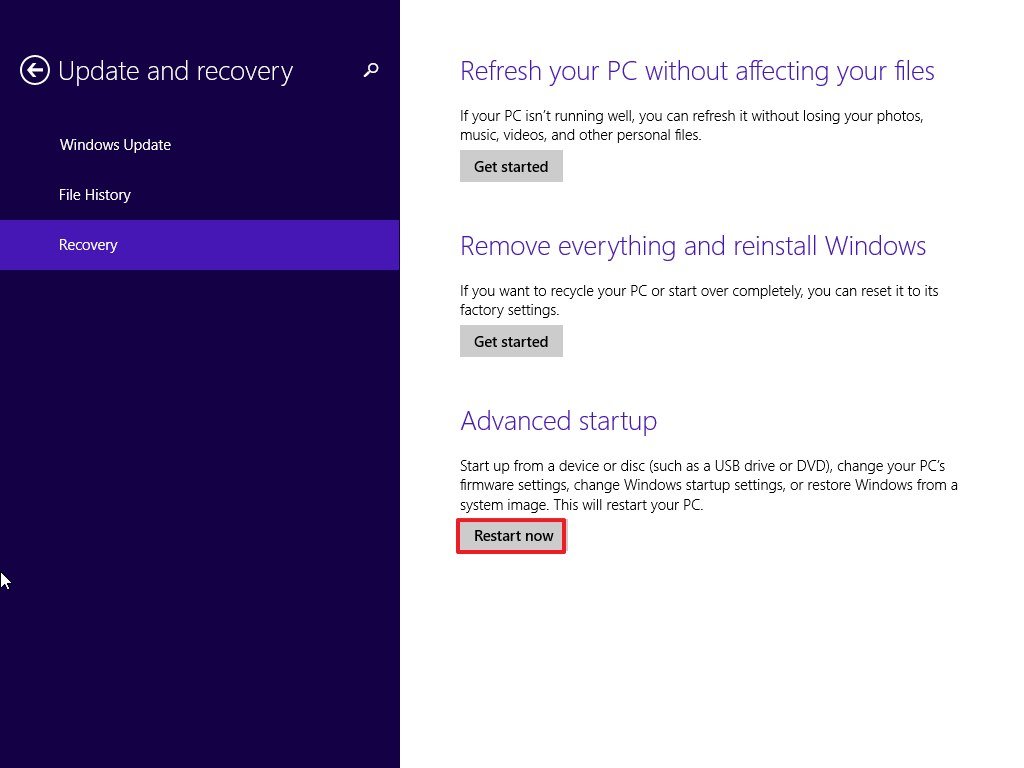
To change the UEFI settings on Windows 10, use these steps:
- Open Settings.
- Click on Update & Security.
- Click on Recovery.
- Under the «Advanced startup» section, click the Restart now button.
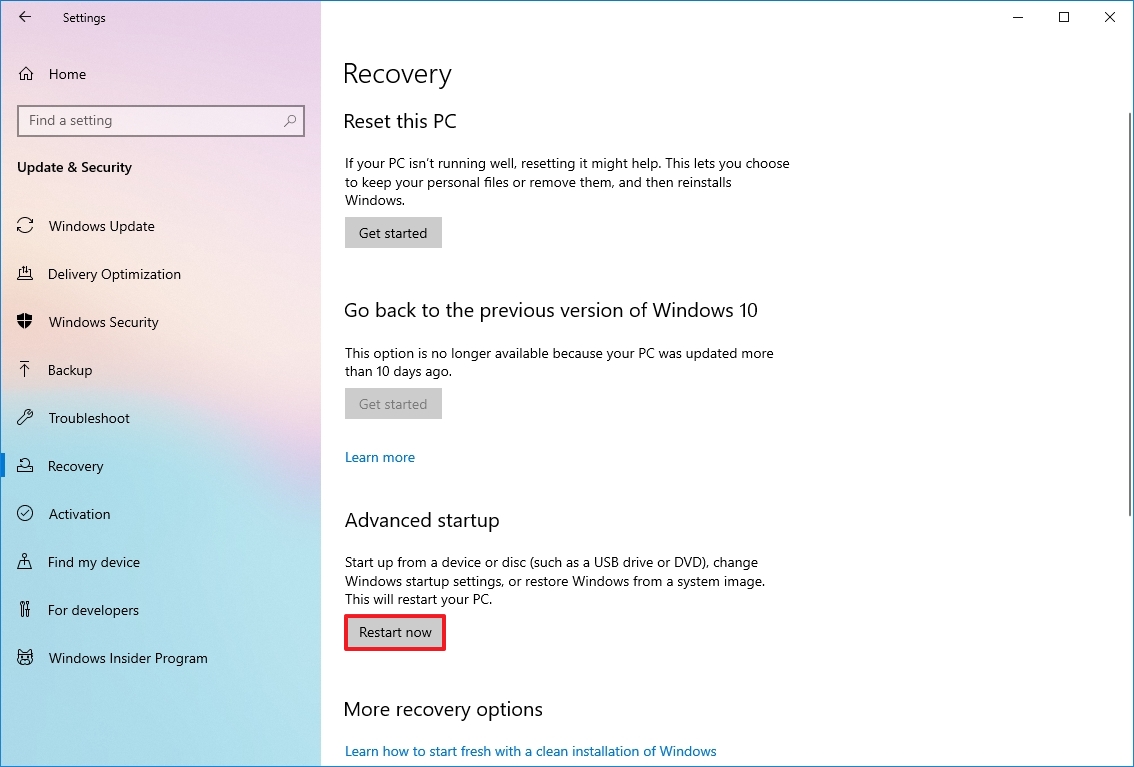
- Click the Troubleshoot button.
- Click on Advanced options.
- Click the «UEFI Firmware Settings» option.
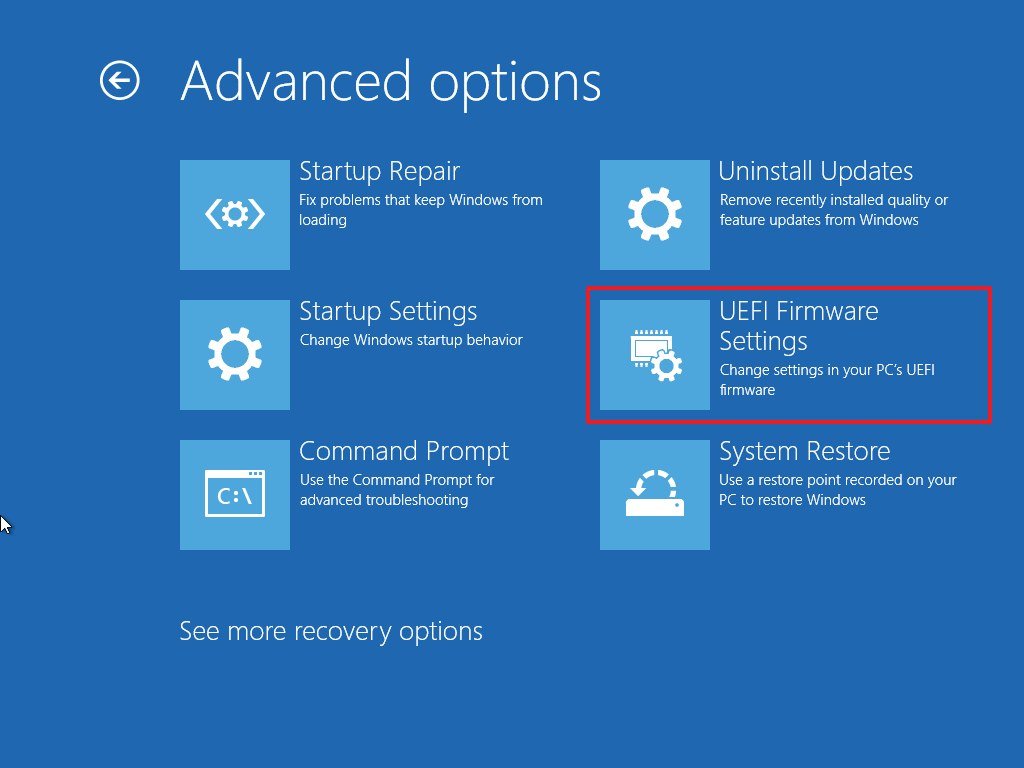
- Click the Restart button.
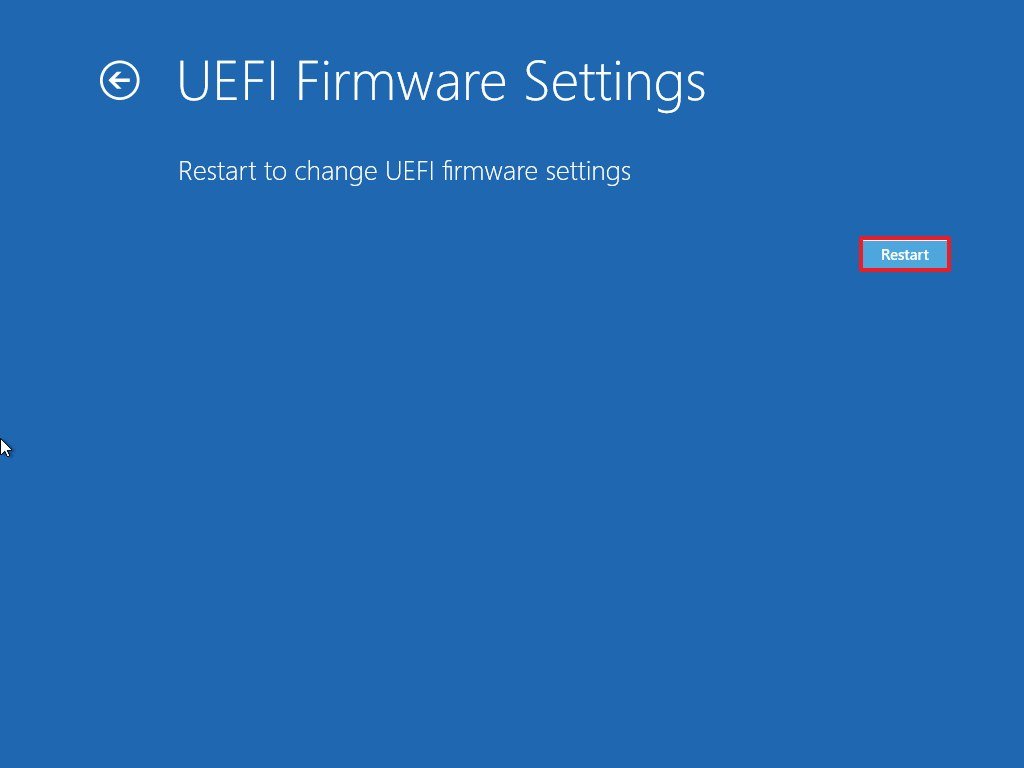
- Inside the motherboard firmware settings, open the Boot page.
- Set the boot order to start from the USB flash drive with the Windows 10 installation files.
- Save the changes.
After you complete the steps, the computer should now be able to start from a USB bootable media.
UEFI settings on Windows 8.1
To change the UEFI settings on Windows 8.1, use these steps:
- Open Settings.
- Click on Update and recovery.
- Click on Recovery.
- Under the «Advanced Startup» section, click the Restart now button.
- Click the Troubleshoot option.
- Click on Advanced options.
- Click the UEFI Firmware Settings option.
- Click the Restart button.
- Inside the motherboard firmware settings, open the Boot page.
- Set the boot order to start from the USB media with the Windows 10 installation files.
- Save the changes.
Once you complete the steps, the device will start from a USB flash drive to proceed with the installation.
UEFI settings on Windows 7
To change the UEFI settings on Windows 7, use these steps:
- Start the PC.
- As soon as it starts, press the F1, F2, F3, F10, F12, Esc, or Delete keys to access the firmware.
- Quick tip: You may need to check your manufacturer support website for more specific steps to access the firmware settings.
- Inside the motherboard firmware settings, open the Boot page.
- Set the boot order to start with the Windows 10 installation files from the USB media.
After you complete the steps, you should be able to start the device using a bootable media.
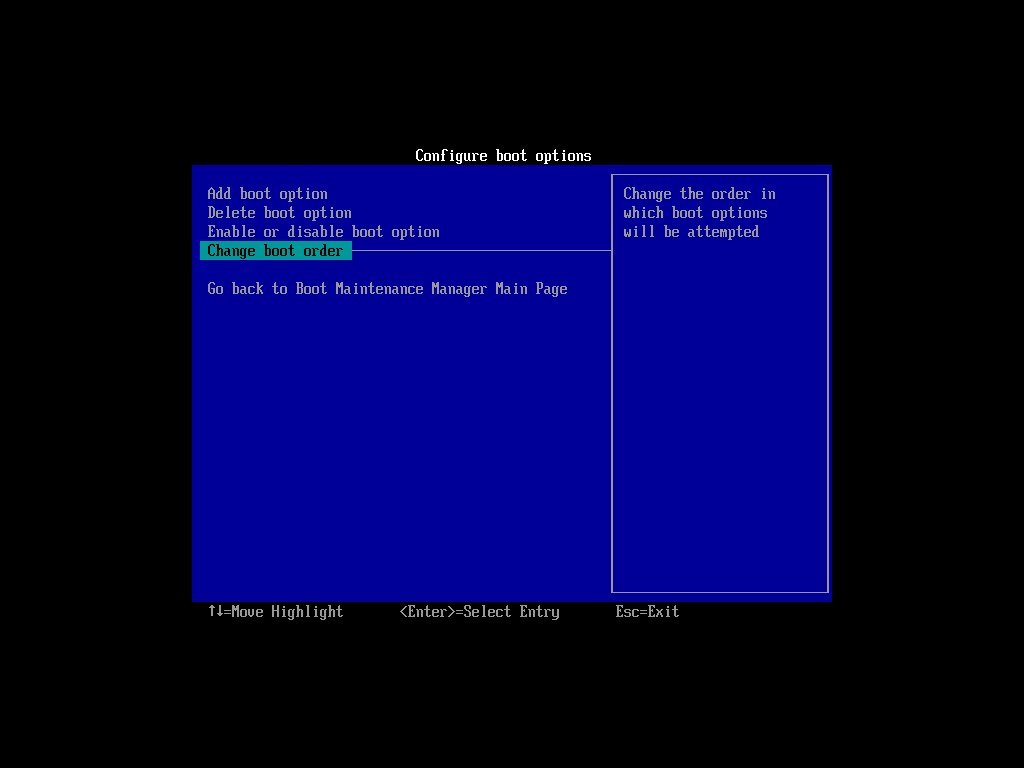
Configure boot order using BIOS
If you have a legacy BIOS firmware, you can change the boot order with these steps:
- Start the PC.
- As soon as the computer starts booting up, press one of the function keys (F1, F2, F3, F10, or F12), Esc, or Delete key.
- Inside the motherboard firmware settings, open the Boot page.
- Set the boot order to start with the Windows 10 installation files from the USB media.
- Save the changes.
Once you complete the steps, the computer can now start from the USB flash drive to upgrade to Windows 10.
Disconnect non-essential peripherals
Typically, peripherals are among the most common reason for problems during a Windows 10 installation. If you have non-essential peripherals connected to the computer (such as removable storage and other USB and Bluetooth devices, printers, scanners, cameras, and others), it’s recommended to disconnect them.
You only need a monitor, keyboard, mouse, and internet connection. After the setup, you can reconnect the peripherals (one at a time) to ensure they don’t cause any issues.
How to create USB for clean install of Windows 10
You will need a USB bootable media to perform a clean installation of Windows 10. You can easily create one using many tools, including the Microsoft Media Creation Tool and Rufus.
Create Windows 10 USB with Media Creation Tool
To create an installation media using the Media Creation Tool, connect a USB flash drive of at least 8GB of space, and use these steps:
- Open the Windows 10 download page (opens in new tab).
- Under the «Create Windows 10 installation media» section, click the «Download tool now» button to save the file on the computer.
- Double-click the MediaCreationToolxxxx.exe file to launch the tool.
- Click the Accept button to agree to the Microsoft terms.
- Select the «Create installation media (USB flash drive, DVD, or ISO file) for another PC» option.
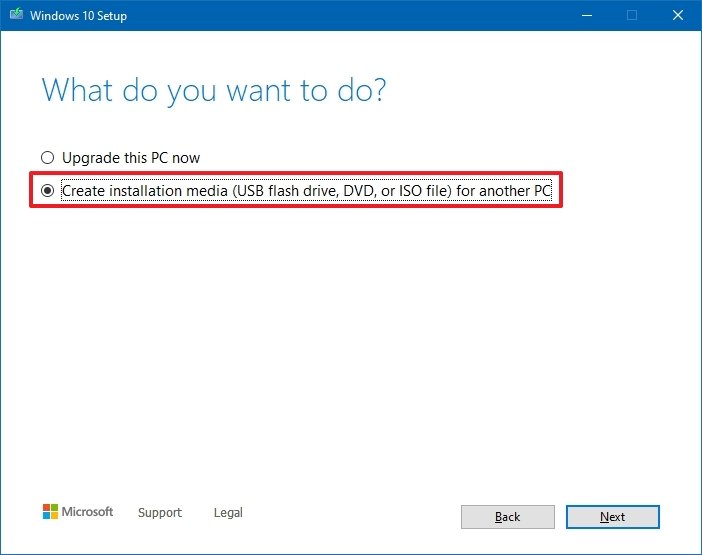
- Click the Next button.
- (Optional) Clear the «Use the recommended options for this PC» option.
- Select the correct language, architecture, and edition of Windows 10.
- Click the Next button.
- Click the Next button.
- Select the USB flash drive (or click the «Refresh drive list» option to make it available).
- Click the Next button.
- Click the Finish button.
Once you complete the steps, the tool will download the files and create an installer with the latest installation files, which you can then use to start the device and configure a fresh copy of Windows 10.
Create Windows 10 USB with Rufus
Alternatively, the Rufus tool can help you create an installation media for computers with UEFI or BIOS firmware.
Rufus is a free tool with many options to help you create a bootable media of Windows 10 faster. However, it’s important to remember that it’s a third-party option, which Microsoft does not support. As a result, use it at your own risk.
To create a Windows 10 USB installer with Rufus, connect a USB flash drive of at least 8GB of space, and then use these steps:
- Open the Rufus download page.
- Under the «Download» section, click the link to save the latest release on the computer.

- Double-click the Rufus-x.xx.exe file to launch the tool.
- Click the Settings button (third button from the left) at the bottom of the page.
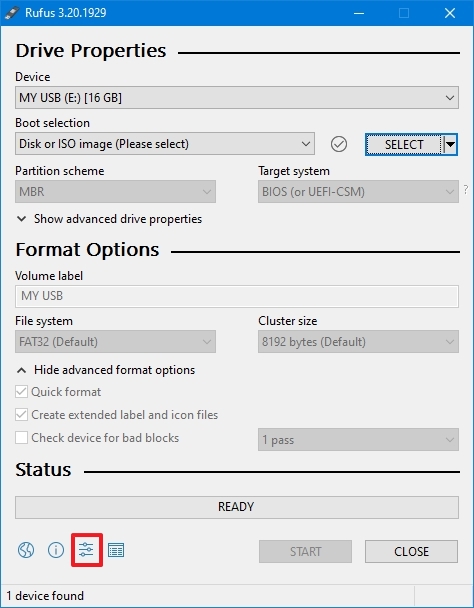
- Under the «Settings» section, use the Check for updates drop-down menu and select the Daily option.
- Quick tip: These steps are necessary to enable the option to use the tool to download the ISO file of Windows 10.
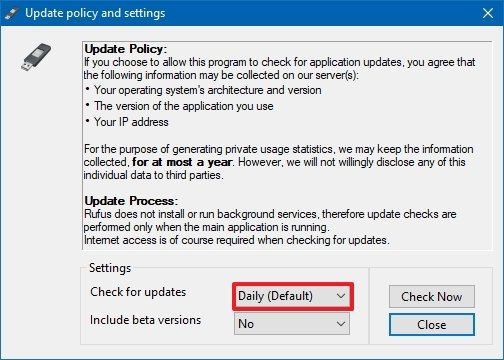
- Click the Close button.
- Close the Rufus tool.
- Relaunch the Rufus tool.
- Under the «Device» section, use the drop-down menu to select the USB flash drive.
- Under the «Boot selection» section, click the down arrow button on the right and select the Download option.
- Quick tip: If you already have an ISO file, click the Select button, choose the Windows 10 ISO file, and continue with step 20.
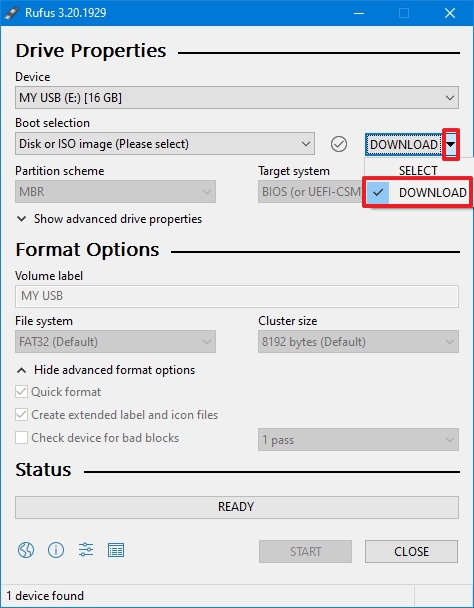
- Click the Download button.
- Use the «Version» drop-down menu and select the Windows 10 option.
- Click the Continue button.
- Select the 21H2 (Build 19044.xxx — xxxx.xx) option to download the Windows 10 November 2021 Update.
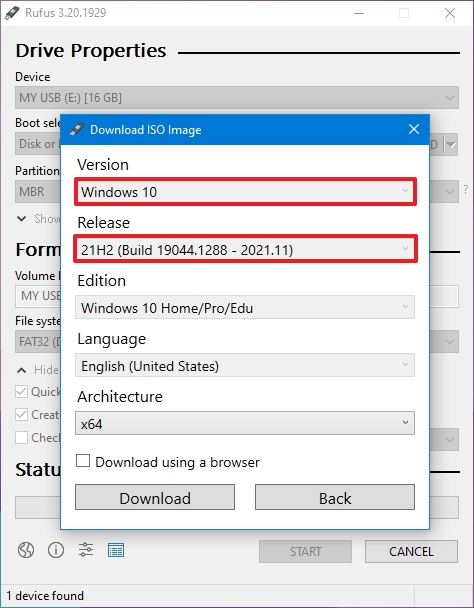
- Click the Continue button.
- Use the «Edition» drop-down menu and select the Windows 10 Home/Pro option.
- Click the Continue button.
- Use the «Language» drop-down menu and select the installation language.
- Quick tip: In the United States, choose the «English» option, not «English International.»
- Click the Continue button.
- Use the «Architecture» drop-down menu and select the 32-bit or 64-bit (recommended).
- Click the Download button.
- Select the location to download the ISO file.
- Click the Save button.
- Use the «Image option» drop-down menu to select the Standard Windows installation option.
- Use the «Partition scheme» drop-down menu to select the GPT option.
- Use the «Target system» drop-down menu to select the UEFI (non CSM) option.
- Quick note: If the computer includes a legacy BIOS, select the MBR option for partition scheme and BIOS (or UEFI-CSM) option target system.
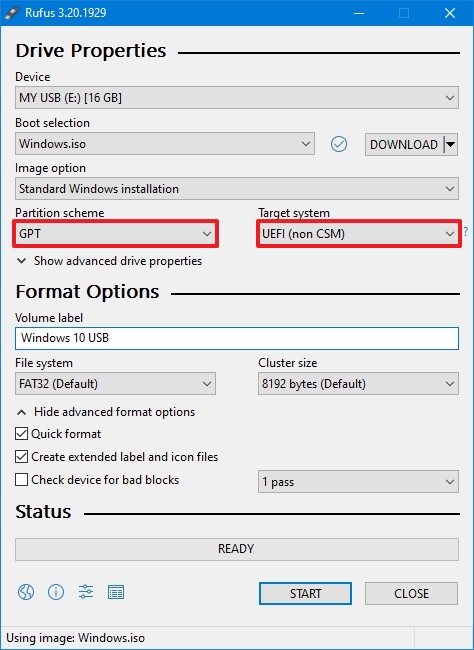
- Under the «Show Advanced drive properties» section, don’t change the default settings.
- (Optional) Under the «Volume label» field, enter a descriptive name for the drive — for example, «win10_usb.»
- Under the «File system» and «Cluster size» sections, don’t change the default settings.
- Click the Show advanced format options button.
- Select the Quick format and Create extended label and icon files options.
- Click the Start button.
- Click the OK button to confirm.
- Click the Close button.
After you complete the steps, Rufus will download the ISO file from the Microsoft servers, and it’ll create the bootable media to perform a clean install of Windows 10.
How to perform clean install of Windows 10
The installation process of Windows 10 has two main parts, including the setup and out-of-box experience (OOBE). In the setup process, that’s where you will select some of the basic settings, and you’ll find the options to erase the hard drive, configure the partitions, and install Windows 10. The out-of-box experience happens after the setup is complete, and it’s the stage where you’ll configure your settings, such as region, network, account, privacy, and other settings.
Windows 10 clean install process
After the preparation, you can proceed with the clean installation of Windows 10.
Warning: This is another friendly reminder that this process will erase everything on the computer. Before proceeding, making a temporary full backup of your PC is always recommended.
To do a clean installation of Windows 10, use these steps:
- Start the PC with Windows 10 USB media.
- On prompt, press any key to boot from the USB flash drive.
- On the «Windows Setup,» click the Next button.
- Quick tip: If your language, time and currency, and keyboard are different from the default selections, make sure to select the correct settings.

- Click the Install now button.
- On a reinstallation, click the «I don’t have a product key» option to continue (assuming your device was already activated). Otherwise, if this is your first time installing Windows 10, enter the product key.
- Click the Next button.
- Select the edition of Windows 10 (If applicable).
- Quick note: The selection has to match the edition of your product key. If you don’t select the correct edition, Windows 10 won’t activate, and you’ll have to redo the entire process.
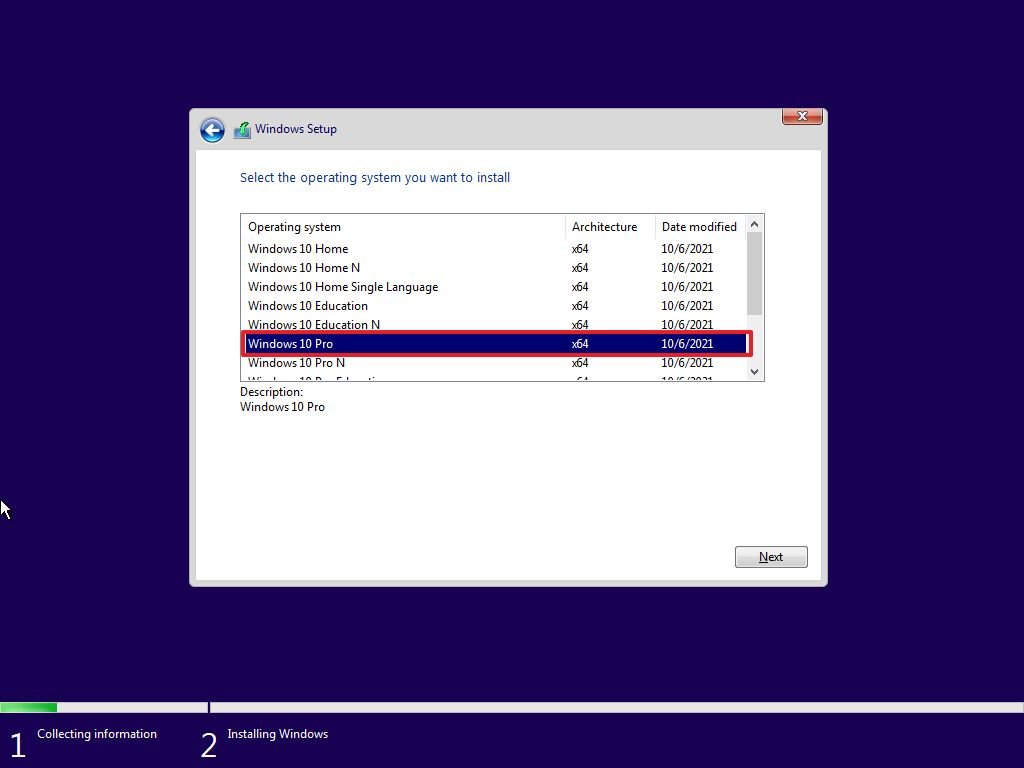
- Click the Next button.
- Select the «I accept the license terms» option to continue.
- Click the Next button.
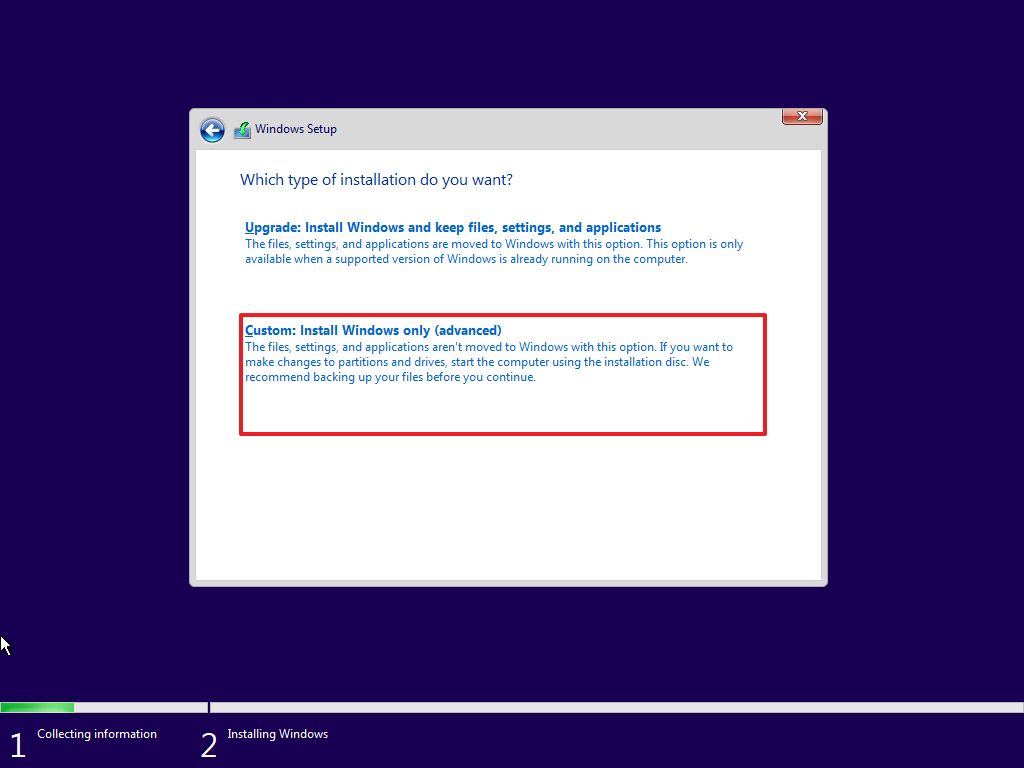
- Click the «Custom: Install Windows only (Advanced)» option to continue with a clean installation.
- Select the partition with the current installation (usually «Drive 0») and click the Delete button.
- Quick tip: If «Drive 0» has multiple partitions, you must select and delete each partition to allow the setup to use the entire hard drive for the new clean installation. The setup will create the required partitions automatically during the process. Also, it’s not necessary to delete the partitions on secondary drives.
- Click the Yes button.
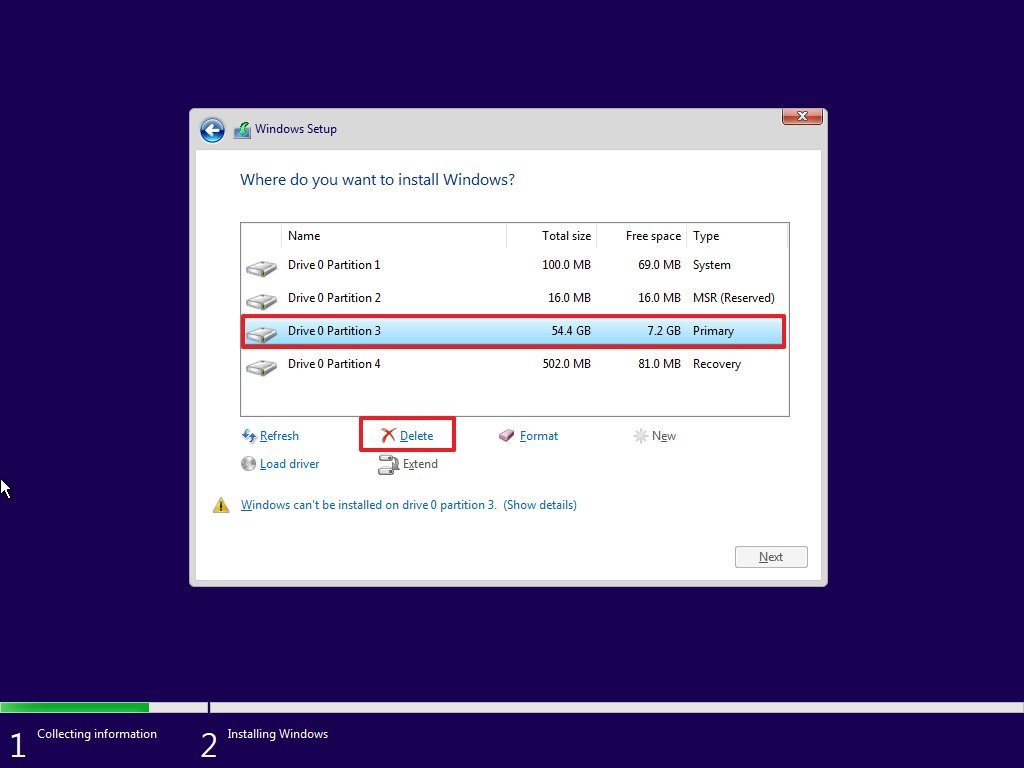
- Select the empty drive (Drive 0 Unallocated Space).

- Click the Next button.
Once you complete the steps, the setup will install a fresh copy of Windows 10 on the device.
If you plan to decommission the computer, you do not need to continue with the out-of-box experience. If this is an upgrade, continue with the instructions below.
Windows 10 out-of-box experience
After the setup, you must continue with the out-of-box experience to configure your preferences and create a new account.
To complete the OOBE on Windows 10, use these steps:
- Select your Region option.
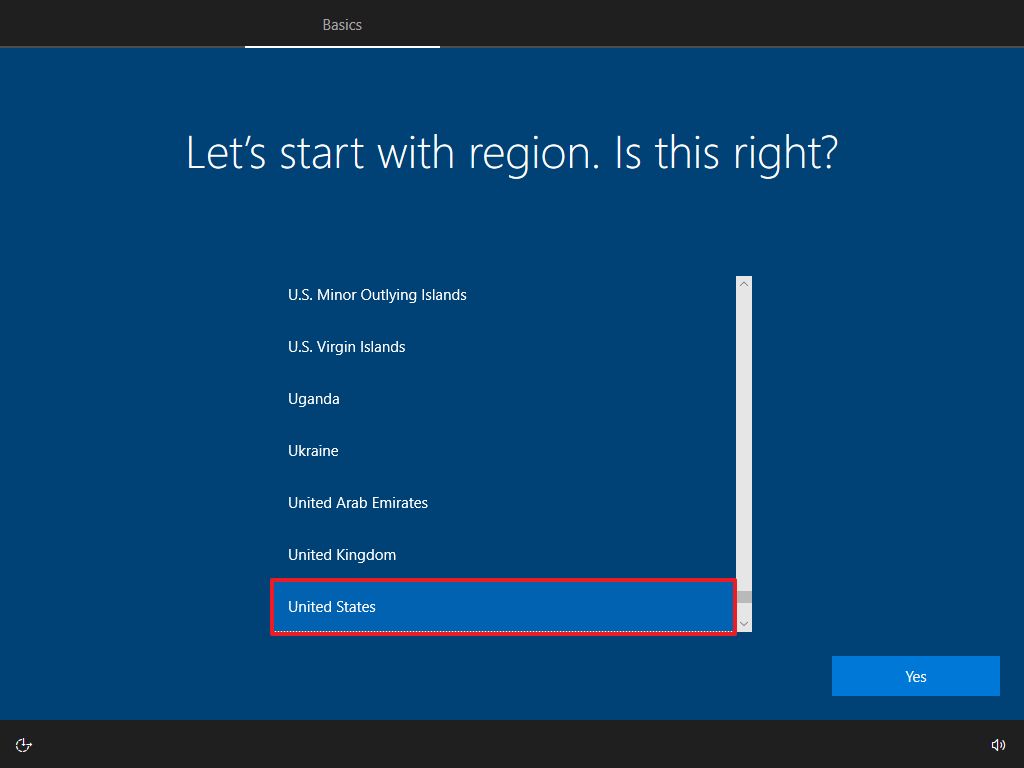
- Click the Yes button.
- Select your keyboard layout option.
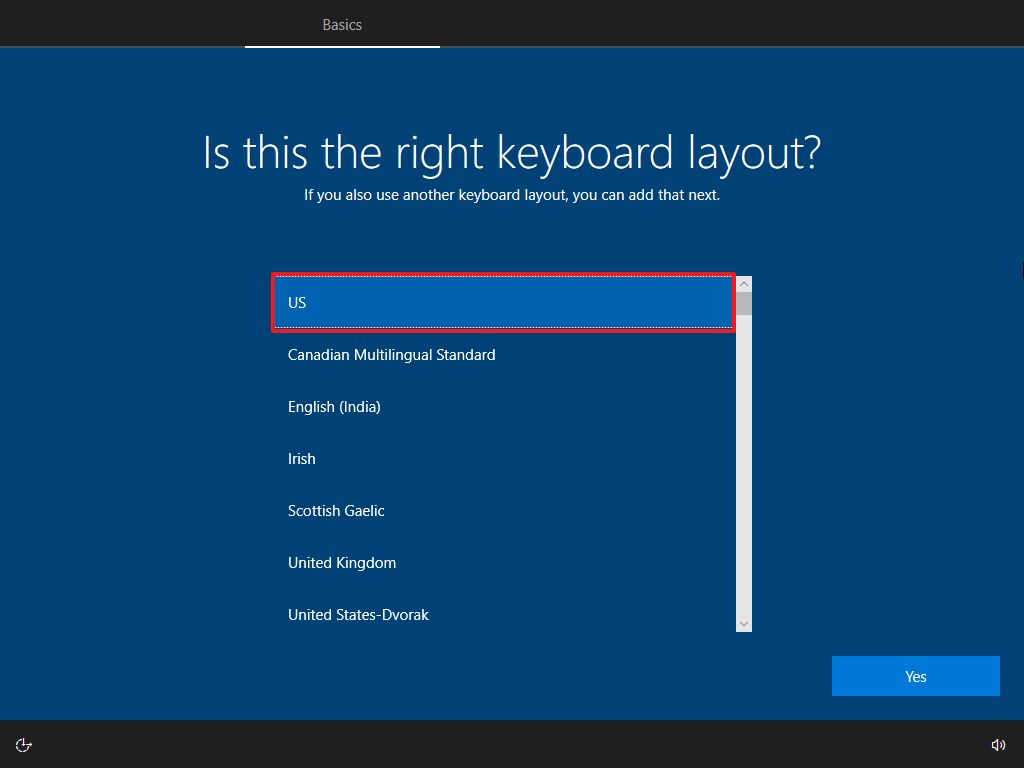
- Click the Yes button.
- Click the Skip button (unless you need to add a second keyboard layout).
- Quick note: If you don’t have a wired network connection, you’ll have to sign into the wireless network.
- Select the «Set up for personal use» option. (This option is only available on Windows 10 Pro.)
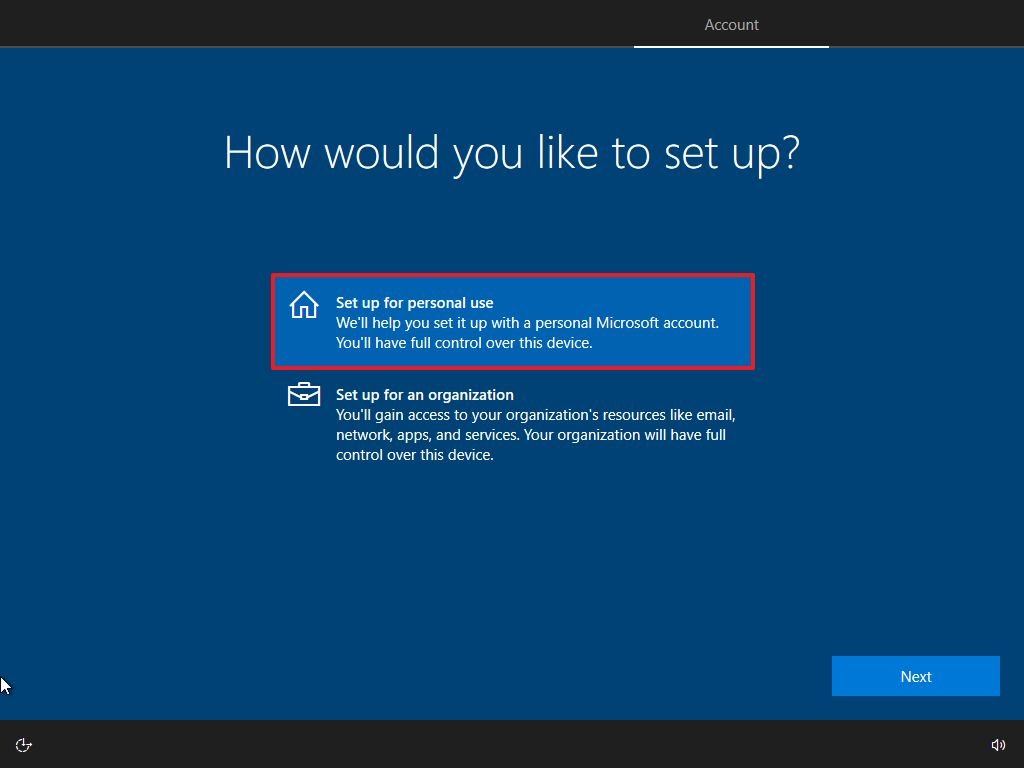
- Click the Next button.
- Confirm your Microsoft account information to create an account.
- Quick note: The recommended process is to use a Microsoft account. However, if you want to use a traditional local account, you’ll need to click the Offline account option from the bottom-left corner and continue with the on-screen directions.
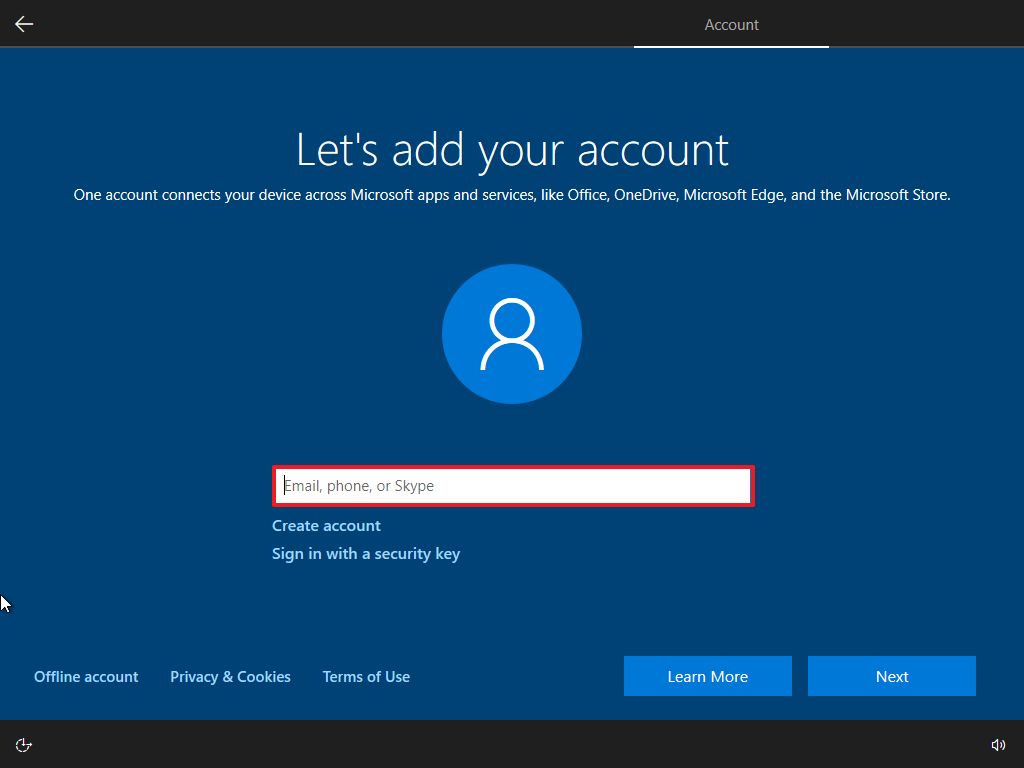
- Click the Next button.
- Confirm your account password.
- Click the Next button.
- Click the Create PIN button.
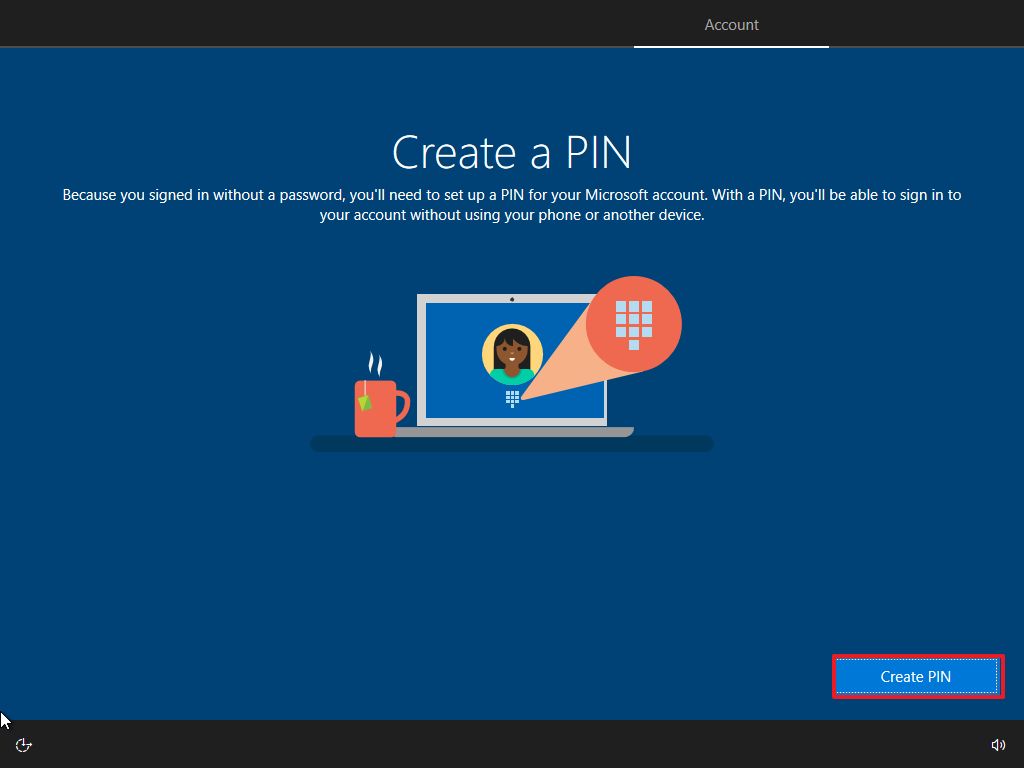
- Create a four-digit Windows Hello PIN.
- Quick tip: If you want to continue using a traditional password, click the Cancel button to skip the process.

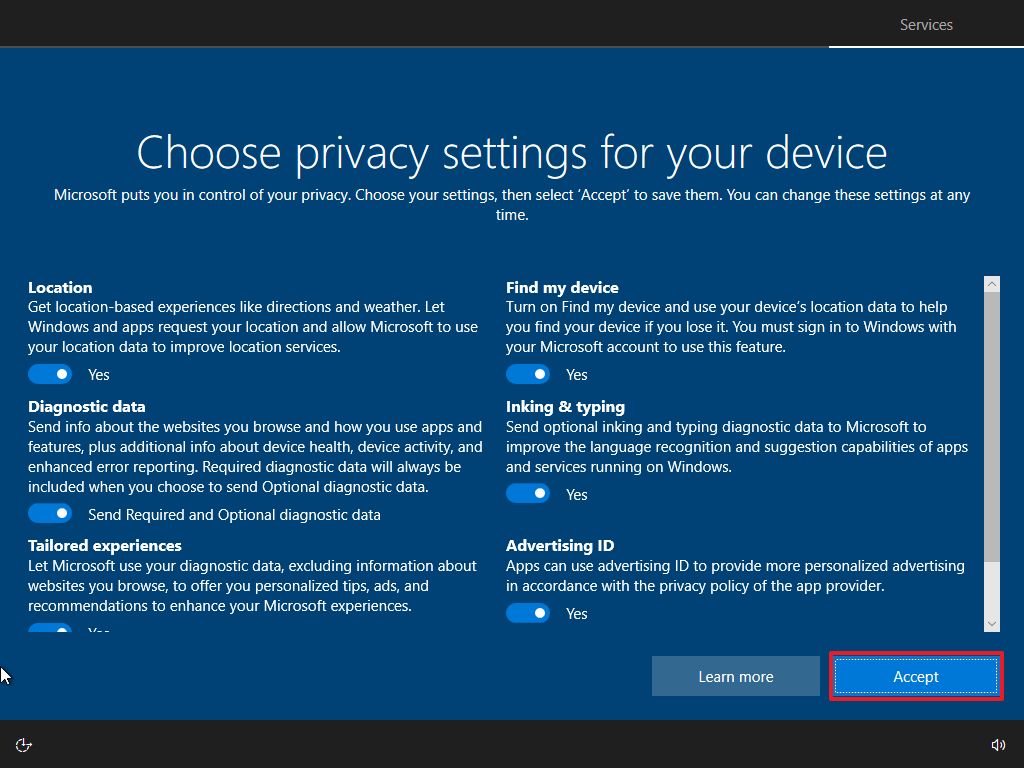
- Select the privacy settings for the device (and don’t forget to scroll down the page to review all the available settings).
- Click the Accept button.
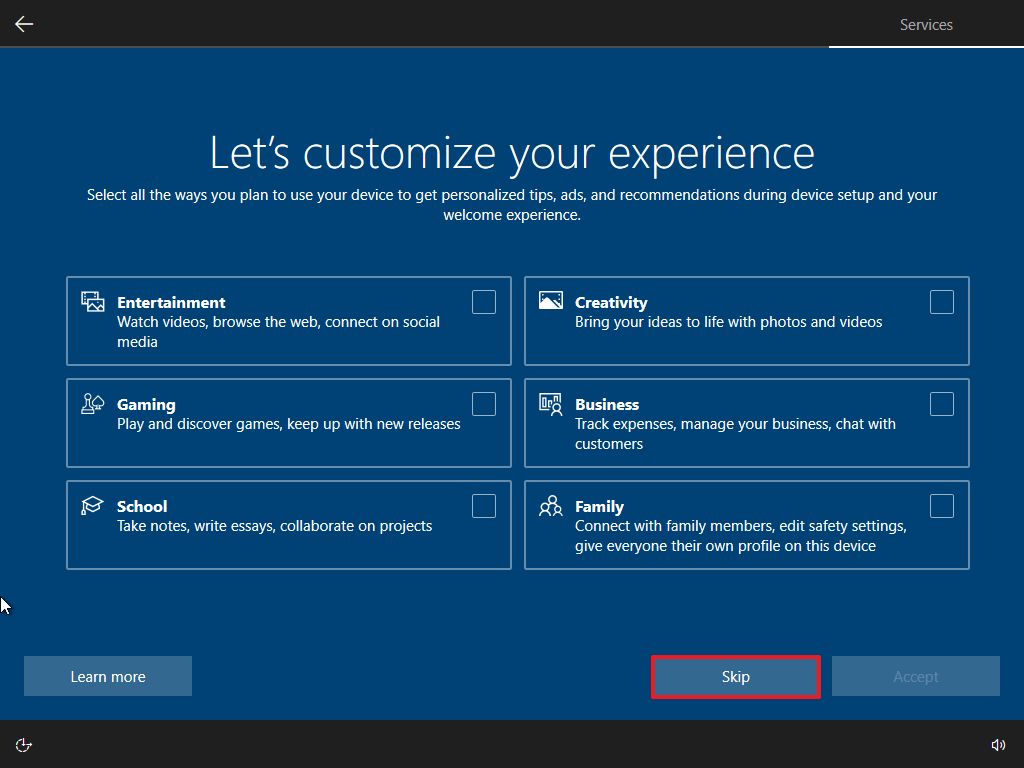
- (Optional) Click the Skip button, or select how you will be using the device to receive targeted ads, tips, and other recommendations and click the Accept button.
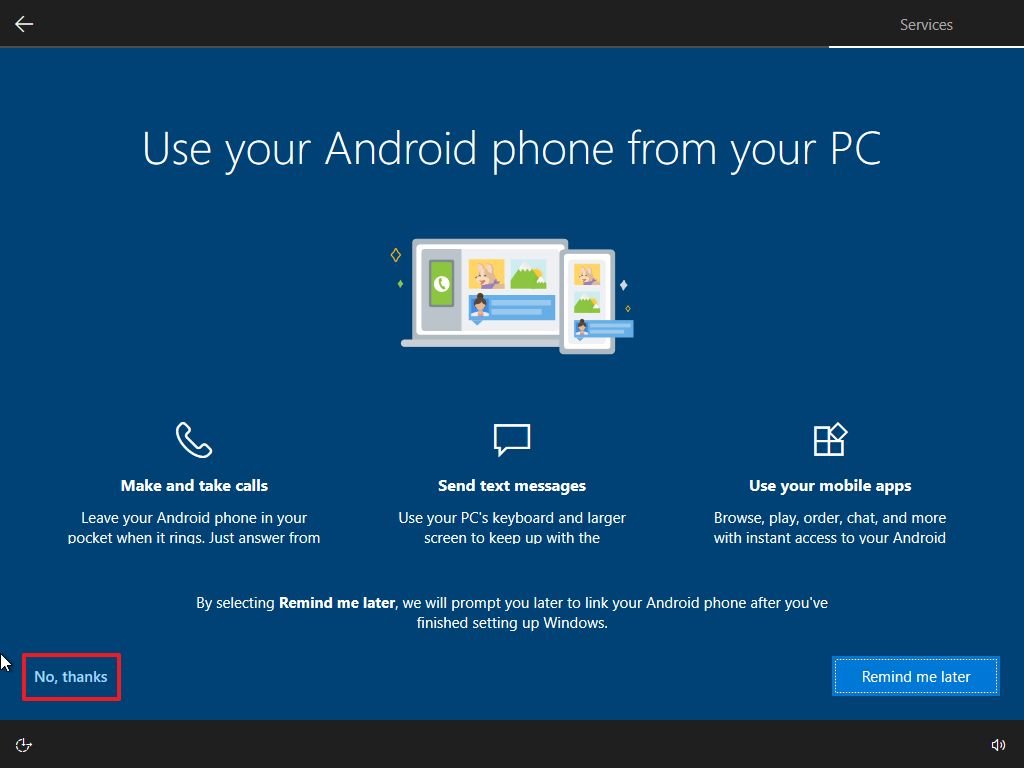
- (Optional) Click the «No, thanks» button to skip the phone link process.
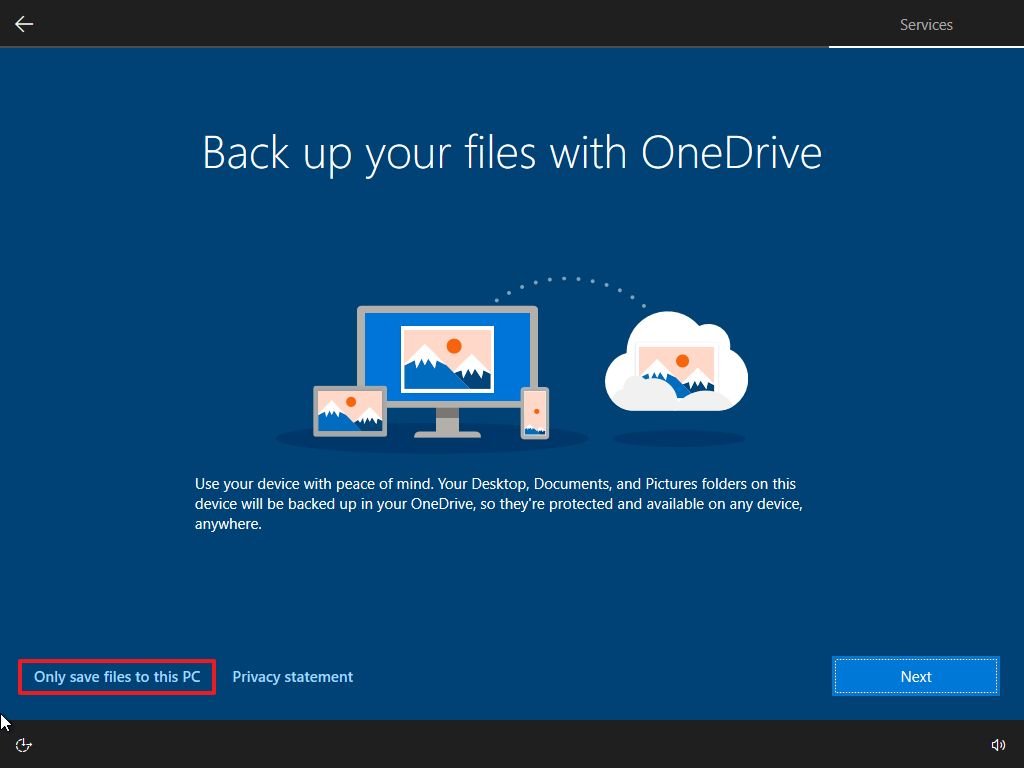
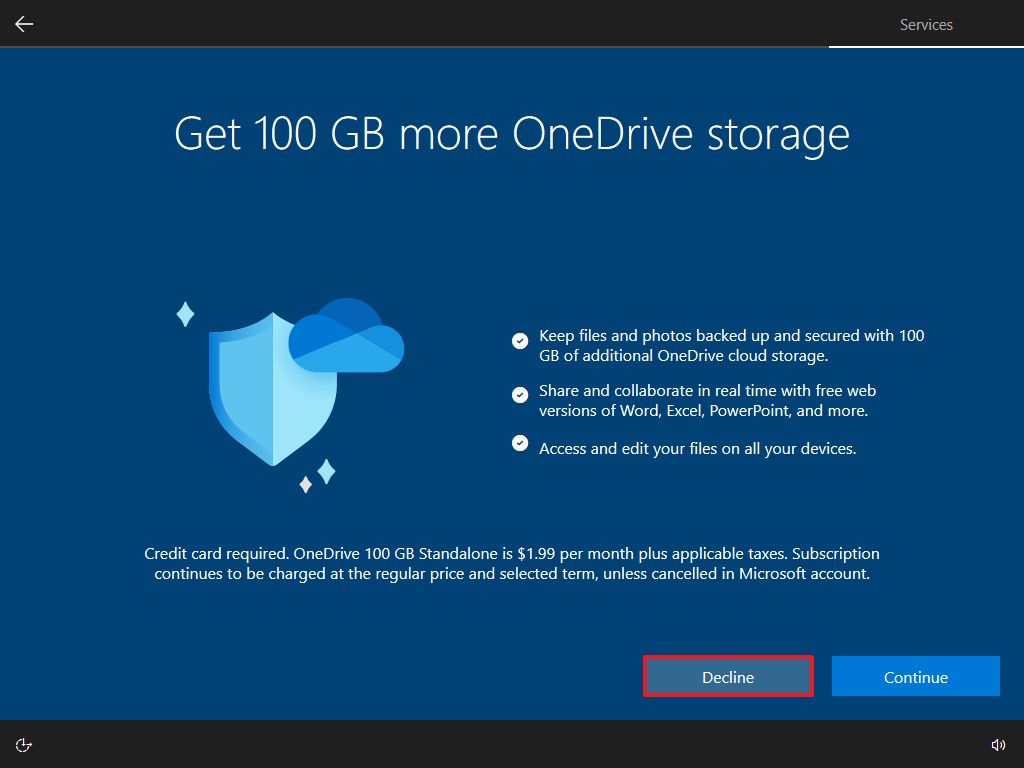
- (Optional) Click the Next button to allow OneDrive to back up the Desktop, Documents, and Pictures folders to the cloud. If you use another cloud service or prefer not to upload files to the cloud, click the «Only save files to this PC» option in the screen’s bottom-left corner.
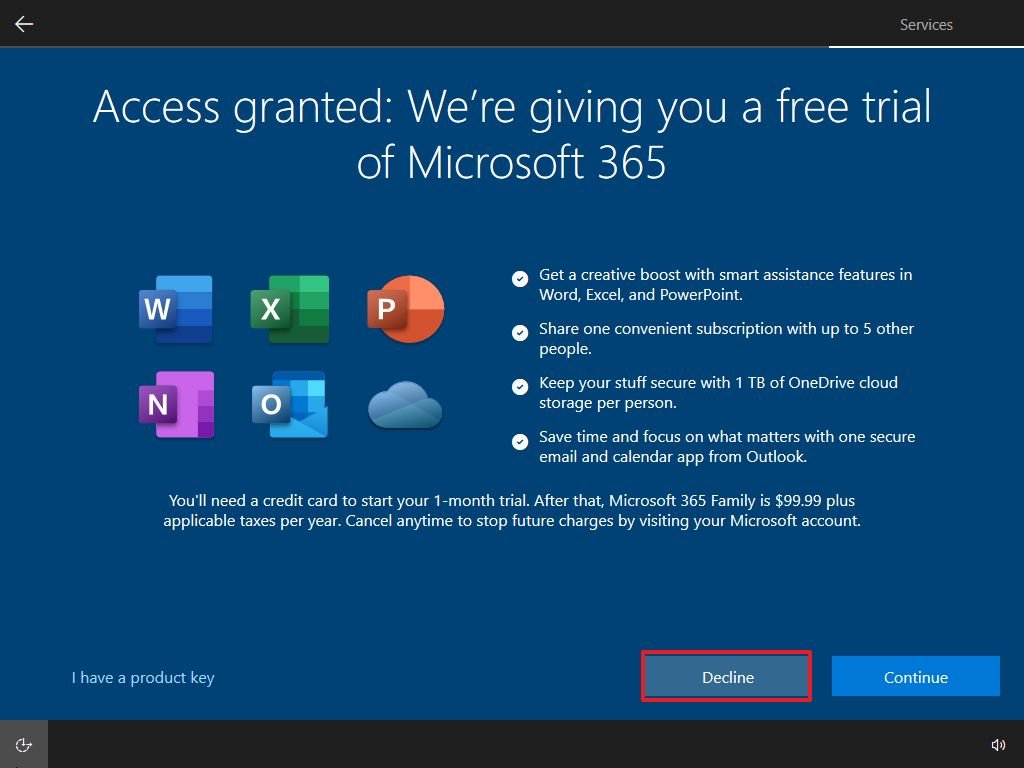
- Click the Decline button to skip the Microsoft 365 setup (if applicable).
- Quick tip: If you have an Office product key, you can click the «I have a product key» option, and then the apps will install automatically.
- Click the Decline button to skip the OneDrive storage promotion.
- Click the «No Thanks» button to skip the Game Pass promotion.

- (Optional) Click the «Not now» button to continue without setting up Cortana.

After you complete the steps, the settings will apply to the clean installation of Windows 10, and you should be able to see the default desktop experience.
How to complete setup after installation of Windows 10
Once the installation is complete, it’s also good to check that Windows 10 isn’t missing any critical updates or drivers and is properly activated.
Install updates
To download and install the latest updates, use these steps:
- Open Settings.
- Click on Update & Security.
- Click on Windows Update.
- Click the Check for updates button.
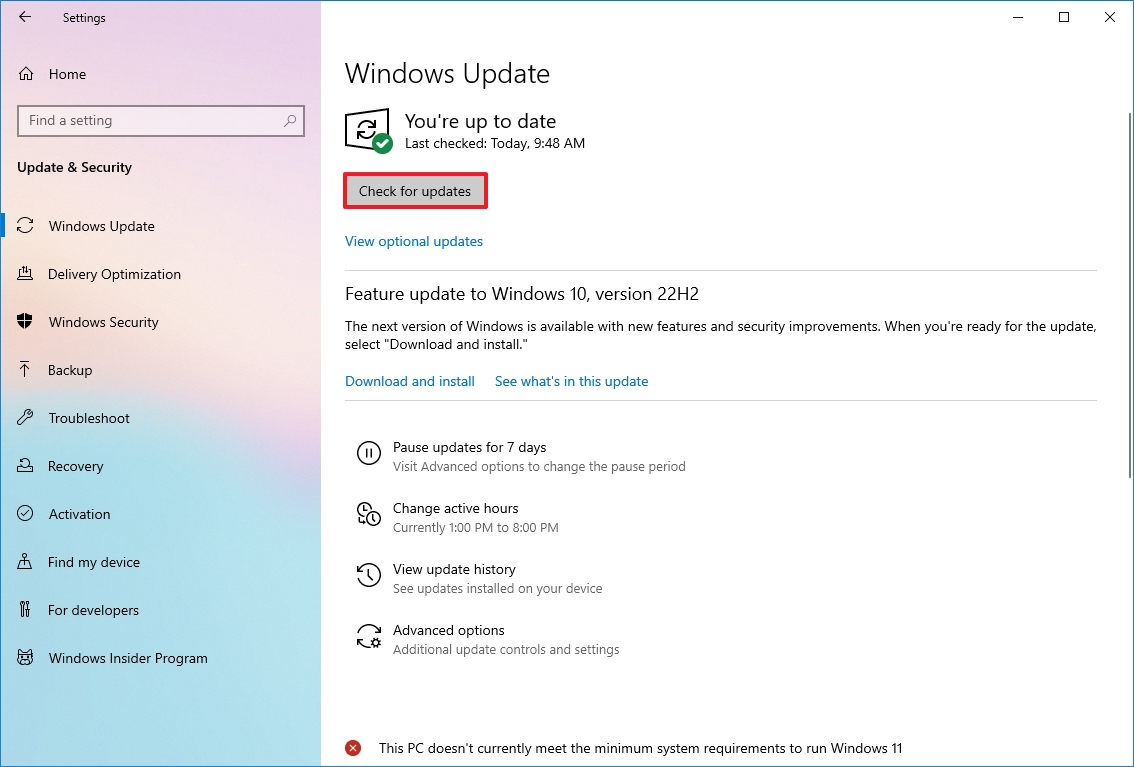
Once you complete the steps, any available updates will automatically download and install. Also, a restart may be required to complete the update process.
Check missing drivers
To determine whether drivers are missing on Windows 10, use these steps:
- Open Start.
- Search for Device Manager and click the top result to open the app.
- Confirm that none of the devices has a yellow or red mark, and make sure nothing is listed as unknown.
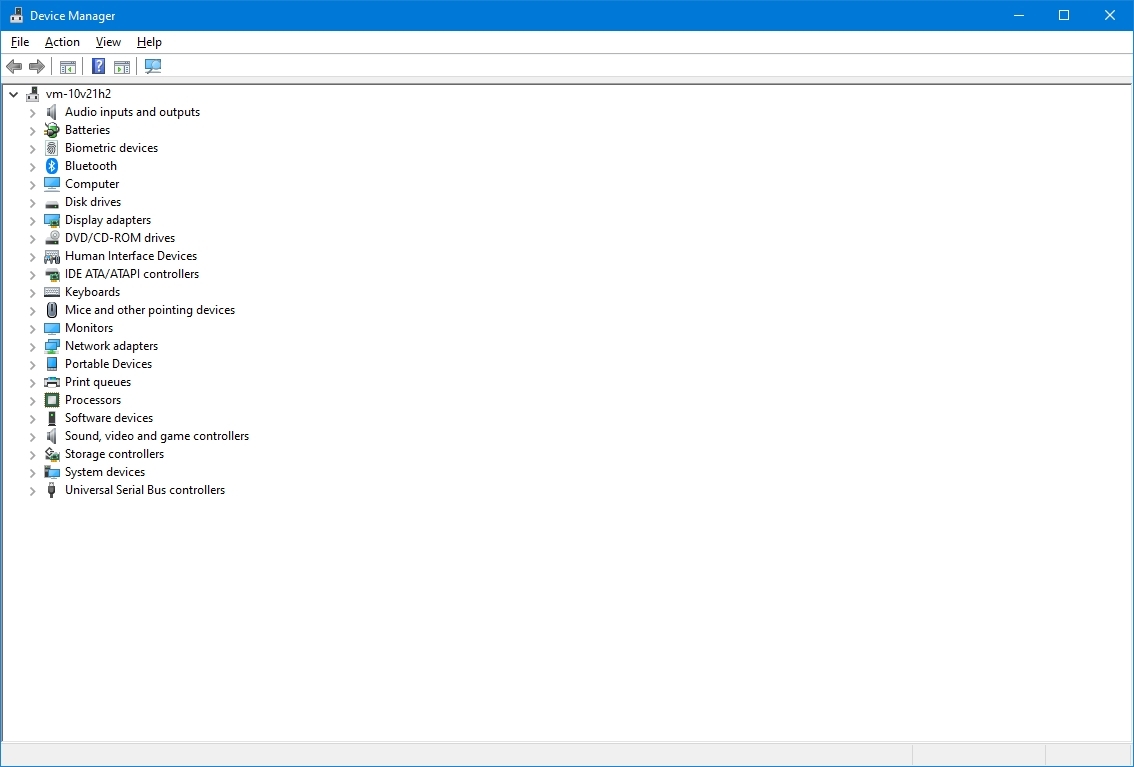
If some hardware components have problems, you may need to manually install the latest drivers from your computer manufacturer’s support website. You can use this guide to install device drivers on Windows 10.
Install missing drivers
On Windows 10, drivers can also be part of the optional updates. If the computer doesn’t have all the required drivers, you may be able to download them from Windows Update.
To download missing drivers on Windows 10, use these steps:
- Open Settings.
- Click on Update & Security.
- Click on Windows Update.
- Click the «View optional updates» option. If the option isn’t available, it means that Windows Update doesn’t have any driver updates for the computer.
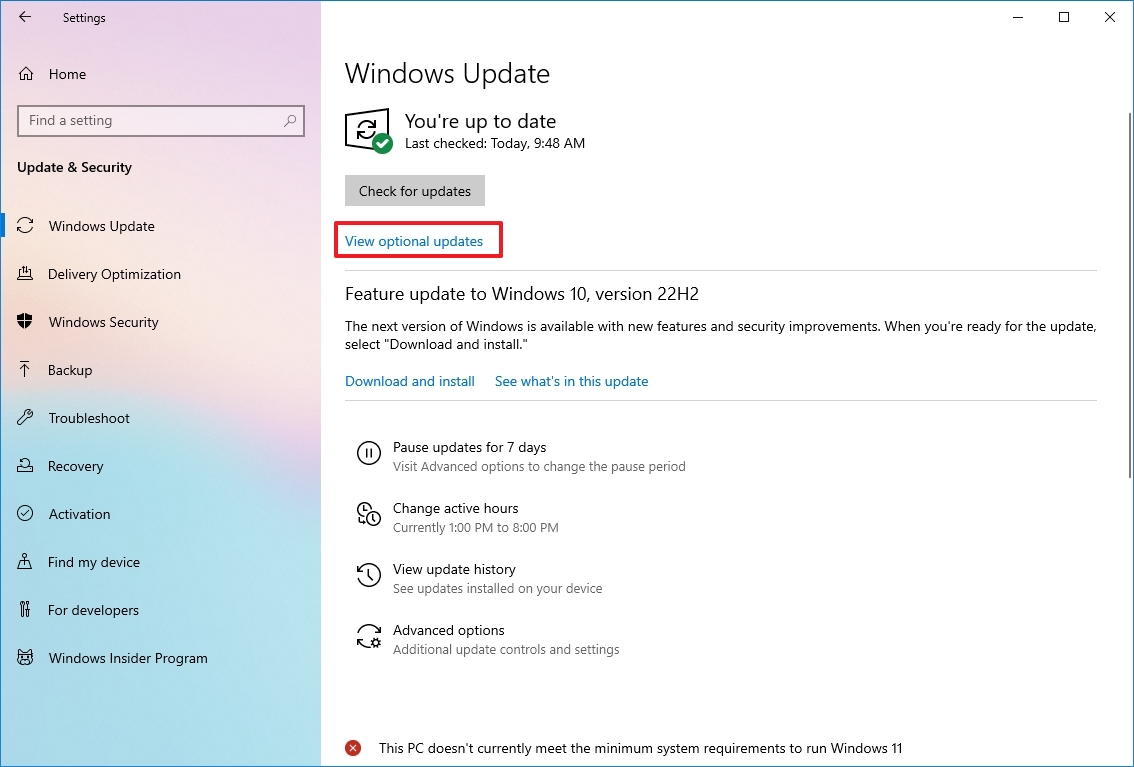
- Click the Driver updates section.
- Select the missing driver.
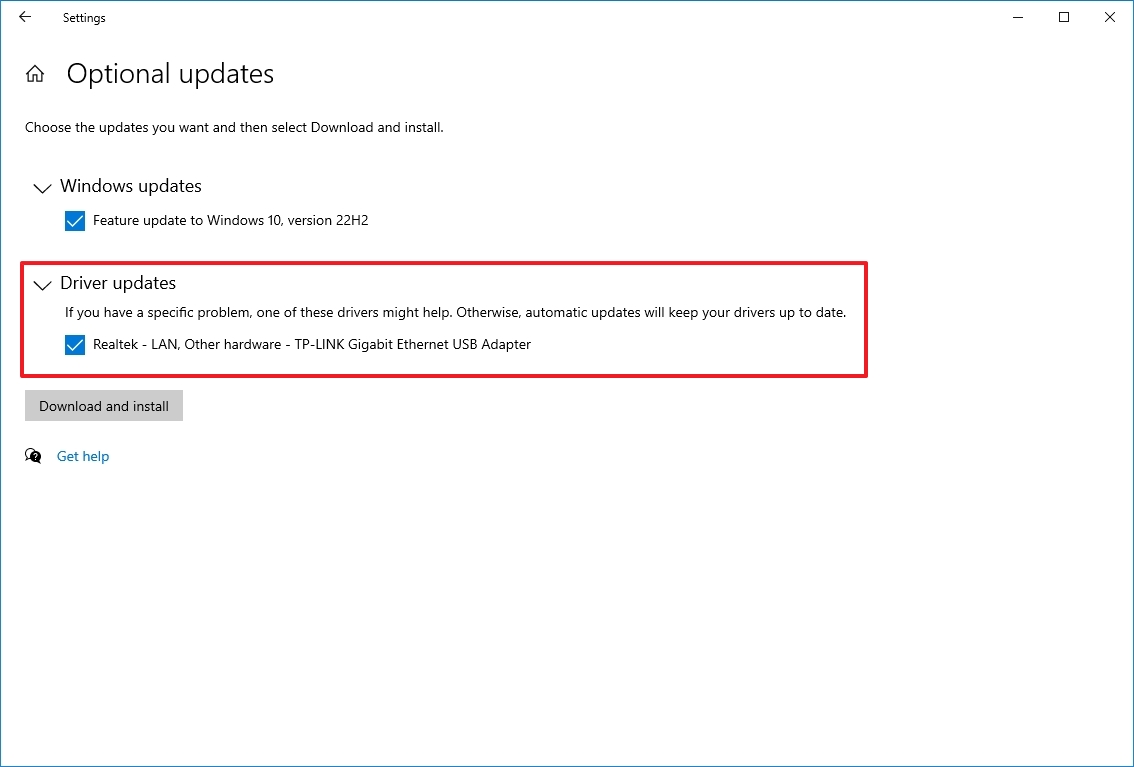
- Click the «Download and install» button.
After you complete the steps, Windows Update will download and install the missing drivers automatically.
Confirm activation
To confirm Windows 10 was activated correctly, use these steps:
- Open Settings.
- Click on Update & Security.
- Click on Activation.
- If Windows 10 is activated successfully, you will see one of these messages:
- Windows is activated with a digital license: The installation has been activated, but it isn’t linked to your Microsoft account.
- Windows is activated with a digital license linked to your Microsoft account: The installation has been activated, and the license is linked to your Microsoft account.
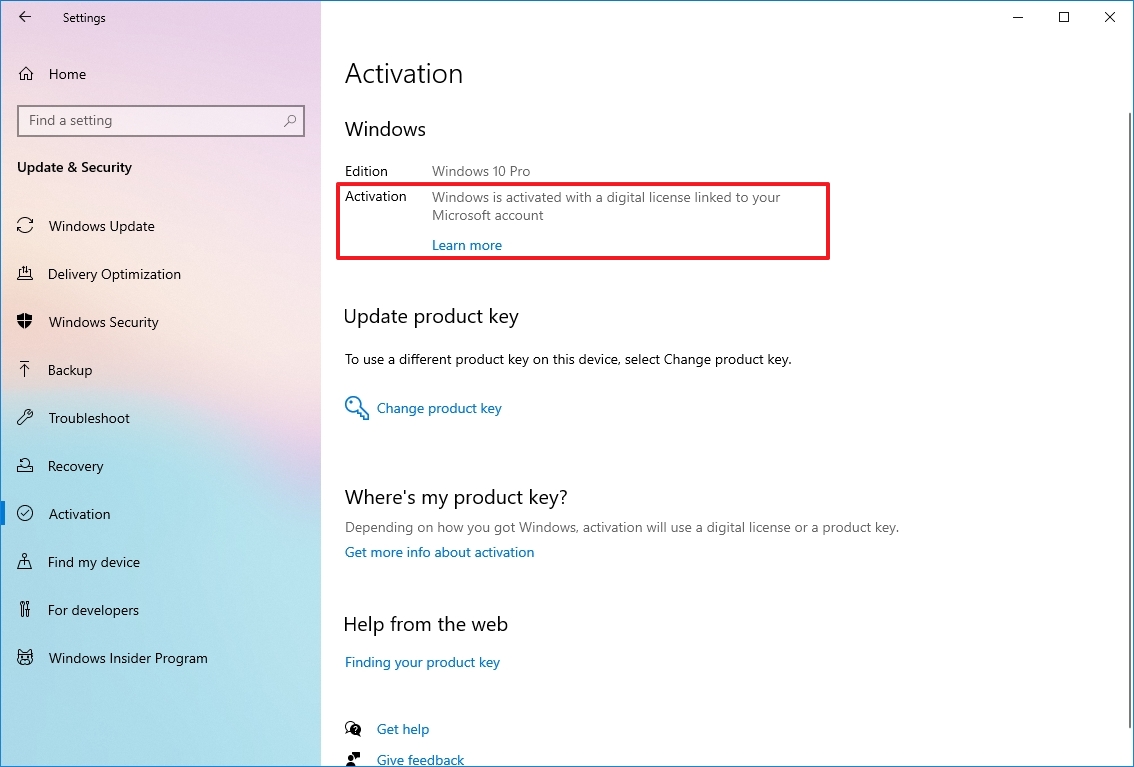
In case Windows 10 didn’t activate, the device will try to reactivate at a later time. If you’re still having issues after a couple of days, you can use the Activation Troubleshooter to activate.
Reinstall apps
Now, it’s time to reinstall the apps, including your preferred web browser, such as Google Chrome, Mozilla Firefox (opens in new tab), or Opera (opens in new tab), to browse the web.
If you use Spotify (opens in new tab) or iTunes (opens in new tab) to listen to tunes while working or surfing the internet, you can download these apps and others from the Microsoft Store.
Also, it’s now a good time to download and install the Microsoft Office apps (opens in new tab) to start working with Word, Excel, and PowerPoint and managing your emails with Outlook.
Restore files from backup
The last thing left is restoring your documents from a previous backup. If you previously configured file backup with OneDrive, the data should already be available inside the OneDrive folder, but if the app didn’t configure automatically, use this guide.
If you have a backup of your files on an external drive, reconnect the storage to restore the data into the default folders (Documents, Downloads, Pictures, etc.).
To restore files from a previous backup on Windows 10, use these steps:
- Open File Explorer.
- Under the This PC section in the left pane, select the external drive with the file backup.
- Select the folders with the file to restore.
- Click the Copy to menu from the «Home» tab.
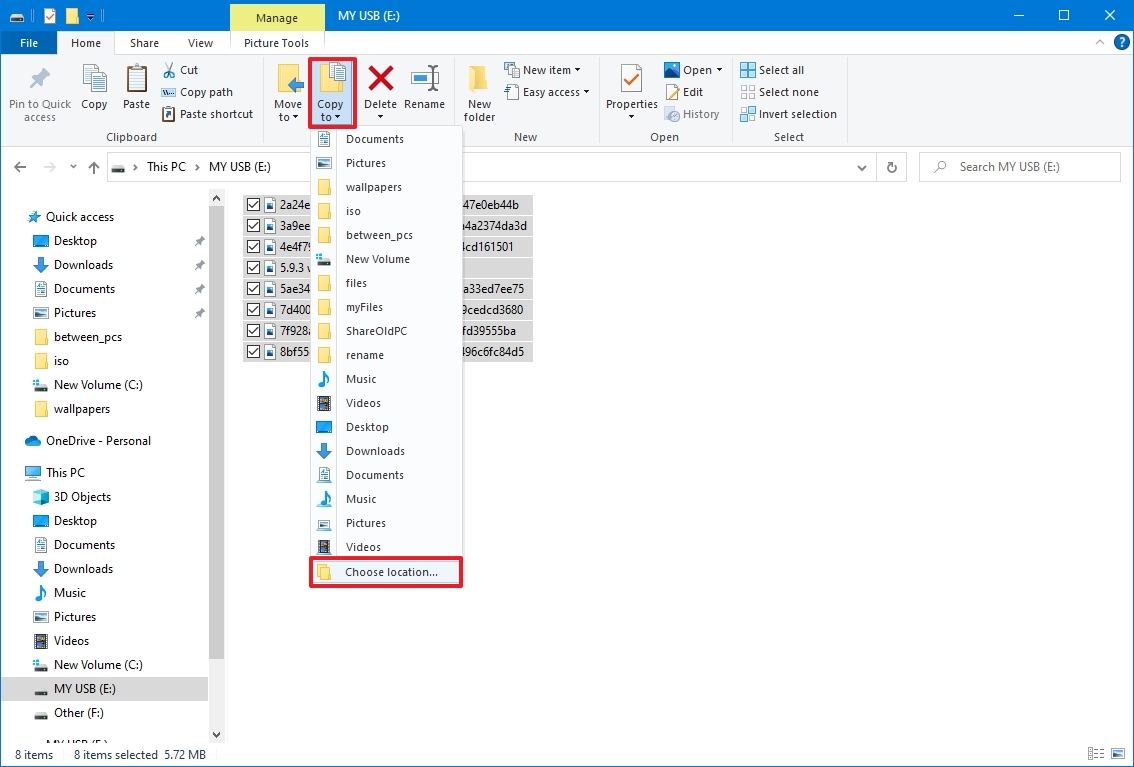
- Select the Choose location option.
- Select the destination to restore the files — for example, the Documents folder.
- Click the Copy button.
After you complete the steps, the files will restore to the new location.
Although you can start a clean installation using the Media Creation Tool without a USB media and even the «Reset this PC» option from the recovery settings, these methods have limitations and do not always work as expected. The bootable media is the alternative if you want the best possible clean installation method.
More resources
For more helpful articles, coverage, and answers to common questions about Windows 10 and Windows 11, visit the following resources:
- Windows 11 on Windows Central — All you need to know
- Windows 10 on Windows Central — All you need to know
Get the best of Windows Central in in your inbox, every day!
Mauro Huculak is technical writer for WindowsCentral.com. His primary focus is to write comprehensive how-tos to help users get the most out of Windows 10 and its many related technologies. He has an IT background with professional certifications from Microsoft, Cisco, and CompTIA, and he’s a recognized member of the Microsoft MVP community.
Microsoft, when Windows 10 came out on the market, started prompting Windows 8.1, 8, & 7 users to upgrade their systems and install the new OS for free. But – as always – the upgrade process to the latest Windows OS, is not the best practice to have a workable computer without problems, especially on computers with a lot of programs installed prior to the upgrade. On the other hand, in the past, if you want to perform a clean install of Windows 10, you have to first upgrade to Windows 10 from your Windows 7 or Windows 8 installation and then to perform a clean install.
Today – finally – Microsoft started allowing the use of a valid Windows 7, 8, or 8.1 product key to perform a fresh install and activate Windows 10 with it. Of course if you have bought a Windows 10 key you can use it to do a clean install of Windows 10.
This tutorial contains detailed instructions on how to perform a clean install of Windows 10 on your computer.
How to perform a Windows 10 clean installation.
Before you continue, make sure that:
1. You have backed up all your files first to another media (e.g. external USB disk)
2. You have in hand a valid Windows 10, 7, 8, or 8.1 product key. If you have previously updated and activated Windows 10 to the same computer you don’t need a key. Windows 10 will be activated automatically.
3. Optionally and if you have more than one physical disk on your system: Disconnect any other hard disk from your system (and keep only the hard disk that you will install Windows on it), to avoid deletion by mistake.
Step 1. Create a Windows 10 installation Media.
In order to do a fresh install of Windows 10 on your computer you need a valid Windows 10, 8.1, 8 or 7 product key and a Windows 10 DVD or USB installation media.
If you don’t have a Windows 10 installation media, you can create one by following the instructions given on these articles:
- How to download & create a bootable Windows 10 DVD installation media.
- How to download & create a bootable Windows 10 USB installation media.
Step 2. Modify Boot Order in BIOS settings.
1. Power On your computer and press “DEL” or “F1” or “F2” or “F10” key to enter BIOS (CMOS) setup utility. *
* Note: The way to enter into BIOS Settings depends on the computer manufacturer. If your computer supports UEFI, press the the corresponding button according to your computer’s manufacturer instructions. (e.g. In Sony Vaio laptops that support UEFI, you have to press the “ASSIST” key on your laptop, while your laptop is Powered-OFF).
2. In BIOS menu, find the “Boot Order” setting. This setting is commonly found in the”Advanced BIOS Features” menu.
3. At “Boot Order” setting, set the USB disk (e.g. USB-HDD) as the first boot device if you have created a Windows 10 USB installation media or set your DVD drive as the first boot device if you have created a Windows 10 DVD installation media.
4. Save and exit from BIOS settings.
Step 3. Install Windows 10.
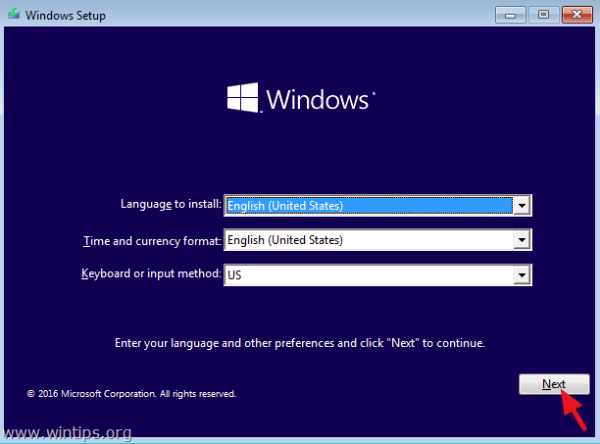
1. Place the Windows 10 installation media on your computer.
2. When prompted press Enter to boot from CD or DVD.

3. At the first setup screen, choose your Language, Time – Currency and your keyboard input method and click Next.

4. At the next screen choose Install now.

5. Then type your Windows 10, 8.1, 8 or 7 product key. *
* Note: If you have previously installed and activated Windows 10 on the same computer, there is no need to type the product key again. Click «I don’t have a product key» and Windows 10 should be activated automatically once installed and connected to the Internet (Microsoft Servers).

6. Accept the license agreement and press Next.

7. Choose Custom: Install Windows only (advanced).

8a. If you have previously installed Windows on the same disk that you are going to install Windows 10, then Delete to remove all listed partitions. Otherwise…

8b. …select the Unallocated Space and click Next.

9. The setup process of Windows 10 is starting. Wait until it is completed.

10. After the setup process is completed, Windows restart, and prompts you to personalize your PC. If you want to make your own customizations, choose Customize settings, otherwise choose Use express settings to continue. *
* Note: In my opinion, I think that you must give some extra time here and make your customizations to critical – for me – decisions, such as which type of data and information can be served to Microsoft.

8. Then define who owns this PC.*
- If the PC is personal (local computer) select «I own it» and press Next. If your PC belongs to a domain** select «My organization» option and press Next.
Notes:
*. You will not see these choices if you setup the Windows 10 Home version.
** You can join a domain after setup is finished (Windows 10 Pro).

9. At the next screen:
a. If you have chosen the «My organization» option at previous screen, select either the «Join Azure ID» if you use Office 365 business services, or select the «Join a Domain» option if your PC belongs to a domain. Then follow the on-screen prompts to setup (first) a local account on your computer and after setup is completed join your domain.

b. If you have chosen the «I own it» option, then you can setup your computer either by using a Microsoft or a local account at «Make it yours screen».
– If you want to use a MS account, type your MS account credentials (username & password) and press Next.
– If you want to setup a new local account, then click the «Skip this step» option and follow the prompts to create a new local account for your computer.

11. Wait until Windows personalization is completed.

12. When Windows 10 OS is installed, decide if you want your PC to be discovered by other PC’s on your network or not.

13. After installation, navigate to the device manager and see if all your devices are recognized properly, otherwise install any other driver needed.
That’s it! Let me know if this guide has helped you by leaving your comment about your experience. Please like and share this guide to help others.
If this article was useful for you, please consider supporting us by making a donation. Even $1 can a make a huge difference for us in our effort to continue to help others while keeping this site free:

If you want to stay constantly protected from malware threats, existing and future ones, we recommend that you install Malwarebytes Anti-Malware PRO by clicking below (we
do earn a commision from sales generated from this link, but at no additional cost to you. We have experience with this software and we recommend it because it is helpful and useful):
Full household PC Protection — Protect up to 3 PCs with NEW Malwarebytes Anti-Malware Premium!
A computer cannot function without an operating system, so installing Windows 10 is a critical step that every non-Mac user should know how to do.
Of course, most devices come pre-configured out of the box, which means Windows is preinstalled and you don’t need to worry about adding the OS manually. However, there are occasions when you might need to install Windows 10 yourself.
- How to use Windows 10 like a pro
- The best laptops currently available
- How to check laptop battery health in Windows 10
- Here’s how to convert PDF to JPG
Perhaps your device is running an outdated version of Windows, and you need to upgrade to Windows 10. Or maybe you want to perform a clean installation as your operating system is experiencing issues. Or you could simply want to add Windows 10 to a new PC or laptop.
Whatever your reason, you can use our guide on how to perform a full Windows 10 installation. We’ve also included a walkthrough for upgrading from a previous version of Windows.
It’s worth noting that installing Windows 10 can be a lengthy process, so make sure you have enough time to wait it out.
How to install Windows 10: Full installation
Before we get into the installation walkthrough, it’s worth noting that installing Windows 10 can be a lengthy process. Make sure you have enough time to wait it out.
1. Check your device meets the Windows 10 system requirements. Below you’ll find the minimum specs needed to run Windows 10, so check your device is capable:
CPU: 1GHz or faster processor
RAM: 1GB for Windows 10 32-bit or 2GB for Windows 10 64-bit
Storage: 32GB of space or more
GPU: DirectX 9 compatible or later with WDDM 1.0 driver
Display: 800×600 resolution or higher
If your computer is lacking in terms of specs, then check out our roundup of the best laptops. or get a beastly machine by choosing one of out best gaming PCs.
2. Create USB installation media. Visit Microsoft’s Windows 10 download page (opens in new tab) and select “Download tool now” under the “create Windows 10 installation media” section. Transfer the downloaded installer tool to a USB drive.
3. Run the installer tool. Open the installer tool by clicking on it. Accept Microsoft’s terms, and then select “Create installation media for another PC” on the “What do you want to do?” page. After selecting which language you want Windows 10 to run in, and which edition you want as well (32-bit or 62-bit), you’ll be asked what type of media you want to use.
Installing from a USB drive is definitely the preferred option but you can also install from a CD or ISO file. Once you choose your device, the installer tool will download the required files and put them onto your drive.
4. Use your installation media. Insert your installation media into your device and then access the computer’s BIOS or UEFI. These are the systems that allow you to control your computer’s core hardware.
The process of accessing these systems is unique to each device, but the manufacturer’s website should be able to give you a helping hand here. Generally, you’ll need to press the F2, F12 or Delete keys as your computer boots up.

5. Change your computer’s boot order. Once you have access to your computer’s BIOS/UEFI you’ll need to locate the settings for boot order. You need the Windows 10 installation tool to be higher up on the list than the device’s current current boot drive: this is the SSD or HDD that your existing OS is stored on. You should move the drive with the installer files to the very top of the boot order menu. Now, when you restart your device the Windows 10 installer should load up first.
6. Restart your device. Save your settings in the BIOS/UEFI and reboot your device.
7. Complete the installation. Your device should now load up the Windows 10 installation tool on restart. This will guide you through the rest of the installation process.
How to install Windows 10: Upgrading from an older version of Windows
If you’re upgrading to Windows 10 from Windows 7 or Windows 8, the process is much easier. Here’s how to upgrade from an older version of the Windows operating system.
1. Download the installer tool. Visit Microsoft’s Windows 10 download page (opens in new tab) and select “Download tool now” under the “create Windows 10 installation media” section.
2. Run installer tool. You can just upgrade your version of Windows directly from the installer tool, without creating separate installation media. When you reach the “what do you want to do?” section, select “Upgrade this PC now.”
3. Complete Windows 10 installation. Now the installer tool will guide you through the rest of the process. Just follow the steps to complete the installation process and you’ll have Windows 10 installed on your device at the end of it.
More Windows 10 tips
How to find your Windows 10 product key | How to encrypt files on Windows 10 | How to turn on Bluetooth for Windows 10 | How to screenshot on Windows 10 | How to boot into Windows 10 safe mode | How to split the screen on Windows 10 | How to record a screen on Windows 10 | How to update drivers on Windows 10 | Mapping a network drive in Windows 10 | How to update Windows 10 | How to change the password on Windows 10 | How to factory reset on Windows 10 | How to speed up Windows 10 | How to reinstall Windows 10
Get instant access to breaking news, the hottest reviews, great deals and helpful tips.
Installing Windows 10 may be required if you bought a laptop without a preinstalled operating system. Also, you may need to reinstall Windows 10 in case of problems with the OS. In any case, you need to know how to install Windows 10 yourself, so as not to overpay the computer masters. In fact, installing Windows 10 is a very easy process. The main thing is to understand the main points.
Before you start looking at the most complete guide to installing Windows 10 on a computer and apply the knowledge gained in practice – take a USB flash drive with at least 8 GB of memory in your hands. When the flash drive is in your hands, you can start installing the distribution kit.
Our team tried to write the most complete instructions for installing Windows 10. But if you have any questions, you can always ask them in the comments!
Installing windows 10 – preparation stage
The flash drive is the main tool with which the operating system will be installed. The first step is to prepare the USB stick. There is no difference whether the flash drive will be 3.0 or 2.0, and this will not affect anything else except the write / install speed. The next stage is the presence of an image from which you will need to write the system to the drive. The image, or as it is also called, the installation files of the Windows 10 system can be found on various Internet resources. Most often, Windows images that “walk on the Internet” are supplemented with various modifications. Such images can limit the functionality of Windows 10 or are crammed with software that does not bring anything good to the end user.
The danger of installing pirated Windows was and will be. If you have no experience of interacting with them and you do not want to become an “accidental victim” of cybercriminals, it is recommended to install a legal version of the OS.
But you can find a clean, legal or original Windows 10 “without modifications” and write it to a USB flash drive in this way:
- Insert the flash drive into the USB port of the computer (it will be displayed in the system with a characteristic sound and can be seen through the explorer).
- Open any browser (Edge, Mozilla, Google and others). The computer or laptop from which you enter the browser must be connected to the Internet.
- In any address bar / search engine in Russian, write “Download Windows 10”.

- The only place that has a clean, legal image is at microsoft.com. You can download the Windows 10 installation right here. No other sites will give the desired result, but the search engine algorithm will give it, and you will receive a link to the desired page.
- Then press the button “Download the tool now”.
- And you download MediaCreationTool.
- The browser is no longer needed, you can close it. Next, run the tool as administrator. The next stage is the preparation of the flash drive itself. If the flash drive is 3.0, then the preparation time on an average computer takes about 15 minutes.
- Accept the license agreement after reviewing its contents.

- Wait a while until the program offers you several options.
- If you have Windows 10, 7 or 8 on this PC, the first item allows you to update your OS to the latest current version. To create an installation USB drive, select Create Installation Media. Choose the second item and click “Next”.
- Uncheck the “use recommended settings” checkbox. And if required, choose your language, bit depth (if in doubt, or make a USB flash drive universal, put “both” in the bit width field). But remember that 32-bit Windows is needed only for some ancient devices with less than 4 GB of RAM. That is, always install 64-bit Windows 10.
- Next, you have a choice between an ISO file or a USB device. If you don’t want to make a bootable USB flash drive now, but you need a system image, choose the ISO file. This will save the image in ISO format to your PC’s hard drive so you can use it in the future for recording without having to go back to the Internet.
- To write the system to a USB flash drive, you need to select “USB device”.
- You need to be careful here. If several drives or flash drives are connected to the computer, you should choose the correct one, because before recording, the program will completely format the flash drive into the FAT32 file system necessary for operation.
- You can make sure that the desired drive is under the same letter, you can use the explorer.

- Next comes a long procedure for creating the media itself, divided into two stages. The first step is downloading the image. The second stage is installing the distribution kit on a USB flash drive.
- After complete installation, the files will be on the media, and the data carrier itself can be used to install Windows 10 from a USB flash drive to a laptop or PC.


In addition to the official program Media Creation Tools, you can use other popular utilities for recording the system image to a USB flash drive:
- Ultra ISO;
- Rufus;
- WinToFlash;
- Universal USB Installer.
You can even use the command line to write the Windows 10 distribution to a USB flash drive.
But the easiest way to understand and implement is the way to work with the official Media Creation Tools, so stick with it.
Installing Windows 10: Different Ways to Install
In general, installing Windows 10 from a USB flash drive comes down to one thing – you run the system installation file and use the installation wizard to install Windows on your computer. But, there are differences in how and in what “environment” you can run the installer. The next method should be chosen based on the needs of what the computer provides you.
Clean install of Windows 10
The mistake of many newbies is that to install the system, they turn on the computer, wait for Windows to load (which needs to be reinstalled) and try to start the installation from the flash drive. It is not advisable to do this, since this method will more often lead to a failed installation of the system.
For a complete and high-quality installation of the OS, it is recommended to do a clean installation of Windows 10. “clean” means the installation of the operating system on a drive prepared and formatted for this task.
The drive can be a hard drive, an SSD, or a dedicated “area” of a drive that you can create from a drive before or during a clean install. Installation sequence:
- Connect the USB flash drive with the distribution kit to the computer prepared for reinstalling Windows.
- Choose to launch the flash drive through a different boot environment (Boot menu, UEFI, BIOS).
- Select the correct installation options and format the hard drive for subsequent installation on it.
- Run the installation and wait for it to complete.
Operating system boot environment BIOS and UEFI
Below is a list of interfaces from which to download the OS installer. The easiest way to work is through the Boot menu.
Installing Windows 10 via UEFI
As soon as you turn on the computer, the motherboard emits a short signal, and information about the manufacturer of the motherboard, PC or laptop appears on the screen, with the help of a certain key you can enter the UEFI interface.
All modern motherboards contain this interface by default. And thanks to him, you can download the installation distribution from a USB flash drive. Installing Windows 10 via UEFI starts like this:
- In the turned off computer, insert the installation USB flash drive with Windows 10 into the USB port.
- Press the Power button to turn on the PC.
- As soon as you heard a squeak and saw the motherboard splash screen, press the Del key on the computer (press continuously until UEFI opens). You can also log in using the F2 or F1 keys. On laptops, this is also F1 and F2. HP notebook PCs enable UEFI with the F10 key.
- In the UEFI interface that opens, find the advanced menu (Advanced mode). Depending on the interface, it can be placed at the bottom or top of the screen. Also, the extended menu can be called with the F7 key.
- Working with an ASUS motherboard, press F7 – go to the “Boot” section – in the Boot Option # 1 line, select USB Flash.

- If your PC has an MSI motherboard – press F7 – Setting – Boot – select “Boot option” from below – set USB: Key “name of the connected flash drive”.

- Booting from AsRock is easier – click on the “Boot” tab and set the Windows flash drive to “Boot Method # 1”.

- For Gigabyte – go to the “Setting” section and click “Boot Option # 1” on your flash drive.

If the Boot Option offers a choice between “name of the stick” and “UEFI: name of the stick”, always choose UEFI. After changing the boot priorities, press F10 and select “Save and Exit”. The download will go from the storage medium you specified.
Installing Windows 10 via BIOS
If your PC motherboard works with BIOS, this means that you are installing Windows 10 through the BIOS. In this case, you can encounter various difficulties both with operation and during the installation process.
It should be understood that only the keyboard works in the BIOS, and all manipulations are carried out through it. Remember:
- Movement – arrows up, down, left, right;
- Apply / Expand – Enter;
- Cancel / go back – Esc;
- Save parameters and exit – F10.
There are various types of BIOS such as Award, AMI, and Phenix-Award.
Due to minor changes in the interface, there is a difference in setting download priorities, but using the AMI example, it is easy to figure out where the required parameter is located:
- Connect the USB flash drive and start the PC.
- After a short sound, press the button to enter the BIOS (computers – Del, laptops – F2, F12, Fn + F2, etc.).
- Go to the “Advanced” – “USB Configuration” section.

- In this section, next to the “USB Function” and “USB 2.0 Controller” parameters, check that “Enabled” is selected.

- Use Esc to go back and go to the “Boot” – “Hard Disk Drives” tab.

- Put your USB flash drive as the first in the list of loading media.

- Install boot from HDD to the second location.

- Then press F10 to save the changes and click “OK”.

- The system will offer to reboot the system while saving the specified parameters. Click OK. The reboot will start automatically. You don’t need to touch anything. We are waiting for the download from the USB flash drive to occur.


Boot-menu
We repeat almost everything that we did when loading UEFI, with a difference in the keys pressed:
- Plug in your USB flash drive and start your computer.
- As soon as the logo of the motherboard appears, press the keys to call the Boot menu. They are different for each motherboard. If your motherboard is from Asus, press F8, F11-F12 if MSI, Gigabyte motherboards are installed, and F9 if Asrock.
- If Windows 8 or 10 is currently installed on the computer, then select the USB flash drive as the bootloader with the inscription “UEFI: USB flash drive name”.

Windows 10 setup wizard
Installation of Windows 10 takes place in several stages: preparation for installation, installation, settings after installation. Thanks to the installation wizard, it’s easy:
- Loading data from a USB flash drive starts a window where you select the language, time format and input method.

- If everything suits you, click “Next” and then “Install”.

- The OS offers to go through activation now. If there is no key, click “I do not have a key.” You can activate Windows 10 later, or even use it without a digital license.
- Next, select the OS you want to install. The “Home” version is sufficient for standard work on a computer. The Pro version is installed because of the additional functions for configuring Windows required in the IT field. Education is an OS focused on learning and students.
- Then read the license terms and accept them.
- To start a new installation of Windows 10, click “Custom”.
- Here you need to choose which drive Windows 10 will be installed on and prepare this drive for installation. To do this, select your hard drive and click “Format”. The formatting function will erase all data from the disk. Then click “Create”.
- At this stage, you set the number of GB for your system and set the necessary markup for its deployment. If you select less than the maximum GB, the drive will be divided into multiple parts. One of these parts (or a whole disk) can be implemented for OS installation. After choosing the number of GB, click “Apply”.
- Then click “OK” that the OS has created a system subkey to save its initial settings.
- After creating the “System” and “Main” section, select “Main” and click “Next”.
- Done. The installation process has begun. The installation time of Windows 10 directly depends on the speed of reading the flash drive and the speed of writing to the hard drive or SSD. On average, if you install an operating system from a USB 3.0 flash drive to an SSD drive via a USB 3.0 port, the installation time will take about 10 minutes. If it works via USB 2.0 and the distribution is deployed to an old hard drive, it can take up to an hour.


Typical Windows 10 installation
You can install Windows 10 on an SSD or hard drive directly from a running OS of the same family. If everything is done correctly, and this OS does not crash, then you can install the distribution kit even on the disk from which your Windows is running now. There will be no mistakes.
The only difference is that a Windows.old folder will be created, which will contain data for restoring the previous operating system.
If this method suits you, then the installation proceeds according to a similar principle:
- Connect the USB flash drive with the distribution kit to your computer and run “Setup.exe”.

- After checking for updates, checking your PC, and accepting the license agreement, Windows 10 Setup will start the installation process.
- Wait for updates to check.
- Then close everything on your PC and click Install.
- Also, you can click on the “Change the components selected for saving” button and choose whether to save or not save your data.
- The installation proceeds in the same way as described for a clean installation of Windows 10. You need to select the disk on which the OS will be recorded. If this is the same drive from which Windows is currently running, you do not need to format it. Just select the drive and click “Next”. The installation wizard will notify you that a Windows.old folder will be created with the files and folders of the current OS. Click “OK”.

- As soon as you decide on the drive, the installation of the OS on the PC will begin. At some point, the PC will restart and the installation will continue outside of Windows 10. Everything will complete in the same way as if you installed the system from scratch.


Additional ways to install Windows 10
There are several other ways to install Windows. All of them are related to the fact that Windows 10 is already installed on your PC and you want to reinstall it.

For these purposes, there are several functions from the recovery section (Win + I – Update and Security):
- Reset the PC to its original state – rollback to the initial settings of the computer if it fails. In this case, the loading of the primary parameters will be pulled up from the recovery environment. If the PC fails to do this, you can connect a USB flash drive with Windows 10 boot files so that the PC can do a recovery via a flash drive.


- Revert to previous version – the option to install the previous version of Windows 10 from the Windows.old folder or alternative backup folders that the OS created. A good solution in terms of if the previous version worked well and the new one works with a lot of bugs.
- The “Windows Security” section in the defender, the “New Start” option is the same as launching the installer from a USB flash drive in Windows 10 itself, only without bootable media. If an option is available, you can work with it.


The disadvantage of all methods of restoring or installing the operating system is that such a process does not give a 100% guarantee of installing Windows. Since the system is being reinstalled due to unstable operation, this could affect these functions as well.
In the end, often, instead of a “successful rollback”, you get a return to this state, a wasted time and a “Problem when returning a PC to its original state” window.

Also, these methods do not allow you to change the type of system. If you need to change “Home” to “Pro” – do a clean install.
Problems installing Windows 10
Sometimes there may be problems before starting the installation or during the process. In this section, we will analyze the errors during the installation of Windows 10 that users most often encounter.
The selected disk contains an MBR partition table

A common problem that is solved by converting MBR to GPT partitions when installing Windows 10. The bottom line is that now for hard drives and their interaction with a modern OS, you need GPT partitioning. An outdated MBR is not suitable, so it needs to be converted. In this case, all data on the disk will be deleted:
- In the local disk selection window, press Shift + F10. Enter the command “diskpart” to launch a special program for working with disk partitioning.

- Run the “List Disk” command which will show all active disks on the PC.

- Select the disk with the MBR partition and run the “clean” command.
- Then enter the “convert GPT” command followed by the “exit” command.


When everything goes well, you can use the “mark up area” or partition the drive through the disk setup and start installing Windows 10 on a GPT partition.
Could not create new or find existing section

An error during the installation of Windows 10 manifests itself in the event that the system has nowhere to create system files or there are partitions on the only hard disk that you created manually. The solution to the problem is quite simple:
- Delete the main partition where you plan to install the OS.

- If there are several partitions, and the data on them is not valuable, delete them all.
- Allocate unallocated space, create the desired partition (or several partitions) and continue installation on one of them.
- If it doesn’t work, just restart your computer and try again to install the OS of the partition you just created.

Installing Windows 10 – error codes
If the installation of Windows 10 is interrupted and an error appears with a specific code, try to solve it using the following methods:
0x8007025d – problem with installation files, reading or writing them.

You need to check the availability of space on the hard disk, whether the hard disk is working properly, whether the OS image and the flash drive itself are working correctly.
You can also do the:
- run the USB flash drive according to the instructions for a clean installation if this condition is not met;
- disconnect all unnecessary USB devices from the PC before installation;
- use a different flash drive with a distribution kit or a different image;
- disconnect the Ethernet cable during the OS deployment period.
0x80070570 — Indicates that there may be installation problems due to hard disk failure or RAM failure
-
- Disconnect the PC and remove the RAM sticks. Wipe dust off them and ports. A regular eraser works well for this, with which you erase a pencil. Also, you can swap the bars and put them in free slots. You can check the RAM using MemTest86 +. Write the utility to a USB flash drive and run it through the Boot-menu. Press “1” to start scanning.

- If there are problems with the image or USB flash drive, reinstall the bootable USB flash drive or change the USB flash drive.
- You can check the hard disk for errors using the Viktoria program. It can be downloaded and installed on a USB flash drive, then run under boot-menu. If there are bad ones, they can be eliminated by the program itself, if there are bad sectors, everything leads to the fact that the disk is crumbling and needs to be replaced.
- Disconnect the PC and remove the RAM sticks. Wipe dust off them and ports. A regular eraser works well for this, with which you erase a pencil. Also, you can swap the bars and put them in free slots. You can check the RAM using MemTest86 +. Write the utility to a USB flash drive and run it through the Boot-menu. Press “1” to start scanning.

0xc0000005 – the error appears at the very beginning, and it seems that the installation of Windows 10 is frozen.
It manifests itself most often if the computer already has one Windows of the previous version installed on the second hard disk, for example Windows 7. To solve, just physically disconnect the second disk with the operating system during installation.
0x80300001 – ошибка проявляется в случае, если на диск с разметкой MBR устанавливается Windows 10 разрядностью x64.
You can fix it by converting MBR to GPT. If this does not fix the problem, you should start compatibility mode in UEFI:
-
- Open the settings called “BIOS Features”.

- Then select “Windows 10 Features” or Windows 8.

- Next click on “Boot Mode Selection -” UEFI Only “.

- Do a similar operation for the “Storage Boot Option Control”.

- Click F10, click “Yes” and repeat the installation process anew.
- Open the settings called “BIOS Features”.


0x80300024 is a problem with hard drives.
You should either manually format the disk on which you are installing or disconnect the drives not used for recording, if there are several of them. This is implemented through weaning drives in UEFI or physically disconnecting them in the system unit. Additionally, it is worth checking if the AHCI mode is enabled. It must be active. If it does not help, check the disk or try to install the OS on a different media.

0xc1900101 – the error often occurs when installing the OS from the update center to Windows 10.
The easiest way to fix the error is to run a clean boot of the Windows. Also, you should check if there is enough space for the installation. If there are many drives, they should be deactivated.

Installing Windows 10, error code 0x8007000d – manifested due to the inability to read or damage the installation files of the operating system
Try putting a different image on a USB flash drive, replace the USB flash drive and also make sure that the USB port you are using is working if you are installing Windows 10 on a laptop.
Required driver not found
If you see the error “no drivers found when installing Windows 10” when installing the OS, then you are doing something wrong.
To avoid the error, follow these steps:
- Connect the USB stick with the distribution to USB 2.0 and start the installation.
- Write down the installation files with any other program mentioned in the first section of this article.
- Please use a different USB drive.
- Re-download the installation file and write to the media.
If you’re trying to deploy an OS on a PC with older hardware, USB 2.0 can play a key role in a successful Windows 10 installation.
Windows 10 installation failed – this can happen when the computer is quite old and cannot install the OS via USB 3.0 without proper help (drivers). Also, the error appears if there was an attempt to install the OS from a DVD-R that is damaged or poorly readable by the drive.
Final stage of installation
After installing Windows 10, the window with the primary settings is pulled up. Go through all the steps to complete the settings:
- Select the country in which you are staying (this is necessary in order to correctly define the interface at least).
- Choose a keyboard layout too.
- You can choose several language packs for the keyboard.
- The installation of Windows 10 updates will start automatically. Provided that the computer is connected to the Internet. If you do not want to install updates, then at this stage it is better to disconnect the router or Ethernet connection from the PC.
- Wait while the system installs the latest updates. Do not turn off your PC to avoid compromising system stability.
- Wait until the end of the update procedure.
- After that, Windows 10 will report the success of the update installation and you will find yourself on the settings screen.
- At this point, select “Configure for personal use.”
- Then you need to sign in to your Microsoft email account or create one. If you don’t want to pull up the profile, you can create a local account with administrative rights. Later, you can authorize the Microsft account on the local profile. To create a local profile with admin rights, click “Offline account”.
- Click on “Limited Features”.
- Give a “Name” to the account. Some programs may not install correctly or work if the name is not in English. Therefore, it is recommended to work with a profile linked under an English name.
- Then come up with a quality password. If you do not use a password, then access to the desktop will be provided unimpeded after pressing the Power button to turn on the PC.
- The telemetry stage is very important. Review each item and decide if you want to leave it on or deactivate it.
- After pressing the “Accept” button, wait a couple of minutes.
- Done. The desktop will boot with only one basket and a control panel.


Once the installation is complete, you can start configuring Windows.
Windows 10 configuration settings
The Windows 10 operating system has a lot of settings that will be needed in certain circumstances of using Windows. But first you need to go through the main ones, which will come in handy in any case.
Account
There are two types of account that are used in Windows:
- Local is an account that is not tied to Microsoft services. It is limited by the OS itself in many ways, and it is best used if security and interaction with services and the Microsoft store are not critical during operation.
- Microsoft Profile – Provides a complete set of features for interacting with the OS. The downside of working through a Microsoft account is the multiple data provided to the company about the user. Most of this data can be turned off, though.
Setting up a profile, setting passwords and transferring from local to Microsoft profile and vice versa is done in one place: “Profile” – “Accounts” – “Your data”.

For example, to change your account to a local one, you should click on “Sign in with a local account instead.”
The password can be set or changed in the Login Options section. In addition to the password, there are other ways for further authorization.
A pin code is convenient for a PC. You can configure or change it without leaving the “Parameters” interface.

Telemetry
Microsoft uses a variety of options to collect information. You can control those that do not affect the security of the system and, if unnecessary, disable:
- Location
If you use a laptop or tablet on Windows 10 and often travel with it, then it makes sense to leave for some applications and the OS itself to access your location.
Applications such as maps, device search programs, weather data will provide relevant information for you. If you work on a stationary PC, you can simply disable geotagging, in most cases it is not needed.
To disable, go to “Options” – “Privacy” – “Location” – “Edit” – “Off”. Below you can pull up programs that can be provided with access to your geodata.

- Synchronization of data.
When you work with the OS through a Microsoft account, there are many options that need to be synchronized with the account. At the same time, data is stored not only on a PC, but also on Microsoft servers.
If you do not need synchronization, you can turn it off: Win + I – Accounts – “Synchronize your settings” – completely disable “Synchronization settings” or selectively for each item.
Additionally, you can disable your Microsoft account and go to local. This will de facto deactivate synchronization, but will deprive you of many different aspects, including access to the Microsoft Store, some security settings, and working with the cloud.

- Cortana – voice assistant
To enable Cortana: go to “Settings” – “Time and Language” – in the “Country or Region” line, select the United States.

It should be remembered that the voice assistant has its own telemetry parameters, which are adjusted independently of the others in the “Coratana Search setting” section.

- The lock screen is a space that can be seen not only by you, but also by other people in the vicinity.
Если вы не хотите, чтобы экран блокировки показывал лишнюю и личную информацию, нужно его изначально настроить: зайдите в «Параметры» – «Система» – «Уведомления и действия».
In the section, you can turn off everything that you do not want to see on the lock screen. If you work with Cortana, you can prevent the voice assistant from working when your PC is locked.

- Advertising identifier – used by the system to target advertisements based on interests for the user.
Naturally, this is a common practice among large corporations, and if you want to turn off the collection of information and the recommended, then you can do it simply: “Options” – “Privacy” – “General” – “Turn off”.

Installing drivers for Windows 10
Installing drivers after installing Windows 10 is done automatically, along with updates. The advantage is that there is always the right driver in the Microsoft databases for modern hardware.
But it is not always possible to install the correct device driver automatically. In this case, you need to refer to another database. For example, to the official website of the manufacturer of a PC, laptop or its component.
It is important to work and download drivers only from the manufacturers’ official websites. Otherwise, you can install the necessary driver, but in the bargain, pick up malware on the newly installed Windows 10.
It is not recommended to download software and drivers for the device from unverified sources!
Required drivers for Windows 10
- Network;
- CPU + Integrated Graphics;
- Controllers;
- Audio;
- Video adapters.
The OS finds all the necessary drivers on its own, and for video cards, they often use programs from the supplier in order to constantly keep abreast of the latest versions.
For NVIDIA, the GeForce Experience program is used. For AMD, it is recommended to go to the official website and download the driver from there.
You can see what drivers are required for installation in the device manager.

If the driver is not installed, an exclamation mark will be displayed next to the device icon, or it will be located in the “unknown device” section. Device Manager opens by right-clicking on Start and selecting from the context list by name.
Windows 10 security
There are three main areas of Windows 10 security to follow and tweak right away:
- Login password – protects your data from prying eyes when the computer is locked (Win + L);
- Restore point – protects the system from damage, as it saves a backup copy of the working OS, to which you can “roll back”. If you give an analogy, then this is a kind of preservation, to which you can return if “something went wrong” in the system.
- Network security + activity on the PC – regulated by Windows Defender or an alternative antivirus, if you install one on the system.
Setting a Windows 10 login password
If you linked your Microsoft account, then you should have the default password. It can and should be made complex to improve security. But in order not to constantly enter it in the unlock field, use the pin code. You can configure it like this:
- Open Options – Accounts – Login Options.

- Select a Pin code and set it.

- Now, in the blocking window, you can choose whether to enter using a pin code or password.


There are also other identification methods that are best used on laptops or laptops.
Recovery point
You can configure a restore point so that it is done automatically, or you can remember to do it manually. The first option is preferable and is configured like this:
- In the Start search bar, type “create a restore point”.
- Select your local disk (system) and click Configure.

- Click “Enable System Protection” and select the percentage of disk space that can be used by the system for this function.

- If you need to restore the system, click “Restore” here. The OS will pull up the last recommended restore point.

- But you can choose another point.


Antivirus
If you adhere to the canons of safe surfing the Internet, use only white programs in your work, do not go to phishing pages from mailing lists, and so on – leave Windows Defender as the main one.
Otherwise, it is recommended to adopt one of the paid antiviruses, which will provide complete protection against network attacks and prevent attempts of malicious activity on the PC.

Here are the top five AV-Test home antiviruses:
- AhnLab V3 Internet Security 9.0;
- Avast Free AntiVirus 20.8;
- AVG Internet Security 20.8;
- Avira Antivirus Pro 15.0;
- Bitdefender Internet Security 25.0.
Based on the latest report for October 2020: Eset ranks 8 in the top, Kaspersky Anti-Virus – 12, and Windows Defender – 15.
Our recommendation is to use the paid version of Malwarebytes antivirus. There will be no problem. For some reason, it was not included in the rating, although it detects many more threats.
Tips for caring for Windows 10
So that the installation of Windows 10 from a USB flash drive does not become a habit, you should take good care of the operating system and from time to time rake the data stream that passes through the computer. Unnecessary – delete, necessary – sort. For this, various processes are used on the PC.
Defragmentation Windows 10
If fragmentation is the removal of all information from the media, then defragmentation is the search and collection of all the divided parts of a file on disk into one place. The procedure allows the hard disk to work more efficiently. It can be done manually, or you can schedule it to be repeated at least once a month:
- To start defragmentation, open Explorer, right-click on the disk and select Properties. Then, go to “Service” and click “Optimize”.

- Select the drive and click “Optimize”.

- To configure the execution according to the schedule, click “Change parameters”, select the frequency “monthly” and click “OK”.


Scanning System
From time to time, you need to check all files and folders on your computer for malware or the consequences of its operation. Antiviruses or the built-in Windows Defender will help with this:
- In the search box, enter “Windows Security” and select the found environment.

- Go to the “Virus and threat protection” section and click “Scan options”.
- Click “Full Scan”.
- And below the button “Scan now”.


Get rid of all detected viruses and potentially unwanted software immediately or work with them through the sandbox.
Browser cache
Cache data can take up a lot of disk space. Therefore, they can be cleaned up once a month. This is how it is done for the Google Chrome browser:
- Press the keyboard shortcut Ctrl + H.
- Then click “Clear History”.
- Select a period and “Pictures and other files saved in the cache”.

- Click “Delete data”.

Cleaning the Windows 10 Registry
There are programs that allow you to optimize your PC in a few mouse clicks. One of these programs is Auslogics Boostspeed, which allows you to:
- Clear cache and cookies in any browsers at once;
- Delete junk entries from the operating system registry;
- Erase temporary files;
- Fix various bugs.

The main thing is to download the utility from the official site and use it periodically to optimize and clean it from garbage.
All in all, installing Windows 10 today is a pretty straightforward process
The Windows 10 installation process does not require any special knowledge or computer skills. To create bootable media, you need a USB flash drive and Internet access.
To install, you need to find out how to enter the UEFI or boot menu and load a USB flash drive from it. And before starting the installation, specify the correct drive.
After installing Windows 10 on your PC, take care of the stable operation of all components in the system and adjust the security settings. For long-term use, remember to optimize your operating system so that you can use it for many years.
An upgrade moves your PC from a previous version of Windows—such as Windows 7 or Windows 8.1—to Windows 10. An upgrade can take place on your existing device, though Microsoft recommends using Windows 10 on a new PC to take advantage of the latest features and security improvements. This FAQ is intended to answer questions about upgrading to Windows 10.
An update ensures you have the most recent features and security improvements for your current version of Windows. If you want to update your device and need more info, see Windows Update: FAQ.
If you’re looking for info on upgrading to Windows 11, see Upgrade to Windows 11: FAQ.
Notes:
-
If you’re looking for info on a specific error code or having problems with product keys, see Get help with Windows activation errors. There, you can press CTRL+F and type or paste the error code or «product key» into the search box to find specific information about your code and how to resolve it.
-
If you need info on installation errors, see Get help with Windows upgrade and installation errors.
For some answers to questions you might have about the upgrade to Windows 10, select any heading below. It’ll open to show more info.
You can purchase a full version of Windows 10 Home or Windows 10 Pro for your Windows 7 or Windows 8.1 PC. However, the best way to experience Windows 10 is on a new PC. Today’s computers are faster and more powerful and come with Windows 10 already installed. To learn more, view new Windows 10 PCs.
Guide to Windows 10 app
Now that support for Windows 7 has ended, Microsoft recommends you move to Windows 10 to continue receiving security updates. Download the Guide to Windows 10 app to compare your options for making the move and get personalized recommendations for your PC.
Get the app
*This app is for Windows 7 only
The Windows 10 free upgrade through the Get Windows 10 (GWX) app ended on July 29, 2016.
All upgrades must have completed and reached the «Welcome» screen by 11:59 PM UTC-10 (Hawaii) on July 29, 2016; this is one worldwide point in time.
Yes, the media creation tool and Windows 10 installation media (ISO files) are available for customers to install Windows 10. If you’re installing Windows 10 for the first time, you’ll need to enter a valid Windows 10 product key or buy a full version of Windows 10 during setup for this tool to work. If you’ve previously installed Windows 10 on your device, you should have a digital license and Windows 10 will automatically activate without entering a product key.
After you upgrade to Windows 10, you can reinstall or do a clean installation on the same device. You won’t need a product key to reactivate Windows 10 on the same hardware. For more info on how to create your own Windows 10 installation media, see the Microsoft software download website.
We’re committed to making sure customers using assistive technologies can upgrade to Windows 10.
If you’re still in the process of upgrading to Windows 10, select any heading below. It’ll open to show more details.
The time that is required to upgrade to Windows 10 depends on factors such as the age of your device and how it’s configured. Most devices will take about an hour to upgrade as soon as the download is completed. Although older devices could take longer, some newer, high-performance devices might upgrade faster.
Devices with a 32 GB hard drive or older devices with full hard drives might need additional storage space to complete the upgrade. If you don’t have sufficient space, try removing files or apps you no longer need or use Disk Cleanup to free up space. Learn more at Tips to free up drive space on your PC.
During the upgrade, you might be asked to free up space on your device or attach an external drive with sufficient space to continue with the upgrade. If you attach an external drive, make sure to keep it in a safe place after the upgrade in case you need it for recovery options.
Some apps have to be uninstalled because they could cause problems with the upgrade process. You’ll be able to reinstall these apps after the upgrade to Windows 10 is done.
Other apps have to be uninstalled because they won’t work correctly or might not work at all with Windows 10.
You won’t be able to reinstall or use these apps after the upgrade is completed.
For the best possible experience, we recommend doing a fresh installation of your applications on your new Windows 10 PC. The Microsoft Store has a variety of 3rd party applications that can be easily downloaded and installed.
Open Microsoft Store
For any software not currently available in the Microsoft Store, we recommend going to that company’s official website and downloading the Windows 10 version from there. In limited circumstances, some older software may not have an updated version that is compatible with Windows 10.
The easiest way to change your language is to upgrade using the same language you currently have on your PC and then add a new language later.
To add new languages in Windows 10, select Start > Settings > Time & Language > Language and then choose the language you want.
Add a new language
No, Windows Media Center isn’t available as part of Windows 10 and will be removed during the upgrade. After the upgrade is completed you won’t be able to install Windows Media Center.
There are several ways for you to go back from Windows 10 to a previous version of Windows:
-
You’ll be able to go back to an earlier version by selecting Start > Settings > Update & Security > Recovery . Then select Get started under Go back to the previous version of Windows 10.
Go back to the previous version of Windows 10
This will keep your personal files, but it’ll remove apps and drivers installed after the upgrade as well as any changes you made to settings. The option to go back to your previous version of Windows 10 is only available for a limited time following the upgrade.
-
If your PC manufacturer provided the option, you might be able to restore your device to factory settings.
-
If options to go back and restore factory settings aren’t available, you can use installation media and a product key to install an earlier version of Windows.
For more info and requirements, see the Go back to your previous version of Windows section of Recovery options in Windows.
Note: If the manufacturer set up your PC to run from a compressed Windows image file (also known as Windows image file boot or WIMBoot) and included the option to restore factory settings, that option will no longer be available after you upgrade to Windows 10.
There are several ways to upgrade your older Windows 7 or Windows 8 OS to Windows 10. Whether you are doing it for the first time on a new computer, upgrading your old computer or just want to do a new clean installation on your system.
How to upgrade to Windows 10 OS from a Windows 7 or Windows 8 PC
1. To upgrade your system from Windows 7 or Windows 8 devices, you can simply use Microsoft’s upgrade tool.
2. If you’re upgrading to Windows 10 on your PC which already has a valid license—you can simply use the Download Windows 10 tool. Just Click “Download Tool Now”, and run it.
3. Next and select “Upgrade this PC”.
4. Follow the instructions to complete the upgrade process to Windows 10.
How to do a clean install of Windows 10 on your PC
1. You can download the official Windows 10 installation media for free from Microsoft and complete a clean install.
2. Go to Microsoft’s Download Windows 10 page, and click “Download Tool Now”, and run the downloaded file.
3. Next “Create installation media for another PC”.
4. Make sure to choose the correct language, edition and architecture you want to install. If you have a 64-bit CPU, download the 64-bit version, and if you have a PC with a 32-bit CPU, you’ll need the 32-bit version of Windows 10.
5. In case you’re installing Windows 10 on your current PC, click on the “Use the recommended options for this PC” box and the tool will automatically download the correct version for your current PC.
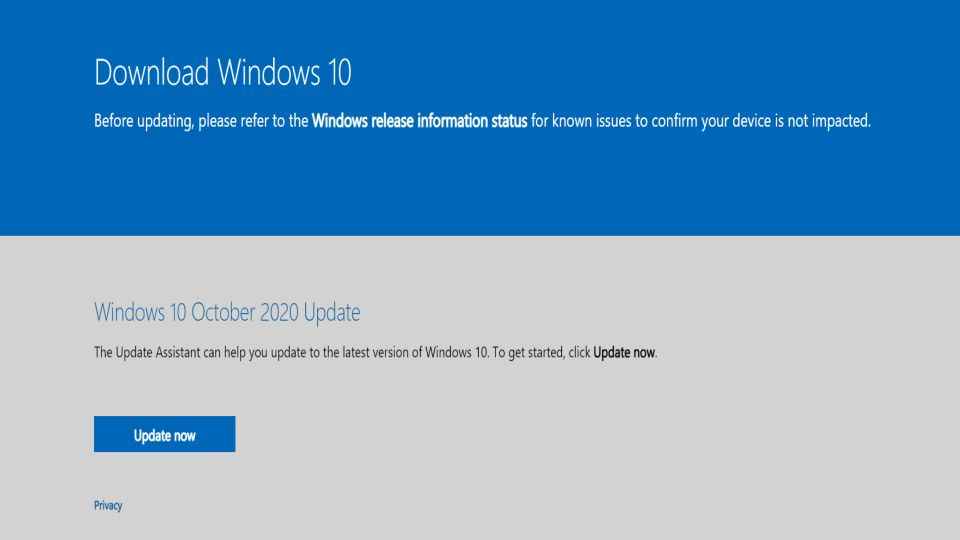
How to Reinstall Windows 10 on a PC that has Windows 10 OS already
If you already have Windows 10 on your PC and want to perform a fresh install you can use Windows 10’s Creators Update which makes it much easier to install Windows 10 from scratch.
Click on the “Fresh start” choice in Windows Defender and get a fresh Microsoft Windows 10 system. This will wipe away all that manufacturer-installed stuff and just leave a fresh Windows 10 system for you to use.