-
Question
-
Hello tech world ..!!!
My question is: Is Possible install Hyper-V server on windows 10 Single Language?. Thanks so much for asnwers…
FernandoJulian.
FernandoJulian
Answers
-
I regret to say, but it’s not possible. Windows 10 Single Language is referred to Windows 10 Home SKU, which does not have Hyper-V feature.
-
Marked as answer by
FernandoJulian
Thursday, July 28, 2016 10:26 PM
-
Marked as answer by
-
-
Marked as answer by
FernandoJulian
Thursday, July 28, 2016 10:26 PM
-
Marked as answer by
All replies
-
I regret to say, but it’s not possible. Windows 10 Single Language is referred to Windows 10 Home SKU, which does not have Hyper-V feature.
-
Marked as answer by
FernandoJulian
Thursday, July 28, 2016 10:26 PM
-
Marked as answer by
-
-
Marked as answer by
FernandoJulian
Thursday, July 28, 2016 10:26 PM
-
Marked as answer by
-
Thanks so much!! but
 jejeje
FernandoJulian
-
Hyper V is faster than other visual Machine tools
 jejeje
Hyper-V is Microsoft’s virtualization platform. It is available on Windows Server operating systems and Microsoft has also added the Hyper-V functionality to Windows 8.1, Windows 10, and Windows 11.
Unfortunately, the Hyper-V feature is only available in Windows 10 Professional, Enterprise, and Education editions. You can’t install it on Windows 10 Home edition by default.
However, using the steps in this article, we’ll show you how to enable Hyper-V in the Windows 10 Home edition.
Table of contents
- Does Your System Support Virtualization?
- Enable Virtualization in Firmware/BIOS
- Install Hyper-V in Windows 10 Home
- How to Enable Hyper-V on Windows 10 (Pro, Enterprise, Education)
- Enable Hyper-V from Optional Features
- Enable Hyper-V from Command Prompt
- Enable Hyper-V from Windows PowerShell
- How to Disable Hyper-V in Windows 10 (Home, Pro, Enterprise, Education)
- Closing Thoughts
Does Your System Support Virtualization?
Before moving forward, we need to check if our system supports virtualization. Hardware virtualization is required for Hyper-V to function correctly. Otherwise, you can use other virtualization platforms like Virtualbox and VMWare.
There are four basic requirements for Hyper-V to be installed on a Windows 10 computer:
- VM Monitor Mode Extensions
- Virtualization enabled in firmware
- Second Level Address Translation (SLAT)
- Data Execution Prevention
All four of these requirements can be easily checked through a Command Prompt cmdlet. Run the following cmdlet in an elevated Command Prompt and obtain the results on the four requirements:
systeminfoThis will generate a list, and you will find the section “Hyper-V Requirements” at the end of the list containing the details of the 4 requirements, as in the image below:
 2")
If these requirements are met, the results will display “Yes.” However, if you find that “Virtualization Enabled In Firmware” states “No,” you need to enable it using the guide below.
Enable Virtualization in Firmware/BIOS
Most modern computers support all the requirements of Hyper-V. But some systems have virtualization disabled from BIOS. You can go to the BIOS setup computer at the startup and enable Virtualization using the following steps:
-
Restart your computer and enter the BIOS setup using the hotkey.
-
Here, look for the “Virtualization” tab and click on it, or use the arrow keys on the keyboard to highlight it and press Enter.
-
Now enable Virtualization.
 3")
Enable virtualization from BIOS -
Now save the new settings and exit BIOS. The system will now reboot normally.
 3")
When it reboots, continue with the following steps to install and enable Hyper-V.
Install Hyper-V in Windows 10 Home
Note: Since Windows Home edition comes without Hyper-V, you must first install it. If you have the Pro, Education, or Enterprise editions, then you may skip this step and proceed to the next section of this article. To check which edition you have, type in winver in the Run Command box and obtain your operating system’s details.
Follow the steps below to install and enable Hyper-V in Windows 10 Home:
-
Download Hyper-V Installer by clicking on the following link:
Hyper-V installer and enabler for Windows 10 Home (317 bytes, 34,966 hits)
-
Once downloaded, right-click on the file and select Run as Administrator from the context menu. This will trigger the installation script.
 5")
Run as admin -
If prompted with a UAC, click Yes.
Click Yes on User Access Control It may take some time to complete the installation. Please let it complete without interruption.
-
Once complete, press Y to continue.
Press Y to continue The computer will now reboot and update.
 5")
 6")
 7")
Once rebooted, Hyper-V will have installed and automatically enabled on your Windows Home.
How to Enable Hyper-V on Windows 10 (Pro, Enterprise, Education)
The method given above automatically enables Hyper-V as well as installing it on a Windows Home. However, if you are running Windows Pro, Education, or Enterprise edition, then you can enable Hyper-V using any one of the following methods.
Enable Hyper-V from Optional Features
Since Hyper-V is an optional feature that one can enable when needed, you can enable it from the Optional Features applet. Here is how:
-
Open the Optional Features applet by typing in optionalfeatures in the Run Command box.
 8")
Open the Optional Features applet -
Now look for the “Hyper-V” option from the list and check the box next to it. Then click Ok.
 9")
Enable Hyper V from Optional Features -
You will now see a window applying the changes. Click Close when it is done.
 10")
Close installation window
 8")
 9")
 10")
Hyper-V will now be installed and enabled. You can now access the Hyper-V manager by searching for it in the search box in the taskbar or through the Start menu.
 11")
Alternatively, you can also use the other 2 command-line methods to enable Hyper-V on Windows 10.
Enable Hyper-V from Command Prompt
Follow these steps to enable Hyper-V using the DISM command tool in the Command Prompt:
-
Run the following cmdlet in an elevated Command Prompt:
DISM /Online /Enable-Feature /All /FeatureName:Microsoft-Hyper-VEnable Hyper V from Command Prompt -
When asked, enter Y to restart the computer:
Enter Y
 12")
 13")
The computer will now restart, When it does, Hyper-V should be enabled successfully.
Enable Hyper-V from Windows PowerShell
If you’d rather prefer to use Windows PowerShell, here is how to enable Hyper-V:
-
Run the following cmdlet in an elevated PowerShell:
Enable-WindowsOptionalFeature -Online -FeatureName Microsoft-Hyper-V-AllEnable Hyper V using PowerShell -
When asked, enter Y and hit Enter to restart the computer:
Enter Y When the computer reboots, Hyper-V will have installed successfully.
 14")
 15")
These are the 3 methods to enable Hyper-V in Windows 10, provided that the hardware is supported and Hyper-V is installed.
How to Disable Hyper-V in Windows 10 (Home, Pro, Enterprise, Education)
If you don’t want this functionality on your computer, you can always disable it. There are three ways to disable it:
-
From Optional Features
-
Open the Optional Features applet by typing in optionalfeatures in the Run Command box.
Open Optional Features applet -
Uncheck the box next to Hyper-V and click Ok.
 17")
Disable Hyper-V from Optional Features -
When done, click Restart now to finalize the changes.
Restart PC
-
-
From Command Prompt
Run the following cmdlet in an elevated Command Prompt to disable Hyper-V:
DISM /Online /Disable-Feature /FeatureName:Microsoft-Hyper-V-allIf asked for a reboot, enter Y for Yes.
Disable Hyper V from Command Prompt -
From PowerShell
Run the following cmdlet in an elevated PowerShell to disable Hyper-V:
Disable-WindowsOptionalFeature -Online -FeatureName Microsoft-Hyper-V-AllIf asked for a reboot, enter Y for Yes.
Disable Hyper V from Windows PowerShell
 17")
 18")
 19")
 20")
Closing Thoughts
Sometimes Hyper-V is very useful even for home users. It can be used to test and evaluate new software without hurting the host system. But there are times when enabling virtualization support or installing Hyper-V is not recommended.
Hyper-V requires some system resources to run its virtual machines. For example, if you have 4 GB RAM, you won’t be able to give any resources to the virtual machine. So it would not be wise to enable Hyper-V functionality.
For what purpose do you want to enable Hyper-V functionality on your Windows 10 Home computer? Please share your thoughts in the comments below.
Also see:
Usman Khurshid is a seasoned IT Pro with over 15 years of experience in the IT industry. He has experience in everything from IT support, helpdesk, sysadmin, network admin, and cloud computing. He is also certified in Microsoft Technologies (MCTS and MCSA) and also Cisco Certified Professional in Routing and Switching.
Hyper-V для Windows 10 – средство виртуализации, которое позволяет создавать виртуальные диски и машины. В этой статье мы расскажем, как включить или выключить Hyper-V в Windows 10, запустить, настроить и добавить виртуальную машину.
Введение
Hyper-V – средство виртуализации на основе гипервизора. Если говорить простым языком – это средство позволяет создавать внутри системы виртуальную машину (Virtual Machine – VM) со своей операционной системой, отдельной от основной.
Изначально была доступна для систем семейства Server, но с выходом Windows 8 Pro, стала доступна и для клиентских версий.
Единственное ограничение, гипервизор недоступен для установки на Home и Single Language. Только Pro версии Windows имеют возможность установки этого компонента.
! Скачать Hyper-V для Windows 10 невозможно, так как это компонент системы и его можно только включить или выключить.
Системные требования:
- Процессор x64 разрядности, желательно с поддержкой многопоточности (например, HyperThreading)
- Процессор должен поддерживать виртуализацию. Иметь технологии, например как Intel VT или AMD-V
- Иметь достаточное оперативной памяти. Каждая виртуальная машина Hyper-V в Windows 10 требует свой объём памяти
- Свободное место на диске для установки VM
Перед использованием, следует удостовериться, что компонент включен или установлен. Далее мы расскажем, как установить Hyper-V на Windows 10 Pro.
Установка
Существует несколько способов включения или установки компонента:
- Через панель управления
Как и любые другие компоненты, например старые версии Framework, их добавление происходит через параметры «Программы и компоненты».
Нажмите на «Включение компонентов…», выберите пункт «Hyper-V» и нажмите ОК. После перезагрузки устройства, можно пользоваться новым компонентом. Это самый простой способ установки Hyper-V на Windows 10.

- Через PowerShell
Откройте окно PowerShell от имени Администратора и введите следующую команду:
Enable-WindowsOptionalFeature -Online -FeatureName Microsoft-Hyper-V -All

Не забудьте перезагрузите компьютер нажатием клавиши Y, это требуется для установки компонента.
Если вы не знаете как отключить Hyper-V в Windows 10, то вам поможет эта команда:
Disable-WindowsOptionalFeature -Online -FeatureName Microsoft-Hyper-V -All
- Используя cmd и DISM
Откройте окно командной строки от имени Администратора и введите команду
DISM /Online /Enable-Feature /All /FeatureName:Microsoft-Hyper-V

После включения функций, выполните перезагрузку компьютера. Но, если вы хотите узнать, как удалить Hyper-V Windows 10 через CMD, то всё практически, как и в прошлом способе, используйте команду:
DISM /Online /Disable-Feature /All /FeatureName:Microsoft-Hyper-V

Запуск и настройка
После того, как компонент установлен, можно приступить к созданию виртуальной машины. Есть 2 способа – быстрый и расширенный, расскажем о каждом подробнее.
Быстрое создание VM
В версии Creators Update Windows 10 в Hyper-V можно быстро создать виртуальную машину. В версии Fall Creators Update функционал был доработан и появилась возможность создания виртуальных машин, отдельно от диспетчера.
В поиске по системе введите запрос «Hyper-V» и выберите приложение «Быстрое создание».

По умолчанию, вам будет доступно 3 вида виртуальных машин:
- Windows 10 (версия Корпоративная)
- Ubuntu 18.04 LTS
- Среда MSIX (Корпоративная версия)
Выбрав нужную ОС, нажмите «Создать виртуальную машину» и автоматически начнётся загрузка образа для установки.
Также, для быстрой установки вы можете указать ISO-образ системы или файл виртуального жесткого диска VHD (VHDX).

Создание виртуальной машины, в выходом новых обновлений системы, становится всё легче. Вам не потребуется отдельно загружать и настраивать виртуальную машину, перед её созданием, система позаботится обо всём сама. Но если вы хотите настроить всё самостоятельно, используйте следующий вариант.
Диспетчер
Используя диспетчер (он же Hyper-V manager Windows 10), вы сможете гибко настроить «для себя» виртуальные машины и управлять ими.
Самый простой способ, как запустить менеджер Hyper-V в Windows 10 – ввести команду virtmgmt.msc в окне «Выполнить» (Win+R).

После чего, выберите пункт «Подключиться к серверу», выберите какое устройство будет выбрано – этот (локальный) или другой компьютер.

После подключения, вам будет доступен полный функционал диспетчера:
- Быстрое создание VM (как в прошлом варианте)
- Создание и администрирование виртуальных машин или дисков
- Настройка Hyper-V в Windows 10, а также настройка сети и коммутаторов VM
Дополнительно
- Иногда, пользователи сталкиваются с ошибками «низкоуровневая оболочка не запущена» «не выполняется» и т.д. Для начала, вам необходимо проверить в спецификации процессора, поддерживает ли он функцию виртуализации.

Если такая функция поддерживается, попробуйте включить её в параметрах BIOS. Обычно она называется «Virtualization Technology».

Если ошибка повторяется, попробуйте переустановить компонент– выключить его и включить повторно.
- Для виртуализации видеокарты и дальнейшего её использования в VM, воспользуйтесь технологией Remotefx, которая доступна в параметрах.
Надеемся, что предоставленная информация была вам интересна и полезна. Если у вас возникли вопросы или сложности по данной статье, мы будем рады помочь в комментариях.
Редакция Windows HOME (домашняя) не имеет встроенной виртуальной машины Hyper-V, но есть способ, как активировать функцию для включения виртуализации и установки Hyper-V.
Как активировать Hyper-V в Windows 10 Home
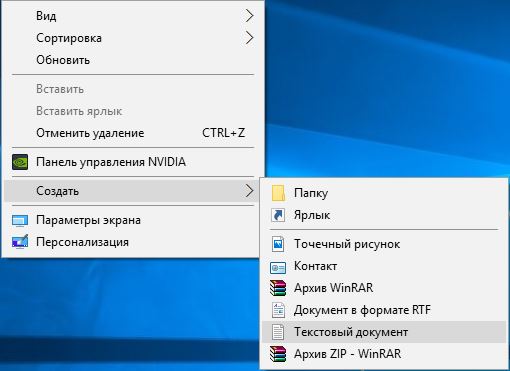
Шаг 1. Нажмите правой кнопкой мыши на пустом месте рабочего стола и выберите «Создать» > «Текстовый документ«.
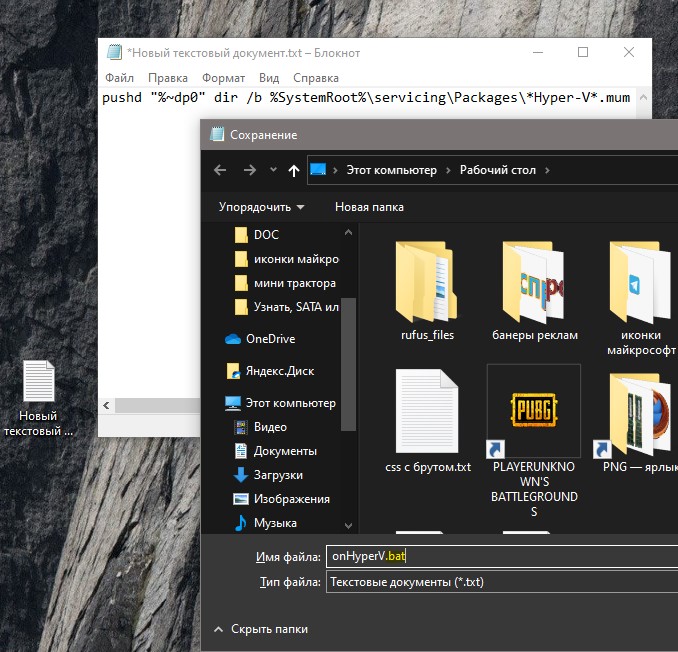
Шаг 2. Помести ниже скрипт написанный командной Microsoft Virtualization на Github в текстовый документ. Далее нажмите на вкладку сверху «Файл» > «Сохранить как«. В поле «Имя файла» укажите любое имя, но с расширением .bat и сохраните его на рабочий стол.
pushd "%~dp0"
dir /b %SystemRoot%servicingPackages*Hyper-V*.mum >hyper-v.txt
for /f %%i in ('findstr /i . hyper-v.txt 2^>nul') do dism /online /norestart /add-package:"%SystemRoot%servicingPackages%%i"
del hyper-v.txt
Dism /online /enable-feature /featurename:Microsoft-Hyper-V -All /LimitAccess /ALL
pause
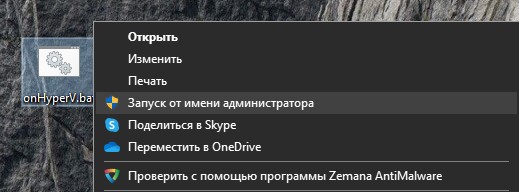
Шаг 3. На рабочем столе нажмите правой кнопкой мыши по созданному бат-файлу и выберите «Запустить от имени администратора«. Далее появится окно командной строки, где будет предложено перезагрузить компьютер нажав на Y.
Шаг 4. Нажмите Win+R и введите optionalfeatures.exe, чтобы быстро открыть компоненты системы. Найдите Hyper-V и установите галочку, после чего нажмите OK.
После установки всех необходимых компонентов вы можете набрать в поиске меню «Hyper» и запустить виртуальную машину в Windows 10 HOME.

Смотрите еще:
- Windows 10 Home: Активировать локальную групповую политику
- Hyper-V: Встроенная виртуальная машина в Windows 10
- Как использовать вместе VMware, VirtualBox с Hyper-V и WSL в Windows 10
- Невозможно запустить движок виртуализации BlueStacks в Windows 10
- Как пользоваться WHOIS при помощи CMD в Windows
[ Telegram | Поддержать ]
Многие функции не поддерживаются в Windows 10 Домашняя. Эта версия Windows была создана для домашних пользователей, которые не будут заниматься чем-либо техническим, например Hyper-V, групповой политикой и т. Д. Это одна из причин, почему домашняя версия также дешевле. Но тогда пользователи могут попасть в ситуацию, когда они захотят установить Hyper-V в Windows 10 Home edition. Это руководство поможет вам в этом.

Интересно отметить, хотя в Windows 10 Home функции доступны не сразу; их можно включить с помощью скриптов и команд. Некоторые из этих команд доступны непосредственно в Windows; люди не знают о них. Мы уже знаем, как включить редактор групповой политики в Windows 10 Home, и теперь этот сценарий поможет вам Hyper-V.
Скрипт для включения Hyper-V
pushd "%~dp0"
dir /b %SystemRoot%servicingPackages*Hyper-V*.mum >hyper-v.txt
for /f %%i in ('findstr /i . hyper-v.txt 2^>nul') do dism /online /norestart /add-package:"%SystemRoot%servicingPackages%%i"
del hyper-v.txt
Dism /online /enable-feature /featurename:Microsoft-Hyper-V -All /LimitAccess /ALL
pause
Скрипт был создан командой Microsoft Virtualization на Github.
Шаги по включению Hyper-V в Windows 10 Home
- Скопируйте вышеупомянутый файл сценария в блокнот и сохраните его как «Включить Hyper-V.bat». Вы можете сохранить его где угодно, но рабочий стол будет быстро доступен.
- Затем щелкните файл правой кнопкой мыши и запустите его с правами администратора.
- Теперь вы должны увидеть командную строку, в которой будет выполняться сценарий.
- После этого вам будет предложено перезагрузить компьютер. Обязательно сделайте это.
Сценарий позволяет включить Hyper-V, но, чтобы наконец установить его в Windows, вам нужно будет включить его с помощью дополнительных функций Windows 10.
Тип optionalfeatures.exe в строке «Выполнить» и нажмите клавишу Enter. Откроется всплывающее окно «Компоненты Windows», в котором вы можете выбрать и отменить выбор, чтобы добавить или удалить функции. Вы также можете ввести Hyper-V, и откроется окно функций Windows.
После этого найдите Hyper-V и установите флажок Инструменты управления Hyper-V и Платформа Hyper-V.
Как видите, большинство функций доступно в версии Windows 10 Home, и их можно включить с помощью скриптов и команд. Хотя Microsoft может не рекомендовать это, винить некого.
Убедитесь, что оборудование вашего компьютера поддерживает Hyper-V — иначе это может не сработать.
Надеюсь, за этим постом было легко следить, и вы смогли включить Hyper-V в версии Windows 10 Home.
Читайте дальше: Как включить Windows Sandbox в Windows 10 Home.
Hyper-V is a Microsoft-owned Windows Hypervisor platform (Type-1) that allows users to run virtual machines with high performance. However, if you are using Windows 10 Home Edition, then you will not have the “Hyper-V” option in the “Turns Windows feature on or off” to run virtual computers because it is available only for Windows 10 Professional, Education, and Enterprise Editions (know the difference). However, still, there is a way to easily download, install and enable the Hyper-V feature on Windows 10 Home using the command line.
Requirements:
- Windows 10 Home OS
- Administrator access
- Virtualization must be enabled in BIOS to create VMs
- Active Internet connection
Although, in modern systems Virtualization is enabled in BIOS by default, however, to confirm it, just right-click on Taskbar and select Task manager ⇒ Performance and find whether it is on or off.


Well, if you don’t want to use Hyper-V then try out some other best third-party Virtual machine creator software programs.
Steps to Activate Hyper-v Feature on Windows 10 Home
Here are the simple steps that we can follow to download and install Hypervisor using a Command-line script.
1. Script to download Hyper v for Windows 10 home
There is a code available on Github that allows users to automate the process of downloading and enabling the Hyper-V feature. Here is that
pushd "%~dp0" dir /b %SystemRoot%servicingPackages*Hyper-V*.mum >hyper-v.txt for /f %%i in ('findstr /i . hyper-v.txt 2^>nul') do dism /online /norestart /add-package:"%SystemRoot%servicingPackages%%i" del hyper-v.txt Dism /online /enable-feature /featurename:Microsoft-Hyper-V -All /LimitAccess /ALL pause
What we have to do is – Right-click on the Desktop and select Text Document. A new file will be created, now open it and paste the above code in that. After that rename that file to Hyper-V Enabler.bat
Alternative- However, to make all this easy for you, we already have created this bat file that you can download directly using this link.
2. Run Hyper-V Enabler Batch file
Once you downloaded or created a Batch file with the given code by yourself on your Desktop. Right-click on that and select “Run as Administrator“.

3. Feature installation will start
As we run the Batch file, it will open a Command prompt to run the code saved in it. Make sure you have an active internet connection on your system to download files required to install and activate Hyper-V on Windows 10 Home. This will take some time depending upon your network speed.
4. Restart your Windows 10 System
Once the installation is complete, the Hyper-v will automatically get enabled on your system. Thus, to make changes into effect, the system will ask you to restart it. Simply type Y on your command terminal and press the Enter key.

5. Run Hyper-V Manager on Windows 10 home
Let’s check whether this Microsoft Windows Hypervisor feature is on our system or not. For that, in the search box type- Turn Windows features on or off, as its icon appears, click to open it.

There scroll and find -Hyper-V and make sure all its tools are checked as shown in the above screenshot, if not already, and then hit the OK button.
Now, we know this free Microsoft virtualization software is on our system, it’s time to run it and start creating virtual machines.
Go to Windows 10 Search box again or simply press the Win key on your keyboard and this time type- Hyper-V, click on its icon when appears.
Alternatively, we can use a command to run Hypervisor- open CMD or the RUN box (shortcut key- Win key + R) and type – virtmgmt.msc

6. Create a Virtual Machine
- To create a virtual machine in Hyper-V Manager, right-click on the connected server and select the New option.

- Click on the Next button and give some name to your virtual machine. For example Ubuntu.
- Choose the Generation for your Virtual machine. If the operating system you want to install supports 32-bit or 64-bit and requires legacy BIOS features then go for Generation 1. Whereas for the latest features and only 64-bit with UEFI boot supported OS users can go for Generation 2. However, you can leave the default selection as it is if you are not sure about this.
- Assign the amount of RAM or Memory you want to use.
- Configure Network. For that select the Default Switch from the Drop-down box. If you don’t have then first create one.
- Select the Size of Virtual Disk.
- Assign the ISO file of the OS you want to install.

To get a step by step guide you can see our article- How to use hyper-v to install Linux Virtual machine on Windows 10
7. Uninstall or Disable Hyper-V feature on Windows 10 Home
Hyper-V is not compatible completely with other Type- 2 virtualizers, even though the latest version of Vmware and Virtualbox can run along with it, there will be a huge performance issue. Thus, if you are planning to use Vmware player or Virtualbox on Windows 10 Home, then first, Deactivate the Hyper-V.
To uninstall this feature, we need to uncheck it from the “Turns Windows features on or off” section. To open it you can either find it from the Search box of Windows 10 or simply press Win Key + R to open the RUN box and type- optionalfeatures.exe

Now uncheck the box given for Hyper-v.

7.1 Command line to disable windows virtualization feature (optional)
If you want then can use a very straightforward method that is either using command prompt or PowerShell command line-
On Powershell run this
Disable-WindowsOptionalFeature -Online -FeatureName Microsoft-Hyper-V-All
Whereas on Command prompt, use this one-
dism.exe /Online /Disable-Feature:Microsoft-Hyper-V-All
7.2 Restart your system
To make sure the hypervisor feature gets disabled completely, now restart your system. This uninstalls it completely.
7.3- In case you want to enable it again (optional)
In the future if you want to enable Microsoft Hypervisor again then you don’t need to run the Batch file this time, just got Windows Features and select it. Or use the command line-
Powershell
Enable-WindowsOptionalFeature -Online -FeatureName Microsoft-Hyper-V
CMD
DISM /Online /Enable-Feature /All /FeatureName:Microsoft-Hyper-V
Also See- Hyper-V vs VirtualBox: A basic comparison
Closing thoughts
Well, this was the quick way to use the Microsoft Windows hypervisor on Windows 10 Home edition. In case you are facing any problem while enabling it, let’s know, the comment section is all yours…
Хотите установить и запустить Linux или более раннюю версию операционной системы Windows на виртуальной машине используя компьютер с Windows 10? Вы будете рады узнать, что вам не нужно стороннее программное обеспечение для виртуализации (например, VirtualBox) для установки и запуска Linux или других операционных систем на Windows 10.
В Windows 10 встроенный инструмент Hyper-V, позволяет создавать и запускать виртуальные машины, которые поддерживают все выпуски операционных систем Linux, FreeBSD и Windows.
ВАЖНО: Если вы думаете о добавлении Microsoft Hyper-V в Windows 10 Home, это невозможно, поскольку опция доступна только в Windows 10 Pro или бизнес-версиях с 64-разрядными процессорами, поддерживающими виртуализацию, и не менее 4 ГБ ОЗУ.
- Требования Hyper-V
- Windows 10 Профессиональная, Корпоративная или Education
- 4 ГБ или больше оперативной памяти
- 64-битный процессор
- Поддержка CPU для расширения режима VM Monitor (VT -c на процессорах Intel)
Проверьте, поддерживает ли ваш компьютер Hyper-V
Хотя Hyper-V является встроенной функцией, по умолчанию она не включена. Вам нужно включить функцию Hyper-V вручную, чтобы иметь возможность использовать ее. Windows 10 предлагает несколько способов включить функцию Hyper-V. Вы можете включить его с помощью панели управления, PowerShell или DISM.
В этом руководстве вы узнаете, как включить Microsoft Hyper-V для настройки и запуска виртуальных машин в Windows 10. Кроме того, вы также узнаете, как отключить эту функцию, если она больше не нужна. Выполните приведенные ниже инструкции, чтобы включить отключить Hyper-V в Windows 10.
Включить Hyper-V с помощью параметров Windows 10
Чтобы включить виртуализацию в Windows 10, выполните следующие действия:
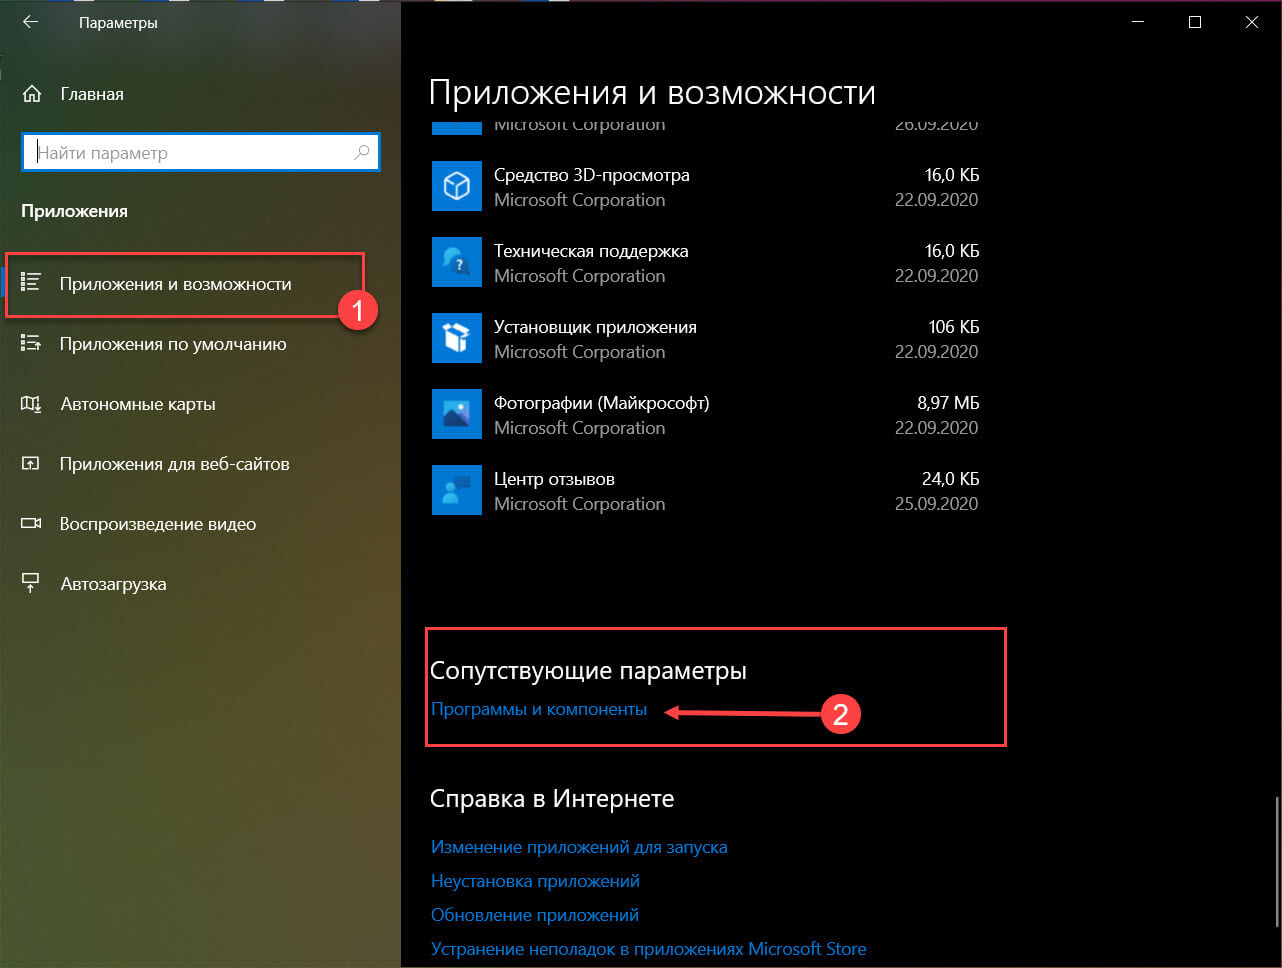
Шаг 1: Откройте Параметры Windows, самый быстрый способ нажать клавиши Win I
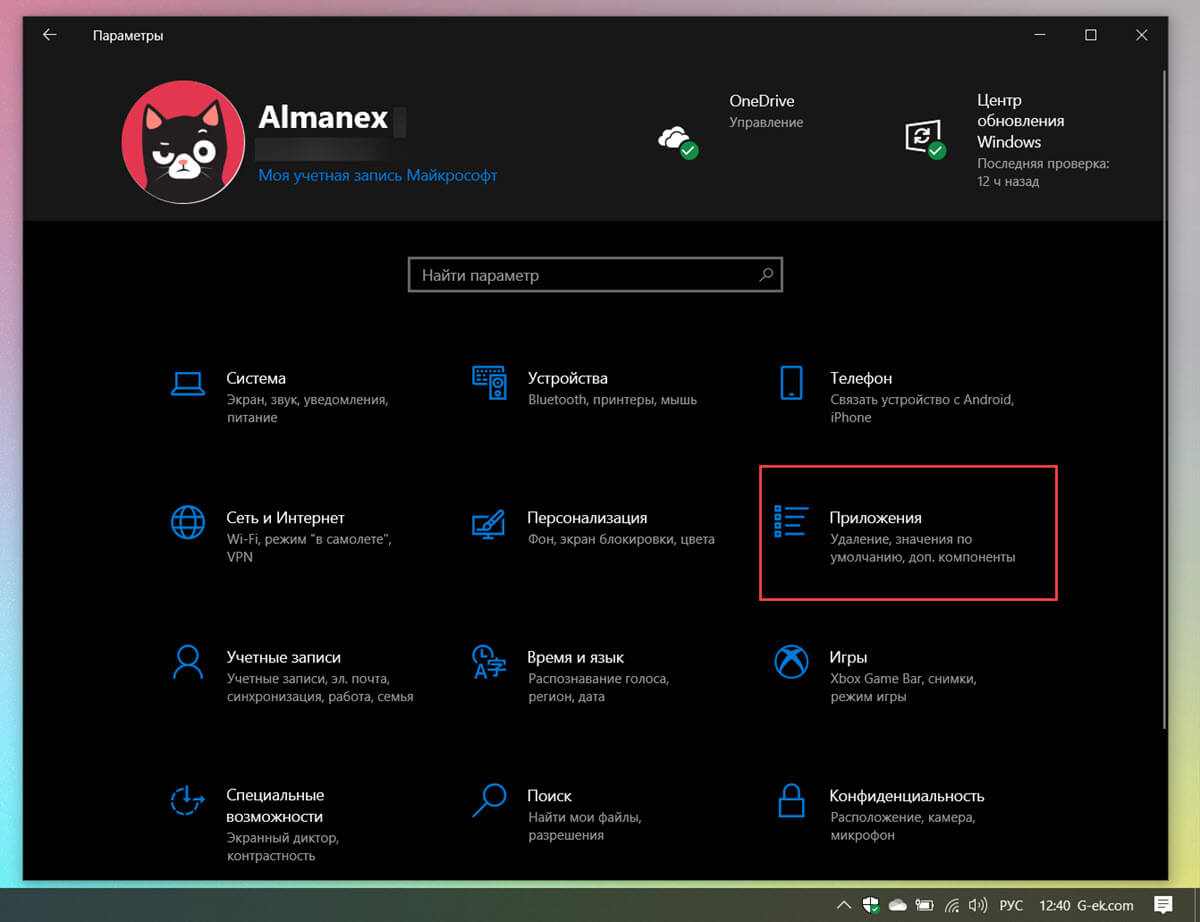
Шаг 2: Нажмите плитку «Приложения».
Шаг 3: Перейдите в раздел «Приложения и возможности».
Шаг 4: В разделе «Сопутствующие параметры» выберите «Программы и компоненты».
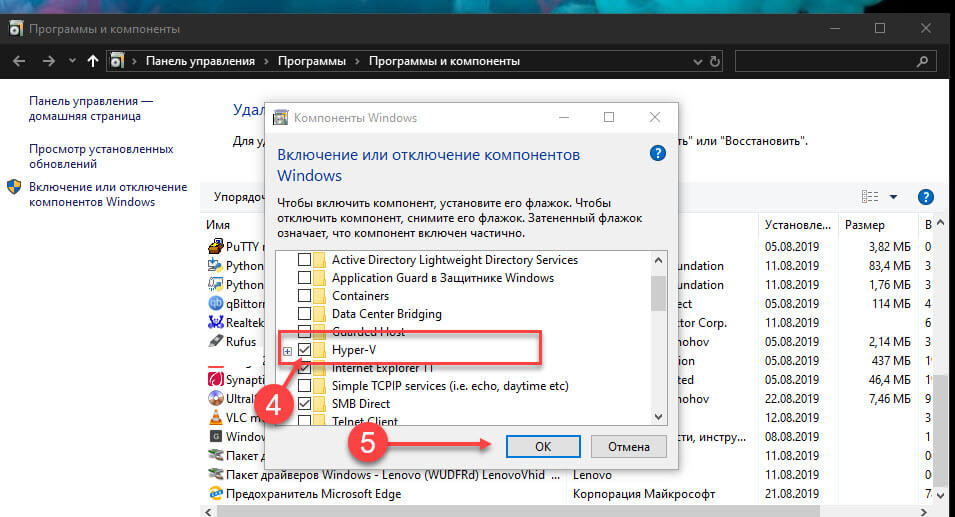
Шаг 5: На левой панели кликните параметр «Включить или отключить компоненты Windows».
Шаг 6: Отметьте опцию Hyper-V.
Подсказка: если параметр недоступен, вероятно, в процессоре устройства отключена виртуализация или функция не поддерживается. Вы можете включить Intel VT-x / EPT или AMD-V / RVI, в BIOS или UEFI на вашем компьютере.
Шаг 7: Нажмите кнопку «ОК».
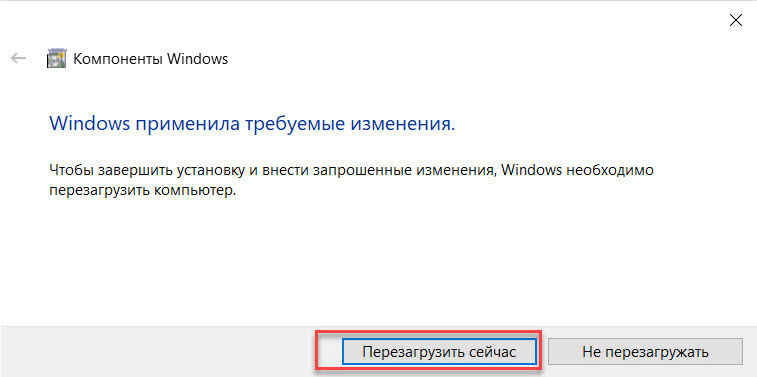
Шаг 8: Нажмите кнопку «Перезагрузить сейчас».
После выполнения этих шагов стек виртуализации Windows 10 будет установлен вместе с приложением «Диспетчер Hyper-V» для настройки и запуска виртуальных машин.
Включить Hyper-V с помощью Панели управления
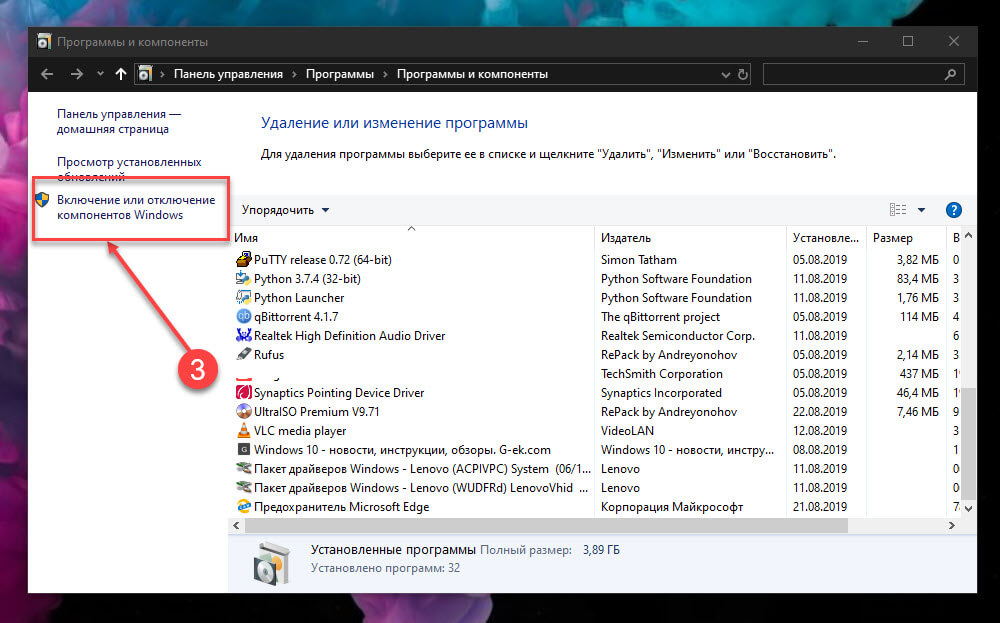
Шаг 1: Введите appwiz.cpl в поле поиска «Пуск / панель задач», а затем нажмите клавишу Enter, чтобы открыть окно «Программы и компоненты».
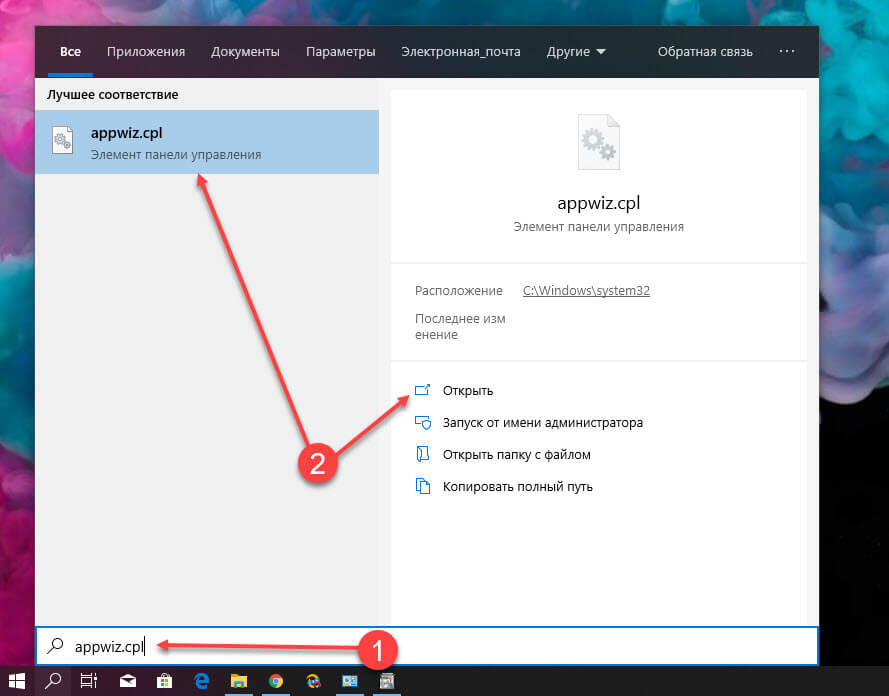
Шаг 2: В левой панели окна нажмите ссылку «Включение или отключение компонентов Windows». При нажатии на ссылку откроется окно Компоненты Windows.
Шаг 3: Здесь найдите запись Hyper-V. Установите флажок рядом с записью и нажмите кнопку «ОК».
Вас могут попросить перезагрузить компьютер для завершения установки.
Включить Hyper-V с помощью PowerShell
Шаг 1: Откройте PowerShell от имени администратора.
Шаг 2: В окне PowerShell скопируйте и вставьте следующую команду:
Enable-WindowsOptionalFeature -Online -FeatureName Microsoft-Hyper-V -All
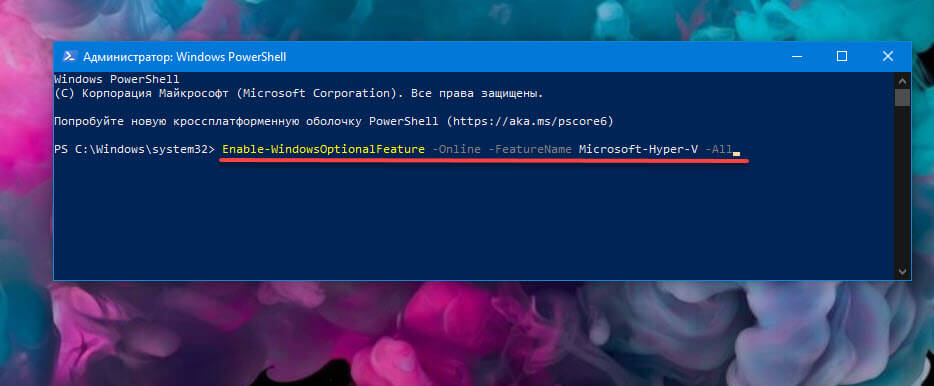
Шаг 3: Нажмите клавишу Enter, чтобы запустить команду.
После завершения установки перезагрузите компьютер.
Включить Hyper-V с помощью командной строки и DISM
Шаг 1: Запустите командную строку от имени администратора.
Шаг 2: Скопируйте и вставьте следующую команду в окне командной строки и нажмите клавишу Enter:
DISM /Online /Enable-Feature /All /FeatureName:Microsoft-Hyper-V
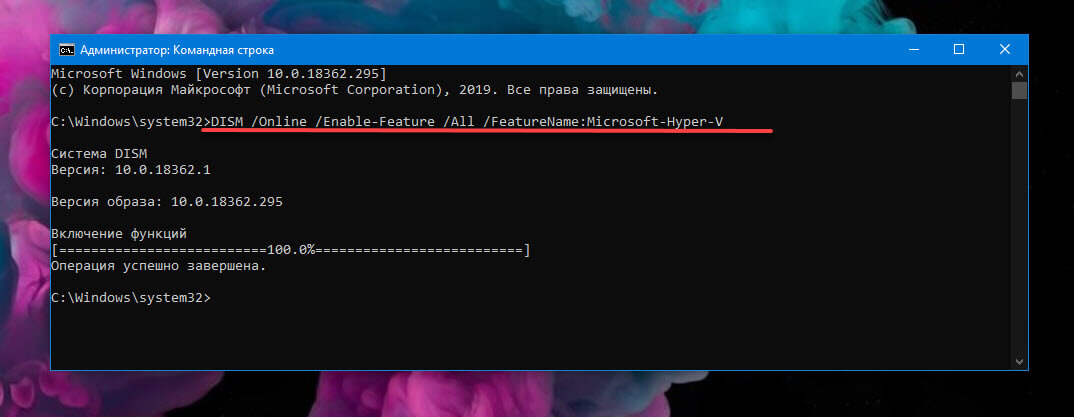
Шаг 3: После завершения установки перезагрузите компьютер.
Отключить Hyper-V с помощью параметров Windows 10
Чтобы отключить функцию виртуализации Hyper-V, выполните следующие действия:
Шаг 1: Откройте приложение «Параметры».
Шаг 2: Нажмите плитку «Приложения».
Шаг 3: Перейдите в раздел «Приложения и возможности».
Шаг 4: В разделе «Сопутствующие параметры» выберите «Программы и компоненты».
Шаг 5: На левой панели кликните параметр «Включить или отключить компоненты Windows».
Шаг 6: Снимите флажок с Hyper-V.

Шаг 7: Нажмите кнопку «ОК» и «Перезагрузить сейчас».
После выполнения этих шагов компоненты виртуализации будут отключены на вашем устройстве.
Отключить Hyper-V с помощью PowerShell в Windows 10
Чтобы отключить Hyper-V с помощью команды PowerShell, выполните следующие действия:
Шаг 1: Откройте «Пуск» и начните набирать PowerShell.
Шаг 2: Кликните правой кнопкой мыши верхний результат и выберите параметр «Запуск от имени администратора».
Шаг 3: Введите следующую команду и нажмите Enter:
DISM /Online /Disable-Feature:Microsoft-Hyper-V
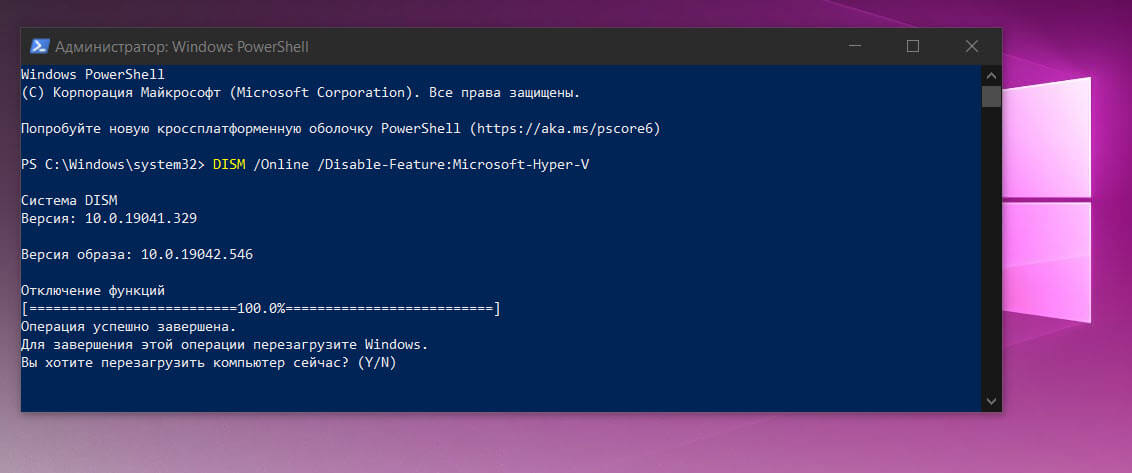
Шаг 4: Введите Y, чтобы перезагрузить компьютер.
После выполнения этих шагов диспетчер Microsoft Hyper-V и его дополнительные компоненты будут удалены.
Все!