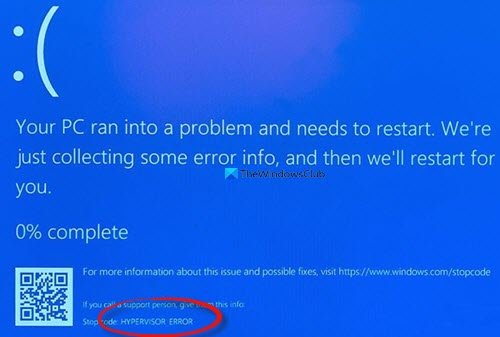
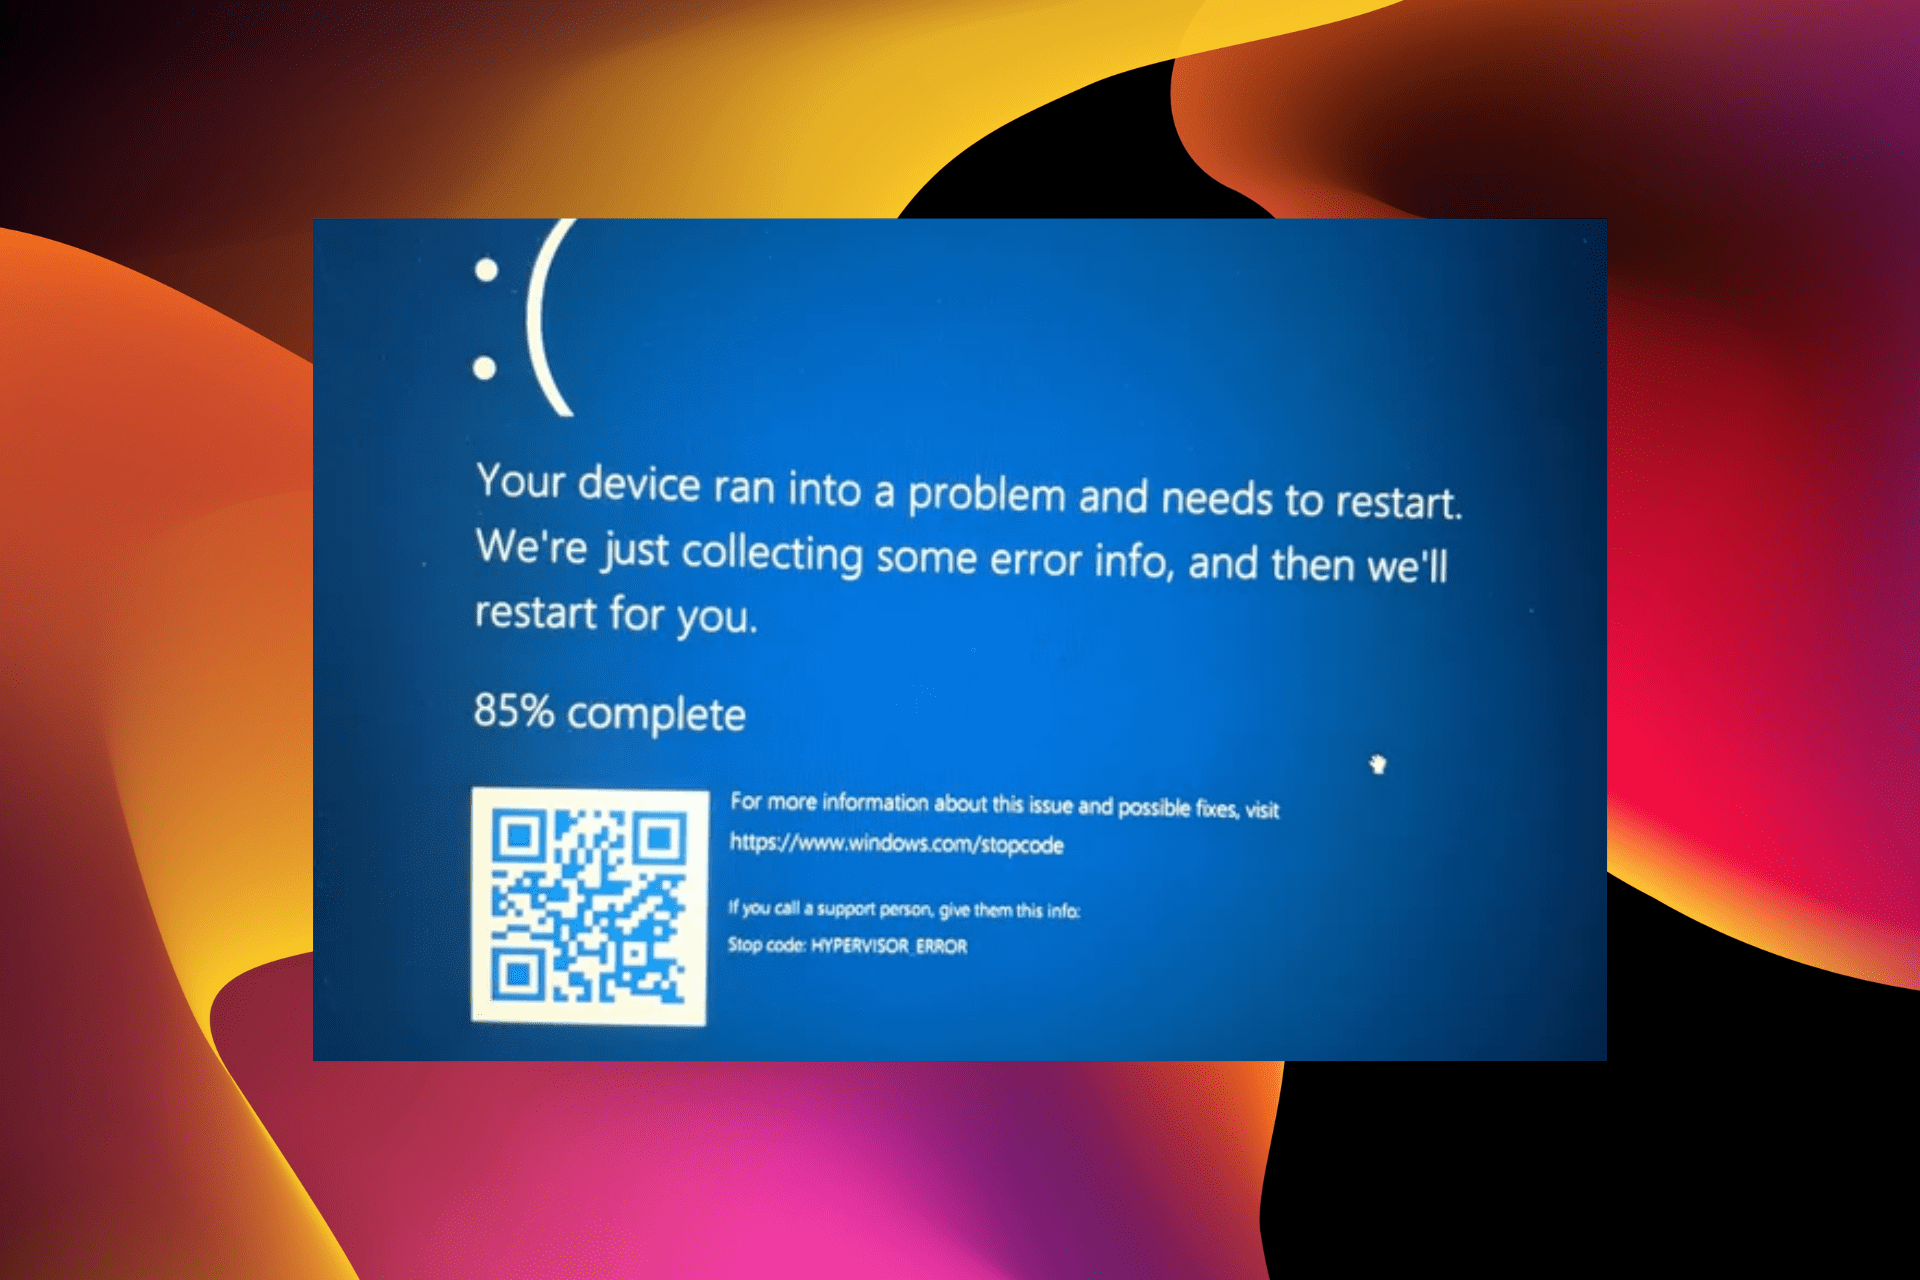
Проблема HYPERVISOR_ERROR может быть связана, среди прочего, с устаревшими или несовместимыми драйверами системы, поврежденными секторами диска и поврежденными файлами изображений. Некоторые пользователи разместили на форуме Microsoft сообщение о проблеме HYPERVISOR_ERROR BSOD (синий экран смерти) с кодом остановки ниже:
Проверка ошибки HYPERVISOR_ERROR имеет значение 0x00020001.
Это указывает на то, что гипервизор обнаружил фатальную ошибку. Код ошибки 0x00020001.
Эта ошибка BSOD может возникнуть у пользователей, использующих Windows Sandbox или сторонние приложения для виртуальных машин в Windows 10. В этой статье мы рассмотрим способы решения этой неприятной проблемы.
HYPERVISOR_ERROR можно исправить с помощью следующих шагов:
- Устранение проблем с ОЗУ с помощью диагностики памяти Windows.
- Обновите драйверы устройств.
- Запустите сканирование обслуживания образов развертывания.
- Обновите BIOS (базовую систему ввода-вывода).
- Используйте расширение отладки! Analysis.
Эти описанные шаги должным образом объяснены ниже.
1]Устранение проблем с ОЗУ с помощью диагностики памяти Windows.
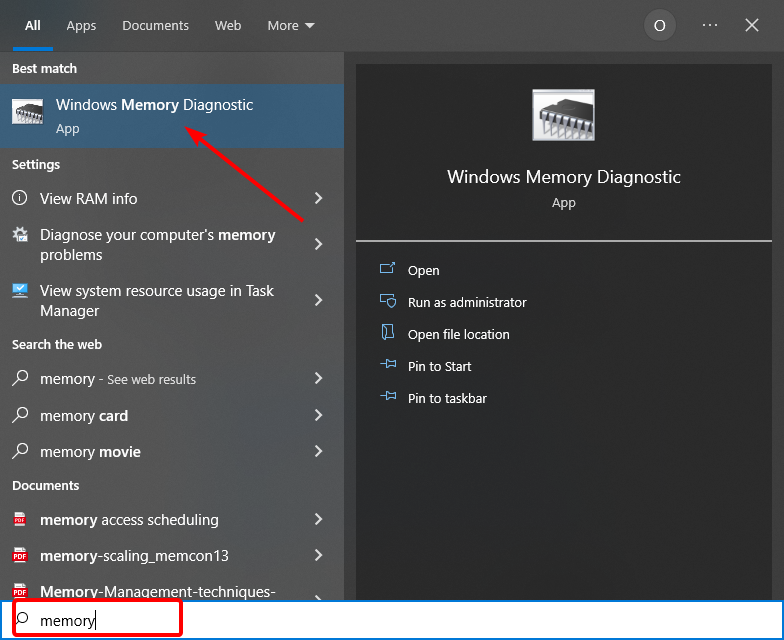
Для этого нажмите горячую клавишу Windows + S для утилиты поиска. Введите память в поле поиска.
Щелкните Диагностика памяти Windows, чтобы открыть окно этой утилиты.
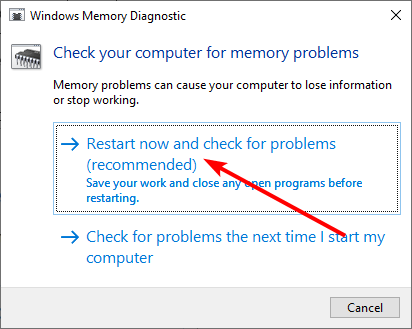
Нажмите кнопку «Перезагрузить сейчас» в программе диагностики памяти Windows.
Когда это будет сделано, ваш настольный компьютер или ноутбук перезагрузится, и средство диагностики памяти Windows проверит наличие проблем с оперативной памятью.
2]Обновите драйверы устройств
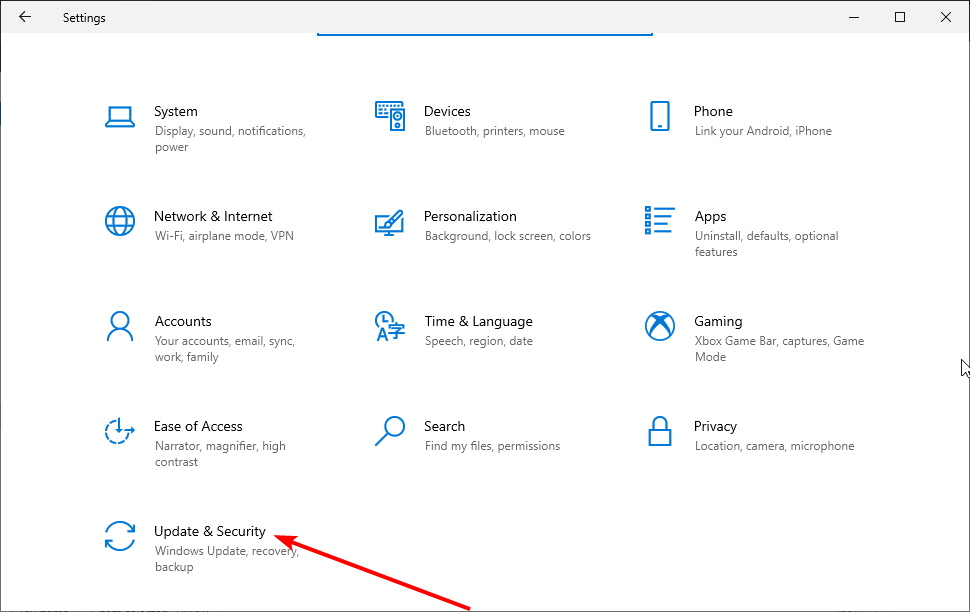
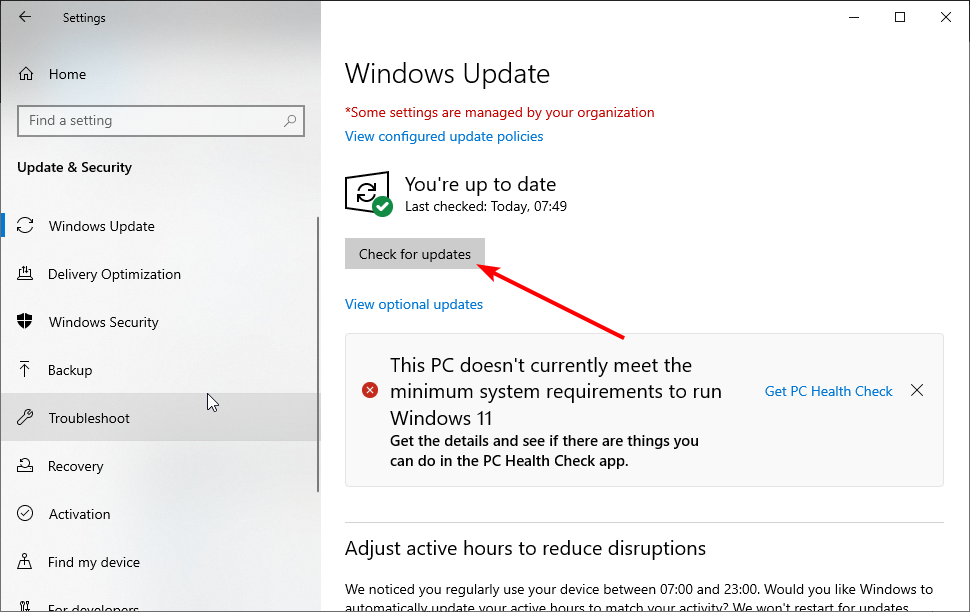
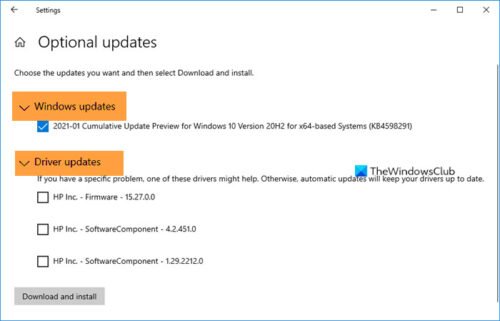
Обновление драйверов устройств может устранить HYPERVISOR_ERROR. Пользователи могут обновить драйверы устройств в своей системе, открыв «Настройки», затем перейдите в раздел «Обновление и безопасность» и щелкните его, чтобы открыть страницу Центра обновления Windows.
Сразу под ним пользователи увидят интерактивную ссылку «Просмотреть дополнительные обновления», нажмите на нее.
В разделе «Обновления драйверов» будет доступен список обновлений, которые вы можете установить. поставив отметку рядом с обновлением, которое хотите установить, нажмите «Загрузить и установить».
Читайте: Как отключить гипервизор в Windows 10.
3]Запустите сканирование обслуживания образов развертывания.
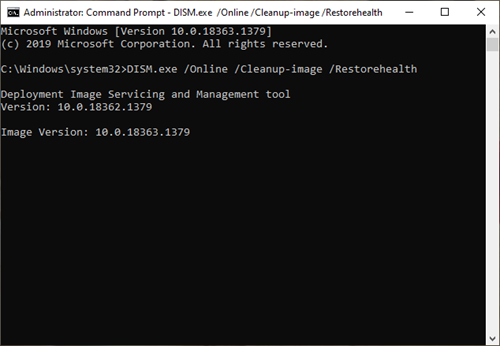
DISM можно запустить, набрав cmd в поле поиска Windows 10. Затем щелкните правой кнопкой мыши «Командная строка» и выберите «Запуск от имени администратора» в открывшемся контекстном меню.
Затем введите следующую команду службы образов развертывания в окне подсказки:
DISM.exe / Online / Cleanup-image / Restorehealth
Нажмите кнопку Enter, чтобы запустить команду Deployment Image Service.
После этого перезапустите Windows, когда сканирование будет завершено.
4]Обновите BIOS (базовую систему ввода-вывода).
Чтобы обновить устаревшую версию BIOS, вам необходимо загрузить последнюю версию прошивки BIOS с веб-сайта производителя материнской платы.
Также может быть доступна специальная программная утилита для обновления BIOS:
- Утилита Dell Update поможет вам загрузить или обновить микропрограмму и драйверы Dell.
- Lenovo System Update помогает загрузить драйверы Lenovo, программное обеспечение, прошивку и обновить BIOS.
- Пользователи AMD могут использовать AMD Driver Autodetect.
- Пользователи Intel могут использовать Intel Driver & Support Assistant.
5]Используйте расширение отладки! Analysis.
Расширение! analysis отображает информацию о текущем исключении или проверке ошибок. Он предназначен только для разработчиков.
В пользовательском режиме! Анализировать отображает информацию о текущем исключении, тогда как в режиме ядра! Анализировать отображает информацию о последней проверке ошибок.
Пользовательский режим:
! анализировать [-v] [-f | -hang] [-D BucketID]
! анализировать -c [-load KnownIssuesFile | -unload | -help ]
Режим ядра:
! анализировать [-v] [-f | -hang] [-D BucketID]
! анализировать -c [-load KnownIssuesFile | -unload | -help ]
! analysis -show BugCheckCode [BugParameters]
Если вы разработчик, то воспользуйтесь ! анализировать расширение отладки — Он отображает информацию о проверке ошибок и может быть полезен для определения основной причины.
С помощью этих шагов пользователи могут исправить ошибку Hypervisor_Error в Windows 10.
.
Corrupt hard disk sectors are among the chief causes of this error
by Matthew Adams
Matthew is a freelancer who has produced a variety of articles on various topics related to technology. His main focus is the Windows OS and all the things… read more
Published on September 22, 2022
Reviewed by
Vlad Turiceanu

Passionate about technology, Windows, and everything that has a power button, he spent most of his time developing new skills and learning more about the tech world. Coming… read more
- The Hyper_Error issue can be due to outdated or incompatible system drivers, bad disk sectors, and corrupted image files, among other things.
- Restoring Windows 10 can often fix BSOD errors like the Hypervisor_Error blue screen.
- The Hypervisor_Error in Windows 10 is less likely to arise when Windows 10 is fully updated.
- Windows 10 also includes built-in scanning utilities for hard drives and RAM that can feasibly resolve the Windows Hypervisor_Error BSOD error.
XINSTALL BY CLICKING THE DOWNLOAD FILE
This software will repair common computer errors, protect you from file loss, malware, hardware failure and optimize your PC for maximum performance. Fix PC issues and remove viruses now in 3 easy steps:
- Download Restoro PC Repair Tool that comes with Patented Technologies (patent available here).
- Click Start Scan to find Windows issues that could be causing PC problems.
- Click Repair All to fix issues affecting your computer’s security and performance
- Restoro has been downloaded by 0 readers this month.
Some users have posted on Microsoft’s forum about a Hypervisor_Error BSOD (Blue Screen of Death) issue with a 0x00020001 stop code.
This BSOD error can arise for users utilizing Windows Sandbox or third-party virtual machine applications within Windows 10. For example, in one forum post, a user said:
I’ve seen this Hypervisor_Error BSOD three times in the past two weeks. Each time that it happens, I am running an AVD (Android virtual device); and I am working on a mobile application.
Read this thorough guide to explore the best ways to deal with this annoying issue.
What is Windows hypervisor platform Windows 10?
An extended user-mode API has been added to the Windows Hypervisor Platform, which allows third-party virtualization stacks and applications to create and manage partitions at the hypervisor level.
Moreover, you can configure memory mappings for the partition, and create and control the execution of virtual processors. These capabilities were previously unavailable.
What causes the hypervisor error?
The Hypervisor BSoD error usually occurs when users use an Android Virtual Device. Below are some of the causes of this frustrating error:
- Outdated drivers
- Broken or corrupt system files
- Outdated operating system
- Outdated BIOS
How do I fix the Hypervisor error?
1. Update all your system drivers
1.1. Update driver manually
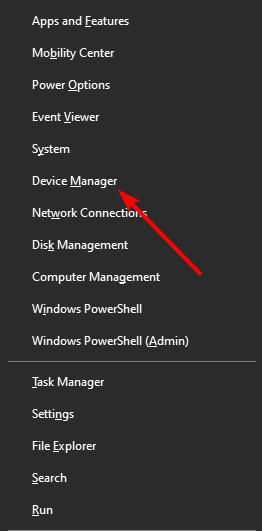
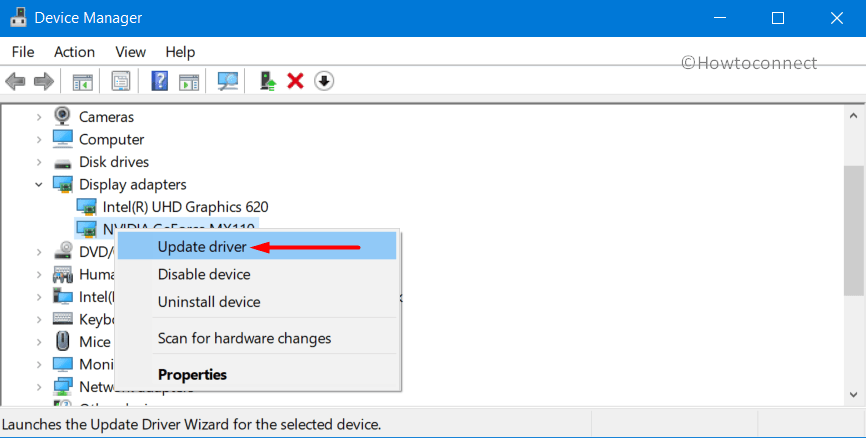
- Press the Windows key + X and select Device Manager.

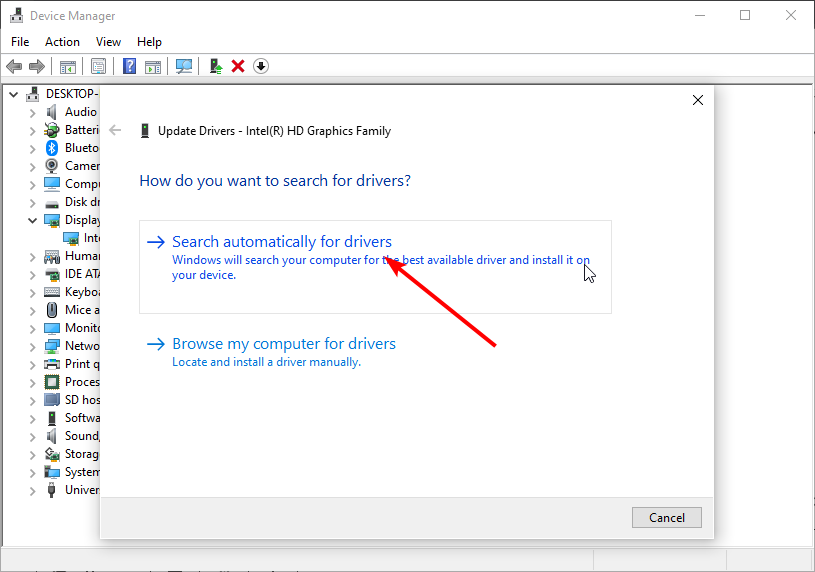
- Double-click the adapter you want to its drivers to expand it.
- Right-click the driver there and select Update driver.

- Choose the Search automatically for drivers option.
- Wait for the search to complete and install the available updates.

It might be because of outdated drivers if you are getting the Hypervisor error while trying to run games like Valorant. In this case, you need to update your graphics drivers and related ones.
1.2. Update drivers automatically
Updating all your drivers manually can be time-wasting and prone to errors. So, you should use one of the best driver updaters in DriverFix.
DriverFix is a driver updater utility with which you can quickly scan all your PC’s device drivers. In addition, this software will display a list of your PC devices with outdated, corrupted, missing drivers.
DriverFix is ideal for resolving driver issues as it lets users quickly and easily download and install drivers for PCs that need new ones.
Pro users can select an Automatically Install option to install downloaded drivers at the click of a button, which makes updating drivers very straightforward.
Other useful DriverFix features
- DriverFix backs up drivers with ZIP files before updating them
- Users can schedule scans for optimal times with DriverFix’s schedule manager
- Its download manager displays driver download progress for users
- Live chat support is available for DriverFix users

DriverFix
Easily resolve the Hypervisor_Error by using this versatile and powerful software today.
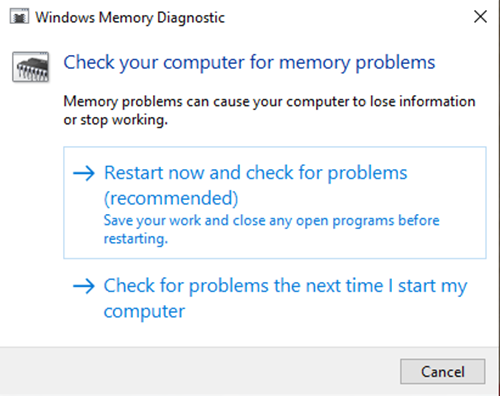
2. Fix RAM issues with Windows Memory Diagnostic
- Press the Windows + S hotkey for the search utility.
- Type memory in the search box and click Windows Memory Diagnostic to open that utility’s window.

- Click the Restart now and check for problems (recommended) option within the Windows Memory Diagnostic utility.

- After that, your desktop or laptop will restart, and the Windows Memory Diagnostic tool will check for RAM issues.
Sometimes, the Hypervisor error on Dell can be down to issues with your RAM. This can be fixed using the Windows tool. Also, if you are busy with an important task that can’t wait, you can select the second option and restart your PC when you are done.
3. Update Windows 10
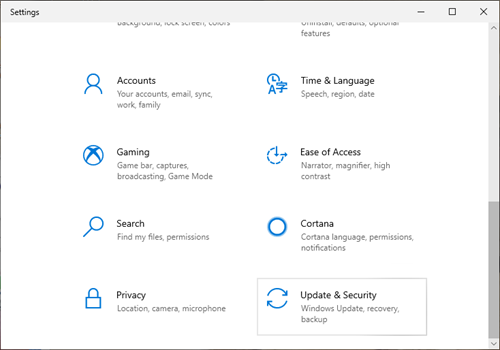
- Press the Windows key + I to open the Settings app.
- Select the Update & Security option.

- Click the Check for updates button.
- Finally, click the Install now button after downloading the available updates.

If you are getting the Hypervisor error while using the Oracle VM VirtualBox on Windows 10, it might be because your OS is outdated. Updating Windows 10 and restarting your PC should do the trick here.
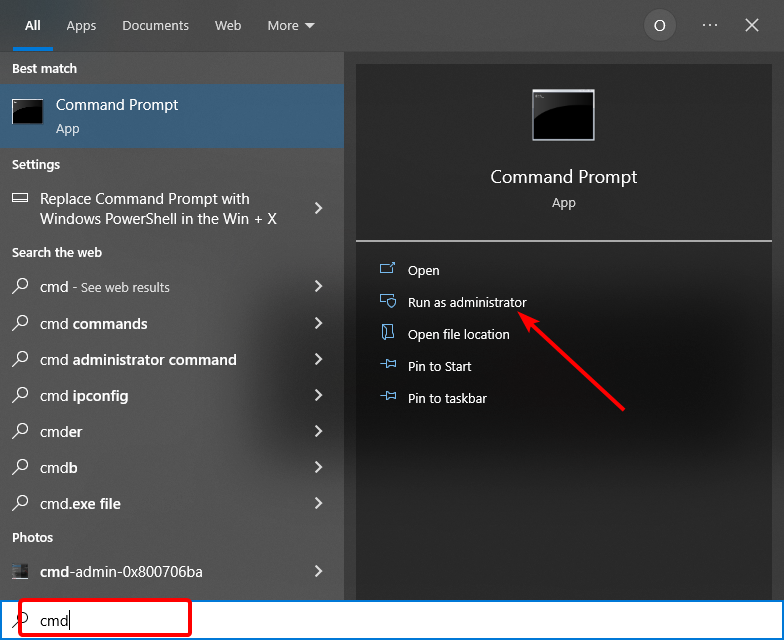
4. Run a check disk scan
- Press the Windows key + S and type cmd.
- Select Run as administrator under Command Prompt.
- Input this chkdsk command and hit Enter:
chkdsk C: /f /r /x

Some PC issues are hard to tackle, especially when it comes to corrupted repositories or missing Windows files. If you are having troubles fixing an error, your system may be partially broken.
We recommend installing Restoro, a tool that will scan your machine and identify what the fault is.
Click here to download and start repairing.
The Hypervisor error can also occur due to bad hard disk sectors. Again, running the CHKDSK command helps to repair these sectors if they can still be saved.
5. Update your BIOS (Basic Input Output System)

You’ll need to download the latest BIOS firmware from your motherboard manufacturer’s website to update an outdated BIOS.
There might also be a dedicated software utility available for updating your BIOS. Check out our How to update BIOS article for further details about updating the BIOS.
6. Run DISM scan
- Open Command Prompt as administrator.
- Input the following command and press Enter:
DISM.exe /Online /Cleanup-image /Restorehealth
- Wait for the Scan to complete and restart your PC.

Corrupt system files are among the chief causes of the Hypervisor error. You can effectively repair these files using the DISM tool.
However, to run a deep and thorough scan and repair virtually all broken system files, we recommend using a dedicated system file repairer in Restoro.
Restoro is a specialized tool that keeps your PC in top shape by detecting any faulty file and repairing it before it starts causing problems. This helps prevent file loss and ensures your PC always delivers maximum performance.
Finally, it is not just limited to file repair only. Instead, it fixes all common PC errors to help keep your device optimized.
⇒ Get Restoro
- WHEA Internal Error: Fix it Using These 9 Quick Methods
- Windows Update Error 80200053: 4 Quick Fixes
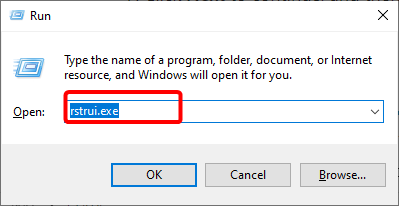
7. Restore Windows 10 to an earlier date
- Press the Windows key + R to open the Run utility.
- Type rstrui.exe and press Enter.

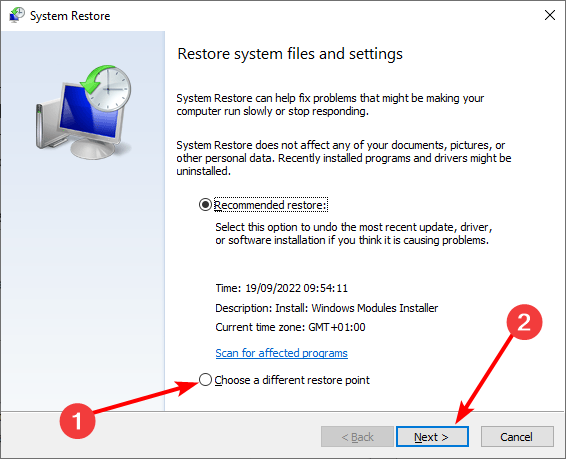
- Click the Choose a different restore point option and the Next button.

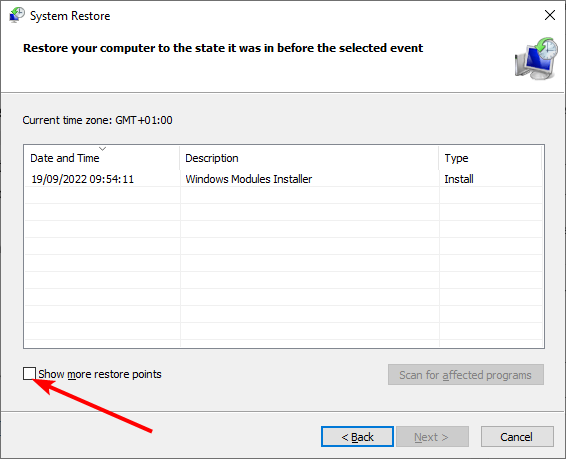
- Check the box for Show more restore points checkbox to open the complete list of dates.
- Choose a restore point date that predates the Hypervisor error BSOD issue.
- If you’re unsure which one to choose, select the oldest restore point.
- Click Next to continue, and then select the Finish option.
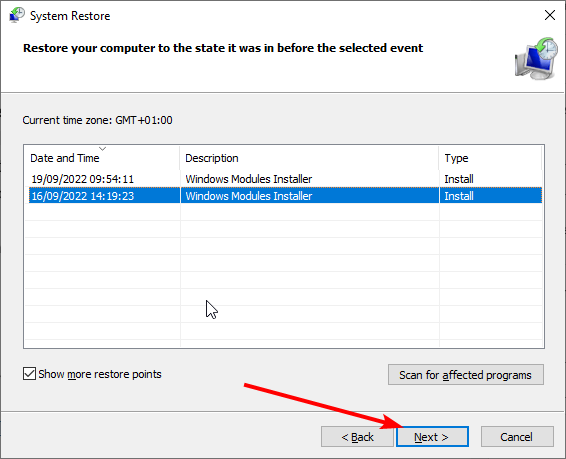
If all the solutions above fail to fix the Hypervisor error, you might need to restore your PC to a later date before the issue.
Note that any software installed after the selected restore point gets deleted. Click the Scan for affected programs button on the System Restore window to see what software a selected restore point removes.
How do I fix the Hypervisor error on Windows 11?
The Hypervisor error on Windows 11 is usually caused by corrupt system files and bad disk sectors. Also, the issue can be due to some incorrect or conflicting settings on your PC.
To fix it effectively, check our detailed guide on Hypervisor errors on Windows 11.
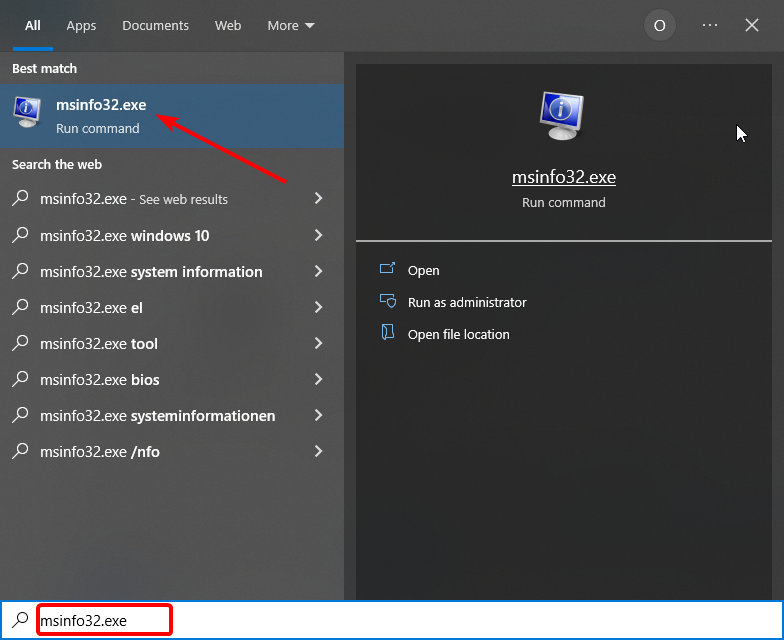
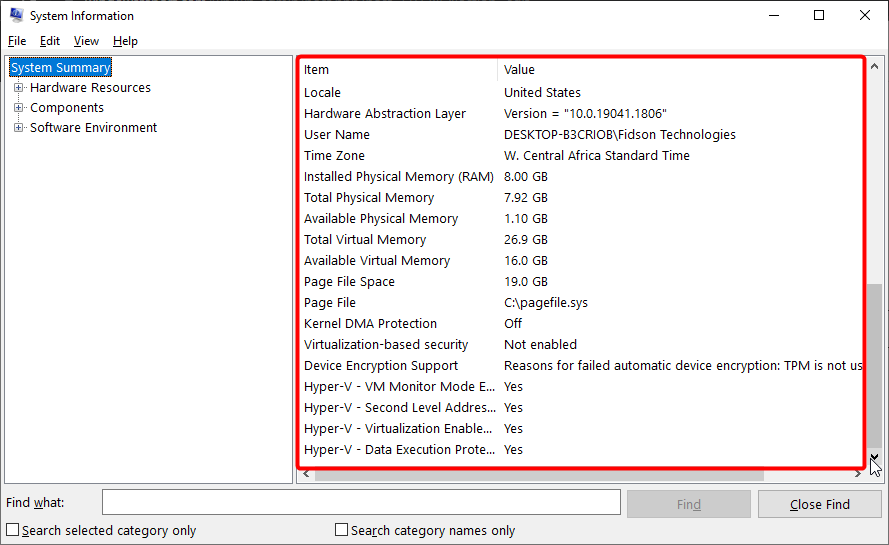
How do I know if Hypervisor is running?
- Press the Windows key + S and type msinfo32.exe.
- Select the msinfo32.exe option.
- If Hypervisor is running, you will see A hypervisor has been detected. Features required for Hyper-V will not be displayed in the details section.

Those are likely fixes for the Hypervisor error in Windows 10. However, we hope you can fix the issue before exhausting the list.
If you need a list of the best BSoD fixers to repair blue screen errors effortlessly, check our guide for the best options that are currently available.
Feel free to let us know the solution that helped you fix the issue in the comments below.
Still having issues? Fix them with this tool:
SPONSORED
If the advices above haven’t solved your issue, your PC may experience deeper Windows problems. We recommend downloading this PC Repair tool (rated Great on TrustPilot.com) to easily address them. After installation, simply click the Start Scan button and then press on Repair All.
![]()
Newsletter
Corrupt hard disk sectors are among the chief causes of this error
by Matthew Adams
Matthew is a freelancer who has produced a variety of articles on various topics related to technology. His main focus is the Windows OS and all the things… read more
Published on September 22, 2022
Reviewed by
Vlad Turiceanu
Passionate about technology, Windows, and everything that has a power button, he spent most of his time developing new skills and learning more about the tech world. Coming… read more
- The Hyper_Error issue can be due to outdated or incompatible system drivers, bad disk sectors, and corrupted image files, among other things.
- Restoring Windows 10 can often fix BSOD errors like the Hypervisor_Error blue screen.
- The Hypervisor_Error in Windows 10 is less likely to arise when Windows 10 is fully updated.
- Windows 10 also includes built-in scanning utilities for hard drives and RAM that can feasibly resolve the Windows Hypervisor_Error BSOD error.
XINSTALL BY CLICKING THE DOWNLOAD FILE
This software will repair common computer errors, protect you from file loss, malware, hardware failure and optimize your PC for maximum performance. Fix PC issues and remove viruses now in 3 easy steps:
- Download Restoro PC Repair Tool that comes with Patented Technologies (patent available here).
- Click Start Scan to find Windows issues that could be causing PC problems.
- Click Repair All to fix issues affecting your computer’s security and performance
- Restoro has been downloaded by 0 readers this month.
Some users have posted on Microsoft’s forum about a Hypervisor_Error BSOD (Blue Screen of Death) issue with a 0x00020001 stop code.
This BSOD error can arise for users utilizing Windows Sandbox or third-party virtual machine applications within Windows 10. For example, in one forum post, a user said:
I’ve seen this Hypervisor_Error BSOD three times in the past two weeks. Each time that it happens, I am running an AVD (Android virtual device); and I am working on a mobile application.
Read this thorough guide to explore the best ways to deal with this annoying issue.
What is Windows hypervisor platform Windows 10?
An extended user-mode API has been added to the Windows Hypervisor Platform, which allows third-party virtualization stacks and applications to create and manage partitions at the hypervisor level.
Moreover, you can configure memory mappings for the partition, and create and control the execution of virtual processors. These capabilities were previously unavailable.
What causes the hypervisor error?
The Hypervisor BSoD error usually occurs when users use an Android Virtual Device. Below are some of the causes of this frustrating error:
- Outdated drivers
- Broken or corrupt system files
- Outdated operating system
- Outdated BIOS
How do I fix the Hypervisor error?
1. Update all your system drivers
1.1. Update driver manually
- Press the Windows key + X and select Device Manager.
- Double-click the adapter you want to its drivers to expand it.
- Right-click the driver there and select Update driver.
- Choose the Search automatically for drivers option.
- Wait for the search to complete and install the available updates.
It might be because of outdated drivers if you are getting the Hypervisor error while trying to run games like Valorant. In this case, you need to update your graphics drivers and related ones.
1.2. Update drivers automatically
Updating all your drivers manually can be time-wasting and prone to errors. So, you should use one of the best driver updaters in DriverFix.
DriverFix is a driver updater utility with which you can quickly scan all your PC’s device drivers. In addition, this software will display a list of your PC devices with outdated, corrupted, missing drivers.
DriverFix is ideal for resolving driver issues as it lets users quickly and easily download and install drivers for PCs that need new ones.
Pro users can select an Automatically Install option to install downloaded drivers at the click of a button, which makes updating drivers very straightforward.
Other useful DriverFix features
- DriverFix backs up drivers with ZIP files before updating them
- Users can schedule scans for optimal times with DriverFix’s schedule manager
- Its download manager displays driver download progress for users
- Live chat support is available for DriverFix users
DriverFix
Easily resolve the Hypervisor_Error by using this versatile and powerful software today.
2. Fix RAM issues with Windows Memory Diagnostic
- Press the Windows + S hotkey for the search utility.
- Type memory in the search box and click Windows Memory Diagnostic to open that utility’s window.
- Click the Restart now and check for problems (recommended) option within the Windows Memory Diagnostic utility.
- After that, your desktop or laptop will restart, and the Windows Memory Diagnostic tool will check for RAM issues.
Sometimes, the Hypervisor error on Dell can be down to issues with your RAM. This can be fixed using the Windows tool. Also, if you are busy with an important task that can’t wait, you can select the second option and restart your PC when you are done.
3. Update Windows 10
- Press the Windows key + I to open the Settings app.
- Select the Update & Security option.
- Click the Check for updates button.
- Finally, click the Install now button after downloading the available updates.
If you are getting the Hypervisor error while using the Oracle VM VirtualBox on Windows 10, it might be because your OS is outdated. Updating Windows 10 and restarting your PC should do the trick here.
4. Run a check disk scan
- Press the Windows key + S and type cmd.
- Select Run as administrator under Command Prompt.
- Input this chkdsk command and hit Enter:
chkdsk C: /f /r /x
Some PC issues are hard to tackle, especially when it comes to corrupted repositories or missing Windows files. If you are having troubles fixing an error, your system may be partially broken.
We recommend installing Restoro, a tool that will scan your machine and identify what the fault is.
Click here to download and start repairing.
The Hypervisor error can also occur due to bad hard disk sectors. Again, running the CHKDSK command helps to repair these sectors if they can still be saved.
5. Update your BIOS (Basic Input Output System)
You’ll need to download the latest BIOS firmware from your motherboard manufacturer’s website to update an outdated BIOS.
There might also be a dedicated software utility available for updating your BIOS. Check out our How to update BIOS article for further details about updating the BIOS.
6. Run DISM scan
- Open Command Prompt as administrator.
- Input the following command and press Enter:
DISM.exe /Online /Cleanup-image /Restorehealth - Wait for the Scan to complete and restart your PC.
Corrupt system files are among the chief causes of the Hypervisor error. You can effectively repair these files using the DISM tool.
However, to run a deep and thorough scan and repair virtually all broken system files, we recommend using a dedicated system file repairer in Restoro.
Restoro is a specialized tool that keeps your PC in top shape by detecting any faulty file and repairing it before it starts causing problems. This helps prevent file loss and ensures your PC always delivers maximum performance.
Finally, it is not just limited to file repair only. Instead, it fixes all common PC errors to help keep your device optimized.
⇒ Get Restoro
- WHEA Internal Error: Fix it Using These 9 Quick Methods
- Windows Update Error 80200053: 4 Quick Fixes
- Your Computer Could Not Connect to Another Console Session [Fixed]
- Video Dxgkrnl Fatal Error: What Is It & How to Fix It [9 Tips]
7. Restore Windows 10 to an earlier date
- Press the Windows key + R to open the Run utility.
- Type rstrui.exe and press Enter.
- Click the Choose a different restore point option and the Next button.
- Check the box for Show more restore points checkbox to open the complete list of dates.
- Choose a restore point date that predates the Hypervisor error BSOD issue.
- If you’re unsure which one to choose, select the oldest restore point.
- Click Next to continue, and then select the Finish option.
If all the solutions above fail to fix the Hypervisor error, you might need to restore your PC to a later date before the issue.
Note that any software installed after the selected restore point gets deleted. Click the Scan for affected programs button on the System Restore window to see what software a selected restore point removes.
How do I fix the Hypervisor error on Windows 11?
The Hypervisor error on Windows 11 is usually caused by corrupt system files and bad disk sectors. Also, the issue can be due to some incorrect or conflicting settings on your PC.
To fix it effectively, check our detailed guide on Hypervisor errors on Windows 11.
How do I know if Hypervisor is running?
- Press the Windows key + S and type msinfo32.exe.
- Select the msinfo32.exe option.
- If Hypervisor is running, you will see A hypervisor has been detected. Features required for Hyper-V will not be displayed in the details section.
Those are likely fixes for the Hypervisor error in Windows 10. However, we hope you can fix the issue before exhausting the list.
If you need a list of the best BSoD fixers to repair blue screen errors effortlessly, check our guide for the best options that are currently available.
Feel free to let us know the solution that helped you fix the issue in the comments below.
Still having issues? Fix them with this tool:
SPONSORED
If the advices above haven’t solved your issue, your PC may experience deeper Windows problems. We recommend downloading this PC Repair tool (rated Great on TrustPilot.com) to easily address them. After installation, simply click the Start Scan button and then press on Repair All.
![]()
Newsletter
Windows продолжает получать новые функции и исправления безопасности с каждым обновлением, и это причина, по которой пользователям это нравится. Что ж, это действительно отличная ОС, но все же бывают случаи, когда пользователи сталкиваются с различными проблемами и сталкиваются с ошибками. Здесь мы говорим об одной такой ошибке, которая называется HYPERVISOR_ERROR BSOD Stop Code Error.
В большинстве случаев эта ошибка возникает, когда пользователь пытается запустить песочницу Windows, а также какую-либо другую виртуальную машину. Не только это, но иногда это происходит при выполнении некоторых более простых задач, таких как просмотр веб-страниц. Кроме того, использование сторонней антивирусной программы, отсутствие файлов DLL и компонентов Windows, запуск двух или более похожих приложений, повреждение реестра также может вызвать ошибку.
Наконец, в некоторых случаях ошибка BSOD HYPERVISOR_ERROR возникает, когда вредоносное ПО захватывает элементы системы. Какой бы ни была причина, в этой статье мы даем вам решения для всех возможных причин этой ошибки.

Содержание страницы
-
1 Как исправить ошибку кода остановки BSOD HYPERVISOR_ERROR
- 1.1 Метод 1: обновить Windows
- 1.2 Метод 2: обновите драйверы
- 1.3 Метод 4: используйте средство устранения неполадок Windows, чтобы исправить ошибку кода остановки BSOD HYPERVISOR_ERROR
- 1.4 Метод 5: запустите средство диагностики памяти, чтобы исправить проблемы с ОЗУ
- 1.5 Метод 6: используйте утилиту очистки диска, чтобы удалить ненужные файлы и освободить место
- 1.6 Метод 6. Удалите стороннее антивирусное программное обеспечение.
- 2 Заключение
Как исправить ошибку кода остановки BSOD HYPERVISOR_ERROR
Это один из необходимых шагов, прежде чем перейти к решениям. Поскольку мы получали отчеты от пользователей, в большинстве случаев ваши окна перезапускаются автоматически, как только вы сталкиваетесь с этой ошибкой. Это происходит не со всеми пользователями, но большинство пользователей сталкиваются с этим.
Чтобы исправить это, сначала нажмите Windows + D, а затем щелкните правой кнопкой мыши на ЭТОМ ПК и выберите в меню Свойства. Откроется новое окно, в котором выберите Дополнительные параметры системы.
В-третьих, нажмите на опцию Advance, чтобы перейти на вкладку Advanced. Теперь найдите область «Запуск и восстановление» и нажмите «Настройки» под ней.

Откроется окно настроек. Теперь в окне настроек вам нужно снять флажок с опции Автоматический перезапуск, как показано на следующем изображении. Нажмите ОК, чтобы завершить процесс.
Метод 1: обновить Windows
Как мы уже говорили ранее, обновления Windows содержат различные исправления. Не каждый раз сталкиваешься с ошибкой по указанным выше причинам. Чтобы быть более конкретным, могут быть некоторые ошибки, которые вызывают такие ошибки, и в таких случаях последнее обновление — это все, что вам нужно. Поэтому обновите свои окна, чтобы предотвратить ошибку.
Метод 2: обновите драйверы
Это простой и эффективный способ решения этой ошибки. Если причиной этой ошибки является несовместимость драйверов или какая-либо ошибка драйвера, их обновление является способом решения ошибки.
Чтобы обновить драйверы, сначала нажмите Windows + R, введите «devmgmt.msc» в диалоговом окне и нажмите Enter.

Теперь вы увидите здесь окна диспетчера драйверов. Вы можете обновить все драйверы вручную. Для этого щелкните правой кнопкой мыши драйвер, который вы хотите обновить, и выберите вариант обновления драйвера.

С помощью этого метода вы можете обновлять все драйверы один за другим, и если драйвер вызывает ошибку, она будет устранена. Вы также можете использовать сторонние пакеты драйверов для обновления драйверов.
Метод 4: используйте средство устранения неполадок Windows, чтобы исправить ошибку кода остановки BSOD HYPERVISOR_ERROR
Как я уже сказал, Microsoft стремится решать проблемы своих пользователей. Поскольку многие пользователи столкнулись с ошибкой кода остановки BSOD HYPERVISOR_ERROR, Microsoft представила служебный инструмент под названием Windows Blue Screen Troubleshooter. Все, что вам нужно, это последнее обновление Windows 10, чтобы использовать эту утилиту.
Чтобы использовать эту утилиту, сначала нажмите Windows + I, чтобы открыть приложение настроек.

Во-вторых, щелкните параметр «Обновление и безопасность», а затем выберите параметр устранения неполадок.
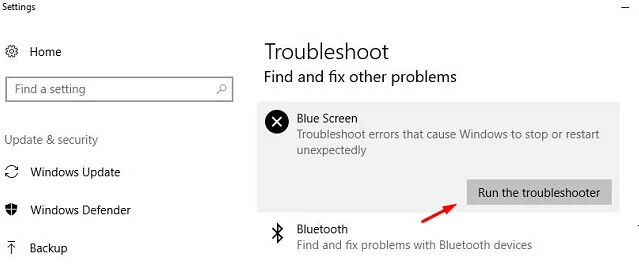
В-третьих, найдите вариант синего экрана и выберите вариант запуска средства устранения неполадок.
Наконец, дайте утилите завершить свою работу. Это автоматический процесс, поскольку он обнаруживает проблему и начинает ее исправлять. Так что расслабьтесь и расслабьтесь, пока выполняет работу.
Метод 5: запустите средство диагностики памяти, чтобы исправить проблемы с ОЗУ
Поврежденная оперативная память и неправильное выделение памяти играют активную роль в возникновении BSOD HYPERVISOR_ERROR. В Windows есть средство диагностики памяти по умолчанию, которое может помочь вам в решении этих проблем с памятью.
Чтобы запустить инструмент диагностики памяти, прежде всего откройте приложение настроек так же, как мы делали в последнем методе.

Во-вторых, введите «Память» в строке поиска окна настроек и выберите «Диагностика проблем с памятью вашего компьютера» в результатах поиска. Откроется окно средства диагностики.
В-третьих, нажмите кнопку «Перезагрузить сейчас и проверьте наличие проблем» (рекомендуется) в окне.
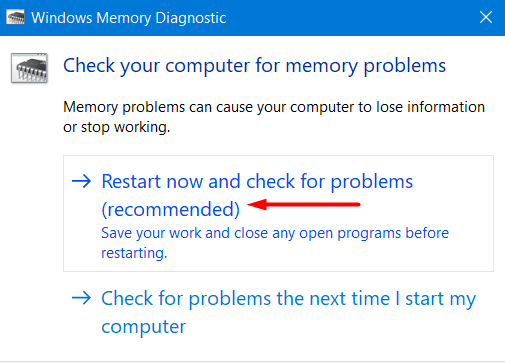
Теперь ваша система перезагрузится автоматически, и после перезапуска инструмент начнет свою работу. Вы увидите процентный индикатор, и как только этот показатель достигнет 100%, ваш компьютер снова перезагрузится.
Наконец, после второй перезагрузки вы увидите результат диагностики на экране. Надеюсь, вы больше не столкнетесь с кодом остановки BSOD HYPERVISOR_ERROR.
Метод 6: используйте утилиту очистки диска, чтобы удалить ненужные файлы и освободить место
Если у вас мало места и вы столкнулись с кодом остановки BSOD HYPERVISOR_ERROR, то это ваше решение. Windows создает ненужные файлы, когда мы выполняем с ними задачи. Со временем эти файлы будут становиться все больше и больше, если мы не будем их удалять. Эти файлы не опасны для вашего ПК, но если у вас мало памяти, рекомендуется их удалить. Это легко сделать с помощью утилиты очистки диска.
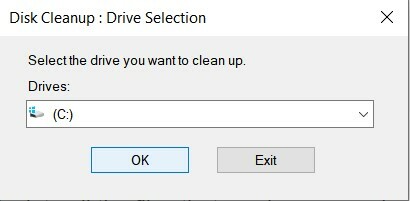
Для этого сначала нажмите Windows + S, чтобы открыть окно поиска, после чего напишите «cleanmgr» в поле поиска и нажмите Enter.

Откроется диалоговое окно, в котором вас попросят выбрать диск для очистки. Выберите диск C оттуда, используя раскрывающееся меню, и нажмите ОК.
Как только вы нажмете ОК, инструмент вычислит все файлы, которые можно удалить, и покажет вам всплывающее окно. Нажмите на опцию Очистить системные файлы.
Когда вы это сделаете, вы увидите новое всплывающее окно с просьбой указать предпочтительный диск. Выберите C и нажмите Enter.
После этого вы снова увидите окно очистки диска для C. Теперь проверьте все элементы в разделе «Файлы для удаления», кроме «Загрузить». После этого нажмите «ОК», чтобы запустить очистку.
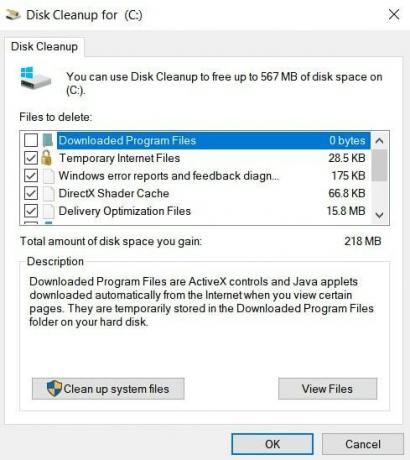
Это запустит очистку. Это долгий процесс, и потребуется немало времени, чтобы набраться терпения и не останавливать процесс на середине. Как только процесс будет завершен, перезагрузите компьютер и, надеюсь, вы больше не столкнетесь с HYPERVISOR_ERROR.
Метод 6. Удалите стороннее антивирусное программное обеспечение.
Все мы используем то или иное антивирусное программное обеспечение, чтобы обеспечить безопасность нашей системы. Однако есть антивирусное программное обеспечение, которое портит системные файлы и, таким образом, может вызывать код остановки BSOD HYPERVISOR_ERROR.
Такое случается редко, поэтому мы предлагаем вам попробовать другие методы перед этим, и если ни один из них не работает, то. Используйте только этот метод. Вам не нужно беспокоиться о безопасности вашей системы, поскольку Windows уже имеет свой инструмент безопасности, то есть безопасность Windows.
Заключение
Подводя итог, это были все возможные решения для устранения ошибки кода остановки BSOD HYPERVISOR_ERROR. Вы можете использовать любой из этих методов для решения вашей ошибки. Кроме того, вы можете обратиться в службу поддержки Windows, если столкнетесь с ошибкой даже после попытки всех решений. Служба поддержки Windows предоставит вам необходимое решение, чтобы помочь вам с ошибкой. Мы надеемся, что это развеет все ваши сомнения по этому поводу.
Выбор редактора:
- Исправить ошибку ОЗУ при проверке безопасности ядра в Windows 10
- Как исправить BSOD повреждения кучи режима ядра в Windows 10
- Исправить ошибку BSOD кода остановки управления памятью
- Исправлено: Неустранимая системная ошибка C000021A в Windows 7 и 8.1.
- Как включить или отключить диалоговое окно подтверждения удаления в Windows 10?
Рекламные объявления В этом уроке мы покажем вам, как исправить код ошибки Steam 2: Серверы…
Рекламные объявления В последнее время цифровой мир заполнен многочисленными пользователями ПК, которые заявляют о том, что «сканирование DISM завершается неудачно с…
Рекламные объявления Windows 10 — самая продвинутая и умная версия Microsoft Windows, которая порождает большие ожидания…
Have you ever come across any error text on display relating to HYPERVISOR_ERROR? This is a Blue Screen of Death error in the system having a bug check value of 0x00020001. The case study says that the possible reasons behind this issue are malware taking over system elements, missing DLL files and Windows components, corruption on the registry, using a third-party anti-virus program, running two or more similar applications, and more.
Apart from these, hardware issues can also be equally responsible for this error to occur. Some might also get this error after installing a new additional HDD or having bad sectors in the drive. But the most annoying issue is restarting of Windows automatically quite often. HYPERVISOR_ERROR BSOD in Windows 11 or 10 has long term effect in the computers if not eliminated in the first place. You might face frequent hanging of the desktop, continuous error messages manipulating ongoing tasks. Necessary steps are mandatory to recover the device from its dangerous grasp. So, today, we will discuss all these processes elaborately here and try to resolve this HYPERVISOR ERROR. Let not waste any more time, better be started!
Here is how to fix HYPERVISOR_ERROR BSOD in Windows 11 or 10 –
Way-1: Prevent Windows From Restarting Automatically
First thing first, as the computer might repeatedly restart automatically, we can heal that at the beginning. This will not actually bypass the error but you will get an efficient arena of deploying resolutions. Here is the method –
- Press Win+D and head to Desktop area straightway.
- Right click on This PC and select Properties.
- When in a separate window, choose Advanced system settings.
- From System properties wizard next, move into Advanced tab.
- Reach down to the Startup and Recovery area.
- Select Settings option from this place.
- In the following popup, reach out to the System failure section.
- Uncheck Automatically restart option.

- Hit the OK button to proceed on.
Now, Windows will not restart automatically and you can make the proper environment for applying other processes. Head to the next resolutions.
Way-2: Use the Safe Boot Mood as Rescuer of HYPERVISOR_ERROR
Starting from very old times to now, whenever any critical issue like HYPERVISOR ERROR raises up for windows system, booting in Safe Mode came out as the savior. In fact, like all of you, the next resolution we are taking up is to perform it. Let’s see the method in below section –
- Hover the mouse pointer and reach the left bottom of the taskbar.
- Perform a click on the Start menu icon.
- Hit a click on Power icon from there and select Restart option holding Shift key at the same time.
- Once Windows completes the first cycle of restarting, there will be a blue screen holding a few options. Choose Troubleshoot from there.
- Moving ahead to the next page, select “Advanced options” followed by a hit on “Startup Settings“.
- Now, you need to click on the Power cog icon. Located at the right bottom corner followed by choosing Restart.
- Windows after restarting for the second time will offer you a menu at the startup including options to “Boot in Safe Mode“.
- Press the “F4” button from keyboard continuously and enter into the Safe Mode.
Way-3: Protect from Virus using Windows Security
Missing system elements stay in the front row for causing HYPERVISOR_ERROR in Windows 11 or 10. The question is, how do these go missing? Well, there might be malware or virus attacks and once they get into the system, erase necessary data. We all are well familiar with the fact that it’s very rare to stay away from them. What we can easily do is perform a regular check and dismiss these. The steps are as follows –
Step-1: Press Win+S hotkeys together and invoke Taskbar search on display.
For reference, read How to Remove Windows Security System Tray Icon in Windows 10.
Step-2: In the empty text space, type Security and when Windows Security arrives in the result, choose to launch.
Step-3: In the App UI, select Virus and threat protection from the left-hand side and switch to the adjacent wing.
Step-4: On the right, perform a click on the link Scan options and discover all the processes.
Step-5: Mark the radio button conjoint with Full scan and from down, hit Scan now option.
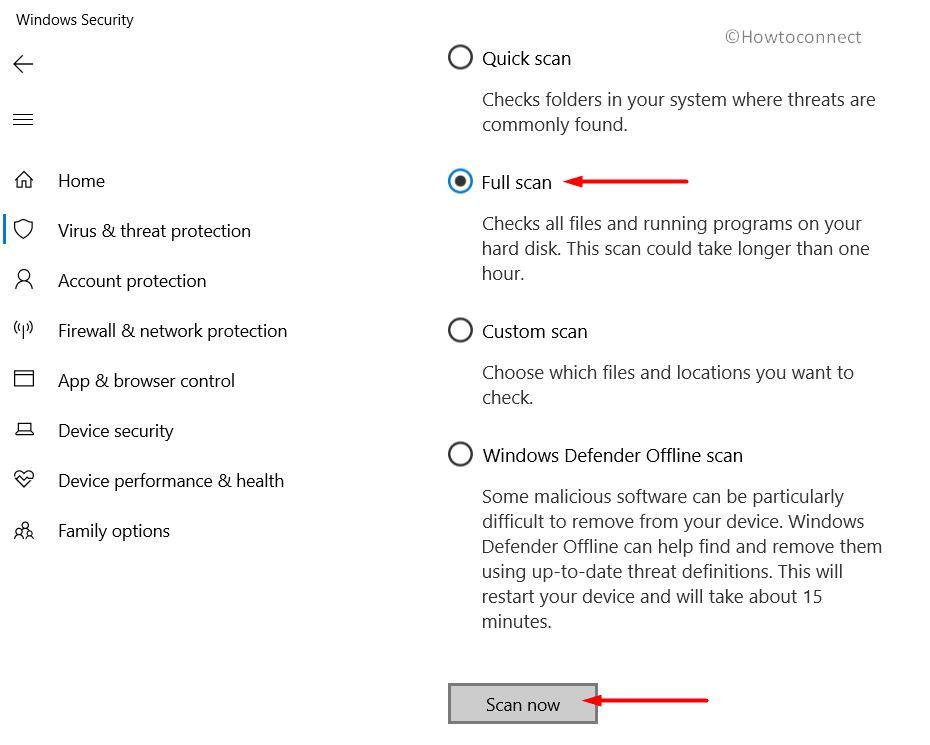
Step-6: The process will start immediately and once it gets over, you can see the result in front. Now, hit on Clean threats option in order to dismiss those sharply.
Step-7: On the following window, you will be delivered three more options. Choose Remove and finally hit Start actions button from down.
Step-8: Restart Windows 10 PC as you normally do.
Once, all the malware will get disappeared, this HYPERVISOR_ERROR in Windows 10 o 11 will not appear anytime again.
Way-4: Download and Install all available patches
Microsoft releases regular patches and these files contain fixes for bugs and problems as well as amazing features. This is quite important to keep Windows updated even have no issues. Since outdated patches often call in HYPERVISOR ERROR issue, we can consider it as a resolution and proceed with following.
- Press on the Start button from keyboard and let the menu spread up.
- Perform a click on the Settings sign and call in the Windows Settings app.
- Being in the app area, proceed to Update & Security and click on it.
- Once the next page is visible on display, select Windows Update and move to the corresponding side.
- On this spot, hit a click on Check for updates link even there is a visible dialog “You’re up to date”.
- Upon all the patches being shown on screen, choose the Download button and get the files in the system.
- Installation begins automatically when downloading gets finished. You might have to keep the device manned always to attend to timely restarting.
When the Windows is finally updated, HYPERVISOR_ERROR BSOD error will dismiss away.
Way-5: Make the Outdated Drivers Updated with Device Manager
We have seen many cases based on BSOD errors and came to the conclusion that outdated device drivers do the maximum damage. Hence, we need to step up immediately to update them. The Built-in Device manager will do the task for you. We need to just move ahead with below proceedings.
- Open the Run dialog box by pressing the “Win+R” keys combined.
- In the space provided here, type “devmgmt.msc” and hit Enter key from the keyboard.
- Device Manager will show up after a while and you need to look for an exclamation mark in the full console.
- If there is any present, expand the device by clicking on it and again see deeply for any yellow indication mark in the drivers.
- Right click on each once discovered and select Update driver option.
- Follow the directions coming on the display to complete the task properly.
After all the drivers being updated, there should not be HYPERVISOR ERROR in the system.
Way-6: Windows Blue Screen Troubleshooter to solve HYPERVISOR_ERROR
Microsoft being so dedicated to the users considered customer satisfaction most. As HYPERVISOR ERROR keeps on haunting badly, they came up with a new utility called Windows Blue Screen Troubleshooter. If you have the updated version of Windows 10 same as Fall Creators Update, can enjoy this awesome privilege. Move ahead with the following procedure –
- Do a joint press of Win+I hotkeys and let Windows launch Settings app.
- Slide over the app area and click on Update & security once reached.
- Moving ahead to the following window, do select Troubleshoot and jump ahead to adjacent overlay.
- Locate the Blue Screen option and click on it.
- Choose Run the Troubleshooter option to start the curing.
This is an automatic process. Once detection finished, fixing will start by its own. After the process end, you might not face any errors in the system and use the device with the utmost ease.
Read Blue Screen Troubleshooter Windows 10 to Fix BSOD.
Way-7: Throw away all the problematic Windows update files
Updating process in Windows operating system is autonomous and it generally doesn’t end up into any manipulation. But sometimes, people experience abnormal termination of this process and hence HYPERVISOR ERROR takes place in the system. The best remedy in this respect is to delete them all from the computer. Here are the steps to be followed –
Step-1: Move the pointer to the extreme left bottom end of the screen and do click on the Start menu.
Step-2: Once it opens up, hit a click on Settings cog. And let the app open in the display.
Step-3: When in the accessible area, head to Update & Security tile and click on it.
Step-4: On the next page, choose Windows Update from the left pane and switch to the right.
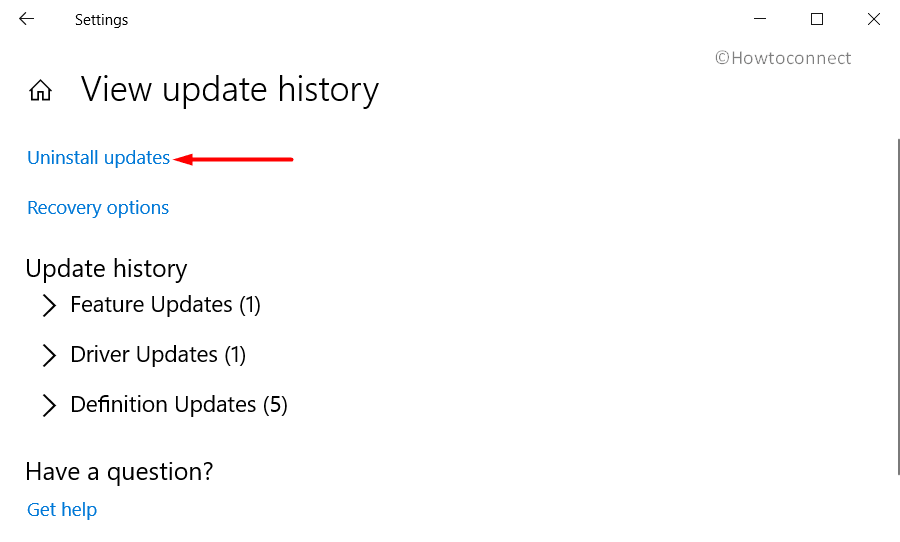
Step-5: After shifting, click on the link saying View update history and unveil the past update files.
Step-6: When the following page unrolls, select “Uninstall updates” and wait until Program and features window fleshes from Control Panel.
Step-7: Next in the process, right click on the last patch you have downloaded and choose Uninstall.
Step-8: Wait until the uninstalling process gets over and finally, reboot the device normally.
Step-9: When coming back to operation, hopefully, there will be no HYPERVISOR_ERROR BSOD in Windows 11 and 10.
Way-8: Run the Memory Diagnostic Tool and fix RAM issues
The wrong allotment of Memory, corruption in the Random Access Memory (RAM) has active participation in causing the HYPERVISOR_ERROR in Windows 10 or 11. Therefore, the default Windows Memory Diagnostic Tool will be super handy in fixing those bad areas. See the method below –
- Get access to the Settings app using any of the above-mentioned ways.
- After the app interface comes in the screen, type memory in the search box provided here.
- Once the result shows up, select Diagnose your computer’s memory problems from the list.
See more ways to Open Memory Diagnostic Tool in Windows 10.
- When Windows Memory Diagnostic Tool pops-up, choose the option namely “Restart now and check for problems (recommended)“.
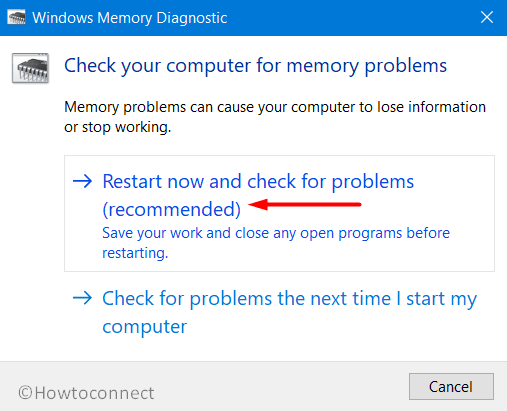
- Windows will now reboot automatically and when it turns back again to operation, you will observe a blue screen taking over the process and detecting Memory issues in the system.
- The progress will be indicated in percentage and when it becomes 100%, the system will restart again for the second time.
- Upon startup, the result of the diagnosis will be available in the system tray- notification area.
Way-9: Use the Disk Cleanup Utility to wipe junk and recover space
For the sake of completing tasks we perform, the computer needs to create junk files every time. These are temporary files and have no use after completing the tasks. However, as they get stored in the Disk Drive, occupies space and slowly gets bigger in volume. Eventually, the system runs out of enough space in it and makes the operation slower. In the process, HYPERVISOR_ERROR BSOD rises. So, we need to clean them using Disk Cleanup Utility. Guidelines are as follows –
- Do a combined press of Windows key and S from keyboard to invoke Taskbar search.
- In the box provided for typing here, write cleanmgr and also when Disk Cleanup utility hits on the result, select it.
- Moving ahead, the utility will throw a small popup dialog asking the drive name where Cleanup will be carried out.
- Select C: by clicking on the dropdown menu and hit Ok button.
- The tool will first go for calculating the amount of space in Drive C: it can recover and then shows a popup wizard.
- Moving ahead to the wizard, come down to the bottom left end of it and select Clean up system files.
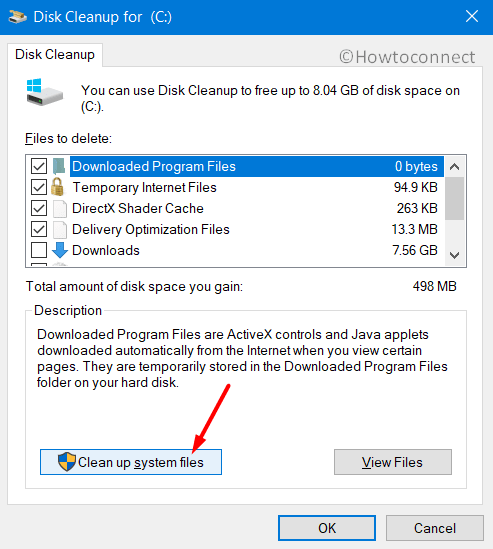
- One more time the small popup will float up asking for the preferable drive. Choose C: again and hit Enter key.
- After calculating retrievable space in it, again the Disk Cleanup for (C:) will appear.
- On the window, check all the items under Files to delete, and don’t touch Downloads only.
- Make a check in the Recycle Bin and also move any important files to their designated location.
- Now, coming back to wizard again, do select Ok button to initiate cleanup.
- This is a little bit slower process and might take a good amount of time to accomplish. Wait until it finishes normally and does not terminate in the middle.
- Once finished, Restart the device and once come back to display, see if HYPERVISOR_ERROR is there.
Way-10: Remove Programs colliding with one another
If the computer has two or more programs for serving similar purposes, they might be stuck in the collision between them and eventually deletes the necessary elements for OS. However, as of being the same purpose, the wise decision is to remove them as they call BSOD errors frequently. You can install again once the HYPERVISOR_ERROR BSOD in Windows 11 or 10 goes away.
- Perform a right click on the Start menu and later on, select Run from the menu.
- On the Run dialog, type appwiz.cpl in the void text field.
- Select OK button under the box and let Program and features window hit upon the screen from Control Panel.
- Moving ahead to the new window, look closely for the programs causing HYPERVISOR_ERROR BSOD in Windows 10 or 11 in the list visible here.
- Once found, do a right click on each and at the same time hit Uninstall button appearing.
- Follow the onscreen guidelines available afterward to complete Uninstallation.
- Upon finishing the process, Reboot the computer and when it returns to action, see if there is any trace of error in the system.
- If nothing is present, download and install the programs you have deleted before and use them normally.
Way-11: Detect and fix the Bad sectors in the Hard Disk Drive
Due to prolonged use, HDD runs in manipulation and has poor sectors developed in it. These areas cause permanent damage in the long run and obviously play a big role in making HYPERVISOR_ERROR in Windows 11 or 10. There is a Built-in Tool introduced by Microsoft to deal with it and that is the Disk Checking Utility. In the Elevated Command Prompt, CHKDSK will perform this task.
- Get access to Cortana, type cmd. On the results, execute a right-click on Command Prompt and select “Run as Administrator”.
- User Account Control (or UAC) will ask for permission immediately and you have to select Yes to proceed.
- Type the command in below arrangement in the Command Prompt –
chkdsk [Drive:] [parameters]
- When you hit Enter, you can see the Disk status only. Since we are up to a target of fixing the bad areas, the command needs some notations like-
/f /r /x
- Here, “f “will fix the brought-up issues in the disk. “r” will detect the issues present and the last one “x” will split up the whole Disk volume before the utility take action.
- After inserting all the characters in the Command, it will look finally like-
chkdsk C: /f /r /x
Important- C: is present here as we have OS installed in this drive. If you have done it in another one, use that drive letter.
- When you press Enter key, the process will initiate and it will take almost 10 minutes to accomplish fully.
- Wait patiently and when ends, do a normal Restart to Windows so that all changes are effective.
- When the PC powers up next, check if there are any issues like HYPERVISOR_ERROR BSOD in Windows 11 or 10.
Way-12: Measure for External Hardware Device to resolve HYPERVISOR_ERROR
Hardware issues causing BSOD error such as HYPERVISOR_ERROR are a little dangerous and often leave no room for you. A group of people comes across the issue after connecting the external HDD with the device. We all know, how much important it is for these days and cannot really ignore. Therefore the best way is to disconnect the drive or Hardware material and then re-plug again once HYPERVISOR ERROR eliminates.
- Unplug all the devices from ports and keep beside you in order.
- Perform a Fresh Restarting to the System.
- Once it comes back to the desktop, check if there are any issues.
- If resolved successfully, visit Manufacturer page for each Hardware item, then download and install the latest device driver for each one of them.
Way-13: Stop Using Third-Party Anti-virus Programs
Malware is ruling out everywhere on the internet and we can be prey to them anytime. As a preventive measure, we often use a Third party tool and thus end up calling HYPERVISOR_ERROR BSOD in Windows 10 or 11. Microsoft has the best utility is this aspect as Windows Security. So, you can uninstall others using below steps –
Step-1: Open the Settings app by pressing Windows key and I.
Step-2: In the layout, run to Apps tile and also select to bring up more settings.
Step-3: Moving ahead, select Apps & features from the left pane and jump to adjacent overlay.
Step-4: Reach out to the program in the list of Installed apps and select it.
Step-5: Hit Uninstall option.
Step-6: UAC will prompt for permission immediately and you need to select Yes to move ahead.
Step-7: Again click the Uninstall button from the program to finish the uninstallation procedure.
Way-14: Perform System Restore to Undo Current Changes
We try new things on the machine every day such as installing a program or removing something. Often we do it without concerning the changes and thus HYPERVISOR_ERROR shows up. To resolve it, System Restore can be an eligible savior.
Note- This process needs a Pre-created Restore Point. If you don’t have, skip this method and move ahead to the next resolution.
- Open Run dialog on display and type “rstrui” in the box for searching.
- Hit Enter and let the System Restore wizard show up on the screen.
- Hit Next option from wizard to move ahead.
- On the following page, do select Show more restore points to reveal all points.
- Perform a click on the latest one and select the Next button.
- Once the next screen hits display, come down to the bottom and select Finish.
- The process will start and revert changes to the previous state.
This will hopefully cure HYPERVISOR_ERROR BSOD in Windows 11 or 10.
Way-15: Activate DISM Tool to fix up Windows Image Files
Windows Image files may sometime run into corruption and end up causing HYPERVISOR_ERROR BSOD in Windows 10 or 11. The best way to resolve this is to run the “Deployment Image Servicing and Management” (DISM) utility.
- Move the mouse pointer to Taskbar area and perform a right-click on it.
- Select Task Manager from the list and allow it to open.
- Moving ahead, select File from top left end and choose “Run new task” option.
- Once Run dialog appears, type “cmd” in the search field and also check the dialog saying “Create this task with administrative privileges”.
- Press Enter key and let the Elevated Command Prompt window to take place.
- Now, at the base of blinking cursor, type the following command line tool. Hit Enter key to start actions. This process will take a little longer. So wait patiently to end up.
DISM.exe /Online /Cleanup-image /Restorehealth

Once the process finishes, Restart the computer, and afterward, see if there are any issues. Hopefully, you will not come across anything.
These are all the workarounds necessary to resolve HYPERVISOR_ERROR BSOD in Windows 10 or 11. However, as you have come to this area, you have successfully done that we guess. Unfortunately, if that’s not true, there is a last resort for all issues and errors. The solution is to do a complete installation of the Operating System. If you want to proceed with that, make sure you are confident enough or seeking help from professional. This will save from lots of problems happening afterward. Obviously, save backup for important files, images, and data in a safe place outside of the computer to avoid loss. Hope, you can recover the device from the grasp of HYPERVISOR_ERROR BSOD in Windows 11 or 10 finally.
Methods:
Way-1: Prevent Windows From Restarting Automatically
Way-2: Use the Safe Boot Mood as Rescuer of HYPERVISOR_ERROR
Way-3: Protect from Virus using Windows Security
Way-4: Download and Install all available patches
Way-5: Make the Outdated Drivers Updated with Device Manager
Way-7: Throw away all the problematic Windows update files
Way-8: Run the Memory Diagnostic Tool and fix RAM issues
Way-9: Use the Disk Cleanup Utility to wipe junk and recover space
Way-10: Remove Programs colliding with one another
Way-11: Detect and fix the Bad sectors in the Hard Disk Drive
Way-12: Measure for External Hardware Device to resolve HYPERVISOR_ERROR
Way-13: Stop Using Third-Party Anti-virus Programs
Way-14: Perform System Restore to Undo Current Changes
Way-15: Activate DISM Tool to fix up Windows Image Files
That’s all!!
Repair any Windows problems such as Blue/Black Screen, DLL, Exe, application, Regisrty error and quickly recover system from issues using Reimage.
Содержание
- Синий экран в Windows 10: «На вашем ПК возникла проблема. » (а за ним перезагрузка компьютера)
- Из-за чего появляется синий экран, и что можно сделать
- При очевидной причине (установка сбойного драйвера, обновления ОС и пр.)
- Как восстановить систему
- Как откатиться к старому драйверу
- При не очевидной причине: ошибка возникла внезапно
- Если синий экран не дает загрузить Windows
- Если ошибка появляется в игре
- Диагностика: что проверить
- Температуры ЦП, видеокарты
- Стресс-тест (как себя ведет оборудование под нагрузкой)
- Тестирование планок ОЗУ
- Сбросить настройки BIOS
- Microsoft подтверждает проблему Синего экрана смерти в Windows 10 и ошибку принудительной перезагрузки
- Ошибка принудительной перезагрузки
- Fix: Hypervisor_Error BSOD in Windows 10
- How can I fix the Hypervisor_Error for good?
- 1. Update all your system drivers
- Run a System Scan to discover potential errors
- DriverFix
- 2. Fix RAM issues with Windows Memory Diagnostic
- 3. Update Windows 10
- 4. Run a check disk scan
- 5. Update your BIOS (Basic Input Output System)
- 6. Run a Deployment Image Servicing scan
- 7. Restore Windows 10 to an earlier date
- VirtualBox вызывает хост BSOD запуск виртуальной машины под Windows 10. Технология Hyper-V-это от
- 4 ответов
- Fix: Hypervisor is not Running Error on Windows 10
- What causes the ‘Virtual Machine could not be started because the Hypervisor is not running’ Error on Windows 10?
- Solution 1: Using the Command Prompt
- Solution 2: Starting the Hyper-V Service
- Solution 3: Enabling Hyper-V Feature
Синий экран в Windows 10: «На вашем ПК возникла проблема. » (а за ним перезагрузка компьютера)
 Здравствуйте.
Не могу не отметить, что подобная ошибка «коварная», т.к. не всегда просто найти ее причину (к тому же, она может возникнуть на этапе загрузки ОС и не позволить исправить ее).
Как бы там ни было, в этой заметке представлю несколько наиболее типичных причин появления синего экрана, а также способы их устранения. Заметка рассчитана на начинающих пользователей.
И так, ближе к теме.

На вашем ПК возникла проблема и его необходимо перезагрузить / Пример подобной ошибки

Из-за чего появляется синий экран, и что можно сделать
При очевидной причине (установка сбойного драйвера, обновления ОС и пр.)
Под очевидной я понимаю ту причину, которая привела к ошибке сразу же после вашего действия (и вы это заметили). Например, установили новую программу — появился синий экран ⇒ причина понятна. 👌 Кстати, в более половине случаев так и бывает (просто не все обращают на это внимание).
Стоит отметить, что наиболее часто синий экран возникает после подключения нового оборудования и установки драйвера на него. Сюда же можно отнести и обычное обновление драйверов, и ОС Windows.
Поэтому, если после установки какой-то программы/драйвера началась подобная проблема — просто удалите это ПО, или замените его на более старую версию (откатитесь к старому драйверу). Кстати, чаще всего (по моим наблюдениям) проблема возникает при обновлении драйвера видеокарты, и при установки драйвера без цифровой подписи.
Как восстановить систему
Самый надежный вариант восстановить работу ОС после установки сбойного ПО — это воспользоваться точкой восстановления (создаются они автоматически, правда, в разных версиях ОС эта опция может быть как включена, так и выключена).
Для запуска восстановления (универсальный способ):

В общем-то, если точки восстановления есть — просто откатите систему к одной из них, и проблема в большинстве случаев на этом и разрешается.

Выбор точки восстановления
Что делать, если точки восстановления нет:
Как откатиться к старому драйверу
1) Сначала необходимо открыть диспетчер устройств.


При не очевидной причине: ошибка возникла внезапно
Когда синий экран появился внезапно и нет какой-то явно-очевидной причины — разобраться с этим не всегда так просто.
Для начала я рекомендую сфотографировать (или записать) код ошибки, проблемный файл и т.д. (см. мои примеры ниже). Этот код ошибки (или конкретный проблемный файл) — могут очень существенно сузить круг проблем (а иногда и прямо указать на нее).

VIDEO TDR FAILURE (фото экрана с ошибкой)
Если вы не успели заснять ошибку, то есть спец. утилита BlueScreenView, позволяющая просмотреть дамп в Windows и найти все последние ошибки, связанные с синим экраном.

Далее, зная код ошибки, попробуйте воспользоваться специализированными сайтами и найти по нему причину проблемы:
Обратите внимание, что на том же bsodstop.ru можно получить не только вероятную причину, но и ее решение. По крайней мере, начать разбираться с проблемой рекомендую именно с этого.

Если код ошибки ничего не дал, попробуйте провести несколько шагов диагностики.
Если синий экран не дает загрузить Windows
Примечание : т.е. он появляется сразу же во время начала загрузки ОС Windows (до появления рабочего стола).
Этот вариант синего экрана наиболее коварен, т.к. у неподготовленного пользователя складывается ощущение, что «система мертва» и уже ничего нельзя поделать. 👀
Что можно посоветовать:
1) После 2-3-х неудачных загрузок с появлением критических ошибок — в большинстве случаев появляется окно с предложением восстановить работу устройства. Если причина ошибок связана с каким-нибудь недавно установленным ПО — рекомендую загрузиться в безопасном режиме и удалить его.
Также отсюда можно попробовать запустить восстановление системы (актуально, если у вас есть точка восстановления, об этом ниже).

2) Если окно восстановление не появляется, можно загрузить ПК/ноутбук с помощью установочной флешки (как ее сделать). Разумеется, идеально, если она уже у вас есть (либо есть второй ПК, на котором ее можно быстро создать).


Восстановление системы / Windows 10
После должен запуститься мастер, который поможет вам откатить систему к предыдущему работоспособному состоянию (при наличии точек восстановления).

Возможно, вам также понадобиться восстановить загрузочные записи ОС (ссылка ниже в помощь).

4) Попробуйте установить еще одну ОС Windows на диск (либо переустановить старую).
5) Если предыдущее не помогло, возможно проблема в железе. Попробуйте отключить от ПК/ноутбука всё (до минимума): принтеры, сканеры, USB-переходники, доп. мониторы и т.д.
Рекомендую также обратить внимание на ОЗУ, попробуйте оставить только одну планку (если у вас их 2/3), поочередно установите и проверьте ее работу в разных слотах (не лишним было бы протестировать ее с помощью спец. утилиты).
Если ошибка появляется в игре
1) Переустановите драйвера (в особенности на видеокарту). Загрузите их с официального сайта производителя вашего устройства.
Если есть возможность, попробуйте использовать другую ОС с более старой/новой версией видеодрайвера.
2) Проверьте файлы игры антивирусом, попробуйте ее переустановить. Измените графические настройки (отключите туман, мелкие частицы, вертикальную синхронизацию, различные фильтры и т.д.).
3) Проведите стресс-тест видеокарты, просмотрите ее температуры, проверьте не перегревается ли она.
4) Отключите (удалите) различные утилиты для ускорения игр, просмотра за FPS и т.д.
Диагностика: что проверить
Температуры ЦП, видеокарты
В играх, редакторах (и др. ресурсоемких программах) температура ЦП и видеокарты может существенно повышаться. Разумеется, если температура выходит за определенные пределы — это может приводить к различным ошибкам (в т.ч. и синему экрану).
Для просмотра температуры чаще всего используют спец. утилиты (например, AIDA 64). Разумеется, смотреть за температурой нужно в динамике: т.е. запустите утилиту сразу же после загрузки Windows, а потом приступите к своей обычной работе за ПК (время от времени поглядывая за датчиками, особенно, когда слышите нарастающий гул кулеров).

Примечание : у AIDA 64 датчики температур можно вывести в трей (рядом с часами) Windows. Таким образом вам не придется каждый раз сворачивать/разворачивать окно утилиты.
Вообще, конечно, более эффективно проверить состояние железа компьютера позволяет стресс-тест (это когда спец. программа «искусственно» создает высокую нагрузку). Об этом ниже.

Температура процессора Intel: как ее узнать; какую считать нормальной, а какую перегревом — https://ocomp.info/temperatura-protsessora-intel.html
Стресс-тест (как себя ведет оборудование под нагрузкой)
Стресс-тест позволяет узнать реальную частоту работы ЦП и видеокарты, их температуры, проверить стабильность системы, узнать обо всех слабых местах ПК/ноутбука. Нередко, стресс-тест — является единственным способом, позволяющим докопаться до причины нестабильной работы устройства.
Как выполнить стресс-тест процессора и системы в целом, держит ли он частоты, нет ли перегрева (AIDA 64) — https://ocomp.info/kak-vyipolnit-stress-test-videokartyi-noutbuka-v-aida-64.html

Частота работы ЦП / AIDA 64

Результаты теста в реальном времени / утилита OCCT

Тестирование планок ОЗУ

С памятью есть проблемы / утилита Memtest 86+
Кстати, также порекомендовал бы почистить контакты планок с помощью резинки и кисточки (разъемы на материнской плате не лишним было бы продуть). Если у вас используется несколько планок — попробуйте запустить компьютер с одной (возможно, что из-за одной из планок (или слота) и выскакивает синий экран. ).

Чистка контактов памяти резинкой и кисточкой
Сбросить настройки BIOS
В BIOS есть ряд настроек, при изменении которых компьютер может перестать стабильно работать. Например, один из вариантов — это смена режима работы накопителя (AHCI, IDE) или изменение приоритета загрузки.
Стоит отметить, что подобные параметры не всегда меняются вручную — смена может произойти из-за севшей батареи или скачка в цепях электропитания (в этом случае прошивка BIOS может «сгинуть» (вы это сразу поймете, т.к. устройство перестанет включаться вовсе!) и восстановить ее можно будет только в сервисе на программаторе).

Дополнения по теме приветствуются.
Источник
Microsoft подтверждает проблему Синего экрана смерти в Windows 10 и ошибку принудительной перезагрузки

Всего через несколько недель после того, как Microsoft выпустила свою последнюю версию Windows 10 20H2, компания отметила две проблемы, также дала рекомендации пользователям вернуться к предыдущей версии Windows, если они получат ошибку «Синего экрана смерти» или предупреждение о принудительной перезагрузке после входа в систему.
Этот шаг был сделан после того, как пользователи сообщили, что последние обновления Windows 10 являются причиной печально известных ошибок Blue Screen of Death (BSOD). Проанализировав отзывы первых пользователей, Microsoft выявила две проблемы как в Windows 10 версии 2004, так и в версии 20H2.
В документе поддержки Microsoft отметила, что проблема совместимости с обновлением компонентов Windows 10 приведет к ошибке «Синего экрана смерти» со следующим кодом ошибки:
• DRIVER_VERIFIER_DMA_VIOLATION (e6) Проверяемый драйвер предпринял попытку выполнения недопустимой операции DMA.
Microsoft и Intel обнаружили проблемы совместимости с некоторыми твердотельными дисками (SSD) NVMe. Компания уже применила ограничение совместимости, чтобы заблокировать обновление на уязвимых системах.

Похоже, что принудительные установки вызывают ошибки «Синего экрана смерти» и другие проблемы, такие как бесконечные циклы перезагрузки системы или зависание производительности системы.
Если у вас есть устройство, на котором обновление недоступно в настройках, возможно, лучше пока избегать установки при помощи Media Creation Tool и аналогичных программ. Если вас по-прежнему беспокоят обновления, вы всегда можете отключить автоматические обновления в Windows 10 и дождаться, пока Microsoft исправит проблемы.
Вам нужно будет вручную удалить обновление и выполнить откат к предыдущей версии Windows, если вы уже обновили устройство и теперь получаете ошибки BSOD.
Ошибка принудительной перезагрузки
В отдельном документе поддержки Microsoft признала еще одну ошибку, из-за которой Windows 10 случайным образом просила вас выйти из системы и принудительно перезагрузить некоторые системы из-за проблемы с двумя функциями: процесс локальной безопасности и оснастка MMC.
Если вас это задело, то вы получите сообщение с просьбой перезагрузить компьютер. Сообщение появится снова даже после того, как вы выполните указанные действия и перезапустите устройство или выйдите из своей учетной записи Microsoft.
Microsoft заявляет, что проблема в первую очередь возникает, когда пользователи пытаются получить доступ к странице приложения параметров входа в систему. Microsoft уже применила удержание совместимости на затронутых устройствах, но вам нужно будет вручную удалить обновление, если это касается вашего устройства.
Конечно, это не первый раз, когда при обновлении Windows 10 возникают проблемы. Только на прошлой неделе Microsoft признала и исправила ошибку черного экрана в Windows 10. В то же время в компании признали, что потерю данных в браузере в ближайшее время исправить не удастся.
Источник
Fix: Hypervisor_Error BSOD in Windows 10


Some users have posted on Microsoft’s forum about a Hypervisor_Error BSOD (blue screen of death) issue with a 0x00020001 stop code.
This BSOD error can arise for users utilizing Windows Sandbox or third-party virtual machine applications within Windows 10. In one forum post, a user said:
I’ve seen this Hypervisor_Error BSOD three times in the past two weeks. Each time that it happens, I am running an AVD (Android virtual device); and I am working on a mobile application.
Explore the best ways to deal with this annoying issue by reading through this thorough guide.
How can I fix the Hypervisor_Error for good?
1. Update all your system drivers

The Hypervisor_Error can be due to incompatible or buggy drivers, which is something DriverFix can resolve. DriverFix is a driver updater utility with which you can quickly scan all your PC’s device drivers.
This software will then display a list of your PC devices with outdated, corrupted, missing drivers.
DriverFix is ideal for resolving driver issues as it enables users to quickly and easily download and install drivers for PC devices that need new ones.
Pro users can select an Automatically Install option to install downloaded drivers at the click of a button, which makes updating drivers very straightforward.
Run a System Scan to discover potential errors


Click Start Scan to find Windows issues.

Click Repair All to fix issues with Patented Technologies.
Other useful DriverFix features
DriverFix
Easily resolve the Hypervisor_Error by using this versatile and powerful software today.
2. Fix RAM issues with Windows Memory Diagnostic
3. Update Windows 10
4. Run a check disk scan
5. Update your BIOS (Basic Input Output System)
To update an outdated BIOS, you’ll need to download the latest BIOS firmware from your motherboard manufacturer’s website.
There might also be a dedicated software utility available for updating your BIOS. Check out our How to update BIOS article for further details about updating the BIOS.
6. Run a Deployment Image Servicing scan
7. Restore Windows 10 to an earlier date
Note: Software you installed after selected restore points get deleted. Click the Scan for affected programs button on the System Restore window to see what software a selected restore point removes.
Those are some of the more likely fixes for the Hypervisor_Error in Windows 10.
If further resolutions are still required, check out the big M’s Troubleshoot blue screen errors page.
This page includes Microsoft’s official BSOD troubleshooter, which provides resolutions for a wide range of BSOD errors.
Restoro has been downloaded by 0 readers this month.
Источник
VirtualBox вызывает хост BSOD запуск виртуальной машины под Windows 10. Технология Hyper-V-это от
после обширной (и разочарование) Google, я нашел много ссылок на это время вызвано Hyper-V виртуализации Windows 10, так что я выключил это с помощью функций Windows;и убедитесь, что службы Hyper-V не запущены или настроены на запуск при запуске. Это не помешали BSODs.
Это точно такая же установка, в том числе аппаратных средств, но с Win 7 32-бит вместо Win 10 64-бит, работал отлично, пока он не повторно образ моей машины для Windows 10.
ниже вывод VBox.лог, хотя и не похоже, что в нем что-то значимое.
может ли кто-нибудь предложить путь вперед?
редактировать:Минидампа здесь, для идентичного сбоя, за исключением VirtualBox v 5.1.22.
4 ответов
Как оказалось, отключения Hyper-V недостаточно. Существует еще одна функция Windows, называется виртуализации на основе безопасности, которая использует Hyper-V. вам нужно отключить, что также.
все, что мне нужно было изменить один ключ реестра и перезагрузку:
используйте regedit для установки
раздел HKEY_LOCAL_MACHINEсистемапрограммное обеспечениеCurrentControlSet наконтрольDeviceGuard
0 и перезагрузиться.
есть хорошее описание Device Guard / виртуализация на основе безопасности здесь:Windows 10 Device Guard и Credential Guard Демистифицированные.
похоже, что эта функция приведет в VirtualBox и в синий экран.
вы счастливчики, есть быстрый и грязный способ исправить это: отключить безопасную загрузку.
Источник
Fix: Hypervisor is not Running Error on Windows 10
There have been users reports that state that users are not able to launch VirtualBox as they are presented with a message box saying hypervisor is not running. This error is often due to your Hyper-V services not running automatically or disabled Hyper-V feature. Basically, Hypervisor is a software that is used to run or create virtual machines. When users try to open VirtualBox, instead of the user interface, they are prompted with the ‘Virtual Machine could not be started because the hypervisor is not running’ error.
 Virtual Machine Could Not be Started Because Hypervisor is not Running Windows 10
We all know about virtual machines and many of us have used it at least once throughout the years, albeit most of us aren’t aware of the responsible tech at play. Nonetheless, the error can be easily resolved by applying a few simple solutions that we have mentioned down below.
What causes the ‘Virtual Machine could not be started because the Hypervisor is not running’ Error on Windows 10?
Well, after looking at the user reports, the error is due to the following factors —
To fix your issue, you can follow the few solutions down below. If you want a quick workaround, we recommend following the solutions in the same order as provided.
Solution 1: Using the Command Prompt
You can fix your issue by setting the hypervisor to start automatically in your boot configuration data file. This will require an elevated command prompt so make sure you are using an administrator account. Here’s how to do it:
Solution 2: Starting the Hyper-V Service
Another fix that you can implement to circumvent the issue would be changing the properties of a Hyper-V service. Sometimes, the service doesn’t start automatically due to which the error is popping up. Therefore, to fix it, you will have to set the service to start automatically. Here’s how to do it:
Solution 3: Enabling Hyper-V Feature
Finally, the last thing that can potentially fix your issue would be enabling the disabled Hyper-V feature. This feature is located in the Windows features list which can be found in the Control Panel. To do this, you will have to do the following:
Источник
Download PC Repair Tool to quickly find & fix Windows errors automatically
The HYPERVISOR_ERROR issue can be due to outdated or incompatible system drivers, bad disk sectors, and corrupted image files among other things. Some users have posted on Microsoft’s forum about a HYPERVISOR_ERROR BSOD (blue screen of death) issue with the stop code below-
The HYPERVISOR_ERROR bug check has a value of 0x00020001.
This indicates that the hypervisor has encountered a fatal error. Error code 0x00020001.

This BSOD error can arise for users utilizing Windows Sandbox or third-party virtual machine applications within Windows 10. In this article, we will explore the ways to deal with this frustrating issue.
The HYPERVISOR_ERROR can be fixed with the help of these steps:
- Fix RAM issues with Windows Memory Diagnostic.
- Update device drivers.
- Run a Deployment Image Servicing scan.
- Update your BIOS (Basic Input Output System).
- Use the !analyze debug extension.
These outlined steps are properly explained below.
1] Fix RAM issues with Windows Memory Diagnostic.
To do this, press the Windows + S hotkey for the search utility. Type memory in the search box.
Click on Windows Memory Diagnostic to open that utility’s window.
Click on the Restart now button within the Windows Memory Diagnostic utility.
When this is done, your desktop or laptop will restart and the Windows Memory Diagnostic tool will check for RAM issues.
2] Update device drivers
Updating device drivers may resolve the HYPERVISOR_ERROR. Users can update device drivers on their system by opening Settings, then navigate to Update & security and click on it to open the Windows Update page.
Just under it, users will see a clickable link View optional updates, click on it.
Under Driver Updates, a list of updates will be available, which you can choose to install. when you have checked the box of the update you want to install, then click on Download and install.
Read: How to disable Hypervisor in Windows.
3] Run a Deployment Image Servicing scan
DISM can be run done by typing cmd in Windows search box. Then right-click Command Prompt and select Run as administrator on the context menu that opens.
Next, input the following Deployment Image Service command in the Prompt’s window:
DISM.exe /Online /Cleanup-image /Restorehealth
Click the Enter button to run the Deployment Image Service command.
Thereafter, restart Windows when the scan is complete.
4] Update your BIOS (Basic Input Output System)
To update an outdated BIOS, you’ll need to download the latest BIOS firmware from your motherboard manufacturer’s website.
There might also be a dedicated software utility available for updating your BIOS:
- Dell Update utility will help you download or update Dell Firmware & Drivers
- Lenovo System Update helps you download Lenovo Drivers, Software, Firmware, Update BIOS.
- AMD users may use AMD Driver Autodetect.
- Intel users may use Intel Driver & Support Assistant.
5] Use the !analyze debug extension
!analyze extension displays information about the current exception or bug check. It is meant for developers only.
In user mode, !analyze displays information about the current exception whereas in kernel mode, !analyze displays information about the most recent bug check.
User-Mode:
!analyze [-v] [-f | -hang] [-D BucketID]
!analyze -c [-load KnownIssuesFile | -unload | -help ]
Kernel-Mode:
!analyze [-v] [-f | -hang] [-D BucketID]
!analyze -c [-load KnownIssuesFile | -unload | -help ]
!analyze -show BugCheckCode [BugParameters]
If you are a developer, then use the !analyze debug extension – It displays information about the bug check and can be helpful in determining the root cause.
With these steps, users can fix the Hypervisor_Error in Windows 11/10.

Anand Khanse is the Admin of TheWindowsClub.com, a 10-year Microsoft MVP (2006-16) & a Windows Insider MVP (2016-2022). Please read the entire post & the comments first, create a System Restore Point before making any changes to your system & be careful about any 3rd-party offers while installing freeware.
Question
Issue: How to fix HYPERVISOR ERROR BSOD in Windows 10?
Hi, today I started getting repeated HYPERVISOR ERROR Blue Screen of Death crashes. It mainly happens when I play games, although it also happened a few times when the PC was basically idle. I am using Windows 10.
Solved Answer
HYPERVISOR ERROR Blue Screen of Death can occur suddenly and make Windows reboot immediately, interrupting all the work. Without a doubt, such interruption can cause significant inconvenience to people In most cases, the system can recover from the error after the restart, and computer work can continue without any problems.
Blue Screen errors, while annoying and sometimes damaging, play a vital role within the Windows environment. Essentially, this occurrence stops the system from being critically damaged, which results in an immediate PC restart. As mentioned already, a reboot is usually enough to recover from a stop error.
However, the problem starts when users start experiencing the same BSOD several times. In most cases, there is a user action that triggers it, although it can also be related to underlying Windows processes running in the background. Users who are looking for ways how to fix HYPERVISOR ERROR are typically those that experience the issue several times.
Unfortunately, all Windows provides is a standard BSOD message along with an error code – there is not enough information on what caused the issue or how to fix it. The message reads:
Your PC ran into a problem and needs to restart. We’re just collecting some error info, and then we’ll restart for you.
Stop code: HYPERVISOR ERROR
While the error can occur at any time, users reported that most commonly, it happens when performing graphic-intensive tasks such as gaming. This makes a lot of sense as Hypervisor is a component within a processor that handles virtualization technologies.
The reason for HYPERVISOR ERROR BSOD can be many, including outdated/corrupt system drivers, corrupted system files, outdated operating systems, and much more. Below you will find all the information needed in order to stop the Blue Screen from appearing on your system once and for all.

Method 1. Use an automatic repair tool
Fix it now!
Fix it now!
To repair damaged system, you have to purchase the licensed version of Reimage Reimage.
Blue Screen errors might be relatively harmless. In some cases, BSODs can indicate a serious malfunctions, e.g., hardware failure or a presence of a rootkit[1] or another malware. In any case, if you notice Blue Screen errors such as APC_INDEX_MISMATCH or BAD_POOL_HEADER more and more often, you should never ignore them, as it could just make matters much worse than they are.
Finding the culprit of the error, however, might be rather difficult, considering that every Windows machine has a different configuration, and same BSOD might indicate something completely different. In many cases, troubleshooting takes a long time, and those less tech savvy individuals struggle to perform fixes themselves.
If you want to save time, we highly recommend you try using ReimageMac Washing Machine X9 instead of performing troubleshooting yourself. The app can quickly diagnose the underlying Windows problems and quickly fix BSODs, missing DLLs, registry[2] errors, and much more. Besides, it can remove junk, clean browsers, remove malware and fix virus-caused damage.

Method 2. Update Windows to the latest version
Fix it now!
Fix it now!
To repair damaged system, you have to purchase the licensed version of Reimage Reimage.
Windows updates often include bug fixes, security patches, and various other improvements. There is simply no point in keeping your OS outdated, so make sure all the updates are applied accordingly:
- Type Updates in Windows search and press Enter
- Click Check for Updates on the right

- Wait till Windows downloads all the necessary files
- Install all available updates and restart your computer.
Method 3. Check your disk for errors
Fix it now!
Fix it now!
To repair damaged system, you have to purchase the licensed version of Reimage Reimage.
- Type cmd in Windows search
- Right-click on Command Prompt search result and select Run as administrator
- Copy and paste the following command, pressing Enter after:
chkdsk C: /f /r /x
- If the check disk does not start but instead shows and error, type in Y and hit Enter

- Restart your PC to begin the scan.
Method 4. Run SFC and DISM
Fix it now!
Fix it now!
To repair damaged system, you have to purchase the licensed version of Reimage Reimage.
- Open Command Prompt as administrator as explained above
- Type the following command and press Enter:
sfc /scannow

- Wait till scan finishes and restart your PC
- If SFC delivers an error, you should run DISM – paste the following commands and press Enter every time:
dism /online /cleanup-image /scanhealth
dism /online /cleanup-image /checkhealth
dism /online /cleanup-image /restorehealth

Method 5. Turn off Virtual Machine and Hypervisor
Fix it now!
Fix it now!
To repair damaged system, you have to purchase the licensed version of Reimage Reimage.
If for some reason Virtual Machine Platform or Hypervisor Platform are turned on while you are not using them, disable them:
- Type Control Panel in Windows search bar and press Enter
- Pick Programs > Uninstall a program
- Select Turn Windows features on or off on the left
- Scroll down and remove ticks from Virtual Machine Platform and Hypervisor Platform

- Click OK and reboot.
Method 6. Update your BIOS
Fix it now!
Fix it now!
To repair damaged system, you have to purchase the licensed version of Reimage Reimage.
Warning: do not perform this step if you are not sure what you are doing. Messing this process up might negatively affect your device.[3]
- Type System Information in search bad and press Enter
- Check the BIOS Version/Date and BaseBoard Product sections

- Open your web browser and navigate to its manufacturer’s website
- Go to Download section and look for relevant BIOS update download file
- Proceed with on-screen guide and restart your device.
Method 7. Update all drivers
Fix it now!
Fix it now!
To repair damaged system, you have to purchase the licensed version of Reimage Reimage.
- Right-click on Start and pick Device Manager
- Expand the section you want to update, for example, Display adapters
- Right-click on the device and select Update driver
- Select Search automatically for drivers

- Now perform the same for every other device on your PC
- Restart Windows.
It might take you a while to update all drivers on your machine, and it also does not help that the Device Manager might not find all the relevant updates. Therefore, either visit the manufacturer’s website and download drivers from there or employ DriverFix for a quick solution – all drivers can be updated within just a few minutes.
Repair your Errors automatically
ugetfix.com team is trying to do its best to help users find the best solutions for eliminating their errors. If you don’t want to struggle with manual repair techniques, please use the automatic software. All recommended products have been tested and approved by our professionals. Tools that you can use to fix your error are listed bellow:
do it now!
Download Fix
Happiness
Guarantee
do it now!
Download Fix
Happiness
Guarantee
Compatible with Microsoft Windows
Compatible with OS X
Still having problems?
If you failed to fix your error using Reimage, reach our support team for help. Please, let us know all details that you think we should know about your problem.
Reimage — a patented specialized Windows repair program. It will diagnose your damaged PC. It will scan all System Files, DLLs and Registry Keys that have been damaged by security threats.Reimage — a patented specialized Mac OS X repair program. It will diagnose your damaged computer. It will scan all System Files and Registry Keys that have been damaged by security threats.
This patented repair process uses a database of 25 million components that can replace any damaged or missing file on user’s computer.
To repair damaged system, you have to purchase the licensed version of Reimage malware removal tool.

To stay completely anonymous and prevent the ISP and the government from spying on you, you should employ Private Internet Access VPN. It will allow you to connect to the internet while being completely anonymous by encrypting all information, prevent trackers, ads, as well as malicious content. Most importantly, you will stop the illegal surveillance activities that NSA and other governmental institutions are performing behind your back.
Unforeseen circumstances can happen at any time while using the computer: it can turn off due to a power cut, a Blue Screen of Death (BSoD) can occur, or random Windows updates can the machine when you went away for a few minutes. As a result, your schoolwork, important documents, and other data might be lost. To recover lost files, you can use Data Recovery Pro – it searches through copies of files that are still available on your hard drive and retrieves them quickly.