Hi:
I checked the cloud recovery tool website and entered your notebook’s product number (4L680EA#ACB), and it indicates that your notebook is not supported or not yet supported by the cloud recovery tool.
Cloud Recovery (cloud-recovery.s3-website-us-west-1.amazonaws.com)
See if this works so you can install W11…
Since your notebook as an Intel 11th gen core processor, there is a special process needed to install W10 on notebooks with the new Intel 11th gen core processors…
See the info at the link below.
https://support.hp.com/us-en/product/hp-15-f2000-laptop-pc-series/35900344/model/35900346/document/c…
Here is the link to the driver you need…
This package contains the Intel Rapid Storage Technology Driver for the supported notebook models and operating systems. The Intel Rapid Storage Technology is designed to provide functionality for the Intel Storage Controllers. The driver improves Serial ATA (SATA) disk performance with Native Command Queuing.
https://ftp.hp.com/pub/softpaq/sp111501-112000/sp111776.exe
There is an error in that document, and that is where HP tells you to right click on the Intel driver file and select Extract to
When I ran through the steps, I don’t get an Extract to option when I right click on the file.
You will probably have the same issue. Download and install the free 7-zip file utility from the link below.
The 1st file at the top of the page is for 64 bit.
7-Zip (7-zip.org)
Then you can right click on the exe file, select 7-Zip from the menu, and select Extract to: and let it extract the file into its folder name (sp111776), and copy that folder to your USB flash drive, and continue with the instructions.
Все пользователи ноутбуков Asus (Vivobook, ROG и тд) с процессорами Intel 11-го и 12-го поколения сталкиваются с проблемой отсутствия SSD/HDD при установке Windows 11 / Windows 10. Поколение распознается следующим образом, например у вас процессор Intel Core i5-1135G7, где первые две цифры (11) после тире обозначают поколение; соответственно Intel Core i9-12950HX — это 12-поколение.
То есть, покупатель приобретает ноутбук, к примеру, Asus Vivobook 15 K513 (11th gen Intel) без операционной системы, приходит домой, начинает инсталляцию виндовс, но компьютер не отображает носители, на которые можно было бы установить ОС. При этом, в BIOS SSD NVME или HDD корректно отображаются. Забегая вперед, отмечу, что проблема не аппаратная, повода для переживания нет.
На самом деле эта проблема встречается не только у производителя Asus, но и у других брендов с процессорами Intel 11-го и 12-го поколения. Решение проблемы с установкой драйвера (об этом ниже) одинаково для любых производителей ноутбуков, то есть данные драйверы можно использовать на линейках других брендов.
Ниже описан пошаговый мануал с иллюстрациями, поэтому не должен вызвать сложности при решении проблемы по отображению носителей для хранения данных. Всего два способа исправить ситуацию с неопределением SSD в ноутбуках с 11-ым поколением Intel. Перед тем, как приступить к решению проблемы, обязательно прочитайте статью до конца, это позволит сэкономить ваше время и выбрать наиболее подходящий метод.
Содержание
- Способ 1. Установка драйвера Intel RST VMD Controller
- Способ 2. Отключение контроллера VMD в BIOS
Пошаговая инструкция
Способ 1. Установка драйвера Intel RST VMD Controller
Если вы начали установку Windows, то прервите, извлеките загрузочную флешку с установочной операционной системой.
С помощью другого компьютера откройте сайт производителя asus.com или rog.asus.com, смотря какая линейка. В правом верхнем углу выберите Поддержка — Центр загрузок (см. скриншот ниже).
Введите в строку модель вашего ноутбука, например, VivoBook 15 K513, кликните по предложенному варианту
Справа кликните по ссылке «База знаний«.

Выберите точную модель вашего ноутбука из выпадающего списка и нажмите ОК.

В левой колонке «Фильтр» поставьте галочку перед HDD/SSD хранилища. Выберите «[Ноутбук] Процессоры Intel 11-го поколения (Intel Tiger Lake) Устранение неполадок — Во время установки Windows 10 не определяется ни один из дисков» (если на сайте rog.asus.com, то выберите «[Ноутбук]Устранение неполадок — Как решить проблему отсутствия дисков при установке Windows 11/10«).

Скачайте драйвер Intel Rapid Storage Technology (IRST) по ссылке на странице. Извлеките файлы с помощью архиватора, нажав правую кнопку мыши на скачанный файл V18.4.1146_IRST_VMD_20H1 (или RST_V19.1.0.1001_PV, смотря что скачано), и выбрав «Извлечь файлы…»

Скопируйте разархивированную папку «V18.4.1146_IRST_VMD_20H1» или «RST_V19.1.0.1001_PV» в загрузочную флешку Windows 10 или на любой другой USB-носитель.

Подключите флешку к ноутбуку и запустите установку Windows 10 или 11. В окне выбора носителей нажмите «Загрузить драйвер«.

Выберите ОК.

Затем опять ОК.

Нажмите кнопку «Обзор«, выберите папку V18.4.1146_IRST_VMD_20H1 или RST_V19.1.0.1001_PV), подтвердите нажав ОК. Внимание: если драйверы не найдены, то попробуйте открыть папку с драйверами и нажмите ОК.

Отметьте Intel RST VMD Controller 9A08 (TGL), кликните Далее.

Теперь у вас появились диски, на которые можно установить систему.

Создайте раздел под систему, далее все проходит без подводных камней как стандартная установка Windows.
Способ 2. Отключение контроллера VMD в BIOS
Если с первым методом справиться не получилось, то переходим ко второму. Можно сразу использовать второй способ, минуя первый, это уже каждый решает для себя сам. Первый метод работает при поддержке VMD, второй — минуя его. Разъясню более подробно, после чего можете принять собственное решение.
Технология Intel Volume Management Device (Intel VMD) встроена в процессоры 11-го поколения Intel, она дает возможность использовать:
- загрузочный RAID массив
- горячее отключение/подключение дисков SSD NVMe.
Большинству обычных пользователей данные функции не нужны, если вы из их числа, то отключите VMD. Для этого войдите в биос, откройте вкладку Advanced, откройте VMD setup menu, в строке Enable VMD controller выставьте Disabled. Сохраните настройки перед выходом из BIOS. К сожалению, возможность отключить данную функцию присутствует не на всех устройствах и/или путь может отличаться, так как версии биос могут сильно разниться.
Следуя данной инструкции вы сможете установить Windows 11/10 на свой компьютер или ноутбук, так как проблем с определением дисков у вас больше не будет.
8 Replies
-

-
EminentX
This person is a verified professional.
Verify your account
to enable IT peers to see that you are a professional.ghost chili
Windows 10 Expert
-
check
33
Best Answers -
thumb_up
80
Helpful Votes -
format_list_bulleted
2
How-tos
-
check
-
Hello EminentX sorry the late reply. I had tried this and chkdsk did not find any errors on the drive.
Was this post helpful?
thumb_up
thumb_down
-
This worked well thanks. Fessor
Was this post helpful?
thumb_up
thumb_down
-
Hello,
Thazwick. Could you share a step-by-step instruction on how you fixed your issue? I checked out the minitool guide, but I cannot effectively do any of those options without booting into the system properly.I believe I am in the same situation, I had to load intel RST drivers to detect, format, and install windows 10 and upon initial boot I get a blue screen with the same error codes. I’ve tried copying
aStorAfs.sysfrom my bootable media to WindowsSystem32drivers through file explorer utility via windows 10 repair toolkit but no luck.
Any help would be appreciated.
1 found this helpful
thumb_up
thumb_down
-
Did you ever end up resolving this issue? I’m experiencing the same problem after a clean install of Windows 10 x64 on a 1TB NVMe SSD.
Was this post helpful?
thumb_up
thumb_down
-
I have found a solution to this problem. There was a VMD controller on my ACER laptop, because of it this error appeared. You need to either display the hidden bios settings and disable VMD, or try to find a driver suitable for this controller.
1 found this helpful
thumb_up
thumb_down
-
I do have this problem, when i reinstall win10, thazwick how u resolved this problem, cause i can’t reset the laptop, or update intel, and even remove the IRST. Help me please
Was this post helpful?
thumb_up
thumb_down


| Информация о файле | Описание |
|---|---|
| Размер файла: | 27 kB |
| Дата и время изменения файла: | 2019:11:28 06:53:30+00:00 |
| Тип файла: | Win32 EXE |
| Тип MIME: | application/octet-stream |
| Тип компьютера: | Intel 386 or later, and compatibles |
| Метка времени: | 2016:09:13 14:45:56+00:00 |
| Тип PE: | PE32 |
| Версия компоновщика: | 14.0 |
| Размер кода: | 12288 |
| Размер инициализированных данных: | 3584 |
| Размер неинициализированных данных: | 0 |
| Точка входа: | 0x60a8 |
| Версия ОС: | 10.0 |
| Версия образа: | 10.0 |
| Версия подсистемы: | 10.0 |
| Подсистема: | Native |
| Номер версии файла: | 15.2.0.1020 |
| Номер версии продукта: | 15.2.0.1020 |
| Маска флагов файлов: | 0x003f |
| Флаги файлов: | Private build |
| Файловая ОС: | Windows NT 32-bit |
| Тип объектного файла: | Driver |
| Подтип файла: | 7 |
| Код языка: | English (U.S.) |
| Набор символов: | Unicode |
| Наименование компании: | Intel Corporation |
| Описание файла: | Intel(R) Rapid Storage Technology Filter driver — x86 |
| Версия файла: | 15.2.0.1020 |
| Внутреннее имя: | IaStorF.sys |
| Авторское право: | Copyright (C), Intel Corporation. All rights reserved. |
| Название продукта: | Intel(R) Rapid Storage Technology Filter driver |
| Версия продукта: | 15.2.0.1020 |
| Комментарии: | -x86 |
| Товарные знаки: | |
| Закрытая сборка: |
✻ Фрагменты данных файлов предоставлены участником Exiftool (Phil Harvey) и распространяются под лицензией Perl Artistic.

Если вы продолжаете получать случайные синие экраны с iaStorA.sys (с кодом остановки DRIVER_IRQL_NOT_LESS_OR_EQUAL , Kmode_exception_not_handled и т.п.) в последнее время вы не одиноки. Многие пользователи сообщили то же самое. К счастью, это легко исправить…
Оба исправления ниже работают для Windows 10 , 8.1 и 7 . Возможно, вам не придется пробовать оба; просто работайте, пока не избавитесь от этого iaStorA.sys не удалось синий экран смерти проблема.
- Удалите драйверы IRST
- Обновите драйверы IRST
Исправление 1. Удалите драйверы IRST.
Этот Ошибка iaStorA.sys проблема в основном связана с Intel RST (технология быстрого хранения) , приложение для Windows для повышения производительности компьютера (в частности, неправильное использование драйверов IRST). Итак, сначала мы можем попробовать удалить их, чтобы посмотреть, поможет ли это решить проблему.
Для этого:
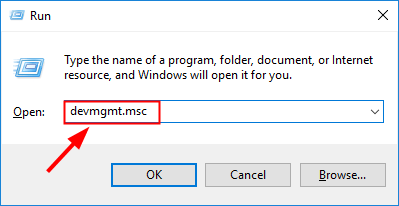
- На клавиатуре нажмите клавиша с логотипом Windows и р в то же время, затем введите devmgmt.msc в коробку и нажмите Войти .
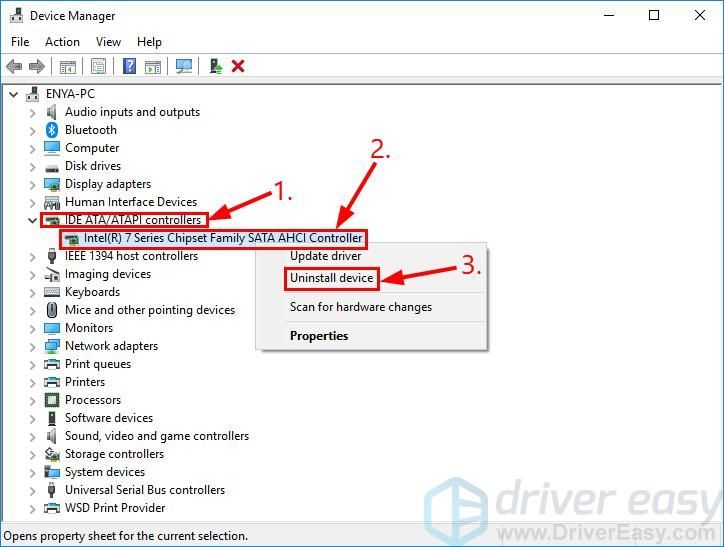
- Дважды щелкните на IDE ATA / ATAPI . Затем щелкните правой кнопкой мыши на КАЖДЫЙ ПУНКТ ниже и нажмите Удалить устройство .
- Перезагрузите компьютер и посмотрите, iaStorA.sys проблема была исправлена. Если да, то поздравляю! Но если проблема не исчезнет, попробуйте Исправить 2 , ниже.
Исправление 2: Обновите драйверы IRST
Эта проблема также может возникнуть, если на вашем компьютере установлены неправильные или устаревшие драйверы IRST. Поэтому вам следует обновить драйверы IRST, чтобы увидеть, решит ли он проблему.Если у вас нет времени, терпения или навыков работы с компьютером для обновления драйверов вручную, вместо этого вы можете сделать это автоматически с помощью Водитель Easy .
Driver Easy автоматически распознает вашу систему и найдет для нее подходящие драйверы.Вам не нужно точно знать, на какой системе работает ваш компьютер, вам не нужно рисковать, загружая и устанавливая неправильный драйвер, и вам не нужно беспокоиться о том, чтобы сделать ошибку при установке. Driver Easy справится со всем .
Вы можете автоматически обновлять драйверы с помощью СВОБОДНЫЙ или Pro версия Driver Easy. Но с версией Pro требуется всего 2 клика (и вы получаете полную поддержку и 30-дневную гарантию возврата денег):
1) Скачать и установите Driver Easy.
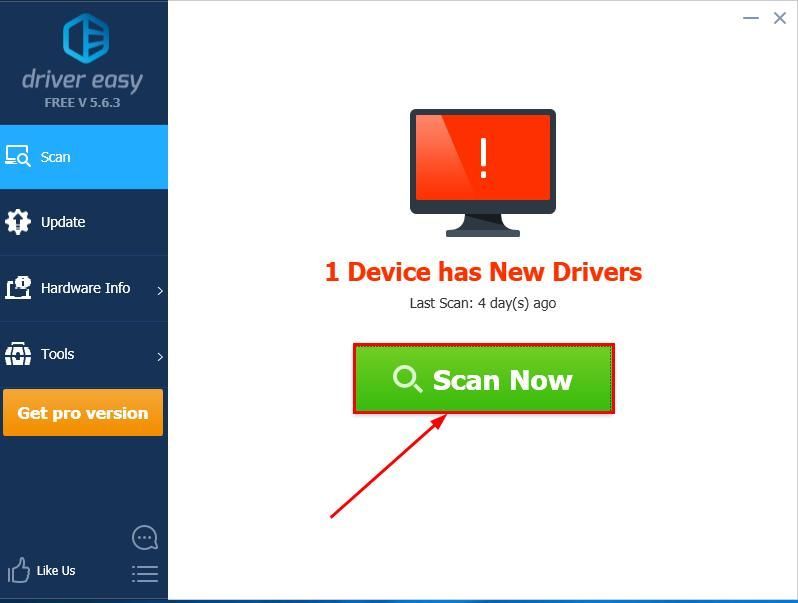
2) Запустите Driver Easy и нажмите Сканировать сейчас кнопка. Driver Easy просканирует ваш компьютер и обнаружит проблемы с драйверами.
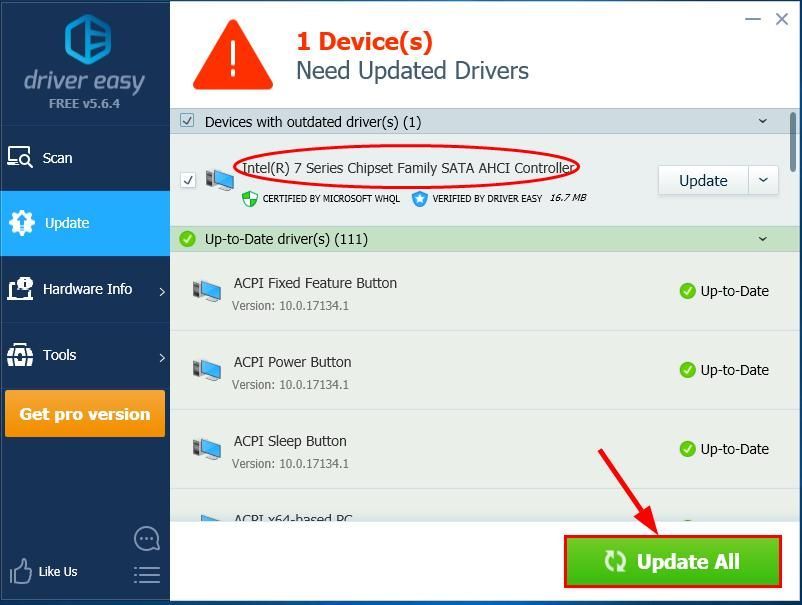
3) Нажмите Обновить все для автоматической загрузки и установки правильной версии всех драйверов, которые отсутствуют или устарели в вашей системе (для этого требуется Pro версия — вам будет предложено выполнить обновление, когда вы нажмете «Обновить все»).
4) Перезагрузите компьютер и, надеюсь, проблема с iaStorA.sys решена.
Вот и все — два простых способа избавиться от мерзкого синего экрана смерти ( iaStorA.sys не удалось) проблема. Надеюсь, что статья соответствует своей цели, и не стесняйтесь оставлять нам комментарии ниже, если у вас есть дополнительные вопросы или идеи, которыми вы можете поделиться с нами. 🙂
Hi!
Just got a new laptop, the model is ASUS F515EA-EJ2211. It comes without any OS so I was installing Windows 10 from a bootable USB with Rufus. I have done this several times with other PCs/laptops without much complication.
In this case, when the installation reached the disk selection step, it didn’t detect any storages despite the BIOS detecting it (this laptop has one SSD of 512GB). I downloaded the IRST drivers from the speicifc model website (https://www.asus.com/supportonly/F515EA/HelpDesk_Download/) and copied it into the USB. Went through the load drivers thing in the windows installation, it showed two options for the drivers, one that said «something-controller» and one that said «something-manager-controller» (by something i mean letters and numbers). I tried with both of these options and the outcome was the same in the end.
After this it did detect the SSD drive and proceeded with the windows installation, which seemed to finalize correctly. But then, just as it restarted after the installation, it went straight into a BSOD:
«The operating system couldn’t be loaded because a required file is missing or contains errors.
File: iaStorAfs.sys
Error Code: 0xc00000098″
I tried going into recovery mode but the same BSOD keeps happening.
Any ideas?
Thank you very much in advance!!
EDIT: FIXED IT. Instead of using the drivers in the link I posted above, I used these: https://www.asus.com/us/support/FAQ/1044458/.
- Sign up
- Sign in
- HP Community
- Notebooks
- Notebook Software and How To Questions
- Windows Error after Installation iaStorAfs.sys (0xc0000098)
Options
- Mark Topic as New
- Mark Topic as Read
- Float this Topic for Current User
- Bookmark
- Subscribe
- Mute
- Printer Friendly Page
![]()

Create an account on the HP Community to personalize your profile and ask a question
Your account also allows you to connect with HP support faster, access a personal dashboard to manage all of your devices in one place, view warranty information, case status and more.


9l8_
2
0
0
436
New member
10-25-2022
10:59 AM

HP Recommended
- Mark as New
- Bookmark
- Subscribe
- Permalink
- Flag Post
Product: 705646
Operating System: Microsoft Windows 10 (64-bit)
When i finished a installation of a new windows 10 on Hp 15-dw3048ne i3-1115g4 i burnt the iso with rufus on a 32gb Flash drive i tried to reinstall it many times and used many drivers as the processor needs a rapid storage driver to show the disk

3 REPLIES 3
Was this reply helpful?
Yes
No
9l8_
Author
2
0
0
382
New member
10-26-2022
06:32 AM
HP Recommended
- Mark as New
- Bookmark
- Subscribe
- Permalink
- Flag Post
Thank you for your reply , I tried your solution ut showed the disk but after i boot into the windows it shows an error and it says iaStorAfs.sys corrupted file
Was this reply helpful?
Yes
No
10-26-2022
07:13 AM
HP Recommended
- Mark as New
- Bookmark
- Subscribe
- Permalink
- Flag Post
You’re very welcome.
Sorry that driver didn’t work for you.
Unfortunately, I don’t have any other suggestions for you to try.
I recommend that you contact HP for assistance if your notebook is under warranty.
Contact HP | HP® Official Site
Was this reply helpful?
Yes
No
![]()
Be alert for scammers posting fake support phone numbers and/or email addresses on the community.
If you think you have received a fake HP Support message, please report it to us by clicking on «Flag Post».
† The opinions expressed above are the personal opinions of the authors, not of HP. By using this site, you accept the Terms of Use and Rules of Participation.

-
English
Open Menu

† The opinions expressed above are the personal opinions of the authors, not of HP. By using this site, you accept the <a href=»https://www8.hp.com/us/en/terms-of-use.html» class=»udrlinesmall»>Terms of Use</a> and <a href=»/t5/custom/page/page-id/hp.rulespage» class=»udrlinesmall»> Rules of Participation</a>.