Modified on:
Thu, 10 Nov, 2022 at 4:29 AM
In order to run ShortPoint on your SharePoint 2019 On-Premise environment, it will need the capability to read Multipurpose Internet Mail Extensions (MIME) information from your server’s Internet Information Services (IIS) configuration. This functionality becomes available once IIS 6 Metabase Compatibility is enabled and installed.
You will find the steps on how to configure this in the following support article.
Short walkthrough for advanced users
If you are familiar with the required interface to complete this process, please go ahead and follow these steps:
- Login to your SharePoint 2019 Farm Server
- Open Windows PowerShell as administrator
- Execute the following PowerShell commands:
- import-module servermanager
- install-windowsfeature web-metabase
If done successfully, you are ready to move to the next step in installing ShortPoint on your SharePoint 2019 environment.
Step-by-step Tutorial
Here are key information and detailed steps on how to enable IIS 6 Metabase Compatibility on SharePoint 2019 On-Premise environments.
TABLE OF CONTENTS
- This article is for you if
- How to enable IIS 6 Metabase Compatibility
- Option 1: Enable IIS 6 Metabase Compatibility with PowerShell
- Step 1: Run Windows Management Shell
- Step 2: Execute PowerShell commands
- Option 2: Enable IIS 6 Metabase Compatibility using Windows Server Manager
- Step 1: Launch Server Manager
- Step 2: Open the Add Roles and Features wizard
- Step 3: Enable IIS 6 Management Compatibility
- Step 4: Proceed to Install Selections
- Option 1: Enable IIS 6 Metabase Compatibility with PowerShell
This article is for you if
- You are running ShortPoint SPFx package on SharePoint 2019 On-Premise
- You have local administrator access on your SharePoint Farm Servers and are able to add Server Roles and Features to your environment
There are two ways to configure IIS 6 Metabase Compatibility on your environment. One is through Windows PowerShell and another through Windows Server Manager. Select the option that you are most familiar and comfortable with.
Option 1: Enable IIS 6 Metabase Compatibility with PowerShell
Follow these steps if you wish to enable IIS 6 Metabase Compatibility through Windows PowerShell.
Step 1: Run Windows Management Shell
Look for the Windows PowerShell application through the search box on your Windows taskbar. Right-click on the app and select to Run it as an administrator.
Step 2: Execute PowerShell commands
A PowerShell administrator window will appear. Follow these steps to execute the required commands:
- First, type the command import-module servermanager and hit Enter.
- Then type the command install-windowsfeature web-metabase and press Enter to complete the process.
Once completed you are all set to proceed to the next steps in installing ShortPoint on your ShortPoint 2019 environment.
Option 2: Enable IIS 6 Metabase Compatibility using Windows Server Manager
Follow these steps if you wish to enable IIS 6 Metabase Compatibility through Windows Server Manager.
Step 1: Launch Server Manager
Open the Windows Start Menu, select Administrative Tools, and open Server Manager.
Step 2: Open the Add Roles and Features wizard
On the top left portion of the window, you will find a navigation pane. Click Manage and select Add Roles and features from the dropdown to launch the wizard window.
Step 3: Enable IIS 6 Management Compatibility
On the Add Roles and Features wizard, hit the Next button until you reach the Server Roles options. In the Select Role Services pane, scroll down to the Web Server IIS section, expand Management Tools, and select the tick box to enable IIS 6 Management Compatibility. Also, select to enable all its sub-features.
Step 4: Proceed to Install Selections
Click Next on the succeeding windows until you reach the Confirm Installations Selections pane and press Install.
Once the installation is complete, you can hit Close to exit the Add Roles and Features wizard.
You now have IIS 6 Metabase Compatibility enabled in your environment. Go ahead and continue to do Installation Step 1: Upload ShortPoint SPFx to App Catalog (SharePoint 2019).
Related Articles:
- ShortPoint SPFx Installation for SharePoint 2019 (First Time)
- Prerequisite 1: Setup SharePoint 2019 Farm App Catalog (SPFx)
- Prerequisite 2: Enable Scripting Capabilities with Powershell (SharePoint 2019)
- Installation Step 1: Upload ShortPoint SPFx to App Catalog (SharePoint 2019)
- Installation Step 2: Add ShortPoint SPFx to Site Contents (SharePoint 2019)
- Installation Step 3: Run ShortPoint SPFx Installation from Dashboard (SharePoint 2019)
Did you find it helpful?
Yes
No
Send feedback
Sorry we couldn’t be helpful. Help us improve this article with your feedback.
Содержание
- IIS 6 Compatibility components not installed_LonghornIIS6MetabaseNotInstalled
- Iis 6 metabase compatibility windows 10
- Диспетчер служб iis в windows 10
- Установить IIS 8.5 через powershell
- Iis 6 metabase compatibility windows 10
- Answered by:
- Question
- Answers
- All replies
- ИТ База знаний
- Полезно
- Навигация
- Серверные решения
- Телефония
- Корпоративные сети
- Установка IIS сервера на Windows 10
- Установка IIS
- Компоненты совместимости IIS 6, не установленные _ LonghornIIS6MetabaseNotInstalled
Applies to: Exchange Server 2013
The content in this topic hasn’t been updated for Microsoft Exchange Server 2013. While it hasn’t been updated yet, it may still be applicable to Exchange 2013. If you still need help, check out the community resources below.
Having problems? Ask for help in the Exchange forums. Visit the forums at Exchange Server.
MicrosoftВ® Exchange Server 2007 Setup cannot continue its attempt to install the Client Access Server server role, the Mailbox server role, or the Exchange 2007 Administrative Tools on the following Windows operating systems:
Windows Server 2008 R2
Windows Server 2008
Windows 7 (Administrative Tools only)
Windows Vista (Administrative Tools only)
This problem occurs because the Internet Information Server (IIS) 6 Metabase Compatibility component and the IIS 6 Management Console component are not installed.
Exchange 2007 setup requires that the computer on which you are installing the Exchange 2007 Client Access server role, the Mailbox server role, or the Exchange 2007 Administrative Tools has the IIS 6 Metabase Compatibility component and the IIS 6 Management Console component installed.
To resolve this problem, install the IIS 6 Metabase Compatibility component on the destination computer, and then rerun Microsoft Exchange Setup.
Install the IIS 6.0 Management Compatibility Components in Windows Server 2008 R2 or in Windows Server by using the Server Manager tool
Click Start, click Administrative Tools, and then click Server Manager.
In the navigation pane, expand Roles, right-click Web Server (IIS), and then click Add Role Services.
In the Select Role Services pane, scroll down to IIS 6 Management Compatibility.
Click to select the IIS 6 Metabase Compatibility, IIS 6 WMI Compatibility, and IIS 6 Management Console check boxes.
In the Select Role Services pane, click Next.
In the Confirm Installations Selections pane, click Install.
Click Close to exit the Add Role Services wizard.
Install the IIS 6.0 Management Compatibility Components in Windows 7 or in Windows Vista from Control Panel
Click Start, click Control Panel, click Programs and Features, and then click Turn Windows features on or off.
Open Internet Information Services.
Open Web Management Tools.
Open IIS 6.0 Management Compatibility.
Click to select the IIS 6 Metabase and IIS 6 configuration compatibility, IIS 6 WMI Compatibility, and IIS 6 Management Console check boxes.
Источник
Добрый день, в прошлый раз я вам рассказал, как отключить Internet Information Services и мы в этом разобрались, теперь же я хотел вернуться к клиентской версии операционной системы, а именно к Windows 10 Creators Update и другие редакции, многие из пользователей не предполагают, что еще со времен Windows 7, ее можно превратить в настоящий веб-сервер, на той же службе IIS и создавать на ней свои сайты, такой аля хостинг, как в Европе. Сегодня я вам покажу, как установить iis на windows 10 за минуту, вы поймете, что это реально просто и дешевле, чем покупать серверную версию.
Диспетчер служб iis в windows 10
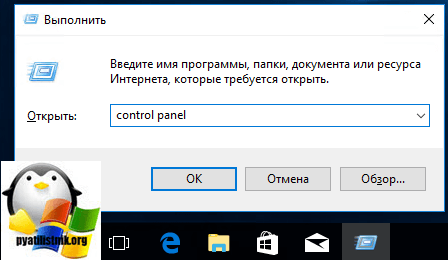
Итак, службы iis в windows 10 по умолчанию, находятся в выключенном состоянии, а точнее, данный компонент не установлен из коробки, сделано это специально, чтобы не тратились ресурсы компьютера и лишние сокеты не крутились на нем. Чтобы нам добавить нужный компонент, сделайте вот что. Нажмите сочетание клавиш Win+R и введите в окне выполнить:
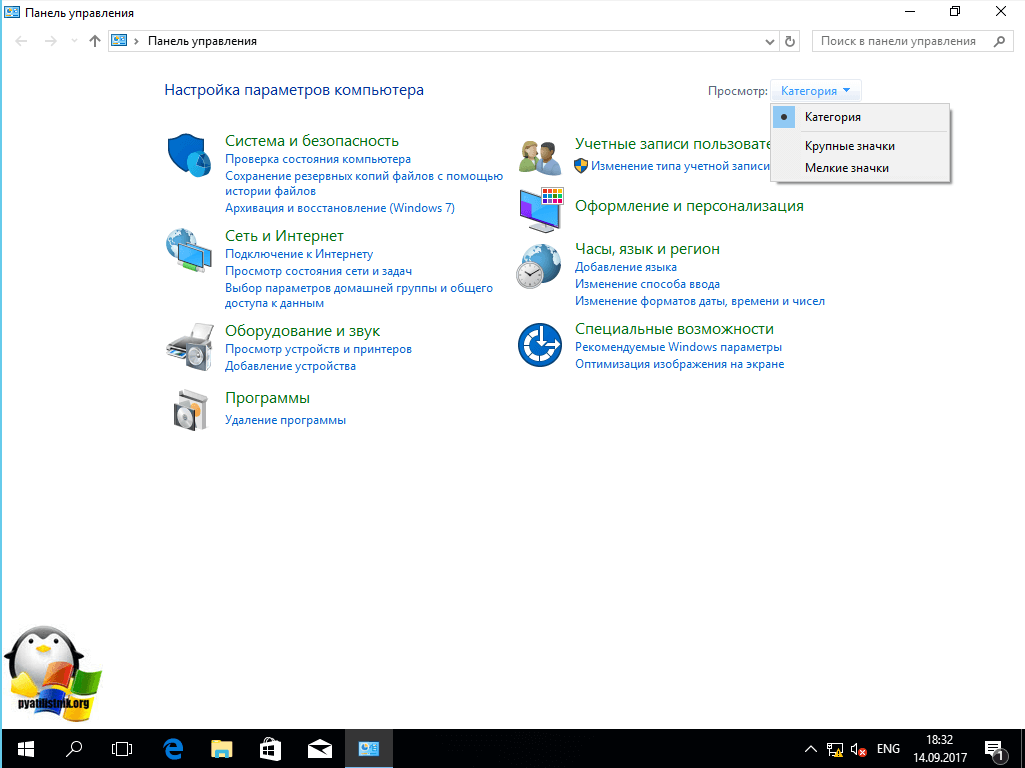
В результате чего у вас откроется панель управления Windows. Сделаем в ней представление значков в формате «Крупные значки»
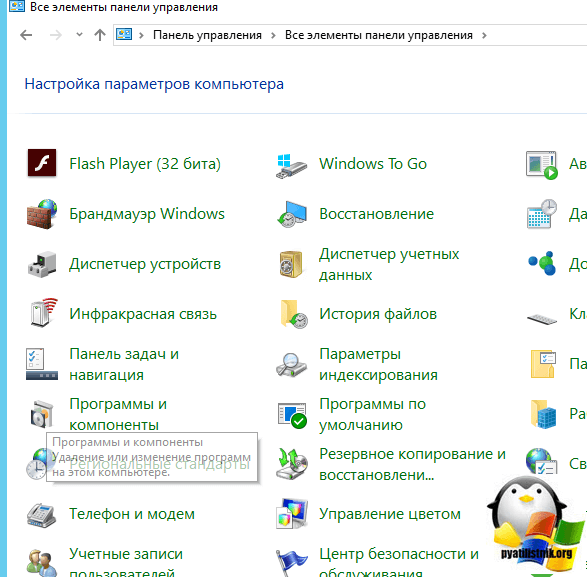
Далее находим пункт «Программы и компоненты»
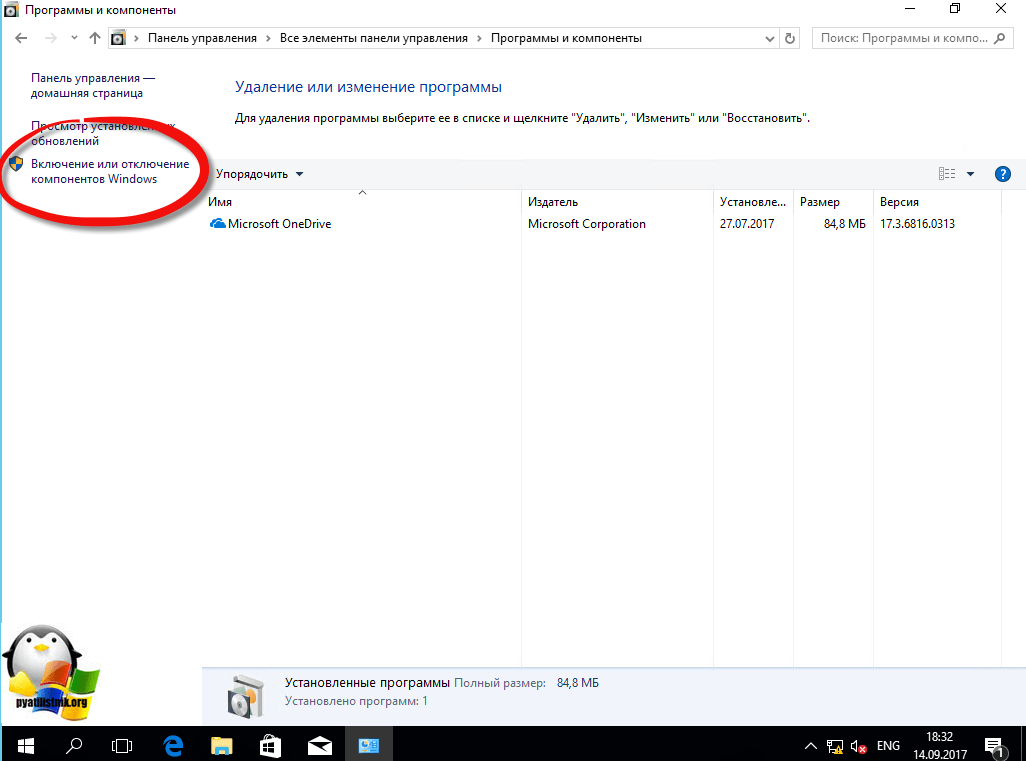
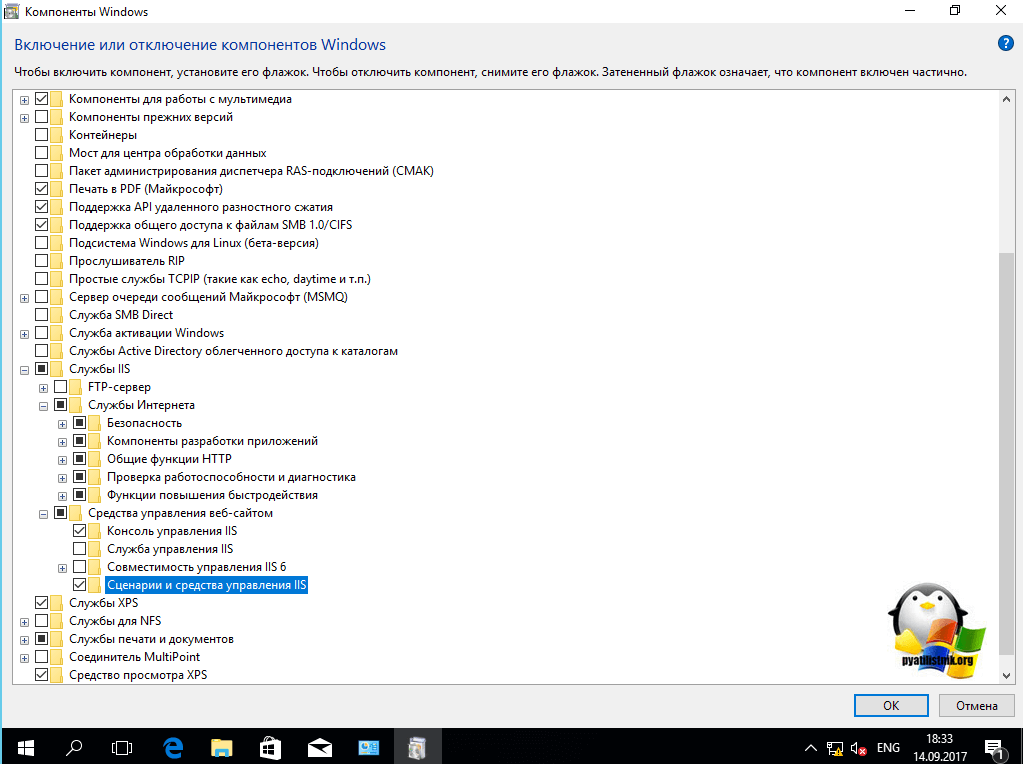
Переходим в пункт «Включение или отключение компонентов Windows», мы с вами это уже делали, устанавливая telnet клиент
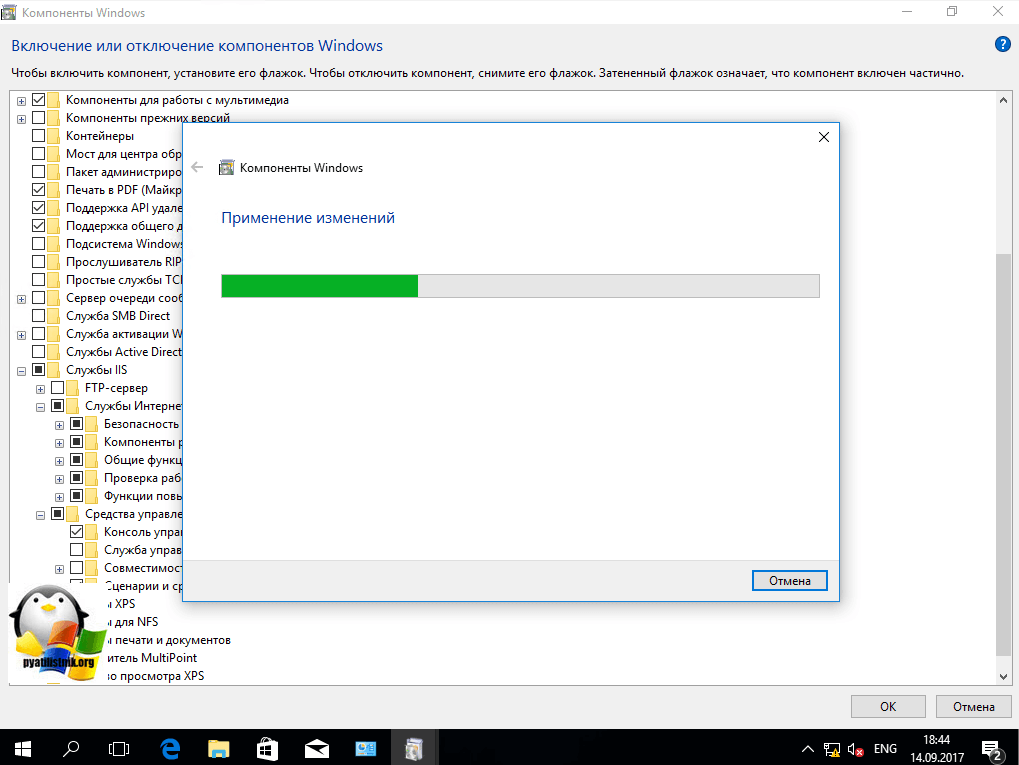
Находим среди множества пунктов «Службы Интернета», ставим на против них галку и нажимаем ок. У вас начинается установка IIS windows 10.
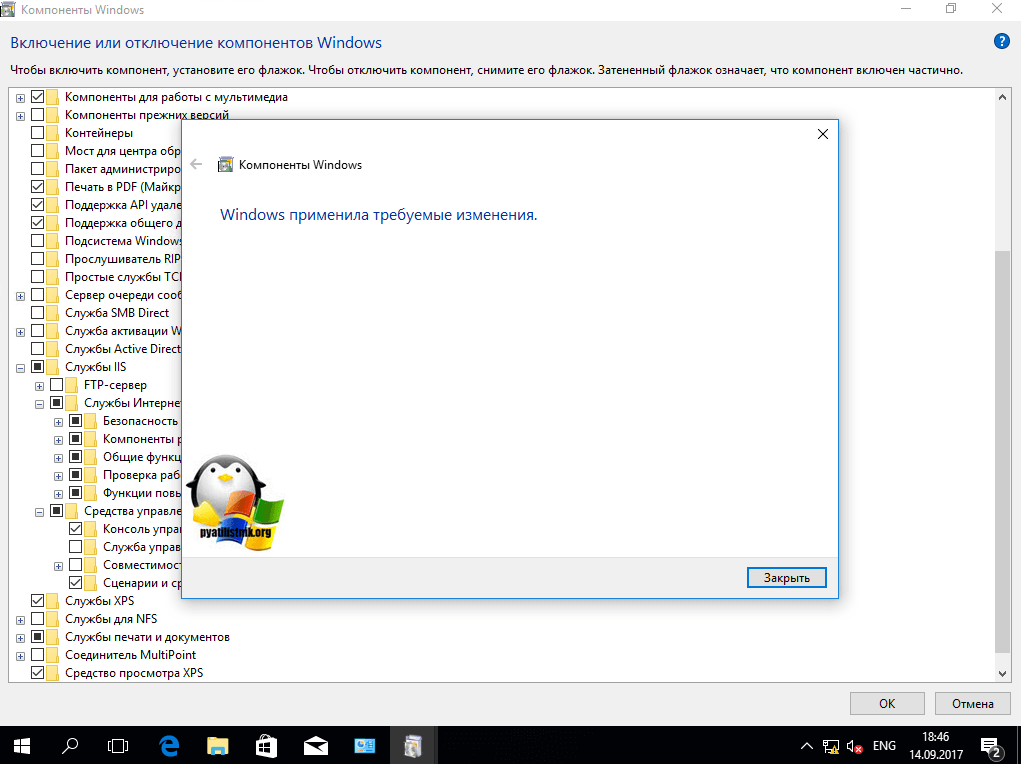
Компонент веб сервер IIS, будет добавлен в считанные секунды, после чего я вам советую перезагрузить вашу операционную систему Windows 10.
Как и писал выше, перезапустим систему.
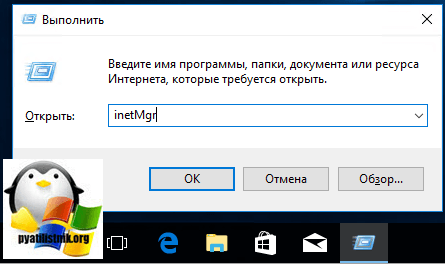
Кстати, как только вы все установили, перед запуском не поленитесь поискать свежие обновления в центре обновления Windows, так как могут быть свежие заплатки. Теперь смотрите, как вы можете теперь открыть диспетчер IIS. Есть несколько способов, первый, нажмите WIN+R и введите inetMgr. У вас откроется нужная оснастка.
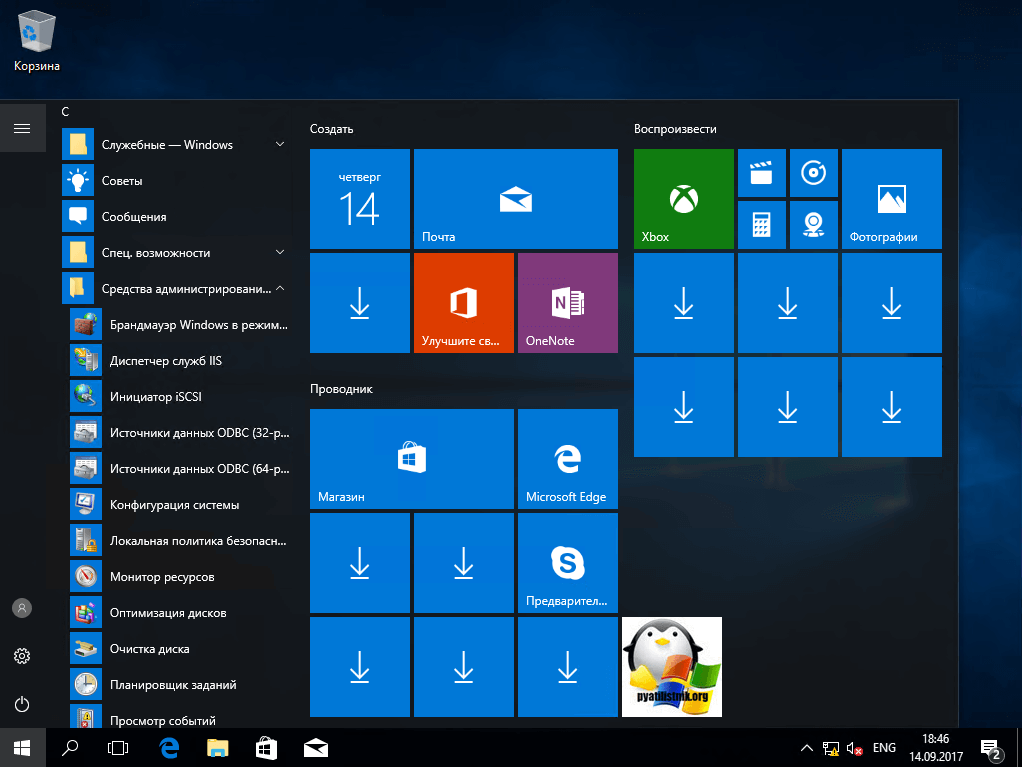
Второй метод, это открыть кнопку пуск и в папке «Средства администрирования» найдите «Диспетчер служб IIS»
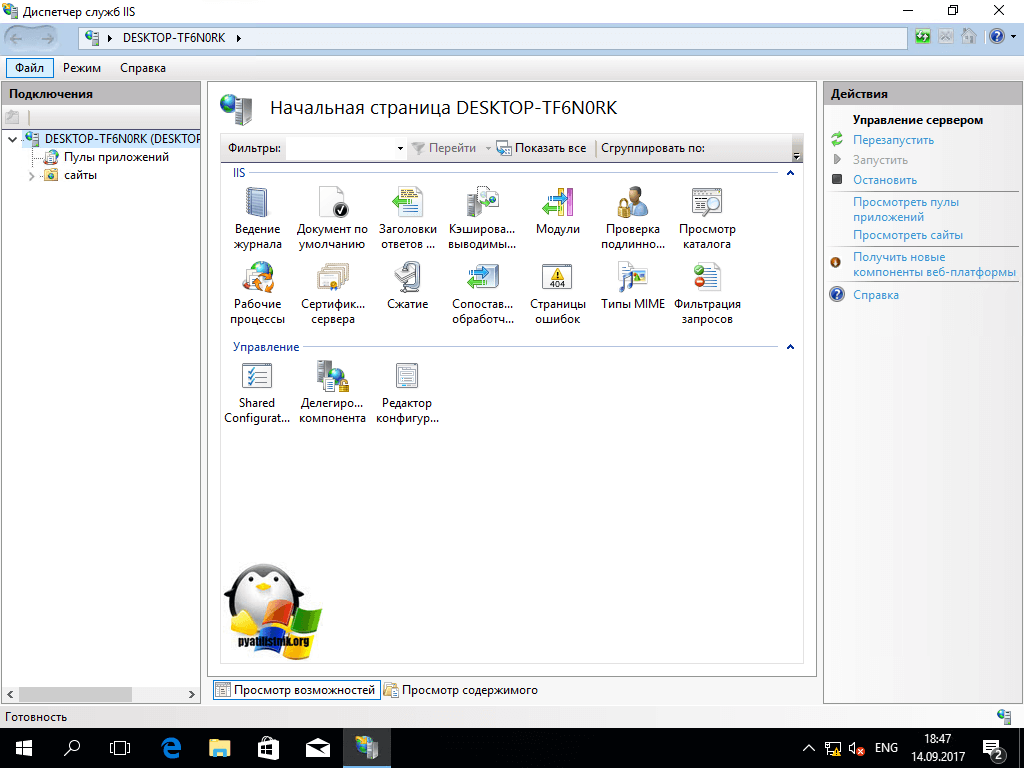
Вот так вот выглядит оснастка. Далее я вам советую почитать, про создание сайтов.
Установить IIS 8.5 через powershell
Источник
This forum has migrated to Microsoft Q&A. Visit Microsoft Q&A to post new questions.
Answered by:
Question
I am trying to install IIS 6 Metabase and IIS 6 configuration compatibility to my Windows 7 ultimate machine. the install fails, and the following log entry is created
Update IIS-Metabase of package IIS-WebServer-Package failed to be turned on. Status: 0x80070bc9.
Answers
Regarding the issue to be more of IIS 6.0, I kindly recommend you to post in Microsoft Official IIS Forums for a better assistance. Thanks for your understanding and cooperation.
Regarding the issue to be more of IIS 6.0, I kindly recommend you to post in Microsoft Official IIS Forums for a better assistance. Thanks for your understanding and cooperation.
Install the IIS 6.0 Management Compatibility Components in Windows Server 2008 R2 or in Windows Server by using the Server Manager tool
Click Start, click Administrative Tools, and then click Server Manager.
In the navigation pane, expand Roles, right-click Web Server (IIS), and then click Add Role Services.
In the Select Role Services pane, scroll down to IIS 6 Management Compatibility.
Click to select the IIS 6 Metabase Compatibility and IIS 6 Management Console check boxes.
In the Select Role Services pane, click Next, and then click Install at the Confirm Installations Selectionspane.
Click Close to exit the Add Role Services wizard.
Click Start, click Control Panel, click Programs and Features, and then click Turn Windows features on or off.
Open Internet Information Services.
Open Web Management Tools.
Open IIS 6.0 Management Compatibility.
Select the check boxes for IIS 6 Metabase and IIS 6 configuration compatibility and IIS 6 Management Console.
Источник
ИТ База знаний
Полезно
— Онлайн генератор устойчивых паролей
— Онлайн калькулятор подсетей
— Руководство администратора FreePBX на русском языке
— Руководство администратора Cisco UCM/CME на русском языке
— Руководство администратора по Linux/Unix
Навигация
Серверные решения
Телефония
FreePBX и Asterisk
Настройка программных телефонов
Корпоративные сети
Протоколы и стандарты
Установка IIS сервера на Windows 10
Установка IIS
На самом деле это даже не установка, как таковая, а включение службы, потому что в Windows 10 этот компонент есть сразу, но он просто выключен.
Первым делом нам нужно нажать комбинацию клавиш Win + R, и после того как появится окно “Выполнить”, нам нужно набрать “appwiz.cpl” и нажать OK. Либо мы просто можем пойти в Панель управления и там выбрать пункт Программы – Программы и компоненты – Установка и удаление программ.

Тут нам нужно выбрать пункт “Включение или отключение компонентов Windows”.

Тут находим пункт “Службы IIS”, ставим на против него галочку и нажимаем ОК, после чего служба будет включена.

Если вам, как разработчику, нужны дополнительные параметры, то мы можете раскрыть этот пункт, нажав на плюсик, и включить или отключить те функции, которые вам необходимы.

После того как все сделано можно запустить браузер, и вбить в адресной строке localhost, чтобы убедиться, что все работает. Также в меню Пуск и в папке «Средства администрирования» появится пункт «Диспетчер служб IIS». Также туда можно попасть снова нажав Win + R и набрав inetMgr.

Онлайн курс по Linux
Мы собрали концентрат самых востребованных знаний, которые позволят тебе начать карьеру администратора Linux, расширить текущие знания и сделать уверенный шаг к DevOps
Источник
Компоненты совместимости IIS 6, не установленные _ LonghornIIS6MetabaseNotInstalled
Применяется к: Exchange Server 2013 г.
Содержимое этой статьи не обновлялось для Microsoft Exchange Server 2013. Несмотря на отсутствие обновления, оно может быть применимо для Exchange 2013. Если вам все еще нужна помощь, ознакомьтесь с указанными ниже ресурсами сообщества.
Возникли проблемы? Попросите помощи на форумах Exchange. Перейти на форумы можно по следующей ссылке: Exchange Server.
Microsoft® Exchange Server 2007 Setup не может продолжать попытки установить роль сервера сервера клиентского доступа, роль сервера почтовых ящиков или административные средства Exchange 2007 г. на следующих операционных системах Windows:
Windows Server 2008 R2
Windows Server 2008
Windows 7 (только средства администрирования)
Windows Vista (только средства администрирования)
Проблема вызвана отсутствием компонентов «Совместимость метабазы IIS 6» и «Консоль управления IIS 6».
Необходимо, чтобы на компьютере, на который устанавливается роль сервера клиентского доступа Exchange 2007, роль сервера почтовых ящиков или средства администрирования Exchange 2007, были установлены компоненты «Совместимость метабазы IIS 6» и «Консоль управления IIS 6».
Чтобы устранить эту проблему, установите на конечный компьютер компонент «Совместимость метабазы IIS 6» и повторно запустите программу установки Microsoft Exchange.
Установка компонентов «Совместимость управления IIS 6.0» в Windows Server 2008 R2 или в Windows Server при помощи средства «Диспетчер серверов»
Нажмите кнопку Пуск и выберите пункт Администрирование, а затем — Диспетчер серверов.
В области навигации разверните узел Роли, щелкните правой кнопкой мыши элемент Веб-сервер (IIS) и выберите команду Добавить службы ролей.
В области Выбор служб ролей прокрутите список вниз и выберите пункт Совместимость управления IIS 6.
Установите флажки Совместимость метабазы IIS 6, Совместимость IIS 6 WMI и Консоль управления IIS 6.
В области Выбор служб ролей выберите пункт Далее.
В области Подтверждение выбранных элементов установки выберите пункт Установить.
Нажмите кнопку Закрыть, чтобы завершить работу мастера добавления служб ролей.
Установка компонентов «Совместимость управления IIS 6.0» в панели управления в Windows 7 или Windows Vista
В меню Пуск выберите Панель управления, Программы и компоненты, а затем Включение или отключение компонентов Windows.
Откройте Службы IIS.
Откройте Средства управления веб-сайтом.
Откройте Совместимость управления IIS 6.0.
Установите флажки Совместимость метабазы IIS 6 и конфигурации IIS 6, Совместимость WMI в IIS 6 и Консоль управления IIS 6.
Источник
Touch the file C:inetpubcusterren-US401-1.htm, creating any missing directories in the path, then run the installer again.
More info:
I viewed the log file for DISM located at C:WindowsLogsDISMdism.log and found the following set of lines for the error:
2017-10-09 13:43:28, Error                 DISM   DISM Package Manager: PID=4280 TID=14940 Failed finalizing changes. - CDISMPackageManager::Internal_Finalize(hr:0x800f0922)
2017-10-09 13:43:28, Error                 DISM   DISM Package Manager: PID=4280 TID=14940 Failed processing package changes with session options - CDISMPackageManager::ProcessChangesWithOptions(hr:0x800f0922)
2017-10-09 13:43:28, Error                 DISM   DISM Package Manager: PID=4280 TID=14940 Failed ProcessChanges. - CPackageManagerCLIHandler::Private_ProcessFeatureChange(hr:0x800f0922)
2017-10-09 13:43:28, Error                 DISM   DISM Package Manager: PID=4280 TID=14940 Failed while processing command enable-feature. - CPackageManagerCLIHandler::ExecuteCmdLine(hr:0x800f0922)
2017-10-09 13:43:28, Info                  DISM   DISM Package Manager: PID=4280 TID=14940 Further logs for online package and feature related operations can be found at %WINDIR%logsCBScbs.log - CPackageManagerCLIHandler::ExecuteCmdLine
2017-10-09 13:43:28, Error                 DISM   DISM.EXE: DISM Package Manager processed the command line but failed. HRESULT=800F0922
Following the recommendation, I checked the CBS log located at C:WindowsLogsCBSCBS.log and found the following line with the same timestamp:
2017-10-09 13:43:28, Error CSI 00000096 (F) STATUS_OBJECT_PATH_NOT_FOUND #5294871# from Windows::Rtl::SystemImplementation::DirectFileSystemProvider::SysCreateFile(flags = (AllowSharingViolation|AllowAccessDenied), handle = {provider=NULL, handle=0, name= ("null")}, da = (FILE_GENERIC_READ|DELETE|WRITE_DAC|WRITE_OWNER|FILE_WRITE_ATTRIBUTES|FILE_WRITE_EA|FILE_APPEND_DATA|FILE_WRITE_DATA|0x00000040), oa = @0x92431fdd18->OBJECT_ATTRIBUTES {s:48; rd:NULL; on:[38]'??C:inetpubcusterren-US401-1.htm'; a:(OBJ_CASE_INSENSITIVE)}, iosb = @0x92431fdd78, as = (null), fa = (FILE_ATTRIBUTE_NORMAL), sa = (FILE_SHARE_READ|FILE_SHARE_WRITE), cd = 5, co = (FILE_NON_DIRECTORY_FILE|FILE_SYNCHRONOUS_IO_NONALERT|0x00004000), eab = NULL, eal = 0, disp = Invalid)
I was able to determine that it was looking for the path C:inetpubcusterren-US401-1.htm and couldn’t find it. Sure enough, that path did not exist at all.
First, I tried testing permissions by giving the user object Everyone full control access to inetpub. I know, not ideal, but it was worth it to test it. I ran that DISM command again to add HttpErrors, but still failed. Finally I just created the directories custerr and en-US, and a blank text file called 401-1.htm, and tried DISM one last time. The folder instantly populated with the rest of the HTTP error pages and the installation completed.
Hope this helps someone.
In this tutorial, we are going to learn how to host a website in local IIS in windows 10. IIS or Internet Information Services are used to host ASP.Net Web applications to either show your development progress for a client or for a test run of your websites. If you are a freelancer and want to show your sites to your customer, IIS might be your best and easiest way.
Also visit : how to enable IIS How to enable Internet Information Services
Before we start make sure that you have enable IIS on your Windows machine. If not, follow the step provided below.
I. Enable IIS on Windows 10
It’s really easy to enable Internet Information Services in Windows 10. Internet Information Services (IIS) is a Microsoft-developed extended web server that may be used with Windows NT; also, ASP.NET developers will want to enable IIS , since it is required to host ASP.NET. IIS has an interactive user interface that makes configuring the server simple.
To enable IIS and the required IIS components on Windows 10, do the following:
- Open Control Panel and click Programs and Features » Turn Windows features on or off.
- Enable Internet Information Services.
- Expand the Internet Information Services feature and verify the web server components that is needed for IIS to work. Refer to the required IIS component listed below.
- Click OK.
Required IIS components
- Web Management Tools
- IIS 6 Management Compatibility
- IIS Metabase and IIS 6 configuration compatibility
- IIS Management Console
- IIS 6 Management Compatibility
- World Wide Web Services
- Application Development Features
- .NET Extensibility 4.5
- ASP.NET 4.5
- ISAPI Extensions
- ISAPI Filters
- WebSocket Protocol
- Common HTTP Features
- Default Document
- Static Content
- Security
- Basic Authentication
- Request Filtering
- Windows Authentication
- Application Development Features
II. How to Check IIS Version on Windows 10
- Open Run Command using the shortcut Win Key + R.
- Search for inetmgr.
- Internet Information Services(IIS) manager will open.
- Click on Help.
- Go to “About Internet Information Services“
- “About Internet Information Services manager dialog box will now open, where you can view details on about your IIS.
III. Deploy ASP.NET MVC on IIS
- First, open your IIS Manager by going to the start menu and searching for Internet Information Services(IIS) and open Internet Information Services from the search result. Refer to the image shown below.
You may also use Run then input inetmgr to open IIS Manager.
2. In your IIS manager, expand the sites folder and right click on Default Web Sites. Then select Explore to open the root directory.
3. Once the root directory is open, we can create a folder for our ASP.NET directory location. wwwroot is the default IIS directory, but if you want to select different location, you can specify it later after we are done creating the build files for our ASP.NET MVC Application. In this tutorial, this is the directory that I use. wwwroot » MySites.
4. Now, it’s time to create build file for our sample ASP.NET App. In my case I just pick-up a random project I created from my previous tutorial, you may check it out this link for a sample ASP.NET App “Login App using Form Authentication in ASP.NET MVC“. You may also create a new project just to test IIS deployment.
This is how my sample Web Application looks like.
5. Open your project in Visual Studio and navigate to the solution explorer. Right-click on your project name and select publish.
6. In the Publish Web Window choose Profile and create name for your publish profile.
7. To customize the profile name for this setting you may set a familiar name to easily identify it for the next time you deploy this application. Enter your desired publish profile name. Then press “OK”.
8. Click “Next” to proceed. Select File System as your publish method.
9. Select your published directory. In my case, it is C:inetpubwwwrootMySites, which is the default website directory of IIS. Then click “Open.”
10. Lastly click on the publish button to proceed. See the image below.
11. It may take a while to finish an application to publish. Once, done you can see the notification from the Output windows like the screenshot shown below.
IV. Convert your website to IIS Application
Navigate back to your IIS Manager and go to Sites » Default Web Sites. Then search for your folder name where we published our websites. In my case, I name it MySites. Right-click on the folder name MySites and select Convert to Application.
You’re done!! To open your website application right click on MySites. Select Manage Application then choose browse.
Browser will popup and display your deployed ASP.NET Application. See the image below.
You may also access your websites using your local IP ex. http://192.168.1.2/MySites
Summary
In this tutorial, we have learn how to host a website in local IIS in windows 10. We also lear how we can enable and configure IIS on windows 10. If you wanted to share your website to your team on your local network you can visit this article to know how you can configure IIS to use your local IP address Deploy and Share ASP NET Core WebApp to a Local Network using IIS
That’s it you have successfully publish your website into IIS. Hopefully, this article will give you an idea and can be used with your future project.
KEEP CODING!
Also Read :
Best Computer Services Brisbane
Sony Ericsson Mobile
- Remove From My Forums
-
Question
-
I am trying to install IIS 6 Metabase and IIS 6 configuration compatibility to my Windows 7 ultimate machine. the install fails, and the following log entry is created
Update IIS-Metabase of package IIS-WebServer-Package failed to be turned on. Status: 0x80070bc9.
Answers
-
Hi,
Regarding the issue to be more of IIS 6.0, I kindly recommend you to post in
Microsoft Official IIS Forums for a better assistance. Thanks for your understanding and cooperation.Best Regards
Dale
-
Marked as answer by
Monday, May 10, 2010 1:17 AM
-
Marked as answer by
| title | author | description | ms.date | ms.assetid | msc.legacyurl | msc.type |
|---|---|---|---|---|---|---|
|
How to Use Metabase Compatibility with IIS 7 and Above |
tobint |
IIS 7 and IIS 8 allow legacy configuration scripts and applications to continue running. There is an optional setup component that enables the Metabase s… |
11/22/2007 |
43a39948-73f2-43f7-b777-983befa2fa7f |
/learn/manage/managing-your-configuration-settings/how-to-use-metabase-compatibility-with-iis-7-and-above |
authoredcontent |
by Tobin Titus
IIS 7 and IIS 8 allow legacy configuration scripts and applications to continue running. There is an optional setup component that enables the Metabase system with its programmatic interfaces: Admin Base Objects (ABO), and ADSI and WMI providers on top of it. The system intercepts calls to ABO and maps them to the new configuration system. The data is persisted in applicationHost.config but the ABO caller is presented with a legacy view of the configuration structure.
Prerequisites
- Make sure IIS is installed on the machine by selecting
http://LocalHostfrom IE and see that you get the default «Under Construction» page. If IIS is not installed, refer to the Setup How-To for installation instructions. - Make sure you have administrative privileges on the machine: By default, you do not have them if you’re logged on as a user other than the built-in Administrator account, even if this user was added to the local Administrators group on the machine (this is a new security feature in Windows Server® 2008 and above with IIS, called LUA, which is beyond the scope of IIS). Make sure to either log-on as the built-in Administrator account, or explicitly invoke applications as the built-in Administrator as needed, using the «runas» cmd-line tool. For example, to launch notepad.exe you could run this command: «runas /user:administrator notepad.exe». You will be prompted for the password of the Administrator account. It is useful to have a cmd-box shell that is already elevated, by running «runas /user:administrator cmd.exe». Every application you run from that cmd-box will be elevated as well, and you will not need to use the «runas» syntax from that cmd-box.
- Make sure the master configuration file is backed up. Simply copy applicationHost.config to a different file, so that you can restore it later. You will find applicationHost.config under the inetsrv directory, which in turn is under the system directory. Note that you will need to be an administrator to do this – see previous point above.
- Before you start, make sure you are in a «clean state». To do so, revert changes you may have done to the applicationHost.config file in previous exercises. (If you are using a VPC image, the easiest way to do that is to restart the image without saving its state).
- It is also recommended that you turn off friendly HTTP error messages in IE (Tools > Options > Advanced) for quicker troubleshooting.
[!NOTE]
When copying text from .html files, you also copy hidden characters. When you paste the text into an editor such as Visual Studio, or into a command-box window, the text might appear as if it had been copied correctly, but the text you pasted might not work properly because it contains hidden characters. This situation can be difficult to debug.
The best way to copy text from .MHT files is to copy it, then paste it into Notepad, and then copy it again from Notepad. This removes any hidden characters. If the text is short, sometimes it is easier to just type it yourself instead of copying and pasting it.
Writing a Global Settings Using ABO
In this step, you will learn how to change a value on a global setting using AdminBaseObjects interface and have it written through to the applicationHost.config file. You will use the MBExplorer.exe tool to perform this task.
First, verify that the Metabase Compatibility component of IIS is installed on the machine. This component is not installed by default. On Windows Server® 2008 and above builds, you can use the Server Manager tool (Start->Administrative Tools->Server Manager), and check the «IIS 6.0 Management Compatibility» component to install it. From a cmd-box, verify that the NT service IISADMIN is up and running, by running «net start iisadmin». You should get a message indicating that IISADMIN is already running.
Next, you need to download the MBExplorer tool off the web. Use MSN Search to look it up—it will direct you to the download center on Microsoft.com, where you will need to download and install the IIS 6.0 Resource Kit. The MBExplorer tool is included in the resource kit. After installation, you will typically find it under Program FilesIIS ResourcesMetabase ExplorerMBExplorer.exe.
-
Run MBExplorer.exe. This tool works on top of the AdminBaseObjects (ABO) interface, so it presents an ABO view of the configuration hierarchy.
-
In the left pane, navigate to the LM > W3SVC level. This is the global level of the configuration hierarchy, in an ABO view.
-
Locate the AuthFlags property.
[!TIP]
It is easier to locate the property if you sort the properties by clicking the Name column header. The default value is 1. -
Change the value to an integer between 1 and 7, inclusive.
-
Using a text editor such as Notepad, open the ApplicationHost.config file in the following location:
%windir%system32inetsrvconfigApplicationHost.config -
Locate the <authentication> section group. The <authentication> sections are enabled per the value you set. For example, if you set AuthFlags=2, then only BasicAuthentication will have enabled=»true», and other authentication sections will have enabled=»false». This is because «2» maps to «AUTH_BASIC» in the IIS 6.0 schema.
-
Change the value in MBExplorer and refresh your view of the ApplicationHost.config file. By changing AuthFlags property in the metabase, you indirectly enable and disable authentication schemes in the ApplicationHost.config file.
Writing a Virtual Directory Setting Using ABO
In this step, you will learn how to change a value under a virtual directory using ABO, and have the value write through to applicationHost.config. Because you are not changing a global setting, the ABO compatibility layer generates a location tag in the applicationHost.config file, with a path that corresponds to the virtual directory you changed. Note that web.config files are not handled by the Metabase Compatibility component.
- Run the MBExplorer.exe tool.
- In the left pane, navigate to the LM > W3SVC > 1 >ROOT level. This is the root application under the default Web site.
- Set a value for the AuthFlags property. Click ROOT in the left pane, from the Edit menu select New DWORD Record, and then enter 6000 as the record ID.
- This creates an AuthFlags property at this level with the value 0. Double-click the property in the right pane and change the value to an integer between 1 and 7, inclusive.
- Using a text editor such as Notepad, open the ApplicationHost.config file in the following location:
%windir%system32inetsrvconfigApplicationHost.config - At the bottom of the file, note a new <location path=»Default Web Site»:> tag with the authentication sections enabled or disabled per the value you set.
Summary
In this document, you learned how to enable and use the compatibility feature of the configuration system. You used a legacy tool to change settings at the global, and virtual directory, levels and have them written through to applicationHost.config. You might want to use other tools, like adsutil.vbs, to perform the mapping and write-through. You might want to verify that your existing ABO/ADSI/WMI scripts and applications continue to work in this environment. You can also experiment with the reverse direction: change values in applicationHost.config, and verify that they are reflected in the ABO view in MBExplorer or any other tool or script.
Checks if ASP.NET is configured properly to install the Autodesk Vault Server.
The check runs tests using three ASPX files. The issue can be automatically repaired by clicking Re-Test on the install screen or by manually correcting the issue.
Automatically Fix the Issue
Auto-fix will automatically resolve this issue by going through each area of access that was checked and updating settings as needed.
- Click Re-Test to automatically fix the issue and run the pre-installation test conditions again to verify that the error has been corrected.
-
- If the error has been corrected, click Continue to proceed with the installation.
- If the error has not been corrected, you must perform a manual fix, as described in the next section of this topic.
Manually Fix the Issue
To manually correct the issue, review the error messages and take the corresponding corrective action.
Note: Some firewalls can cause this check to fail. See Known Firewall Check for more information on configuring a firewall.
1. MSI Web Service Installation
- ASP.Net Test installation was unable to find x file(s).
- ASP Status Check Failed during installation of test msi.
An error occurred during the installation of the TestASPNet msi file. Make sure that you have Administrator access and that your IIS installation is working properly.
2. IIS Metabase Access
IIS Metabase Access is required. Make sure that the feature is enabled by following these steps.
On Windows 7, 8, 8.1, and 10
- From the Windows Control Panel, select Programs
Programs and Features.
- Click Turn Windows features on or off.
- Expand Internet Information Services and Web Management Tools.
- For Windows 10, expand the IIS6 Management Compatibility folder.
- For Windows 7, 8, and 8.1, select the IIS 6 Metabase and IIS 6 configuration compatibility option and click OK.
For Windows 10, select the IIS Metabase and IIS 6 configuration compatibility option and click OK.
On Server 2012, 2012 R2, and 2016
- From Windows Server Manager, select Add Roles and Features from the Manage option to the top right.
- Select Next until the Server Roles dialog displays.
- Expand Web Server (IIS), Management Tools, and IIS 6 Management Compatibility.
- Select the IIS 6 Metabase Compatibility option and click Next to complete the install.
- Check that read access to the TestASP IIS Virtual Directory and its contents are allowed.
3. Static HTTP File Access
Accessing an http static file failed at URL «http:// localhost/TestASP/TestASPNetStatic.txt»
The contents of the file «http://localhost/TestASP/TestASPNetStatic.txt» is xxx, expected yyy.
- Check that read access to the TestASP IIS Virtual Directory and its contents are allowed.
4. ASPX Access
ASPX file failed to run at URL: «http://localhost/TestASP/TestASPNet.aspx».
- Check that read access to the TestASP IIS Virtual Directory and its contents are allowed.
- Check AutodeskTestDMPool (.NET Framework version and Managed pipeline mode settings).
- Launch IIS Manager.
- In the IIS Manager window, expand local computer and select Application Pools.
- Right click on AutodeskTestDMPool and select Basic Settings.
- Select .NET Framework v4.0.30319 and Integrated pipeline mode.
- Click OK.
- Check that IIS ASP .NET Application Development feature is enabled.
On Windows 8, 8.1, 10, Server 2012, and Server 2012 R2
- Launch the administrative command prompt.
- Run command %windir%system32DISM.exe /Online /Enable-Feature /FeatureName:IIS-ASPNET45 /All /quiet /NoRestart
On Windows 7
- Launch the administrative command prompt.
- Run command c:windowsmicrosoft.netframework64v4.0.30319aspnet_regiis -i -enable
ASPX page was unable to write temp file to directory: xxx.
- Navigate to the directory specified in the error messsage and grant write access.
5. Web Service Access
ASP Status Check Web Service Call failed with an exception.
- Check that read access to the TestASP IIS Virtual Directory and its contents are allowed.


