![]() FTP-Сервер обеспечивает возможность передачи файлов между клиентом и сервером с помощью протокола FTP. Здесь будет рассказано как запустить FTP-сервер в Windows Server 2008 R2.
FTP-Сервер обеспечивает возможность передачи файлов между клиентом и сервером с помощью протокола FTP. Здесь будет рассказано как запустить FTP-сервер в Windows Server 2008 R2.
0. Оглавление
- Добавление службы FTP-сервер
- Добавление FTP-сайта
- Детальная настройка уровня доступа для FTP-сайта
1. Добавление службы FTP-сервер
FTP-Сервер является службой роли «Веб-сервер (IIS)» , поэтому для начала нужно установить данную роль. Для этого заходим в диспетчер сервера («Пуск» — «Администрирование» — «Диспетчер сервера»). Раскрываем вкладку «Роли» и нажимаем «Добавить роли» . Если веб-сервер уже был установлен раннее, то необходимо кликнуть правой кнопкой мыши на названии роли в диспетчере сервера и выбрать «Добавить службы ролей» .

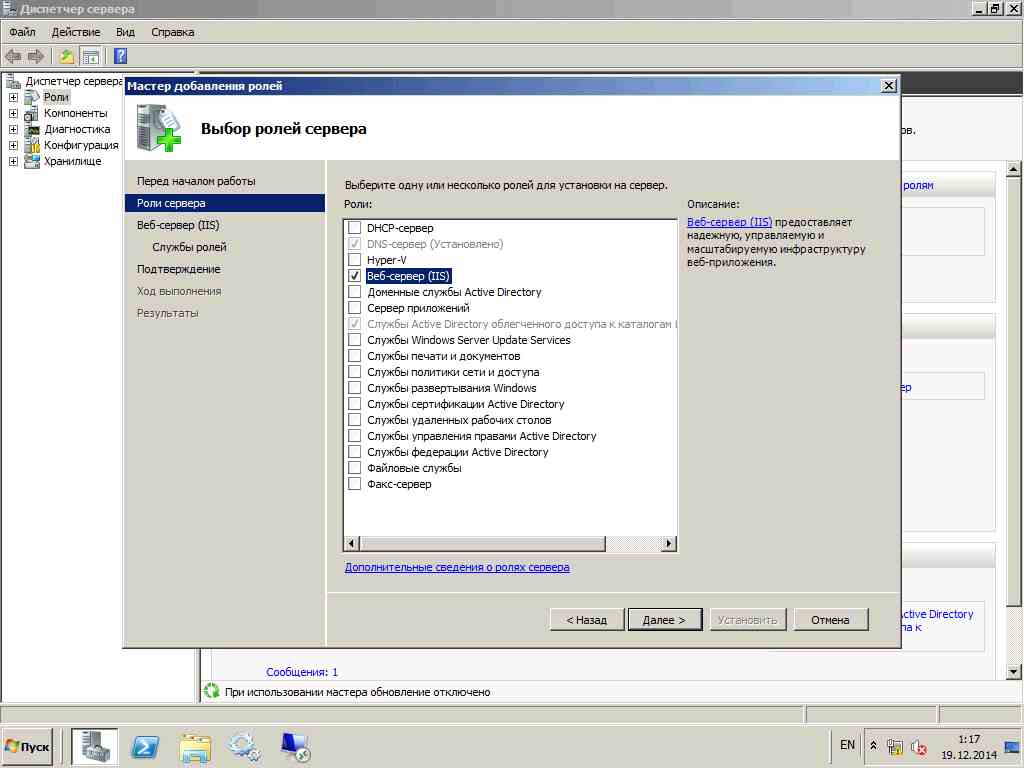
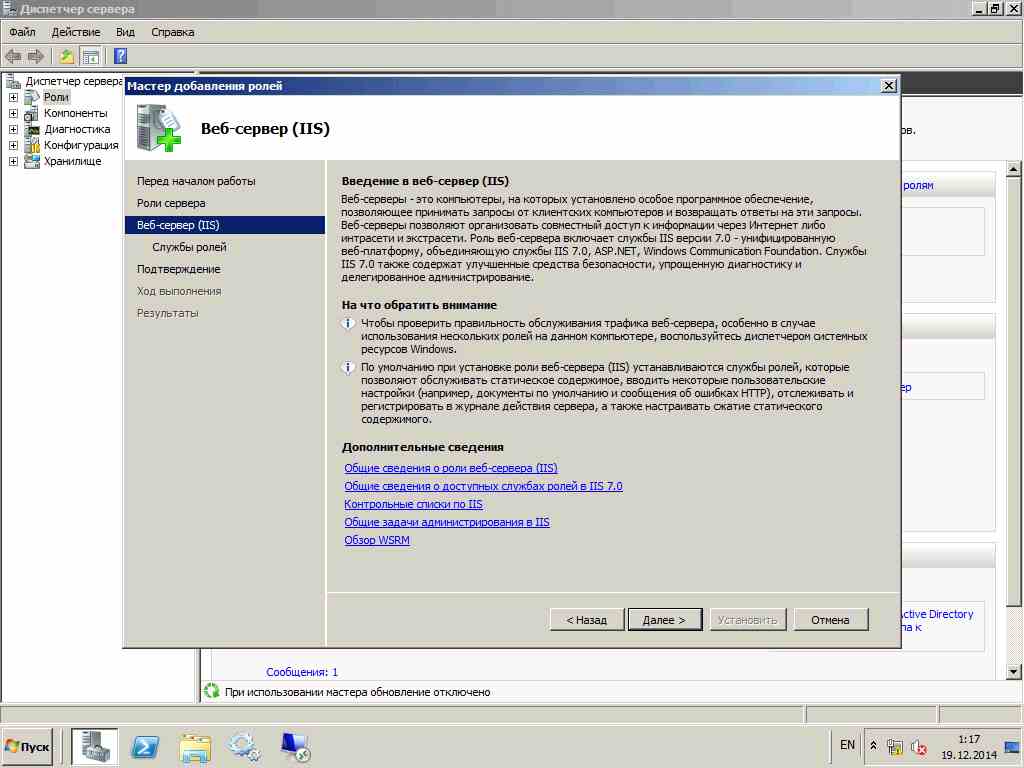
В запустившемся мастере нажимаем «Далее» , выбираем роль «Веб-сервер (IIS)» и 2 раза жмем «Далее» .

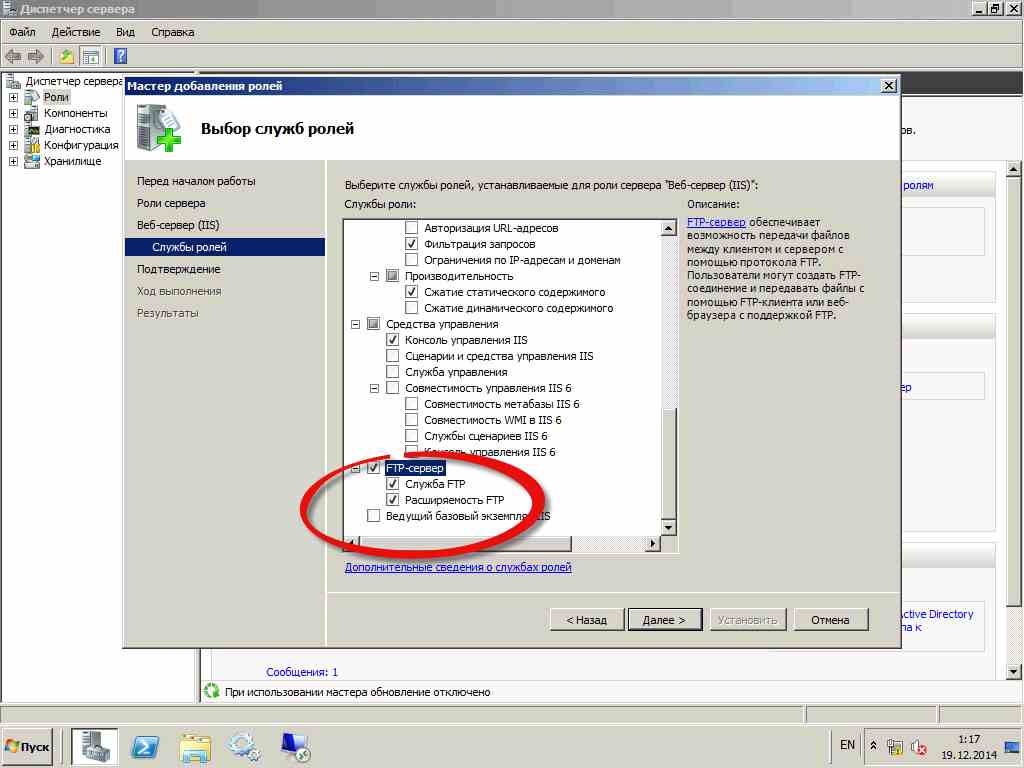
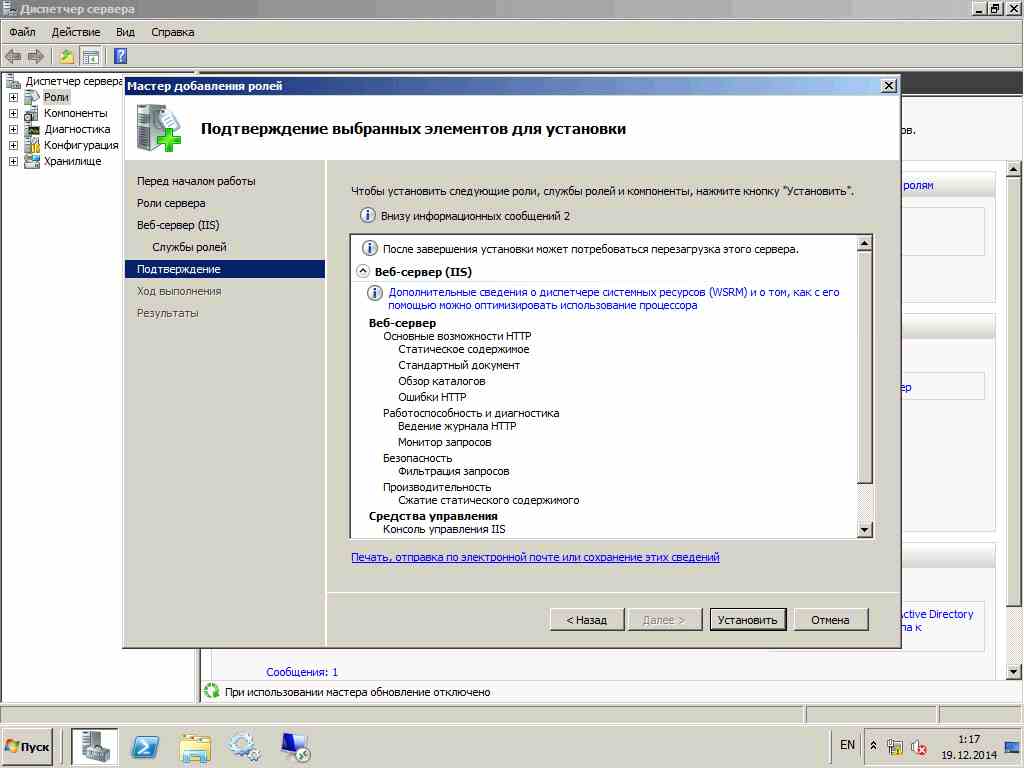
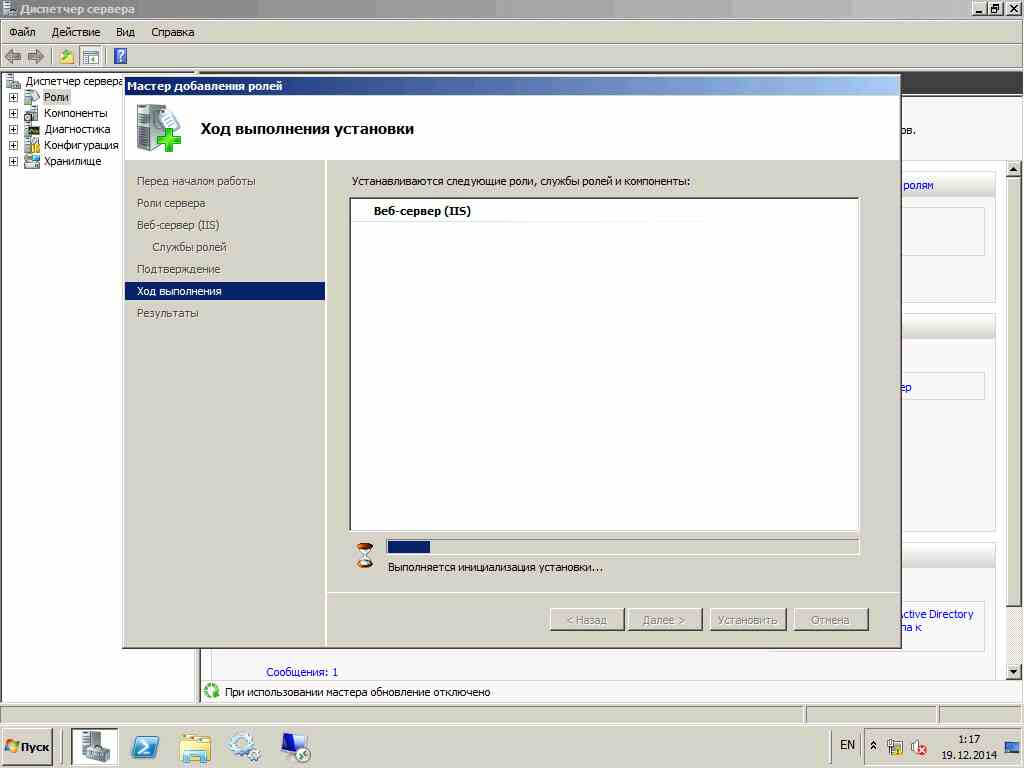
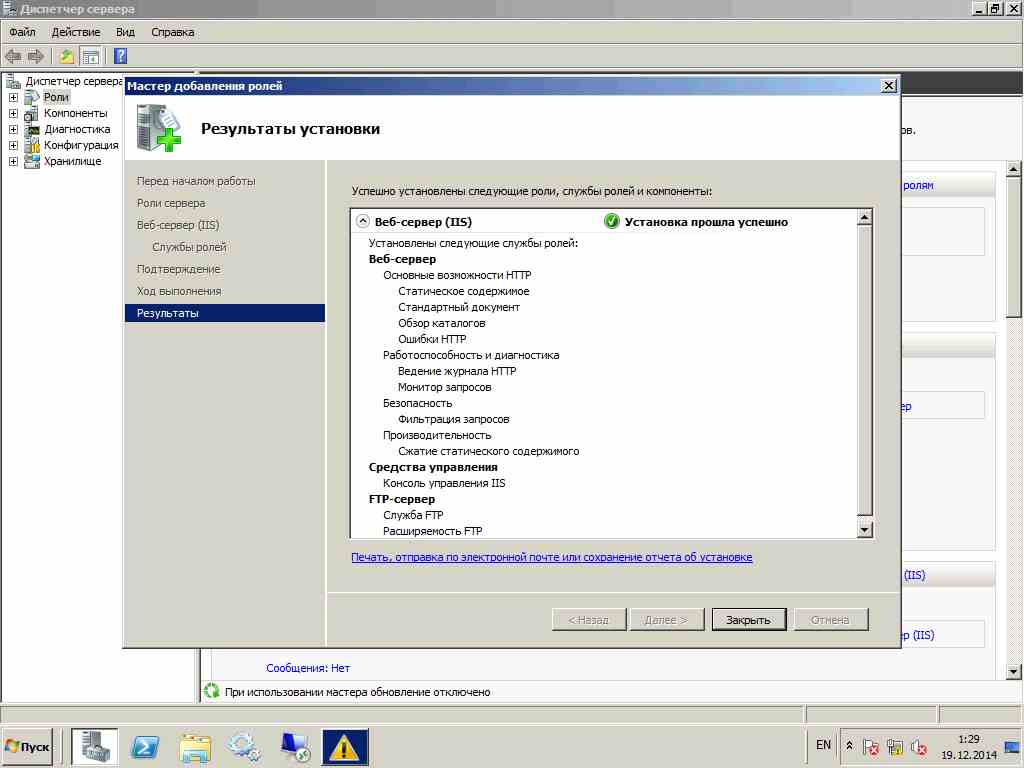
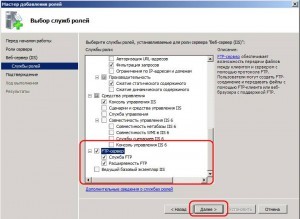
Теперь надо выбрать службы для данной роли. По умолчанию уже отмечены службы, необходимые для работы web-сервера. Листаем вниз и отмечаем службу «FTP-Сервер» . Затем жмем «Далее» , «Установить» и дожидаемся сообщения об успешной установке роли.

2. Добавление FTP-сайта
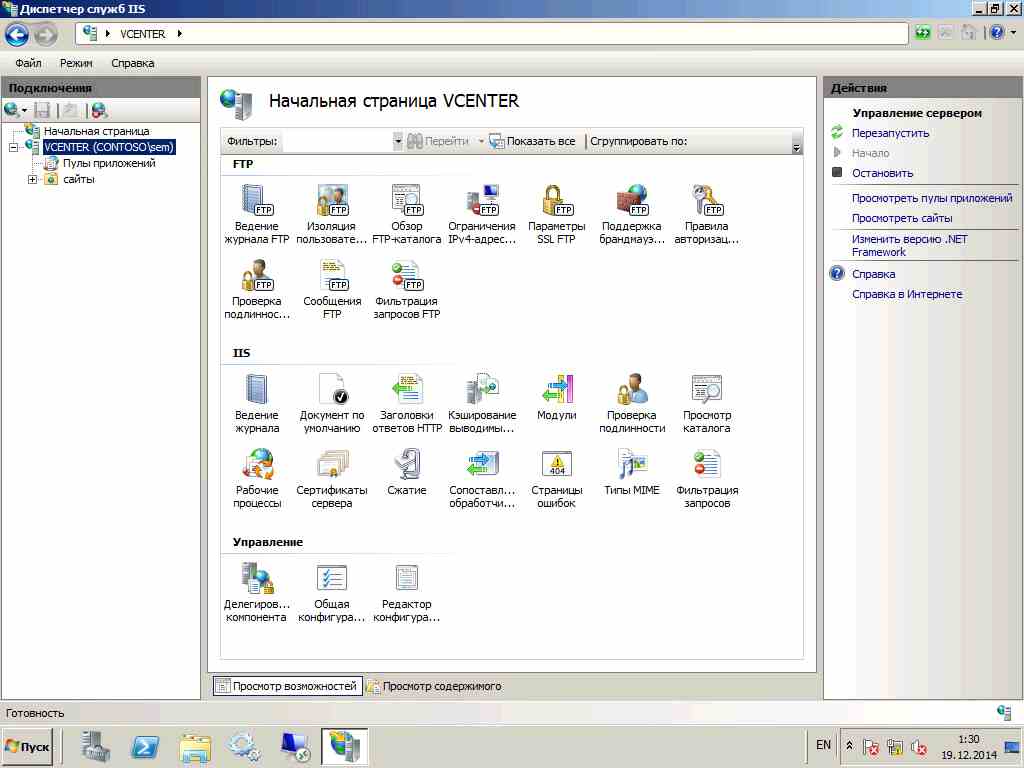
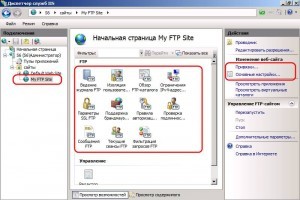
Теперь в диспетчере сервера, раскрыв вкладку «Роли» мы видим добавленную только что роль «Веб-сервер (IIS)» . Кликаем по ней 2 раза и заходим в «Диспетчер служб IIS» (доступен также через «Пуск» — «Администрирование» — «Диспетчер служб IIS» ).

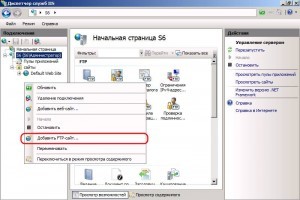
В диспетчере служб IIS мы видим, что у нас уже добавлен сайт по умолчанию «Default Web Site» (Чтобы его просмотреть можно набрать в строке браузера http://localhost/ ) , нам же надо добавить новый ftp-сайт. Для этого кликаем правой кнопкой мыши в окне «Подключения» и выбираем «Добавить FTP-сайт» .

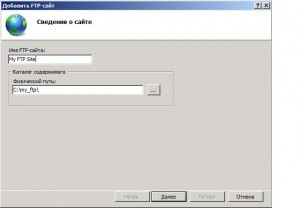
Запустится мастер добавления FTP-сайта. Придумываем имя FTP-сайта (только для нас), указываем расположения каталогов для сайта и жмем «Далее» .

На следующей странице, в меню «Привязки» оставляем «Все свободные» и можно поменять порт по умолчанию, если вам это надо. Далее, если у вас есть доменное имя, и вы хотите чтобы по нему был доступен FTP-сайт, записываем его в поле «Виртуальный узел» (О доменном имени и привязке его к IP адресу можно прочитать здесь). У меня это ftp.tavalik.ru, в противном случае НЕ включаем опцию «Разрешить имена виртуальных узлов» . Оставляем галочку «Запускать FTP-сайт автоматически» (чтобы сайт запускался автоматически при запуске компьютера), выбираем пункт «Без SSL» (в этой статье я не буду рассматривать данный протокол) и жмем «Далее» .

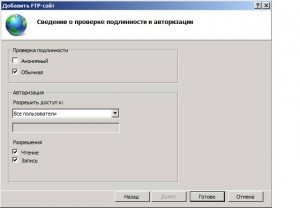
Теперь настраиваем уровень доступа к FTP-сайту. Устанавливаем проверку подлинности «Анонимный» , только если хотим оставить анонимный доступ к сайту и выбираем «Обычная» для обычной проверки доступа. Далее необходимо выбрать для каких пользователей будет доступен наш FTP-сайт. Можно выбрать группы пользователей или перечислить имена пользователей через запятую. Я же выбираю «Все пользователи» , устанавливаем флаги «Чтение» и «Запись» и жмем «Готово» .

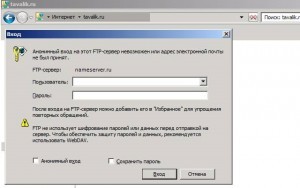
Все, на этом наш FTP-сайт готов. Для проверки можно набрать в браузере ftp://<%вашдомен%>, если Вы делали привязку к доменному имени, или ftp://localhost в противном случае.

Если вы настраивали все так же, как описано у меня, то FTP-сайт доступен для всех пользователей, имеющихся в системе (о том как добавить пользователя я писал здесь). Кроме того, все параметры вводимые при добавлении FTP-сайта можно изменить в любое время в меню управления сайтом, а также в меню «Действия» , выделив его в диспетчере служб IIS.

3. Детальная настройка уровня доступа для FTP-сайта
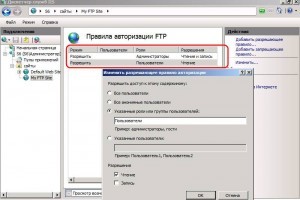
Наш FTP-сайт настроен и работает, теперь надо настроить уровень доступа пользователей на FTP. Сделать это можно, например, выбрав пункт «Правила авторизации FTP» в меню управления сайтом. На скриншоте ниже, настройки установлены таким образом, что группе «Администраторы» позволены запись и чтение на сайте, а группе «Пользователи» только чтение:

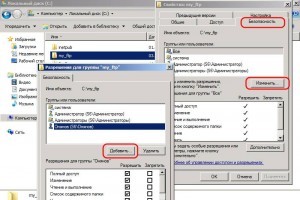
Более детально, уровень доступа можно настроить управляя параметрами безопасности для каталогов и файлов в директории, где находится FTP-сервер. В моем случае это C:my_ftp . Заходим в свойства папки, выбираем вкладу «Безопасность» затем нажимаем «Изменить» и выбираем уровень доступа для пользователей и групп пользователей. Аналогично настраивается безопасность для вложенных папок и отдельных файлов.

Обновлено 10.06.2017
 Добрый день уважаемые читатели и гости портала, в современном мире уже сложно себе представить какую-либо компанию, не имеющую свой сайт или какой-либо ресурс в интернете, да и это понятно, сейчас поиск информации должен быть очень быстрым, прошли те времена, когда нужную компанию вы искали по газетам или у друзей. С выходом операционной системы Windows Server 2008 R2, организовать свой хостинг под сайт компании стало очень просто, в этом там помогает свежая версия веб сервера, а именно IIS 7. В первой части мы рассмотрим как установить IIS 7 и FTP сервер в Windows Server 2008 R2.
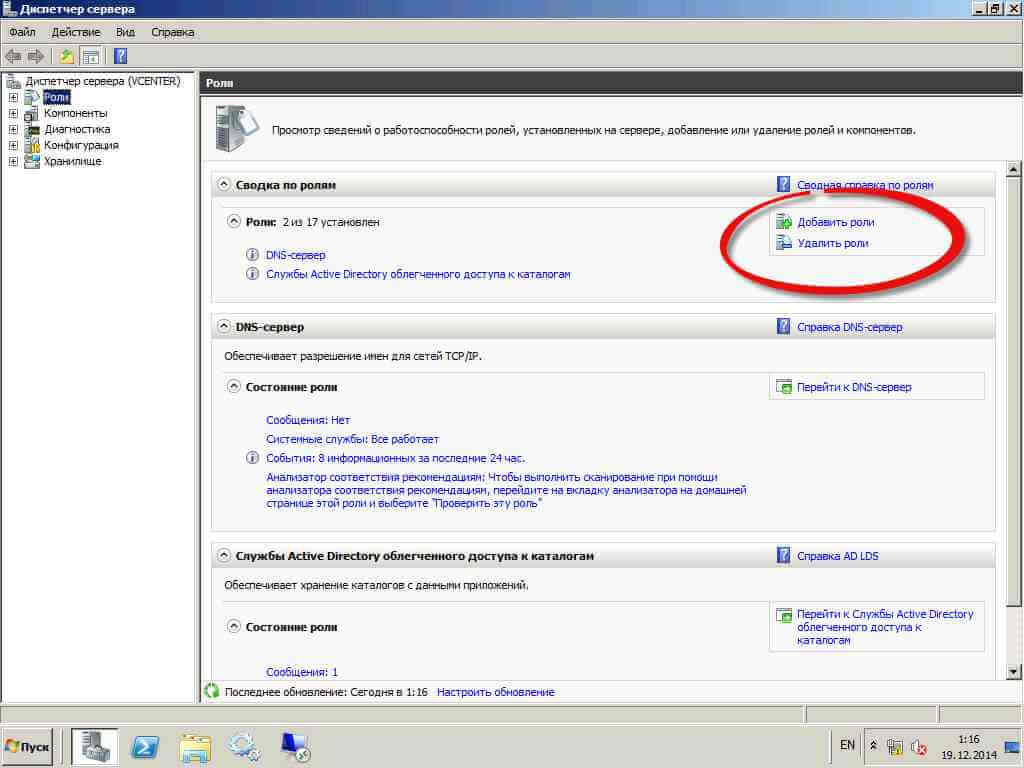
Установка роли
Открываем «Диспетчер сервера» и нажимаем «Добавить роли»
Как установить IIS 7 и FTP сервер в Windows Server 2008 R2-1 часть-01
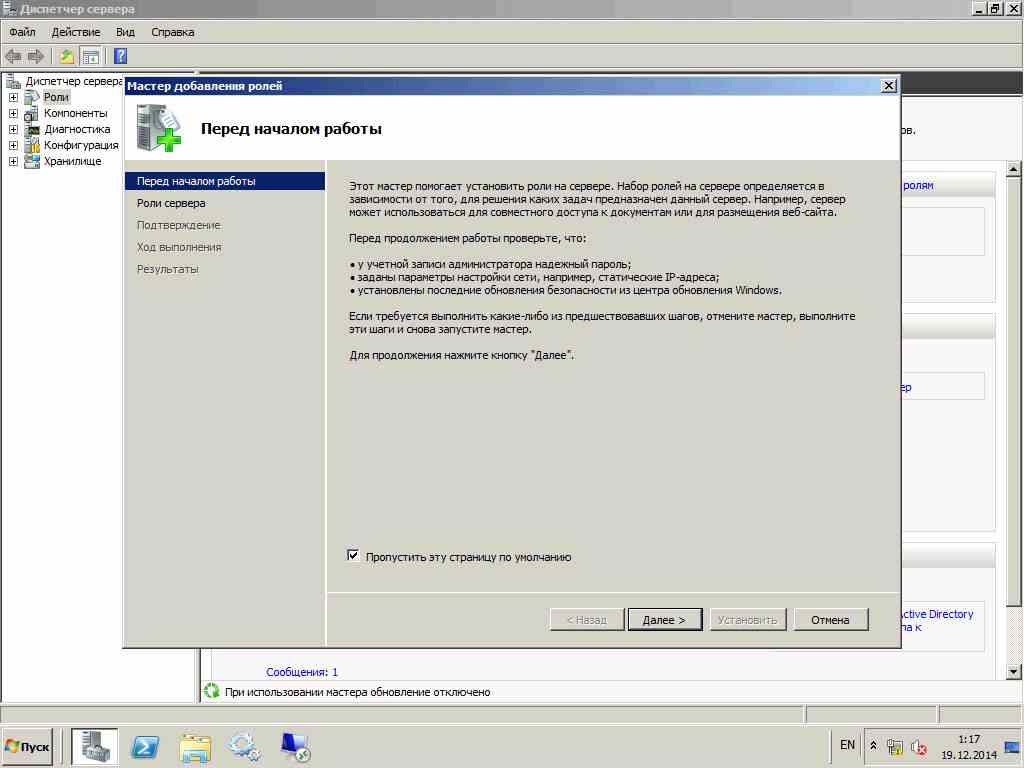
В открывшемся окне нажимаем «Далее»
Как установить IIS 7 и FTP сервер в Windows Server 2008 R2-1 часть-02
Выбираем роль IIS
Как установить IIS 7 и FTP сервер в Windows Server 2008 R2-1 часть-03
Далее
Как установить IIS 7 и FTP сервер в Windows Server 2008 R2-1 часть-04
Оставляем все по умолчанию за исключение того что снизу ставим галку на против FTP:
- Служба FTP
- Расширяемость FTP
Как установить IIS 7 и FTP сервер в Windows Server 2008 R2-1 часть-05
Когда все компоненты выбраны, нажимаем «Установить»
Как установить IIS 7 и FTP сервер в Windows Server 2008 R2-1 часть-06
Процесс инсталляции занимает некоторое время.
Как установить IIS 7 и FTP сервер в Windows Server 2008 R2-1 часть-07
Все видим, что «Установка прошла успешно», можно закрывать окно.
Как установить IIS 7 и FTP сервер в Windows Server 2008 R2-1 часть-08
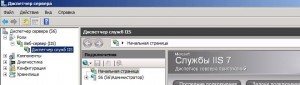
Открываем Пуск-Администрирование-Диспетчер IIS

Как установить IIS 7 и FTP сервер в Windows Server 2008 R2-1 часть-09
В Диспетчере IIS, в разделе подключения вы увидите меню сайты в котором в следующей статье мы настроим наш портал.
Как установить IIS 7 и FTP сервер в Windows Server 2008 R2-1 часть-10
Во второй части мы рассмотрим как настроить ftp сервер.
Июн 10, 2017 13:00
Прочитано:
7 831
Итак задача:
- Поднять FTP сервер на Server 2008 R2 SP1 (Enterprise)
- Авторизация на FTP ресурсе посредством IIS учетных записей, а не Windows.
- Посредством FSRM настроить наблюдение и квоту
- Настроить проброс порта для доступа из вне на эту систему.
Ниже я приведу все шаги посредством которых поставленная задача была выполнена и если ее нужно будет повторить, то это уже не составит ни какого труда.
Нужно установить роль File Services (компонент File Server Resource Manager) и Web Server (IIS) (компоненты FTP Server):
Start – Control Panel – Administrative Tools – Server Manager – Add Roles
или же через консоль командной строки:
C:UsersAdministrator>dism /online /enable-feature /featurename:CoreFileServer
C:UsersAdministrator>dism /online /enable-feature /featurename:FSRM-Management
C:UsersAdministrator>start /wait dism /online /enable-feature /featurename:IIS
-WebServerRole
C:UsersAdministrator>start /wait dism /online /enable-feature /featurename:IIS
-FTPServer /featurename:IIS-FTPSvc /featurename:IIS-FTPExtensibility
Важно замечание: установленный IIS имеет версию (Version 7.5.7600.16385)
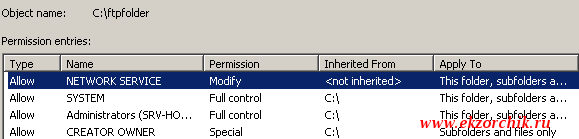
Затем на логическом диске, пусть это будет тот на котором стоит система создаем каталог, отключаем наследование прав и оставляем доступ к нему только для Администраторов текущей системы: c:ftpfolder
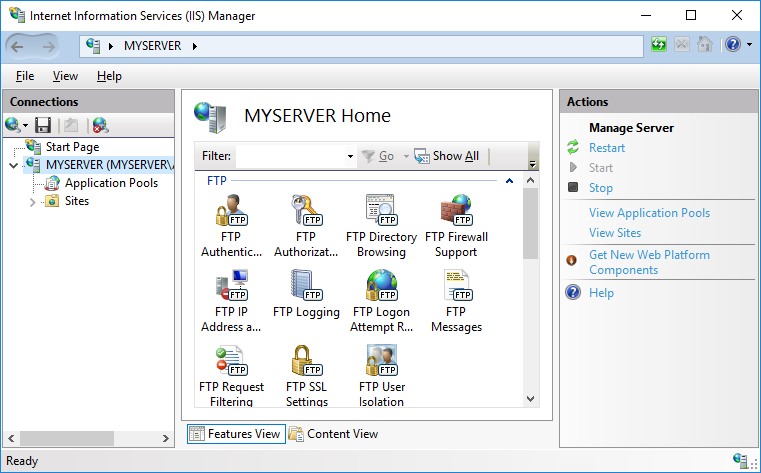
После запускаем оснастку управления IIS Web сервером:
Start – Control Panels – Administrative Tools – Internet Information Services (IIS) Manager и создаем новый FTP Site:
Start Page – SRV-HOST1 (SRV-HOST1Administrator) – Sites и через правый клик вызываем мастер Add FTP Site…
FTP site name: srv-host1
Physical path: указываем путь до c:ftpfolder
и нажимаем кнопку Next, теперь нужно указать на каком сетевом интерфейсе ожидать подключения, порт взаимодействия, запускать ли FTP сайт автоматические и поддерживает ли наш ftp сайт SSL сертификат:
- IP Address: 192.168.1.162 (Я выбираю текущий IP адрес)
- Port: 21 (дефолтный)
- Start FTP site automatically: отмечаю галочкой
- SSL: No SSL
и нажимаю кнопку Next, далее момент когда нужно определить каким образом будет происходить авторизация на FTP сервисе:
Authentication: Basic
Authorization – Allow access to – Specified users (выбираю что только указанным учетным записям будет разрешен вход)
Ниже указываю их: ftpuser1,ftpuser2
Permissions: Write
и нажимаю кнопку Finish.
Вот и появился мой добавленный в IIS ресурс для обслуживания через FTP сервис:
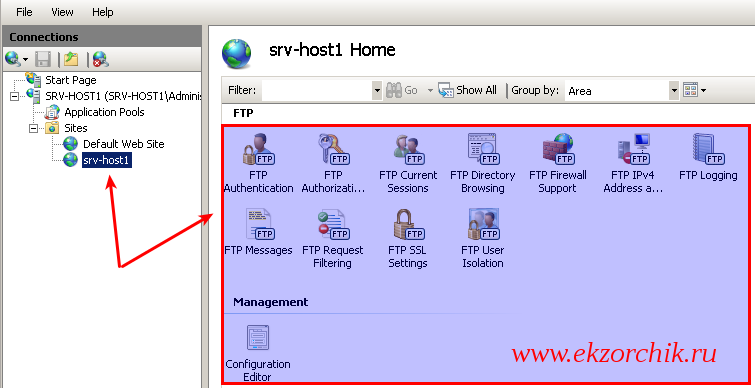
Слева в оснастке Internet Information Services (IIS) Manager представлены имеющиеся сайты, выделив который справа отобразятся апплеты настройки и управления возможностями.
Хоть я и посредством мастера создал пользователя и тип доступ, его можно посредством апплетов и видоизменить.
Важным было бы это определить как производить логирование взаимодействия с FTP сервисом: FTP Logging – Select W3C Fields… — отмечаем все пункты которые представляют из себя колонки заполняемой информации в формируемом лог файле при взаимодействии с FTP сервисом, уже потом поработав какое-то время можно будет исключить не представляющую из себя логируемую информацию и нажимаем кнопку OK окна Information To Log. Каталог по умолчанию для логов:
- Directory:
c:inetpublogsLogFiles - Select a method that FTP uses to create a new log file: Schedule: Daily
- Use local time for file naming and rollover: Отмечаю галочкой
Чтобы внесенные изменения сохранились в правом углу нужно будет нажать кнопку Apply, когда изменения сохранены в правом углу появится надпись: The changes have been successfully saved.
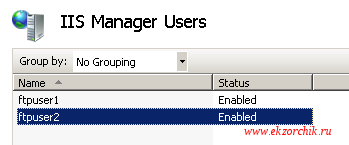
Теперь нужно создать и назначить пароли для пользователей FTP—ресурса, для этого в оснастке IIS должны быть специальные апплеты, что я имею в виде, если перейти:
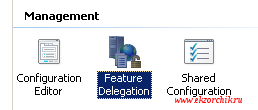
Start – Control Panels – Administrative Tools – Internet Information Services (IIS) Manager – Start Page – SRV-HOST1 (SRV-HOST1Administrator) – и в правой части в подменю Management должна быть оснастка: IIS Manager Users если ее нет, как у меня к примеру:
То чтобы она появилась действия следующие:
Start – Control panel – Administrative Tools – Server Manager – Server Manager – Roles – Web Server (IIS) – Add Role Services
и отмечаем галочками:
- IIS Managemenet Console
- IIS Management Scripts and Tools
- Managemenet Service
- IIS 6 Managemenet Compatibility
- IIS 6 Metabase Compatibility
- IIS 6 Scripting Tools
- IIS 6 Management Console
и нажимаю кнопку Next – Install – Close
После нужно закрыть консоль управления IIS и заново открыть и необходимый апплет появится. Заходим в апплет → IIS Manager Users и создаю необходимых пользователей: Add User
- User name: ftpuser1
- Password: Aa1234567
- Confirm password: Aa1234567
и нажимаю OK, по аналогии создаю другого пользователя ftpuser2
Далее нужно определить что доступ к FTP ресурсу будет осуществлен с использованием созданных учетных записей IIS, а не учетных записей системы:
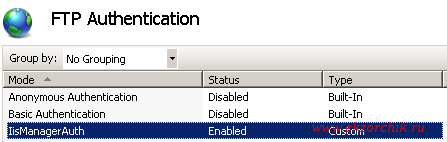
Start – Control Panels – Administrative Tools – Internet Information Services (IIS) Manager – Start Page – SRV-HOST1(SRV-HOST1Administrator) – Sites – srv-host1 – FTP Authentication – через правый клик мышью вызываю мастер: Custom Providers… и регистрирую провайдера IisManagerAuth.
У Вас должно быть точно также как у меня на представленном скриншоте ниже:
- Anonymous Authentication: Disabled
- Basic Authentication: Disables
- IisManagerAuth: Enable
После меняем тип аутентификации на всем сервисе, по умолчанию стоит Windows credentials only, а я изменяю на:
Start – Control Panels – Administrative Tools – Internet Information Services (IIS) Manager – Start Page – SRV-HOST1 (SRV-HOST1Administrator) – Management Service: Windows credentials or IIS Manager credentials и не забываем нажать Apply.
C:UsersAdministrator>CACLS "%SystemDrive%WindowsSystem32inetsrvconfig" /G "Network Service":R /E
C:UsersAdministrator>CACLS "%SystemDrive%WindowsSystem32inetsrvconfigadministration.config" /G "Network Service":R /E
C:UsersAdministrator>CACLS "%SystemDrive%WindowsSystem32inetsrvconfigredirection.config" /G "Network Service":R /E
C:UsersAdministrator>cacls "c:ftpfolder" /G "Network Service":C /T /E
C:UsersAdministrator>iisreset /stop
Attempting stop…
Internet services successfully stopped
C:UsersAdministrator>iisreset /start
Attempting start…
Internet services successfully started
C:UsersAdministrator>iisreset /status
Status for IIS Admin Service ( IISADMIN ) : Running
Status for Windows Process Activation Service ( WAS ) : Running
Status for World Wide Web Publishing Service ( W3SVC ) : Running
или же находясь в то же окне где изменяли поведение авторизации справа нажать Start.
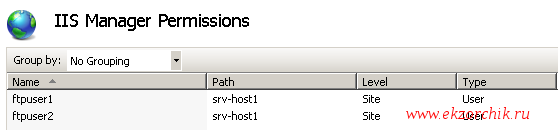
Затем добавляю к своему FTP—ресурсу в разрешения IIS учетные записи на основе которых и будет происходить авторизация, а не Windows создаваемые учетные записи:
Start – Control Panels – Administrative Tools – Internet Information Services (IIS) Manager – Start Page – SRV-HOST1(SRV-HOST1Administrator) – Sites – srv-host1 – IIS Manager Permissions – Allow User… —
теперь параметр IIS Manager доступен для выбора (ранее он был затемнен, т.е. деактивирован) и через Select… указываю созданный ранее двух пользователей: ftpuser1, ftpuser2 и нажимаю OK.
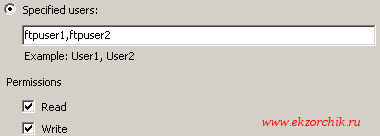
После нужно дать данным пользователям полный доступ к FTP ресурсу, а не права только чтения, но и запись иначе да они смогут создавать каталоги,файлы,переименовывать, но получить список файлов не смогут:
Start – Control Panels – Administrative Tools – Internet Information Services (IIS) Manager – Start Page – SRV-HOST1(SRV-HOST1Administrator) – Sites – srv-host1 —
FTP Authorization Rules —
- Specified users: ftpuser1,ftpuser2
- Permissions: Read и Write отмечаем галочками как на представленном ниже скриншоте.
Теперь когда все настройки по организации FTP сервиса настроены нужно по заметке если нужно настроить квоту на FTP-каталог и определить какие файлы разрешено на нем размещаться, останавливаться как это сделать не буду лишь укажу ссылки на FSRM с помощью которого все это делается.
Ладно это все вспомогательная часть которую можно и опустить, но я этого не рекомендую.
Теперь нужно на встроенный брандмауэер системы добавить правила на доступ:
C:UsersAdministrator>netsh advfirewall firewall add rule name=FTP action=allow protocol=tcp localport=21 dir=in profile=any
C:UsersAdministrator>netsh advfirewall set global statefulftp enable
После проверяю, что могу с другой системы в локальной сети подключиться, к примеру это будет моя рабочая система Ubuntu 12.04.5 Desktop amd64 (Gnome Classic):
ekzorchik@navy:~$ nmap -v 192.168.1.162 -p 21 | grep ftp
21/tcp open ftp
Теперь пробую подключиться с организованному FTP ресурсу:
ekzorchik@navy:~$ ftp 192.168.1.162
Connected to 192.168.1.162.
220 Microsoft FTP Service
Name (192.168.1.162:ekzorchik): ftpuser1
331 Password required for ftpuser1.
Password:Aa1234567
230 User logged in.
Remote system type is Windows_NT.
ftp> pwd
257 «/» is current directory.
ftp> mkdir 1
257 «1» directory created.
ftp> rename 1 2
350 Requested file action pending further information.
250 RNTO command successful.
ftp> quit
421 Service not available, remote server has closed connection
Справку по командам FTP ресурсам смотреть: ftp> help
Итого я получил решение своей задумки по организации FTP ресурса на Windows Server 2008 R2 без создания аутентификационных данных в Windows, только IIS аутентификация. Теперь же я смогу выполнить поставленную задачу от руководитель отдела запасных частей:
Есть необходимость в FTP.
Суть вопроса в следующем:
Поставщик шин готов предоставить нам выгрузку остатков шин (обновления будут происходить каждые 5 минут). Возможные варианты, которые реализованы с их стороны — выгрузка на FTP.
С нашей стороны необходимо предоставить / Хост[:Порт / Логин: / Пароль:
В дальнейшем данные файлы будут использоваться для загрузки на наш интернет-магазин, так же в автоматическом режиме.
Прошу предоставить ответ сегодня о возможности использования данного алгоритма.
Но это я сделал если FTP ресурс будет в пределах локальной сети, а тут как я погляжу из задания требуется доступ снаружи для поставщика, что ж и это можно.
У меня вся сетевая инфраструктура организована посредством оборудования Mikrotik (вот к примеру действия на моем: v6.37 on RB2011UiAS-2HnD), а значит я могу просто сделать проброс порта из вне:
winbox – IP&DNS – user&pass – IP – Firewall – NAT – Add —
вкладка: General
- Chain: dstnat
- Dst. Address: <уникальный_идентификатор>.sn.mynetname.net&IP-Addresss (Если статический)
- Protocol: 6 (tcp)
- Dst. Port: 33644 (выбирается произвольно главное чтобы был не занят)
вкладка: Action
- Action: dst-nat
- To Addresses: 192.168.1.162
- To Ports: 21
После не забываем сохранить изменения: Apply – Ok. Вот и все, проверяю со своего хостинга:
ekzorchik@ekzorchik:~$ ftp <уникальный_идентификатор>.sn.mynetname.net 33644
Connected to <уникальный_идентификатор>.sn.mynetname.net.
220 Microsoft FTP Service
Name (<уникальный_идентификатор>.sn.mynetname.net:ekzorchik): ftpuser1
331 Password required for ftpuser1.
Password:Aa1234567
230 User logged in.
Remote system type is Windows_NT.
ftp> quit
221 Goodbye.
Ну конечно же работает как могло быть иначе, ведь после того как сделал и перепроверил все работает как и было задумано. Вот теперь я могу отписать руководителю поставленной задачи – что задача выполнена и прислать ему необходимые данные для поставщика и организации задачи. На этом я прощаюсь и до новых встреч на моем блоге практических задач с которыми мне как системному администратору приходится сталкиваться, с уважением автор блога – Олло Александр.
Documentation » Using WinSCP » Guides » Other »
You may want to install a secure FTP server on Windows either as standalone file storage or to have means of editing your website hosted on IIS (Internet Information Services) web server. In both cases, you can use an optional FTP Server component of the IIS. It can be installed standalone or along with a Web Server.1
- Installing FTP Server
- On Windows Server 2022, Windows Server 2019, Windows Server 2016 and Windows Server 2012
- On Windows Server 2008 R2
- On Windows Desktop (Windows 11, Windows 10, Windows 8, Windows 7 and Windows Vista)
- Opening IIS Manager
- Creating Certificate for the FTPS Server
- Servers behind external Firewall/NAT
- Windows Firewall Rules
- Restarting FTP Service
- Adding FTP Site
- To a Web Site
- Standalone FTP Site
- Connecting to Your FTPS Server
- Further reading
Installing FTP Server
On Windows Server 2022, Windows Server 2019, Windows Server 2016 and Windows Server 2012
- In Windows Server Manager go to Dashboard and run Manage > Add Roles and Features.
Advertisement
- In Add Roles and Features wizard:
- Proceed to Installation Type step and confirm Role-based or feature-based installation.
- Proceed to Server Roles step and check Web Server (IIS) role. Note that it is checked already, if you had IIS installed as a Web Server previously. If your are prompted to install IIS Management Console tool, confirm it.
- Proceed to Web Server Role (IIS) > Role Services step and check FTP Server role service. Uncheck Web Server role service, if you do not need it.
- Proceed to the end of the wizard and click Install.
- Wait for the installation to complete.

Advertisement
Skip to the next step.
On Windows Server 2008 R2
If you do not have IIS installed yet:
- In Windows Server Manager go to Roles node and in Roles Summary panel click Add Roles.
- In Add Roles wizard:
- Proceed to Server Roles step and check Web Server (IIS) role.
- Proceed to Role Services step and check FTP Server > FTP Service role service. Uncheck Web Server role service, if you do not need it. Make sure Management Service > IIS Management Console role service is checked.
- Proceed to the end of the wizard and click Install.
- Wait for the installation to complete.
If you have IIS installed already (i.e. as a Web Server):
- In Windows Server Manager go to Roles node and in Web Server (IIS) > Role Services panel click Add Role Services.
- In Add Role Services wizard:
- Check FTP Server > FTP Service role service.
- Make sure that Management Service > IIS Management Console is checked.
- Confirm with Next button.
- Proceed to the end of the wizard and click Install.
- Wait for the installation to complete.

Advertisement
Skip to the next step.
On Windows Desktop (Windows 11, Windows 10, Windows 8, Windows 7 and Windows Vista)
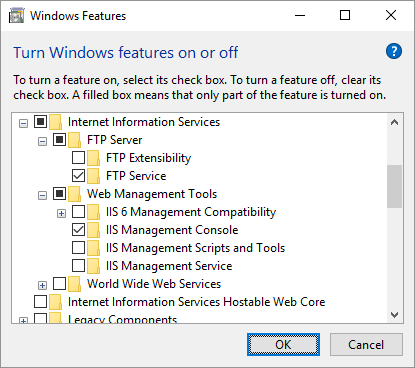
- Go to Control Panel > Programs > Programs and Features > Turn Windows features on or off.
- On a Windows Features window:
- Expand Internet Information Services > FTP Server and check FTP Service.
- Expand Internet Information Services > Web Management Tools and check IIS Management Console, if it is not checked yet.
- Confirm with OK button.
- Wait for the installation to complete.
Opening IIS Manager
- Go to Control Panel > System and Security > Administrative Tools (Windows Tools on Windows 11) and open Internet Information Services (IIS) Manager.
- Navigate to your Windows server node.
Advertisement
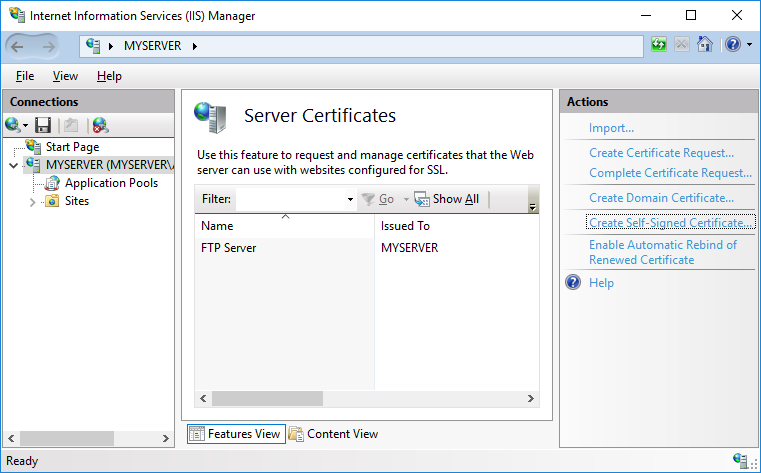
Creating Certificate for the FTPS Server
You need a TLS/SSL certificate to secure your FTP server. Ideally, you should acquire the certificate from a certificate authority.
You may also create a self-signed certificate locally, but in such case users of your FTPS server will be warned, when connecting to the server.
To create the self-signed certificate:
- In IIS Manager, open IIS > Server Certificates.
- Click on Create Self-Signed Certificate action.
- Specify a certificate name (e.g. “FTP Server”) and submit with OK.
Self-signed certificates created by old versions of IIS Manager do not work with FTPS clients that check for key usage violations.2 To create a certificate with a correct key usage, use New-SelfSignedCertificate PowerShell as an Administrator:
New-SelfSignedCertificate -FriendlyName "FTP Server" -CertStoreLocation cert:localmachinemy -DnsName ftp.example.com
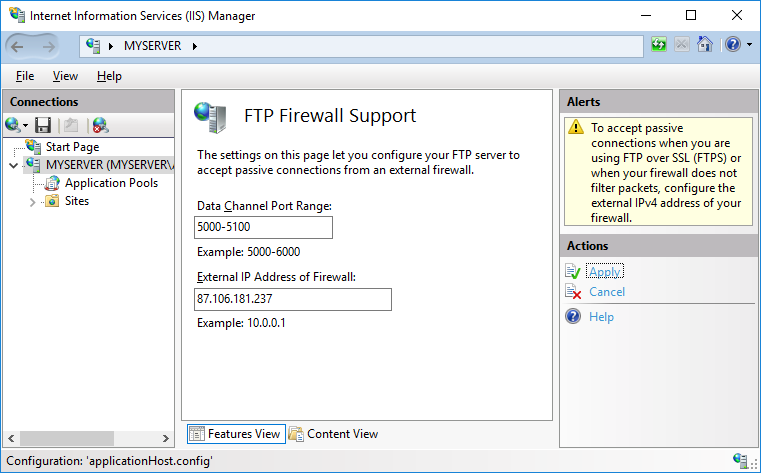
Servers behind external Firewall/NAT
If your server is behind an external firewall/NAT, you need to tell the FTP server its external IP address, to allow passive mode connections.
- In IIS Manager, open FTP > FTP Firewall Support.
- Specify your server’s external IP address.
For Microsoft Azure Windows servers you will find the external IP address in Public IP address section of the virtual machine page.
When behind an external firewall, you need to open ports for data connections (obviously in addition to opening an FTP port 21 and possibly an implicit TLS/SSL FTP port 990). You won’t probably want to open whole default port range 1024-65535. In such case, you need to tell the FTP server to use only the range that is opened on the firewall. Use a Data Channel Port Range box for that. Any time you change this range, you will need to restart FTP service. Learn how to open ports on Microsoft Azure.
Advertisement
Click Apply action to submit your settings.
Some external firewalls are able to monitor FTP control connection and automatically open and close the data connection ports as needed. So you do not need to have whole port range opened all the time, even when not in use. This won’t work with the secure FTPS as the control connection is encrypted and the firewall cannot monitor it.
Windows Firewall Rules
An internal Windows firewall is automatically configured with rules for the ports 21, 990 and 1024-65535 when IIS FTP server is installed.
The rules are not enabled initially on some versions of Windows.3 To enable or change the rules, go to Control Panel > System and Security > Windows Defender Firewall4 > Advanced Settings > Inbound Rules and locate three “FTP server” rules. If the rules are not enabled, click on Actions > Enable Rule.
Restarting FTP Service
While the internal Windows firewall is automatically configured to open FTP ports when FTP server is installed, this change does not seem to apply, until FTP service is restarted. The same is true for changing data channel port range.
To restart FTP service go to Control Panel > System and Security > Administrative Tools (Windows Tools on Windows 11) and open Services. Locate Microsoft FTP Service and click Restart service.5
Adding FTP Site
To a Web Site
If you want to add FTP server to manage your existing web site remotely, locate your web site node in IIS Manager and:
- Click Add FTP Publishing action.
- In Add FTP Site Publishing wizard:
- On an initial Binding and SSL Settings step, select Require SSL to disallow non-encrypted connections and select your certificate.
- On Authentication and Authorization Information step, select Basic authentication and make sure Anonymous authentication is not selected. Select which users (Windows accounts) you allow to connect to the server with what permissions. You can choose All users or select only some. Do not select Anonymous users.
- Submit with Finish button.
Advertisement
Your secure FTPS server is now running and can be connected to.

Standalone FTP Site
If you want to add a standalone FTP server to store/exchange files, locate Sites node (folder) of your Windows server in IIS Manager and:
- Click Add FTP Site action.
- In Add FTP Site wizard:
- On an initial Site Information step, give a name to your FTP site (if it’s the only site you are going to have, simple “FTP site” suffice) and specify a path to a folder on your server’s disk that is going to be accessible using FTP.
- On a Binding and SSL Settings step, select Require SSL to disallow non-encrypted connections and select your certificate.
- On Authentication and Authorization Information step, select Basic authentication and make sure Anonymous authentication is not selected. Select which users (Windows accounts) you allow to connect to the server with what permissions. You can choose All users or select only some. Do not select Anonymous users.
- Submit with Finish button.
Your secure FTPS server is now running and can be connected to.
Connecting to Your FTPS Server
For connecting to a Microsoft Azure Windows instance, see a specific guide.
Start WinSCP. Login Dialog will appear. On the dialog:
- Select FTP protocol and TLS/SSL Explicit encryption.
- Enter your Windows server hostname to Host name field. Avoid using an IP address to allow WinSCP to verify that the hostname matches with host the server’s certificate was issued to (not applicable to self-signed certificates).
- Specify username and password for Windows account you want to connect with (when using domain accounts, you need to specify a full username with format
domainusername). - You may want to save your session details to a site so you do not need to type them in every time you want to connect. Press Save button and type site name.
- Press Login to connect.
- If you are using self-signed certificate, you will be prompted to accept it.
Advertisement

Further reading
- Installing secure FTP server on Microsoft Azure using IIS;
- Installing SFTP/SSH Server on Windows using OpenSSH;
- Upload files to FTP server or SFTP server;
- Automate file transfers (or synchronization) to FTP server or SFTP server.
| title | author | description | ms.date | ms.assetid | msc.legacyurl | msc.type |
|---|---|---|---|---|---|---|
|
Installing and Configuring FTP 7 on IIS 7 |
rmcmurray |
Describes how to install and configure FTP 7 on IIS 7, and provides a list of prerequisites and troubleshooting advice. |
12/06/2007 |
1d813d22-e411-4a5a-a0f1-689421b498ae |
/learn/install/installing-publishing-technologies/installing-and-configuring-ftp-7-on-iis-7 |
authoredcontent |
by Robert McMurray
Compatibility
| Version | Notes |
|---|---|
| IIS 7.5 | The FTP 7.5 service ships as a feature for IIS 7.5 in Windows 7 and Windows Server 2008 R2. |
| IIS 7.0 | The FTP 7.0 and FTP 7.5 services were shipped out-of-band for IIS 7.0, which required downloading and installing the service from the following URL: https://www.iis.net/downloads/microsoft/ftp. |
Introduction
Microsoft rewrote the FTP service for Windows Server® 2008 and above. This updated FTP service incorporates many new features that enable web authors to publish content better than before, and offers web administrators more security and deployment options.
- Integration with IIS: IIS has a new administration interface and configuration store, and the new FTP service is tightly integrated with this design. The old IIS 6.0 metabase is gone, and the updated configuration store based on the .NET XML-based *.config format took its place. In addition, IIS has an updated administration tool, and the new FTP server plugs seamlessly into that paradigm.
- Support for new Internet standards: One of the most significant features in the updated FTP server is support for FTP over SSL. The FTP server also supports other Internet improvements such as UTF8 and IPv6.
- Shared hosting improvements: By fully integrating into IIS, the updated FTP server makes it possible to host FTP and Web content from the same site by simply adding an FTP binding to an existing Web site. In addition, the FTP server has virtual host name support, making it possible to host multiple FTP sites on the same IP address. The FTP server also has improved user isolation, making it possible to isolate users through per-user virtual directories.
- Custom authentication providers: The updated FTP server supports authentication using non-Windows accounts for IIS Managers and .NET Membership.
- Improved logging support: FTP logging was enhanced to include all FTP-related traffic, unique tracking for FTP sessions, FTP sub-statuses, additional detail fields in FTP logs, and much more.
- New supportability features: IIS has the option to display detailed error messages for local users, and the FTP server supports this by providing detailed error responses when logging on locally to an FTP server. The FTP server also logs detailed information using Event Tracing for Windows (ETW), which provides additional detailed information for troubleshooting.
- Extensible feature set: FTP supports extensibility that allows you to extend the built-in functionality that ships with the FTP service. More specifically, there is support for creating your own authentication and authorization providers. You can also create providers for custom FTP logging and for determining the home directory information for your FTP users.
Additional information about new features in FTP 7.5 is available in the What’s New for Microsoft and FTP 7.5? article.
This document will walk you through installing the new FTP service and troubleshooting installation issues.
Installing FTP for IIS 7.5
IIS 7.5 for Windows Server 2008 R2
-
On the taskbar, click Start, point to Administrative Tools, and then click Server Manager.
-
In the Server Manager hierarchy pane, expand Roles, and then click Web Server (IIS).
-
In the Web Server (IIS) pane, scroll to the Role Services section, and then click Add Role Services.
-
On the Select Role Services page of the Add Role Services Wizard, expand FTP Server.
-
Select FTP Service.
[!NOTE]
To support ASP.NET Membership or IIS Manager authentication for the FTP service, you will also need to select FTP Extensibility. -
Click Next.
-
On the Confirm Installation Selections page, click Install.
-
On the Results page, click Close.
IIS 7.5 for Windows 7
-
On the taskbar, click Start, and then click Control Panel.
-
In Control Panel, click Programs and Features, and then click Turn Windows Features on or off.
-
Expand Internet Information Services, then FTP Server.
-
Select FTP Service.
[!NOTE]
To support ASP.NET Membership or IIS Manager authentication for the FTP service, you will also need to select FTP Extensibility. -
Click OK.
Installing FTP for IIS 7.0
Prerequisites
The following items are required to complete the procedures in this section:
- You must be using Windows Server 2008.
- Internet Information Services 7.0 must be installed.
- If you are going to manage the new FTP server by using the IIS 7.0 user interface, the administration tool will need to be installed.
- You must install the new FTP server as an administrator. (See the Downloading and Installing section for more.)
- IIS 7.0 supports a shared configuration environment, which must be disabled on each server in a web farm before installing the new FTP server for each node. Note: Shared configuration can be re-enabled after the FTP server had been installed.
- The FTP server that is shipped on the Windows Server 2008 DVD must be uninstalled before installing the new FTP server.
Downloading the right version for your server
There are two separate downloadable packages for the new FTP server; you will need to download the appropriate package for your version of Windows Server 2008:
-
32-bit Installation Package:
- FTP 7.5 for IIS 7.0 (x86)
-
64-bit Installation Package:
- FTP 7.5 for IIS 7.0 (x64)
Launching the installation package
You will need to run the installation package as an administrator. This can be accomplished by one of the following methods:
-
Logging in to your server using the actual account named «Administrator», then browsing to the download pages listed above or double-clicking the download package if you have saved it to your server.
-
Logging on using an account with administrator privileges and opening a command-prompt by right-clicking the Command Prompt menu item that is located in the Accessories menu for Windows programs and selecting «Run as administrator», then typing the appropriate command listed below for your version of Windows to run the installation:
-
32-bit Windows Versions:
- msiexec /i FTP 7_x86_75.msi
-
64-bit Windows Versions:
- msiexec /i FTP 7_x64_75.msi
-
[!NOTE]
One of the above steps is required because the User Account Control (UAC) security component in the Windows Vista and Windows Server 2008 operating systems prevents access to your applicationHost.config file. For more information about UAC, see User Account Control.
The following steps walk you through all of the required settings to add FTP publishing for the Default Web Site.
Walking through the installation process
-
When the installation package opens, you should see the following screen. Click Next to continue.

-
On the next screen, click the I accept check box if you agree to the license terms, and then click Next.
-
The following screen lists the installation options. Choose which options you want installed from the list, and then click Next.
- Common files: this option includes the schema file. When installing in a shared server environment, each server in the web farm will need to have this option installed.
- FTP Publishing Service: this option includes the core components of the FTP service. This option is required for the FTP service to be installed on the server.
- Managed Code Support: this is an optional component, but features that use managed extensibility require this option before using them, such as ASP.NET and IIS manager authentication. Note: This feature cannot be installed on Windows Server 2008 Core.
- Administration Features: this option installs the FTP 7 management user interface. This requires the IIS 7.0 manager and .NET framework 2.0 to be installed. Note: This feature cannot be installed on Windows Server 2008 Core.
-
On the following screen, click Install to begin installing the options that you chose on the previous screen.
-
When installation has completed, click Read notes to view the FTP README file, or click Finish to close the installation dialog.


[!NOTE]
If an error occurs during installation, you will see an error dialog. Refer to the Troubleshooting Installation Issues section of this document for more information.
Troubleshooting Installation Issues
When the installation of FTP 7 fails for some reason, you should see a dialog with a button called «Installation log». Clicking the «Installation log» button will open the MSI installation log that was created during the installation. You can also manually enable installation logging by running the appropriate command listed below for your version of Windows. This will create a log file that will contain information about the installation process:
-
32-bit Windows Versions:
- msiexec /L FTP 7.log /I FTP 7_x86_75.msi
-
64-bit Windows Versions:
- msiexec /L FTP 7.log /I FTP 7_x64_75.msi
You can analyze this log file after a failed installation to help determine the cause of the failure.
Clicking the «Online information» button on the error dialog will launch the «Installing and Troubleshooting FTP 7.5» document in your web browser.
[!NOTE]
If you attempt to install the downloaded package on an unsupported platform, the following dialog will be displayed:

Known Issues in This Release
The following issues are known to exist in this release:
-
While Web-based features can be delegated to remote managers and added to web.config files using the IIS configuration infrastructure, FTP features cannot be delegated or stored in web.config files.
-
The icon of a combined Web/FTP site may be marked with a question mark even though the site is currently started with no error. This occurs when a site has a mixture of HTTP/FTP bindings.
-
After adding an FTP publishing to a Web site, clicking the site’s node in the tree view of the IIS management tool may not display the FTP icons. To work around this issue, use one of the following:
- Hit F5 to refresh the IIS management tool.
- Click on the Sites node, then double-click on the site name.
- Close and re-open the IIS management tool.
-
When you add a custom provider in the site defaults, it shows up under each site. However, if you attempt to remove or modify the settings for a custom provider at the site-level, IIS creates an empty <providers /> section for the site, but the resulting configuration for each site does not change. For example, if the custom provider is enabled in the site defaults, you cannot disable it at the site-level. To work around this problem, open your applicationHost.config file as an administrator and add a <clear/> element to the list of custom authentication providers, the manually add the custom provider to your settings. For example, in order to add the IIS Manager custom authentication provider, you would add settings like the following example:
[!code-xmlMain]
-
The following issues are specific to the IIS 7.0 release:
- The FTP service that is shipped on the Windows Server 2008 DVD should not be installed after the new FTP service has been installed. The old FTP service does not detect that the new FTP service has been installed, and running both FTP services at the same may cause port conflicts.
- IIS 7 can be uninstalled after the new FTP service has been installed, and this will cause the new FTP service to fail. If IIS is reinstalled, new copies of the IIS configuration files will be created and the new FTP service will continue to fail because the configuration information for the new FTP service is no longer in the IIS configuration files. To fix this problem, re-run the setup for the new FTP service and choose «Repair».
Getting Started with FTP 7.5
In order to help get started using the new FTP server, the following walkthroughs have been published:
-
Working with FTP Sites:
- Creating a New FTP Site
- Add FTP publishing to an existing Web site
-
Configuring Security Features:
- Configure FTP over SSL
- Configure FTP User Isolation
- Configure FTP Firewall Settings
- Configure IIS Manager Authentication
-
Advanced Administrative Features:
- Configure FTP virtual host names
- Using FSRM Folder Quotas with FTP
In addition to these documents, the help file for the new FTP server contains a great deal of information regarding the use and administration of the new FTP server. To open the help file, open one of the FTP features in the IIS manager and click the «Help» item in the «Actions» pane.
Данныя заметка содержит информацию о том, как установить и включить FTP доступ к серверу на базе Windows Server 2008 (включая R2) при использовании встроенного IIS 7.
Для того, чтобы Windows начала принимать подключения по FTP — необходимо установить ряд компонент. Если у Вас не стоит IIS — имейте в виду — оно понадобится.
Если IIS еще не стоит
Итак, Если IIS (Internet Information Services) еще не стоит — открываем оснастку «Управление сервером» (Пуск -> Администрирование -> Управление сервером), открываем блок «Роли» и нажимаем на «Добавить роль».

Нам нужно добавить роль «Веб-сервер (IIS)».
Среди компонент найдите и выделите блок «FTP сервер» и проследите, чтобы так-же поставились галочки на компонентах «Служба FTP» и «Расширяемость FTP».

Все, дальше действуйте по подсказкам визарда — устанавливайте IIS — вместе с ним поставятся компоненты для FTP.
Если IIS уже стоит
В данном случае нам нужно добавить к IIS поддержку FTP. Для этого откройте оснастку «Управление сервером» (Пуск -> Администрирование -> Управление сервером), открываем блок «Роли», находим установленную роль «Веб сервер (IIS)» (тыкаем на нее) и нажимаем на «Добавить службы ролей».

В открывшемся окне выделяйте «FTP сервер» и проследите, чтобы были поставлены галочки напротив «Служба FTP» и «Расширяемость FTP».

Продолжайте работу мастера — он установит FTP службы.
Настройка FTP
Открываем оснастку «Диспетчер служб IIS» (Пуск -> Администрирование -> Диспетчер служб FTP).
Далее раскрываем строчку с именем нашего сервера и нажимаем на «Сайты». В случае, если IIS уже стоит и Вы им пользуетесь — Вы знаете, что в этой вкладке можно создавать сайты. Но сейчас, если нажать правой кнопкой на этом пункте («Сайты») — можно увидеть еще одну опцию: «Добавить FTP-сайт».

Именно эта опция нас сейчас и интересует. Итак, правой кнопкой на «Сайты» и нажимаем «Добавить FTP-сайт».
В открывшемся окне задаем имя сайта и путь к его папке (т.е. путь к физической папке на жестком диске, где будут располагаться файлы этого FTP-сайте). После чего жмем «Далее».
Далее указываем IP-адреса, по которым будет доступен сайт (или оставляем значение по-умолчанию «Все свободные», чтобы сайт был доступен со всех адресов) и указываем порт (порт 21 — стандартный для FTP).
Опция «Разрешить имена виртуальных узлов» позволяет Вам (как в случае с HTTP-сервером) использовать виртуальные хосты (т.е. на одном IP несколько FTP-сайтов и доступ к ним организуется не по IP адресу, а по DNS FQDN имени, например, «ftp://my.ftp.site.ru»).
В разделе SSL выберите подходящий Вам вариант. При варианте по-умолчанию «Требовать» Вам придется указать сертификат безопасности SSL (который Вы должны создать и установить заранее) и такой вариант не позволит большинству обычных клиентам FTP осуществить подключение к этому сайту (т.к. требует поддержку SSL со стороны FTP), а остальные клиенты не смогут рабоать в открытом режиме. С одной стороны это хорошо — уж слишком открыто передается информация через FTP. С другой стороны — позаботьтесь о том, чтобы у Вас был современный FTP клиент для доступа к этому сайту.
Или же просто выберите вариант «Без SSL».
Следующее окно и следующие вопросы.
«Проверка подлинности».
Если поставить галочку напротив «Анонимный», то анонимные (не авторизующиеся) пользователи смогут получать доступ к FTP на чтение.
Установка галочки «Обычный» позволит зарегистрированным пользователям получать доступ с более высокими привилегиями (на запись).
В блоке «Авторизация» Вы можете укакать тип авторизации:
а) «Не выбрано» — никто не имеет доступа;
б) «Все пользователи» — при этом все пользователи будут иметь доступ к FTP с указанными ниже привилегиями;
в) «Анонимные пользователи» — только анонимные пользователи будут иметь доступ с указанными ниже привилегиями;
г) «Указанные пользователи и группы» — Вы можете перечислить пользователей и группы (в том числе доменных) в строке ниже — эти пользователи и группы будут иметь доступ к FTP с указанными привилегиями;
д) «Указанные пользователи» — Вы можете перечислить только пользователей (не группы) в строке ниже — эти пользователи будут иметь доступ к FTP с указанными привилегиями.
Ниже можно указать — какой уровень доступа будут иметь перечисленные пользователи: чтение, запись или чтение+запись. Да-да, Windows дает такую хитрую особенность — в ее FTP каталог можно сделать разрешение на запись, но запретить чтение, и это работает 
Т.е. пользователь сможет загружать на сервер информацию, но даже список файлов получить не сможет.
Все, жмем на «Готово» — и сайт создан. Уже отсюда можно подсоединиться к серверу и пошалить в его FTP папке.
Пост-настройка.
Но Вам может понадобиться изменить разрешения к каталогу сайта FTP или другие параметры. Для этого кликните на строчке с сайтом и в правой части у Вас появится панель управления.
Права на доступ к сайту задаются через пункт «Правила авторизации FTP».
Режимы авторизации (анонимный доступ, доступ по логин/паролю) изменяются в «Проверка подлинности FTP».
Параметры SSL шифрования Вы можете изменить, соответственно, в пункте «Параметры SSL FTP».
В пункте «Ограничения IPv4-адресов и доменов FTP» Вы можете создать разрешающие или запрещающие записи — с каких IP можно к этому сайту цепляться, а с каких — нельзя.
В пункте «Изоляция пользователей FTP» можно настроить — как пользователи будут изолироваться друг от друга:
а) Корневой каталог FTP — все пользователи видят все папки и файлы друг друга, сессия начинается с корневой папки этого сайта.
б) Каталог имени пользователя — все пользователи видят все папки и файлы друг друга, но сессия начинается в личной папке этого пользователя (при этом пользователь может подняться на уровень выше и увидеть папки других пользователей).
в) Изолировать пользователей пределами своих домашних директорий с различными вариантами (с глобальными виртуальными каталогами или без, либо вообще через каталог Active Directory).
Вот как-то так. Панель довольно проста и разобраться в ней можно за 5-10 минут.
FTP-Сервер обеспечивает возможность передачи файлов между клиентом и сервером с помощью протокола FTP. В этой статье я расскажу как запустить FTP-сервер в Windows Server 2008.
Что необходимо:
- Компьютер под управлением Windows Server 2008, подключенный к сети internet.
- Права администратора на сервере.
Добавление службы FTP-Сервер:
FTP-Сервер является службой роли Веб-сервер IIS, поэтому для начала нужно установить данную роль. Для этого заходим в диспетчер сервера («Пуск» — «Администрирование»; «Диспетчер сервера»). Раскрываем вкладку «Роли» и нажимаем «Добавить роли». (Если Веб-сервер уже был установлен раннее, то необходимо кликнуть правой кнопкой мыши на названии роли в диспетчере сервера и выбрать Добавить службы ролей).

В запустившемся мастере нажимаем Далее, выбираем роль Веб-сервер IIS кликаем 2 раза и жмем Далее.

Теперь надо выбрать службы для данной роли. По умолчанию уже отмечены службы, необходимые для работы web-сервера. Прокручиваем вниз и отмечаем службу FTP-Сервер. Затем жмем Далее, Установить и дожидаемся сообщения об успешной установке роли.
Добавление FTP-сайта
Теперь в диспетчере сервера, раскрыв вкладку Роли мы видим добавленную только что роль Веб-сервер IIS. Кликаем по ней 2 раза и заходим в Диспетчер служб IIS (доступен также через «Пуск» — «Администрирование» «Диспетчер служб IIS»).
В диспетчере служб IIS мы видим, что у нас уже добавлен сайт по умолчанию Default Web Site (Чтобы его просмотреть можно набрать в строке браузера http://localhost/), нам же надо добавить новый ftp-сайт. Для этого кликаем правой кнопкой мыши в окне Подключения и выбираем Добавить FTP-сайт.
Запустится мастер добавления FTP-сайта. Придумываем имя FTP-сайта (любое название), указываем расположения каталогов для сайта и жмем Далее.
На следующей странице, в меню Привязки оставляем Все свободные и можно поменять порт (21) по умолчанию, если Вам это надо. Далее, если у вас есть доменное имя, и вы хотите чтобы по нему был доступен FTP-сайт, записываем его в поле Виртуальный узел. В нашем случае это ftp.namesevere.ru, в противном случае НЕ включаем опцию Разрешить имена виртуальных узлов. Оставляем галочку Запускать FTP-сайт автоматически (чтобы сайт запускался автоматически при запуске компьютера), выбираем пункт Без SSL (в этой статье я не буду рассматривать данный протокол) и жмем Далее.

Теперь настраиваем уровень доступа к FTP-сайту. Устанавливаем проверку подлинности Анонимный, только если хотим оставить анонимный доступ к сайту и выбираемОбычная для обычной проверки доступа. Далее необходимо выбрать для каких пользователей будет доступен наш FTP-сайт. Можно выбрать группы пользователей или перечислить имена пользователей через запятую. Я же выбираю Все пользователи, устанавливаем флаги Чтение и Запись и жмем Готово.
Все, на этом наш FTP-сайт готов. Для проверки можно набрать в браузере ftp://<%вашдомен%>, если Вы делали привязку к доменному имени, или ftp://localhost в противном случае.
Если Вы настраивали все так же, как описано у меня, то FTP-сайт доступен для всех пользователей, имеющихся в системе. Кроме того, все параметры вводимые при добавлении FTP-сайта можно изменить в любое время в меню управления сайтом, а также в меню Действия, выделив его в диспетчере служб IIS:
Детальная настройка уровня доступа для FTP-сайта
Наш FTP-сайт настроен и работает, теперь надо настроить уровень доступа пользователей на FTP. Сделать это можно, например, выбрав пункт Правила авторизации FTP в меню управления сайтом. На скриншоте ниже, настройки установлены таким образом, что группе Администраторы разрешены права на запись и чтение на сайте, а группе Пользователи только права на чтение.
Более детально, уровень доступа можно настроить управляя параметрами безопасности для каталогов и файлов в директории, где находится FTP-сервер. В моем случае это C:my_ftp. Заходим в свойства папки, выбираем вкладу Безопасность после чего нажимаем Изменить и выбираем уровень доступа для пользователей и групп пользователей. Аналогично настраивается безопасность для вложенных папок и отдельных файлов.