После перехода на операционную систему Windows 10 пользователи столкнулись с отсутствием на рабочем столе таких привычных элементов как «Мой компьютер», «Мои документы». Разработчики посчитали, что нет необходимости перегружать рабочий стол разнообразными значками. Поэтому по умолчанию на рабочем столе отображается только значок Корзины. А для пользователей, которым привычнее если эти значки всегда под рукой оставили возможность вернуть их на рабочий стол. В настоящей статье мы расскажем, как найти мой компьютер и другие значки и включить их на рабочем столе.
Содержание
- Какие есть стандартные значки рабочего стола
- Основные способы вернуть стандартные значки и Мой Компьютер на рабочий стол
- Как удалить значки с рабочего стола
Какие есть стандартные значки рабочего стола
Кроме Корзины, на рабочий стол можно добавить следующие стандартные значки:
Этот компьютер.

Двойной щелчок по значку Этот компьютер открывает окно, предоставляющее доступ к жестким и съемным дискам компьютера. Щелчок по этому значку правой кнопкой мыши и выбор в контекстном меню команды Управление открывает консоль Управление компьютером (Computer Management). Контекстное меню значка Этот компьютер также содержит опции для подключения и отключения сетевых папок.
Панель управления.

Двойной щелчок по значку Панель управления открывает окно Панели управления, предоставляющее доступ к средствам конфигурации и управления системой.
Сеть.

Щелчок по значку Сеть открывает окно, предоставляющее доступ к сетевым ресурсам локальной сети. Контекстное меню значка Сеть, открываемое щелчком правой кнопки мыши, содержит, среди прочих, опции для подключения и отключения сетевых папок.
Файлы пользователя.

Значок папки текущего пользователя имеет вид полуоткрытой папки с фигурой человека и именем текущего пользователя. Двойной щелчок по значку открывает личную папку текущего пользователя.
Корзина.

Двойной щелчок по значку Корзины открывает ее окно, в котором можно просмотреть объекты, предназначенные для удаления. Чтобы безвозвратно удалить содержимое Корзины, выберите меню Управление (Manage) Корзины, а затем в панели инструментов щелкните по значку Очистить корзину (Empty Recycle Bin).
Для управления использованием Корзины выберите меню Управление, а затем щелкните по значку Свойства корзины. Откроется диалоговое окно Свойства: Корзина, в котором для каждого несъемного жесткого диска задается отдельная Корзина в виде папки.
Для каждого диска можно задать максимальный размер Корзины или же указать немедленное удаление файлов, без промежуточного помещения их в Корзину.
Основные способы вернуть стандартные значки и Мой Компьютер на рабочий стол
- Персонализация
Добавление основных значков рабочего стола осуществляется посредством следующих действий.
Щелкните правой кнопкой мыши в свободной области рабочего стола и в контекстном меню выберите команду Персонализация.

В открывшемся окне Персонализация выберите вкладку Темы.

В правой части окна щелкните по ссылке Параметры значков рабочего стола.

В открывшемся диалоговом окне Параметры значков рабочего стола имеются флажки для каждого из рассмотренных выше стандартных значков рабочего стола.
Чтобы вернуть, например, значок Этот компьютер на рабочий стол нужно установить его флажок. Сброс флажка убирает соответствующий значок с рабочего стола. Установив необходимые флажки, нажмите кнопку OK, чтобы сохранить эти настройки.

Результат установки всех флажков значков рабочего стола показан на скриншоте.

Все значки рабочего стола можно отобразить или скрыть, щелкнув правой кнопкой мыши в свободной области рабочего стола, выбрав в контекстном меню команду Вид (View), а во вложенном меню установив или сбросив флажок Отображать значки рабочего стола (Show desktop items), соответственно.

- Команда Выполнить
Откройте диалоговое окно Выполнить нажав сочетание клавиш ![]() + R.
+ R.
Скопируйте и вставьте в поле ввода окна Выполнить команду:
rundll32.exe shell32.dll,Control_RunDLL desk.cpl,,0
Нажмите клавишу Enter ↵.

В результате откроется окно Параметры значков рабочего стола.

- Создать ярлык
Для этого способа необходимо запустить Проводник. Сделать это вы можете использовав команду ![]() + E или на Панели задач в поиске (значок лупы) введите «Проводник». Среди предложенных вариантов выберите приложение и нажмите Открыть.
+ E или на Панели задач в поиске (значок лупы) введите «Проводник». Среди предложенных вариантов выберите приложение и нажмите Открыть.
В открывшемся окне слева вы увидите список элементов, к которым предоставлен доступ пользователю. Найдите необходимый значок (мы покажем на примере значка Этот компьютер). Перетащите значок левой кнопкой мыши на рабочий стол как показано на рисунке.
Готово! Ярлык папки Этот компьютер создан на рабочем столе.
Как удалить значки с рабочего стола
Чтобы удалить значок или ярлык с рабочего стола, щелкните на нем правой кнопкой мыши и в контекстном меню выберите команду Удалить.

Обратите внимание, что удаление с рабочего стола значка, представляющего файл или папку, также удаляет этот файл или папку вместе с ее содержимым.
Некоторое время назад смена значков на компьютерах была очень и очень популярна. Но вот только большинство людей, которые сделали это уже и не помнят как вернуть все иконки в исходное положение.
К примеру, сейчас у вас такие значки.

Нужно выполнить действия по инструкции:
1. Кликните в любом месте дважды правой кнопкой мыши. Главное в той части, где нет ничего.
2. Выберете пункт персонализация.
3. Теперь в этом окне выбираем слева пункт «изменение значков рабочего стола».
4. Перед вами будут представлены все значки, которые есть.
5. Выделите нужную вам иконку и нажмите на «обычный значок». Вы можете сделать это практически со всеми элементами.
Этот способ, к сожалению, срабатывает не всегда и есть некоторые исключения, о которых мы расскажем ниже.
1. Закрываем все возможные программы.
2. Открываем блокнот и пишем следующую фразу
SetLocal EnableExtensions DisableDelayedExpansionREG DELETE «HKLMSOFTWAREMicrosoftWindowsCurrentVersionExplorerShell Icons»/fREG ADD «HKLMSOFTWAREMicrosoftWindows NTCurrentVersionWinlogon»/vAutoRestartShell /tREG_DWORD /d0 /ftaskkill /im»explorer.exe»/ftimeout /t5cd/d%userprofile%AppDataLocalDEL IconCache.db /ashutdown-lИсточник контента: https://it-tehnik.ru/novice/standart-icons-windows7.html#ixzz4xkt4GSge
Теперь сохраните этот файл с расширение «bat».
Откройте этот документ с правами администратора. Нажмите на Yes.
Таким образом выполните вход со стандартными иконками.
Если вы хотите изменить значок по умолчанию для определенной папки или ярлык, который вы создали, вы можете спросить, где можно найти новые значки. Хотя существует множество веб-сайтов, предлагающих пользовательские наборы значков, вы, тем не менее, можете предпочесть использовать значки, которые уже найдены на вашем компьютере или устройстве с Windows 10. В этой статье мы покажем вам, где значки хранятся в Windows 10. Если вы хотите найти все файлы значков Windows 10 по умолчанию, читайте дальше.
Иконки обычно хранятся внутри файлов ICO. Однако файлы ICO имеют большой недостаток: они могут содержать только один значок. В Windows 10 множество приложений, папок, файлов и ярлыков, и многие из них имеют свои уникальные значки. Если бы у Windows был файл ICO для каждого используемого значка, это привело бы к значительному числу файлов значков.
Чтобы решить эту проблему, вместо использования файлов ICO для хранения значков, Windows использует файлы DLL. Основным преимуществом DLL- файла является тот факт, что он может содержать несколько значков внутри. На самом деле, вы можете сравнить DLL- файл значков с библиотекой значков. Если вы хотите изменить значок определенного файла, папки или ярлыка, вы можете просто установить его расположение значка, чтобы оно указывало на определенный файл DLL и конкретный значок из него.
Большинство значков из Windows 10 хранятся в файлах DLL. В следующем разделе мы покажем, где находятся эти библиотеки DLL со значками в Windows 10.
Где расположены значки Windows 10 по умолчанию?
Мы попытались упорядочить наш список значков Windows 10 по умолчанию как по расположению их файлов DLL, так и с учетом основного назначения значков, найденных внутри файлов DLL. Далее вы можете увидеть наш список мест из Windows 10, где вы найдете файлы .DLL, содержащие значки:
1. %systemroot%system32imageres.dll
Файл imageres.dll содержит много значков, используемых практически везде в Windows 10. Он содержит значки для различных типов папок, аппаратных устройств, периферийных устройств, действий и так далее.
![]()
2. %systemroot%system32shell32.dll
Файл shell32.dll также содержит множество значков, используемых в различных частях Windows 10. Вместе с imageres.dll , shell32.dll содержит одну из самых больших коллекций значков. Внутри вы можете найти значки для Интернета, устройств, сетей, периферийных устройств, папок и так далее.
![]()
3. %systemroot%system32pifmgr.dll
Pifmgr.dll содержит некоторые значки в старом стиле, которые были найдены в более старых версиях Windows, таких как Windows 95 и Windows 98. В нем вы можете найти забавные значки, которые изображают такие вещи, как окно, труба, шар, шляпа волшебника, и другие. 🙂
![]()
4. %systemroot%explorer.exe
Explorer.exe имеет несколько значков, используемых File Explorer и его более ранними версиями. Первый значок является значком по умолчанию, используемым в проводнике , но следующие использовались в старых версиях Windows для таких вещей, как принтеры, папки, действия, приложения для обмена сообщениями, почта и другие.
![]()
5. %systemroot%system32accessibilitycpl.dll
Accessibilitycpl.dll имеет набор значков, которые используются в основном для специальных возможностей в Windows 10. Он имеет значки с людьми, курсорами мыши, увеличительным стеклом, мышью и клавиатурой и так далее.
![]()
6. %systemroot%system32ddores.dll
Ddores.dll содержит значки для аппаратных устройств и ресурсов, таких как динамики, наушники, экраны, компьютеры, пульты дистанционного управления и игровые планшеты, мыши и клавиатуры, камеры, принтеры и так далее.
![]()
7. %systemroot%system32moricons.dll
Moricons.dll — это еще один файл, который содержит значки в старом стиле, используемые Microsoft в старых версиях Windows. Большинство значков здесь относятся к программам MS-DOS, но у вас также есть значки для старых языков программирования, таких как Turbo Pascal или FoxPro.
![]()
8. %systemroot%system32mmcndmgr.dll
Mmcndmgr.dll — еще один файл со старинными значками, который, как мы полагаем, был разработан главным образом для настроек, связанных с управлением компьютером. Среди прочего, он включает в себя значки для сетей, папок, аутентификации, времени, компьютеров и серверов.
![]()
9. %systemroot%system32mmres.dll
Mmres.dll имеет несколько значков с различными аудио ресурсами, такими как динамики, наушники, микрофоны и веб-камера.
![]()
10. %systemroot%system32netcenter.dll
Netcenter.dll имеет несколько значков для сетевых настроек и функций.
![]()
11. %systemroot%system32netshell.dll
Netshell.dll содержит значки для всех видов сетевых подключений и соответствующего оборудования или технологий.
Например, внутри него вы можете найти значки для Bluetooth, беспроводных маршрутизаторов и сетевых подключений.
![]()
12. %systemroot%system32networkexplorer.dll
Networkexplorer.dll — другой файл .dll с несколькими периферийными устройствами, такими как телефон, маршрутизатор, принтер или факс, и некоторыми значками, связанными с сетью.
![]()
13. %systemroot%system32pnidui.dll
Pnidui.dll имеет значки для настроек, связанных с сетью (состояние Ethernet или беспроводной сети, расположение в сети и т.д.). Большинство значков здесь прозрачного белого цвета, поэтому вы должны выбрать их, чтобы увидеть, как они выглядят.
![]()
14. %systemroot%system32sensorscpl.dll
Sensorscpl.dll имеет несколько значков для разных типов датчиков. Хотя большинство из них выглядят одинаково, их детали указывают на такие вещи, как температура, мощность, ветер и т.д.
![]()
15. %systemroot%system32setupapi.dll
Setupapi.dll имеет значки, используемые для мастеров установки различных аппаратных устройств. Он имеет экраны, периферийные устройства, аппаратные компоненты, разъемы и разъемы, игровые панели и другие.
![]()
16. %systemroot%system32wmploc.dll
Wmploc.dll содержит мультимедийные значки, используемые для мультимедийных устройств, музыкальные и видеофайлы, папки, CD и DVD диски и так далее.
![]()
17. %systemroot%system32wpdshext.dll
Wpdshext.dll имеет значки для некоторых портативных устройств, таких как камеры, телефоны или mp3-плееры, и несколько индикаторов батареи.
![]()
18. %systemroot%system32compstui.dll
Comstui.dll включает в себя различные классические иконки из более старых версий Windows.
На нем есть иконки с лампочками, почтой, принтерами, документами, телефонами, факсимильными аппаратами и так далее.
![]()
19. %systemroot%system32ieframe.dll
Ieframe.dll содержит значки, используемые Internet Explorer для его ярлыков, кнопок и меню.
![]()
20. %systemroot%system32dmdskres.dll
Dmdskres.dll содержит значки, используемые только для управления дисками.
![]()
21. %systemroot%system32dsuiext.dll
Dsuiext.dll включает в себя значки для сетевых служб. Он имеет значки с серверами, людьми, принтерами, офисными зданиями, службами аутентификации и так далее.
![]()
22. %systemroot%system32mstscax.dll
Mstscax.dll хранит только несколько значков, используемых для подключений к удаленному рабочему столу, с компьютерами, уведомлениями и сертификатами безопасности.
![]()
23. %systemroot%system32wiashext.dll
Wiashext.dll имеет несколько значков для различных устройств обработки изображений, таких как сканеры, камеры, фото и видеокамеры, и несколько похожих значков.
![]()
24. %systemroot%system32comres.dll
Comres.dll содержит несколько значков, которые изображают пользователя, папку, карандаш и некоторые действия.
![]()
25. %systemroot%system32mstsc.exe
Mstsc.exe содержит несколько других значков, связанных с сетью, но также включает в себя другие значки, такие как динамик, микрофон и логотип Windows 8.
![]()
26. actioncentercpl.dll, aclui.dll, autoplay.dll, comctl32.dll, xwizards.dll, ncpa.cpl, url.dll (все в %systemroot%system32)
Все эти файлы содержат значки; однако у многих есть только одна иконка внутри или только несколько, поэтому мы решили упомянуть их все вместе. У них есть значки, используемые в Центре действий Windows 10 , некоторые значки ошибок и информации, значки автозапуска, некоторые значки пользователей и значки веб-сайтов.
![]()
Как использовать значки, хранящиеся в файле .DLL
Значки, хранящиеся в файлах .DLL, не могут быть скопированы и сохранены в другом месте, по крайней мере, если вы не используете специальное приложение, которое может извлекать значки из файлов .DLL. Однако вы можете использовать любой значок, хранящийся в таком файле, чтобы установить его в качестве значка, используемого папкой, библиотекой или ярлыком. Просто скопируйте и вставьте путь, который мы указали для интересующей вас DLL, в поле «Искать значки в этом файле».
What do you think about the default icons on Windows 11/10? Well, they look great, but with time appear boring, isn’t it? You would have tried to cut the boredom by customizing your device by changing the themes and fonts. But you can take this customization to a whole new level by changing the default Windows icons and making your PC look unique and better sorted. In this Windows guide, we take you through the different ways to change any icons on Windows 11/10.
Why customize Windows 11/10 icons?
Killing ennui is just one reason, customization can be done for many different purposes. A few of them include:
- Give your PC a personal spin
- Make your environment look catchy and trendy
- Make your system more user-friendly
- Highlight the importance of a particular icon by making it look unique
- To locate an important icon immediately from a huge crowd of icons
Along with the array of benefits listed above, there are many different types of icons that can be modified on Windows 10. These include desktop icons, taskbar icons, folder icons, and shortcut icons. To know how to customize these, let’s move on the method.
Where can you find new or custom icons for Windows 11/10?
Before we can start changing icons on Windows 11/10, we will need some icons to replace the existing ones. The Operating System has a collection of built-in icons, but they might not be that great. The good news is that there are many online resources offering millions of high-quality impressive icons. You can grab them in a pack at once, or download single icons based on your likings. Few popular icon repositories are FlatIcon, Findicons, IconArchive, DeviantArt, or GraphicBurger – all of these have loads of free icons.
In case you just can’t find the icon of your choice, you can even try making high-resolution icons out of any image.
Now let’s look at the methods of changing different types of icons one after one-
- Desktop icons
- Shortcut icons
- Taskbar icons
- Folder icons
- File icons
- Drive icons.
1] Customize your Desktop Icons
What are ‘Desktop Icons’? The icons like This PC, Network, Recycle Bin, and your User folder all fall in this category. Even though modern versions of Windows do not show them all on the desktop, users can always restore these missing icons and have them appear on your system’s desktop or even change these icons even if they appear elsewhere on your system.
To customize or change your file or folder icons in Windows 11, do the following:
![]()
- From the WinX Menu, open Windows 11 Settings
- Click on Personalization settings
- Select Themes
- Scroll down a bit till you see Desktop icon settings
- Clicking on it will open the Desktop Icon Setttings box
- Select the checkbox corresponding to the specific item whose icon you wish to customize.
- Hit the Change Icon button.
- From the new panel that opens, choose from these in-built Windows icons or Browse to your own icon.
- Once set, click on Apply and exit.
For customizing desktop icons in Windows 10 follow the below-mentioned steps which are similar:
1] Go to ‘Settings’
2] Hit ‘Personalization’
3] Now click on ‘Themes’, and go to ‘Desktop Icon Settings’.

4] Once you click on ‘Desktop Icon Settings’ a separate ‘Desktop Icon Settings’ window will appear.
5] In the ‘Desktop Icons’ section, check the checkbox corresponding to the specific item whose icon you wish to customize.
6] Now hit the ‘Change Icon’ button.
![]()
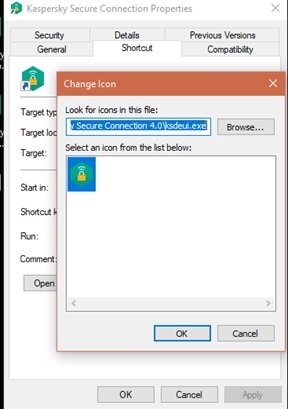
7] Once you click the ‘Change Icon’ button, a list of different in-built icons will appear on the screen. To choose from these in-built Windows icons select one and hit the ‘OK’ button.
![]()
This will change the icon.
To select a custom icon hit the ‘Browse’ button to go to the folder having the icon of your choice and hit ‘Open’ to upload the icon on the Windows icon list; then select the uploaded icon. Also, if you browse for your own icons, you can select any EXE, DLL, or ICO file.
8] Finally, click the ‘Apply’ button and then hit on the ‘OK’ button to save your settings.
Now, your ‘Computer’ icon will look like the below image.
![]()
To reverse the change, go back to the ‘Desktop Icon Settings’ window, hit ‘Restore Default’ button and hit ‘Apply’ and then click ‘Ok’ to save settings.
2] Customize Shortcut Icons
Adding a shortcut for folders and applications makes things very easy and simple on any operating system. Users can alter the icon for a shortcut in Windows and this works for all sorts of shortcuts including a shortcut to an app, folder, or even Command Prompt command. Here are the steps to customize any shortcut icon:
1] Go to your ‘Desktop’ and select the shortcut you wish to change the icon for
2] Right-click the shortcut and select ‘Properties’.
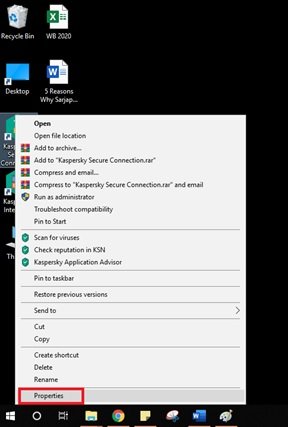
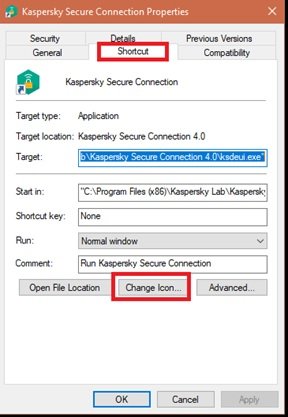
3] On the ‘Shortcut’ tab, select the ‘Change Icon’ button.
4] This opens the standard ‘Change Icon’ window you saw above.
5] Now follow the same steps as listed in the above ‘Desktop Icon’ option to select the icon and apply settings.
3] Customize your Taskbar Icons
The icons pinned to your taskbar are also shortcuts; you can customize these in nearly the same way that you customize any shortcut icon. But there are a few things you would need to keep in mind here:
- You can customize only those icons that are pinned to the taskbar and not the ones which are currently running and appearing there.
- For an app that is pinned, but is currently running, you will need to close the app to begin customizing the shortcut icon.
Start by holding the ‘Shift’ key and right-click the app icon and choose ‘Properties’.
Now, follow the same steps as listed in the ‘Desktop Icon’ option above to set a new icon.
4] Customize Folder Icons
To customize the Folder icons in Windows 10, perform the following steps:
1] Right-click the folder and select ‘Properties’ in the context menu.
![]()
2] Select ‘Customize’ and hit ‘Change Icon’ in the Properties window.
![]()
3] You can replace the folder icon with a basic/personalized icon.
4] Now click ‘OK’ to save the changes.
![]()
5] Finally, hit ‘OK’ to finish changing the folder icon.
![]()
Done, this will change your specific folder icons.
You might want to also take a look at these Free software to change the Folder icon color.
5] Customize Specific File Types Icons
Personalizing the icon of a specific type of file demands third-party tools like File Types Manager. Follow these steps:
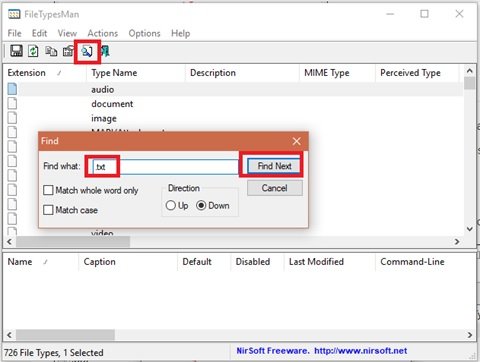
1] Get freeware FileTypesMan on your system
2] In the ‘Find Box’ locate the file type that you want to change its icon for.
3] Now close the Find box.
4] Right-click the file and choose ‘Edit Selected File Type’.
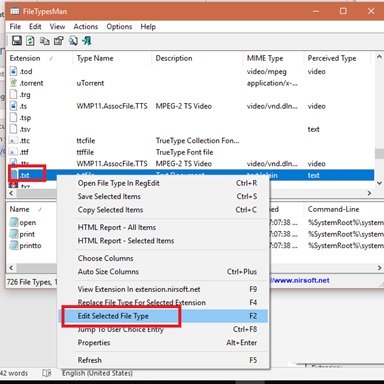
5] In Default Icon option, click the 3-dots button in the pop-out window.
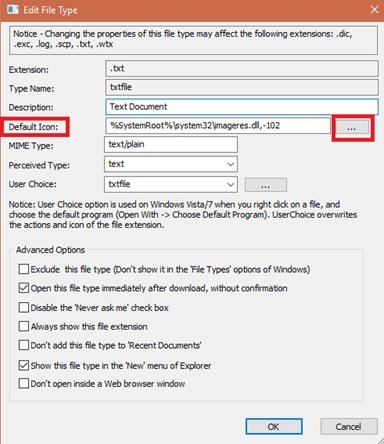
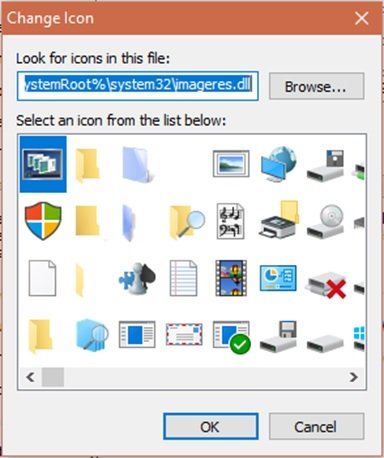
6] Select one of the existing icons or input your own icon by clicking Browse > click OK.
7] Finally, hit ‘Ok’ to execute the changes.
7] Change Drive icons
You can change the Icons of your Windows Drives by tweaking the Registry or easily using freeware Drive Icon Changer or My Drive Icon.
In this way, you can customize different types of icons in Windows 10. So, keep customizing and add new and interesting icons to your applications or folders. And yes, if you wish to revert the changes, you will only need to hit the ‘Restore Defaults’ button in the corresponding Properties window and click on it.
Read next: How to Resize Desktop icons or Change Explorer View type quickly.
What do you think about the default icons on Windows 11/10? Well, they look great, but with time appear boring, isn’t it? You would have tried to cut the boredom by customizing your device by changing the themes and fonts. But you can take this customization to a whole new level by changing the default Windows icons and making your PC look unique and better sorted. In this Windows guide, we take you through the different ways to change any icons on Windows 11/10.
Why customize Windows 11/10 icons?
Killing ennui is just one reason, customization can be done for many different purposes. A few of them include:
- Give your PC a personal spin
- Make your environment look catchy and trendy
- Make your system more user-friendly
- Highlight the importance of a particular icon by making it look unique
- To locate an important icon immediately from a huge crowd of icons
Along with the array of benefits listed above, there are many different types of icons that can be modified on Windows 10. These include desktop icons, taskbar icons, folder icons, and shortcut icons. To know how to customize these, let’s move on the method.
Where can you find new or custom icons for Windows 11/10?
Before we can start changing icons on Windows 11/10, we will need some icons to replace the existing ones. The Operating System has a collection of built-in icons, but they might not be that great. The good news is that there are many online resources offering millions of high-quality impressive icons. You can grab them in a pack at once, or download single icons based on your likings. Few popular icon repositories are FlatIcon, Findicons, IconArchive, DeviantArt, or GraphicBurger – all of these have loads of free icons.
In case you just can’t find the icon of your choice, you can even try making high-resolution icons out of any image.
Now let’s look at the methods of changing different types of icons one after one-
- Desktop icons
- Shortcut icons
- Taskbar icons
- Folder icons
- File icons
- Drive icons.
1] Customize your Desktop Icons
What are ‘Desktop Icons’? The icons like This PC, Network, Recycle Bin, and your User folder all fall in this category. Even though modern versions of Windows do not show them all on the desktop, users can always restore these missing icons and have them appear on your system’s desktop or even change these icons even if they appear elsewhere on your system.
To customize or change your file or folder icons in Windows 11, do the following:
![]()
- From the WinX Menu, open Windows 11 Settings
- Click on Personalization settings
- Select Themes
- Scroll down a bit till you see Desktop icon settings
- Clicking on it will open the Desktop Icon Setttings box
- Select the checkbox corresponding to the specific item whose icon you wish to customize.
- Hit the Change Icon button.
- From the new panel that opens, choose from these in-built Windows icons or Browse to your own icon.
- Once set, click on Apply and exit.
For customizing desktop icons in Windows 10 follow the below-mentioned steps which are similar:
1] Go to ‘Settings’
2] Hit ‘Personalization’
3] Now click on ‘Themes’, and go to ‘Desktop Icon Settings’.
4] Once you click on ‘Desktop Icon Settings’ a separate ‘Desktop Icon Settings’ window will appear.
5] In the ‘Desktop Icons’ section, check the checkbox corresponding to the specific item whose icon you wish to customize.
6] Now hit the ‘Change Icon’ button.
![]()
7] Once you click the ‘Change Icon’ button, a list of different in-built icons will appear on the screen. To choose from these in-built Windows icons select one and hit the ‘OK’ button.
![]()
This will change the icon.
To select a custom icon hit the ‘Browse’ button to go to the folder having the icon of your choice and hit ‘Open’ to upload the icon on the Windows icon list; then select the uploaded icon. Also, if you browse for your own icons, you can select any EXE, DLL, or ICO file.
8] Finally, click the ‘Apply’ button and then hit on the ‘OK’ button to save your settings.
Now, your ‘Computer’ icon will look like the below image.
![]()
To reverse the change, go back to the ‘Desktop Icon Settings’ window, hit ‘Restore Default’ button and hit ‘Apply’ and then click ‘Ok’ to save settings.
2] Customize Shortcut Icons
Adding a shortcut for folders and applications makes things very easy and simple on any operating system. Users can alter the icon for a shortcut in Windows and this works for all sorts of shortcuts including a shortcut to an app, folder, or even Command Prompt command. Here are the steps to customize any shortcut icon:
1] Go to your ‘Desktop’ and select the shortcut you wish to change the icon for
2] Right-click the shortcut and select ‘Properties’.
3] On the ‘Shortcut’ tab, select the ‘Change Icon’ button.
4] This opens the standard ‘Change Icon’ window you saw above.
5] Now follow the same steps as listed in the above ‘Desktop Icon’ option to select the icon and apply settings.
3] Customize your Taskbar Icons
The icons pinned to your taskbar are also shortcuts; you can customize these in nearly the same way that you customize any shortcut icon. But there are a few things you would need to keep in mind here:
- You can customize only those icons that are pinned to the taskbar and not the ones which are currently running and appearing there.
- For an app that is pinned, but is currently running, you will need to close the app to begin customizing the shortcut icon.
Start by holding the ‘Shift’ key and right-click the app icon and choose ‘Properties’.
Now, follow the same steps as listed in the ‘Desktop Icon’ option above to set a new icon.
4] Customize Folder Icons
To customize the Folder icons in Windows 10, perform the following steps:
1] Right-click the folder and select ‘Properties’ in the context menu.
![]()
2] Select ‘Customize’ and hit ‘Change Icon’ in the Properties window.
![]()
3] You can replace the folder icon with a basic/personalized icon.
4] Now click ‘OK’ to save the changes.
![]()
5] Finally, hit ‘OK’ to finish changing the folder icon.
![]()
Done, this will change your specific folder icons.
You might want to also take a look at these Free software to change the Folder icon color.
5] Customize Specific File Types Icons
Personalizing the icon of a specific type of file demands third-party tools like File Types Manager. Follow these steps:
1] Get freeware FileTypesMan on your system
2] In the ‘Find Box’ locate the file type that you want to change its icon for.
3] Now close the Find box.
4] Right-click the file and choose ‘Edit Selected File Type’.
5] In Default Icon option, click the 3-dots button in the pop-out window.
6] Select one of the existing icons or input your own icon by clicking Browse > click OK.
7] Finally, hit ‘Ok’ to execute the changes.
7] Change Drive icons
You can change the Icons of your Windows Drives by tweaking the Registry or easily using freeware Drive Icon Changer or My Drive Icon.
In this way, you can customize different types of icons in Windows 10. So, keep customizing and add new and interesting icons to your applications or folders. And yes, if you wish to revert the changes, you will only need to hit the ‘Restore Defaults’ button in the corresponding Properties window and click on it.
Read next: How to Resize Desktop icons or Change Explorer View type quickly.

Красивые иконки из официального набора Windows 10, выпущенные компанией Microsoft в 2020 году. В наборе Вы найдете значки для всех стандартных программ операционной системы, а также офисного пакета Microsoft Office. Все они выполнены в стиле Flat, однако с применением некоторых графических эффектов и стильных переходов. Такое направление было названо Fluent и сейчас активно набирает обороты. Иконки в формате PNG. Каждая из них разного размера и формы, но выполнена в едином стиле.
Как установить значки
- Скачайте и распакуйте архив windows_10x_icons_by_theninjacat27_ddt79k9.zip с помощью 7zip.
- Для установки в Windows подойдут только иконки формата .ico. PNG потребуется предварительно конвертировать.
- Для рабочего стола: нажмите правой кнопкой мыши в пустой области и выберите пункт «Персонализация». В Windows 10/11 можно также перейти через Настройки (сочетание клавиш Win+I). Кликните по ссылке «Параметры значков рабочего стола» в боковой колонке. В открывшемся окне выделите нужный блок (корзина, сеть, компьютер) и нажмите «Сменить значок». Теперь, кнопкой «Обзор» найдите иконку в проводнике. Используйте «ОК», чтобы сохранить изменения.
- Для папок: нажмите правой кнопкой мыши по нужной папке и выберите пункт «Свойства» в контекстном меню. В разделе «Настройка» нажмите «Сменить значок». Действуйте по аналогии с предыдущим пунктом (выбрать иконку в проводнике, сохранить).
- Для дисков: скопируйте файл .ico в корневую директорию диска. Создайте текстовый документ «autorun.inf» со следующим содержанием, где «vsthemes-org.ico» — название вашего файла:
[Autorun]
Icon=vsthemes-org.ico
Содержимое архива
+ ICO
- Access.ico
- Alarms & Clock.ico
- App Installer.ico
- Bing.ico
- Calculator.ico
- Calendar.ico
- Camera.ico
- Camera Barcode Scanner.ico
- Excel.ico
- Exchange.ico
- Facebook.ico
- Feedback Hub.ico
- File Explorer.ico
- Forms.ico
- Get Help.ico
- Groove Music.ico
- Instagram.ico
- Mail.ico
- Maps.ico
- Messenger.ico
- Microsoft Edge.ico
- Microsoft Editor.ico
- Microsoft Emulator.ico
- Microsoft News.ico
- Microsoft Paint.ico
- Microsoft Planner.ico
- Microsoft Solitaire Collection.ico
- Microsoft Stream.ico
- Microsoft To-Do.ico
- Microsoft Whiteboard.ico
- Mobile Plans.ico
- Movies & TV.ico
- Movies and TV.ico
- MSN Weather.ico
- Notepad.ico
- Office.ico
- OneDrive.ico
- OneNote.ico
- Outlook.ico
- Paint 3D.ico
- People.ico
- Photos.ico
- PowerPoint.ico
- PowerToys.ico
- Project.ico
- Publisher.ico
- Remote Tools for Microsoft Edge.ico
- Settings.ico
- SharePoint.ico
- Skype.ico
- Snip and Sketch.ico
- Sticky Notes.ico
- Sticky Notes Dark.ico
- Sway.ico
- Teams.ico
- Tips.ico
- Twitter.ico
- Visio.ico
- Visual Studio.ico
- Visual Studio Code.ico
- Voice Recorder.ico
- Windows.ico
- Windows Defender.ico
- Windows File Recovery.ico
- Windows Package Feed (Feature Experience Pack).ico
- Windows Terminal.ico
- Word.ico
- Yammer.ico
- Your Phone.ico
+ PNG
- Access.png
- Alarms & Clock.png
- App Installer.png
- Bing.png
- Calculator.png
- Calendar.png
- Camera.png
- Camera Barcode Scanner.png
- Excel.png
- Exchange.png
- Facebook.png
- Feedback Hub.png
- File Explorer.png
- Forms.png
- Get Help.png
- Groove Music.png
- Instagram.png
- Mail.png
- Maps.png
- Messenger.png
- Microsoft Edge.png
- Microsoft Editor.png
- Microsoft Emulator.png
- Microsoft News.png
- Microsoft Paint.png
- Microsoft Planner.png
- Microsoft Solitaire Collection.png
- Microsoft Store.ico
- Microsoft Store.png
- Microsoft Store Dark.ico
- Microsoft Store Dark.png
- Microsoft Stream.png
- Microsoft To-Do.png
- Microsoft Whiteboard.png
- Mobile Plans.png
- Movies and TV.png
- MSN Weather.png
- Notepad.png
- Office.png
- OneDrive.png
- OneNote.png
- Outlook.png
- Paint 3D.png
- People.png
- Photos.png
- PowerPoint.png
- PowerToys.png
- Project.png
- Publisher.png
- Remote Tools for Microsoft Edge.png
- Settings.png
- SharePoint.png
- Skype.png
- Snip and Sketch.png
- Sticky Notes.png
- Sticky Notes Dark.png
- Sway.png
- Teams.png
- Tips.png
- Twitter.png
- Visio.png
- Visual Studio.png
- Visual Studio Code.png
- Voice Recorder.png
- Windows.png
- Windows Defender.png
- Windows File Recovery.png
- Windows Package Feed (Feature Experience Pack).png
- Windows Terminal.png
- Word.png
- Yammer.png
- Your Phone.png
Preview.png