This article is basically the same as my Adding Internet Explorer 10 to your Windows 7 SP1 reference image post that was published in July 2013, but obviously this one is updated for Internet Explorer 11. For those of you using Windows 8 only, don’t bother reading, just replace your Windows 8 images with Windows 8.1 images.
Anyway, as you probably know, Internet Explorer 11 was released for Windows 7 SP1 on November 7, 2013, and like the previous versions you can create a customized IE 11 application using the Internet Explorer Administration Kit (IEAK) 11. You then configure MDT 2012 Update or MDT 2013 (recommended) to install that application as part of your reference image build.
Step-by-Step Guide
Anyway, the overview steps to add IE 11 to your Windows 7 SP1 reference image are the following:
- Download the IE 11 prerequisites and add as OS packages in MDT
- Create the IE 11 package using IEAK 11, and add as an application in MDT
- Add the application to your Windows 7 SP1 task sequence
Note: If you are still using MDT 2012 Update 1, once you have created the reference image, you also need to update the Unattend.xml file for the task sequence used to deploy it. This is because the native template in MDT contains settings that are not compatible with IE 11. See the “Deploying a Windows 7 image with Internet Explorer 11” section later in this post for details. If you are using MDT 2013 you don’t need to worry about this. The MDT 2013 unattend.xml template for Windows 7 is already updated.
Download the IE 11 prerequisites and add as OS packages in MDT
In this example I have a server named MDT01 with MDT installed, and I’m preparing a IE 11 package for Windows 7 SP1 x64.
- On the MDT01 server, create a folder named D:SetupIE11 PreReqs
- Download the following files to the D:SetupIE11 PreReqs folder
- http://go.microsoft.com/fwlink/?LinkID=303935
- http://go.microsoft.com/fwlink/?LinkID=272391
- http://go.microsoft.com/fwlink/?LinkID=239722
- http://go.microsoft.com/fwlink/?LinkID=254722
- http://go.microsoft.com/fwlink/?LinkID=258387
- http://go.microsoft.com/fwlink/?LinkID=258385
- http://go.microsoft.com/fwlink/?LinkID=273751
- http://go.microsoft.com/fwlink/?LinkID=324542
- http://go.microsoft.com/fwlink/?LinkID=324541
Note: Microsoft does have a KB article listing the IE 11 prerequisites (http://support.microsoft.com/kb/2847882 ), however that article is not complete (I filed a bug, time will tell if they update the article).
- In Deployment Workbench, in the Packages node, create a folder named Windows 7 SP1 x64.
- Expand the Packages node, right-click the Windows 7 SP1 x64 folder and select Import OS Packages.
- On the Specify Directory page, in the Package source directory text box, browse to D:SetupIE11 PreReqs and complete the wizard.
Note: If you are deploying multiple operating systems in your MDT deployment share, use selection profiles to limit what OS packages that are injected during deployment.

The content of the D:SetupIE11 PreReqs folder.

Deployment Workbench after adding IE 11 prerequisites in to the packages node.
Create the Install – Microsoft IE 11 for Windows 7 SP1 – x64 Application
In these steps, I assume that you have downloaded IEAK 11 to your Windows 7 SP1 x64 machine.
Note: You need to have Internet Explorer 11 installed on your Windows 7 SP1 x64 machine to be able to install IEAK 11.
- Install IEAK 11 with the following settings:
- Choose License Type: Internal Distribution via a Corporate Intranet
- Organization name: ViaMonstra
- Start the IEAK 11 wizard (Internet Explorer Customization Wizard 11), and use the following settings:
- Destination Folder: C:SetupIE11 – ViaMonstra Build

- Target Platform: Windows 7 Service Pack 1 Systems (x64-Based)
- Target Language: English (United States)
- Package Type: Full Installation Package
- Feature Selection:
Note: The Internal Install option is new in this release and allows you to control the setup behavior (like restart) without additional command line switches.
- Automatic Version Synchronization: Click Synchronize
Note: The synchronize option may display the “Run” dialog box behind the window, so watch the taskbar.
- Custom Components:
- Internal Install:
- User Experience: Completely Silent Installation and No Restart.
The new options in IEAK 11 for setup behavior. - Browser User Interface:
- Search Providers: Click Import to add any search providers from your local machine.
- Important URLs – Home page and Support
- Remove the default home page, and add http://www.viamonstra.com.
- Clear the Retain previous Home Page (Upgrade) check box.
- Accelerators:
- Favorites, Favorites Bar and Feeds:
- Browsing Options:
- First Run Wizard and Welcome Page Options: clear the Use Internet Explorer 11 First Run Wizard (recommended) check box
Disabling the Internet Explorer 11 First Run Wizard (recommended) option. - Compatibility View:
- Connection Manager:
- Connection Settings:
- Automatic Configuration:
- Proxy Settings:
- Security and Privacy Settings:
- Programs:
- Additional Settings:
- Destination Folder: C:SetupIE11 – ViaMonstra Build
- Navigate to the C:SetupIE11 – ViaMonstra BuildFLATAMD64_WIN7EN-US folder and copy the IE11-Setup-Full.exe file to your MDT server (mine is named MDT01, and I copied the package to D:SetupInstall – Microsoft IE 11 for Windows 7 SP1 – x64.
- Add the IE 11 Package to Deployment Workbench, by completing the New Application Wizard using the following settings:
- Application with source files
- Publisher:
- Application name: Install – Microsoft IE 11 for Windows 7 SP1 – x64
- Version:
- Source Directory: D:SetupInstall – Microsoft IE 11 for Windows 7 SP1 – x64
- Specify the name of the directory that should be created: Install – Microsoft IE 11 for Windows 7 SP1 – x64
- Command Line: IE11-Setup-Full.exe
Note: In IEAK 10 (the previous version), you needed to add the /c:»IE-REDIST.EXE /quiet /norestart /update-no» command line switch, but because of the new Internal Install option in IEAK 11 that’s no longer needed.
- Working directory:


The Install – Microsoft IE 11 for Windows 7 SP1 – x64 application added to Deployment Workbench.
Edit the Task Sequence
In these steps, you add the Install – Microsoft IE 11 for Windows 7 SP1 – x64 application to your Windows 7 SP1 x64 task sequence.
- Right-click your Windows 7 Enterprise x64 SP1 task sequence, and select Properties.
- On the Task Sequence tab, configure the task sequence with the following settings:
- State Restore. After the Tattoo action, add a new Group action with the following setting:
- Name: Windows 7 Applications
- State Restore / Windows 7 Applications. Add a new Install Application action with the following settings:
- Name: Install – Microsoft IE 11 for Windows 7 SP1 – x64
- Install a Single Application: Install – Microsoft IE 11 for Windows 7 SP1 – x64
- State Restore / Windows 7 Applications. After the Install – Microsoft IE 11 for Windows 7 SP1 – x64 action, add a Restart Computer action.
- State Restore. After the Tattoo action, add a new Group action with the following setting:
- Click OK.

The IE 11 application and Computer Restart added to the task sequence.
Done! You can now start your virtual machine, and run the build and capture task sequence.
Deploying a Windows 7 image with Internet Explorer 11
If you are still using MDT 2012 Update 1, once you have created the Windows 7 SP1 reference image with IE 11, you also need to update the Unattend.xml file for the task sequence you use to actually deploy it. If not, the deployment will fail with the infamous error: “Windows could not parse or process unattend answer file [C:WindowsPantherunattend.xml] for pass [specialize]. A component or setting specified in the answer file does not exist.”. This is because the native template in MDT 2012 Update 1 contains settings that are not compatible with IE 11.
Note: Again, this is not needed if you are using MDT 2013.
In these steps I assume you have created your reference image with IE 11 per the previous instructions, and imported into your production deployment share.
- Using Deployment Workbench, right-click the Windows 7 SP1 task sequence and select Properties.
- In the OS Info tab, click Edit Unattend.xml. MDT now generates a catalog file, which will take a few minutes, and then Windows System Image Manager (WSIM) starts.
- In Windows System Image Manager (WSIM), in the Answer File pane, expand the 4 specialize node, and select the amd64_Microsoft-Windows-IE-InternetExplorer_neutral entry.
- In the amd64_Microsoft-Windows-IE-InternetExplorer_neutral properties (right-hand window), right-click the IEWelcomeMessage property and select Revert Change.
Note: Depending on your Unattend.xml template, you may need to to delete the «ShowMenuBar» = «true» setting in amd64_Microsoft-Windows-IE-InternetExplorer_neutral entry as well. Thank’s Nick for pointing that one out.
- Save the Unattend.xml file, and close Windows System Image Manager.
- On the Windows 7 SP1 Properties window, click OK.

Editing the unattend.xml file.

The error you get if still using MDT 2012 Update 1, and you don’t modify the unattend.xml.
Happy deployment, Johan
Привет друзья! Не секрет, что операционная система Windows 7 ещё пользуется большой популярностью и многие пользователи, чьи компьютеры совместимы с семёркой, держат Win 7 в качестве второй или даже основной операционной системы на компьютере. Зная о неугасающей популярности старенькой системы, Майкрософт ещё летом выпустила для неё очень удобный накопительный пакет обновлений «Rollup Update» (или обновление KB3125574), получивший неофициальное название — Service Pack 2, так как содержит в себе все важнейшие обновления с 2011 года. Данный накопительный пакет очень удобен, ведь всем известно, что сразу после установки на компьютер, Windows 7 начинает скачивать массу обновлений и устанавливать их с целой чередой перезагрузок, что очень неудобно для пользователя. Другое дело сразу после установки системы накатить накопительный пакет «Rollup Update» со всеми обновлениями и спокойно работать. В одной из наших предыдущих статей мы разобрали, как установить «Rollup Update» на Windows 7, но вот интересно, а возможно ли интегрировать в дистрибутив OS этот накопительный пакет, чтобы после установки все обновления были уже установлены в операционную систему. Об этом мы и поговорим в сегодняшней статье.
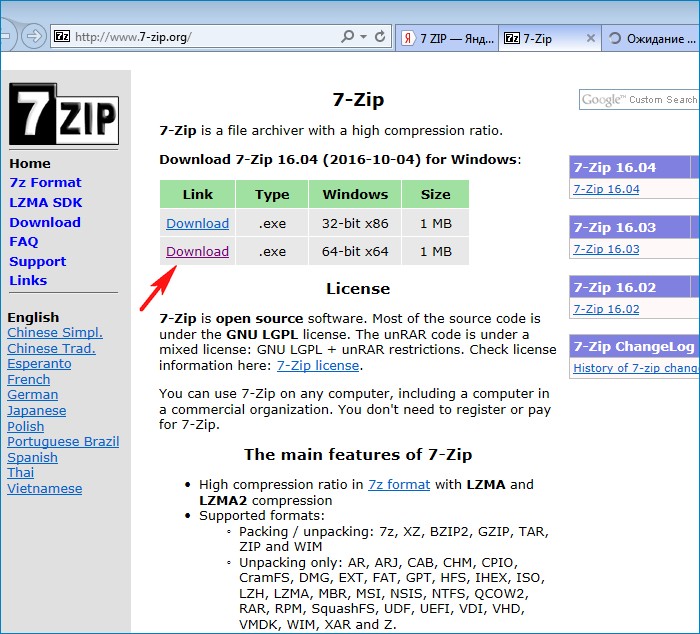
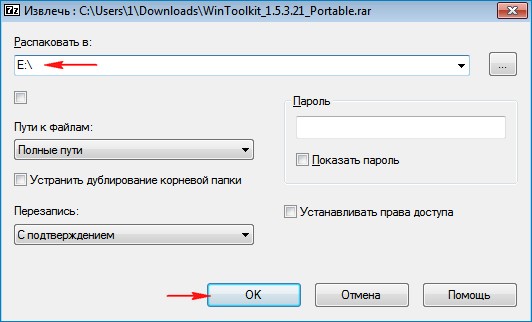
Во-первых скачаем программу 7-Zip по ссылке и установим её (если вы работаете в Windows 8.1, 10, то 7-Zip вам не нужна, так как эти системы прекрасно работают с ISO-образами).
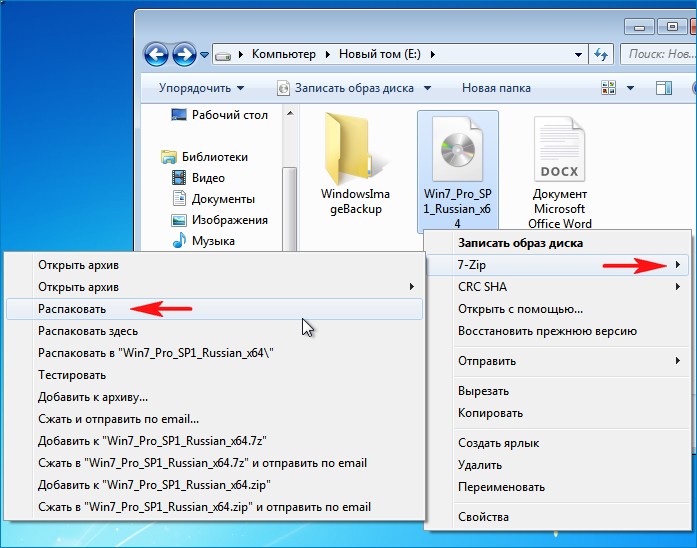
Затем скачаем ISO-образ Windows 7 на официальном сайте Майкрософт. Щелкаем на ISO-образе правой мышью и выбираем «7-Zip»—>«Распаковать»
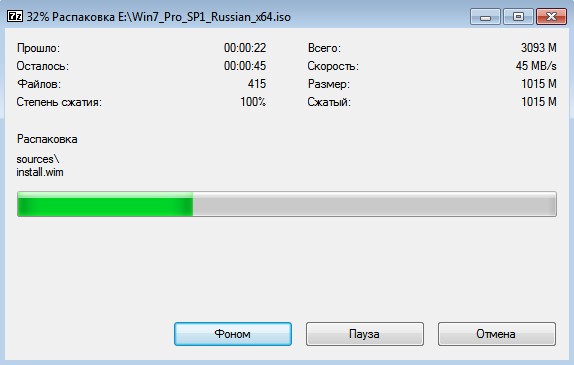
Снимаем галочку и распаковываем файлы Windows 7 на раздел (E:) с созданную нами папку «1»

Распаковка файлов.
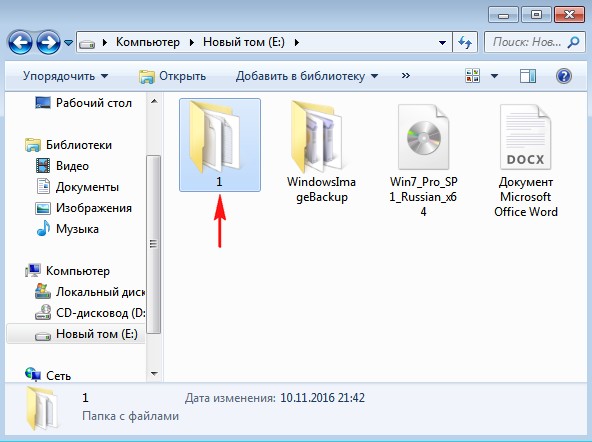
Файлы Windows 7 распакованы на раздел (E:) в папку «1».
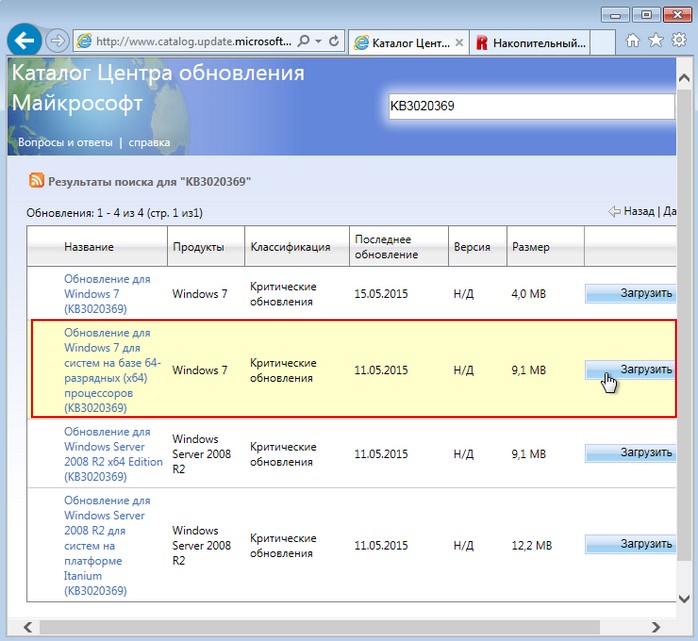
Скачиваем (обязательно в браузере Internet Explorer) три пакета обновлений KB3020369 по ссылке:
http://www.catalog.update.microsoft.com/Search.aspx?q=KB3020369
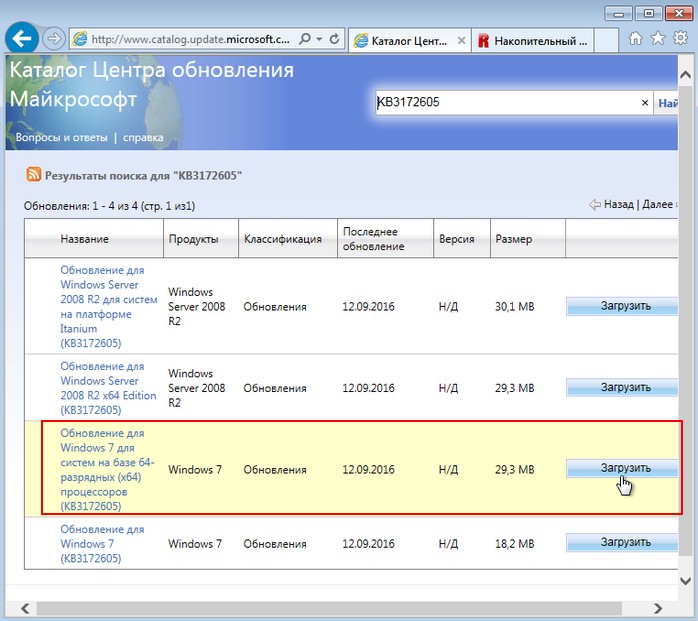
KB3172605 по ссылке:
http://www.catalog.update.microsoft.com/Search.aspx?q=KB3172605
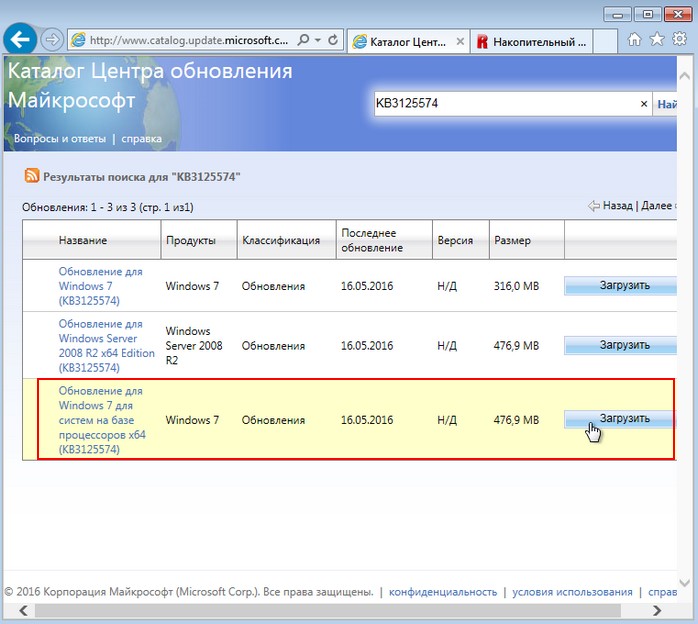
и накопительный пакет обновлений «Rollup Update» KB3125574:
http://www.catalog.update.microsoft.com/Search.aspx?q=KB3125574
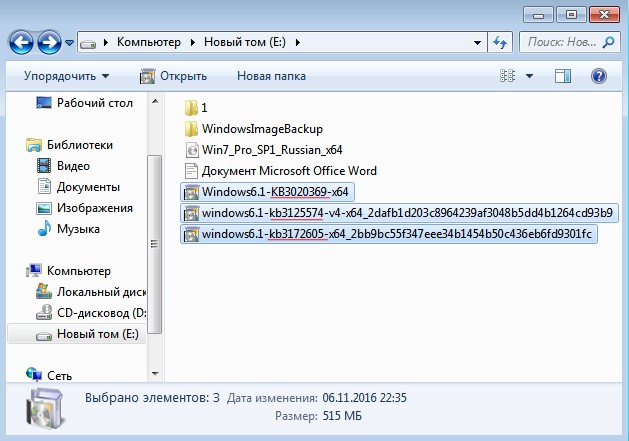
Все три пакета обновлений скачаны на раздел жёсткого диска (E:)
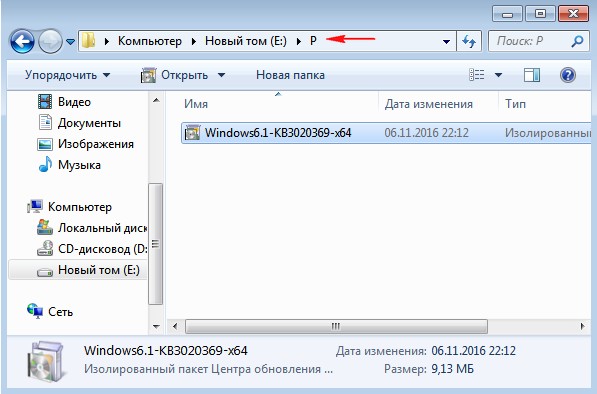
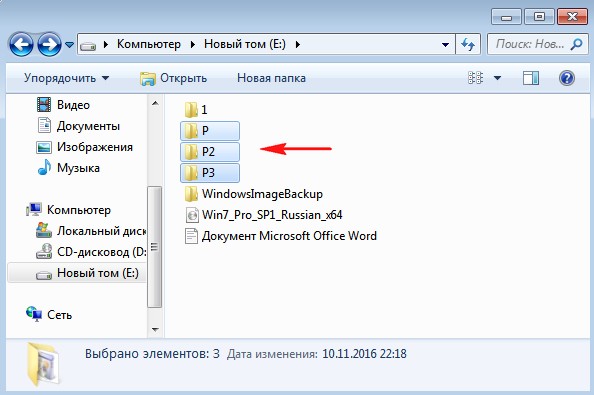
Создаём на разделе (E:) папку с названием «P» (русских букв быть не должно) и копируем в неё пакет обновлений «KB3020369».
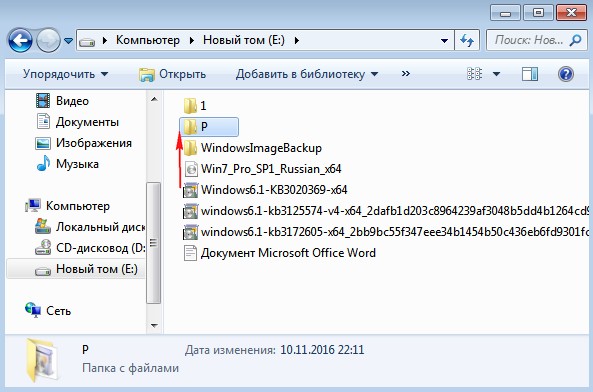
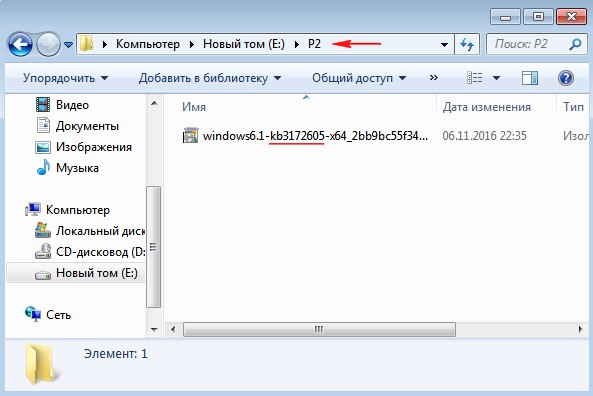
Создаём на разделе (E:) папку с названием «P2» и копируем в неё пакет обновлений «KB3172605»
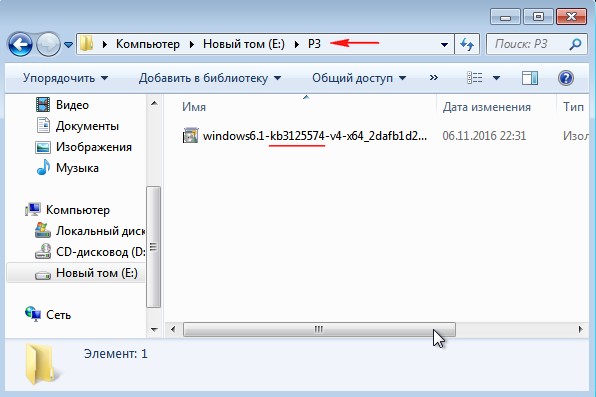
Создаём на разделе (E:) папку с названием «P3» и копируем в неё пакет обновлений «KB3125574»
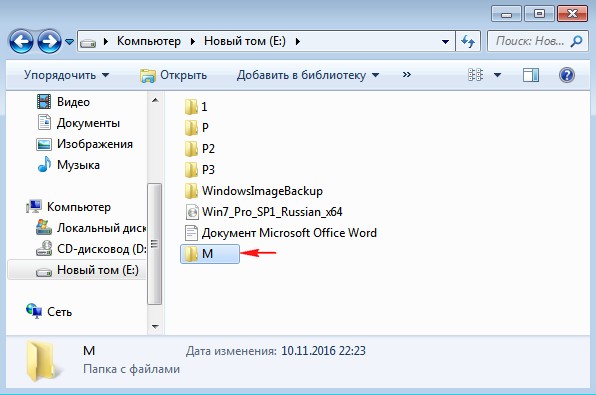
Создаём на разделе (E:) папку с названием «M», в данную папку мы смонтируем Windows 7 64-бит и затем интегрируем в неё обновления.
Запускаем командную строку от имени администратора
ISO-образ Windows 7 64-бит мы разархивировали с вами в начале статьи в папку «1».
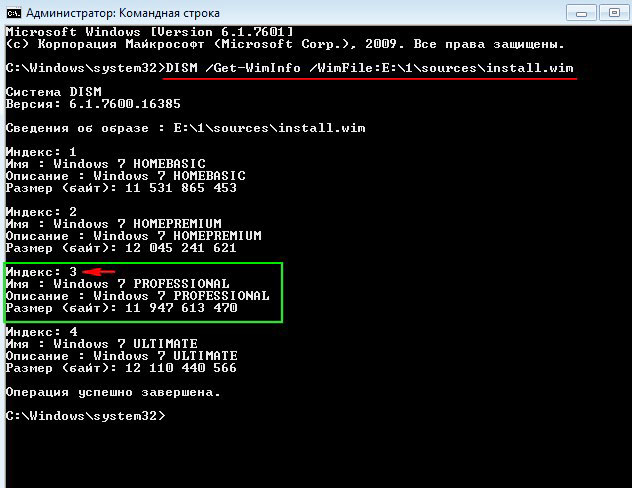
Следующей командой узнаём индекс всех релизов, находящихся в ISO-образе Windows 7.
Dism /Get-WimInfo /WimFile:E:1sourcesinstall.wim
мне нужна Windows 7 Профессиональная и её индекс 3.
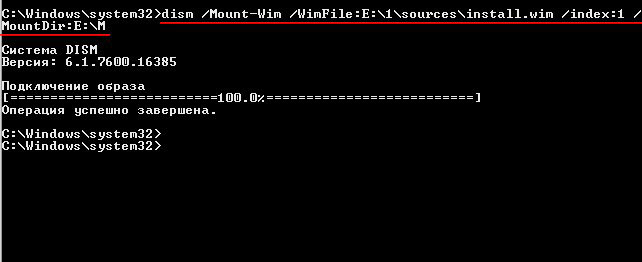
Следующей командой монтируем (распаковываем архив Windows 7), находящийся в папке 1, в подпапке «source» файл-образ install.wim — в папку «M» на диске (E:)
dism /Mount-Wim /WimFile:E:1sourcesinstall.wim /index:3 /MountDir:E:M
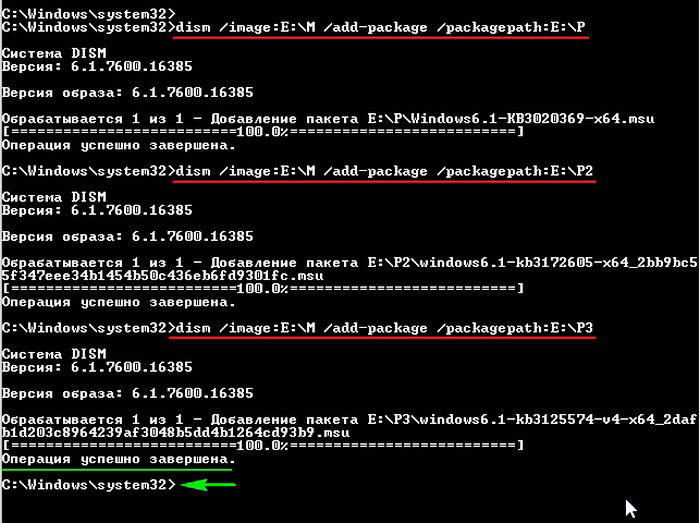
Интегрируем из папки «P» пакет обновлений «KB3020369» в смонтированный в папку M: образ Windows 7.
dism /image:E:M /add-package /packagepath:E:P
Интегрируем из папки «P2» пакет обновлений «KB3172605» в смонтированный в папку M: образ Windows 7.
dism /image:E:M /add-package /packagepath:E:P2
Интегрируем из папки «P3» пакет обновлений «KB3125574» в смонтированный в папку M: образ Windows 7.
dism /image:E:M /add-package /packagepath:E:P3
Дождитесь сообщения:
Операция успешно завершена
C:windowssystem32>
Следующей командой отключаем (размонтируем) образ Windows 7 из папки «M».
dism /unmount-wim /mountdir:E:M /commit

Теперь нам осталось только запаковать Windows 7 с интегрированными обновлениями в ISO-образ
Скачиваем программу по ссылке WinToolkit 1.5
Щелкаем на скачанном архиве с программой WinToolkit 1.5 правой мышью и выбираем «7-Zip»—>«Распаковать»
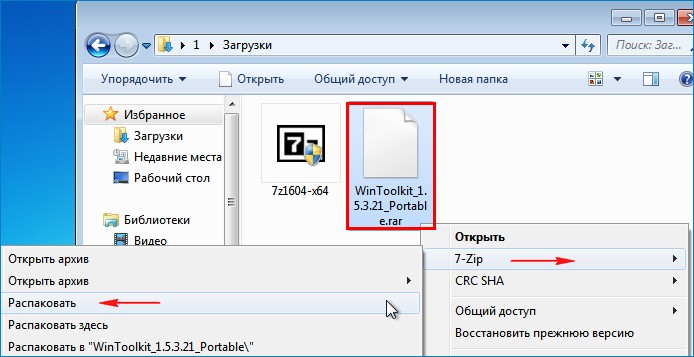
Я распакую программу на раздел (E:).
Запускаю программу WinToolkit 1.5.

Закрываем окно с рекламой.
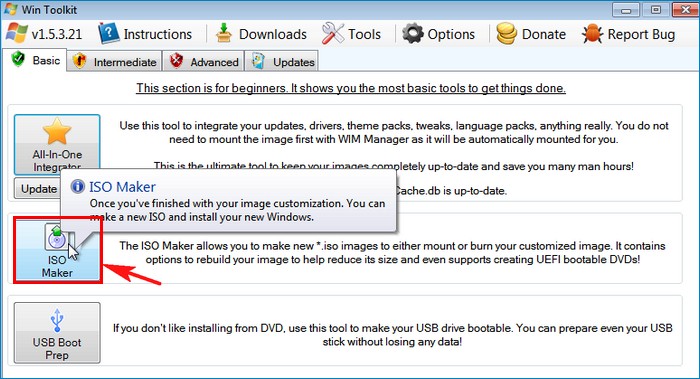
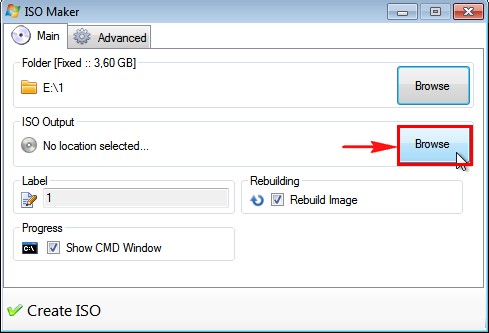
Жмём на кнопку ISO Maker для создания образа, содержащего все редакции Windows 7
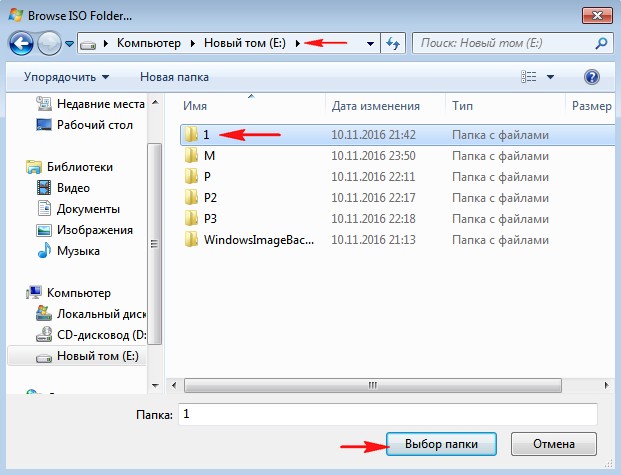
Жмём на верхнюю кнопку «Browse»

В открывшемся проводнике находим на диске (E:) папку «1» с файлами Windows 7, выделяем её левой мышью и жмём кнопку «Выбор папки»
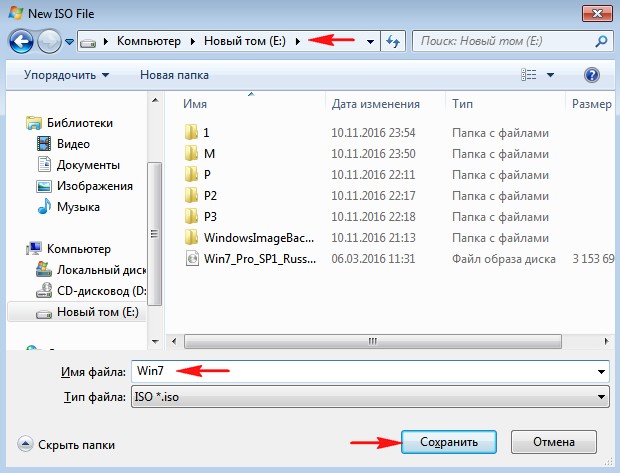
Жмём на нижнюю кнопку «Browse»
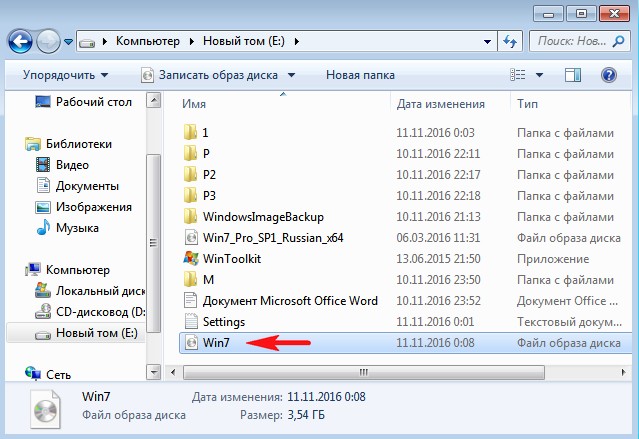
В открывшемся проводнике выбираем место сохранения будущего ISO-образа Windows 7 (раздел E:) и даём ему название «Win7», затем жмём «Сохранить»
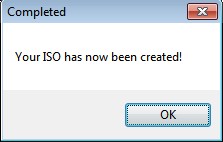
Жму на кнопку «Create ISO»
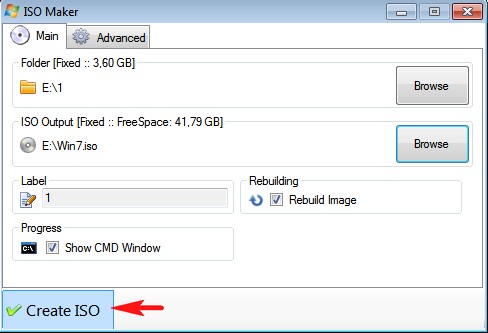
и начинается процесс создания ISO образа Windows 7
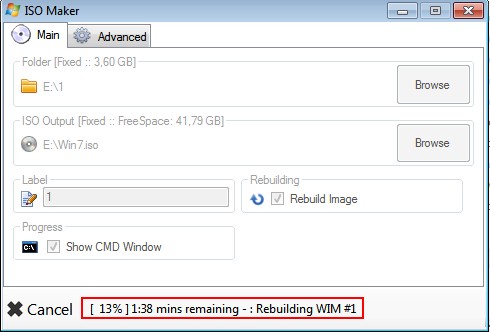
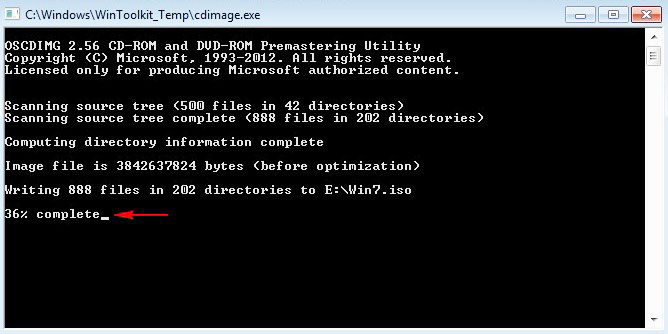
ISO-образ Windows 7 64-бит с интегрированными обновлениями готов!
«ОК»
и находится на диске (E:).
Устанавливаем Windows 7 с интегрированными обновлениями «Rollup Update» на другой компьютер
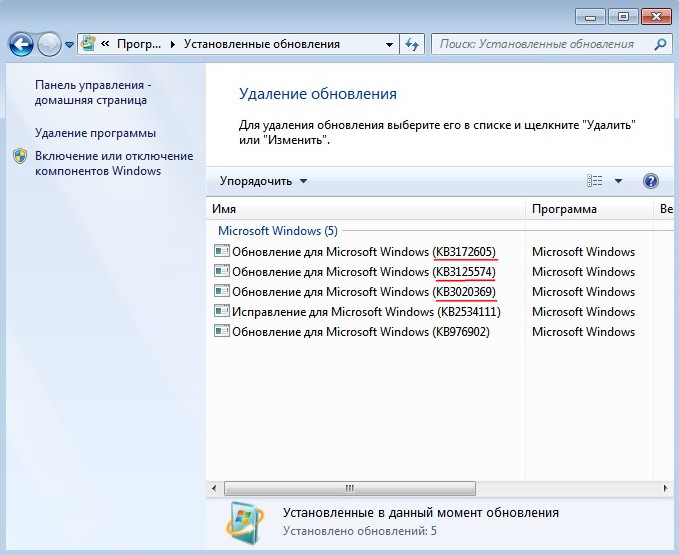
После успешной установки идём в «Центр обновления Windows» и смотрим установленные обновления.
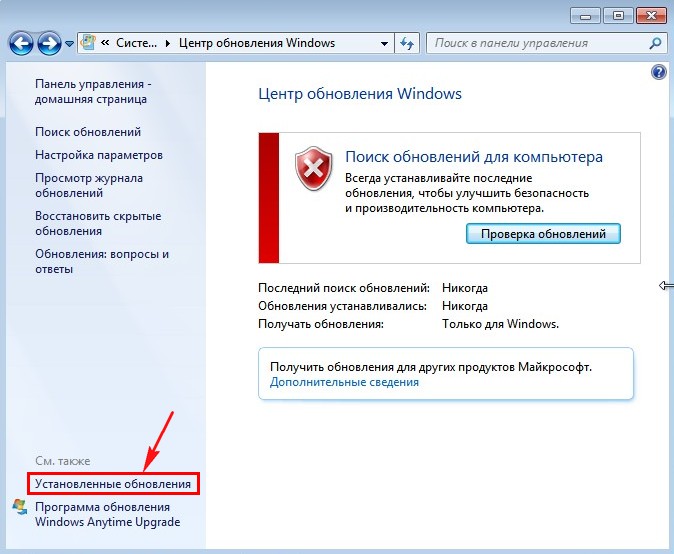
Видим наши интегрированные обновления установились вместе с операционной системой.
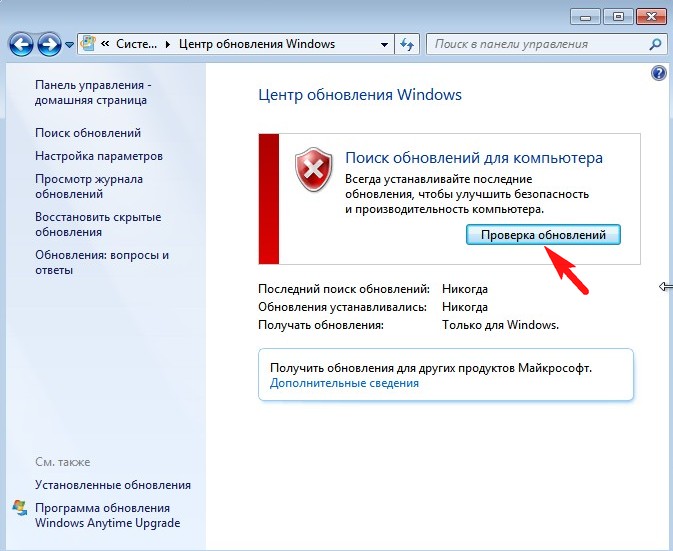
Возвращаемся в предыдущее окно и жмём на кнопку «Проверка обновлений»
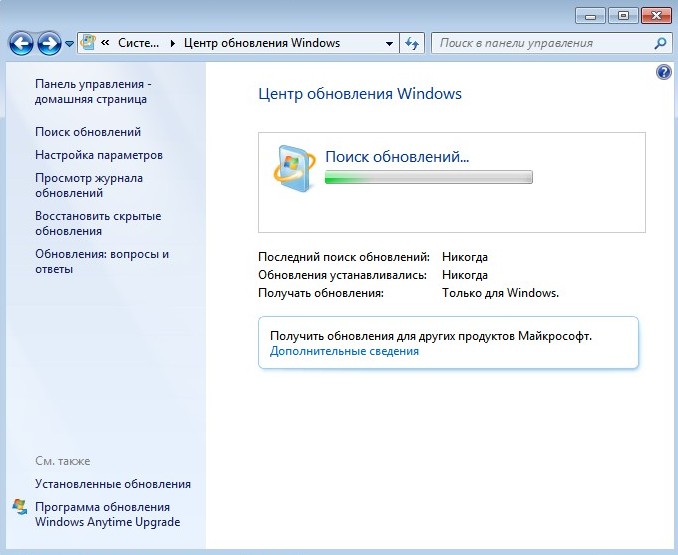
Windows 7 начинает поиск обновлений.
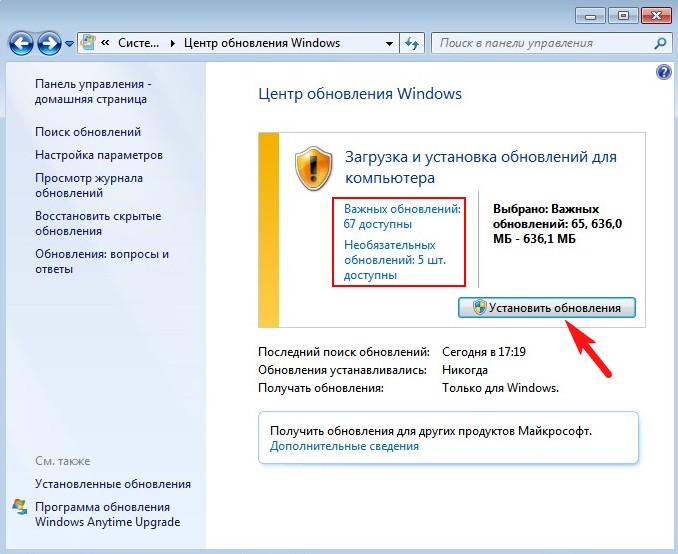
И обновления находятся. Жмём на кнопку «Установить обновления»
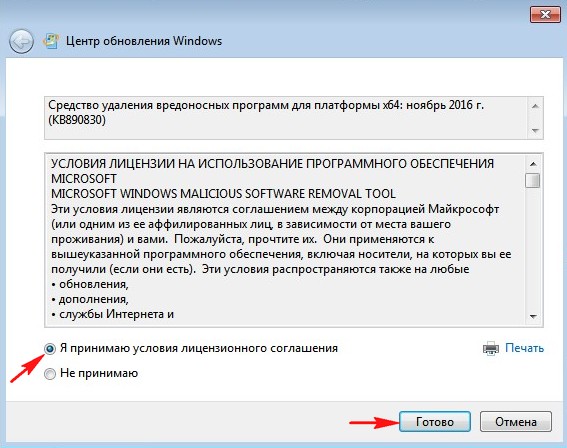
Принимаем условия лицензионного соглашения и жмём «Готово»
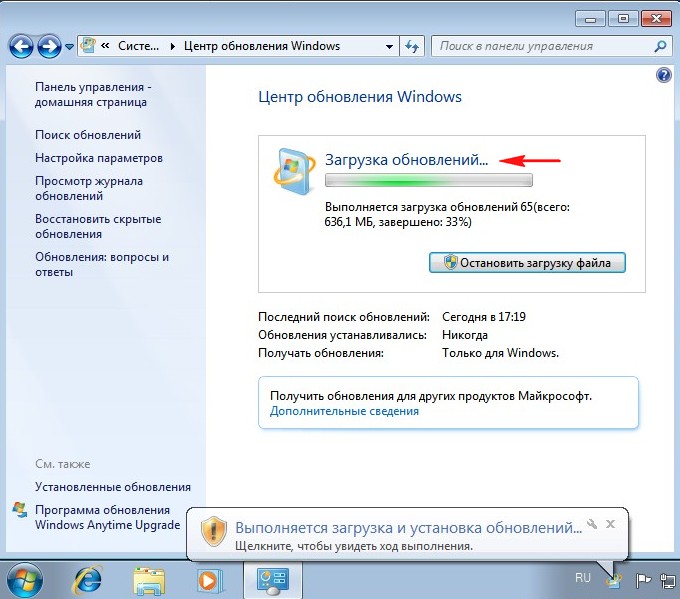
Начинается загрузка обновлений.
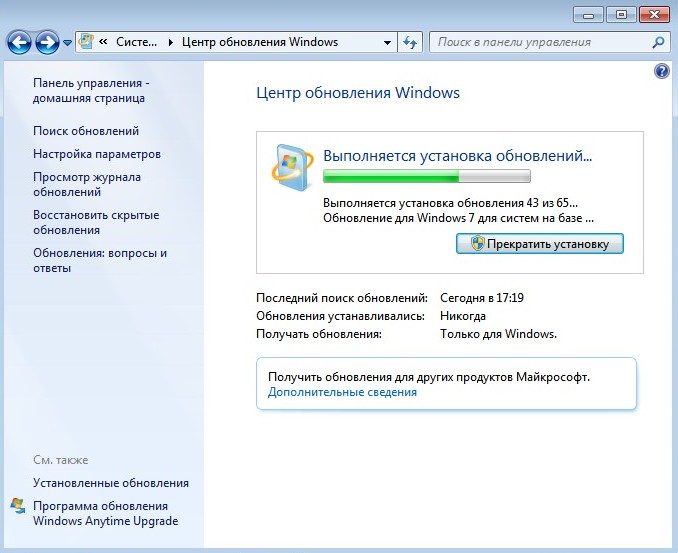
Выполняется установка обновлений.
После установки обновлений система просит перезагрузку.
Начинается Настройка обновлений.

После перезагрузки идём «Центр обновления Windows и видим, что все обновления установлены»

Смотрим Журнал обновлений.

Статья по этой теме:
Как создать дистрибутив Windows 7 с интегрированными обновлениями операционной системы при помощи виртуального диска VHD
Содержание
- Установка ie11 на windows 7 без интернета
- Установка ie11 на windows 7 без интернета
- Как установить Internet Explorer 11 без доступа в интернет (офлайн)
- Вот они:
- Бинго! Пошла установка этого шикарного и столь нужного важного каждому ПО!
- Установка последней версии Internet Explorer на Windows 7
- Требования к системе для установки браузера Internet Explorer 11
- Где скачать браузер Internet Explorer 11 для Windows 7?
- Установка браузера Internet Explorer 11 на Windows 7
- Как установить Эксплорер 11 в Виндовс 7
- Процесс установки
- Дополнительное ПО
Установка ie11 на windows 7 без интернета

Для установки Visual Studio 2013 на машину с Windows 7 x64 SP1 потребовалось установить Internet Explorer 10, который является необходимым для установки. Машина не подключена к интернету и не может быть подключена в принципе.
На машине с интернетом я, разумеется, забил в поисковике «Internet explorer 10» первая предложенная ссылка вела на сайт производителя http://www.microsoft.com/ru-ru/download/internet-explorer-10-details.aspx. Выбрал нужную разрядность, сохранил, скопировал на изолированный компьютер. Но установщик сообщил мне, что нужно подключиться к интернету для установки необходимых обновлений.

Ниже ссылки на статьи баз знаний и ссылки на загрузки
Номер статьи базы знаний
Ссылка для загрузки
2729094 Доступно обновление для символьного шрифта Segoe UI в Windows 7 и Windows Server 2008 R2 Загрузить пакет x86
Загрузить пакет x64 2731771 Доступно обновление, которое добавляет новые интерфейсы API для преобразования между местным временем и временем UTC в Windows 7 или Windows Server 2008 R2 Загрузить пакет x86
Загрузить пакет x64 2533623 Рекомендации корпорации Майкрософт по безопасности: Загрузка небезопасной библиотеки делает возможным удаленное выполнение кода Загрузить пакет x86
Загрузить пакет x64 2670838 Обновления платформы для Windows 7 с пакетом обновления 1 и Windows Server 2008 R2 с пакетом обновления 1 Загрузить пакет x86
Загрузить пакет x64 2786081 После перезагрузки компьютера под управлением Windows 7 с пакетом обновления 1 или Windows Server 2008 R2 с пакетом обновления 1 или после выхода из системы, Internet Explorer 10 не сохраняет учетные данные для веб-сайта. Загрузить пакет x86
Абсолютно аналогичные требования и для офлайновой установки Internet Explorer 11.
Источник
Установка ie11 на windows 7 без интернета
Сообщения: 106
Благодарности: 16
Скачал, распаковал, посмотрел. Почему бы не удалить ненужные обновления: KB2533623, KB2639308, KB2676562, KB2731771, KB2758857, KB2786081, KB2888049? Или что-то из этого нужное? Я вот прочёл статьи Prerequisite updates for Internet Explorer 11 и How to create an all-inclusive deployment package for Internet Explorer 11 и тоже решил для себя сделать автономный установщик IE11.
Планирую совместить x86 и x64 так, чтобы скрипт сам выбирал нужную разрядность на основе данных об ОС. Также хочу включить предварительную проверку наличия необходимых обновлений, чтобы не запускалась их установка если они уже установлены. Как это лучше сделать?
MKN, почему файлы ie11-windows6.1-kb4034733-x64.msu и ie11-windows6.1-kb4034733-x86.msu присутствуют дважды: в корне временной папки распаковки $TEMP и в папках x64, x86? Кстати, обновление KB4034733 (Cumulative security update for Internet Explorer: August 8, 2017) заменено на KB4040685 (Cumulative security update for Internet Explorer: October 10, 2017).
Как установить Internet Explorer 11 без доступа в интернет (офлайн)
Понадобилось мне установить Консоль администрирования Касперского (KSC) на своё рабочее место. Сборка винды чистая, не перепак, возможно поэтому я сразу же и столкнулся с проблемой. За каким-то лядом для установки KSC нужен Internet Explorer версии 10 или выше.


И тут же натыкаемся на то, что для установки Internet Explorer требуется подключиться к интернету. Сначала для меня была загадка что IE забыл в тырнете, шпионские игры прям. Но попробовав установить несколько версий, в том числе IE 10 в различных вариация (изолированный файл или exe*шничек).

Для меня это был не вариант, интернет подключение отсутствует на этом компьютере как таковое. Покопавшись на просторах сети, выяснил, что IE нужен выход в сеть, чтобы подсосать пяток обновлений перед установкой.
Вот они:
Вообще все эти танцы с бубном напоминают РПГ игру, в которой взял квест у лаборатории Касперского и пытаешься пройти. И вообще напоминают типичный лёгкий рецепт – «возьмите кило свинины, авокадо, перо из жопы полярной совы, глаз динозавра и кровь девственницы». СложнААААА одним словом  . Но это так, ремарка к статье.
В одной строк логов был пункт что IE 11 пытается скачать ещё одно обновление, о котором в предыдущих статьях не было написано.
Проверка на наличие обновлений также показывает что оно не установлено.
00:20.904: INFO: Version Check for (KB2834140) of C:WindowsSystem32d3d11.dll: 6.2.9200.16492 >= 6.2.9200.16570 (False)

После установки последнего обновления и перезагрузки, вылезло следующее сообщение с просьбой закрыть программы, мешающие установке IE11. Не смог отказать Microsoft в таком удовольствии.

Бинго! Пошла установка этого шикарного и столь нужного важного каждому ПО!
После обновления Internet Explorer до 11 версии, консоль Администрирования Касперского устанавливается без проблем.

Также в логах отразилось удачная проверка установки данного обновления, о чём указывает результат «True».
00:20.920: INFO: Version Check for (KB2834140) of C:WindowsSystem32d3d11.dll: 6.2.9200.16570 >= 6.2.9200.16570 (True)
Перезагружаемся и вуаля!

После этих нехитрых манипуляций, вы можете использовать то приложение, ради которого устанавливали это шикарный браузер, которым никто не пользуется для сёрфинга интернета  .
.

Если вам помогла статья, можете поделиться ей с сообществом. Есть вопросы? Пишите, обсудим, попробуем на живом железе её решить 
Источник
Установка последней версии Internet Explorer на Windows 7
С 12 января 2016 года компания Microsoft прекращает поддержку всех версий Internet Explorer, кроме самой последней, т.е. Internet Explorer 11, поэтому всем кто пользуется браузером Internet Explorer, рекомендуется перейти на 11 версию. Сегодня в материале я покажу, как можно установить Internet Explorer 11 на операционную систему Windows 7.

По умолчанию в состав ОС Windows 7 включена версия Internet Explorer 8, в Windows 8 входит Internet Explorer 10, а 11 версия браузера Internet Explorer по умолчанию включена только в версии Windows 8.1. Поэтому если у Вас Windows 8.1, то браузер Internet Explorer 11 у Вас уже установлен, и Вам ничего не нужно делать, но если Вы обладатели версий Windows 7 или 8 то лучше, конечно же, обновить Internet Explorer до 11 версии. Как я уже сказал, начиная с 12.01.2016г. Microsoft прекращает выпуск обновлений для системы безопасности, других обновлений, а также перестает оказывать услуги по технической поддержке всех версий Internet Explorer кроме 11. Поддержка браузера Internet Explorer 11 будет длиться до окончания жизненного цикла операционной системы, на которую он устанавливается, т.е. Windows 7, Windows 8.1 и Windows 10, так как браузер Internet Explorer является компонентом Windows.
Требования к системе для установки браузера Internet Explorer 11
Итак, для того чтобы установить Internet Explorer 11 на Windows 7 необходимо иметь операционную систему Windows 7 с установленным Service Pack 1, т.е. другими словами 11 версию Internet Explorer можно установить только она Windows 7 SP1. Если у Вас не установлен Service Pack 1 или Вы просто, не знаете, есть ли он у Вас или нет, то подробно об установке и вообще, о том, что такое Service Pack мы разговаривали в материале «Установка Service Pack 1 на Windows 7».
Для установки и запуска Internet Explorer 11 на ОС Windows 8 необходимо обновить систему до версии 8.1 или 10.
Для установки Internet Explorer 11 на ОС Windows 7 в компьютере должно быть:
Где скачать браузер Internet Explorer 11 для Windows 7?
Скачать 11 версию Internet Explorer можно, конечно же, с официального сайта Microsoft со страницы загрузки вот она http://www.microsoft.com/ru-ru/download/internet-explorer-11-for-windows-7-details.aspx
Рекомендуется всегда загружать программное обеспечение только с официальных источников (не только Microsoft).
После того как Вы перешли на страницу загрузки жмем «Скачать».
Примечание! Я скачиваю версию для 32 битной Windows 7, если у Вас 64 битная система, то кликните по ссылке «Change Systems», затем выберите пункт Internet Explorer 11 (64-Bit) и нажмите «Next».

После того как Вы нажали на кнопку «Скачать» начнется загрузка браузера Internet Explorer 11 и в итоге загрузится файл IE11-Windows6.1-x86-ru-ru.exe размером 30.8 мегабайт.
Установка браузера Internet Explorer 11 на Windows 7
Итак, браузер Internet Explorer 11 мы скачали, теперь необходимо его установить, для этого запускаем скаченный файл (в данный момент все открытые браузеры лучше закрыть).
Если у Вас появится следующее сообщение, значит, у Вас не установлен Service Pack 1, чуть выше при рассмотрении требований к системе я уже отмечал то, что Internet Explorer 11 можно установить только на Windows 7 с Service Pack 1.

Если Service Pack 1 установлен, то откроется окно, в котором нам необходимо нажать «Установить».

Начнется установка Internet Explorer 11.

Установка будет завершена, когда появится вот такое окно, жмем «Перезагрузить сейчас» в итоге компьютер перезагрузится.

Источник
Как установить Эксплорер 11 в Виндовс 7

Полноценная поддержка операционной системы Windows 7 была прекращена в 2016 году. С тех пор обновления выходят в раз в месяц. К 2020 году Microsoft перестанут и вовсе выпускать какие-либо патчи и обновления безопасности. То есть Windows 7 официально перестанет являться актуальной версией, что приведёт к отказу разработки самого различного программного обеспечения под данную ОС. Тем не менее, популярность Виндовс 7 даже на 2019 год всё ещё очень высока. Особенно это касается пользователей, занятых программной сферой деятельности, к примеру, системных администраторов. Именно по этой причине на различных форумах продолжают появляться темы, в которых обсуждают или решают те или иные проблемы.
Одной из них является обновление встроенного браузера Internet Explorer. Дело в том, что при установке оригинального образа Windows 7 Service Pack 1, который был выпущен в 2011 году, пользователь столкнётся с достаточно устаревшей версией браузера по умолчанию, который, скорее всего, не будет работать должным образом. В нижеописанной инструкции будет подробно объяснено, как инсталлировать Internet Explorer 11 на Windows 7.
Процесс установки
Из-за неосновательного отношения Microsoft к поддерживаемости способности Windows 7 обновляться из встроенного центра, пользователю приходится прибегать к ручным методам.
Источник
| Рекомендуем! InstallPack | Стандартный установщик |
|---|---|
| Официальный дистрибутив Internet Explorer | |
| Тихая установка без диалоговых окон | |
| Рекомендации по установке необходимых программ | |
| Пакетная установка нескольких программ |
kak-ustanovit.rf рекомендует InstallPack, с его помощью вы сможете быстро установить программы на компьютер, подробнее на сайте.
Конечно, в этом нет ничего сложного, однако, в зависимости от правильности установленных драйверов для оборудования и оригинальности ОС, могут возникнуть некоторые трудности. Первое, что необходимо, это удостовериться, что операционная система корректно работает со всеми комплектующими компьютера. Убедиться в этом можно с помощью диспетчера устройств. Запускается он через поисковик Windows или в свойствах компьютера, в левой колонке будет ссылка на открытие.


Открыть нужно первую же ссылку на официальный веб-сайт Microsoft. Далее загружается исполняемый файл-установщик. Важно убедиться, что браузер правильно определил используемую ОС. В крайнем случае это можно отредактировать.

Загруженный файл надо запустить, откроется информационное окно, на котором нужно согласиться с условиями лицензии и нажать на кнопку «Установить».

Больше никаких действий от пользователя не требуется. Остаётся лишь дожидаться окончания загрузки всех необходимых обновлений и пакетов.

Занимает это не много времени, всё зависит от скорости подключения интернет-соединения. Когда установщик завершит установку, компьютер нужно будет перезагрузить.

Теперь пользователю не нужно думать о том, как бесплатно установить Интернет Эксплорер 11 для Windows 7, так как это уже сделано.
Дополнительное ПО
Источник
If you created AIO Windows 7 distro and want to add updates/drivers/IE9/product key etc. then here is how:
Requirements:
Machine with Windows 7 SP1 x64 for optimum conditions
Windows 7 SP1 x64 (real distro or image, if it’s image then also a software that works with them. Alcohol, Daemon, PismoMount … even Windows 8! I don’t care)
Updates
IE9 (optional)
.Net Framework 3.5 SP1 updates (optional)
Drivers which you want to add (expanded drivers only because setups, exes etc won’t work but we’ll talk about this later ….)
This guide also works for x32 users they just need to do this for x86
This even works for Windows 8 with its updates.
Intro
——————————————————
The best way to know what updates you need is just do a fresh install of Windows 7 x64 SP1 on a machine you want. Install network drivers, connect to Internet, run Windows Updates and get the list of all updates you need. So you will know which updates you will need to add to your win7 distro. Yeah I know this process will take 20 minutes…. Actually a lot of Microsoft updates have got rather to do with the security issues and kernel bugs (remote code execution etc) than performance but anyway ….
——————————————————
To save you all from hassle I did a list of all updates you need. (November, 2011).
The updates always change (some get removed with new ones, new updates will appear etc.)
Improtant: KB2533552 cannot be added so just don’t download/add it. And for some odd reason Windows6.1-KB2536276-v2-x64.msu cannot be added either.
Download them manually from Microsoft. Some of them will ask for validation on Microsoft site. Everyone who wants x86 will have to download x86 versions for their x86 win7 sp1.
Updates preparation
————————————
Let’s start. So you downloaded all your updates and inserted Windows 7 SP1 x64 dvd (or mounted its image).
Let’s say the letter of your optical drive/virtual rom is D
Open command line as Admin and enter these lines one by one:
mkdir C:win7
robocopy D: C:win7 /E /A-:R
This will create a folder for win7 distro and will copy all files from dvd/image to there.
Copying from actual dvd will take some time so be patient.
mkdir C:imagemount
mkdir C:imageupdates
cd c:image
This creates image directory with mount and updates sub-directories and goes to image folder. Now manually put all updates you downloaded in updates folder. After that do this:
for %a in (.updatesWindows6.1-KB2*-x64.msu) do mkdir %~pna
expand .updatesWindows6.1-KB2*-x64.msu -F:Windows6.1-KB2*-x64.cab .updates
for %a in (.updatesWindows6.1-KB2*-x64.cab) do expand %a -F:* %~pna
del /Q .updates*
This process will create separate folder for each update, extract cabs from msus and expand cabs in corresponding folders which were just created. And finally we clear all the mess from update folder and leave folders with extracted updates which we’re gonna add. Expanding will take some time (the more updates you unpack the longer) so be patient. When this important process is done do this:
move C:win7sourcesinstall.wim C:image
It moves Windows wim file to our image directory.
Wim mounting
After that:
dism /get-wiminfo /wimfile:install.wim
dism /get-wiminfo /wimfile:install.wim /index:2
dism /Mount-Wim /WimFile:install.wim /index:2 /MountDir:mount
So one by one:
First line gives you info about your wim.
Then where do you want to add your updates? In my example I add them in Home Premium so my index is 2.
And in the third line we mount our wim image with edition we chose. This process will take a couple of minutes. So don’t interrupt. Btw as you notice we use DISM (Deployment Image Service and Management) utility, it’s a part of Windows 7 & Win2k8 R2. Then:
Let’s add our updates
FOR /D %g in (.updatesWindows6.1-KB2*-x64) do dism /Image:.mount /Add-Package /PackagePath:%g
So here we go. This iteration process will add updates from their folders into wim image. The more the longer it takes … you know …. When it’s done … great we added updates!
Optional: Adding IE9
If you want to add IE9 then go and download it. Drop it on disk C:, also create a folder C:IE9 and run this command:
C:IE9-Windows7-x64-enu /x:C:IE9
This process will unpack IE9 in C:IE9 directory. Then manually go to that folder and delete all files except for IE9-Win7.cab which is actual Internet Explorer 9. Then let’s go back to dism:
dism /image:.mount /Add-Package /PackagePath:C:IE9
This line adds IE9 to your windows 7 sp1 distro. Congrats.
Adding Drivers
I don’t know which drivers you want to add but DISM utility has a limitation. You can add only expanded drivers. For that purpose install and run program like Driver Max and update your drivers to the latest and greatest version. Then back up your third party (non-Microsoft) drivers (put them in c:imagedrivers folder). Later you could use that drivers folder and add them via /recurse switch to your distro. When you add drivers with dism you can point a particular inf file or you can point it to the entire folder where infs files are sitting. In the latter case you need to use recurse switch. If you want to add unsigned drivers you need to add /forceunsigned switch as well.
dism /image:.mount /Add-Driver /driver:c:imagedrivers /recurse /forceunsigned
If you want to remove drivers or packages use /Remove-Package or /Remove-Driver options. You can read more if you just type dism/? in command line and also read it here and here. Now if you want to see what updates you’ve just added use this command:
dism /image:.mount /Get-Packages > c:updt.txt
This will create a txt file on disk c where you can read all the updates you included in your win 7 distro. If it says that drivers pending it’s ok. They’re pending because it’s no running system but a mounted wim image.
And for drivers:
dism /image:.mount /Get-Drivers > c:drv.txt
It enumerates all drivers you added and outputs it in txt file on disk c.
Save and Exit
dism /Unmount-Wim /MountDir:mount /commit
Saving will take some time. If you changed your mind then discard changes and don’t save. To discard changes run this command:
dism /Unmount-Wim /MountDir:mount /discard
And finally let’s clean the mess:
dism /Cleanup-Wim
It’s optional, just in case.
Note: In this guide we added updates/drivers/ie9/ to one particular edition (Home Premium). If you want to add them to all your AIO distro you will have to go through this process for each and every edition (mount, select edition, add (extracted) updates, add (expanded) drivers, add ie9, save & unmount).
Creating an iso and burning
So congrats you have a win7 sp1 x64 distro with all greatest and latest updates, drivers and even IE9. Now let’s clean the mess, make a bootable iso and burn it (lol or not if you want to make a bootable thumb drive for netbooks or whatsoever).
Let’s now place our install.wim back to its distro folder.
move C:imageinstall.wim C:win7sources
After this you can go and delete image folder, folders where you’ve put your updates, IE9, drivers etc. So now we only have folder with Windows 7 distro. Now let’s create an iso:
You will need an utility called oscdimg 120 kb or something and drop it in c:windowssystem32. And after that run this command:
oscdimg -lW7SP1 -t08/15/2011 -m -u2 -bC:win7bootetfsboot.com C:win7 C:win7dvdx64.iso
Utility uses etfsboot.com from your distro to create an iso from win7 folder and puts it in c. After this you got a bootable Win7DVD. You can now burn it or make a bootable flash drive. Delete win7 folder and iso if you want. So that’s it. Now you can use that distro.
After you installed windows from this distro you can check updates and drivers you added on that fresh system
for updates
dism /online /Get-Packages
for drivers
dism /online /Get-Drivers
Or you can simply go and check it in Programs and features for updates and device manager for drivers. Also you can enumerate drivers of your system by pnp utility
pnputil /E
P.S. You can add .Net Framework 3.5 SP1 updates as well. They are msu files, just like Windows update files.
Windows6.1-KB2518869-x64.msu
Windows6.1-KB2539635-x64.msu
Windows6.1-KB2572077-x64.msu