Содержание
- Установка HPE SUM — Smart Update Manager
- Три няньки для ProLiant
- Пакет исправленный и дополненный
- Read-Only забесплатно
- Удаленное управление и немного Enterprise-магии от Integrated Lights-Out
- Insight Control VS OneView
- Итого
- smartmontools
- Контекстная Навигация
- Smartmontools Download and Installation
- Table of Contents
- Install precompiled package
- Install the Windows package
- Install the OSX/Darwin package
- Install from the source tarball
- Install latest unreleased code from SVN repository
- Update the drive database
- Run smartmontools from Live-system
- Программа MSI Smart Tool
- Назначение программы
- Как использовать программу?
- Using SMART Product Update (SPU) for SMART Product Drivers and SMART Ink
- Contents
Установка HPE SUM — Smart Update Manager


Вместе с вами установим HPE SUM на Windows Server, дадим ему свежий SPP, подключим какой-нибудь сервер и обновим его. Можно ставить и на Windows 10.
Качаем Smart Update Manager:
Получаем файлик sum835.zip. Распаковываем в C:hpsum, инсталляция не требуется.


Видим информационное сообщение:
No baseline found in the current directory.
Я скачиваю файлик P09835_001_spp-2018.09.0-SPP2018090.2018_0914.32.iso.
В папке C:hpsum создаём директорию, например, SPP_2018.09.0 и распаковываю в неё содержимое скачанного ISO образа:

Возвращаемся в GUI, переходим в Baseline Library:

Кликаем Add Baseline:


Переходим в директорию C:hpsum:

HP SUM определяет, что в папке C:hpsum что-то есть. Кликаем на C:hpsumSPP_2018.09.0.


Кликаем Add. Пошёл процесс.

Через некоторое время видим следующую картину:

SUM нашёл наш SPP версии 2018.09.0 и начал инвентаризацию. Процесс долгий — можно идти пить кофе. Итак:

Аналогично можно добавить и другие SPP.

Используем свою способность «кликание мышкой» на кнопке Add Node:

В поле IPV4 / IPV6 / DNS указываем адрес сервера:

В поле Baseline кликаем стрелку вниз и выбираем добавленный ранее baseline, SPP 2018.06.0:

Node type указываем ILO, ну потому что там iLO:

Скроллим ниже, в разделе Credentials указываем логин-пароль админа от iLO. Нажимаем Add:

Происходит какой-то процесс:


Нам предлагают сделать инвентаризацию. Кликаем на зелёную ссылку Inventory:


Идёт инвентаризация. Тоже долгий процесс.

Вроде всё неплохо. Кликаем на Review and deploy updates:

Мне предлагают обновить iLO с версии 2.61 на 2.61. Смысла нет, но. обновляем. Кликаем Forced и Deploy:

Дальше ставится пакет:


Источник
Три няньки для ProLiant

Одно из наших хранилищ HP LeftHand P4000 стало жаловаться на проблемы с памятью. То есть все работало без ошибок, но в мониторинге HP Systems Insight Manager один из модулей был помечен как проблемный. Разумеется, более «глобальная» система мониторинга в компании рапортовала зелеными галочками и проблем просто не видела.
Конечно, потерять из-за этого данные на «Левше» было бы проблематично, но ведь не все системы работают в подобном кластере. В этой статье хочу поделиться опытом работы со средствами управления оборудованием от Hewlett Packard Enterprise (HPE):
Сразу оговорюсь, речь пойдет только о стоечных и башенных серверах x86 ProLiant (на базе которого, кстати, построена и та памятная P4000), как наиболее массовых.
Пакет исправленный и дополненный
Администратор любого классического x86-сервера HPE может загрузить специальный набор свежих драйверов и прошивок Service Pack for ProLiant (SPP). Этот образ загрузочного диска обновляется ежегодно и позволяет быстро «освежить» программную и железную составляющую серверного парка.
Особенно удобен инструмент при настройке нового оборудования, так как его можно совместить с установкой операционной системы. В комплекте также идет HPE Insight Management Agents, необходимый для подключения серверов устаревших поколений к централизованному мониторингу. Начиная с восьмого поколения Gen8, функции агента интегрированы в модуль iLO и сразу доступны для использования.
К слову, оповещения от сервера можно получать и без помощи централизованного мониторинга, для чего в инструменте Event Notifier Config следует указать e-mail администратора и координаты почтовой службы. Для небольших серверных инсталляций это самый недорогой способ быть в курсе состояния оборудования.
Из минусов таких локальных оповещений можно отметить отсутствие поддержки SMTP-серверов с обязательным шифрованием TLSSSL. Это может доставить неудобства при использовании почтовых служб вроде Gmail, которые позволяют отправлять письма без шифрования только другим пользователям Google. Но всегда можно использовать SMTP-relay или настроить пересылку с одного ящика Gmail на другой.

В SPP входит и утилита под названием HPE Smart Update Manager, с помощью которой можно обновлять прошивки на нескольких серверах сразу. С этим инструментом процесс сводится к выбору репозитория с обновками и указанию целевых серверов. Дальнейшее происходит автоматически.
Read-Only забесплатно
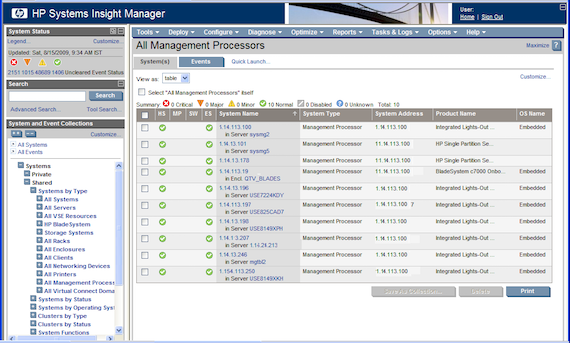
HPE предлагает собственную систему мониторинга оборудования Systems Insight Manager (SIM), которая распространяется бесплатно и позволяет быть в курсе состояния практически любой из систем дата-центра.
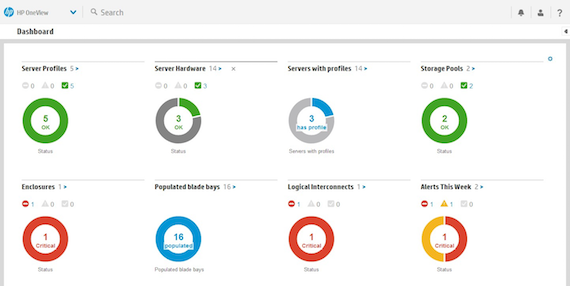
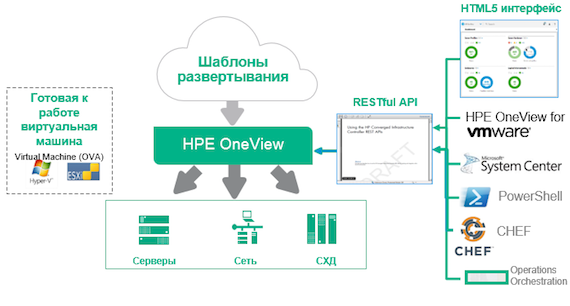
Но этот продукт уже объявлен устаревшим и ему на смену пришел комплект OneView. При использовании лицензии Standard он фактически служит заменой бесплатного мониторинга SIM. Одной из приятных особенностей OneView является способ распространения. Если SIM распространяется как обычный дистрибутив для установки, то OneView доступен для загрузки в формате готовой виртуальной машины для хостов под управлением VMware или Hyper-V.
Мониторинг от HPE работает по вполне типовой схеме. Помимо банальной Ping-проверки, система подключается через WMISNMP к агентам на серверах HPE и собирает подробные сведения со всех внутренних датчиков. Доступна также библиотека MIB Kit для оборудования других производителей.
Для администраторов серверных систем HPE подключение к мониторингу упрощено:
Интеграция с HPE Smart Update Manager. Результатом будет что-то вроде WSUS, но только для обновления прошивок.
Разумеется, можно обойтись и без фирменного мониторинга – например, привычными для многих Zabbix или Nagios. Конечно, придется поискать подходящие MIB-файлы, повозиться с настройками и скриптами, но базовый набор возможностей будет похож. Тем не менее, обновление прошивок и драйверов придется выполнять вручную или с помощью Service Pack for ProLiant.
Шаблон для взаимодействия с iLO 4 выложен на wiki Zabbix, а про Nagios с iLO есть хорошая статья.
Удаленное управление и немного Enterprise-магии от Integrated Lights-Out
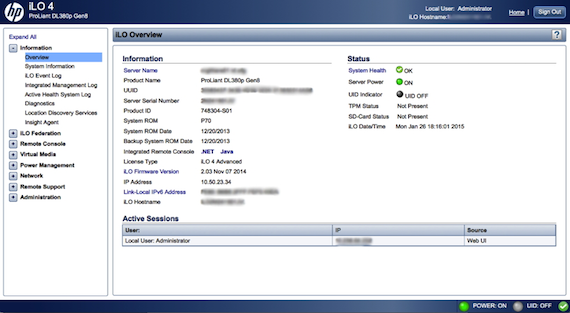
Все дальнейшее преимущественно относится к Integrated Lights-Out (iLO) 4 в восьмом поколении HPE ProLiant. Это аппаратный диагностический модуль в серверах HPE, предназначенный для удаленного управления. Можно сказать, система представляет собой проприетарный аналог IPMI с набором дополнительных возможностей, большинство из которых предлагается за деньги.
Однажды я допустил незначительную ошибку при настройке фаервола на удаленном сервере, что привело к незапланированному ночному путешествию. С тех пор я применяю скрипты автоматического отката параметров фаервола при удаленной настройке. Заодно обязательно включаю в бюджет IP-KVM или лицензию на iLO.
В качестве скрипта для штатного брандмауэра Windows 2008 и старше использую простенький скрипт:
rem экспортируем настройки
netsh advfirewall export %temp%temp-firewall
rem ждем 60 секунд
rem импортируем настройки
netsh advfirewall import %temp%temp-firewall
Если в течение минуты скрипт не прервать – настройки фаервола будут восстановлены.
Для более наглядного сравнения возможностей разных редакций iLO предлагаю небольшую табличку:
| Standard | Essentials | Advanced | |
| Удаленный доступ к консоли (KVM) | нет | да | да |
| Подключение ISO-образа по сети | нет | да | да |
| Доступ по SSH | нет | нет | да |
| Поддержка внешнего сервера Syslog | нет | нет | да |
| E-mail уведомления | нет | да | да |
| Запись видео загрузки | нет | нет | да |
| Поддержка Active Directory | нет | нет | да |
| Цена* | $100 | $360 |
*- Цена указана приблизительно, на 3 октября 2016, по данным официального магазина HPE
Более подробно отличия между редакциями iLO представлены в документации вендора.
Благодаря модулю управления с поддержкой Rest API можно также разработать собственное решение для управления серверами, с баккара и профурсетками.
Insight Control VS OneView
Insight Control предоставляет доступ к следующим возможностям:
Установка операционных систем на физические серверы через консоль управления без использования PXE.
Лицензия iLO Advanced входит в стоимость.
Работа с виртуальными машинами VMware, Hyper-V и Xen на RHEL или SLES. Возможна миграция машин при обновлении прошивок, как это реализовано в системах Dell. Достаточно в консоли Insight Control открыть управление виртуальной машиной и для параметра «Set Alternate Virtual Machine Host» указать альтернативный хост.
Все возможности SIM включены, центральным средством управления является консоль SIM.
OneView Advanced отличается следующим набором:
Располагает аналогичными Insight Control возможностями, а также включает лицензию на использование самого Insight Control.
Есть лицензии с iLO Advanced и без, разница в цене около 100 долларов.
При переходе с лицензии Standard на Advanced нет необходимости что-либо переустанавливать или перенастраивать – нужным серверам назначаются необходимые лицензии.
Одним словом, OneView Advanced – мощный продукт, ориентированный скорее на крупные организации, чем на средний или малый бизнес.
Итого
Даже без приобретения недешевого программного обеспечения HPE предоставляет неплохой инструментарий для мониторинга и базового обслуживания серверов. В свое время очень полезна оказалась утилита Event Notifier из базового серверного набора: простая и надежная, как штык. Когда инфраструктура разрослась, дошла очередь и до SIM – решили мониторить некоторые СХД, коммутаторы и Windows-системы, а этот продукт позволял добиться желаемого с минимальными затратами денег и усилий.
Если вы тоже захотите попробовать, хотя бы просто для общего развития, то предлагаю несколько полезных ссылок:
Источник
Контекстная Навигация
Table of Contents
Smartmontools 7.2 was released 2020-12-30, see NEWS, ChangeLog and tickets for details.
After installation or booting from a Live-CD, you can read smartmontools man pages and try out the commands:
The Windows package provides preformatted man pages in *.html and *.txt format.
Install precompiled package
Precompiled packages are available for many distributions, see the Packages page.
Install the Windows package
Download and run the latest smartmontools NSIS-installer ( *.win32-setup.exe ) from here. More recent Windows test releases build from SVN snapshots are available here.
The default install type «Full» creates start menu shortcuts including an uninstaller, and adds the install directory to the PATH variable. The install type «Extract files only» is useful to unpack a «portable» version without affecting the Windows registry. The files can also be unpacked by 7-Zip which is also available for Linux.
The 32-bit version of smartmontools usually works also on 64-bit versions of Windows. Starting with smartmontools 5.43, the installer also provides 64-bit executables. These may be useful if the 32-bit subsystem is not available (e.g. 64-bit Windows Recovery CD).
Virus scanners occasionally produce false positive virus reports for NSIS-installers, see the NSIS False Positives page. If this is the case for the smartmontools installer, please send a report to the smartmontools-support mailing list.
To use the smartd warning mail feature, download and install the Blat mail utility.
See the WPKG-Wiki for info about automated deployment of smartmontools and Blat.
Alternatively you could use the Smartmontools for Windows Package by Ozy de Jong. This independent package provides user friendly support for smartd configuration and unattended setup.
Install the OSX/Darwin package
Download and run the latest smartmontools dmg image from here. More recent OS X test releases build from the SVN snapshots are available here.
Package provides Mach-O universal binary with 2 architectures (i386 and x86_64) and should work on any Intel based Mac.
Install from the source tarball
Download the latest source tarball from here. More recent test tarballs build from SVN snapshots are available here.
Uncompress the tarball:
The previous step created a directory called smartmontools-6.3 containing the code. Go to that directory, build, and install:
To install to another destination (useful for testing and to avoid overwriting an existing smartmontools installation) replace make install by:
Install latest unreleased code from SVN repository
Sourceforge moved our repository to a new location: https://svn.code.sf.net/p/smartmontools/code/. Use the trac or sourceforge viewer to browse it.
You can also download the source tree via the code browser link Download Snapshot.
All you need to do to get the latest development code is (but note that the development code may be unstable, and that the documentation and code may be inconsistent):
This will create a subdirectory called smartmontools/ containing the code. Go to that directory, build, and install:
To update your sources from trunk (development version):
One of the really cool things about version control systems is that you can get any version of the code you want, from the first release up the the most current development version. And it’s trivial, because each release is tagged with a name. Look at the tags in our SVN repository to see what the different names are.
E.g. run the following command to fetch the RELEASE_5_38 release:
Note that the directory with the smartmontools sourcefiles is named sm5 in releases
Update the drive database
The drive database file drivedb.h can be updated separately with the following command:
This command uses curl, wget or lynx for download. A proxy server can be specified by the environment variable https_proxy (lower case only), see the man pages of the tools for details.
The downloaded file is verified with OpenPGP/GPG key ID 721042C5 (release 6.6: DFD22559 ).
The public key block is included in the script. It is also available at Key Servers ( release 6.6) but there is no need to import it into a local keyring.
The above update method does no longer work for smartmontools older than 6.5. The update-smart-drivedb tools from 5.40 to 6.1 use a download URL which is no longer valid since sourceforge platform upgrades. Releases 6.2 to 6.4 of the script use a HTTP URL which does no longer work since sourceforge site changed to HTTPS-only. The script from release 6.6 could also be used for older releases if the line BRANCH=RELEASE_X_Y is adjusted accordingly.
The drivedb.h file can be viewed or downloaded ( ) using the Trac browser: 5.41, 5.42, 5.43, 6.0, 6.1, 6.2, 6.3, 6.4, 6.5, 6.6, 7.0-7.1, 7.2, trunk.
The following branches are no longer maintained: 5.39, 5.40.
If you have a system that is showing signs of disk trouble (for example, it’s unbootable and the console is full of disk error messages) it can be handy to have a version of smartmontools that can be run off of a bootable medium to examine the disk’s SMART data and run self-tests. This is also useful if you want to run Captive Self-Tests (the -C option of smartctl ) on disks that can not easily be unmounted, such as those hosting the Operating System files. Or you can use this to run smartctl on computers that don’t use Linux as the day-to-day operating system.
License
All content in this wiki is published under GNU GPL.
Источник
В комплекте с материнскими платами MSI всегда идет диск с программным обеспечением. В нем можно найти программы для настройки кулеров, управление RGB подсветка (если поддерживается) и много всего прочего. Из всего ассортимента хочу выделить MSI smart tool. Что это за программа, рассмотрим в рамках данной статьи.
Назначение программы
MSI Smart Tool используется для создания загрузочного диска Windows 7. Кроме создания самого загрузчика операционной системы, программа также записывает драйвер Intel RST (технология Intel® для быстрого хранения данных, используемая в процессорах 6-го поколения) и xHCI (чтобы Windows 7 при установке не просил драйвер USB 3.0). Воспользовавшись MSI Smart Tool, можно установить Windows 7 на жесткий диск или твердотельный накопитель без лишних хлопот.
Как использовать программу?
Программа достаточно проста в использовании. Представляет собой окно, с возможностью выбора источника для записи (папка с данными или ISO образ, смонтированный на виртуальный привод) и USB накопителя.
Запустите MSI Smart Tool и нажмите на кнопку Win7 Smart Tool.

В появившемся окне нужно подтянуть USB накопитель и указать источник записи.


В целом это все. Сделать такой носитель можно с помощью множества программ, часть из них описаны в статьях: загрузочная флешка Windows 7 и Windows 10. А пользоваться MSI Smart Tool или аналогом, решать только вам!
Источник
Using SMART Product Update (SPU) for SMART Product Drivers and SMART Ink
Contents
Using SMART Product Update (SPU) to activate and update SMART Product Drivers and SMART Ink
SPU requires an Internet connection.
The SMART Software Portal is a web service that helps you view product keys, activations and other information for your SMART software. Currently, the SMART Software Portal is available only for English speakers in North America and the United Kingdom. Visit the portal at licensing.smarttech.com.
If you live outside of North America or the United Kingdom, contact your reseller (smarttech.com/wheretobuy) to obtain a product key.
If you lose your product key, go to smarttech.com/findproductkey.
Contact your reseller (smarttech.com/wheretobuy) to obtain a product key.
If you lose your product key, go to smarttech.com/findproductkey.
Follow these instructions to register your SMART hardware product.
To register your SMART hardware product
Locate your SMART hardware product’s serial number.
See smarttech.com/serialnumber for information on locating your SMART hardware product’s serial number.
Follow the on-screen instructions to register your SMART hardware product.
Typically, you activate SMART Product Drivers and SMART Ink after installing it. However, in some situations, you activate the software later. For example, you could choose to evaluate the software before deciding to purchase it.
To activate SMART Product Drivers and SMART Ink
In Windows 7 operating system, select Start > All Programs > SMART Technologies > SMART Tools > SMART Product Update.
In Windows 8.1 operating system, go to the Apps screen, and then scroll to an select SMART Technologies > SMART Product Update.
In Windows 10 operating system, press Start, and then scroll to an select SMART Technologies > SMART Product Update.
The SMART Product Update window opens.
The SMART Software Activation window opens.
The value in the Status column indicates the status for each product:
The software is installed.
The software is installed and activated with a perpetual or maintenance license.
The software is installed and activated with a subscription license. The number in parentheses indicates the days remaining in the subscription period.
The software is installed but not yet activated. The number in parentheses indicates the days remaining in the evaluation period.
The software is installed but not yet activated. The evaluation period is over. You’re unable to use the software until you activate it.
The software’s status is unknown.
Follow the on-screen instructions to activate the software using the product key.
To view product keys
In Windows 7 operating system, select Start > All Programs > SMART Technologies > SMART Tools > SMART Product Update.
In Windows 8.1 operating system, go to the Apps screen, and then scroll to an select SMART Technologies > SMART Product Update.
In Windows 10 operating system, press Start, and then scroll to an select SMART Technologies > SMART Product Update.
The SMART Product Update window opens.
Select Tools > View Licenses.
The Product Keys dialog box appears.
Press OK when you’re done viewing the product keys.
Alternatively, you can view the product keys for a single product by pressing the product’s name in the SMART Product Update window, and then pressing View licenses.
SMART periodically releases updates to its software and firmware products. (Firmware is software installed in hardware products like the SMART Board interactive whiteboard.) You can use SPU to check for and install these updates.
Your system administrator can install SPU in Full mode or Dashboard mode. In Full mode, you can view installed versions and download and install updates as documented in this section. In Dashboard mode, you can only view installed versions.
To check for updates automatically
In Windows 7 operating system, select Start > All Programs > SMART Technologies > SMART Tools > SMART Product Update.
In Windows 8.1 operating system, go to the Apps screen, and then scroll to an select SMART Technologies > SMART Product Update.
In Windows 10 operating system, press Start, and then scroll to an select SMART Technologies > SMART Product Update.
The SMART Product Update window opens.
Select the Check for updates automatically check box, and then type the number of days (up to 60) between SPU checks.
Close the SMART Product Update window.
If an update is available for a product the next time SPU checks, the SMART Product Update window appears automatically and the product’s Update button is enabled.
To check for updates manually
In Windows 7 operating system, select Start > All Programs > SMART Technologies > SMART Tools > SMART Product Update.
In Windows 8.1 operating system, go to the Apps screen, and then scroll to an select SMART Technologies > SMART Product Update.
In Windows 10 operating system, press Start, and then scroll to an select SMART Technologies > SMART Product Update.
The SMART Product Update window opens.
If an update is available for a product, its Update button is enabled. Install the update by following the next procedure.
To install an update
Open the SMART Product Update window as described in the previous procedures.
Press the product’s row.
Product details appear. These product details include the installed version’s number and the update’s number, date and download size (if an update is available).
Press View release notes to view a summary of the changes in the update and the computer requirements for the update.
Follow the on-screen instructions to download and install the update.
To install updates, you must have full administrator access.
To disable automatic checking for updates
In Windows 7 operating system, select Start > All Programs > SMART Technologies > SMART Tools > SMART Product Update.
In Windows 8.1 operating system, go to the Apps screen, and then scroll to an select SMART Technologies > SMART Product Update.
In Windows 10 operating system, press Start, and then scroll to an select SMART Technologies > SMART Product Update.
The SMART Product Update window opens.
Clear the Check for updates automatically check box.
SMART recommends that you do not clear this check box.
Источник


Вместе с вами установим HPE SUM на Windows Server, дадим ему свежий SPP, подключим какой-нибудь сервер и обновим его. Можно ставить и на Windows 10.
Качаем Smart Update Manager:
https://support.hpe.com/hpsc/swd/public/detail?sp4ts.oid=1008556819&swItemId=MTX_fbec980c88534dc3b7c50c9898
Получаем файлик sum835.zip. Распаковываем в C:hpsum, инсталляция не требуется.
clean-cache.bat — запуск батника сотрёт всю ранее настроенную вами информацию о серверах и прошивках. Используйте для очистки данных. При первой установке запускать не требуется.
hpsum.bat — запускаем.
Открывается командная строка. На порту 63001 запускается http сервис, на 63002 — https. Открывается браузер:
Видим информационное сообщение:
No baseline found in the current directory.
Пора дать нашему SUM какой-нибудь сервис пак. Качаем SPP. У меня последний: SPP Service Pack for ProLiant — version 2018.09.0. Скачать можно также здесь: http://www.hpe.com/servers/SPP/download.
Я скачиваю файлик P09835_001_spp-2018.09.0-SPP2018090.2018_0914.32.iso.
В папке C:hpsum создаём директорию, например, SPP_2018.09.0 и распаковываю в неё содержимое скачанного ISO образа:
Возвращаемся в GUI, переходим в Baseline Library:
Кликаем Add Baseline:
Кликаем Browse:
Переходим в директорию C:hpsum:
HP SUM определяет, что в папке C:hpsum что-то есть. Кликаем на C:hpsumSPP_2018.09.0.
Ok.
Кликаем Add. Пошёл процесс.
Через некоторое время видим следующую картину:
SUM нашёл наш SPP версии 2018.09.0 и начал инвентаризацию. Процесс долгий — можно идти пить кофе. Итак:
Аналогично можно добавить и другие SPP.
Возвращаемся в GUI SUM, теперь добавляем сервер , переходим в раздел Nodes:
Используем свою способность «кликание мышкой» на кнопке Add Node:
В поле IPV4 / IPV6 / DNS указываем адрес сервера:
В поле Baseline кликаем стрелку вниз и выбираем добавленный ранее baseline, SPP 2018.06.0:
Node type указываем ILO, ну потому что там iLO:
Скроллим ниже, в разделе Credentials указываем логин-пароль админа от iLO. Нажимаем Add:
Происходит какой-то процесс:
Хост обнаружен:
Нам предлагают сделать инвентаризацию. Кликаем на зелёную ссылку Inventory:
Ещё раз Inventory:
Идёт инвентаризация. Тоже долгий процесс.
Вроде всё неплохо. Кликаем на Review and deploy updates:
Мне предлагают обновить iLO с версии 2.61 на 2.61. Смысла нет, но… обновляем. Кликаем Forced и Deploy:
Дальше ставится пакет:
Если вы добавите хост как Linux или Windows сервер, то обновлений будет побольше. Но у меня ubuntu — поэтому данный способ подойдёт только для обновления iLO. Остальные прошивки придётся ставить с помощью загрузки с ISO образа.
SPP — установка Service Pack for Proliant с ISO
1 Integrated Smart Update Tools for Windows and Linux User Guide Version Abstract This document describes how to use Integrated Smart Update Tools to update firmware and operating system drivers on HPE ProLiant servers. This document is intended for individuals who understand the configuration and operations of Microsoft Windows, Windows Server, Linux, smart components, and the risk of data loss from performing updates. Part Number: Published: February 2018 Edition: 1
2 Copyright 2015, 2018 Hewlett Packard Enterprise Development LP The information contained herein is subject to change without notice. The only warranties for Hewlett Packard Enterprise products and services are set forth in the express warranty statements accompanying such products and services. Nothing herein should be construed as constituting an additional warranty. Hewlett Packard Enterprise shall not be liable for technical or editorial errors or omissions contained herein. Confidential computer software. Valid license from Hewlett Packard Enterprise required for possession, use, or copying. Consistent with FAR and , Commercial Computer Software, Computer Software Documentation, and Technical Data for Commercial Items are licensed to the U.S. Government under vendor’s standard commercial license. Links to third-party websites take you outside the Hewlett Packard Enterprise website. Hewlett Packard Enterprise has no control over and is not responsible for information outside the Hewlett Packard Enterprise website.
3 Contents isut introduction… 5 Integrated Smart Update Tools… 5 isut operating modes… 5 Dual boot environment notes… 6 HPE Firmware, Driver, and Software Inventory Discovery… 6 Downloading isut… 8 Downloading isut… 8 Downloading SUM… 8 Downloading isut RPM keys…8 Installing isut… 9 Configuring isut with the SUM GUI…9 Installing isut with the SUM GUI… 9 Verifying isut installation Setting the staging directory Reinstalling isut with the SUM GUI…10 Issuing isut commands…11 isut command-line basics…11 Changing the isut mode…11 Reviewing staged components Command-line parameters…12 activate…12 clearstaging deploy deployreboot exportconfig help importconfig set…15 stage start status stop verify version…18 isut log files About log files Collecting log files in Windows and Linux Contents 3
4 Uninstalling isut Uninstalling isut in Windows Uninstalling isut in Linux isut troubleshooting…21 Baseline URI not Detected as a Supported Baseline isut unexpectedly installs a CHIF driver Cannot clear the isut staging directory isut is installed, but does not issue commands isut does not recognize a configuration file isut cannot stage files isut cannot mount baseline ISO through ilo Virtual Media…23 isut cannot start deployment…23 isut cannot reboot a server Components in an ilo task queue are marked as Exception isut does not launch SUM…24 isut does not support the version of SUM…25 An unprivileged account installed isut isut unexpectedly changes the command Websites and support…27 Websites Support and other resources Accessing Hewlett Packard Enterprise Support…27 Accessing updates Customer self repair…28 Remote support…28 Warranty information Regulatory information Documentation feedback Contents
5 isut introduction Integrated Smart Update Tools Integrated Smart Update Tools is a software utility used with ilo 4, ilo 5, HPE OneView, ilo Amplifier Pack, Service Pack for ProLiant (SPP), and Smart Update Manager (SUM) to stage, install, and activate firmware and driver updates. NOTE: HPE OneView or ilo Amplifier Pack manage the ilo while isut runs on each server and deploys the updates. The same administrator might not manage both applications. Create a process that notifies the administrators when updates are available. Integrated Smart Update Tools: Polls ilo to check for requests from HPE OneView or ilo Amplifier Pack for updates through the management network and orchestrates staging, deploying, and activating updates. You can adjust the polling interval by issuing the appropriate command-line option provided by isut. Performs inventory on target servers, stages deployment, deploys updates, and then reboots the servers. ilo 5 with integrated Smart Update (Gen10 servers only): Loads Install Sets to the ilo Repository on ilo 5 nodes. isut deploys OS-based updates from the ilo Repository. ilo Amplifier Pack: Displays available updates for servers. Communicates with isut (or SUT 1.x) to initiate updates using the ilo Redfish interface. isut reports the status of updates to ilo Amplifier Pack via ilo Restful Interface. HPE OneView: Displays available updates for servers. Communicates with isut (or SUT 1.x) to initiate updates, reports the status on the Firmware section of the Server Profile page of HPE OneView. HPE OneView provides automated compliance reporting in the dashboard. SPP: A comprehensive systems software and firmware update solution, which is delivered as a single ISO image. SUM: A tool for firmware and driver maintenance for HPE ProLiant servers and associated options. NOTE: Do not manage same nodes with ilo Amplifier Pack and HPE OneView at the same time. isut operating modes isut runs in the following modes: OnDemand mode (default): OnDemand mode enables the administrator to write commands in the CLI window that: Stages updates Deploys updates Reboots servers Auto mode: isut runs in the following Auto modes: isut introduction 5
6 AutoStage Stages available components to the host server through ilo Virtual Media. Uses SUM to inventory the server. Copies needed components to the server for deployment. AutoDeploy Performs all the tasks in AutoStage mode. Deploys available components on the host server. AutoDeployReboot Performs all the tasks in AutoDeploy mode. If required, reboots the host server. NOTE: If the deployment succeeds, isut verifies the updates by default. Use the command sut /deploy noautoverify to prevent the default verification. Use the status command to view which mode isut is running. Dual boot environment notes If you have an environment where servers boot to both Windows and Linux operating systems. If you run isut in one operating system, and then are going to run it in on another, change the staging directory to the correct path. Use the following command: sut -set stagingdirectory=<staging_directory_path> IMPORTANT: isut requires permission to write to the staging directory. For more information on command-line parameters, see Command-line parameters. HPE Firmware, Driver, and Software Inventory Discovery Gen9 and Earlier Smart components are HPE’s release mechanism for firmware, drivers, and other software. A smart component contains meta XML data, an installer, and the firmware, driver, or software to be updated or installed. All of these are compressed into a single deliverable file (RPM for Linux, self-extracting EXE for Windows and ZIP for VMware.) Smart Update Manager (SUM) uses various means to determine whether smart components are applicable for install on a target system, including the following: 6 Dual boot environment notes
7 1. ilo provides inventory information for most firmware. 2. Agentless Management System (AMS) running in the operating system passes storage firmware, software, and driver inventory to ilo, where it is made available. SUM runs the components not identified by the above methods to determine applicability. The process is as follows: 1. When you boot an SPP ISO, SUM runs the firmware components applicable to the SPP operating system (currently SLES 12) in discovery mode. 2. The components display a message when they are applicable for install, and SUM adds them to an install set. 3. After the discovery process is complete, SUM installs all the components in the install set, in the proper order, and with optional reboots. When HPE OneView performs updates using Smart Update Tools (SUT) in the OS, SUT downloads SUM from the HPE OneView-mounted SPP, and then downloads the firmware components for the current OS (Windows, SLES, and RHEL). SUT then runs SUM, which builds an install set using the methods described above. Finally, SUT cleans up SUM and the downloaded components. Gen10 HPE has made significant improvements to all aspects of firmware management in Gen 10, including discovery. Specifically, two improvements help with discovery: Gen10 ilo 5 now provides better inventory, including a GUID that contains IDs (for example PCI IDs) for installed devices. Metadata fields are now added to components, including IDs matching those reported by ilo (above). With some exceptions, SUM can now simply match component GUIDs with GUIDs reported in ilo inventory, and no longer needs to run components in discovery mode. This also reduces disk space for HPE OneView updates because SUT no longer needs to download all the components into the operating system for SUM to run in discovery mode. The ilo Repository in Gen10 servers provides a side benefit for discovery. SUM can build install sets and stage components into the ilo Repository without affecting the production load on the server. Then, during the server’s maintenance window, SUT in the operating system can download just the install set components from the ilo Repository and immediately install them without running SUM discovery. isut introduction 7
8 Downloading isut Downloading isut isut is available through the product downloads page. Procedure Download isut from Downloading SUM Procedure 1. Go to 2. Click Download. 3. Select the SUM version you want to download. 4. In the Delivery Options area, select the SUM file you want to download. Downloading isut RPM keys Procedure Open the link in a web browser and follow the instructions. 8 Downloading isut
9 Installing isut Configuring isut with the SUM GUI For more information on using SUM, see the SUM documentation at Prerequisites Directory containing the isut components. Procedure 1. Launch SUM in GUI mode. 2. On the Baseline Library Screen, click Add Baseline, and then map to the directory that contains the configured isut components. 3. To sort the isut components, click Configurable. 4. Click Components. 5. Click Configurable or Configured. Components labeled Configurable have no configuration settings. Components labeled Configured have saved configuration settings. 6. Change the configuration parameters, and then click Save in SUM or Save and Export. Installing isut with the SUM GUI You can also use the SUM CLI, CLI with Input File, and interactive CLI modes to install isut. For more information on using SUM, see the Smart Update Manager CLI and Interactive CLI Guide at Prerequisites Directory with the isut components. Procedure 1. Launch SUM in GUI mode. 2. On the Baseline Library screen, add a baseline, and then map to the directory that contains the configured isut components. 3. On the Nodes Library screen, add the nodes where you are installing isut and assign the baseline with the isut components. 4. On the Nodes Library screen, perform inventory on the nodes where you are installing isut. 5. Install the components. Installing isut 9
10 Verifying isut installation Procedure Issue the following command on the host. sut -status If isut is installed, the system displays isut settings. For example, mode and baseline version. Setting the staging directory If you do not want to use the default isut staging directory, issue a set parameter to assign the staging directory. Procedure 1. Open a command-line window. 2. Enter the command sut /set stagingdirectory=<directory_path>. isut creates a backup configuration file that isut can use in future sessions. More information set on page 15 Reinstalling isut with the SUM GUI You can reinstall isut with SUM and overwrite the currently installed version of isut. You can reinstall isut to change the configuration for multiple servers at the same time. Prerequisites Directory with isut components configured. Procedure 1. Launch SUM in GUI mode. 2. On the Baseline Library screen, add a baseline, and then map to the directory that contains the configured isut components. 3. On the Nodes Library screen, add the nodes where you are installing SUM and assign the baseline with the isut components. 4. On the Nodes Library screen, perform inventory on the nodes where you are installing isut. 5. Install the components. Use the Advanced Deployment mode and Force the component updates. 10 Verifying isut installation
11 Issuing isut commands isut command-line basics The following example is the basic isut syntax. sut -[command] (Linux) NOTE: Running isut on a server with ilo configured in High Security mode needs ilo Administrator credentials. Use the sut -set command to store ilo credentials in the host so that isut can use the ilo credentials for ilo communication. If you do not want isut to store the ilo credentials, provide the credentials with each isut command. Providing credentials with each command will not work with sut — deploy or sut -deployreboot commands if the baseline also contains the isut component. When using Auto mode, always use the sut -set command so that isut performs the deploy operation in Auto mode when ilo is configured in High Security mode. Changing the isut mode Prerequisites isut installed on the server. Procedure 1. Open a command line on the server. 2. Issue the set parameter. sut -set mode=[mode_type} Reviewing staged components Use the /status parameter to display a list of all components staged by isut. Procedure From a command line, type sut -status. isut generates a list of components available for deployment, and required user actions. Issuing isut commands 11
12 Command-line parameters The following parameters are valid for the command line. activate Syntax /activate (Windows) -activate (Linux) Description Reboots the server if a reboot is required to activate the firmware/software. The command asks for reboot confirmation. Options sut /activate force Provide this option to avoid the reboot confirmation step. Restrictions Valid in the following state: InstalledPendingReboot Example input sut /activate sut -activate clearstaging Syntax /clearstaging (Windows) -clearstaging (Linux) Description Clears everything in the current staging directory. Restrictions Not valid in the following states: Staging Staged Installing 12 Command-line parameters
13 Activating InstalledPendingReboot deploy Example input sut /clearstaging sut -clearstaging Syntax /deploy (Windows) -deploy (Linux) Description Deploys components, and then enables verification after reboot to check whether components are deployed correctly. Options noautoverify Passing parameter prevents isut from verifying the component installation automatically after deployment. Example input sut /deploy sut -deploy deployreboot Syntax /deployreboot (Windows) -deployreboot (Linux) Description Deploys components and then reboots the server if a reboot is required. After reboot, verifies if the updates are deployed correctly. Options noautoverify Passing parameter prevents isut from verifying the component installation automatically after deployment is completed and re-booted. Example input sut /deployreboot sut -deployreboot deploy 13
14 exportconfig Syntax /exportconfig <filename> (Windows) -exportconfig <filename> (Linux) Description Uses the configuration file name as a parameter and writes all isut setting values to the file. Restrictions Valid in all states. Example input sut /exportconfig <filename> sut -exportconfig <filename> More information importconfig on page 14 help Syntax /help (Windows) -help (Linux) Description Displays command-line help information. Example input sut /help sut /? sut -help sut -? importconfig Syntax /importconfig <path_to_config_file> (Windows) -importconfig <path_to_config_file> (Linux) Description Uses the configuration file parameters and applies the settings. 14 exportconfig
15 Restrictions This command is allowed in the following states: StageFailed InstallFailed Activated ActivatedFailed InstalledPendingReboot Example input sut /importconfig <path_to_config_file> sut -importconfig <path_to_config_file> set Syntax /set (Windows) -set (Linux) Description Changes isut options. Options sut -set mode=<ondemand,autostage,autodeploy,autodeployreboot> Selects the mode isut uses. AutoStage: Stages components to the server. AutoDeploy: Stages and deploys the components. AutoDeployReboot: Stages, deploys, and if necessary, reboots the server. OnDemand: isut deploys updates when the admin issues commands. sut -set stagingdirectory=<directory_path> Specifies the directory where isut stages components. sut -set rebootmessage <message> isut displays the reboot message. sut -set rebootdelay <seconds> The number of seconds before isut reboots the node. sut -set pollingintervalinminutes=<time_minutes> How frequently isut requests information from SUM, HPE OneView or ilo Amplifier Pack. sut -set savelogs=<true/false> Sets whether isut saves the log files. set 15
16 sut -set enableiloqueuedupdates=<true/false> Default = true. Valid for ilo 5 nodes only. If true, isut polls the ilo for any updates in the ilo Installation Queue. sut -set ilousername=<username> ilopassword=<password> Enter ilo credentials, to enable the isut perform updates, when ilo 5 is in one of the High Security modes. To hide the password characters, provide ilo username and press Enter, which prompts you enter the password as below: sut -set ilousername=<username> Please provide the ilo password: <******> stage The ilo credentials are stored in the isut database, and will be used to run any On Demand commands in High Security mode. sut -set ignorewarnings=true Ignores warnings isut encounters during deployment. sut -set tpmbypassflag=true Bypasses TPM warnings. Example input sut /set mode=ondemand sut -set mode=autostage Syntax start /stage (Windows) -stage (Linux) Description Determines which components must be applied on the node and copies the components to the staging directory. Restrictions isut requires permissions to write to the staging directory. Example input sut /stage sut -stage Syntax /start (Windows) 16 stage
17 -start (Linux) Description If isut is in Auto mode, starts the isut service. Restrictions isut mode must be in the following modes: AutoStage AutoDeploy AutoDeployReboot status stop Example input sut /start sut -start Syntax /status (Windows) -status (Linux) Description Displays the current state of the isut engine. Example input sut /status sut -status Syntax /stop (Windows) -stop (Linux) Description Stops the isut service. Example input sut /stop sut -stop status 17
18 verify Syntax /verify (Windows) -verify (Linux) Description Verifies that the update happened successfully. Changes state to Activated if the update is successful. Only required if you passed the noautoverify parameter with the deploy or deployreboot command. Example input sut /verify sut -verify version Syntax /version (Windows) -version (Linux) Description Displays the installed version of isut. Example input sut /version sut -version 18 verify
19 isut log files About log files After isut automatically generates updates after: Deploying updates. Staging updates. Verifying updates. isut saves the log files in the following locations: Windows: OnDemand mode: C:UsersAdministratorAppDataLocalsutlogs Auto mode: C:UsersSystem32configsystemprofileAppDataLocalsutlogs Linux: /var/tmp/sut/sum Collecting log files in Windows and Linux Procedure 1. Use one of the following commands: Windows: gatherlogs_x64.exe /debuglogdir <directory_location>. Linux:./gatherlogs.sh —debuglogdir /var/tmp/sut/sum isut log files 19
20 Uninstalling isut Uninstalling isut in Windows Make sure that isut is not installed on your servers. Procedure 1. On your Windows server, open Programs and Features. 2. Select Integrated Smart Update Tools for Windows, and then click Uninstall. Uninstalling isut in Linux Make sure that isut is not installed on your server. Procedure 1. Use the following to find the isut filename. rpm q sut grep -i sut 2. Use the following command to uninstall isut: — rpm e sut 20 Uninstalling isut
21 isut troubleshooting Baseline URI not Detected as a Supported Baseline Symptom The URI provided is not detected as a supported baseline ISO. The directory contents do not match the SPP structure. Action 1. Verify that the SPP ISO is valid. 2. Reissue the request. isut unexpectedly installs a CHIF driver Symptom isut installs a CHIF driver when you did not select it for installation. isut requires the CHIF driver to perform tasks. Action No action. Cannot clear the isut staging directory Symptom While staging components, isut cannot clear the staging directory. Solution 1 The user does not have execution permissions for the directory or file. Action Make sure that the administrator has write permissions for the directory. Solution 2 Other processes are using the staged files. isut troubleshooting 21
22 Action Verify that other processes are not using the staged files. isut is installed, but does not issue commands Symptom isut installed succeeds, but command do not function. A user account without administrator or root user privileges installed isut. Action Uninstall isut and reinstall with an administrator account or root user. isut does not recognize a configuration file Symptom isut does not recognize the specified configuration file. The path to the configuration file includes spaces. Action Remove all empty spaces from the directory path to a configuration file. isut cannot stage files Symptom isut cannot stage files. Solution 1 isut files require more space than available on the disk. Action Clear disk space on staging drive and retry the staging operation. Solution 2 The component is not in the baseline SPP. 22 isut is installed, but does not issue commands
23 Action Verify that the component is in the baseline SPP. Solution 3 SPP fails security validation on Windows. Action Update the Windows root certificates. Manually update the GlobalSign Root CA and AddTrust External Root CA certificates. isut cannot mount baseline ISO through ilo Virtual Media Symptom Mounting the baseline ISO through the ilo Virtual Media failed. The baseline is not accessible. The HTTPS server hosting the baseline ISO is busy. There is no HPE ilo Advanced license installed. Action 1. Check to see if another baseline ISO is already mounted through ilo Virtual Media. 2. Verify that an HPE ilo Advanced license is installed. 3. Verify that the staging directory URI is accessible. 4. Retry the operation. isut cannot start deployment Symptom isut cannot deploy updates. The staging directory is not accessible or has been deleted. isut cannot mount baseline ISO through ilo Virtual Media 23
24 Action Verify the staging directory is valid. isut cannot reboot a server Symptom isut cannot reboot a server after deploying updates to the server. Action Manually reboot the server. Components in an ilo task queue are marked as Exception Symptom isut marks the component state in ilo task queue as Exception with message ID as InvalidFile This can occur if the component signature is not imported into the rpm database. Windows certificates are not current. Action 1. Make sure that the certificates are up-to-date on the system. Linux: Import the HPE rpm keys at Use the rpm —import command. isut does not launch SUM Symptom SUM does not execute. Solution 1 The SUM binary does not exist in the staging location. 24 isut cannot reboot a server
25 Action Make sure that SUM exists in the SPP ISO. Solution 2 The SUM binary does not have the correct permissions. Action Make sure that the SUM binary has the correct permissions. isut does not support the version of SUM Symptom isut cannot launch SUM. The version of SUM is too old. Action Verify that the version of SUM is supported. For more information, see the Integrated Smart Update Tools Release Notes. An unprivileged account installed isut Symptom isut installed succeeds, but command do not function. A user account without administrator or root user privileges installed isut. Action Uninstall isut and reinstall with an administrator account or root user. isut unexpectedly changes the command Symptom A requested command changes during processing. A user sent a request while isut processed another request. isut does not support the version of SUM 25
26 Action Reissue the command that changed. Make sure that one command ends before issuing another command 26 isut troubleshooting
27 Websites and support Websites Hewlett Packard Enterprise Information Library Smart Update Manager Smart Update Manager Downloads Smart Update Manager Information Library Smart Update Tools Smart Update Tools Information Library Service Pack for ProLiant Service Pack for ProLiant documentation Service Pack for ProLiant downloads Service Pack for ProLiant custom downloads HPE SDR site downloads.linux.hpe.com For additional websites, see Support and other resources. Support and other resources Accessing Hewlett Packard Enterprise Support For live assistance, go to the Contact Hewlett Packard Enterprise Worldwide website: To access documentation and support services, go to the Hewlett Packard Enterprise Support Center website: Information to collect Technical support registration number (if applicable) Product name, model or version, and serial number Operating system name and version Firmware version Error messages Websites and support 27
28 Product-specific reports and logs Add-on products or components Third-party products or components Accessing updates Some software products provide a mechanism for accessing software updates through the product interface. Review your product documentation to identify the recommended software update method. To download product updates: Hewlett Packard Enterprise Support Center Hewlett Packard Enterprise Support Center: Software downloads Software Depot To subscribe to enewsletters and alerts: To view and update your entitlements, and to link your contracts and warranties with your profile, go to the Hewlett Packard Enterprise Support Center More Information on Access to Support Materials page: IMPORTANT: Access to some updates might require product entitlement when accessed through the Hewlett Packard Enterprise Support Center. You must have an HPE Passport set up with relevant entitlements. Customer self repair Hewlett Packard Enterprise customer self repair (CSR) programs allow you to repair your product. If a CSR part needs to be replaced, it will be shipped directly to you so that you can install it at your convenience. Some parts do not qualify for CSR. Your Hewlett Packard Enterprise authorized service provider will determine whether a repair can be accomplished by CSR. For more information about CSR, contact your local service provider or go to the CSR website: Remote support Remote support is available with supported devices as part of your warranty or contractual support agreement. It provides intelligent event diagnosis, and automatic, secure submission of hardware event notifications to Hewlett Packard Enterprise, which will initiate a fast and accurate resolution based on your product’s service level. Hewlett Packard Enterprise strongly recommends that you register your device for remote support. If your product includes additional remote support details, use search to locate that information. 28 Accessing updates
29 Remote support and Proactive Care information HPE Get Connected HPE Proactive Care services HPE Proactive Care service: Supported products list HPE Proactive Care advanced service: Supported products list Proactive Care customer information Proactive Care central Proactive Care service activation Warranty information To view the warranty for your product or to view the Safety and Compliance Information for Server, Storage, Power, Networking, and Rack Products reference document, go to the Enterprise Safety and Compliance website: Additional warranty information HPE ProLiant and x86 Servers and Options HPE Enterprise Servers HPE Storage Products HPE Networking Products Regulatory information To view the regulatory information for your product, view the Safety and Compliance Information for Server, Storage, Power, Networking, and Rack Products, available at the Hewlett Packard Enterprise Support Center: Additional regulatory information Hewlett Packard Enterprise is committed to providing our customers with information about the chemical substances in our products as needed to comply with legal requirements such as REACH (Regulation EC No 1907/2006 of the European Parliament and the Council). A chemical information report for this product can be found at: For Hewlett Packard Enterprise product environmental and safety information and compliance data, including RoHS and REACH, see: Warranty information 29
30 For Hewlett Packard Enterprise environmental information, including company programs, product recycling, and energy efficiency, see: Documentation feedback Hewlett Packard Enterprise is committed to providing documentation that meets your needs. To help us improve the documentation, send any errors, suggestions, or comments to Documentation Feedback When submitting your feedback, include the document title, part number, edition, and publication date located on the front cover of the document. For online help content, include the product name, product version, help edition, and publication date located on the legal notices page. 30 Documentation feedback
Одно из наших хранилищ HP LeftHand P4000 стало жаловаться на проблемы с памятью. То есть все работало без ошибок, но в мониторинге HP Systems Insight Manager один из модулей был помечен как проблемный. Разумеется, более «глобальная» система мониторинга в компании рапортовала зелеными галочками и проблем просто не видела.
Конечно, потерять из-за этого данные на «Левше» было бы проблематично, но ведь не все системы работают в подобном кластере. В этой статье хочу поделиться опытом работы со средствами управления оборудованием от Hewlett Packard Enterprise (HPE):
- System Insight Manager + Insight Control (будут актуальны вплоть до следующего поколения серверов HPE Gen10);
- OpenView Standard, Advanced;
- Integrated Lights-Out (iLO);
- ProLiant Support Pack.
Сразу оговорюсь, речь пойдет только о стоечных и башенных серверах x86 ProLiant (на базе которого, кстати, построена и та памятная P4000), как наиболее массовых.
Пакет исправленный и дополненный
Администратор любого классического x86-сервера HPE может загрузить специальный набор свежих драйверов и прошивок Service Pack for ProLiant (SPP). Этот образ загрузочного диска обновляется ежегодно и позволяет быстро «освежить» программную и железную составляющую серверного парка.
Особенно удобен инструмент при настройке нового оборудования, так как его можно совместить с установкой операционной системы. В комплекте также идет HPE Insight Management Agents, необходимый для подключения серверов устаревших поколений к централизованному мониторингу. Начиная с восьмого поколения Gen8, функции агента интегрированы в модуль iLO и сразу доступны для использования.
К слову, оповещения от сервера можно получать и без помощи централизованного мониторинга, для чего в инструменте Event Notifier Config следует указать e-mail администратора и координаты почтовой службы. Для небольших серверных инсталляций это самый недорогой способ быть в курсе состояния оборудования.
Из минусов таких локальных оповещений можно отметить отсутствие поддержки SMTP-серверов с обязательным шифрованием TLSSSL. Это может доставить неудобства при использовании почтовых служб вроде Gmail, которые позволяют отправлять письма без шифрования только другим пользователям Google. Но всегда можно использовать SMTP-relay или настроить пересылку с одного ящика Gmail на другой.
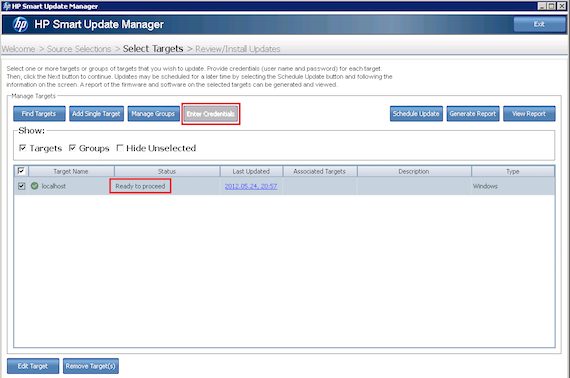
В SPP входит и утилита под названием HPE Smart Update Manager, с помощью которой можно обновлять прошивки на нескольких серверах сразу. С этим инструментом процесс сводится к выбору репозитория с обновками и указанию целевых серверов. Дальнейшее происходит автоматически.
Read-Only забесплатно
HPE предлагает собственную систему мониторинга оборудования Systems Insight Manager (SIM), которая распространяется бесплатно и позволяет быть в курсе состояния практически любой из систем дата-центра.
Но этот продукт уже объявлен устаревшим и ему на смену пришел комплект OneView. При использовании лицензии Standard он фактически служит заменой бесплатного мониторинга SIM. Одной из приятных особенностей OneView является способ распространения. Если SIM распространяется как обычный дистрибутив для установки, то OneView доступен для загрузки в формате готовой виртуальной машины для хостов под управлением VMware или Hyper-V.
Мониторинг от HPE работает по вполне типовой схеме. Помимо банальной Ping-проверки, система подключается через WMISNMP к агентам на серверах HPE и собирает подробные сведения со всех внутренних датчиков. Доступна также библиотека MIB Kit для оборудования других производителей.
Для администраторов серверных систем HPE подключение к мониторингу упрощено:
- В относительно свежих машинах, начиная с восьмого поколения, работа ведется напрямую с iLO, без посреднических услуг агентов. Чтобы получать информацию не только от физических компонентов сервера, но и от операционной системы, HPE предлагает установить службу Agentless Management Service.

-
Интеграция с HPE Smart Update Manager. Результатом будет что-то вроде WSUS, но только для обновления прошивок.
- Детальные отчеты о состоянии оборудования и инвентаризация. Например, удобно получить в два клика отчет о том, где и какие именно жесткие диски установлены.
Разумеется, можно обойтись и без фирменного мониторинга – например, привычными для многих Zabbix или Nagios. Конечно, придется поискать подходящие MIB-файлы, повозиться с настройками и скриптами, но базовый набор возможностей будет похож. Тем не менее, обновление прошивок и драйверов придется выполнять вручную или с помощью Service Pack for ProLiant.
Шаблон для взаимодействия с iLO 4 выложен на wiki Zabbix, а про Nagios с iLO есть хорошая статья.
Удаленное управление и немного Enterprise-магии от Integrated Lights-Out
Все дальнейшее преимущественно относится к Integrated Lights-Out (iLO) 4 в восьмом поколении HPE ProLiant. Это аппаратный диагностический модуль в серверах HPE, предназначенный для удаленного управления. Можно сказать, система представляет собой проприетарный аналог IPMI с набором дополнительных возможностей, большинство из которых предлагается за деньги.
Однажды я допустил незначительную ошибку при настройке фаервола на удаленном сервере, что привело к незапланированному ночному путешествию. С тех пор я применяю скрипты автоматического отката параметров фаервола при удаленной настройке. Заодно обязательно включаю в бюджет IP-KVM или лицензию на iLO.
В качестве скрипта для штатного брандмауэра Windows 2008 и старше использую простенький скрипт:
«get_it_back.bat»
rem экспортируем настройки
netsh advfirewall export %temp%temp-firewall
rem ждем 60 секунд
choice /n /t 60 /d y
rem импортируем настройки
netsh advfirewall import %temp%temp-firewall
Если в течение минуты скрипт не прервать – настройки фаервола будут восстановлены.
Для более наглядного сравнения возможностей разных редакций iLO предлагаю небольшую табличку:
| Standard | Essentials | Advanced | |
| Удаленный доступ к консоли (KVM) | нет | да | да |
| Подключение ISO-образа по сети | нет | да | да |
| Доступ по SSH | нет | нет | да |
| Поддержка внешнего сервера Syslog | нет | нет | да |
| E-mail уведомления | нет | да | да |
| Запись видео загрузки | нет | нет | да |
| Поддержка Active Directory | нет | нет | да |
| Цена* | 0 | $100 | $360 |
*- Цена указана приблизительно, на 3 октября 2016, по данным официального магазина HPE
Более подробно отличия между редакциями iLO представлены в документации вендора.
Отдельно хочу подчеркнуть, что для удаленного доступа к консоли достаточно приобрести HPE iLO Essentials за $100. Из дополнительных возможностей отмечу Intelligent Provisioning, заменивший SmartStart CD для автоматической установки операционной системы. Теперь можно обойтись без создания загрузочного диска или флешки автоматической установки, так как минимально необходимые драйверы, агенты и конфигурационные утилиты уже содержатся в NAND-памяти сервера;
Благодаря модулю управления с поддержкой Rest API можно также разработать собственное решение для управления серверами, с баккара и профурсетками.
Insight Control VS OneView
Используемый многими администраторами HPE Insight Control теперь тоже объявлен устаревшим, хотя и доступен для приобретения по минимальной цене $273 на сервер. Его заменой также является OneView, но только редакции Advanced и с трехлетней поддержкой. Стоимость пакета составляет уже $542, но и возможностей у него больше. Кратко рассмотрим «старичка» и его преемника.
Insight Control предоставляет доступ к следующим возможностям:
-
Установка операционных систем на физические серверы через консоль управления без использования PXE.
- Миграция P2P, P2V, V2P и V2V. Для серверов других производителей потребуется ручная установка агента и самостоятельное использование специального загрузчика. У ProLiant все произойдет автоматически.
-
Лицензия iLO Advanced входит в стоимость.
-
Работа с виртуальными машинами VMware, Hyper-V и Xen на RHEL или SLES. Возможна миграция машин при обновлении прошивок, как это реализовано в системах Dell. Достаточно в консоли Insight Control открыть управление виртуальной машиной и для параметра «Set Alternate Virtual Machine Host» указать альтернативный хост.
-
Все возможности SIM включены, центральным средством управления является консоль SIM.
- Можно использовать средства управления vCenter, Microsoft System Center и Red Hat Enterprise Virtualization в качестве центральной консоли. Работает благодаря плагинам интеграции.
OneView Advanced отличается следующим набором:
-
Располагает аналогичными Insight Control возможностями, а также включает лицензию на использование самого Insight Control.
-
Есть лицензии с iLO Advanced и без, разница в цене около 100 долларов.
-
При переходе с лицензии Standard на Advanced нет необходимости что-либо переустанавливать или перенастраивать – нужным серверам назначаются необходимые лицензии.
- Предполагает управление не столько серверами, сколько инфраструктурой: в частности, конфигурацией Cisco Nexus и рядом других систем. Например, есть статья про дружбу OneView с системой управления конфигурациями CHEF. Через отдельный API идет взаимодействие с DockerAnsible и продуктами других поставщиков.
Одним словом, OneView Advanced – мощный продукт, ориентированный скорее на крупные организации, чем на средний или малый бизнес.
Итого
Даже без приобретения недешевого программного обеспечения HPE предоставляет неплохой инструментарий для мониторинга и базового обслуживания серверов. В свое время очень полезна оказалась утилита Event Notifier из базового серверного набора: простая и надежная, как штык. Когда инфраструктура разрослась, дошла очередь и до SIM – решили мониторить некоторые СХД, коммутаторы и Windows-системы, а этот продукт позволял добиться желаемого с минимальными затратами денег и усилий.
Если вы тоже захотите попробовать, хотя бы просто для общего развития, то предлагаю несколько полезных ссылок:
-
Загрузка MIB Kit для Inside Control
-
Хорошая подборка документации по установке и настройке HPE SIM
- Мануал по миграции серверов с помощью Insight Control
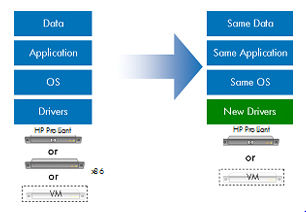
![]() Когда новую ОС Windows Server 2012 загоняли на виртуальные машины на базе Hyper-V 2.0 всё казалось радужно и приятно, однако когда дело дошло до установки на аппаратную платформу “не первой свежести” — HP ProLiant DL 360/380 G5 – веселье куда-то улетучилось… После изучения ситуации с драйверами HP для новой ОС поймал себя на мысли, что любимый вендор ведёт себя как закадычный друг, то есть друг, который хочет взять своих клиентов за кадык, внушая им то, что работать с новой ОС можно только на серверах поколения G7/G8…
Когда новую ОС Windows Server 2012 загоняли на виртуальные машины на базе Hyper-V 2.0 всё казалось радужно и приятно, однако когда дело дошло до установки на аппаратную платформу “не первой свежести” — HP ProLiant DL 360/380 G5 – веселье куда-то улетучилось… После изучения ситуации с драйверами HP для новой ОС поймал себя на мысли, что любимый вендор ведёт себя как закадычный друг, то есть друг, который хочет взять своих клиентов за кадык, внушая им то, что работать с новой ОС можно только на серверах поколения G7/G8…
Здесь изложена небольшая история о, том как я бодался с имеющимся на сегодня комплектом драйверов и прошивок для серверов ProLiant – HP Service Pack for Proliant (SPP) версии 2012.10.0
Итак, скачав с сайта HP доступный на данный момент файл HP_Service_Pack_for_Proliant_2012.10.0-0_713293-001_spp_2012.10.0-SPP2012100.2012_1005.37.iso размером 2 513 903 616 байт, копируем его на сервер со свежеустановленной Windows Server 2012 и с помощью новой встроенной функции Windows монтируем образ в виртуальный DVD-привод …

Перед непосредственным запуском программы устанавливаем в системе службу SNMP Service (в случае если не планируется использовать WBEM).
Далее, открываем командную строку с правами администратора и из смонтированного образа SPP запускаем программу установки hpswpackageshpsum.exe
В конфигурации по умолчанию предлагаемый SPP список репозитариев выглядит так

В такой конфигурации, дойдя до шага непосредственной установки мы столкнёмся с ошибками зависимостей из-за того, что текущая версия SPP не может определить для некоторых устройств подходящий драйвер. Конкретно в моей ситуации при запуске SPP на платформе ProLiant DL 360 G5 возникла проблема с распознанием iLO2 и Smart Array P400i

В поисках решения проблемы на странице HP ProLiant Servers — Microsoft® Windows Server® 2012 обнаружил ссылку указывающую на дополнение к SPP для поддержки Windows Server 2012 — Supplement for SPP. Это дополнение называется Microsoft Windows Server 2012 Supplement for HP Service Pack for ProLiant и представляет собой архивный файл MSsupplement2012.exe размером 183 713 504 байт, который после загрузки был распакован во временный каталог на подопытном сервере.
При повторном запуске SPP добавил этот каталог как дополнительный источник поиска обновлений. Для полноты эксперимента, дополнительно была включена проверка обновлений с ftp.hp.com

После того как HP Smart Update Manager прокачал с интернета дополнительно внушительную пачку обновлений и просканировал локальные каталоги…результат оказался весьма удручающим – ни пакет дополнений ни доступные на ftp файлы не решили проблему…

После некоторого количества экспериментов удалось найти работоспособный вариант мануальной установки драйверов. Выяснилось, что оба неизвестных системе устройства – Base System Device и IPMI Interface в нашем случае относятся к контроллеру iLO2.
Для устройства Base System Device подошёл драйвер HP ProLiant Integrated Lights-Out Management Interface Driver for Windows Server 2003/2008 x64 Editions версии 1.16.0.0 (файл hpswpackagescp016017.exe размером 739 096 байт из состава выше обозначенного SPP). Отдельно загрузить драйвер можно по ссылке.
Для устройства IPMI Interface подошёл драйвер HP ProLiant iLO 2 Management Controller Driver for Windows Server 2008 x64 Editions версии 1.14.0.0 (файл cp013803.exe размером 695 624 байт). На текущий момент загрузить драйвер можно по ссылке.
Для контроллера Smart Array P400i система установила драйвер который шёл в составе ОС, однако этот драйвер не позволяет полноценно обнаружить устройство утилитам HP и поэтому потребовалось заменить его на родной драйвер HP ProLiant Smart Array SAS/SATA Controller Driver for Windows Server 2012 версии 62.24.2.64 (файл hpswpackagescp018436.exe размером 717 064 байт из состава выше обозначенного SPP). Отдельно загрузить драйвер можно по ссылке.

Все указанные драйвера нужно выполнять в режиме ручной установки для каждого отдельного устройства, предварительно распаковав инсталляционный файл драйвера.
После этого установка драйверов и утилит из состава HP Service Pack for ProLiant 2012.10.0 пройдёт без проблем.

