Quick Access to Fix It Looks Like Windows Didn’t Load Correctly
To fix this error — it looks like windows didn’t load correctly, you can choose to restore your PC to an earlier point, only accepting the fact that some downloaded files and applications, plus personal files you saved in the system partition will be missing. The easiest way to fix the error is to watch the video and fix Windows didn’t load correctly in three ways.
- 1 — Fix MBR and System File
- 2 — Fix BCD Error
- 3 — Uninstall Software or Driver in Safe Mode
If you prefer a step-by-step guide, you can read the fixes below to get more help.
| Workable Solutions | Step-by-step Troubleshooting |
|---|---|
| Fix 1. Restore Data to Another Drive | Make sure that all hard drives and other devices were correctly connected and recognized…Full steps |
| Fix 2. Boot into Safe Mode | Connect the Windows Installation Media to the computer. Choose to boot from…Full steps |
| Fix 3. Run CHKDSK | Insert Windows 10/8/7 installation disk or installation USB into PC > boot from the disk or USB…Full steps |
| Fix 4. Rebuild BCD | Insert Windows installation disk > boot from the disk or USB. Click «Repair your computer»…Full steps |
| Fix 5. Perform System Restore | Choose «Advanced options» on the blue screen and then navigate to «Troubleshoot»…Full steps |
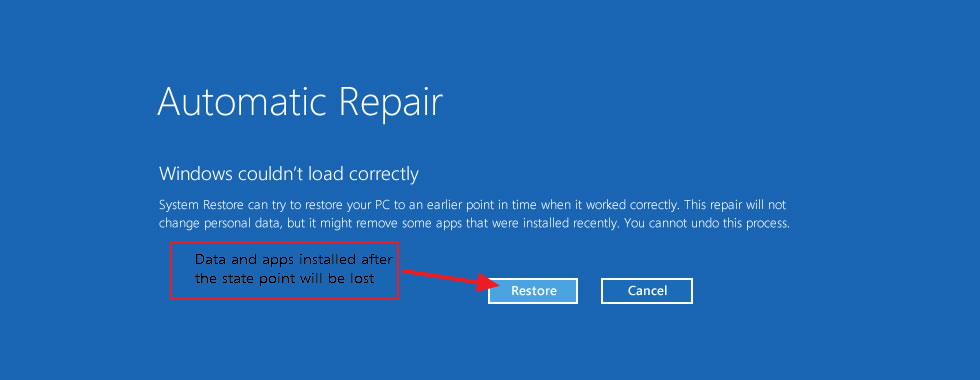
It Looks Like Windows Didn’t Load Correctly
«Automatic Repair
Windows couldn’t load correctly
System Restore can try to restore your PC to an earlier point in time when it worked correctly. This repair will not change personal data, but it might remove some apps that were installed recently. You cannot undo this process.
Restore | Cancel»
This is a Windows Automatic Repair topic called Windows couldn’t load correctly, or perhaps you received the variants, such as Windows couldn’t start correctly, your PC did not start correctly or Windows couldn’t restart correctly. Each specific error has detailed supplementary information behind, telling you what you should do next. Before you are going to fix this error, you must learn about the causes.
What Causes Your PC Did Not Start Correctly
Windows didn’t load correctly error is often caused by these reasons:
1 — BCD is missing or corrupt
BCD became missing or corrupt. This could happen because of disk write errors, power outages, boot sector viruses, or errors made while configuring the BCD manually.
2 — File system integrity compromised
The file system itself may become corrupt or damaged.
3 — System files are damaged
The system files may also become damaged.
After you have learned about the reasons, you can fix Windows couldn’t load correctly error accordingly. To solve your problem, I have gathered 5 effective solutions to fix Windows couldn’t load correctly in Windows 10/8.1/8/7.
- Fix 1. Restore Data to Another Drive
- Fix 2. Boot into Safe Mode
- Fix 3. Run CHKDSK
- Fix 4. Rebuild BCD
- Fix 5. Perform System Restore
Fix 1. Restore Data to Another Drive to Avoid Data Loss
Before you are going to fix Windows couldn’t load correctly error, you must export or restore your data to avoid additional trouble. Since your PC cannot load and boot, you need to create a bootable disk to enter your PC. You can run EaseUS Data Recovery Wizard WinPE Edition. With it, you can restore data to another drive even you can’t boot into Windows. Besides, this data recovery software has many highlights:
- Recover data from dead hard drive
- Restore data from corrupted Windows 10/8/7
- Retrieve photos, videos, documents, and emails
Step 1. Launch EaseUS Data Recovery Wizard in Windows 11/10/8/7 and choose the place where you lost data. Then, click «Scan».

Step 2. After the scan, use the file format filter on the left or upper right corner to find the files you need. Then, you can click the «Preview» button or double-click a file to preview its content.

Step 3. Click the checkbox next to the file and click «Recover» to get back the lost data to a secure place.

Fix 2. Boot into Safe Mode to Fix Windows Not Loading Correctly
Safe Mode is a diagnostic mode of Windows. It is the safest and most promising option when it comes to troubleshooting your pc. Since you cannot boot into Windows when you are faced with Windows didn’t load correctly error, you need a Windows installation CD/DVD for the following methods. If you don’t have the installation disc, follow the guide from Microsoft to create a Windows Installation Media. Then enter Safe Mode:
Step 1. Connect the Windows Installation Media to the computer.
Step 2. Choose to boot from the installation media from the screen.
Step 3. Wait for the files to be loaded.
Step 4. In the Windows Setup window, choose «Next».
Step 5. Again, in the Windows Setup window, choose «Repair your computer» > «Troubleshoot» > «Advanced options» > «Startup Settings».
Step 6. Choose a Safe Mode option (Safe Mode, Safe Mode with Networking, and Safe Mode with Command Prompt) to enter.
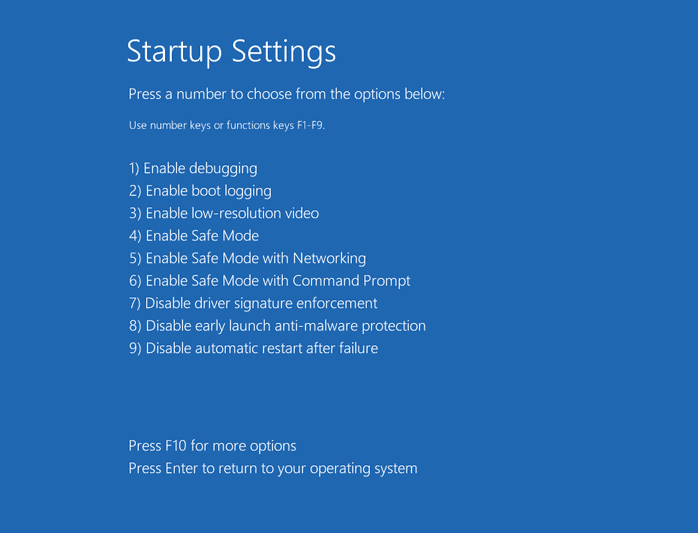
You can uninstall suspicious software or drivers in Safe Mode.
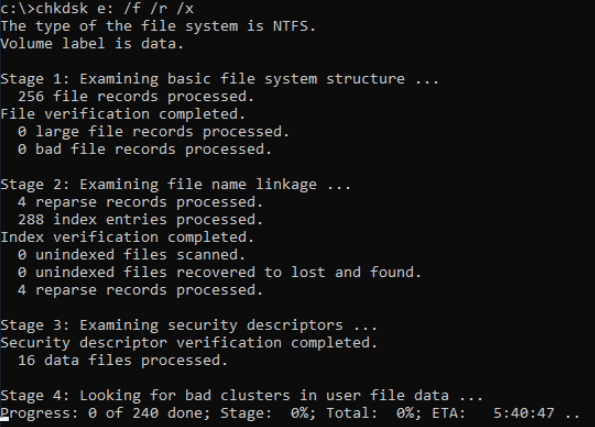
Fix 3. Run CHKDSK to Fix Windows 10 Didn’t Load Correctly
Since you can boot correctly, you need to create a Windows 10/8/7 installation disk. Then, follow the steps below:
Step 1. Insert Windows 10/8/7 installation disk or installation USB into PC > boot from the disk or USB.
Step 2. Click «Repair your computer» or hit F8 at the install now screen.
Step 3. Click «Troubleshoot» > «Advanced options» > «Command Prompt».
Step 4. Type chkdsk E: /f /r /x, and press «enter».
«E» means the drive letter of the partition you want to repair.
Fix 4. Rebuild BCD If Windows Couldn’t Load Correctly
If BCD became missing or corrupt, Windows 10/8/7 cannot load correctly. Thus, you can rebuild BCD to fix the error. You also need a Windows installation disc.
Step 1. Insert Windows 10/8/7 installation disk or installation USB into PC > boot from the disk or USB.
Step 2. Click «Repair your computer» or hit F8 at the install now screen.
Step 3. Click «Troubleshoot» > «Advanced options» > «Command Prompt».
Step 4. Type each command line and hit Enter each time:
ren BCD BCD.old
bcdboot C:Windows /1 en-us /s G: /f ALL (Note: c: is the drive where Windows 10/8.1/8 is installed on.)
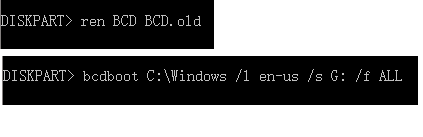
Step 5. Type exit in Command Prompt when the process completes and then restart your PC.
Fix 5. Perform System Restore If Windows Still Cannot Load
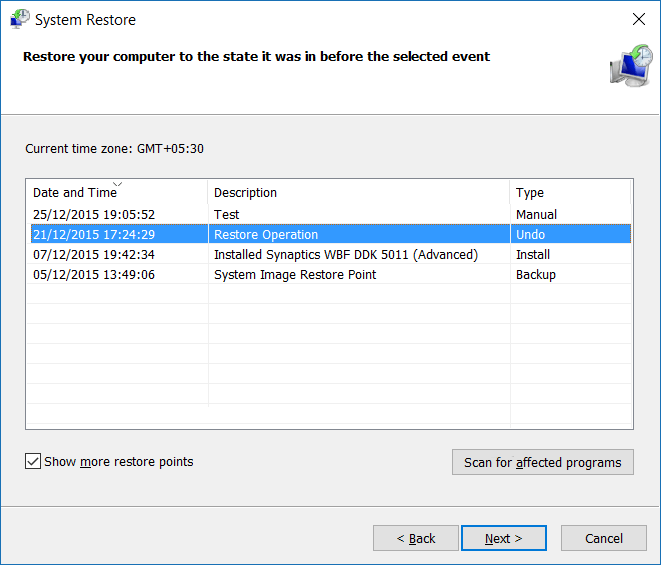
If you have created a Windows restore point before the Windows not loading error occurs, you can perform a system restore to deal with the issue.
Step 1. Choose «Advanced options» on the blue screen and then navigate to «Troubleshoot» > «Advanced Options» > «System Restore».
Step 2. Choose a restore point to restore your computer to the state.
Step 3. Wait until the restore process finishes and then restart your computer.
If you don’t have a system image, you can install Windows 10/8/7 from USB by yourself.
Conclusion
How to fix if it looks like Windows didn’t load correctly error? If you are wondering then you are in the right place. Here you will find out how to fix this issue with five useful solutions. If you have extra tips, you can contact us and share your solutions.
Windows Couldn’t Load Correctly FAQs
If you still have problems, read on to these related questions. You can get additional help about Windows boot problems.
How do I fix it looks like windows didn’t load correctly?
You can fix Windows 10 didn’t load correctly with these solutions:
- Restore Data to Another Drive
- Boot into Safe Mode
- Run CHKDSK
- Rebuild BCD
- Perform System Restore
What causes your PC did not start correctly?
As mentioned above, the Windows did not start correctly issue can be caused by a third-party program or a recent hardware change on your system, a BCD error, or a file system error.
Why Windows 10 is not working properly?
In some cases, third-party anti-virus and anti-malware software can disrupt certain Windows programs.
How do I fix Windows startup problems?
You can fix it by uninstalling new software or drivers:
- Insert the Windows bootable drive and boot from it.
- Select your language preferences, and click Next.
- Click Repair your computer.
- Select Troubleshoot > Startup Settings > Restart.
- Press the F4 key to boot Windows into Safe Mode.
- Then, you can uninstall new software or drivers.
Quick Access to Fix It Looks Like Windows Didn’t Load Correctly
To fix this error — it looks like windows didn’t load correctly, you can choose to restore your PC to an earlier point, only accepting the fact that some downloaded files and applications, plus personal files you saved in the system partition will be missing. The easiest way to fix the error is to watch the video and fix Windows didn’t load correctly in three ways.
- 1 — Fix MBR and System File
- 2 — Fix BCD Error
- 3 — Uninstall Software or Driver in Safe Mode
If you prefer a step-by-step guide, you can read the fixes below to get more help.
| Workable Solutions | Step-by-step Troubleshooting |
|---|---|
| Fix 1. Restore Data to Another Drive | Make sure that all hard drives and other devices were correctly connected and recognized…Full steps |
| Fix 2. Boot into Safe Mode | Connect the Windows Installation Media to the computer. Choose to boot from…Full steps |
| Fix 3. Run CHKDSK | Insert Windows 10/8/7 installation disk or installation USB into PC > boot from the disk or USB…Full steps |
| Fix 4. Rebuild BCD | Insert Windows installation disk > boot from the disk or USB. Click «Repair your computer»…Full steps |
| Fix 5. Perform System Restore | Choose «Advanced options» on the blue screen and then navigate to «Troubleshoot»…Full steps |
It Looks Like Windows Didn’t Load Correctly
«Automatic Repair
Windows couldn’t load correctly
System Restore can try to restore your PC to an earlier point in time when it worked correctly. This repair will not change personal data, but it might remove some apps that were installed recently. You cannot undo this process.
Restore | Cancel»
This is a Windows Automatic Repair topic called Windows couldn’t load correctly, or perhaps you received the variants, such as Windows couldn’t start correctly, your PC did not start correctly or Windows couldn’t restart correctly. Each specific error has detailed supplementary information behind, telling you what you should do next. Before you are going to fix this error, you must learn about the causes.
What Causes Your PC Did Not Start Correctly
Windows didn’t load correctly error is often caused by these reasons:
1 — BCD is missing or corrupt
BCD became missing or corrupt. This could happen because of disk write errors, power outages, boot sector viruses, or errors made while configuring the BCD manually.
2 — File system integrity compromised
The file system itself may become corrupt or damaged.
3 — System files are damaged
The system files may also become damaged.
After you have learned about the reasons, you can fix Windows couldn’t load correctly error accordingly. To solve your problem, I have gathered 5 effective solutions to fix Windows couldn’t load correctly in Windows 10/8.1/8/7.
- Fix 1. Restore Data to Another Drive
- Fix 2. Boot into Safe Mode
- Fix 3. Run CHKDSK
- Fix 4. Rebuild BCD
- Fix 5. Perform System Restore
Fix 1. Restore Data to Another Drive to Avoid Data Loss
Before you are going to fix Windows couldn’t load correctly error, you must export or restore your data to avoid additional trouble. Since your PC cannot load and boot, you need to create a bootable disk to enter your PC. You can run EaseUS Data Recovery Wizard WinPE Edition. With it, you can restore data to another drive even you can’t boot into Windows. Besides, this data recovery software has many highlights:
- Recover data from dead hard drive
- Restore data from corrupted Windows 10/8/7
- Retrieve photos, videos, documents, and emails
Step 1. Launch EaseUS Data Recovery Wizard in Windows 11/10/8/7 and choose the place where you lost data. Then, click «Scan».
Step 2. After the scan, use the file format filter on the left or upper right corner to find the files you need. Then, you can click the «Preview» button or double-click a file to preview its content.
Step 3. Click the checkbox next to the file and click «Recover» to get back the lost data to a secure place.
Fix 2. Boot into Safe Mode to Fix Windows Not Loading Correctly
Safe Mode is a diagnostic mode of Windows. It is the safest and most promising option when it comes to troubleshooting your pc. Since you cannot boot into Windows when you are faced with Windows didn’t load correctly error, you need a Windows installation CD/DVD for the following methods. If you don’t have the installation disc, follow the guide from Microsoft to create a Windows Installation Media. Then enter Safe Mode:
Step 1. Connect the Windows Installation Media to the computer.
Step 2. Choose to boot from the installation media from the screen.
Step 3. Wait for the files to be loaded.
Step 4. In the Windows Setup window, choose «Next».
Step 5. Again, in the Windows Setup window, choose «Repair your computer» > «Troubleshoot» > «Advanced options» > «Startup Settings».
Step 6. Choose a Safe Mode option (Safe Mode, Safe Mode with Networking, and Safe Mode with Command Prompt) to enter.
You can uninstall suspicious software or drivers in Safe Mode.
Fix 3. Run CHKDSK to Fix Windows 10 Didn’t Load Correctly
Since you can boot correctly, you need to create a Windows 10/8/7 installation disk. Then, follow the steps below:
Step 1. Insert Windows 10/8/7 installation disk or installation USB into PC > boot from the disk or USB.
Step 2. Click «Repair your computer» or hit F8 at the install now screen.
Step 3. Click «Troubleshoot» > «Advanced options» > «Command Prompt».
Step 4. Type chkdsk E: /f /r /x, and press «enter».
«E» means the drive letter of the partition you want to repair.
Fix 4. Rebuild BCD If Windows Couldn’t Load Correctly
If BCD became missing or corrupt, Windows 10/8/7 cannot load correctly. Thus, you can rebuild BCD to fix the error. You also need a Windows installation disc.
Step 1. Insert Windows 10/8/7 installation disk or installation USB into PC > boot from the disk or USB.
Step 2. Click «Repair your computer» or hit F8 at the install now screen.
Step 3. Click «Troubleshoot» > «Advanced options» > «Command Prompt».
Step 4. Type each command line and hit Enter each time:
ren BCD BCD.old
bcdboot C:Windows /1 en-us /s G: /f ALL (Note: c: is the drive where Windows 10/8.1/8 is installed on.)
Step 5. Type exit in Command Prompt when the process completes and then restart your PC.
Fix 5. Perform System Restore If Windows Still Cannot Load
If you have created a Windows restore point before the Windows not loading error occurs, you can perform a system restore to deal with the issue.
Step 1. Choose «Advanced options» on the blue screen and then navigate to «Troubleshoot» > «Advanced Options» > «System Restore».
Step 2. Choose a restore point to restore your computer to the state.
Step 3. Wait until the restore process finishes and then restart your computer.
If you don’t have a system image, you can install Windows 10/8/7 from USB by yourself.
Conclusion
How to fix if it looks like Windows didn’t load correctly error? If you are wondering then you are in the right place. Here you will find out how to fix this issue with five useful solutions. If you have extra tips, you can contact us and share your solutions.
Windows Couldn’t Load Correctly FAQs
If you still have problems, read on to these related questions. You can get additional help about Windows boot problems.
How do I fix it looks like windows didn’t load correctly?
You can fix Windows 10 didn’t load correctly with these solutions:
- Restore Data to Another Drive
- Boot into Safe Mode
- Run CHKDSK
- Rebuild BCD
- Perform System Restore
What causes your PC did not start correctly?
As mentioned above, the Windows did not start correctly issue can be caused by a third-party program or a recent hardware change on your system, a BCD error, or a file system error.
Why Windows 10 is not working properly?
In some cases, third-party anti-virus and anti-malware software can disrupt certain Windows programs.
How do I fix Windows startup problems?
You can fix it by uninstalling new software or drivers:
- Insert the Windows bootable drive and boot from it.
- Select your language preferences, and click Next.
- Click Repair your computer.
- Select Troubleshoot > Startup Settings > Restart.
- Press the F4 key to boot Windows into Safe Mode.
- Then, you can uninstall new software or drivers.
 В этой инструкции пошагово будут описаны способы исправить проблему, когда при загрузке Windows 10 на экране «Автоматическое восстановление», вы видите сообщение о том, что компьютер запущен некорректно или что система Windows загрузилась неправильно. Также поговорим и о возможных причинах такой ошибки. Если перед появлением сообщения появлялась информация о том, что на вашем ПК возникла проблема и коде остановки 0xc000021a, об этом здесь: Как исправить ошибку 0xc000021a при загрузке Windows 10.
Прежде всего, если ошибка «Компьютер запущен некорректно» возникает у вас после выключения компьютера или после прерывания обновления Windows 10, но успешно исправляется нажатием кнопки «Перезагрузить», а потом появляется снова, или же в тех случаях, когда компьютер включается не с первого раза, после чего происходит автоматическое восстановление (и опять же все исправляется путем перезагрузки), то все нижеописанные действия с командной строкой — не для вашей ситуации, в вашем случае причины могут быть следующими. Дополнительная инструкция с вариантами проблем запуска системы и их решениями: Не запускается Windows 10.
Первая и распространенная — проблемы с питанием (если компьютер включается не с первого раза, вероятно, неисправен блок питания). После двух неуспешных попыток запуска Windows 10 автоматически запускает восстановление системы. Второй вариант — проблема с выключением компьютера и режимом быстрой загрузки. Попробуйте выключить быстрый запуск Windows 10. Третий вариант — что-то не так с драйверами. Замечено, например, что откат драйвера Intel Management Engine Interface на ноутбуках с Intel на более старую версию (с сайта производителя ноутбука, а не из центра обновлений Windows 10) может решать проблемы с выключением и сном. Также можно попробовать проверку и исправление целостности системных файлов Windows 10.
Если ошибка появляется после сброса Windows 10 или обновления
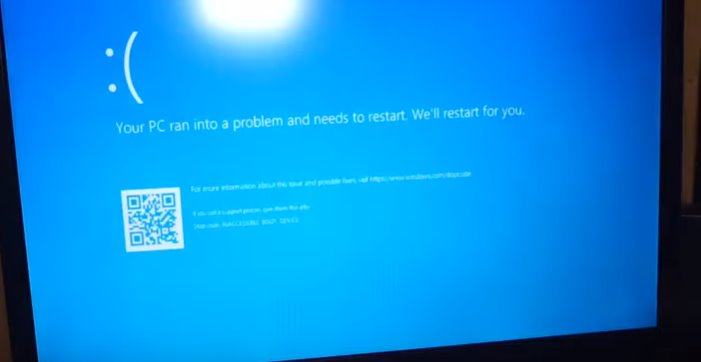
Один из простых вариантов появления ошибки «Компьютер запущен некорректно» является примерно следующий: после сброса или обновления Windows 10 появляется «синий экран» с ошибкой наподобие INACCESSIBLE_BOOT_DEVICE (хотя эта ошибка может быть индикатором и более серьезных проблем, в случае с ее появлением после сброса или отката обычно все просто), а после сбора информации появляется окно «Восстановление» с кнопкой «Дополнительные параметры» и перезагрузка. Хотя, этот же вариант можно опробовать и в других сценариях появления ошибки, способ безопасен.
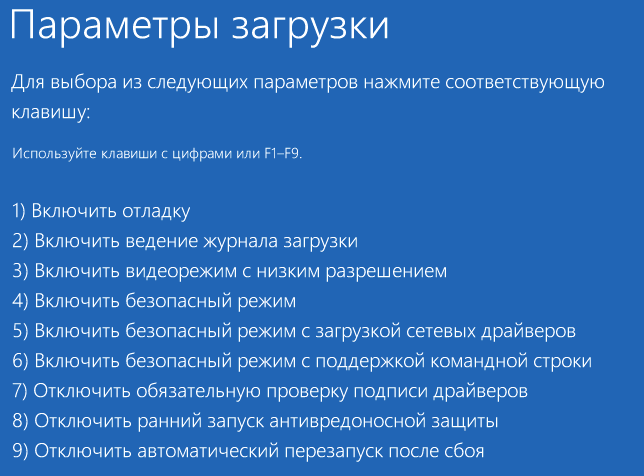
Зайдите в «Дополнительные параметры» — «Поиск и устранение неисправностей» — «Дополнительные параметры» — «Параметры загрузки». И нажмите кнопку «Перезагрузить».

В окне «Параметры загрузки» нажмите клавишу 6 или F6 на клавиатуре для запуска безопасного режима с поддержкой командной строки. Если он запустится, войдите под администратором (а если нет, то этот способ вам не подходит).
В открывшейся командной строке используйте по порядку следующие команды (первые две могут показывать сообщения об ошибках или долго выполняться, «зависая» в процессе. Ожидайте.)
- sfc /scannow
- dism /Online /Cleanup-Image /RestoreHealth
- shutdown -r
И дождитесь, когда компьютер будет перезапущен. Во многих случаях (применительно к появлению проблемы после сброса или обновления) это позволяет исправить проблему, восстановив запуск Windows 10.
«Компьютер запущен некорректно» или «Кажется, система Windows загрузилась неправильно»
Если после включения компьютера или ноутбука вы видите сообщение о том, что идет диагностика компьютера, а после этого — синий экран с сообщением о том, что «Компьютер запущен некорректно» с предложением перезагрузить или зайти в дополнительные параметры (второй вариант того же сообщения — на экране «Восстановление» сообщение о том, что система Windows загрузилась неправильно), это обычно говорит о повреждении каких-либо системных файлов Windows 10: файлов реестра и не только.

Проблема может проявляться после внезапного выключения при установке обновлений, установки антивируса или очистки компьютера от вирусов, очистки реестра с помощью программ-клинеров, установки сомнительных программ.

А теперь о способах решения проблемы «Компьютер запущен некорректно». Если так сложилось, что у вас в Windows 10 было включено автоматическое создание точек восстановления, то прежде всего стоит попробовать именно этот вариант. Сделать это можно следующим образом:
- Нажмите «Дополнительные параметры» (или «Дополнительные варианты восстановления») — «Поиск и устранение неисправностей» — «Дополнительные параметры» — «Восстановление системы».

- В открывшемся мастере восстановления системы нажмите «Далее» и, если он найдет доступную точку восстановления, используйте её, с большой вероятностью, это решит проблему. Если нет, нажимаем «Отмена», а в будущем, вероятно, имеет смысл включить автоматическое создание точек восстановления.

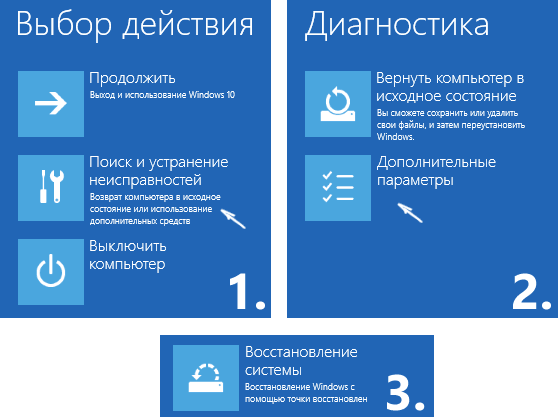

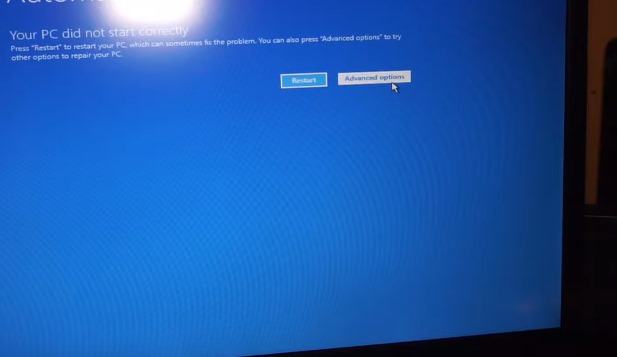
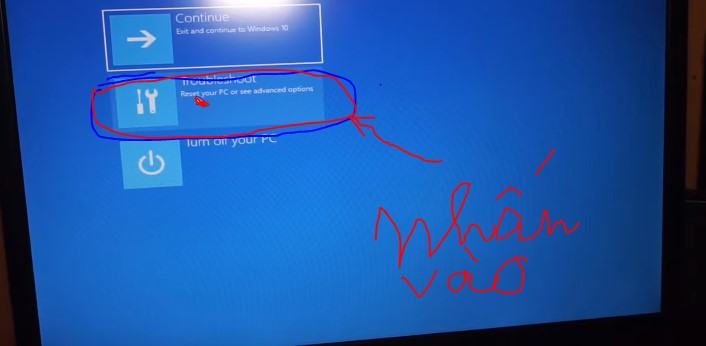
После нажатия кнопки отмена, вы снова попадете на синий экран. Нажмите на нем «Поиск и устранение неисправностей».
Теперь, если вы не готовы предпринимать все следующие шаги по восстановлению запуска, в которых будет использоваться исключительно командная строка, нажмите «Вернуть компьютер в исходное состояние» для сброса Windows 10 (переустановки), которую можно осуществить и с сохранением ваших файлов (но не программ). Если готовы и хотите попробовать вернуть все как было — нажмите «Дополнительные параметры», а затем — «Командная строка».
Внимание: шаги, описанные далее, могут не исправить, а усугубить проблему с запуском. Беритесь за них только лишь в случае готовности к этому.
В командной строке мы по порядку проверим целостность системных файлов и компонентов Windows 10, попробуем исправить их, а также произведем восстановление реестра из резервной копии. Все это в совокупности помогает в большинстве случаев. По порядку используйте следующие команды:
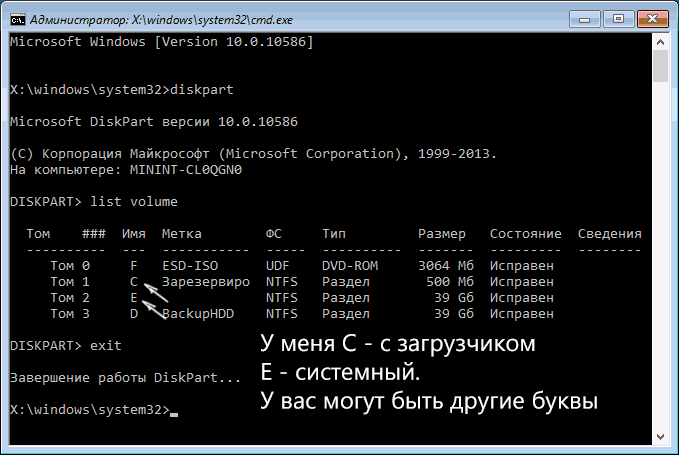
- diskpart
- list volume — после выполнения этой команды вы увидите список разделов (томов) на диске. Вам нужно определить и запомнить букву системного раздела с Windows (в столбце «Имя», она, скорее всего, будет не C: как обычно, в моем случае это — E, дальше буду использовать ее, а вы — свой вариант).

- exit
- sfc /scannow /offbootdir=E: /offwindir=E:Windows — проверка целостности системных файлов (здесь E: — диск с Windows. Команда может сообщить о том, что Защита ресурсов Windows не может выполнить запрошенную операцию, просто выполняем следующие шаги).
- E: — (в этой команде — буква системного диска из п. 2, двоеточие, Enter).
- md configbackup
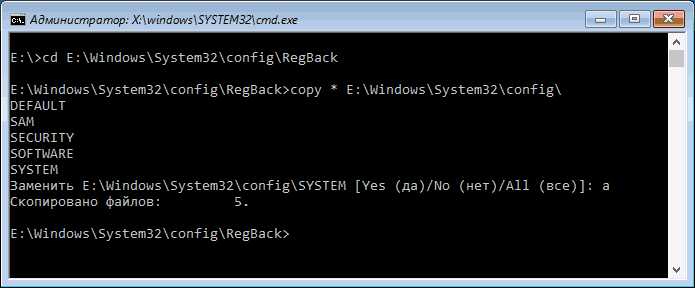
- cd E:WindowsSystem32config
- copy * e:configbackup
- cd E:WindowsSystem32configregback
- copy * e:windowssystem32config — на запрос о замене файлов при выполнении этой команды, нажмите клавишу с латинской A и нажмите Enter. Этим мы производим восстановление реестра из резервной копии, автоматически создаваемой Windows.

- Закройте командную строку и на экране «Выбор действия» нажмите «Продолжить. Выход и использование Windows 10».
Есть немалая вероятность, что после этого Windows 10 запустится. Если нет, вы можете отменить все сделанные изменения в командной строке (запустить которую можно так же, как и раньше или с диска восстановления), вернув файлы из созданной нами резервной копии:
- cd e:configbackup
- copy * e:windowssystem32config (подтвердить перезапись файлов, нажав A и Enter).
Если же ничто из описанного не помогло, то могу рекомендовать лишь сброс Windows 10 через «Вернуть компьютер в исходное состояние» в меню «Поиск и устранение неисправностей». Если после указанных действий попасть в это меню не получается, используйте диск восстановления или загрузочную флешку Windows 10, созданную на другом компьютере, чтобы попасть в среду восстановления. Подробнее в статье Восстановление Windows 10.
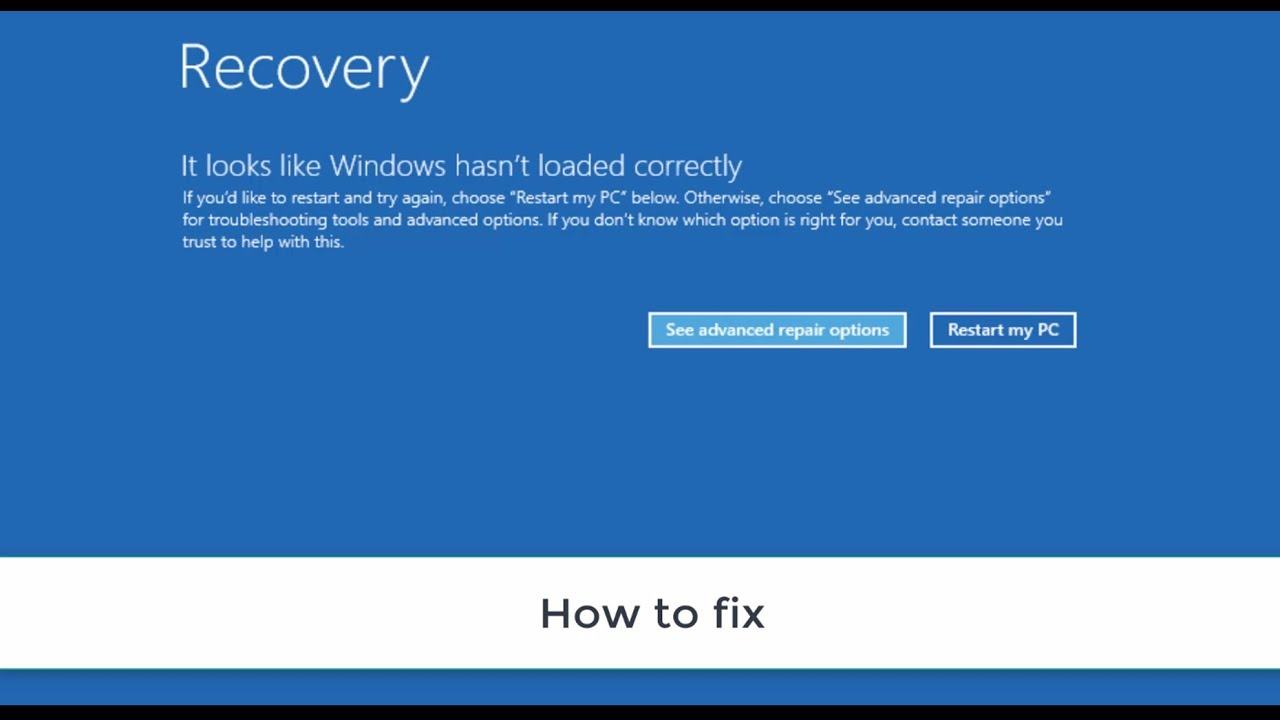
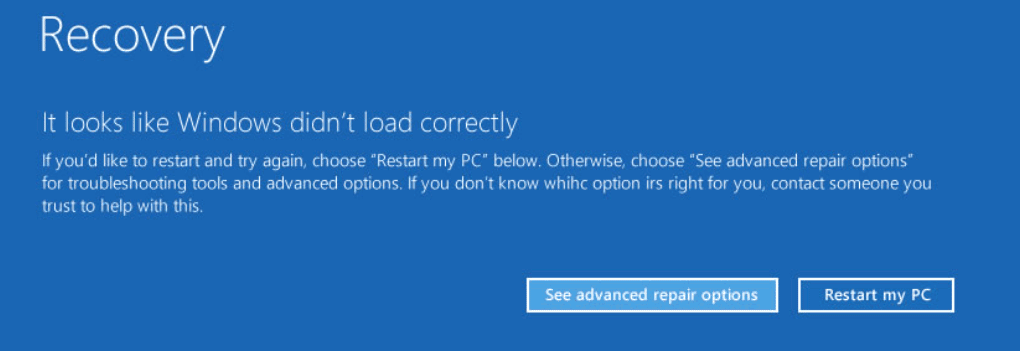
If you see an error message It looks like Windows didn’t load correctly in Windows 11/10 while trying to boot or recover your operating system, you can follow these troubleshooting tips to get rid of this issue. This error may appear randomly due to some corrupted system or boot files.

The entire error message says something like this:
It looks like Windows didn’t load correctly
If you’d like to restart and try again, choose “Restart my PC” below. Otherwise, choose “See advanced repair options” for troubleshooting tools and advanced options. If you don’t know which option is right for you, contact someone you trust to help with this.
To fix the It looks like Windows didn’t load correctly error in Windows 11/10, follow these steps:
- Restart your PC
- Rebuild BCD
- Run Automatic Startup Repair
- Use System Restore point
- Troubleshoot in Safe Mode
To know more about these solutions in detail, keep reading.
1] Restart your PC
It is the very first thing you need to do when you are getting the aforementioned error. At times, a simple restart fixes countless problems within moments. If a bug is causing this issue in Windows 11 or Windows 10 PC, you may be able to bypass it by restarting your computer.
To restart your computer, you do not need to use the physical restart button. Instead, you can click on the Restart my PC button visible on the error screen.
It will restart your computer immediately and allow you to sign in to your user account. However, if you are still getting the same error message frequently, you need to go through the subsequent solutions.
Read: Windows PC will not boot up or start
2] Rebuild BCD
BCD or Boot Configuration Data is one of the most important things to start or boot your computer. Whether it is the installation or the regular start of the system, you must have the BCD intact in order to get a smooth system. However, if there are some issues with the Boot Configuration Data, you may encounter the aforementioned issue.
That is why it is recommended to rebuild the BCD or Boot Configuration Data. The best thing is that you do not need third-party apps, and it is possible to do that with the help of the Command Prompt. For that, you need to click on the See advanced repair options and choose the Command Prompt option.
Then, enter the following command and hit Enter:
bootrec /rebuildbcd
Read: Windows computer unable to boot to BIOS
3] Run Automatic Startup Repair
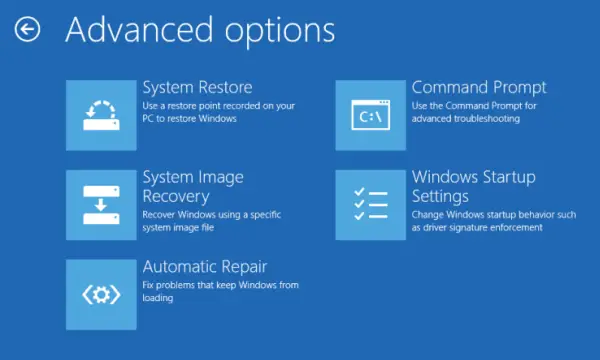
Run Automatic Startup Repair and see if that works for you. Clicking on the See advanced repair options button that you see on the error screen may help you get there quickly.
Read: Windows does not boot after compressing System Drive
4] Use System Restore point

If there are some corrupt system files, you must use the System Restore point to restore your computer to an earlier point when there was no issue. However, this solution works only when you created a System Restore point in the past. If so, you can follow this guide to restore your computer using System Restore point.
You may need to boot into Windows with your Windows Installation Media or Recovery Drive and select Repair your computer to enter Troubleshoot > Advanced Startup Options > Command Prompt. You can now use the System Restore option or CMD to run commands.
Read: Windows computer won’t boot after System Restore
4] Troubleshoot in Safe Mode
Can you boot in Safe Mode? If you can, then it makes things easier. If you have recently installed any driver or software, you can boot Windows in Safe mode and troubleshoot. If you had already enabled the F8 key earlier, things are easier as you press F8 while booting, to enter Safe Mode.
At times, a corrupt or incompatible driver can also cause the same issue. In such situations, using the Safe Mode is probably the best and most straightforward solution you have.
How do you fix Recovery It looks like Windows didn’t load correctly?
To fix the It looks like Windows didn’t load correctly error, you need to use the aforementioned solutions. First, you can restart your computer to check if it resolves the problem or not. Then, you can rebuild the BCD, use the System Restore point and troubleshoot the issue in the Safe Mode.
Why does my computer say It looks like Windows didn’t load correctly?
If there are some corrupt system files, your Windows computer may display that message on your screen. The other reason is the corrupt Boot Configuration Data. In that case, you can simply rebuild the BCD on your computer using the bootrec /rebuildbcd command.
Hope this guide helped.
Read: How to boot to Windows Recovery Environment to fix problems?
Fix error: RECOVERY It looks like Windows didn’t load correctly. If your computer when turn on have a error as this in monitor:
RECOVERY
It looks like Windows didn’t load correctly
If you’d like to restart and try again, choose “Restart my PC” below. Otherwise, choose “See advanced repair options” for troubleshooting tools and advance options. If you don’t know which option is right for you, contact someone you trust to help with this
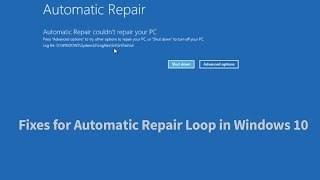
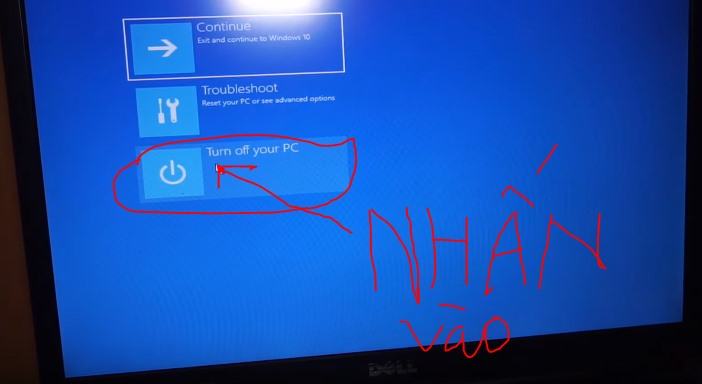
You continue restart and Repair window have a notification startup repair couldn’t repair your pc
Press “Advanced options” to try other options to repair your PC, or “Shut down” to turn off your PC
Log file C:WindowsSystem32LogfilesSrtSrtTrail.txt
Before proceeding, we need more information to help you better.
Are you able to boot into Desktop?
Do you get any error message when you try to load Windows?
Method 1:
Setup again windows carefully- this way is the best. Please back up your data and reinstall your windows.
Method 2:
Please check this way: I solved the issue by turning off hybrid sleep. Because the problem happened when the computer put itself to sleep, I went to Control Panel > Hardware and Sound > Power Options > Edit Plan Settings and selected “Change advanced power settings.” I expanded Sleep, then Allow hybrid sleep and selected Off. This solved my problem. Note my problem only occurred when the computer put itself to sleep. It always booted up just fine.
Method 3:
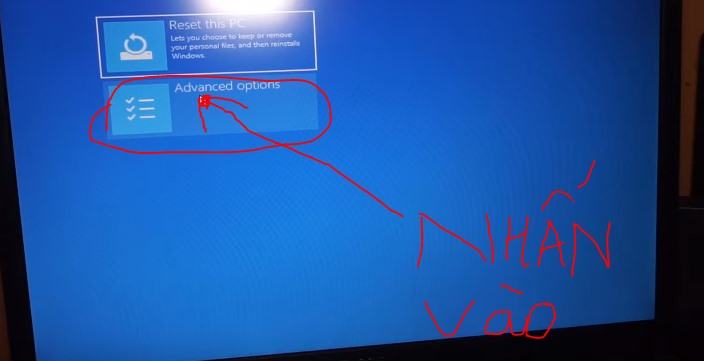
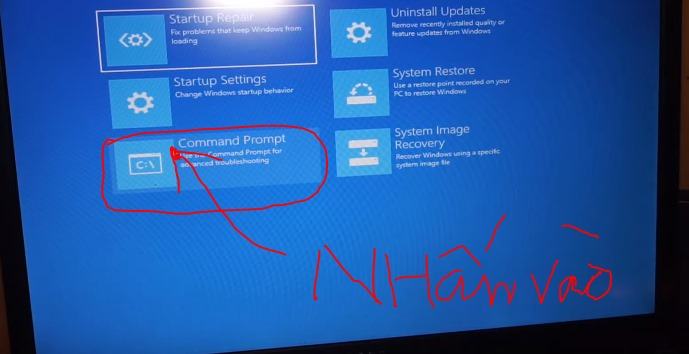
How to fix blue screen error win 10 pole GETTING – Automatic Repair if the error as shown in Figure 1,2,3; 4

Click on advanced options in Figure 5
Click Troubleshooting Figure 6
Click Advanced options in Figure 7
Click Command Prompt in Figure 8
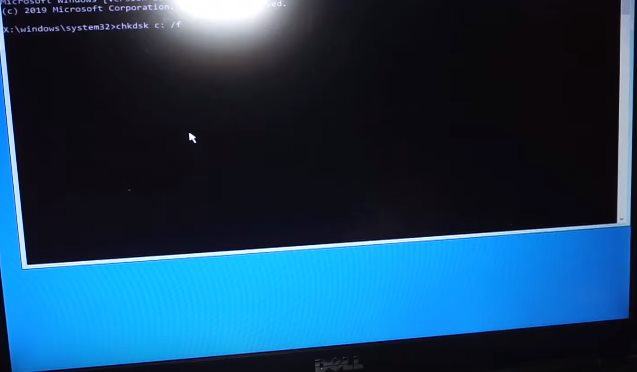
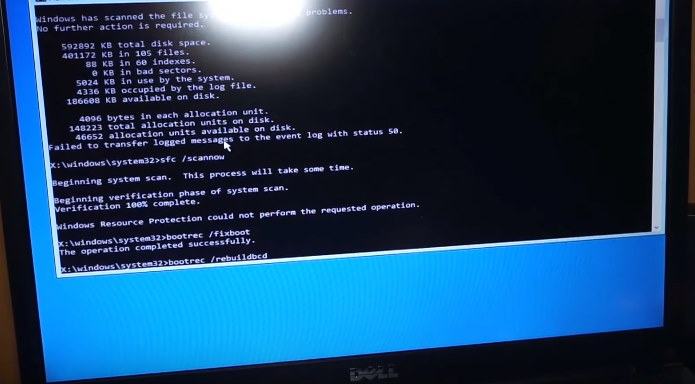
Step 1: type or copy this command (chkdsk c: / f) and then press enter (Figure 9)
Step 2: type or copy this command (sfc / scannow) then press enter (Figure 10)


Step 4: Type or copy this command (bootrec / rebuildbcd) then press enter (Figure 12)
Step 5: (exit) then press enter (Figure 13)
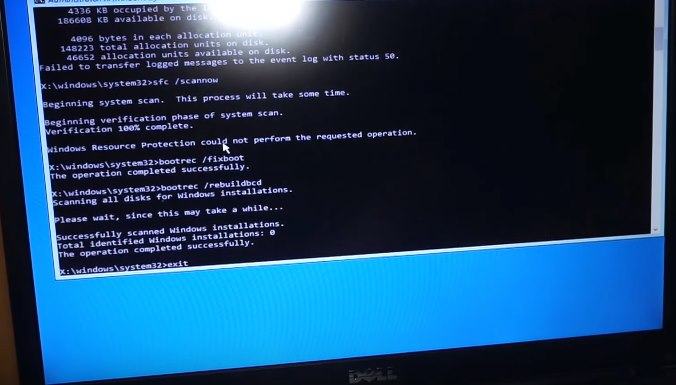
then press turn off your PC to reboot
(Figure 14)
If after restarting the computer still has a blue screen error, I recommend that you reinstall Windows
“Recovery it looks like Windows didn’t load correctly” is a common error message during the PC startup process in Windows 11/10. If you are hit by this issue when booting your Dell or Lenovo, take it easy and MiniTool collects multiple methods to fix it easily.
It Looks Like Windows Didn’t Load Correctly Windows 11/10 Dell/Lenovo
According to users who are using a Dell or Lenovo, the error message “Recovery it looks like Windows didn’t load correctly” appears on your computer when trying to boot or recover the PC. Sometimes your PC accidentally stops working with a blue screen and after a restart, you get the error. Sometimes Windows not loading correctly appears randomly. See an example from a Windows 11 user:

The screen gives you two options – See advanced repair options and Restart my PC. To troubleshoot the issue, click the first one. If you would like to restart and try again, click the second one. The error screen is shown below:
This issue is mainly triggered by damaged Windows files, missing/corrupt BCD, compromised system integrity, etc. It usually happens on Windows 11, 10, and 8. After knowing the reasons to some extent, you can find out how to fix them. Of course, some other solutions are also can help. Now, let’s go to the next part to figure out what you should do.
Sometimes you see another error when performing an automatic repair – “Automatic Repair, Your PC did not start correctly.» To find solutions, refer to this post — 7 Solutions: Your PC Did Not Start Correctly Error in Windows 10.
Fixes for It Looks Like Windows Didn’t Load Correctly Dell/Lenovo
Enter Safe Mode
Safe Mode is a diagnostic mode in Windows and it boots the system with the minimum drivers and services. When it comes to PC troubleshooting, entering Safe Mode is a safe and reliable way. If you are plagued by the issue of Windows not loading correctly, try this way.
Step 1: On the Recovery page, click on See advanced repair options to enter the troubleshooting interface. Alternatively, you can restart your PC several times when seeing the Windows logo to enter the WinRE page.
Step 2: Click Troubleshoot > Advanced options and you can see several options.
Step 3: Click Startup Settings > Restart. Then, you see the following figure and press F4 or F5 to open Safe Mode.

In Safe Mode, you can run a quick diagnostic, for example, uninstall suspicious software or a recently installed driver. To uninstall the driver, go to Device Manager, locate the driver, and right-click on it to choose Uninstall device. To uninstall an app, go to Control Panel > Uninstall a program, right-click on the program and choose Uninstall.
After that, restart your Dell or Lenovo PC to see if the error “it looks like Windows didn’t load correctly” is fixed. If not, continue the troubleshooting.
Turn Off Hybrid Sleep
According to some users, the Hybrid Sleep feature can cause the error of Windows not loading correctly in Windows 10/11. To fix this issue, make sure you disable Hybrid Sleep and see how to do it:
Step 1: In Safe Mode, type Control Panel into the search box and click this app to open it. View items by large icons.
Step 2: Click Power Options > Change plan settings.
Step 3: Click the Change advanced power settings link to open the Advanced settings tab.
Step 4: Expand Sleep > Allow hybrid sleep and then change On to Off.

Step 5: Click Apply > OK.
Run SFC and DISM Scans
Sometimes Windows not loading correctly is triggered by corrupted system files. To get rid of this issue from Windows 10/11, you need to fix the corruption in the Windows system. To do this work, System File Checker (SFC) is helpful. Besides, you can run a DISM scan to repair bad system images. See how to do the scans:
Step 1: In Safe Mode, type cmd to the search box, right-click on Command Prompt, and choose Run as administrator. Alternatively, you can boot the PC to WinRE and go to Troubleshoot > Advanced options > Command Prompt.
Step 2: Type sfc /scannow and press Enter to begin the scan. This scan will take some time and wait patiently.
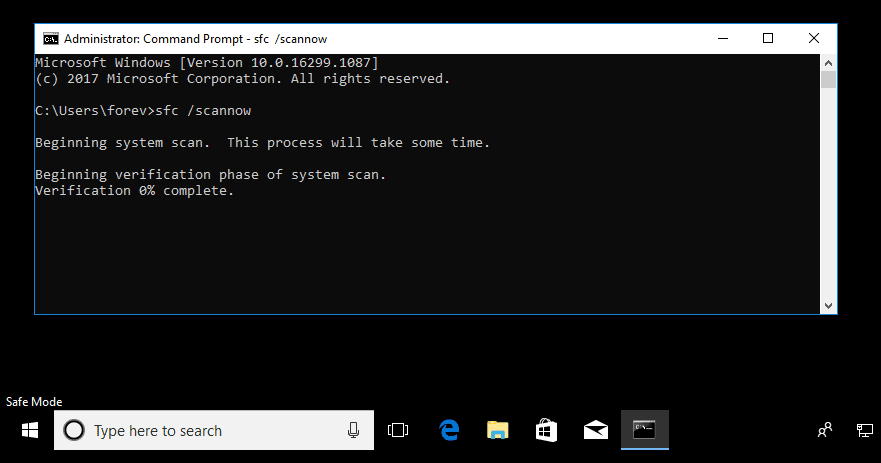
SFC isn’t always working and sometime it may get stuck. If you encounter this issue, go to find solutions from our previous post — Windows 10 SFC /Scannow Stuck at 4/5/30/40/73, etc.? Try 7 Ways.
Step 3: After the SFC scan, run a DISM scan. Just execute these commands one by one, as shown below. Remember to press Enter after each one.
Dism /Online /Cleanup-Image /ScanHealth
Dism /Online /Cleanup-Image /CheckHealth
Dism /Online /Cleanup-Image /RestoreHealth
Run CHKDSK
Sometimes the file system is corrupted or there are bad blocks on the hard drive, as a result, “Recovery it looks like Windows didn’t load correctly” appears on your Windows 11/10 PC. In this case, it is necessary to run the CHKDSK scan.
Step 1: Open Command Prompt (as shown in the above way).
Step 2: Type chkdsk /f /r and press Enter to check for file system errors and hard drive errors, and then fix the found errors and recover the readable information from the bad sectors.
If you want to know the difference between chkdsk /f and /r, refer to this article — CHKDSK /F or /R | Difference Between CHKDSK /F and CHKDSK /R.
Rebuild BCD
If the BCD files in Windows 11/10 are missing or corrupted, the error “it looks like Windows didn’t load correctly” may appear on the screen. To fix it, try to rebuild BCD. In WinRE, go to Troubleshoot > Advanced options > Command Prompt. After opening Command Prompt, type bootrec /rebuildbcd and press Enter.

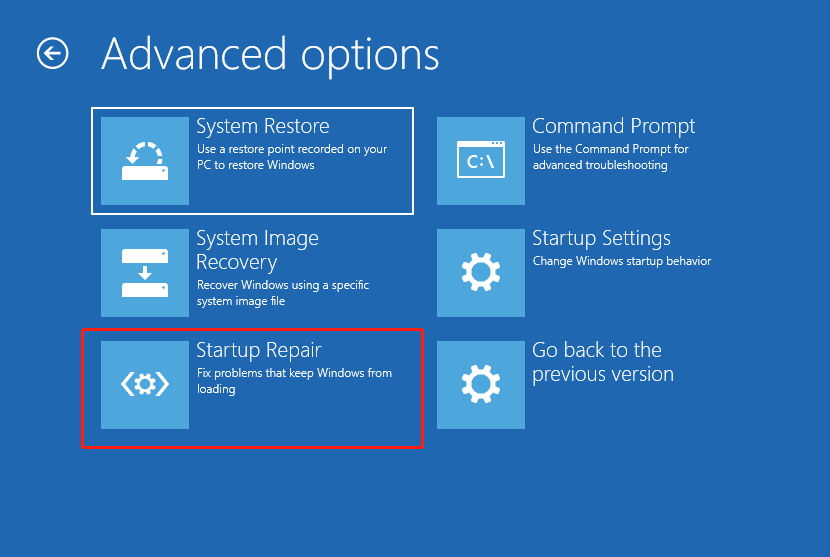
Run Startup Repair
Some users recommend running Startup Repair in Windows Recovery Environment. When seeing the error “Recovery it looks like Windows didn’t load correctly”, click See advanced repair options. Then, go to the Advanced options page and click Startup Repair.
Perform System Restore
If you have a habit of backup via System Restore, you can use a restore point to revert Windows 11/10 to an earlier state to fix Windows not loading correctly on Dell, Lenovo, etc. PC.
Step 1: Click System Restore in WinRE.
Step 2: You can use the recommended restore point or choose to use a different restore point.
Step 3: Then, click Finish to start the restoration operation.
If there are no restore points created previously, this way cannot fix your issue.
Reset Your PC
If all of the above ways fail to solve your issue, the last resort to remove “it looks like Windows didn’t load correctly” from Windows 10/11 is PC resetting. This operation can help to reinstall your system.
Windows 11 gives you an option to keep your personal files during the resetting process. But if you save some important files on your desktop, we still recommend you to back up them in advance to avoid unexpected data loss.
Back up Data Before You Do
To back up significant files/folders, you can seek help from a piece of professional and free backup software. MiniTool ShadowMaker is worth trying. This backup program allows you to easily create a system image, back up your important data via image backup or sync, and clone a hard drive for disk upgrade/disk backup.
To back up your files when encountering the error “it looks like Windows didn’t load correctly”, it is a bit difficult but you can use MiniTool ShadowMaker to create a bootable USB drive on a working PC and boot the unbootable PC from that drive. Then, back up data with the Bootable Edition of this backup software.
Free Download
Step 1: Download and install MiniTool ShadowMaker on another PC. Then, launch it to the Tools interface and click Media Builder to create a bootable USB drive.

Step 2: On your problematic PC, go to BIOS, change the boot sequence to let Windows start up from the bootable drive, and then enter the MiniTool recovery environment.
Step 3: Launch MiniTool ShadowMaker to its Backup page, choose files/folders you want to back up, specify a storage path and click the Back up Now button to execute the data backup.
To know more information about the backup steps, refer to our previous post — How to Back up Data without Booting Windows? Easy Ways Are Here.
Reset Your PC
After finishing the file backup, follow the steps below to reset the PC with the error Windows not loading correctly.
Step 1: Boot your PC to WinRE by restarting the machine several times when seeing the Windows logo.
Step 2: Go to Troubleshoot > Reset this PC.
Step 3: Choose the Keep my files option to continue.

Step 4: Select Cloud download or Local reinstall. If you don’t know which one to choose, refer to this post — Cloud Download vs Local Reinstall: Differences on Win 10/11 Reset.
Step 5: Continue the resetting operation by following the on-screen wizards.
“Get the error ‘Recovery it looks like Windows didn’t load correctly’ in Windows 11/10? After trying these ways, it can be easily removed. You can share these solutions with more persons on Twitter.”Click to Tweet
Recover Data from Your Unbootable PC
Sometimes when encountering the situation – it looks like Windows didn’t load correctly Windows 11/10, you choose to recover data before fixing it to avoid additional trouble. Well then, how to do this task? Data recovery is not easy but things can turn simple if you use professional data recovery software – MiniTool Power Data Recovery.
It enables you to recover files from a variety of situations like an unbootable PC, inaccessible hard drive, formatted/lost/deleted/RAW partition, Windows update, etc. In case of Windows not loading correctly, you can also easily get your data from the hard disk.
Just get a paid edition like Personal Ultimate to create a bootable USB drive by clicking the CD icon and then run the machine from that drive. Launch the bootable edition of this program for data recovery. Just go to the Devices tab and click Scan after hovering your mouse over the system disk. Wait some time until the scan finishes. Then, find what you want to recover, choose them and click Save.

Bottom Line
Run your PC but get a blue screen saying “Recovery it looks like Windows didn’t load correctly” in Windows 11/10? To remove this error from your Lenovo or Dell computer, you can try the above solutions collected by us. Just have a shot one by one by following the steps. Of course, if you figure out some other workarounds, welcome to share them with us. Thanks a lot.
It Looks Like Windows Didn’t Load Correctly FAQ
What to do when it says it looks like Windows didn’t load correctly?
There are many solutions you can try:
- Enter Safe Mode
- Turn off Hybrid Sleep
- Run SFC and DISM Scans
- Run CHKDSK
- Rebuild BCD
- Perform Startup Repair
- Run System Restore
- Reset PC
What causes Windows to not start correctly?
File system corruption, missing/corrupt BCD, compromised system integrity, a buggy driver and software, and more can cause Windows to not load correctly.