This article discusses the helpful Python environments features available in Visual Studio Code. An «environment» in Python is the context in which a Python program runs and consists of an interpreter and any number of installed packages.
Note: If you’d like to become more familiar with the Python programming language, review More Python resources.
Python environments
Global environments
By default, any Python interpreter installed runs in its own global environment. For example, if you just run python, python3, or py at a new terminal (depending on how you installed Python), you’re running in that interpreter’s global environment. Any packages that you install or uninstall affect the global environment and all programs that you run within it.
Do note that if you install packages into your global environment, though, in time it will become crowded with potentially unrelated or unexpected packages and make it difficult to properly test an application. You typically want to create an environment for each workspace.
Local environments
There are two types of environments that you can create for your workspace: virtual and conda environments. Both types of environment allow you to install packages without affecting other environments. This lets you isolate what packages you install for your workspace so that they don’t interfere with your needs in another workspace.
Virtual environments
A virtual environment is a built-in way to create an environment to isolate the packages you install per workspace. A virtual environment creates a folder that contains a copy (or symlink) to a specific interpreter. When you install packages into a virtual environment it will end up in this new folder so that they are not interspersed with other packages used or needed by other workspaces.
Note: While it’s possible to open a virtual environment folder as a workspace, doing so is not recommended and might cause issues with using the Python extension.
Conda environments
A conda environment is a Python environment that’s managed using the conda package manager (see Getting started with conda). Whether to use a conda environment or a virtual one will depend on your packaging needs, what your team has standardized on, etc.
Python environment tools
The following table lists the various tools involved with Python environments:
| Tool | Definition and Purpose |
|---|---|
| pip | The Python package manager that installs and updates packages. It’s installed with Python 3.9+ by default (unless you are on a Debian-based OS; install python3-pip in that case). |
| venv | Allows you to manage separate package installations for different projects and is installed with Python 3 by default (unless you are on a Debian-based OS; install python3-venv in that case) |
| conda | Installed with Miniconda. It can be used to manage both packages and virtual environments. Generally used for data science projects. |
How the extension looks for environments
If an interpreter hasn’t been specified, then the Python extension automatically selects the interpreter with the highest version in the following priority order:
- Virtual environments located directly under the workspace folder.
- Virtual environments related to the workspace but stored globally. For example, Pipenv or Poetry environments that are located outside of the workspace folder.
- Globally installed interpreters. For example, the ones found in
/usr/local/bin,C:\python27,C:\python38, etc.
Note: The interpreter selected may differ from what
pythonrefers to in your terminal.
If Visual Studio Code doesn’t locate your interpreter automatically, you can manually specify an interpreter.
Where the extension looks for environments
The extension automatically looks for interpreters in the following locations, in no particular order:
- Standard install paths such as
/usr/local/bin,/usr/sbin,/sbin,c:\python27,c:\python36, etc. - Virtual environments located directly under the workspace (project) folder.
- Virtual environments located in the folder identified by the
python.venvPathsetting (see General Python settings), which can contain multiple virtual environments. The extension looks for virtual environments in the first-level subfolders ofvenvPath. - Virtual environments located in a
~/.virtualenvsfolder for virtualenvwrapper. - Interpreters created by pyenv, Pipenv, and Poetry.
- Virtual environments located in the path identified by
WORKON_HOME(as used by virtualenvwrapper). - Conda environments found by
conda env list. Conda environments which do not have an interpreter will have one installed for them upon selection. - Interpreters installed in a
.direnvfolder for direnv under the workspace folder.
Creating environments
Using the Create Environment command
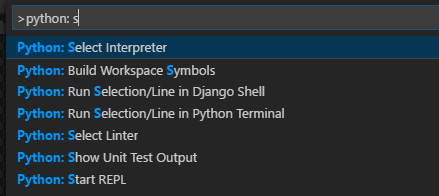
From within VS Code, you can create local environments, using virtual environments or Anaconda, by opening the Command Palette (⇧⌘P (Windows, Linux Ctrl+Shift+P)), start typing the Python: Create Environment command to search, and then select the command.
The command presents a list of environment types: Venv or Conda.

If you are creating an environment using Venv, the command presents a list of interpreters that can be used as a base for the new virtual environment.
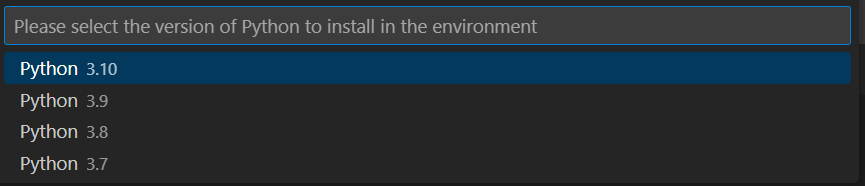
If you are creating an environment using Conda, the command presents a list of Python versions that can be used for your project.
After selecting the desired interpreter or Python version, a notification will show the progress of the environment creation and the environment folder will appear in your workspace.

Note: The command will also install necessary packages outlined in a requirements/dependencies file, such as
requirements.txt,pyproject.toml, orenvironment.yml, located in the project folder. It will also add a.gitignorefile to the virtual environment to help prevent you from accidentally committing the virtual environment to source control.
Create a virtual environment in the terminal
If you choose to create a virtual environment manually, use the following command (where «.venv» is the name of the environment folder):
# macOS/Linux
# You may need to run `sudo apt-get install python3-venv` first on Debian-based OSs
python3 -m venv .venv

# Windows
# You can also use `py -3 -m venv .venv`
python -m venv .venv
Note: To learn more about the
venvmodule, read Creation of virtual environments on Python.org.
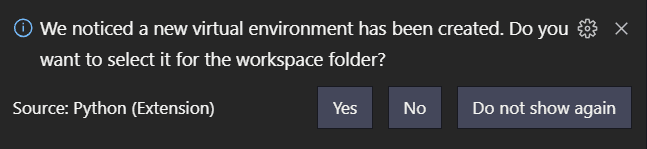
When you create a new virtual environment, a prompt will be displayed in VS Code to allow you to select it for the workspace.
Tip: Make sure to update your source control settings to prevent accidentally committing your virtual environment (in for example
.gitignore). Since virtual environments are not portable, it typically does not make sense to commit them for others to use.
Create a conda environment in the terminal
The Python extension automatically detects existing conda environments. We recommend you install a Python interpreter into your conda environment, otherwise one will be installed for you after you select the environment. For example, the following command creates a conda environment named env-01 with a Python 3.9 interpreter and several libraries:
conda create -n env-01 python=3.9 scipy=0.15.0 numpy
Note: For more information on the conda command line, you can read Conda environments.
Additional notes:
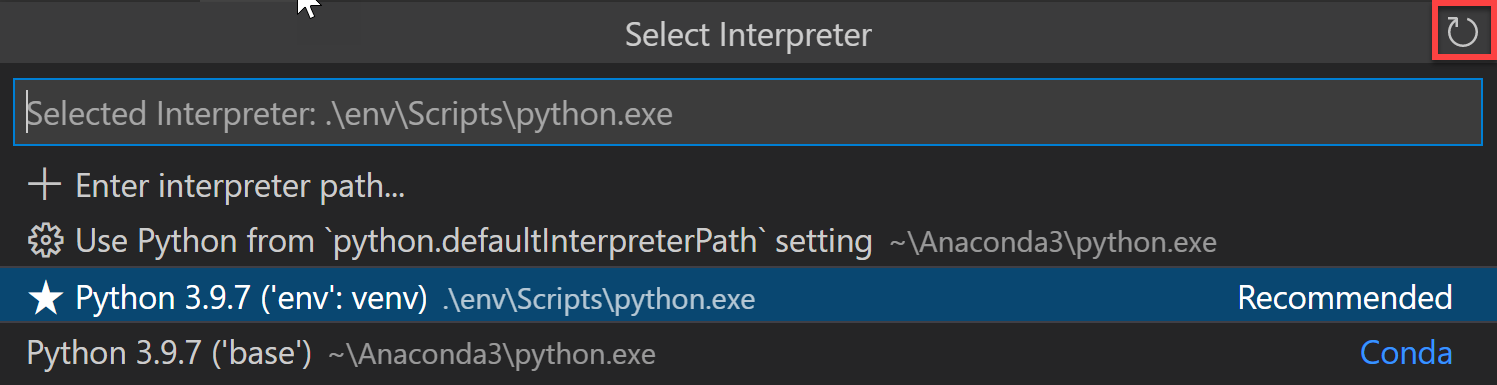
- If you create a new conda environment while VS Code is running, use the refresh icon on the top right of the Python: Select Interpreter window; otherwise you may not find the environment there.
-
To ensure the environment is set up well from a shell perspective, one option is to use an Anaconda prompt with the activated environment to launch VS Code using the
code .command. At that point you just need to select the interpreter using the Command Palette or by clicking on the status bar. -
Although the Python extension for VS Code doesn’t currently have direct integration with conda
environment.ymlfiles, VS Code itself is a great YAML editor. -
Conda environments can’t be automatically activated in the VS Code Integrated Terminal if the default shell is set to PowerShell. To change the shell, see Integrated terminal — Terminal profiles.
-
You can manually specify the path to the
condaexecutable to use for activation (version 4.4+). To do so, open the Command Palette (⇧⌘P (Windows, Linux Ctrl+Shift+P)) and run Preferences: Open User Settings. Then setpython.condaPath, which is in the Python extension section of User Settings, with the appropriate path.
Working with Python interpreters
Select and activate an environment
As mentioned earlier, the Python extension tries to find and then select what it deems the best environment for the workspace. If you would prefer to select a specific environment, use the Python: Select Interpreter command from the Command Palette (⇧⌘P (Windows, Linux Ctrl+Shift+P)).
Note: If the Python extension doesn’t find an interpreter, it issues a warning. On macOS 12.2 and older, the extension also issues a warning if you’re using the OS-installed Python interpreter as it is known to have compatibility issues. In either case, you can disable these warnings by setting
python.disableInstallationChecktotruein your user settings.
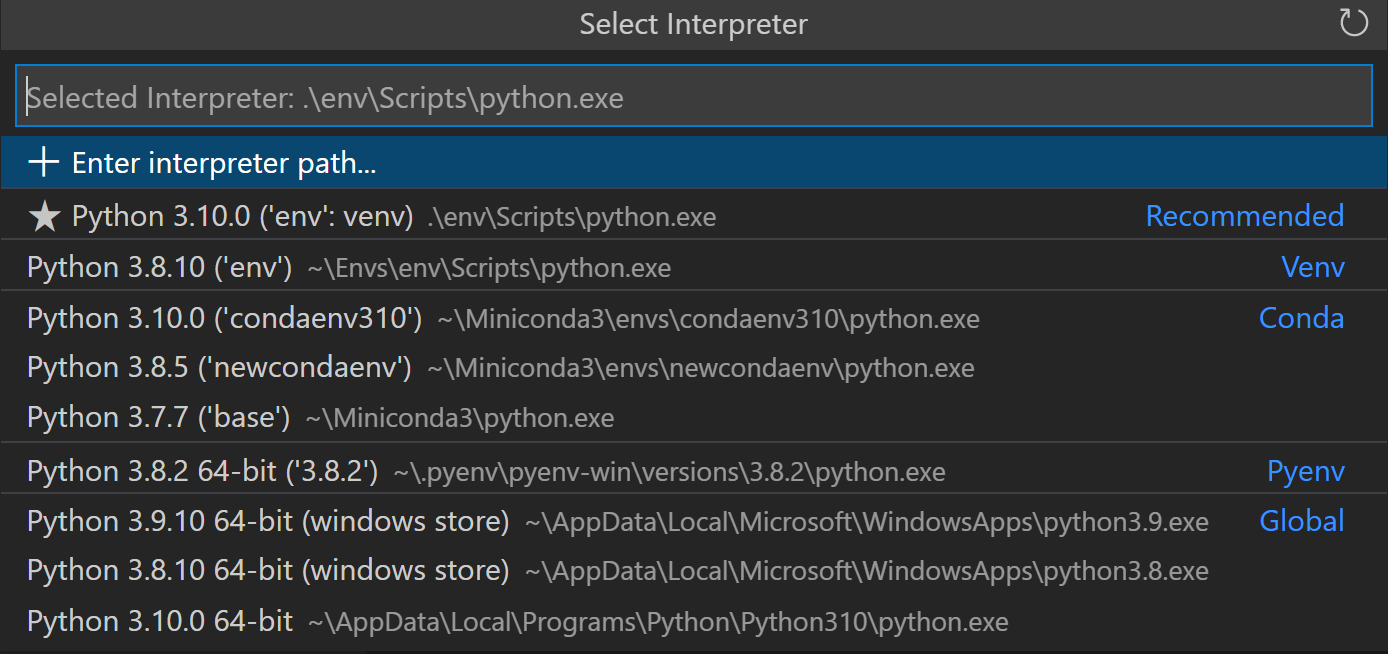
The Python: Select Interpreter command displays a list of available global environments, conda environments, and virtual environments. (See the Where the extension looks for environments section for details, including the distinctions between these types of environments.) The following image, for example, shows several Anaconda and CPython installations along with a conda environment and a virtual environment (env) that’s located within the workspace folder:
Note: On Windows, it can take a little time for VS Code to detect available conda environments. During that process, you may see «(cached)» before the path to an environment. The label indicates that VS Code is presently working with cached information for that environment.
If you have a folder or a workspace open in VS Code and you select an interpreter from the list, the Python extension will store that information internally so that the same interpreter will be used once you reopen the workspace.
The Python extension uses the selected environment for running Python code (using the Python: Run Python File in Terminal command), providing language services (auto-complete, syntax checking, linting, formatting, etc.) when you have a .py file open in the editor, and opening a terminal with the Terminal: Create New Terminal command. In the latter case, VS Code automatically activated the selected environment.
Tip: To prevent automatic activation of a selected environment, add
"python.terminal.activateEnvironment": falseto yoursettings.jsonfile (it can be placed anywhere as a sibling to the existing settings).
Tip: If the activate command generates the message «Activate.ps1 is not digitally signed. You cannot run this script on the
current system.», then you need to temporarily change the PowerShell execution policy to allow scripts to
run (see About Execution Policies in the PowerShell documentation):
Set-ExecutionPolicy -ExecutionPolicy RemoteSigned -Scope Process
Note: By default, VS Code uses the interpreter selected for your workspace when debugging code. You can override this behavior by specifying a different path in the
pythonproperty of a debug configuration. See Choose a debugging environment.
The selected interpreter version will show on the right side of the Status Bar.

The Status Bar also reflects when no interpreter is selected.

In either case, clicking this area of the Status Bar is a convenient shortcut for the Python: Select Interpreter command.
Tip: If you have any problems with VS Code recognizing a virtual environment, please file an issue so we can help determine the cause.
Manually specify an interpreter
If VS Code doesn’t automatically locate an interpreter you want to use, you can browse for the interpreter on your file system or provide the path to it manually.
You can do so by running the Python: Select Interpreter command and select the Enter interpreter path… option that shows on the top of the interpreters list:
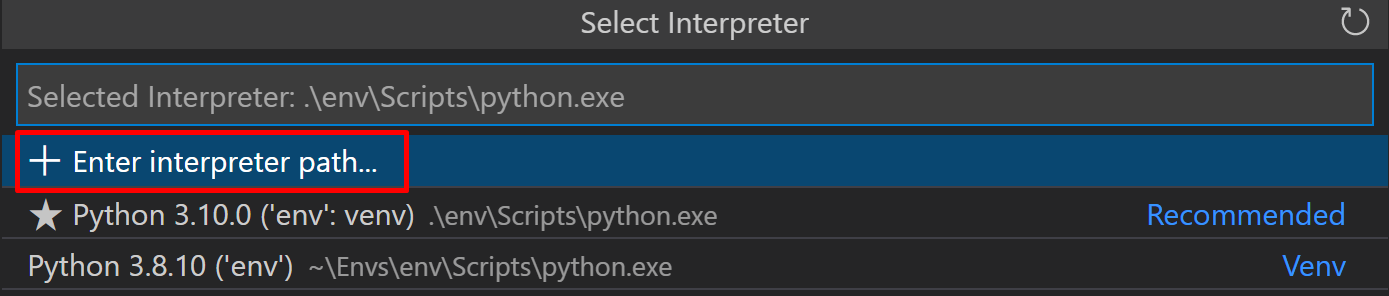
You can then either enter the full path of the Python interpreter directly in the text box (for example, «.venv/Scripts/python.exe»), or you can select the Find… button and browse your file system to find the python executable you wish to select.

If you want to manually specify a default interpreter that will be used when you first open your workspace, you can create or modify an entry for the python.defaultInterpreterPath setting.
Note: Changes to the
python.defaultInterpreterPathsetting are not picked up after an interpreter has already been selected for a workspace; any changes to the setting will be ignored once an initial interpreter is selected for the workspace.
Additionally, if you’d like to set up a default interpreter to all of your Python applications, you can add an entry for python.defaultInterpreterPath manually inside your User Settings. To do so, open the Command Palette (⇧⌘P (Windows, Linux Ctrl+Shift+P)) and enter Preferences: Open User Settings. Then set python.defaultInterpreterPath, which is in the Python extension section of User Settings, with the appropriate interpreter.
Environments and Terminal windows
After using Python: Select Interpreter, that interpreter is applied when right-clicking a file and selecting Python: Run Python File in Terminal. The environment is also activated automatically when you use the Terminal: Create New Terminal command unless you change the python.terminal.activateEnvironment setting to false.
Please note that launching VS Code from a shell in which a specific Python environment is activated doesn’t automatically activate that environment in the default Integrated Terminal.
Note: conda environments cannot be automatically activated in the integrated terminal if PowerShell is set as the integrated shell. See Integrated terminal — Terminal profiles for how to change the shell.
Changing interpreters with the Python: Select Interpreter command doesn’t affect terminal panels that are already open. You can thus activate separate environments in a split terminal: select the first interpreter, create a terminal for it, select a different interpreter, then use the split button (⌘ (Windows, Linux Ctrl+Shift+5)) in the terminal title bar.
Choose a debugging environment
By default, the debugger will use the Python interpreter you’ve selected with the Python extension. However, if you have a python property in the debug configuration of launch.json, that interpreter is used instead. To be more specific, VS Code will give precedence to the python property of the selected debug configuration in launch.json. If it’s not defined, then it will use the path to the Python interpreter you’ve selected for your workspace.
For more details on debug configuration, see Debugging configurations.
Environment variables
Environment variable definitions file
An environment variable definitions file is a simple text file containing key-value pairs in the form of environment_variable=value, with # used for comments. Multiline values aren’t supported, but values can refer to any other environment variable that’s already defined in the system or earlier in the file. Environment variable definitions files can be used for scenarios such as debugging and tool execution (including linters, formatters, IntelliSense, and testing tools), but aren’t applied to the terminal.
Note: Environment variable definitions files are not necessarily cross-platform. For instance, while Unix uses
:as a path separator in environment variables, Windows uses;. There is no normalization of such operating system differences, and so you need to make sure any environment definitions file use values that are compatible with your operating system.
By default, the Python extension looks for and loads a file named .env in the current workspace folder, then applies those definitions. The file is identified by the default entry "python.envFile": "${workspaceFolder}/.env" in your user settings (see General Python settings). You can change the python.envFile setting at any time to use a different definitions file.
Note: Environment variable definitions files are not used in all situations where environment variables are available for use. Unless Visual Studio Code documentation states otherwise, these only affect certain scenarios as per their definition. For example, the extension doesn’t use environment variable definitions files when resolving setting values.
A debug configuration also contains an envFile property that also defaults to the .env file in the current workspace (see Debugging — Set configuration options). This property allows you to easily set variables for debugging purposes that replace variables specified in the default .env file.
For example, when developing a web application, you might want to easily switch between development and production servers. Instead of coding the different URLs and other settings into your application directly, you could use separate definitions files for each. For example:
dev.env file
# dev.env - development configuration

# API endpoint
MYPROJECT_APIENDPOINT=https://my.domain.com/api/dev/

# Variables for the database
MYPROJECT_DBURL=https://my.domain.com/db/dev
MYPROJECT_DBUSER=devadmin
MYPROJECT_DBPASSWORD=!dfka**213=
prod.env file
# prod.env - production configuration

# API endpoint
MYPROJECT_APIENDPOINT=https://my.domain.com/api/

# Variables for the database
MYPROJECT_DBURL=https://my.domain.com/db/
MYPROJECT_DBUSER=coreuser
MYPROJECT_DBPASSWORD=kKKfa98*11@
You can then set the python.envFile setting to ${workspaceFolder}/prod.env, then set the envFile property in the debug configuration to ${workspaceFolder}/dev.env.
Note: When environment variables are specified using multiple methods, be aware that there is an order of precedence. All
envvariables defined in thelaunch.jsonfile will override variables contained in the.envfile, specified by thepython.envFilesetting (user or workspace). Similarly,envvariables defined in thelaunch.jsonfile will override the environment variables defined in theenvFilethat are specified inlaunch.json.
Use of the PYTHONPATH variable
The PYTHONPATH environment variable specifies additional locations where the Python interpreter should look for modules. In VS Code, PYTHONPATH can be set through the terminal settings (terminal.integrated.env.*) and/or within an .env file.
When the terminal settings are used, PYTHONPATH affects any tools that are run within the terminal by a user, as well as any action the extension performs for a user that is routed through the terminal such as debugging. However, in this case when the extension is performing an action that isn’t routed through the terminal, such as the use of a linter or formatter, then this setting won’t have an effect on module look-up.
Next steps
- Editing code — Learn about autocomplete, IntelliSense, formatting, and refactoring for Python.
- Debugging — Learn to debug Python both locally and remotely.
- Testing — Configure test environments and discover, run, and debug tests.
- Settings reference — Explore the full range of Python-related settings in VS Code.
More Python resources
- Getting Started with Python in VS Code — Learn how to edit, run, and debug code in VS Code.
- Virtual Environments and Packages (Python.org) — Learn more about virtual environments and packages.
- Installing Python Modules (Python.org) — Learn how to install Python modules.
- Python tutorial (Python.org) — Learn more about the Python language.
1/20/2023
This is an addition to Sumit S Chawla’s answer that, though it is correct, is missing the fact that anytime you open a folder in Visual Studio Code, it creates a .vscode folder, but those can be multiple, created any time you eventually open a directory.
The .vscode folder has JSON objects that content properties such «setting.json», in which one declare the interpreter to use at that the «.vscode» level (refer to What is a ‘workspace’ in Visual Studio Code? for more clarifications).
{
   {
     "python.pythonPath": "VirtualEnPath/bin/python3.6"
   }
}
So potentially you could open Visual Studio Code at another level in the virtual environment. It creates another .vscode folder that assume as Python directory those of the global machine and so having such an error, and has I experienced has nothing to do if the virtual environment is activated or not.
This is indeed what happened to me. I have indeed a DjangoRESTAPI_GEN folder in which I initially opened the IDE and it did recognize the virtual environment Python path. Then a few days after I opened it at the level where Git is, so it did create another .vscode folder, that picked the global Python Interpreter, causing my lint in the virtual environment not been used.
And the virtual env interpreter did not even show in «select python interpreter». But as written, opening the IDE at the level where the .vscode folder, that has the settings.json file with the correct path, it does.
Once you set the correct path in the setting.json file and select the virtual environment interpreter, then Visual Studio Code will automatically activate the virtual environment in its terminal:

На очередном py-проекте понадобилось виртуальное окружение, при этом используется VS Code в качестве IDE. Существующие гайды, которые попались, либо неполные, либо устаревшие, либо очень пространные. Решил добить тему, сделать быстрый пошаговый гайд для конкретного набора: venv + VS Code под Windows
1. Запустить VS Code от имени администратора, перейти в каталог проекта в PowerShell, выполнить код ниже, появится папка env, содержащая файлы виртуального окружения
python -m venv env
2. Изменить политику, в PowerShell набрать
Set-ExecutionPolicy -ExecutionPolicy RemoteSigned -Scope CurrentUser
3. Войти в папку окружения (env), выполнить команду
envScriptsactivate.ps1
4. Впереди в PowerShell появится маркер окружения (env), но VS Code может о нем все еще ничего не знать. Нажать Ctrl+Shift + P, набрать Python: Select Interpreter
Указать нужный путь к python.exe в папке окружения env, это отобразится внизу в панели состояния. Профит! Теперь можно устанавливать модули только для конкретного проекта.
5. Если нужно будет выйти, то в PowerShell выполнить deactivate, в выборе интерпетатора вернуться на глобальный.
When trying to use a Python virtual environment in VSCode, it was not detecting the virtual environment. The solution was very simple, but I couldn’t find it on Google.
Most of the solutions found on StackOverflow and Github were suggesting to change the pythonPath in VSCode settings.
This article shows how to use a Python virtual environment in VSCode, without having to change the pythonPath in VSCode settings.
Just for the sake of completeness, we will start by installing virtualenv and creating a virtual environment. If you are only interested in the VSCode setup, skip to the VSCode setup section directly.
Install Virtualenv
We will be using virtualenv to create our python virtual environments. We will use pip to install it.
Install virtualenv using pip:
pip install virtualenvCheck your installation:
virtualenv --versionCreate a Virtual Environment
First, let us create a folder .virtualenvs in the home directory. This is where we will keep all our virtual environments.
cd ~
mkdir .virtualenvs
cd .virtualenvs
From inside the .virtualenvs directory, create a new virtual environment using virtualenv
virtualenv venvNow, let us activate the virtual environment
source venv/bin/activateWe will install a package in the virtual environment so that we can test if the setup is working as expected.
pip install excelWe will create test.py that will import from the excel package that we just installed.
from excel import OpenExcelVSCode Setup
At first, if you open the test.py file, assuming you have Python linter extension installed, VSCode will show an error like this.
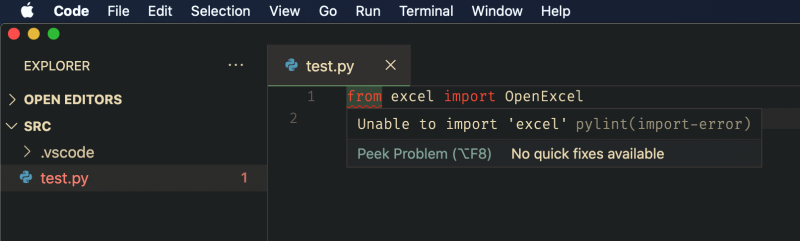
This is because VSCode is not using the correct python interpreter. There are two ways in which you can fix this.
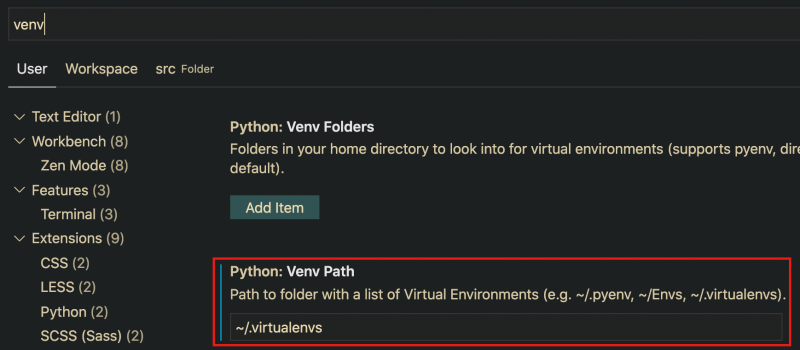
1. Update Venv Path Settings in VSCode
Open VSCode preferences (Ctrl + ,) and search for “venv”. Add ~/.virtualenvs to the “Venv Path” settings, like so:
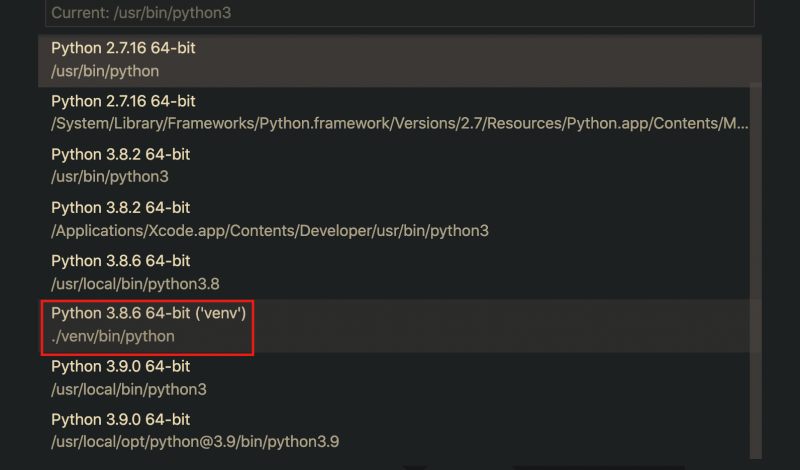
Restart VSCode and click on the interpreter version on the left-bottom corner.

Now, you will be able to see the virtual environment python interpreter in the interpreter list. Select it, now the issue should be resolved.
2. Add the Virtual Environment Folder to VSCode.
Add the folder that contains the virtual environment to VSCode, in our case, it is the ~/.virtualenv folder. Once added, you will be able to select the interpreter by clicking on the interpreter version displayed on the left-bottom corner.
That’s all folks 🙂
We have provided examples of how to work with conda environments. In this post, we will provide you a walk-through example of how to work with VS Code and virtual environments.
Why working with Virtual Environments
When we work on a Data Science project, which can include a Flask API, it is better to have full control over the libraries used in the project. Moreover, it is more efficient to work with the necessary only libraries. This is because with the virtual environments, the project is reproducible, and we will need to install only the required libraries as stated in the requirements.txt. Finally, it is less risky to mess with your other projects when you work with virtual environments.
Create a Project Environment
For this example, we call our project “venv_example“, and we have created a folder with the same name. Within this folder, we can create a virtual environment called “myvenv” by running the following command:
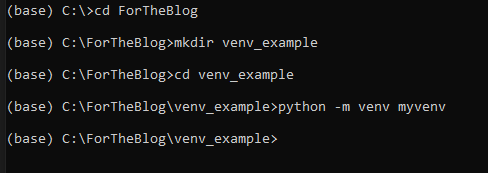
# Linux
sudo apt-get install python3-venv    # If needed
python3 -m venv myvenv

# macOS
python3 -m venv myvenv

# Windows
python -m venv myvenv
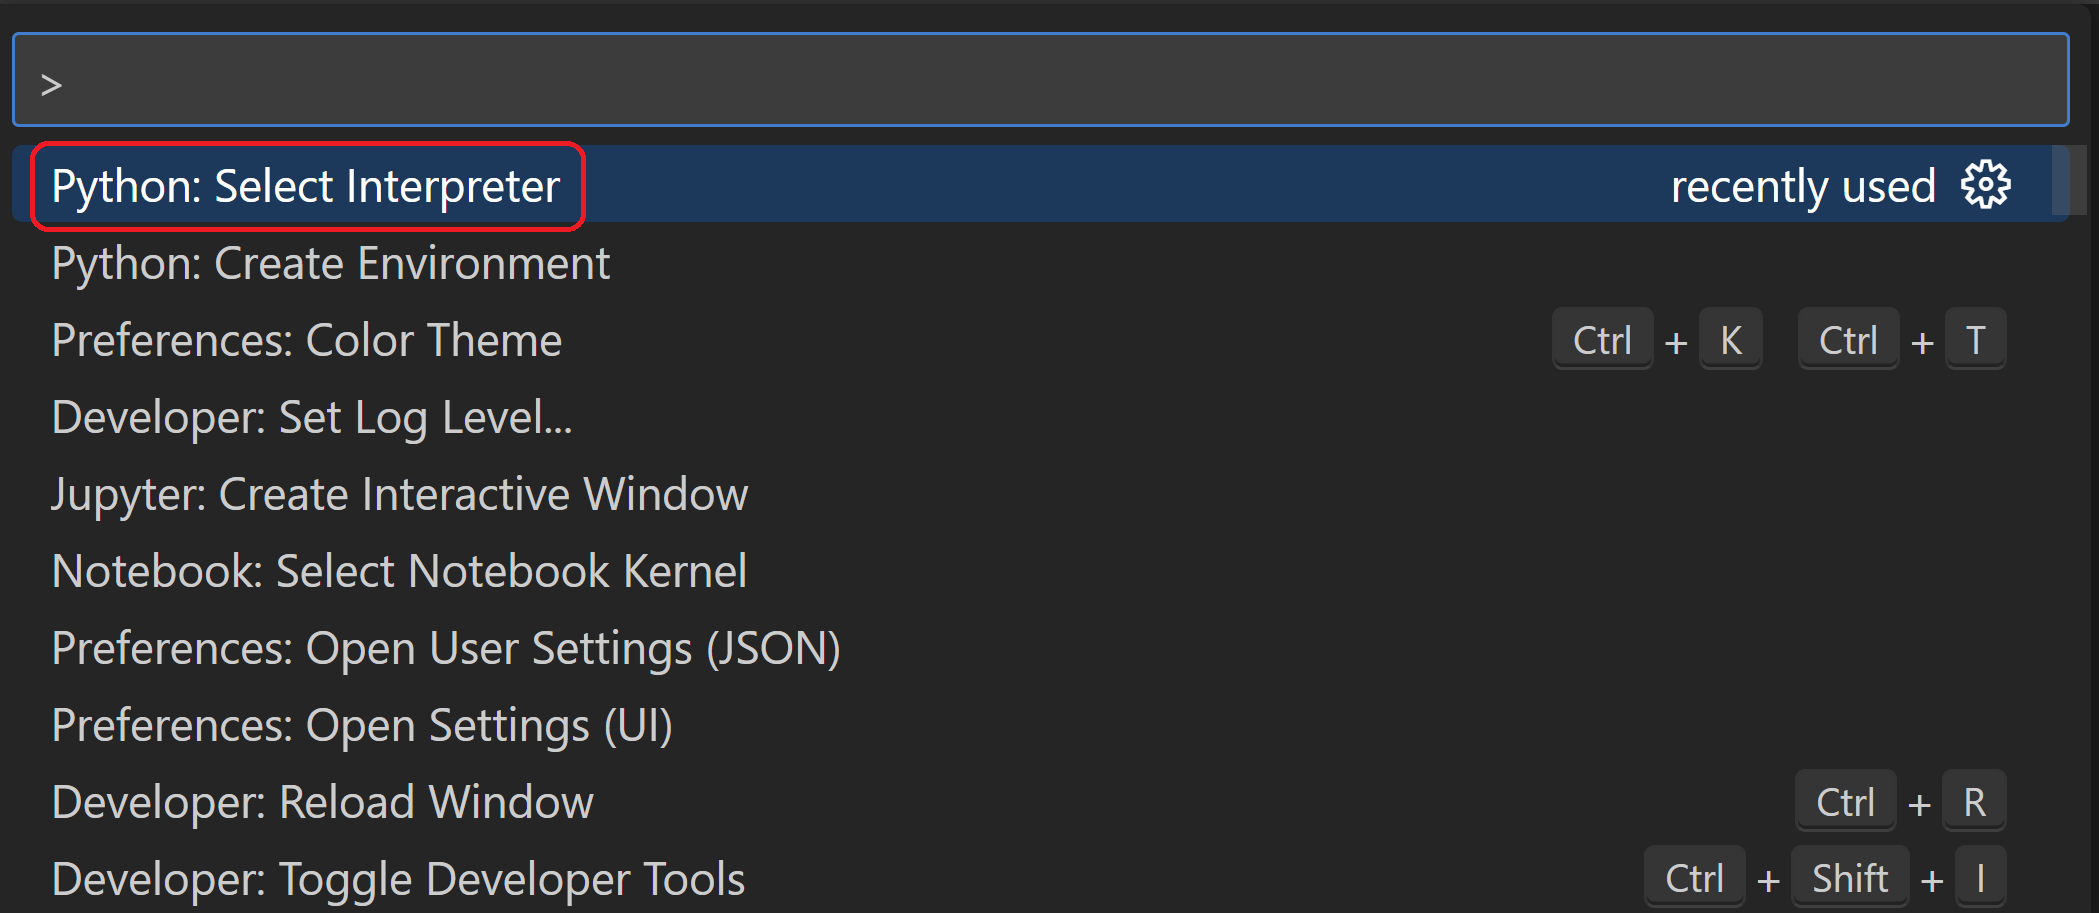
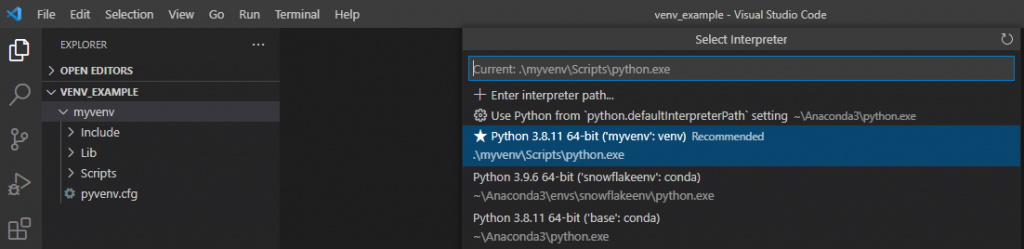
Then, we can open the folder “venv_example” from the VS Code using the File > Open Folder command. Then In VS Code, open the Command Palette (View > Command Palette or (Ctrl+Shift+P)). Then, select the Python: Select Interpreter command and then the environment that we created “myenv“:
Then run Terminal: Create New Terminal (Ctrl+Shift+`)) from the Command Palette, that opens a new python terminal and in parallel it activates the virtual environment.

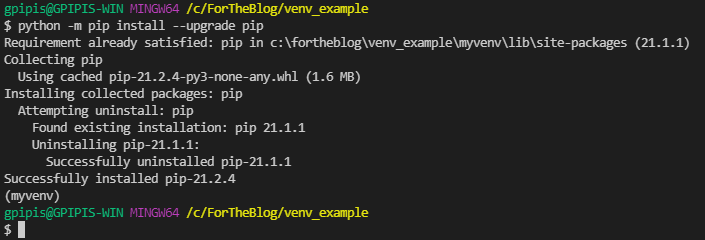
Confirm that that new environment is selected (Hint: look at the blue status bar at the bottom of the VS code) and then update the pip in the virtual environment:
python -m pip install --upgrade pip
Finally, let’s install the pandas and flask libraries
python -m pip install flask
python -m pip install pandas
Create a requirement.txt file
Using the pip freeze command we can generate the requirement.txt file based on the libraries that we installed in our virtual environment.
In the terminal of the activated virtual environment, we can run:
pip freeze > requirements.txt
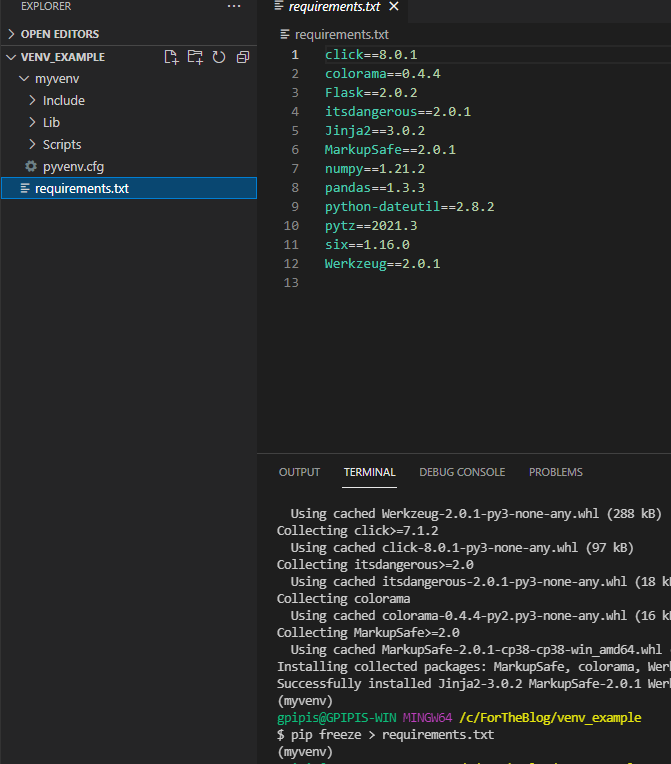
As we can see, in our folder, there is the requirements.txt file as well as the myenv folder. Now, anyone can create the same environment by running the pip install -r requirements.txt command to reinstall the packages.
Another way to activate the environment is by running source myvenv/bin/activate (Linux/macOS) or myvenvScriptsActivate.ps1 (Windows).
How to Delete the Environment
In case that you want to remove the environment, you can simply run:
rm -rf myvenv
Getting Started with Python in VS Code
In this tutorial, you will use Python 3 to create the simplest Python «Hello World» application in Visual Studio Code. By using the Python extension, you make VS Code into a great lightweight Python IDE (which you may find a productive alternative to PyCharm).
This tutorial introduces you to VS Code as a Python environment — primarily how to edit, run, and debug code through the following tasks:
- Write, run, and debug a Python «Hello World» Application
- Learn how to install packages by creating Python virtual environments
- Write a simple Python script to plot figures within VS Code
This tutorial is not intended to teach you Python itself. Once you are familiar with the basics of VS Code, you can then follow any of the programming tutorials on python.org within the context of VS Code for an introduction to the language.
If you have any problems, you can search for answers or ask a question on the Python extension Discussions Q&A.
Prerequisites
To successfully complete this tutorial, you need to first setup your Python development environment. Specifically, this tutorial requires:
- Python 3
- VS Code application
- VS Code Python extension
Install Visual Studio Code and the Python Extension
-
If you have not already done so, install VS Code.
-
Next, install the Python extension for VS Code from the Visual Studio Marketplace. For additional details on installing extensions, see Extension Marketplace. The Python extension is named Python and it’s published by Microsoft.

Install a Python interpreter
Along with the Python extension, you need to install a Python interpreter. Which interpreter you use is dependent on your specific needs, but some guidance is provided below.
Windows
Install Python from python.org. You can typically use the Download Python button that appears first on the page to download the latest version.
Note: If you don’t have admin access, an additional option for installing Python on Windows is to use the Microsoft Store. The Microsoft Store provides installs of supported Python versions.
For additional information about using Python on Windows, see Using Python on Windows at Python.org
macOS
The system install of Python on macOS is not supported. Instead, a package management system like Homebrew is recommended. To install Python using Homebrew on macOS use brew install python3 at the Terminal prompt.
Note On macOS, make sure the location of your VS Code installation is included in your PATH environment variable. See these setup instructions for more information.
Linux
The built-in Python 3 installation on Linux works well, but to install other Python packages you must install pip with get-pip.py.
Other options
-
Data Science: If your primary purpose for using Python is Data Science, then you might consider a download from Anaconda. Anaconda provides not just a Python interpreter, but many useful libraries and tools for data science.
-
Windows Subsystem for Linux: If you are working on Windows and want a Linux environment for working with Python, the Windows Subsystem for Linux (WSL) is an option for you. If you choose this option, you’ll also want to install the WSL extension. For more information about using WSL with VS Code, see VS Code Remote Development or try the Working in WSL tutorial, which will walk you through setting up WSL, installing Python, and creating a Hello World application running in WSL.
Verify the Python installation
To verify that you’ve installed Python successfully on your machine, run one of the following commands (depending on your operating system):
-
Linux/macOS: open a Terminal Window and type the following command:
python3 --version -
Windows: open a command prompt and run the following command:
py -3 --version
If the installation was successful, the output window should show the version of Python that you installed.
Note You can use the
py -0command in the VS Code integrated terminal to view the versions of python installed on your machine. The default interpreter is identified by an asterisk (*).
Start VS Code in a workspace folder
By starting VS Code in a folder, that folder becomes your «workspace». VS Code stores settings that are specific to that workspace in .vscode/settings.json, which are separate from user settings that are stored globally.
Using a command prompt or terminal, create an empty folder called «hello», navigate into it, and open VS Code (code) in that folder (.) by entering the following commands:
mkdir hello
cd hello
code .
Note: If you’re using an Anaconda distribution, be sure to use an Anaconda command prompt.
Alternately, you can run VS Code through the operating system UI, then use File > Open Folder to open the project folder.
Select a Python interpreter
Python is an interpreted language. Thus, in order to run Python code and get Python IntelliSense, you must tell VS Code which interpreter to use.
From within VS Code, select a Python 3 interpreter by opening the Command Palette (⇧⌘P (Windows, Linux Ctrl+Shift+P)), start typing the Python: Select Interpreter command to search, then select the command. You can also use the Select Python Environment option on the Status Bar if available (it may already show a selected interpreter, too):
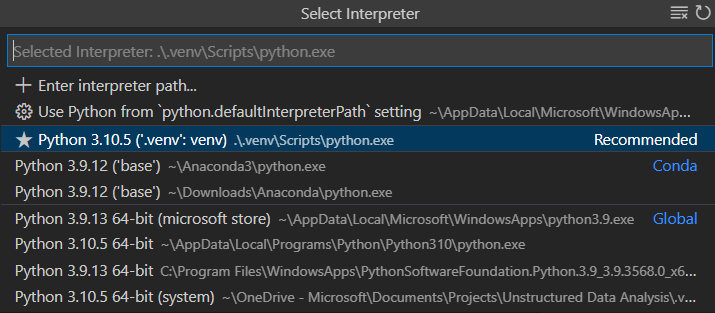
The command presents a list of available interpreters that VS Code can find automatically, including virtual environments. If you don’t see the desired interpreter, see Configuring Python environments.
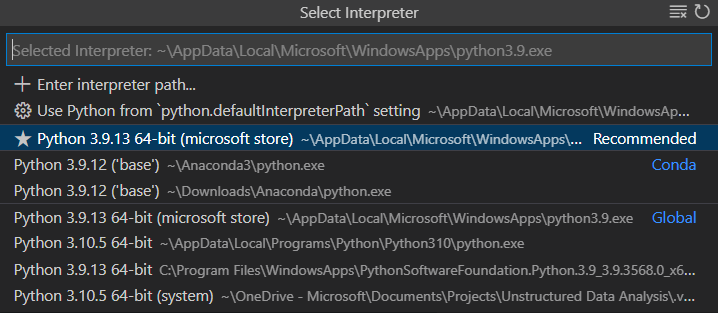
Note: When using an Anaconda distribution, the correct interpreter should have the suffix
('base':conda), for examplePython 3.7.3 64-bit ('base':conda).
Selecting an interpreter sets which interpreter will be used by the Python extension for that workspace.
Note: If you select an interpreter without a workspace folder open, VS Code sets
python.defaultInterpreterPathin User scope instead, which sets the default interpreter for VS Code in general. The user setting makes sure you always have a default interpreter for Python projects. The workspace settings lets you override the user setting.
Create a Python Hello World source code file
From the File Explorer toolbar, select the New File button on the hello folder:
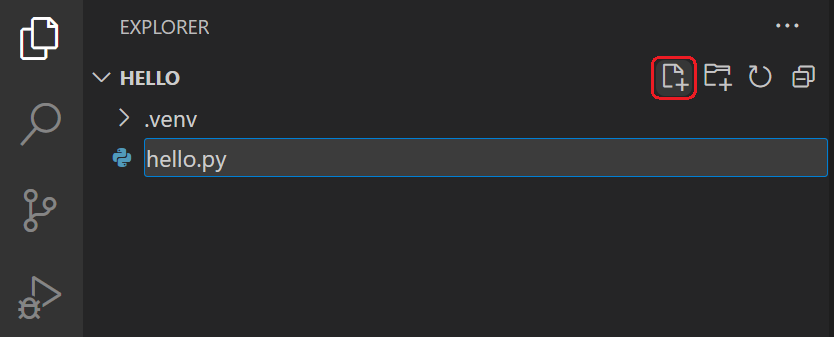
Name the file hello.py, and it automatically opens in the editor:
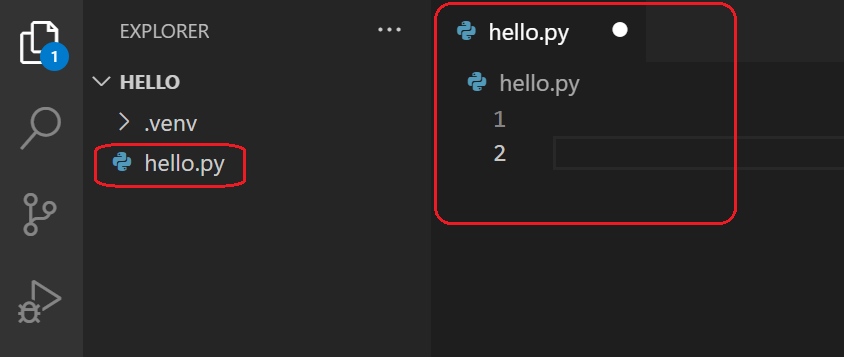
By using the .py file extension, you tell VS Code to interpret this file as a Python program, so that it evaluates the contents with the Python extension and the selected interpreter.
Note: The File Explorer toolbar also allows you to create folders within your workspace to better organize your code. You can use the New folder button to quickly create a folder.
Now that you have a code file in your Workspace, enter the following source code in hello.py:
msg = "Hello World"
print(msg)
When you start typing print, notice how IntelliSense presents auto-completion options.
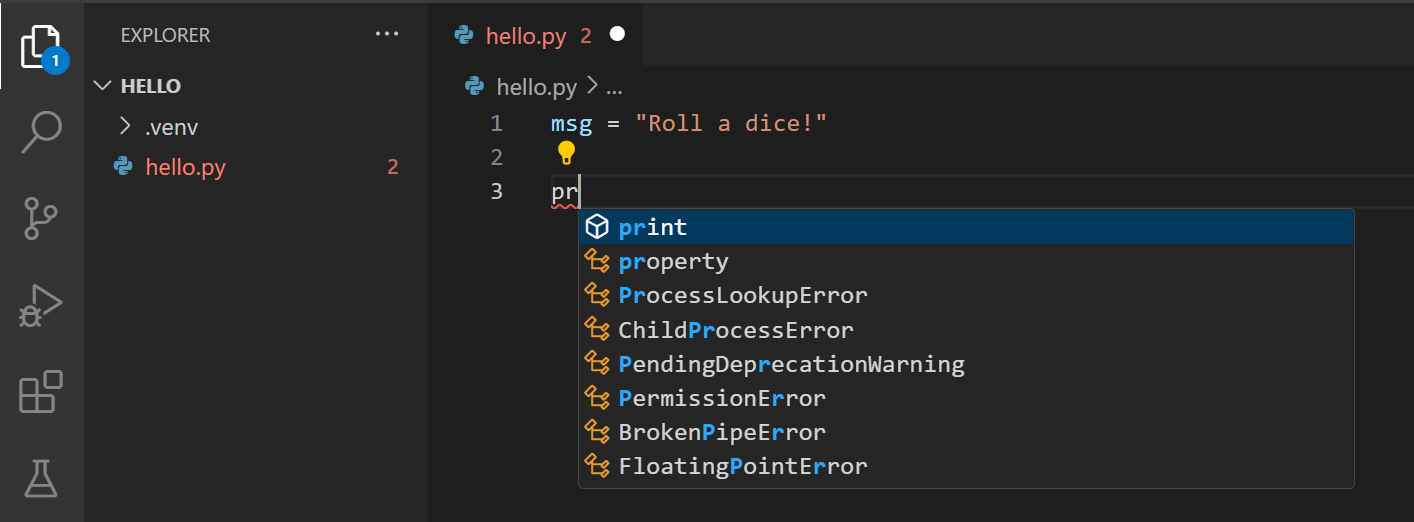
IntelliSense and auto-completions work for standard Python modules as well as other packages you’ve installed into the environment of the selected Python interpreter. It also provides completions for methods available on object types. For example, because the msg variable contains a string, IntelliSense provides string methods when you type msg.:
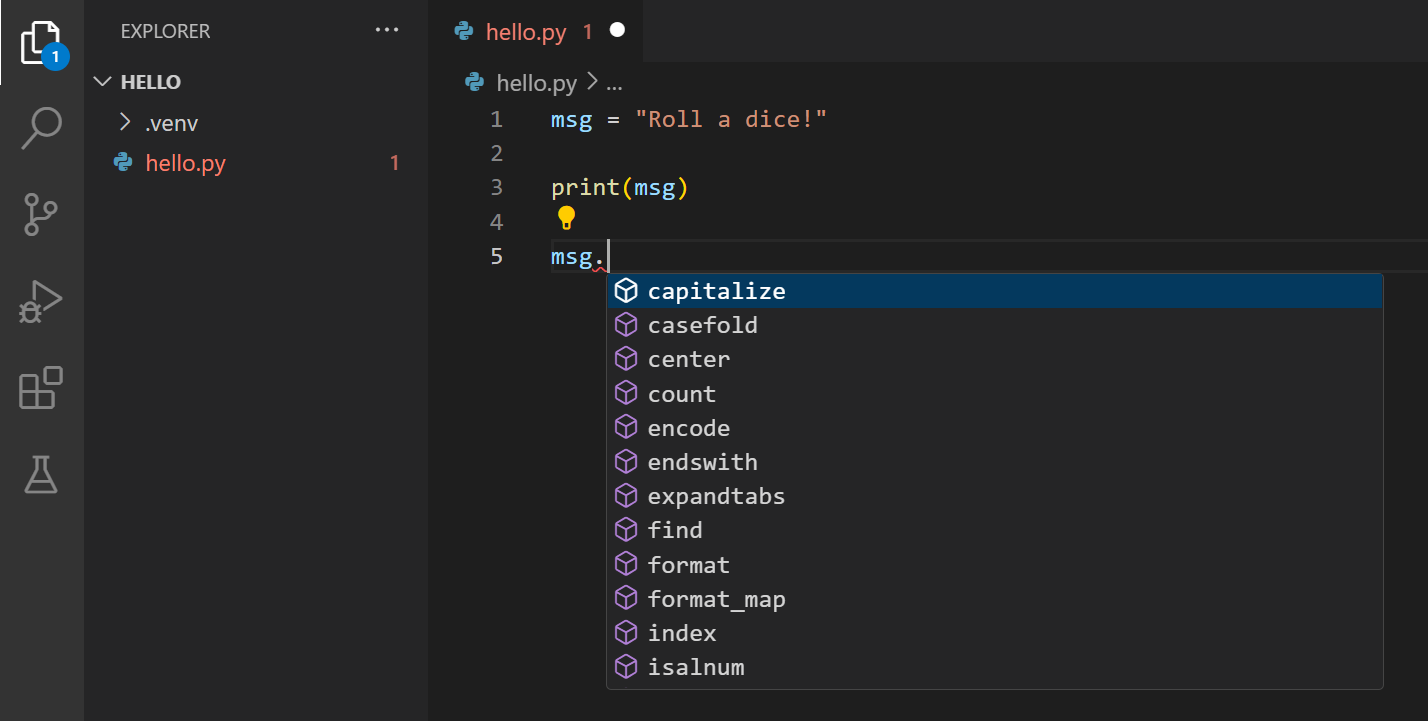
Feel free to experiment with IntelliSense some more, but then revert your changes so you have only the msg variable and the print call, and save the file (⌘S (Windows, Linux Ctrl+S)).
For full details on editing, formatting, and refactoring, see Editing code. The Python extension also has full support for Linting.
Run Hello World
It’s simple to run hello.py with Python. Just click the Run Python File in Terminal play button in the top-right side of the editor.
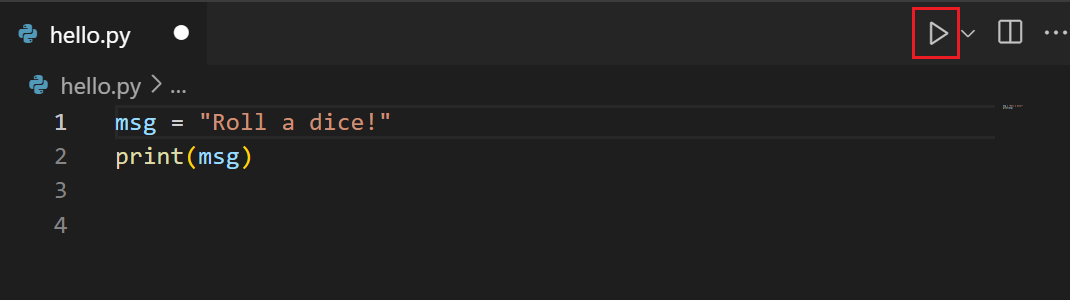
The button opens a terminal panel in which your Python interpreter is automatically activated, then runs python3 hello.py (macOS/Linux) or python hello.py (Windows):

There are three other ways you can run Python code within VS Code:
-
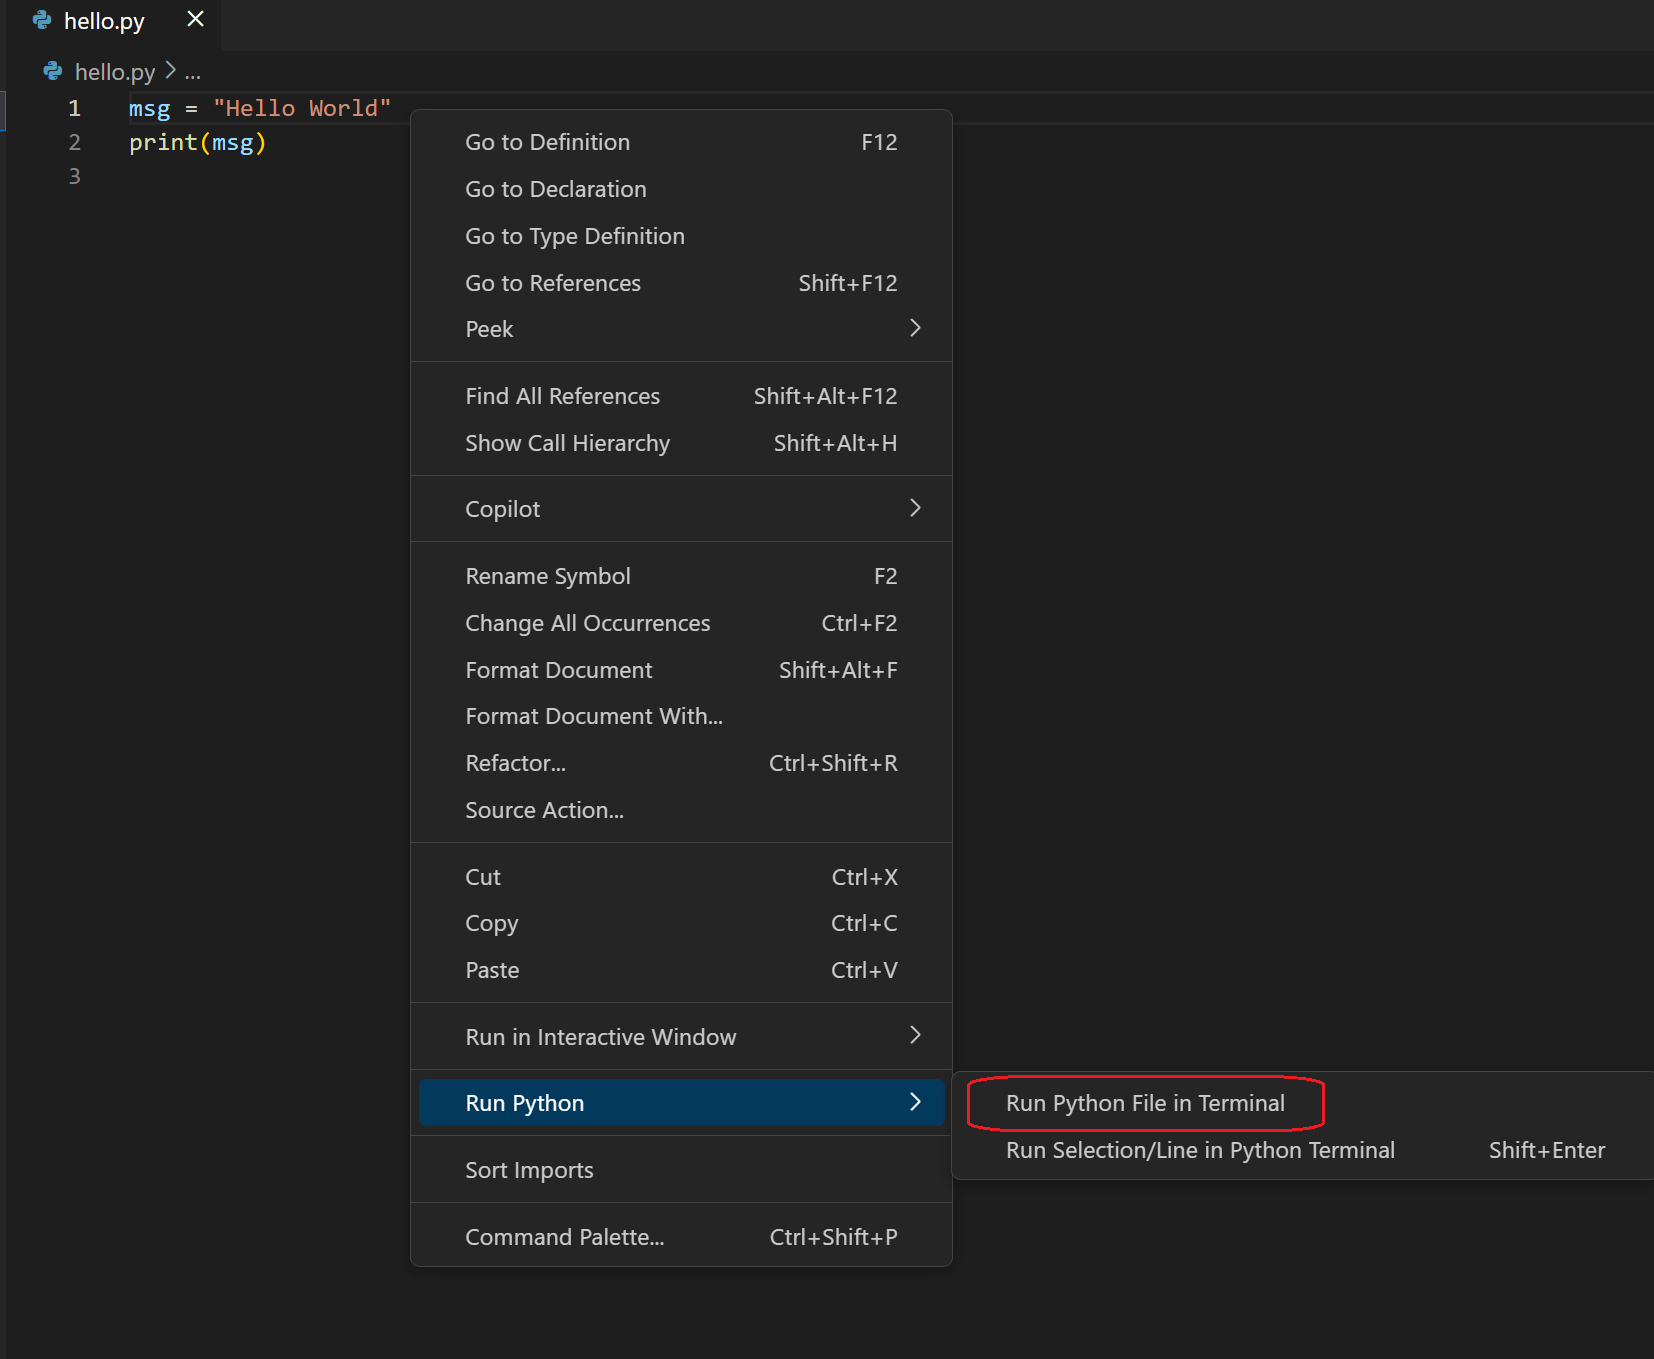
Right-click anywhere in the editor window and select Run Python File in Terminal (which saves the file automatically):
-
Select one or more lines, then press Shift+Enter or right-click and select Run Selection/Line in Python Terminal. This command is convenient for testing just a part of a file.
-
From the Command Palette (⇧⌘P (Windows, Linux Ctrl+Shift+P)), select the Python: Start REPL command to open a REPL terminal for the currently selected Python interpreter. In the REPL, you can then enter and run lines of code one at a time.
Configure and run the debugger
Let’s now try debugging our simple Hello World program.
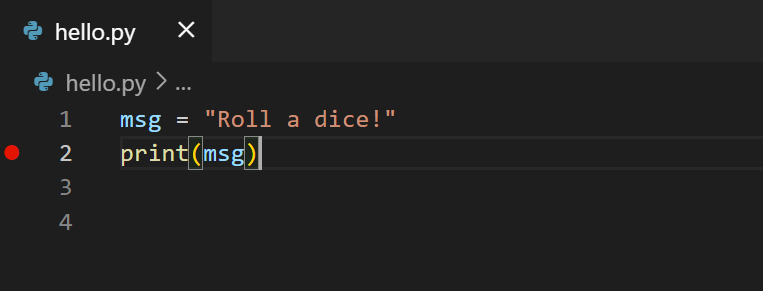
First, set a breakpoint on line 2 of hello.py by placing the cursor on the print call and pressing F9. Alternately, just click in the editor’s left gutter, next to the line numbers. When you set a breakpoint, a red circle appears in the gutter.
Next, to initialize the debugger, press F5. Since this is your first time debugging this file, a configuration menu will open from the Command Palette allowing you to select the type of debug configuration you would like for the opened file.

Note: VS Code uses JSON files for all of its various configurations; launch.json is the standard name for a file containing debugging configurations.
These different configurations are fully explained in Debugging configurations; for now, just select Python File, which is the configuration that runs the current file shown in the editor using the currently selected Python interpreter.
You can also start the debugger by clicking on the down-arrow next to the run button on the editor, and selecting Debug Python File in Terminal.

The debugger will stop at the first line of the file breakpoint. The current line is indicated with a yellow arrow in the left margin. If you examine the Local variables window at this point, you will see now defined msg variable appears in the Local pane.
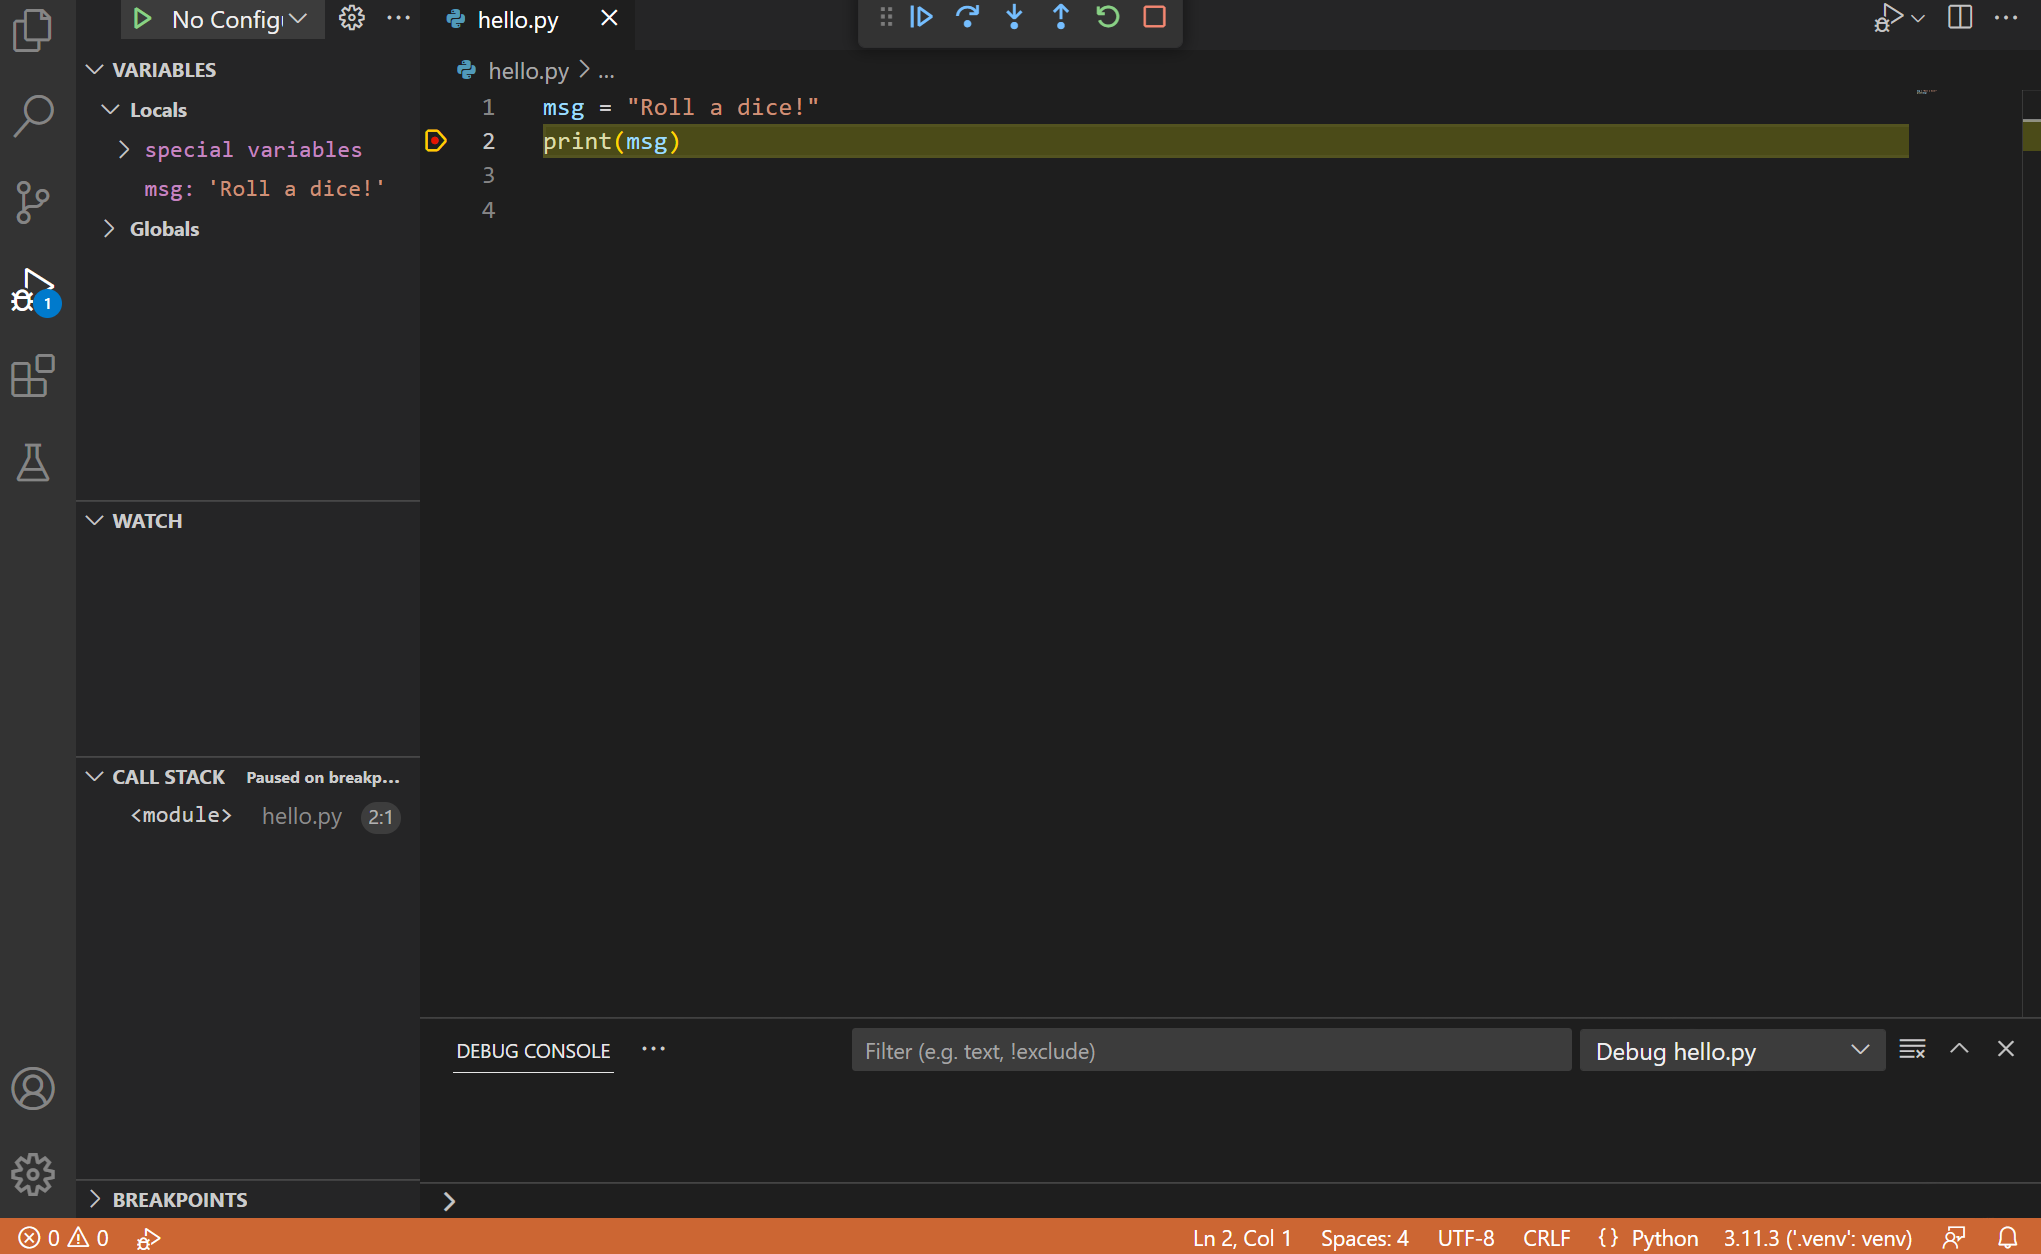
A debug toolbar appears along the top with the following commands from left to right: continue (F5), step over (F10), step into (F11), step out (⇧F11 (Windows, Linux Shift+F11)), restart (⇧⌘F5 (Windows, Linux Ctrl+Shift+F5)), and stop (⇧F5 (Windows, Linux Shift+F5)).

The Status Bar also changes color (orange in many themes) to indicate that you’re in debug mode. The Python Debug Console also appears automatically in the lower right panel to show the commands being run, along with the program output.
To continue running the program, select the continue command on the debug toolbar (F5). The debugger runs the program to the end.
Tip Debugging information can also be seen by hovering over code, such as variables. In the case of
msg, hovering over the variable will display the stringHello worldin a box above the variable.
You can also work with variables in the Debug Console (If you don’t see it, select Debug Console in the lower right area of VS Code, or select it from the … menu.) Then try entering the following lines, one by one, at the > prompt at the bottom of the console:
msg
msg.capitalize()
msg.split()

Select the blue Continue button on the toolbar again (or press F5) to run the program to completion. «Hello World» appears in the Python Debug Console if you switch back to it, and VS Code exits debugging mode once the program is complete.
If you restart the debugger, the debugger again stops on the first breakpoint.
To stop running a program before it’s complete, use the red square stop button on the debug toolbar (⇧F5 (Windows, Linux Shift+F5)), or use the Run > Stop debugging menu command.
For full details, see Debugging configurations, which includes notes on how to use a specific Python interpreter for debugging.
Tip: Use Logpoints instead of print statements: Developers often litter source code with
Install and use packages
Let’s now run an example that’s a little more interesting. In Python, packages are how you obtain any number of useful code libraries, typically from PyPI. For this example, you use the matplotlib and numpy packages to create a graphical plot as is commonly done with data science. (Note that matplotlib cannot show graphs when running in the Windows Subsystem for Linux as it lacks the necessary UI support.)
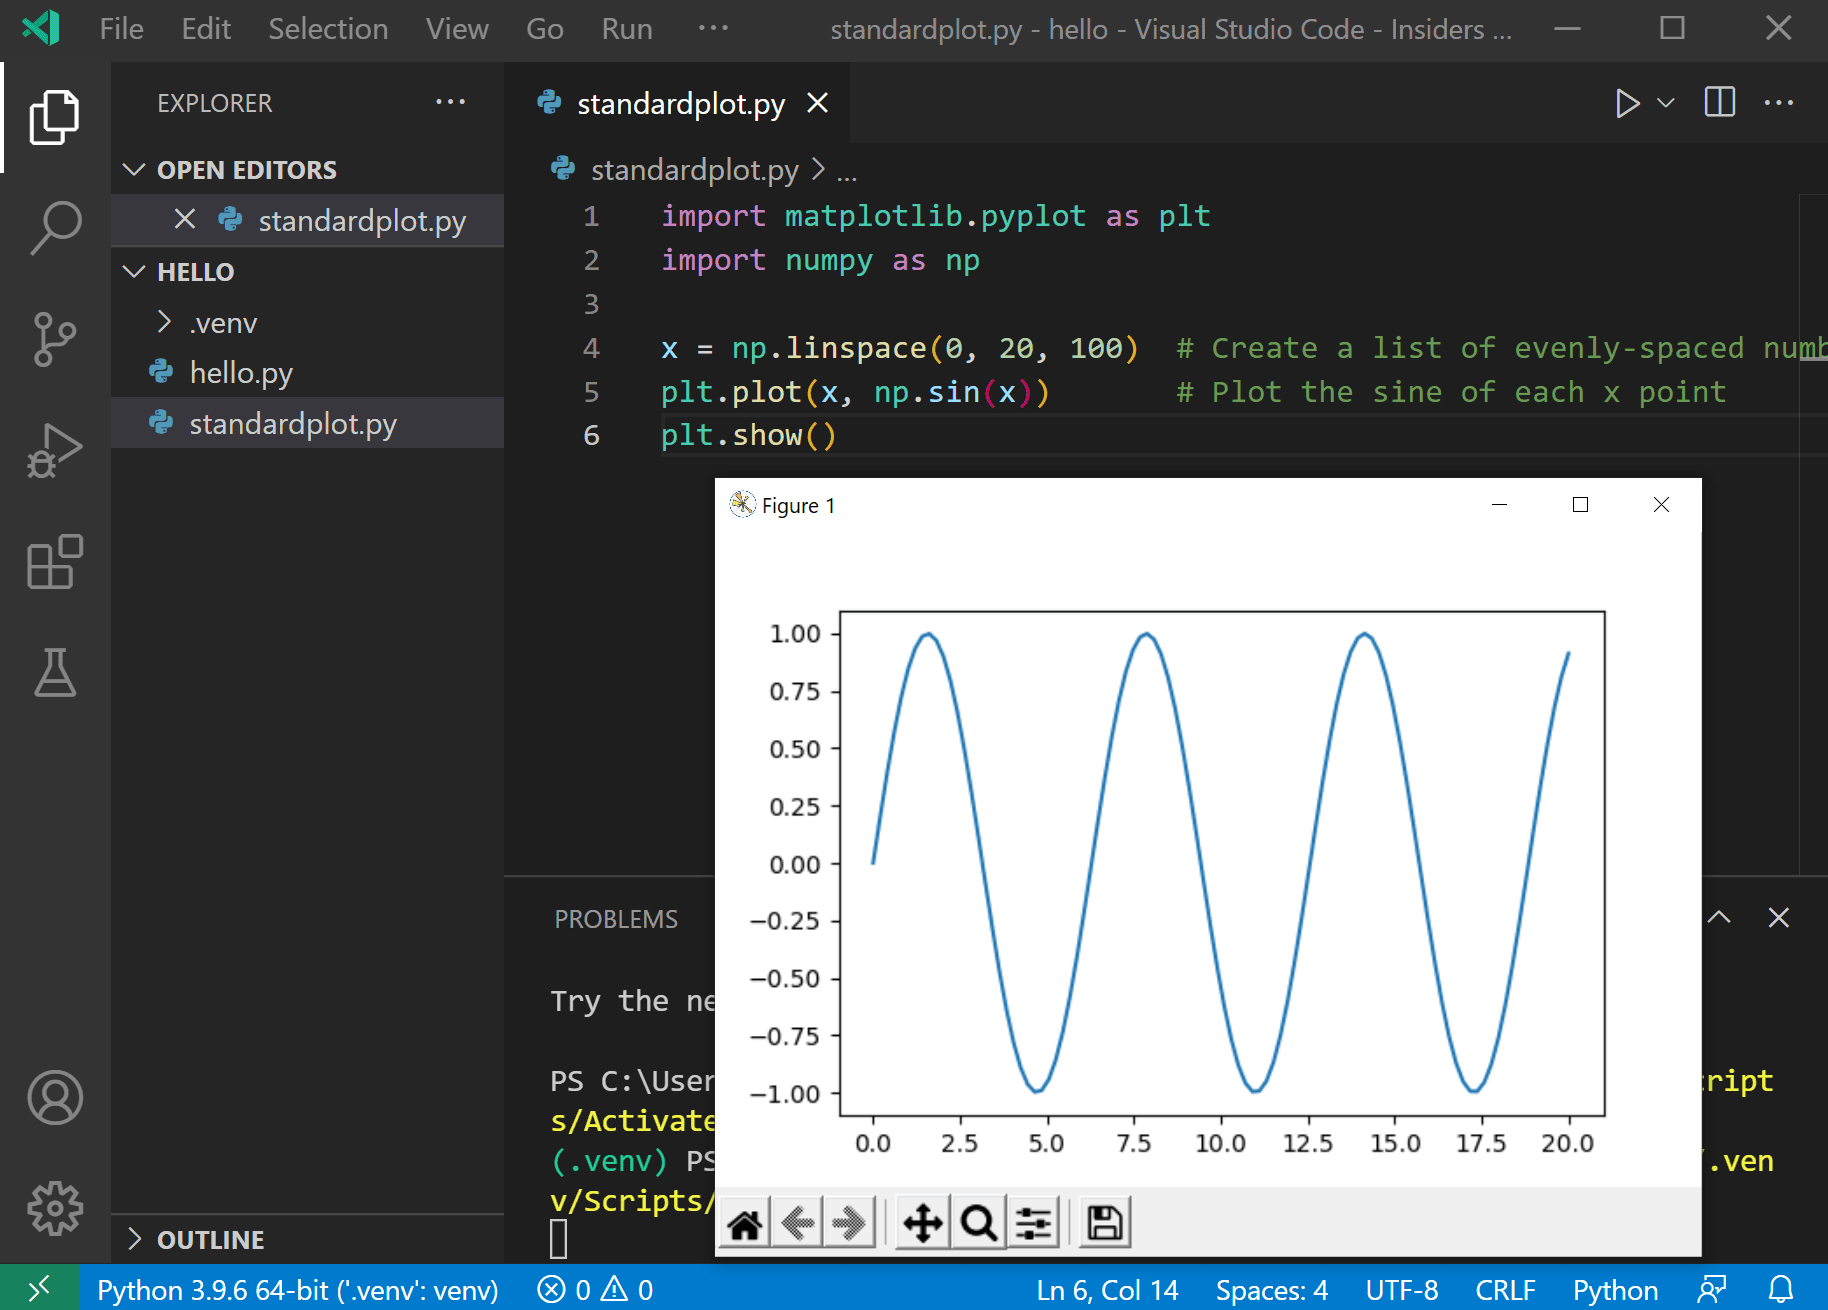
Return to the Explorer view (the top-most icon on the left side, which shows files), create a new file called standardplot.py, and paste in the following source code:
import matplotlib.pyplot as plt
import numpy as np

x = np.linspace(0, 20, 100)  # Create a list of evenly-spaced numbers over the range
plt.plot(x, np.sin(x))       # Plot the sine of each x point
plt.show()                   # Display the plot
Tip: If you enter the above code by hand, you may find that auto-completions change the names after the
askeywords when you press Enter at the end of a line. To avoid this, type a space, then Enter.
Next, try running the file in the debugger using the «Python: Current file» configuration as described in the last section.
Unless you’re using an Anaconda distribution or have previously installed the matplotlib package, you should see the message, «ModuleNotFoundError: No module named ‘matplotlib'». Such a message indicates that the required package isn’t available in your system.
To install the matplotlib package (which also installs numpy as a dependency), stop the debugger and use the Command Palette to run Terminal: Create New Terminal (⌃⇧` (Windows, Linux Ctrl+Shift+`)). This command opens a command prompt for your selected interpreter.
A best practice among Python developers is to avoid installing packages into a global interpreter environment. You instead use a project-specific virtual environment that contains a copy of a global interpreter. Once you activate that environment, any packages you then install are isolated from other environments. Such isolation reduces many complications that can arise from conflicting package versions. To create a virtual environment and install the required packages, enter the following commands as appropriate for your operating system:
Note: For additional information about virtual environments, see Environments.
v
-
Create a virtual environment using the Create Environment command
From within VS Code, you can create non-global environments, using Venv or Anaconda, by opening the Command Palette (⇧⌘P (Windows, Linux Ctrl+Shift+P)), start typing the Python: Create Environment command to search, and then select the command. You can also trigger the Python: Create Environment command through the Getting Started with Python page.
The command presents a list of environment types, Venv or Conda. For this example, select Venv.
The command then presents a list of interpreters that can be used for your project.
After selecting the desired interpreter, a notification will show the progress of the environment creation and the environment folder will appear in your workspace.
The command will also install necessary packages outlined in a requirements/dependencies file, such as
requirements.txt,pyproject.toml, orenvironment.yml, located in the project folder.Note: If you want to create an environment manually, or run into error in the environment creation process, visit the Environments page.
-
Ensure your new environment is selected by using the Python: Select Interpreter command from the Command Palette.
-
Install the packages
# Don't use with Anaconda distributions because they include matplotlib already. # macOS python3 -m pip install matplotlib # Windows (may require elevation) python -m pip install matplotlib # Linux (Debian) apt-get install python3-tk python3 -m pip install matplotlib -
Rerun the program now (with or without the debugger) and after a few moments a plot window appears with the output:
-
Once you are finished, type
deactivatein the terminal window to deactivate the virtual environment.
For additional examples of creating and activating a virtual environment and installing packages, see the Django tutorial and the Flask tutorial.
Next steps
You can configure VS Code to use any Python environment you have installed, including virtual and conda environments. You can also use a separate environment for debugging. For full details, see Environments.
To learn more about the Python language, follow any of the programming tutorials listed on python.org within the context of VS Code.
To learn to build web apps with the Django and Flask frameworks, see the following tutorials:
- Use Django in Visual Studio Code
- Use Flask in Visual Studio Code
There is then much more to explore with Python in Visual Studio Code:
- Editing code — Learn about autocomplete, IntelliSense, formatting, and refactoring for Python.
- Linting — Enable, configure, and apply a variety of Python linters.
- Debugging — Learn to debug Python both locally and remotely.
- Testing — Configure test environments and discover, run, and debug tests.
- Settings reference — Explore the full range of Python-related settings in VS Code.
- Deploy Python to Azure App Service
- Deploy Python to Container Apps
1/20/2023
Getting Started with Python in VS Code
In this tutorial, you will use Python 3 to create the simplest Python «Hello World» application in Visual Studio Code. By using the Python extension, you make VS Code into a great lightweight Python IDE (which you may find a productive alternative to PyCharm).
This tutorial introduces you to VS Code as a Python environment — primarily how to edit, run, and debug code through the following tasks:
- Write, run, and debug a Python «Hello World» Application
- Learn how to install packages by creating Python virtual environments
- Write a simple Python script to plot figures within VS Code
This tutorial is not intended to teach you Python itself. Once you are familiar with the basics of VS Code, you can then follow any of the programming tutorials on python.org within the context of VS Code for an introduction to the language.
If you have any problems, you can search for answers or ask a question on the Python extension Discussions Q&A.
Prerequisites
To successfully complete this tutorial, you need to first setup your Python development environment. Specifically, this tutorial requires:
- Python 3
- VS Code application
- VS Code Python extension
Install Visual Studio Code and the Python Extension
-
If you have not already done so, install VS Code.
-
Next, install the Python extension for VS Code from the Visual Studio Marketplace. For additional details on installing extensions, see Extension Marketplace. The Python extension is named Python and it’s published by Microsoft.
Install a Python interpreter
Along with the Python extension, you need to install a Python interpreter. Which interpreter you use is dependent on your specific needs, but some guidance is provided below.
Windows
Install Python from python.org. You can typically use the Download Python button that appears first on the page to download the latest version.
Note: If you don’t have admin access, an additional option for installing Python on Windows is to use the Microsoft Store. The Microsoft Store provides installs of supported Python versions.
For additional information about using Python on Windows, see Using Python on Windows at Python.org
macOS
The system install of Python on macOS is not supported. Instead, a package management system like Homebrew is recommended. To install Python using Homebrew on macOS use brew install python3 at the Terminal prompt.
Note On macOS, make sure the location of your VS Code installation is included in your PATH environment variable. See these setup instructions for more information.
Linux
The built-in Python 3 installation on Linux works well, but to install other Python packages you must install pip with get-pip.py.
Other options
-
Data Science: If your primary purpose for using Python is Data Science, then you might consider a download from Anaconda. Anaconda provides not just a Python interpreter, but many useful libraries and tools for data science.
-
Windows Subsystem for Linux: If you are working on Windows and want a Linux environment for working with Python, the Windows Subsystem for Linux (WSL) is an option for you. If you choose this option, you’ll also want to install the WSL extension. For more information about using WSL with VS Code, see VS Code Remote Development or try the Working in WSL tutorial, which will walk you through setting up WSL, installing Python, and creating a Hello World application running in WSL.
Verify the Python installation
To verify that you’ve installed Python successfully on your machine, run one of the following commands (depending on your operating system):
-
Linux/macOS: open a Terminal Window and type the following command:
python3 --version -
Windows: open a command prompt and run the following command:
py -3 --version
If the installation was successful, the output window should show the version of Python that you installed.
Note You can use the
py -0command in the VS Code integrated terminal to view the versions of python installed on your machine. The default interpreter is identified by an asterisk (*).
Start VS Code in a workspace folder
By starting VS Code in a folder, that folder becomes your «workspace». VS Code stores settings that are specific to that workspace in .vscode/settings.json, which are separate from user settings that are stored globally.
Using a command prompt or terminal, create an empty folder called «hello», navigate into it, and open VS Code (code) in that folder (.) by entering the following commands:
mkdir hello
cd hello
code .
Note: If you’re using an Anaconda distribution, be sure to use an Anaconda command prompt.
Alternately, you can run VS Code through the operating system UI, then use File > Open Folder to open the project folder.
Select a Python interpreter
Python is an interpreted language. Thus, in order to run Python code and get Python IntelliSense, you must tell VS Code which interpreter to use.
From within VS Code, select a Python 3 interpreter by opening the Command Palette (⇧⌘P (Windows, Linux Ctrl+Shift+P)), start typing the Python: Select Interpreter command to search, then select the command. You can also use the Select Python Environment option on the Status Bar if available (it may already show a selected interpreter, too):
The command presents a list of available interpreters that VS Code can find automatically, including virtual environments. If you don’t see the desired interpreter, see Configuring Python environments.
Note: When using an Anaconda distribution, the correct interpreter should have the suffix
('base':conda), for examplePython 3.7.3 64-bit ('base':conda).
Selecting an interpreter sets which interpreter will be used by the Python extension for that workspace.
Note: If you select an interpreter without a workspace folder open, VS Code sets
python.defaultInterpreterPathin User scope instead, which sets the default interpreter for VS Code in general. The user setting makes sure you always have a default interpreter for Python projects. The workspace settings lets you override the user setting.
Create a Python Hello World source code file
From the File Explorer toolbar, select the New File button on the hello folder:
Name the file hello.py, and it automatically opens in the editor:
By using the .py file extension, you tell VS Code to interpret this file as a Python program, so that it evaluates the contents with the Python extension and the selected interpreter.
Note: The File Explorer toolbar also allows you to create folders within your workspace to better organize your code. You can use the New folder button to quickly create a folder.
Now that you have a code file in your Workspace, enter the following source code in hello.py:
msg = "Hello World"
print(msg)
When you start typing print, notice how IntelliSense presents auto-completion options.
IntelliSense and auto-completions work for standard Python modules as well as other packages you’ve installed into the environment of the selected Python interpreter. It also provides completions for methods available on object types. For example, because the msg variable contains a string, IntelliSense provides string methods when you type msg.:
Feel free to experiment with IntelliSense some more, but then revert your changes so you have only the msg variable and the print call, and save the file (⌘S (Windows, Linux Ctrl+S)).
For full details on editing, formatting, and refactoring, see Editing code. The Python extension also has full support for Linting.
Run Hello World
It’s simple to run hello.py with Python. Just click the Run Python File in Terminal play button in the top-right side of the editor.
The button opens a terminal panel in which your Python interpreter is automatically activated, then runs python3 hello.py (macOS/Linux) or python hello.py (Windows):
There are three other ways you can run Python code within VS Code:
-
Right-click anywhere in the editor window and select Run Python File in Terminal (which saves the file automatically):
-
Select one or more lines, then press Shift+Enter or right-click and select Run Selection/Line in Python Terminal. This command is convenient for testing just a part of a file.
-
From the Command Palette (⇧⌘P (Windows, Linux Ctrl+Shift+P)), select the Python: Start REPL command to open a REPL terminal for the currently selected Python interpreter. In the REPL, you can then enter and run lines of code one at a time.
Configure and run the debugger
Let’s now try debugging our simple Hello World program.
First, set a breakpoint on line 2 of hello.py by placing the cursor on the print call and pressing F9. Alternately, just click in the editor’s left gutter, next to the line numbers. When you set a breakpoint, a red circle appears in the gutter.
Next, to initialize the debugger, press F5. Since this is your first time debugging this file, a configuration menu will open from the Command Palette allowing you to select the type of debug configuration you would like for the opened file.
Note: VS Code uses JSON files for all of its various configurations; launch.json is the standard name for a file containing debugging configurations.
These different configurations are fully explained in Debugging configurations; for now, just select Python File, which is the configuration that runs the current file shown in the editor using the currently selected Python interpreter.
You can also start the debugger by clicking on the down-arrow next to the run button on the editor, and selecting Debug Python File in Terminal.
The debugger will stop at the first line of the file breakpoint. The current line is indicated with a yellow arrow in the left margin. If you examine the Local variables window at this point, you will see now defined msg variable appears in the Local pane.
A debug toolbar appears along the top with the following commands from left to right: continue (F5), step over (F10), step into (F11), step out (⇧F11 (Windows, Linux Shift+F11)), restart (⇧⌘F5 (Windows, Linux Ctrl+Shift+F5)), and stop (⇧F5 (Windows, Linux Shift+F5)).
The Status Bar also changes color (orange in many themes) to indicate that you’re in debug mode. The Python Debug Console also appears automatically in the lower right panel to show the commands being run, along with the program output.
To continue running the program, select the continue command on the debug toolbar (F5). The debugger runs the program to the end.
Tip Debugging information can also be seen by hovering over code, such as variables. In the case of
msg, hovering over the variable will display the stringHello worldin a box above the variable.
You can also work with variables in the Debug Console (If you don’t see it, select Debug Console in the lower right area of VS Code, or select it from the … menu.) Then try entering the following lines, one by one, at the > prompt at the bottom of the console:
msg
msg.capitalize()
msg.split()
Select the blue Continue button on the toolbar again (or press F5) to run the program to completion. «Hello World» appears in the Python Debug Console if you switch back to it, and VS Code exits debugging mode once the program is complete.
If you restart the debugger, the debugger again stops on the first breakpoint.
To stop running a program before it’s complete, use the red square stop button on the debug toolbar (⇧F5 (Windows, Linux Shift+F5)), or use the Run > Stop debugging menu command.
For full details, see Debugging configurations, which includes notes on how to use a specific Python interpreter for debugging.
Tip: Use Logpoints instead of print statements: Developers often litter source code with
Install and use packages
Let’s now run an example that’s a little more interesting. In Python, packages are how you obtain any number of useful code libraries, typically from PyPI. For this example, you use the matplotlib and numpy packages to create a graphical plot as is commonly done with data science. (Note that matplotlib cannot show graphs when running in the Windows Subsystem for Linux as it lacks the necessary UI support.)
Return to the Explorer view (the top-most icon on the left side, which shows files), create a new file called standardplot.py, and paste in the following source code:
import matplotlib.pyplot as plt
import numpy as np

x = np.linspace(0, 20, 100)  # Create a list of evenly-spaced numbers over the range
plt.plot(x, np.sin(x))       # Plot the sine of each x point
plt.show()                   # Display the plot
Tip: If you enter the above code by hand, you may find that auto-completions change the names after the
askeywords when you press Enter at the end of a line. To avoid this, type a space, then Enter.
Next, try running the file in the debugger using the «Python: Current file» configuration as described in the last section.
Unless you’re using an Anaconda distribution or have previously installed the matplotlib package, you should see the message, «ModuleNotFoundError: No module named ‘matplotlib'». Such a message indicates that the required package isn’t available in your system.
To install the matplotlib package (which also installs numpy as a dependency), stop the debugger and use the Command Palette to run Terminal: Create New Terminal (⌃⇧` (Windows, Linux Ctrl+Shift+`)). This command opens a command prompt for your selected interpreter.
A best practice among Python developers is to avoid installing packages into a global interpreter environment. You instead use a project-specific virtual environment that contains a copy of a global interpreter. Once you activate that environment, any packages you then install are isolated from other environments. Such isolation reduces many complications that can arise from conflicting package versions. To create a virtual environment and install the required packages, enter the following commands as appropriate for your operating system:
Note: For additional information about virtual environments, see Environments.
v
-
Create a virtual environment using the Create Environment command
From within VS Code, you can create non-global environments, using Venv or Anaconda, by opening the Command Palette (⇧⌘P (Windows, Linux Ctrl+Shift+P)), start typing the Python: Create Environment command to search, and then select the command. You can also trigger the Python: Create Environment command through the Getting Started with Python page.
The command presents a list of environment types, Venv or Conda. For this example, select Venv.
The command then presents a list of interpreters that can be used for your project.
After selecting the desired interpreter, a notification will show the progress of the environment creation and the environment folder will appear in your workspace.
The command will also install necessary packages outlined in a requirements/dependencies file, such as
requirements.txt,pyproject.toml, orenvironment.yml, located in the project folder.Note: If you want to create an environment manually, or run into error in the environment creation process, visit the Environments page.
-
Ensure your new environment is selected by using the Python: Select Interpreter command from the Command Palette.
-
Install the packages
# Don't use with Anaconda distributions because they include matplotlib already. # macOS python3 -m pip install matplotlib # Windows (may require elevation) python -m pip install matplotlib # Linux (Debian) apt-get install python3-tk python3 -m pip install matplotlib -
Rerun the program now (with or without the debugger) and after a few moments a plot window appears with the output:
-
Once you are finished, type
deactivatein the terminal window to deactivate the virtual environment.
For additional examples of creating and activating a virtual environment and installing packages, see the Django tutorial and the Flask tutorial.
Next steps
You can configure VS Code to use any Python environment you have installed, including virtual and conda environments. You can also use a separate environment for debugging. For full details, see Environments.
To learn more about the Python language, follow any of the programming tutorials listed on python.org within the context of VS Code.
To learn to build web apps with the Django and Flask frameworks, see the following tutorials:
- Use Django in Visual Studio Code
- Use Flask in Visual Studio Code
There is then much more to explore with Python in Visual Studio Code:
- Editing code — Learn about autocomplete, IntelliSense, formatting, and refactoring for Python.
- Linting — Enable, configure, and apply a variety of Python linters.
- Debugging — Learn to debug Python both locally and remotely.
- Testing — Configure test environments and discover, run, and debug tests.
- Settings reference — Explore the full range of Python-related settings in VS Code.
- Deploy Python to Azure App Service
- Deploy Python to Container Apps
1/20/2023