Firefox до 46 версии поставляется с поддержкой WebDriver. Geckodriver требуется для Firefox выше 47+ версии. Нужно установить geckodriver отдельно от браузера.
Скачать geckodriver для Linux, Windows и Mac
Зайдите на github страницу с релизами чтобы выбрать нужный вам файл для скачивания в зависимости от вашей операционной системы и версии браузера Firefox.
Релизы: https://github.com/mozilla/geckodriver/releases/
На текущий момент, актуальная версия geckodriver является v0.26.0.

Установка geckodriver под Ubuntu, Windows и Mac
Ниже мы приводим примеры более «правильной» установки драйвера, но есть и более быстрый способ. Примените данный метод в двух случаях.
- Вам нужны разные версии geckodriver.
- У вас не получилось ничего из того, что мы предлагаем ниже под каждую операционную систему.
Инструкция установки
- Заходим на сайт https://github.com/mozilla/geckodriver/releases/
- Скачиваем архив под вашу операционную систему
- Распаковываем файл и запоминаем где находится файл geckodriver или geckodriver.exe (Windows)
Если у вас Linux дистрибутив или Mac, вам нужно дать файлу geckodriver нужные права на выполнения. Открываем терминал и вводим команды одна за другой.
|
cd /путь/до/драйвера/ sudo chmod +x geckodriver |
Теперь, когда вы будете запускать код в Python, вы должны указать Selenium на этот файл.
|
from selenium import webdriver driver = webdriver.Firefox(‘/путь/до/драйвера/geckodriver’) driver.get(«http://www.google.com») |
Для Windows
|
from selenium import webdriver # Указываем полный путь к geckodriver.exe на вашем ПК. driver = webdriver.Firefox(‘C:\Files\geckodriver.exe’) driver.get(«http://www.google.com») |
Минусы такого подхода
- Нужно помнить где у вас лежит geckodriver;
- Нужно не забывать указывать в конструктор класса webdriver.Firefox путь к драйверу.
Установка geckodriver в Ubuntu, Debian и ArchLinux
Выбираем (в зависимости от архитектуры процессора x32 или x64) нужный tar архив. В моем случае будет файл geckodriver-v0.26.0-linux64.tar.gz у меня Ubuntu 18.04.3 LTS.
Скачиваем архив.
|
wget https://github.com/mozilla/geckodriver/releases/download/v0.26.0/geckodriver—v0.26.0—linux64.tar.gz |
Вытаскиваем файл из архива.
Даем нужные права драйверу.
|
sudo chmod +x geckodriver |
Отправляем драйвер в папку где его будет искать Selenium.
|
sudo mv geckodriver /usr/local/bin/ |
Установка geckodriver в Mac OS
Пожалуй, самая простая установка в Mac. Выполняем в терминале:
|
sudo brew install geckodriver |
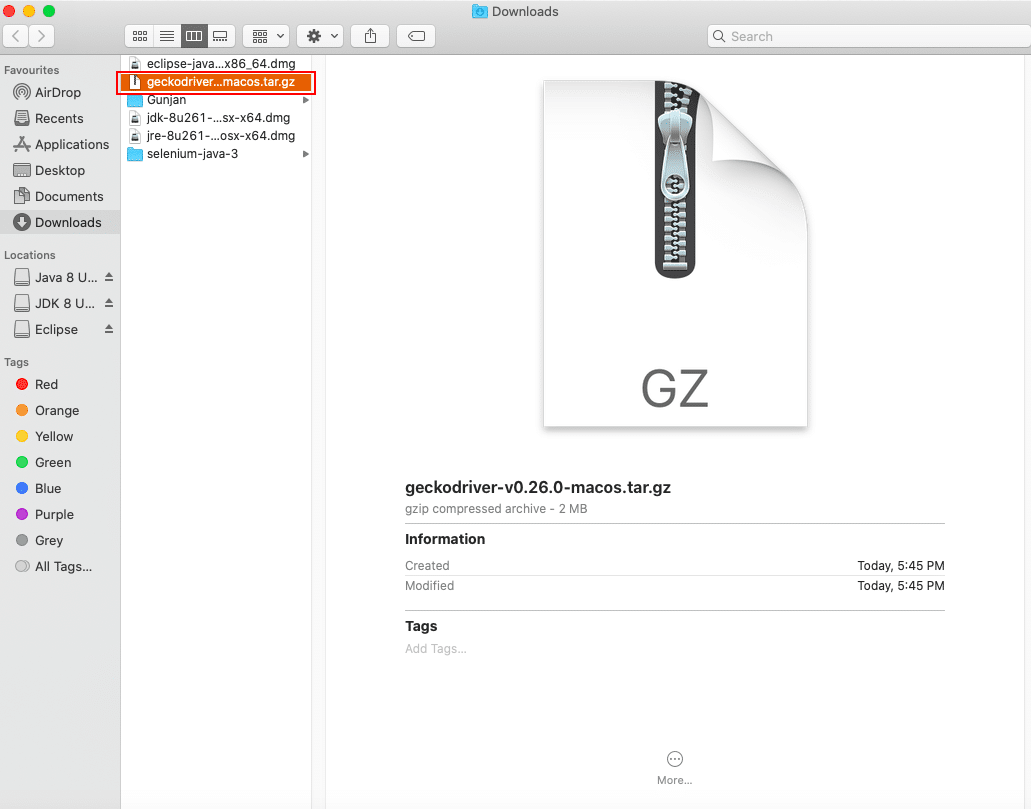
Проблема такого подхода в том, что может быть старая версия. Для новой версии смотрите на страницу github с релизами и скачиваем архив geckodriver-v0.26.0-macos.tar.gz.
Заходим через терминал в папку где будет лежать архив и сам драйвер.
Скачиваем архив.
|
curl —o geckodriver.tar.gz —k https://github.com/mozilla/geckodriver/releases/download/v0.26.0/geckodriver—v0.26.0—macos.tar.gz |
Распаковываем архив.
|
gunzip —c geckodriver.tar.gz | tar xopf — |
Даем драйверу права на выполнения.
|
sudo chmod +x geckodriver |
Редактируемым файл «~/.bashrc» с помощью VIM или NANO.
Добавляем в конец файла следующие строки. ВНИМАНИЕ! Заменяем «/your/path/» указывая реальный путь к geckodriver файлу.
|
export PATH=$PATH:/your/path/geckodriver |
Возможно вы не поймете как выйти из VIM. Такое бывает.
- Нажимаем клавишу ESC
- Вводим символы
:wq - Enter
Теперь у вас будет последняя версия geckodriver на вашем новеньком маке.
Установка geckodriver в Windows
Windows пользователи возможно не слышали о таким виде архивов как tar.gz это нормально. Скачиваем и устанавливаем программу 7-Zip.
Программа для распаковки tar.gz в Windows: http://www.7-zip.org/
Полная инструкция по установки geckodriver в Windows показана в видео. Смотрим с 40 секунды и повторяем. Помните что не нужно скачивать именно ту версию, что указана в видео. По указанной ссылке с github последняя версия 0.19.1 когда в самом видео 12-я версия. Скачивайте самую новую версию, возможно когда вы сейчас читаете эту статью уже вышла новая версия — скачиваем её.
Скрипт теста ниже откроет веб-сайт в новом окне Firefox.
I am going over Sweigart’s Automate the Boring Stuff with Python text. I’m using IDLE and already installed the Selenium module and the Firefox browser.
Whenever I tried to run the webdriver function, I get this:
from selenium import webdriver
browser = webdriver.Firefox()
Exception:
Exception ignored in: <bound method Service.__del__ of <selenium.webdriver.firefox.service.Service object at 0x00000249C0DA1080>>
Traceback (most recent call last):
  File "C:PythonPython35libsite-packagesseleniumwebdrivercommonservice.py", line 163, in __del__
    self.stop()
  File "C:PythonPython35libsite-packagesseleniumwebdrivercommonservice.py", line 135, in stop
    if self.process is None:
AttributeError: 'Service' object has no attribute 'process'
Exception ignored in: <bound method Service.__del__ of <selenium.webdriver.firefox.service.Service object at 0x00000249C0E08128>>
Traceback (most recent call last):
  File "C:PythonPython35libsite-packagesseleniumwebdrivercommonservice.py", line 163, in __del__
    self.stop()
  File "C:PythonPython35libsite-packagesseleniumwebdrivercommonservice.py", line 135, in stop
    if self.process is None:
AttributeError: 'Service' object has no attribute 'process'
Traceback (most recent call last):
  File "C:PythonPython35libsite-packagesseleniumwebdrivercommonservice.py", line 64, in start
    stdout=self.log_file, stderr=self.log_file)
  File "C:PythonPython35libsubprocess.py", line 947, in __init__
    restore_signals, start_new_session)
  File "C:PythonPython35libsubprocess.py", line 1224, in _execute_child
    startupinfo)
FileNotFoundError: [WinError 2] The system cannot find the file specified
During handling of the above exception, another exception occurred:
Traceback (most recent call last):
  File "<pyshell#11>", line 1, in <module>
    browser = webdriver.Firefox()
  File "C:PythonPython35libsite-packagesseleniumwebdriverfirefoxwebdriver.py", line 135, in __init__
    self.service.start()
  File "C:PythonPython35libsite-packagesseleniumwebdrivercommonservice.py", line 71, in start
    os.path.basename(self.path), self.start_error_message)
selenium.common.exceptions.WebDriverException: Message: 'geckodriver' executable needs to be in PATH.
I think I need to set the path for geckodriver, but I am not sure how, so how would I do this?
![]()
user
4,4325 gold badges17 silver badges34 bronze badges
asked Oct 23, 2016 at 21:39
![]()
10
selenium.common.exceptions.WebDriverException: Message: ‘geckodriver’ executable needs to be in PATH.
First of all you will need to download latest executable geckodriver from here to run latest Firefox using Selenium
Actually, the Selenium client bindings tries to locate the geckodriver executable from the system PATH. You will need to add the directory containing the executable to the system path.
-
On Unix systems you can do the following to append it to your system’s search path, if you’re using a Bash-compatible shell:
export PATH=$PATH:/path/to/directory/of/executable/downloaded/in/previous/step -
On Windows you will need to update the Path system variable to add the full directory path to the executable geckodriver manually or command line** (don’t forget to restart your system after adding executable geckodriver into system PATH to take effect)**. The principle is the same as on Unix.
Now you can run your code same as you’re doing as below :-
from selenium import webdriver

browser = webdriver.Firefox()
selenium.common.exceptions.WebDriverException: Message: Expected browser binary location, but unable to find binary in default location, no ‘moz:firefoxOptions.binary’ capability provided, and no binary flag set on the command line
The exception clearly states you have installed Firefox some other location while Selenium is trying to find Firefox and launch from the default location, but it couldn’t find it. You need to provide explicitly Firefox installed binary location to launch Firefox as below :-
from selenium import webdriver
from selenium.webdriver.firefox.firefox_binary import FirefoxBinary

binary = FirefoxBinary('path/to/installed firefox binary')
browser = webdriver.Firefox(firefox_binary=binary)
https://github.com/mozilla/geckodriver/releases
For Windows:
Download the file from GitHub, extract it, and paste it in Python file. It worked for me.
https://github.com/mozilla/geckodriver/releases
For me, my path path is:
C:UsersMYUSERNAMEAppDataLocalProgramsPythonPython39
![]()
answered Oct 23, 2016 at 23:16
![]()
Saurabh GaurSaurabh Gaur
23.2k10 gold badges53 silver badges73 bronze badges
16
This solved it for me.
from selenium import webdriver
driver = webdriver.Firefox(executable_path=r'yourpathgeckodriver.exe')
driver.get('http://inventwithpython.com')
answered Feb 8, 2017 at 19:45
![]()
NesaNesa
2,8552 gold badges12 silver badges19 bronze badges
14
This steps solved it for me on Ubuntu and Firefox 50.
-
Download geckodriver
-
Copy geckodriver to folder
/usr/local/bin
You do not need to add:
firefox_capabilities = DesiredCapabilities.FIREFOX
firefox_capabilities['marionette'] = True
firefox_capabilities['binary'] = '/usr/bin/firefox'
browser = webdriver.Firefox(capabilities=firefox_capabilities)
![]()
answered Dec 2, 2016 at 12:09
![]()
6
I see the discussions still talk about the old way of setting up geckodriver by downloading the binary and configuring the path manually.
This can be done automatically using webdriver-manager
pip install webdriver-manager
Now the above code in the question will work simply with the below change,
from selenium import webdriver
from webdriver_manager.firefox import GeckoDriverManager

driver = webdriver.Firefox(executable_path=GeckoDriverManager().install())
![]()
answered Nov 6, 2019 at 10:23
![]()
NavarasuNavarasu
7,8692 gold badges21 silver badges32 bronze badges
7
On macOS with Homebrew already installed, you can simply run the Terminal command:
brew install geckodriver
Because Homebrew already did extend the PATH there isn’t any need to modify any startup scripts.
![]()
answered Sep 3, 2017 at 14:09
![]()
roskakoriroskakori
2,9891 gold badge27 silver badges27 bronze badges
3
The answer by saurabh solves the issue, but it doesn’t explain why Automate the Boring Stuff with Python doesn’t include those steps.
This is caused by the book being based on Selenium 2.x and the Firefox driver for that series does not need the Gecko driver. The Gecko interface to drive the browser was not available when Selenium was being developed.
The latest version in the Selenium 2.x series is 2.53.6 (see e.g. these answers, for an easier view of the versions).
The 2.53.6 version page doesn’t mention Gecko at all. But since version 3.0.2 the documentation explicitly states you need to install the Gecko driver.
If after an upgrade (or install on a new system), your software that worked fine before (or on your old system) doesn’t work anymore and you are in a hurry, pin the Selenium version in your virtualenv by doing
pip install selenium==2.53.6
but of course the long term solution for development is to setup a new virtualenv with the latest version of selenium, install the Gecko driver and test if everything still works as expected.
But the major version bump might introduce other API changes that are not covered by your book, so you might want to stick with the older Selenium, until you are confident enough that you can fix any discrepancies between the Selenium 2 and Selenium 3 API yourself.
![]()
answered Dec 30, 2016 at 8:23
![]()
AnthonAnthon
65.6k29 gold badges179 silver badges236 bronze badges
0
To set up geckodriver for Selenium Python:
It needs to set the geckodriver path with FirefoxDriver as the below code:
self.driver = webdriver.Firefox(executable_path = 'D:Selenium_RiponAlWasimgeckodriver-v0.18.0-win64geckodriver.exe')
Download geckodriver for your suitable OS (from https://github.com/mozilla/geckodriver/releases) → Extract it in a folder of your choice → Set the path correctly as mentioned above.
I’m using Python 3.6.2 and Selenium WebDriver 3.4.3 on Windows 10.
Another way to set up geckodriver:
i) Simply paste the geckodriver.exe under /Python/Scripts/ (in my case the folder was: C:Python36Scripts)
ii) Now write the simple code as below:
self.driver = webdriver.Firefox()
![]()
answered Jul 21, 2017 at 13:32
![]()
Ripon Al WasimRipon Al Wasim
36.4k42 gold badges153 silver badges173 bronze badges
If you are using Anaconda, all you have to do is activate your virtual environment and then install geckodriver using the following command:
conda install -c conda-forge geckodriver
answered Jun 26, 2018 at 10:12
![]()
Rodolfo AlvarezRodolfo Alvarez
9522 gold badges10 silver badges18 bronze badges
1
Ubuntu 18.04+ and the newest release of geckodriver
This should also work for other Unix-like varieties as well.
export GV=v0.30.0
wget "https://github.com/mozilla/geckodriver/releases/download/$GV/geckodriver-$GV-linux64.tar.gz"
tar xvzf geckodriver-$GV-linux64.tar.gz
chmod +x geckodriver
sudo cp geckodriver /usr/local/bin/
For Mac update to:
geckodriver-$GV-macos.tar.gz
![]()
answered Jun 13, 2019 at 16:22
![]()
jmunschjmunsch
21.6k10 gold badges89 silver badges109 bronze badges
The easiest way for Windows!
Download the latest version of geckodriver from here. Add the geckodriver.exe file to the Python directory (or any other directory which already in PATH). This should solve the problem (it was tested on Windows 10).
![]()
answered Oct 22, 2017 at 23:16
![]()
Jalles10Jalles10
4194 silver badges8 bronze badges
1
geckodriver is not installed by default.
geckodriver
Output:
Command 'geckodriver' not found, but it can be installed with:

sudo apt install firefox-geckodriver
The following command not only installs it, but it also puts it in the executable PATH.
sudo apt install firefox-geckodriver
The problem is solved with only a single step. I had exactly the same error as you and it was gone as soon as I installed it. Go ahead and give it a try.
which geckodriver
Output:
/usr/bin/geckodriver
geckodriver
Output:
1337    geckodriver    INFO    Listening on 127.0.0.1:4444
^C
![]()
answered Sep 3, 2020 at 13:55
3
For versions Ubuntu 16.04 (Xenial Xerus) and later you can do:
For Firefox:
sudo apt-get install firefox-geckodriver
For Chrome:
sudo apt-get install chromium-chromedriver
![]()
answered Aug 9, 2021 at 7:18
![]()
MaheepMaheep
6999 silver badges6 bronze badges
1
Steps for Mac
The simple solution is to download GeckoDriver and add it to your system PATH. You can use either of the two approaches:
Short Method
-
Download and unzip Geckodriver.
-
Mention the path while initiating the driver:
driver = webdriver.Firefox(executable_path='/your/path/to/geckodriver')
Long Method
-
Download and unzip Geckodriver.
-
Open
.bash_profile. If you haven’t created it yet, you can do so using the command:touch ~/.bash_profile. Then open it using:open ~/.bash_profile -
Considering GeckoDriver file is present in your Downloads folder, you can add the following line(s) to the
.bash_profilefile:PATH="/Users/<your-name>/Downloads/geckodriver:$PATH" export PATH
By this you are appending the path to GeckoDriver to your System PATH. This tells the system where GeckoDriver is located when executing your Selenium scripts.
- Save the
.bash_profileand force it to execute. This loads the values immediately without having to reboot. To do this you can run the following command:
source ~/.bash_profile
- That’s it. You are done! You can run the Python script now.
![]()
answered Feb 8, 2017 at 20:33
![]()
1
Some additional input/clarification:
The following suffices as a resolution for Windows 7, Python 3.6, and Selenium 3.11:
dsalaj’s note for another answer for Unix is applicable to Windows as well; tinkering with the PATH environment variable at the Windows level and restart of the Windows system can be avoided.
(1) Download geckodriver (as described in this thread earlier) and place the (unzipped) geckdriver.exe at X:Folderofyourchoice
(2) Python code sample:
import os;
os.environ["PATH"] += os.pathsep + r'X:Folderofyourchoice';

from selenium import webdriver;
browser = webdriver.Firefox();
browser.get('http://localhost:8000')
assert 'Django' in browser.title
Notes:
(1) It may take about 10 seconds for the above code to open up the Firefox browser for the specified URL.
(2) The Python console would show the following error if there’s no server already running at the specified URL or serving a page with the title containing the string ‘Django’:
selenium.common.exceptions.WebDriverException: Message: Reached error page: about:neterror?e=connectionFailure&u=http%3A//localhost%3A8000/&c=UTF-8&f=regular&d=Firefox%20can%E2%80%9
![]()
answered Apr 16, 2018 at 7:14
![]()
0
I’ve actually discovered you can use the latest geckodriver without putting it in the system path. Currently I’m using
https://github.com/mozilla/geckodriver/releases/download/v0.12.0/geckodriver-v0.12.0-win64.zip
Firefox 50.1.0
Python 3.5.2
Selenium 3.0.2
Windows 10
I’m running a VirtualEnv (which I manage using PyCharm, and I assume it uses Pip to install everything).
In the following code I can use a specific path for the geckodriver using the executable_path parameter (I discovered this by having a look in
Libsite-packagesseleniumwebdriverfirefoxwebdriver.py ). Note I have a suspicion that the order of parameter arguments when calling the webdriver is important, which is why the executable_path is last in my code (the second to last line off to the far right).
You may also notice I use a custom Firefox profile to get around the sec_error_unknown_issuer problem that you will run into if the site you’re testing has an untrusted certificate. See How to disable Firefox’s untrusted connection warning using Selenium?
After investigation it was found that the Marionette driver is incomplete and still in progress, and no amount of setting various capabilities or profile options for dismissing or setting certificates was going to work. So it was just easier to use a custom profile.
Anyway, here’s the code on how I got the geckodriver to work without being in the path:
from selenium import webdriver
from selenium.webdriver.common.desired_capabilities import DesiredCapabilities

firefox_capabilities = DesiredCapabilities.FIREFOX
firefox_capabilities['marionette'] = True

#you probably don't need the next 3 lines they don't seem to work anyway
firefox_capabilities['handleAlerts'] = True
firefox_capabilities['acceptSslCerts'] = True
firefox_capabilities['acceptInsecureCerts'] = True

# In the next line I'm using a specific Firefox profile because
# I wanted to get around the sec_error_unknown_issuer problems with the new Firefox and Marionette driver
# I create a Firefox profile where I had already made an exception for the site I'm testing
# see https://support.mozilla.org/en-US/kb/profile-manager-create-and-remove-firefox-profiles#w_starting-the-profile-manager

ffProfilePath = 'D:WorkPyTestFrameworkFirefoxSeleniumProfile'
profile = webdriver.FirefoxProfile(profile_directory=ffProfilePath)
geckoPath = 'D:WorkPyTestFrameworkgeckodriver.exe'
browser = webdriver.Firefox(firefox_profile=profile, capabilities=firefox_capabilities, executable_path=geckoPath)
browser.get('http://stackoverflow.com')
![]()
answered Jan 6, 2017 at 14:26
![]()
RoochiedoorRoochiedoor
83511 silver badges19 bronze badges
1
A new way to avert the error is using Conda environments.
Use conda install -c conda-forge geckodriver and you do not have to add anything to the path or edit the code!
![]()
answered Oct 6, 2021 at 6:52
![]()
1
You can solve this issue by using a simple command if you are on Linux
-
First, download (https://github.com/mozilla/geckodriver/releases) and extract the ZIP file
-
Open the extracted folder
-
Open the terminal from the folder (where the
geckodriverfile is located after extraction)
-
Now run this simple command on your terminal to copy the geckodriver into the correct folder:
sudo cp geckodriver /usr/local/bin
![]()
answered Jul 22, 2020 at 16:09
![]()
It’s really rather sad that none of the books published on Selenium/Python and most of the comments on this issue via Google do not clearly explain the pathing logic to set this up on Mac (everything is Windows!). The YouTube videos all pickup at the «after» you’ve got the pathing setup (in my mind, the cheap way out!). So, for you wonderful Mac users, use the following to edit your Bash path files:
touch ~/.bash_profile; open ~/.bash_profile*
Then add a path something like this….
# Setting PATH for geckodriver
PATH=“/usr/bin/geckodriver:${PATH}”
export PATH

# Setting PATH for Selenium Firefox
PATH=“~/Users/yourNamePATH/VEnvPythonInterpreter/lib/python2.7/site-packages/selenium/webdriver/firefox/:${PATH}”
export PATH

# Setting PATH for executable on Firefox driver
PATH=“/Users/yournamePATH/VEnvPythonInterpreter/lib/python2.7/site-packages/selenium/webdriver/common/service.py:${PATH}”
export PATH*
This worked for me.
![]()
answered Dec 19, 2016 at 21:38
![]()
0
Consider installing a containerized Firefox:
docker pull selenium/standalone-firefox
docker run --rm -d -p 5555:4444 --shm-size=2g selenium/standalone-firefox
Connect using webdriver.Remote:
driver = webdriver.Remote('http://localhost:5555/wd/hub', DesiredCapabilities.FIREFOX)
driver.set_window_size(1280, 1024)
driver.get('https://toolbox.googleapps.com/apps/browserinfo/')
driver.save_screenshot('info.png')
![]()
answered Jan 31, 2020 at 19:18
![]()
Max MalyshMax Malysh
28.2k19 gold badges108 silver badges114 bronze badges
I’m using Windows 10 and this worked for me:
- Download geckodriver from here. Download the right version for the computer you are using.
- Unzip the file you just downloaded and cut/copy the «.exe» file it contains
- Navigate to C:{your python root folder}. Mine was C:Python27. Paste the geckodriver.exe file in this folder.
- Restart your development environment.
- Try running the code again. It should work now.
![]()
answered Jul 14, 2017 at 12:33
![]()
Lone RoninLone Ronin
2,25017 silver badges28 bronze badges
0
from webdriverdownloader import GeckoDriverDownloader # vs ChromeDriverDownloader vs OperaChromiumDriverDownloader
gdd = GeckoDriverDownloader()
gdd.download_and_install()
#gdd.download_and_install("v0.19.0")
This will get you the path to your gekodriver.exe on Windows.
from selenium import webdriver
driver = webdriver.Firefox(executable_path=r'C:\Users\username\bin\geckodriver.exe')
driver.get('https://www.amazon.com/')
![]()
answered Oct 9, 2019 at 14:29
![]()
InLawInLaw
2,4562 gold badges21 silver badges33 bronze badges
For MacBook users:
Step 1:
Open this link and copy that Homebrew path, paste it in terminal and install it.
Step 2:
brew install geckodriver
Step 3:
pip install webdriver-manager
![]()
answered Oct 2, 2021 at 8:09
![]()
Selenium answers this question in their DESCRIPTION.rst file:
Drivers
=======Selenium requires a driver to interface with the chosen browser. Firefox,
for example, requiresgeckodriver <https://github.com/mozilla/geckodriver/releases>_, which needs to be installed before the below examples can be run. Make sure it’s in yourPATH, e. g., place it in/usr/binor/usr/local/bin.
Failure to observe this step will give you an error `selenium.common.exceptions.WebDriverException: Message: ‘geckodriver’ executable needs to be in PATH.
Basically just download the geckodriver, unpack it and move the executable to your /usr/bin folder.
![]()
answered Apr 19, 2017 at 15:21
![]()
Peter GrahamPeter Graham
2,3792 gold badges22 silver badges29 bronze badges
1
For Windows users
Use the original code as it’s:
from selenium import webdriver
browser = webdriver.Firefox()
driver.get("https://www.google.com")
Then download the driver from: mozilla/geckodriver
Place it in a fixed path (permanently)… As an example, I put it in:
C:Python35
Then go to the environment variables of the system. In the grid of «System variables» look for the Path variable and add:
;C:Python35geckodriver
geckodriver, not geckodriver.exe.
![]()
answered Mar 19, 2019 at 18:02
![]()
MinionsMinions
4,7883 gold badges46 silver badges88 bronze badges
1
If you use a virtual environment and Windows 10 (maybe it’s the same for other systems), you just need to put geckodriver.exe into the following folder in your virtual environment directory:
…my_virtual_env_directoryScriptsgeckodriver.exe
![]()
answered Dec 6, 2019 at 7:15
![]()
burneyburney
84814 silver badges16 bronze badges
1
On macOS v10.12.1 (Sierra) and Python 2.7.10, this works for me:
def download(url):
    firefox_capabilities = DesiredCapabilities.FIREFOX
    firefox_capabilities['marionette'] = True
    browser = webdriver.Firefox(capabilities=firefox_capabilities,
                                executable_path=r'/Users/Do01/Documents/crawler-env/geckodriver')
    browser.get(url)
    return browser.page_source
![]()
answered Feb 15, 2017 at 21:59
![]()
Hamid ZandiHamid Zandi
2,58422 silver badges31 bronze badges
On Raspberry Pi I had to create it from the ARM driver and set the geckodriver and log path in file webdriver.py:
sudo nano /usr/local/lib/python2.7/dist-packages/selenium/webdriver/firefox/webdriver.py
def __init__(self, firefox_profile=None, firefox_binary=None,
             timeout=30, capabilities=None, proxy=None,
             executable_path="/PATH/gecko/geckodriver",
             firefox_options=None,
             log_path="/PATH/geckodriver.log"):
![]()
answered Feb 27, 2017 at 20:10
![]()
2
For me it was enough just to install geckodriver in the same environment:
brew install geckodriver
And the code was not changed:
from selenium import webdriver
browser = webdriver.Firefox()
![]()
answered Apr 21, 2020 at 0:36
![]()
Visit Gecko Driver and get the URL for the Gecko driver from the Downloads section.
Clone this repository: https://github.com/jackton1/script_install.git
cd script_install
Run
./installer --gecko-driver https://github.com/mozilla/geckodriver/releases/download/v0.18.0/geckodriver-v0.25.0-linux64.tar.gz
![]()
answered Aug 17, 2017 at 15:56
![]()
jackotonyejackotonye
3,48222 silver badges30 bronze badges
I am using Windows 10 and Anaconda 2. I tried setting the system path variable, but it didn’t work out. Then I simply added geckodriver.exe file to the Anaconda 2/Scripts folder and everything works great now.
For me the path was:
C:UsersBhavyaAnaconda2Scripts
![]()
answered Dec 13, 2017 at 1:48
![]()
I am going over Sweigart’s Automate the Boring Stuff with Python text. I’m using IDLE and already installed the Selenium module and the Firefox browser.
Whenever I tried to run the webdriver function, I get this:
from selenium import webdriver
browser = webdriver.Firefox()
Exception:
Exception ignored in: <bound method Service.__del__ of <selenium.webdriver.firefox.service.Service object at 0x00000249C0DA1080>>
Traceback (most recent call last):
  File "C:PythonPython35libsite-packagesseleniumwebdrivercommonservice.py", line 163, in __del__
    self.stop()
  File "C:PythonPython35libsite-packagesseleniumwebdrivercommonservice.py", line 135, in stop
    if self.process is None:
AttributeError: 'Service' object has no attribute 'process'
Exception ignored in: <bound method Service.__del__ of <selenium.webdriver.firefox.service.Service object at 0x00000249C0E08128>>
Traceback (most recent call last):
  File "C:PythonPython35libsite-packagesseleniumwebdrivercommonservice.py", line 163, in __del__
    self.stop()
  File "C:PythonPython35libsite-packagesseleniumwebdrivercommonservice.py", line 135, in stop
    if self.process is None:
AttributeError: 'Service' object has no attribute 'process'
Traceback (most recent call last):
  File "C:PythonPython35libsite-packagesseleniumwebdrivercommonservice.py", line 64, in start
    stdout=self.log_file, stderr=self.log_file)
  File "C:PythonPython35libsubprocess.py", line 947, in __init__
    restore_signals, start_new_session)
  File "C:PythonPython35libsubprocess.py", line 1224, in _execute_child
    startupinfo)
FileNotFoundError: [WinError 2] The system cannot find the file specified
During handling of the above exception, another exception occurred:
Traceback (most recent call last):
  File "<pyshell#11>", line 1, in <module>
    browser = webdriver.Firefox()
  File "C:PythonPython35libsite-packagesseleniumwebdriverfirefoxwebdriver.py", line 135, in __init__
    self.service.start()
  File "C:PythonPython35libsite-packagesseleniumwebdrivercommonservice.py", line 71, in start
    os.path.basename(self.path), self.start_error_message)
selenium.common.exceptions.WebDriverException: Message: 'geckodriver' executable needs to be in PATH.
I think I need to set the path for geckodriver, but I am not sure how, so how would I do this?
![]()
user
4,4325 gold badges17 silver badges34 bronze badges
asked Oct 23, 2016 at 21:39
![]()
10
selenium.common.exceptions.WebDriverException: Message: ‘geckodriver’ executable needs to be in PATH.
First of all you will need to download latest executable geckodriver from here to run latest Firefox using Selenium
Actually, the Selenium client bindings tries to locate the geckodriver executable from the system PATH. You will need to add the directory containing the executable to the system path.
-
On Unix systems you can do the following to append it to your system’s search path, if you’re using a Bash-compatible shell:
export PATH=$PATH:/path/to/directory/of/executable/downloaded/in/previous/step -
On Windows you will need to update the Path system variable to add the full directory path to the executable geckodriver manually or command line** (don’t forget to restart your system after adding executable geckodriver into system PATH to take effect)**. The principle is the same as on Unix.
Now you can run your code same as you’re doing as below :-
from selenium import webdriver

browser = webdriver.Firefox()
selenium.common.exceptions.WebDriverException: Message: Expected browser binary location, but unable to find binary in default location, no ‘moz:firefoxOptions.binary’ capability provided, and no binary flag set on the command line
The exception clearly states you have installed Firefox some other location while Selenium is trying to find Firefox and launch from the default location, but it couldn’t find it. You need to provide explicitly Firefox installed binary location to launch Firefox as below :-
from selenium import webdriver
from selenium.webdriver.firefox.firefox_binary import FirefoxBinary

binary = FirefoxBinary('path/to/installed firefox binary')
browser = webdriver.Firefox(firefox_binary=binary)
https://github.com/mozilla/geckodriver/releases
For Windows:
Download the file from GitHub, extract it, and paste it in Python file. It worked for me.
https://github.com/mozilla/geckodriver/releases
For me, my path path is:
C:UsersMYUSERNAMEAppDataLocalProgramsPythonPython39
![]()
answered Oct 23, 2016 at 23:16
![]()
Saurabh GaurSaurabh Gaur
23.2k10 gold badges53 silver badges73 bronze badges
16
This solved it for me.
from selenium import webdriver
driver = webdriver.Firefox(executable_path=r'yourpathgeckodriver.exe')
driver.get('http://inventwithpython.com')
answered Feb 8, 2017 at 19:45
![]()
NesaNesa
2,8552 gold badges12 silver badges19 bronze badges
14
This steps solved it for me on Ubuntu and Firefox 50.
-
Download geckodriver
-
Copy geckodriver to folder
/usr/local/bin
You do not need to add:
firefox_capabilities = DesiredCapabilities.FIREFOX
firefox_capabilities['marionette'] = True
firefox_capabilities['binary'] = '/usr/bin/firefox'
browser = webdriver.Firefox(capabilities=firefox_capabilities)
![]()
answered Dec 2, 2016 at 12:09
![]()
6
I see the discussions still talk about the old way of setting up geckodriver by downloading the binary and configuring the path manually.
This can be done automatically using webdriver-manager
pip install webdriver-manager
Now the above code in the question will work simply with the below change,
from selenium import webdriver
from webdriver_manager.firefox import GeckoDriverManager

driver = webdriver.Firefox(executable_path=GeckoDriverManager().install())
![]()
answered Nov 6, 2019 at 10:23
![]()
NavarasuNavarasu
7,8692 gold badges21 silver badges32 bronze badges
7
On macOS with Homebrew already installed, you can simply run the Terminal command:
brew install geckodriver
Because Homebrew already did extend the PATH there isn’t any need to modify any startup scripts.
![]()
answered Sep 3, 2017 at 14:09
![]()
roskakoriroskakori
2,9891 gold badge27 silver badges27 bronze badges
3
The answer by saurabh solves the issue, but it doesn’t explain why Automate the Boring Stuff with Python doesn’t include those steps.
This is caused by the book being based on Selenium 2.x and the Firefox driver for that series does not need the Gecko driver. The Gecko interface to drive the browser was not available when Selenium was being developed.
The latest version in the Selenium 2.x series is 2.53.6 (see e.g. these answers, for an easier view of the versions).
The 2.53.6 version page doesn’t mention Gecko at all. But since version 3.0.2 the documentation explicitly states you need to install the Gecko driver.
If after an upgrade (or install on a new system), your software that worked fine before (or on your old system) doesn’t work anymore and you are in a hurry, pin the Selenium version in your virtualenv by doing
pip install selenium==2.53.6
but of course the long term solution for development is to setup a new virtualenv with the latest version of selenium, install the Gecko driver and test if everything still works as expected.
But the major version bump might introduce other API changes that are not covered by your book, so you might want to stick with the older Selenium, until you are confident enough that you can fix any discrepancies between the Selenium 2 and Selenium 3 API yourself.
![]()
answered Dec 30, 2016 at 8:23
![]()
AnthonAnthon
65.6k29 gold badges179 silver badges236 bronze badges
0
To set up geckodriver for Selenium Python:
It needs to set the geckodriver path with FirefoxDriver as the below code:
self.driver = webdriver.Firefox(executable_path = 'D:Selenium_RiponAlWasimgeckodriver-v0.18.0-win64geckodriver.exe')
Download geckodriver for your suitable OS (from https://github.com/mozilla/geckodriver/releases) → Extract it in a folder of your choice → Set the path correctly as mentioned above.
I’m using Python 3.6.2 and Selenium WebDriver 3.4.3 on Windows 10.
Another way to set up geckodriver:
i) Simply paste the geckodriver.exe under /Python/Scripts/ (in my case the folder was: C:Python36Scripts)
ii) Now write the simple code as below:
self.driver = webdriver.Firefox()
![]()
answered Jul 21, 2017 at 13:32
![]()
Ripon Al WasimRipon Al Wasim
36.4k42 gold badges153 silver badges173 bronze badges
If you are using Anaconda, all you have to do is activate your virtual environment and then install geckodriver using the following command:
conda install -c conda-forge geckodriver
answered Jun 26, 2018 at 10:12
![]()
Rodolfo AlvarezRodolfo Alvarez
9522 gold badges10 silver badges18 bronze badges
1
Ubuntu 18.04+ and the newest release of geckodriver
This should also work for other Unix-like varieties as well.
export GV=v0.30.0
wget "https://github.com/mozilla/geckodriver/releases/download/$GV/geckodriver-$GV-linux64.tar.gz"
tar xvzf geckodriver-$GV-linux64.tar.gz
chmod +x geckodriver
sudo cp geckodriver /usr/local/bin/
For Mac update to:
geckodriver-$GV-macos.tar.gz
![]()
answered Jun 13, 2019 at 16:22
![]()
jmunschjmunsch
21.6k10 gold badges89 silver badges109 bronze badges
The easiest way for Windows!
Download the latest version of geckodriver from here. Add the geckodriver.exe file to the Python directory (or any other directory which already in PATH). This should solve the problem (it was tested on Windows 10).
![]()
answered Oct 22, 2017 at 23:16
![]()
Jalles10Jalles10
4194 silver badges8 bronze badges
1
geckodriver is not installed by default.
geckodriver
Output:
Command 'geckodriver' not found, but it can be installed with:

sudo apt install firefox-geckodriver
The following command not only installs it, but it also puts it in the executable PATH.
sudo apt install firefox-geckodriver
The problem is solved with only a single step. I had exactly the same error as you and it was gone as soon as I installed it. Go ahead and give it a try.
which geckodriver
Output:
/usr/bin/geckodriver
geckodriver
Output:
1337    geckodriver    INFO    Listening on 127.0.0.1:4444
^C
![]()
answered Sep 3, 2020 at 13:55
3
For versions Ubuntu 16.04 (Xenial Xerus) and later you can do:
For Firefox:
sudo apt-get install firefox-geckodriver
For Chrome:
sudo apt-get install chromium-chromedriver
![]()
answered Aug 9, 2021 at 7:18
![]()
MaheepMaheep
6999 silver badges6 bronze badges
1
Steps for Mac
The simple solution is to download GeckoDriver and add it to your system PATH. You can use either of the two approaches:
Short Method
-
Download and unzip Geckodriver.
-
Mention the path while initiating the driver:
driver = webdriver.Firefox(executable_path='/your/path/to/geckodriver')
Long Method
-
Download and unzip Geckodriver.
-
Open
.bash_profile. If you haven’t created it yet, you can do so using the command:touch ~/.bash_profile. Then open it using:open ~/.bash_profile -
Considering GeckoDriver file is present in your Downloads folder, you can add the following line(s) to the
.bash_profilefile:PATH="/Users/<your-name>/Downloads/geckodriver:$PATH" export PATH
By this you are appending the path to GeckoDriver to your System PATH. This tells the system where GeckoDriver is located when executing your Selenium scripts.
- Save the
.bash_profileand force it to execute. This loads the values immediately without having to reboot. To do this you can run the following command:
source ~/.bash_profile
- That’s it. You are done! You can run the Python script now.
![]()
answered Feb 8, 2017 at 20:33
![]()
1
Some additional input/clarification:
The following suffices as a resolution for Windows 7, Python 3.6, and Selenium 3.11:
dsalaj’s note for another answer for Unix is applicable to Windows as well; tinkering with the PATH environment variable at the Windows level and restart of the Windows system can be avoided.
(1) Download geckodriver (as described in this thread earlier) and place the (unzipped) geckdriver.exe at X:Folderofyourchoice
(2) Python code sample:
import os;
os.environ["PATH"] += os.pathsep + r'X:Folderofyourchoice';

from selenium import webdriver;
browser = webdriver.Firefox();
browser.get('http://localhost:8000')
assert 'Django' in browser.title
Notes:
(1) It may take about 10 seconds for the above code to open up the Firefox browser for the specified URL.
(2) The Python console would show the following error if there’s no server already running at the specified URL or serving a page with the title containing the string ‘Django’:
selenium.common.exceptions.WebDriverException: Message: Reached error page: about:neterror?e=connectionFailure&u=http%3A//localhost%3A8000/&c=UTF-8&f=regular&d=Firefox%20can%E2%80%9
![]()
answered Apr 16, 2018 at 7:14
![]()
0
I’ve actually discovered you can use the latest geckodriver without putting it in the system path. Currently I’m using
https://github.com/mozilla/geckodriver/releases/download/v0.12.0/geckodriver-v0.12.0-win64.zip
Firefox 50.1.0
Python 3.5.2
Selenium 3.0.2
Windows 10
I’m running a VirtualEnv (which I manage using PyCharm, and I assume it uses Pip to install everything).
In the following code I can use a specific path for the geckodriver using the executable_path parameter (I discovered this by having a look in
Libsite-packagesseleniumwebdriverfirefoxwebdriver.py ). Note I have a suspicion that the order of parameter arguments when calling the webdriver is important, which is why the executable_path is last in my code (the second to last line off to the far right).
You may also notice I use a custom Firefox profile to get around the sec_error_unknown_issuer problem that you will run into if the site you’re testing has an untrusted certificate. See How to disable Firefox’s untrusted connection warning using Selenium?
After investigation it was found that the Marionette driver is incomplete and still in progress, and no amount of setting various capabilities or profile options for dismissing or setting certificates was going to work. So it was just easier to use a custom profile.
Anyway, here’s the code on how I got the geckodriver to work without being in the path:
from selenium import webdriver
from selenium.webdriver.common.desired_capabilities import DesiredCapabilities

firefox_capabilities = DesiredCapabilities.FIREFOX
firefox_capabilities['marionette'] = True

#you probably don't need the next 3 lines they don't seem to work anyway
firefox_capabilities['handleAlerts'] = True
firefox_capabilities['acceptSslCerts'] = True
firefox_capabilities['acceptInsecureCerts'] = True

# In the next line I'm using a specific Firefox profile because
# I wanted to get around the sec_error_unknown_issuer problems with the new Firefox and Marionette driver
# I create a Firefox profile where I had already made an exception for the site I'm testing
# see https://support.mozilla.org/en-US/kb/profile-manager-create-and-remove-firefox-profiles#w_starting-the-profile-manager

ffProfilePath = 'D:WorkPyTestFrameworkFirefoxSeleniumProfile'
profile = webdriver.FirefoxProfile(profile_directory=ffProfilePath)
geckoPath = 'D:WorkPyTestFrameworkgeckodriver.exe'
browser = webdriver.Firefox(firefox_profile=profile, capabilities=firefox_capabilities, executable_path=geckoPath)
browser.get('http://stackoverflow.com')
![]()
answered Jan 6, 2017 at 14:26
![]()
RoochiedoorRoochiedoor
83511 silver badges19 bronze badges
1
A new way to avert the error is using Conda environments.
Use conda install -c conda-forge geckodriver and you do not have to add anything to the path or edit the code!
![]()
answered Oct 6, 2021 at 6:52
![]()
1
You can solve this issue by using a simple command if you are on Linux
-
First, download (https://github.com/mozilla/geckodriver/releases) and extract the ZIP file
-
Open the extracted folder
-
Open the terminal from the folder (where the
geckodriverfile is located after extraction) -
Now run this simple command on your terminal to copy the geckodriver into the correct folder:
sudo cp geckodriver /usr/local/bin
![]()
answered Jul 22, 2020 at 16:09
![]()
It’s really rather sad that none of the books published on Selenium/Python and most of the comments on this issue via Google do not clearly explain the pathing logic to set this up on Mac (everything is Windows!). The YouTube videos all pickup at the «after» you’ve got the pathing setup (in my mind, the cheap way out!). So, for you wonderful Mac users, use the following to edit your Bash path files:
touch ~/.bash_profile; open ~/.bash_profile*
Then add a path something like this….
# Setting PATH for geckodriver
PATH=“/usr/bin/geckodriver:${PATH}”
export PATH

# Setting PATH for Selenium Firefox
PATH=“~/Users/yourNamePATH/VEnvPythonInterpreter/lib/python2.7/site-packages/selenium/webdriver/firefox/:${PATH}”
export PATH

# Setting PATH for executable on Firefox driver
PATH=“/Users/yournamePATH/VEnvPythonInterpreter/lib/python2.7/site-packages/selenium/webdriver/common/service.py:${PATH}”
export PATH*
This worked for me.
![]()
answered Dec 19, 2016 at 21:38
![]()
0
Consider installing a containerized Firefox:
docker pull selenium/standalone-firefox
docker run --rm -d -p 5555:4444 --shm-size=2g selenium/standalone-firefox
Connect using webdriver.Remote:
driver = webdriver.Remote('http://localhost:5555/wd/hub', DesiredCapabilities.FIREFOX)
driver.set_window_size(1280, 1024)
driver.get('https://toolbox.googleapps.com/apps/browserinfo/')
driver.save_screenshot('info.png')
![]()
answered Jan 31, 2020 at 19:18
![]()
Max MalyshMax Malysh
28.2k19 gold badges108 silver badges114 bronze badges
I’m using Windows 10 and this worked for me:
- Download geckodriver from here. Download the right version for the computer you are using.
- Unzip the file you just downloaded and cut/copy the «.exe» file it contains
- Navigate to C:{your python root folder}. Mine was C:Python27. Paste the geckodriver.exe file in this folder.
- Restart your development environment.
- Try running the code again. It should work now.
![]()
answered Jul 14, 2017 at 12:33
![]()
Lone RoninLone Ronin
2,25017 silver badges28 bronze badges
0
from webdriverdownloader import GeckoDriverDownloader # vs ChromeDriverDownloader vs OperaChromiumDriverDownloader
gdd = GeckoDriverDownloader()
gdd.download_and_install()
#gdd.download_and_install("v0.19.0")
This will get you the path to your gekodriver.exe on Windows.
from selenium import webdriver
driver = webdriver.Firefox(executable_path=r'C:\Users\username\bin\geckodriver.exe')
driver.get('https://www.amazon.com/')
![]()
answered Oct 9, 2019 at 14:29
![]()
InLawInLaw
2,4562 gold badges21 silver badges33 bronze badges
For MacBook users:
Step 1:
Open this link and copy that Homebrew path, paste it in terminal and install it.
Step 2:
brew install geckodriver
Step 3:
pip install webdriver-manager
![]()
answered Oct 2, 2021 at 8:09
![]()
Selenium answers this question in their DESCRIPTION.rst file:
Drivers
=======Selenium requires a driver to interface with the chosen browser. Firefox,
for example, requiresgeckodriver <https://github.com/mozilla/geckodriver/releases>_, which needs to be installed before the below examples can be run. Make sure it’s in yourPATH, e. g., place it in/usr/binor/usr/local/bin.
Failure to observe this step will give you an error `selenium.common.exceptions.WebDriverException: Message: ‘geckodriver’ executable needs to be in PATH.
Basically just download the geckodriver, unpack it and move the executable to your /usr/bin folder.
![]()
answered Apr 19, 2017 at 15:21
![]()
Peter GrahamPeter Graham
2,3792 gold badges22 silver badges29 bronze badges
1
For Windows users
Use the original code as it’s:
from selenium import webdriver
browser = webdriver.Firefox()
driver.get("https://www.google.com")
Then download the driver from: mozilla/geckodriver
Place it in a fixed path (permanently)… As an example, I put it in:
C:Python35
Then go to the environment variables of the system. In the grid of «System variables» look for the Path variable and add:
;C:Python35geckodriver
geckodriver, not geckodriver.exe.
![]()
answered Mar 19, 2019 at 18:02
![]()
MinionsMinions
4,7883 gold badges46 silver badges88 bronze badges
1
If you use a virtual environment and Windows 10 (maybe it’s the same for other systems), you just need to put geckodriver.exe into the following folder in your virtual environment directory:
…my_virtual_env_directoryScriptsgeckodriver.exe
![]()
answered Dec 6, 2019 at 7:15
![]()
burneyburney
84814 silver badges16 bronze badges
1
On macOS v10.12.1 (Sierra) and Python 2.7.10, this works for me:
def download(url):
    firefox_capabilities = DesiredCapabilities.FIREFOX
    firefox_capabilities['marionette'] = True
    browser = webdriver.Firefox(capabilities=firefox_capabilities,
                                executable_path=r'/Users/Do01/Documents/crawler-env/geckodriver')
    browser.get(url)
    return browser.page_source
![]()
answered Feb 15, 2017 at 21:59
![]()
Hamid ZandiHamid Zandi
2,58422 silver badges31 bronze badges
On Raspberry Pi I had to create it from the ARM driver and set the geckodriver and log path in file webdriver.py:
sudo nano /usr/local/lib/python2.7/dist-packages/selenium/webdriver/firefox/webdriver.py
def __init__(self, firefox_profile=None, firefox_binary=None,
             timeout=30, capabilities=None, proxy=None,
             executable_path="/PATH/gecko/geckodriver",
             firefox_options=None,
             log_path="/PATH/geckodriver.log"):
![]()
answered Feb 27, 2017 at 20:10
![]()
2
For me it was enough just to install geckodriver in the same environment:
brew install geckodriver
And the code was not changed:
from selenium import webdriver
browser = webdriver.Firefox()
![]()
answered Apr 21, 2020 at 0:36
![]()
Visit Gecko Driver and get the URL for the Gecko driver from the Downloads section.
Clone this repository: https://github.com/jackton1/script_install.git
cd script_install
Run
./installer --gecko-driver https://github.com/mozilla/geckodriver/releases/download/v0.18.0/geckodriver-v0.25.0-linux64.tar.gz
![]()
answered Aug 17, 2017 at 15:56
![]()
jackotonyejackotonye
3,48222 silver badges30 bronze badges
I am using Windows 10 and Anaconda 2. I tried setting the system path variable, but it didn’t work out. Then I simply added geckodriver.exe file to the Anaconda 2/Scripts folder and everything works great now.
For me the path was:
C:UsersBhavyaAnaconda2Scripts
![]()
answered Dec 13, 2017 at 1:48
![]()
I am trying to intall webdriver and in order to open firefox i need the geckodriver to be installed and in the correct path.
Firstly the download link to install geckodriver only allows you to install a file that is not an executable. So is there a way to make it an executable?
secondly I have tried to change my path variables in commmand prompt, but of course it didn’t work. I then changed the user variable not the system path variables because there is not Path in system. there is a Path in user variables so I edited that to change where the file is located.
I have extracted the geckodriver rar file and have received a file with no extension. I don’t know how you can have a file with no extension, but they did it. The icon is like a blank sheet of paper with a fold at the top left.
If anyone has a solution for this including maybe another package that is like webdriver and will allow me to open a browser and then refresh the page after a given amount of time. this is all I want to do.
asked Mar 1, 2017 at 5:46
![]()
ControContro
1591 gold badge1 silver badge10 bronze badges
4
First download GeckoDriver for Windows, extract it and copy the path to the folder.
- Right-click on My Computer or This PC.
- Select Properties.
- Select advanced system settings.
- Click on the Environment Variables button.
- From System Variables select PATH.
- Click on Edit button.
- Click New button.
- Paste the path of GeckoDriver file.
answered Jul 7, 2019 at 22:51
![]()
You can put it anywhere.
1. put it into your project folder.
2. create a folder and put driver into it. Set the driver path up in your code.
  from selenium import webdriver
  path="C:\Programs\Python36\BrowersDriver\chromedriver.exe"
  driver=webdriver.Chrome(path)
  driver.get("http://www.yahoo.com")
  driver.close()
  driver.quit()
http://kennethhutw.blogspot.sg/2017/03/how-to-install-geckodriver-on-windows.html
answered Mar 3, 2017 at 6:39
![]()
Hu KennethHu Kenneth
2412 silver badges12 bronze badges
1
For one make sure you are downloading the one for your OS. Windows is at the bottom of the list it will say win32. Download that file or 64 doesn’t matter.
After that you are going to want to extract the file. If you get an error that says there is no file in the Winrar file, this may be because in your Winrar settings you have Winrar set to not extract any files that have the extension .exe. If you go to Winrar options then settings then security you can delete this it will say *.exe, and after you delete that you can extract the file. After that is done, search how to update the path so that gecko driver can be accessed. Then you will most likely need to restart.
![]()
halfer
19.7k17 gold badges95 silver badges183 bronze badges
answered Mar 1, 2017 at 21:53
![]()
ControContro
1591 gold badge1 silver badge10 bronze badges
I am working with python 3.7.7 under Windows 10 Build 19041.329. After pip-installing selenium into a venv I got an error that demanded that the selenium executeable should be in PATH. I solved this by installing the C++ redistributeables for Windows as recommended in the geckodriver git
https://github.com/mozilla/geckodriver/releases/tag/v0.26.0
and just copying the .exe file into my venv folder.
answered Jun 19, 2020 at 15:39
![]()
DanielDaniel
3855 silver badges14 bronze badges
I’ve wrestled with the same question for last hour.
-
Make sure you have the latest version of Firefox installed. I had Firefox 36, which, when checking for updates, said it was the latest version. Mozilla’s website had version 54 as latest. So download Firefox from website, and reinstall.
-
Make sure you have the latest gecko driver downloaded.
-
If you’re getting the path error — use the code below to figure out which path python is looking at. Add the geckodriver.exe to the working directory.
import os
os.getcwd()
answered Oct 25, 2017 at 8:05
![]()
FlyingZebra1FlyingZebra1
1,2351 gold badge17 silver badges26 bronze badges
3
This article provides a detailed, step by step guide on how to launch Firefox with Selenium Geckodriver. In this article we use the latest versions of Selenium, Firefox & Geckodriver and show you how you can launch Firefox by providing updated code snippets. The tool versions that we will be using in this article are –
- Selenium – version 3.11.0
- Firefox – version 59.0.2 (Firefox Quantum)
- Geckodriver – version 0.20.1
Are you using an older version of Selenium Webdriver? Make sure you switch to the latest Selenium Webdriver version to avoid compatibility issues!!

What is Selenium Geckodriver?
Let us first start with the very basics – What is Gecko and GeckoDriver? Gecko is a web browser engine used in many applications developed by Mozilla Foundation and the Mozilla Corporation, most noticeably the Firefox web browser, its mobile version other than iOS devices, their email client Thunderbird and many other open source software projects. You can get more information about Gecko here – https://en.wikipedia.org/wiki/Gecko_(software)
Geckodriver is a proxy for using W3C WebDriver-compatible clients to interact with Gecko-based browsers i.e. Mozilla Firefox in this case. This program provides the HTTP API described by the WebDriver protocol to communicate with Gecko browsers. It translates calls into the Marionette automation protocol by acting as a proxy between the local and remote ends.
How things worked before Geckodriver and Selenium 3
If you are new to Selenium and you have started directly with Selenium 3.x, you would not know how Firefox was launched with the previous versions of Selenium (version 2.53 and before). It was a pretty straight forward process where you were not required to use Geckodriver or any other driver. After you download and install Selenium, you just write the code to instantiate the WebDriver and open Firefox. The code snippet is shown below –
public class FirefoxTest {

	public static void main(String[] args) {
		WebDriver driver = new FirefoxDriver();
		driver.get("http://www.google.com");
	}
}
If you just run this code, you would notice that Firefox browser would get opened and Google.com would be displayed in the browser. This is how it worked with Selenium 2.53 and before. Let’s see whats the new implementation in Selenium 3.
What happens when you don’t use Firefox Geckodriver with Selenium 3.x
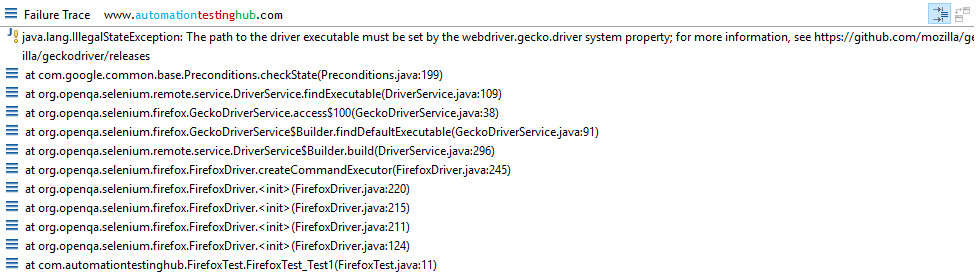
To try this out, all that you need to do is point your JAR files to the latest version of Selenium 3 and then run the same code that is given above. You will now notice that Google.com page would not open in a new Firefox window. Instead you will see an error message as shown below –
java.lang.IllegalStateException: The path to the driver executable must be set by the webdriver.gecko.driver system property; for more information, see https://github.com/mozilla/geckodriver. The latest version can be downloaded from https://github.com/mozilla/geckodriver/releases
You will need to use Selenium Geckodriver to remove this error. Let us see how this can be done.
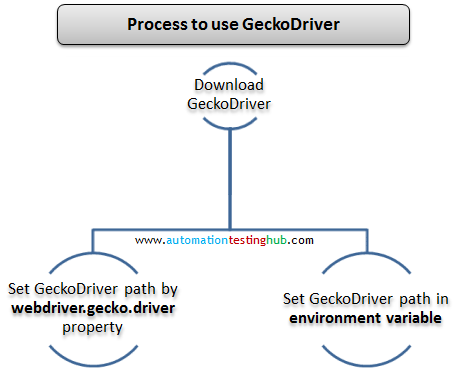
How to use Selenium Geckodriver to launch Firefox
To launch Firefox with Selenium Geckodriver, you will first need to download Geckodriver and then set its path. This can be done in two ways as depicted in the below image –
Check if Firefox is 32-bit or 64-bit
There are two versions of Geckodriver for Windows: 32-bit and 64-bit. Based on whether your Firefox is 32-bit or 64-bit, you need to download the corresponding Geckodriver exe. In this section, you will first check whether your Firefox is 32-bit or 64-bit
1. Open Firefox on your machine. Click on Hamburger icon from the right corner to open the menu as shown below
![]()
2. From this menu, click on Help icon (Help icon is marked in red box in the above image)
3. Once you click on Help icon, the Help Menu would be displayed
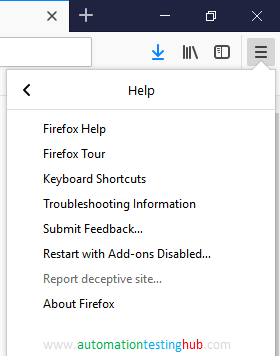
4. Click on About Firefox from the Help menu. About Mozilla Firefox popup would be displayed

5. Note down whether Firefox is 32 or 64 bit. For us, Firefox is 64-bit as shown in the above image. Now close this popup and close Firefox as well.
Download the latest version of Selenium Geckodriver
Follow the steps given below to download Geckodriver –
1. Open this Github page – https://github.com/mozilla/geckodriver/releases
2. Download the latest release (windows version) based on whether your Firefox is 32-bit or 64-bit. We are downloading geckodriver-v0.20.1-win64.zip, as we have 64-bit Firefox
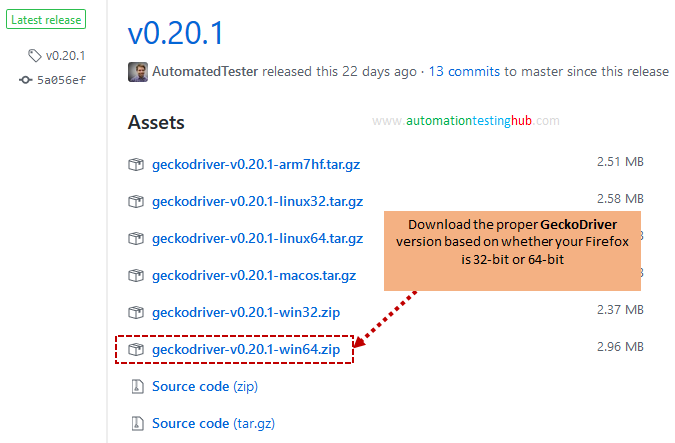
3. Once the zip file is downloaded, unzip it to retrieve the driver – geckodriver.exe
This completes the downloading process. Now let’s see how you can use it in your project. There are 2 methods using which you can configure this driver in your project. You can use any of these methods.
According to this statcounter report, Chrome is by far the most used browser. If you are learning Selenium, make sure that you run your scripts on Chrome browser as well
Launch Firefox Method 1 : webdriver.gecko.driver system property
With this method, you will have to add an additional line of code in your test case. Follow the steps given below to use this method –
1. Copy the entire path where you unzipped geckodriver.exe. Let us assume that the location is – D:Firefoxgeckodriver.exe. You will need to add System.setProperty with the driver location to your code.
The code to launch Firefox browser would look like this –
Important Note 1: In the folder paths in the below code, we have used double backslash (\). This is because Java treats single back slash () as an escape character. So you would need to use double back slash, everywhere you add some folder path.
public class FirefoxTest {

	public static void main(String[] args) {
		System.setProperty("webdriver.gecko.driver","D:\Firefox\geckodriver.exe");

		WebDriver driver = new FirefoxDriver();
		driver.get("http://www.google.com");
	}
}
Important Note 2: If you are using older versions of Geckodriver (v0.16.1 or before), then you will also need to provide the Firefox Binary, otherwise you might get the below error –
org.openqa.selenium.SessionNotCreatedException: Expected browser binary location, but unable to find binary in default location, no ‘moz:firefoxOptions.binary’ capability provided, and no binary flag set on the command line
But please note that this is needed only for Geckodriver v0.16.1 or before. So for older Gecko versions, please use the below code where Firefox binary location has been provided using FirefoxOptions class.
public class FirefoxTest {

	public static void main(String[] args) {
		System.setProperty("webdriver.gecko.driver","D:\Firefox\geckodriver.exe");

		FirefoxOptions options = new FirefoxOptions();
		options.setBinary("C:\Program Files (x86)\Mozilla Firefox\firefox.exe"); //This is the location where you have installed Firefox on your machine

		WebDriver driver = new FirefoxDriver(options);
		driver.get("http://www.google.com");
	}
}
3. Run this code to verify that everything is working fine. You will notice that google.com gets opened in new Firefox window
Launch Firefox Method 2 : Set property in Environment Variables
1. Copy the entire folder location where geckodriver.exe is saved. If the entire path is D:Firefoxgeckodriver.exe, then the folder location would be D:Firefox
2. Open Advanced tab in System Properties window as shown in below image.
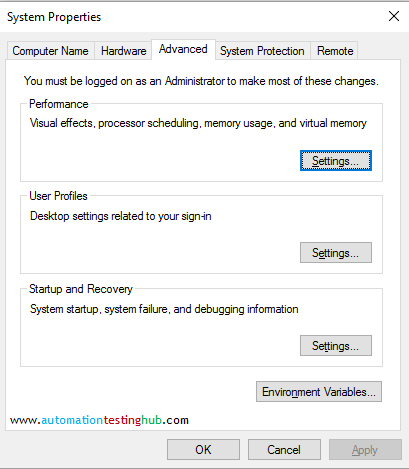
3. Open Environment Variables window.
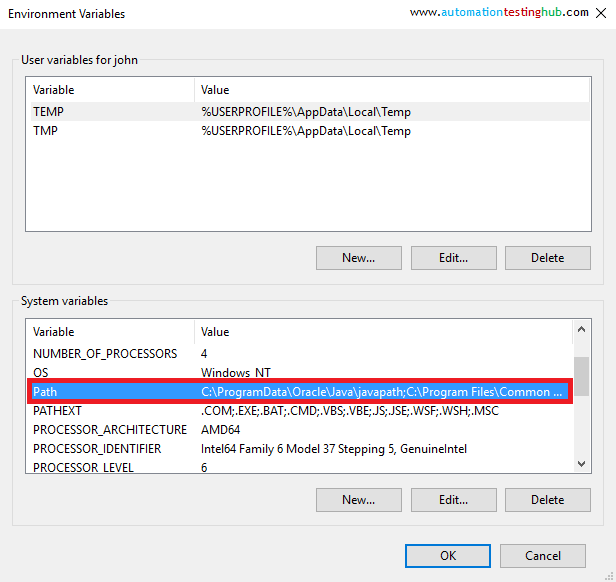
4. In System variables section, select the Path variable (highlighted in the above image) and click on Edit button. Then add the location of Geckodriver that we copied in step 1 (D:Firefox), to path variable (below image shows UI for Windows 10)
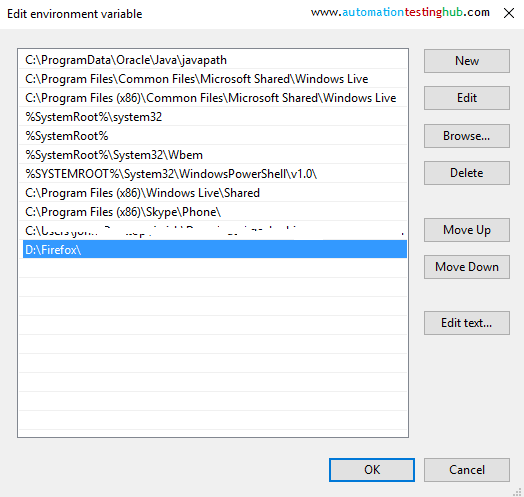
5. If you are using Windows 7, then move to the end of the Variable value field, then add a semi-colon (;) and then add the folder location as shown below (Semicolon acts as a separator between multiple values in the field)
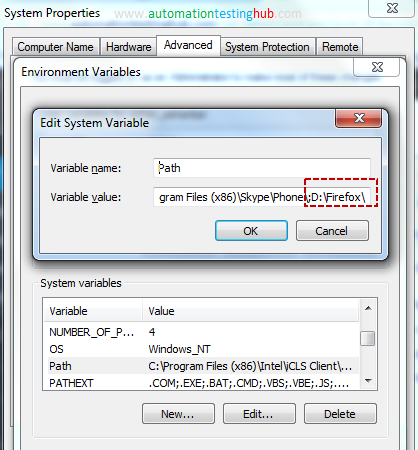
6. Click on Ok button to close the windows. Once the path is set, you would not need to set the System property every time in the test script. Your test script would simply look like this –
For GeckoDriver v0.20, v0.19.0, v0.18.0 and v0.17.0 –
public class FirefoxTest {

	public static void main(String[] args) {
		WebDriver driver = new FirefoxDriver();
		driver.get("http://www.google.com");
	}
}
For GeckoDriver v0.16.1 or before –
public class FirefoxTest {

	public static void main(String[] args) {
		FirefoxOptions options = new FirefoxOptions();
		options.setBinary("C:\Program Files (x86)\Mozilla Firefox\firefox.exe"); //This is the location where you have installed Firefox on your machine

		WebDriver driver = new FirefoxDriver(options);
		driver.get("http://www.google.com");
	}
}
7. Run the code to check that it works fine.
This completes our article on how you can use launch Firefox with Selenium GeckoDriver. Try it out and let us know if this worked for you. Feel free to contact us using comments section if you face any issue while implementing this.
UPDATE 1 [30 April, 2017]: Use DesiredCapabilities and FirefoxOptions to launch Firefox with Selenium GeckoDriver
public class FirefoxTest {

	public static void main(String[] args) {
		FirefoxOptions options = new FirefoxOptions();
		options.setBinary("C:\Program Files (x86)\Mozilla Firefox\firefox.exe"); //Location where Firefox is installed

		DesiredCapabilities capabilities = DesiredCapabilities.firefox();
		capabilities.setCapability("moz:firefoxOptions", options);
		//set more capabilities as per your requirements

		FirefoxDriver driver = new FirefoxDriver(capabilities);
		driver.get("http://www.google.com");
	}
}
Here are a few hand-picked articles for you to read next:
- Learn how to launch firefox in headless mode with Selenium
- Disable low level console logs when you run your tests on Firefox
- Add the power of Cucumber BDD to your test scripts
If you enjoyed this article, like us on Facebook. We have lot more things going on at our Facebook page. See you there!!
Selenium is one of the most used tools for Web automation in the IT industry these days. While the user base is continuously increasing, new features continually added, and over time new version(s) of Selenium is being launched. Lately, with the introduction of Selenium 3 and 4, Gecko Driver usage has become a necessity. Subsequently, in this article, we’ll learn everything about Selenium GeckoDriver and see how we can use it in our selenium scripts. We will primarily focus on the below points in this article:
- What is GeckoDriver?
- How GeckoDriver works?
- Why use it?
- How to install GeckoDriver on Windows?
- How to download GeckoDriver on Windows?
- Similarly, how to set it up on Windows?
- How to install GeckoDriver on macOS?
- How to download GeckoDriver in macOS?
- Similarly, how to setup GeckoDriver on macOS?
- How to run tests in Headless mode using GeckoDriver?
- What are the Common exceptions raised while using GeckoDriver?
What is GeckoDriver?
Let us first understand Gecko before understanding the GeckoDriver. Gecko is a web browser engine that has been developed by Mozilla. Different applications developed by Mozilla Foundation or Mozilla Corporation use it. The GeckoDriver is in C++ and JavaScript, as well in Rust since 2016. Additionally, we can use it on Windows, macOS, Linux, Unix & BSD operating systems.
GeckoDriver is the link between Selenium tests and the Firefox browser. In other words, GeckoDriver is a proxy that interacts between W3C WebDriver-compatible clients and Gecko-based browsers like Firefox. Therefore, sometimes people often refer to it as Firefox driver when they mean it is the GeckoDriver. In simple words, GeckoDriver or Firefox driver links our Selenium tests with the Mozilla Firefox browser. Moreover, it is an executable file that the system paths for your test required.
How GeckoDriver works?
The WebDriver connects with the firefox browser using the GeckoDriver. Just like the other drivers(e.g., ChromeDriver), a local server is started by this executable, which runs your selenium tests. It works as a proxy between the local and remote end to translate calls into Marionette automation protocol. Additionally, to understand more about how it interacts, refer to the diagram below:
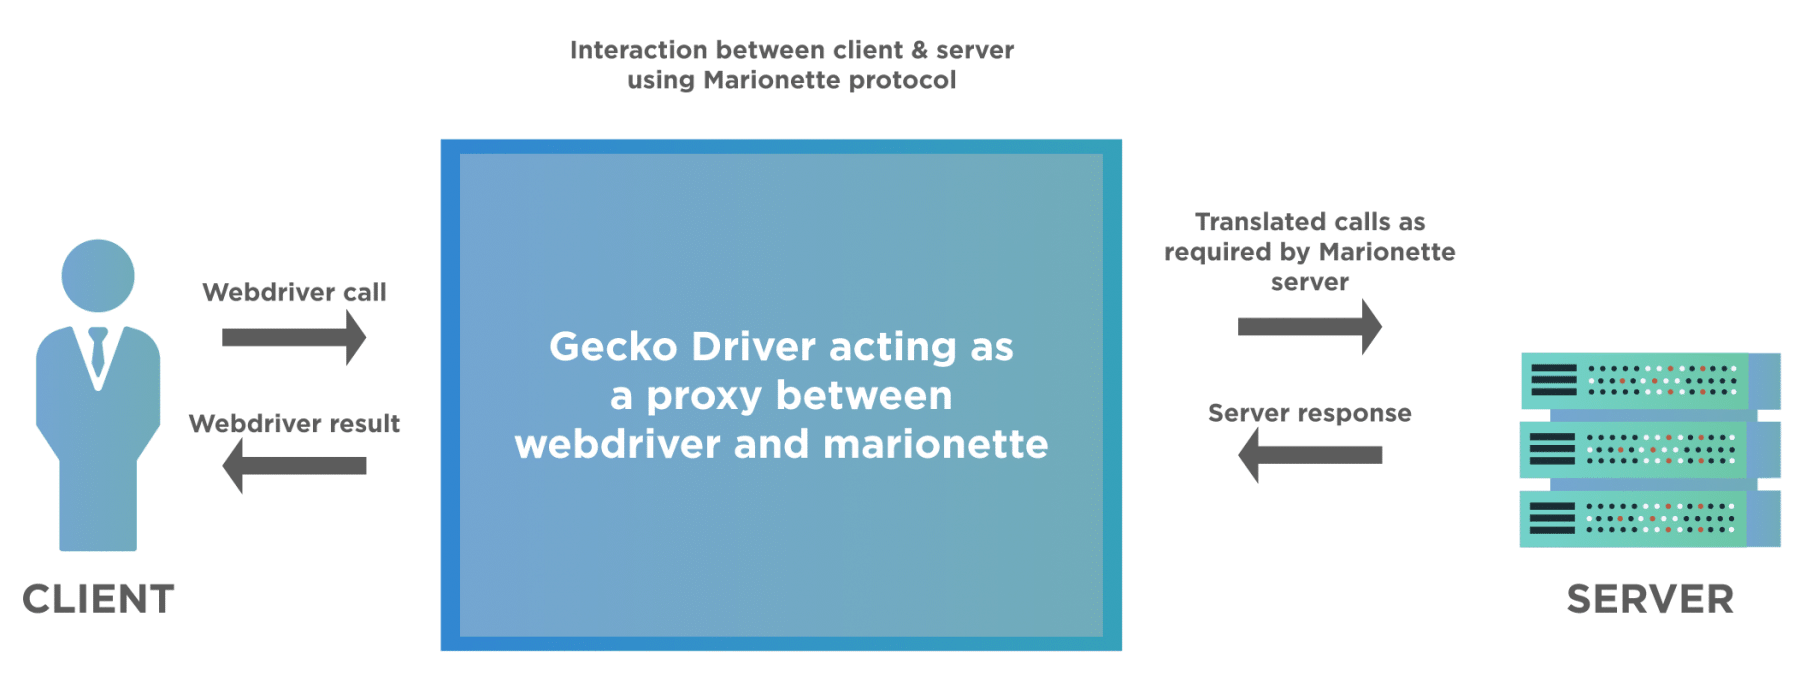
The client or the local system sends a request, which is the WebDriver call to the GeckoDriver. The GeckoDriver converts these request(s) into Marionette Protocol and transfers to Marionette Driver. Now, the server sends back the response to the client via the GeckoDriver. Hence, the execution happens inside the browser. Now that we know the working of the firefox driver let us understand why we need it to execute our Selenium tests.
Why use Gecko Driver?
With earlier versions of Selenium (like version 2.53 & below ), launching the Firefox browser was straightforward. Additionally, this could be done directly by using the below line of code, and you could instantiate Firefox driver using the WebDriver reference like below:
WebDriver driver = new FirefoxDriver();
To understand it more, refer below diagram:

Before Marionette became a part of Firefox, the default browser of WebDriver was Firefox, and it had its inbuilt driver to launch the Firefox browser. Moreover, the WebDriver directly implements the FirefoxDriver, due to which there was no need to use any executable to launch Firefox. Just a simple line of code, as shown above, would open the Firefox browser. But after Firefox v47.0+, we need to use a proxy to interact with the browser.
Also, with Firefox 47.0+, it is not possible to have any third party driver interact directly with the browser. As a result, it is challenging to use Selenium 2 with the latest Firefox versions. So, we have to use Selenium 3, which has the MarionetteDriver. Marionette driver is an automation driver for Mozilla, which can directly control the UI or internal JavaScript of a Gecko platform like Firefox. Hence, we need GeckoDriver to instantiate an object and launch Firefox. Let us see what happens if we do not use GeckoDriver with Selenium 3 or latest through below example-
package gecko;

import org.openqa.selenium.WebDriver;
import org.openqa.selenium.firefox.FirefoxDriver;

public class GeckoDriver {

	public static void main(String[] args) {

		WebDriver driver = new FirefoxDriver();
		driver.get("https://demoqa.com/");

	}

}
On running the above code, you will get IllegalStateException, as shown below:
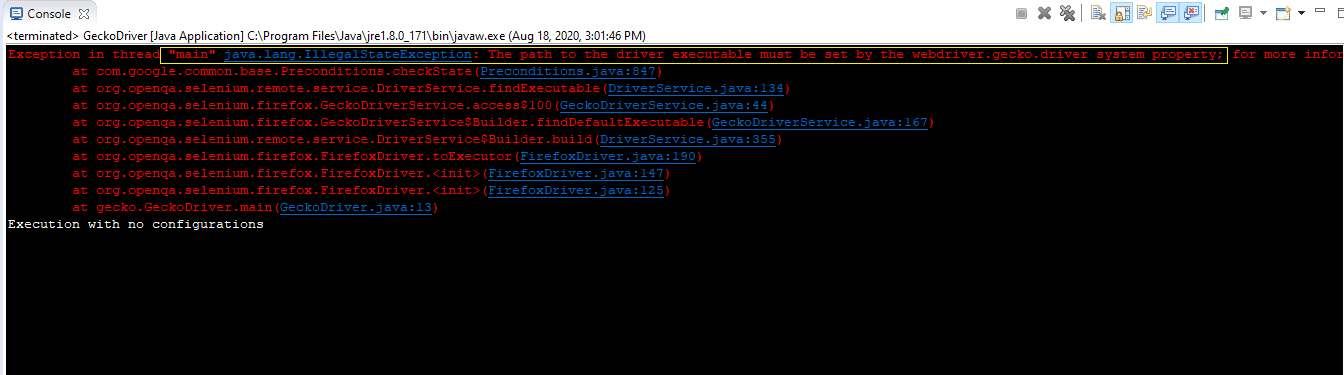
Note: If you have GeckoDriver set up in your system already, you will not get any error like this.
We can resolve the above exception by using GeckoDriver in place of the regular FirefoxDriver. In the next section, we will see how we can set up GeckoDriver in our system.
How to install GeckoDriver on Windows?
In this section, we will see how we can download, setup, and use GeckoDriver on the Windows operating system. There are different ways to set it up for your selenium scripts, which we will be discussing in detail. Consequently, let’s first start with downloading the driver executable for the Windows platform:
How To Download GeckoDriver on Windows?
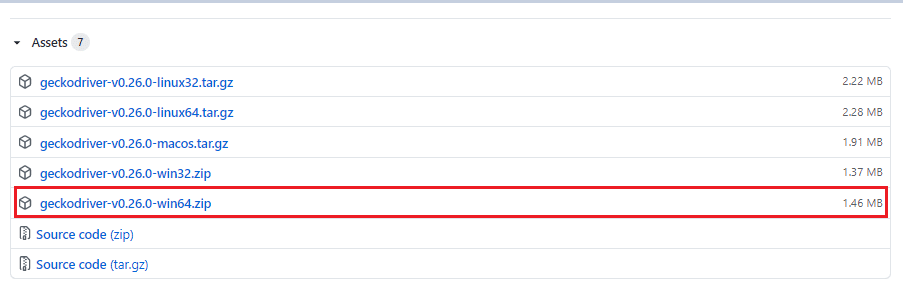
- Firstly, you can download the platform-specific GeckoDriver (preferably the latest version) directly from Github. As we are downloading it for the Windows 64-bit platform, so we will download the file «geckodriver-<latest-version>-win64.zip» as shown in the below screenshot:
- Secondly, extract the downloaded gecko driver zip file.

- Thirdly, please select a destination to save it.
You are now all set to use the GeckoDriver in your test scripts. As a next step, we need to set up the driver on our system.
How To Setup GeckoDriver on Windows?
Unlike the earlier implementation of Firefox driver, GeckoDriver can’t directly instantiate. We need to initialize it before creating the instance of the WebDriver explicitly. The path of the GeckoDriver executable file should be accessible to the FirefoxDriver, so as when the User creates an instance of the WebDriver using the FirefoxDriver, it should be able to find the path of the GeckoDriver executable file. It will lead to successful initialization. We can follow any of the below-mentioned approaches to setup GeckoDriver:
- Setup GeckoDriver using System Properties in Environment Variables.
- Setup GeckoDriver using System Properties in the test script.
- Similarly, setup GeckoDriver by initializing the Desired capabilities for the browser.
Let’s understand all of these and try running our test code with Selenium 3 or Selenium 4.
How to setup GeckoDriver using System Properties in Environment Variables?
On Windows, Environment Variables are one of the easiest ways to declare any global system level variable, which will be accessible to all the programs running on the system. Using the same way, we can use the Environment Variables to set the path of the GeckoDriver. Hence, as when we create the instance of the WebDriver, it automatically finds the path of the GeckoDriver in the System’s PATH variable and executes the same. We can follow the steps mentioned below to add the path of the GeckoDriver in the System’s PATH variable:
- Firstly, open properties by right-clicking on This PC.
- Secondly, open Advanced System Settings and click on Environment Variables.
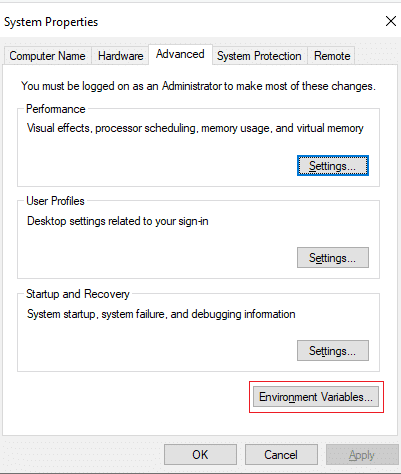
- Thirdly, under the System variables, select Path and click on Edit.
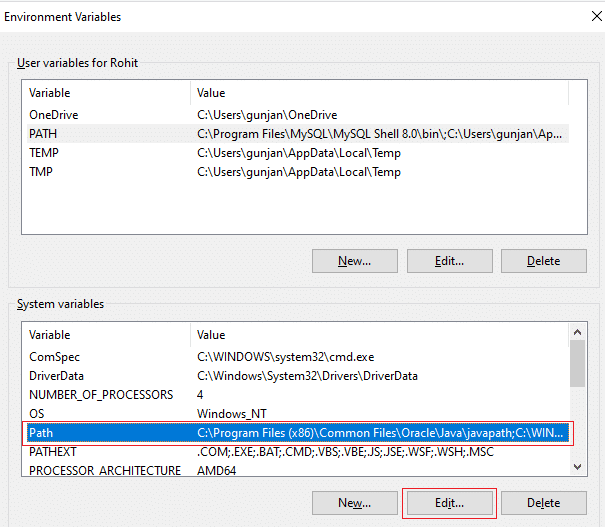
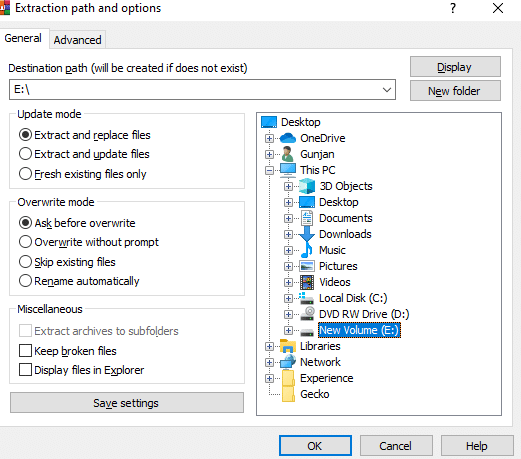
- After that, you need to append the path of the GeckoDriver. Click on New and paste the path at the last editable row and click on OK. Moreover, we need to specify the folder path where the GeckoDriver executable file resides. In our case, it was «E:drivers«
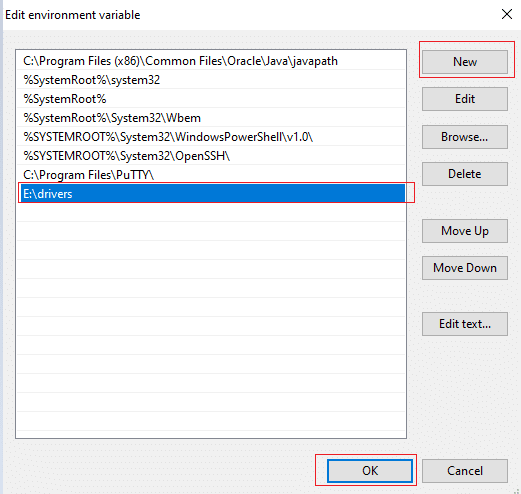
After closing all the subsequent windows, you can use GeckoDriver without using the system property code. Note that you might have to restart your system for the Environment Variables changes to take effect. You can now update the test code to instantiate the WebDriver directly, as shown below:
package gecko;
import org.openqa.selenium.WebDriver;
import org.openqa.selenium.firefox.FirefoxDriver;
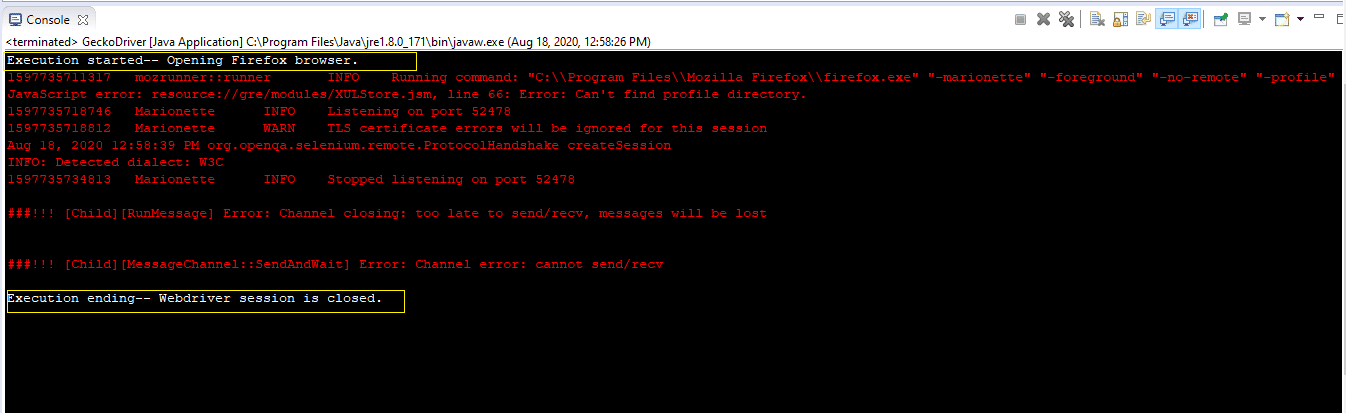
public class GeckoDriver {
public static void main(String[] args) throws InterruptedException{
System.out.println("Execution after setting driver path in system variables");
WebDriver driver = new FirefoxDriver();
driver.get("https://demoqa.com");
Thread.sleep(3000);
driver.quit();
System.out.println("Execution complete");
}
}
On executing the above code, you will see the results like below-
As is clear from the console results, there is no WebDriver error, which implies that the WebDriver set up is correct. You can see the print statements as the entry and exit points of our execution. Correspondingly you will be able to see the execution in your system.
How to initialize Gecko Driver using System Properties in the Selenium test script?
We need to add a single line of code to set up the system properties for the GeckoDriver-
System.setProperty("webdriver.gecko.driver","<Path to geckodriver.exe>)");
Let us modify the code we used above and see that we can launch the Firefox browser successfully. The modified code would look like this:
package gecko;
import org.openqa.selenium.WebDriver;
import org.openqa.selenium.firefox.FirefoxDriver;
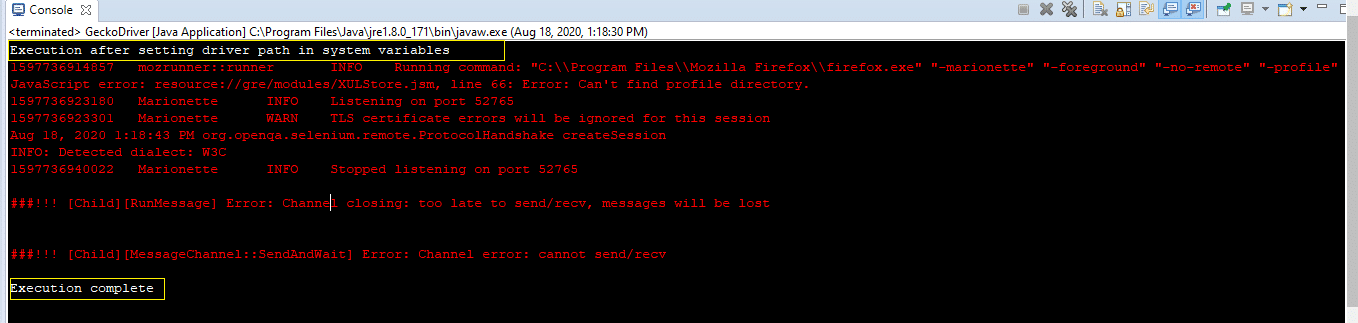
public class GeckoDriver {
public static void main(String[] args) throws InterruptedException {
System.out.println("Execution started-- Opening Firefox browser.");
System.setProperty("webdriver.gecko.driver", "E:\drivers\geckodriver.exe");
WebDriver driver = new FirefoxDriver();
driver.get("https://demoqa.com/");
Thread.sleep(3000);
driver.quit();
System.out.println("Execution ending-- Webdriver session is closed.");
}
}
You will see that demoqa.com opens in the Firefox browser without any error and exception.
The execution logs indicate that our WebDriver session started with the print statement being displayed right at the beginning. The lines in red are some browser logs corresponding to the browser session. You can see the browser opening up in your system, and after the website opens, the browser session is closed.
How to setup Selenium GeckoDriver by Setting up Desired capabilities for the browser?
Desired Capabilities help Selenium understand the browser details, like its name, version, and OS. We can use the Desired Capabilities and set Marionette to true to launch Firefox. You need to add the below lines to your code:
DesiredCapabilities cap = DesiredCapabilities.firefox();
cap.setCapability("marionette", true);
WebDriver driver = new FirefoxDriver(cap);
The complete code would look like this:
package gecko;

import org.openqa.selenium.WebDriver;
import org.openqa.selenium.firefox.FirefoxDriver;
import org.openqa.selenium.remote.DesiredCapabilities;

public class GeckoDriver {

	public static void main(String[] args) throws InterruptedException {

		System.out.println("Execution with desired capabilities");
                DesiredCapabilities cap = DesiredCapabilities.firefox();
		cap.setCapability("marionette", true);
		WebDriver driver = new FirefoxDriver(cap);
		driver.get("https://demoqa.com");
		Thread.sleep(3000);
		driver.quit();
                System.out.println("Execution completed");

	}

}
On executing the above code, you will see results like below-
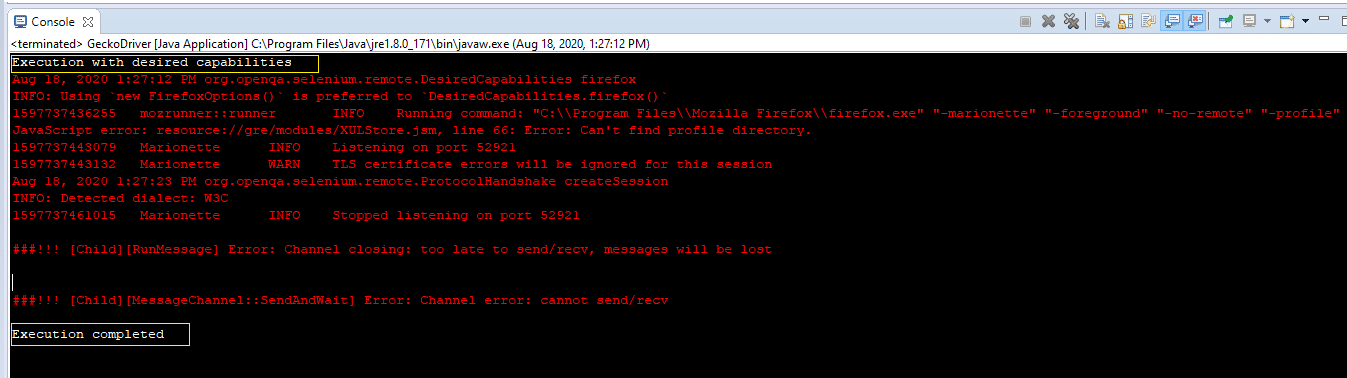
Just like the executions above, using desired capabilities, you will be able to see successful execution with no exceptions. You can see that our test passed, and the complete code runs without any halt.
How to install GeckoDriver on macOS?
The installation and setup of GeckoDriver on macOS is almost the same as that of the Windows platform, the only difference being the executable for macOS will be different, and the way we can include the GeckoDriver executable in the System’s PATH variable is bit different. Let’s see how we can install and setup the GeckoDriver on macOS:
How To Download GeckoDriver in macOS?
Similar to Windows, You can navigate to GitHub and download the macos.tar.gz file, as shown below:
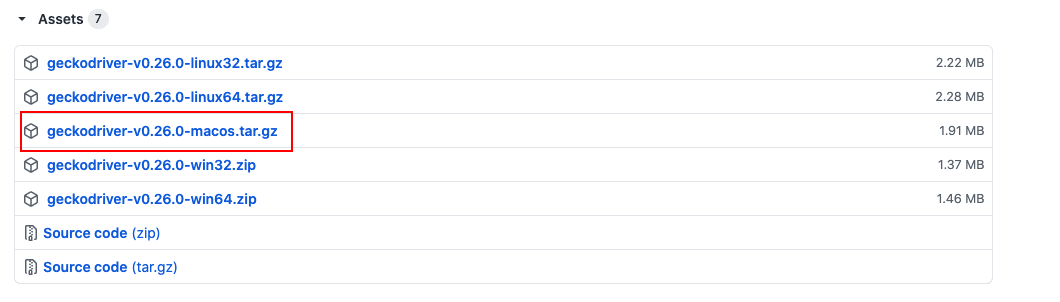
By default, the tar file will be downloaded under the Downloads folder as shown below:

Note: You can download the file in any folder of your choice, depending on your system’s settings.
Next, You will need to extract the driver from the tar file that we downloaded in the previous step. To do so, double-click the macos.tar.gz file, and you will notice that a Unix executable file named «geckodriver» is extracted at the same location as shown below:
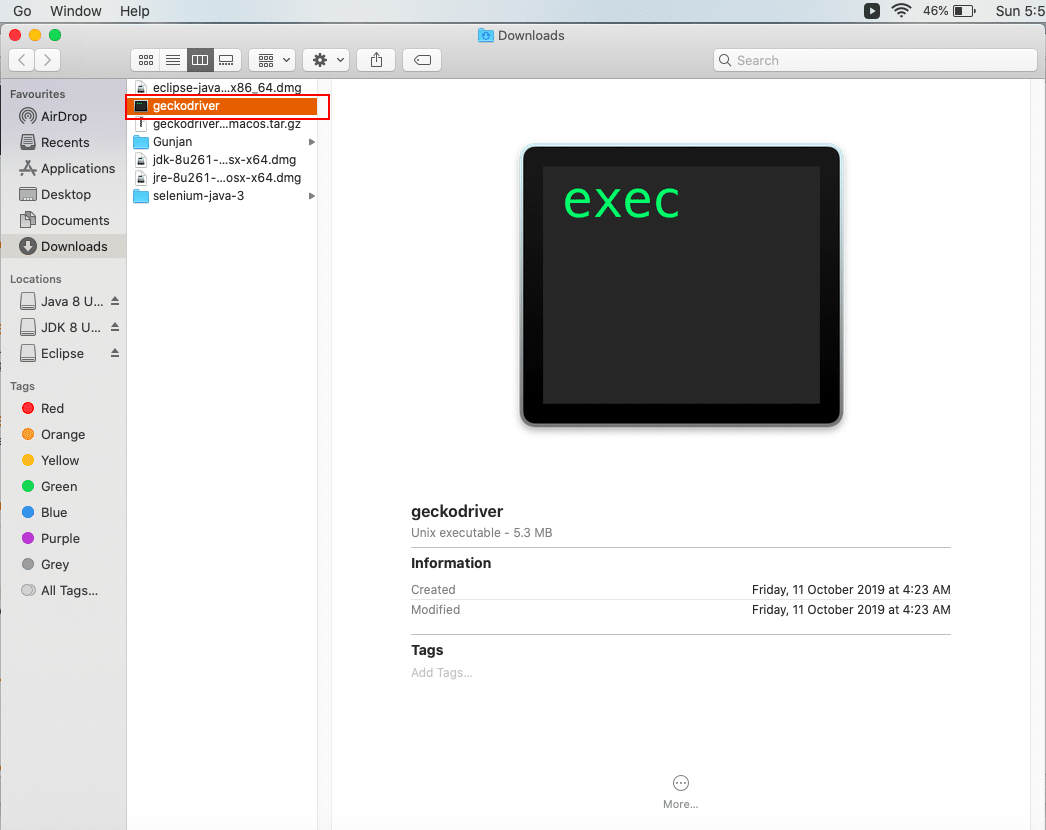
So, now we do have the GeckoDriver executable file on or system, let’s see how to set up and use the same in our test scripts.
How To Set Up Selenium GeckoDriver on macOS?
Now that you have downloaded the Selenium GeckoDriver, the next step is to set it up so that you can use it in your test scripts. On macOS also, we can follow the same ways, as on Windows, to set up the GeckoDriver:
- Setup GeckoDriver using the System’s PATH variable.
- Setup GeckoDriver using System Properties in the test script.
- Similarly, setup GeckoDriver by initializing the Desired capabilities for the browser.
The last 2 points, being directly embedded in the JAVA Code, are the same on all the platforms, So we can follow the same steps as we mentioned above for the Windows platform. For the 1st point, as it depends on the operating system, how a global variable can set, and how can we exposed to all the applications on the platform. Even though there are many ways to set up the GeckoDriver’s executable path in the System’s PATH variable, one of the easiest way is to copy the executable under any of the folders, which are already under the «PATH» variable of the macOS. Let’s see how to achieve the same:
How to setup Selenium GeckoDriver using the System’s PATH variable in macOS?
As we mentioned above, one of the easiest ways to make the executable available globally on the macOS is to copy the executable under any the folders which are already in the PATH variable. Let’s follow the steps mentioned below to achieve the same:
- Identify the folders which are included in the PATH variable using the command ‘echo $PATH‘ on the terminal. It will give a sample output, as shown below:

-
As we can see, multiple directories are already part of the PATH variable. Suppose we choose «/usr/local/bin» as out directory to hold the GeckoDriver executable.
-
Next, you need to keep the driver at the following location ‘/usr/local/bin’. Just copy the GeckoDriver executable and navigate to Go > Go to Folder
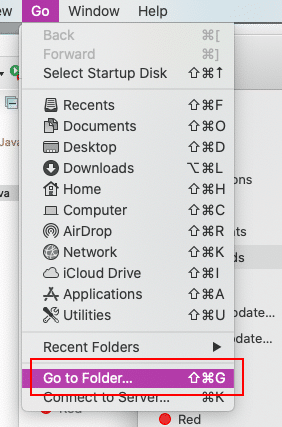
- Enter the destination directory path and click on Go.
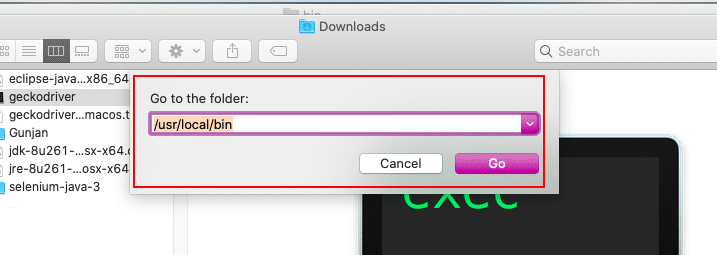
- Paste the Unix executable inside the bin folder.
Now your GeckoDriver is ready to be used in your Selenium test scripts. Now we will write a simple program and execute the same in the mac system.
package DemoProject;

import org.openqa.selenium.WebDriver;
import org.openqa.selenium.firefox.FirefoxDriver;

public class GeckoDriver {

	public static void main(String[] args) throws InterruptedException {

		WebDriver driver = new FirefoxDriver();
		System.out.println("GeckoDriver execution on mac!!");
		driver.get("https://demoqa.com");
		Thread.sleep(3000);
		driver.quit();
		System.out.println("Execution completed on mac!!");

	}

}
On executing the same, you can find the results in your console window-
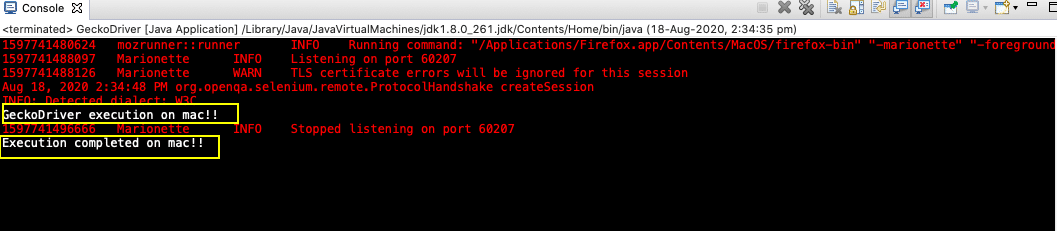
You can see the execution happening successfully without any error. Both the print statements are getting displayed, which indicates that our execution did not face any error. So did you see how easy it was to run GeckoDriver tests in macOS? Unlike the windows system, where you have to remember the path of your driver executable, just placing the driver at a location in mac makes our lives so easy!
How to run tests in Headless mode using GeckoDriver?
You can run your tests in headless mode, i.e., with no UI display and just background execution. The headless mode in GeckoDriver can be used by simply using Firefox Options. All you need to do is use the setHeadless() method, which is a part of the Options class. Below is the Firefox Options code that we would add to our existing tests.
FirefoxOptions options = new FirefoxOptions();
options.setHeadless(true);
WebDriver driver = new FirefoxDriver(options);
And the complete code to run your test in headless mode would look like below:
package gecko;

import org.openqa.selenium.WebDriver;
import org.openqa.selenium.firefox.FirefoxDriver;
import org.openqa.selenium.firefox.FirefoxOptions;

public class GeckoDriver {

	public static void main(String[] args) throws InterruptedException {

		System.out.println("Execution in Headless Mode");
                FirefoxOptions options = new FirefoxOptions();
	        options.setHeadless(true);
		WebDriver driver = new FirefoxDriver(options);
		driver.get("https://demoqa.com");
		Thread.sleep(3000);
		System.out.println("The page title is " +driver.getTitle());
		driver.quit();
		System.out.println("Execution completed");
	}

}
On running this code, you will see that the browser window doesn’t come into the display, and in the console, you can see the print statement.
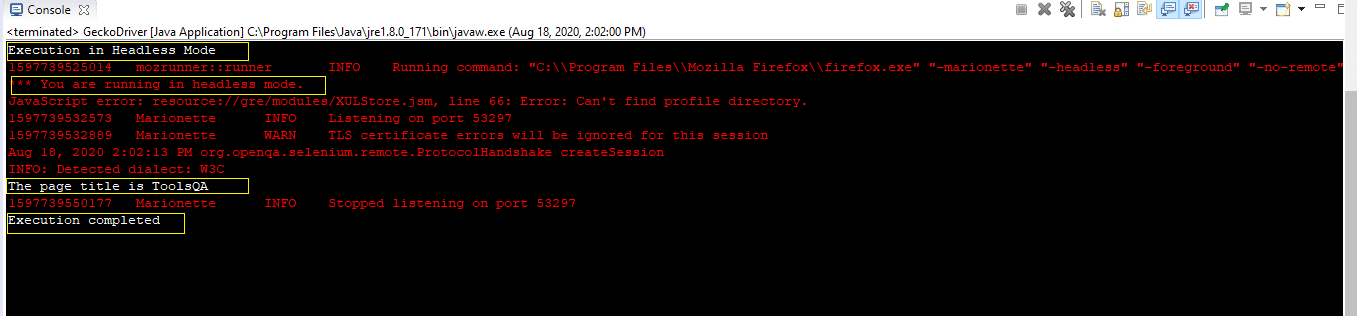
See how easy it was to fasten up your test execution using this headless option! Let us now see the common exceptions that we may come across while working with the GeckoDriver.
What are the Common exceptions raised while using GeckoDriver?
You might come across some issues while working with GeckoDriver. Few of them are listed below with the solutions-
- Not Connected Exception
org.openqa.selenium.firefox.NotConnectedException: Unable to connect to host 127.0.0.1 on port 7055 after 45000 ms.
This exception occurs when you are using the latest Firefox version but an old Selenium version. To resolve, update the selenium jar to the latest version.
- WebDriver Exception
Exception in thread “main” org.openqa.selenium.WebDriverException: Failed to decode response from marionette
This exception occurs when there is a mismatch between the GeckoDriver version or the Selenium version or Firefox Version. To fix, update the latest Gecko Driver version and make sure the Firefox updates to the latest version.
- Connection Refused Exception
org.openqa.selenium.WebDriverException: Connection refused (Connection refused)
Such an exception occurs when WebDriver is unable to establish a connection with Firefox. To resolve, you can clear the browser cache.
- Unreachable Browser Exception
Exception in thread “main” org.openqa.selenium.remote.UnreachableBrowserException: Error communicating with the remote browser. It may have died.
It generally happens when WebDriver is trying to reach some elements, but either the session is closed, or the browser does not launch. Make sure that you quit() or close() method is killing the browser instance in Task Manager.
Key Takeaways:
- With GeckoDriver, you will be able to execute your selenium scripts and be able to launch the Firefox browser using any of the many ways listed above.
- Moreover, you can freely execute your scripts in headless mode and optimize the speed of execution.
- Additionally, you can efficiently build tests knowing the way out when you come across various exceptions!
geckodriver is an implementation of WebDriver, and WebDriver can
be used for widely different purposes. How you invoke geckodriver
largely depends on your use case.
Selenium
If you are using geckodriver through Selenium, you must ensure that
you have version 3.11 or greater. Because geckodriver implements the
W3C WebDriver standard and not the same Selenium wire
protocol older drivers are using, you may experience incompatibilities
and migration problems when making the switch from FirefoxDriver to
geckodriver.
Generally speaking, Selenium 3 enabled geckodriver as the default
WebDriver implementation for Firefox. With the release of Firefox 47,
FirefoxDriver had to be discontinued for its lack of support for the
new multi-processing architecture in Gecko.
Selenium client bindings will pick up the geckodriver binary executable
from your system’s PATH environmental variable unless you
override it by setting the webdriver.gecko.driver Java VM system
property:
System.setProperty("webdriver.gecko.driver", "/home/user/bin");
Or by passing it as a flag to the java(1) launcher:
% java -Dwebdriver.gecko.driver=/home/user/bin YourApplication
Your mileage with this approach may vary based on which programming
language bindings you are using. It is in any case generally the case
that geckodriver will be picked up if it is available on the system path.
In a bash compatible shell, you can make other programs aware of its
location by exporting or setting the PATH variable:
% export PATH=$PATH:/home/user/bin
% whereis geckodriver
geckodriver: /home/user/bin/geckodriver
On Window systems you can change the system path by right-clicking My
Computer and choosing Properties. In the dialogue that appears,
navigate Advanced → Environmental Variables → Path.
Or in the Windows console window:
% set PATH=%PATH%;C:bingeckodriver
Standalone
Since geckodriver is a separate HTTP server that is a complete remote end
implementation of WebDriver, it is possible to avoid using the Selenium
remote server if you have no requirements to distribute processes across
a matrix of systems.
Given a W3C WebDriver conforming client library (or local end) you
may interact with the geckodriver HTTP server as if you were speaking
to any Selenium server.
Using curl(1):
% geckodriver &
[1] 16010
% 1491834109194   geckodriver     INFO    Listening on 127.0.0.1:4444
% curl -H 'Content-Type: application/json' -d '{"capabilities": {"alwaysMatch": {"acceptInsecureCerts": true}}}' http://localhost:4444/session
{"value":{"sessionId":"d4605710-5a4e-4d64-a52a-778bb0c31e00","capabilities":{"acceptInsecureCerts":true,[...]}}}
% curl -H 'Content-Type: application/json' -d '{"url": "https://mozilla.org"}' http://localhost:4444/session/d4605710-5a4e-4d64-a52a-778bb0c31e00/url
{}
% curl http://localhost:4444/session/d4605710-5a4e-4d64-a52a-778bb0c31e00/url
{"value":"https://www.mozilla.org/en-US/"
% curl -X DELETE http://localhost:4444/session/d4605710-5a4e-4d64-a52a-778bb0c31e00
{}
% fg
geckodriver
^C
Using the Python wdclient library:
import webdriver

with webdriver.Session("127.0.0.1", 4444) as session:
    session.url = "https://mozilla.org"
    print "The current URL is %s" % session.url
And to run:
% geckodriver &
[1] 16054
% python example.py
1491835308354   geckodriver     INFO    Listening on 127.0.0.1:4444
The current URL is https://www.mozilla.org/en-US/
% fg
geckodriver
^C
- Use the
geckodriver.exeFile and Add It to the SystemPATH - Use the
executable_pathParameter in thewebdriver.Firefox()Function - Use the
webdriver-managerModule
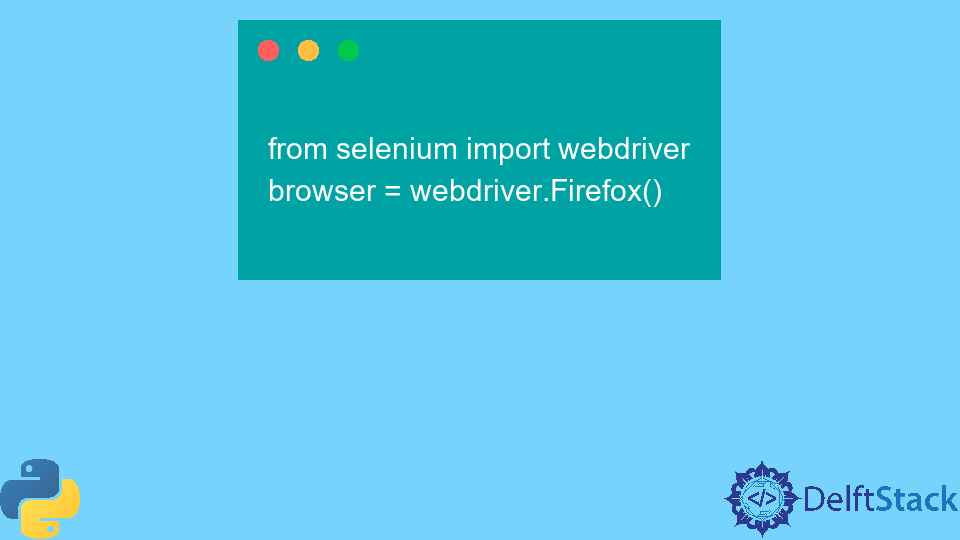
The selenium package in Python can automate tasks on a web browser. Using their web drivers, we can use different web browsers like Google Chrome, Firefox, and more.
This tutorial will discuss the Message: 'geckodriver' executable needs to be in PATH error in Python.
The geckodriver is a Mozilla-developed browser engine that acts as a link between Selenium and the Firefox browser. This error occurs when the driver is not installed properly, or its path is not specified appropriately.
See the code below.
from selenium import webdriver
browser = webdriver.Firefox()
Output:
WebDriverException: Message: 'geckodriver' executable needs to be in PATH.
Let us now discuss different ways to solve this error.
Use the geckodriver.exe File and Add It to the System PATH
Selenium tries to identify the driver executable from the system environment variable PATH. We can add the executable path of the geckodriver to this variable.
First, we must download the driver’s executable from the official Mozilla website. We need to add the path of the directory that contains this executable to the PATH variable discussed previously.
The PATH variable can be found under the Environment Variables menu. We need to right-click the This PC icon, go to Properties, and select the Advance Settings option to get this menu.
Linux users can copy the executable file directly to the /usr/local/bin directory.
Use the executable_path Parameter in the webdriver.Firefox() Function
We use the webdriver.Firefox() constructor to create the Driver object that can open the browser window and perform the automated tasks. We can specify the path of the geckodriver executable within this function using the executable_path parameter.
For example:
from selenium import webdriver
driver = webdriver.Firefox(executable_path=r'userpathofdrivergeckodriver.exe')
Mac OS users can also install the geckodriver using homebrew. The following command can be utilized.
brew install geckodriver
After installation, the path of the driver is shown. We can copy this path, paste it into the Finder application, and click Go to Folder.
This will return the full path of the driver that can be used in the executable_path parameter.
Use the webdriver-manager Module
The webdriver-manager module was introduced to provide some relief in managing the web drivers of different browsers.
We can use the GeckoDriverManager().install() functions to install and use the executable for the geckodriver. This needs to be specified in the executable_path parameter discussed previously.
See the code below.
from selenium import webdriver
from webdriver_manager.firefox import GeckoDriverManager
driver_object = webdriver.Firefox(executable_path=GeckoDriverManager().install())