Последнее обновление: 31.10.2015
PictureBox предназначен для показа изображений. Он позволяет отобразить файлы в формате bmp, jpg, gif, а также метафайлы ищображений
и иконки. Для установки изображения в PictureBox можно использовать ряд свойств:
-
Image: устанавливает объект типа Image
-
ImageLocation: устанавливает путь к изображению на диске или в интернете
-
InitialImage: некоторое начальное изображение, которое будет отображаться во время загрузки главного изображения,
которое хранится в свойстве Image -
ErrorImage: изображение, которое отображается, если основное изображение не удалось загрузить в PictureBox
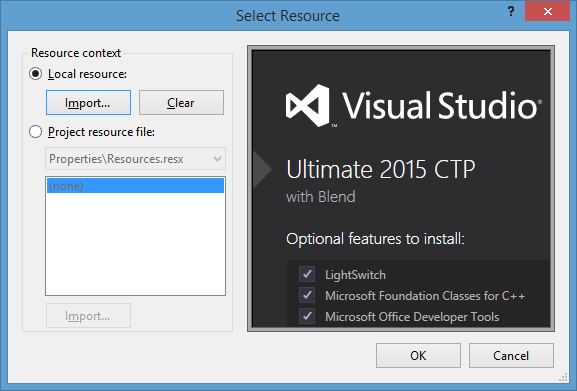
Чтобы установить изображение в Visual Studio, надо в панели Свойств PictureBox выбрать свойство Image. В этом случае нам откроется окно импорта изображения
в проект, где мы собственно и сможем выбрать нужное изображение на компьютере и установить его для PictureBox:
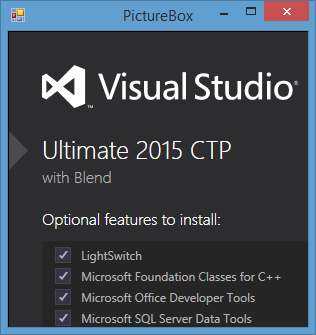
И затем мы сможем увидеть данное изображение в PictureBox:
Либо можно загрузить изображение в коде:
pictureBox1.Image = Image.FromFile("C:UsersEugenePictures12.jpg");
Размер изображения
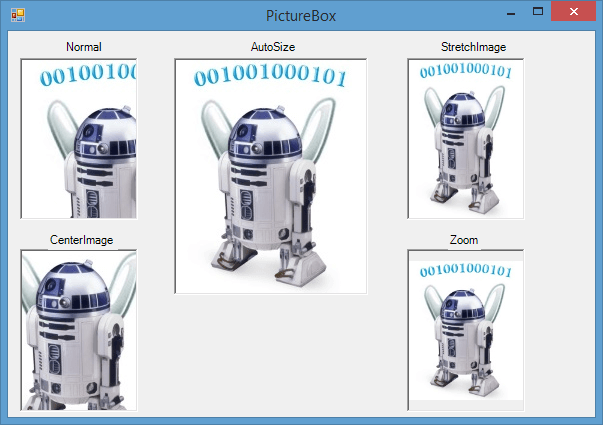
Для установки изображения в PictureBox используется свойство SizeMode, которое принимает следующие значения:
-
Normal: изображение позиционируется в левом верхнем углу PictureBox, и размер изображения не изменяется. Если
PictureBox больше размеров изображения, то по справа и снизу появляются пустоты, если меньше — то изображение обрезается -
StretchImage: изображение растягивается или сжимается таким обраом, чобы вместиться по всей ширине и высоте элемента PictureBox -
AutoSize: элемент PictureBox автоматически растягивается, подстраиваясь под размеры изображения -
CenterImage: если PictureBox меньше изображения, то изображение обрезается по краям и выводится только его центральная часть.
Если же PictureBox больше изображения, то оно позиционируется по центру. -
Zoom: изоражение подстраивается под размеры PictureBox, сохраняя при этом пропорции
I wanted to display an image to the windows forms, but i already did this and the image did not come out.
Where did I go wrong?
Here is the code:
private void Images(object sender, EventArgs e)
{
    PictureBox pb1 = new PictureBox();
    pb1.Image = Image.FromFile("../SamuderaJayaMotor.png");
    pb1.Location = new Point(100, 100);
    pb1.Size = new Size(500, 500);
    this.Controls.Add(pb1);
}
![]()
Lee Taylor
7,65916 gold badges33 silver badges49 bronze badges
asked Oct 5, 2013 at 3:50
![]()
1
Here (http://www.dotnetperls.com/picturebox) there 3 ways to do this:
- Like you are doing.
-
Using ImageLocation property of the PictureBox like:
private void Form1_Load(object sender, EventArgs e) { PictureBox pb1 = new PictureBox(); pb1.ImageLocation = "../SamuderaJayaMotor.png"; pb1.SizeMode = PictureBoxSizeMode.AutoSize; } -
Using an image from the web like:
private void Form1_Load(object sender, EventArgs e)
{
    PictureBox pb1 = new PictureBox();
    pb1.ImageLocation = "http://www.dotnetperls.com/favicon.ico";
    pb1.SizeMode = PictureBoxSizeMode.AutoSize;
}
And please, be sure that «../SamuderaJayaMotor.png» is the correct path of the image that you are using.
4
There could be many reasons for this. A few that come up quickly to my mind:
- Did you call this routine AFTER
InitializeComponent()? - Is the path syntax you are using correct? Does it work if you try it in the debugger? Try using backslash () instead of Slash (/) and see.
- This may be due to side-effects of some other code in your form. Try using the same code in a blank Form (with just the constructor and this function) and check.
answered Oct 5, 2013 at 3:54
![]()
dotNETdotNET
32.2k22 gold badges151 silver badges242 bronze badges
I display images in windows forms when I put it in Load event like this:
    private void Form1_Load( object sender , EventArgs e )
    {
        pictureBox1.ImageLocation = "./image.png"; //path to image
        pictureBox1.SizeMode = PictureBoxSizeMode.AutoSize;
    }
answered Jun 15, 2017 at 19:59
![]()
IliyanIliyan
511 silver badge4 bronze badges
private void Form1_Load(object sender, EventArgs e)
    {
        PictureBox pb = new PictureBox();
        pb.Location = new Point(0, 0);
        pb.Size = new Size(150, 150);
        pb.Image = Image.FromFile("E:\Wallpaper (204).jpg");
        pb.Visible = true;
        this.Controls.Add(pb);
    }
answered Jun 9, 2020 at 13:27
![]()
У многие новичков возникают вопросы при написании программа на C#. Один из часто задаваемых, как использовать компонент pictureBox и как использовать этот класс. Если вы пользуетесь конструктором в visual studio это одно, да вам легко перетащить из панели элементов pictureBox и в свойствах Image вставить изображение. Но что делать если вам требуется изменить картинку программно, или вовсе при нажатии кнопки менять изображения. Вот об этом и поговорим в этой статье. Прежде всего вам потребуется сама картинка, я создал новое приложение назвал его pictureBox скачал из интернета 4 картинки, на форме разместил компонент pictureBox 150х150 и button. рис 1.
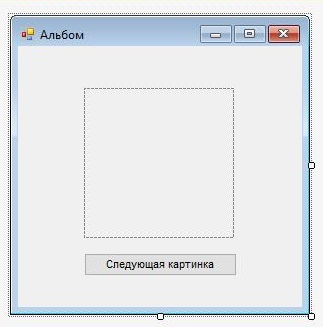
рис 1.
Теперь нам потребуется добавить наши картинки в проект, для это выбираем свойство нашего проекта рис 2.
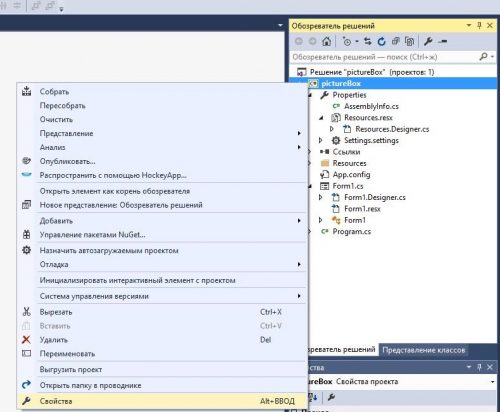
рис 2.
Переходим во вкладку ресурсы, вверху окна выберем рядом со стрелочкой добавить ресурс, и жмем добавить существующий фаил, указываем наш фаил и он загружается в проект, по аналогии добавляем остальные картинки. рис. 3.
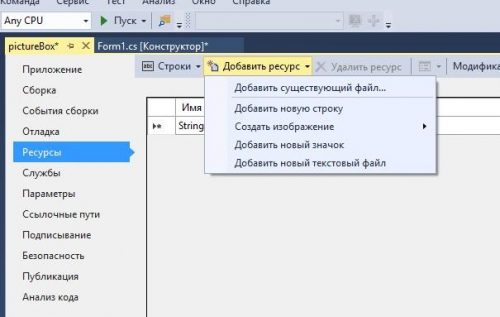
рис. 3
Молодцы теперь мы умеем добавлять ресурсы в наш проект, сюда так же можно добавлять и другого формата файлы, видео, музыку, текстовые файлы. Если вы были внимательны, то в обозревателе решений в папке Resources появились наши картинки. рис 3.
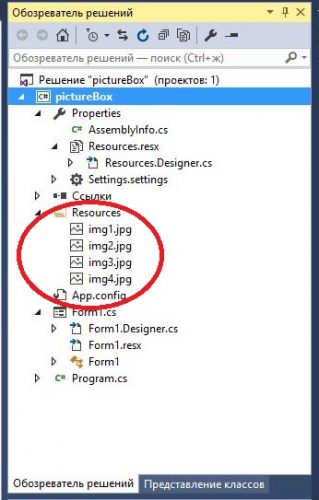
рис. 3
Теперь перейдем не посредственно коду программы, а именно одним из его свойств.
Свойство Image компонента PictureBox:
|
1 2 3 4 5 6 7 8 9 10 11 12 13 14 15 16 17 18 19 20 21 22 23 24 25 |
using System; using System.Collections.Generic; using System.ComponentModel; using System.Data; using System.Drawing; using System.Linq; using System.Text; using System.Threading.Tasks; using System.Windows.Forms; namespace pictureBox { public partial class Form1 : Form { public Form1() { InitializeComponent(); } private void button1_Click(object sender, EventArgs e) { pictureBox1.Image = Properties.Resources.img1; } } } |
В коде программы мы видим что при нажатии на кнопку, мы переходим в обработчик событий button1_Click где вставляем в компонент pictureBox1 картинку, причем мы указываем полный путь к картинке, это папка свойства, ресурсы, img1. Теперь запустите наш пример и убедитесь что при нажатии на клавише у вас появилась картинка. Усложним нашу программы что бы изображения менялось на другие картинки при нажатии на кнопку, все строки я за комментировал что бы вам было легче разобраться.
|
1 2 3 4 5 6 7 8 9 10 11 12 13 14 15 16 17 18 19 20 21 22 23 24 25 26 27 28 29 30 31 32 33 34 35 36 37 38 39 40 41 42 43 44 45 46 47 |
using System; using System.Collections.Generic; using System.ComponentModel; using System.Data; using System.Drawing; using System.Linq; using System.Text; using System.Threading.Tasks; using System.Windows.Forms; namespace pictureBox { public partial class Form1 : Form { public Form1() { InitializeComponent(); } int count = 0; private void button1_Click(object sender, EventArgs e) { count++; //тут я увеличиваю значения счетчика на 1 if (count == 1) { //если счетчик равен 1 то медведь pictureBox1.Image = Properties.Resources.img1; } if (count == 2) { //если счетчик равен 2 то конь pictureBox1.Image = Properties.Resources.img2; } if (count == 3) { //если счетчик равен 3 то щенок и котенок pictureBox1.Image = Properties.Resources.img3; } if (count == 4) { //если счетчик равен 4 то тигренок count = 0; //сбрасываем счетчки что бы начать все заново pictureBox1.Image = Properties.Resources.img4; } } } } |
Вот что должно было у вас получиться:
PictureBox кроме свойства Image которое с вами рассмотрели, имеет ряд свойств.
Свойство Size Определяет Width ширину компонента, и Height высоту компонента, спомощью него можно задать размер и получить текущий размер PictureBox.
|
pictureBox1.Size = new System.Drawing.Size(150, 150); //задаем размеры int h =pictureBox1.Size.Height; //получаем текущую высоту int w = pictureBox1.Size.Width;//получаем текущую ширину |
Свойство Location позволяет задать положения компонента на поверхности форму, с помощью приведенного ниже примера вы сможете разместить в любом месте на форме PictureBox.
|
pictureBox1.Location = new System.Drawing.Point(66, 42); |
Доброго времени суток!
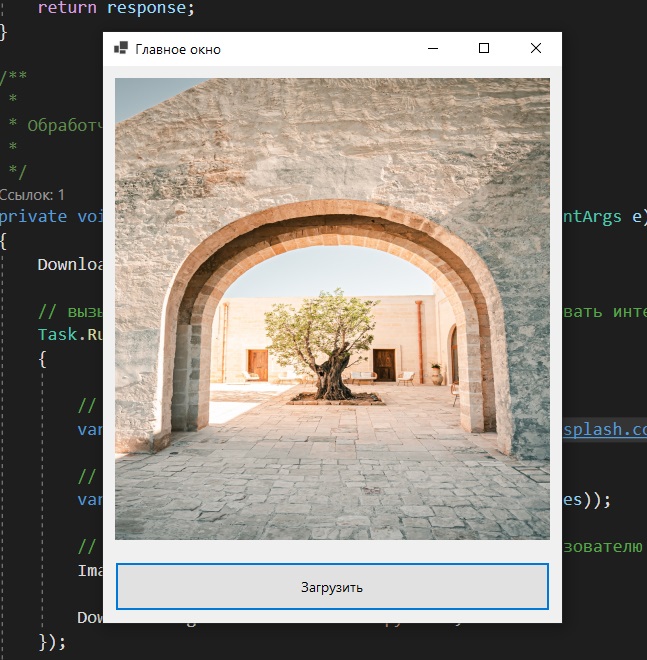
В данном примере я покажу Вам как можно загрузить картинку из Интернета и отобразить
ее в пользовательском интерфейсе. Изображение будет отображаться при нажатии на кнопку
причем, каждый раз будет новое изображение.
Итак, ко:
Интерфейс MainForm.Designer.cs
namespace ShowImagwFromInternetWinForm
{
partial class MainForm
{
/// <summary>
/// Required designer variable.
/// </summary>
private System.ComponentModel.IContainer components = null;
/// <summary>
/// Clean up any resources being used.
/// </summary>
/// <param name="disposing">true if managed resources should be disposed; otherwise, false.</param>
protected override void Dispose(bool disposing)
{
if (disposing && (components != null))
{
components.Dispose();
}
base.Dispose(disposing);
}
#region Windows Form Designer generated code
/// <summary>
/// Required method for Designer support - do not modify
/// the contents of this method with the code editor.
/// </summary>
private void InitializeComponent()
{
this.ImagePictureBox = new System.Windows.Forms.PictureBox();
this.DownloadImageButton = new System.Windows.Forms.Button();
((System.ComponentModel.ISupportInitialize)(this.ImagePictureBox)).BeginInit();
this.SuspendLayout();
//
// ImagePictureBox
//
this.ImagePictureBox.Anchor = ((System.Windows.Forms.AnchorStyles)((((System.Windows.Forms.AnchorStyles.Top | System.Windows.Forms.AnchorStyles.Bottom)
| System.Windows.Forms.AnchorStyles.Left)
| System.Windows.Forms.AnchorStyles.Right)));
this.ImagePictureBox.BackColor = System.Drawing.SystemColors.ActiveCaption;
this.ImagePictureBox.Location = new System.Drawing.Point(12, 12);
this.ImagePictureBox.Name = "ImagePictureBox";
this.ImagePictureBox.Size = new System.Drawing.Size(435, 462);
this.ImagePictureBox.SizeMode = System.Windows.Forms.PictureBoxSizeMode.StretchImage;
this.ImagePictureBox.TabIndex = 0;
this.ImagePictureBox.TabStop = false;
//
// DonwloadImageButton
//
this.DownloadImageButton.Anchor = ((System.Windows.Forms.AnchorStyles)(((System.Windows.Forms.AnchorStyles.Bottom | System.Windows.Forms.AnchorStyles.Left)
| System.Windows.Forms.AnchorStyles.Right)));
this.DownloadImageButton.Cursor = System.Windows.Forms.Cursors.Hand;
this.DownloadImageButton.Location = new System.Drawing.Point(12, 496);
this.DownloadImageButton.Name = "DonwloadImageButton";
this.DownloadImageButton.Size = new System.Drawing.Size(435, 49);
this.DownloadImageButton.TabIndex = 1;
this.DownloadImageButton.Text = "Загрузить";
this.DownloadImageButton.UseVisualStyleBackColor = true;
this.DownloadImageButton.Click += new System.EventHandler(this.DonwloadImageButton_Click);
//
// Form1
//
this.AutoScaleDimensions = new System.Drawing.SizeF(8F, 19F);
this.AutoScaleMode = System.Windows.Forms.AutoScaleMode.Font;
this.ClientSize = new System.Drawing.Size(459, 557);
this.Controls.Add(this.DownloadImageButton);
this.Controls.Add(this.ImagePictureBox);
this.Name = "Form1";
this.StartPosition = System.Windows.Forms.FormStartPosition.CenterScreen;
this.Text = "Главное окно";
((System.ComponentModel.ISupportInitialize)(this.ImagePictureBox)).EndInit();
this.ResumeLayout(false);
}
#endregion
private PictureBox ImagePictureBox;
private Button DownloadImageButton;
}
}
Код формы с логикой программы
using System.Net.Http;
namespace ShowImagwFromInternetWinForm
{
public partial class MainForm : Form
{
public MainForm()
{
InitializeComponent();
}
/**
* Загружает изображение
* и возвращает его как массив байт
*
*/
private static byte[] DownloadImage(string url)
{
using var httpClient = new HttpClient();
var response = httpClient.GetByteArrayAsync(url).Result;
return response;
}
/**
*
* Обработчик нажатия кнопки загрзки
*
*/
private void DonwloadImageButton_Click(object sender, EventArgs e)
{
DownloadImageButton.Text = "Картинка загружается...";
// вызываем загрузку внутри отдельной задачи, чтобы не блокировать интерфейс
Task.Run(() =>
{
// загружаем картинку
var imageBytes = DownloadImage("https://source.unsplash.com/random");
// создаем объект Bitmap из массива байт
var bitmap = new Bitmap(new MemoryStream(imageBytes));
// Устанавливаем изображение для отображение пользователю
ImagePictureBox.Image = bitmap;
DownloadImageButton.Text = "Загрузить";
});
}
}
}
Таким образом, при запуске этой программы Вы увидите пустое окно, в которое при нажатии на кнопку
будет загружено изображение.
-

Создано 23.08.2022 08:29:08
-
Михаил Русаков

Копирование материалов разрешается только с указанием автора (Михаил Русаков) и индексируемой прямой ссылкой на сайт (http://myrusakov.ru)!
Добавляйтесь ко мне в друзья ВКонтакте: http://vk.com/myrusakov.
Если Вы хотите дать оценку мне и моей работе, то напишите её в моей группе: http://vk.com/rusakovmy.
Если Вы не хотите пропустить новые материалы на сайте,
то Вы можете подписаться на обновления: Подписаться на обновления
Если у Вас остались какие-либо вопросы, либо у Вас есть желание высказаться по поводу этой статьи, то Вы можете оставить свой комментарий внизу страницы.
Если Вам понравился сайт, то разместите ссылку на него (у себя на сайте, на форуме, в контакте):
-
Кнопка:
Она выглядит вот так:
-
Текстовая ссылка:
Она выглядит вот так: Как создать свой сайт
- BB-код ссылки для форумов (например, можете поставить её в подписи):

See how you can draw shapes, use colors, and render images in a WinForms app.

Windows Forms is a framework that lets you build desktop applications. You can click and drag components like buttons onto a visual user interface. It also helps you manually create various shapes within your code.
This article will show you how to add lines, shapes, and images to your application. This tutorial uses the Visual Studio 2019 Community Edition to show examples.
What Are the Built-In Classes Used for Drawing Graphics?
Windows Forms uses the C# programming language. Its built-in classes and methods allow you to draw various shapes onto a Windows Form canvas. These include the Graphics, Pen, Color, and Brush classes.
|
Class |
Description |
|---|---|
|
Graphics |
The Graphics class allows you to draw shapes and lines onto the canvas. It includes methods such as:
|
|
Pen |
The Pen class allows you to specify the properties of a ‘pen’ tip which you can use to draw your shapes. You can specify properties such as color, thickness, or dash style. Methods include:
|
|
Color |
A color object made up of R (red), G (green), and B (blue) values. You will need a color object for many of the built-in methods that create shapes. |
|
SolidBrush, HatchBrush, TextureBrush |
These brush classes derive from the «Brush» interface. These classes allow you to color in blank spaces on the canvas. You can also choose to fill the spaces using different patterns or textures. You can specify properties such as the color. |
|
Rectangle, Line, Polygon, Ellipse |
You can create objects based on these shapes, and use them when calling methods such as DrawRectangle(). Instead of passing the x, y, width, and height as arguments, you can choose to pass an existing Rectangle object instead. |
To view the source code for a running example of the above tutorial, visit the GitHub repository. You can try out the following examples once you’ve created a Winforms application.
How to Add a Paint on Form Load Event Handler
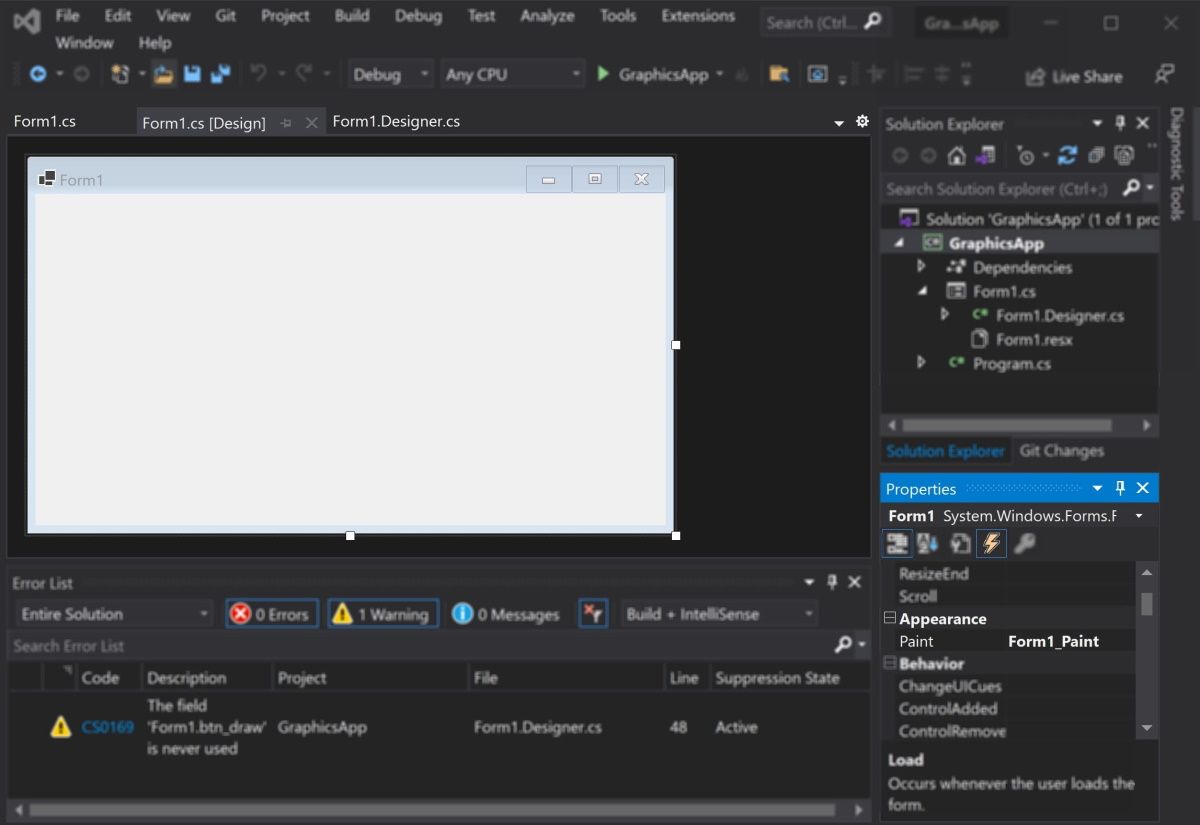
First, add an event handler to draw shapes when the canvas loads.
- Add a Paint function for the form.
 private void Form1_Paint(object sender, PaintEventArgs e)
{
    // Code goes here
} - Go into the Design View Tab.
- In the Properties window, select the lightning icon to open the «Events» tab.
- In «Paint», under «Appearance», select the Form1_Paint function. This will execute the function when you run the application.

How to Draw Lines Onto a Windows Form Canvas
You can use a Color, Pen, and the DrawLine() method to draw lines on a canvas.
- Inside the Form1_Paint() function, create a Color object with the color you want the line to be. Then, create a Pen object to draw the line with.
 Color black = Color.FromArgb(255, 0, 0, 0);
Pen blackPen = new Pen(black); - The DrawLine() method from the Graphics class will draw a line using the pen. This will start drawing a line from an x, y position to another x, y position.
e.Graphics.DrawLine(blackPen, 300, 200, 800, 200); - You can modify the properties for the pen object to change its width, dash style, and start or end cap.
 blackPen.Width = 20;
blackPen.DashStyle = System.Drawing.Drawing2D.DashStyle.Dash;
blackPen.StartCap = System.Drawing.Drawing2D.LineCap.ArrowAnchor;
e.Graphics.DrawLine(blackPen, 300, 200, 800, 200); - Press the green play button at the top of Visual Studio to see the changes.


How to Draw Shapes Such as Rectangles and Circles
You can use the shapes classes for different shapes, or draw shapes manually onto the canvas.
- Create a Color and Pen object as shown in the previous steps. Then, use the DrawRectangle() method to create the rectangle. The arguments are the x and y coordinates for the top-left of the rectangle, along with its width and height.
 Color red = Color.FromArgb(255, 255, 0, 0);
Pen redPen = new Pen(red);
redPen.Width = 5;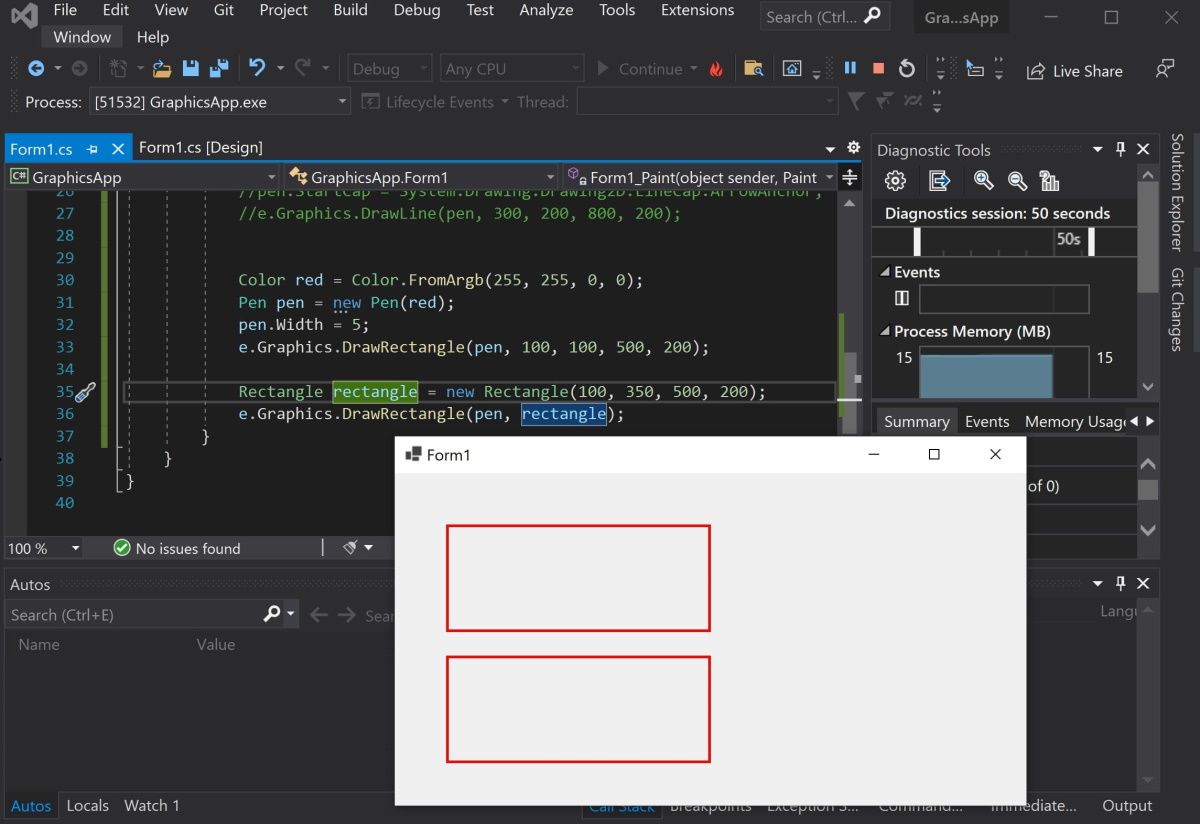
e.Graphics.DrawRectangle(redPen, 100, 100, 500, 200); - You can also create a rectangle using the Rectangle Class. First, create a Rectangle object. The arguments are also the x and y coordinates for the top-left corner, width, and height.
Rectangle rectangle = new Rectangle(100, 350, 500, 200); - Use the DrawRectangle() function to draw the rectangle. Instead of passing the x, y, width, and height like before, you can use the Rectangle object instead.
e.Graphics.DrawRectangle(redPen, rectangle); - Press the green play button at the top of Visual Studio to see the changes.

- Go back to the code to draw other shapes. Use the DrawEllipse() function to draw a circle.
 Color green = Color.FromArgb(255, 0, 255, 0);
Pen greenPen = new Pen(green);
greenPen.Width = 5;
e.Graphics.DrawEllipse(greenPen, 400, 150, 400, 400);
When you draw a circle, the x and y coordinates (x=400, y=150) refer to the top-left corner of the circle, not the center of the circle.

- To draw other shapes such as triangles or hexagons, use the DrawPolygon() method. Here you can specify a list of coordinates to represent the points of the shape.
 Color blue = Color.FromArgb(255, 0, 0, 255);
Pen bluePen = new Pen(blue);
bluePen.Width = 5;PointF[] coordinatesForTriangle = new PointF[] {
    new PointF(400, 150),
    new PointF(300, 300),
    new PointF(500, 300)
};e.Graphics.DrawPolygon(bluePen, coordinatesForTriangle);
The DrawPolygon() method will draw lines between the points specified.


How to Use the Brush Class to Fill In Shapes With Color
You can use the FillRectangle(), FillEllipses() or FillTriangle() methods to create shapes with a solid color.
- First, create a brush object.
 Color purple = Color.FromArgb(255, 128, 0, 0);
SolidBrush solidBrush = new SolidBrush(purple); - Use the FillRectangle(), FillEllipses() or FillTriangle() methods. They work the same way as the draw functions above, except instead of a Pen, they use a Brush object.
 e.Graphics.FillRectangle(solidBrush, 50, 50, 200, 250);
e.Graphics.FillEllipse(solidBrush, 300, 50, 200, 200);
e.Graphics.FillPolygon(solidBrush, new PointF[] { new PointF(700, 150), new PointF(600, 300), new PointF(800, 300) });
- You can also input a shape object directly instead of providing coordinates.
 Rectangle rectangle = new Rectangle(100, 350, 500, 200);
e.Graphics.FillRectangle(solidBrush, rectangle); - Use the HatchBrush to fill the shape using a different fill style, such as a horizontal or vertical pattern.
 Color blue = Color.FromArgb(255, 0, 0, 255);
Color green = Color.FromArgb(255, 0, 255, 0);
HatchBrush hatchBrush = new HatchBrush(HatchStyle.Horizontal, green, blue);
e.Graphics.FillRectangle(hatchBrush, 50, 50, 200, 250);
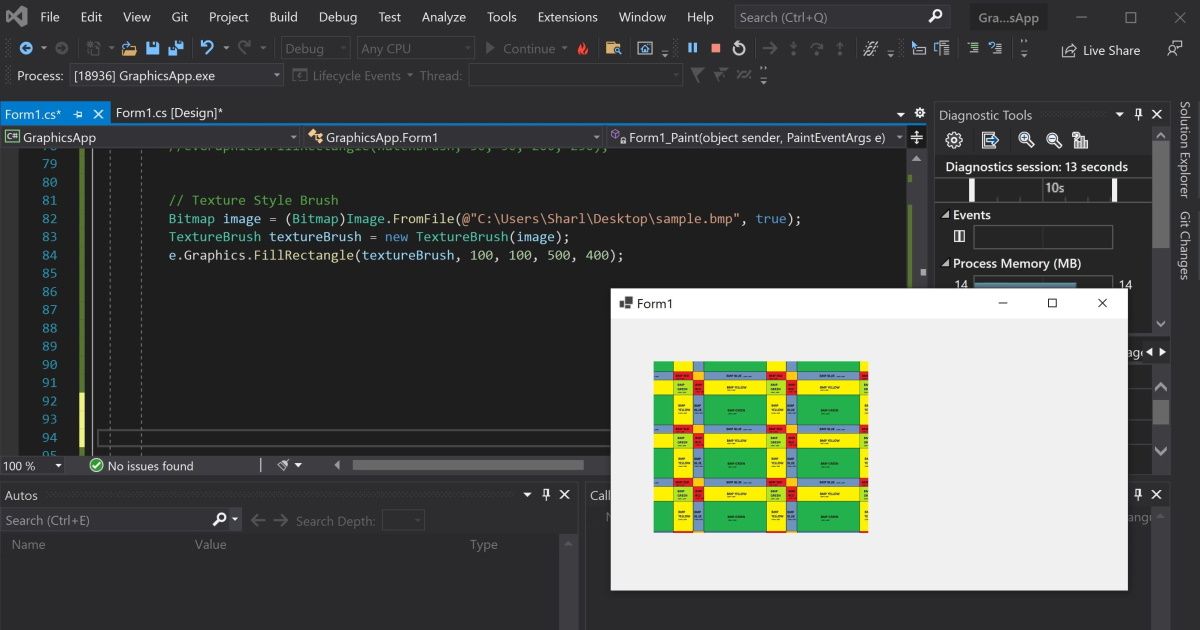
- You can use the TextureBrush to fill a shape using an image. Here, create a bitmap by pointing to an image file. Instead of creating a brush using a color, create it using the image.
 Bitmap image = (Bitmap)Image.FromFile(@"C:UsersSharlDesktopflag.bmp", true);
TextureBrush textureBrush = new TextureBrush(image);
e.Graphics.FillRectangle(textureBrush, 100, 100, 500, 400);

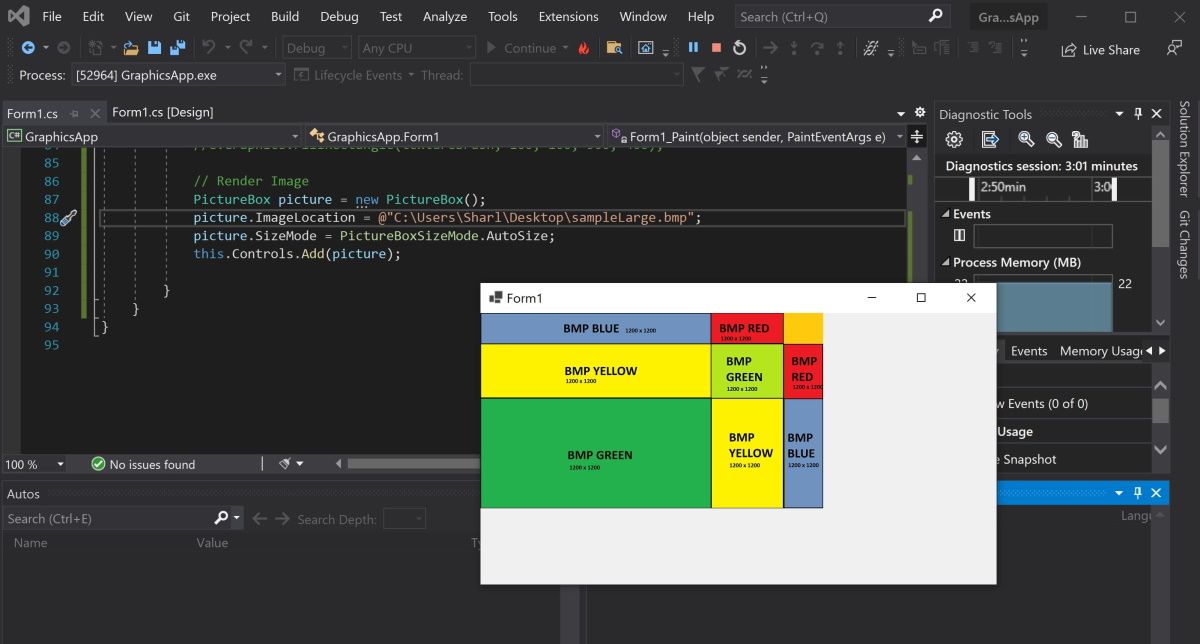
How to Render Images Onto the Form
To render an image, create a PictureBox control object and add it to the form.
- Create a PictureBox control object using an image file.
 PictureBox picture = new PictureBox();
picture.ImageLocation = @"C:UsersSharlDesktopflagLarge.bmp"; - Set the size of the image and add it onto the form so it renders.
 picture.SizeMode = PictureBoxSizeMode.AutoSize;
this.Controls.Add(picture); - Press the green start button at the top to view the image.

Adding More Shapes to Your Windows Form
You should now understand how to add lines, shapes, and images to your Windows form. You can combine shapes to create new shapes. You can also play around with the built-in functions to create more complex shapes.
See how you can draw shapes, use colors, and render images in a WinForms app.
Windows Forms is a framework that lets you build desktop applications. You can click and drag components like buttons onto a visual user interface. It also helps you manually create various shapes within your code.
This article will show you how to add lines, shapes, and images to your application. This tutorial uses the Visual Studio 2019 Community Edition to show examples.
What Are the Built-In Classes Used for Drawing Graphics?
Windows Forms uses the C# programming language. Its built-in classes and methods allow you to draw various shapes onto a Windows Form canvas. These include the Graphics, Pen, Color, and Brush classes.
|
Class |
Description |
|---|---|
|
Graphics |
The Graphics class allows you to draw shapes and lines onto the canvas. It includes methods such as:
|
|
Pen |
The Pen class allows you to specify the properties of a ‘pen’ tip which you can use to draw your shapes. You can specify properties such as color, thickness, or dash style. Methods include:
|
|
Color |
A color object made up of R (red), G (green), and B (blue) values. You will need a color object for many of the built-in methods that create shapes. |
|
SolidBrush, HatchBrush, TextureBrush |
These brush classes derive from the «Brush» interface. These classes allow you to color in blank spaces on the canvas. You can also choose to fill the spaces using different patterns or textures. You can specify properties such as the color. |
|
Rectangle, Line, Polygon, Ellipse |
You can create objects based on these shapes, and use them when calling methods such as DrawRectangle(). Instead of passing the x, y, width, and height as arguments, you can choose to pass an existing Rectangle object instead. |
To view the source code for a running example of the above tutorial, visit the GitHub repository. You can try out the following examples once you’ve created a Winforms application.
How to Add a Paint on Form Load Event Handler
First, add an event handler to draw shapes when the canvas loads.
- Add a Paint function for the form.
 private void Form1_Paint(object sender, PaintEventArgs e)
{
    // Code goes here
} - Go into the Design View Tab.
- In the Properties window, select the lightning icon to open the «Events» tab.
- In «Paint», under «Appearance», select the Form1_Paint function. This will execute the function when you run the application.
How to Draw Lines Onto a Windows Form Canvas
You can use a Color, Pen, and the DrawLine() method to draw lines on a canvas.
- Inside the Form1_Paint() function, create a Color object with the color you want the line to be. Then, create a Pen object to draw the line with.
 Color black = Color.FromArgb(255, 0, 0, 0);
Pen blackPen = new Pen(black); - The DrawLine() method from the Graphics class will draw a line using the pen. This will start drawing a line from an x, y position to another x, y position.
e.Graphics.DrawLine(blackPen, 300, 200, 800, 200); - You can modify the properties for the pen object to change its width, dash style, and start or end cap.
 blackPen.Width = 20;
blackPen.DashStyle = System.Drawing.Drawing2D.DashStyle.Dash;
blackPen.StartCap = System.Drawing.Drawing2D.LineCap.ArrowAnchor;
e.Graphics.DrawLine(blackPen, 300, 200, 800, 200); - Press the green play button at the top of Visual Studio to see the changes.
How to Draw Shapes Such as Rectangles and Circles
You can use the shapes classes for different shapes, or draw shapes manually onto the canvas.
- Create a Color and Pen object as shown in the previous steps. Then, use the DrawRectangle() method to create the rectangle. The arguments are the x and y coordinates for the top-left of the rectangle, along with its width and height.
 Color red = Color.FromArgb(255, 255, 0, 0);
Pen redPen = new Pen(red);
redPen.Width = 5;
e.Graphics.DrawRectangle(redPen, 100, 100, 500, 200); - You can also create a rectangle using the Rectangle Class. First, create a Rectangle object. The arguments are also the x and y coordinates for the top-left corner, width, and height.
Rectangle rectangle = new Rectangle(100, 350, 500, 200); - Use the DrawRectangle() function to draw the rectangle. Instead of passing the x, y, width, and height like before, you can use the Rectangle object instead.
e.Graphics.DrawRectangle(redPen, rectangle); - Press the green play button at the top of Visual Studio to see the changes.
- Go back to the code to draw other shapes. Use the DrawEllipse() function to draw a circle.
 Color green = Color.FromArgb(255, 0, 255, 0);
Pen greenPen = new Pen(green);
greenPen.Width = 5;
e.Graphics.DrawEllipse(greenPen, 400, 150, 400, 400);
When you draw a circle, the x and y coordinates (x=400, y=150) refer to the top-left corner of the circle, not the center of the circle.
- To draw other shapes such as triangles or hexagons, use the DrawPolygon() method. Here you can specify a list of coordinates to represent the points of the shape.
 Color blue = Color.FromArgb(255, 0, 0, 255);
Pen bluePen = new Pen(blue);
bluePen.Width = 5;PointF[] coordinatesForTriangle = new PointF[] {
    new PointF(400, 150),
    new PointF(300, 300),
    new PointF(500, 300)
};e.Graphics.DrawPolygon(bluePen, coordinatesForTriangle);
The DrawPolygon() method will draw lines between the points specified.
How to Use the Brush Class to Fill In Shapes With Color
You can use the FillRectangle(), FillEllipses() or FillTriangle() methods to create shapes with a solid color.
- First, create a brush object.
 Color purple = Color.FromArgb(255, 128, 0, 0);
SolidBrush solidBrush = new SolidBrush(purple); - Use the FillRectangle(), FillEllipses() or FillTriangle() methods. They work the same way as the draw functions above, except instead of a Pen, they use a Brush object.
 e.Graphics.FillRectangle(solidBrush, 50, 50, 200, 250);
e.Graphics.FillEllipse(solidBrush, 300, 50, 200, 200);
e.Graphics.FillPolygon(solidBrush, new PointF[] { new PointF(700, 150), new PointF(600, 300), new PointF(800, 300) }); - You can also input a shape object directly instead of providing coordinates.
 Rectangle rectangle = new Rectangle(100, 350, 500, 200);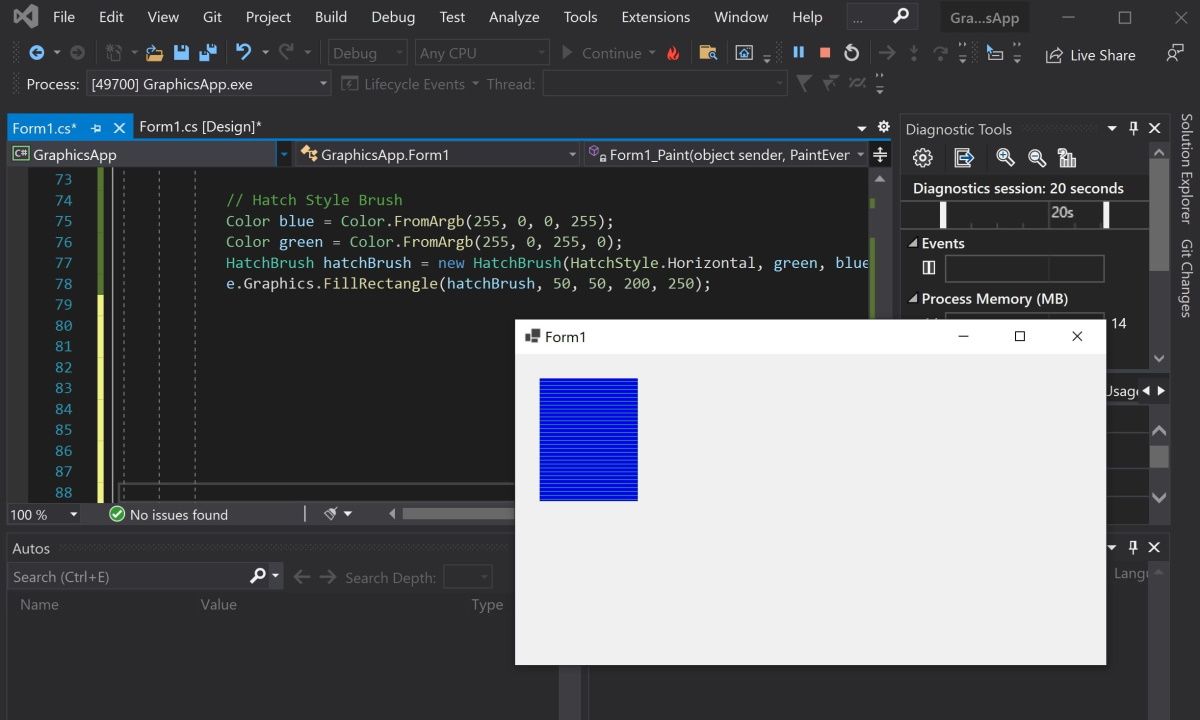
e.Graphics.FillRectangle(solidBrush, rectangle); - Use the HatchBrush to fill the shape using a different fill style, such as a horizontal or vertical pattern.
 Color blue = Color.FromArgb(255, 0, 0, 255);
Color green = Color.FromArgb(255, 0, 255, 0);
HatchBrush hatchBrush = new HatchBrush(HatchStyle.Horizontal, green, blue);
e.Graphics.FillRectangle(hatchBrush, 50, 50, 200, 250); - You can use the TextureBrush to fill a shape using an image. Here, create a bitmap by pointing to an image file. Instead of creating a brush using a color, create it using the image.
 Bitmap image = (Bitmap)Image.FromFile(@"C:UsersSharlDesktopflag.bmp", true);
TextureBrush textureBrush = new TextureBrush(image);
e.Graphics.FillRectangle(textureBrush, 100, 100, 500, 400);
How to Render Images Onto the Form
To render an image, create a PictureBox control object and add it to the form.
- Create a PictureBox control object using an image file.
 PictureBox picture = new PictureBox();
picture.ImageLocation = @"C:UsersSharlDesktopflagLarge.bmp"; - Set the size of the image and add it onto the form so it renders.
 picture.SizeMode = PictureBoxSizeMode.AutoSize;
this.Controls.Add(picture); - Press the green start button at the top to view the image.
Adding More Shapes to Your Windows Form
You should now understand how to add lines, shapes, and images to your Windows form. You can combine shapes to create new shapes. You can also play around with the built-in functions to create more complex shapes.
- Remove From My Forums
-
Question
-
hi guys,
how do i add an image or icon to my winform form ?
e.g. see this
thanks
Ehi
Answers
-
not really, e.g. in a webform you add the image control and then specify the path for the image.
Likewise in the webform, I dont see any image control in the toolbox to add ???
Its simply just to make it fancy, nothing more.
Hi Ehioze,
Welcome to the MSDN Forum.
Maybe you want to draw the picture without any control, but show it as a background and you don’t want to set the background-Image, than you can do like the following sample:
public partial class Form1 : Form
{
    public Form1()
    {
        InitializeComponent();

        SetStyle(ControlStyles.ResizeRedraw, true);

        InitilizePicture();
    }

    Bitmap b = new Bitmap(1600, 900);
    Rectangle rect;
    Rectangle sourceRect;
    Image picture;
    Graphics g;

    private void InitilizePicture()
    {
        picture = Image.FromFile(Path.Combine(Environment.CurrentDirectory,"BG.jpg"));
        b.SetResolution(picture.HorizontalResolution, picture.VerticalResolution);
        g = Graphics.FromImage(b);

        rect = new Rectangle(0, 0,1600, 900);
      //  sourceRect = new Rectangle(new Point(0, 0), new Size(picture.Width, picture.Height));
        sourceRect = new Rectangle(0, 0, picture.Width, picture.Height);

        g.DrawImage(picture, rect, sourceRect, GraphicsUnit.Pixel);
    }

    private void Form1_MouseClick(object sender, MouseEventArgs e)
    {
        Close();
    }

    protected override void OnPaint(PaintEventArgs e)
    {
        e.Graphics.DrawImage(b, rect, sourceRect, GraphicsUnit.Pixel);
        base.OnPaint(e);

    }
}
And you can add a property with set method so that you can change the image.
On the other hand, you can also add the BackgroundImage by using the Visual Studio.
Best Regards
Neddy Ren[MSFT]
MSDN Community Support | Feedback to us
-
Marked as answer by
Thursday, November 24, 2011 9:16 AM
-
Marked as answer by
Покажем, как загрузить картинку в PictureBox из файла, используя язык программирования C#.
Для того чтобы загрузить картинку в PictureBox из файла, воспользуйтесь следующим кодом:
|
1 2 3 4 5 6 7 8 9 10 11 12 13 14 15 16 17 18 19 20 |
Bitmap image; //Bitmap для открываемого изображения OpenFileDialog open_dialog = new OpenFileDialog(); //создание диалогового окна для выбора файла open_dialog.Filter = «Image Files(*.BMP;*.JPG;*.GIF;*.PNG)|*.BMP;*.JPG;*.GIF;*.PNG|All files (*.*)|*.*»; //формат загружаемого файла if (open_dialog.ShowDialog() == DialogResult.OK) //если в окне была нажата кнопка «ОК» { try { image = new Bitmap(open_dialog.FileName); //вместо pictureBox1 укажите pictureBox, в который нужно загрузить изображение this.pictureBox1.Size = image.Size; pictureBox1.Image = image; pictureBox1.Invalidate(); } catch { DialogResult rezult = MessageBox.Show(«Невозможно открыть выбранный файл», «Ошибка», MessageBoxButtons.OK, MessageBoxIcon.Error); } } |
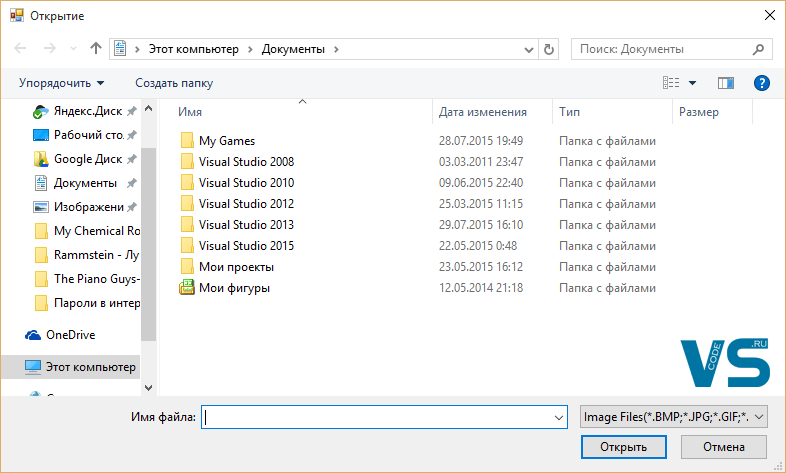
Диалоговое окно выбора файла
В случае ошибки открытия файла будет выведен MessageBox с соответствующим предупреждением.
Также в видео ниже подробно демонстрируется написание кода открытия изображения в PictureBox:
Скачать листинг
О том, как сохранить изображение из PictureBox можно прочитать вот здесь.