Built to run applications from a wide assortment of third-party sources on a server, Python is easily one of the most widely used open-source programming languages out there that lets you integrate systems efficiently and get work done quickly. And PIP is the best tool for the purposes of installing and managing Python packages. Python users would concur.
Although PIP comes pre-packaged with the newest versions of Python, if you’re using an older version, you will have to install PIP on Windows yourself. Here is everything you need to know about installing PIP on Windows 11.
What is PIP?
PIP (or Preferred installer program) is a tool that enables third-party package installations and is the standard package manager for Python. Through PIP, you can install and manage packages that contain some features that are not available in the standard Python library. As such, a wide variety of applications use PIP to install binary packages, which is one of the reasons for its widespread fame.
Related: Windows 11 Shortcuts: Our Complete List
How to check if PIP is already installed
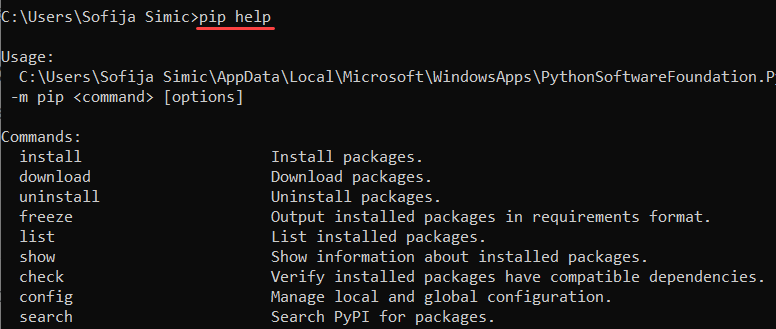
As mentioned, PIP is so important for Python that it has been included with the Python installer since Python version 3.4 (for Python 3) and Python version 2.7.9 (for Python 2). That means it’s possible that you most probably have PIP already installed. To check if that is the case, first, open an elevated instance of the Command Prompt.
To do so, press Start, type cmd, then click on Run as administrator.

Then type the following command:
pip help

If the command prompt tells you that “‘pip’ is not recognized as an internal or external command, operable program or batch file”, it is either not installed or its system variable path hasn’t been set. If you’re sure that PIP has been installed, then go to the last section to know the fix.

If for some reason you don’t have pip installed or are using an older version, here are the steps to install pip on Windows 11.
Related: How to Create a Restore Point in Windows 11
Method #01: Install PIP while installing/upgrading Python 3
Download python from here.
Once downloaded, run the setup file. Then click on Customize installation.

Here, make sure there’s a tick next to ‘pip’ to ensure that it gets installed.

Although you wouldn’t need to do this for newer versions of Python, it is one way to be sure that it does get installed. Click on ‘Next’ and go ahead with the installation.

Method #02: Using get-pip.py file and command line
Well, here is how to fix an existing PIP installation or install a new one if you already got Pything but only want to install PIP now.
Step 1: Download the get-pip.py file
Firstly, download the get-pip.py file.
You may notice upon clicking the link that you are taken to a new page with a bunch of binary data. In that case, press ctrl+s to save the file. However, to easily download it, you will have to right-click on the link given above and select Save links as… option and then save the file on your hard disk.

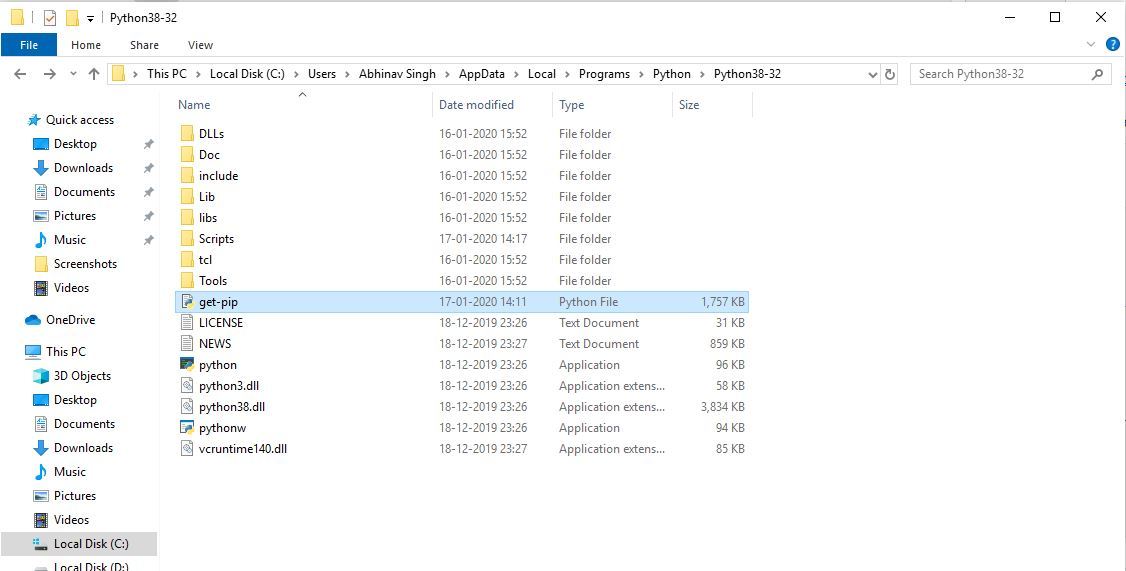
Copy the file to the same directory where Python is installed. For us, it is Pythin39 but it may change for you depending on what version of Python 2 or 3 you have installed. So, the python folder for us is here: C:Users(username)AppDataLocalProgramsPythonPython39.
Step 2: Install PIP via Command Prompt
Now, to install PIP, open the Command Prompt as shown before. Change the current path directory to the directory where the file is saved by typing the following command and press Enter:
cd C:UsersshashAppDataLocalProgramsPythonPython39

Now, type the following command and press Enter:
python get-pip.py

Wait for the installation process to complete. Once it’s done, you will see the ‘Successfully installed pip…’ message.

And that’s it! PIP is now installed on your system.
How to check PIP version and verify PIP installation
Just to be sure, you can verify whether pip has been properly installed or not by checking its version. To do so, enter the following command in the Command Prompt and hit Enter:
pip -V

The Command Prompt will show you the PIP version in the next line.

How to upgrade PIP
PIP, just like every software, gets updated from time to time and it’s important to stay updated to get the most out of the latest features and bug fixes. In fact, you can even update PIP with a simple command line. Here’s how to do so:
Open the Command Prompt as shown before. Then type the following command line and press Enter:
python -m pip install --upgrade pip

This will uninstall the previous version and get you updated to the latest PIP version.
How to downgrade PIP
On the other hand, if you are experiencing compatibility issues with the latest version of PIP, you may want to downgrade it to a previous version. Here’s how you can downgrade PIP:
Open the Command Prompt and enter the following command, followed by the specific PIP version number, and press Enter:
python -m pip install pip==(version number)

This will uninstall the previous version and install the PIP version that you’ve specified.
Fix: ‘PIP’ is not recognized as an internal or external command
There may be times when, while running the PIP command, the Command Prompt gives the “not recognized as an internal or external command” error message. There can be two causes for this – either PIP is not installed on your computer, or it’s not added to the PATH environment variable.
Since we’ve already shown how to install PIP on Windows 11, the problem most definitely lies with the Path environment variable not being updated. To fix this error message, follow the instructions given below:
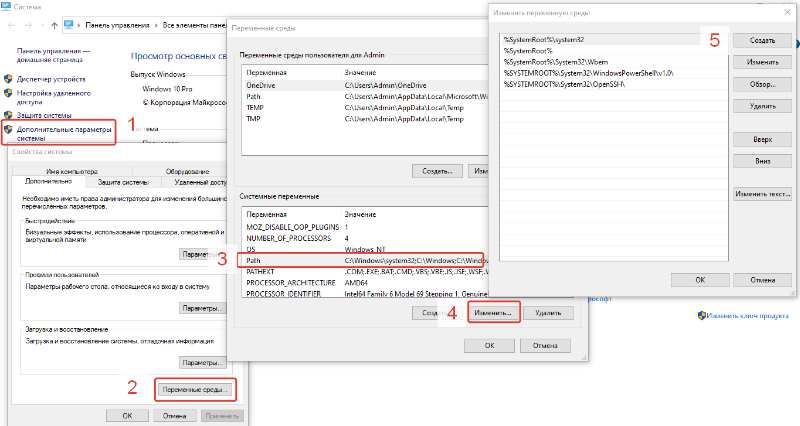
Press Start and search for System Environment Variables, and click on the first option.

Now click on Environment Variables.

Under ‘System Variables’, double-click on Path.

Here, click on New.

Then add the location where ‘PIP’ is installed. By default this is C:Users(username)AppDataLocalProgramsPythonPython39Scripts

Click OK on all open windows.

Now open a new instance of Command Prompt and try the ‘pip’ command again. Because the command prompt now knows where to look for the ‘pip’ command, it won’t throw up the error message again.
So this is how you can install PIP on Windows 11, upgrade, or downgrade it.
RELATED
- How to Change a Wallpaper on Windows 11
- How to Ungroup Icons on Windows 11 Taskbar With a Registry Hack
- What Windows 11 Services to Disable Safely and How?
- How to Show Hidden Files on Windows 11
- How to Change Brightness on Windows 11
- How to Find Product Key on Windows 11
Содержание
- Требование к установки Python PIP в Windows
- Перед началом работы: Проверьте, установлен ли PIP уже
- Установка PIP В Windows
- Шаг 1: Загрузите PIP get-pip.py
- Шаг 2: Установка PIP в Windows
- Шаг 3: Проверка установки pip в ОС Windows
- Шаг 4. Добавьте PiP в переменную среду Windows PATH
- Шаг 5: Настройка
- Обновление PIP для Python в Windows
- Понизить версию PIP
PIP — это система управления пакетами, используемая для установки и управления программными пакетами, написанными на Python. Это означает “preferred installer program” или “Pip Installs Packages”.
PIP для Python — это утилита для управления установкой пакетов PyPI из командной строки.
Если вы используете более старую версию Python в Windows, то вам может потребоваться установить PIP. Вы можете легко установить PIP в Windows, для этого загрузите установочный пакет, открыв командную строку и запустив программу установки.
В этой статье будет подробно показано, как установить PIP в Windows, проверить его версию, обновить и настроить.
Примечание: Последние версии Python поставляются с предустановленным PIP, но более старые версии требуют установки вручную. Следующее руководство предназначено для версии 3.4 и выше. Если вы используете более старую версию Python, вы можете обновить Python через веб-сайт Python.
Требование к установки Python PIP в Windows
- Компьютер под управлением Windows или Windows server
- Доступ к окну командной строки
Перед началом работы: Проверьте, установлен ли PIP уже
PIP автоматически устанавливается с Python 2.7.9+ и Python 3.4+ и поставляется с виртуальными средами virtualenv и pyvenv.
Перед установкой PIP в Windows проверьте, не установлен ли PIP уже.
1. Запустите окно командной строки:
- Нажмите клавишу Windows + X.
- Нажмите кнопку Выполнить.
- Введите cmd.exe и нажми «Ввод».
Либо просто введите cmd в строке поиска Windows и щелкните значок “Командная строка”.
2. Введите следующую команду в командной строке:
pip help
Если PIP отвечает, то PIP установлен. В противном случае появится сообщение об ошибке, в котором говорится, что программа не найдена.

Выполните действия, описанные ниже, чтобы установить PIP в Windows.
Шаг 1: Загрузите PIP get-pip.py
Перед установкой PIP скачайте get-pip.py файл.
1. Запустите командную строку, если она еще не открыта. Для этого откройте строку поиска Windows, введите cmd и нажмите на значок командной строки.
2. Далее выполните следующую команду, чтобы загрузить get-pip.py файл:
curl https://bootstrap.pypa.io/get-pip.py -o get-pip.py

Шаг 2: Установка PIP в Windows
Чтобы установить PIP, введите следующую команду в cmd:
python get-pip.py

Если файл не найден, дважды проверьте путь к папке, в которой вы сохранили файл. Вы можете просмотреть содержимое текущего каталога, используя следующую команду:
dir
Команда dir возвращает полный список содержимого каталога.
Шаг 3: Проверка установки pip в ОС Windows
После установки PIP вы можете проверить, была ли установка успешной, для этого введите следующую команду:
pip help
Если PIP был установлен, программа запускается, и вы должны увидеть расположение пакета программного обеспечения и список команд, с которыми вы можете работать pip.

Если вы получите сообщение об ошибке, тогда повторите процесс установки.
Шаг 4. Добавьте PiP в переменную среду Windows PATH
Чтобы запустить PIP из любого места, вам необходимо добавить его в переменные среды Windows, чтобы избежать ошибки «not on PATH«. Для этого выполните действия, описанные ниже:
- Откройте компьютер и нажмите свойства
- Далее дополнительные параметры системы
- Нажмите на кнопку Переменные среды и дважды щелкните переменную Пути в Системных переменных.
- Затем выберите Создать и добавьте каталог, в который вы установили PIP.
- Нажмите кнопку ОК, чтобы сохранить изменения.

Добавьте PiP в переменную среду Windows PATH
Шаг 5: Настройка
В Windows файл конфигурации PIP является %HOME%pippip.ini.
Существует также устаревший файл конфигурации для каждого пользователя. Файл находится по адресу %APPDATA%pippip.ini.
Вы можете задать пользовательский путь для этого файла конфигурации с помощью переменной среды PIP_CONFIG_FILE.
Обновление PIP для Python в Windows
Время от времени выпускаются новые версии PIP. Эти версии могут улучшить функциональность или быть обязательными в целях безопасности.
Чтобы проверить текущую версию PIP, запустите:
pip --version

Чтобы обновить PIP в Windows, введите следующую команду в командной строке:
python -m pip install --upgrade pip
Эта команда удаляет старую версию PIP, а затем устанавливает самую последнюю версию PIP.
Понизить версию PIP
Понижение версии может потребоваться, если новая версия PIP начнет работать нестабильно. Чтобы понизить PIP до предыдущей версии, укажите нужную версию.
Чтобы понизить версию PIP, используйте синтаксис:
python -m pip install pip==version_number
Например, чтобы перейти на версию 18.1, вы должны ввести команду:
python -m pip install pip==18.1
Теперь вы должны увидеть версию PIP, которую вы указали.
Заключение
Поздравляю, вы установили PIP для Python в Windows. Ознакомьтесь с другими нашими руководствами, чтобы узнать, как установить PIP в других операционных системах:
- Установка PIP в Ubuntu
- ИСПРАВЛЕНИЕ “E: INVALID OPERATION PYTHON3-PIP” В KALI LINUX
Теперь, когда у вас запущен и запущен PIP, вы готовы управлять своими пакетами Python.
NumPy — это библиотека для языка программирования Python, добавляющая поддержку больших многомерных массивов и матриц. Ознакомьтесь с нашим руководством и узнайте, как установить NumPy с помощью PIP.
Python 3.4+ and 2.7.9+
Good news! Python 3.4 (released March 2014) and Python 2.7.9 (released December 2014) ship with Pip. This is the best feature of any Python release. It makes the community’s wealth of libraries accessible to everyone. Newbies are no longer excluded from using community libraries by the prohibitive difficulty of setup. In shipping with a package manager, Python joins Ruby, Node.js, Haskell, Perl, Go—almost every other contemporary language with a majority open-source community. Thank you, Python.
If you do find that pip is not available, simply run ensurepip.
-
On Windows:
py -3 -m ensurepip -
Otherwise:
python3 -m ensurepip
Of course, that doesn’t mean Python packaging is problem solved. The experience remains frustrating. I discuss this in the Stack Overflow question Does Python have a package/module management system?.
Python 3 ≤ 3.3 and 2 ≤ 2.7.8
Flying in the face of its ‘batteries included’ motto, Python ships without a package manager. To make matters worse, Pip was—until recently—ironically difficult to install.
Official instructions
Per https://pip.pypa.io/en/stable/installing/#do-i-need-to-install-pip:
Download get-pip.py, being careful to save it as a .py file rather than .txt. Then, run it from the command prompt:
python get-pip.py
You possibly need an administrator command prompt to do this. Follow Start a Command Prompt as an Administrator (Microsoft TechNet).
This installs the pip package, which (in Windows) contains …Scriptspip.exe that path must be in PATH environment variable to use pip from the command line (see the second part of ‘Alternative Instructions’ for adding it to your PATH,
Alternative instructions
The official documentation tells users to install Pip and each of its dependencies from source. That’s tedious for the experienced and prohibitively difficult for newbies.
For our sake, Christoph Gohlke prepares Windows installers (.msi) for popular Python packages. He builds installers for all Python versions, both 32 and 64 bit. You need to:
- Install setuptools
- Install pip
For me, this installed Pip at C:Python27Scriptspip.exe. Find pip.exe on your computer, then add its folder (for example, C:Python27Scripts) to your path (Start / Edit environment variables). Now you should be able to run pip from the command line. Try installing a package:
pip install httpie
There you go (hopefully)! Solutions for common problems are given below:
Proxy problems
If you work in an office, you might be behind an HTTP proxy. If so, set the environment variables http_proxy and https_proxy. Most Python applications (and other free software) respect these. Example syntax:
http://proxy_url:port
http://username:password@proxy_url:port
If you’re really unlucky, your proxy might be a Microsoft NTLM proxy. Free software can’t cope. The only solution is to install a free software friendly proxy that forwards to the nasty proxy. http://cntlm.sourceforge.net/
Unable to find vcvarsall.bat
Python modules can be partly written in C or C++. Pip tries to compile from source. If you don’t have a C/C++ compiler installed and configured, you’ll see this cryptic error message.
Error: Unable to find vcvarsall.bat
You can fix that by installing a C++ compiler such as MinGW or Visual C++. Microsoft actually ships one specifically for use with Python. Or try Microsoft Visual C++ Compiler for Python 2.7.
Often though it’s easier to check Christoph’s site for your package.
Prerequisite: Python Language Introduction
Before we start with how to install pip for Python on Windows, let’s first go through the basic introduction to Python. Python is a widely-used general-purpose, high-level programming language. Python is a programming language that lets you work quickly and integrate systems more efficiently.
PIP is a package management system used to install and manage software packages/libraries written in Python. These files are stored in a large “online repository” termed as Python Package Index (PyPI). pip uses PyPI as the default source for packages and their dependencies. So whenever you type:
pip install package_name
pip will look for that package on PyPI and if found, it will download and install the package on your local system.
Check if Python is installed
Run the following command to test if python is installed or not. If not click here.
python --version
If it is installed, You will see something like this:
Python 3.10.0
Download and Install pip
The PIP can be downloaded and installed using the command line by going through the following steps:
Method 1: Using cURL in Python
Curl is a UNIX command that is used to send the PUT, GET, and POST requests to a URL. This tool is utilized for downloading files, testing REST APIs, etc.
Step 1: Open the cmd terminal
Step 2: In python, a curl is a tool for transferring data requests to and from a server. Use the following command to request:
curl https://bootstrap.pypa.io/get-pip.py -o get-pip.py
python get-pip.py

Method 2: Manually install PIP on Windows
Pip must be manually installed on Windows. You might need to use the correct version of the file from pypa.org if you’re using an earlier version of Python or pip. Get the file and save it to a folder on your PC.
Step 1: Download the get-pip.py (https://bootstrap.pypa.io/get-pip.py) file and store it in the same directory as python is installed.
Step 2: Change the current path of the directory in the command line to the path of the directory where the above file exists.

Step 3: get-pip.py is a bootstrapping script that enables users to install pip in Python environments. Run the command given below:
python get-pip.py
Step 4: Now wait through the installation process. Voila! pip is now installed on your system.

Verification of the installation process
One can easily verify if the pip has been installed correctly by performing a version check on the same. Just go to the command line and execute the following command:
pip -V
or
pip --version

Adding PIP To Windows Environment Variables
If you are facing any path error then you can follow the following steps to add the pip to your PATH. You can follow the following steps to set the Path:
- Go to System and Security > System in the Control Panel once it has been opened.
- On the left side, click the Advanced system settings link.
- Then select Environment Variables.
- Double-click the PATH variable under System Variables.
- Click New, and add the directory where pip is installed, e.g. C:Python33Scripts, and select OK.
Upgrading Pip On Windows
pip can be upgraded using the following command.
python -m pip install -U pip
Downgrading Pip On Windows
It may happen sometimes that your pip current pip version is not supporting your current version of python or machine for that you can downgrade your pip version with the following command.
Note: You can mention the version you want to install
python -m pip install pip==17.0
Программные пакеты Python устанавливаются и управляются с помощью пакетов установки Pip (pip). Как правило, он используется для пакетов в индексе пакетов Python. Ваша системная переменная PATH должна быть установлена так, чтобы команды Python можно было запускать из командной строки Windows.
Если вы установили Python через установочный файл, он должен добавиться автоматически. Пользователи пакета Python часто получают сообщение об ошибке pip не работает и не знают, как это исправить. Ознакомьтесь с этими советами по устранению этой ошибки, если вы столкнулись с ней.

Содержание страницы
-
Как исправить установку PIP, не работающую в Windows 10/11
- Исправление 1: убедитесь, что PIP был добавлен в вашу переменную PATH
- Исправление 2: добавьте PIP в переменную среды PATH
- Исправление 3: убедитесь, что Pip включен в установку
- Исправление 4: переустановите его
Как исправить установку PIP, не работающую в Windows 10/11
Хотя это техническая вещь, вы можете исправить это, даже если у вас почти нет знаний о том, как исправить установку PIP, не работающую на ПК с Windows 10/11. Итак, давайте проверим, как это сделать:
Исправление 1: убедитесь, что PIP был добавлен в вашу переменную PATH
- Откройте CMD с правами администратора.
-
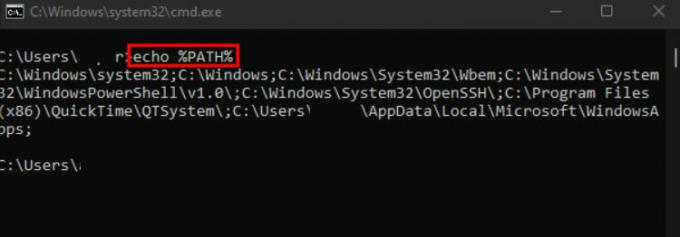
Теперь выполните команду: эхо% ПУТЬ%

- В зависимости от вашей версии Python вы найдете такой путь, как «C:/Python39/Scripts». Если это так, то путь добавляется, и теперь вы увидите, что установка PIP снова начинает работать.
Исправление 2: добавьте PIP в переменную среды PATH
- Откройте окно «Выполнить» и найдите sysdm.cpl чтобы открыть свойства системы.
- Теперь переключитесь на Передовой вкладку и нажмите на Переменные среды.
-
Затем доступ Системные переменные и выберите Дорожка.
-
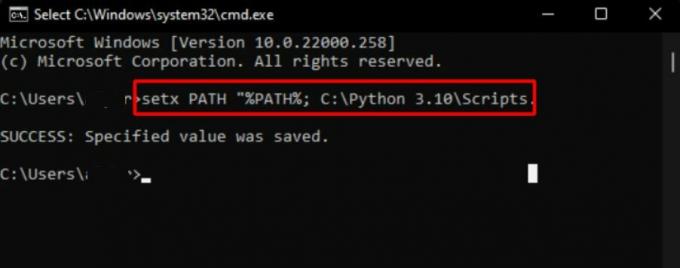
Теперь нажмите на Редактировать кнопку и нажмите на Новый чтобы добавить путь установки pip. Однако, чтобы добавить путь установки pip, вы должны открыть CMD и выполнить эту команду: setx ПУТЬ «% ПУТЬ%; C:Python39Скрипты

Исправление 3: убедитесь, что Pip включен в установку
- Откройте страницу настроек Windows и перейдите в Программы раздел.
- Затем щелкните правой кнопкой мыши на Питон и ударил Изменять кнопка.
- Теперь нажмите на Изменить вариант и под Дополнительные особенности, проверить точка коробка и удар Следующий.
- Вот и все. Теперь, чтобы сохранить изменения, нажмите кнопку Установить кнопка.
После этого обязательно перезагрузите компьютер с Windows 10/11 и проверьте, устранена ли ошибка установки PIP, не работающая или нет.
Исправление 4: переустановите его
Эта ошибка обычно возникает из-за проблемы с установкой Python или неправильно настроенной переменной PATH. Чтобы решить эту проблему, переустановите Python и все его компоненты. Использование исполняемого установщика Python — самый простой способ. Вы можете сделать это, выполнив следующие действия:
Объявления
- Откройте страницу настроек Windows и перейдите в Программы раздел.
- Затем щелкните правой кнопкой мыши на Питон и ударил удалить кнопка.
- После этого перезагрузите устройство и снова загрузите Python.
- Затем установите его, как обычно, и проверьте, устранена ли ошибка установки PIP, которая не работает.
Итак, это все о том, как исправить установку PIP, не работающую в Windows 10/11. Мы надеемся, что вы найдете это руководство полезным. Между тем, если у вас есть какие-либо сомнения или вопросы, прокомментируйте ниже и дайте нам знать.
Что представляют собой пакеты и модули, откуда их брать и что с ними делать.
https://gbcdn.mrgcdn.ru/uploads/post/1340/og_cover_image/a9b1c9e84cf2c603aa80f227403c4177

Прежде чем что-то устанавливать, давайте разберёмся, что такое пакет, чем он отличается от модуля, и как с ним работать. У слова «пакет» применительно к Python два значения.
C одной стороны, пакеты Python — это Py-приложения, дополнения или утилиты, которые можно установить из внешнего репозитория: Github, Bitbucket, Google Code или официального Python Package Index. На сервере пакеты хранятся в .zip и .tar архивах, либо в дополнительной упаковке — «яйцах» (.egg, старый формат) или «колесах» (.whl). В составе пакета, как правило, есть сценарий установки setup.py, который хранит сведения о зависимостях — других пакетах и модулях, без которых пакет работать не будет.
С другой стороны, если речь об архитектуре Python-приложения, пакет — это каталог, внутри которого файл __init__.py и, опционально, другие каталоги и файлы .py. Так большую Python-программу разбивают на пакеты и модули. Модуль — файл с исходным кодом, который можно использовать в других приложениях: как «заготовку» для будущих проектов или как часть библиотеки/фреймворка. Но к теме статьи это прямого отношения не имеет, поэтому дальше мы будем говорить только о пакетах из репозиториев.
Чтобы за секунды устанавливать пакеты со всеми зависимостями, используют менеджер пакетов pip или модуль easy_install. В большинстве случаев рекомендуется использовать pip. И только если у вас есть инфраструктура на пакетах .egg, которые pip не открывает, нужен easy_install.
Установка PIP для Python 3 и 2
Если вы используете виртуальные окружения на базе venv или virtualenv, pip уже установлен. Начиная с Python 3.4 (для Python 2 — с версии 2.7.9) pip поставляется вместе с интерпретатором. Для более ранних версий устанавливать менеджер пакетов нужно вручную. Вариантов два:
-
C помощью скрипта get_pip.py — быстро.
-
Через setuptools — кроме pip сможем использовать easy_install.
Вариант 1. Скачиваем скрипт get_pip.py и запускаем в консоли. Для этого открываем терминал через Win+R>»cmd»>OK и пишем:
python get_pip.py
Остальное установщик сделает сам: если нужно, попутно установит wheel (для распаковки .whl-колес) и setuptools. Чтобы запретить инсталляцию дополнительных инструментов, можно добавить в строку ключи —no-setuptools и/или —no-wheels.
Если возникает ошибка, путь к Python не прописан в переменной среды $PATH. Нужно либо найти эту переменную в системном реестре и задать её значение, либо каждый раз указывать полный путь до python.exe, а за ним уже имя исполняемого Py-файла:
C:/python32/python.exe get_pip.py
Полный путь полезен и в том случае, если у вас на компьютере несколько версий Python и вы ставите пакет для одной из них.
Вариант 2. Скачиваем архив с setuptools из PYPI и распаковываем в отдельный каталог. В терминале переходим в директорию setuptools c файлом setup.py и пишем:
python setup.py install
Обновить pip для Python в Windows можно так:
python pip install -U pip
Если это не работает, нужно добавить путь к папке с pip в $PATH.
Установка пакета в pip

Пора запустить pip в Python и начать устанавливать пакеты короткой командой из консоли:
pip install имя_пакета
При установке в Windows, перед pip нужно добавить «python -m».
Обновить пакет не сложнее:
pip install имя_пакета -U
Если у вас последняя версия пакета, но вы хотите принудительно переустановить его:
pip install --force-reinstall
Посмотреть список установленных пакетов Python можно с помощью команды:
pip list
Найти конкретный пакет по имени можно командой «pip search». О других командах можно прочесть в справке, которая выдается по команде «pip help».
Удаление пакета Python
Когда пакет больше не нужен, пишем:
pip uninstall имя_пакета
Как установить пакеты в Python без pip
Формат .egg сейчас используют не часто, поэтому pip его не поддерживает. Модуль easy_install умеет устанавливать как .egg, так и обычные пакеты, но есть у него важные минусы:
-
он не удаляет пакеты,
-
он может пытаться установить недозагруженный пакет.
Использовать easy_install можно сразу после установки setuptools. Хранится модуль в папке Scripts вашего интерпретатора. Если у вас в $PATH верно прописан путь, ставить пакеты из PYPI можно короткой командой:
easy_install имя_пакета
Для обновления после install и перед именем пакета нужно ставить ключ -U. Откатиться до нужной версии можно так:
easy_install имя_пакета=0.2.3
Если нужно скачать пакет из альтернативного источника, вы можете задать URL или локальный адрес на компьютере:
easy_install http://адрес_репозитория.ру/директория/пакет-1.1.2.zip
Чтобы узнать об опциях easy_install, запустим его с ключом -h:
easy_install -h
Список пакетов, установленных через easy_install, хранится в файле easy-install.pth в директории /libs/site-packages/ вашего Python.
К счастью, удалять установленные через easy_install пакеты можно с помощью pip. Если же его нет, потребуется удалить пакет вручную и стереть сведения о нем из easy-install.pth.
Теперь вы умеете ставить и удалять пакеты для вашей версии Python.
Кстати, для тех, кто изучает Python, мы подготовили список полезных и практичных советов.
Introduction
PIP is a package management system used to install and manage software packages written in Python. It stands for “preferred installer program” or “Pip Installs Packages.”
PIP for Python is a utility to manage PyPI package installations from the command line.
If you are using an older version of Python on Windows, you may need to install PIP. You can easily install PIP on Windows by downloading the installation package, opening the command line, and launching the installer.
This tutorial will show how to install PIP on Windows, check its version, upgrade, and configure.
Note: The latest versions of Python come with PIP pre-installed, but older versions require manual installation. The following guide is for version 3.4 and above. If you are using an older version of Python, you can upgrade Python via the Python website.
Prerequisites
- Computer running Windows or Windows server
- Access to the Command Prompt window
Before you start: Check if PIP is Already Installed
PIP is automatically installed with Python 2.7.9+ and Python 3.4+ and it comes with the virtualenv and pyvenv virtual environments.
Before you install PIP on Windows, check if PIP is already installed.
1. Launch the command prompt window:
- Press Windows Key + X.
- Click Run.
- Type in cmd.exe and hit enter.
Alternatively, type cmd in the Windows search bar and click the “Command Prompt” icon.
2. Type in the following command at the command prompt:
pip helpIf PIP responds, then PIP is installed. Otherwise, there will be an error saying the program could not be found.

Installing PIP On Windows
Follow the steps outlined below to install PIP on Windows.
Step 1: Download PIP get-pip.py
Before installing PIP, download the get-pip.py file.
1. Launch a command prompt if it isn’t already open. To do so, open the Windows search bar, type cmd and click on the icon.
2. Then, run the following command to download the get-pip.py file:
curl https://bootstrap.pypa.io/get-pip.py -o get-pip.py
Step 2: Installing PIP on Windows
To install PIP type in the following:
python get-pip.py
If the file isn’t found, double-check the path to the folder where you saved the file. You can view the contents of your current directory using the following command:
dirThe dir command returns a full listing of the contents of a directory.
Step 3: Verify Installation
Once you’ve installed PIP, you can test whether the installation has been successful by typing the following:
pip helpIf PIP has been installed, the program runs, and you should see the location of the software package and a list of commands you can use with pip.
If you receive an error, repeat the installation process.
Step 4: Add Pip to Windows Environment Variables
To run PIP from any location, you need to add it to Windows environment variables to avoid getting the «not on PATH» error. To do so, follow the steps outlined below:
- Open the System and Security window by searching for it in the Control Plane.
- Navigate to System settings.
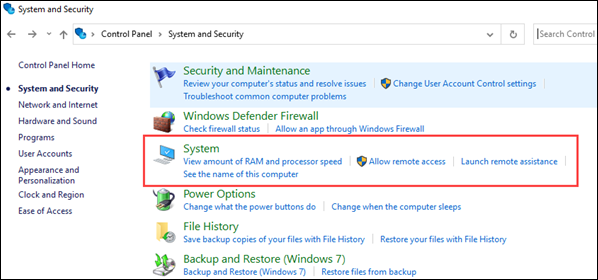
- Then, select Advanced system settings.
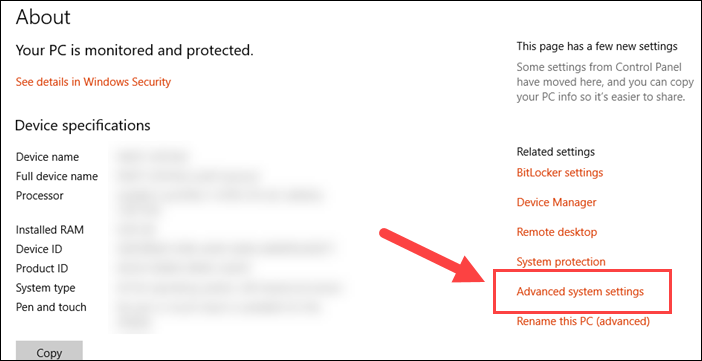
- Open the Environment Variables and double-click on the Path variable in the System Variables.

- Next, select New and add the directory where you installed PIP.
- Click OK to save the changes.
Step 5: Configuration
In Windows, the PIP configuration file is %HOME%pippip.ini.
There is also a legacy per-user configuration file. The file is located at %APPDATA%pippip.ini.
You can set a custom path location for this config file using the environment variable PIP_CONFIG_FILE.
Upgrading PIP for Python on Windows
New versions of PIP are released occasionally. These versions may improve the functionality or be obligatory for security purposes.
To check the current version of PIP, run:
pip --version
To upgrade PIP on Windows, enter the following in the command prompt:
python -m pip install --upgrade pipThis command uninstalls the old version of PIP and then installs the most current version of PIP.
Downgrade PIP Version
Downgrading may be necessary if a new version of PIP starts performing undesirably. To downgrade PIP to a prior version, specifying the version you want.
To downgrade PIP, use the syntax:
python -m pip install pip==version_numberFor example, to downgrade to version 18.1, you would run:
python -m pip install pip==18.1You should now see the version of PIP that you specified.
Conclusion
Congratulations, you have installed PIP for Python on Windows. Check out our other guides to learn how to install PIP on other operating systems:
- Install PIP on CentOS
- Install PIP on Ubuntu
- Install PIP on Debian
- Install PIP on Mac
Now that you have PIP up and running, you are ready to manage your Python packages.
NumPy is a library for the Python programming language, adding support for large, multi-dimensional arrays and matrices. Check out our guide and learn how to install NumPy using PIP.