Содержание
- Создайте свои собственные шрифты, используя Inkscape и Fontastic.me
- Импортируйте фотографию вашего написанного шрифта
- Проследите фотографию, чтобы создать векторные линии.
- Разделить трассировку на отдельные письма
- Установите размер документа
- Создайте отдельные файлы SVG для каждой буквы
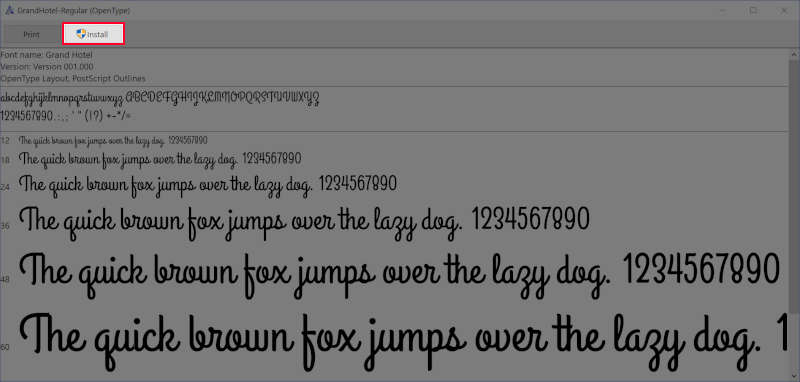
- Installing fonts
- Installing without admin rights
- HOW TO FIX MISSING FONTS IN WINDOWS 10:
- Method 2
- How To Add Fonts To GIMP and Inkscape | 3 Simple Steps
- How To Install Fonts In GIMP and Inkscape
- Step 1: Find A Font
- Step 2: Download & Install
- Step 3: Restart GIMP and Inkscape
- Fonts Still Not Showing?
- 16 thoughts on “ How To Add Fonts To GIMP and Inkscape | 3 Simple Steps ”
- Leave a Reply Cancel reply
- Recent Posts
- Keep In Touch
- Встраивание шрифтов в inkscape
- Программа Inkscape – установка, возможности и преимущества
- Что это такое
- Как скачать и установить программный продукт
- Как пользоваться Inkscape
- Интерфейс Inkscape
- Работа с текстом
- Создание фигур
- Работа с растровыми изображениями
- Группировка объектов
Создайте свои собственные шрифты, используя Inkscape и Fontastic.me
Несмотря на то, что разработка шрифта, который будет эффективно работать при различных размерах, с тщательно созданным кернингом букв – это навык, который может затрачивать годы, этот быстрый и увлекательный проект покажет вам, как вы можете создавать свои собственные рукописные шрифты, используя Inkscape и fontastic.me, давая Вы свой собственный уникальный шрифт. Основной целью fontastic.me является создание значков шрифтов для веб-сайтов, но вы можете создать шрифт букв, который можно использовать для создания заголовков или небольших объемов текста.
Если вы не знакомы с ними, Inkscape – это бесплатное приложение для рисования векторных линий с открытым исходным кодом, которое доступно для Windows, OS X и Linux. Fontastic.me – это веб-сайт, который предлагает различные шрифты значков, но также позволяет загружать собственную графику SVG и конвертировать ее в шрифт бесплатно.
Для целей этого урока мы проследим фотографию некоторых письменных писем, но вы можете легко адаптировать эту технику и рисовать свои письма прямо в Inkscape. Это может работать особенно хорошо для тех, кто использует планшеты для рисования.
Импортируйте фотографию вашего написанного шрифта
Вам понадобится фотография некоторых нарисованных букв, если вы хотите следовать, и если вы не хотите делать свои собственные, вы можете скачать и использовать a-doodle-z.jpg, который содержит заглавные буквы A-Z.
Если вы собираетесь создавать свои собственные, используйте темные цветные чернила и белую бумагу для сильного контраста и сфотографируйте законченные буквы при хорошем освещении. Кроме того, старайтесь избегать любых закрытых пробелов в буквах, таких как «О», так как это усложнит жизнь при подготовке отслеживаемых писем.
Чтобы импортировать фотографию, выберите «Файл»> «Импорт», затем перейдите к фотографии и нажмите кнопку «Открыть». В следующем диалоговом окне рекомендуется использовать опцию «Вставить».
Если файл изображения очень большой, вы можете уменьшить масштаб, используя параметры в подменю «Вид»> «Масштаб», а затем изменить его размер, щелкнув один раз по нему, чтобы отобразить маркеры со стрелками в каждом углу. Нажмите и перетащите маркер, удерживая клавишу Ctrl или Command, и он сохранит свои первоначальные пропорции.
Далее мы проследим изображение, чтобы создать векторные линии букв.
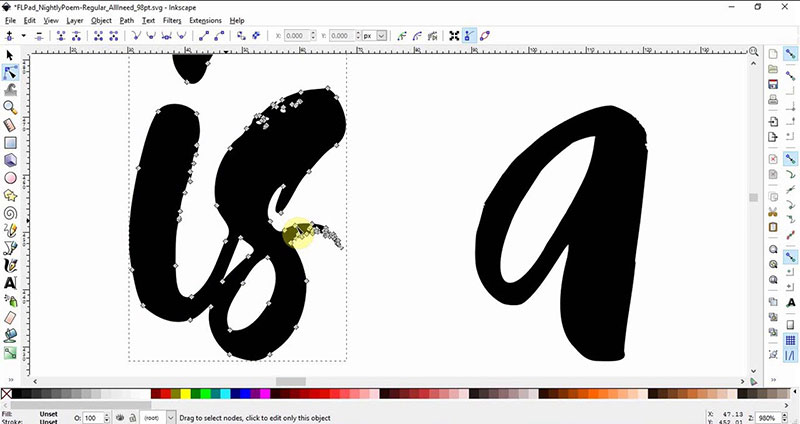
Проследите фотографию, чтобы создать векторные линии.
Хорошей идеей будет рассмотреть процесс отслеживания растровой графики перед началом работы.
Нажмите на фото, чтобы убедиться, что оно выбрано, и затем перейдите в Path> Trace Bitmap, чтобы открыть диалоговое окно Trace Bitmap. Здесь мы оставили все настройки по умолчанию, и это дало хороший, чистый результат. Возможно, вам придется отрегулировать настройки трассировки, но вам может оказаться проще снять фотографию снова с лучшим освещением, чтобы получить изображение с более сильным контрастом.
На снимке экрана вы видите прослеженные буквы, которые мы утащили от оригинальной фотографии. Когда трассировка завершена, буквы будут размещены непосредственно над фотографией, поэтому они могут быть не очень очевидными. Прежде чем двигаться дальше, вы можете закрыть диалоговое окно Trace Bitmap, а также нажать на фотографию, чтобы выбрать ее, и нажать клавишу Delete на клавиатуре, чтобы удалить ее из документа.
Разделить трассировку на отдельные письма
На этом этапе все буквы объединены, поэтому перейдите в Path> Break Apart, чтобы разбить их на отдельные буквы. Обратите внимание, что если у вас есть буквы, состоящие из более чем одного элемента, они также будут разбиты на отдельные элементы. В нашем примере это относится к каждой букве, поэтому на данном этапе имеет смысл сгруппировать каждую букву.
Чтобы сделать это, просто нажмите и перетащите выделенную область вокруг буквы, а затем перейдите в Object> Group или нажмите Ctrl + G или Command + G в зависимости от вашей клавиатуры.
Очевидно, что вам нужно сделать это только с буквами, которые содержат более одного элемента. Перед созданием файлов букв мы изменим размер документа до подходящего размера.
Установите размер документа
Вам нужно установить подходящий размер документа, поэтому перейдите в «Файл»> «Свойства документа» и в диалоговом окне установите ширину и высоту, если необходимо. Мы устанавливаем наши значения 500 на 500 пикселей, хотя в идеале вы должны устанавливать ширину по-разному для каждой буквы, чтобы последние буквы были более аккуратными.
Далее мы создадим буквы SVG, которые будут загружены в fontastic.me.
Создайте отдельные файлы SVG для каждой буквы
Fontastic.me требует, чтобы каждая буква была отдельным SVG-файлом, поэтому вам нужно будет создать их, прежде чем нажимать.
Перетащите все свои буквы так, чтобы они находились за пределами краев страницы. Fontastic.me игнорирует любые элементы, находящиеся за пределами области страницы, поэтому вы можете оставить эти буквы без проблем.
Теперь перетащите первую букву на страницу и используйте ручки перетаскивания в углу, чтобы изменить ее размер по мере необходимости.
Теперь вы можете переместить или удалить первую букву и поместить вторую букву на страницу и снова перейти в «Файл»> «Сохранить как». Вы должны сделать это для каждого письма. Если вы терпеливы, вы можете отрегулировать ширину страницы, чтобы лучше соответствовать каждой букве.
Наконец, вы можете рассмотреть вопрос о пунктуации, хотя вам обязательно понадобится символ пробела. Для места просто сохраните пустую страницу. Кроме того, если вам нужны заглавные и строчные буквы, вам также необходимо сохранить их все.
Источник
Installing fonts
Inkscape does not require (or offer) any specific way of installing fonts. Essentially, one has to download whatever fonts one would like and place them in the default font directory. Many Linux distributions and other operating systems will allow to install a font by double-clicking on the file, which will then install/copy the font into the correct directory for you.
If your operating system does not offer this comfortable way of installing fonts, these hints may help you:
Once done doing this, you need to rebuild your font cache files (only if you are using Linux or some other OS for which font caches are used) so other programs can effectively use the fonts. Do this by going to your default font directory (/usr/share/fonts) and typing as root:
Installing without admin rights
On most Linux distributions, there is a directory called .fonts in your home directory. You can install fonts only for yourself by copying them there. This does not require admin rights.
Previously, GNOME’s Nautilus file browser had a special location called fonts:/// which could be used to install fonts. After the migration to GVFS, this no longer works, but may be re-added some time in the future.
HOW TO FIX MISSING FONTS IN WINDOWS 10:
This is a known bug witch is going to be fixed in 0.94x and 1.0. You need to have all your fonts installed for all users to be seen by Inkscape in Windows. Until then (or users who do want to update) here’s how to fix it:
(you can copy this and past into explorer just change your user name)
Method 2
IF this does not work there is another option to try
Источник
How To Add Fonts To GIMP and Inkscape | 3 Simple Steps
This is something I’m asked about quite often and figured it would make sense to finally put together this brief instructional on how to add fonts to GIMP and Inkscape. This method works the same regardless if you’re using Windows, Linux or Mac.
How To Install Fonts In GIMP and Inkscape
You don’t actually install the font into the application; you install it onto your operating system, then you’ll be able to use it with all of your applications. The process is quite simple…
Step 1: Find A Font
You’ll need to pick out a font to install. I like to use FontSquirrel.com because all of their fonts are free for both personal and commercial use. You can also find free fonts on sites like Dafont, but you have to be careful about how you use them because most of them are only free for personal use, and if you use them commercially or for client work you could be breaking copyright law.
If you’re doing work for a client, it may be a good idea to invest in some premium fonts.
Step 2: Download & Install
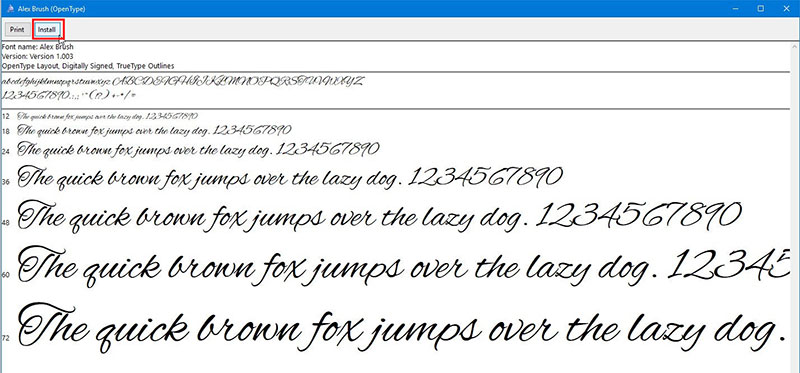
Simply download the font from the font page. It usually comes packaged in a ZIP folder. Open the zip folder (no need to extract it if you’re using Windows) and look for the font file. It should end with either .ttf or .otf.
Double-click that file to open it, then somewhere near the top of the window you should see a button that says “Install”. Go ahead and click that button and the font will be added to your computer so you can use it with GIMP and Inkscape.
Step 3: Restart GIMP and Inkscape
If you already have GIMP and/or Inkscape open, you’ll have to close out of them and reopen again in order for the new font(s) to populate in the font directory. Once you’ve done that, your newly-added fonts should be ready to use. Newly-added font populated in GIMP And here’s how it looks in Inkscape
If any part of these instructions were unclear, please refer to the video tutorial at the top of the page or leave a comment below.
Fonts Still Not Showing?
I’ve been getting a lot of feedback lately from some of you who claim that your fonts still aren’t populating in Inkscape despite following these steps. I found a solution after looking into it a bit which you can read about here.
Logos By Nick LLC is a participant in the Amazon Services LLC Associates Program, an affiliate advertising program designed to provide a means for sites to earn advertising fees by advertising and linking to Amazon.com. As an Amazon Associate I earn from qualifying purchases. Read affiliate disclosure here.
LogosByNick.com is an educational media platform for learning about graphic design software.
16 thoughts on “ How To Add Fonts To GIMP and Inkscape | 3 Simple Steps ”
The website is and here article for fonts are very awesome and unique so I have a question about office fonts how to change the font style on the in the office and also can I used this type of the fonts style in the office
Thank you so much Nick!
How to type tamil fonts, with the aid of some external applications like keyman in inkscape. The font appears in the list and letters look like box.
Couldn’t able to type even a single letter.
I downloaded fonts from Font Squirrel and I cannot get them to load in Inkscape. I closed out Inkscape, when I re-opened it, I cannot get them. What am I doing wrong?
This is a glitch with Inkscape. I have a tutorial on how to fix it here: https://logosbynick.com/inkscape-fonts-are-missing/
I have GIMP 2.8 and when I installed a new font, like I usually do, it is no where to be found. Please help I have no idea how to put it on the new version of GIMP.
SERIOUSLY THANK YOU. I have spent the last 2 HOURS trying to find a fix for this and yours is the first page that actually gave me an answer. Phew.
Hi Nick, at first I’m German and sorry for my bad English skills. Since the last version of Gimp (I use 2.10.6 from Partha, Win 10) new installed fonts are not availlable, the same in Inkscape. The font appears in all Office Apps but not in both graphic tools. Do you have any idea?
Best regards
Barthl
That’s odd, I haven’t heard of that happening and don’t know why it would. I would reach out to GIMP support and see if they have any solutions. Sorry I couldn’t help further than that.
I think that the solution is to install the font for all users. You can right-click on the font file and select “install for all users”. Then you should have access to the font in all the various applications. At least, that solved the same problem in my machine.
That’s odd, I’ve never had a problem with Inkscape or GIMP utilizing installed fonts. Are you sure you’re looking in the right places for them? If you open the text menu (control + shift + t) you’ll notice that if you select a font in the window to the left, it’ll show all of the font’s variations in the window to the right. I would check that. Sometimes all of the variations get installed as separate fonts though. Good luck, sorry I couldn’t help further.
Leave a Reply Cancel reply
Recent Posts
Keep In Touch
Join the mailing list to be notified of new posts and receive 200+ FREE design templates!
Источник
Встраивание шрифтов в inkscape
Любое тело знает, каков текущий статус встраивания шрифтов в файл svg, который читается inkscape. Я считаю, что отсутствие встроенных шрифтов серьезно затрудняет переносимость SVG файлов, особенно если вы отправляете файл лицу, у которого нет доступа администратора на их машине, и не может установить шрифты.
Я попытался следовать инструкциям, приведенным по этой ссылке:
но не смогли заставить его работать, эта ссылка также предполагает, что это возможно:
Я, честно говоря, пытаюсь заставить это работать на windows, а не на linux (у меня нет доступа к Linux-машине прямо сейчас). Кто-нибудь знает или имеет доступ к фактическому svg файлу, в котором работает эта функция?
В текущей версии Inkscape кажется невозможным встроить SVG-шрифты (см. Также здесь небольшой пример).
В 0,48 Примечания к выпуску:
Существует известное ограничение, когда список глифов в диалоговом окне еще не отображается в выбранном шрифте, но все же в системном шрифте
В примечаниях к выпуску версии 0.47 содержится более подробное объяснение ограничений:
В качестве проекта SoC 2008 JucaBlues реализовала начальный синтаксический анализ и визуализацию шрифтов SVG. Вы можете создавать шрифты в Inkscape, но их использование для визуализации текста на холсте пока не поддерживается. Мы ждем, когда libpango обеспечит правильную поддержку функции user-fonts.
Отказ от шрифтов SVG не поддерживается Firefox или Internet Explorer, а Inkscape Wiki сообщает нам, что:
SVG2.0 может заменить шрифты SVG на WOFF
Источник
Программа Inkscape – установка, возможности и преимущества
Векторная графика с каждым годом ставится всё более популярной и востребованной на рынке. Правда, продвинутые редакторы (к примеру, продукция от компании Adobe) стоит немалых денег. Один из наиболее удачных векторных редакторов, который можно скачать абсолютно бесплатно, — Inkscape. Давайте познакомимся с ним поближе.

Что это такое
Inkscape – это бесплатный векторный редактор, многофункциональный инструмент для создания и работы с художественной и технической графикой.
Разработка программы началась ещё в 2003 году, она пришла на смену устаревшему редактору Sodipodi. Сегодня Инскейп часто сравнивают с известными Adobe Illustrator и Corel Draw, однако ранее именно эта программа была лидером в своей области.
Чаще всего Inkscape используется для:

Возможность масштабировать изображение без потери в качестве — особенность векторной графики, которую многие дизайнеры применяют в работе.
Являясь кроссплатформенным редактором, Inkscape имеет открытый исходный код, позволяющий любому пользователю внести необходимые коррективы в работу программы.
Особенность Inkscape – использование открытого формата Scalable Vector Graphics. Несмотря на то, что работа в программе происходит исключительно в SVG, Инскейп поддерживает десятки других форматов: PDF, AI, JPEG, PNG, GIF и другие.
SVG основан на языке разметки XML. Это позволяет разработчикам дополнительно писать расширения, тем самым значительно увеличивая функционал.
Программа работает на Windows (версии 7, 8.1, 10), MacOS (32-х или 64-х бит) и Linux.
Как скачать и установить программный продукт
Inkscape – абсолютно бесплатная программа. Проще и надёжнее всего скачать её с официального сайта (есть русский язык). Перейдя на вкладку «Скачать», вы найдёте множество версий программы для разных ПО. На этой же вкладке можно просмотреть и сразу загрузить дополнения, необходимые для удобной работы. Более того, есть возможность скачать исходный код и собрать программу самому (кому это интересно и кто обладает определёнными навыками).
Также понадобятся монитор с разрешением 1024х768 и доступ в интернет.
Как пользоваться Inkscape
Редактор имеет внушительный набор инструментов, позволяющий создавать изображения любой сложности, но начинающий дизайнер может столкнуться с некоторыми трудностями. Отсутствие знаний о базовых приёмах ограничивает творческий поток и усложняет процесс пользования программой.

Интерфейс Inkscape
Рассмотрим подробнее интерфейс программы. При открытии Inkscape мы видим холст и множество инструментов. Выделяют 5 основных областей:
Работа с текстом
Inkscape неплохо работает с текстами:
Для добавления новых шрифтов перейдите в папку с установленной программой, откройте 51-local.conf в любом текстовом редакторе, etcfontsconf.d directory, добавьте строчку с адресом необходимого набора шрифтов C:UsersпользовательAppDataRoamingMonotypeskyfonts-Google> и сохраните.
Создание фигур
К инструментам фигур относятся прямоугольник, эллипс, звезда, спираль и другие.
Давайте попробуем начать, к примеру, кликаем на инструмент прямоугольник в левом меню, нажимаем на холст, и на холсте появились прямоугольники определённого оттенка (в зависимости от установлено цвета). Если у вас получились просто белые фигуры, нужно поменять цвета и прозрачность.

Точно так же можно нарисовать круг, эллипс, спираль и другие объекты, которые можно легко найти на боковой левой панели.
В любой момент можно воспользоваться инструментом «Стрелки».
В Inkscape есть весьма полезный инструмент — линия с переменной толщиной (помогает создавать необычные рисунки и текст). Во вкладке меню «Контурные эффекты» также можно найти много вариантов штриховки.
Действия над фигурами подразумевают:
Плагины Inkscape называются фильтрами и расширениями. Используя их, получается добиться намного лучшего эффекта. Скачать можно с сайта разработчиков или сделать самому.
Для создания прозрачного фона откройте «Файл», дальше «Свойства документа» и выберите цвет фона. Альфа-канал должен равняться 0. Следующий шаг «Файл» → «Export Bitmap» (Shift + Ctrl + E) и сохраняем в PNG.
При создании графического изображения иногда возникает потребность использовать лишь часть рисунка. Сделать это можно таким образом:
В результате получаем выделенный участок изображения.
Также вам может понадобиться изменить ориентацию рабочей области (по умолчанию — портретная). Для этого открываем «Свойства документа» на вкладке «Страница» и меняем ориентацию на книжную.
Для упрощённого рисования и прорисовки фигур в Inkscape предусмотрены направляющие, которые «притягивают» рабочие инструменты, позволяя установить инструмент точно по ним.
Работа с растровыми изображениями
При необходимости добавить растровый фрагмент или изображение, нужно его векторизовать способом превращения его в SVG-элемент: отметьте объект, который нужно перевести в контуры, выберите команду «Контуры», затем «Векторизовать растр…» (Shift+Alt+B).
Чтобы выполнить обратный процесс, перейдите в меню «Файл» пункт «Экспортировать в растр».
Группировка объектов
В Inkscape можно объединять разные объекты в группу. При дальнейшей трансформации и перемещении программа будет воспринимать всё как единый объект. Для этого выберите объекты и нажмите Ctrl+G (выбрать «Объект», пункт «Сгруппировать»). Непосредственно сами группы можно объединять между собой. Чтобы изменить один элемент, необязательно разбивать группу, нажмите на объект с нажатой Ctrl, и можно будет работать с объектом отдельно. Чтобы разгруппировать группу, выберите нужный объект и нажмите Shift+Ctrl+G (меню «Объект», пункт «Разгруппировать»).
Сохранение результата не отличается от любых других редакторов. Единственное, что важно не забыть, указать формат, в котором нужно экспортировать файл.
Inkscape – мощный инструмент, предлагающий значительный набор инструментов для векторной графики. Интуитивно понятный интерфейс, множество необходимых функций и постоянные обновления от разработчиков. А что вы думаете о данном редакторе? Возникали ли трудности в работе с программой? Делитесь своими мыслями в комментариях.
Источник
Inkscape does not require (or offer) any specific way of installing fonts. Essentially, one has to download whatever fonts one would like and place them in the default font directory. Many Linux distributions and other operating systems will allow to install a font by double-clicking on the file, which will then install/copy the font into the correct directory for you.
If your operating system does not offer this comfortable way of installing fonts, these hints may help you:
- On Linux, fonts can be made available systemwide, to be accessible to core GUI resources such as KDE or GNOME. More commonly, users only install fonts so they can be used by product-making applications including Inkscape and OpenOffice.org.
- Truetype fonts are installed by placement of the files into the /usr/share/fonts/ttf directory (or C:WINDOWSFONTS for Windows types).
- mv ~/downloads/*.ttf /usr/share/fonts/ttf
- It is advisable that the font cache file be deleted in the process. This file is fonts.cache-1, located in /usr/share/fonts (or C:WINDOWSFONTS for Windows types). After font files have been transferred to the default font directory, delete this fonts.cache-1 file and the .fonts.cache-1 file in your home directory (or «My Documents» directory for Windows types).
- rm -f /usr/share/fonts/*fonts.cache-1
- rm -f ~/*fonts.cache-1
Once done doing this, you need to rebuild your font cache files (only if you are using Linux or some other OS for which font caches are used) so other programs can effectively use the fonts. Do this by going to your default font directory (/usr/share/fonts) and typing as root:
- fc-cache
Installing without admin rights
On most Linux distributions, there is a directory called .fonts in your home directory. You can install fonts only for yourself by copying them there. This does not require admin rights.
Previously, GNOME’s Nautilus file browser had a special location called fonts:/// which could be used to install fonts. After the migration to GVFS, this no longer works, but may be re-added some time in the future.
HOW TO FIX MISSING FONTS IN WINDOWS 10:
This is a known bug witch is going to be fixed in 0.94x and 1.0. You need to have all your fonts installed for all users to be seen by Inkscape in Windows. Until then (or users who do want to update) here’s how to fix it:
- Open Explorer (This computer)
- Go to:
C:Users '''My USER Name''' AppDataLocalMicrosoftWindowsFonts
(you can copy this and past into explorer just change your user name)
- Select all fonts
- Right-click and select INSTALL FOR ALL USERS
- Restart Inkscape
- You should have all your fonts
Method 2
IF this does not work there is another option to try
add the line
~/AppData/Local/Microsoft/Windows/Fonts
below the line
WINDOWSFONTDIR
in the file «…Inkscapeetcfontsfonts.conf»
В этом руководстве по Inkscape я покажу вам, как установить шрифты в программу. Добавляя эти сторонние шрифты, вы можете расширить возможности Inkscape для дизайна, а также предоставить себе более широкий выбор шрифтов для ваших проектов графического дизайна.
Это учебник по основам Inkscape для начинающих.
Скачать
Загрузите последнюю версию Inkscape:
https://inkscape.org/
Загрузите бесплатный шрифт Halogen:
https://www.pixelsurplus.com/freebies/halogen
Полезные ссылки
Посетите наш сайт для получения дополнительных текстовых и видеоуроков:
https://daviesmediadesign.com/inkscape-tutorials/
Спасибо нашим покровителям Diamond Level, которые поддерживают нас на Patreon!
Кен Брюер
Дилли Противоречие
Спасибо нашим Покровителям Золотого уровня, которые поддерживают нас на Patreon!
BashMurals
commodore256
Джейми Фрейзер
Спасибо нашим покровителям уровня Silver, которые поддерживают нас на Patreon!
Стефани Пайнтер
Лиза Клар
Galvane
Поддержите наш канал и помогите нам расти, став сегодня покровителем — и получите взамен крутые награды:
https://www.patreon.com/daviesmediadesign
Как сделать холст Inkscape похожим на артборд Adobe Illustrator:
https://daviesmediadesign.com/how-to-make-your-inkscape-canvas-look-like-adobe-illustrators-artboard/
Посмотрите, как вы можете помочь команде Inkscape:
https://inkscape.org/contribute/
Facebook: https://www.facebook.com/DaviesMediaDesign/
Twitter: @DaviesMediaDes
Instagram: @DaviesMediaDesign

This is something I’m asked about quite often and figured it would make sense to finally put together this brief instructional on how to add fonts to GIMP and Inkscape. This method works the same regardless if you’re using Windows, Linux or Mac.
You don’t actually install the font into the application; you install it onto your operating system, then you’ll be able to use it with all of your applications. The process is quite simple…
Step 1: Find A Font
You’ll need to pick out a font to install. I like to use FontSquirrel.com because all of their fonts are free for both personal and commercial use. You can also find free fonts on sites like Dafont, but you have to be careful about how you use them because most of them are only free for personal use, and if you use them commercially or for client work you could be breaking copyright law.
If you’re doing work for a client, it may be a good idea to invest in some premium fonts.

Step 2: Download & Install
Simply download the font from the font page. It usually comes packaged in a ZIP folder. Open the zip folder (no need to extract it if you’re using Windows) and look for the font file. It should end with either .ttf or .otf.
Double-click that file to open it, then somewhere near the top of the window you should see a button that says “Install”. Go ahead and click that button and the font will be added to your computer so you can use it with GIMP and Inkscape.
Step 3: Restart GIMP and Inkscape
If you already have GIMP and/or Inkscape open, you’ll have to close out of them and reopen again in order for the new font(s) to populate in the font directory. Once you’ve done that, your newly-added fonts should be ready to use.


If any part of these instructions were unclear, please refer to the video tutorial at the top of the page or leave a comment below.
Fonts Still Not Showing?
I’ve been getting a lot of feedback lately from some of you who claim that your fonts still aren’t populating in Inkscape despite following these steps. I found a solution after looking into it a bit which you can read about here.
This post may contain affiliate links. Read affiliate disclosure here.
Logos By Nick
LogosByNick.com is an educational media platform for learning about graphic design software.
Recent Posts
How To Create A Multi Page PDF with Inkscape
For the longest time, making multi-page PDFs with Inkscape was a process that requires several workarounds and third-party applications. But thanks to an update in version 1.2 (and beyond,) it can…
A design program is not complete without an extensive list of fonts to choose from. Even those designers who devote themselves almost exclusively to drawings know the importance of having the right letters for certain cases. The problem is that most of the default galleries do not include enough eye-catching options, so additional fonts must be installed that meet the requirements of the artists. Inkscape, an open-source design software, does not escape this problem, but luckily, the process to solve it is easy. Keep reading to learn how to add fonts to Inkscape.
It would be logical to think that because it is an open-source program, the Inkscape base file includes many fonts to choose from. The reality is that its gallery is based on that of the operating system, so that if you want to use something more artistic, you must download it separately.
Having to install Inkscape fonts does not mean that the program is not excellent in its work. It offers a complete editor for scalable vector graphics, a format used to create designs based on simple shapes that do not lose quality regardless of their size. This makes Inkscape ideal for immense size designs, or for print jobs.
If you are a constant user of the software, you will be interested in adding fonts to Inkscape. Most of the fonts that you download will be able to be installed automatically on your system, although some will require a somewhat more complex process to be able to use them. Below, we explain the different ways to install fonts.
Side note: Do you want to increase your chances of getting a better design job? Get a Graphic Design Specialization from CalArts (California Institute of the Arts).
Using the installation wizard
Get 300+ freebies in your inbox!
Subscribe to our newsletter and receive 300+ design resources in your first 5 minutes as a subscriber.
Windows, by default, can detect TTF type fonts to install them automatically using a wizard. Before continuing with the process, it is recommended to close open programs, since the font will be installed throughout the system.
Get the Inkscape fonts you want
The first step is simply to download the font you want to install. If you don’t know exactly what font you need, you can always search in pages that collect different fonts. There are many free Windows fonts available, but there are also premium options that will give you higher quality and quantity of characters.
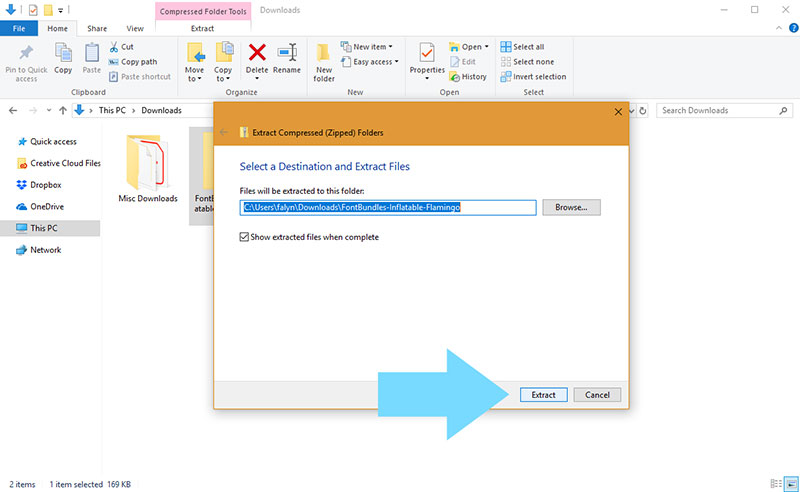
Please note that the file you download is probably compressed in ZIP or RAR format. Before you can use it, you must unzip it with some software such as WinRAR.
Determine which file to install
Once unzipped, you will find a folder with multiple files. In this, you must identify which is the font file to be able to install it. The most common file type is TFF (which is identified by Windows), but you can also find them in other formats like OTF, EOT, WOFF, or SVG.
Open the installation wizard
Select all the files you want to install to speed up the process. On anyone, right-click and look for the “Install” option. Make sure this option has a shield drawing, which means you will be doing the process with administrator rights. If the shield does not appear, hold the Shift and K keys when right-clicking.
Within the installation wizard, you will find an option that says “Install for all users.” By clicking “Install”, the process should be complete. If this is not the case, there may be a conflict with the path where the fonts are located. This can be fixed by moving the unzipped folder to another path and then repeating the installation process.
Run Inkscape
Now run Inkscape (or any program that allows you to enter text) and check if the new characters were correctly installed. These should appear normally in the Font list.
From the Windows installation folder
Another way in which you can add a font to Inkscape is by a manual way, simply dragging the files that you want to install in the Windows fonts folder. Again, remember to close all open programs for the changes to take effect.
Open Control Panel
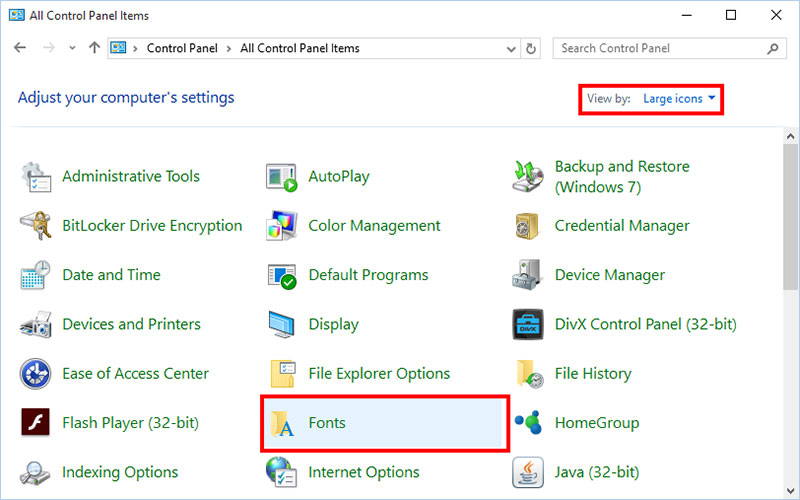
Advertisement
With the file you want to install already downloaded and unzipped, you’ll need to find the Windows Fonts folder. The fastest way is from the Control Panel in the Start menu. The Start menu is the Windows symbol that is in the lower left.
Find where to save fonts
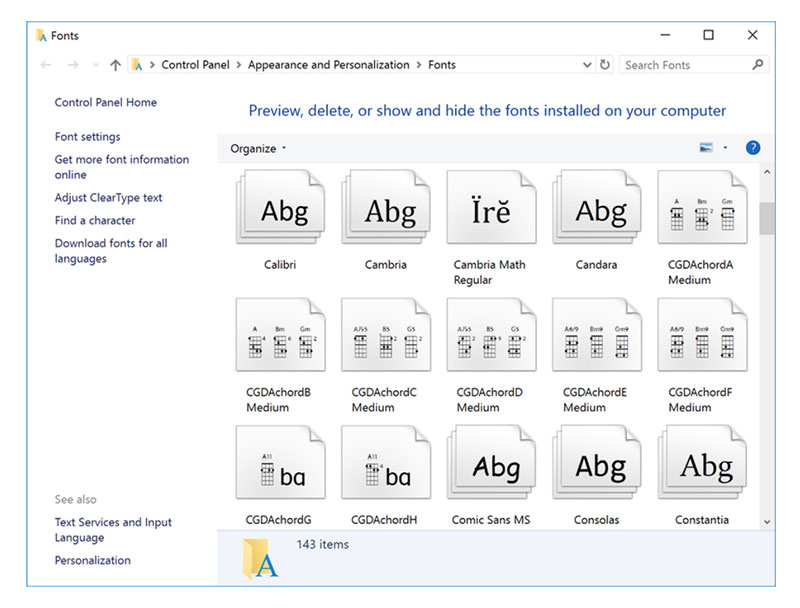
In the Control Panel, you must click on the “Appearance and Personalization” sub-menu. Here you should find an option called “Fonts”. A window will open where you will see all the fonts installed on the PC.
Copy and Paste the new files
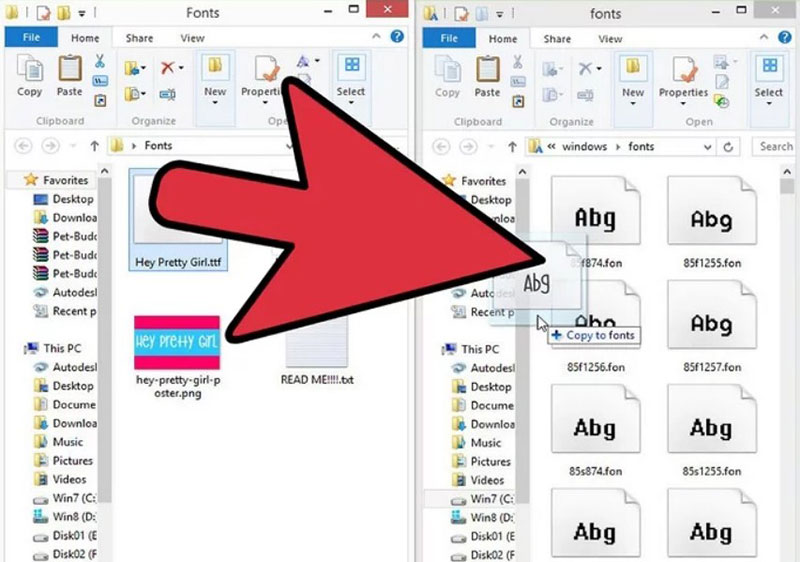
Leave the “Fonts” tab open aside and look again for the place where you unzipped the Inkscape fonts you downloaded. Find files that are TFF, OTF, WOFF, SVG, or OET. Select any of them depending on your case using the right mouse button. Press the “Copy” or “Cut” option to add it to the clipboard.
Go back to the “Fonts” tab and anywhere in the folder right-click to bring up a drop-down menu. Select the “Paste” option to place your new font.
Verify installation
To verify that everything has been installed properly, start Inkscape or any similar program that allows you to create texts. When creating text, the font you installed should appear in the font selection box.
How to add fonts to Inkscape – Mac
For a single user
You can perform a manual installation for each of the Mac computer users if you want to place the fonts only to certain users. This is done by selecting the root directory that has the name of the corresponding user.
From this user, you must enter the “Library” folder and then “Fonts”. Just drag and drop the file you want to install into this folder.
If you don’t find the folder manually, this is because the operating system has it hidden. In these cases, from the “Finder” window use the “Go” option to find the folder. Don’t delete anything from that folder or it could corrupt other fonts.
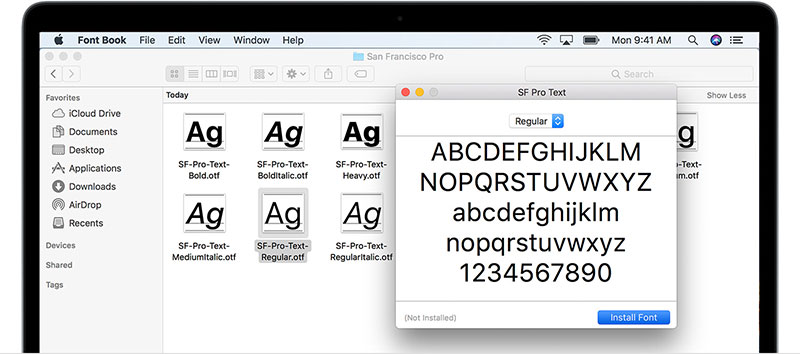
How to add fonts to Inkscape using Font Book
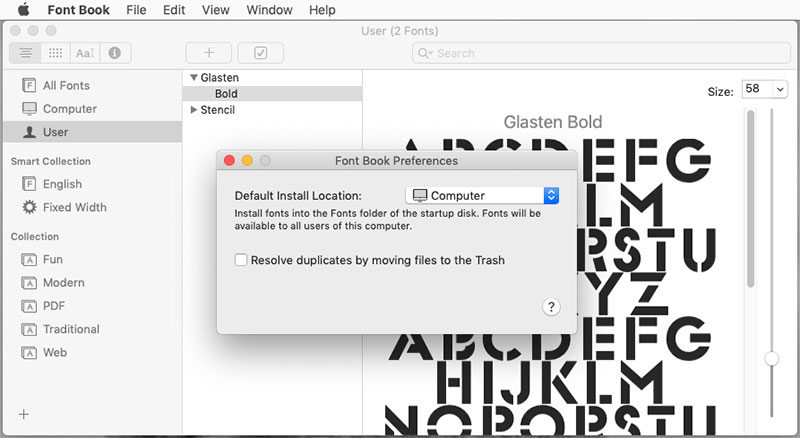
Mac also has its installer. The Font Book utility will open when you double-click a compatible file. From there you can see a preview of your fonts for Inkscape, in addition to finding all the fonts installed on the system. Just press the “Install” button.
How to find the font and use its special characters in Inkscape
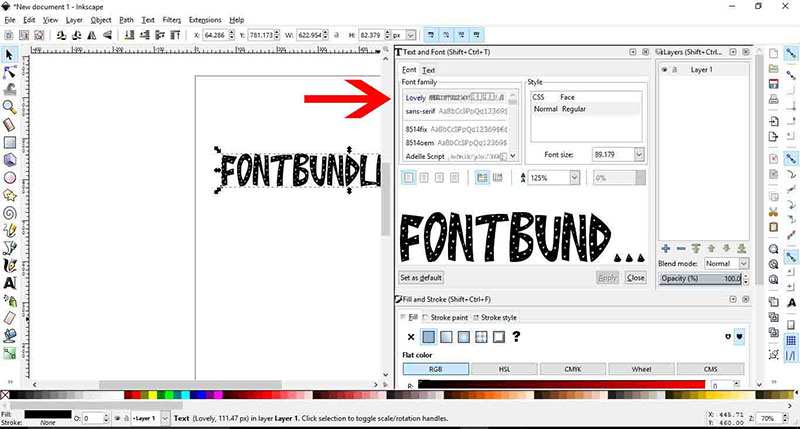
Now that you have the new font installed, you can start using all of its features from Inkscape. To find it within the program, all you have to do is create any text, select it, and look in the font option (in the upper left corner) for the characters.
You have the option to scroll through the entire list until you find the font, or you can use the search engine found in the drop-down menu.
Some characters in the Windows font directory include special letters with more complex PUA-encoded designs. If you downloaded a compatible file, then you can use these “special characters” in Inkscape. If the font you installed does not have this encoding, the special character menu will not show you anything.
If you enjoyed reading this article on how to add fonts to Inkscape, you should read these as well:
- How to add fonts to FireAlpaca (FireAlpaca fonts guide)
- The Amazon font. What font does Amazon use? (Answered)
- The most popular newspaper fonts and alternatives you can use
By default, Inkscape uses the fonts that are installed in the system, and every time you open Inkscape it checks the default-font locations in your operating system, and updates its fonts list according to what did it find; so, there is no in-app setting to install fonts in Inkscape.
Usually, installing fonts in any operating system is done simply by clicking the font file and then installing the font.
Table of Contents
- How to Add Fonts to Inkscape
- Install Fonts on Linux
- Using the graphical user interface(GUI)
- Using the terminal (CLI)
- Install Fonts on Windows
- Install Fonts on Mac
- Install Fonts on Linux
- Conclusion
Install Fonts on Linux
There are two ways to install fonts in Linux (I’ll be using Ubuntu Studio, but these methods should work in any Debian-based distribution), those are:
Using the graphical user interface(GUI)
You can install either .ttf (true type font) or .otf (open type font), and you can install the font just by opening the font file then click install.


Using the terminal (CLI)
It is yet an easy method with just one command, open the terminal on the directory of the font (.ttf or .otf), then execute the next command.
sudo cp /usr/local/share/fonts

Install Fonts on Windows
Installing a font in Windows is easy, open the font file and click install.

Now you’re done you can open Inkscape (or restart it if already opened), remember it loads fonts at the beginning!

Note: I installed all the family the same way.
Install Fonts on Mac
To install fonts on your Mac you check out this very short tutorial on support.apple.com.
Conclusion
In this article, we knew how to install fonts not for just Inkscape, but system-wide for both Windows and Linux, and that Inkscape captures system’s font at the start.
-
Tags:
- Inkscape
Создание персонализированных шрифтов не требует дорогого программного обеспечения или больших художественных способностей. Можно создавать собственные шрифты, используя Inkscape и IcoMoon , две бесплатные программы, которые работают на любом компьютере.
Инструкции в этой статье относятся к Inkscape версии 0.92.4 для Windows, Mac и Linux.
Что нужно для создания пользовательских шрифтов
Помимо программного обеспечения, вам понадобится фото некоторых нарисованных букв . Если вы собираетесь создать свой собственный, используйте темные цветные чернила и белую бумагу для сильного контраста и сфотографируйте законченные буквы при хорошем освещении . Кроме того, старайтесь избегать любых закрытых пробелов в письмах, таких как буква «О», так как они усложнят процесс подготовки ваших отслеживаемых писем.
Если вы не хотите рисовать свои собственные буквы, вы можете найти бесплатные изображения алфавита онлайн. Убедитесь, что он содержит все символы, которые вы хотите использовать, включая заглавные и строчные буквы AZ.
Вы также можете нарисовать свои письма прямо в Inkscape. Это может работать особенно хорошо, если вы используете планшет для рисования .
Как создать свои собственные шрифты
Чтобы создать пользовательские шрифты с помощью Inkscape и Icomoon:
-
Откройте Inkscape и выберите « Файл» > « Импорт» .
-
Выберите ваше изображение и выберите Открыть .
-
Убедитесь Вставить выбран рядом Image Import Type , затем выберите OK .
-
Если изображение кажется слишком маленьким или большим в окне, перейдите в « Вид» > « Масштаб»> «Масштаб 1: 1», чтобы настроить вид.
Чтобы изменить размер изображения, нажмите на него, чтобы отобразить маркеры со стрелками в каждом углу, затем перетащите один из маркеров, удерживая клавишу Ctrl или Command, чтобы сохранить исходные пропорции.
-
Установите флажок рядом с Live Preview, чтобы увидеть, как будет выглядеть конечный продукт. Настройте параметры по своему вкусу или оставьте значения по умолчанию и выберите ОК .
Если вы используете фотографию с рисунком, вам, возможно, будет проще снова сделать снимок с лучшим освещением, чтобы получить изображение с более сильным контрастом.
-
Когда трассировка завершена, буквы появятся прямо над фотографией. Нажмите на фотографию и перетащите ее в сторону, чтобы разделить два слоя, затем нажмите « Удалить» на клавиатуре, чтобы удалить ее из документа. Вы останетесь только с контурами букв.
-
Перейдите в Path > Break Apart, чтобы разбить буквы на отдельные элементы.
-
Некоторые отдельные буквы могут быть разбиты на несколько элементов. Чтобы сгруппировать эти элементы вместе, нарисуйте рамку вокруг них с помощью инструмента « Выделение» , затем перейдите в « Объект» > « Группа» . У каждой буквы должен быть свой отдельный элемент, поэтому лучше сделать это для каждого символа.
-
Перейдите в Файл > Свойства документа .
-
Установите ширину и высоту до 500 пикселей .
-
Перетащите все свои письма за края страницы.
-
Перетащите первую букву на страницу, а затем перетащите маркеры, чтобы изменить размер буквы, чтобы она занимала большую часть страницы.
Не забудьте удерживать Ctrl или Command, чтобы сохранить исходные пропорции.
-
Перейдите в Файл > Сохранить как .
-
Дайте файлу осмысленное имя и выберите Сохранить .
Обязательно сохраните файл в обычном формате .svg .
-
Переместите или удалите первую букву, затем поместите вторую букву на страницу и повторяйте процесс, пока каждая буква не будет сохранена как отдельный файл .svg.
-
Откройте Icomoon в веб-браузере, затем выберите « Импорт значков» .
-
Выберите первую букву в вашем наборе пользовательских шрифтов и выберите Открыть .
Импорт нескольких файлов одновременно может привести к сбою Icomoon, поэтому лучше загружать их по одному.
-
Когда вы загрузите каждый символ, он появится на странице. Как только вы загрузите их все, нажмите на каждый из них, чтобы выделить его, и выберите « Создать шрифт» в правом нижнем углу.
Выберите карандаш в верхней части страницы для дальнейшего редактирования отдельных символов.
-
Присвойте каждую букву юникод-символу. Щелкните в правой части поля под каждым файлом .svg и введите символ, который вы хотите связать с ним. Icomoon автоматически обнаружит соответствующий шестнадцатеричный код. Когда закончите, выберите Загрузить .