About SSH key passphrases
You can access and write data in repositories on GitHub.com using SSH (Secure Shell Protocol). When you connect via SSH, you authenticate using a private key file on your local machine. For more information, see «About SSH.»
When you generate an SSH key, you can add a passphrase to further secure the key. Whenever you use the key, you must enter the passphrase. If your key has a passphrase and you don’t want to enter the passphrase every time you use the key, you can add your key to the SSH agent. The SSH agent manages your SSH keys and remembers your passphrase.
If you don’t already have an SSH key, you must generate a new SSH key to use for authentication. If you’re unsure whether you already have an SSH key, you can check for existing keys. For more information, see «Checking for existing SSH keys.»
If you want to use a hardware security key to authenticate to GitHub, you must generate a new SSH key for your hardware security key. You must connect your hardware security key to your computer when you authenticate with the key pair. For more information, see the OpenSSH 8.2 release notes.
Generating a new SSH key
You can generate a new SSH key on your local machine. After you generate the key, you can add the key to your account on GitHub.com to enable authentication for Git operations over SSH.
Note: GitHub improved security by dropping older, insecure key types on March 15, 2022.
As of that date, DSA keys (ssh-dss) are no longer supported. You cannot add new DSA keys to your personal account on GitHub.com.
RSA keys (ssh-rsa) with a valid_after before November 2, 2021 may continue to use any signature algorithm. RSA keys generated after that date must use a SHA-2 signature algorithm. Some older clients may need to be upgraded in order to use SHA-2 signatures.
-
Open TerminalTerminalGit Bash.
-
Paste the text below, substituting in your GitHub email address.
$ ssh-keygen -t ed25519 -C "your_email@example.com"Note: If you are using a legacy system that doesn’t support the Ed25519 algorithm, use:
$ ssh-keygen -t rsa -b 4096 -C "your_email@example.com"This creates a new SSH key, using the provided email as a label.
> Generating public/private ALGORITHM key pair.When you’re prompted to «Enter a file in which to save the key», you can press Enter to accept the default file location. Please note that if you created SSH keys previously, ssh-keygen may ask you to rewrite another key, in which case we recommend creating a custom-named SSH key. To do so, type the default file location and replace id_ssh_keyname with your custom key name.
> Enter a file in which to save the key (/Users/YOU/.ssh/id_ALGORITHM: [Press enter]> Enter a file in which to save the key (/c/Users/YOU/.ssh/id_ALGORITHM):[Press enter]> Enter a file in which to save the key (/home/YOU/.ssh/ALGORITHM):[Press enter] -
At the prompt, type a secure passphrase. For more information, see «Working with SSH key passphrases.»
> Enter passphrase (empty for no passphrase): [Type a passphrase]
> Enter same passphrase again: [Type passphrase again]
Adding your SSH key to the ssh-agent
Before adding a new SSH key to the ssh-agent to manage your keys, you should have checked for existing SSH keys and generated a new SSH key. When adding your SSH key to the agent, use the default macOS ssh-add command, and not an application installed by macports, homebrew, or some other external source.
-
Start the ssh-agent in the background.
$ eval "$(ssh-agent -s)"
> Agent pid 59566
Depending on your environment, you may need to use a different command. For example, you may need to use root access by running
sudo -s -Hbefore starting the ssh-agent, or you may need to useexec ssh-agent bashorexec ssh-agent zshto run the ssh-agent. -
If you’re using macOS Sierra 10.12.2 or later, you will need to modify your
~/.ssh/configfile to automatically load keys into the ssh-agent and store passphrases in your keychain.-
First, check to see if your
~/.ssh/configfile exists in the default location.$ open ~/.ssh/config > The file /Users/YOU/.ssh/config does not exist. -
If the file doesn’t exist, create the file.
$ touch ~/.ssh/config -
Open your
~/.ssh/configfile, then modify the file to contain the following lines. If your SSH key file has a different name or path than the example code, modify the filename or path to match your current setup.Host *.github.com AddKeysToAgent yes UseKeychain yes IdentityFile ~/.ssh/id_ed25519Notes:
-
If you chose not to add a passphrase to your key, you should omit the
UseKeychainline. -
If you see a
Bad configuration option: usekeychainerror, add an additional line to the configuration’s’Host *.github.comsection.Host *.github.com IgnoreUnknown UseKeychain
-
-
-
Add your SSH private key to the ssh-agent and store your passphrase in the keychain. If you created your key with a different name, or if you are adding an existing key that has a different name, replace id_ed25519 in the command with the name of your private key file.
$ ssh-add --apple-use-keychain ~/.ssh/id_ed25519Note: The
--apple-use-keychainoption stores the passphrase in your keychain for you when you add an SSH key to the ssh-agent. If you chose not to add a passphrase to your key, run the command without the--apple-use-keychainoption.The
--apple-use-keychainoption is in Apple’s standard version ofssh-add. In MacOS versions prior to Monterey (12.0), the--apple-use-keychainand--apple-load-keychainflags used the syntax-Kand-A, respectively.If you don’t have Apple’s standard version of
ssh-addinstalled, you may receive an error. For more information, see «Error: ssh-add: illegal option — K.» -
Add the SSH key to your account on GitHub. For more information, see «Adding a new SSH key to your GitHub account.»
If you have GitHub Desktop installed, you can use it to clone repositories and not deal with SSH keys.
-
Ensure the ssh-agent is running. You can use the «Auto-launching the ssh-agent» instructions in «Working with SSH key passphrases», or start it manually:
# start the ssh-agent in the background $ eval "$(ssh-agent -s)" > Agent pid 59566 -
Add your SSH private key to the ssh-agent. If you created your key with a different name, or if you are adding an existing key that has a different name, replace id_ed25519 in the command with the name of your private key file.
$ ssh-add ~/.ssh/id_ed25519 -
Add the SSH key to your account on GitHub. For more information, see «Adding a new SSH key to your GitHub account.»
-
Start the ssh-agent in the background.
$ eval "$(ssh-agent -s)"
> Agent pid 59566
Depending on your environment, you may need to use a different command. For example, you may need to use root access by running
sudo -s -Hbefore starting the ssh-agent, or you may need to useexec ssh-agent bashorexec ssh-agent zshto run the ssh-agent. -
Add your SSH private key to the ssh-agent. If you created your key with a different name, or if you are adding an existing key that has a different name, replace id_ed25519 in the command with the name of your private key file.
$ ssh-add ~/.ssh/id_ed25519 -
Add the SSH key to your account on GitHub. For more information, see «Adding a new SSH key to your GitHub account.»
Generating a new SSH key for a hardware security key
If you are using macOS or Linux, you may need to update your SSH client or install a new SSH client prior to generating a new SSH key. For more information, see «Error: Unknown key type.»
-
Insert your hardware security key into your computer.
-
Open TerminalTerminalGit Bash.
-
Paste the text below, substituting in the email address for your account on GitHub.
$ ssh-keygen -t ed25519-sk -C "YOUR_EMAIL"Note: If the command fails and you receive the error
invalid formatorfeature not supported,you may be using a hardware security key that does not support the Ed25519 algorithm. Enter the following command instead.$ ssh-keygen -t ecdsa-sk -C "your_email@example.com" -
When you are prompted, touch the button on your hardware security key.
-
When you are prompted to «Enter a file in which to save the key,» press Enter to accept the default file location.
> Enter a file in which to save the key (/Users/YOU/.ssh/id_ed25519_sk): [Press enter]> Enter a file in which to save the key (/c/Users/YOU/.ssh/id_ed25519_sk):[Press enter]> Enter a file in which to save the key (/home/YOU/.ssh/id_ed25519_sk):[Press enter] -
When you are prompted to type a passphrase, press Enter.
> Enter passphrase (empty for no passphrase): [Type a passphrase] > Enter same passphrase again: [Type passphrase again] -
Add the SSH key to your account on GitHub. For more information, see «Adding a new SSH key to your GitHub account.»
Инструменты
Git SSH Windows — пошаговое руководство
Дата размещения статьи 08/12/2019 👁26098
Git SSH Windows — пошаговое руководство
Настроим пошагово Git SSH для Windows 10. Это позволит вам выполнять команды git без ввода пароля от своей учетной записи GitHub.
Порядок действий:
- Генерация ключа SSH.
- Добавление SSH-ключа в ssh-agent.
- Добавление ключа SSH в учетную запись GitHub.
Генерация ключа SSH
Откройте bash/терминал. Добавьте следующий текст, подставив свой адрес электронной почты GitHub.
ssh-keygen -t rsa -b 4096 -C "ваша@почта.com"Будет создан ключ ssh, используя e-mail в качестве метки.
Когда вам будет предложено «Введите файл, в котором вы хотите сохранить ключ», нажмите Enter. Это установит в местоположение по умолчанию.
Enter a file in which to save the key (/c/Users/you/.ssh/id_rsa):[Press enter]
Далее введите безопасную фразу-пароль дважды или просто нажмите Enter.
Enter passphrase (empty for no passphrase): [Type a passphrase]
Enter same passphrase again: [Type passphrase again]
Добавление SSH-ключа в ssh-agent
Чтобы запустить ssh-агент введите следующую команду.
На экране отобразится похожая строка.
Agent pid 31724
Добавим свой закрытый ключ SSH в ssh-agent. Если вы создали свой ключ с другим именем (или добавляете существующий ключ с другим именем), замените в команде id_rsa на имя вашего файла закрытого (приватного) ключа.
Ключ будет успешно добавлен в ssh-агент.
Добавление ключа SSH в учетную запись GitHub
Мы сгенерировали у себя на компьютере закрытый ключ SSH и добавили его в ssh-агент. Теперь нам необходимо добавить SSH ключ в учетную запись GitHub.
Сейчас нам необходимо скопировать SSH ключ в буфер обмена.
Способов есть несколько, но я же вам предлагаю следующее решения для Windows 10: введите команду ниже.
Прямо в терминале вы увидите содержимое необходимого файла с ключем. Скопируйте его в буфер.
Теперь зайдите на вашу страницу GitHub » Settings.
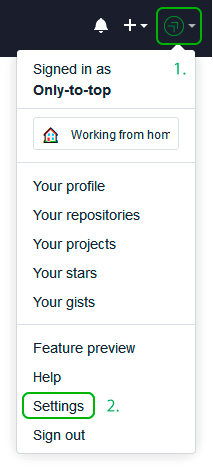
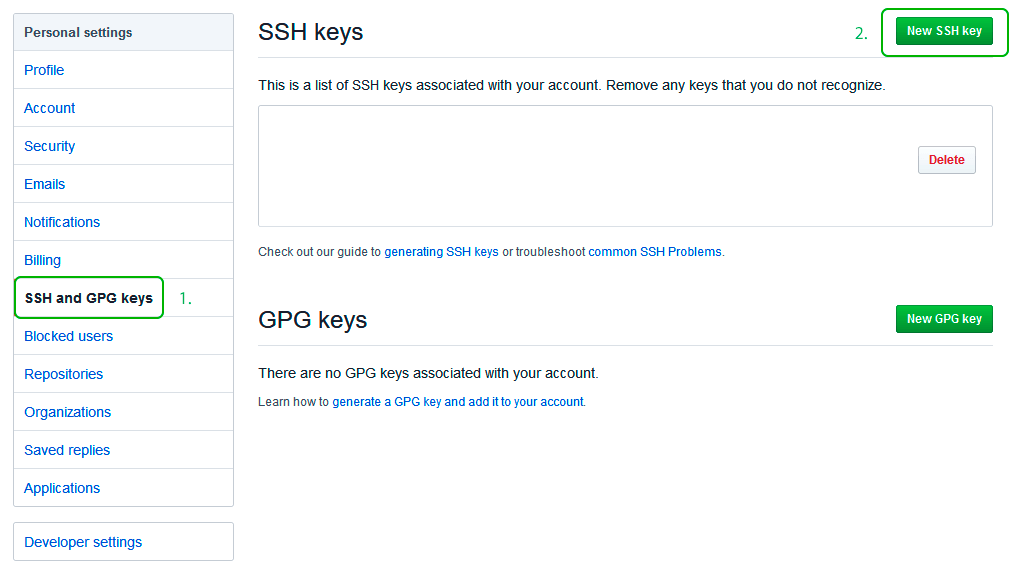
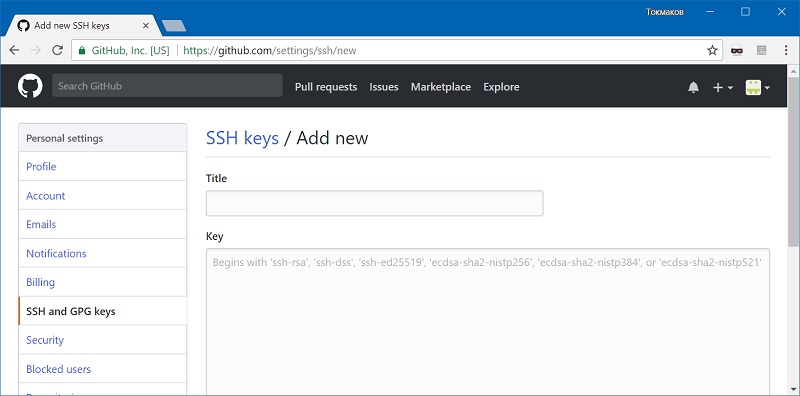
Перейдите во вкладку SSH and GPG keys и нажмите на кнопку New SSH key для добавления SSH ключа в вашу учетную запись GitHub.
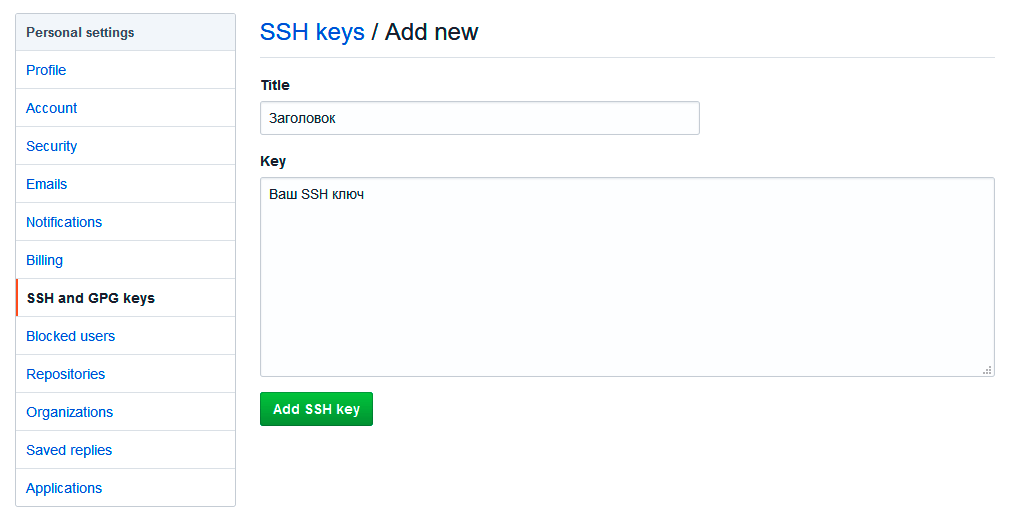
В поле Title добавьте заголовок для данного ключа. Например, если вы захотите настроить SSH доступ на нескольких устройствах, то вы будите понимать какой ключ принадлежит какому устройству.
В поле Key добавьте свой ssh-ключ, который вы скопировали в буфер обмена на предыдущем шаге.
Нажмите Add SSH key.
Для подтверждения вам потребуется ввести свой пароль от учетной записи GitHub.
На этом настройка SSH для вашего устройства завершена, теперь вы можете работать с git без ввода пароля от своей учетной записи.
Если вам понравилась данная статья, можете прочитать как настроить моментальную загрузку сайта на хостинг и синхронизацию файлов.
JavaScript: Window Location Checkbox Checked — Проверка Состояния Чекбокса ✔️
Надеюсь, вам понравилась данная информация. Если вам интересна тема web-разработки,
то можете следить за выходом новых статей в Telegram.
- Настройка Gulp Babel
- Микроразметка сайта
- Как перенести сайт WordPress на хостинг
- Настройте показ всего текста во время загрузки веб-шрифтов
- Сниппеты в VS Code
- Не удается проверить так как не задан исполняемый PHP-файл
Git умеет работать с четырьмя сетевыми протоколами для передачи данных: локальный, Secure Shell (SSH), Git и HTTP. Положительным аспектом использования протокола HTTP(S) является простота настройки. Поэтому при работе с GitHub он используется чаще всего.
$ git remote -v
origin  https://github.com/username/project.git (fetch)
origin  https://github.com/username/project.git (push)
Как настроить работу с репозиторием на GitHub.com по SSH под Windows 10? Для начала посмотрим, какие ssh-ключи уже есть в системе:
$ ls -al ~/.ssh
drwxr-xr-x 1 Evgeniy 197121    0 фев 25 10:26 ./
drwxr-xr-x 1 Evgeniy 197121    0 фев 25 10:25 ../
Ключей еще нет, директория пуста. Сгенерируем ключи командой
$ ssh-keygen
Generating public/private rsa key pair.
Enter file in which to save the key (/c/Users/Evgeniy/.ssh/id_rsa):[Жмем Enter]
Enter passphrase (empty for no passphrase):[Вводим пароль для ключа]
Enter same passphrase again:[Вводим пароль для ключа]
Your identification has been saved in id_rsa.
Your public key has been saved in id_rsa.pub.
Сначала необходимо указать расположение файла для сохранения ключа. Просто жмем Enter, чтобы сохранить ключ в файле по умолчанию (~/.ssh/id_rsa). Затем надо дважды ввести пароль для ключа, который можно оставить пустым (в этом случае дважды жмем Enter).
Можно добавить сгенерированный ключ в свой SSH-агент. Агент будет хранить ключ у себя, а все программы (например, ssh) будет обращаться к агенту, что обеспечивает дополнительную безопасность. Включаем SSH-агент командой
$ eval $(ssh-agent -s)
Agent pid 9600
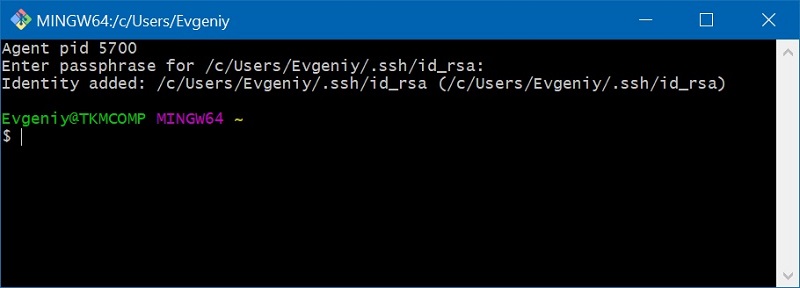
Добавляем в него ключ
$ ssh-add ~/.ssh/id_rsa
Enter passphrase for /c/Users/Evgeniy/.ssh/id_rsa:[Вводим пароль для ключа]
Identity added: /c/Users/Evgeniy/.ssh/id_rsa (/c/Users/Evgeniy/.ssh/id_rsa)
Теперь надо добавить наш ключ в аккаунте GitHub. Авторизуемся и переходим на страницу https://github.com/settings/keys, жмем кнопку «New SSH key» и вставляем содержимое файла ~/.ssh/id_rsa.pub в текстовое поле «Key».
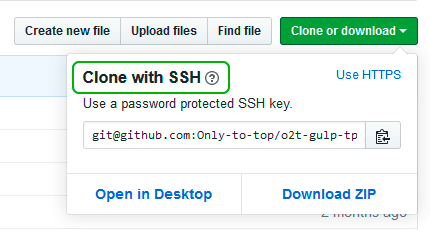
Теперь можно использовать SSH вместо HTTPS. Смотрим, какой должна быть ссылка проекта на GitHub, предварительно выбрав «Use SSH» (вместо «Use HTTPS»):
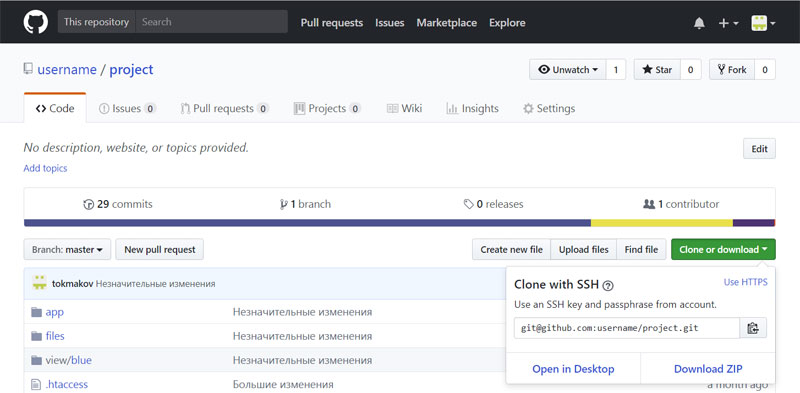
И выполняем команду:
$ git remote set-url origin git@github.com:username/project.git
Проверяем:
$ git remote -v
origin  git@github.com:username/project.git (fetch)
origin  git@github.com:username/project.git (push)
Чтобы не вводить каждый раз пароль от ключа при работе с репозиторием на GitHub, нужно создать файл C:/Users/UserName/.bashrc и добавить туда следующее:
#!/bin/bash
eval $(ssh-agent -s)
ssh-add ~/.ssh/id_rsa
Теперь запрос пароля от ключа будет происходить только один раз, при запуске (каждой новой) консоли.
Все команды выполняются в git bash (командная строка с стиле linux), которая устанавливается вместе с Git для Windows.
Здесь у меня получилось не однозначно, так что решил уточнить. Использовать ssh-агента полезно только в том случае, если для ключа был задан пароль. Если это не так — нужно просто указать git, какой ключ использовать при работе с github.com. Для этого создаем-редактируем файл ~/.ssh/config:
Host github.com
  IdentityFile ~/.ssh/id_rsa
Host some-server
  User evgeniy
  HostName 123.123.123.123
  Port 22
  IdentityFile ~/.ssh/some-server
Поиск:
Git • GitHub • SSH • Web-разработка • Windows
Каталог оборудования
Lorem ipsum dolor sit amet, consectetur adipiscing elit, sed do eiusmod tempor incididunt ut labore et dolore magna aliqua.
Производители
Lorem ipsum dolor sit amet, consectetur adipiscing elit, sed do eiusmod tempor incididunt ut labore et dolore magna aliqua.
Функциональные группы
Lorem ipsum dolor sit amet, consectetur adipiscing elit, sed do eiusmod tempor incididunt ut labore et dolore magna aliqua.
Гитхаб — крупнейший веб-сервис для хостинга IT-проектов и их совместной разработки. Он как раз и основан на системе контроля версий Гит. Кроме размещения кода участники могут общаться, комментировать правки друг друга, а также следить за новостями знакомых. Именно в нём работаем мы в Академии и ученики на интенсивах.
Регистрация и установка
Устанавливаем Гит
Если до этого вы не работали с Гитом, то его нужно установить. Рассмотрим, как это сделать в популярных операционных системах.
Установка в Linux
Если вы хотите установить Git под Linux как бинарный пакет, это можно сделать, используя обычный менеджер пакетов вашего дистрибутива. Пользователи Fedora, могут воспользоваться yum:
$ yum install git-core
Для дистрибутивов, основанных на Debian (например Ubuntu), используйте apt-get:
$ sudo apt-get install git
Установка на Mac
Сперва устанавливаем Homebrew если он у вас ещё не стоит. Также вы можете установить его с помощью команды:
ruby -e "$(curl -fsSL https://raw.githubusercontent.com/Homebrew/install/master/install)"После установки Homebrew, введите в терминале команду: brew install git.
Эта команда установит Гит на ваш компьютер.Чтобы прописать новый путь к установке Гит введите команду:export PATH=/usr/local/bin:$PATH
Установка в Windows
Здесь всё просто. Просто скачайте exe-файл инсталлятора со страницы проекта на Гитхабе и запустите его.
После установки у вас будет как консольная версия (включающая SSH-клиент, который пригодится позднее), так и стандартная графическая.
Регистрация на Гитхабе
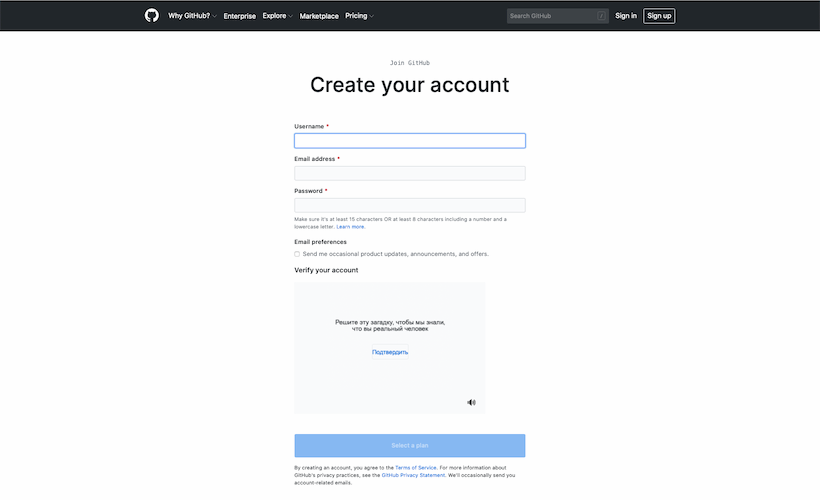
Чтобы начать работать с Гитхабом, нужно зарегистрироваться на нём, если вы ещё этого не сделали. Регистрация предельно проста:
- Переходим на сайт Гитхаба.
- Нажимаем кнопку Sign up (зарегистрироваться).
- На странице регистрации вам предложат ввести обязательные данные:
- имя пользователя;
- адрес электронной почты;
- пароль.

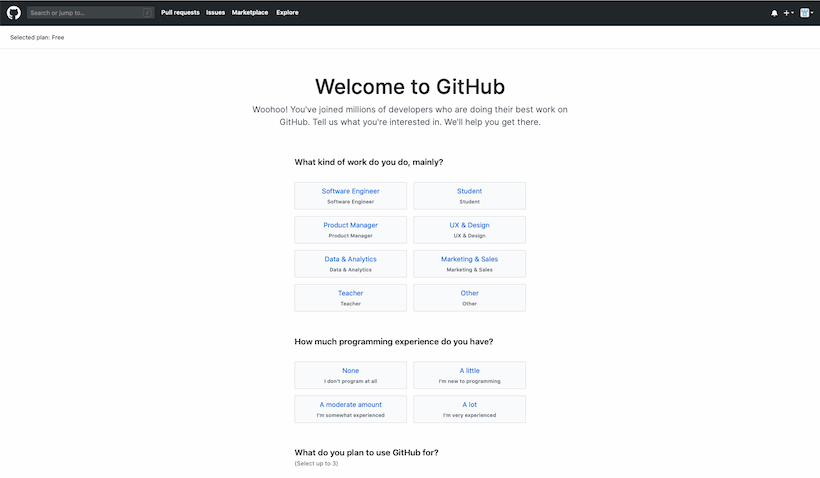
Страница регистрации Гитхаб - После этого вы попадёте на небольшой опрос от Гитхаба, который можете просто пропустить, нажав skip this step.
Начинаем работу
Устанавливаем SSH-ключи
SSH-ключ нужен чтобы быстро устанавливать соединение с Гитхабом, не вводя пароля. Кроме того, SSH — единственный из сетевых протоколов, предоставляющий доступ и на чтение, и на запись. Два других сетевых протокола (HTTP[S] и Git) в большинстве случаев дают доступ только на чтение, поэтому даже если они вам доступны, вам всё равно понадобится SSH для записи. К тому же SSH — протокол с аутентификацией и шифрованием трафика, что называется «из коробки». Недостаток SSH в том, что, используя его, вы не можете обеспечить анонимный доступ к репозиторию.
Доступ к удалённому репозиторию по SSH — самый распространённый вариант настройки удалённого доступа, быстрый, удобный и безопасный. Настроив авторизацию в SSH по ключам, вы будете избавлены от необходимости вводить пароли для доступа к репозиторию, сохраняя, однако, приемлемый уровень безопасности.
- Откройте используемый вами терминал.
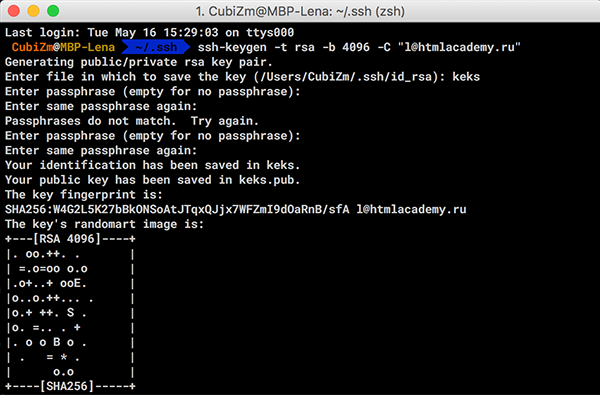
- Введите команду
ssh-keygen -t rsa -b 4096 -C "your_email@example.com",
она создаст новый SSH-ключ, используя вашу электронную почту как метку. В качестве электронного адреса укажите электронную почту, которую использовали при регистрации аккаунта в Гитхаб. - Вам будет предложено ввести пароль к ключу. Вы можете не использовать его или назначить любой. Пароль защищает ваш ключ от нежелательных вторжений.
- После этого будет предложено дважды ввести придуманный пароль (или просто этот шаг будет пропущен, если вы решили не создавать пароль), и затем создастся ключ.
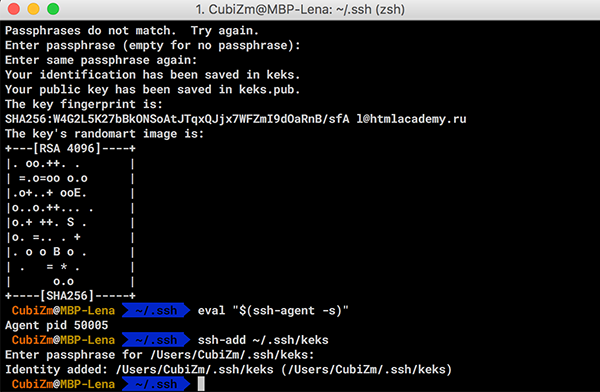
- Добавляем ключ в ssh-agent.
Проверяем доступность ключа командойeval "$(ssh-agent -s)"и добавляем командойssh-add ~/.ssh/your_key_name.

Примечание: у пользователей Windows, которые пользуются программой Cmder, могут возникнуть проблемы с командой eval "$(ssh-agent -s)". Им будет выведено вот такое сообщение об ошибке:
«eval» не является внутренней или внешней командой, исполняемой программой или пакетным файлом.
В Сmder для запуска ssh-agent можно использовать команду start-ssh-agent.
Если проблема осталась, то рекомендуем воспользоваться программой Git Bash.
Примечание: если вы используете macOS Sierra 10.12.2 или более позднюю версию, то вам нужно будет модифицировать ваш ~/.ssh/config файл, чтобы автоматически загрузить ключи в ssh-agent и хранить пароли.
Host *
 AddKeysToAgent yes
 UseKeychain yes
 IdentityFile ~/.ssh/id_rsa
Также вы можете добавить свой приватный ключ в ssh-agent и сохранить пароль к нему с помощью команды
$ ssh-add -K ~/.ssh/id_rsa.
Если вы создали свой ключ с другим именем или добавили существующий ключ с другим именем, замените в команде id_rsa на имя вашего личного ключа.
После того как создан ключ, его остаётся только добавить на Гитхаб.
Для этого скопируем его содержимое командой pbcopy < ~/.ssh/id_rsa.pub (для пользователей macOS или Linux) или clip < ~/.ssh/id_rsa.pub (для пользователей Windows).
Также вы можете просто открыть файл .pub с именем вашего ключа и скопировать его содержимое.
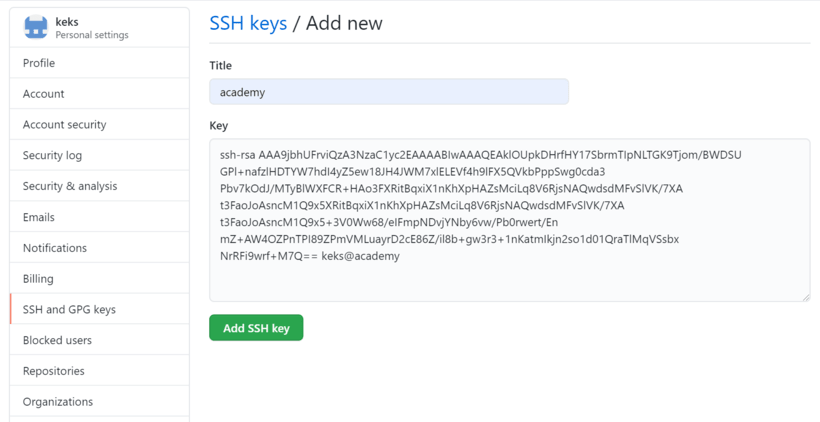
Переходим на страницу https://github.com/settings/keys и нажимаем кнопку New SSH key.
Введите произвольное имя ключа и вставьте код ключа из буфера обмена. После этого можно нажимать Add SSH key. Необходимо будет ввести пароль от аккаунта, чтобы подтвердить действие.
Проверить, что всё сделано верно, можно командой ssh -T git@github.com. Она должна выдать похожее сообщение:

Теперь можно клонировать любой доступный репозиторий используя его SSH-ссылку.
Более подробное описание работы с Гитхабом мы рассмотрим в статье «Pабота с Гит через консоль»
Другие статьи о Git
- Шпаргалка по Git
- Как работать в программе GitHub Desktop
- Регистрация на Гитхабе. Работа через GitHub Desktop

![]()
Welcome to my first official guide on Dev.to. Today I want to explain how you can setup SSH and Git on your Windows 10 computer.
Note: This is not about 100% securing your keys but about how to generate keys for use with GitHub.
Thanks to garethdd for his constructive feedback.
What is SSH?
SSH stands for Secure Shell and is an awesome way to authenticate yourself on remote servers (for example the Github server) without typing in a password everytime.
SSH works via two keys, the Private Key and the Public Key. While the private key should always stay private and safe, the public key can be shared around the internet without any problems.
The private key allows you to get access to servers that have your public key registered, so your access can only be stolen if the attacker somehow gets your Secret Key so keep it safe!
SSH should be preinstalled on new Windows 10 machines.
What is Git?
Git is a free version management tool that helps you to versionize your code and potentially save it on a remote server (for example Github, Gitlab or Bitbucket).
You can install Git from here:
https://git-scm.com/download/win
You can also install Git via chocolatey:
Create a SSH Key
The first step is to generate a new SSH key. Use cmd or Powershell and run the following command:
ssh-keygen -t rsa -b 4096 -C "your_email@example.com"
You can but don’t need to give it a passphrase since you should never share your secret key around but using one will secure your keys. Keep in mind that everybody can have as many private keys as they want.
This generates a new private SSH key with rsa encryption and 4096 bits. It also generates a public key from the secret key which you can share around.
There will be a new folder and files in your Windows user folder.
In general you can create as many keys as you want. The id_rsa key is the default key generated by ssh and will be automatically be used by your ssh-agent if you don’t tell it to use another key.
What is an ssh-agent?
An ssh-agent is the agent process used to actually authenticate yourself with ssh. There are a few out there (PuTTY with Pageant for example) but for this example we’ll use the ssh-agent provided by the native and default Windows 10 ssh-agent.
If you want to you can use PuTTY and Pageant to make your keys even more secure. Read this post on Digital Ocean for more information.
If you want to change the key used by your ssh-agent, you must first start the service. The service will be disabled on Windows 10 by default. Search for Services and open the Services settings and look for the «OpenSSH Authentication Agent» and Activate it:

Now you will be able to access the ssh-agent from your console via ssh-agent.
For this example we’re going to try to load another key called example into our agent and use it instead of the id_rsa key. To do this you can run the following command:
Now you will have both keys available for this session.
Register your SSH Key on Github
The next step is to register your generated SSH key on Github. For that, run the following command:
type C:Usersyour_user_name.sshid_rsa.pub
and copy the output string into your clipboard. Now go to your Github keys settings and add a new SSH key with your public key and save it.
Congratulations! You now are able to get and push code to Github without any password!
Note: There should also be a C:Usersyour_user_name.sshid_rsa file. This is your private key, don’t share this around!
Setup Github in your Shell
Now it’s time to setup Git on your machine. After installing it from the link above, open a new cmd or Powershell window. Now we need to set your public Git name and Git email address. This will always be public when pushing code.
Luckily Github gives you a privatized email address for use. Go to https://github.com/settings/emails and you will find a @users.noreply.github.com email address for your account. Copy this email address.
Next register your name and email in Git:
git config --global user.name "Your Name"
git config --global user.email your_email@users.noreply.github.com
Congratulations! Now all your Commits will be registered as being commited from your Github user.
Signing your GitHub commits (Optional Step)
To sign your commits you first must install the GPG command line tools. After you installed the GPG toolkit, you can run the following command to generate a new gpg key:
This will ask you what kind of key you want. Go for RSA and RSA.
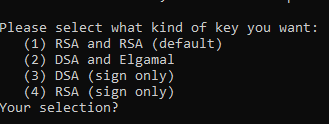
Now you need to enter a bit length. The recommendation is 4096 bits.
After that you can specify a expiration length or if the key should never expire. Pick as you want. Expiring keys are more secure in general because you have to renew them every now and then.
Now enter your personal informations to verifying your identity with your gpg key.
When you’re done you will be asked for a passphrase. Give it a secure passphrase and you will be done with your gpg-key generation.
After that you will be able to find your key in your users .gnupg folder as specified in the success message.
If you want to list your gpg keys, simply run
// short version
gpg --list-secret-keys

// long version
gpg --list-secret-keys --keyid-format LONG
Your GPG key you can share with Github is the key coming after sec rsa4096/ so for example in
/Users/hubot/.gnupg/secring.gpg
------------------------------------
sec   4096R/3AA5C34371567BD2 2016-03-10 [expires: 2017-03-10]
uid                          Hubot
ssb   4096R/42B317FD4BA89E7A 2016-03-10
the gpg key would be 3AA5C34371567BD2
To get your public key block, simply run
gpg --armor --export YOUR_GPG_KEY
which will output your public GPG Key Block. Copy it and paste it to your GitHub Account here.
From now on your commits will be signed when commited.
Use Git
Now you’re ready to actually use Git. From now you can clone repositories via git clone or push new code to Github. Here is a quick reference:
# Clone a repository to the current directory
git clone [REPOSITORY_CLONE_URL]

# Create a new commit with a message
git commit -m "Your commit message"

# Add files to the commit
git add .
git add ./filename.ext

# Push your commits to Github
git push origin master
git push origin [YOUR_BRANCH_NAME]

# Reset your repo to the last version
git reset --hard

# Create a new branch
git checkout -b [YOUR_BRANCH_NAME]

# Switch branches
git checkout [YOUR_BRANCH_NAME]
git checkout master

# Reset a single file
git checkout ./filename.ext
Conclusion
Thanks for reading this post. I hope it helped you with the setup. If you need help or have questions let me know!
Table of Contents
C 13 августа 2021 года Github блокирует доступ по HTTPS протоколу к репозиториям, то есть теперь вы не сможете, получить или отправить изменений в удаленный репозиторий без SSH ключа.
В этом гайде покажу как создать ключ, загрузить на сервер и перенастроить локальный репозиторий на SSH доступ. В качестве примера используется Windows 10 и GitBash.
Что необходимо
- Gitbash или установленный git для Linux и macOS.
- Репозиторий на GitHub.
Создание пары ключей SSH
SSH (Secure SHell) — это протокол, который позволяет безопасно авторизоваться в различные сервисы, подключаться к удаленным терминалам, передавать по шифрованным каналам информацию. Очень распрастранен при работе с репозиториями. Использует пару ключей — публичный и приватный.
Открывайте GitBash или терминал, вводите:
💡 Если у вас будет ошибка: No such file or directory — создайте папку, выполнив команду:
После заходите в папку.
Для генерации ключа используется программа ssh-keygen, она обычно установлена, в Windows встроена в GitBash.
Github рекомендует использовать ключ типа ed25519, так как этот алгоритм на данный момент самый безопасный, с коротким открытым ключом (68 символов, против 544 у RSA) и что важно — быстро работает. За тип ключа отвечает параметр -t.
Длина ключа рекомендуется 4096 бит, при создании это параметр -b.
💡 При генерации ключей , ключи по-умолчанию будут сохранены в папке .ssh текущего пользователя.
В итоге для запуска генерации ключа, выполните:
ssh-keygen -t ed25519 -b 4096
Вам будут заданы несколько вопросов:
-
Куда сохранить файл (
Enter file in which to save...) — нажмите Enter и по умолчанию ключ будет названid_ed25519и сохранится в .ssh папке профиля текущего пользователя. (в Windows папки пользователя в C:/Users, в macOs/Linux папка пользователя в /home) -
Введите кодовую фразу (
Enter passphrase...) — опционально, кодовая фраза это элемент безопасности. Если ваш приватный ключ попадет в чужие руки, им не смогут воспользоваться пока не подберут кодовую фразу. Это даст вам больше времени для замены ключей и отказа от скомпрометированного ключа. Предлагаю в данный момент отказаться от ключевой фразы и просто нажать Enter. -
Подтвердить кодовую фразу или ее отсутсвие, тоже нажав Enter.
В результате вам покажут рисунок вашего ключа:
+--[ED25519 256]--+
|        o + .    |
|       . * *     |
|      o   * .    |
|     o   . .     |
|.   .   S      . |
|o. .    . . + . .|
|o..o   o =.+ = o |
|. = . o o E+=.B o|
|   o .   ++o.*=X+|
+----[SHA256]-----+
Проверьте, на месте ли ключи, выведите список файлов в папке .ssh:
Вывод должен быть таким:
id_ed25519 id_ed25519.pub
первый файл это приватный ключ, а второй с .pub это публичный.
Активация ключа
Для того чтобы ключ использовался системой, необходимо добавить ключ в ssh-agent.
Запустите ssh-agent:
результат, номер процесса может отличаться:
Добавьте ранее созданный ключ:
ssh-add ~/.ssh/id_ed25519
При успехе получите ответ:
Identity added: /c/Users/JohnDoe/.ssh/id_ed25519
Ключи SSH готовы к использованию!
Добавление публичного ключа в профиль на GitHub
ℹ Кратко про ключи. С помощью публичного ключа, каждый может зашифровать информацию, расшифровать может только владелец приватного ключа, поэтому приватный ключ нельзя передавать, отправлять или хранить в открытом виде. Желательно пару ключей дополнительно скопировать на отдельный носитель, на случай потери ключа на компьютере.
В GitHub для работы с репозиториями скопируйте публичный ключ, одним из способов:
- в GitBash выполните команду:
clip < ~/.ssh/id_ed25519.pub
это скопирует публичный ключ в буфер обмена.
- если данная команда не работает, откройте файл
id_ed25519.pubв любом текстовом редакторе, и скопируйте все содержимое файла, публичный ключ выглядит так:
ssh-ed25519 AAAAC3NzaC1lZDI1NME5AAAAIMNTCjcl4AXofA/lBMPT7iLAdoPyWJab9N9enEj2iXOb JohnDoe@DESKTOP-IKJ2EOH
- Переходите на страницу управления ключами:
https://github.com/settings/keys
-
Нажимайте не кнопку
New SSH Key -
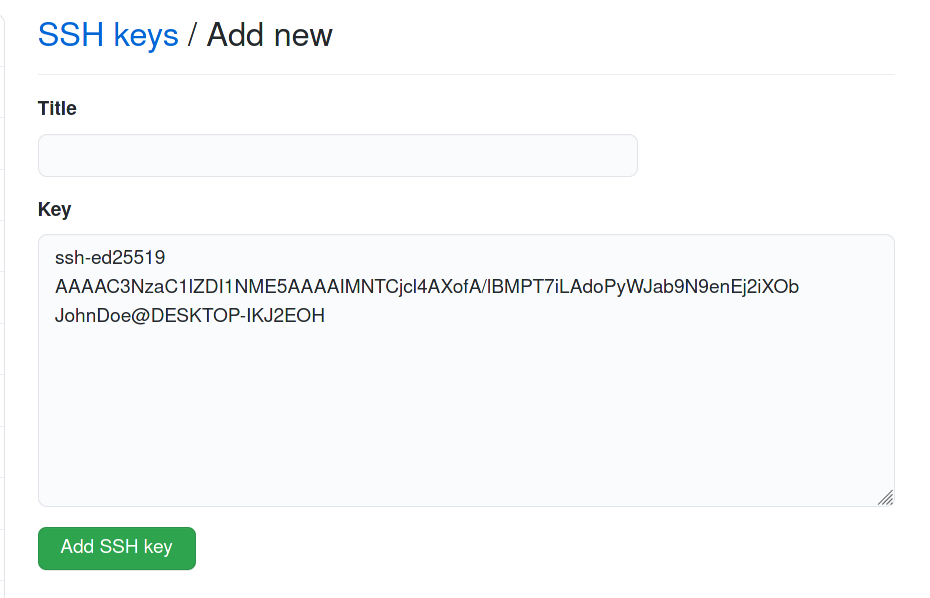
В поле
Keyвставьте скопированный ключ:
-
В поле
Titleможете вставить название ключа, пригодится если у вас будет в профиле более одного ключа. Поможет их различать. -
Нажимайте кнопку
Add SSH Key.
Теперь можно использовать SSH доступ к вашим репозиторияем!
Получение репозитория по SSH
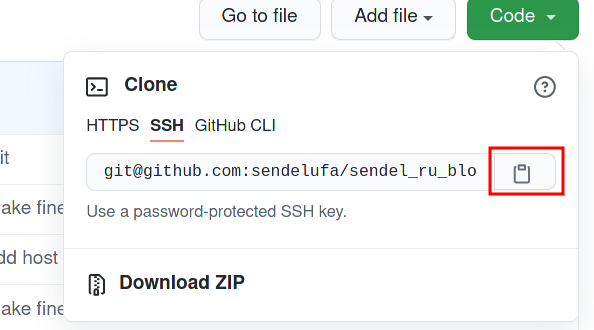
Откройте репозиторий и скопируйте ссылку для SSH доступа:
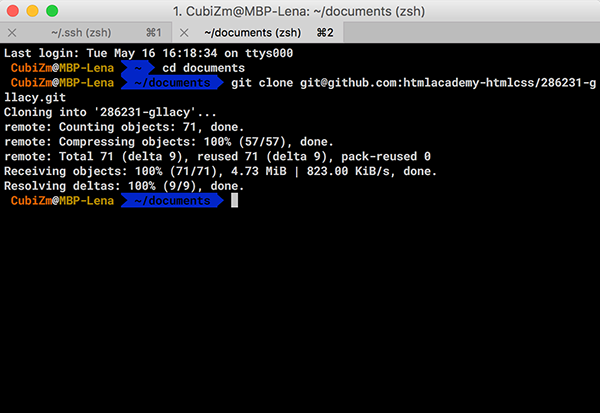
И как обычно используйте команду git clone:
git clone git@github.com:sendelufa/sendel_ru_blogging.git
Как сменить работу с HTTPS на SSH
Если у вас есть локальный (на вашем рабочем компьютере) репозиторий полученный по https, очень просто сменить доступ на SSH.
Для этого убедитесь что доступ по HTTPS, для этого выведите список remote:
git remote -v

origin  https://github.com/sendelufa/tutorial-ssh.git (fetch)
origin  https://github.com/sendelufa/tutorial-ssh.git (push)
ссылки начинаются c https, а значит вы не можете ни загрузить ни получить обновления удаленного репозитория.
Зайдите в репозиторий и скопируйте SSH ссылку доступа, перейдите в локальный репозиторий и удалите текущий remote origin:
и добавьте новый, последняя строка в команде это ссылка доступа SSH:
git remote add origin git@github.com:sendelufa/tutorial-ssh.git
проверьте список удаленных репозиториев:
git remote -v

origin  git@github.com:sendelufa/tutorial-ssh.git (fetch)
origin  git@github.com:sendelufa/tutorial-ssh.git (push)
и если у вас формат без https в начале ссылки, то все выполнено верно, можно работать с репозиторием и проверить командой git fetch
На этом вопросы с доступом к вашим репозиториям на гитхабе закрыт!
Чистого кода и красивых коммитов!
OpenSSH, the open source version of the Secure Socket Shell (SSH) tools, is a standard part of the Windows 10 and Windows Server 2019 operating systems. This greatly simplifies how to connect to GitHub with SSH on Windows.
Step-by-step Windows GitHub SSH example
To connect to GitHub with SSH from Windows, follow these steps:
- Open PowerShell
- Run the ssh-keygen command to create SSH keys
- Copy the value of the SSH public key
- Save the public key in your GitHub account settings
- Perform a Git clone operation using your repo’s SSH URL
Create SSH Keys for GitHub
To start, store a public SSH key on GitHub. This is validated against a locally stored private key that Git uses to validate and establish a connection. GitHub SSH keys are created with the ssh-keygen tool that comes prepackaged with updated versions of Windows.
In Windows PowerShell, issue the following ssh-keygen command to create GitHub SSH keys:
PS C:githubsshexample> ssh-keygen -o -t rsa -C "[email protected]"
You will be asked for an optional passphrase. It’s permissible to click enter and leave this blank.
| ssh-keygen flags | Purpose | Suggested |
|---|---|---|
| -C | Comments or metadata to add to the public key | Email address |
| -t | The type of GitHub SSH key to create | RSA |
| -o | Use the newest OpenSSH format | Leave blank |
You will also be asked for a location to save the GitHub SSH keys on Windows. Again, just click enter to accept the default location, which is the .ssh folder under the user’s home directory.
The Windows GitHub SSH keys live in the .ssh folder under the current user’s home directory. The following directory listing under the .ssh folder of a user named Cameron shows the two files created by the ssh-keygen tool:
PS C:UsersCameron.ssh> dir
LastWriteTime      Name
-------------      ----
1/1/2022           id_rsa
1/1/2022           id_rsa.pub
GitHub SSH config
Open the SSH public key in a text editor such as Notepad++, perform a Select All, and copy the key.
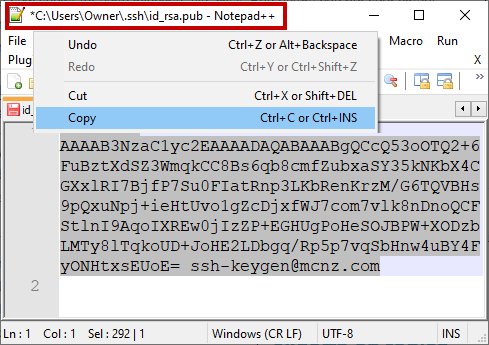
Copy the public GitHub SSH key and store this value as a registered SSH key in your GitHub account.
With the SSH key copied, log into GitHub, navigate to your account settings, and paste the public key as a new SSH key.
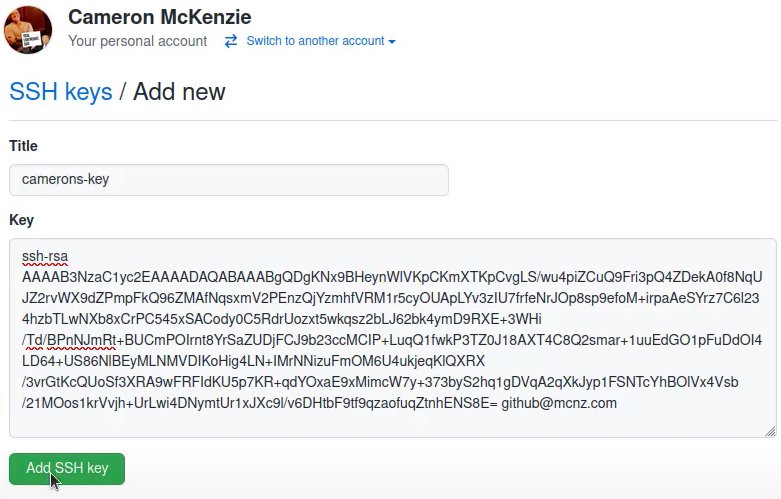
To obtain a secure, GitHub SSH Windows connection, you must register the public key in your online account settings.
SSH to GitHub on Windows
With the SSH keys generated, and the public key registered in your GitHub account, you can now use Git to connect to GitHub over SSH on Windows.
Simply copy the SSH URL from the GitHub page of the repository you wish to clone, and then provide that SSH link to the Git clone command:
PS C:githubsshexample> git clone [email protected]:cameronmcnz/java-jakarta-ee.git
Cloning GitHub SSH Windows into ‘java-jakarta-ee’…
Host authenticity cannot be established.
Do you still want to connect(yes or no)? yes
Receiving objects: 100% (55/55),5.78 MiB | 1.32 MiB/s, Windows GitHub SSH done.
Resolving deltas: 100% (66/66), Windows GitHub SSH done.
Notice the initial git clone with GitHub SSH on Windows complains about being unable to establish the host authenticity. That warning message is expected. Just type yes and allow the GitHub SSH clone operation to continue.
Once the remote repository is cloned, you can continue to use Git as you normally would, issue commits, add submodules, rebase branches and push back and forth with GitHub. All operations that use the network will automatically use an SSH connection.
And that’s how easy it is to connect to GitHub over SSH on Windows based machines.
Learn how to create a SSH key to work with Github and Gitlab using PuTTYGen in Windows 10.
When you work with Git either with Github or Gitlab, you will need often to authenticate yourself using your username and password. The SSH Keys are an alternative to identify yourself without providing the mentioned credentials every time you interact with your repositories. You will only need to share your public key with the service and the private key will remain stored in your computer, so when the keys match, you have full access to your stuff.
For example, if you try to clone one of your repositories through SSH like this:
git clone [email protected]:username-or-organization/repository.gitIn Windows, if you don’t have any SSH key configured properly, the following message will appear:
Cloning into 'your-git-repo'...
[email protected]: Permission denied (publickey,keyboard-interactive).
fatal: Could not read from remote repository.

Please make sure you have the correct access rights
and the repository exists.
In this article, I will explain to you how to easily generate your own SSH key to identify your device.
1. Install PuTTYGen
The first thing you gotta do to work with the SSH authentication with your repositories is to install PuTTYGen in the system. This application comes included in the installation setup of PuTTY on the official website here. However, you can download the puttygen.exe file as well if you don’t want the entire PuTTy bundle.
PuTTYGen is an RSA and DSA key generation utility that will be used to create our SSH key in the Windows environment.
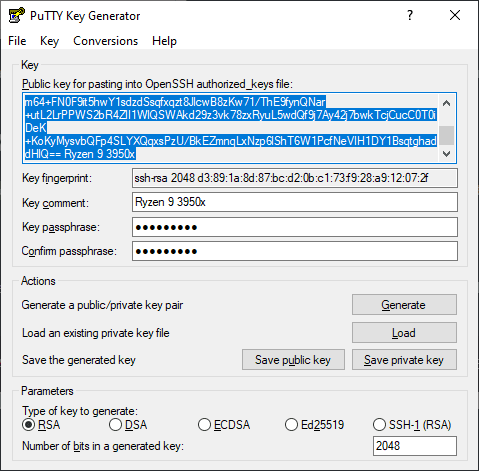
2. Generate your SSH Key
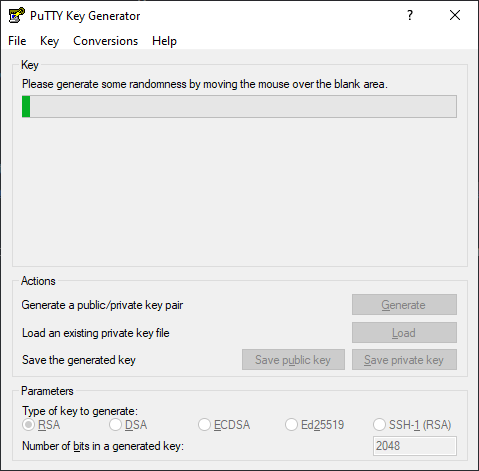
Launch the PuttyGen binary and start creating the SSH key by clicking on «Generate», after that, you will be asked to move the mouse over the blank space to generate some randomness in your key:
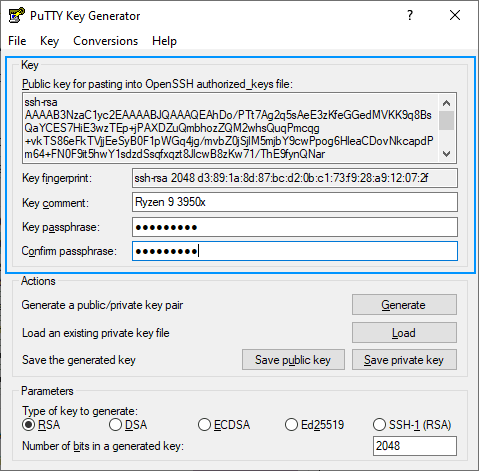
After moving the mouse at this point, the SSH key will be generated and you will have to fill the following fields:
- Key comment: the name to use for this key, usually the name of the computer that you are working on right now.
- Key passphrase: this will be the password that you will need to provide to unlock the key every time you need it.
Now that we have the password of the SSH key and a name for it, you can now proceed to save in the required formats for Windows.
3. Create the .ssh folder in your user directory
Create the .ssh folder in the current user’s directory. For example, on my computer, it is located at C:/Users/sdkca. So I created the .ssh folder in there (you can obtain the directory with the environment variable %USERPROFILE%):
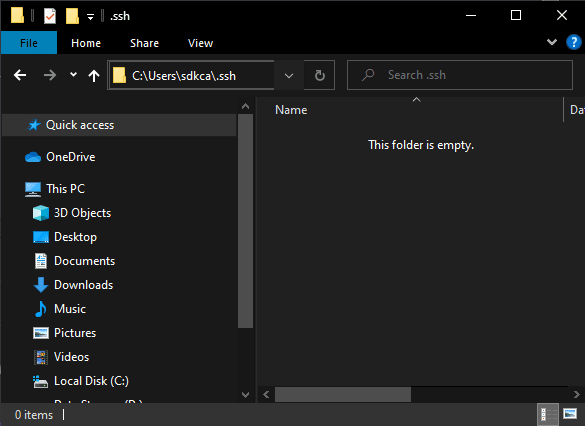
You will store all the created files in the mentioned directory.
4. Store PuTTY Private Key (PPK File)
The first file to generate from our now generated SSH key is the file with .ppk extension that you can generate by clicking on «Save private key»:

You can provide a custom name, in our case we will use the same name as the comment «ryzen93950x.ppk» and will be stored in the .ssh directory created in step #3. The content of the .ppk file looks something like this:
PuTTY-User-Key-File-2: ssh-rsa
Encryption: aes256-cbc
Comment: Ryzen 9 3950x
Public-Lines: 6
AAAAB3NzaC1yc2EAAAABJQAAAQEAhDo/PTt7Ag2q5sAeE3zKfeGGedMVKK9q8BsQ
aYCES7HiE3wzTEp+jPAXDZuQmbhozZQM2whsQuqPmcqg+vkTS86eFkTVjjEeSyB0
F1pWGq4jg/mvbZ0jSjlM5mjbY9cwPpog6HleaCDovNkcapdPm64+FN0F9it5hwY1
sdzdSsqfxqzt8JlcwB8zKw71/ThE9fynQNar+utL2LrPPWS2bR4ZlI1WlQSWAkd2
9z3vk78zxRyuL5wdQf9j7Ay42j7bwkTcjCucC0T0iDeK+KoKyMysvbQFp4SLYXQq
xsPzU/BkEZmnqLxNzp6lShT6W1PcfNeVIH1DY1BsqtghaddHlQ==
Private-Lines: 14
ksW4kvFIMD4OqwgDYbEkhiB0l1uNsfj2uXw/lch/mHmaUSS08+2RHojc4GNDD2VG
....
.....
5. Store OpenSSH Public Key for authorized keys (id_rsa.pub File)
Now you need to create the file id_rsa.pub that will contain the string in the middle of the PuTTYGen application (Public key). The string is used on the authorized_keys file of the servers so you can access them:
Copy the content and paste it into the mentioned id_rsa.pub file in the .ssh directory created in step #3. The file content will look something like this:
ssh-rsa AAAAB3NzaC1yc2EAAAABJQAAAQEAhDo/PTt7Ag2q5sAeE3zKfeGGedMVKK9q8BsQaYCES7HiE3wzTEp+jPAXDZuQmbhozZQM2whsQuqPmcqg+vkTS86eFkTVjjEeSyB0F1pWGq4jg/mvbZ0jSjlM5mjbY9cwPpog6HleaCDovTROLOLOLOLO-DONTUSETHISKEY-USEYOUROWNKEYJlcwB8zKw71/ThE9fynQNar+utL2LrPPWS2bR4ZlI1WlQSWAkd29z3vk78zxRyuL5wdQf9j7Ay42j7bwkTcjCucC0T0iDeK+KoKyMysvbQFp4SLYXQqxsPzU/BkEZmnqLxNzp6lShT6W1PcfNeVIH1DY1BsqtghaddHlQ== Ryzen 9 3950x6. Store OpenSSH Key (id_rsa File)
Finally, the third file will be your identity file that will be your SSH Key in Open SSH format. You will need to convert your key to this format as it’s the one you require on tools like Github and Gitlab. You can easily do this by clicking on the Conversions tab of PuTTYGen and then clicking on Export OpenSSH Key (force new file format):
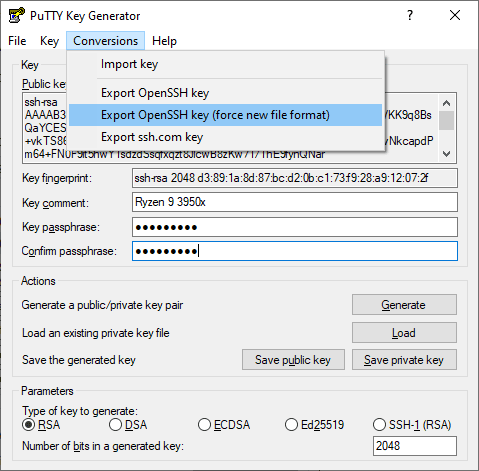
Note: if you don’t use the new file format, it will work anyway, however, you will always find the warning «load pubkey «/c/Users/USERNAME/.ssh/id_rsa»: invalid format».
This will prompt you where to save the file, use id_rsa as name and store it in the .ssh directory created in step #3. The content of this file should look like this:
-----BEGIN RSA PRIVATE KEY-----
Proc-Type: 4,ENCRYPTED
DEK-Info: DES-EDE3-CBC,920A7C839CE3CABE

qWuTR1ARsILMzEGwhmr5SYFdu/MxsLKA3XTLy1dO4RYsvLqZOmloRvtZgy9VSNpg
...............................
-----END RSA PRIVATE KEY-----
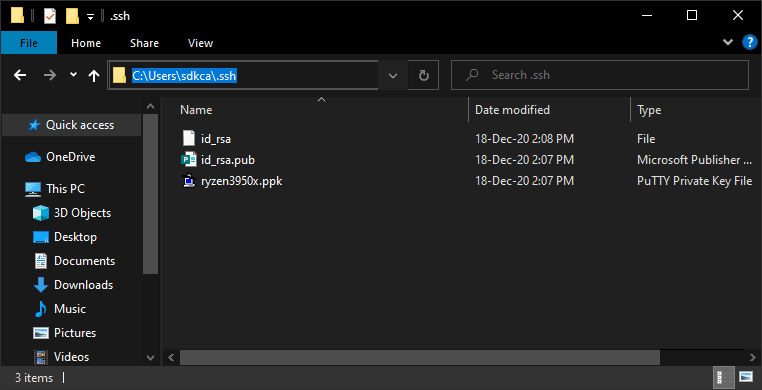
After following all the previous steps you will end up with 3 files in the .ssh directory:
7. Register SSH key in Github and Gitlab
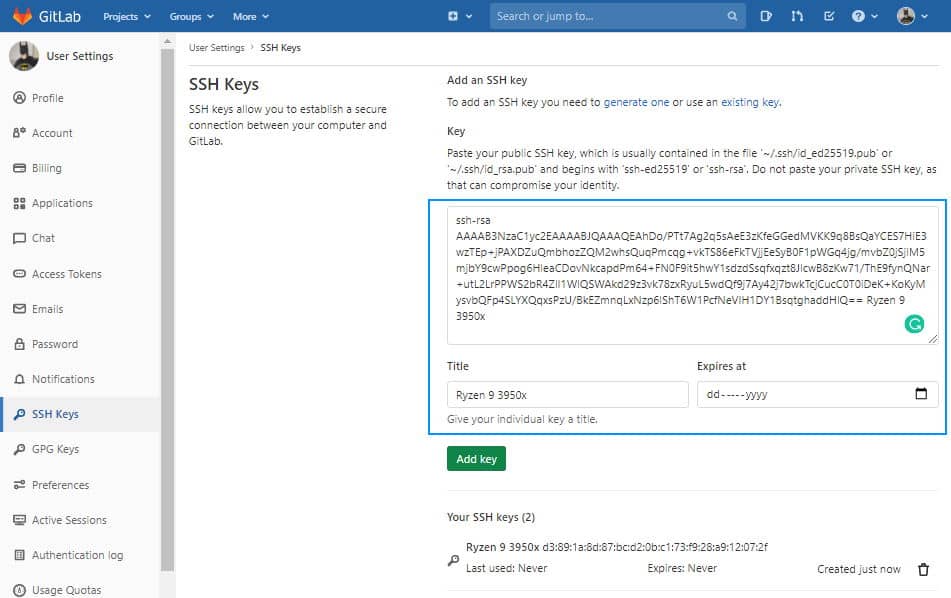
As the final step, you need to register your OpenSSH Public Key in the platform of your choice in your SSH Keys:
Gitlab
Login to Gitlab and open your user settings. In the left side menu, choose the SSH Keys option and register the value of your id_rsa.pub file:
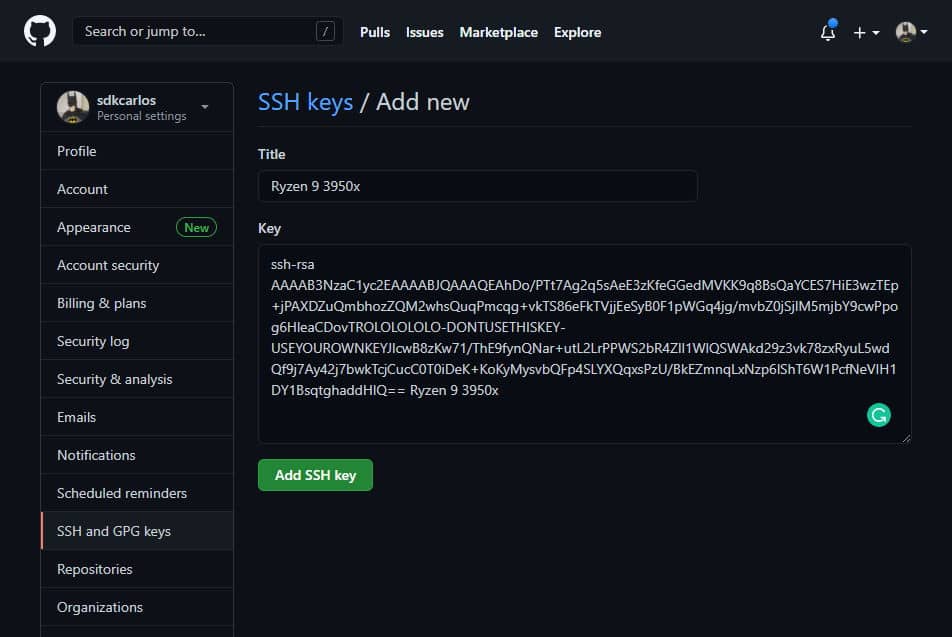
Github
Login to Github and open your user personal settings through the top right side dropdown. Select SSH AND GPG keys and register your key:
8. Using SSH Authentication
Now that you have your keys registered, you can clone your repositories and make changes to your repositories:
git clone [email protected]:username/repository-name.gitHappy coding ❤️!
I downloaded and installed git from: https://git-scm.com/downloads. I can use git on Windows Command Prompt now.
I downloaded puttygen and used it to generate a pair of RSA keys, stored at D:rsa_keys
I added the public key to my company’s git website.
Now, how can I tell git to use the rsa key I just created?
asked Jun 25, 2018 at 12:10
![]()
mommomonthewindmommomonthewind
4,23010 gold badges42 silver badges72 bronze badges
7
I think you may need to run git bash and set keys there:
- Start git bash (the simplest way:
All Programs -> Git -> Git Bash - In the git bash terminal type
ssh-keygen -t rsa. This will generate public and private key pair - Go to the location of the keys (I’d recommend using git bash for it) and open the public key (with cat, for example), copy it
- Paste the public key on your github account using
Account->SSH Keys->Add key
I hope this helps.
answered May 8, 2019 at 20:13
![]()
2
On Windows 10 I wasn’t able to just use the SSH public/private key pair as generated on GitHub.
I had to first convert the private key to a .ppk format. To do this, open PuTTY Key Generator, go to Conversions -> Import Key. Choose your private key, and then click on Save private key. You’ll have your private key in a .ppk file.
After that, you need Pageant (PuTTY Authenticator Agent) to be aware of that key. Open Pageant and add the private key with the .ppk file you just created.
This allowed me to authenticate with GitHub correctly.
answered Dec 8, 2020 at 19:00
![]()