Asked
13 years, 5 months ago
Viewed
18k times
How can I play a sound in WinForms with C#?
![]()
Cole Tobin
9,02115 gold badges49 silver badges72 bronze badges
asked Aug 20, 2009 at 5:58
![]()
0
For playing sound simply, with no interaction you can use System.Media.SoundPlayer:
System.Media.SoundPlayer player = new System.Media.SoundPlayer();
player.SoundLocation = "soundFile.wav";
player.Play();
answered Aug 20, 2009 at 6:20
![]()
Karl JohanKarl Johan
3,9521 gold badge25 silver badges36 bronze badges
1
![]()
answered Aug 20, 2009 at 6:06
![]()
Sebastian GraySebastian Gray
2,5903 gold badges26 silver badges36 bronze badges
0
|
Leksway1 4 / 4 / 4 Регистрация: 19.05.2014 Сообщений: 56 |
||||
|
1 |
||||
нужно добавить звук при нажатии кнопки25.11.2015, 13:03. Показов 8053. Ответов 1 Метки нет (Все метки)
Нужно добавить звук после нажатие кнопки. я чет пытался, но никак. подскажите?ошибок нет но и звука нет
__________________
0 |

|
Programming Эксперт 94731 / 64177 / 26122 Регистрация: 12.04.2006 Сообщений: 116,782 |
25.11.2015, 13:03 |
|
Ответы с готовыми решениями: Как при нажатии кнопки на второй форме (пускай ее зовут newForm), добавить фамилию в листбокс на Form1 Не работает звук при нажатии кнопки под Windows 7 PlaySound(PChar(ExtractFilePath(Application.ExeName) + ‘123.wav’), Нужно написать программу, что бы при нажатии кнопки, появлялись другие кнопки, а та пропадала
Всё работает, 1 |
") Почему звук отключается лишь при повторном нажатии кнопки
Почему звук отключается лишь при повторном нажатии кнопки|
Эвальд 9 / 9 / 8 Регистрация: 07.04.2015 Сообщений: 84 |
||||||
|
25.11.2015, 19:22 |
2 |
|||||
Вложения
0 |
- Download source code — 1,105.9 Kb
Introduction
This article describes an approach to embedding WAV audio files into an application and playing them through the use of the System.Media class library. Due to the use of the System.Media class library, this example does not rely upon the import of the «winmm.dll» in order to play the audio file and for that reason this approach requires far less code to implement.
The audio files used were embedded into the application as resources which eliminates the need to package up external WAV files for installations requiring the presentation of audio files. At the same time, the use of embedded resources precludes the potential for such files being moved or deleted after the consuming application has been installed.
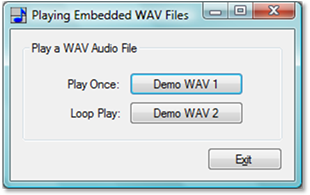
Figure 1. Demonstration Form in Sample Application
Getting Started.
The solution provided with this download contains a single project entitled, «PlayWavFiles». The project is described in the solution explorer (figure 2). The project contains only the default references for a win forms application; the resources indicated were embedded into the application Resources and are not delivered with the application through an installation.

Figure 2. Solution Explorer
The example was written using Visual Studio 2005 using C#; open the solution into the IDE to examine the code.
Adding Audio Files the Resources
To add audio files to the solution, open the Resources.resx file shown in the solution explorer. Once open, you will see a combo box (figure 3) that is used to allow you to select the type of resource to add to the project, select the Audio file option from the list and then click on «Add Resource».

Figure 3. Adding Audio Files to Resources
Once you have selected the «Add Resource» button, a file browser will open and you can use this file browser to search for audio files and add them to the application resources.
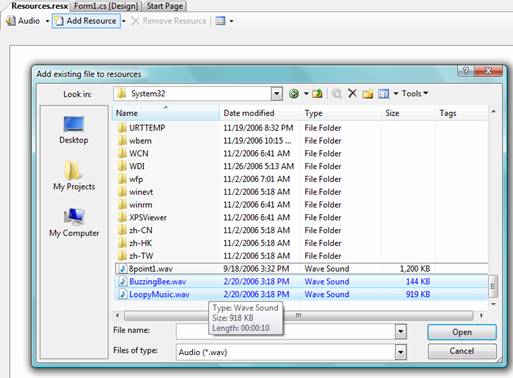
Figure 4. Browsing for Audio Files
Once the audio files have been added to the application resources, select each item added and set the «Persistence» property to «Embedded in .resx».

Figure 5. Setting the Persistence Property for Added Audio Files
At this point, the audio files are added and set; they may now be used within the project.
The Code: Main Form.
There is only a single form in the application (frmMain) and that form contains all of the code necessary to play the embedded audio files. Aside from the default imports, the System.Media class library has been added to the form:
using System;
using System.Collections.Generic;
using System.ComponentModel;
using System.Data;
using System.Drawing;
using System.Text;
using System.Windows.Forms;
using System.Media;

namespace PlayWavFiles
{
    public partial class frmMain : Form
    {
        public frmMain()
        {
            InitializeComponent();
        }
The sum total of code required is contained in three button click event handlers; the exit button is used to close the application:
private void btnExit_Click(object sender, EventArgs e)
{
    Application.Exit();
}
The next button click event handler plays an embedded WAV file once:
private void btnDemo1_Click(object sender, EventArgs e)
{
    try
    {
        SoundPlayer sndplayr = new
                 SoundPlayer(PlayWavFiles.Properties.Resources.BuzzingBee);
        sndplayr.Play();
    }
    catch (Exception ex)
    {
        MessageBox.Show(ex.Message + ": " + ex.StackTrace.ToString(),
                       "Error");
    }
}
The click event handler creates an instance of the System.Media sound player and sets the player to load an audio file from the application resources. After the resource is loaded into the player, the player’s Play function is called and the audio file is played.
The next click event handler demonstrates looping the play of an embedded audio file:
private void btnDemo2_Click(object sender, EventArgs e)
{
    try
    {
        SoundPlayer sndplayr = new
            SoundPlayer(PlayWavFiles.Properties.Resources.LoopyMusic);
        if (btnDemo2.Text == "Demo WAV 2")
        {
            sndplayr.PlayLooping();
            btnDemo2.Text = "STOP";
        }
        else
        {
            sndplayr.Stop();
            btnDemo2.Text = "Demo WAV 2";
        }
    }
    catch (Exception ex)
    {
        MessageBox.Show(ex.Message + ": " + ex.StackTrace.ToString(),
            "Error");
    }
}
This example works in much the same way as the last click event handler except that this handler calls the sound player’s «PlayLooping» function rather than the «Play» function; with this option called, the WAV file will play in a loop and will terminate only by playing another WAV file or by calling the sound player’s «Stop» function. To support this, when the loop is started, the text of the button is changed to read, «STOP». If the user clicks on the button when it says «STOP» the player’s «Stop» function is called and the button’s text is restored to read, «Demo WAV 2». Subsequent clicks will start the loop playing or stop the player and update the text of the button to alternative between the two options.
That is all there is to the code used to support the play of embedded audio files.
Summary
The example provided shows how to embed audio files into an application’s resources, and how to retrieve the file and play it using the System.Media class library. Similar functionality can obtained by importing and using the winmm.dll; however, the approach shown requires less code and is safer from the standpoint of deployment.
This member has not yet provided a Biography. Assume it’s interesting and varied, and probably something to do with programming.
- Download source code — 1,105.9 Kb
Introduction
This article describes an approach to embedding WAV audio files into an application and playing them through the use of the System.Media class library. Due to the use of the System.Media class library, this example does not rely upon the import of the «winmm.dll» in order to play the audio file and for that reason this approach requires far less code to implement.
The audio files used were embedded into the application as resources which eliminates the need to package up external WAV files for installations requiring the presentation of audio files. At the same time, the use of embedded resources precludes the potential for such files being moved or deleted after the consuming application has been installed.
Figure 1. Demonstration Form in Sample Application
Getting Started.
The solution provided with this download contains a single project entitled, «PlayWavFiles». The project is described in the solution explorer (figure 2). The project contains only the default references for a win forms application; the resources indicated were embedded into the application Resources and are not delivered with the application through an installation.
Figure 2. Solution Explorer
The example was written using Visual Studio 2005 using C#; open the solution into the IDE to examine the code.
Adding Audio Files the Resources
To add audio files to the solution, open the Resources.resx file shown in the solution explorer. Once open, you will see a combo box (figure 3) that is used to allow you to select the type of resource to add to the project, select the Audio file option from the list and then click on «Add Resource».
Figure 3. Adding Audio Files to Resources
Once you have selected the «Add Resource» button, a file browser will open and you can use this file browser to search for audio files and add them to the application resources.
Figure 4. Browsing for Audio Files
Once the audio files have been added to the application resources, select each item added and set the «Persistence» property to «Embedded in .resx».
Figure 5. Setting the Persistence Property for Added Audio Files
At this point, the audio files are added and set; they may now be used within the project.
The Code: Main Form.
There is only a single form in the application (frmMain) and that form contains all of the code necessary to play the embedded audio files. Aside from the default imports, the System.Media class library has been added to the form:
using System;
using System.Collections.Generic;
using System.ComponentModel;
using System.Data;
using System.Drawing;
using System.Text;
using System.Windows.Forms;
using System.Media;

namespace PlayWavFiles
{
    public partial class frmMain : Form
    {
        public frmMain()
        {
            InitializeComponent();
        }
The sum total of code required is contained in three button click event handlers; the exit button is used to close the application:
private void btnExit_Click(object sender, EventArgs e)
{
    Application.Exit();
}
The next button click event handler plays an embedded WAV file once:
private void btnDemo1_Click(object sender, EventArgs e)
{
    try
    {
        SoundPlayer sndplayr = new
                 SoundPlayer(PlayWavFiles.Properties.Resources.BuzzingBee);
        sndplayr.Play();
    }
    catch (Exception ex)
    {
        MessageBox.Show(ex.Message + ": " + ex.StackTrace.ToString(),
                       "Error");
    }
}
The click event handler creates an instance of the System.Media sound player and sets the player to load an audio file from the application resources. After the resource is loaded into the player, the player’s Play function is called and the audio file is played.
The next click event handler demonstrates looping the play of an embedded audio file:
private void btnDemo2_Click(object sender, EventArgs e)
{
    try
    {
        SoundPlayer sndplayr = new
            SoundPlayer(PlayWavFiles.Properties.Resources.LoopyMusic);
        if (btnDemo2.Text == "Demo WAV 2")
        {
            sndplayr.PlayLooping();
            btnDemo2.Text = "STOP";
        }
        else
        {
            sndplayr.Stop();
            btnDemo2.Text = "Demo WAV 2";
        }
    }
    catch (Exception ex)
    {
        MessageBox.Show(ex.Message + ": " + ex.StackTrace.ToString(),
            "Error");
    }
}
This example works in much the same way as the last click event handler except that this handler calls the sound player’s «PlayLooping» function rather than the «Play» function; with this option called, the WAV file will play in a loop and will terminate only by playing another WAV file or by calling the sound player’s «Stop» function. To support this, when the loop is started, the text of the button is changed to read, «STOP». If the user clicks on the button when it says «STOP» the player’s «Stop» function is called and the button’s text is restored to read, «Demo WAV 2». Subsequent clicks will start the loop playing or stop the player and update the text of the button to alternative between the two options.
That is all there is to the code used to support the play of embedded audio files.
Summary
The example provided shows how to embed audio files into an application’s resources, and how to retrieve the file and play it using the System.Media class library. Similar functionality can obtained by importing and using the winmm.dll; however, the approach shown requires less code and is safer from the standpoint of deployment.
This member has not yet provided a Biography. Assume it’s interesting and varied, and probably something to do with programming.
Системные звуки
В этой статье мы узнаем, как изменять системные звуки Windows. На всякий случай рекомендуется сделать резервную копию реестра, прежде чем вы будете запускать нашу программу, которая вносит изменения в реестре.
Возможно, вы знаете, что в Windows можно установить свои звуки сопровождения для различных событий, таких как Вход в Windows, Установка соединения, Уведомление о получении почты и так далее. Мы можем настроить на компьютере жертвы свои звуки, чтобы подшутить над коллегой. Есть много ресурсов, где можно найти хорошую коллекцию звуков, например, http://www.reelwavs.com/.
Настройка системных звуков
Если у вас есть доступ к компьютеру жертвы, то вы можете изменить системные звуки в Панели управления, открыв категорию Звук (Панель управления | Оборудование и звук | Звук | Изменение системных звуков). Вы можете пройтись по всем событиям и назначить свои звуки, указав пути к файлам.
Программная настройка системных звуков
Мы можем программно изменить системные звуки при помощи своей утилиты. Кроме того, утилита будет сохранять и восстанавливать звуковые настройки и воспроизводить звуки.
Но для начала нам нужно узнать, где хранится информация о файлах системных звуков. Как и многое другое, подобная информация хранится в реестре. Вы можете найти эту информацию в определенном месте:
Каждая папка в разделе Schemes/Apps/.Default соответствует определенному событию. Например, если вы отключали USB-устройство, то должны были слышать системный звук, связанный с событием DeviceDisconnect. У заданного события, подобного DeviceDisconnect, имеется несколько папок: .current, .Default, и папка для дополнительных звуковых схем.
Системное событие имеет следующую структуру:
- .current — содержит пустой ключ со значением, содержащим путь к звуковому файлу, который используется в данной конфигурации. Для DeviceDisconnect в Windows XP текущим файлом является «C:WINDOWSmediaWindows XP Hardware Remove.wav».
- .Default — Содержит пустое значение, содержащее звуковой файл по умолчанию. Если вы не меняли звуковой файл, то это значение совпадает с ключом .current.
- Другие папки — У вас могут быть другие папки, в которых хранятся звуковые схемы (пользовательские настройки).
Чтение и запись звуковых файлов для событий
Зная, где хранятся нужные настройки, можно создать DataSet, в котором будут содержаться системные события и путь к файлам для этих событий. Запустим новый проект Windows Forms и выберем «Add New Item…» из окна Solution Explorer, затем выберем шаблон DataSet. Добавим элемента DataColumn SoundName and SoundFile, как показано ниже:

Далее добавляем новый файл для класса RegistryWrapper.cs, в котором будут находиться все функции для работы с реестром: чтение, запись, сохранение, восстановление данных.
Чтение данных о системных событиях из реестра
Объявим две переменные в классе RegistryWrapper для хранения путей.
//these represent the location in the registry with the user sounds
string hivePrefix = @"AppEventsSchemesApps.Default";
string hiveSuffix = @".current";
Далее, добавляем метод GetSystemSound(), который возвращает RegSoundDataTable, содержащий значения SoundName и SoundFile. Первое, что мы делаем – это получаем список всех подразделов для пути, который мы задаем при вызове метода GetSubKeyNames. Метод возвратит нам список всех системных звуков для событий. Потом, мы проходим через каждое событие, создавая новый ряд для DataTable до тех пор, пока настройки для SoundName к текущему событию и SoundFile в ключе реестра содержат путь к файлу. Обратите внимание, что когда мы вызываем метод GetValue для получения звукового файла, мы должны передать в имени ключа пустую строку «». Также мы добавим вспомогательную функцию для соединения двух переменных, объявленных ранее.
public RegSound.RegSoundDataTable GetSystemSound()
{
    //Get the subkey key
    string[] values = Registry.CurrentUser.OpenSubKey(hivePrefix).GetSubKeyNames();

    RegSound.RegSoundDataTable tb = new RegSound.RegSoundDataTable();

    foreach (string s in values)
    {
        //Loop through rows
        RegSound.RegSoundRow newRow = tb.NewRegSoundRow();
        newRow.SoundName = s;
        newRow.SoundFile =
            (string)Registry.CurrentUser.OpenSubKey(getRegKeyPath(s)).GetValue("") ;
        tb.Rows.Add(newRow);
    }
    return tb;
}

//adds the full registry key including prefix and suffix
private string getRegKeyPath(string s)
{
    return hivePrefix + s + hiveSuffix;
}
Запись в реестр
Для установки всех звуковых событий мы создадим другой метод, который берет RegSound DataTable и звуковые файлы, которые мы меняем. Проходим в цикле через каждый ряд в DataTable и устанавливаем значение ключа в реестре для звука при помощи метода SetValue. Вызывая метод SetValue, нам нужно знать имя ключа (в нашем случае это пустая строка «»), значение ключа (путь к звуковому файлу), и RegistryKind, который описывает тип значения (мы используем тип строка).
public void SetSystemSound(RegSound.RegSoundDataTable sounds,
        string soundPath)
{
    //loop through all sounds
    foreach (RegSound.RegSoundRow row in sounds)
    {
        //Set key and value
        RegistryKey key =
           Registry.CurrentUser.OpenSubKey(getRegKeyPath(row.SoundName), true);
        key.SetValue("", soundPath, RegistryValueKind.String);
    }
}
Резервное копирование текущих звуковых настроек
Меняя звуковые схемы у жертвы, мы должны предусмотреть возможность восстановить прежние настройки. Для этого, добавим метод SaveSystemSound, который использует DataTable для сохранения и пути файлов. Мы можем использовать метод WriteXml в объекте DataTable для сохранения DataTable как XML-файла.
public void SaveSystemSound(
     RegSound.RegSoundDataTable sounds, string savePath)
{
    //Save Sound DataSet
    sounds.WriteXml(savePath);
}
Восстановление сохраненных настроек
Теперь давайте добавим метод для восстановления настроек из предыдущего шага. Нам нужно знать, где был сохранен DataTable, и вызвать метод ReadXml для чтения данных. Теперь у нас есть возможность пройти в цикле через каждое звуковое событие и вызвать метод setValue для установки нового значения.
public void RestoreSystemSound(string savePath)
{
    //Restore Sound DataSet
    RegSound.RegSoundDataTable sounds =
        new RegSound.RegSoundDataTable();
    sounds.ReadXml(savePath);

    foreach (RegSound.RegSoundRow row in sounds)
    {
        //Set Key
        RegistryKey key =
               Registry.CurrentUser.OpenSubKey(
               getRegKeyPath(row.SoundName), true);
        key.SetValue("", row.SoundFile, RegistryValueKind.String);
    }
}
Воспроизведение звукового события
Наконец, мы добавим возможность воспроизведения звуков. Звуковые файлы находятся в папке media системной папки Windows, нам нужно быстро проверить, есть ли в пути к файлу обратный слэш («»), чтобы узнать, содержит ли файл путь и само имя файла. Если нет, то мы присоединяем путь к имени файла и воспроизводим его.
public void PlayRegistrySound(string soundFile)
{
    //play sound if there is an associated file
    if (soundFile != "")
    {
        SoundPlayer sp = new SoundPlayer();

        //add default path if there isn't one
        int a = soundFile.IndexOf('\');
        if (a != 0)
        {
            soundFile = "%SystemRoot%\media\" + soundFile;
        }
        sp.SoundLocation = soundFile;
        sp.Play();
    }
}
Создание пользовательского интерфейса
Создание пользовательского интерфейса мы начнем с добавления элементов управления на форму:
- Элемент ToolStrip для кнопок Бэкап, Восстановить, Выбрать, и Применить изменения.
- DataGridView, который мы можем перетаскивать при помощи щелчка «Data > Show Data Sources,» и перетащив элемент RegSound DataGridView.
- Два элемента OpenFileDialog, один для выбора, откуда восстановить настройки, а второй – для выбора звуковых файлов для замены.
- Элемент SaveFileDialog для выбора, где сохранять резервную копию текущих системных звуков.
Загрузка данных
Итак, у нас все почти все готово для приложения. Добавим еще две переменные. Одна для представления RegistryWrapper, котору мы описали раньше и другая для хранения данных RegSoundDataTable. Для заполнения DataTable, мы вызовем метод GetRegistrySounds, который в свою очереднь вызовет метод GetSystemSound, созданный нами ранее. Мы вызываем метод GetRegistrySounds во время загрузки формы и во время восстановления звуков или когда мы применяем изменения, заполняя текущими звуковыми настройками DataGridView.
private void frmMainMenu_Load(object sender, EventArgs e)
{
    GetRegistrySounds();
}
private void GetRegistrySounds()
{
    //Call the RegistryWrapper Class
    sounds = myReg.GetSystemSound();
    regSoundDataGridView.DataSource = sounds;
}
Настройка DataGridView
Займемся представлением данных в элементе DataGridView, изменяя некоторые свойства, например, установкой свойства AlternatingRowsDefaultCellStyle в различные цвета, изменяя шрифт DefaultCellStyle в Arial 10, и выключив возможность добавления, редактирования и удаления данных.
Мы также добавим изображение «play» , чтобы прослушать текущий ассоциированный звук. Для этого щелкните правой кнопкой мыши на DataGridView и выберите «Edit Columns» для вызова диалогового окна Edit Column. Здесь мы добавим новую колонку «Play,» установим тип DataGridViewImageColumn, присвоим свойству Image наше изображение музыки и установим свойство ImageLayout в «Zoom», чтобы изображения заполнило всю клетку колонки.
Добавим код для воспроизведения звука, когда будем щелкать на картинке. Для этого нужно использовать событие DataGridView CellContentClick. Звук будет играть, если мы щелкнем на третьей колонке (индекс отчитываестя с 0, поэтому для третьей колонки используемs #2). Для воспроизведения нам нужно знать путь к файлу, который мы получим, создавая DataGridViewTextBoxCell для колонки SoundFile и считывая ее значение.
private void regSoundDataGridView_CellContentClick(
       object sender, DataGridViewCellEventArgs e)
{
    //Represents col #3 the "Play" column
    if (e.ColumnIndex == 2)
    {
        DataGridViewTextBoxCell cell = (DataGridViewTextBoxCell)
          regSoundDataGridView.Rows[e.RowIndex].Cells[e.ColumnIndex - 1];
        //Play Sound
        myReg.PlayRegistrySound(cell.Value.ToString());
    }
}
Заключение
Читать и записывать данные реестра очень просто, используя упорядоченные данные DataSet. Также легко найти новые звуки для приложения в интернете. Пробуйте. Счастливого вам программирования!
Скачать пример
Перевод: Василий Котов
- Use C# Windows Form Application to Create a Simple Mp3 Player
- Use
DirectShowFunctionality to Create an Mp3 Windows Form Application inC#

This post will demonstrate how to build a simple C# mp3 player using your C# Windows form application and a Windows Media Player.
Use C# Windows Form Application to Create a Simple Mp3 Player
First, we’ll create a new Windows form by following these steps.
-
Open Microsoft Visual Studio 2017 or updated version.
-
At the top-left corner, find
Fileand open a new project. -
Then choose
Windows Forms Application, name it, and clickOK. -
After you click
OK, a new empty window form will appear.
Now, we’ll design the form.
After creating the Windows form, we’ll design it. If you don’t have the Windows Media Player items in your Toolbox, follow these steps.
-
Right-click on
Componentsand clickChoose Itemsin the toolbox area, a new window will appear. -
Select the
COM Componentstab, and click on theWindows Media Playeritem from the list.
Adding Items:
-
Drag and drop the
Windows Media Playeronto the form, then adjust its position. -
Add a
ListBoxand name itAudiolistto choose the mp3 file list. -
Now add a button from the toolbox and name it
ChooseButton. We’re using a button to choose a playlist, and the listbox will display a playlist of audio files that will play inWindows Media Playerwhen you select one from the listbox.
We can create an MP3 Player Windows form by following these particular steps.
Libraries that are required:
using System;
using System.Collections.Generic;
using System.ComponentModel;
using System.Data;
using System.Drawing;
using System.Linq;
using System.Text;
using System.Threading.Tasks;
using System.Windows.Forms;
Firstly, initialize two string array-type global variables named file and filepath.
Now create an OpenFileDialog type variable named fileOpen, which will be used to launch a dialogue box for selecting files from the storage.
OpenFileDialog fileOpen = new OpenFileDialog();
Then we’ll apply a condition and pass the following as parameters.
if (fileOpen.ShowDialog() == System.Windows.Forms.DialogResult.OK)
The file’s name will be saved in the file variable if this expression is true.
file = fileOpen.SafeFileNames;
Using the below command, store the whole path of the file in the path variable named filepath.
filepath = fileOpen.FileNames;
Then we’ll use a for loop to add audio files in ListBox.
for (int i = 0; i < file.Length; i++){
    Audiolist.Items.Add(file[i]);

    }
After that, generate a click event of ListBox by double-clicking on it.
private void Audiolist_SelectedIndexChanged(object sender, EventArgs e) {

}
This code is then pasted into the Audiolist body. This code will transfer the list or the path to that file into your Windows Media Player, regardless of the name you give it in the ListBox.
private void Audiolist_SelectedIndexChanged(object sender, EventArgs e) {
    axWindowsMediaPlayer1.URL = filepath[Audiolist.SelectedIndex];
}
The source code for building a simple C# mp3 player using your C# Windows form application, and a Windows Media Player is below.
using System;
using System.Collections.Generic;
using System.ComponentModel;
using System.Data;
using System.Drawing;
using System.Linq;
using System.Text;
using System.Threading.Tasks;
using System.Windows.Forms;

namespace Mp3Player
{
    public partial class Form1: Form
    {
     string[] file, filepath;
    public Form1()
    {
    InitializeComponent();
    }
     private void ChooseButton_Click(object sender, EventArgs e){
        OpenFileDialog fileOpen=new OpenFileDialog();
          if (fileOpen.ShowDialog() == System.Windows.Forms.DialogResult.OK)
           {
            file = fileOpen.SafeFileNames;
            filepath = fileOpen.FileNames;
            for (int i = 0; i < file.Length; i++)
             {
                Audiolist.Items.Add(file[i]);
             }
           }
        }
    private void Audiolist_SelectedIndexChanged(object sender, EventArgs e){
       axWindowsMediaPlayer1.URL = filepath[Audiolist.SelectedIndex];
    }
  }
}
Use DirectShow Functionality to Create an Mp3 Windows Form Application in C#
Use DirectShow functionality to create an Mp3 Windows form application with a Windows Media Player.
Tlbimp transforms type definitions in a COM type library to comparable definitions in an executable assembly for a common language.
The output of Tlbimp.exe is a binary file (an assembly) with runtime metadata for the types declared in the original type library.
To create QuartzTypeLib.dll, follow these steps.
-
Run the
tlbimptool first. -
Run
TlbImp.exe %windir%system32quartz.dll(This location or directory may differ from device to device.) -
The output would be
QuartzTypeLib.dll. -
Right-click the mouse button on the project name in
Solution Explorer, then select theAddmenu item and thenReference. It will addQuartzTypeLib.dllto your project as a COM-reference. -
Expand
Referencesin your Project and look for theQuartzTypeLibreference. ChangeEmbed Interop Typesto false by right-clicking it and selecting properties. -
Disable the
Prefer 32-bitsetting in Project Settings. Build tab if you don’t want to get the Exceptions.
You can use this source code to create an Mp3 Windows form application.
using QuartzTypeLib;

public sealed class DirectShowPlayer
{
  private FilgraphManager fgm;
    public void Play(string filepath){
    FilgraphManager fgm= new FilgraphManager();
    fgm.RenderFile(filepath);
    fgm.Run();
    }
    public void Stop()
    {
    fgm?.Stop();
    }
}
Вопрос:
У меня есть приложение Windows, написанное на С#/. NET.
Как я могу воспроизвести определенный звук при нажатии кнопки?
Лучший ответ:
Вы можете использовать:
System.Media.SoundPlayer player = new System.Media.SoundPlayer(@"c:mywavfile.wav");
player.Play();
Ответ №1
Вы можете использовать SystemSound, например System.Media.SystemSounds.Asterisk.Play();.
Ответ №2
Для Windows Forms одним из способов является использование SoundPlayer
private void Button_Click(object sender, EventArgs e)
{
using (var soundPlayer = new SoundPlayer(@"c:WindowsMediachimes.wav")) {
soundPlayer.Play(); // can also use soundPlayer.PlaySync()
}
}
Страница MSDN
Это также будет работать с WPF, но у вас есть другие варианты, такие как использование MediaPlayer страница MSDN
Ответ №3
Дополнительная информация.
Это немного высокоуровневый ответ для приложений, которые хотят легко вписаться в среду Windows. Технические характеристики воспроизведения определенного звука были предоставлены в других ответах. Кроме того, всегда обратите внимание на эти две точки:
-
Используйте пять стандартных системных звуков в типичных сценариях, т.е.
-
Asterisk – воспроизведение, когда вы хотите выделить текущее событие
-
Вопрос – игра с вопросами (это окно окна системных сообщений)
-
Восклицание – играйте с символом excalamation (это окно окна системного сообщения)
-
Звуковой сигнал (системный звук по умолчанию)
-
Критическая остановка ( “Рука” ) – воспроизведение с ошибкой (это окно окна системных сообщений) |
Способы класса
System.Media.SystemSoundsбудут воспроизводить их для вас. -
-
Внедрение любых других звуков, настраиваемых вашими пользователями в панели управления звуком
- Таким образом, пользователи могут легко изменять или удалять звуки из вашего приложения, и вам не нужно писать какой-либо пользовательский интерфейс для этого – он уже существует.
- Каждый пользовательский профиль может переопределять эти звуки по-своему.
- Как к:
- Создать звуковой профиль вашего приложения в реестре Windows (Подсказка: нет необходимости в программировании, просто добавьте ключи в программу установки вашего приложения.)
- В вашем приложении прочитайте путь к звуковому файлу или DLL-ресурсу из своих разделов реестра и воспроизведите его. (Как играть звуки, которые вы можете видеть в других ответах.)
Ответ №4
Ответ №5
Чтобы воспроизвести аудиофайл в форме Windows с помощью С#, проверьте простой пример следующим образом:
1.Go Visual Studio (VS-2008/2010/2012) → Меню “Файл” → “Новый проект”.
2. В новом проекте → щелкните “Приложение Windows Forms” → “Дать имя” и нажмите “ОК”.
Откроется новый проект Windows Forms.
3.Drag-and-Drop элемент управления Button из панели инструментов в форму Windows.
4. Дважды нажмите кнопку, чтобы автоматически создать обработчик события Click Click по умолчанию и добавить следующий код.
Этот код отображает диалоговое окно “Открыть файл” и передает результаты методу “playSound”, который вы создадите на следующем шаге.
 OpenFileDialog dialog = new OpenFileDialog();
dialog.Filter = "Audio Files (.wav)|*.wav";


if(dialog.ShowDialog() == DialogResult.OK)
{
string path = dialog.FileName;
playSound(path);
}
5.Добавьте следующий код метода под обработчиком события button1_Click.
 private void playSound(string path)
{
System.Media.SoundPlayer player = new System.Media.SoundPlayer();
player.SoundLocation = path;
player.Load();
player.Play();
}
6. Теперь вы можете запустить приложение, просто нажав F5, чтобы запустить код.
7. Нажмите кнопку и выберите аудиофайл. После загрузки файла звук будет воспроизводиться.
Надеюсь, это полезный пример для новичков…
Ответ №6
Я думаю, что вы должны сначала добавить файл .wav к ресурсам. Например, у вас есть звуковой файл с именем Sound.wav. После добавления файла Sound.wav в раздел “Ресурсы” вы можете использовать этот код:
System.Media.SoundPlayer player = new System.Media.SoundPlayer(Properties.Resources.Sound);
player.Play();
Это еще один способ воспроизведения звука.
Чтобы воспроизвести аудиофайл в форме Windows с помощью С#, проверьте простой пример следующим образом:
1.Go Visual Studio (VS-2008/2010/2012) → Меню «Файл» → «Новый проект».
2. В новом проекте → щелкните «Приложение Windows Forms» → «Дать имя» и нажмите «ОК».
Откроется новый проект Windows Forms.
3.Drag-and-Drop элемент управления Button из панели инструментов в форму Windows.
4. Дважды нажмите кнопку, чтобы автоматически создать обработчик события Click Click по умолчанию и добавить следующий код.
Этот код отображает диалоговое окно «Открыть файл» и передает результаты методу «playSound», который вы создадите на следующем шаге.
 OpenFileDialog dialog = new OpenFileDialog();
 dialog.Filter = "Audio Files (.wav)|*.wav";


if(dialog.ShowDialog() == DialogResult.OK)
{
  string path = dialog.FileName;
  playSound(path);
}
5.Добавьте следующий код метода под обработчиком события button1_Click.
 private void playSound(string path)
 {
   System.Media.SoundPlayer player = new System.Media.SoundPlayer();
   player.SoundLocation = path;
   player.Load();
   player.Play();
 }
6. Теперь вы можете запустить приложение, просто нажав F5, чтобы запустить код.
7. Нажмите кнопку и выберите аудиофайл. После загрузки файла звук будет воспроизводиться.
Надеюсь, это полезный пример для новичков…