Более или менее продвинутые пользователи нередко пользуются командной строкой, ведь через неё можно влиять на большинство системных процессов. При использовании строки DISM, которая есть в седьмой и следующих версиях Windows, время от времени могут появляться сообщения об ошибке.
Это норма для любой программы, но наша задача — избавиться от неполадки, чтобы выполнить необходимую команду. Ошибка 87 DISM возникает по нескольким причинам, и в каждом случае есть свои пути её устранения.

Иногда пользователи могут столкнуться с ошибкой 87 в строке DISM
Давайте выясним, при каких обстоятельствах обычно появляется такое сообщение и как избавиться от него без посторонней помощи.
С чем связана ошибка 87?
Как правило, она напрямую относится к любым действиям, выполняемым с директорией WinSxS. Если вдруг в Windows пропадёт любой системный файл, он тут же будет восстановлен рабочей копией из этой папки. То есть, WinSxS это очень важная папка с документами.
И вот ошибка 87 возникает в тот момент, когда пользователь пытается проделать какие-то операции с папкой через DISM. А теперь давайте конкретнее рассмотрим ситуации, когда возникает эта неполадка, чтобы в зависимости от них узнать способы избавления от неё.
Ошибка 87 при проверке целостности системных файлов
Время от времени Windows 7, 8, 8.1 и даже последняя версия начинает некорректно работать. Иногда компьютер внезапно перезагружается или попросту часто зависает. В такой ситуации обычно пользователям советуют не только проверить ПК на вирусы, но и выяснить, нет ли каких-либо повреждений в системных файлах.
Чтобы произвести такую проверку, используется командная строка, где вводится sfc /scannow. Если всё хорошо, то пользователь получает соответствующий текст. Однако в некоторых случаях вы получите сообщение о том, что система нашла повреждённые файлы, но ничего не может с ними сделать.

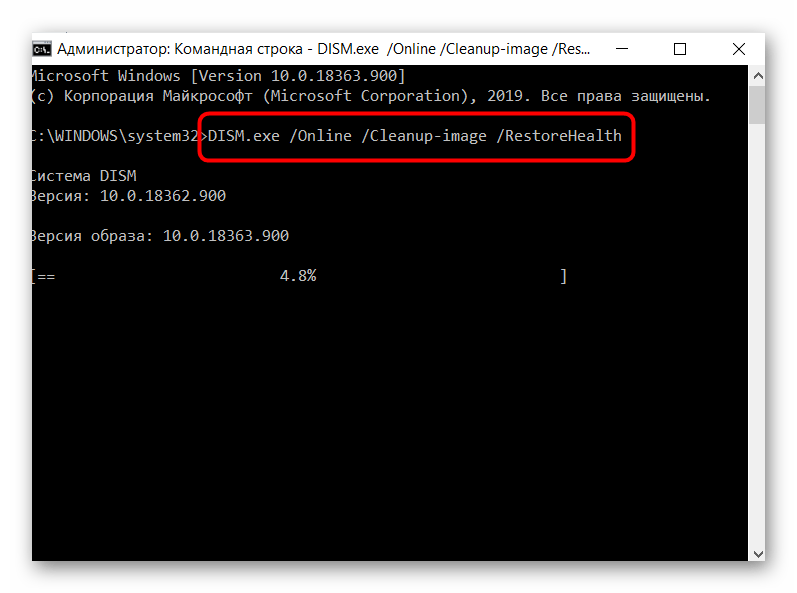
В этот момент в игру вступает DISM — следует открыть его от имени администратора и ввести такие команды:
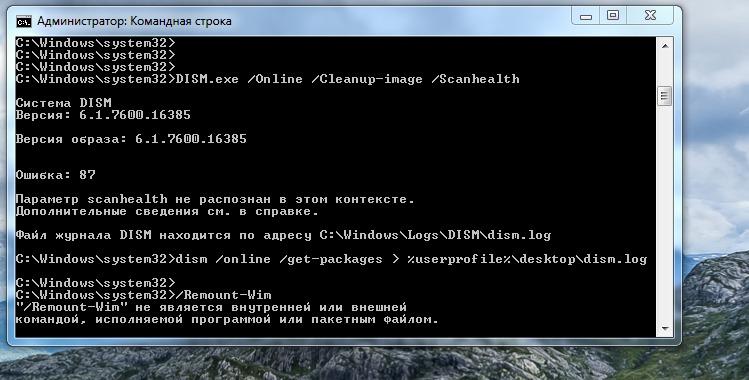
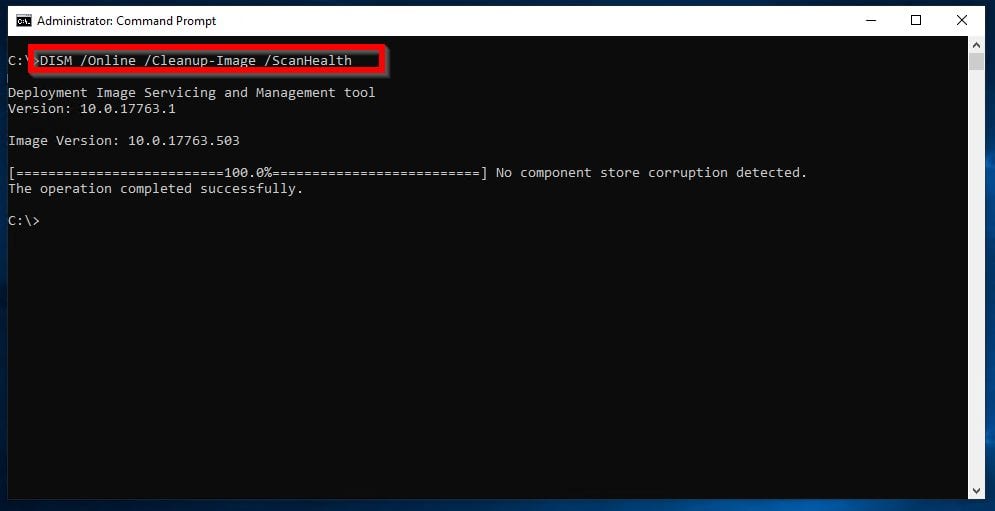
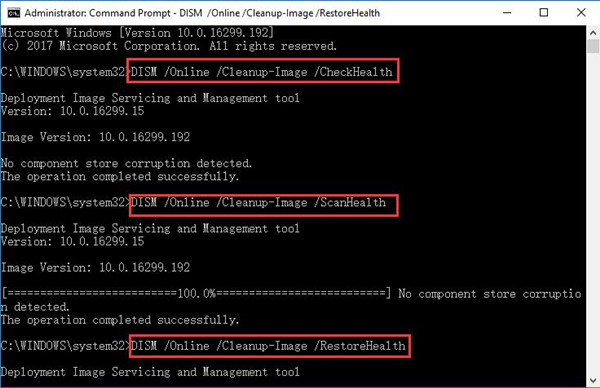
- DISM /Online /Cleanup-image /ScanHealth — если у вас седьмая версия Windows;
- Та же команда + DISM.exe /Online /Cleanup-image /RestoreHealth — две команды для Windows 8, 10. Первая необходима для поиска повреждений, вторая команда запускает их исправление.
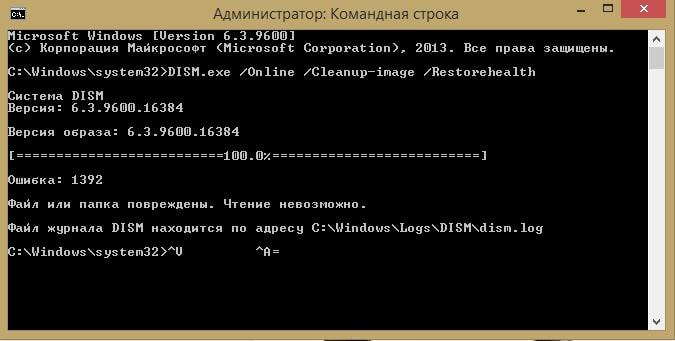
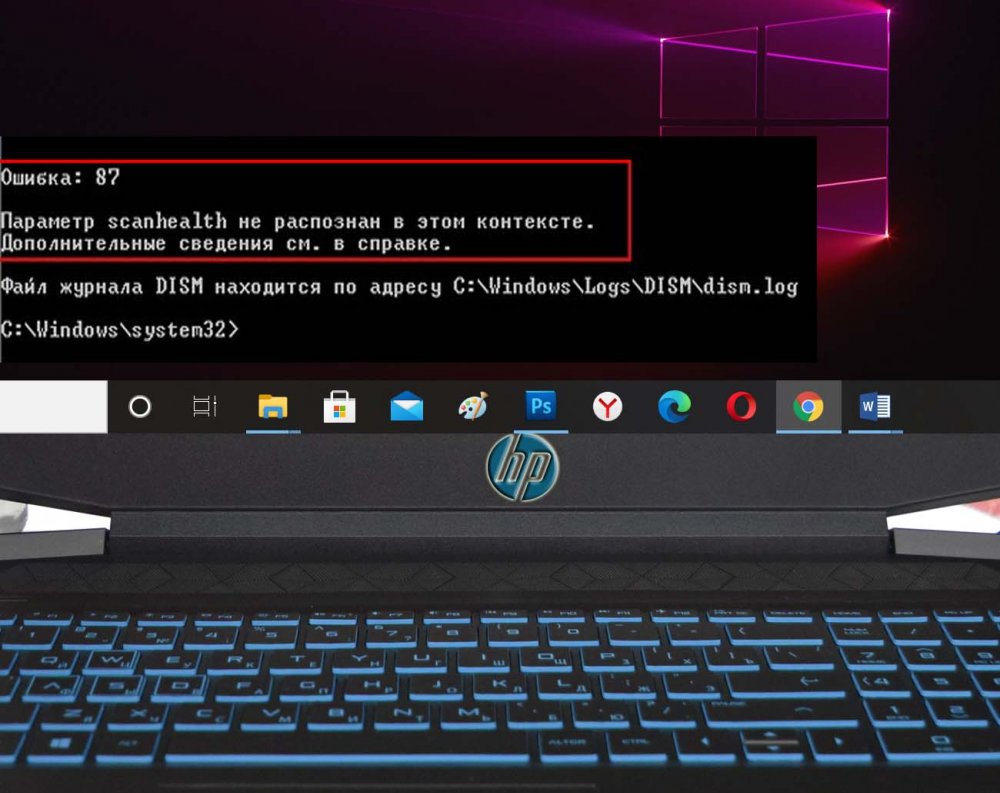
Именно после первой комбинации из списка, которая разработана для седьмой версии системы, всплывает ошибка 87 в командной строке DISM с сопутствующим текстом «Параметр ScanHealth не распознан в этом контексте».
Как её исправить? Первое очень простое решение — проверить правильность ввода комбинации. Поскольку эта командная строка очень требовательна к каждому знаку, убедитесь, что ставите только один пробел перед каждым слешем.
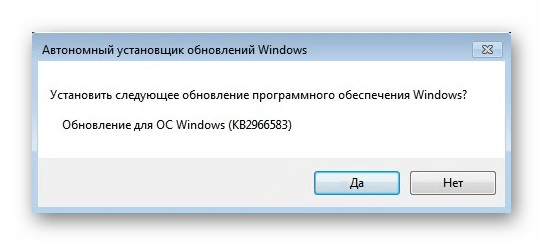
Не помогло? Тогда вам следует скачать обновление под названием KB2966583 на сайте Майкрософт и установить его на своём компьютере.
После успешной установки вы сможете снова запустить командную строку DISM и выполнить восстановление целостности файлов Windows.
Ошибка 87 и попытки почистить директорию WinSxS
Иногда вышеупомянутую директорию, которая работает страховкой для всех самых важных файлов, пытаются уменьшить. Для чего? В большинстве случаев папка WinSxS занимает много места на диске — 5,7 и даже 8 и больше ГБ, что может не нравиться пользователям, особенно если свободной памяти и так не хватает.
Поэтому чтобы немного сэкономить место, можно удалить бэкап папки таким образом:
- Открывается DISM.
- Вводиться текст dism /online /cleanup-image /spsuperseded /hidesp.
Часто именно после этой команды выбивает ошибку 87 с таким текстом: «Параметр spsuperseded не распознан в этом контексте».
Что делать в таком случае? Проверьте работоспособность сервиса «Установщик модулей Windows». Если он нерабочий, установите его, запустите, и затем повторите вышеуказанные действия.
Если же это не помогло, значит, команда для удаления бэкапа уже выполнялась, и больше места вы сэкономить не сможете.

Теперь вы знаете, по каким причинам появляется ошибка 87 в командной строке Windows, и знаете, что делать для её исчезновения. Советуем быть аккуратными при пользовании подобными программами и внимательно следить за тем, в какие процессы вы вмешиваетесь, чтобы не навредить компьютеру.
 Используя DISM в командной строке для проверки хранилища компонентов Windows или других целей, некоторые пользователи могут столкнуться с ошибкой 87: «Неизвестный параметр» или «Параметр не распознан в этом контексте».
В этой инструкции подробно о причинах ошибки 87 в командной строке при использовании DISM в Windows 11, Windows 10 и 7 и о возможных способах её исправления.
Проверьте правильность ввода команды DISM
Самая распространенная причина ошибки 87, особенно если речь идёт не о старых ОС, а о Windows 11 и Windows 10 — синтаксические ошибки при вводе команды.

Чаще всего это бывают следующие варианты ошибок:
- Отсутствие пробелов перед знаком «/» в указанных параметрах команды DISM.
- Неправильный порядок указания параметров (например, если изменить порядок параметров checkhealth и cleanup-image, вы получите указанную ошибку).
- Также русскоязычные пользователи, случается, путают латинские буквы C и S, U и Y.
Даже если вы копируете команду с какого-то сайта, следует учитывать, что ошибки могут быть и там — опечатки, копирование кода с ошибками, никто от этого не застрахован.
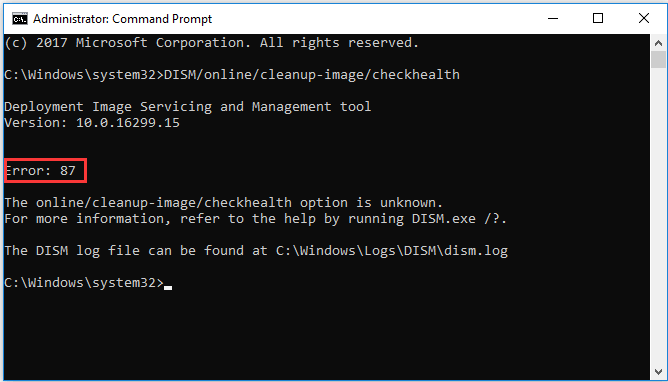
Версия DISM
Версии DISM и набор поддерживаемых команд отличаются. Не все команды, которые работают в DISM из Windows 11/10 будут работать в Windows 7 и 8.1. К примеру, если в современной ОС с DISM 10-й версии использовать команду
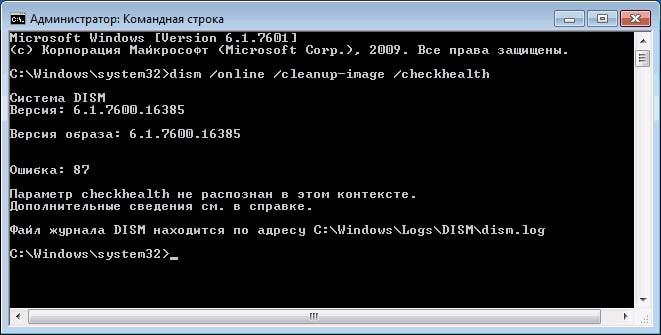
DISM /online /cleanup-image /checkhealth
она будет исправно работать.
Если ту же команду ввести в Windows 7, с DISM версии 6.1, результатом будет ошибка 87:

Возможные варианты решения:
- Не использовать неподдерживаемые команды, если они не критичны для получения нужного результата.
- Установить последнюю версию DISM, это можно сделать даже в старой версии системы, что будет рассмотрено далее.
Установка последней версии DISM в Windows старых версий
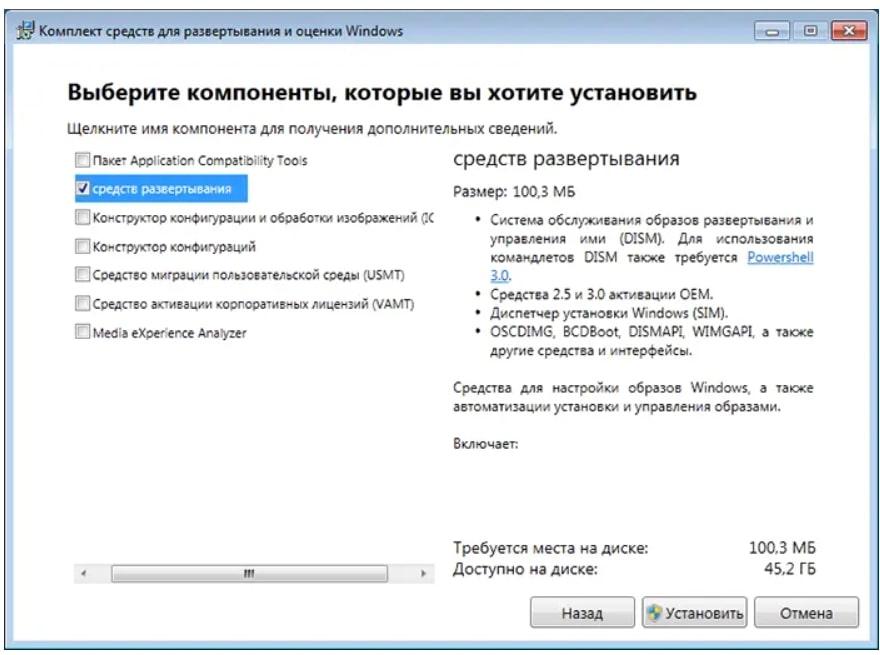
При необходимости использовать последнюю версию DISM в предыдущей версии Windows, вы можете скачать и установить Windows ADK (Комплект средств для развертывания и оценки Windows) нужной версии (например, мы можем установить ADK для Windows 10 в Windows 7) и выбрать пункт «средства развертывания» при установке:

Установщики последних версий Windows ADK доступны на официальной странице https://learn.microsoft.com/en-us/windows-hardware/get-started/adk-install при этом следует учитывать:
- Для установки последних версий требуется наличие .NET Framework 5 на компьютере.
- Это онлайн-установщики и загрузка необходимых компонентов из РФ без VPN не работает.
- Новая версия DISM не заменяет имеющуюся, а устанавливается отдельно, по умолчанию — в папке C:Program Files (x86)Windows Kits10Assessment and Deployment KitDeployment Toolsamd64DISM и потребуется запускать её из этого расположения, либо добавлять в переменные среды.
Если ошибка сохраняется, можно учесть следующие нюансы и попробовать некоторые дополнительные варианты действий:
- Для работы некоторых параметров DISM, например, /spsuperseded требуется, чтобы служба «Установщик модулей Windows» была включена. Включить службу можно в Win+R — services.msc. Находим «Установщик модулей Windows» в списке, дважды нажимаем по службе и устанавливаем тип запуска «Вручную» — значение по умолчанию для этой службы.
- Выполнить проверку целостности системных файлов с помощью команды sfc /scannow
- Если ранее ошибка не возникала, попробовать использовать точки восстановления системы.
- Если есть обновления Windows — попробуйте установить их, однажды в очередном обновлении Windows 10 ошибка 87 была вызвана проблемами в самом обновлении и уже в следующем она была исправлена.
Если проблема сохраняется, опишите в комментариях, при каких обстоятельствах она возникает, а также укажите версию Windows, DISM (отображается после запуска команды), какую именно команду вы пробуете ввести — я постараюсь помочь.
Содержание
- Способ 1: Запуск cmd с правами администратора
- Способ 2: Проверка написания
- Способ 3: Установка обновления
- Способ 4: Восстановление DISM
- Вопросы и ответы

Способ 1: Запуск cmd с правами администратора
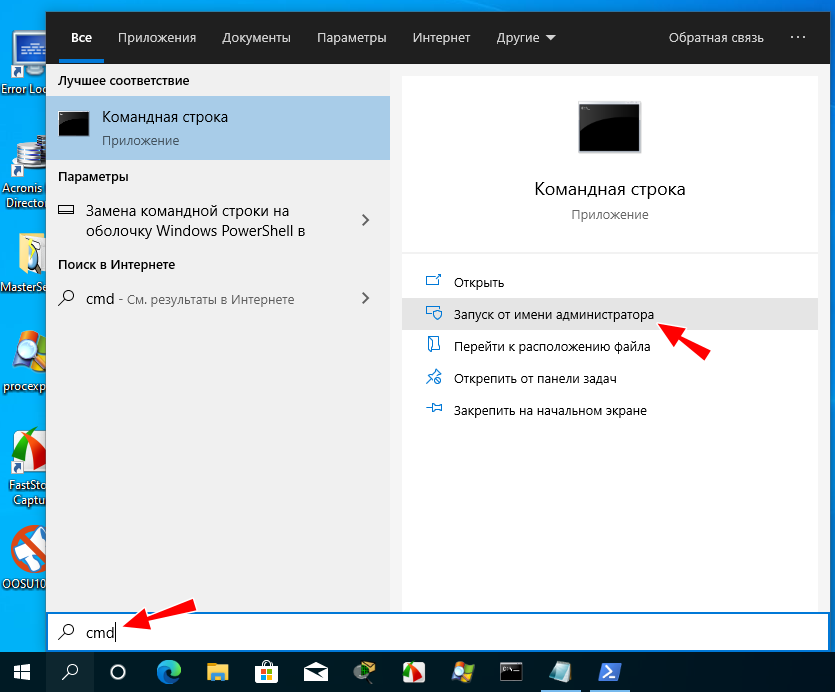
Нередко ошибку удается исправить, просто запустив «Командную строку» с администраторскими полномочиями. Для этого найдите приложение через «Пуск», кликните по нему правой кнопкой мыши и выберите пункт «Запуск от имени администратора».
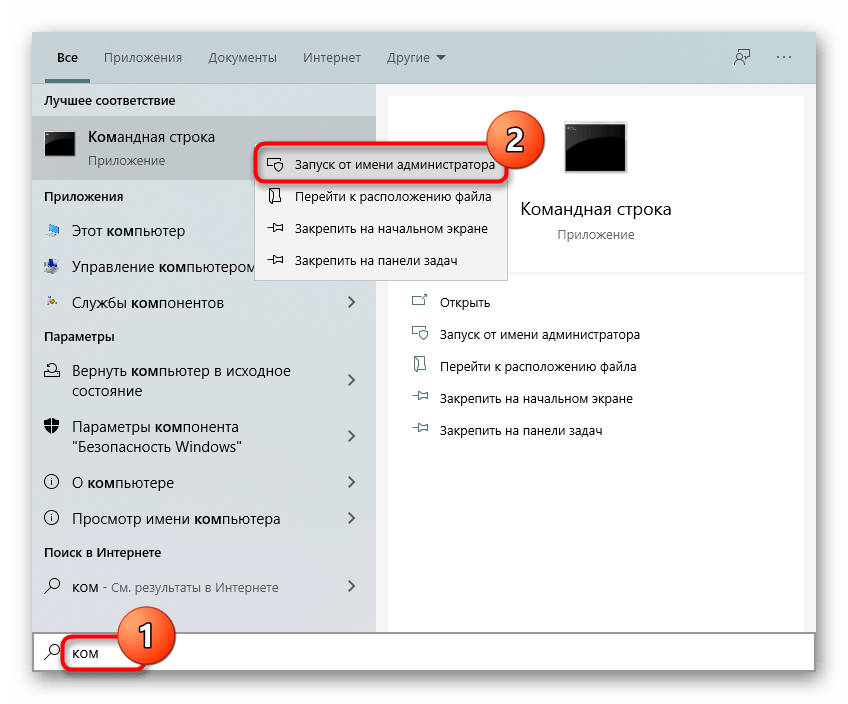
В «десятке» это можно сделать и через расширенное меню «Пуска».
Впишите команду еще раз.
Способ 2: Проверка написания
Часто пользователи не придают значения правильному написанию команды. В результате, даже если там нет ошибок, отсутствие, например, пробелов или косых черточек уже не позволит выполнить команду. Проверьте правильность ее написания, при необходимости скопируйте строчку ниже и вставьте в консоль клавишами Ctrl + V:
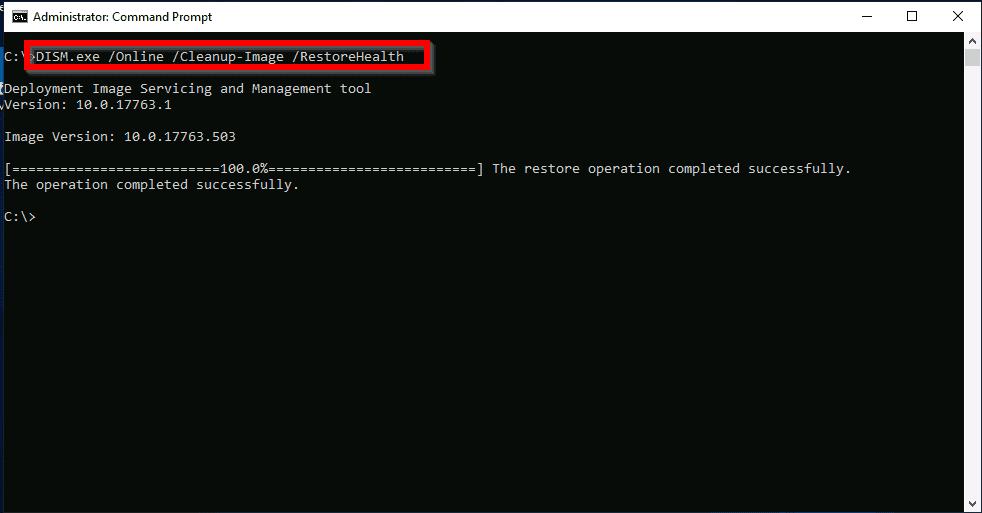
DISM.exe /Online /Cleanup-image /RestoreHealth
Способ 3: Установка обновления
В Windows 7, где действие команд DISM.exe /Online /Cleanup-image /ScanHealth и DISM.exe /Online /Cleanup-image /RestoreHealth объединено в одну (в первую), устранить ошибку 87 можно установкой обновления, без которого обе команды не работают в принципе. Скачивается пакет с официального сайта Microsoft по ссылке ниже.
Скачать KB2966583 с официального сайта Microsoft
- Выберите установленную на вашем ПК операционную систему и нажмите кнопку «Загрузите пакет».
- Укажите подходящий язык и кликните «Download».
- Скачанный пакет запустите и дождитесь завершения проверки.
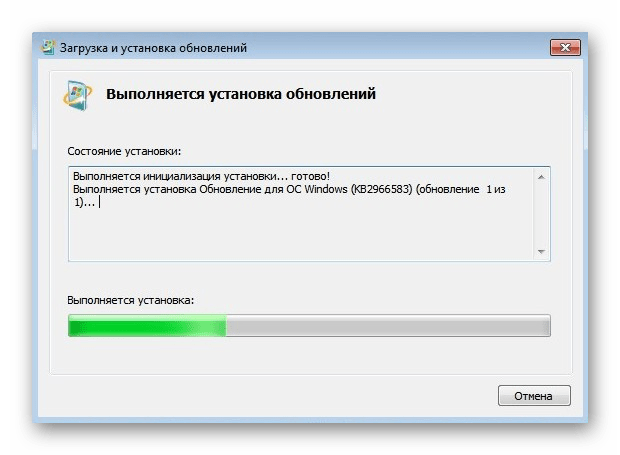
- В ответ на вопрос об установке нажмите «Да».
- Начнется инсталляция, которая не займет много времени.
- Закройте установочное окно.


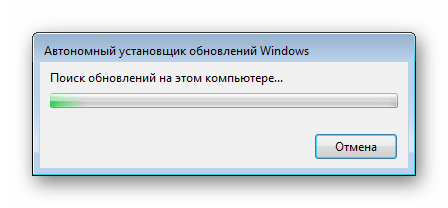


Попробуйте снова запустить команду в консоли.
Вероятно, если DISM был критически поврежден в результате действий пользователя, внутренних ошибок, использования «кривой» сборки Windows, есть смысл восстановить его работоспособность. Сделать это не очень просто, и может потребоваться создание загрузочной флешки. Более подробно этот процесс в Windows и в среде восстановления был рассмотрен в статье по следующей ссылке.
Подробнее: Использование и восстановление проверки целостности системных файлов в Windows
При использовании любительской сборки советуем перейти на чистую, а еще лучше лицензионную версию.
Еще статьи по данной теме:
Помогла ли Вам статья?
What is the DISM? Why you receive the DISM error 87 when running DISM tool in Command Line Windows? How to fix the error 87 DISM? This post shows how to fix the DISM error 87 Windows 10/8/7. After solving this CMD error 87, it is recommended to use MiniTool software to keep your data safe.
What Is DISM?
DISM, whose full name is the Deployment Image Service and Management, is a built-in tool of Windows, first introduced in Windows 7 and Windows Server R2. It can perform servicing tasks on a Windows installation image, on an online or offline image within a folder, or on WIM files.
The DISM tool can be available from the Command Line or the Windows PowerShell. DISM tool can be used to update files and fix problems when a Windows image becomes unserviceable. However, when running the DISM tool, you may receive the error code 87 or some other codes like DISM error 50, DISM error 2, DISM error 3, DISM error 1639 and so on, as shown in the following picture:
These DISM error codes mean that you cannot proceed. Therefore, do you know what may cause the DISM error 87 or other DISM error codes?
What Causes DISM Error 87?
As a matter of fact, there are several reasons leading to the DISM error 87 Windows 10/8/7.
1. The command is not correct.
This is the common reason that leads to the DISM error 87 the parameter is incorrect. In most situations, users may forget to type a space before the slash when they type the command.
2. The command does not run into an elevated prompt.
The second cause for the DISM error 87 is that the command does not run into an elevated Command Prompt window. If users run this command in a regular Command Line window, they may receive the error 87 DISM.
3. The machine uses the wrong DISM version.
You may encounter the DISM error 87 if you use the wrong version of DISM when applying a Windows 10 image. Thus, to fix this problem, you need to use the correct DISM version.
Having known what may lead to the DISM restorehealth error 87, how to fix this DISM error?
How to Fix Dism Error 87?
- Use Correct DISM Command.
- Run this command using an elevated command prompt.
- Run Windows update.
- Run System File Checker.
- Use correct DISM version.
- Reinstall Windows.
6 Solutions to DISM Error 87 Windows 7/8/10
In the following section, we will list several solutions to DISM error 87. If you have the same trouble, try these solutions.
Solution 1. Use Correct DISM Command
As we have mentioned in the above section, the DISM error 87 may be caused by the incorrect command. For example, if you input the command without space before the slash like this DISM/online/cleanup-image/checkhealth, you will encounter the DISM/online/cleanup-image/restorehealth error 87.
So, in order to solve this DISM error code, please type the correct command. Please add the space before the slash, like these:
- DISM /Online /Cleanup-image /Scanhealth
- DISM /Online /Cleanup-image /Restorehealth
After that, you can check whether you still encounter the DISM error 87.
See what you can do if DISM /Online /Cleanup-image /Restorehealth is stuck.
Solution 2. Run This Command Using an Elevated Command Prompt
Some people say that they encounter the DISM error 87 when they do not run Command Prompt as administrator.
So in order to solve the error 87 DISM Windows 10, try to run Command Prompt as administrator.
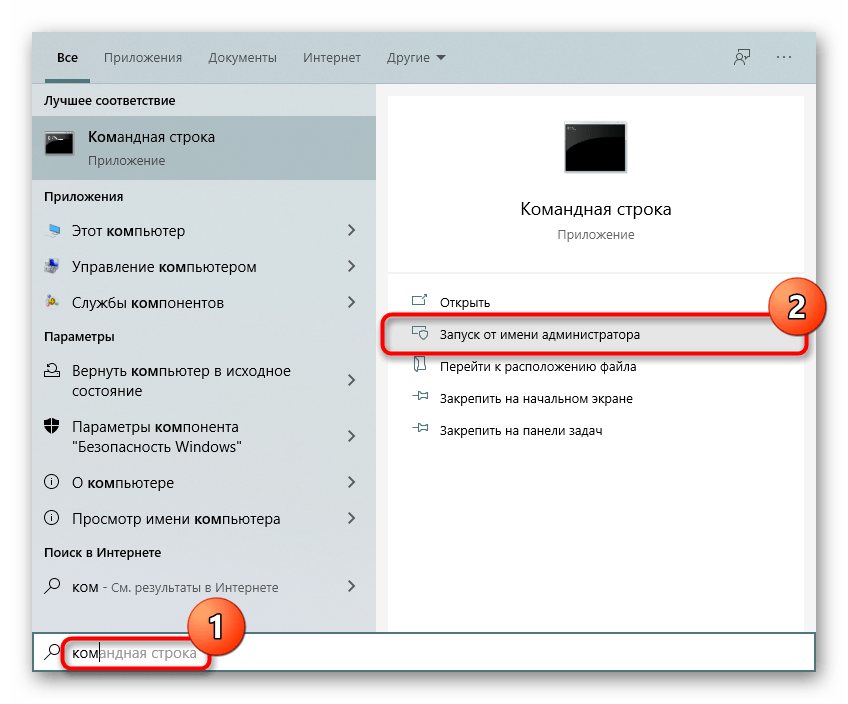
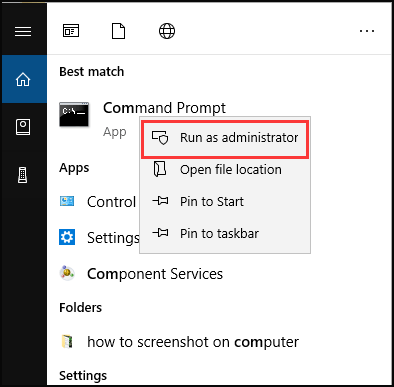
Step 1: Type command prompt in the search box of Windows 10 and choose the best matched one.
Step 2: Right-click it to choose Run as administrator to continue.
You can also refer to the post Command Prompt Windows 10: Tell Your Windows to Take Actions to know more ways to run Command Prompt as administrator.
After running Command Prompt as administrator, type the command to continue and check whether the issue DISM error 87 is solved.
Solution 3. Run Windows Update
The DISM restorehealth error 87 may be caused by the pending Windows update. So in order to solve this error 87 DISM, you need to install all pending updates.
Now, here is the tutorial.
Step 1: Open Windows Update
- Press Windows and I keys together to open Settings.
- In the pop-up window, choose Update & Security to continue.
Step 2: Check for updates
- In the pop-up window, go to Windows Update tab.
- Then choose Check for Updates to continue.
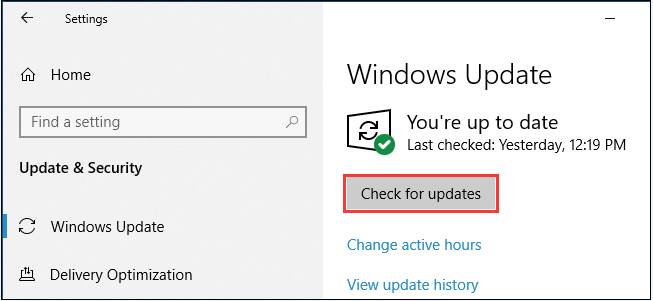
Tip: During the Windows Update process, you may need to restart your computer.
When the process is finished, you can run Command Prompt as administrator and input the command again to check whether the error 87 DISM is solved.
Solution 4. Run System File Checker
If there are corrupted system files on your computer, you may also encounter the error 87 DISM Windows 10/8/7. Thus, to fix this problem, you need to check and repair the corrupted system files firstly.
Hence, the Windows built-in tool System File Checker is a good choice to repair the corrupted system files.
Now, here is the tutorial on how to fix the corrupted system files so as to fix the DISM error 87 Windows 7/8/10.
Step 1: Open Command Prompt
- Type command prompt in the search box of Windows 10 and choose the best matched one.
- Right-click it to choose Run as administrator to continue.
Step 2: Type the command to continue
- In the pop-up window, type the command sfc /scannow and hit Enter to continue.
- Please do not close the command line windows until you see the message verification 100% completed.

When the process is finished, you will successfully repair the corrupted system files if there exists. Then open Command Prompt and run as administrator, type the command again, and check whether the DISM error 87 is solved.
If this sfc command does not work, you can refer to the post Quickly Fix – SFC Scannow Not Working (Focus on 2 Cases) to look for solutions.
Note: In addition to checking and repairing corrupted system files, you can also check whether there are bad sectors on hard drive and repair them.
Solution 5. Use the Correct DISM Version
Here, we will walk you through the fifth solution to fix the DISM error 87 Windows 10. If you are a Windows user, you need to run the Windows 10 version of DISM because this version requires the Wofadk.sys filter driver.
Note: The Wofadk.sys filter is contained in the Windows 10 Assessment and Deployment Kit. The driver must be installed and configured with Windows 10 DISM when the command runs on an earlier version of Windows host or Windows Preinstallation Environment.
So, in order to solve DISM error 87 Windows 10, you need to use the Windows 10 Version of DISM with the wofadk.sys filter driver. For more detailed information, you can see the DISM Supported Platforms and Install Windows 10 using a Previous version of Windows PE.
After that, you can reboot your computer and run Command Prompt as administrator again, then type the command to check whether the DISM error 87 Windows 10 is solved.
Solution 6. Reinstall Windows
Now, we will show you the last solution to DISM error 87. If none of the above methods works, there is no other choice for you except reinstalling Windows. Hence, you can reinstall the operating system to fix the DISM error 87and other system problems.
But one important thing is that reinstalling the operating system will lead to data loss. So before continuing, please back up all important files firstly.
After ensuring data safe, you can continue to reinstall the operating system.
I encountered the DISM error 87 when running DISM, but I successfully fixed this DISM error code after I read this post. Click to Tweet
What to Do After Solving DISM Error 87?
After you have fixed the DISM restorehealth error 87, what can you do?
It is strongly recommended to create a system image after fixing this issue. In this way, you can restore your computer to the normal state if you encounter the error 87 DISM again in later.
In addition, if you encounter some other OS problems during the using process, you can also restore your computer to a previous state with the system image created before.
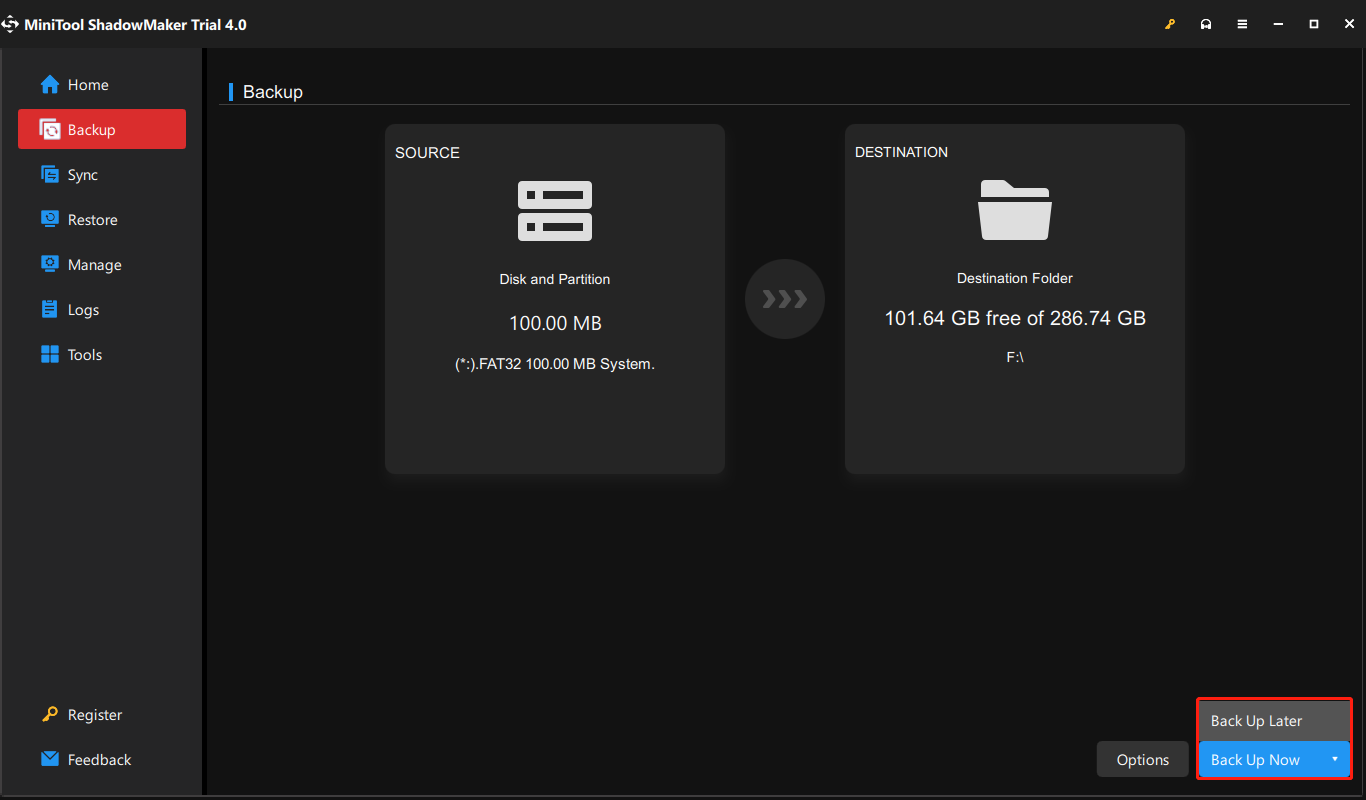
Thus, do you know how to back up computer or create system image easily? To easily keep data safe, MiniTool ShadowMaker would be a good choice.
MiniTool ShadowMaker is a piece of professional Windows backup software which is specializing in backing up disks, partitions, files, folders and the operating system.
Besides backup feature, it is also a clone tool which can clone OS from HDD to SSD without data loss.
So, with so many features, download MiniTool ShadowMaker Trial from the following button immediately or choose to purchase an advanced edition.
Free Download
Now, we will show you how to back up computer with the step-by-step guide.
Step 1: Launch MiniTool ShadowMaker
- Download MiniTool ShadowMaker and install it on your computer.
- Launch it.
- Click Keep Trial to continue.
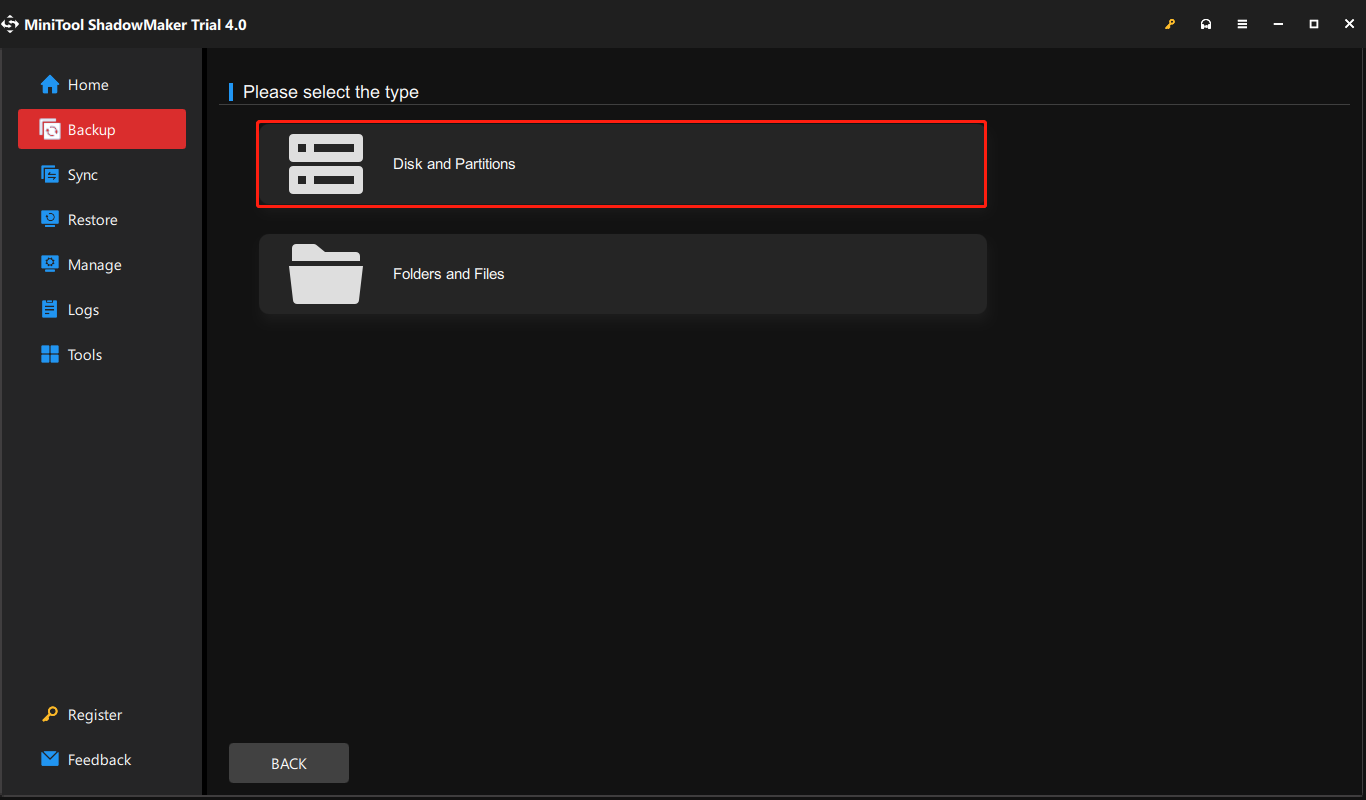
Step 2: Select the backup source
- MiniTool ShadowMaker chooses the operating system as the backup source by default. So, there is no need for you to choose it again.
- However, if you want to select a backup source by yourself. Please go to the Backup page, click the Source module, and choose Disk and Partitions to select the system disk to continue. (If you want to back up files, choose Folders and Files.)
Step 3: Select the backup destination
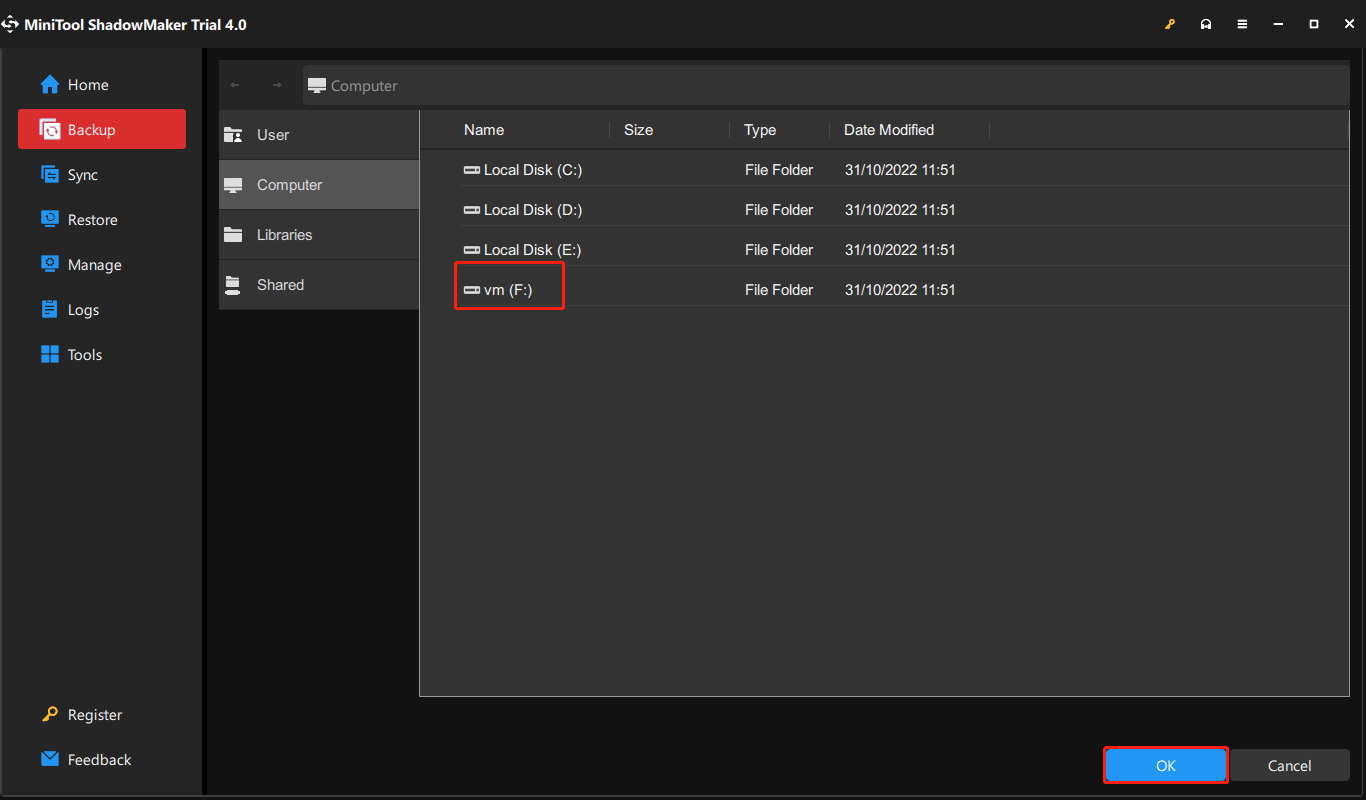
- After returning to the backup page, please click the DESTINATION module to choose a backup destination.
- Here are four available paths which are User, Computer, Libraries, and Shared. It is suggested to save the backup images on an external hard drive. So, click Computer, choose an external hard drive, and click OK to continue.
Here are three points you should pay attention to.
- MiniTool ShadowMaker enables you to create a regular backup. Just go to Options > Schedule Settings.
- MiniTool ShadowMaker provides three different backup schemes. Go to Options > Scheme Settings to change.
- You can also set some advanced backup parameters during the backup process, such as encrypting backup files, etc.
Step 4: Start to backup
- After selecting the backup source and destination, click Back Up Now to perform the backup task immediately.
- Or click Back Up Later to postpone the backup task and restart it on the Manage page.
When all steps have been finished, you have successfully created a system image. With this system image, you can feel relax even though you encounter the DISM error 87 again or some other system problems because you can restore computer to a previous state.
Free Download
MiniTool ShadowMaker is a powerful tool. With this software, I am assured as it can keep my computer and data safe.Click to Tweet
Bottom Line
To sum up, this post has introduced what the DISM is and what may cause the DISM error 87. Apart from that, this post has walked through 6 solutions to DISM error 87 Windows 7/8/10.
If you have any better solution to error 87 Windows 10, you can share it on the comment zone. Or if you have any problem with this post or MiniTool ShadowMaker, please contact us via the email [email protected] and we will reply to you as soon as possible.
DISM Error 87 FAQ
How do I fix error 87 DISM?
- Use Correct DISM Command.
- Run this command using an elevated command prompt.
- Run Windows update.
- Run System File Checker.
- Use correct DISM version.
- Reinstall Windows.
What is the DISM?
DISM, also called Deployment Image Service and Management, is a Windows built-in tool that can be used to service and prepare Windows image including the online or offline image within a folder or WIM file. Its features include mounting and unmounting images, querying installed device drivers in an offline image and adding a device driver to an offline image.
What does dism online cleanup image RestoreHealth do?
Dism /Online /Cleanup-Image /RestoreHealth attempts to scan and repair corrupted system files that found on your computer.
How do I fix corrupted files on Windows 10?
- Type Command Prompt in the search box of Windows and choose the best matched one.
- Right-click it to choose Run as administrator.
- Type the command sfc /scannow and hit Enter to continue.
- Wait for the process to be finished.
На чтение 8 мин. Просмотров 4.6k. Опубликовано 03.09.2019
Если вы столкнулись с ошибкой 87 , то на вашем компьютере указан неверный параметр, это может быть связано с попыткой копирования огромного файла из одного раздела в другой, что означает максимальный размер файла, который можно сохранить был превышен.
Это сообщение об ошибке также появляется, когда необходимая служба не запущена на вашем компьютере, так что вы не сможете подключиться к сети и, возможно, не сможете установить сетевые адаптеры, таким образом, такие службы, как Plug and Play, диспетчер автоматического подключения удаленного доступа Диспетчер подключений удаленного доступа и телефония.
Ошибка 87 также может произойти при попытке скопировать файлы на сервер SharePoint, но сам файл ограничен.
Другая вероятная причина – аппаратные ошибки и/или ошибки диска или файла, которые повреждены (или чьи данные повреждены).
Существуют различные решения для устранения этой проблемы в зависимости от вашей ситуации, но в основном эта проблема может помочь в проверке возможности перетаскивания для копирования данных или смены устройств путем тестирования на разных дисках.
Однако ошибка 87 имеет тенденцию быть неопределенной, поэтому вы не можете сузить ее до одного решения, но вот некоторые исправления, которые вы можете попробовать.
Содержание
- Исправить ошибку 87, параметр неверен
- Решение 1. Выполните чистую загрузку
- Решение 2: Запустите инструмент DISM
- Решение 3. Используйте средство проверки системных файлов для восстановления поврежденных файлов Windows
- Решение 4. Запустите средство готовности обновления системы
- Решение 5. Использование средства устранения неполадок приложения Windows
- Решение 6. Обновите драйвер дисплея
- Решение 7. Получите последние версии драйверов и установите их в режиме совместимости
- Решение 8. Временно отключите брандмауэры и любое антивирусное или вредоносное ПО
Исправить ошибку 87, параметр неверен
- Выполнить чистую загрузку
- Использовать проверку системных файлов
- Запустить инструмент DISM
- Запустите средство готовности обновления системы
- Использовать средство устранения неполадок приложения Windows
- Обновите драйвер дисплея
- Получить последние версии драйверов и установить в режиме совместимости
- Отключить антивирус
Решение 1. Выполните чистую загрузку
Чистая загрузка устраняет любые конфликты программного обеспечения, которые могут быть причиной проблемы.
Чтобы успешно выполнить чистую загрузку в Windows 10, вы должны войти в систему как администратор, а затем выполните следующие действия:
- Перейти к окну поиска
- Введите msconfig

- Выберите Конфигурация системы , чтобы открыть окно конфигурации системы.

- Найдите вкладку Услуги

- Установите флажок Скрыть все службы Microsoft .

- Нажмите Отключить все .
- Перейдите на вкладку Автозагрузка .
- Нажмите Открыть диспетчер задач .

- Закройте диспетчер задач и нажмите ОК .
- Перезагрузите компьютер
У вас будет чистая среда загрузки после выполнения этих шагов. Если вы все еще не можете исправить ошибку 87, параметр неверен, попробуйте следующее решение.
- ТАКЖЕ ПРОЧИТАЙТЕ: Windows 10 не загружается. Вот как исправить эту проблему навсегда
Решение 2: Запустите инструмент DISM
Средство обслуживания образов развертывания и управления ими (DISM) помогает исправить ошибки повреждения Windows, когда не удается установить обновления Windows и пакеты обновления из-за ошибок повреждения, например, если у вас поврежденный системный файл.
- Нажмите Пуск .
- В поле поиска введите CMD .
- Нажмите Командная строка в списке результатов поиска.

- Введите Dism/Online/Cleanup-Image/ScanHealth для сканирования отсутствующих компонентов.
- Введите Dism/Online/Cleanup-Image/CheckHealth , чтобы проверить наличие отсутствующих или поврежденных файлов.
- Введите Dism/Online/Cleanup-Image/RestoreHealth , чтобы отсканировать и устранить любые причины проблем с рабочим столом Windows 10.
- Нажмите Enter .
После завершения восстановления перезагрузите компьютер и проверьте, сохраняется ли проблема, после чего вы можете запустить сканирование SFC, как описано в следующем решении.
Примечание: инструмент DISM обычно занимает 15 минут, однако иногда это может занять больше времени. Не отменяйте, когда он работает.
Если запуск инструмента DISM не помогает исправить ошибку 87, параметр неверен, попробуйте следующее решение.
Решение 3. Используйте средство проверки системных файлов для восстановления поврежденных файлов Windows
Сканирование проверки системных файлов проверяет или сканирует все защищенные системные файлы, а затем заменяет неправильные версии подлинными и правильными версиями Microsoft.
Вот как это сделать:
- Нажмите Пуск .
- Перейдите в поле поиска и введите CMD .
- Щелкните правой кнопкой мыши Командная строка и выберите Запуск от имени администратора .

- Введите sfc/scannow

- Нажмите Enter .
Перезагрузите компьютер и попробуйте установить обновления снова.
Если использование средства проверки системных файлов не помогает исправить ошибку 87, параметр неверен, попробуйте следующее решение.
Решение 4. Запустите средство готовности обновления системы
Если вы все еще не можете исправить ошибку 80070490 после сканирования SFC, используйте средство готовности обновления системы, чтобы исправить ошибки повреждения Windows, а затем снова установите обновление Windows или пакет обновления.
Этот инструмент используется потому, что в магазине обслуживания Windows обнаружены несоответствия, которые могут помешать успешной установке будущих обновлений, пакетов обновления и программного обеспечения. Он проверяет ваш компьютер на наличие таких несоответствий и пытается решить проблемы, если они найдены.
- Загрузите Средство готовности обновления системы , нажав ссылку для загрузки, соответствующую версии Windows, установленной на вашем компьютере. Инструмент регулярно обновляется, поэтому всегда загружайте последнюю версию (проверьте, работает ли на вашем компьютере 32- или 64-разрядная версия Windows).
- Нажмите Загрузить на веб-странице центра загрузки.
- Установите, нажав Открыть или Запустить , и следуйте инструкциям на экране.
- В диалоговом окне «Автономный установщик Центра обновления Windows» нажмите кнопку «Да». Инструмент запускается автоматически в течение 15 или более минут, поэтому не нажимайте кнопку «Отмена».
- Когда появится сообщение Установка завершена , нажмите кнопку Закрыть.
- Переустановите обновление или пакет обновления, который вы пытались установить ранее
Если запуск средства готовности к обновлению системы не помогает исправить ошибку 87, параметр неверен, попробуйте следующее решение.
- ТАКЖЕ ЧИТАЙТЕ: как исправить проблемы с производительностью после установки обновлений Patch Tuesday
Решение 5. Использование средства устранения неполадок приложения Windows
Средство устранения неполадок в приложении автоматически исправляет некоторые проблемы, которые могут помешать запуску приложений, в том числе неверные параметры безопасности или настройки учетной записи.
- Нажмите правой кнопкой мыши Пуск .
- Выберите Панель управления .

- Перейдите в верхний правый угол и измените параметр Просмотр по на Большие значки .

- Нажмите Устранение неполадок .

- Нажмите Просмотреть все на левой панели.

- Выберите Центр обновления Windows .

- Следуйте инструкциям, чтобы запустить приложение устранения неполадок
Помогает ли это исправить ошибку 87? Неправильный ли параметр?
Решение 6. Обновите драйвер дисплея
Иногда ошибка 87 может быть результатом драйверов вашего адаптера дисплея, поэтому вы можете использовать приведенные ниже шаги для обновления драйвера дисплея и посмотреть, поможет ли это:
- Нажмите правой кнопкой мыши Пуск .
- Выберите Диспетчер устройств .

- Найдите Адаптеры дисплея

- Нажмите Адаптеры дисплея , чтобы развернуть список адаптеров.
- Щелкните правой кнопкой мыши на адаптере дисплея в списке
- Нажмите Обновить программное обеспечение драйвера .
- Выберите автоматический поиск обновленного программного обеспечения драйвера .
- Перезагрузите компьютер
Вы также можете проверить веб-сайт производителя вашего компьютера, загрузить последние версии драйверов для вашего компьютера и установить их.
Обновлять драйверы автоматически
Если загрузка драйверов с веб-сайта производителя не является решением, которое вам помогло, мы настоятельно рекомендуем использовать инструмент Tweakbit Driver Updater . Этот инструмент одобрен Microsoft и Norton Antivirus. После нескольких испытаний наша команда пришла к выводу, что это лучшее автоматизированное решение. Ниже вы можете найти краткое руководство, как это сделать.
-
- Загрузите и установите средство обновления драйверов TweakBit
-
 После установки программа автоматически начнет сканирование вашего компьютера на наличие устаревших драйверов. Driver Updater проверит установленные вами версии драйверов по своей облачной базе данных последних версий и порекомендует правильные обновления. Все, что вам нужно сделать, это дождаться завершения сканирования.
 После установки программа автоматически начнет сканирование вашего компьютера на наличие устаревших драйверов. Driver Updater проверит установленные вами версии драйверов по своей облачной базе данных последних версий и порекомендует правильные обновления. Все, что вам нужно сделать, это дождаться завершения сканирования.
По завершении сканирования вы получите отчет обо всех проблемных драйверах, найденных на вашем ПК. Просмотрите список и посмотрите, хотите ли вы обновить каждый драйвер по отдельности или все сразу. Чтобы обновить один драйвер за раз, нажмите ссылку «Обновить драйвер» рядом с именем драйвера.Или просто нажмите кнопку «Обновить все» внизу, чтобы автоматически установить все рекомендуемые обновления.

Примечание. Некоторые драйверы необходимо установить в несколько этапов, поэтому вам придется нажмите кнопку «Обновить» несколько раз, пока все его компоненты не будут установлены.
Решение 7. Получите последние версии драйверов и установите их в режиме совместимости
Вы можете перейти на веб-сайт производителя видеокарты и найти последние версии драйверов, доступные для вашей конкретной модели, а затем установить их, следуя инструкциям на веб-сайте.
Для установки в режиме совместимости выполните следующие действия:
- Загрузите последнюю версию драйвера с сайта производителя.
- Сохраните его на локальном диске
- Щелкните правой кнопкой мыши на файле настройки драйвера
- Нажмите Свойства .
- Нажмите вкладку “Совместимость” .
- Установите флажок Запустить эту программу в режиме совместимости .
- Выберите Операционную систему в раскрывающемся списке.
- Драйвер установится, затем проверит его работоспособность.
- Перезагрузите компьютер и проверьте, сохраняется ли проблема
Решение 8. Временно отключите брандмауэры и любое антивирусное или вредоносное ПО
Иногда наличие нескольких брандмауэров, антивирусных или вредоносных программ может иногда мешать вам выполнять определенные задачи или запускать процессы на вашем компьютере.
Если это является причиной проблемы, временно отключите любой из трех, а затем попробуйте войти снова.
Обязательно включите эти программы сразу же после того, как вы это сделаете, чтобы хакеры, вирусы и черви не повредили вашу систему.
Помогло ли какое-либо из этих решений исправить ошибку 87? Неправильный ли для вас параметр? Поделитесь с нами своим опытом, оставив комментарий в разделе ниже.
На чтение 3 мин Просмотров 87 Опубликовано 02.01.2023
Применяя DISM в строчке команд, чтобы проверить хранилище компонентов Windows или иных целей, некоторые пользователи сталкиваются с ошибкой 87:«Неизвестный параметр» или «Параметр не распознан в этом контексте». Насколько серьезна DISM ошибка 87? В нашей статье мы поделимся информацией о причинах ошибки и способах ее исправления.
Содержание
- Что такое DISM в Windows?
- Почему появляется ошибка 87 в командной строке?
- Как исправить ошибку 87 в командной строке?
Что такое DISM в Windows?
В Windows DISM (Обслуживание образов развертывания и управление ими) считается инструментом, созданным Майкрософт для решения проблем, связанных с системой.
Применение его можно увидеть в различных руководствах, помогающих решать ошибки Винды. У пользователей случаются проблемы с применением DISM в своих системах. Начиная с семерки версии ОС, было внедрение обновленной версии командной строки DISM. Чаще данной ошибкой «грешит» Windows 10.
Каковы могут быть причины, при которых возникает ошибка 87 в командной строке dism Windows? Назовем их далее.
Почему появляется ошибка 87 в командной строке?
Перечислим основные:
- Использование директории WinSxS. Она выполняет роль резервного хранилища, благодаря которому возможно выполнить восстановление копий значимых файлов системы.
- Некорректно написаны запросы. Строка команд очень восприимчивая к синтаксису. Опечатки, излишние пробелы, неправильно написанная символика на выходе дадут ошибку.
- Несоответствуют запрашиваемые функции и права для доступа. Это могут сделать пользователи с правами Администратора с опытом.
- Отказ по причине старой версии строки команд.
Далее в следующем пункте мы разберем пути решения, если у вас возникла ошибка 87 в командной строке Windows.
Как исправить ошибку 87 в командной строке?
Причина 1. Синтаксические ошибочки при введении команды. Какие обычно встречаются?

Перечислим:
- Нет пробелов перед значком «/» в параметрах программы.
- Несоблюдение порядка указывания параметров (пример checkhealth и cleanup-image).
- Путаница букв латиницы C и S, U и Y.
Причина 2. Версии DISM и набор команд различаются. Определенные команды из DISM, предназначенные для Виндовс 11, 10 не сработают на Виндовс 7 и 8.1.
Пример. В свежей операционке с DISM 10 версии примени «DISM /online /cleanup-image /checkhealth» и работа пошла. А в Виндовс 7 с версией 6.1 в результате выйдет ошибка 87.
Какими решениями воспользоваться?
Перечислим:
- Не используйте неподдерживаемые команды при условии их некритичности для получаемого результата.
- Установите самую свежую версию DISM.
Как осуществить? Скачивайте и устанавливайте Windows ADK необходимой версии(пример ADK для Виндовс 10 в Виндовс 7) и осуществить выбор пункта «средства развертывания» при установке. Это можно сделать из официального источника.
Опишем:
- Для последних версий понадобится .NET Framework 5 на ПК.
- Загрузка важных компонентов онлайн установщиков из России без VPN не получится.
- Свежая DISM не заменит вашу, а установится отдельно. Папка расположена в «С:Program Files (x86)Windows Kits10Assessment and Deployment KitDeploymentTools amd64DISM» и понадобится делать запуск из данного расположения, а также выполнять добавление в переменные среды.
Ошибка сохранилась?
Попробуйте еще варианты:
- Для работы отдельных параметров DISM необходимо включение службы «Установщика модулей Виндовс». Включение ее возможно и в «Win+R» — services.msc. Находите «Установщик модулей Виндовс» в списке, пару раз жмете по службе и осуществляете установку типа запуска «Вручную» — значение по умолчанию для данной службы.
- Применяйте проверку целостности системных файлов, воспользовавшись командой «sfc /scannow».
- Ранее проблем не было? Пробуйте применить точки восстановления системы.
- Имеются обновления у Виндовс? Пробуйте сделать установку.
- Воспользуйтесь Restoro PC Repair Tool. Инструмент просканирует компьютер и укажет на неисправность, и поможет их исправить.

admin
Администратор и автор данного сайта. Специалист в области ИТ-технологий. Опыт работы в сфере информационных технологий с 2012 года.
Оцените автора
( Пока оценок нет )
Одной из распространённых причин неполадок в работе Windows является повреждение системных файлов, например, вследствие внезапного отключения электропитания в момент перезаписывания файла. Для устранения таких неполадок в Windows предусмотрена специальная утилита SFC. Если запустить её с параметром SCANNOW, она просканирует систему на предмет повреждённых и/или удалённых файлов и восстановит их из хранилища компонентов WinSxS. Если SFC не справляется со своей задачей по причине повреждения хранилища, в ход идёт консольная утилита DISM, способная восстановить само хранилище.
Ошибка 87 в Windows при работе с DISM
 При этом сначала в командной строке обычно выполняется команда DISM /Online /Cleanup-Image /ScanHealth, а при обнаружении повреждений хранилища выполняется та же команда, но уже с параметром /RestoreHealth вместо /ScanHealth. Но было бы ошибочно считать DISM всесильной, утилита сама может завершить работу с ошибками. Таких ошибок у DISM существует около дюжины, и каждая из них имеет свой код и описание. Сегодня мы коснёмся распространённой ошибки с кодом 87, а заодно посмотрим, что можно предпринять в случае её возникновения.
Отсутствие привилегий
Ошибка 87 может возникнуть, когда пользователь выполняет команду в консоли, запущенной с правами обычного пользователя. Командную строку или PowerShell нужно запускать от имени администратора. Запустить PowerShell с повышенными правами в Windows 10 можно из контекстного меню кнопки Пуск, классическую командную строку — через поиск, так же выбрав в меню соответствующую опцию.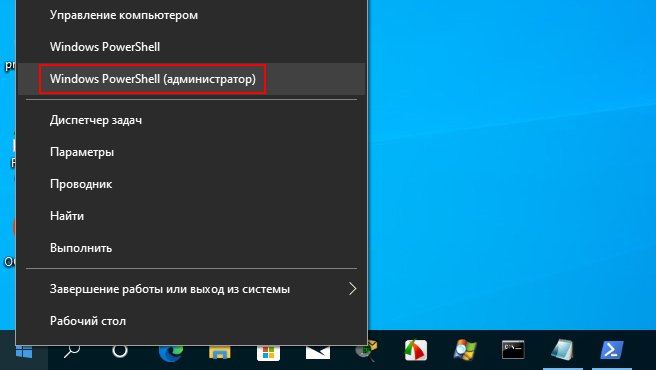
Ошибка синтаксиса
Очень часто причиной ошибки 87 становится банальная ошибка синтаксиса. Либо пользователь ошибается в момент ручного ввода, например, случайно пропускает пробел между передаваемыми параметрами, либо копирует команду DISM с веб-страницы, на которой в команде уже допущена ошибка. Понять, что причиной ошибки 87 стал именно синтаксис нетрудно: в описании ошибки будет указано «неизвестный параметр…» или «параметр не распознан в этом контексте». Проверьте корректность ввода команды, убедитесь, что между передаваемыми параметрами имеются пробелы. 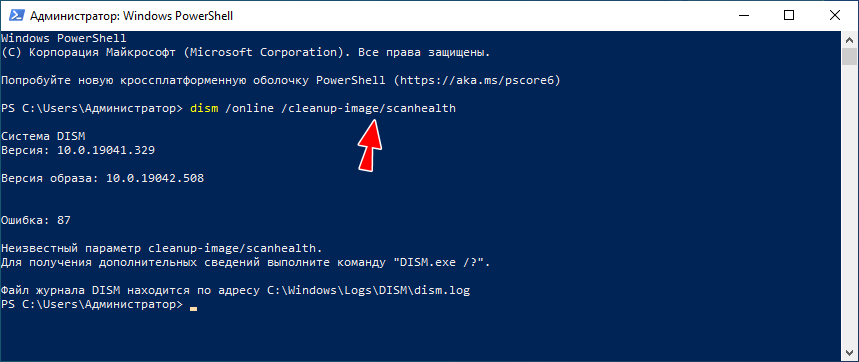
Остановка системных служб
Ошибка с кодом 87 и сообщением «параметр не распознан в этом контексте» может также возникнуть при попытке сжать каталог WinSxS. Для этого DISM передаются параметры /cleanup-image, /spsuperseded и /hidesp, и именно /spsuperseded чаще всего вызывает ошибку. В данном случае к ней приводит остановка системной службы «Установщик модулей Windows». Проверьте её состояние в оснастке управления службами, она должна иметь тип запуска «Вручную». Если она отключена, включите и запустите её, а затем выполните команду DISM.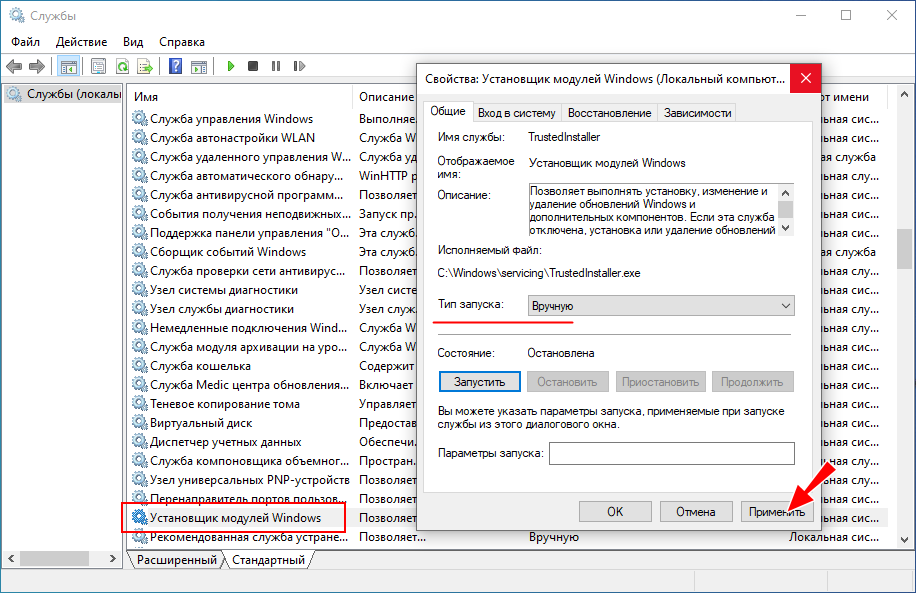
Отсутствие обновлений
В истории Windows 10, а именно в 2017 году, уже был прецедент с появлением ошибки 87 при работе с DISM. Тогда причиной ошибки была недоработка со стороны разработчиков Microsoft, которые вскоре после этого выпустили патч исправления. Нечто подобное может повториться и в будущем, и тогда вам нужно будет установить последние обновления Windows.
Ошибка 87 при применении образа
Появление ошибки 87 отмечалось и при попытке применения (использовании параметра /Apply-Image) образа Windows 10 в операционной системе более ранней версии. В таких случаях обычно рекомендуют «обновить» саму DISM, перенеся её с компьютера с более новой версией Windows, но это связано с целым рядом сложностей. Пожалуй, будет проще перейти на новую версию операционной системы или выполнить её сброс к исходному состоянию, чтобы восстановить нормальную работу инструмента.
Более или менее продвинутые пользователи нередко пользуются командной строкой, ведь через неё можно влиять на большинство системных процессов. При использовании строки DISM, которая есть в седьмой и следующих версиях Windows, время от времени могут появляться сообщения об ошибке.
Это норма для любой программы, но наша задача — избавиться от неполадки, чтобы выполнить необходимую команду. Ошибка 87 DISM возникает по нескольким причинам, и в каждом случае есть свои пути её устранения.
Иногда пользователи могут столкнуться с ошибкой 87 в строке DISM
Давайте выясним, при каких обстоятельствах обычно появляется такое сообщение и как избавиться от него без посторонней помощи.
Как правило, она напрямую относится к любым действиям, выполняемым с директорией WinSxS. Если вдруг в Windows пропадёт любой системный файл, он тут же будет восстановлен рабочей копией из этой папки. То есть, WinSxS это очень важная папка с документами.
И вот ошибка 87 возникает в тот момент, когда пользователь пытается проделать какие-то операции с папкой через DISM. А теперь давайте конкретнее рассмотрим ситуации, когда возникает эта неполадка, чтобы в зависимости от них узнать способы избавления от неё.
Ошибка 87 при проверке целостности системных файлов
Время от времени Windows 7, 8, 8.1 и даже последняя версия начинает некорректно работать. Иногда компьютер внезапно перезагружается или попросту часто зависает. В такой ситуации обычно пользователям советуют не только проверить ПК на вирусы, но и выяснить, нет ли каких-либо повреждений в системных файлах.
Чтобы произвести такую проверку, используется командная строка, где вводится sfc /scannow. Если всё хорошо, то пользователь получает соответствующий текст. Однако в некоторых случаях вы получите сообщение о том, что система нашла повреждённые файлы, но ничего не может с ними сделать.
В этот момент в игру вступает DISM — следует открыть его от имени администратора и ввести такие команды:
- DISM /Online /Cleanup-image /ScanHealth — если у вас седьмая версия Windows;
- Та же команда + DISM.exe /Online /Cleanup-image /RestoreHealth — две команды для Windows 8, 10. Первая необходима для поиска повреждений, вторая команда запускает их исправление.
Именно после первой комбинации из списка, которая разработана для седьмой версии системы, всплывает ошибка 87 в командной строке DISM с сопутствующим текстом «Параметр ScanHealth не распознан в этом контексте».
Как её исправить? Первое очень простое решение — проверить правильность ввода комбинации. Поскольку эта командная строка очень требовательна к каждому знаку, убедитесь, что ставите только один пробел перед каждым слешем.
Не помогло? Тогда вам следует скачать обновление под названием KB2966583 на сайте Майкрософт и установить его на своём компьютере.
После успешной установки вы сможете снова запустить командную строку DISM и выполнить восстановление целостности файлов Windows.
Ошибка 87 и попытки почистить директорию WinSxS
Иногда вышеупомянутую директорию, которая работает страховкой для всех самых важных файлов, пытаются уменьшить. Для чего? В большинстве случаев папка WinSxS занимает много места на диске — 5,7 и даже 8 и больше ГБ, что может не нравиться пользователям, особенно если свободной памяти и так не хватает.
Поэтому чтобы немного сэкономить место, можно удалить бэкап папки таким образом:
- Открывается DISM.
- Вводиться текст dism /online /cleanup-image /spsuperseded /hidesp.
Часто именно после этой команды выбивает ошибку 87 с таким текстом: «Параметр spsuperseded не распознан в этом контексте».
Что делать в таком случае? Проверьте работоспособность сервиса «Установщик модулей Windows». Если он нерабочий, установите его, запустите, и затем повторите вышеуказанные действия.
Если же это не помогло, значит, команда для удаления бэкапа уже выполнялась, и больше места вы сэкономить не сможете.
Теперь вы знаете, по каким причинам появляется ошибка 87 в командной строке Windows, и знаете, что делать для её исчезновения. Советуем быть аккуратными при пользовании подобными программами и внимательно следить за тем, в какие процессы вы вмешиваетесь, чтобы не навредить компьютеру.
How to Fix DISM Error 87 (dism /online /cleanup-image /restorehealth error 87)
Am I the only one who’s DISM doesn’t working properly and getting DISM Error 87 (dism /online /cleanup-image /restorehealth error 87)? and how to Fix DISM error 87 easily and quickly? Now, for your confirmation, I want to tell you that you are not the only one whose DISM is getting error code 87 as from the last few days, most of the Windows 10 and Windows 7 & 8 users are getting trouble while using DISM and getting error 87 DISM. Now, you don’t need to worry anymore as I am going to guide you with the solutions by which you can fix this error instantly.
DISM stands for Deployment Image Service and Management Tool, which was first introduced to Windows 7. It is used to work or perform several tasks on the windows installation image. It also includes features of mounting or unmounting images. Windows 10 offers many in-built features or tools and DISM is also one of them.
As you may know that DISM is a command-line tool which is mostly used for preparing windows image. Are you also using DISM? then you don’t need any more information about it. Now, if you are frustrated with the DISM Error 87, then after 5 minutes when this article finishes, you can solve your issue 100%, and its a bet. Now, before going to the solutions, let’s take a dig towards the basic information.
What is DISM Error 87?
DISM error code 87 is seen by the windows 10 users and lower version aswell but mostly on windows 10 users, when they try to run DISM from an elevated command prompt. Now, if you are also one of those, then don’t be sad, as in the last section, I had a bet with you that I will provide you 100% working DISM error 87 solutions.
So, as you all know before going to the solutions, we should always research for the reasons, that’s why our computer or any device getting an error so, that we can take care in the future. Now, the reasons for this error 87 DISM are given in the next section.
What are the Reasons for DISM Error 87?
From the last few days, I got many queries about error code 87 DISM (mostly from Windows 10 Users) and after that, I researched for it and found many major reasons for it and I am going to share all those reasons with you.
So, now please pay attention as the reasons for DISM error 87 are listed below:
1. Check Your Command-Line
Are you new to DISM and didn’t know anything much about it? then maybe you are using some wrong inputs and it can be the main reason because of which you are getting DISM error 87. As it was space-sensitive and maybe you leave incorrect space before / symbol. To overcome this reason you don’t need to do anything big as you just have to read the command lines again, properly.
2. Windows 10 Bug
Are you a Windows 10 user? then the bug can be the main reason for occurring this error as many users disable the core updates of windows and this will lead to bugs and the conflicts and errors might take place.
3. Make Sure to Run Command in Elevated Prompt
Are you trying to run commands in regular command elevated prompt? then this might be the reason for this error code 87 DISM, as I earlier said that you have to use this in an elevated command prompt. So, try to change it if this is your reason.
4. Wrong Version of DISM
This is the major reason for DISM error 87, as might be Windows 10 images are using an older version.
How to Fix DISM Error 87 (2020)?
Now, you are in the most important section of today’s section, so pay your full attention and follow the steps as guided.
Fixing DISM Error 87 is not a big deal as it is a temporary issue and you can fix it easily and quickly. This issue occurs because of your small mistakes and in the solutions list, I will cover all the mistakes and now, by following the steps given in the solutions, you can fix it in few minutes.

The solutions for how to fix DISM error 87 are listed below:
1. Restart Your PC
The first solution that I will prefer is restarting your PC as most of the users marked this method more effective, as this will reduce the bugs and increase your PC speed and your PC starts working properly and might be your error code 87 in DISM gets fixed.
Note: Please keep in mind that before restarting, you should save your work.
Now, after restarting your PC, open the elevated command prompt again and check whether the issue is fixed or not. If not, follow other methods given below.
2. Use Correct Inputs (Spellings)
As I earlier said you that please check your spellings, as we all are humans and the mistakes are common so, before following other steps, first, read your command again and instead of running your command as
make use of space before «/» (Symbol) like :
3. Make Sure to Use Elevated Command Prompt
Most of the users didn’t use the Elevated Command prompt and if you are also one of those then follow the steps given below and try to launch commands as guided:
Note: You might have to grant permissions to administrative privileges.
4. Update your Windows
If the above steps didn’t work for you then try to update your windows, as many of the windows 10 users disables the automatic updates and in this way, their pc will lead to many errors and issues. Now, follow the steps given below to check for updates:
After a successful update, Your PC will get restarted and after that, check whether the DISM error 87 still arises when you try to launch command on an elevated command prompt.
5. Use Windows 10 version of DISM
This issue may be occurring because your image is using a lower version and to resolve this you have to start DISM with Wofadk.sys filter driver.
6. Performing a Repair Install
If none of the solutions given above helps you then the last method will help you 100%, but if you use this method then your data will be deleted to get DISM error 87 fixed.
- First of all, Download the Windows 10 ISO file from this link.
- Then, Save it on your PC in your folder.
- After that, Mount the ISO file.
- Now, you have to double click on the file setup.exe to start the repair – install from the mounted drive.
Conclusion
DISM error 87 is a temporary error but at the time you see this error, I know how much it irritates and that’s why I posted this article.
I hope that all the steps and reasons are very helpful for you and you successfully fixed your DISM error 87, because of which you visited our site and I also hope that I won the bet.
dism /online /cleanup-image /restorehealth gives me an error 87.how to fix this?
#1 jeffhubert
jeffhubert
- Members
- 56 posts
- OFFLINE
- Gender: Male
- Location: Philippines
- Local time: 10:11 AM
i just run (dism /online /cleanup-image /restorehealth) in cmd but this comes to me
Microsoft Windows [Version 6.1.7601]
Copyright © Microsoft Corporation. All rights reserved
C:Windowssystem32>dism /online /cleanup-image /restorehealth
Deployment Image Servicing and Management tool
Image Version : 6.1.7601.17514
The restorehealth option is not recognized in this context.
For more information, refer to the help.
The DISM log file can be found at C:WindowsLogsDISMdism.log
i already tried all caps lock but no luck. i tried this more than 10 times and it gives error 87..
how to fix this?
here is the log file
dism.log 311.21KB 41 downloads
- Back to top’>Back to top
BC AdBot (Login to Remove)
- BleepingComputer.com
- Register to remove ads

#2 dc3

- Gender: Male
- Location: Sierra Foothills of Northern Ca.
- Local time: 03:11 AM
Why are you running the dism?
Family and loved ones will always be a priority in my daily life. You never know when one will leave you.
- Back to top’>Back to top
#3 jeffhubert
jeffhubert
- Topic Starter
- Members
- 56 posts
- OFFLINE
- Gender: Male
- Location: Philippines
- Local time: 10:11 AM
- Back to top’>Back to top
#4 dc3
- Gender: Male
- Location: Sierra Foothills of Northern Ca.
- Local time: 03:11 AM
Yes, let’s do a repair installation.


Family and loved ones will always be a priority in my daily life. You never know when one will leave you.
- Back to top’>Back to top
#5 jeffhubert
jeffhubert
- Topic Starter
- Members
- 56 posts
- OFFLINE
- Gender: Male
- Location: Philippines
- Local time: 10:11 AM
i have done that without cd or dvd i have an option when booting up and perssing f8 then there are so many options i click the repair computer then windows files is loading then i tried startup repair after it finishes nad its restarts and it didnt fixed my problem. i tried using dism /online /cleanup-image /restorhealth in the command prompt in the system recovery options but it gives me an error 50.
but i will try again the startup repair bkus my laptop has an build startup repair on boot time and pressing or tapping f8 so many times and theres an option repair computer.
Edited by jeffhubert, 06 October 2013 — 10:45 PM.
- Back to top’>Back to top
#6 jeffhubert
jeffhubert
- Topic Starter
- Members
- 56 posts
- OFFLINE
- Gender: Male
- Location: Philippines
- Local time: 10:11 AM
can repair install remove my all files,programs and games?
- Back to top’>Back to top
#7 jeffhubert
jeffhubert
- Topic Starter
- Members
- 56 posts
- OFFLINE
- Gender: Male
- Location: Philippines
- Local time: 10:11 AM
i will do this later or soon..without the cd or dvd i have an option repair computer at boot time and press f8..what if did not fixed the problem?
- Back to top’>Back to top
#8 dc3
- Gender: Male
- Location: Sierra Foothills of Northern Ca.
- Local time: 03:11 AM
can repair install remove my all files,programs and games?
The only time that I’ve heard of lost data was when one of our members lost a couple of files, but nothing like losing all your documents or pictures, etc.
Family and loved ones will always be a priority in my daily life. You never know when one will leave you.
- Back to top’>Back to top
#9 jeffhubert
jeffhubert
- Topic Starter
- Members
- 56 posts
- OFFLINE
- Gender: Male
- Location: Philippines
- Local time: 10:11 AM
mate i just tried again startup repair but after attempting repairs it just pops up that it cant be fixed..how can i fix my file?bkus i have so many corrupted files or windows files like .wmp,desktop.ini and pictures
i did this first:
then after scanning and attempting repairs this now pops out
- Back to top’>Back to top
#10 dc3
- Gender: Male
- Location: Sierra Foothills of Northern Ca.
- Local time: 03:11 AM
The first picture is of your Advanced Bot Options. This isn’t part of the repair installation, so it looks like you are not doing what I had requested.
Please use the instructions I posted for the repair installation. One of the step includes the startup repair, let this do its thing and get on with the rest of the repair. This is the only thing you can do at this point short of doing a reinstall of the operating system, or use the system recovery. Either of these will erase all of your data.
I leave this morning to take my wife to her physician for her bi-monthly treatment and will not be back until Wed. or Thrs.
Family and loved ones will always be a priority in my daily life. You never know when one will leave you.
- Back to top’>Back to top
DISM.exe /Online /Cleanup-Image /Restorehealth Explained

In this Itechguide, Victor explains “DISM.exe /Online /Cleanup-Image /Restorehealth” – what it is and how to use it. The Itechguide also includes some examples.
“DISM.exe /Online /Cleanup-Image /Restorehealth” is a DISM command that repairs issues with the running Operating system you are logged into.
Before I go further to explain what “DISM.exe /Online /Cleanup-Image /Restorehealth” does let me define DISM.exe first.
Browse Post Topics
What is DISM.EXE?

DISM.exe (Deployment Image Servicing and Management) is a Windows command-line tool that is used to manage both Windows Online and Offline Images.
DISM.exe /Online /Cleanup-Image /Restorehealth Explained

As I said in my introduction, this command fixes any problem(s) identified in your current operating system.
But what does each switch in this command do? I will explain the switches and put it all together for you.
DISM.exe /Online vs /Image
When you run DISM.exe command, you must either specify the /Online or /Image switch. If you specify the /Online switch, DISM.exe will not expect a path to an offline image. Rather, the command tool will target the running operating system.
On the other hand, if you specify the /Image switch, Deployment Image Servicing and Management tool will expect you to specify the path to the root directory of an offline Windows image.
So, DISM.exe /Online switch means you are asking DISM to target the running Operating system instead of an offline image. In the next section, I will explain the /Cleanup-Image switch.
DISM.exe /Cleanup-Image
For DISM.exe command to work, the /Online or /Image switch must be followed by other image servicing commands. One of the command-line options for the DISM.exe /Online switch is the /Cleanup-Image switch.
So, what does the /Cleanup-Image switch do in our “DISM.exe /Online /Cleanup-Image /Restorehealth” command? The /Cleanup-Image switch performs cleanup and recovery operations on the running Operating System.
To put it together to this point: when you run the command “DISM.exe /Online /Cleanup-Image”, you are asking Deployment Image Servicing and Management tool to:
- Target the running Operating System
- Perform cleanup and recovery operations on the running Operating System
DISM.exe /Restorehealth
The last switch in “DISM.exe /Online /Cleanup-Image /Restorehealth” command is the /Restorehealth switch. The /RestoreHealth switch scans the Operating System for corrupt files. If DISM finds corrupt files, it attempts to repair them automatically.
What Does “DISM.exe /Online /Cleanup-Image /Restorehealth” Do?
With the 3 switches in the command explained, I can summarize what the command does.
When you run DISM.exe /Online /Cleanup-Image /Restorehealth command, it does the following:
- The /Online switch instructs DISM.exe to target the running Operating System instead of an offline Windows image (.wim) file or virtual hard disk (.vhd or .vhdx)
- The /Cleanup-Image switch performs cleanup and recovery operations on the running Operating System
- Finally, the /Restorehealth switch scans the running Operating System for corrupt files and attempts to fix them.
Below is the result of the command.
How to Use DISM.EXE to Check Your Operating System Health

I suppose by now, you are probably thing “can DISM.exe help me find problems in my OS?” Yes, it can! If you are having problems with your Windows computer, use the /ScanHealth switch to perform advanced scan. See the command below:
The result of the command is shown in the image below:
How To Run DISM.EXE from Windows 10 Recovery Mode

Sometimes Windows may not even boot. If you wish to repair your Windows 10 computer that does not boot at all, use the steps below:
- Download Windows 10 ISO, burn it into a DVD and boot your computer with it. For a step by step guide on how to download Window 10 ISO image, read Download Windows 10 ISO Image.
- When your computer boots to the screen shown below, press any key to boot into the Windows 10 DVD.
- Next, click Troubleshoot. Then click Command Prompt.

- Command Prompt loads.
How To Extract Install.WIM from Windows 10 ISO

As I said earlier, before you can use DISM /Online /Cleanup-Image /RestoreHealth command with a WIM file, the file has to be extracted.
Follow the steps below to extract the OS WIM file from install.esd:
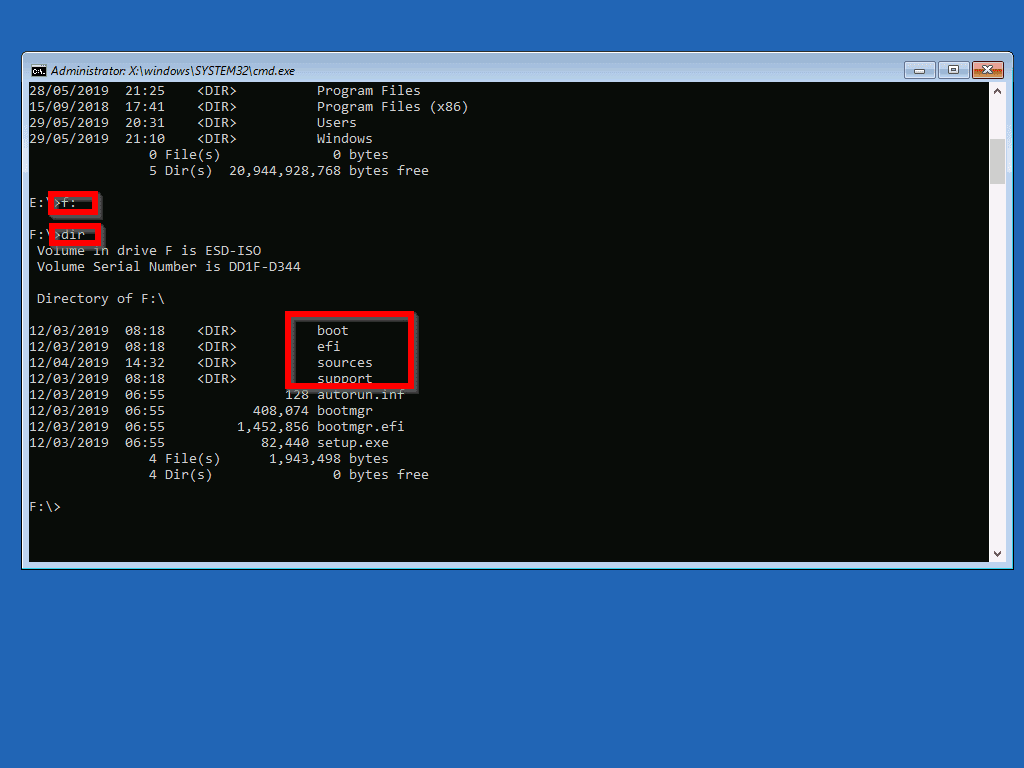
- First, you need to determine the drive your ISO image was mounted. This will depend on the number of drives on your computer. Knowing that it cannot be drive C, try D, then E and so on.
- To change to a drive, enter the drive name, followed by colon then press Enter.
- Next, type Dir and press the Enter key.
Keep checking possible drive letters until you find the one with folders, boot, efi, sources and support. This is the drive your Windows 10 ISO is mounted.
- Next, you need to find the index number of the Windows 10 edition you wish to use. To do this, execute the command below:
- Then, type this command and press the enter key.
The result of the last command is shown below:
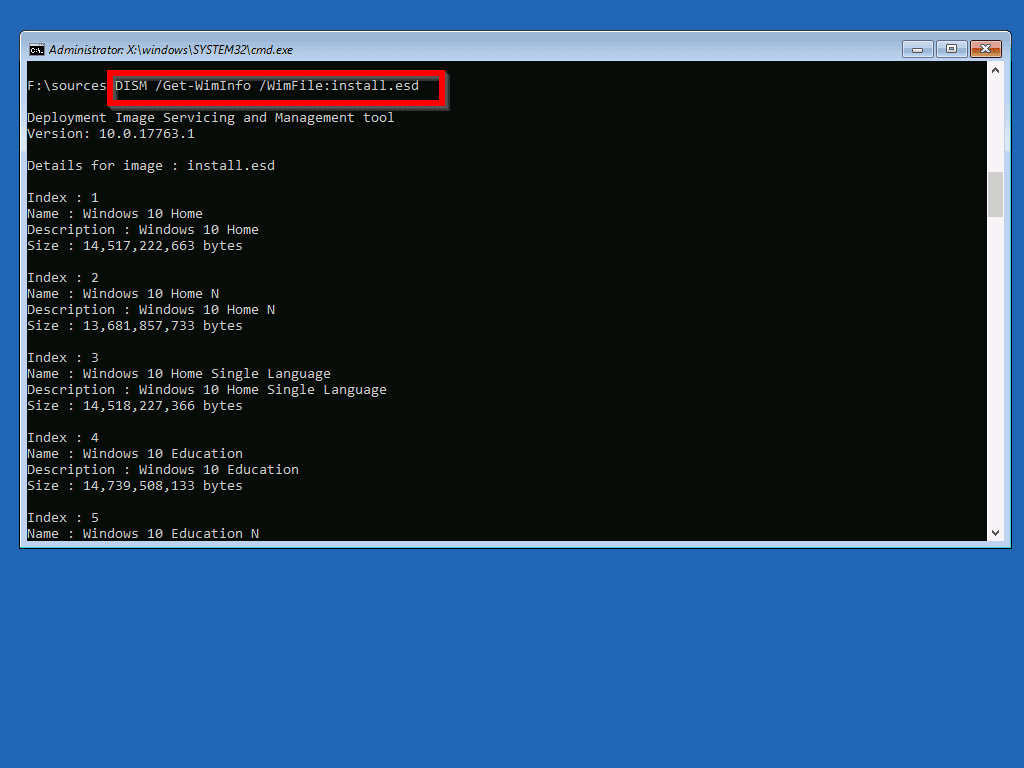
All the Windows 10 editions are listed with their index number. As the edition installed on my computer is Windows 10 Pro, I need to use the same edition for DISM repair. To see the index number, I need to scroll down a bit. Here are the details of Windows 10 Pro.
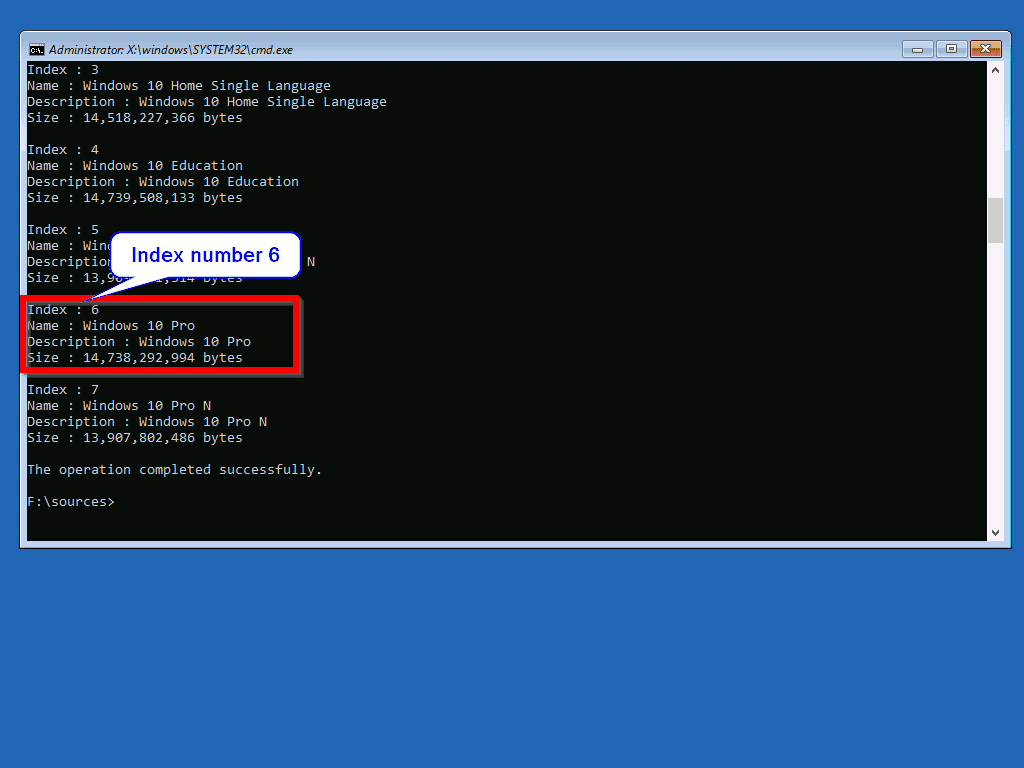
The index number I need is 6.
Before you proceed, you need to create a folder to extract your Install.WIM file to. To do this type the command below and press Enter.
- Now it is time to extract Install.WIM to d:test folder. To do this, run the command below:
When the command completes, proceed to the next step.
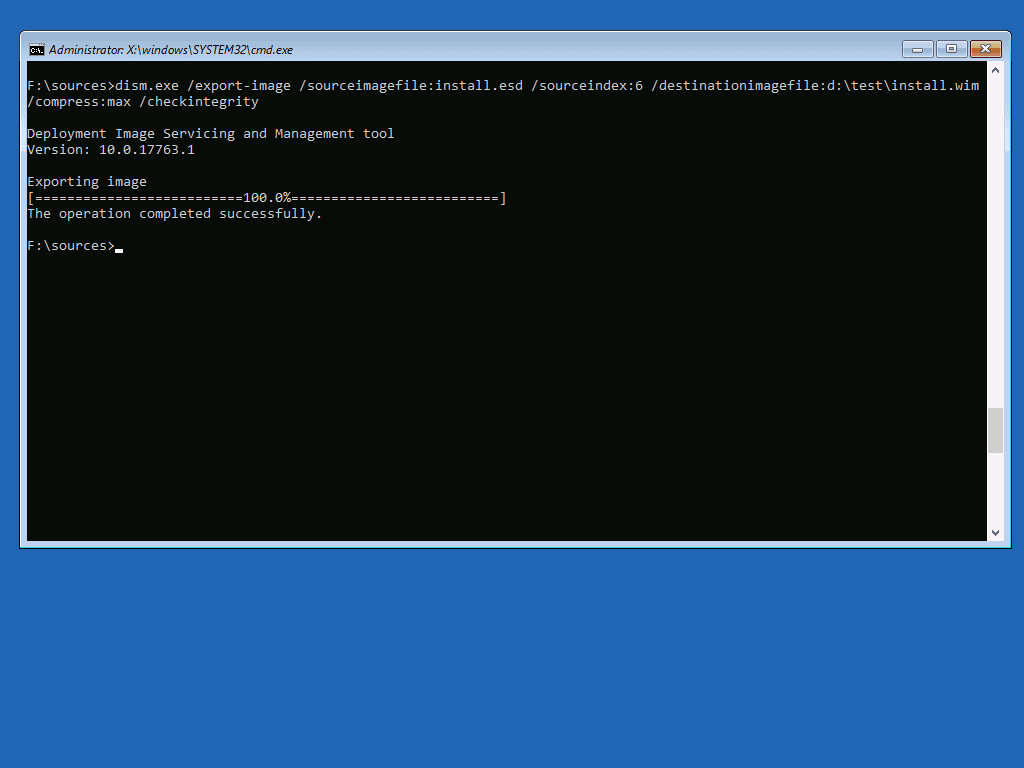
- Finally, to repair windows 10 using intall.wim, run the command below:
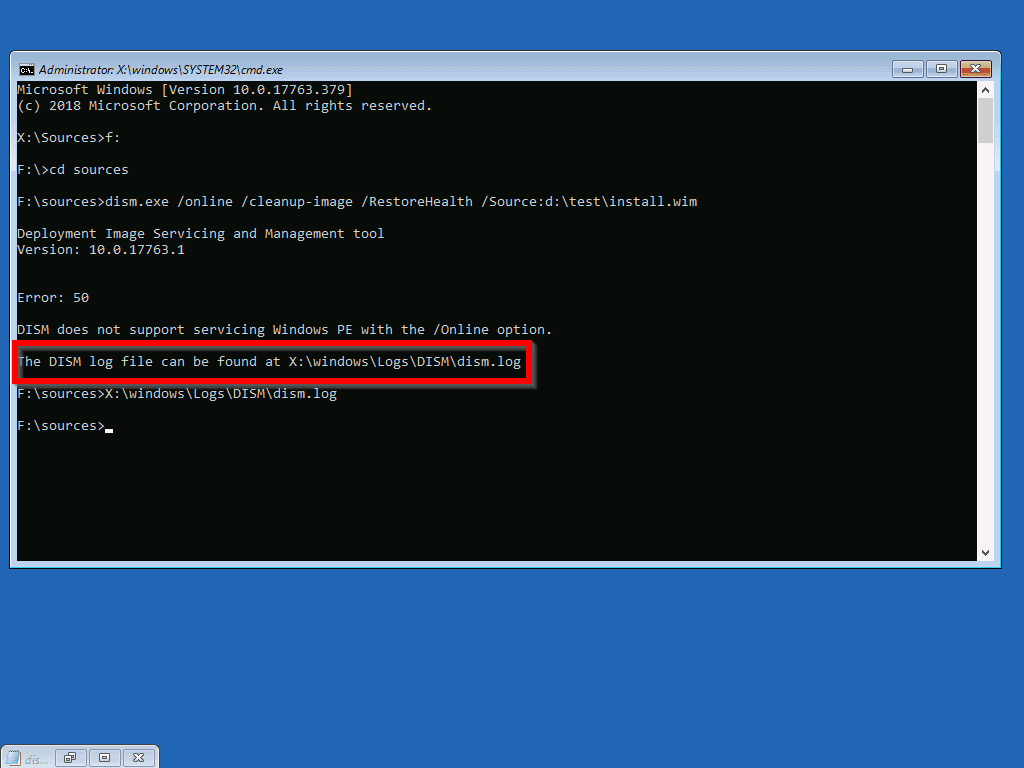
When I ran the command it returned error 50: DISM does not support servicing Windows PE with the /Online option. If you receive this error message, find the resolution below this image.
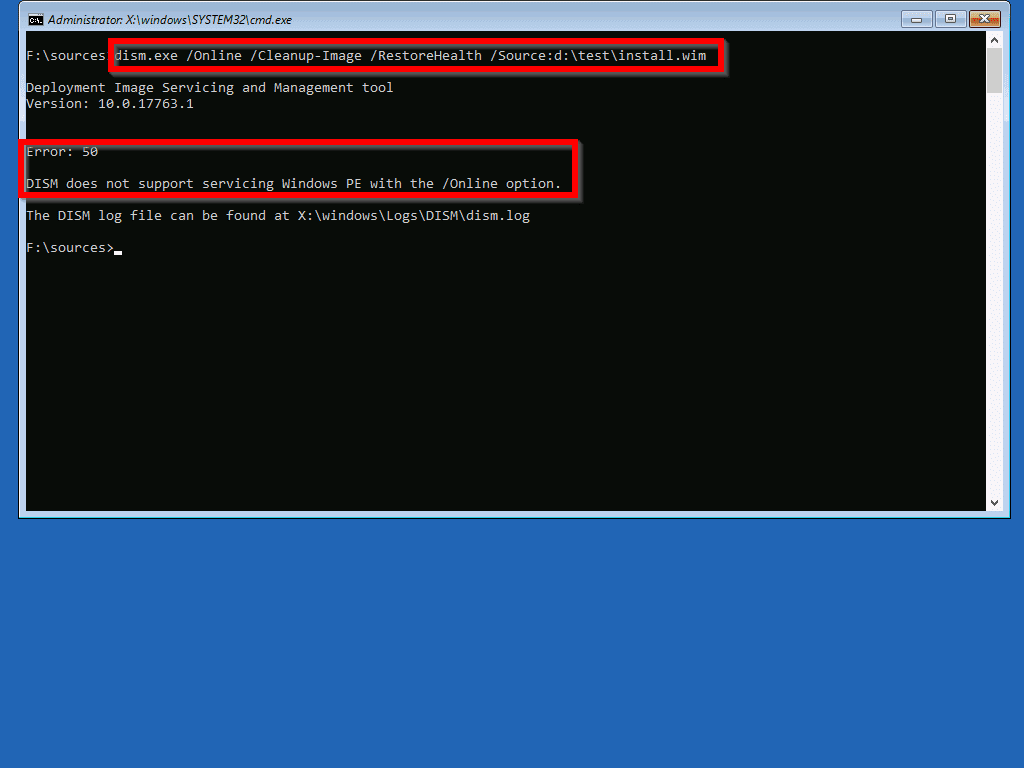
How to Fix DISM Error 50

If you receive error 50 – “dism does not support servicing windows PE with the /online option”, resolve it with the steps below:
- From the command prompt, type regedit and press enter. Registry editor opens.
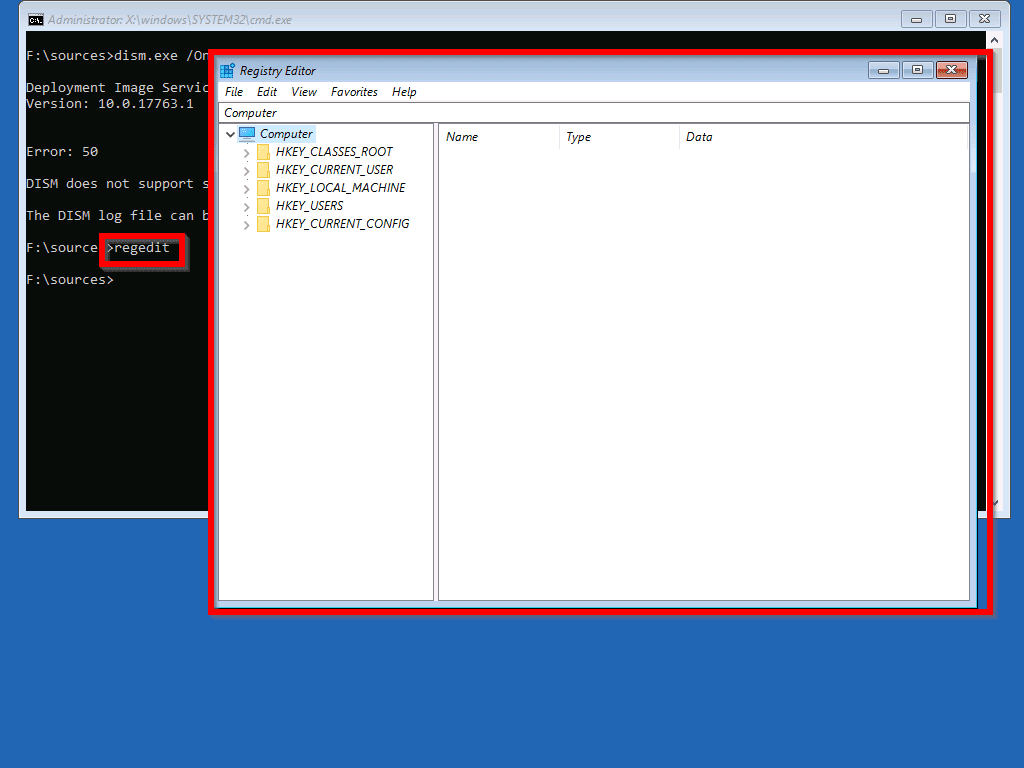
- Navigate to HKEY_LOCAL_MACHINESYSTEMControlSet001Control. Right-click MiniNT key and delete it. On the delete confirmation, click Yes.


- On the command prompt, type Exit and press Enter. Then Select Turn Off your PC.
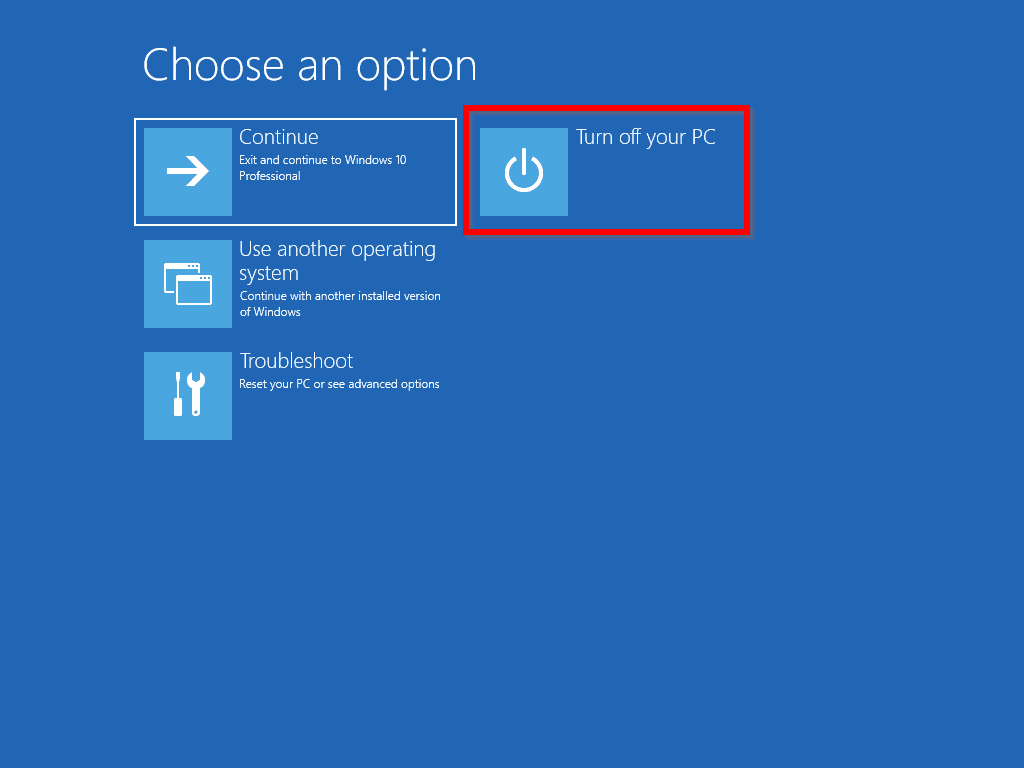
- When the Computer reboots, repeat the steps from Run DISM.EXE from Windows 10 Recovery Mode (opens in a new window/tab)
- When Command Prompt loads, change to the drive letter where your ISO is mounted. Also change to the Sources directory. Then rerun the DISM command shown below:
If error 50 persists, get more information on how to resolve it from this guide – How to quickly fix DISM error 50 on Windows 10 (opens in a new window/tab). You may also read the DISM log shown in the error message.
How to Fix DISM.exe /Online /Cleanup-Image /Restorehealth Error 87

There are so many reasons why you may receive error 87 when you run the “DISM.exe /Online /Cleanup-Image /Restorehealth” command. Here are some of the causes of the error and how to fix them.
DISM.exe /Online /Cleanup-Image /Restorehealth Error 87: Solution 1
From my research, the top on the list is when you run the command without adding the required spaces in the switches. Below is the DISM command without spaces:
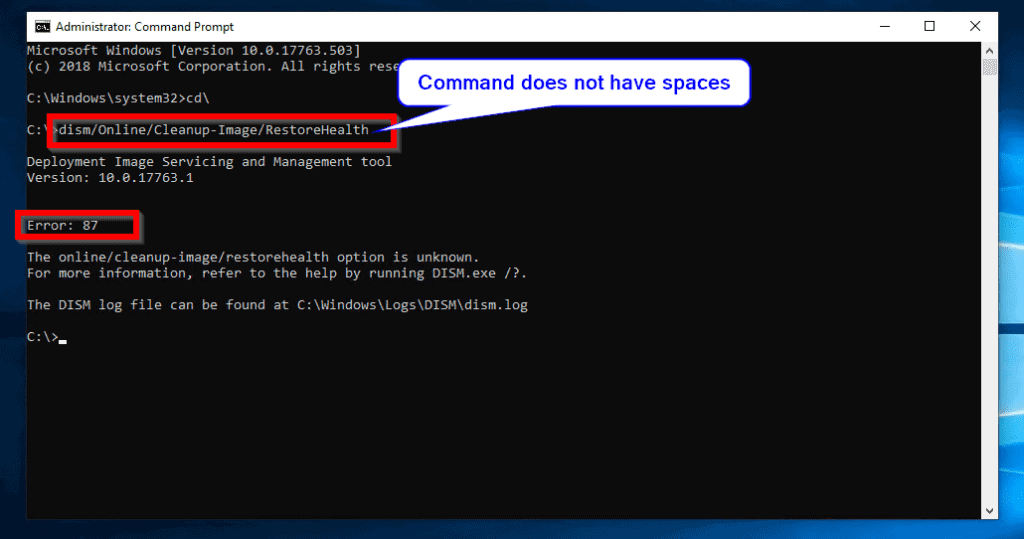
Solution
Run the command with spaces as shown below:
DISM.exe /Online /Cleanup-Image /Restorehealth Error 87: Solution 2
Another reason for error 87 could be pending updates.
Solution
The solution is to install all and any pending updates.
To check for and install any pending update, follow the steps below:
- Right-click Windows logo on the left of your task bar [1]. Then click System [2].
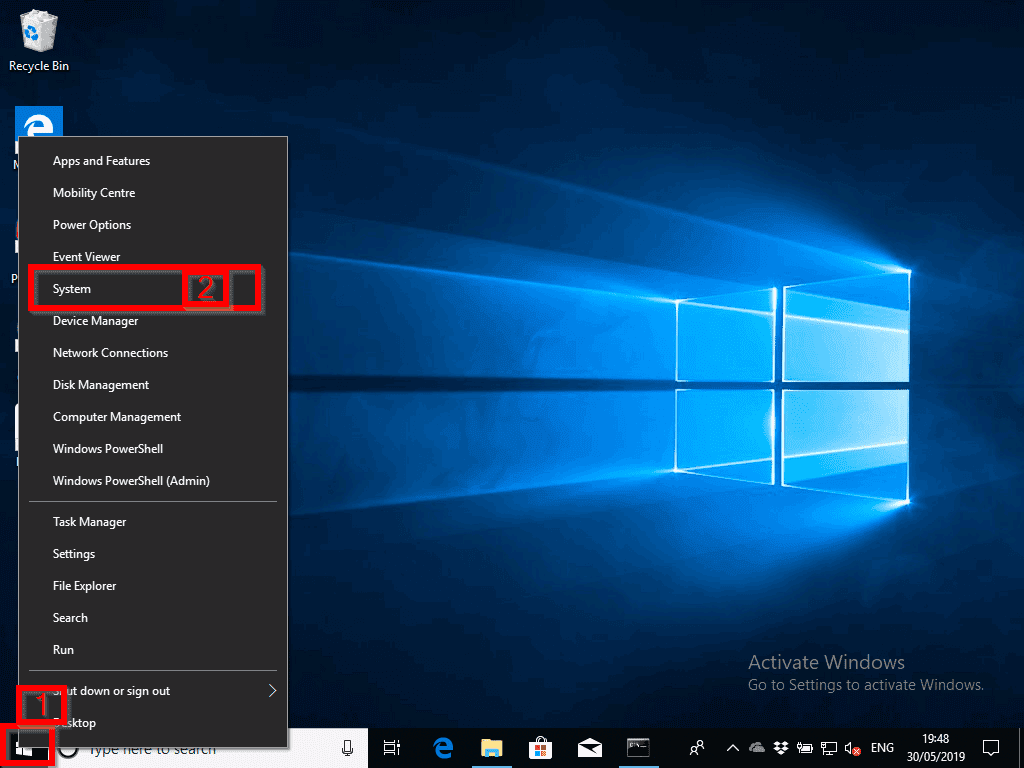
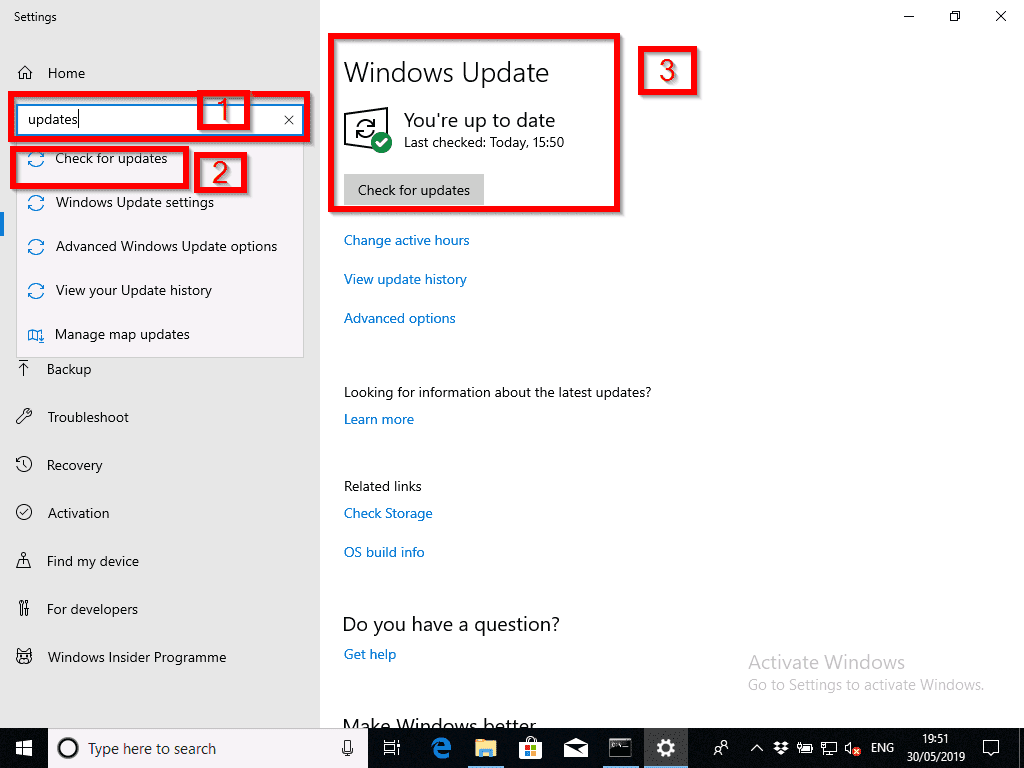
- When Settings loads, type updates in the search bar [1]. Then select Check for updates. Check the part labelled [3] for pending updates. If any click install.
DISM.exe /Online /Cleanup-Image /Restorehealth: Frequently Asked Question

This section answers frequently asked DISM.exe questions
DISM.exe (Deployment Image Servicing and Management) is a Windows command-line tool used to manage Windows images. The tool can be used to manage running operating systems or Operating System images and VHDs.
This DISM command repairs the windows operating system it runs on. The /Online switch forces DISM to scan the operating system for errors – it fixes any errors.
DISM.exe is a legitimate Windows command that manages both online and offline Windows images. It is completely safe to run DISM.exe
It take between 10 minutes to a few hours for DISM /Online /Cleanup-image /RestoreHealth to run. How long it takes depends on how much errors it finds and needs to fix
It is recommended to run SFC first. Then, run DISM /Online /Cleanup-image /RestoreHealth. SFC checks for Windows file integrity violations and tries to fix them. However, DISM is more effective at fixing corrupt Windows Operating System files.
“DISM.exe /Online /Cleanup-Image /Restorehealth” is a very important and helpful Window command!
I hope you found this Itechguide helpful?
You could ask a question, leave a comment or provide feedback with the “Leave a Reply” form found towards the end of this page.
Finally, for more Itechguides like this, visit our Windows & Linux Explained page.
Fixed: DISM Error 87 on Windows 10
Contents:
DISM Error 87 Overview
So long as there are any missing or corrupted Windows images or there is a need to repair Windows 10 update errors, users are prone to run the image repairing tool-DISM. While recently, according to your reports, many of you are encountering cannot clean up Windows 10 image – Error: 87. The DISM log file can be found at C:WINDOWSLogsDISMdism.log.
Often, after SFC command sfc/scannow doesn’t work or fails to fix Windows file errors, you start to take advantage of DISM, and usually, it would take you 20 or more minutes to use DISM /restorehealth, but the error is you just stumble upon error 87 DISM the parameter is incorrect.
Or what you hit upon may be DISM error code 112, 11, 50, 2, 3, 87, 1910, 0x800f081f. Anyway, once DISM failed after Windows updates or whenever, you would find it hard to fix many system image issues, thus numerous system crashes, such as black screen with cursor. Now try to get down to resolving this DISM cleanup-image error 87 for Windows 10.
What is DISM?
Preinstalled on Windows 8.1 and Windows 10, Windows Deployment Imaging Servicing Management (DISM) is dedicated to repairing and preparing Windows images, including Windows Recovery Environment, Windows Setup, and Windows PE. And one the other hand, DISM also serves to fix the recovery images of Windows system and Virtual hard disk on Windows 10.
Specifically, working as a system management tool, DISM often comes into play while you are unable to solve the Windows errors using the SFC (System File Checker). It is also used to correct the problematic files, thus enabling the SFC. That is how you use DISM to fix SFC can’t work error on Windows 10.
Having known well about the DISM tool, it is time to deal with the error occurring to it, like DISM error 87.
How to Fix DISM Error 87 on Windows 10?
In most cases, parameters in Command Prompt needs to be absolutely correct, otherwise, it will show you the command is unknown and warns you of an error.
And for another thing, as per the normal situations, users won’t get into DISM cleanup-image error 87 when using DISM /CheckHealth or DISM / ScanHealth, this error 87 DISM or code 50 or 0x800f081f is unique to DISM /RestoreHealth. The reason lies in that DISM will use Windows 10 update to download the files necessary for repairing corrupted images or files. Hence, DISM can run into issues can be somewhat a Windows 10 update error.
Based on the culprits above, you may as well determine to fix the DISM restore health failed with error 87, 2, 50, 0x800f081f as soon as possible.
Solutions:
Solution 1: Use DISM Command-line Utility Correctly
In line with experiment, if you execute command DISM/Online /Cleanup-Image /RestoreHealth instead of DISM /Online /Cleanup-Image /RestoreHealth, error 87 will pop up, making you unable to use DISM to fix Windows image problem successfully.
So in the first place, you would better learn how to use DISM command-line utility on Windows 10.
1. Search in the search bar Command Prompt and then right click it to Run as administrator.
2. In Command Prompt with administrative privileges, enter the commands below one by one and then press Enter key to run DISM tool.
DISM /Online /Cleanup-Image /CheckHealth
DISM /Online /Cleanup-Image /ScanHealth
DISM /Online /Cleanup-Image /RestoreHealth
Do make sure there is a space between every DISM and /.
As long as there is no DISM incorrect parameter, even a blank space will cause Windows 10 to error code 87 for Deployment Imaging Servicing Management.
Tips: What are DISM Commands Used for?
In short, there are mainly three DISM commands.
DISM /Online /Cleanup-Image /CheckHealth is designed for checking the detected files.
DISM /Online /Cleanup-Image /ScanHealth aims to scan for the corrupted files or Windows images.
DISM /Online /Cleanup-Image /RestoreHealth affords to repair the damaged files.
After DISM finished its working, you will get to know the image version and whether there is component corruption on Windows 10. If possible DISM Restore Health will help you get rid of the corrupted files and images.
Solution 2: Revert Windows Update and Clear Component Store
Apart from the incorrect parameter for DISM, Windows update issues are also to blame as DISM will evoke it to supply files for fixing corruptions.
On this occasion, you would better convert the updated Windows 10 to its previous one and then clean up the component store which supports Windows updates, installations, and configurations.
1. In Command Prompt, copy and paste the following command and then hit Enter to revert Windows 10 updates.
dism.exe /image:C: /cleanup-image /revertpendingactions
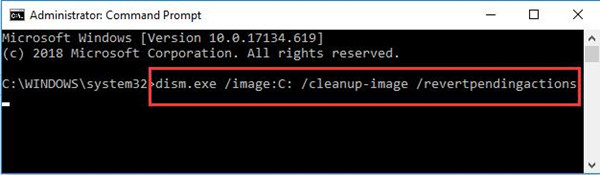
That will revert all the pending actions, such as Windows 10 updates.
After that, you are supposed to reboot your PC to take effect. Or if possible, it is feasible to enter the safe mode to fix the DISM error 87 or 0x800f081f.
2. Then again in Command Prompt, run the command below to clean up the component store corruptions.
dism.exe /online /Cleanup-Image /StartComponentCleanup
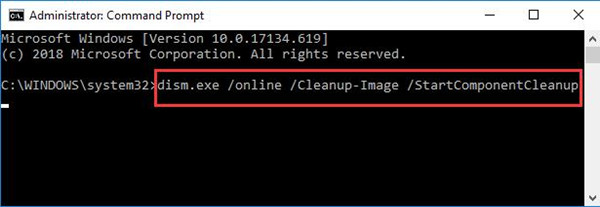
3. Reboot Windows 10 again.
The WinSxS folder where the component store and also some the potentially corrupted files locate will be cleaned up.
You are likely now able to run DISM cleanup well on Windows 10. And it is suggestible that you manage to run SFC, you will find the System File Checker tool can work as normal as well.
Solution 3: Run Windows Update Troubleshooter
After all, DISM error 87 or 2, 50, 87 can be relevant to Windows 10 updates. There is a high probability that Windows embedded troubleshooter will fix this cleanup error.
1. Head to Start > Settings > Update & Security.
2. Under Troubleshoot, find out Windows Update and then click Run the troubleshooter.
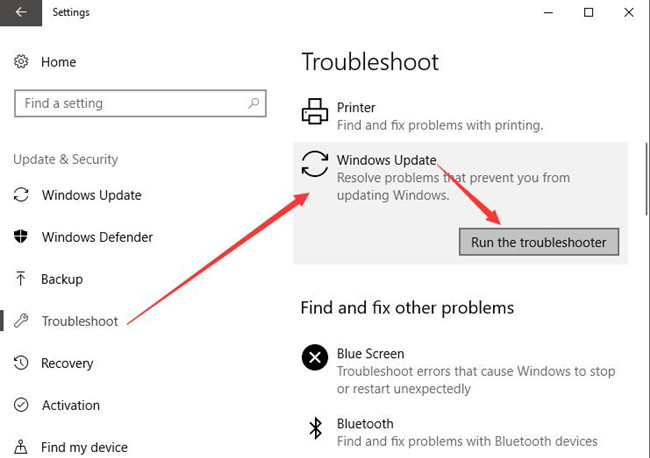
It will take some time for Windows 10 to troubleshoot the DISM cleanup issues in Windows system installation.
Then you might as well make attempt to perform SFC to see whether it can scan for corruptions now.
Solution 4: Use Source Options
As discussed above, the error 87 DISM can be caused due to the files from Windows update. Here you are capable of making full use of the /Source options to store the non-corrupted files.
Then these good filed can be utilized to fix the corruptions, in doing so, there is no need to update Windows 10 in order to get the required files for DISM cleanup tool.
To activate the /Source options, you need to:
1. Prepare a copy of wim file from another PC, and download Windows 10 ISO files.
2. Make sure the source of the good files match those files on your system in version, edition, and language.
Once you copied, start to use the source options to restore the infected files on Windows 10 in case DISM 87 error appears again.
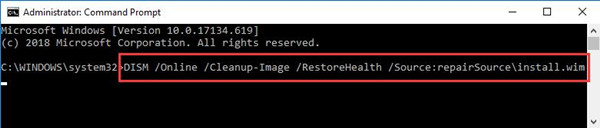
3. In Command Prompt, copy the following command and then execute it.
DISM /Online /Cleanup-Image /RestoreHealth /Source:repairSourceinstall.wim
That will repair the files without Windows update, in this way, DISM can work without meeting the broken Windows update files.
5. Or you can limit the use of Windows update by running the command below.
DISM.exe /Online /Cleanup-Image /RestoreHealth /Source:C:RepairSourceWindows /LimitAccess
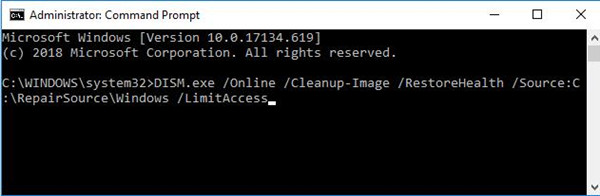
Here if you stored the good files in other locations, you need to replace C:RepairSource with D:RepairSource or any other paths.
6. Restart your PC to take effect.
From then on, DISM will start repairing the missing or corrupted files without using Windows 10 updates to provide the repairing files. You can attempt to run DISM command again to check if it will also inform you of error 87 and DISM log files not found.
All in all, no matter you are plagued by DISM error 87, or 2, 50, 87 or whatever, you are required to enter the correct parameter and avoid the corruptions from Windows 10 updates. And in this case, you can use DISM to fix SFC can’t work on Windows 10.
- Remove From My Forums
-
Вопрос
-
Добрый день, на одном из клиентских компьютеров перестали устанавливаться обновления (Windows 7 x64). Решил проверить sfc /scannow — не удается запустить проверку. Пробую DISM:
DISM /Online /Cleanup-Image /RestoreHealth
Cистема DISM
Версия: 6.1.7600.16385Версия образа: 6.1.7600.16385
Ошибка: 87
Неизвестный параметр cleanup-image.
Для получения дополнительных сведений выполните команду «DISM.exe /?».Что такое происходит с системой? Как вернуть в нормальное состояние? Проверил на вирусы — вроде бы все чисто.
Ответы
-
Переустановка будет быстрее. Искать неисправность имеет смысл, если для Вас важна причина этой неисправности и есть время на поиски.
-
Помечено в качестве ответа
1 февраля 2018 г. 7:57
-
Помечено в качестве ответа