Вы можете настроить мышь различными способами в Windows. Например, вы можете переключить функции кнопок мыши, сделать указатель более заметным и изменить скорость прокрутки колесика мыши.
-
Откройте окно свойств: нажмите кнопку Пуск ,
и выберите пункт Панель управления. В поле поиска введите мышь и выберите элемент Мышь.
-
Перейдите на вкладку Кнопки мыши и выполните любое из следующих действий:
-
Чтобы поменять функции правой и левой кнопок мыши, в разделе Конфигурация кнопок установите флажок Обменять назначение кнопок.
-
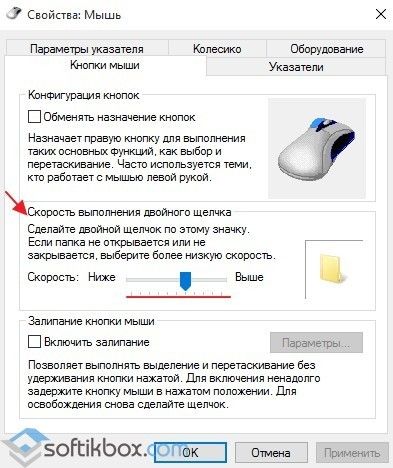
Чтобы изменить скорость выполнения двойного щелчка, в разделе Скорость выполнения двойного щелчка переместите ползунок Скорость к значению Ниже или Выше.
-
Чтобы включить залипание кнопки мыши, которое позволяет выделять или перетаскивать элементы, не удерживая кнопку мыши, в разделе Залипание кнопки мыши установите флажок Включить залипание.
-
-
Нажмите кнопку ОК.
-
Откройте окно свойств: нажмите кнопку Пуск ,
и выберите пункт Панель управления. В поле поиска введите мышь и выберите элемент Мышь.
-
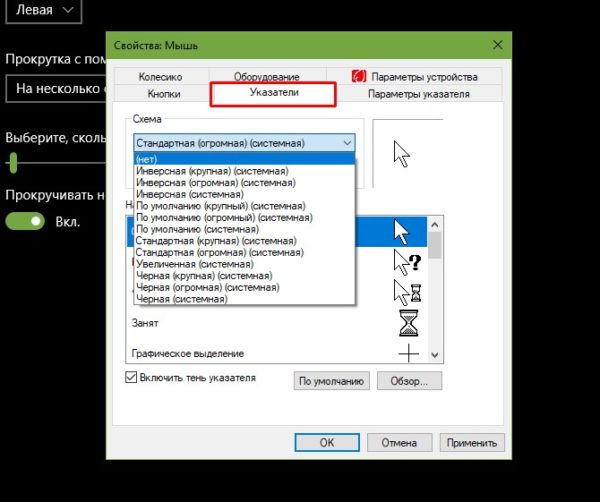
Перейдите на вкладку Указатели и выполните одно из следующих действий:
-
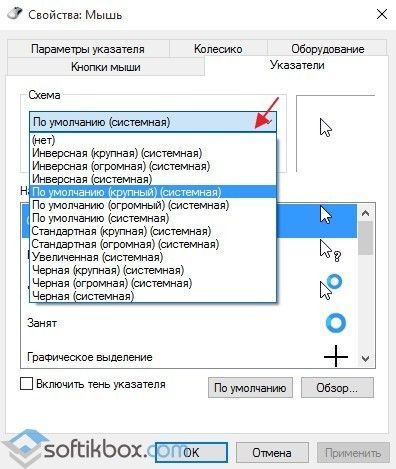
Чтобы изменить внешний вид всех указателей, в раскрывающемся списке Схема выберите новую схему.
-
Чтобы изменить отдельный указатель, в списке Настройка выберите указатель, нажмите кнопку Обзор, выберите нужный указатель и нажмите кнопку Открыть.
-
-
Нажмите кнопку ОК.
-
Откройте окно свойств: нажмите кнопку Пуск ,
и выберите пункт Панель управления. В поле поиска введите мышь и выберите элемент Мышь.
-
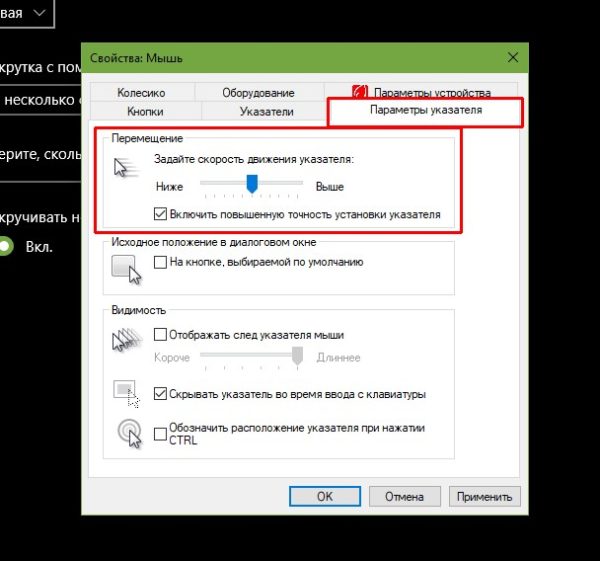
Перейдите на вкладку Параметры указателя и выполните любое из следующих действий:
-
Чтобы изменить скорость перемещения указателя, в разделе Перемещение переместите ползунок Задайте скорость движения указателя к значению Ниже или Выше.
-
Чтобы указатель работал точнее при медленном перемещении мыши, в разделе Перемещение установите флажок Включить повышенную точность установки указателя.
-
Чтобы ускорить выбор элементов в диалоговом окне, в разделе Исходное положение в диалоговом окне установите флажок На кнопке, выбираемой по умолчанию. (Не все программы поддерживают этот параметр. В некоторых программах необходимо переместить указатель мыши к нужной кнопке).
-
Чтобы указатель было заметнее при перемещении, в разделе Видимость установите флажок Отображать след указателя мыши и перетащите ползунок к значению Короче или Длиннее, чтобы уменьшить или увеличить след указателя.
-
Чтобы указатель не мешал при вводе текста, в разделе Видимость установите флажок Скрывать указатель во время ввода с клавиатуры.
-
Чтобы указатель можно было найти, нажав клавишу Ctrl, в разделе Видимость установите флажок Обозначить расположение указателя при нажатии CTRL.
-
-
Нажмите кнопку ОК.
-
Откройте окно свойств: нажмите кнопку Пуск ,
и выберите пункт Панель управления. В поле поиска введите мышь и выберите элемент Мышь.
-
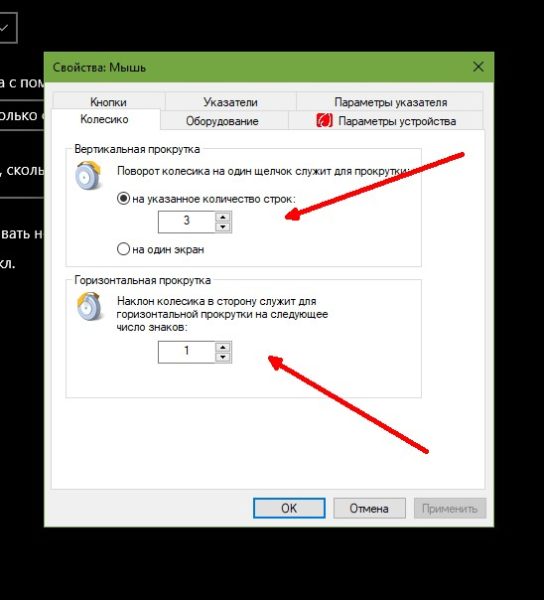
Перейдите на вкладку Колесико и выполните одно из следующих действий:
-
Чтобы задать количество строк, прокручиваемое одним движением колесика мыши, в разделе Вертикальная прокрутка выберите на указанное количество строк, а затем введите нужное количество строк.
-
Чтобы прокручивать весь экран одним движением колесика, в разделе Вертикальная прокрутка выберите на один экран.
-
Если колесико мыши поддерживает горизонтальную прокрутку, в разделе Горизонтальная прокрутка, в поле Наклон колесика в сторону служит для горизонтальной прокрутки на следующее число знаков, введите количество символов, прокручиваемое при наклоне колесика влево или вправо.
-
-
Нажмите кнопку ОК.
Нужна дополнительная помощь?

В этой пошаговой инструкции для начинающих подробно о том, как настроить чувствительность мыши в Windows 11 и Windows 10 в Параметрах и Панели управления, а также кратко о фирменных утилитах от производителей, которые также позволяют уменьшить или увеличить её.
Как изменить чувствительность мыши в Параметрах
Первый способ настройки чувствительности мыши — использования интерфейса «Параметры». В Windows 11 шаги будут следующими:
- Откройте Параметры (можно нажать клавиши Win+I), а в них — раздел «Bluetooth и устройства».
- Откройте пункт «Мышь».
- Измените «Скорость указателя мыши», передвигая ползунок мышью. При желании ниже вы также можете изменить скорость прокрутки страниц колесиком.
В Windows 10 действия очень похожи:
- Откройте «Параметры» и перейдите в раздел «Устройства».
- В списке слева выберите пункт «Мышь».
- Измените значение «Скорость курсора», передвигая его вправо для увеличения скорости или влево для её уменьшения.
Настройка скорости указателя мыши в Панели управления
Второй способ — настройка чувствительности мыши в Панели управления:
- Откройте Панель управления. Для этого можно использовать поиск на панели задач. Подробнее: Как открыть панель управления Windows 11, Как открыть панель управления Windows 10.
- Убедитесь, что в поле «Просмотр» панели управления установлено «Значки» и откройте пункт «Мышь».
- В следующем окне перейдите на вкладку «Параметры указателя» и задайте скорость движения указателя — ниже или выше.
- Примените настройки
Выполняемые изменения применяются сразу, то есть после каждого изменения чувствительности, ещё до их применения, вы можете проверить, подходят ли они вам.
Программы с возможностью изменения чувствительности мыши
Описанные выше методы изменения чувствительности мыши — это всё, что может предложить Windows 11 и Windows 10, если говорить о встроенных средствах системы.
Однако, для многих «продвинутых» мышей, особенно игровых, производители выпускают собственные бесплатные программы для настройки, позволяющие настраивать чувствительность и другие параметры мыши, например:
- Logitech G Hub для игровых мышей Logitech, или Logitech Options для «обычных» мышек
- Razer Synapse
- SteelSeries Engine
- Corsair iCUE
- Центр управления мышью и клавиатурой для устройств Microsoft
Обычно такое ПО доступно на официальном сайте производителя вашей мыши в разделе «Поддержка», а в некоторых случаях скачивается и устанавливается Windows автоматически.
Вы можете настроить мышь различными способами в Windows. Например, вы можете переключить функции кнопок мыши, сделать указатель более заметным и изменить скорость прокрутки колесика мыши.
-
Откройте окно свойств: нажмите кнопку Пуск ,
и выберите пункт Панель управления. В поле поиска введите мышь и выберите элемент Мышь.
-
Перейдите на вкладку Кнопки мыши и выполните любое из следующих действий:
-
Чтобы поменять функции правой и левой кнопок мыши, в разделе Конфигурация кнопок установите флажок Обменять назначение кнопок.
-
Чтобы изменить скорость выполнения двойного щелчка, в разделе Скорость выполнения двойного щелчка переместите ползунок Скорость к значению Ниже или Выше.
-
Чтобы включить залипание кнопки мыши, которое позволяет выделять или перетаскивать элементы, не удерживая кнопку мыши, в разделе Залипание кнопки мыши установите флажок Включить залипание.
-
-
Нажмите кнопку ОК.
-
Откройте окно свойств: нажмите кнопку Пуск ,
и выберите пункт Панель управления. В поле поиска введите мышь и выберите элемент Мышь.
-
Перейдите на вкладку Указатели и выполните одно из следующих действий:
-
Чтобы изменить внешний вид всех указателей, в раскрывающемся списке Схема выберите новую схему.
-
Чтобы изменить отдельный указатель, в списке Настройка выберите указатель, нажмите кнопку Обзор, выберите нужный указатель и нажмите кнопку Открыть.
-
-
Нажмите кнопку ОК.
-
Откройте окно свойств: нажмите кнопку Пуск ,
и выберите пункт Панель управления. В поле поиска введите мышь и выберите элемент Мышь.
-
Перейдите на вкладку Параметры указателя и выполните любое из следующих действий:
-
Чтобы изменить скорость перемещения указателя, в разделе Перемещение переместите ползунок Задайте скорость движения указателя к значению Ниже или Выше.
-
Чтобы указатель работал точнее при медленном перемещении мыши, в разделе Перемещение установите флажок Включить повышенную точность установки указателя.
-
Чтобы ускорить выбор элементов в диалоговом окне, в разделе Исходное положение в диалоговом окне установите флажок На кнопке, выбираемой по умолчанию. (Не все программы поддерживают этот параметр. В некоторых программах необходимо переместить указатель мыши к нужной кнопке).
-
Чтобы указатель было заметнее при перемещении, в разделе Видимость установите флажок Отображать след указателя мыши и перетащите ползунок к значению Короче или Длиннее, чтобы уменьшить или увеличить след указателя.
-
Чтобы указатель не мешал при вводе текста, в разделе Видимость установите флажок Скрывать указатель во время ввода с клавиатуры.
-
Чтобы указатель можно было найти, нажав клавишу Ctrl, в разделе Видимость установите флажок Обозначить расположение указателя при нажатии CTRL.
-
-
Нажмите кнопку ОК.
-
Откройте окно свойств: нажмите кнопку Пуск ,
и выберите пункт Панель управления. В поле поиска введите мышь и выберите элемент Мышь.
-
Перейдите на вкладку Колесико и выполните одно из следующих действий:
-
Чтобы задать количество строк, прокручиваемое одним движением колесика мыши, в разделе Вертикальная прокрутка выберите на указанное количество строк, а затем введите нужное количество строк.
-
Чтобы прокручивать весь экран одним движением колесика, в разделе Вертикальная прокрутка выберите на один экран.
-
Если колесико мыши поддерживает горизонтальную прокрутку, в разделе Горизонтальная прокрутка, в поле Наклон колесика в сторону служит для горизонтальной прокрутки на следующее число знаков, введите количество символов, прокручиваемое при наклоне колесика влево или вправо.
-
-
Нажмите кнопку ОК.
Нужна дополнительная помощь?

В этой пошаговой инструкции для начинающих подробно о том, как настроить чувствительность мыши в Windows 11 и Windows 10 в Параметрах и Панели управления, а также кратко о фирменных утилитах от производителей, которые также позволяют уменьшить или увеличить её.
Как изменить чувствительность мыши в Параметрах
Первый способ настройки чувствительности мыши — использования интерфейса «Параметры». В Windows 11 шаги будут следующими:
- Откройте Параметры (можно нажать клавиши Win+I), а в них — раздел «Bluetooth и устройства».
- Откройте пункт «Мышь».
- Измените «Скорость указателя мыши», передвигая ползунок мышью. При желании ниже вы также можете изменить скорость прокрутки страниц колесиком.
В Windows 10 действия очень похожи:
- Откройте «Параметры» и перейдите в раздел «Устройства».
- В списке слева выберите пункт «Мышь».
- Измените значение «Скорость курсора», передвигая его вправо для увеличения скорости или влево для её уменьшения.
Настройка скорости указателя мыши в Панели управления
Второй способ — настройка чувствительности мыши в Панели управления:
- Откройте Панель управления. Для этого можно использовать поиск на панели задач. Подробнее: Как открыть панель управления Windows 11, Как открыть панель управления Windows 10.
- Убедитесь, что в поле «Просмотр» панели управления установлено «Значки» и откройте пункт «Мышь».
- В следующем окне перейдите на вкладку «Параметры указателя» и задайте скорость движения указателя — ниже или выше.
- Примените настройки
Выполняемые изменения применяются сразу, то есть после каждого изменения чувствительности, ещё до их применения, вы можете проверить, подходят ли они вам.
Программы с возможностью изменения чувствительности мыши
Описанные выше методы изменения чувствительности мыши — это всё, что может предложить Windows 11 и Windows 10, если говорить о встроенных средствах системы.
Однако, для многих «продвинутых» мышей, особенно игровых, производители выпускают собственные бесплатные программы для настройки, позволяющие настраивать чувствительность и другие параметры мыши, например:
- Logitech G Hub для игровых мышей Logitech, или Logitech Options для «обычных» мышек
- Razer Synapse
- SteelSeries Engine
- Corsair iCUE
- Центр управления мышью и клавиатурой для устройств Microsoft
Обычно такое ПО доступно на официальном сайте производителя вашей мыши в разделе «Поддержка», а в некоторых случаях скачивается и устанавливается Windows автоматически.
Содержание
- Настраиваем чувствительность мыши в Windows 10
- Способ 1: Фирменное программное обеспечение
- Способ 2: Встроенное средство Windows
- Вопросы и ответы
Компьютерная мышь — одно из основных периферийных устройств, используемое для ввода информации. Она есть у каждого владельца ПК и активно используется каждый день. Правильное конфигурирование оборудования поможет упростить работу, а каждый юзер подстраивает все параметры индивидуально под себя. Сегодня мы бы хотели рассказать о настройке чувствительности (скорости передвижения указателя) мышки в операционной системе Windows 10.
Читайте также: Как подключить беспроводную мышь к компьютеру
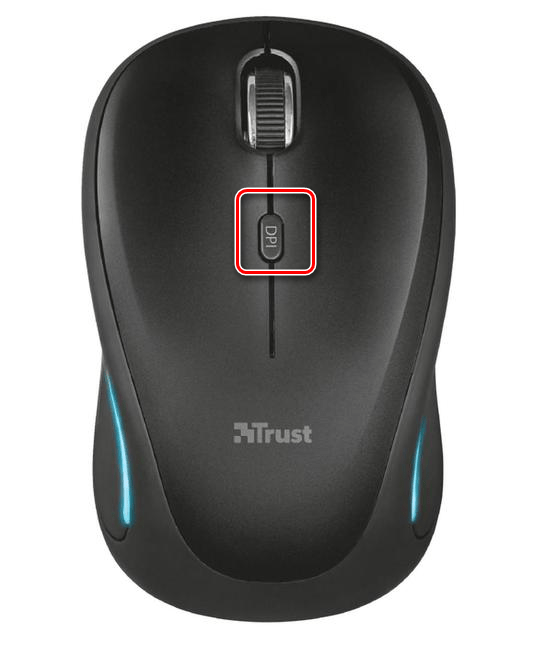
Не всегда установленные по умолчанию параметры устраивают пользователя, поскольку размеры мониторов и привычки к скорости у всех отличаются. Поэтому редактированием чувствительности занимаются многие. Сделать это можно различными способами, а в первую очередь внимание стоит обратить на наличие соответствующей кнопки на самой мышке. Обычно она располагается по центру и иногда имеет выбитую надпись «DPI». То есть, количество DPI и определяет скорость передвижения курсора по экрану. Попробуйте нажать несколько раз на эту кнопку, если она у вас присутствует, возможно, один из встроенных профилей окажется подходящим, тогда ничего изменять в системе не нужно.
Читайте также: Как выбрать мышь для компьютера
В противном случае придется воспользоваться средством от разработчиков устройства или задействовать настройки самой ОС. Давайте детально рассмотрим каждый метод.
Способ 1: Фирменное программное обеспечение
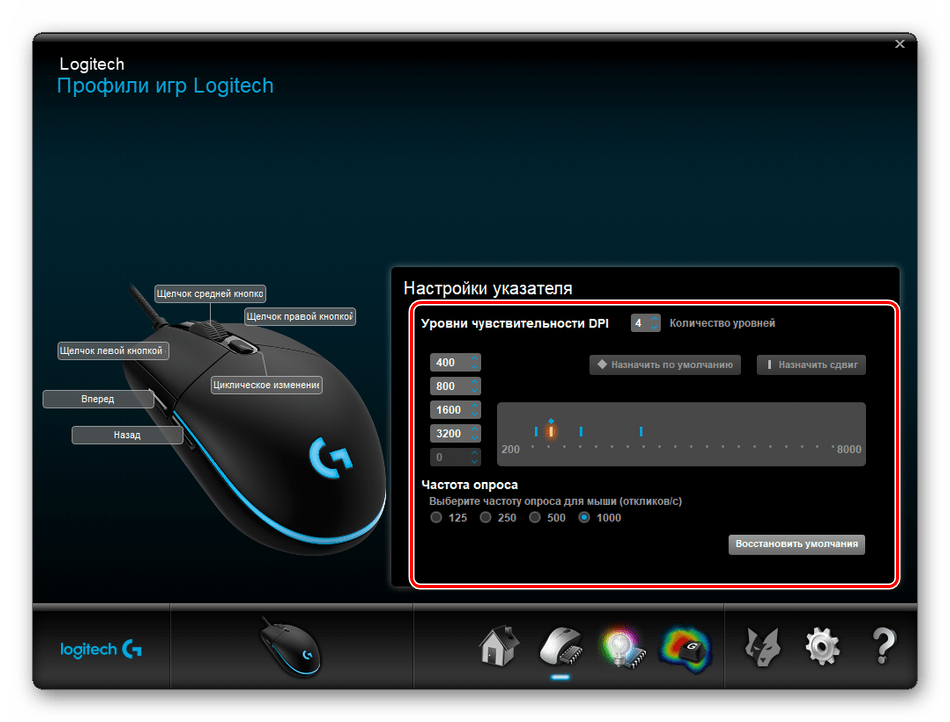
Ранее фирменное программное обеспечение разрабатывалось только для некоторых игровых девайсов, а у офисных мышей не было даже такой функции, которая позволяла бы регулировать чувствительность. На сегодняшний день такого ПО стало больше, однако на дешевые модели оно все еще не распространяется. Если вы владеете геймерским или дорогим оборудованием, скорость изменить можно следующим образом:
- Откройте официальную страницу производителя устройства в интернете и отыщите там необходимый софт.
- Скачайте его и запустите установщик.
- Пройдите простую процедуру инсталляции, следуя указанным инструкциям в самом Мастере.
- Запустите программу и переходите в раздел настройки мыши.
- Конфигурация указателя осуществляется достаточно просто — передвигайте ползунок скорости или определите один из заготовленных профилей. Далее останется только проверить, насколько выбранное значение вам подходит, и сохранить результат.
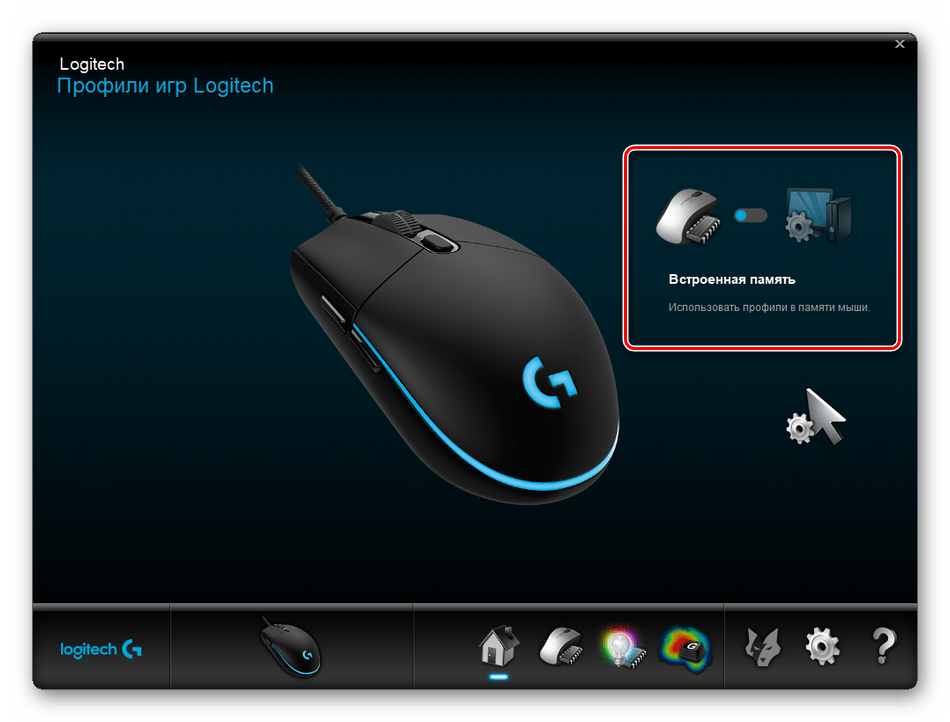
- В таких мышках обычно есть встроенная память. Она может хранить несколько профилей. Делайте все изменения именно во встроенной памяти, если хотите подключить это оборудование к другому компьютеру без сброса чувствительности на стандартное значение.
Способ 2: Встроенное средство Windows
Теперь давайте затронем те ситуации, когда у вас нет кнопки переключения DPI и фирменного софта. В таких случаях конфигурация происходит через инструменты Виндовс 10. Изменить рассматриваемые параметры можно так:
- Откройте «Панель управления» через меню «Пуск».
- Перейдите в раздел «Мышь».
- Во вкладке «Параметры указателя» укажите скорость, перемещая ползунок. Отметить стоит и «Включить повышенную точность установки указателя» — это вспомогательная функция, проводящая автоматическую доводку курсора до объекта. Если вы играете в игры, где необходима точность наводки, рекомендуется отключать этот параметр, чтобы не происходило случайных отклонений от цели. После всех настроек не забудьте применить изменения.

Помимо такого редактирования вам доступно изменение скорости прокрутки колесиком, что также можно отнести к теме про чувствительность. Корректируется данный пункт так:
- Откройте меню «Параметры» любым удобным методом.
- Переключитесь в раздел «Устройства».
- На панели слева выберите «Мышь» и передвиньте ползунок на подходящее значение.

Вот таким нехитрым образом изменяется количество прокручиваемых строк за один раз.
На этом наше руководство подходит к концу. Как видите, изменяется чувствительность мыши буквально за несколько кликов несколькими способами. Каждый из них будет наиболее подходящим для разных пользователей. Надеемся, у вас не возникло трудностей с редактированием скорости и теперь работать за компьютером стало легче.
Читайте также:
Проверка компьютерной мыши с помощью онлайн-сервисов
Программы для настройки мыши
Еще статьи по данной теме:
Помогла ли Вам статья?
08.09.2017
Просмотров: 16444
Пользуясь стационарным ПК или ноутбуков, пользователи Windows 10 используют мышь для выполнения различного рода операций. Однако бывают случаи, когда устройство с запозданием реагирует на действия пользователя или наоборот.
Чтобы правильно настроить кнопки мыши необходимо установить оптимальную чувствительность курсора, скорость его перемещения, резкость и «подкрутить» колесико, возможности которого не все используют в полной мере. При этом нужно не забыть о левой и правой инверсии, частотности отклика. Задав корректные настройки мыши в Windows 10, комфортность её использования будет гарантирована.
Читайте также: Как настроить мышку в Windows 10 и изменить курсор?
Настройки мыши через Параметры Windows 10
Способов, как настроить чувствительность мыши на Виндовс 10 не так много. Первый метод – это использование возможностей раздела «Параметры». Настройка в данном случае будет следующей:
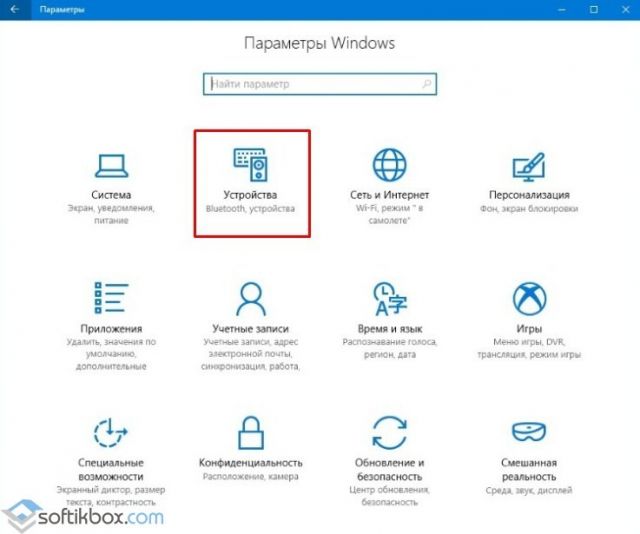
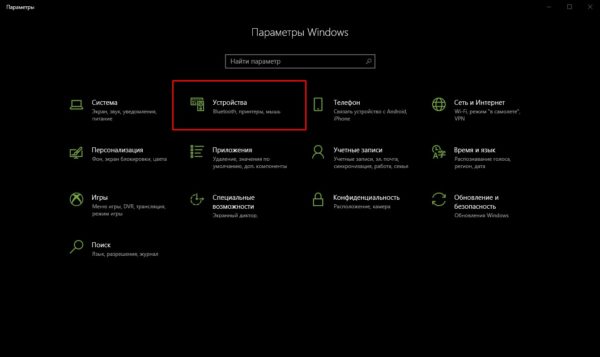
- Жмём «Пуск» и выбираем «Параметры». Откроется новое окно. Выбираем раздел «Устройства».
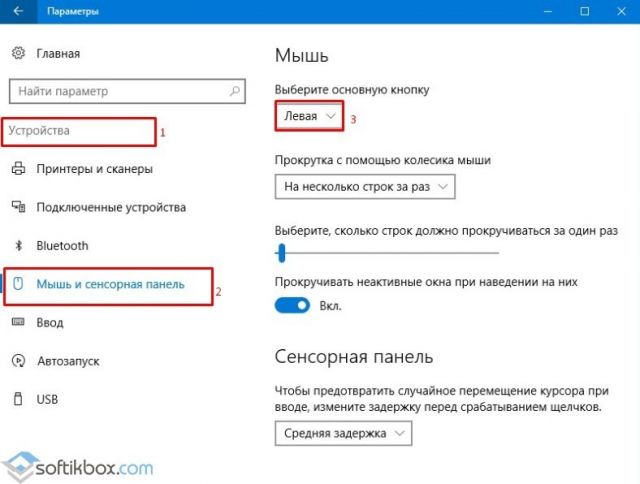
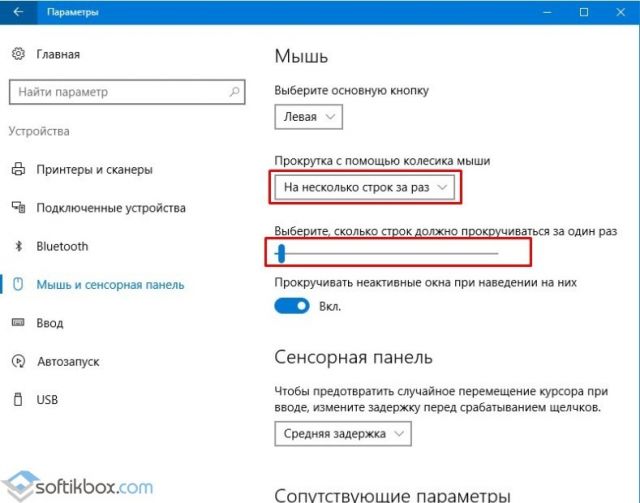
- В меню слева выбираем «Мышь и сенсорная панель». Здесь нужно будет задать несколько настроек. Первый – установить левую кнопку основной.
- Если задать для колесика прокрутки параметр «На несколько строк зараз», то ползунок ниже станет активным. Можем выставить количество прокручиваемых строк. Лучше задать небольшое количество, чтобы контент на сайте не проскакивал. Также рекомендуем задать прокрутку неактивных окон.
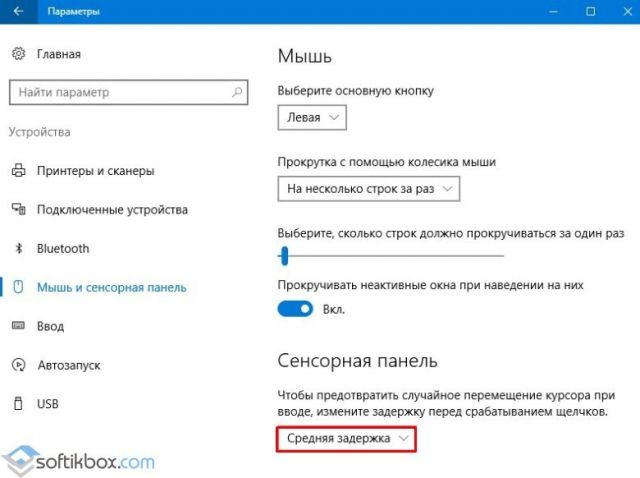
- Следующий пункт относится только к тачпаду. Нажав на выпадающее меню, можно выбрать задержку для сенсорной панели. В данном случае мы выбрали «Среднюю», хотя задержку можно вовсе отключить.
На этом настройка работы мышки через раздел «Параметры» на Windows 10 завершена.
Настройка чувствительности мыши на Windows 10 через Панель управления
Если ваша мышка не работает так как нужно, настроить её работу можно через «Панель управления». Для этого стоит выполнить следующее:
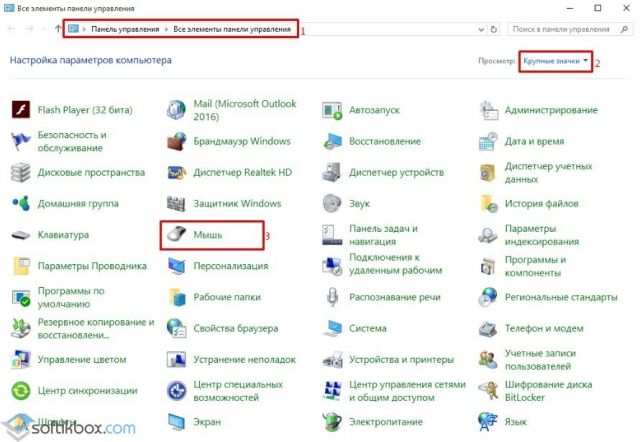
- Нажимаем правой кнопкой мыши на кнопке «Пуск» и выбираем «Панель управления».
- Откроется новое окно. Настраивать чувствительности мыши будем через раздел «Мышь».
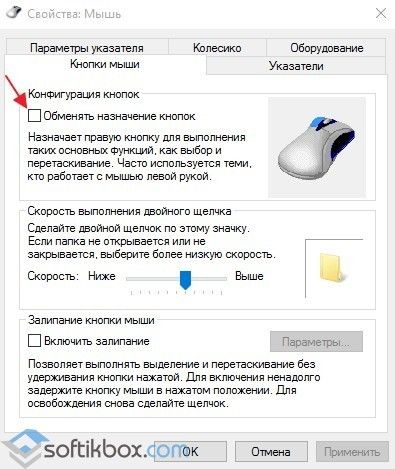
- Переходим во вкладку «Кнопка мыши». Здесь даны несколько параметров. Если поставить отметку «Обменять назначение кнопок», левая кнопка мыши будет отвечать за действия правой и наоборот.
- Далее переходим к скорости выполнения двойного щелчка. Перетаскиваем ползунок в нужное положение, чтобы отрегулировать параметр.
- В этом же окне будет и параметр «Залипание мыши». Однако этот параметр мы не рекомендуем трогать.
- Переходим во вкладку «Указатель». Выбираем тип значка мыши.
- Самая важная вкладка — «Параметры указателя», хранит настройки резкости, скорости перемещения курсора мышки. Здесь ставим отметку «Включить повышенную точность указателя мыши» и перетаскиваем ползунок в нужное положение.
- Сохраняем результат и проверяем мышку на работоспособность.
Важно отметить, что чувствительность мыши также зависит от мощности ПК. Если у вас слабый ПК, то мышка будет тормозить.
О том, как еще отрегулировать чувствительность мыши смотрите в видео:
DPI mouse (dpi stands for dots-per-second) indicator is used to test your mouse’s sensitivity, enabling you to adjust your mouse’s cursor speed by adjusting how many pixels per second it moves. Understanding your DPI is particularly useful when playing video games or using software where you want to be precise when placing your cursor. It also makes it much easier to use widescreen monitors and multiple displays.
Generally, DPI mouse is the standard used to measure the mouse sensitivity, expressed as the number of DPIs (dots per linear inch) that a device can detect. By changing the DPI, you can instantly adjust pointer speed for precision tasks, such as in-game targeting or photo editing.
This article will present how you can check your mouse DPI and change it on Windows 10.
What is the DPI Mouse?
A mouse’s DPI is the standard used to measure the mouse sensitivity, expressed as the number of DPIs (dpi stands for dots per linear inch) that a device can detect. By changing the DPI count, you can instantly adjust the mouse cursor or pointer speed for precision tasks, such as in-game targeting or photo editing.
Mouse DPI is also a measurement used to show how many pixels your mouse can move when you move your mouse cursor one inch. For example, if your mouse has 1600 DPI (low dpi mice), moving it exactly one inch (2.54 cm) will move the cursor to 1600 pixels on your screen.
The higher your DPI (dots per inch), the more sensitive your mouse is. For example, any modern gaming mouse has high dpi standards of up to 20,000 on high dpi mice. This may seem unpleasant. However, many people using large or multiple displays love being able to move the cursor faster or improve cursor speed.
While most people aren’t concerned about DPI count, it’s important for those playing video games. Especially in First Person Shooter (FPS) titles, many theorize about the perfect DPI setting to aim precisely.
Below are several ways to change your DPI settings, then check your current DPI to remember which setting works best.
How to change your Mouse DPI in Windows 10
So, How do I change mouse sensitivity (DPI)?
Many people want to modify their current DPI setting to achieve higher or lower sensitivity. You can gain more comfort and operate your device better. Having perfect sensitivity allows you to get things done better and enjoy your gaming experience even more.
The process of changing your mouse’s DPI (dots per inch) varies based on your type of mouse. Office mice usually have no more than two buttons — the left and right mouse buttons, — whereas a dedicated gaming mouse has somewhere between 4 and 8 buttons.
If your mouse has DPI on-the-fly buttons, press one of the DPI On-the-fly buttons to create new settings for each DPI button. The mouse LCD will briefly display the new DPI setting. On the other hand, if your mouse doesn’t have DPI on-the-fly buttons, start Microsoft Mouse and Keyboard Center, select the mouse you are using, click basic settings, locate Sensitivity, make your changes.
Let’s look at this in detail below:
Method #1: Change sensitivity of mouse in the Settings app
This method mostly applies to mice with no dedicated DPI button. Luckily, the Windows 10 developers didn’t forget people who use simpler computer mice and gave everyone the option to switch mouse dpi, hence their sensitivity easily.
Note: While you won’t know the exact number right away, you can use the methods described in the next section to determine your new DPI (dots per inch). You can switch dpi to a higher dpi or lower it.
Using the Windows Settings app, you can easily adjust your DPI settings and levels.
- Click on the Windows icon in the bottom-left of your screen to bring up the Start menu, then choose “Settings app.” You can also use the Windows + I keyboard shortcut to go to the settings app.
- Click on the “Devices” tile.
- Switch to the “Mouse” tab using the left-side panel.
- Click on the “Additional mouse options” link at the bottom of the page or in the right-side panel.
- Switch to the “Pointer Options” tab using the header menu of the Mouse Properties window.
- Adjust the speed of your mouse with the slider under ‘Motion’ on high-resolution screen. Moving the slider head to the left will make your mouse slower while moving it to the right will increase its speed.
- We recommend turning off the “Enhance pointer precision” setting, as it’s capable of messing up your DPI.
- Click the OK button. You should immediately see the change in mouse speed when you try to scroll the mouse cursor and see the cursor speed.
Method #2: Adjust sensitivity in the video game itself
Many video games allow you to adjust your sensitivity in-game and adjust it to a higher dpi or lower it. This allows you to use one general DPI for operating your system normally, then set up different sensitivity settings for different games.
While the setting is located in different menus for each game, you can generally follow these steps to find where you can change your in-game mouse scrolling sensitivity.
- Launch the game you want to change your sensitivity in and wait for it to load entirely.
- Locate the menu that says either “Options” or “Settings,” usually available from the title screen.
- You should be able to locate a menu that says “Controls.” If this menu is missing, chances are that you can’t directly adjust the sensitivity of the mouse from the game you opened.
- Look for the sensitivity slider and adjust it until you feel comfortable with the speed.
Method #3: Use the DPI changer button on your gaming mice
Any gaming mouse has a button dedicated to changing your DPI on-the-fly, which you can adjust to higher dpi or lower. You can adjust your DPI between various presets, which may or may not be customizable depending on your mouse, no matter your application.
The DPI button is usually located below the scrolling wheel. It’s relatively small compared to the other buttons and sometimes even has the word “DPI” written on it as well.
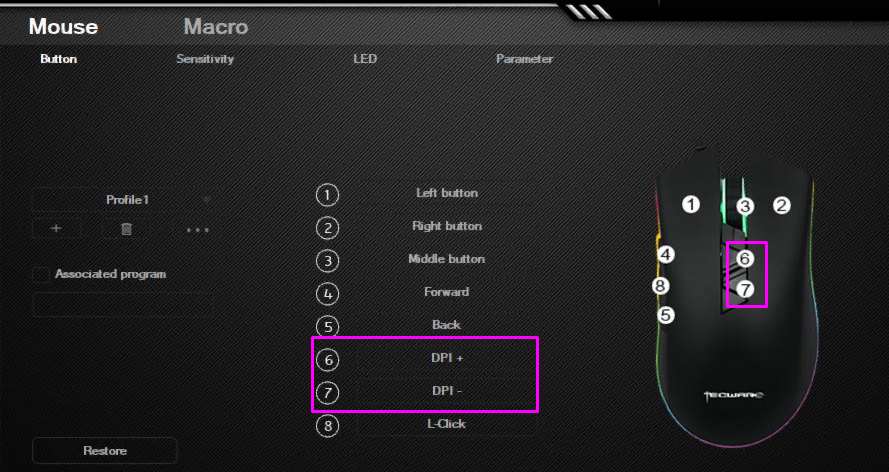
You can cycle through the preset DPI settings that gradually get higher and higher by pressing the button once. Some mice may offer two buttons to increase it to higher dpi or decrease the DPI instead of cycling. And some high dpi mice might need lowering when you change from gaming to normal work. Or use gaming mice (gaming mice are mice designed for gaming) strictly for gaming.
Unsure of which button is responsible for your DPI? We recommend searching for the box your mouse came in, which usually has visual labels for each button on your mouse. You can also hop online and start looking for your model on the manufacturer’s website.
How to check your Mouse DPI
At the moment of writing, there’s no dedicated Windows 10 application for checking your DPI that comes with the system itself. This is an issue, as many people would love to get a clear and simple understanding of their mouse gadget’s DPI.
Don’t feel discouraged, though — there are many other ways to check what DPI you’re rolling with. Simply follow our instructions below to identify and make changes to your mouse gadget’s DPI.
Method #1: Check the manufacturer’s specifications
This method mostly applies to branded mice. Most major brands list their products on a website, complete with a set of specifications and images. This is mostly used to get customers interested, however, it can help those who’ve already purchased the product as well.
In this example, we’ll look at the Razer Mamba Elite mouse and determine its DPI. This process is similar for every mouse. However, some manufacturers don’t have a website or technical information about their products.
- Head over to the manufacturer’s website. In our case, we navigated to the official Razer website.
- Use the built-in search engine to find your mouse model.
- Locate the technical specifications and check the DPI count written on the website.
If you can’t find your mouse on the manufacturer’s website, we suggest getting in touch with customer support. Many brands offer support through e-mail or the phone.
Method #2: Use Microsoft Paint
This might seem like a silly way to determine your DPI. However, it works near perfectly. Since MS Paint comes with the ability to see the pixel your cursor is at, you’re able to do a little experiment to find a somewhat accurate measurement of your DPI.
- Open MS Paint by searching for it in your taskbar or your list of applications.
- Set your zoom level to 100%.
- Select any brush tool and place your cursor to the far left of the screen. In the bottom-left, the first number should show 0.
- Hold the left mouse button and move your mouse around 2-3 inches. Look at the first number in the bottom-left without moving your mouse and note it down.
- Repeat this process multiple times, then find the average of each measurement. This is your DPI.
Method #3: Install the correct mouse drivers
Most branded computer mice and any high dpi mouse come with the manufacturer’s own driver software. This allows you to completely customize how the hardware behaves, even if it has extra buttons and features.
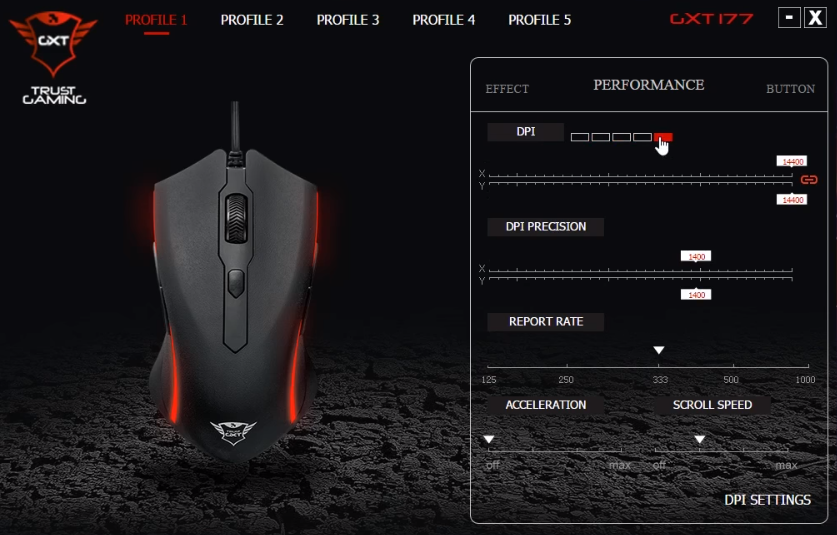
Installing the right mouse driver may give you the option to check your DPI. Again, we’ll be using a branded Trust GXT 177 Rivan RGB Gaming Mouse for this example.
- Head over to the manufacturer’s website. In our case, we navigated to the official Trust website.
- Use the search engine to find your product.
- Look for a section to download the driver software, then choose your operating system.
- Install the driver and launch the software. You should be able to locate a section dedicated to DPI settings, allowing you to see the DPI of your mouse.
Note: Not every manufacturer and mouse has dedicated driver software except on a gaming mouse. However, it’s worth checking in case you want to make personalized changes.
Conclusion
We hope this article helped you with the DPI issues on both high dpi and low dpi mice. You now know what dpi stands for (dpi stands for dots per inch) and that a mouse’s DPI is flexible — you don’t have to stick to one setting. Make sure to dedicate different mouse dpi settings or options for different activities to control cursor speed.
For more tech support and tips, visit our help center, subscribe to our email list, and receive tech updates, offers, and discounts at your comfort.
You May Also Like:
» How to Fix Mouse Lag on Windows 10
» How to Turn Off Mouse Acceleration Completely in Windows 10
» How to Fix Keyboard Typing Wrong Characters in Windows 10
» How to Fix Your Keyboard Not Working in Windows 10
»How To Change Your Mouse Cursor on Windows 10/11
Пожалуй, каждый хоть раз разочаровывался в своей мышке. Кого-то, может, не устраивал скролл (прокрутка колесиком), кого-то — скорость передвижения курсора по экрану. Левшам вообще трудно приспособиться к управлению мышкой для подавляющего большинства правшей. Но оказывается, указатель можно очень легко настроить под себя.
В стандартных настройках Windows 10 не так много установок для мыши, впрочем, как и немного функций у самого указателя. При помощи средств ОС можно настроить: скорость перемещения курсора по области экрана, свойства скролла, взаимозамену правой и левой кнопки, а также некоторые визуальные эффекты.
Основные настройки кнопки мыши в Windows 10
Настроить мышку можно следующим образом:
- Нажимаем комбинацию клавиш Win+I и открываем апплет «Устройства».
Нажимаем комбинацию клавиш Win+I и открываем апплет «Устройства» - Переходим во вкладку «Мышь» и меняем одну из трёх настроек:
- «Выбор основной кнопки», по умолчанию стоит левая, выбор состоит между левой и правой кнопками;
- «Прокрутка с помощью колесика мыши», по умолчанию стоит прокрутка строк, можно заменить на прокрутку страниц. В последнем случае настройка количества строк за прокрутку будет неактивной;
- «Прокручивать неактивные окна», если этот параметр включён, можно совершать прокрутку документов или страниц при наведении на окно, без выделения его активным.
Основные настройки содержат смену кнопок и вариации скролла
Видео: как изменить скорость прокрутки мыши
«Дополнительные параметры мыши»: расширенные настройки мыши в Windows 10
Кроме вышеописанных, существуют другие установки для курсора. Чтобы их открыть, в той же вкладке «Мышь» щёлкаем кнопку «Дополнительные параметры мыши».
Как настроить чувствительность мыши
Чувствительность, она же скорость перемещения настраивается во вкладке «Параметры указателя».
- В дополнительных параметрах открываем вышеуказанную вкладку. Затем в графе «Перемещение» двигаем ползунок в сторону «Быстрее» или «Медленнее» в зависимости от эффекта, который нужно достичь.
Во вкладке «Параметры указателя» двигаем ползунок в графе «Перемещение» - Также можно поставить галочку у пункта «Включить повышенную точность установки указателя». Этот параметр «притормаживает» курсор в районе кнопок, чтобы пользователи не промазывали с выбором.
После каждого изменения настроек в «Дополнительных параметрах» необходимо нажимать OK или «Применить», чтобы установки вступили в силу и сохранились.
Как настроить колесико и скорость прокрутки
В целом настройки колесика в «Дополнительных параметрах» не особо отличаются от тех, что находятся на основной странице установок:
- Переходим во вкладку «Колесико» и настраиваем два параметра прокрутки:
- в вертикальной можно выбрать прокрутку по строкам и их количеству. Или установить параметр постраничного скролла;
- в горизонтальной можно выбрать только количество знаков для скролла.
Во вкладке «Колесико» задаем параметры прокрутки
Как показывает мой опыт, горизонтальная прокрутка в более или менее новых мышках уже не работает. Вместо неё внедрена функция плавного скролла во все стороны. Для этого необходимо нажать колесико в окне с документом, после чего появится специальный значок с указателями во все четыре стороны. Дальнейшее перемещение курсора по экрану будет сопровождаться прокруткой документа. Скорость регулируется расстояние от точки, где находился курсор во время нажатия колесика и до нынешнего положения. Чем дальше указатель, тем быстрее прокручивается документ. Этот способ скролла особо эффективен при чтении или поиске информации в больших документах, очень часто его использую.
Другие настройки
Кроме настроек параметров указателя и прокрутки «Дополнительные параметры» также позволяют визуально настроить курсор, изменить кнопки мыши для левши и правши и включить функцию залипания:
- Чтобы визуально изменить курсор, переходим во вкладку «Указатели» и среди фильтра «Схемы» выбираем один из вариантов.
Переходим во вкладку «Указатели» и среди фильтра «Схемы» выбираем один из вариантов - После смены сохраняем изменения кнопкой OK или «Применить».
Функция смены кнопок и включение залипания находится во вкладке «Кнопки»:
- Открываем вкладку, затем выбираем тумблер между «Для правши» и «Для левши».
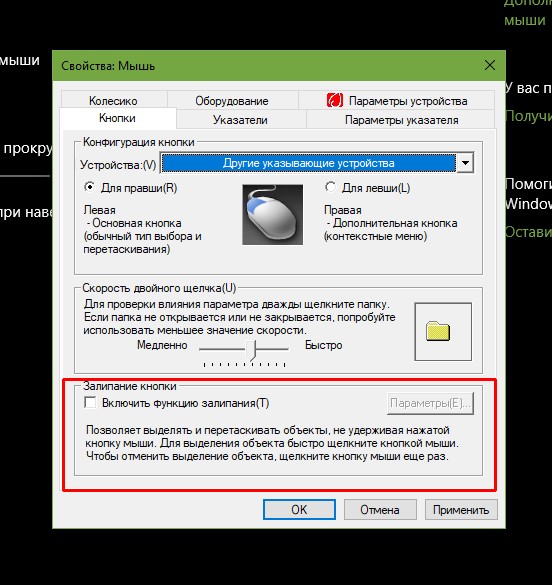
- Включаем функцию залипания, поставив галочку у одноимённого пункта внизу вкладки.
Включаем функцию залипания, поставив галочку у одноимённого пункта внизу вкладки
Настройка современных (игровых) мышек с дополнительными кнопками при помощи специальных программ
Большинство современных мышек имеют в своём арсенале куда больше, чем две кнопки и колесико. Наибольшую популярность такие мышки имеют у геймеров, потому что для «лишних» клавиш можно придумать специальные функции, например двойной-тройной выстрел, вместо одинарного и многое другое. Кроме того, игровые мышки имеют целые макросы (определённые последовательности нажатия клавиш) для ещё большего упрощения процесса.
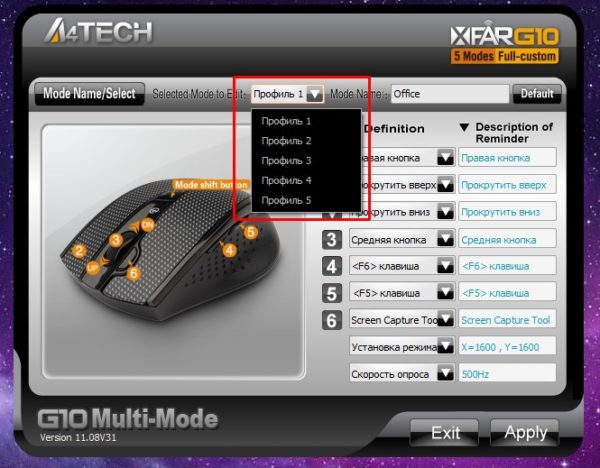
И даже больше того. Некоторые мышки в своих настройках поддерживают многопрофильность установок. Это означает, что можно создать несколько вариаций значения кнопок, а затем быстро переключаться между ними. Таким образом одна мышка может содержать практически весь спектр быстрых команд.
Все программы работают по шаблону: сначала визуально обозначается каждая кнопка, и в панели рядом находятся фильтры, отвечающие за присваивание функций кнопкам.
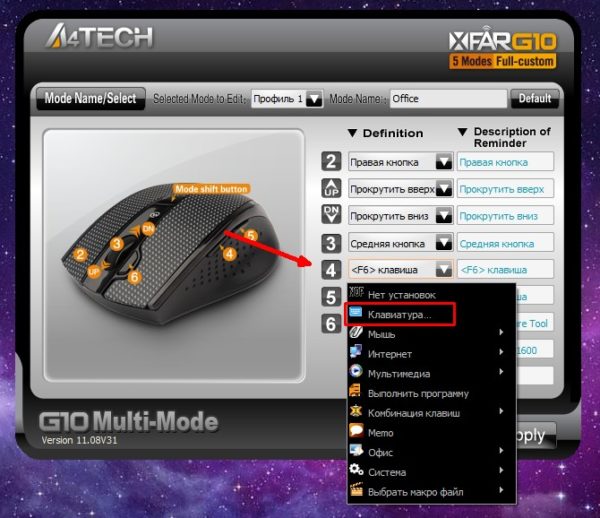
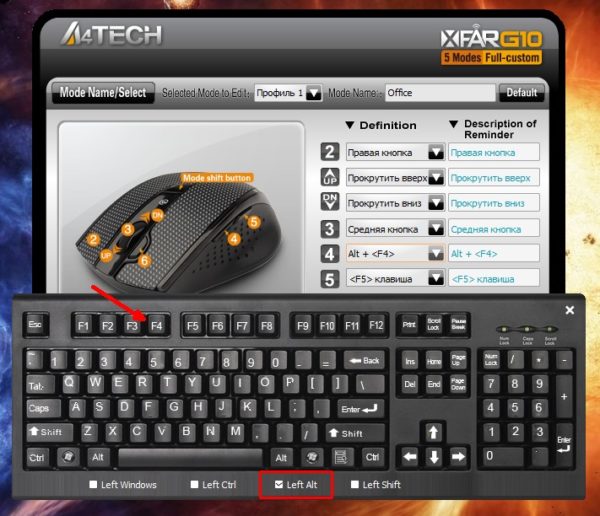
К примеру, необходимо назначить четвёртой функциональной кнопке комбинацию клавиш Alt+F4:
- Открываем фильтр у пункта 4 настроек и выбираем «Клавиатура».
В фильтре кнопки выбираем «Клавиатура» - На появившейся клавиатуре ставим галочку у Left Alt и щёлкаем по кнопке F4.
На появившейся клавиатуре ставим галочку у Left Alt и щёлкаем по кнопке F4
Аналогичным образом можно назначить любую кнопку. В некоторых моделях мышек добавлены такие возможности:
- выключение, перезагрузка ПК;
- вызов калькулятора;
- быстрые команды для работы с офисом:
- копировать;
- вставить;
- вырезать;
- приблизить;
- отдалить;
- быстрые команды для работы в интернете:
- обновить;
- прекратить обновление;
- перейти в избранное;
- открыть почту и многое другое.
Настроить мышку очень просто. Для этого необходимо использовать встроенные в Windows установки или специальные программные продукты, если девайс продвинут и имеет дополнительные кнопки.
- Распечатать
Здравствуйте! Меня зовут Алексей. Мне 27 лет. По образованию — менеджер и филолог.
Оцените статью:
- 5
- 4
- 3
- 2
- 1
(11 голосов, среднее: 4.2 из 5)
Поделитесь с друзьями!
DPI mouse (dpi stands for dots-per-second) indicator is used to test your mouse’s sensitivity, enabling you to adjust your mouse’s cursor speed by adjusting how many pixels per second it moves. Understanding your DPI is particularly useful when playing video games or using software where you want to be precise when placing your cursor. It also makes it much easier to use widescreen monitors and multiple displays.
Generally, DPI mouse is the standard used to measure the mouse sensitivity, expressed as the number of DPIs (dots per linear inch) that a device can detect. By changing the DPI, you can instantly adjust pointer speed for precision tasks, such as in-game targeting or photo editing.
This article will present how you can check your mouse DPI and change it on Windows 10.
What is the DPI Mouse?
A mouse’s DPI is the standard used to measure the mouse sensitivity, expressed as the number of DPIs (dpi stands for dots per linear inch) that a device can detect. By changing the DPI count, you can instantly adjust the mouse cursor or pointer speed for precision tasks, such as in-game targeting or photo editing.
Mouse DPI is also a measurement used to show how many pixels your mouse can move when you move your mouse cursor one inch. For example, if your mouse has 1600 DPI (low dpi mice), moving it exactly one inch (2.54 cm) will move the cursor to 1600 pixels on your screen.
The higher your DPI (dots per inch), the more sensitive your mouse is. For example, any modern gaming mouse has high dpi standards of up to 20,000 on high dpi mice. This may seem unpleasant. However, many people using large or multiple displays love being able to move the cursor faster or improve cursor speed.
While most people aren’t concerned about DPI count, it’s important for those playing video games. Especially in First Person Shooter (FPS) titles, many theorize about the perfect DPI setting to aim precisely.
Below are several ways to change your DPI settings, then check your current DPI to remember which setting works best.
How to change your Mouse DPI in Windows 10
So, How do I change mouse sensitivity (DPI)?
Many people want to modify their current DPI setting to achieve higher or lower sensitivity. You can gain more comfort and operate your device better. Having perfect sensitivity allows you to get things done better and enjoy your gaming experience even more.
The process of changing your mouse’s DPI (dots per inch) varies based on your type of mouse. Office mice usually have no more than two buttons — the left and right mouse buttons, — whereas a dedicated gaming mouse has somewhere between 4 and 8 buttons.
If your mouse has DPI on-the-fly buttons, press one of the DPI On-the-fly buttons to create new settings for each DPI button. The mouse LCD will briefly display the new DPI setting. On the other hand, if your mouse doesn’t have DPI on-the-fly buttons, start Microsoft Mouse and Keyboard Center, select the mouse you are using, click basic settings, locate Sensitivity, make your changes.
Let’s look at this in detail below:
Method #1: Change sensitivity of mouse in the Settings app
This method mostly applies to mice with no dedicated DPI button. Luckily, the Windows 10 developers didn’t forget people who use simpler computer mice and gave everyone the option to switch mouse dpi, hence their sensitivity easily.
Note: While you won’t know the exact number right away, you can use the methods described in the next section to determine your new DPI (dots per inch). You can switch dpi to a higher dpi or lower it.
Using the Windows Settings app, you can easily adjust your DPI settings and levels.
- Click on the Windows icon in the bottom-left of your screen to bring up the Start menu, then choose “Settings app.” You can also use the Windows + I keyboard shortcut to go to the settings app.
- Click on the “Devices” tile.
- Switch to the “Mouse” tab using the left-side panel.
- Click on the “Additional mouse options” link at the bottom of the page or in the right-side panel.
- Switch to the “Pointer Options” tab using the header menu of the Mouse Properties window.
- Adjust the speed of your mouse with the slider under ‘Motion’ on high-resolution screen. Moving the slider head to the left will make your mouse slower while moving it to the right will increase its speed.
- We recommend turning off the “Enhance pointer precision” setting, as it’s capable of messing up your DPI.
- Click the OK button. You should immediately see the change in mouse speed when you try to scroll the mouse cursor and see the cursor speed.
Method #2: Adjust sensitivity in the video game itself
Many video games allow you to adjust your sensitivity in-game and adjust it to a higher dpi or lower it. This allows you to use one general DPI for operating your system normally, then set up different sensitivity settings for different games.
While the setting is located in different menus for each game, you can generally follow these steps to find where you can change your in-game mouse scrolling sensitivity.
- Launch the game you want to change your sensitivity in and wait for it to load entirely.
- Locate the menu that says either “Options” or “Settings,” usually available from the title screen.
- You should be able to locate a menu that says “Controls.” If this menu is missing, chances are that you can’t directly adjust the sensitivity of the mouse from the game you opened.
- Look for the sensitivity slider and adjust it until you feel comfortable with the speed.
Method #3: Use the DPI changer button on your gaming mice
Any gaming mouse has a button dedicated to changing your DPI on-the-fly, which you can adjust to higher dpi or lower. You can adjust your DPI between various presets, which may or may not be customizable depending on your mouse, no matter your application.
The DPI button is usually located below the scrolling wheel. It’s relatively small compared to the other buttons and sometimes even has the word “DPI” written on it as well.
You can cycle through the preset DPI settings that gradually get higher and higher by pressing the button once. Some mice may offer two buttons to increase it to higher dpi or decrease the DPI instead of cycling. And some high dpi mice might need lowering when you change from gaming to normal work. Or use gaming mice (gaming mice are mice designed for gaming) strictly for gaming.
Unsure of which button is responsible for your DPI? We recommend searching for the box your mouse came in, which usually has visual labels for each button on your mouse. You can also hop online and start looking for your model on the manufacturer’s website.
How to check your Mouse DPI
At the moment of writing, there’s no dedicated Windows 10 application for checking your DPI that comes with the system itself. This is an issue, as many people would love to get a clear and simple understanding of their mouse gadget’s DPI.
Don’t feel discouraged, though — there are many other ways to check what DPI you’re rolling with. Simply follow our instructions below to identify and make changes to your mouse gadget’s DPI.
Method #1: Check the manufacturer’s specifications
This method mostly applies to branded mice. Most major brands list their products on a website, complete with a set of specifications and images. This is mostly used to get customers interested, however, it can help those who’ve already purchased the product as well.
In this example, we’ll look at the Razer Mamba Elite mouse and determine its DPI. This process is similar for every mouse. However, some manufacturers don’t have a website or technical information about their products.
- Head over to the manufacturer’s website. In our case, we navigated to the official Razer website.
- Use the built-in search engine to find your mouse model.
- Locate the technical specifications and check the DPI count written on the website.
If you can’t find your mouse on the manufacturer’s website, we suggest getting in touch with customer support. Many brands offer support through e-mail or the phone.
Method #2: Use Microsoft Paint
This might seem like a silly way to determine your DPI. However, it works near perfectly. Since MS Paint comes with the ability to see the pixel your cursor is at, you’re able to do a little experiment to find a somewhat accurate measurement of your DPI.
- Open MS Paint by searching for it in your taskbar or your list of applications.
- Set your zoom level to 100%.
- Select any brush tool and place your cursor to the far left of the screen. In the bottom-left, the first number should show 0.
- Hold the left mouse button and move your mouse around 2-3 inches. Look at the first number in the bottom-left without moving your mouse and note it down.
- Repeat this process multiple times, then find the average of each measurement. This is your DPI.
Method #3: Install the correct mouse drivers
Most branded computer mice and any high dpi mouse come with the manufacturer’s own driver software. This allows you to completely customize how the hardware behaves, even if it has extra buttons and features.
Installing the right mouse driver may give you the option to check your DPI. Again, we’ll be using a branded Trust GXT 177 Rivan RGB Gaming Mouse for this example.
- Head over to the manufacturer’s website. In our case, we navigated to the official Trust website.
- Use the search engine to find your product.
- Look for a section to download the driver software, then choose your operating system.
- Install the driver and launch the software. You should be able to locate a section dedicated to DPI settings, allowing you to see the DPI of your mouse.
Note: Not every manufacturer and mouse has dedicated driver software except on a gaming mouse. However, it’s worth checking in case you want to make personalized changes.
Conclusion
We hope this article helped you with the DPI issues on both high dpi and low dpi mice. You now know what dpi stands for (dpi stands for dots per inch) and that a mouse’s DPI is flexible — you don’t have to stick to one setting. Make sure to dedicate different mouse dpi settings or options for different activities to control cursor speed.
For more tech support and tips, visit our help center, subscribe to our email list, and receive tech updates, offers, and discounts at your comfort.
You May Also Like:
» How to Fix Mouse Lag on Windows 10
» How to Turn Off Mouse Acceleration Completely in Windows 10
» How to Fix Keyboard Typing Wrong Characters in Windows 10
» How to Fix Your Keyboard Not Working in Windows 10
»How To Change Your Mouse Cursor on Windows 10/11
Содержание
- Настраиваем чувствительность мыши в Windows 10
- Способ 1: Фирменное программное обеспечение
- Способ 2: Встроенное средство Windows
- Вопросы и ответы
Компьютерная мышь — одно из основных периферийных устройств, используемое для ввода информации. Она есть у каждого владельца ПК и активно используется каждый день. Правильное конфигурирование оборудования поможет упростить работу, а каждый юзер подстраивает все параметры индивидуально под себя. Сегодня мы бы хотели рассказать о настройке чувствительности (скорости передвижения указателя) мышки в операционной системе Windows 10.
Читайте также: Как подключить беспроводную мышь к компьютеру
Настраиваем чувствительность мыши в Windows 10
Не всегда установленные по умолчанию параметры устраивают пользователя, поскольку размеры мониторов и привычки к скорости у всех отличаются. Поэтому редактированием чувствительности занимаются многие. Сделать это можно различными способами, а в первую очередь внимание стоит обратить на наличие соответствующей кнопки на самой мышке. Обычно она располагается по центру и иногда имеет выбитую надпись «DPI». То есть, количество DPI и определяет скорость передвижения курсора по экрану. Попробуйте нажать несколько раз на эту кнопку, если она у вас присутствует, возможно, один из встроенных профилей окажется подходящим, тогда ничего изменять в системе не нужно.
Читайте также: Как выбрать мышь для компьютера
В противном случае придется воспользоваться средством от разработчиков устройства или задействовать настройки самой ОС. Давайте детально рассмотрим каждый метод.
Способ 1: Фирменное программное обеспечение
Ранее фирменное программное обеспечение разрабатывалось только для некоторых игровых девайсов, а у офисных мышей не было даже такой функции, которая позволяла бы регулировать чувствительность. На сегодняшний день такого ПО стало больше, однако на дешевые модели оно все еще не распространяется. Если вы владеете геймерским или дорогим оборудованием, скорость изменить можно следующим образом:
- Откройте официальную страницу производителя устройства в интернете и отыщите там необходимый софт.
- Скачайте его и запустите установщик.
- Пройдите простую процедуру инсталляции, следуя указанным инструкциям в самом Мастере.
- Запустите программу и переходите в раздел настройки мыши.
- Конфигурация указателя осуществляется достаточно просто — передвигайте ползунок скорости или определите один из заготовленных профилей. Далее останется только проверить, насколько выбранное значение вам подходит, и сохранить результат.
- В таких мышках обычно есть встроенная память. Она может хранить несколько профилей. Делайте все изменения именно во встроенной памяти, если хотите подключить это оборудование к другому компьютеру без сброса чувствительности на стандартное значение.

Способ 2: Встроенное средство Windows
Теперь давайте затронем те ситуации, когда у вас нет кнопки переключения DPI и фирменного софта. В таких случаях конфигурация происходит через инструменты Виндовс 10. Изменить рассматриваемые параметры можно так:
- Откройте «Панель управления» через меню «Пуск».
- Перейдите в раздел «Мышь».
- Во вкладке «Параметры указателя» укажите скорость, перемещая ползунок. Отметить стоит и «Включить повышенную точность установки указателя» — это вспомогательная функция, проводящая автоматическую доводку курсора до объекта. Если вы играете в игры, где необходима точность наводки, рекомендуется отключать этот параметр, чтобы не происходило случайных отклонений от цели. После всех настроек не забудьте применить изменения.

Помимо такого редактирования вам доступно изменение скорости прокрутки колесиком, что также можно отнести к теме про чувствительность. Корректируется данный пункт так:
- Откройте меню «Параметры» любым удобным методом.
- Переключитесь в раздел «Устройства».
- На панели слева выберите «Мышь» и передвиньте ползунок на подходящее значение.

Вот таким нехитрым образом изменяется количество прокручиваемых строк за один раз.
На этом наше руководство подходит к концу. Как видите, изменяется чувствительность мыши буквально за несколько кликов несколькими способами. Каждый из них будет наиболее подходящим для разных пользователей. Надеемся, у вас не возникло трудностей с редактированием скорости и теперь работать за компьютером стало легче.
Читайте также:
Проверка компьютерной мыши с помощью онлайн-сервисов
Программы для настройки мыши
Еще статьи по данной теме:
Помогла ли Вам статья?

Ох… Казалось бы, ну что такое мышка? 👀
Тем не менее, на ее настройку (иногда) уходит кучу времени и нервов (особенно, в тех случаях, когда от нее нужно добиться чего-то более «тонкого», чем просто «перемещение» белой стрелочки в режиме «абы как» по экрану монитора…).
Собственно, в текущую заметку я решил вынести все основные моменты по настройке мышки, с которыми так или иначе приходится сталкиваться. Получилась, своего рода, инструкция с пошаговыми действиями.
Примечание: т.к. ОС Windows 11 сейчас активно обновляется — некоторые моменты из материалов ниже могут со временем «устареть» (чтобы минимизировать это — я привожу неск. способов, как открыть те или иные вкладки / параметры — выбирайте актуальный для вас!).
Итак, теперь к сути… 👌
*
👉 Доп. в помощь!
1) Перестала работать мышь на компьютере или ноутбуке — что делать (пошаговая инструкция)
2) Как подключить беспроводную мышку к компьютеру — см. пошаговую инструкцию
*
Содержание статьи
- 1 Настройки мышки
- 1.1 Регулируем чувствительность, скорость перемещения указателя и двойного клика
- 1.1.1 Спец. возможности от производителя устройства (Corsair, A4, Logitech, Razer и др.)
- 1.1.2 Пару слов о играх и чувствительности мышки
- 1.2 Как открывать папки и файлы одним или двумя кликами
- 1.3 Как сделать, чтобы мышь не выводила компьютер из «сна»
- 1.4 Дополнительные функции для кнопок мыши: например, регулирование громкости
- 1.5 Изменение курсора (ставим что-то вместо белой стрелочки)
- 1.6 Автоматические нажатия мышки (без вашего участия)
- 1.1 Регулируем чувствительность, скорость перемещения указателя и двойного клика
→ Задать вопрос | дополнить
Настройки мышки
Регулируем чувствительность, скорость перемещения указателя и двойного клика
👉 Способ 1
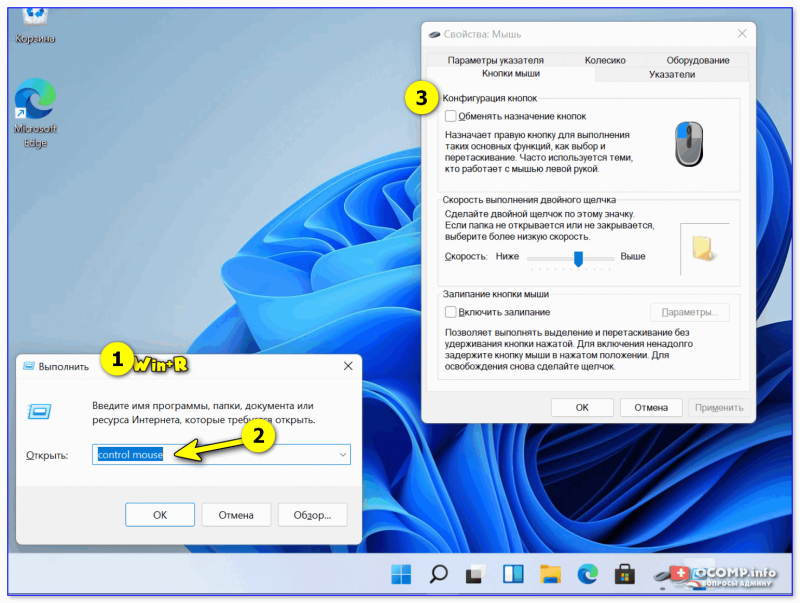
- нажать Win+R — должно появиться окно «Выполнить» (вместо него можно также вызвать диспетчер задач с помощью Ctrl+Shift+Esc, и создать новую задачу);
- в строку «Открыть» ввести команду control mouse и нажать Enter. Далее должно появиться окно «Свойства: мышь». 👇
*
Во вкладке «Кнопки мыши» (она появится по умолчанию) можно будет сразу же:
- обменять назначение кнопок (правую на левую — возможно, это удобно для левшей // или для некоторых игр // или для вертикальных мышек);
- задать скорость выполнения двойного клика.
Control mouse — открываем настройки мышки
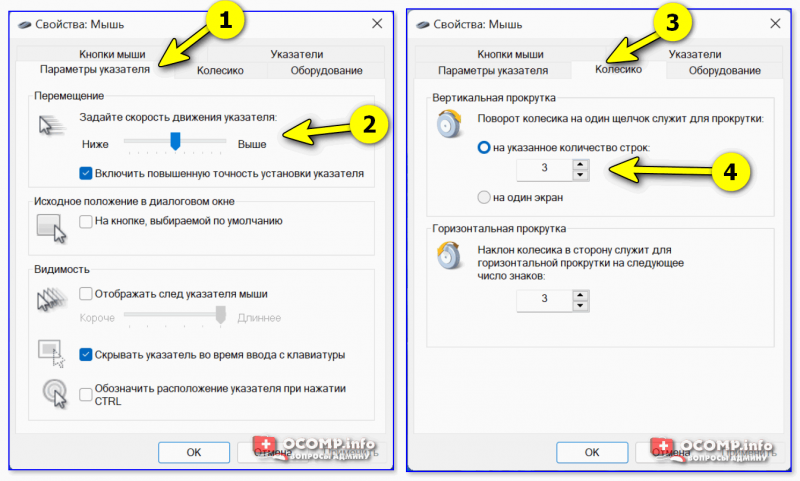
Далее можно перейти во вкладки «параметры указателя» и «колесико» — в них, соответственно, можно будет отрегулировать скорость перемещения стрелочки по экрану, а также, как быстро будет перематываться страничка при прокрутке колесика.
Совет: во вкладке «параметры указателя» рекомендую включить повышенную точность указателя! Это снизит дрожание стрелочки, а также повысит ее точность наведения при небольших перемещениях.
Скорость передвижения указателя, скорость прокрутки
👉 Способ 2
- нажать Win+R;
- в окно «Выполнить» ввести команду ms-settings:mousetouchpad и нажать Enter;
- далее откроется окно параметров Windows (вкладка «Устройства / мышь»// сочетание Win+i). Здесь можно будет также изменить скорость курсора, отрегулировать колесико, до-настроить сопутствующие параметры. 👇
Устройства — мышь — параметры ОС
👉 Способ 3
- открыть контрольную панель;
- включить отображение крупных значков;
- кликнуть по ссылке «Мышь». 👇
Панель управления — крупные значки — мышь
*
Спец. возможности от производителя устройства (Corsair, A4, Logitech, Razer и др.)
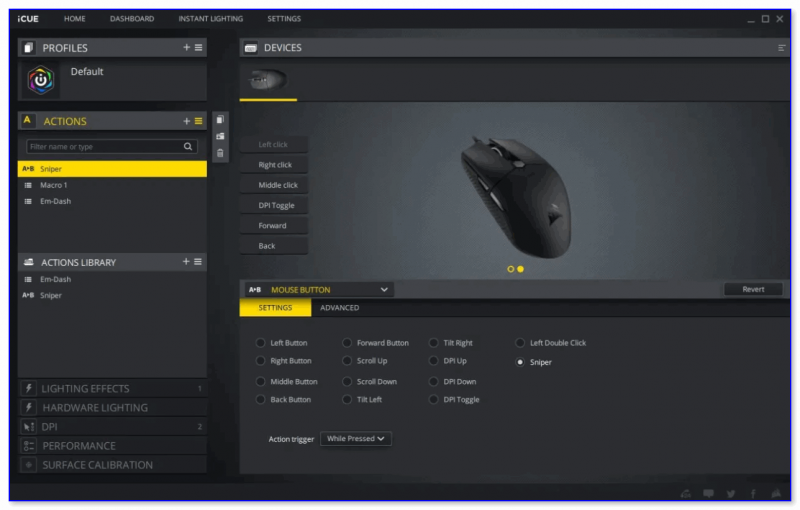
Если вы используете какую-нибудь игровую («модную») мышку от таких производителей, как Corsair, A4, Logitech, Razer (и ряд др.) — очень вероятно, что к ней может быть своя доп. панель управления от производителя. 👇
Как правило, такая панель позволяет более точечно настроить мышку: задать функции доп. кнопкам на корпусе устройства; до-настроить чувствительность; установить режим подсветки; вкл. макросы и т.д.
В общем, посыл здесь простой: 👀 посмотрите на сайте производителя вашей мышки — нет ли там спец. драйвера с панелью управления…
Corsair-мышка — приложение для настройки iCue
*
Пару слов о играх и чувствительности мышки
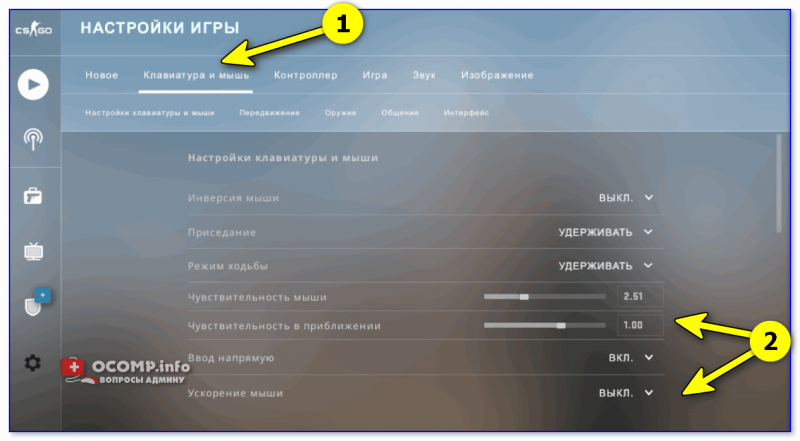
👉 Обратите внимание, что во многих играх могут быть доп. настройки чувствительности и ускорения курсора мышки. И это очень сильно влияет на точность ваших действий (наведения, позиционирования и т.д.).
Например, в игре CS:GO — в настройках есть несколько важных опций насчет чувствительности мышки (см. скрин ниже 👇). Так, многие отмечают, что ускорение мыши (например) следует отключать. Но вообще, конечно, многое здесь подбирается индивидуально, под конкретное железо и привычку (реакцию) пользователя…
Скриншот из игры CS:GO — настройка клавиатуры и мышки
*
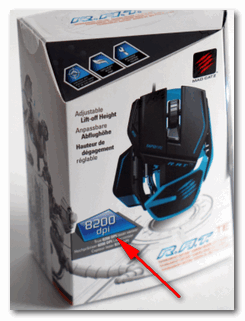
👉 Кстати, если говорим об играх, нельзя также не сказать о таком параметре, как DPI мышки (у обычных бюджетных мышек он в среднем 800-2000 👇). Этот показатель очень сильно влияет на точность и плавность наведения курсора!
Разумеется, чем выше значение DPI у мышки — тем лучше ваша рука сможет делать ей «виртуозные» точные вещи (ну и само собой, выс. DPI также отразиться на цене устройства). Как правило, для игр часто предпочитают мышки с 4000+ DPI* (хотя, здесь мне сложно давать советы, т.к. я не киберспортсмен 😉).
*
👉 В помощь!
Чем отличается оптическая мышь от лазерной? Какая лучше, разбор основных характеристик мыши
8200 DPI // пример игровой мышки
*
Как открывать папки и файлы одним или двумя кликами
Универсальный вариант открыть настройки:
- нажать сочетание Win+R;
- в строку «Открыть» ввести команду control folders и нажать Enter;
- в параметрах проводника найти подзаголовок «Щелчки мышью» и указать нужный вариант. См. пример на скриншоте ниже. 👇
Параметры проводника
Альтернативный вариант:
- перейти в любую из папок на диске (чтобы запустить проводник — можно использовать сочетание Win+E);
- в верхней правой части окна кликнуть по значку «Параметры»;
- далее аналогично, как в предыдущем примере. ☝
Любая открытая папка — Windows 10
*
Как сделать, чтобы мышь не выводила компьютер из «сна»
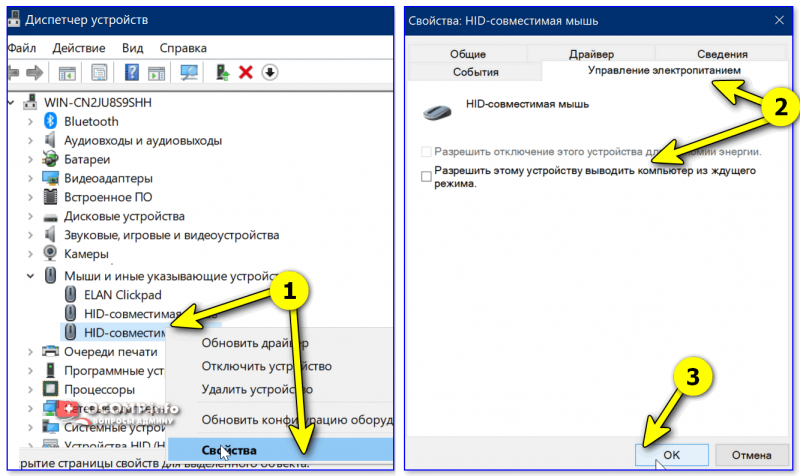
Если вы отправите компьютер (ноутбук) в сон, а затем пошевелите мышкой — он сразу же «проснется» (так ведут себя настройки электропитания мышки по умолчанию).
👉 Чтобы отключить этот момент нужно:
- открыть 👉 диспетчер устройств (чтобы это сделать — можно кликнуть правой кнопкой мыши по ПУСК);
- далее найти и раскрыть вкладку «Мыши и иные указывающие устройства»;
- после поочередно открыть свойства каждого устройства в этой вкладке и снять флажок, разрешающий устройству выводить компьютер из ждущего режима (см. пример ниже). 👇
Разрешить этому устройству выводить ПК из ждущего режима
*
Кстати, помимо мышки, возможно, вам потребуется отключить и клавиатуру (это помогает исключить случайные «пробуждения» ПК). У меня на эту тему, кстати говоря, была на блоге более подробная инструкция (ссылка ниже).
*
👉 В помощь!
Компьютер, ноутбук выходит из спящего режима САМ. Почему, как это исправить?
*
Дополнительные функции для кнопок мыши: например, регулирование громкости
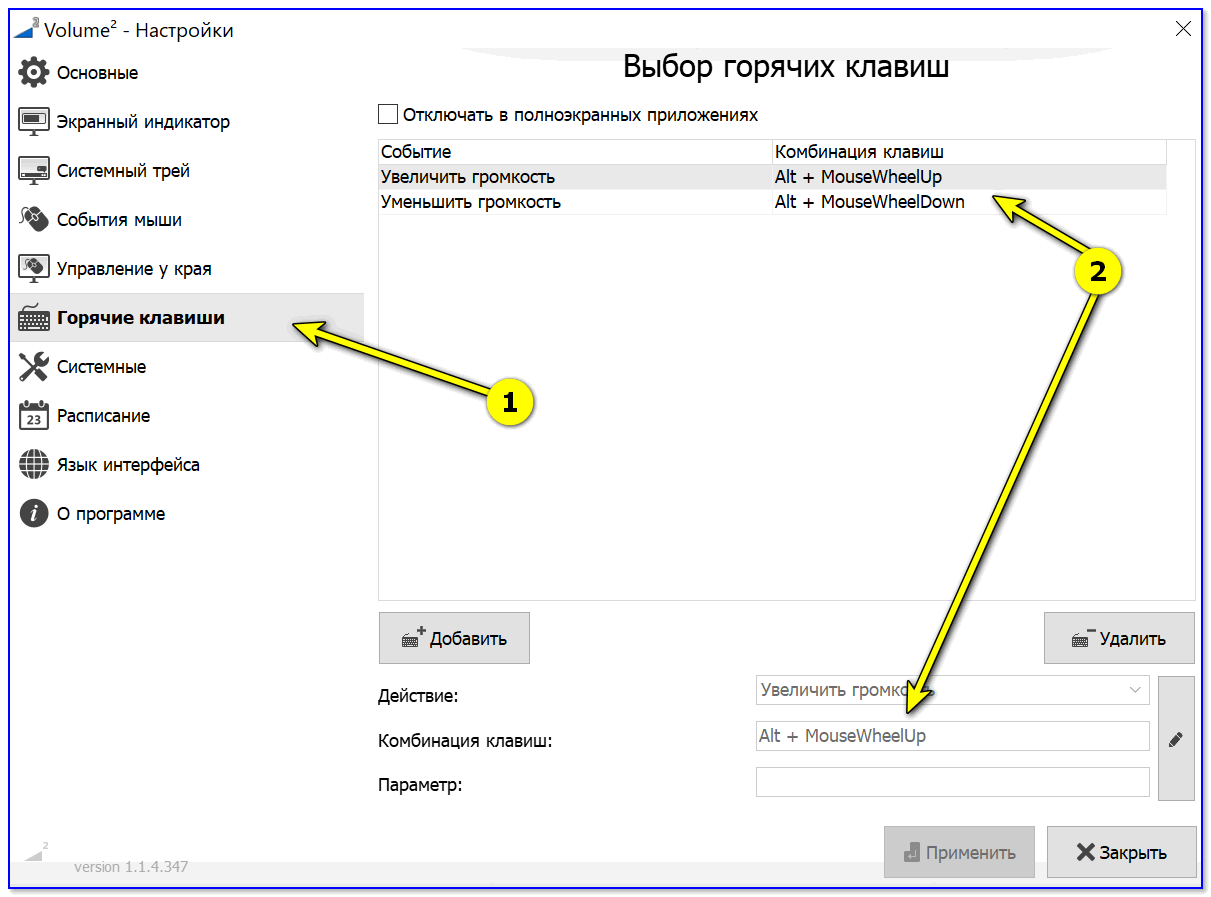
Не многие знают, что кнопкам и колесику мыши можно дать дополнительные возможности (причем, не обязательно, чтобы мышка была какой-то дорогой геймерской…).
Например, довольно удобно на мышку «повесить» регулировку громкости — крутанул колёсико и звук прибавлен! 👌
О том, как это можно настроить — рассказано в одной моей заметке (ссылка ниже 👇).
👉 В помощь!
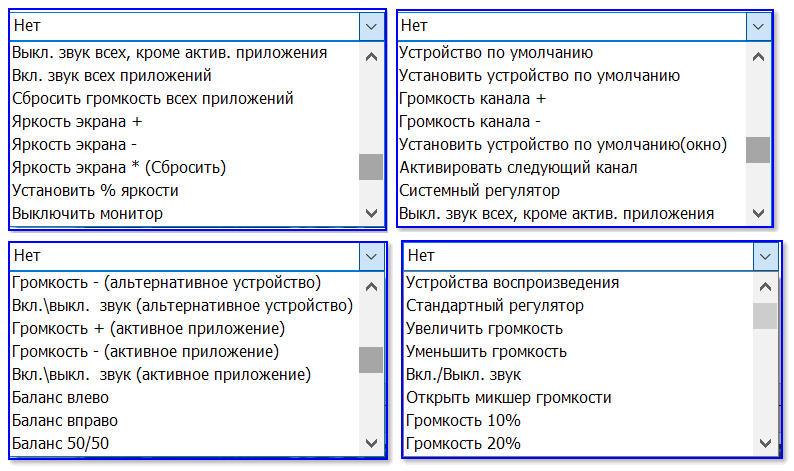
Как обычной клавиатуре и мышке добавить возможность регулировать яркость экрана, уровень громкости, выкл. монитора, и т.д.
Выбор горячих клавиш для регулировки звука // утилита Volume 2
Список функций // утилита Volume 2
*
Изменение курсора (ставим что-то вместо белой стрелочки)
Если вы хотите просто изменить цвет курсора (белой стрелочки) и его размер — то устанавливать что-то дополнительно совсем не обязательно.
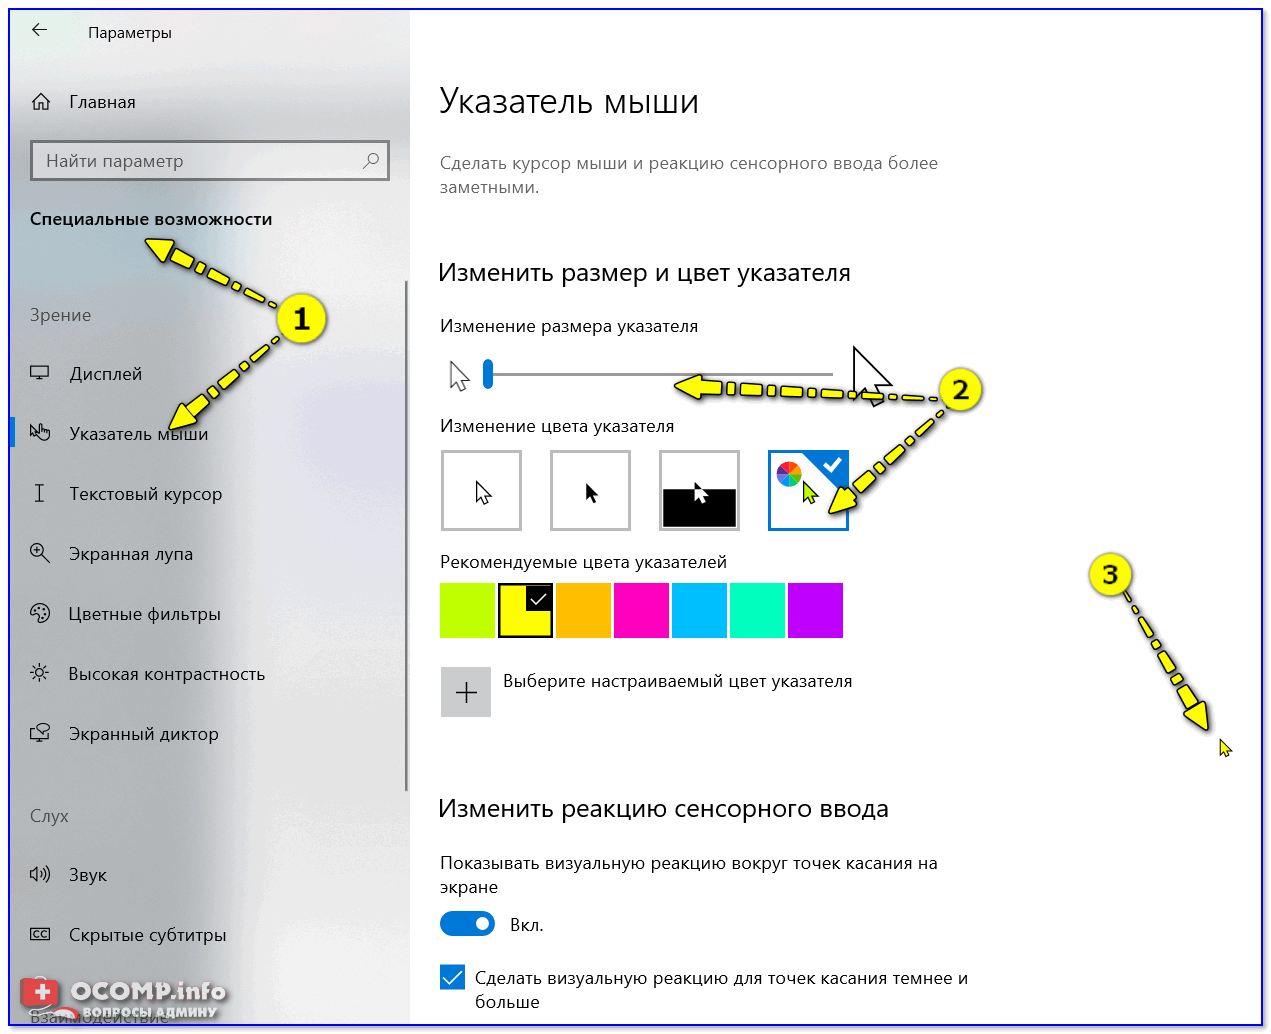
Если открыть параметры Windows 11/10 (как их открыть) и перейти в раздел «Спец. возможности / Указатель мыши» — вы сможете самостоятельно изменить эти настройки… 👇
Спец. возможности — указатель мыши
Если есть желание вместо стрелочки установить что-то более интересное (например, как у меня на скриншоте ниже 👇) — для этого понадобиться загрузить к себе на диск спец. набор указателей, а после вручную выбрать один из них. Сам набор, а также, как с ним работать — я разобрал в одной своей прошлой заметке, ссылка ниже.
👉 В помощь!
Большой набор указателей мыши — как установить и настроить
Пример — на что можно поменять стрелку…
*
Автоматические нажатия мышки (без вашего участия)
Один из довольно популярных вопросов (когда многие перешли на «удалёнку»): «Можно ли сделать так, чтобы мышка самостоятельно периодически что-то «нажимала». Как это настроить?».
Ответ: да, можно! Но, разумеется, ее нажатия не сравнить с человеком — действовать она будет по какому-то заранее заданному плану. Реализуется это с помощью спец. приложений. Ссылка ниже в помощь.
*
👉 В помощь!
Утилиты для создания последовательности нажатий нужных клавиш (клавиатура + мышка). Пошаговый пример настройки
Скриншот из игры World of Warcraft // Персонаж из игры самостоятельно применяет весь спектр возможностей против врага // пример использования авто-комбинаций
*
На сим пока всё…
Дополнения по точечной настройке мыши — приветствуются!
Успехов!
👋


Полезный софт:
-
- Видео-Монтаж
Отличное ПО для создания своих первых видеороликов (все действия идут по шагам!).
Видео сделает даже новичок!
-
- Ускоритель компьютера
Программа для очистки Windows от «мусора» (удаляет временные файлы, ускоряет систему, оптимизирует реестр).

 и выберите пункт Панель управления. В поле поиска введите мышь и выберите элемент Мышь.


