Иногда возникает желание внести разнообразие на рабочий стол, изменить иконки папок, программ или сделать иконки прозрачными, поменять их размер. Сделать это совсем несложно.
Скачайте в интернете новые иконки, используйте стандартные иконки Windows или сделайте их из картинок:
1. Как изменить иконки в Windows 7:
Подведите курсор к папке, иконку которой хотите поменять, щелкните правой кнопкой мыши.
Далее СВОЙСТВА — НАСТРОЙКА — СМЕНИТЬ ЗНАЧОК. Выберите из коллекции Windows иконку, щелкните ОК и еще раз ОК. Иконка изменилась.
Чтобы поменять иконку у программы вместо НАСТРОЙКИ выберите ЯРЛЫК, далее те же действия.
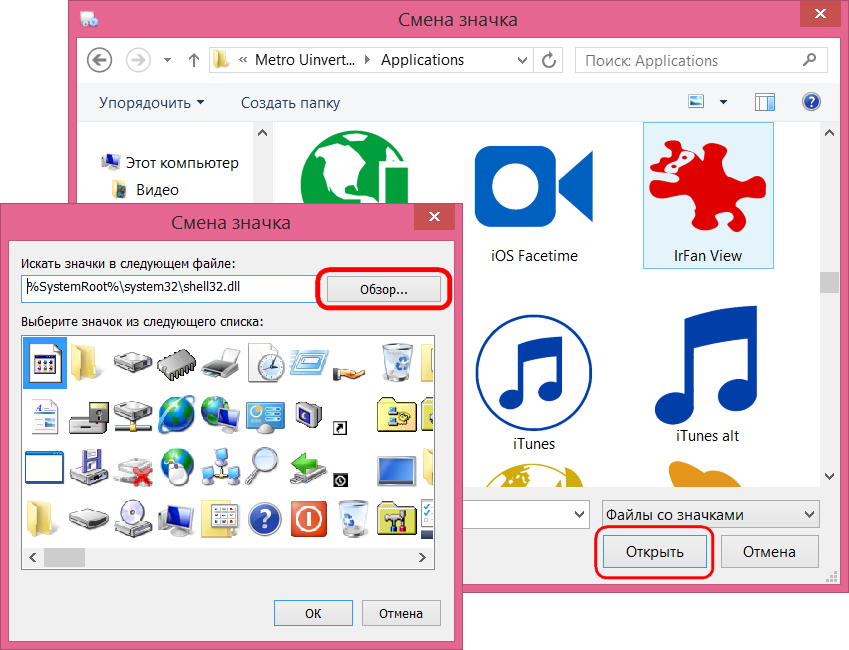
Если хотите поставить свою иконку, то после нажатия СМЕНИТЬ ЗНАЧОК кликните ОБЗОР и найдите в компьютере иконку (обязательно формата ico) — Открыть — ОК — ОК:

2. Как изменить иконки в Windows XP:
Подведите курсор к нужной папке или программе на рабочем столе, кликните правой кнопкой мыши, выберите СВОЙСТВА, зайдите в НАСТРОЙКУ, кликните СМЕНИТЬ ЗНАЧОК, выберите стандартную иконку или поставьте свою — ОБЗОР, найдите картинку в компьютере, дважды кликните ОК.
Изменяя иконки в Windows XP используйте картинки формата ico.
Для замены ярлыка у программы в СВОЙСТВАХ выберите ЯРЛЫК, далее те же действия:

3. Как изменить иконки в Windows Vista:
Правой кнопкой мыши кликните на иконку, затем выберите СВОЙСТВА — зайдите в НАСТРОЙКИ — кликните ПОМЕНЯТЬ ИКОНКУ. Выберите стандартную иконку (или кликните ОБЗОР, откройте свою картинку) и дважды щелкните ОК.
В Windows Vista для иконок допустимо использовать картинки с расширением png и ico.
Изменить иконки в MacOS тоже совсем просто.
4. Как изменить размер иконок Windows.
Windows 7:
В любом месте рабочего стола кликните правой кнопкой мышки — ВИД — выберите размер значков:

Windows XP:
В любом месте рабочего стола кликните правой кнопкой мышки, зайдите в СВОЙСТВА — выберите ДОПОЛНИТЕЛЬНО.
В ЭЛЕМЕНТАХ найдите ЗНАЧОК, настройте желаемый размер значка и дважды кликните ОК:

5. Как сделать иконки прозрачными:
Windows 7:
1) Настроить отображение скрытых папок и файлов на рабочем столе:
ПУСК — Панель управления — Оформление — Параметры папок — ВИД — Скрытые папки и файлы — отметить «Показывать скрытые папки и файлы»:

2) Папку или файл, который Вы хотите сделать прозрачным настроить скрытым:
Кликните на папке правой кнопкой мыши и зайдите в СВОЙСТВА. Далее ОБЩИЕ. Найдите АТРИБУТЫ, поставьте галочку «СКРЫТЫЙ». Щелкните ОК:

И папка на Вашем рабочем столе станет прозрачной.
Windows XP:
1) Настроить отображение скрытых папок и файлов на рабочем столе:
ПУСК — НАСТРОЙКА — Панель управления — Оформление и темы — Свойства папки — ВИД — Скрытые файлы и папки — Показывать скрытые папки и файлы — ОК:

2) Сделать папку или файл скрытым:
Кликнуть на папке правой кнопкой мышки — СВОЙСТВА — ОБЩИЕ — поставьте галочку СКРЫТЫЙ — ОК:

Получилась прозрачная иконка 
Сохраните полезный совет:
Изменение значков Рабочего стола
Изменение значков Рабочего стола
Как уже говорилось в начале главы, после установки Windows на Рабочем столе имеется только один значок – Корзина. Ко всем остальным папкам – даже таким важным, как Компьютер или Сеть – можно добраться только через меню Пуск. Это не очень удобно. Поэтому в самом начале работы с Vista поместите на Рабочий стол значки хотя бы основных папок. Для этого щелкните кнопкой мыши на ссылке Изменить значки рабочего стола в окне Персонализация и в открывшемся окне (рис. 2.15) отметьте флажками названия тех папок, которые желаете видеть на Рабочем столе.
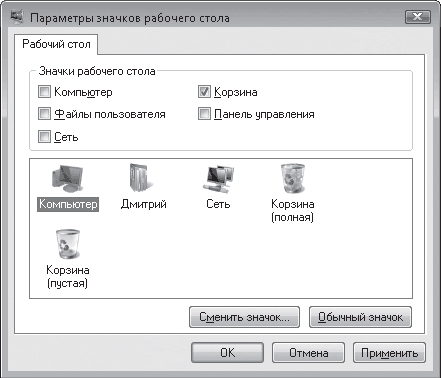
Рис. 2.15. Окно настройки элементов Рабочего стола
В центре окна изображены значки, которые используются по умолчанию для системных папок. Если хотите поменять какой-нибудь значок, выделите его щелчком кнопки мыши и нажмите кнопку Сменить значок. Откроется окно с образцами значков, можете выбрать любой. Вернуться к стандартному виду значка можно с помощью кнопки Обычный значок.
Данный текст является ознакомительным фрагментом.
Читайте также
Изменение значков Рабочего стола
Изменение значков Рабочего стола
Как уже говорилось в начале главы, после установки Windows на Рабочем столе есть только один значок – Корзина. Доступ же к системным папкам можно получить только через меню. Однако система позволяет вам поместить на Рабочий стол значки
1.3.3.1. Изменение фона рабочего стола
1.3.3.1. Изменение фона рабочего стола
Выберите команду меню Система?Параметры?Оформление?Внешний Вид (или щелкните правой кнопкой на рабочем стопе и выберите в раскрывшемся контекстном мню команду Изменить фон рабочего стола). Раскроется окно Настройка внешнего вида (рис.
Гаджеты рабочего стола
Гаджеты рабочего стола
Как уже говорилось выше, гаджеты – маленькие программы, размер окна которых позволяет размещать их на Рабочем столе без особого ущемления прав других приложений.Гаджеты могут иметь разное назначение, например, с их помощью можно узнавать прогноз
7.2. Фон Рабочего стола
7.2. Фон Рабочего стола
Фон Рабочего стола как составную часть темы также в любой момент можно изменить. Например, вам нравятся звуки установленной темы, но не нравится используемый при этом фон? Нет проблем: фон Рабочего стола меняется так же просто, как и сама тема, поэтому
7.6. Изменение значков Рабочего стола
7.6. Изменение значков Рабочего стола
Как вы уже, наверное, заметили, по умолчанию сразу после установки операционная система отображает на Рабочем столе только значок Корзины. С чем связано такое решение – непонятно, ведь значки Компьютер и Сеть на практике применяются
Обои для Рабочего стола
Обои для Рабочего стола
За картинку, используемую в качестве обоев для Рабочего стола отвечает строковый параметр HKEY_CURRENT_USERControl PanelDesktopWallpaper, который содержит путь bmp-файла
Ярлыки рабочего стола
Ярлыки рабочего стола
Но иногда нужно, чтобы некоторые файлы находились всегда под рукой, чтобы работать с ними было еще проще. То же касается и программ, с которыми вы часто работаете. Как тут быть?В этом случае можно их вынести прямо на рабочий стол. Нет, это не тот рабочий
Обои для Рабочего стола
Обои для Рабочего стола
За картинку, используемую в качестве обоев для Рабочего стола отвечает строковый параметр ·Wallpaper·, который содержит путь bmp-файла в HKCUControl PanelDesktopЧтобы ваша картинка на Рабочем столе располагалась в строго заданном месте, а не в центре, нужно в
Темы Рабочего стола
Темы Рабочего стола
Чем бы вы ни занимались на любимом компьютере, вам придется постоянно взаимодействовать с интерфейсом программ. Операционная система Windows XP имеет большой набор фоновых рисунков и программ-заставок, с помощью которых можно создавать темы Рабочего
Настройка Рабочего стола
Настройка Рабочего стола
Сокрытие всех элементов Рабочего стола
Ключ:[HKEY_CURRENT_USERSoftwareMicrosoftWindowsCurrentVersionExplorer] Значение:
6.4.1. Изменение оформления рабочего стола
6.4.1. Изменение оформления рабочего стола
Щелкните правой кнопкой мыши на рабочем столе. Вы увидите всплывающее меню (рис. 40). Выберите команду Свойства. Появится окно Свойства: Экран (рис. 41). На вкладках этого окна вы сможете изменять оформление вашего рабочего стола:Тема
3.3. Настройка рабочего стола
3.3. Настройка рабочего стола
Щелкните правой кнопкой на рабочем столе. В появившемся меню три последние команды будут следующими:? Разрешение экрана — позволяет изменить разрешение экрана;? Гаджеты — о гаджетах мы поговорим в разд. 3.7;? Персонализация — позволяет
3.3.2. Изменение фона рабочего стола
3.3.2. Изменение фона рабочего стола
Окно Персонализация (рис. 3.12) позволяет изменить все параметры рабочего стола — от фонового рисунка до заставки (хранителя экрана). Откройте это окно. В области Изменение изображения и звука на компьютере вы можете выбрать одну из тем
3.3.5. Изменение других параметров рабочего стола
3.3.5. Изменение других параметров рабочего стола
Вернемся в окно Персонализация (см. рис. 3.12). В левой части окна вы увидите следующие команды:? Панель управления — домашняя страница — позволяет быстро перейти к Панели управления;? Изменения значков рабочего стола —
2.5.4. Настройка рабочего стола
2.5.4. Настройка рабочего стола
Настроить рабочий стол под свои вкусы и интересы — вещь, безусловно, необходимая, поскольку именно вы работаете на компьютере и должны чувствовать себя удобно и комфортно. Аналогично папкам, на рабочем столе Windows можно выровнять и
Настройка значков Рабочего стола
Настройка значков Рабочего стола
Вы можете открыть окно настройки значков Рабочего стола, щелкнув кнопкой мыши в окне Персонализация на ссылке Изменить значки рабочего стола, которая находится на левой панели окна. В появившемся окне (рис. 2.26) можно включать или
Компания Microsoft даже если бы и хотела кардинально преобразить иконки Windows, представив на обозрение пользователей их, скажем, в каком-нибудь кричащем стиле с красной или фиолетовой цветовой гаммой, она этого никогда не сделает. Причина – узкие рамки концепции. Дизайн-концепция любого продукта предусматривает его узнаваемость массами, и его внешнее преображение не должно выходить за определённые рамки.
Именно потому от версии к версии Windows мы можем наблюдать некую визуальную трансформацию иконок, но эти изменения вряд ли можно назвать кардинальными. От ХР к Vista, от Vista к «Семёрке», от «Семёрки» к «Восьмёрке» увидим практически один и тот же дизайн иконок Windows с преобладанием жёлтых оттенков. Даже в новой версии Windows 10, где иконки больше всего не похожи на имеющиеся во всех остальных версиях операционной системы, они лишь обрели плоскость очертаний и изменённую прорисовку. Но всё так же остались в жёлтой цветовой гамме и с теми же отдельными элементами картинок.
Благо, в системе Windows смена приевшейся картины – дело рук самих пользователей. Ниже рассмотрим, как сменить иконки Windows.
Что являют собой файлы иконок?
Файлы иконок Windows имеют расширение «.ico» и являют собой картинку небольшого размера, как правило, не более 48х48 пикселей. Самые распространённые размеры картинок иконок – это 16х16, 32х32 и 48х48 пикселей. Могут быть размеры и побольше – например, 64х64 или 128х128 пикселей, но это, в большинстве случаев, уже сторонние иконки, специально создаваемые для замены стандартных. В старых версиях системы большие размеры иконок могут отображаться некорректно, потому среди файлов установки программ редко когда встретим файлы иконок с большими размерами картинки. Помимо файлов с расширением «.ico», в качестве иконок в Windows можно задействовать и другие типы файлов – например, файлы запуска «.exe» или файлы библиотек «.dll». Однако таковые не особо хорошо смотрятся при увеличенных масштабах ярлыков.
Иконки, специально создаваемые профессиональными дизайнерами, могут содержать несколько изображений разных размеров.
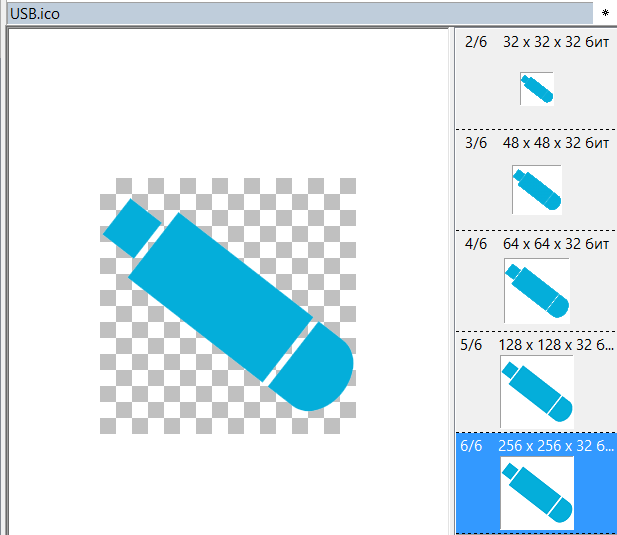
При уменьшении масштаба ярлыков картинки таких иконок не будут терять резкость, а при увеличении – соответственно, детализацию. Если изображений в иконке несколько, компьютер автоматически подбирает нужный размер для отображения, и такие ярлыки всегда смотрятся привлекательно – будь это системный проводник, будь это стартовый Metro-экран с плитками, будь это док-панель или панель запуска внутри стороннего файлового менеджера.
Где взять иконки для Windows?
Если не для подмены ярлыков запуска одних программ иконками совершенно других, дабы внести хаос в работу жертв таких розыгрышей, а для безобидного изменения дизайна Windows, естественно, на компьютере должны быть сторонние иконки.
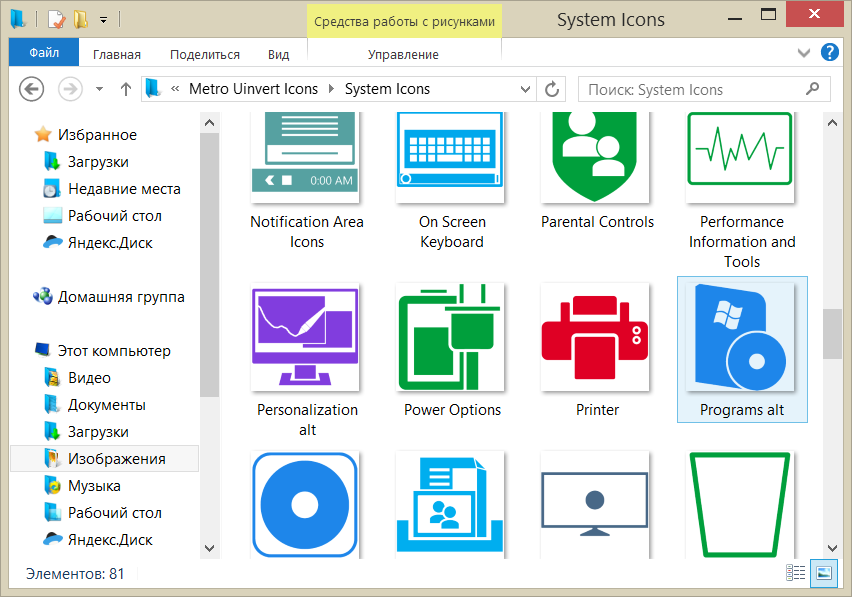
Их коллекциями можно скачать в Интернете, введя ключевой запрос типа «Иконки скачать» или «Icons Pack скачать». Архивный файл с коллекцией иконок необходимо распаковать и поместить где-то в укромное место. Папки с иконками желательно в дальнейшем не перемещать и не переименовывать, ведь тогда будет утерян путь размещения, настроенный для ярлыков, и всё нужно будет настраивать заново.
Иконки можно создать самостоятельно из собственных изображений. Любым из графических редакторов (даже тем же штатным Paint) нужную картинку можно обрезать и уменьшить в размере, например, до 48х48 пикселей. Затем сохранить в формате BMP. После этого расширение «.bmp» в проводнике Windows или стороннем файловом менеджере переименовывается на «.ico». И всё — иконка готова.
Изображение практически любого формата можно преобразовать в ICO с помощью программных или онлайн-конвертеров. Для создания иконок есть специальные небольшие программки по типу минималистичного графического редактора — например, Easy Picture2Icon, M-Icon Editor, IconUtils, ArtIcons и прочие.
Как сменить иконку папки
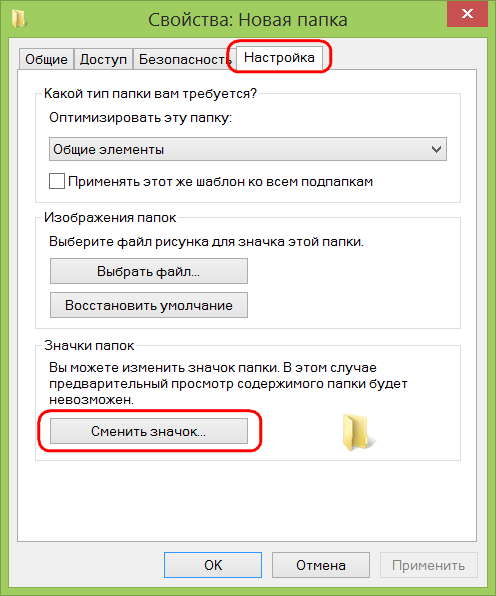
Для каждой отдельной папки в Windows можно настроить свою уникальную иконку. Для этого нужно выбрать эту самую папку и с помощью контекстного меню открыть её свойства.
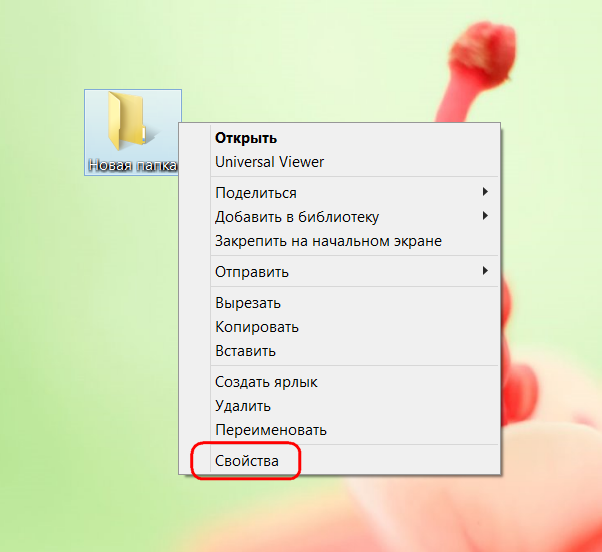
Во вкладке «Настройка» окна свойств папки жмём кнопку смены значка.
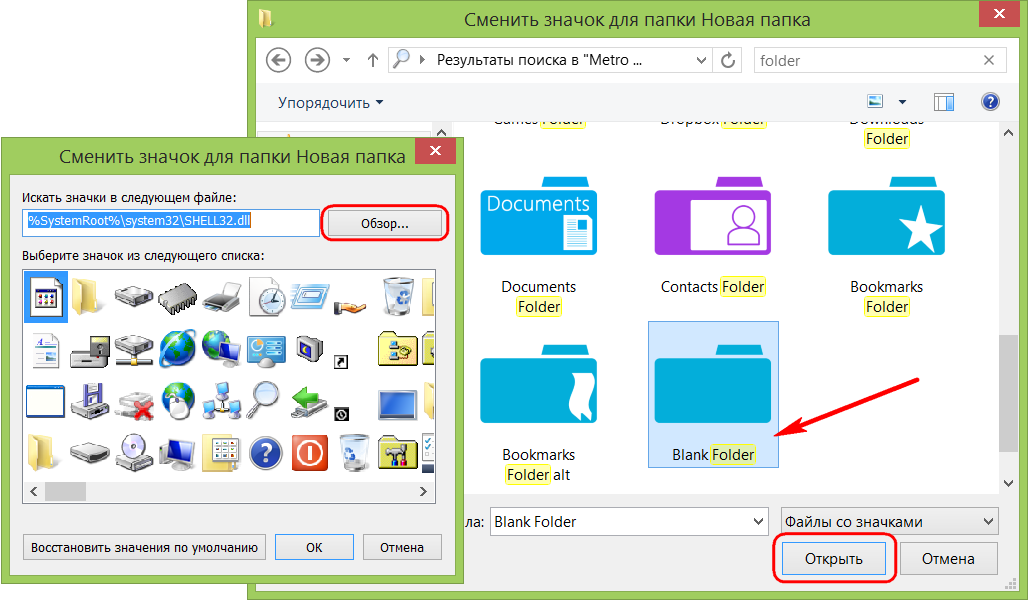
Увидим подборку существующих в системе значков, но не они нам нужны, и так уже приелись. Жмём кнопку обзора, в проводнике выбираем папку с сохранёнными иконками и открываем файл понравившейся.
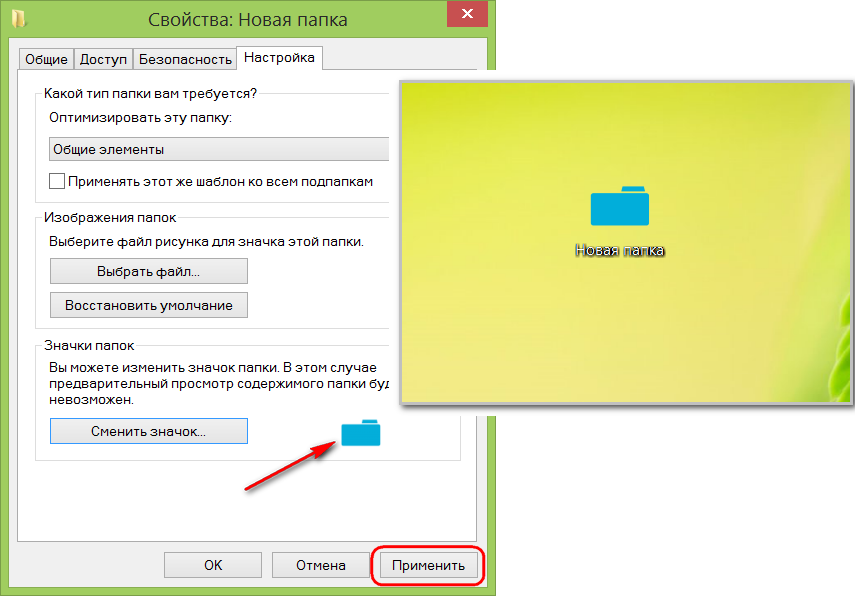
Вернувшись в окно свойств, жмём кнопку «Применить». И можем наблюдать, как папка преобразилась.
Как сменить иконку ярлыка
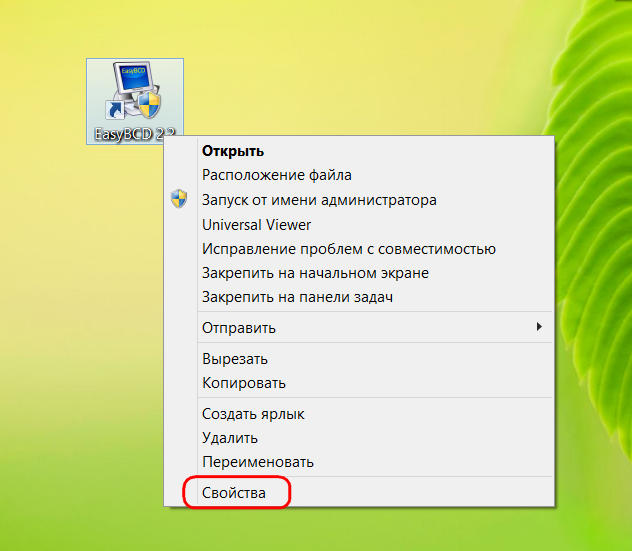
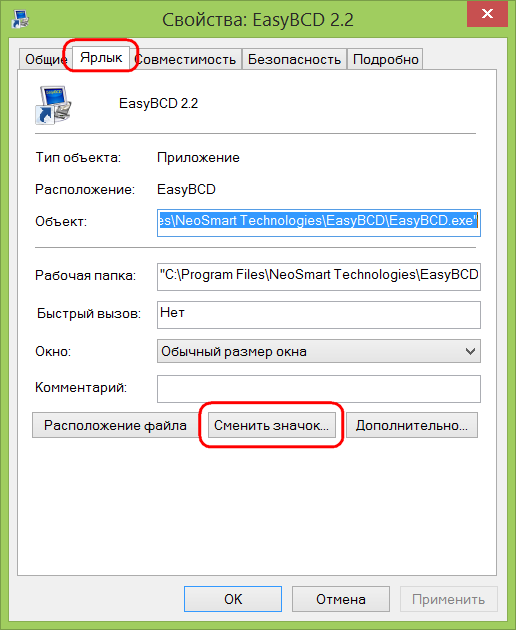
Как и для папки, для каждого отдельного ярлыка запуска программы, штатной службы, сохранённой веб-страницы или прочего объекта можно назначить другую иконку. Вызываем на ярлыке контекстное меню и жмём «Свойства».
Во вкладке «Ярлык» кликаем кнопку смены значка.
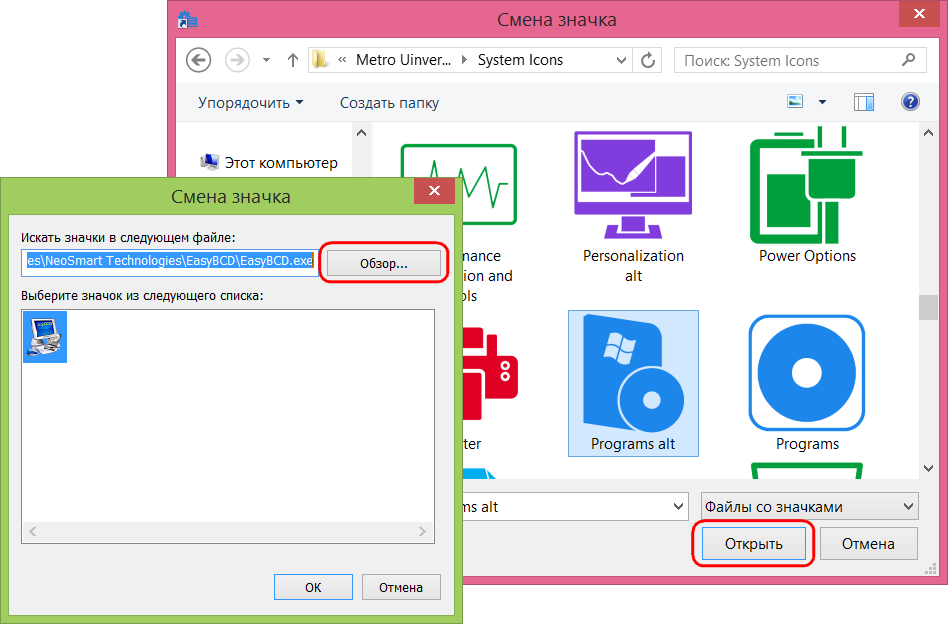
Далее нажимаем кнопку обзора и в проводнике указывать путь к иконке.
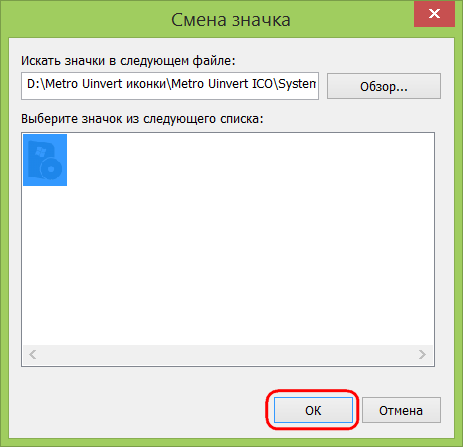
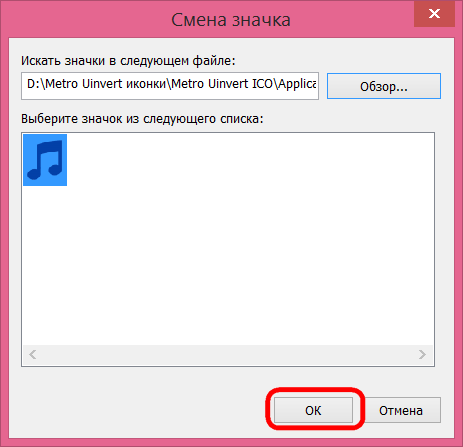
Жмём «Ок» в окне смены значка.
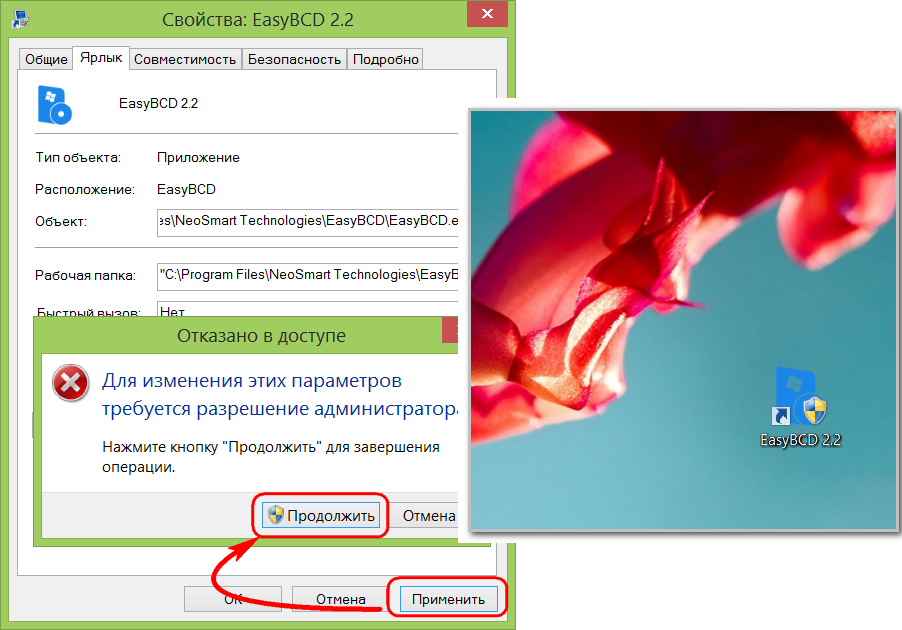
Вернувшись в окно свойств ярлыка, кликаем внизу «Применить» и подтверждаем решение в окошке запроса прав администратора. После чего можем наблюдать этот ярлык с уже изменённой иконкой.
Как сменить иконки рабочего стола
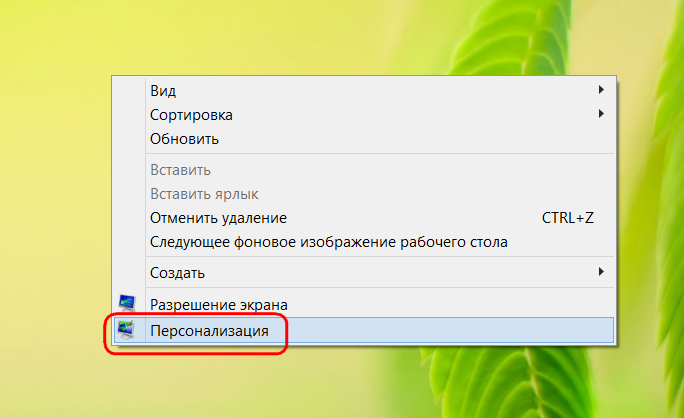
Свои иконки для некоторых элементов рабочего стола – содержимого компьютера, пользовательского профиля, сети, корзины и пр. – можно настроить в разделе персонализации. На пустом месте рабочего стола вызываем контекстное меню и выбираем, собственно, пункт «Персонализация».
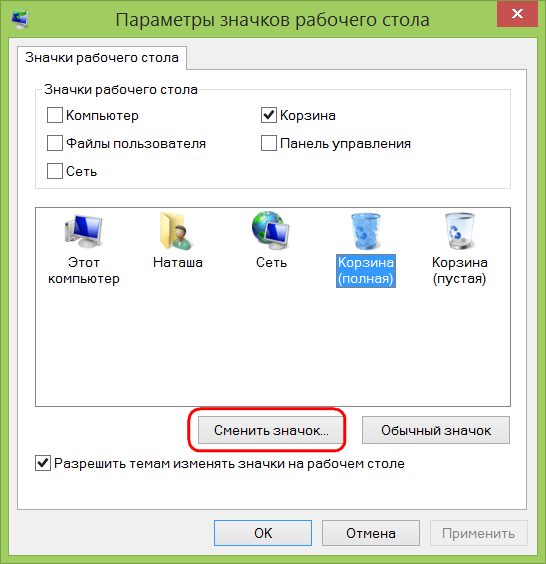
Вверху слева жмём ссылку изменения значков рабочего стола.

Для каждого элемента в отдельности кликаем кнопку «Сменить значок».
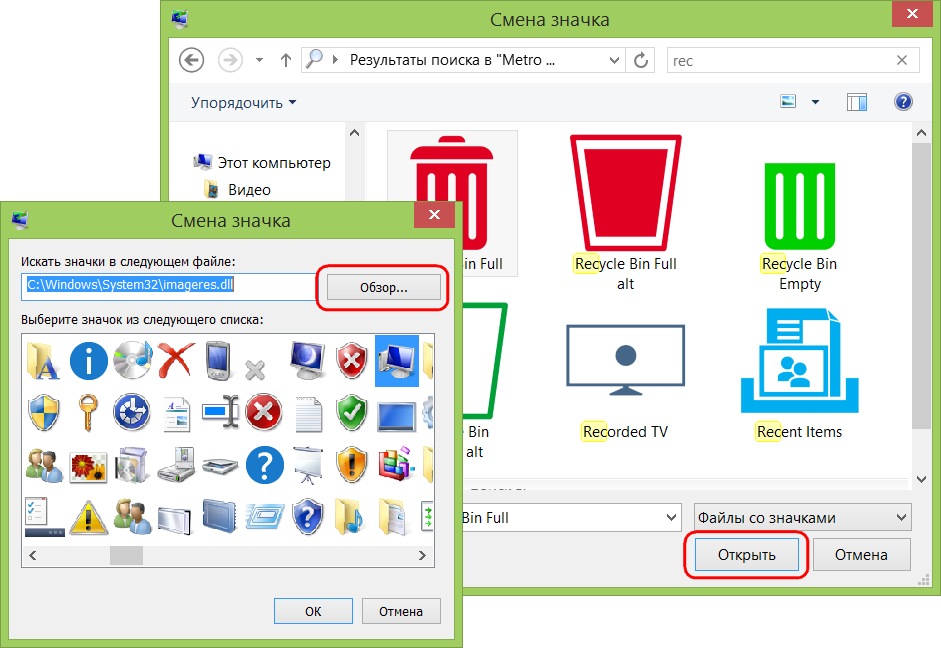
Затем, нажав кнопку обзора, выбираем иконку в проводнике.
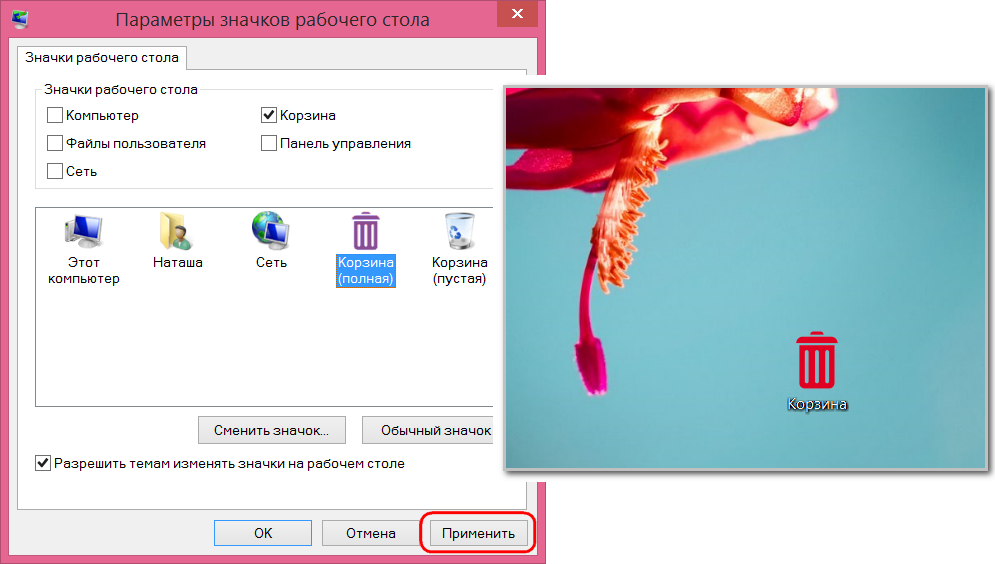
После применения изменений выбранный элемент рабочего стола преобразится.
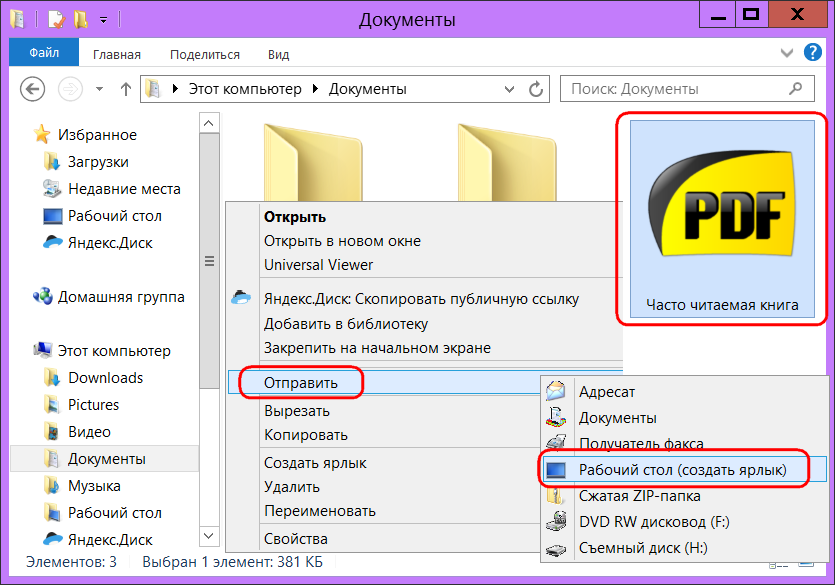
Как сменить иконку файла
Windows не предусматривает возможность смены иконок для отдельных файлов. Документы, видео-, аудиозаписи, рисунки и прочие файлы будут иметь облик приложения, которое их воспроизводит по умолчанию. Тем не менее, придать уникальный вид отдельным часто запускаемым файлам можно, создав для них ярлыки на рабочем столе и настроив иконки этих ярлыков указанным выше способом.
Как сменить иконку типа файлов
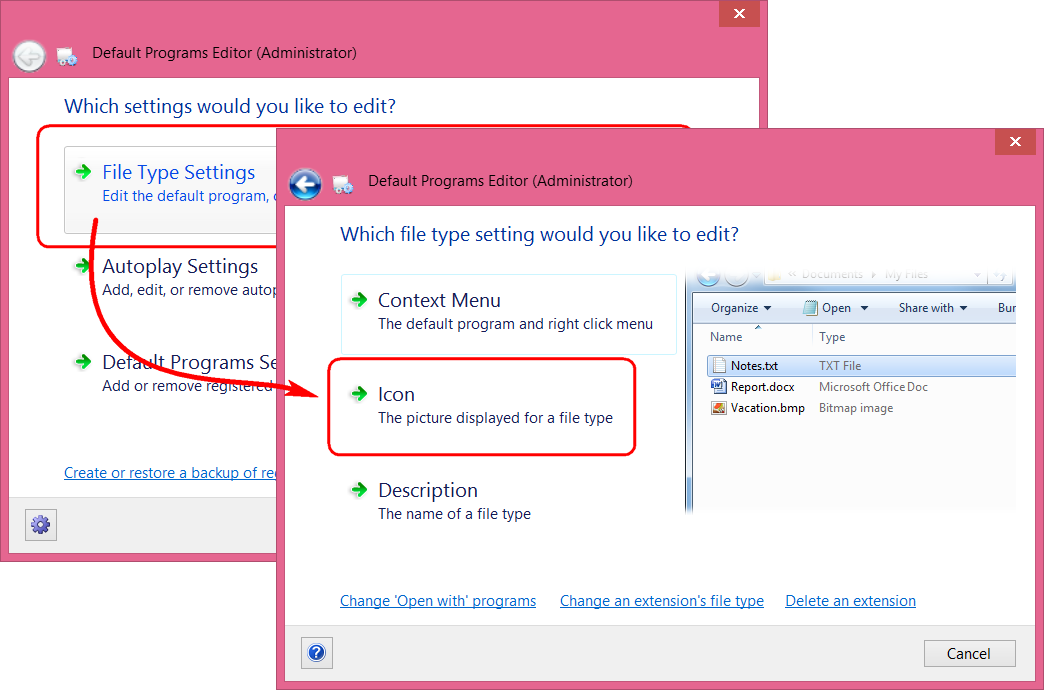
Не предусматривает Windows и настройку пользовательских иконок для отдельных типов файлов. Но это возможно с помощью бесплатной сторонней программы Default Programs Editor. Она предназначена для редактирования контекстного меню Windows и изменения настроек ассоциаций файлов.
После запуска программы жмём «File Type Setings», затем – «Icon».
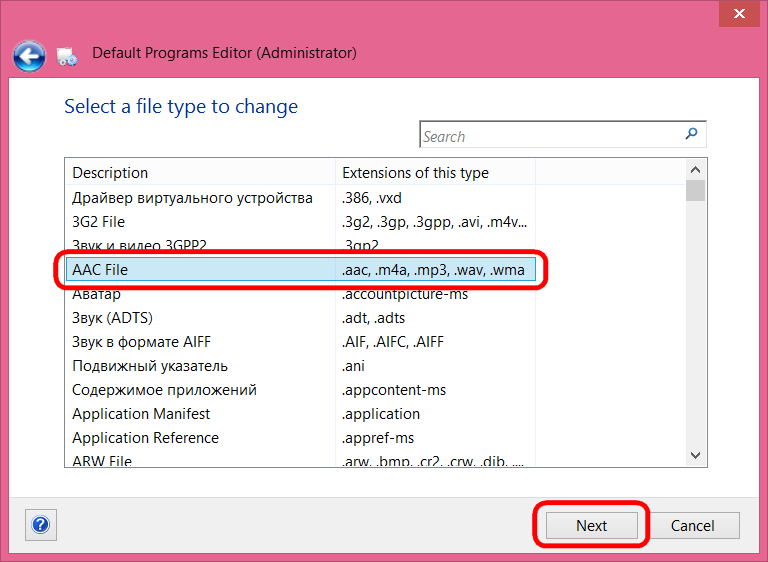
Далее выделяем нужный тип файлов и жмём «Next».
В следующем окне жмём «Browse».
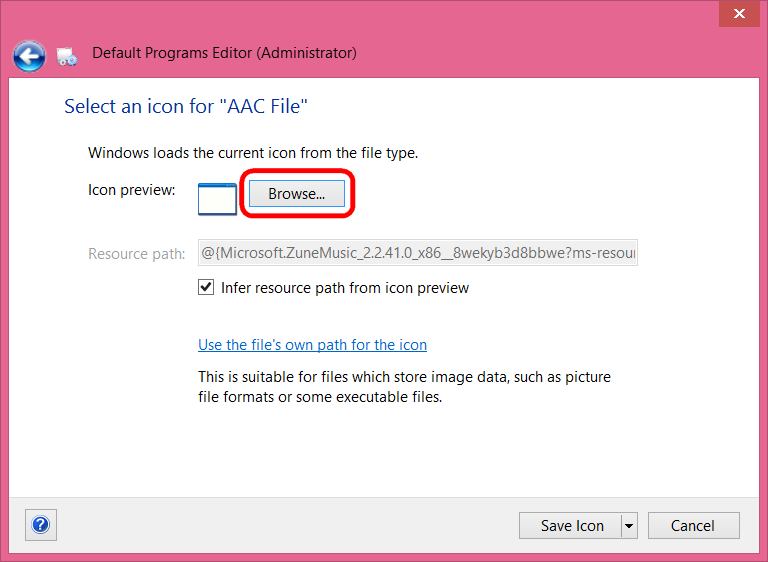
Затем нажимаем ещё одну кнопку обзора (уже системную) для указания пути к нужной иконке.
Подтверждаем выбор.
Сохраняем иконку для выбранного типа файлов нажатием кнопки «Save Icon».
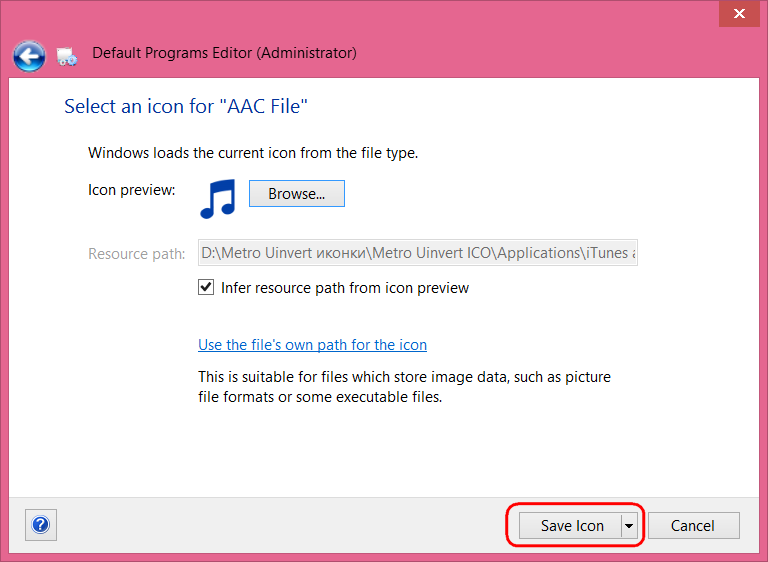
Можем смотреть, что изменилось: тогда как прочие типы файлов будут отображаться значками своих приложений, у настроенного только что типа файлов будет собственная иконка.

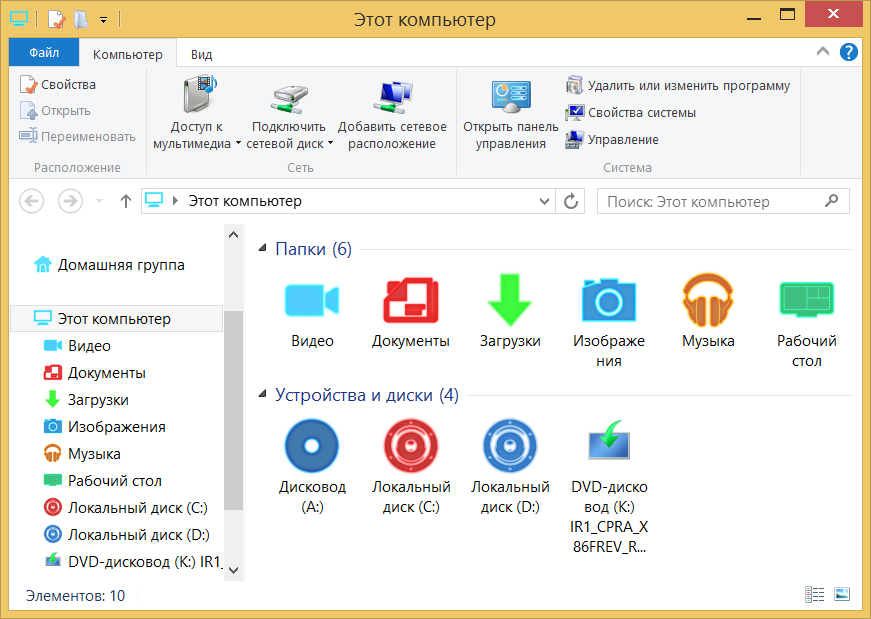
Автоматическая смена иконок с помощью патчей
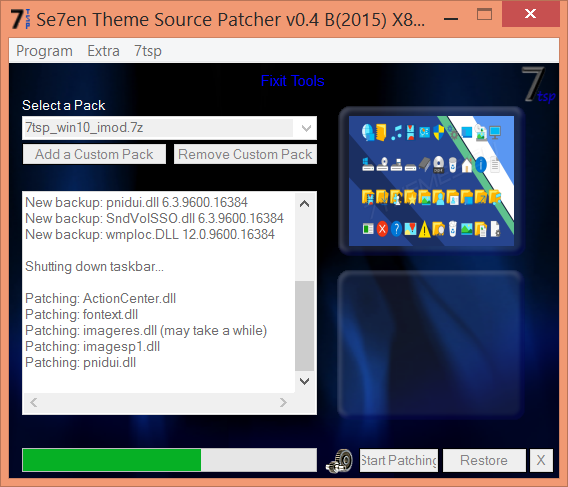
Выше мы рассмотрели способы ручной настройки иконок для отдельных элементов. Но стандартные иконки Windows можно автоматически заменить на другие – созданные в едином стиле коллекции. Тематические иконки, внедряемые в Windows с помощью патчей, заменяют стандартные значки папок, устройств и дисков, элементов сети, рабочего стола, панели управления и прочих объектов системы. Применение патча для смены системных иконок – куда проще способ освежить внешней вид системы, нежели ручная настройка значков папок и ярлыков, однако это далеко не самое безопасное действо.
Внедрение патчей для смены иконок, тем оформления, курсоров, применение твиков системы и подобного рода операции с вмешательством в настройки Windows могут иногда заканчиваться неудачно – от лёгких подтормаживаний проводника при дальнейшей работе до синего экрана смерти. Потому при скачивании в Интернете патчей для смены иконок желательно ознакомиться с отзывами пользователей – либо благодарящих владельца сайта за выкладку столь прекрасных программ, либо проклинающих его за распространение убийц системы.
Ну и как же без базовых правил безопасности? Перед любыми трансформационными операциями с применением патчей необходимо создать точку восстановления или резервную копию.
Патчи для применения сторонних иконок можно встретить в виде универсальных утилит, которые могут работать с несколькими пакетами иконок.
А уже сами пакеты иконок, работая в связке с таким патчем, подбираются отдельно на вкус и цвет каждого.
Другой тип патчей – отдельные коллекции, внедряемые в систему с помощью собственного инсталлятора.
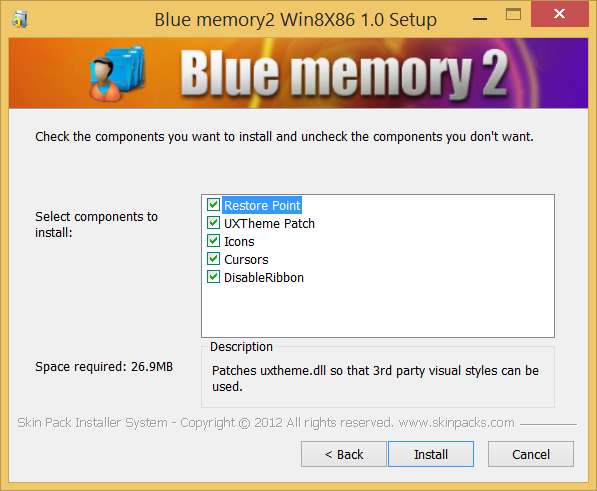
Пропатчивание Windows проводится в процессе инсталляции таких программ.
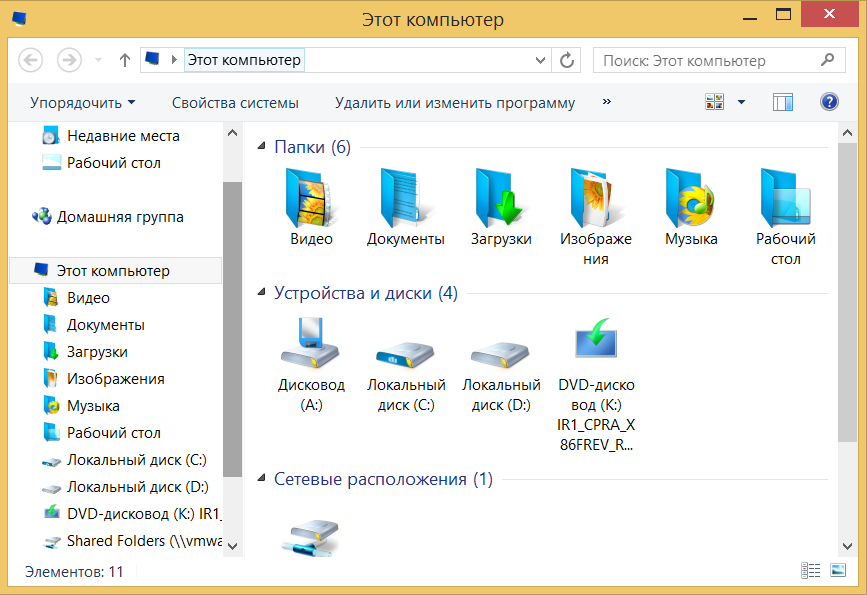
И без лишней возни на выходе получаем уже готовый результат – изменённый дизайн иконок.
![]() Загрузка…
Загрузка…
Последнее обновление в Февраль 12 2021 De
Привет друзья, в сегодняшнем уроке мы увидим, как мы можем изменить приложения значки, значки Мой компьютер, Корзина и значки разделов. Метод чрезвычайно прост и не требует никакого программного обеспечения. Чтобы изменить иконки в Windows, могут быть использованы различные методы использования дополнительных приложений, но я решил не усложнять сегодня. Использование ПО менять иконки, у нас есть тот недостаток, что программное обеспечение будет иметь, чтобы пойти в запуске (с окнами), а также программное обеспечение и изменить иконки на окнах будет оставаться до тех пор, как программное обеспечение установлено. Если удаление программного обеспечения, значки окон вернется к нормальному или хуже будет отображаться как для неизвестного файла. Все, что вам нужно сделать, это изменить иконки быть очень осторожными, чтобы видео-учебник и иметь под рукой некоторые значки дюйма Ico, что вы найдете тысячи на Google. Нам в прошлом я делал уроки по настройке именно об как мы можем изменить окнах Orb кнопку 7 и Vista,. Я уверен, что это руководство будет очень полезно для тех, кто увлечен настройки поэтому я могу только Предлагаем вашему вниманию видео-учебник. Ниже приведены несколько нот в случае, если вы хотите изменить иконки раздела. Пожалуйста, посмотрите внимательно на учебнике написано ниже, чтобы сделать смысл!
Текст, который должен быть записан в файле «Autorun.inf» для изменения значков разделов:
[Autorun]
ICON = Driveicon.ico
Как только значок будет размещен вместе с файлом «Autorun.inf» в разделе, вам нужно будет перезапустить его, чтобы отобразить на «Моем компьютере». Как и для изменения значков на разделах, вы также можете изменить значок на USB-накопителе или карте памяти, чтобы при вставке карты памяти или карты памяти в другой ПК значки который вы установите, будет отображаться.
СКАЧАТЬ Icons Pack для Windows
Помните, что если у вас есть предложения, жалобы или дополнения, не стесняйтесь писать в поле для комментариев, де-также, если вы встретились в поле для комментариев у пользователя есть проблемы, и вы можете помочь ему, не стесняйтесь делать это, единственный способ, которым мы можем сделать это место лучше, увидеть в поле для комментариев!
На поле для комментариев пытается получить немного на эту тему, так что другие посетители могут предложить учебник + комментарии соответствующие комментарии могут быть дополнительная поддержка для пользовательских ошибок, или желание учиться.
Перед тем как задать вопрос, попробуйте обратиться комментариям старейших, в большинстве случаев там уже ответил на ваш вопрос.
Используйте больше категорий в верхней части сайта и поисковой системы с правого угла, чтобы быстро добраться до того, что вас интересует, мы имеем над 500 учебных пособий, которые охватывают почти каждый жанр программного обеспечения, мы поняли, я вы просто должны искать их и наблюдать за ними.
Инструкция по применению videotutorial.ro
Search Engine.
Если, например, у вас есть проблемы с Yahoo Messenger, вы можете ввести в наших терминах поисковых систем, таких как Yahoo, Mess, Messenger, ID беспорядок, multimess проблемы мессенджера, ошибки мессенджера и т.д., вы увидите, что у вас будет выбор.
Категории.
Если вы используете категорию раскрывающийся, они находят планку в домашних категориях: Офис, Графический дизайн, оборудование, Интернет, мультимедиа, безопасности, системы, хранения, резервного копирования, под эти категории организованы подкатегории и суб-суб -categorii, это более точной фильтрации. Для того, чтобы найти что-то связанное с Yahoo Messenger, используя категории можно привести категорию:ИнтернетТам будет открывать другие подкатегории, где вы выбираете Голос-чатОттуда вы можете пойти на подкатегории YahooИ, наконец, с этими фильтрами поступит на страницу, где только элементы, связанные с Yahoo Messenger или Yahoo Mail.
Архивы.
на архив Вы можете найти все наши обучающие программы, организованные красивые дни saptameni, месяцы и годы.
Все логично, просто следовать логике.
Наслаждайтесь!
Адриан Burlugeanu…… ..linux.videotutorial.ro
![]()
Download Article
An in-depth guide to editing the size and image of your Windows desktop icons
![]()
Download Article
- Showing or Hiding Desktop Icons
- Resizing Desktop Icons
- Changing System Desktop Icons
- Changing Shortcut and Folder Icons
- Adding Shortcuts to the Desktop
- Creating Icon Images
- Downloading Icons
- Q&A
- Tips
- Warnings
|
|
|
|
|
|
|
|
|
Do you want to customize the appearance of the icons on your Windows desktop? You can adjust icons by using the «Properties» options or you make new desktop icons entirely. You’ll only be able to change the icon for system desktop icons, folders, and shortcuts. This wikiHow will show you how to change a desktop icon’s appearance and how to download or create a custom icon on your Windows computer.
Things You Should Know
- Right-click the desktop. Hover over «View», then uncheck «Show desktop icons» to hide them.
- Right-click the desktop, hover over «View», then select a new icon size.
- To change icons, right-click the folder or shortcut. Click «Properties» → «Customize/Shortcut» → «Change Icon».
-

1
-
2
Hover your cursor over «View». This will be at the very top of the menu.
Advertisement
-
3
Click Show desktop icons. When this option in unchecked, all desktop icons will be hidden.
- To show desktop icons again, click Show desktop icons.
Advertisement
-
1
Right-click your desktop. For easier navigation, be sure to minimize all open windows.
- A pop-up menu will open.
-
2
Hover your cursor over «View». This will be at the very top of the menu.
-
3
Select your icon size. You can click Large icons, Medium icons, or Small icons. After clicking, your desktop icons will be changed immediately.
- You can also hold CTRL and scroll up or down on your mouse to increase or decrease the icon size.
Advertisement
-
1
Open Start
. Click the Windows logo in the bottom-left corner of the screen, or press the Windows key.[2]
-
2
Click Settings
. It’s in the lower-left side of the Start window.
-
3
Click Personalization. This is the monitor-shaped icon on the Windows Settings page.
- You can also access this page by right-clicking a blank space on the desktop and then clicking Personalization in the drop-down menu.
-
4
Click Themes. It’s a tab on the left side of the Personalization window.
-
5
Click Desktop icon settings. This link is in the upper-right side of the Themes page. Clicking it opens the Desktop Icon Settings window.
- If you haven’t edited your theme at all, this link will be in the middle of the page beneath the «Related Settings» heading.
- You can also click Get more themes in the Store below the «Apply a theme» heading to browse desktop themes. Some themes will change your desktop icons’ appearances.
-
6
Click an icon you want to change. This will select the icon.
- For example, you might click This PC or Recycle Bin.
- You can also check the box next to a desktop icon’s name at the top of the window to make it appear on your desktop, or uncheck the box to remove it from the desktop.
- Check the «Allow themes to change desktop icons» box on this window to enable theme-related icon changes.
-
7
Click Change Icon. It’s near the bottom of the window.
-
8
Select an icon. You can select two different types of icons:
- System icon: Click an icon in the window.
- Custom icon: Click Browse, then click the folder that your custom icons are in on the left side of the window. Select the icon you want to use, then click Open.
-
9
Click OK. This will assign your selected icon to the desktop program.
-
10
Click Apply, then click OK. Doing so confirms your decision and changes the desktop program’s icon to your selected icon.


Advertisement
-
1
Open the File Explorer
. You can find this icon at the lower-left side of your taskbar, or you can press the Start menu and search for File Explorer.
- You cannot change the icons of specific files (e.g., Notepad files or .exe files) using this method. You’ll only be able to customize desktop shortcuts and folders with this method.
-
2
Click Desktop. It’s a folder in the left-hand column of options in the File Explorer window.
- This may already be pinned under Quick access.
-
3
Click a shortcut or folder icon. Shortcut icons have a white box with an arrow in their lower-left corners.
-
4
Click the Home tab. It’s in the upper-left corner of the File Explorer window. Doing so will open a toolbar at the top of the window.
-
5
Click Properties. This is a white box with a red checkmark in the «Open» section of the toolbar.
- You can also right-click on the icon on your desktop and then click Properties to get to this menu.
- If the icon is pinned to your task bar, you can right-click it and click Properties to get this menu.
-
6
Click Customize or Shortcut. This will be located at the top of the Properties window.
- Shortcut: Click the Shortcut tab at the top of the Properties window.
- Folder: Click the Customize tab at the top of the Properties window.
-
7
Click Change Icon. This will be near the bottom of the window.
-
8
Select an icon. You can select two different types of icons:
- System icon — Click an icon in the window.
- Custom icon — Click Browse, then click the folder that your custom icons are in on the left side of the window. Select the icon you want to use, then click Open.
-
9
Click OK. This will assign your selected icon.
-
10
Click Apply, then click OK. Doing so confirms your decision and changes the original icon to your selected icon.

Advertisement
-
1
Open the File Explorer
. You can find this icon at the lower-left side of your taskbar, or you can press the Start menu and search for File Explorer.
-
2
Click the Desktop folder. It’s on the left side of the File Explorer window.
- This may already be pinned under Quick access.
-
3
Click the Home tab. You’ll find this tab in the upper-left side of the File Explorer window.
-
4
Click New item. It’s in the «New» section of the tool bar at the top of the window.
-
5
Click Shortcut. This option is in the New item drop-down menu. A window with options for your new shortcut will appear.
-
6
Click Browse. It’s in the middle of the page. Doing so opens a pop-up window.
-
7
Scroll down and click the program’s or file’s folder. For example, if the program or file is in the Documents folder, you’d click My Documents.
- You may have to click through several different folders to find the program or file for which you want to create a shortcut.
-
8
Click OK. Doing so sets the desktop shortcut’s target as your selected item.
- If you rename the desktop icon or move it to a new folder, your shortcut will no longer work.
-
9
Click Next, then enter a name. The default name for the shortcut is the same name as the program itself.
-
10
Click Finish. It’s in the bottom-right corner of the window. This will create your shortcut in the folder you selected.
Advertisement
-
1
Open the Paint application on your computer. If you don’t have the Paint application, you can download it from the Microsoft Store.
- Use this method if you want to create custom icons.
-
2
Click File. It’s a blue button in the upper-left corner of the Paint window.
-
3
Click Open. This option is in the File menu. Doing so opens a window where you can open a file location.
- If you’d rather create your own icon by drawing in Paint, skip this step and instead create your drawing.
-
4
Select a picture. You may have to click a location on the left side of the Open window (e.g., Pictures) to find the picture you want to open.
- Skip this step if you’re drawing your own icon.
-
5
Click Open. This will open your image in the Paint window.
- Skip this step if you’re drawing your own icon.
-
6
Click File again. It’s in the top-left corner of Paint.
-
7
Select Save as. This option is near the top of the File menu.
-
8
Click BMP picture. It’s an option to the right of the Save as button. Doing so opens a Save As window where you can name your file.
-
9
Type in your file’s name followed by
.ico. This will ensure that your file is saved as an icon file.- For example, you might name your file «shortcut.ico».
-
10
Navigate to a save location. Do so in the left-hand pane of the Save As window.
- The Pictures folder is a safe place to save your shortcut file.
-
11
Click Save. It’s at the bottom of the window. Doing so will save your icon in your selected folder.
-
12
Change a program’s icon using your created icon. You’ll use the Browse method and select your custom icon from the folder where you saved it.
Advertisement
-
1
Open a web browser. Microsoft Edge is the official Windows 10 browser, though you can use Google Chrome, Firefox, Opera, or another browser.
-
2
Search for Windows icons. Type «download windows desktop icons» into your browser’s address bar or a search engine and press Enter.
- You can narrow your search by entering the program’s name (e.g., «Windows my computer icon») or by using the icon file type (e.g., «ICO»).
- Some popular icon websites include:
- https://www.flaticon.com/
- https://feathericons.com/
- https://fontawesome.com/
- https://boxicons.com/
-
3
Download the icons you want. You can do this by opening a site that has your icons and clicking the Download button. Doing so will save the icons to your computer.
- If you download multiple icons at once, you may have to extract the icons to a regular folder before continuing.
-
4
Open the File Explorer
. You can find this icon at the lower-left side of your taskbar, or you can press the Start menu and search for File Explorer.
-
5
Click Desktop. This folder is on the left side of File Explorer.
-
6
Click your icons folder. Doing so selects it.
- If you just downloaded one icon, select the icon instead.
-
7
Click Home. This tab is in the upper-left corner of the File Explorer window.
-
8
Click Move to. It’s in the «Organize» section of the toolbar at the top of the File Explorer window.
-
9
Click Pictures. This folder is near the middle of the pop-up window.
- You can select any folder on your computer if you don’t want to place your icons in Pictures.
-
10
Click Move. This will send your icons to a folder where you won’t move or delete them.
-
11
Change a program’s icon using your downloaded icon. You’ll use the Browse method and then select an icon from within the Pictures folder to do this.
Advertisement
Add New Question
-
Question
I lost the icon for my email. How do I get it back on my desktop?

Click on your Windows key and type your email program. Then, just drag it onto your desktop.
-
Question
How do I change the background of icon names on my desktop in XP?
Highlight then right-click, and a list of things should pop up. Click on «change.»
-
Question
How do I put icons on my desktop from a program?
If on windows, search using the windows key for the program and then drag and drop it onto your desktop.
See more answers
Ask a Question
200 characters left
Include your email address to get a message when this question is answered.
Submit
Advertisement
-
Some themes will change your desktop icons. To enable this feature, open the Desktop Icon Settings window from within Personalization, then check the «Allow themes to change desktop icons» box and click OK.
-
You can find themes for Windows 10 in the Store, which is an app that comes preinstalled on Windows 10.
Thanks for submitting a tip for review!
Advertisement
-
If you move or delete an icon file, the program you were using the file with will stop displaying the icon.
Advertisement
About This Article
Article SummaryX
1. Click the Start menu and select Settings.
2. Click Personalization.
3. Click Themes.
4. Click Desktop icon settings.
5. Select an icon to change.
6. Click Change Icon.
7. Select a new icon and click OK.
8. Click OK.
Did this summary help you?
Thanks to all authors for creating a page that has been read 2,287,121 times.
Is this article up to date?
![]()
Download Article
An in-depth guide to editing the size and image of your Windows desktop icons
![]()
Download Article
- Showing or Hiding Desktop Icons
- Resizing Desktop Icons
- Changing System Desktop Icons
- Changing Shortcut and Folder Icons
- Adding Shortcuts to the Desktop
- Creating Icon Images
- Downloading Icons
- Q&A
- Tips
- Warnings
|
|
|
|
|
|
|
|
|
Do you want to customize the appearance of the icons on your Windows desktop? You can adjust icons by using the «Properties» options or you make new desktop icons entirely. You’ll only be able to change the icon for system desktop icons, folders, and shortcuts. This wikiHow will show you how to change a desktop icon’s appearance and how to download or create a custom icon on your Windows computer.
Things You Should Know
- Right-click the desktop. Hover over «View», then uncheck «Show desktop icons» to hide them.
- Right-click the desktop, hover over «View», then select a new icon size.
- To change icons, right-click the folder or shortcut. Click «Properties» → «Customize/Shortcut» → «Change Icon».
-
1
-
2
Hover your cursor over «View». This will be at the very top of the menu.
Advertisement
-
3
Click Show desktop icons. When this option in unchecked, all desktop icons will be hidden.
- To show desktop icons again, click Show desktop icons.
Advertisement
-
1
Right-click your desktop. For easier navigation, be sure to minimize all open windows.
- A pop-up menu will open.
-
2
Hover your cursor over «View». This will be at the very top of the menu.
-
3
Select your icon size. You can click Large icons, Medium icons, or Small icons. After clicking, your desktop icons will be changed immediately.
- You can also hold CTRL and scroll up or down on your mouse to increase or decrease the icon size.
Advertisement
-
1
Open Start
. Click the Windows logo in the bottom-left corner of the screen, or press the Windows key.[2]
-
2
Click Settings
. It’s in the lower-left side of the Start window.
-
3
Click Personalization. This is the monitor-shaped icon on the Windows Settings page.
- You can also access this page by right-clicking a blank space on the desktop and then clicking Personalization in the drop-down menu.
-
4
Click Themes. It’s a tab on the left side of the Personalization window.
-
5
Click Desktop icon settings. This link is in the upper-right side of the Themes page. Clicking it opens the Desktop Icon Settings window.
- If you haven’t edited your theme at all, this link will be in the middle of the page beneath the «Related Settings» heading.
- You can also click Get more themes in the Store below the «Apply a theme» heading to browse desktop themes. Some themes will change your desktop icons’ appearances.
-
6
Click an icon you want to change. This will select the icon.
- For example, you might click This PC or Recycle Bin.
- You can also check the box next to a desktop icon’s name at the top of the window to make it appear on your desktop, or uncheck the box to remove it from the desktop.
- Check the «Allow themes to change desktop icons» box on this window to enable theme-related icon changes.
-
7
Click Change Icon. It’s near the bottom of the window.
-
8
Select an icon. You can select two different types of icons:
- System icon: Click an icon in the window.
- Custom icon: Click Browse, then click the folder that your custom icons are in on the left side of the window. Select the icon you want to use, then click Open.
-
9
Click OK. This will assign your selected icon to the desktop program.
-
10
Click Apply, then click OK. Doing so confirms your decision and changes the desktop program’s icon to your selected icon.
Advertisement
-
1
Open the File Explorer
. You can find this icon at the lower-left side of your taskbar, or you can press the Start menu and search for File Explorer.
- You cannot change the icons of specific files (e.g., Notepad files or .exe files) using this method. You’ll only be able to customize desktop shortcuts and folders with this method.
-
2
Click Desktop. It’s a folder in the left-hand column of options in the File Explorer window.
- This may already be pinned under Quick access.
-
3
Click a shortcut or folder icon. Shortcut icons have a white box with an arrow in their lower-left corners.
-
4
Click the Home tab. It’s in the upper-left corner of the File Explorer window. Doing so will open a toolbar at the top of the window.
-
5
Click Properties. This is a white box with a red checkmark in the «Open» section of the toolbar.
- You can also right-click on the icon on your desktop and then click Properties to get to this menu.
- If the icon is pinned to your task bar, you can right-click it and click Properties to get this menu.
-
6
Click Customize or Shortcut. This will be located at the top of the Properties window.
- Shortcut: Click the Shortcut tab at the top of the Properties window.
- Folder: Click the Customize tab at the top of the Properties window.
-
7
Click Change Icon. This will be near the bottom of the window.
-
8
Select an icon. You can select two different types of icons:
- System icon — Click an icon in the window.
- Custom icon — Click Browse, then click the folder that your custom icons are in on the left side of the window. Select the icon you want to use, then click Open.
-
9
Click OK. This will assign your selected icon.
-
10
Click Apply, then click OK. Doing so confirms your decision and changes the original icon to your selected icon.
Advertisement
-
1
Open the File Explorer
. You can find this icon at the lower-left side of your taskbar, or you can press the Start menu and search for File Explorer.
-
2
Click the Desktop folder. It’s on the left side of the File Explorer window.
- This may already be pinned under Quick access.
-
3
Click the Home tab. You’ll find this tab in the upper-left side of the File Explorer window.
-
4
Click New item. It’s in the «New» section of the tool bar at the top of the window.
-
5
Click Shortcut. This option is in the New item drop-down menu. A window with options for your new shortcut will appear.
-
6
Click Browse. It’s in the middle of the page. Doing so opens a pop-up window.
-
7
Scroll down and click the program’s or file’s folder. For example, if the program or file is in the Documents folder, you’d click My Documents.
- You may have to click through several different folders to find the program or file for which you want to create a shortcut.
-
8
Click OK. Doing so sets the desktop shortcut’s target as your selected item.
- If you rename the desktop icon or move it to a new folder, your shortcut will no longer work.
-
9
Click Next, then enter a name. The default name for the shortcut is the same name as the program itself.
-
10
Click Finish. It’s in the bottom-right corner of the window. This will create your shortcut in the folder you selected.
Advertisement
-
1
Open the Paint application on your computer. If you don’t have the Paint application, you can download it from the Microsoft Store.
- Use this method if you want to create custom icons.
-
2
Click File. It’s a blue button in the upper-left corner of the Paint window.
-
3
Click Open. This option is in the File menu. Doing so opens a window where you can open a file location.
- If you’d rather create your own icon by drawing in Paint, skip this step and instead create your drawing.
-
4
Select a picture. You may have to click a location on the left side of the Open window (e.g., Pictures) to find the picture you want to open.
- Skip this step if you’re drawing your own icon.
-
5
Click Open. This will open your image in the Paint window.
- Skip this step if you’re drawing your own icon.
-
6
Click File again. It’s in the top-left corner of Paint.
-
7
Select Save as. This option is near the top of the File menu.
-
8
Click BMP picture. It’s an option to the right of the Save as button. Doing so opens a Save As window where you can name your file.
-
9
Type in your file’s name followed by
.ico. This will ensure that your file is saved as an icon file.- For example, you might name your file «shortcut.ico».
-
10
Navigate to a save location. Do so in the left-hand pane of the Save As window.
- The Pictures folder is a safe place to save your shortcut file.
-
11
Click Save. It’s at the bottom of the window. Doing so will save your icon in your selected folder.
-
12
Change a program’s icon using your created icon. You’ll use the Browse method and select your custom icon from the folder where you saved it.
Advertisement
-
1
Open a web browser. Microsoft Edge is the official Windows 10 browser, though you can use Google Chrome, Firefox, Opera, or another browser.
-
2
Search for Windows icons. Type «download windows desktop icons» into your browser’s address bar or a search engine and press Enter.
- You can narrow your search by entering the program’s name (e.g., «Windows my computer icon») or by using the icon file type (e.g., «ICO»).
- Some popular icon websites include:
- https://www.flaticon.com/
- https://feathericons.com/
- https://fontawesome.com/
- https://boxicons.com/
-
3
Download the icons you want. You can do this by opening a site that has your icons and clicking the Download button. Doing so will save the icons to your computer.
- If you download multiple icons at once, you may have to extract the icons to a regular folder before continuing.
-
4
Open the File Explorer
. You can find this icon at the lower-left side of your taskbar, or you can press the Start menu and search for File Explorer.
-
5
Click Desktop. This folder is on the left side of File Explorer.
-
6
Click your icons folder. Doing so selects it.
- If you just downloaded one icon, select the icon instead.
-
7
Click Home. This tab is in the upper-left corner of the File Explorer window.
-
8
Click Move to. It’s in the «Organize» section of the toolbar at the top of the File Explorer window.
-
9
Click Pictures. This folder is near the middle of the pop-up window.
- You can select any folder on your computer if you don’t want to place your icons in Pictures.
-
10
Click Move. This will send your icons to a folder where you won’t move or delete them.
-
11
Change a program’s icon using your downloaded icon. You’ll use the Browse method and then select an icon from within the Pictures folder to do this.
Advertisement
Add New Question
-
Question
I lost the icon for my email. How do I get it back on my desktop?
Click on your Windows key and type your email program. Then, just drag it onto your desktop.
-
Question
How do I change the background of icon names on my desktop in XP?
Highlight then right-click, and a list of things should pop up. Click on «change.»
-
Question
How do I put icons on my desktop from a program?
If on windows, search using the windows key for the program and then drag and drop it onto your desktop.
See more answers
Ask a Question
200 characters left
Include your email address to get a message when this question is answered.
Submit
Advertisement
-
Some themes will change your desktop icons. To enable this feature, open the Desktop Icon Settings window from within Personalization, then check the «Allow themes to change desktop icons» box and click OK.
-
You can find themes for Windows 10 in the Store, which is an app that comes preinstalled on Windows 10.
Thanks for submitting a tip for review!
Advertisement
-
If you move or delete an icon file, the program you were using the file with will stop displaying the icon.
Advertisement
About This Article
Article SummaryX
1. Click the Start menu and select Settings.
2. Click Personalization.
3. Click Themes.
4. Click Desktop icon settings.
5. Select an icon to change.
6. Click Change Icon.
7. Select a new icon and click OK.
8. Click OK.
Did this summary help you?
Thanks to all authors for creating a page that has been read 2,287,121 times.