About cloning a repository
You can clone a repository from GitHub.com to your local computer to make it easier to fix merge conflicts, add or remove files, and push larger commits. When you clone a repository, you copy the repository from GitHub.com to your local machine.
Cloning a repository pulls down a full copy of all the repository data that GitHub.com has at that point in time, including all versions of every file and folder for the project. You can push your changes to the remote repository on GitHub.com, or pull other people’s changes from GitHub.com. For more information, see «Using Git».
You can clone your existing repository or clone another person’s existing repository to contribute to a project.
Cloning a repository
-
On GitHub.com, navigate to the main page of the repository.
-
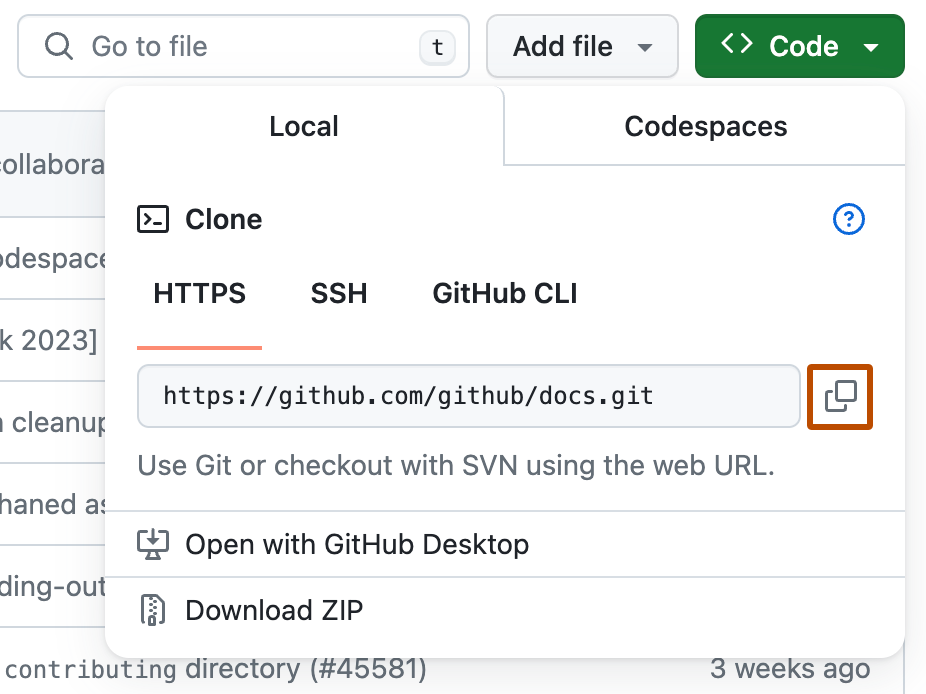
Above the list of files, click Code.

-
Copy the URL for the repository.
- To clone the repository using HTTPS, under «HTTPS», click .
- To clone the repository using an SSH key, including a certificate issued by your organization’s SSH certificate authority, click SSH, then click .
- To clone a repository using GitHub CLI, click GitHub CLI, then click .
-
Open TerminalTerminalGit Bash.
-
Change the current working directory to the location where you want the cloned directory.
-
Type
git clone, and then paste the URL you copied earlier.$ git clone https://github.com/YOUR-USERNAME/YOUR-REPOSITORY -
Press Enter to create your local clone.
$ git clone https://github.com/YOUR-USERNAME/YOUR-REPOSITORY
> Cloning into `Spoon-Knife`...
> remote: Counting objects: 10, done.
> remote: Compressing objects: 100% (8/8), done.
> remove: Total 10 (delta 1), reused 10 (delta 1)
> Unpacking objects: 100% (10/10), done.

To clone a repository locally, use the repo clone subcommand. Replace the repository parameter with the repository name. For example, octo-org/octo-repo, monalisa/octo-repo, or octo-repo. If the OWNER/ portion of the OWNER/REPO repository argument is omitted, it defaults to the name of the authenticating user.
gh repo clone REPOSITORYYou can also use the GitHub URL to clone a repository.
gh repo clone https://github.com/PATH-TO/REPOSITORY- On GitHub.com, navigate to the main page of the repository.
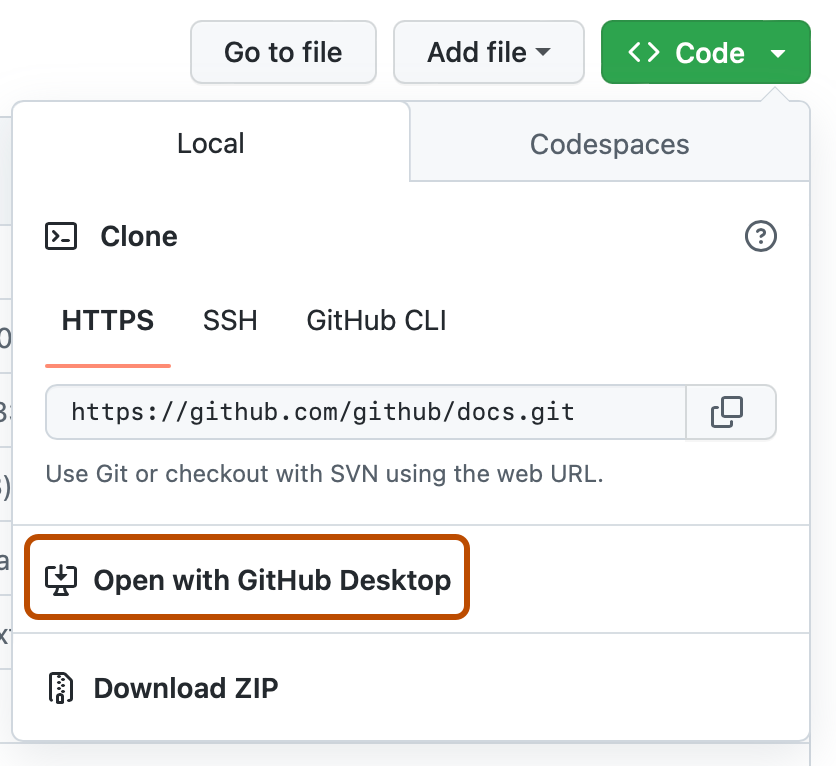
- Above the list of files, click Code.
- Click Open with GitHub Desktop to clone and open the repository with GitHub Desktop.
- Follow the prompts in GitHub Desktop to complete the clone.
For more information, see «Cloning a repository from GitHub to GitHub Desktop.»
Cloning an empty repository
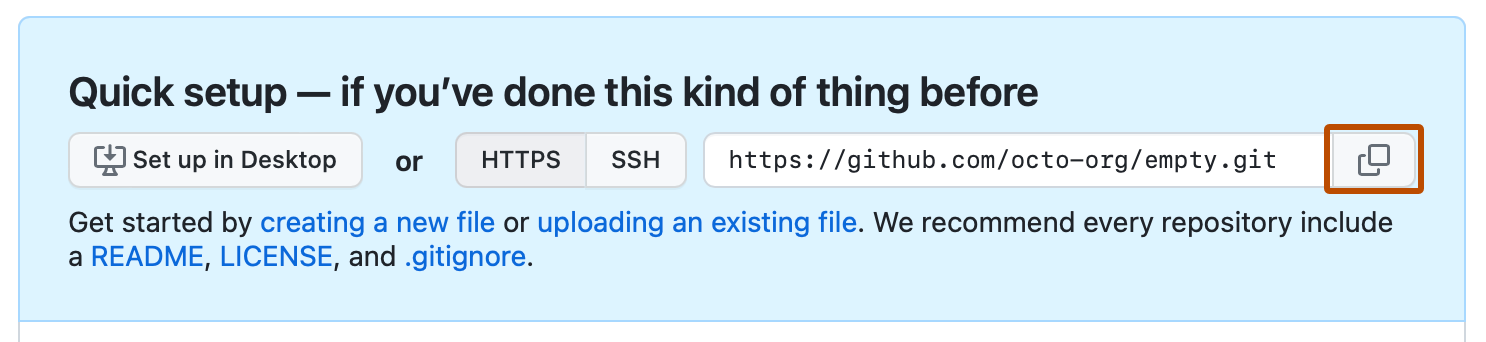
An empty repository contains no files. It’s often made if you don’t initialize the repository with a README when creating it.
-
On GitHub.com, navigate to the main page of the repository.
-
To clone your repository using the command line using HTTPS, under «Quick setup», click . To clone the repository using an SSH key, including a certificate issued by your organization’s SSH certificate authority, click SSH, then click .
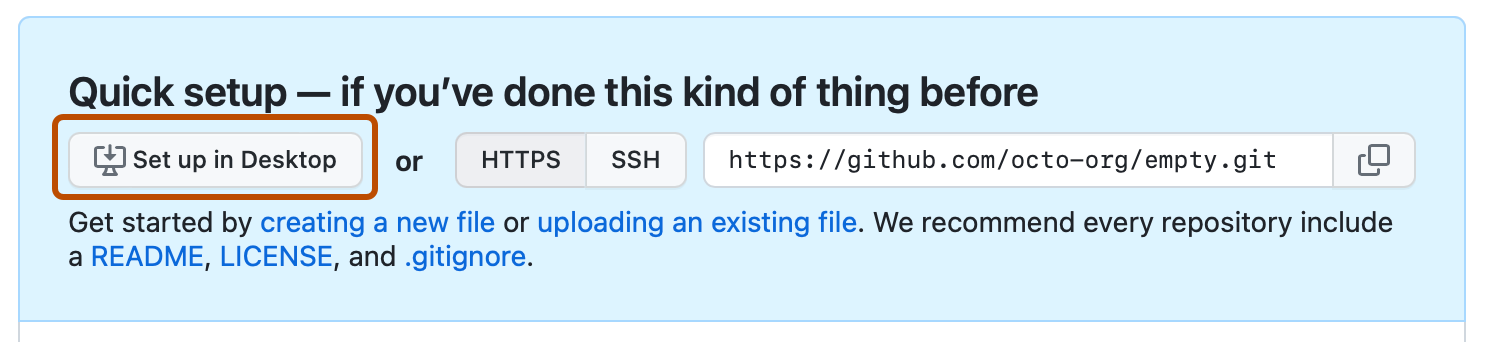
Alternatively, to clone your repository in Desktop, click Set up in Desktop and follow the prompts to complete the clone.
-
Open TerminalTerminalGit Bash.
-
Change the current working directory to the location where you want the cloned directory.
-
Type
git clone, and then paste the URL you copied earlier.$ git clone https://github.com/YOUR-USERNAME/YOUR-REPOSITORY -
Press Enter to create your local clone.
$ git clone https://github.com/YOUR-USERNAME/YOUR-REPOSITORY
> Cloning into `Spoon-Knife`...
> remote: Counting objects: 10, done.
> remote: Compressing objects: 100% (8/8), done.
> remove: Total 10 (delta 1), reused 10 (delta 1)
> Unpacking objects: 100% (10/10), done.
Troubleshooting cloning errors
When cloning a repository it’s possible that you might encounter some errors.
If you’re unable to clone a repository, check that:
- You can connect using HTTPS. For more information, see «HTTPS cloning errors.»
- You have permission to access the repository you want to clone. For more information, see «Error: Repository not found.»
- The default branch you want to clone still exists. For more information, see «Error: Remote HEAD refers to nonexistent ref, unable to checkout.»
Further reading
- «Troubleshooting connectivity problems»
If you can read only one chapter to get going with Git, this is it.
This chapter covers every basic command you need to do the vast majority of the things you’ll eventually spend your time doing with Git.
By the end of the chapter, you should be able to configure and initialize a repository, begin and stop tracking files, and stage and commit changes.
We’ll also show you how to set up Git to ignore certain files and file patterns, how to undo mistakes quickly and easily, how to browse the history of your project and view changes between commits, and how to push and pull from remote repositories.
You typically obtain a Git repository in one of two ways:
-
You can take a local directory that is currently not under version control, and turn it into a Git repository, or
-
You can clone an existing Git repository from elsewhere.
In either case, you end up with a Git repository on your local machine, ready for work.
Initializing a Repository in an Existing Directory
If you have a project directory that is currently not under version control and you want to start controlling it with Git, you first need to go to that project’s directory.
If you’ve never done this, it looks a little different depending on which system you’re running:
for Linux:
$ cd /home/user/my_projectfor macOS:
$ cd /Users/user/my_projectfor Windows:
$ cd C:/Users/user/my_projectand type:
This creates a new subdirectory named .git that contains all of your necessary repository files — a Git repository skeleton.
At this point, nothing in your project is tracked yet.
See Git Internals for more information about exactly what files are contained in the .git directory you just created.
If you want to start version-controlling existing files (as opposed to an empty directory), you should probably begin tracking those files and do an initial commit.
You can accomplish that with a few git add commands that specify the files you want to track, followed by a git commit:
$ git add *.c
$ git add LICENSE
$ git commit -m 'Initial project version'
We’ll go over what these commands do in just a minute.
At this point, you have a Git repository with tracked files and an initial commit.
Cloning an Existing Repository
If you want to get a copy of an existing Git repository — for example, a project you’d like to contribute to — the command you need is git clone.
If you’re familiar with other VCSs such as Subversion, you’ll notice that the command is «clone» and not «checkout».
This is an important distinction — instead of getting just a working copy, Git receives a full copy of nearly all data that the server has.
Every version of every file for the history of the project is pulled down by default when you run git clone.
In fact, if your server disk gets corrupted, you can often use nearly any of the clones on any client to set the server back to the state it was in when it was cloned (you may lose some server-side hooks and such, but all the versioned data would be there — see Getting Git on a Server for more details).
You clone a repository with git clone <url>.
For example, if you want to clone the Git linkable library called libgit2, you can do so like this:
$ git clone https://github.com/libgit2/libgit2That creates a directory named libgit2, initializes a .git directory inside it, pulls down all the data for that repository, and checks out a working copy of the latest version.
If you go into the new libgit2 directory that was just created, you’ll see the project files in there, ready to be worked on or used.
If you want to clone the repository into a directory named something other than libgit2, you can specify the new directory name as an additional argument:
$ git clone https://github.com/libgit2/libgit2 mylibgitThat command does the same thing as the previous one, but the target directory is called mylibgit.
Git has a number of different transfer protocols you can use.
The previous example uses the https:// protocol, but you may also see git:// or user@server:path/to/repo.git, which uses the SSH transfer protocol.
Getting Git on a Server will introduce all of the available options the server can set up to access your Git repository and the pros and cons of each.
Если вы хотите начать работать с Git, прочитав всего одну главу, то эта глава — то, что вам нужно.
Здесь рассмотрены все базовые команды, необходимые вам для решения подавляющего большинства задач, возникающих при работе с Git.
После прочтения этой главы вы научитесь настраивать и инициализировать репозиторий, начинать и прекращать контроль версий файлов, а также подготавливать и фиксировать изменения.
Мы также продемонстрируем вам, как настроить в Git игнорирование отдельных файлов или их групп, как быстро и просто отменить ошибочные изменения, как просмотреть историю вашего проекта и изменения между отдельными коммитами (commit), а также как отправлять (push) и получать (pull) изменения в/из удалённого (remote) репозитория.
Создание Git-репозитория
Обычно вы получаете репозиторий Git одним из двух способов:
-
Вы можете взять локальный каталог, который в настоящее время не находится под версионным контролем, и превратить его в репозиторий Git, либо
-
Вы можете клонировать существующий репозиторий Git из любого места.
В обоих случаях вы получите готовый к работе Git репозиторий на вашем компьютере.
Создание репозитория в существующем каталоге
Если у вас уже есть проект в каталоге, который не находится под версионным контролем Git, то для начала нужно перейти в него.
Если вы не делали этого раньше, то для разных операционных систем это выглядит по-разному:
для Linux:
$ cd /home/user/my_projectдля macOS:
$ cd /Users/user/my_projectдля Windows:
$ cd C:/Users/user/my_projectа затем выполните команду:
Эта команда создаёт в текущем каталоге новый подкаталог с именем .git, содержащий все необходимые файлы репозитория — структуру Git репозитория.
На этом этапе ваш проект ещё не находится под версионным контролем.
Подробное описание файлов, содержащихся в только что созданном вами каталоге .git, приведено в главе Git изнутри
Если вы хотите добавить под версионный контроль существующие файлы (в отличие от пустого каталога), вам стоит добавить их в индекс и осуществить первый коммит изменений.
Добиться этого вы сможете запустив команду git add несколько раз, указав индексируемые файлы, а затем выполнив git commit:
$ git add *.c
$ git add LICENSE
$ git commit -m 'Initial project version'
Мы разберем, что делают эти команды чуть позже.
Теперь у вас есть Git-репозиторий с отслеживаемыми файлами и начальным коммитом.
Клонирование существующего репозитория
Для получения копии существующего Git-репозитория, например, проекта, в который вы хотите внести свой вклад, необходимо использовать команду git clone.
Если вы знакомы с другими системами контроля версий, такими как Subversion, то заметите, что команда называется «clone», а не «checkout».
Это важное различие — вместо того, чтобы просто получить рабочую копию, Git получает копию практически всех данных, которые есть на сервере.
При выполнении git clone с сервера забирается (pulled) каждая версия каждого файла из истории проекта.
Фактически, если серверный диск выйдет из строя, вы можете использовать любой из клонов на любом из клиентов, для того, чтобы вернуть сервер в то состояние, в котором он находился в момент клонирования (вы можете потерять часть серверных хуков (server-side hooks) и т. п., но все данные, помещённые под версионный контроль, будут сохранены, подробнее об этом смотрите в разделе Установка Git на сервер главы 4).
Клонирование репозитория осуществляется командой git clone <url>.
Например, если вы хотите клонировать библиотеку libgit2, вы можете сделать это следующим образом:
$ git clone https://github.com/libgit2/libgit2Эта команда создаёт каталог libgit2, инициализирует в нём подкаталог .git, скачивает все данные для этого репозитория и извлекает рабочую копию последней версии.
Если вы перейдёте в только что созданный каталог libgit2, то увидите в нём файлы проекта, готовые для работы или использования.
Для того, чтобы клонировать репозиторий в каталог с именем, отличающимся от libgit2, необходимо указать желаемое имя, как параметр командной строки:
$ git clone https://github.com/libgit2/libgit2 mylibgitЭта команда делает всё то же самое, что и предыдущая, только результирующий каталог будет назван mylibgit.
В Git реализовано несколько транспортных протоколов, которые вы можете использовать.
В предыдущем примере использовался протокол https://, вы также можете встретить git:// или user@server:path/to/repo.git, использующий протокол передачи SSH.
В разделе Установка Git на сервер главы 4 мы познакомимся со всеми доступными вариантами конфигурации сервера для обеспечения доступа к вашему Git репозиторию, а также рассмотрим их достоинства и недостатки.
![]()
Download Article
![]()
Download Article
Git is a very common tool in collaborative software development. Cloning a repository locally stores the latest changes of a project, allowing you to branch off and make your own edits without immediately affecting someone else’s work. To do this, you will need to download Git or other Git-supported software, locate the repository you wish to clone, and specify a location to save the cloned repository. This can be done from the command line program, or with a program’s supported graphical user interface (GUI).[1]
-
1
Download and install Git. Go to https://git-scm.com/downloads and select the download for the platform you are using.
-
2
Create a directory for your repository. Navigate to a location of your choosing in your computer. Then right-click (or Ctrl + click) and select “New Folder”.
- For simplicity, it may be best to create your first repository folder on the Desktop.
Advertisement
-
3
Open Git CMD. This program is installed along with the git tools, however you can also use the natively installed Command Prompt (Windows) or Terminal (Mac/Linux).
-
4
Navigate to your target directory in the command line. Enter the “cd” command following by the path to the repository folder you created. Folders in the path are separated by “”. Hit ↵ Enter to complete the action.
- For example, a folder on the desktop for Windows would use the command “cd c:users[username]desktop[foldername]”
- “cd” stands for “change directory”
- You can change directories one at a time instead of all at once if you find it faster to type: “cd desktop” ↵ Enter “cd folder name” ↵ Enter.
-
5
Navigate to the repository page in your web browser. Go to the github (or whichever git alternative) page of the repository you are trying to clone. The source location of the repository will be displayed on the repository page.
- The exact location of the source location will vary depending on which repository site you are using, but they are usually located near the top for easy access. Look for a URL.
-
6
Copy the source location. Click the source location (typically a URL starting with “https” or “ssh”) and hit Ctrl+C or ⌘ Cmd+C to copy.
-
7
Enter “git clone” followed by the source location into the command line. The “git” command tells the command line you are using a Git function, and “clone” tells it to clone the location following the command. Paste or type out the source location after the command.
- In order to paste into the Windows command line, you have to right-click and select “Paste” from the context menu. This is not necessary in the Mac or Linux Terminal.
-
8
Hit ↵ Enter. The cloning process will begin and display its progress in the command line. You will be notified when the process in completed by a message in the command line.


Advertisement
-
1
Download and install Git. Go to https://git-scm.com/downloads and select the download for the platform you are using.
-
2
Create a directory for your repository. Navigate to a location of your choosing your computer. Then right-click (or Ctrl + click) and select “New Folder”.
- For simplicity, it may be best to create your first repository folder on the Desktop.
-
3
Navigate to the repository page in your web browser. Go to the github (or whichever git product) page of the repository you are trying to clone. The source location of the repository will be displayed on the repository page.
- The exact location of the source location will vary depending on which repository site you are using, but they are usually located near the top for easy access. Look for a URL.
-
4
Copy the source location. Click the source location (typically a URL starting with “https” or “ssh”) and hit Ctrl+C or ⌘ Cmd+C to copy.
-
5
Open Git GUI. This program is installed along with the git tools. Instead of booting into a text command line, you will see a window with clickable buttons.
-
6
Click “Clone Repository”. This is the first option on the boot splash screen.
- You can also select “Clone” from “Repository” dropdown menu.
-
7
Enter the source location. Paste or type the source location into this field.
-
8
Enter target directory. Enter the path to the repository folder you created.
- You can also click “Browse” to search for the folder without having to type it out.
-
9
Click “Clone”. The GUI will display your progress and notify you once the clone is complete.


Advertisement
-
1
Navigate to the repository page in your web browser. Go to the github (or whichever git product) page of the repository you are trying to clone. The source location of the repository will be displayed on the repository page.
- The exact location of the source location will vary depending on which repository site you are using, but they are usually located near the top for easy access. Look for a URL.
-
2
Copy the source location. Click the source location (typically a URL starting with “https” or “ssh”) and hit Ctrl+C or ⌘ Cmd+C to copy.
-
3
Open Visual Studio. Visual Studio is common in Windows development environments, but is not free. You can download VS Express to get a stripped down free edition.
-
4
Select the “Team Explorer” tab. This is located in the bottom of right-hand sidebar.
-
5
Click the “Manage Connections” button. This button is represented by the plug icon and is located in the top menu bar of the right sidebar.
-
6
Click “Clone”. This is located in the “Local git repositories” section in the right sidebar.
-
7
Enter or paste the source location into the text field. Once in the field, the “Clone” action button will become clickable.
-
8
Click “Clone”. This button is located below the source location field. Once clicked a progress bar will appear displaying the clone process. The process is complete once the bar is filled.
- Cloned repositories are automatically cloned to a local directory in your visual studio directory.[2]
- Cloned repositories are automatically cloned to a local directory in your visual studio directory.[2]


Advertisement
Ask a Question
200 characters left
Include your email address to get a message when this question is answered.
Submit
Advertisement
-
For cloning a remote host git clone, use the “username@host:/path/to/repository” format after “git clone”.[3]
-
Use git pull to update instead of re-cloning. Save re-cloning for situations where you are having severe merge or compiler issues.
-
If you move your repository directory, make sure you make the proper adjustments to the path when you attempt to access it in the command line.
Thanks for submitting a tip for review!
Advertisement
About This Article
Thanks to all authors for creating a page that has been read 50,575 times.
Is this article up to date?
![]()
Download Article
![]()
Download Article
Git is a very common tool in collaborative software development. Cloning a repository locally stores the latest changes of a project, allowing you to branch off and make your own edits without immediately affecting someone else’s work. To do this, you will need to download Git or other Git-supported software, locate the repository you wish to clone, and specify a location to save the cloned repository. This can be done from the command line program, or with a program’s supported graphical user interface (GUI).[1]
-
1
Download and install Git. Go to https://git-scm.com/downloads and select the download for the platform you are using.
-
2
Create a directory for your repository. Navigate to a location of your choosing in your computer. Then right-click (or Ctrl + click) and select “New Folder”.
- For simplicity, it may be best to create your first repository folder on the Desktop.
Advertisement
-
3
Open Git CMD. This program is installed along with the git tools, however you can also use the natively installed Command Prompt (Windows) or Terminal (Mac/Linux).
-
4
Navigate to your target directory in the command line. Enter the “cd” command following by the path to the repository folder you created. Folders in the path are separated by “”. Hit ↵ Enter to complete the action.
- For example, a folder on the desktop for Windows would use the command “cd c:users[username]desktop[foldername]”
- “cd” stands for “change directory”
- You can change directories one at a time instead of all at once if you find it faster to type: “cd desktop” ↵ Enter “cd folder name” ↵ Enter.
-
5
Navigate to the repository page in your web browser. Go to the github (or whichever git alternative) page of the repository you are trying to clone. The source location of the repository will be displayed on the repository page.
- The exact location of the source location will vary depending on which repository site you are using, but they are usually located near the top for easy access. Look for a URL.
-
6
Copy the source location. Click the source location (typically a URL starting with “https” or “ssh”) and hit Ctrl+C or ⌘ Cmd+C to copy.
-
7
Enter “git clone” followed by the source location into the command line. The “git” command tells the command line you are using a Git function, and “clone” tells it to clone the location following the command. Paste or type out the source location after the command.
- In order to paste into the Windows command line, you have to right-click and select “Paste” from the context menu. This is not necessary in the Mac or Linux Terminal.
-
8
Hit ↵ Enter. The cloning process will begin and display its progress in the command line. You will be notified when the process in completed by a message in the command line.
Advertisement
-
1
Download and install Git. Go to https://git-scm.com/downloads and select the download for the platform you are using.
-
2
Create a directory for your repository. Navigate to a location of your choosing your computer. Then right-click (or Ctrl + click) and select “New Folder”.
- For simplicity, it may be best to create your first repository folder on the Desktop.
-
3
Navigate to the repository page in your web browser. Go to the github (or whichever git product) page of the repository you are trying to clone. The source location of the repository will be displayed on the repository page.
- The exact location of the source location will vary depending on which repository site you are using, but they are usually located near the top for easy access. Look for a URL.
-
4
Copy the source location. Click the source location (typically a URL starting with “https” or “ssh”) and hit Ctrl+C or ⌘ Cmd+C to copy.
-
5
Open Git GUI. This program is installed along with the git tools. Instead of booting into a text command line, you will see a window with clickable buttons.
-
6
Click “Clone Repository”. This is the first option on the boot splash screen.
- You can also select “Clone” from “Repository” dropdown menu.
-
7
Enter the source location. Paste or type the source location into this field.
-
8
Enter target directory. Enter the path to the repository folder you created.
- You can also click “Browse” to search for the folder without having to type it out.
-
9
Click “Clone”. The GUI will display your progress and notify you once the clone is complete.
Advertisement
-
1
Navigate to the repository page in your web browser. Go to the github (or whichever git product) page of the repository you are trying to clone. The source location of the repository will be displayed on the repository page.
- The exact location of the source location will vary depending on which repository site you are using, but they are usually located near the top for easy access. Look for a URL.
-
2
Copy the source location. Click the source location (typically a URL starting with “https” or “ssh”) and hit Ctrl+C or ⌘ Cmd+C to copy.
-
3
Open Visual Studio. Visual Studio is common in Windows development environments, but is not free. You can download VS Express to get a stripped down free edition.
-
4
Select the “Team Explorer” tab. This is located in the bottom of right-hand sidebar.
-
5
Click the “Manage Connections” button. This button is represented by the plug icon and is located in the top menu bar of the right sidebar.
-
6
Click “Clone”. This is located in the “Local git repositories” section in the right sidebar.
-
7
Enter or paste the source location into the text field. Once in the field, the “Clone” action button will become clickable.
-
8
Click “Clone”. This button is located below the source location field. Once clicked a progress bar will appear displaying the clone process. The process is complete once the bar is filled.
- Cloned repositories are automatically cloned to a local directory in your visual studio directory.[2]
- Cloned repositories are automatically cloned to a local directory in your visual studio directory.[2]
Advertisement
Ask a Question
200 characters left
Include your email address to get a message when this question is answered.
Submit
Advertisement
-
For cloning a remote host git clone, use the “username@host:/path/to/repository” format after “git clone”.[3]
-
Use git pull to update instead of re-cloning. Save re-cloning for situations where you are having severe merge or compiler issues.
-
If you move your repository directory, make sure you make the proper adjustments to the path when you attempt to access it in the command line.
Thanks for submitting a tip for review!
Advertisement
About This Article
Thanks to all authors for creating a page that has been read 50,575 times.
Is this article up to date?
Урок, в котором мы познакомимся с репозиториями git, научимся их создавать и клонировать, а также узнаем, зачем нужны ssh-ключи
Видеоурок. Часть 1. Практика
Все о репозиториях
- что это такое
- клонирование
- публичные и приватные репозитории
- создаем собственный репозиторий
- Инициализация репозитория
- Генерируем ssh-ключи
ssh-ключи
- что это такое и зачем они нужны
- генерируем свой ключ
Видеоурок. Часть 2
- Что выбрать: github или bitbucket?
- Копирование ssh-ключей
Конспект урока
Краткое содержание урока, основные инструкции для командной строки, полезные ссылки и советы.
Что такое репозиторий
Это каталог в файловой системе, где хранится информация о проекте:
- файлы и папки проекта
- история проекта
- настройки проекта
- служебная информация
Информация о репозитории хранится в скрытой папке .git в корне проекта.
Можно ли работать с git локально
Да, можно. Но при этом проект находится только на нашей машине и в случае поломки железа или случайной потери данных мы не сможем восстановить проект.
Локальный репозиторий
Это репозиторий, который хранится на нашей машине, в рабочей папке проекта. Это та самая скрытая папка .git
Удаленный репозиторий, зачем он нужен
Это репозиторий, который хранится в облаке, на сторонних сервисах, специально созданных под работу с проектами git.
Плюсы удаленного репозитория
- выполняет роль резервной копии
- возможность работать в команде
- некоторые дополнительные возможности, которые предоставляет хостинг. Например, визуализация истории или возможность работать над проектом прямо в веб-интерфейсе
Что такое клонирование
Это копирование удаленного репозитория на локальную машину. Обычно это первое действие при работе с проектом.
При клонировании на нашу машину копируются файлы и папки проекта и вся его история.
То есть мы получаем доступ к истории не с момента начала нашей работы над проектом, а с самого начала проекта.
Как клонировать готовый проект
В первую очередь, нужно получить ссылку на проект. Мы можем найти ее сами или получим готовую, например, на новой работе.
Возьмем для примера репозиторий vuejs — https://github.com/vuejs/vue.git
Наберем в командной строке
$ git clone https://github.com/vuejs/vue.git
При этом в текущем каталоге создастся папка vue, в ней окажутся все файлы проекта vue и специальная скрытая папка .git, то есть сам репозиторий, или информация о нем.
Как клонировать проект в другую папку
При клонировании по умолчанию создается папка с таким же названием, как и у репозитория. Но можно склонировать репозиторий и в другую папку вот так
$ git clone https://github.com/vuejs/vue.git vue-new
Где vue-new — нужное название папки.
Свой удаленный репозиторий
Для своих проектов нам понадобится собственный репозиторий. Можно работать и локально, но плюсы удаленного мы уже рассматривали выше. Теперь нужно выбрать хостинг для наших git-проектов.
Где держать репозиторий
Есть множество вариантов, самые известные — это github и bitbucket. Нужно выбирать.

На самом деле не парьтесь. У них схожий функционал, и в начале работы с git мы не заметим разницы.
bitbucket мне нравится больше из-за интерфейса, но в уроках выберем github из-за его большей популярности.
Чтобы продолжить уроки, нужно зарегистрироваться на github. Если у вас нет там аккаунта, то форму регистрации увидите сразу на главной странице — https://github.com/
Как создать репозиторий в github
После регистрации создание репозитория доступно с главной страницы github. При создании нужно указать название проекта и тип (публичный или приватный). На остальное пока не обращаем внимания.
Права на репозиторий, публичные и приватные
Есть 2 типа репозиториев:
- публичный (public), открыт всем
- приватный (private), доступен только определенному кругу лиц — в первую очередь, нам самим
Публичные репозитории хороши для opensource-проектов и чтобы показать в резюме. Пока нам это не нужно.
Для себя будем создавать приватные репозитории. Для этого нам понадобятся ssh-ключи.

Что такое ssh-ключи
ssh-ключи используются для идентификации клиента на сервере при подключении по безопасному ssh-протоколу.
Другими словами, ssh-ключ нужен для того, чтобы пускать на сервер только определенных клиентов. Только тех, кому разрешен доступ к проекту.
ssh-ключ не имеет прямого отношения к git, но так репозитории находятся на удаленных серверах, то ssh-ключи используются для разграничения доступа к приватным репозиториям.
ssh-ключ состоит из пары ключей: публичного и приватного ключа. Это просто 2 текстовых файла:
- /домашний-каталог/.ssh/id_rsa.pub — публичный
- /домашний-каталог/.ssh/id_rsa — приватный
Публичный ключ передается сторонним серверам, например, github, для открытия доступа на эти сервера. Приватный ключ хранится только на нашей машине и никому не передается.
То есть когда у нас просят ssh-ключ, чтобы дать доступ на какой-нибудь сервер, мы отдаем именно публичный ключ, id_rsa.pub
Как сгенерировать ssh-ключ
ssh-ключи сами собой не появляются, но стоит проверить, возможно, они были установлены раньше. Запустим в терминале команды
    $ cd ~/.ssh
    $ ls -l
Если видим файлы id_rsa и id_rsa.pub — отлично, ключи уже есть.
Если этих файлов нет, то нужно сгенерировать ключи утилитой ssh-keygen. В Windows она устанавливается вместе с git, в Linux и MacOS при необходимости установите. В Linux, например, вот так
$ sudo apt install ssh-keygen
После этого нужно сгенерировать пару ключей, запустив команду в терминале
$ ssh-keygen -t rsa -b 4096 -C "your_email@example.com"
Проверяем
    $ ls -l
    total 24
    -rw-------  1 sn8 sn8 1675 Feb 11  2017 id_rsa
    -rw-r--r--  1 sn8 sn8  392 Feb 11  2017 id_rsa.pub
    -rw-r--r--  1 sn8 sn8 5746 Oct 28 21:52 known_hosts
Появились файлы id_rsa и id_rsa.pub — значит, ключи успешно сгенерированы.
known_hosts — это файл, в котором ssh прописывает сервера, на которые мы заходим.
При первом подключении к github нужно будет разрешить доступ к github.com (напечатать yes в терминале)
Как добавить ssh-ключ в настройках github
Открываем публичный ключ id_rsa.pub и копируем его содержимое. В настройках github ищем раздел «SSH и GPG keys» — https://github.com/settings/keys.
Жмем «New SSH key», задаем название ключа, например, имя, и вставляем форму публичный ключ, прямо текстом. Все, теперь у нас есть доступ к нашим приватным репозиториям.
Два способа создания проекта
Первый, когда мы начинаем новый проект. Удобнее будет создать репозиторий на github и склонировать пустой проект на локальную машину.
Второй, когда у нас уже есть проект. Нужно зайти в папку проекта и связать его с уже существующим репозиторием на github. Это называется инициализация.
Рассмотрим оба способа.
Пустой проект
Создаем приватный репозиторий на github, назовем его first-site.
Я зарегистрировался под именем Webdevkin, моя ссылка для клонирования будет такая — git@github.com:Webdevkin/first-site.git. Ваша зависит от имени пользователя.
Идем в командную строку и запускаем
$ git clone git@github.com:Webdevkin/first-site.git
В текущей папке получим новую папку с названием first-site — это и есть наш проект.
P.S. У вас склонировать этот репозиторий не получится — он закрытый. Создайте свой 
Непустой проект
Допустим, у нас на локальной машине уже есть проект second-site. Создаем в github репозиторий second-site. Заходим в папку проекта и выполняем команды
    $ git init
    $ git add .
    $ git commit -m "Initial commit"
    $ git remote add origin git@github.com:Webdevkin/second-site.git
    $ git push -u origin master
Все, можно приступать к работе над проектом. Команды add, commit и push мы разберем в следующих уроках.
Это единственный урок, в котором мы разбирались с тонкостями репозиториев. В дальнейшем будем считать, что репозиторий = проект.
Что могу посоветовать
- github или bitbucket? Для личных проектов неважно, оба сервиса разрешают бесплатно создавать приватные репозитории. Для open source или резюме — github
- не увлекайтесь клонированием в папку со своим названием. Есть шанс запутаться, самому или коллегам
- не путайте публичный и приватный ключи. Отдаем вовне только публичный ключ id_rsa.pub
- при смене рабочей машины можно не генерировать ssh-ключи заново, а скопировать их со старой машины. Тогда не придется заново прописывать новые ключи на серверах
Немного подробнее о копировании ssh-ключей
Как скопировать ssh-ключи с одной машины на другую
Хочу немного затронуть эту тему отдельно. Генерировать ключ на новой машине не обязательно. Но нужно выполнить такие действия
- Скопировать id_rsa и id_rsa.pub со старой машины на новую
- Посмотреть права на файлы, возможно, ключи окажутся слишком «открытыми» для записи и потребуется сменить им права доступа — sudo chmod 700 ~/.ssh/*
- Выполнить команду ssh-add
Ссылки, которые могут пригодиться
- github — https://github.com/
- bitbucket — https://bitbucket.org/
- подробнее об ssh-ключах (en) — connecting-to-github-with-ssh
На этом все. В следующем уроке мы сделаем первые изменения в проекте и начнем понимать, в чем заключается прелесть git.
Спасибо за внимание и до встречи!
Все уроки курса
- Вводный урок
- 1. Установка и базовая настройка git
- 2. Создание и клонирование репозитория git
- 3. Делаем первые изменения, git status и git diff
- 4. Коммиты и история коммитов, git commit, git log и git show
- 5. Подробнее об истории коммитов. Путешествие по истории
- 6. Работа с сервером, git push и git pull
- 7. Ветки — главная фишка git, git branch и git checkout
- 8. Работа с ветками на сервере, git fetch
- 9. Слияния или мерджи веток, git merge
- 10. Конфликты и их разрешение
- Платная часть курса. Презентация
- * 11. Работа с gitignore и git exclude
- * 12. Буфер обмена git, git stash
- * 13. Копирование коммитов, git cherry-pick
- * 14. Отмена и редактирование последнего коммита
- * 15. Отмена произвольного коммита, git revert
- 16. Склеивание коммитов, git rebase —interactive и git reflog
- * 17. Зачем склеивать коммиты. Плюсы и минусы сквоша
- * 18. Работа с git rebase. Отличия от merge
- * 19. Что такое git push —force и как с ним работать
- * 20. Ищем баги с помощью git, git bisect
- * 21. Как и зачем работать с тегами git
- * 22. Процессы: github flow и git flow
- * 23. Псевдонимы в git
- 24. Мердж-реквесты
- * 25. Форки
* платные уроки
список обновляется…

27 Сен
Репозиторий — это место, где хранятся некие данные (файлы), можно сказать, что это просто директория или же папка.
Для того, чтобы получить файлы с какого-либо репозитория или элементарно по-быстрому связать папку на своём компьютере с удалённым репозиторием.
Удалённый репозиторий — это место в неком облачном хранилище, к которой Вы имеете доступ, в котором хранятся некие данные (файлы).
В качестве примера будем клонировать репозиторий с GitHub специально подготовленный для данного урока. Файл, находящийся в рассматриваемом репозитории, не несёт ничего особо важного. Там хранится текстовый файл с текстом внутри.
Примечание: на операционной системе Windows (в некоторых версиях) периодически возникают проблемы с «правами доступа». Чтобы не править настройки (каждый случай, можно сказать, индивидуален) будем использовать вариант, который работает во многих случаях.
Примечание: если Вы подключены к интернету с помощью прокси — могут возникнуть проблемы.
- Перейдите в папку «Мои документы»;
- Создайте папку с названием «Git». Имя можете сделать своё (лучше используйте латиницу), в примере будет рассматриваться имя папки «Git»;
- Кликните правой кнопкой мыши в папке «Git» и выберите «Git Bash Here». Откроется консоль;
- Введите команду
git clone «https://github.com/DaemonNikolay/trainingRepository»
- Пойдёт процесс клонирования, он не долгий, несколько секунд;
- В папке, куда клонировали, появится новая папочка с именем «trainingRepository»;


Таким не хитрым образом мы разобрались с «клонирование репозитория с GitHub через Git на Windows»!